1
Safety o Assembly
o Operation
oTips & Techniques o Maintenance
* Troubleshooting
o Parts Lists oWarranty
22" Rotary Mower -- Model Series 074
READ SAFETY
RULES
AND mNSTRUCTmONS CAREFULLY
BEFORE
OPERATmON
Warning: This unit is equippedwith an internalcombustionengineand shouldnot be usedon or nearany unimprovedforest-covered,brush=
coveredor grass=coveredland unlessthe engine'sexhaustsystemis equippedwith a sparkarrestermeetingapplicablelocalor state laws (if any),
If a sparkarresteris used, it shouldbe maintainedin effectiveworkingorder by the operator,Inthe Stateof Californiathe aboveis requiredbylaw
(Section4442 of the CaliforniaPublicResourcesCode), Otherstates mayhavesimilarlaws,Federallaws applyon federallands,A sparkarrester
for the muffleris availablethroughyournearestengineauthorizedservicedealeror contactthe servicedepartment,RO, Box361131Cleveland,
Ohio 44136=0019,
PRINTEDIN U,S,A
MTD LLC, P.O. BOX 361131 CLEVELAND,
OHiO 44136-0019
FORMNO,769=01538C
10/2005
This Operator's
Manua_ is an important part of your
prepare and maintain the unit for best performance.
new lawn mower, mtwH_ he_p you assembJe,
Please read and understand
what it says.
Table of Contents
Slope Gauge .......................................................
Safe Operation
Practices ...................................
Setup and Adjustment
.......................................
Operating Your Lawn Mower ..............................
Maintaining
Your Lawn Mower .........................
Finding
3
4
6
8
10
12
13
14
Warranty
16
and Recording
without
Model Number
Modem Number
SeriaJ Number
www, mtdproducts,com
P.O. BOX
CLEVELAND,
330-220-4683
8;00-800-731
MTD LLC
Customer
P_ease do NOTreturn
............................................................
f
BEFOREYOU START ASSEMBLING
YOUR NEW EQUIPMENT,
please locate the model plate on the equipment and copy the
information to the sample model plate providedto the righL
You can locate the model plate by standing at the operating
position and looking down at the rear of the deck. This
information will be necessary to use the manufacturer's web
site and/or obtain assistance from the Customer Support
Department or an authorized service dealer.
purchased,
Trouble Shooting ..............................................
Safety Labels ....................................................
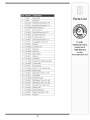
Parts List ...........................................................
361131
OH 44136
0
Support
the unit to the retai_er from
first contacting
Customer
which
it was
Support.
if you have difficulty assembling this product or have any questions regarding the controls, operation, or maintenance of this
unit, you can seek help from the experts. Choose from the options below:
1. Visit mtdproducts.com
Click on the Service & Support menu option.
2. Phone a Customer Support Representative at
(800) 800=7310.
3. The engine manufacturer is responsiblefor all engine=relatedissues with regards to performance, power=rating,specifica=
tions, warranty and service. Please referto the engine manufacturer's Owner's/Operator's Manual, packed separatelywith
your unit, for more information.
MID _r_r#r_ti_e_
Aw_d
Wk_ni_@Pld#ct_
C_n_ac_ Us
O_._rC_mpa#,y
:S_eH;ice _ SJpp:_±
Produ_
P,egistration
2
?riwc" t, P_y
yourlawnmoweronsuchslopes.
/
t
/
/
/
/
/
o
WARNING
w_
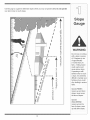
Do not mowon inclines
with a dope in excess
of 15 degrees (a rise
of approximately
2-"
feet). A riding r
could overturn and
cause serious injury.
if operating a walb
behind mower on such
a dope, it is extremely
footing and you could
dip, resulting in serious
injury.
Operate RiDiNG
mowers up and down
dopes, neveracross
the face of dopes.
o
Operate
WALK-BEHIND
mowers across the
face of dopes, never
up and down slopes.
\
3
WARNING:
EngineExhaust,
someofitsconstituents,
andcertainvehiclecompo
_
nentscontainoremitchemicals
knownto StateofCalifornia
tocausecancerand
birthdefectsor otherreproductive
harm.
DANGER:
Thismachinewasbuilttobeoperated
according
totherubsforsafeoperation
inthis
manuakAswithanytypeofpowerequipment,
carelessness
or erroronthepartoftheoperatorcan
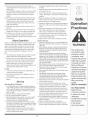
Sa.'_e
,,
Operation
WARNING
_ut importantsafety
resultinseriousinjury.Thismachine
is capableofamputating
handsandfeetandthrowingobjects.
Failuretoobservethefollowingsafetyinstructions
couldresultin seriousinjuryordeath.
Children
Tragicaccidentscan occurif operatoris not alert to presence
of children.Childrenare oftenattractedto mowerandmowing
activity.They do not understandthe dangers.Neverassume
thatchildrenwill remainwhereyou lastsawthem.
1. Keepchildrenout of the mowingarea andunderwatchful
careof a responsibleadultotherthanthe operator.
2. Be alert andturn moweroff if a childentersthe area.
3. Beforeand whilemovingbackwards,look behindanddown
forsmallchildren.
4. Useextremecare when approachingblindcorners,
doorways,shrubs,trees, or otherobjectsthat may'obscure
yourvisionof a childwho may run into the mower.
5. Keepchildrenawayfrom hot or runningengines.Theycan
sufferburnsfrom a hot muffler.
6. Neverallowchildrenunder14 yearsoldto operatea power
mower.Children14yearsold andovershouldreadand
understandoperationinstructionsandsafetyrulesin this
manualandshouldbe trainedandsupervisedbya parent.
General
endangerthe personal
safety and/or property
of yourselfand others.
qead and follow all
manual beforeattemptingto operate
this machine. Failure
in personalinjury,When
you see this symbol.
HEED roTSWARNING!
Your Responsibility
Restrict the use
sf this powermachine
to persons who read.
understand
and follow the warnings
and instructions
in this manual
and on the machine.
6. Alwayswear safetyglasses or safetygogglesduringoperation andwhile performingan adjustmentor repairto protect
youreyes. Thrownobjectswhich ricochetcan causeserious
injury to the eyes.
7. Wearsturdy, rough-soledwork shoesand close-fitting
slacksandshirts. Shirtsand pantsthat coverthe arms and
legs andsteel-toedshoesare recommended.Neveroperate
this machinein bare feet,sandals, slipperyor light-weight
(e.g. canvas)shoes.
8. Do not put hands or feet near rotatingparts or undercutting
deck. Contactwithblade can amputatehands andfeet.
9. A missingor damageddischargecovercan causeblade
contactor thrownobject injuries.
10. Manyinjuriesoccur asa resultof the mowerbeing pulled
overthe foot duringa fall causedby slipping or tripping.
Do not hold on to the mower if you are falling; releasethe
handle immediately.
11. Neverpullthe mowerback towardyou whileyou are
walking.If you mustback the mowerawayfrom a wall or
obstructionfirst look down andbehind to avoid trippingand
thenfollow thesesteps:
a. Stepback from mowerto fully extendyour arms.
b. Be sureyou arewell balancedwithsure footing.
c. Pullthe mowerback slowly,no morethan half way
towardyou.
d. Repeatthese stepsas needed.
12. Do not operatethe mowerwhileunderthe influenceof
alcoholor drugs.
13. Do not engagethe self-propelledmechanismon units so
equippedwhilestartingengine.
14. The bladecontrol handleis a safetydevice.Neverattempt
to bypassits operation.Doing so makesthe safetydevice
inoperativeandmay resultinpersonal injurythrough
contactwiththe rotatingblade.The bladecontrol handle
mustoperate easilyin bothdirectionsandautomatically
returnto the disengagedpositionwhen released.
15. Neveroperatethe mowerinwet grass. Alwaysbe sure of
yourfooting. A slip and fallcan causeseriouspersonal
injury.If you feel you are losingyour footing,releasethe
bladecontrol handle immediatelyandthe bladewill stop
rotatingwithinthreeseconds.
16. Mow only indaylightor good artificial light. Walk,never run.
17. Stopthe bladewhen crossinggraveldrives,walks or roads.
18. If the equipmentshouldstart to vibrateabnormally,stop the
engine andcheck immediatelyforthe cause.Vibrationis
generallya warning of trouble.
Operation
1. Readthis operator'smanualcarefullyin its entiretybefore
attemptingto assemblethis machine.Read,understand,
andfollow all instructionson the machineandin the
manual(s)beforeoperation.Be completelyfamiliarwith
the controls andthe proper use of this machinebefore
operatingit.Keepthis manualin a safe place forfuture
and regularreferenceandfor orderingreplacementparts.
2. This machineis a precision pieceof powerequipment,
not a plaything.Therefore,exerciseextremecautionat all
times.Yourunit has been designedto performonejob: to
mow grass.Do not use itfor any otherpurpose.
3. Neverallowchildren under 14yearsold to operatethis
machine.Children 14yearsold and overshould readand
understandthe instructionsinthis manualandshould
be trainedand supervisedbya parent.Only responsible
individualswho arefamiliar withthese rulesof safe
operationshould be allowedto use this machine.
4. Thoroughlyinspectthe area wherethe equipmentis to
be used. Removeall stones,sticks,wire, bones,toys
and otherforeign objects,which could be trippedover or
picked up andthrown bythe blade.Thrown objectscan
causeseriouspersonalinjury.Plan your mowingpattern
to avoid dischargeof materialtoward roads,sidewalks,
bystandersandthe like.Also,avoid dischargingmaterial
againsta wall or obstruction,whichmay causedischarged
materialto ricochetback towardthe operator.
5. Tohelp avoid bladecontact or a thrown objectinjury,
stay inoperatorzone behindhandles andkeepchildren,
bystanders,helpersand pets at least 75 feet from mower
whileit is in operation.Stopmachineif anyoneenters
area.
4
19. Shuttheengineoffandwaituntilthebladecomestoa
completestop beforeremovingthe grasscatcheror uncloggrogthe chute.
The cutting bladecontinuesto rotatefor a fewseconds after
the engine is shut off. Neverplace any part of the body'in
the blade area untilyou are surethe blade has stopped
rotating,
20. Neveroperate mowerwithoutpropertrail shield, discharge
cover, grasscatcher,bladecontrolhandle or othersafety
protectivedevices in place andworking.Neveroperate
mowerwithdamagedsafetydevices.Failureto do socan
resultin personalinjury.
21. Mufflerandengine becomehot and can causea burn.Do
not touch.
22. Onlyuse parts and accessoriesmadefor this machineby
manufacturer.Failureto do so can result inpersonalinjury.
23. If situationsoccurwhichare not coveredin this manual,
use careand goodjudgment. Contactyour dealerfor
assistance.Telephone1-800-800-7310forthe name of your
nearestdealer.
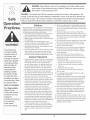
7. Extinguishallcigarettes cigars pipes andothersources
_
of ignition.
8. Neverfuel machineindoorbecauseflammablevapors will
accumulatein the area.
L{'_
--J
///
i
"_
/,'
9. Neverremovegas cap or add fuel whileengine is hot or
running. Allow engineto cool at least two minutesbefore
refueling.
10. Neverover fill fuel tank. Filltank to no morethan _/_inch
belowbottom of filler neckto providefor fuel expansion.
11. Replacegasolinecap andtighten securely.
12. If gasolineis spilled,wipe it off the engineand equipment.
Moveunit to anotherarea.Wait 5 minutesbeforestarting
engine.
13. Neverstore the machineor fuel containernear an open
flame,spark or pilot light as on a water heater,space
heater,furnace, clothesdryeror othergas appliances.
14. Toreducefire hazard,keepmowerfree of grass, leaves,
or otherdebrisbuild-up.Clean up oil or fuel spillageand
removeanyfuel soakeddebris.
15. Allow a mowerto cool at least5 minutesbeforestoring.
General Service:
SJope Operation
1. Neverrun an engineindoorsor ina poorlyventilatedarea.
Engineexhaustcontainscarbonmonoxide,an odorlessand
deadlygas.
2. Beforecleaning,repairing,or inspecting,makecertainthe
bladeandall movingparts havestopped.Disconnectthe
sparkplug wire andgroundagainstthe engineto prevent
unintendedstarting.
3. Checkthe bladeandenginemountingbolts atfrequent
intervalsfor propertightness.Also,visuallyinspectbladefor
damage(e.g.,bent, cracked,worn) Replacebladewiththe
originalequipmentmanufacture's(O.EM.) bladeonly',listed
inthis manual.Use of parts whichdo not meetthe original
equipmentspecificationsmay leadto improperperformance
andcompromisesafety!"
4. Mowerbladesare sharp andcan cut.Wrap the bladeor wear
gloves,anduse extracautionwhen servicingthem.
5. Keepall nuts,bolts, andscrewstight to be surethe equipment is in safeworkingcondition.
6. Nevertamperwithsafetydevices.Checktheirproper operation regularly.
Slopesare a majorfactor relatedto slip andfallaccidents,which
can resultinsevereinjury'.Operationon slopes requiresextra
caution.Ifyou feel uneasyon a slope,do not mow it.Foryour
safety,use the slopegaugeincludedas part of this manualto
measureslopes beforeoperatingthis unit on a slopedor hilly
area.If the slope is greaterthan 15 degrees,do not mowit.
Do:
1. Mowacrossthe face ofslopes;neverup anddown.Exercise
extremecautionwhenchangingdirectionon slopes.
2. Watchfor holes,ruts, rocks,hidden objects,or bumpswhich
can causeyou to slip or trip.Tall grasscan hide obstacles.
3. Alwaysbe sure of yourfooting.A slip andfall can cause
seriouspersonalinjury.If you feel you are losingyour
balance,releasethe blade controlhandle immediately,and
the blade will stop rotatingwithin 3 seconds.
Do Not:
1. Do not mownear drop-offs, ditchesor embankments,you
could loseyour footing or balance.
2. Do not mowslopes greaterthan 15degrees as shownon
the slope gauge.
3. Do not mowon wetgrass. Unstablefooting could cause
slipping.
7. Afterstrikinga
the engine,disconnectthe spark foreignobject,stop
plugwire andgroundagainstthe
engine.
Thoroughly'inspectthe mowerfor any damage.Repairthe
damagebeforestartingandoperatingthe mower,
8. Neverattempt
to makea
wheel or cutting height adjustmerlt
whilethe engineis
running.
9. Grasscatchercomponents,dischargecover,and trail
shieldare subjectto wear anddamagewhichcould expose
Service
Safe Handling Of Gasoline:
1. To avoid personalinjury or propertydamage useextreme
care in handlinggasoline.Gasolineis extremelyflammable
andthe vapors are explosive.Serious personalinjury can
occurwhen gasolineis spilledon yourself or your clothes,
which can ignite.
2. Washyour skinand changeclothesimmediately.
3. Useonly an approvedgasolinecontainer.
4. Neverfill containersinsidea vehicle or on a truckor trailer
bedwith a plasticliner.Alwaysplace containerson the
groundawayfrom yourvehicle beforefilling.
5. Removegas-poweredequipmentfrom the truck or trailer
andrefuel it on the ground. Ifthis is not possible,then refuel
such equipmenton a trailer witha portablecontainer,rather
than from a gasoline dispensernozzle.
6. Keepthe nozzlein contactwith the rim of the fuel tank or
container openingat all times until fuelingis complete.Do
not use a nozzlelock-opendevice.
movingparts
or allow objectsto
be thrown.Forreplaceimsafety'
protection,frequentlycheck
componentsand
mediatelywithoriginal equipmentmanufacturer's(O.E.M.)
parts only,listed in this manual.'Use of partswhich do
not meetthe original equipmentspecificationsmaylead to
improperperformanceandcompromisesafety!"
10. Donot changethe engine governorsettingor over-revthe
engine.The governorcontrolsthe maximumsafe operating
speedof the engine.
11. Maintainor replacesafetylabels,as necessary.
12. Observeproperdisposallawsand regulations.Improper
disposalof fluidsand materialscan harmthe environment.
5
safety and!or property
ual before attempting to
Fai!ureto ComplyWith
these instructions may
resu!t !n personal injury,
When You see this
symbo.
YOUr _
HeSpOtlS i'T_l Ity
Of this power machine
/(
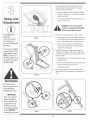
1, Forshippingpurposes,the chutedeflectoron your
moweris held in an uprightpositionbya retainer,
Removethe retainerasfollows:
a, Pushchutedeflectorup towardsengine,Holding
deflectorin this position,removethe retainerand
discard,See Step1,
b, Lowerthe chute deflectorcarefullykeepingyour
fingersout of the way,
WARNING:The
chute retainer
must be removed and discarded
before operating the mower.
2, Performthe followingsequencefor handlesetup:
a, Lift the upperhandleup from foldedpositionA and
pull it to extendedpositionB followingthe arrowin
Step 1
Step2, The handleshouldclickinto this position,
f
b, Makesurethe carriageboltis seated properly
in the handle,Tightenwing nuts securingupper
handleto the lowerhandle
Your mower is
3, if satisfiedwith heightof handle,tightenwingnuts
at the endsof the lowerhandleshownin Step3, For
convenienceof operating,youmay adiustthe handle
heightas follows:
a, Removethe wing nutsshown in Step3 and remove
the lowerhandle,
b, Positioneachhandlebracketstud into thetop hole
in the lowerhandle,See Step3 inset,
c, Tightenthewing nuts,
4, insert post on cane ties into holesprovidedon the
lowerhandle,Pull cane tie tight and trim excess,See
Step4,
Step 2
WARNING
f
s
"h
IMPORTANT
without gasoline or
\
Step 4
Step 3
6
5, Ropeguide Setupas followsin Step5:
a, Holdthe bladecontrol againstthe upperhandle,
PositionA,
b, Slowlypull starterrope outof engine,PositionB,
c, Slip starterrope intothe rope guide,Tighten rope
guidewing nut, PositionC,
6, Installwheelsas followsin Step6:
a, Usinghardwarefrom hardwarepack,securethe
wheelto thedeck as shown in Step6, The small
bell washershouldbe installedwith the crown
sidefacing thewheel
b, Securethe wheelto the deck with the large bell
washerand nut, Repeaton othersides,
7, Eachwheelcan be adiustedto changethe cutting
heightof the mower,
WHEEL iNSTALL
Step 6
The holes in the deck
_rovidethree cutting
heights. Use the same
hole for all four wheels
when assembling,
Step 5
a, Removethe carriageboltsand relatedhardware
from thewheelsas shown in Step7,
b, Reattachthe wheelswith carriageboltsin one of
the threeavailablehobs on the deck,Remember
to attachALL wheelsat the same relativeposition
to ensurean evencut, Referto instructionsfor
attachingthe wheelsin the previousstep, Fora
highercuttingheight,use the lowerhob; for a
lowercuttingheight,usethe upper hob,
CUTTINGHEIGHT
Step7
All wheels rrlJst be
)laced in the same
relativeposition, For
rough or uneven lawns.
movethe wheels to a
!
higher position. This
will stop scalping of
grass,
,,._
j
Step 6
IMPORTANT
This unit is shipped
without gasoline or
oil in the engine. Fill
up gasoline and oil
as instructed in the
f
accompanying engine
manual BEFORE
operating your mower,
._
j
Step 7
7
WARNING
This blade control
mechanism is a
safety device. Never
attempt to bypass its
operations.
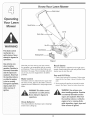
Figure 1
Use extreme care
Now that you have set up your lawn mower
for operation, get acquainted with its controls
and features, These are described beUowand
Recoil
Starter
The recoil starter is attached to the right upper
handle, Stand behind the unit and pull the recoil
[[[ustrated this page, This knowUedge wiU[aUUow starter rope to start the unit,
you to use your new equipment to its fuUUest
potential,
Gas and Oil Fill-Up
1, Checkoil [eve[and add oHif necessary,Followengine
Blade Control
manualfor this, See Figure1 abovefor locationof the
The blade control is attached to the upper hanoil fill,
dle of the mower, Depress the blade control to
2, Serviceenginewith gasolineas instructedin engine
operate the unit, Release it to stop engine and
manual See Figure1 abovefor locationofgas cap,
Made,
when handJing
gasoJine. GasoJine is
extremely flammable
and the vapors are
expJosive. Never fueJ
the machine indoors
or while the engine
is hot or running.
Extinguish cigarettes,
cigars, pipes and
other sources of
ignition.
WARNiNG:This blade eontroJ
WARNING: Use extreme care
mechanism is a safety device.
Never attempt to bypass its
operations.
when handling gasoJine. Gasoline
is extremeJy flammable and the
vapors are explosive. Never fueJ
the machine indoors or while the
engine is hot or running. Extinguish cigarettes, cigars, pipes and
other sources of ignition.
Chute
Deflector
The chute deflector discharges grass clippings
beside each cutting lap,
/
8
WARNING:
Theoperationof
anylawnmowercanresult in
f
foreign objects being thrown
into the eyes, which can damage
your eyes severely. Always wear
safety glasses while operating
the mower, or while performing
any adjustments or repairs on it.
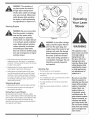
Starting
Engine
WARNING: Be sure no one other
than the operator is standing
near the lawn mower while
starting engine or operating
mower. Never run engine indoors
or in enclosed, poorly ventilated
areas. Engine exhaust contains
carbon monoxide, an odorless
and deadly gas. Keep hands,
feet, hair and loose clothing away
from any moving parts on engine
and lawn mower.
WARNING: if you strike a foreign
object, stop the engine. Remove
wire from the spark ping, thor°
ough[y inspectthe mower for any
damage, and repair the damage
before restarting and operating
the mower. Extensive vibration
1. Push primerthreetimes.Wait abouttwo seconds
betweeneachpush. See Figure2. In temperature
around55° F or below,primefive times. Do notprime
to restarta warmengine.
of the mower during operation is
an indication of damage. The unit
should be promptly inspected
and repaired.
Figure 2
2. Standingbehindthe mower,squeezethe blade
controlagainst upperhandle.See Figure2.
damage your eyes
severe[y. A[ways wear
safety glasses while
operating the mower,
Operating Tips
1. Forbest results,do notcut wet grass.
3. Holdingthesetwo handlestogetherfirmly,grasp
recoilstarter handleand pull ropeout with a rapid,
continuous,full armstroke.See Figure2. Keeping
a firm grip on thestarter handle,let the roperewind
slowly.Repeatuntilenginecranks. Letthe rope
rewindeachtime slowly.
Stopping
lawn mower can result
in foreign objects
being thrown into
the eyes which can
2. Newgrass,thickgrass,or wet grass mayrequirea
narrowercut.
3. Fora healthierlawn, nevercut off morethanone4hird
of thetotal lengthof the grass.
4. Your lawnshouldbe cut in the fallas longas there
is growth.
Engine
1. Releasebladecontrol tostop the engine and blade.
5. Adjust yourgroundspeedaccordingto conditionof
2. Disconnectsparkplug wire fromspark plug and
groundagainstthe engine.
lawn,
Be sure no one other
thantheopeiatoi
standing near the lawn
mower while starting
engine or operating
mower. Never run
eng
Using Your Lawn Mower
ne ndoors or
!n enc osed,poor y
Be sure the lawn is dear of stones, sticks,
wire, or other objects which could damage the
lawn mower or the engine. Such objects could
be acc[dent[y thrown by the mower in any
direction and cause serious persona[ injury to
the operator and others.
ventilated areas,
g! ne exhaust contains
carbon monoxide, an
0do,oss
and
dooa y
gas: Keep hands, feet,
hair and loose c[othim
away from any moving
parts Onengine and
lawn mower.
9
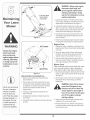
' Lubricate these
points before
reassembly.
WARNING: Always stop engine,
disconnect spark plug, and
groundagainst engine before
cleaning, lubricating or doing
any kindof maintenance on your
machine.Lubrication
1, Lubricatepivot pointson the bladecontrolat least
oncea seasonwith lightoil, The bladecontrol must
operatefreely in bothdirections,See Figure3,
2, Lubricatethe wheelsat least oncea seasonwith
lightoil (or motoroil), If wheelsare removedfor any
reason,lubricatesurfaceof the axlebolt and inner
surfaceof the wheelwith light oil See Figure3,
3, Lubricatethe torsionspringand pivot pointon the
chutedeflectorperiodicallywith lightoil to prevent
rust, See Figure3,
Figure 3
4, Followthe accompanyingengine manualfor lubricationscheduleand instructionfor enginelubrication,
Engine
Air Cleaner
Care
1, Changethe engineoil regularly,as instructedin the
enginemanual,Checkoil levelbeforestartingengine
everytime,
2, Serviceair cleanerevery25 hoursundernormal
conditions,Toservicethe air cleaner,referto the
separateengine manualpackedwith your unit,
3, Cleanthespark plug and reset thegap to,030"at
leastonce a season,Referto the engine manualfor
correctsparkplug type, Referto Figure4,
or doinganykindof
Gas Oap_
Spark Plug
Figure 4
General
Recommendations
1, Alwaysobservesafetyruleswhenperforming
any maintenance,
2, The warrantyon this lawnmowerdoesnot cover
itemsthat havebeensubjectedto operatorabuse
or negligence,Toreceivefull valuefromwarranty,
operatormustmaintainthe lawnmoweras
instructedhere,
Mower
Care
Clean underside of the mower deck after each
use to prevent build-up of grass clippings or
other debris, Follow steps below for this job,
1, Disconnectspark plug wire, Draingasolinefrom lawn
mower,or placea pieceof plasticunder thegas cap
See Figure4,
2, Tipthe mowerso that it restson the housing,Keep
the sidewith the air cleanerfacingup, Holdthe
mowerfirmly,
WARNING:
Never tip the mower
more than 90 degrees in any
directions and do not leave the
mower tipped for any length of
3, Changingof engine-governedspeedwill void
enginewarranty,
time. Oil can drain into the upper
4, All adiustmentsshouldbe checkedat leastonce
eachseason,
part of the engine causing a
starting problem.
5, Periodicallycheck all fastenersand makesurethese
are tight,
3, Scrapeand cleanthe undersideof the deck with a
suitabletool Do notspray with water,
4, Putthe mowerback on its wheelson the ground,If
youhad putplasticunderthe gas capearlier,make
sureto removeit now,
10
Blade Care
WARNING:
Whenremovingthe
cuttingbladefor sharpeningor
replacement,protect your hands
f
%
\
with a pair of heavy gloves or use
a heavy rag to hold the blade.
/
Periodicallyinspectthe blade adapterfor cracks,
especiaNyif you strikea foreignobject,Replacewhen
necessary,Followthe stepsbelowfor bladeservice,
1, Disconnectspark plug wirefrom sparkplug,Turn
moweron its side makingsure thatthe air filter and
the carburetorare up,
i i _
..,._
j
Figure 5
3, Removebladeand adapterfromthe crankshaft,
5, Whensharpeningthe blade,followthe odginalangle
of grind,Grind eachcuttingedge equallyto keepthe
blade balanced,
i
i
2, Removethe boltand the blade bell supportwhich
hold the bladeand the blade adapterto the engine
crankshaft,See Figure5,
4, Theblade can be sharpenedwith a fileor on a
grindingwheel Do notattemptto sharpenthe blade
whileit is still on the mower,
i /
Off-Season
Storage
The followingstepsshouldbe taken to prepareyourlawn
mowerfor storage,
1, Cleanand lubricatemowerthoroughlyas describedin
the lubricationinstructions,
WARNING
WARNING: An unbalanced blade
will cause excessive vibration
5, Storemowerin a dry, cleanarea,Do notstore next to
corrosivematerials,such as fertiNzer,
When removing
the cutting blade
fror sharpening or
placement, protect
your hands with a
pair of heavy gloves
or use a heavy rag to
hold the blade,
when rotating at high speeds.
It may cause damage to mower,
and could break causing personal injury.
Whenstoring anytype of powerequipmentin a poorly
ventilatedor metalstorageshed,care shouldbe takento
rust=proofthe equipment,Usinga lightoil or silicone,coat
theequipment,especiallycanes and all movingparts of
yourlawnmowerbeforestorage,
An unbalanced blade
will cause excessive
vibration when rotab
2, We do notrecommendthe use ofa pressurewasher
or gardenhoseto clean yourunit,
6, Removebladefrom the adapterfor testingbalance,
7, Balancethe bladeon a roundshaft screwdriverto
3, Referto enginemanualfor correctengine
storage instructions,
check, Removemetalfrom the heavyside until it
balancesevenly,
4, Coat mower'scuttingbladewith chassisgreaseto
preventrusting,
ing at high speeds. It
may cause damage
to mower, and could
break causing per=
8, Lubricatethe enginecrankshaftand the innersurface
of the bladeadapterwith Nghtoil SNdethe blade
adapterontothe enginecrankshaft,
9, Placethe bladeon theadaptersuchthat theside
of the blade marked"Bottom"(or with part number)
facesgroundwhenthe moweris in the operating
position,Makesure that the bladeis aNgnedand
seatedon bladeadapterflanges,
sonai injury.
10,Placeblade bensupport on the blade,Align notches
on the blade bell supportwith small holesin blade,
11,Replacehexbolt and tightenhex boltto torque:450
in, Ibs,min,,600 in, Ibs,max,
Toensuresafeoperationof your mower,periodically
checkthe blade boltfor correcttorque,
11
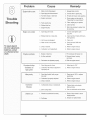
do not prime.
Engine runs erratic
\
/
For repairs beyond
the minor adjustments
listed here, contact
an authorized service
dealer.
Engine overheats
Occasional skips
thesitatesj at
high speed
Excessive
Vibration
F
Unevencul
1, Sparkplug wireloose,
1, Connectandtighten spark
plugwire,
2, Blockedfuel lineor stab fuel
2, Cban fuel line; fill tankwith chart,
fresh gasoline,
3, Ventin gas cap plugged,
3, Clearvent,
4, Wateror air[ in fue syslem,
4, Drainfue tank,Refill with
fresh fuel,
5. Dir!, ar c_eaner,
5, Referto eng ne manua
6. Carburetorout of aajJslmenl,
6, Referto eng ne manua
1. Engineoil levellow,
1. Fill crankcasewireproperoH.
2. Air flow restricted.
2. RemoveD_ovver
hOUSing
ana clean.
8. Carburetornotadjustedproperly,
3. Referto enginemanual
1, Searkp_uggap leo c_ose,
2. Carburetoriqle mixturead uslmeni
1, &qus! gap to ,030".
2, Referto eng ne manua
'lpropen_se!,
1. SparKplug fouled,faultyor gap
_oowlcle,
I. Resetgap to .030"or replace
spark plug.
2. Carburetor[mpro_enyaq Js_ea,
2. Referto enginemanua
3. Dirty air c_eaner.
3. Referto enginemanua
t, Cuttingbladelooseor uneaanceq,
1, -_gntene_aqeana aoa.xer,
3alanceblade,
2. BentcuttingD_aqe.
2, Seean au_nonzeq
serwceqeaer,
1. Wheelsnotposmone_correctly
!. Placeall fourwheeB in same
ne_gniposmon.
2, Du blade,
2. Sharpenor replaceblade.
12
-- "
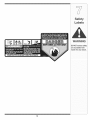
WARNING
DO NOT remove safety
(or any) labeJs from
newer for any reasen,
PLACEANDWRRRIDG.iF DAMAGED REPLACEiMMEDiATELY.
\
13
\
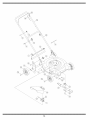
14
17032A
ChuteHinge
2
17098
HingeClip
8
687-02145
HandleBracketAssembly- RH
4
5
6
687-02144 HandleBracketAssembly- LH
787-01084A DeckAssembly,22"
/
712-3017
Hex Nut,3/8-16
7
710-0216
Hex CapScrew3/8-16x 75
8
710-0599
TT Screw1/4-20x 05"
9
710-0654A
710-1044
TT Screw3/8-16x 10
Hex CapScrew3/8-24 x 15
710-1174
CarriageBolt 5/16-18x 20
12
710-1205
EyeBolt
13
712-04065 Lock Nut 3/8-16
14
...............
720-0279
Wing Nut
/..................
15
720-04072 Star Knob
UpperHandle
....L]7491O92A
CableTie
...._#._,j,_l
725"0157
18 731-04019 Trail Shield
19 /731-1034B
................
replacement parts,
HingedChute DeflectorAssembly
@
749-04037
LowerHandle
732-1014
TorsionSpring
....,,22_734-04063
Wheel, 7 x 15, Star-DiamGray
2i748o878cBladeAdapter
736-0270
Bell Washer265 ID x 75 OD
710-1694
ClinchStiud
26 i736-0524B
Blade Bell Support
27 1736-0105
Bell Washer,375 x 870 x 063
736-0331
Bell Washer,390 x 113 x 062
738-0533
ShoulderScrew,498 x 1.635
74_1161A
BladeControl
742-0642A StandardBlade,22"
15
www.mtdproducts,eom
MANUFACTURER'S
LiMiTED WARRANTY
Thefimitedwarrantyset forth belowis givenby MTDLLCwith respect
to new merchandisepurchasedand usedin the UnitedStates,its
possessionsand territories.
"MTD"warrantsthis productagainstdefectsin materialand workman=
shipfor a periodof two (2) yearscommencingon thedate of original
purchaseand will, at its option,repairor replace,free of charge,any
partfound to be defectivein materialsor workmanship.This limitedwar=
ranty shallonlyapply if this producthas beenoperatedand maintained
in accordancewith theOperator'sManualfurnishedwith the product,
and has notbeen subiectto misuse,abuse,commercialuse, neglect,
accident,impropermaintenance,alteration,vandalism,theft, fire, water,
or damagebecauseof otherperil or naturaldisaster.Damageresulting
from the installationor useof any part, accessoryor attachmentnot
approvedby MTDfor use with the product(s)coveredbythis manual
will voidyourwarrantyas to any resultingdamage.
Normalwearpartsare warrantedto be free fromdefects in materialand
workmanshipfor a period of thirty (30) days fromthe date of purchase.
Normalwearparts include,butare notlimitedto itemssuch as: batter=
ies, belts,blades,bladeadapters,grass bags, riderdeck wheels,seats,
snowthrowerskid shoes,shaveplates,auger spiralrubberand tires.
NOW TO OBTAmNSERVICE: Warranty service is available, WITH
PROOF OF PURCHASE,through your !ocal authorized service
dealer. To locate the dealer in your area, check your Yellow Pages,
or contact MTD LLC at RO. Box 361131,Cleveland, Ohio 441360019, or call 1-800-800-7310 or 1-330-220-4683 or log on to our
Web site at www.mtdproducts.com.
This limitedwarrantydoesnot providecoveragein the followingcases:
a. Theengineor componentpartsthereof.These itemsmaycarry a
separatemanufacturer'swarranty.Referto applicablemanufacturer's
warrantyfor termsand conditions.
b. Log splitterpumps,valves,and cylindershavea separateone year
warranty.
c. Routinemaintenanceitemssuch as lubricants,filters, blade
sharpening,tune=ups,brakeadiustments,clutchadjustments,deck
adiustments,and normaldeteriorationof the exteriorfinish due to
useor exposure.
FOR
e. MTDdoesnot extendanywarrantyfor productssold or exported
outsideof the UnitedStates,its possessionsandterritories,except
thosesold throughMTD'sauthorizedchannelsof export distribution.
f. Replacementparts that are not genuineMTDparts.
g. Transportationchargesand servicecalls.
No impliedwarranty, includingany impliedwarranty of mero
chantability of fitness for a particular purpose, applies after the
applicable period of express written warranty above as to the
parts as identified. No other express warranty, whether written or
oral, except as mentioned above, given by any person or entity,
including a dealer or retailer, with respect to any product, shall
bind MTD.During the period of the warranty, the exclusive remedy
is repair or replacement of the product as set forth above.
The provisions as set forth in this warranty provide the sole and
exclusive remedy arising from the sale. MTDshall not be liable
for incidental or consequential loss or damage including, without
limitation, expenses incurred for substitute or replacement lawn
care services or for rental expenses to temporarily replace a
warranted product.
Somestatesdo notallowthe exclusionor limitationof incidentalor
consequentialdamages,or limitationson how longan impliedwarranty
lasts,so the aboveexclusionsor limitationsmaynotapply to you.
in no event shallrecoveryof any kindbe greaterthanthe amountof the
purchasepriceof the productsold. Alteration of safety features of
the product shall void this warranty. Youassumethe risk and liability
for loss,damage,or iniuryto you and yourpropertyand/orto othersand
theirpropertyarisingout of the misuseor inabilityto usethe product.
This limitedwarrantyshallnot extendto anyoneotherthan the original
purchaseror to the personfor whomit was purchasedas a gift.
HOWSTATELAW RELATESTO THISWARRANTY: This limited
warrantygivesyou specificlegal rights,and youmay also haveother
rightswhich vary from stateto state,
IMPORTANT:OwnermustpresentOriginal Proofof Purchasetoobtain
warrantycoverage,
d. Servicecompletedbysomeoneotherthanan authorizedservice
dealer.
MTD LLC, P.O. BOX 361131 CLEVELAND, OHiO 44136-0019;
Phone: 1-800-800-7310,
1-330-220-4683