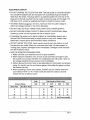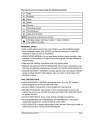
1
Product Manual
Sander
Model No, 320.17559
= Warranty
° Safety
. Assembly
• Operation
, Maintenance
= Parts List
CAUTION! Before using this
product, read this manual and
follow all its Safety Rules
and Operating Instructions=
Sears,
Roebuck
www,craftsman.com
2340018000
and Co,, Hoffman
Estates,
IL 60179
Warranty
Page 2
Safety instruction
Page 3
Assembly
Operation
.
Instructions
Page 8
Page 8
Maintenance
Page 13
Parts List
Page 14
ONE YEAR FULL WARRANTY
ON CRAFTSMAN
®PRODUCT
tf this Craftsman tool fails to give complete satisfaction within one year
from the date of purchase, return it to any Sears store or other Craftsman
outlet in the United States for free replacement.
This warranty does not include sandpaper, which is an expendable
that can wear out from normal use within the warranty period.
This warranty applies for only 90 days from the date of purchase
product is ever used for commercial or rental purposes.
part
if this
This warranty gives you specific legal rights, and you may also have other
rights, which vary from state to state,
Sears, Roebuck
and Co., Hoffman
Estates, IL 60179
Carton Contents
Sander, 3 sanding
belts, filter, dust-collecting
box, manual
WARNING: Some dust created by using power tools contains chemicals
known to the state of California to cause cancer and birth defects or other
reproductive
SAVE THESE
harm.
INSTRUCTIONS!
READ ALL INSTRUCTIONS!
17559
Manual_Revised_07-0131
Page 2
SAFETY SYMBOLS
The purpose of safety symbols is to attract your attention to possible dangers. The
safety symbols and the explanations that accompany them deserve your careful
attention and understanding. The safety warnings DO NOT, by themselves, eliminate any danger. They are no substitutes for proper accident-prevention measures.
,_k SAFETY-ALERT
used in conjunction
,_
DANGER:
SYMBOL:
Indicates danger, warning, or caution. May be
with other symbols
or pictographs.
Failure to obey a safety warning will result in serious injury to
yourself or to others. Always follow the safety precautions
fire, electric shock, and personal injury.
_.
WARNING,
to reduce the risk of
Failure to obey a safety warning can result in serious injury to
yourself or to others. Always follow the safety precautions
fire, electric shock, and personal injury.
to reduce the risk of
_, CAUTION: Failure to obey a safety warning may result in property damage
or personal injury to yourself or to others. Always follow the safety precautions to
reduce the risk of fire, electric shock, and personal injury'.
DAMAGE PREVENTION
AND INFORMATION
MESSAGES
These inform the user of import information and/or instructions that could lead to
equipment or other property damage if they are not followed. Each message is
preceded by the word "NOTE," as in the example below:
NOTE: Equipment and/or property damage
not followed.
WARNING:
manual
tions
before
may result
BE SURE
to read and understand
using this 6.0 Amp
in electric
may result if these instructions are
shock,
Belt Sander.
fire and/or
all instructions
Failure
serious
to follow
personal
in this
all instrucinjury.
WORK AREA SAFETY
= KEEP THE WORK AREA CLEAN AND WELL LIT. Cluttered
areas invite accidents.
benches and dark
,, DON'T USE IN A DANGEROUS ENVIRONMENT. Don't use power tools in damp
or wet locations or expose them to rain. Don't operate power tools in potentially
explosive environments, such as in the presence of flammable liquids, gases,
or dust. Power tools create sparks, which may ignite the dust or fumes.
,, KEEP CHILDREN AND BYSTANDERS
distance away from the work area.
AWAY. All visitors should be kept a safe
• USE THE RIGHT TOOL. Don't force a tool or attachment
it was not designed.
° MAKE THE WORKSHOP
removing starter keys.
17559
ManuaLRevised_07_131
KID-PROOF
with padlocks,
to do a job for which
master switches,
or by
Page 3
ELECTRICAL
SAFETY
o DO NOT CHANGE THE PLUG IN ANY WAY. This belt sander is a double-insulated
tool. Double-insulated tools are equipped with a polarized plug (one blade is
wider than the other). This plug witi fit in a polarized outlet only one way. If the
plug cannot be fully inserted into the outlet, reverse the plug, and try again. If it
still does not fit, contact a qualified electrician to install the proper outlet.
o VOLTAGE: Before plugging in the tool, make sure that the outlet voltage is
within the voltage marked on the tool's data plate.
o DO NOT USE "AC ONLY" RATED TOOLS WiTH A DC POWER SUPPLY.
o DO NOT EXPOSE POWER TOOLS TO RAIN OR WET CONDITIONS.
entering a power tool will increase the risk of electric shock.
Water
o If operating the power tool in damp locations is unavoidable, always use a
Ground Fault Circuit Interrupter to supply power to your tool. Always wear
electrician's rubber gloves and footwear in damp conditions.
o DO NOT ABUSE THE CORD. Never use the cord to carry the tools or to pull
the plug from the outlet. Keep the cord away from heat, oil, sharp edges, or
moving parts. Replace damaged cords immediately. Damaged cords increase
the risk of electric shock°
o USE THE PROPER EXTENSION CORD.
1o Make sure that your extension cord is in good condition.
2. When using an extension cord, be sure to use one heavy enough to carry
the current your product will draw. An Undersized cord will cause a drop on
line voltage resulting in loss of power and overheating.
3. Table A shows the correct size to use depending on cord length and ampere
rating. If in doubt, use the next heavier gauge: the smaller the gauge number,
the heavier the cord.
4. When operating a power tool outside, ALWAYS use an outdoor extension
cord marked "W-A" or "We" These cords are rated for outdoor use and
reduce the risk of electric shock.
Volts
120v
Ampere Rating
Total Length of Cord in feet
25ft
50ft
100ft
150ft
More Than
Not More Than
0
6
18
16
16
14
6
10
18
16
14
12
10
12
16
16
14
12
12
16
14
12
17559
Manual_Revised_07-0131
AWG
Not Recommended
Page 4
The label on your tool may include the following
v
Volts
A
Amperes
Rz
Hertz
W
Watts
Minutes
rain
Alternating
current
no
No-load speed
[]
Class II construction
RPM
A
symbols;
Revolutions
or Strokes per minute
Indicates danger, warning or caution, it means attention!
Your safety is involved.
PERSONAL
SAFETY
• STAY ALERT, WATCH WHAT YOU ARE DOING, and USE COMMON SENSE
when operating a power toolo DO NOT use the tool while tired or under the
influence of drugs, alcohol, or medication.
o WEAR PROPER APPAREL. Do not wear loose clothing, gloves, neckties, rings,
bracelets, or other jewelry. Pull back and secure long hair. Non-slip footwear is
recommended.
° Keep your hair, clothing, and gloves away from moving parts.
o REMOVE ADJUSTING KEYS OR WRENCHES. Form a habit of checking to see
that keys and adjusting wrenches are removed from the tool before turning it on.
• ALWAYS USE SAFETY GLASSES. Everyday glasses may have impact-resistant
lenses, but they are NOT safety glasses. Also use a face or dust mask, if the
operation is dusty.
TOOL USE AND CARE
= AVOID ACCIDENTAL STARTING. Be sure the switch is in the "Off" position
before plugging the tool into an electrical outlet.
, DO NOT CARRY TOOLS WITH YOUR FINGER ON THE SWITCH.
, SECURE YOUR WORK. Use clamps or other practical ways to secure and
support the work piece. It's safer than using your hand, and it frees both hands
to operate the tool.
,, DO NOT OVER REACH. Keep proper footing and balance at all times.
,, PLACE WORKPIECE ON A WORKTABLE OR WORKBENCH:
sturdy table designed for woodworking and similar tasks.
a strong and
o USE A BACKSTOP: a stable surface against which the work piece may be held, to
prevent the work from moving with the sanding belto
17559
ManuaLRevised_0743131
Page 5
TOOL USE AND CARE continued
= DO NOT FORCE THE TOOL. Use the correct toot and blade for your application.
The correct tool and blade will do the job better and more safely at the rate for
which it is designed.
. DO NOT USE TOOL IF THE SWITCH DOES NOT TURN IT "ON" OR "OFR" Any
tool that cannot be controlled with the switch is dangerous and must be repaired.
o DISCONNECT THE TOOL before servicing (such as cleaning the dust-collector
box), changing accessories (such as sand paper), or storing the tool.
o STORE IDLE TOOLS OUT OF THE REACH OF CHILDREN and other untrained
people,
• NEVER LEAVE THE TOOL RUNNING UNATTENDED; turn the power off. Don't
leave the tool until it comes to a complete stop.
_,ALWAYS MAINTAIN TOOLS WITH CARE. Keep cutting tools sharp and clean.
Properly maintained tools with sharp cutting edges are less likely to bind and
are easier to control.
e CHECK FOR DAMAGED PARTS. Before further use of the tool, a guard or
other part that is damaged should be carefully checked to determine that
it will operate properly and perform its intended function. Check for alignment
of moving parts, binding of moving parts, mounting, and any other conditions
that may affect its operation. A guard or other part that is damaged should be
properly repaired or replaced.
WARNING:
Use of accessories
this tool may create hazardous
that are not recommended
for use with
conditions,
USE RECOMMENDED
ACCESSORIES,
Consult the product manual for
recommended
accessories.
The use of improper accessories may increase
the risk of personal injury.
SERVICE
SAFETY
• tf any part of this belt sander is missing or should break, bend, or fail in any
way; or should any electrical component fail to perform properly: ALWAYS shut
off the power switch and remove the plug from the power source, and have the
missing, damaged, or failed part replaced BEFORE resuming operation.
, All service that requires opening the tool MUST be performed only by a Sears
Service Center. All of the motor parts are important components of the doubleinsulation system and MUST only be serviced by a Sears Service Center.
Service performed by unqualified personnel could result in a risk of injury.
,, When servicing a tool, ALWAYS use only identical replacement parts. Follow
instructions in the Maintenance Section of this manual. Use of unauthorized
parts or failure to follow Maintenance
shock or injury.
17559 ManuaLRevised_0743131
Instructions
may create a risk of electric
Page 6
SPECIFIC
SAFETY RULES FOR BELT SANDER
_k WARNING:
Empty the dust-collecting
canister frequently, especially
when sanding resin-coated surfaces, such as polyurethane, varnish, shellac,
etc. Fine particles of sanding dust may self-ignite and cause fire.
° Hold the tool by the insulated, gripping surfaces whenever performing any
operation where the tool may contact hidden wiring or its own cord. Contact
with a "live" wire will make exposed metal parts of the tool "live" and will
shock the operator.
o Always wear safety goggles and a dust mask when sanding, especially
sanding over-head.
o A suitable breathing respirator
pressure-treated
objects.
must be worn while sanding
when
chemically-
,,The belt sander is not suitable for wet sanding.
o Do not use larger sanding paper than is needed. This tool uses 3" x 18"
sanding belts. Extra paper extending beyond the sanding pad can cause
serious lacerations.
_h, WARNING! Use of this tool can generate dust containing chemicals
known to cause cancer, birth defects, or other reproductive harm. Some
examples of these chemicals are:
o Lead from lead-based
o Crystalline
paints.
silica from bricks, cement, and other masonry products.
o Arsenic and chromium
from chemically
treated lumber.
Your risk from these exposures varies, depending upon how often you do
this type of work. To reduce your exposure to these chemicals:
o Work in a well-ventilated
area.
o Work with approved safety equipment, such as those dust masks that are
specially designed to filter out microscopic particles.
Avoid prolonged contact with dust from power sanding, sawing, grinding,
drilling, and other construction
activities. Wear protective clothing and wash
exposed areas with soap and water.
Allowing dust to get into your mouth or eyes or to lie on the skin may promote
absorption of harmful chemicals.
IMPORTANT!
17559 Manual
READ ALL INSTRUCTIONS
Revised_07-O131
Page 7
Your Belt Sander has been shipped fully assembled, except for the sanding belts
and dust-collecting
box, which are included in the carton. Inspect the tool carefully to make sure that no breakage or damage has occurred during shipping, if
any parts are damaged or missing, return the Belt Sander to any Sears store or
other Craftsman outlet in the United States to have it replaced.
Please see the Operations section of the product manual for instructions
installing the sanding belt and dust-collecting
box.
WARNING!
for
If any parts are missing, DO NOT operate this tool until the
missing parts are replaced.
_1_ WARNING! Your Belt Sander should NEVER be connected to the power
source when you are assembling parts, making adjustments,
removing belt, cleaning, or when it is not in use.
installing or
Before attempting to use any tool, always learn about all of the operating features
and safety instructions.
Fig. 1
Lock-on button
Front handle
Dust-exhaust
Belt-tracking
/
_ Rear handle
port
knob
ord
\
Live-wire indicator
ON/OFF Trigger switch
Dust-collecting
box
:Lock lever
17559 ManuaLRevised_07-0131
Page 8
Input:
Square Feet Per Minute
120V, 60HZ, AC only, 6 Amps ............................
1000 SFPM
Sanding belt size
3"X 18"
Protection
II
.....
TURN
class
ON/OFF
THE
BELT SANDER
1. Connect the plug to an
electrical outlet.
,,,
, ,,,,,,,,,
, ,,,,,
(Fig. 2)
Fig° 2
2. Start the tool by squeezing
the on/off trigger switch.
3. Release the trigger to stop
the toolo
4. The lock-on
button allows
the operator to keep the
belt sander running without
continuously holding the
trigger switch° While
squeezing the trigger
switch, depress the red
lock-on button, then
release both the switch and
the lock-on button,
5. To release the lock-on button, squeeze and release the trigger switch.
NOTE: The trigger cannot be released if you are pressing the lock-on button.
WARNING: DO NOT let familiarity
careless. Remember that a careless
cause severe injury.
17559
ManuaLRevised_07-0131
with your belt sander make you
fraction
of a second is sufficient
to
Page 9
TO iNSTALL SANDING
BELT
_I_ WARNING: Always
disconnect
attaching
1. Place
side,
lever
front
or removing
a sanding
the sander on its
and pull the lock
out and
Lrd the
of the tool.
the plug from
the power source
before
belt.
t Fig. 3
1
2o Insert the new sanding belt
around both rollers. Make
sure that the arrow on the
inside of the sanding belt
points in the same direction
as the arrow indicated on
the sander. (Fig. 3)
3. Center the sanding belt
over the rollers and the
bottom plate, then push the
lock lever back to its original position to return tension to the belt.
ADJUSTING
THE BELT TRACKING
When a new sanding belt is
installed, the sanding belt
tracking may need to be
adjusted several times as the
belt becomes more pliable
with use. When the sanding
belt tracking is correct, the
sanding belt will remain centered
on the rollers during use.
(Fig. 4)
Fig. 4
!. Hold the belt sander upside
down, and turn it on.
NOTE: This position is for
the purpose of adjustment
only. Do not allow the
sanding belt to come into
contact with a work piece or any other object during adjustment.
2. If the sanding belt runs inward toward the belt4ightening
belt-tightening
knob clockwise.
3, If the sanding
belt runs toward
17559 ManuaLRevised_0743131
the outside,
rotate the knob
knob, rotate the
counterclockwise.
Page 10
DUST-COLLECTING
BOX
Your belt sander is supplied with a dust-collecting box. Use it for removing dust:
from the sanding space to help keep the working area clear.
,, Before sanding, attach the
dust-collecting box to the
sander,
Fig. 5
Dust-Exhaust
Port
,, For longer periods of use, or
on large pieces of work, it is
advisable to use a suitable
vacuum cleaner° Attach a
1-1/4-inch wet/dry-vac hose
to the dust-exhaust port.
• It is advisable to also wear a
suitable dust mask, as there
may be residual airborne dust
particles in the area.
oTo install: Align the dust-exhaust
port with the dust-collecting
Push the box onto tool until it is firmly seated. (Fig. 5)
,, To remove: Grip the dust-collecting
box outlet.
box firmly, and pull it out from the tool.
_, WARNING:
Clean the dust-collecting
box approximately
every 5
minutes or when dust escapes from the vent of the dust-collecting
box,
• Clean the dust filter: Open
the cover (A) on top of
dust-collecting
box, and
remove the filter (B). Gently
tap the filter to remove the
dust, or use a soft brush.
The filter may then be
rinsed with water (no soap),
if desired, and allowed to
air-dry. (Fig. 6)
Fig. 6
Cover (A)
Filter (B)
Dust-collecting
box
17559 ManuaLRevised_07-0131
Page 11
THE LIVE-TOOL
iNDICATOR
Fig. 7
The Belt Sander has two livetool indicator lamps (Fig. 7).
When the tool is plugged into
an electrical supply, the livetool indicators will show green
lights to remind you that the
tool is plugged in, When the
tool is unplugged, the lights
will turn off.
GENERAL
SANDING
WARNING:
Finish sanding can produce
clouds of fine, sanding dust that
could ignite in the presence of sparks or an open flame. To avoid injury, always
use your sander in a well-ventilated area, away from sparks and flames.
• Secure the work piece with clamps
while sanding.
or other means to keep it from moving
• Be sure the cord is clear of the sanding belt.
, Grasp the handles firmly: Hold the front handle with your left hand and the rear
handle with your right hand.
o Start the sander off of the work surface to avoid gouging. NEVER start or stop
the sander with the belt in contact with the work surface.
° Place the "heel" of the sander on the work first. And then, with a slight forward
motion, begin the sanding stroke as you lower the tool onto the work surface.
= Use the front handle to guide the sander
the sander.
o Use short, overlapping
the work surface.
and the rear handle to control
strokes, moving the sander slowly back and forth across
° Do not apply pressure to the sander. The sander is correctly weighted to provide
the correct pressure, Too much pressure will slow the work by overloading the
motor and reducing the belt speed, Use coarser sandpaper for heavy sanding;
do not use increased pressure.
a Avoid tilting or rocking the sander or sanding in one spot for too long, This will
result in an uneven surface.
= Begin sanding with a coarse-grit sandpaper, and gradually use finer and finer
grits, until the desired finish is achieved. Do not switch from a coarse grit to a
very fine grit in only one step.
• To stop, lift
the lock-on
a complete
"run away,"
the belt sander from the work surface before turning it off. Disengage
button and release the trigger switch. Allow the sander to come to
stop before setting it down. A moving belt will cause the sander to
even if the motor is off.
17559 ManuaLRevised_07-0131
Page 12
_k
WARNING!
DO NOT at any time allow brake fluids, gasoline, petroleum-
based products, penetrating oils, etc. to come in contact with plastic parts.
They contain chemicals that can damage, weaken, or destroy plastic.
o Before cleaning or performing any maintenance,
has been disconnected from the power supply.
o Keep all ventilation openings
make sure that the belt sander
clean.
o When servicing a too!, use only identical replacement parts. Follow instructions
in the maintenance section of this manual. Use of unauthorized parts or failure
to follow maintenance instructions may create a risk of electrical shock and/or
serious personnel injury.
o All service that requires opening the belt sander MUST be performed only by a
Sears Service Center. All motor parts constitute important parts of the doubleinsulation system and MUST only be serviced by a Sears Service Center. Service performed by unqualified personnel could result in a risk of inju_.
e Avoid using solvents when cleaning plastic parts. Most plastics can be
damaged by commercial solvents. Use clean cloths to remove dirt, carbon
dust, etc.
17559
Manual_Revised
0743131
Page 13
The Model Number will be found on the cover of this manual, Always mention the
Model Number in all correspondence
regarding your tool,
01.
2740234000
Stator
1
02.
2750824000
Rotor
1
03,
2800026000
Brush Holder
2
04.
3120234000
, Cord Anchorage
05.
3120398000
.1
Front Pulley
................ •
1
,,
,,,
,,,,,,,,
,,,,,,,,
,,,,,,,,,,
|
,,,,,
06°
3121011000
Cord Guard
07,
3121034000
Timing Belt
08,
3121036000
Rubber Bushing
09.
3121049000
Rubber Spring
1
'10.
3122975000
Left Housing
1
11.
3122976000
Belt Cover
1
12.
31 22977000
Fan Baffle
1
13.
31 22978000
Mounting
14.
31 23002000
Right Indictor Cover
1
15.
31 23003000
Left Indictor Cover
1
16.
3123004000
Lever
1
17,
3!23006000
Left Rubber Gasket
1
..................
Cover
,,,
, ,
,,
,,
1
, ,,,,,,,,,,,,,,,,,_..........
18.
3123007000
Right Rubber Gasket
t
19.
3123008000
Dust-Collecting
Box Cover
I
20.
3123009000
Dust-Collecting
Box
1
3320411000
Right Housing
1
21.
,,,,,
1
.... ,,,,,,,
22.
3320412000
Middle Housing
1
23.
3320423000
Filter Assembly
1
24.
3402156000
Adjusting
1
25,
3420508000
Mounting
1
26.
3420102000
Small Belt Pulley
1
27.
3420101000
Large Belt Pulley
1
28.
3420525000
Rear Pulley
1
29.
3520032000
Gear
1
30,
3550143000
Front Pulley Shaft
1
17559
Manual Revised_07©131
Knob
Page 14
31,
3550144000
,,, |
....
,,,,,
,,,,,,,
__
Rear Pulley Shaft
1
:
32,
3550145000
Gear Shaft
1
33.
2822072000
Support Assembly
1
34.
3660291000
Spring
1
35.
3660130000
Spring
1
36.
3700138000
Mounting
37.
3700145000
WasherA
38.
3700183000
Washer C
39.
3700249000
Washer
40,
3700487000
Epoxy
41.
2822222000
Belt-Contml
42,
4540017000
Power-Supply
43,
4870313000
Switch
i,
1
Plate
1
1
2
Board
Assembly
Indicator
1
1
1
,,
,, ,,,,........
,,
44.
4930004000
Connector
1
45.
4960010000
Carbon Brush
2
46,
5610006000
Tapping Screw
4
47.
5610024000
Tapping Screw
4
48.
5610049000
Tapping Screw
49.
5610103000
Tapping Screw
2
50,
5610106000
Tapping Screw
8
51o
5610034000
Tapping Screw
1
Tapping Screw
8
....
52.
,,, ,,,,,,,,,,,,,,,,,,, ,,,,,
5610035000
....
53,
5610037000
54.
5650048000
55,
5650049000
_,
i
,
, • ,,
,, ,,,,,,,,,
Thread-Forming
,
Screw
,,, ,,,....
i,, ,,,,,,,,,,,,,,,,,,,
_
Wave Washer
1
Plain Washer
3
Plain Washer
1
_
_..
56.
5650050000
57,
5660029000
E Ring
1
58,
5680017000
Rivet
1
59,
5700004000
Bail Bearing
1
60.
5700005000
Ball Bearing
3
61,
5700031000
Needle Bearing
4
,
62.
4860006000
Inner Wire
63,
4810002000
Power Cord & Plug
ManuaLRevised_07-0131
L, I ,,,,,,' ',,,'
,,, ,,,, ,,,, ,,,,,,,,,,,,,,,,,,,
...................................
17559
,
2
,,,,,
6
Page 15
12
45
20
4O
23
26
46
9
7
48
1
!7
10
,_
22
24
50
18
29
27
31
25
59
8
54
32
28
30
34
13
%7
17559 Manual_Revised_07-0131
Page 17
1"[559
ManuaLRevised_07_)131
Page
18
17559
Manual_Revised_07-0131
Page
19
Get/t f=xed, atyour homeo
•
: 111
.
In ......
:.•i•
:-:•
•
•••
•
•••
••
•
• '
•:
oUrs!
r
Your Home
. <
For repairlawn
in your
and garden
no matter
home
-of
equipment,
who made
all
major
brand
appliances,
or heating and cooling systems,
it, no matter who sold it!
For the replacement
parts, accessories
and
owner's manuals
that you need to do-it-yourself.
For Sears
and items
professional
like garage
installation
of home appliances
door openers and water heaters.
1-800-4-MY-HOME
(i-800-469-4663)
www.sears.com
_
Anytime, dayor night
(U.S.A. and Canada)
www.sears.ca
Our Home
For repair of carry-in products like vacuums, lawn equipment,
and electronics, call or go on-line for the nearest
Sears Parts & Repair Service Center
1-800-488-1222
Anytime, day or night (U.S.A. only)
wv._.sears.com
To purchase a protection agreement (UoS.A_)
or maintenance agreement (Canada) on a product serviced by Sears:
1-800-827-6655
(u.sA)
1-800-361-6665
Para pedir servicio de reparaciSn
a domicilio, y para ordenar piezas:
1-888-SU-HOGAR ®
(14_qa4,e427)
(Canada)
Au Canada pour service en fran_;ais:
1.800-LE.FOYER Mc
(1_.6937)
www.sears ca
SealrS
© Bears Brands, LLC
@ Registered
Trademark t TM Trademark
® Marca Registrada
Mc Marque
t sM Service Mark of Sears Brands, LLC
1_rMMarca de F&brica / sM Marca de Servtcio de Sears Brands, LLC
de commerce
! _DMarqued_pos_e
de Sears Brands,
LLC