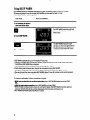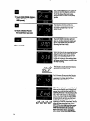
1
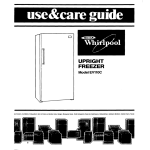
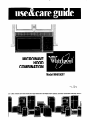
MICROWAVE
COMBINATION
Model MH61OOXY
ews
Ice Makers
O~shwashen.
bill-In
Ovens and Sutiace Units. Ranpes. Microware
Ovens. hash Compaclon.
Room Air Condilioners.
Oehumldiliers.
Aulomalic
Washera. Clolhes Dryers
Freezea.
RI
Contents
5
6
Page
10
14
15
17
18
19
19
Caring for Your Mlcrowave Oven. .....
19
Cleaning the Microwave
Oven. ......
19
Caring for the Filters. .................
Replacing
the Cooktop and
21
Oven Lights. .......................
6
7
7
Operating Safety Precaullons. ........
If You Need Servlce or Assistance. ....
Mlcrowave Oven Warranty. ...........
Page
Parts and Features ....................
Before You Install Your
Mlorowave Oven, .....................
Before You Use Your Mlorowave Oven .
Preoautlons to Avold Possible
Exposure to Exoesslve
Mlorowave Energy ....................
Important Safety Inst~ctions .........
Using Your Mlcrowave Oven. ..........
Microwave
Oven Controls. ...........
Audible Signals. .....................
Sefflng the Clock. ....................
Cooking in Your Microwave
Oven ....
Cooking at High Cook Power .........
Cooking at Lower Cook Powers ......
Defrosting ...........................
Using KEEP WARM ....................
Using AUTO START ....................
Ofher Operattng
Hints ................
Timer. ...............................
Accessory Kits .......................
2
3
3
3
4
5
8
01992 Whirlpool
Parts and features
Corpomtion
MODELAND SERIAL
NUMBERPLATE
/
CAUTION
LABEL
22
24
28
VENT
GRILLE
DEFROST
GUIDE
\
COOKTOP
LIGHT
\
FILTER
COHTROL
PANEL
EXHAUSTFANAND
CGOKTOPLIGHT
SWITCHES
Thank you for buylng a Whlrlpool appliance. Please complete and mall the Owner Reglstratlon Card provided wlth lhls product. Then complete the form below Have this information ready
if you need service
l
l
or call with a question.
Copy model and serial numbers from plate
(behind
the microwave
oven door on the
oven frame] and purchase date from the sales
slip.
Keep this book, the cookbook
and Your sales
slip together in a handy place.
Model Number
Seflal
Purchase
Servlce
2
Number
Date
Comwnv
Phone
Number
Fill out and return the Microwave
missing, please send the model
name and address to...
Whirlpool Corporation
Microwave
Registration
;;o;in$tttive
Center
Card included
and serial number
with your oven. If the card
of your microwave
oven with
iS
Your
Department
Benton Harbor, Michigan
This information
microwave
oven.
Registration
number
49022
will help us reach
you if there is ever a need
to pass along
information
about
your
Before you install your microwave oven
Read and carefully
follow the INSTALLATION INSTRUCTIONS packed
wlth your oven.
Before you use your microwave oven
Read this Use and Care Guide carefully for important
Store in a convenient
place for future use.
It Is your responslblllty
l
Has been installed
to be sure your microwave
where
l
l
l
oven:
The microwave
above 50°F (10°C) for proper operation.
it is protected
should be at a temperature
l
use and safety information.
from the weather.
Has been properly connected
to electrical
supply and grounded.
[See installation instructions.)
is not used by children or anyone unable to Operate it properly.
is properly maintained.
is used only for jobs expected
of a home microwave
oven.
PRECAUTIONS TO AVOID
POSSIBLE EXPOSURE TO EXCESSIVE
MICROWAW ENERGY...
DO NOT attempt
to operate this oven with the door
open since open-door
operation can result in harmful exposure to microwave
energy. it is important not to
defeat or tamper with the
safety interlocks.
DO NOT place
any object
between the oven front
face and the door or allow
soil or cleaner residue
to accumulate
on sealing
surfaces.
DO NOT operate the
oven if it is damaged.
it is
particularly
important that
the oven door close
properly and that there is
no damage
to the
(I) Door (bent),
(2) Hinges and latches
(broken or loosened),
(3) Door seals and sealing
surfaces.
DO NOT operate
the
microwave
oven if the
door window is broken.
The microwave
oven
should be checked for
microwave
leakage
by
qualified
service personnel
after a repair is made.
The oven should not be
adjusted or repaired by
anyone except properly
qualified
service
personnel.
DO NOT operate
the
microwave
oven with
the outer cabinet removed.
oven
IMPORTANT
SAFETY INSTRUCTIONS
MIcrowave
ovens have been thoroughly
tested for safe and efficient
operatlon.
However, as with any appliance,
there are Special InBtallatlOn
and safety precautions
which must be followed to ensure safe and
satisfactory
operation
and prevent damage
to the unit.
To reduce the risk of fire, electrical shock, injury to persons,
or damage
when using the microwave
oven, follow basic
precautions,
including
the following:
1. Read all instructions before using the
microwave oven.
2. Read and follow the s cific “PRECAUTIONS TO AVOID POSSIBr E EXPOSURE TO
EXCESSIVE MICROWAVE ENERGY” found
on page 3.
3. This ap liance must be grounded. Connect only Po roperly rounded outlet. See
“GROUNDIN INSTRUe TIONS” found in the
Installation Instructions.
4. hlStdl Or locate
this appiiance
Oniy in
accordance with the provided lnstallatlon
Instructions.
5. Some products such as whole eggs and
sealed containers - for exam ie, closed
glass jars - may explode an 8 should not
be heated in this oven.
6. Use this appliance only for its intended
use as described in this manual. Do not use
corrosive chemicals or vapors in this ap
pliance. This ty e of oven is specifically designed to hea,P cook, or dry food. It is not
designed for industrial or laboratory use.
7. As with any appliance, close supervision is necessary when used by children.
8. Do not operate this appliance if it has a
damaged cord or plug, If it is not working
properly, or if it has been damaged
or
dropped. Electric shock, fire or other hazards may result.
9. This a pliance should be serviced only
by quali Pied service personnel. Call an authorized WhirlpoolSM service company for
examination, repair or adjustment.
10. Do not cover or block any opening on
the appliance. Fire may result.
11. Do not store or use this appliance outdoors. Do not use this roduct near water for example, near a Ritchen.sink, in a wet
basement or near a swrmmrng Pool, and
the like.
12. See door surface and interior cleaning
instructions on page 19.
13. To reduce the risk of fire in the oven
cavity:
a. Do not overcook food. Carefully attend
appliance if paper, plastic, or other combustible materials are placed inside the
oven to facilitate cooking. Paper can char
or burn, and some iastics can melt if used
when heating foo CP
s.
b’ Do not deep fry in Oven’
c. Test dlnnerware
or cookware
uslng.
See page
24. Some
dishes
(melamine, Centura,@ etc.) absorb microwave energy, becoming too hot to handle
and
Slowing
Cooking
times.
Remove
wire
twist-ties from paper Or piaStiC bags b&Ore
placing bag in oven. Cooking In metal
containers not designed for microwave use
can damage the oven, as can containers
with hidden metal (twist-ties, foil lining, stapies, metallic glaze or trim.)
d. If materials inside the oven should ignite,
keep oven door closed, turn oven off, and
disconnect
the power cord, or shut off
power at the fuse or circuit breaker panel.
e. Do not use the cavity for storage purposes.
Do not leave paper products, cooking
utensils, or food in the cavity when not in use.
14. Read and follow “Operating Safety Precau’ons starf’ng On page 22*
15. Because of the automatic exhaust fan
feature, the following cautions must be
observed:
a. Do not leave the area when using your
cooktop at a high setting. Accidental fires
from boiiovers or spatterin on the surface
unit could spread, especia 8 ly if the exhaust
fan is operating.
b. Do not allow rease and soil to build up
in the grease fiBter. Exhaust fan efficiency
will decrease and fire may result. Clean
often following the filter cleaning instructions on pages 19 and 20.
c. Do not change the cooktop or oven
lights without turning the power off at the
main power supply, see page 21). Eiectrical shock may resul\ .
d. Do not flame foods on a cooktop surface
below this unit. The fan, if operating, may
spread the flame and cause personal injury or properly damage.
SAW THESE INSTRUCTIONS
4
before
Using your microwave oven
Microwave oven controls
When you first plug in the oven, a tone sounds
and the Display will show 88:88. If after you set
the Clock (page 6), the Display again shows
all 8’s; your electricity
was off for a while.
Reset the Clock.
There are four parts in the control section:
-The Display/Clock
and Indicator Lights
- Command
Pads
- Number Pads
- Fan and Light Pads
Instructions for each control are covered
following pages. Read them carefully.
on the
Command
Pads
Touch Command
Pads to tell the microwave what to do and
in what order. A few
examples:
-CLOCK SETtells the
oven you are golng
to set the clock.
-START tells the clock
to start.
-CANCEL - touch this
pad to erase an incorrect command,
cancel the Timer or
stop the oven during
cooking.
See page 6 for information on the tone
you hear when touching any pad.
Each Command
Pad
(except START and
CANCEL] lights an Indlcator Light on the
digital display.
Fan and light Pads
Number Pads
The six pads at the bottom of the control
panel control the 2-Speed Exhaust Fan and
the Cooktop Light.
Touch Fan Pad for the desired
fan speed.
(NOTE: If the temperature gets too hot around
the mlcrowave oven, the exhaust fan In the
vent hood will automatlcally
turn on the LOW
settlng to protect the oven. It may stay on up
to an hour to cool the oven. When thls occurs,
the Fan Pad will not turn the fan off.)
Once you’ve touched Command
Pad to tell
the oven what you want it to do, you’ll touch
Number Pads to tell it...
-a time.
- a Cook Power.
Touch Light Pad for the desired
countertop
lighting.
cooktop
or
Audible Signals
Audible signals are available
to guide you when setting and using your oven. (A programming
tone
will sound each tlme you touch a pad. Two beeps will sound between cycles. A reminder tone will sound
every 60 seconds after cooking is done to remind you that something has been left in the oven. Four
beeps signal the end of the Timer function and a Cook or Defrost cycle.] If you don’t hear a tone, it is
because of incorrectly
entered Instructions or because the tones have been removed. For example, a
tone will not sound if you touch a Number Pad before you touch a Command
Pad.
To remove the programming
remlnder tone:
l
l
l
To remove all tones:
tone and
l
Open the door.
Touch CANCEL twice, then touch START.
Programming
and reminder tones will
be cancelled.
l
l
NOTE: Do not remove all tones If you use the
tlmer.
To replace the tones:
To replace the tones:
Repeat
l
the steps above.
l
NOTE: If your electrlclty
Open the door.
Touch CANCEL twice, touch 0, then touch START.
All audible tones (including
Timer signal] will be
cancelled.
Repeat
goes off, the tones will be replaced
the steps above.
when the electrlclty
comes back on.
Setting the Clock
When the oven is first plugged
in, a tone sounds and the Display shows “88:881’ If the
electric power ever goes off, the Display will again show all 8’s when the power comes
back on.
You can cook or use the Timer without setting the Clock, but the Display will be
blank after cooking.
DO THIS...
.
Him
I. Touch CLOCK SET.
THIS HAPPENS...
p
l
The Display will show a “0” and the
colon will start to flash. The first
__
I
Number Pad must be touched withln
5 seconds or the Display will go
blank. If this happens, touch CLOCK
SET again
6
and continue.
The Display will show what numbers
you touched In the order you
touched them. This example shows
3:25.
2. Touch Number Pads for the
correct time of day.
The colon will stop flashing. The Clock
Is set.
3. Touch
START.
If you have touched in an incorrect
time, such asl2:65,“En”
will show on
the Display. Touch Number Pads to reenter the tlme of day. If you have not
entered the time of day wlthln approximately eight seconds, you must touch
CLOCK SETand start over.
NOTE: To mt the Clock, touch CLOCK SET.The current tlme will show on the Display
and the colon will flash. Contlnue to set the Clock as shown above.
Cooking in Your Microwave Oven
Although a new rating method* rates this oven at 750 waits, you may use a reliable
cookbook
wlth recipes developed
for 650-700 watt mlcrowave
ovens.
Be sure to read the MICRO MENUS@ Cookbook
It contains information about:
l
l
l
l
l
l
packed
with the microwave
oven.
What microwave
energy is.
How food is cooked by microwave
energy.
What affects cooking speed and cooking evenness.
Safety tips.
Utensils to use when cooking in a microwave
oven.
Cooking times for different foods.
important
thlngs to remember to get the best cooklng
results:
ALWAYS cook food for the MINIMUM recommended
cooking time. If necessary, add time
in one or two minute periods, then check for doneness to avoid overcooking
the food.
l Stir, turn or rearrange
the food being cooked about halfway through the cooking time for
most even doneness with all recipes.
l If a glass cover
is not available,
use waxpaper,
paper towels or microwave
approved
plastic wrap. Turn back a corner to vent steam during cooking.
‘IEC-705 Test Procedure. The IEC-705 Test Procedure Is an Internationally
recognized method of
rating mlcrowave wattage output and does not represent an actual change to output power
or cooking performance.
l
Cooking at High Cook Power
Follow these steps to cook at HIGH power.
DO THIS...
THIS HAPPENS...
1. Put food
In the oven and
close the door.
conttnued
on next page
7
m
The COOK Indicator Light will come
and the Display will show four 0’s.
.a
2. Touch
on
COOK.
The display will show the numbers YOU
touched In the order you touched
them. The example shows 1 minute,
30 seconds.
3. Touch Number Pads for
cooklng time you want.
m*.
4. Touch
The oven will automatically
HIGH Cook Power.
cook at
The COOK Indicator Light will stay on
to show that fhe oven is cooking in the
cycle.
START.
The Display counts down the time to
show how much cooklng time is left.
CDUd
QWll
d
When the cooklng tlme ends, “End” will
show on the Display and 4 beeps will
sound. (You can stop the beeplng
by
opening the door or by touching
CANCEL.) “End” will remain on the
Display and a remlnder tone will
sound every 60 seconds (to remind
you that food Is left In the oven) unfll
the door Is opened or CANCEL Is
touched. The Display will then show
the tlme of day.
Changing the Cooking Time
Cooking
1. Touch
2. Touch
3. Touch
Cook
time can be changed
any time before touching
COOK.
numbers for the new ttme.
START.
will continue
cooking
START or during
the cycle:
for the new time.
Cooking at Lower Cook Powers
For best results, some recipes call for lower Cook Powers. The lower the Cook Power, the
slower the cooking. Each Number Pad also stands for a different percentage
of Cook Power.
Many recipes in your MICRO MENUS@ Cookbook
tell you, by number, which Cook Power to use.
Recipes in other books and magazines
may tell you by name (HI, MED, LO, etc.) or
percentage
(lo%, 50%, 80%. etc.).
The following chart gives the percentage
of Cook Power each Number Pad stands for, and
Cook Power name usually used.
aufomafic
100% of full power HIGH
4 = 40% of full power
9 = 90% of full power
3 = 30% of full power MEDLOW
8 = 80% of full power
2 = 20% of full power
7 = 70% of full power MED-HIGH
1 = 10% of full power LOW
6 = 60% of full power
0 = no power (fan and light will be offj
5 = 50% of full power MED
8
DO THIS...
THIS HAPPENS...
1. Put food
In the oven and
close the door.
and the Display
2. Touch
will show four 0’s.
COOK.
7 minutes, 30 seconds.
3. Touch Number Pads for the
cooklng tlme you want.
m
The COOK POWER Indicator Light will
come on and the Display will show
‘;;hls
shows the oven Is preprogrammed
to cook at full (HIGH)
ml
4. Touch
COOK POWER.
The Display will show what you
touched. Thls example
shows you
touched Number Pad 5 for 50% of
full power.
The COOK and COOK POWER Indicator
Lights will stay on to show that the oven
is cooking at a Cook Power other than
HIGH.
COUdZ
OWll
d
The Display counts down fhe time to
show how much cooking time is leff.
For 2 of every10 seconds, the Display
will show the Cook Power you
selected.
continued
on next page
9
When the cooking time ends, “End” will
show on the Display and 4 beeps will
sound. (You can stop the beeping
by
openlng the door or by touching
CANCEL.) “End” will remain on the
Display and a reminder tone will
sound every 60 seconds (to remind
you that food Is left in the oven) until
the door Is opened or CANCEL is
touched. The Display will then show
the tlme of day.
Changlng the Cook Power
The Cook Power can be changed
l
l
l
any time before touching
START or during
Touch COOK POWER.
Touch a number for the new Cook Power.
Touch START.The cycle will cook at the new Cook Power for the original
the cycle.
time.
OR...
l
l
Touch COOK POWER twice if you want to change
START.
a lower Cook Power to HIGH.
Touch
Defrosting
Use QUICK DEFROST to thaw frozen food before cooking. For suggested defrost times, see
the guide behlnd the oven door or in your MICRO MENUS@ Cookbook.
Do not use defrosting
times developed
for other types of defrost systems, as food may be partially cooked.
DO THIS...
THIS HAPPENS...
1. Put frozen
food In the oven
and close the door.
q
I
.
The QUICK DEFROST lndlcator
will come on and the Display
show four 0’s.
‘.
2. Touch
Light
will
QUICK DEFROST.
The Display will show the number
you touched In the order you
touched them. This example shows
2 minutes, 30 seconds.
3. Touch Number Pads for the
defrosting ttme you want.
m
The QUICK DEFROST Indicator Llght
will stay on to show that the oven is in
the Quick Defrost Cycle.
I.
4. Touch
START.
count
dQWll
10
The Display counts down the time to
show how much defrosting time is left.
When the defrost time ends, “End” will
show on the Display and 4 beeps will
sound. (You can stop the beeplng
by
openlng the door or by touching
CANCEL.) “End” will remain on the
Display and a reminder tone will
sound every 60 seconds (to remind
you that food Is left In the oven) unfll
the door Is opened or CANCEL Is
touched. The Display will then show
the flme of day.
Sfandlng Tlme
For best results, allow the food to stand for a while affer defrosting.
temperature
of the food to provide more even defrosting.
This helps equalize
the
When the COOK cycle follows QUICK DEFROST,fhe oven automatically
provides a standing
time equal to the time touched in for QUICK DEFROST.The COOK Cycle will begin after the
automatic
standing time. There is no standing time between QUICK DEFROST and KEEP WARM.
About the QUICK DEFROSTCycle
The microwave
oven automatically
divides the time set for the QUICK
three equal parts:
First part.
.... .. .
...
...
...
...........
Secondpari
.... ....... ......... .... ..... .... ....... ........ ......
Thirdpart
.........................................................
This automatic
step-down
in Cook Power helps defrost food quickly
DEFROST Cycle
80% of full Cook Power
50%offullCookPower
20%offullCookPower
and completely.
Changing or Adding Defrost Time
You can change
l
l
l
the defrosting
time any time before or affer touching
The best time to change
l
l
Open the door.
Check the food with long-fined
fork; if center
time Is necessary
Close the door and touch STARTto continue
area is hard frozen, set additional
to complete
the cycle
OR...
l
Touch in new instructions
will continue
the
the setting is near the end of the QUICK DEFROST Cycle.
Remember that standlng
l
START.
Touch QUICK DEFROST.
Touch numbers for new time.
Touch START.
Any new time sefflng made while QUICK DEFROSTIs operatlng
defrostfng at only 20% of full power.
for additional
defrosting
time.
time.
defrostlng.
if no additional
info
time is needed.
Cooking Automatically
After Defrosting
The controls can be set so the microwave
Cook cycle you have touched in.
from defrosting
to the
THIS HAPPENS...
DO THIS...
1, Put food
oven goes automatically
In the oven and close
the door.
The QUICK DEFROST Indicator Light will
come on and the Display will show
four 0’s.
2.
Touch QUICK DEFROST.
q
The COOK Indicator Light will come
and the Display will show four 0’s.
..
4.
Touch COOK.
5. Touch Number Pads for ‘the
cooklng ttme you want.
The Display will show the numbers you
touched In the order you touched
them. This example shows 2 minutes,
30 seconds.
The COOK POWER Indicator Light will
come on and the Display will show
“P-HI:’ This shows the oven is preprogrammed
to cook at full (HIGH) power.
6. Touch
COOK POWER.
(Optton: Touch START If you
want to use HIGH power.)
7. Touch a Number Pad for the
Cook Power you
want.
12
on
The Display will show what you
touched. This example
shows you
touched Number Pad 6 for 60%
of full power.
-.
a. Touch START,
count
dOWll
When you touch START,the QUICK
DEFROST Indicator Light will stay on.
All other Indicator Lights will go off.
The Display counts down the time to
show how much time is left in the
Defrost cycle.
When the defrost time ends, the microwave oven automatically
lets the food
stand for the same amount of flme
used for defrosflng.
NOTE: If the defrosf flme has been
changed one or more flmes, the
sfandlng flme will equal the orlglnal
defrosfffme entered.
The QUICK DEFROST Indicator Light
stays on and the Display counts down
the standing time. During the counf-
down fhe oven will be dark, and fhe
fan will be off.
When the standing time is over, you
will hear 2 beeps and the Cook cycle
will start.
The COOK Indicator Light will be on during the Cook cycle. The COOK POWER
Indicator Light will also be on If you are
using a Cook Power other than HIGH.
CDUd
ClWtl
d
The Display counts down the time
to show how much time is left in the
second cycle.
When the Cook cycle ends, “End” will
show on the Display and 4 beeps will
sound. (You can stop the beeping
by
opening the door or by touching
CANCEL.] “End” will remain on the
Display and a reminder tone will
sound every 60 seconds (to remlnd
you that food is left in the oven) until
the door is opened or CANCEL is
touched
the time bfThe
day,Display will then show
13
Using KEEP WARM
Hot, cooked foods can be safely kept warm in your microwave
oven for up to 99 minutes,
99 seconds (about 1 hour, 40 minutes). KEEP WARM can be used by itself, or it can
automatically
follow a cooking cycle.
DO THIS...
THIS HAPPENS...
1. Put cooked,
hot food In
oven and close door.
EM
The KEEP WARM Indicator Light will
come on. The Display will show the
time of day
.-
2. Touch
3. Touch
l
l
l
l
l
l
KEEPWARM.
The KEEP WARM Indicator Light
will stay on. The oven light and the
fan will come on. The Display will
continue to show the time of day.
START.
KEEP WARM operates for up to 99 minutes, 99 seconds.
Opening the oven door cancels KEEP WARM. Close the door and touch KEEP WARM, then START
if additional
KEEP WARM time is desired.
Foods cooked covered should be covered during KEEP WARM.
Pastry Items (pies, turnovers, etc.) should be uncovered
during KEEP WARM.
Complete
meals kept warm on a dinner plate should be covered during KEEPWARM.
The use of more than one complete
KEEP WARM (about 1 hour, 40 minutes) is not recommended.
The qualify of some foods will suffer with extended
fime.
To Automatically
l
l
l
l
Follow Another Cycle
While you are touching In cooklng Instructlons, touch KEEPWARM before touching
OR...
Affer the oven starls operatlng, touch KEEP WARM and then START.
START,
When the last cooking cycle is over, you will hear 4 beeps. The KEEP WARM Indicator
come on and the time of day will be displayed
while the oven continues to run.
KEEP WARM will follow QUICK DEFROST or COOK.
Light will
Using AUTO START
The microwave
oven can be set to start automatically
at a later time. Use AUTO STARTto
delay the start of cooking for up to 11hours, 59 minutes.
DO THIS...
THIS HAPPENS...
1. Make
sure the Clock Is set to
correct tlme of day. See page
6 If any change Is needed.
2. Put food in oven and close
the door. (See WARNING on
page 17.)
qI .
The AUTO START Indicator Light will
come on and the Display will show
a “0:’
.
3. Touch
AUTO START.
The Display
Lhi
will show the numbers
E;xiedlnth?orderyou
touched them. This example
shows
4. Touch Number Pads for
the tlme of day you
cooklng to start.
want
The COOK Indicator Light will come
on and the Display will show four 0’s.
5. Touch COOK.
6. Touch
The Display will show the numbers
you touched In the order you
touched them. This example shows
8 minutes. 30 seconds.
Number Pads for the
cooklng tlme you want.
continued
on next page
15
The COOK POWER Indicator Light will
come on and the Display will show
“P-HI:’ This shows the oven is preprogrammed
to cook at full (HIGH)
power.
The Display will show what you
touched. This example
shows you
touched Number Pad 7 for 70%
8. Touch
a Number Pad for
the Cook Power you want.
9. Touch
The AUTO START Indicator Light will
stay on. All other Indicator Lights will
go off. The Display will go back to
showing the time of day
START.
When the time of day reaches the time
you have set in AUTO START,the AUTO
START Indicator Light will go off, the
COOK and COOK POWER Indicator
Lights will come on, the cooking time
will show on the Display, and the oven
will start cooking.
The Display counts down the time to
show how much time is left.
For 2 of every 10 seconds the Display
will show the Cook Power you
selected. If you are using a Cook
Power other than HIGH.
When the cooking time ends, “End” will
show on the Display and 4 beeps will
sound. (You can stop the beeping
by
openlng the door or by touching CANCEL.) “End” will remain on the Display
and a reminder tone will sound every
60 seconds (to remind you that food
is left in the oven] until the door is
opened or CANCEL is touched. The Display will then show the time of day
NOTE: If ihe oven IlgM and fan come
on when you touch START,the Start
Time has not been set correctly.
Open and close door, reprogram
AUTO START time, then touch START.
16
Addtffonal
l
l
l
l
information
Additional
cycles can be set when using AUTO START.Follow instructions under the
proper heading (Defrosting, Using KEEP WARM] either before or after you touch START.
You can change times, or add cycles at any time during the AUTO START cycle.
I. Touch the COOK Cycle you wish to change or add.
2. Touch numbers for new time.
3. Touch COOK POWER, if desired.
4. Touch number for new Cook Power, or touch COOK POWER again if high is desired.
5. Touch START.
Opening the door does not cancel Auto Start operation.
Touch CANCEL to cancel Auto Start operation and erase all instructions.
To avold sickness and food waste when using AUTO START:
l Do not use foods that will spoil while waltlng
for cooklng to start, such as dlshes with mllk or
eggs, cream soups, and cooked meats or fish. Any food that has to wait for cooklng to statl
should be very cold or frozen before ll Is put In the oven. MOST UNFROZENFOODS SHOULD
NEVERSTAND MORE THAN TWO HOURS BEFORECOOKING STARTS.
l Do not use foods contalnlng
baklng powder or yeast when uslng AUTO START.They will not
rise properly.
l Do not allow
food to remain In oven for more than lwo hours after end of cooklng cycle.
Other Operating Hints
1. To double check sefflngs while the oven Is nmnlng:
l
Touch the Command
Pad for the setting you want to check. The instruction
programmed
for that pad will show on the Display for 5 seconds. The Display
to showing what the oven is doing.
returns
2. To stop the oven while lt Is runnlng:
Open the door. The oven will stop. To restart the oven, close the door and touch START.
Touch CANCEL. All instructions will be erased. You must touch in new instructions.
3. If you touch two instructions into the same cycle, the second set of instructlons will
cancel the flrst.
l
l
17
Timer
The microwave
oven controls can be used as a kitchen timer. Use COOK at “0” Cook Power
for timing up to 99 minutes, 99 seconds. NOTE: If all tones are removed (see page 6) the
Timer will still function, but the Timer slgnal will not sound.
DO THIS...
THIS HAPPENS...
The COOK Indicator Light will come
and the Display will show four 0’s.
on
1. Touch COOK.
The Display will show what numbers
you touched In the order you
touched them. This example shows
1 minute, 45 seconds.
2. Touch Number Pads for the
mlnutes and seconds you want.
The COOK POWER Indicator Light will
come on and the Display will show
“P-HI:’
3.
Touch COOK POWER.
The Display will show “P-01’ This tells
at
you that the oven will be operating
4. Touch “0” Number Pad.
5. Touch START.
NOTE: If you hear the fan
start when you touch
START, you have not set
the Cook Power properly.
Touch CANCEL and start
over.
18
The COOK Indicator Light will stay
on to show that the timer is running.
The COOK POWER Indicator Light
will be on.
The Display counts down to show you
how much time is left. During the countdown the oven will be dark and the
fan will be off. For 2 of every10 seconds
the Display will show “P-O” to tell you
that the oven is operating
at 0% power.
When the set time ends,“End” will show
on the Display and 4 beeps will sound.
(You can stop the beeping
by opening
the door or by touching CANCEL.)
“End” will remain on the Display and a
reminder tone will sound every 60
seconds until the door is opened or
CANCEL is touched. The Display will
then show the time of day.
Accessory Kits
l
l
A removable
Bi-Level Cooking Rack is available
as an accessory
kit. This rack lets
you cook or reheat foods together as a meal. Ask your Whirlpool dealer for details
on 4158310 - Bi-Level Cooking Rack Kit.
A smoke deflector kit for your model is available
from your Whirlpool parts dealer
to use when installlng this microwave
oven over cooking products with grill or
griddle. Ask your Whirlpool dealer for details on 4158440 - Smoke Deflector Kit.
Caring for your microwave oven
Cleaning the Microwave Oven
Wipe often with warm, sudsy
water and a sponge.
For stubborn soil, boil a cup
of water in the oven for 2 or 3
minutes. Steam will soften the soil.
Abrasive cleansers, steel wool pads, grffty
can damage the control panel and the lnferlor and exterior
oven surfaces. Use a sponge wlth a mlld detergent or a paper
towel wlth spray glass cleaner. Apply spray glass cleaner to
paper towel; do not spray directly on oven.
Be sure to keep the areas
clean where the door and
oven frame touch when
closed. Use only mild, nonabrasive soaps or detergents
applied
with a sponge
when cleaning
surfaces.
Rinse well.
Caring for the Filters
The grease
1. For your
and cleaned
often, at least once a month. NOTE: If your
Is Installed to recirculate air, the charcoal filter (Part No.
every 6-12 months. The charcoal filter can not be cleaned.
filters should be removed
mlcrowave hood comblnatlon
4358003) should be replaced
personal safety,
turn off the electric power
at the main power supply.
2. To remove grease tllters,
slide each
filter to the front.
Pull filters downward
and
push to the rear. The filter will
drop out.
3. Soak grease filters in hot
waterand
a mild deteraent.
Scrub and swish to remove
embedded
dirt and
grease. Rinse well and
shake to dry. Do not use
ammonla 6r place In a
dlshwasher. The alumlnum will darken.
continued
on next page
,n
I
I
4. To replace
grease filters,
5. To replace
slide filter In the frame slot on
the front of the openlng.
8.
filter:
Rush filter upward and push
to the rear to lock into place.
6. Tip the
Slide a new charcoal
fflter
Into place. The filter should
rest at the angle shown.
9. Slide the bottom of the
vent cover into place.
Rush the top until it snaps
into place. Replace the
mounting screws.
7. Llft the back of the
charcoal
filter. Slide the
filter straight out.
cover forward, then
Ilft out to remove.
10.
20
charcoal
remove the vent cover
mounting screws.
Turn the power back on
at the main power supply
11. DO not
operate the hood
without the filters In place.
-.
Replacing the Cooktop and Oven Lights
Use only candelabra
could result In tire.
Fire Hazard
base bulbs, 30-watl maxlmum. Failure to do so
The Cooktop light:
2. Remove the bulb cover
mounting screws.
Electrical Shock Hazard
Turn off power at maln
power supply before CBplaclng the IlgM bulb.
Failure to do so could result In electrical shock.
3. We recommend
replaclng
bulb(s) with candelabrabase 30-watt bulb(s) available from your authorized
WhirlpoolSM service company (Part No. 4158432).
The Oven light:
1
2. Remove the vent cover
mounting
Electrical Shock Hazard
Turn off power at maln
power supply before replaclng the IlgM bulb.
Failure to do so could result In electrical shock.
4. Remove bulb holder
mounting screw.
screws.
3. Tii;;Ft;;;E;vard,
then
6. We
recommend
replacing
bulb with candelabra-base
30-watt bulb available
from
your authorized
Whirlpool”
service company
(Part No.
4158432).
7. Replace the bulb holder
and mounting screw.
5. Lift up the bulb holder.
8. Slide the top of the vent
cover into place. Push the
bottom until it snaps into
place. Replace the mounting screws. Turn the power
back on at main power
SUPPlY.
21
Operating safety precautions
To reduce the rlsk of tire, electrlcal shock, Injury to
persons, or damage when uslng the mlcrowave oven,
follow the precautions on pages 22-24.
v
NEVER COOK OR
REHEAT A WHOLE EGG.
Steam build-up in whole
eggs may cause them to
burst and burn you, and
possibly damage
the oven.
Slice hard boiled eggs before heating. In rare instances, poached
eggs have
been known to explode.
Cover poached
eggs and
allow a standing time of one
minute before cutting into
them.
USE HOT PADS. Microwave
energy does not heat containers, but the hot food does.
Stir before heating
For best results stir any
llquld several ttmes before
heating or reheating.
Liquids heated in certain
containers (especially
cylindrical-shaped
containers)
may become overheated.
The liquid may splash out wlth
a loud noise during or after
heating or when adding
ingredients (coffee, etc.)
resulting in harm to the oven
and possible personal injury
DO NOT heat, store or use
flammable
materials in or
near the oven. Fumes can
create a fire hazard or
explosion.
NEVER lean on the door or
allow a child to swing on It
when the door Is open. Injury
could result.
DO NOT do canning
of foods
in the oven. Closed glass jars
may explode
resulting in
damage
to the oven or possible personal injury.
DO NOT use the oven to sterilize objects (baby bottles, etc.).
It is difficult to maintain the high
temperature
required for safe
sterilization.
DO NOT deep fry in the oven.
Microwavable
utensils are not
suitable and it is difficult to
maintain appropriate
deep
frying temperatures.
22
-.
DO NOT use the oven for storage. Do not leave paper products, books or cooking utensils
in the oven when not in use. Fire
may result if someone accidentally starts the oven.
Starting a microwave
oven
when it is empty is not recommended. Product life may be
shortened. If you practice
programming
the oven, put a
container of water in the oven.
DO NOT let food or container
touch the top or sides of the
oven.
It is normal for the inside of the
oven door to look wavy after
the oven has been running for
a while.
If a fire should start in the
oven cavity:
l
l
l
do not open oven door
touch CANCEL to turn
oven off
turn off the power at the
maln power supply
NEVERremove the mode
mixer cover. The plastic cover
protects the microwave
mixer
blade from soil or bending.
DO NOT OVERCOOK
POTATOES.Fire could result. At
the end of the recommended
cooking time potatoes should
be slightly firm because they
will continue cooking during
standing time. After microwaving, wrap potatoes in foil and
set aside for 5 minutes. They will
finish cooking while standing.
DO NOT pop popcorn,
except in a microwave
approved
popcorn popper
or commercial
package
designed
especially
for mlcrowave ovens. Follow dlrectlons
supplied wlth the product.
NEVERtry to pop popcorn
in
a paper bag not designed for
microwave
use. Overcooking
may result in smoke and fire.
DO NOT repop unpopped
kernels. DO NOT reuse
popcorn
DO NOT use newspaper or
other printed paper in the oven,
Fire could result.
DO NOT dry flowers, fruit,
herbs, wood, paper, gourds or
clothes in the oven. Fire couid
result.
bags.
DO NOT try to melt paraffin
wax in the oven. Paraffin wax
will not melt in a microwave
oven because it allows microwaves to pass through it.
23
General information
etc.) absorb microwave
energy,
becoming
too hot to handle
and slowing cooking times.
1 FUUEjOX /
If Your electric power line
or outlet voltage is less
than normal 120 volts,
cooklng times may be
longer.
To test a dish for safe use, put it
into the oven with a cup of
water beside tt. Cook on HIGH
Cook Power for one minute. If
the dlsh gets hot and water
stays cool, do not use it. Some
dishes (melamine,
Centura,@
Remove wire twist-tfes from
paper or plastic bags
before placlng bag In oven.
Cooklng In metal contalners not deslgned for mlcrowave use can damage
the oven, as can containers
wllh hldden metal (twlstties, toll llnlng, staples,
metallic glaze or Mm).
If you need service or assistance,
we suggest you follow these steps:
1. Before calling for assistance...
Performance
problems often result from llttle
thlngs You can flnd and flx Yourself wlthout tools
of any kind.
If nothlng operates:
l
l
Is the oven correctly
wlred Into a live circuit
wltti the proper voltage? See the Installation
Instructtons.
. Have You checked
Your home’s main fuses or
clrcult breaker box?
l Have
You checked
the electric company
for
a power fallure?
l
If the mlcrowove
If the Display shows a time counttng down but
the oven Is not oooklng:
oven will not run:
l
Is the oven door closed completely?
Have You set the controls as a kitchen timer?
Is the oven in standing time between QUICK
DEFROST and COOK or AUTO START?
If you do not hear a programmlng
(page 61:
l
l
tone
Is the command
correct?
Has the tone been cancelled?
If the fan seems to be runnlng
usual:
slower than
Is the oven being used as a tlmer?
l Is the door
firmly closed and latched?
. Dld You touch START?
l Dld You follow
the dlrectlons exactly?
l
If the mlcrowave
long:
If there has been a power Interruptlon, the
Display will show 88:88. Reset the clock,
l
l
l
l
oooklng
times seem too
Is the electric supply to Your home or wall outlet low or lower than normal? Your electric
company
can tell you If the line voltage Is low.
Your electrlclan
or service technician
can tell
you If the outlet voltage Is low.
Is the Cook Power at the recommended
setting?
Are You allowlng for more tlme when cooking
more food at one tlme?
Has the oven been stored in a cold area? The
fan will run slower until the oven warms up to
normal room temperature.
(page
61.
-.
2.
If you need
assistance*...
4.
Call Whlrlpool Consumer Asslstance Center telephone number. Dlal free from anywhere In the U.S.:
l-800-25313Ol
and talk with one of our trained consultants. The
consultant can Instruct you In how to obtaln satisfactory operatlon
from Your appliance
or, if
service Is necessary,
recommend
a quallfled
service company
in your area.
If You prefer, write to:
Mr. William Clark
Consumer Assistance Representative
Whirlpool Corporatlon
2000 M-63
Benton Harbor, Ml 49022
Please include
a daytime
phone number in
Your correspondence.
3.
If you are not satisfied with
hok the problem was solved%.
Contact the Major Appliance
Consumer Action Panel (MACAP). MACAP Is a group of lnde
pendent
consumer experts that voices consumer views at the hlghest levels of the ma)or
appliance
industry.
l Contact
MACAP only when the dealer, authorized servicer or Whlrlpool have falled to re
solve Your problem.
Major Appliance
Consumer Actton Panel
20 North Wacker Drlve
Chicago,
IL 60606
l MACAP
will in turn Inform us of Your action.
*When requestlng
assistance, please provlde:
model number, serial number, date of purchase, and a complete
description
of the
problem. This information is needed In order to
better respond to Your request.
l
If you need service*...
panies. Whlrlpool
service technicians
are tralned
to fulfill the
product warrantv
and provide after-warranty
service, anywhere
in the Unlted States. To locate
the authorized
Whirlpool service company
In
Your area, call our Consumer Assistance Center
telephone
number (see Step 2) or look in Your
telephone
directory Yellow Pages under:
APPLIANCES
- HOUSEHOLD
MAJOR - SERVICE A REPlSR
ELECTRICAL
~PPUIIICES
MAJOR - REPAIRING
A PARTS
OR
WASHING MACHINES.
DRIERS
L IRONERS - SERWClWO
WHIRLPOOL APPLIANCES
AUTHORIZED WHIRLPOOL SERVICE
SERVICE
YYZ SERVICE CO
123 MAPLE
COMPANIES
999-998s
NOTE:
I. Short power-supply
cord is provlded to reduce the risks resultlng from becoming
entangled
In
or tripping over a longer cord.
2. Longer cord sets or extension cords are available
and may be used if care is exercised
In their
use.
3. If a long cord or extension cord is used, (a) the marked electrical
rating of the cord set or
extension cord should be at least as great as the electrical
rating of the appliance,
(b) the
extension cord must be a grounding-type
J-wire cord, and (c) the longer cord should be
arranged
so that it will not drape over the countertop
or tabletop where it can be pulled on by
children or tripped over accidentally.
25
Notes
26
Notes
27
I
WHIRLPOOL”
MICROWAW OVEN/RANGE PRODUCT
WARRANTY
MW007
LENGTH OF WARRANTY
WHIRLPOOL
FULL ONE-YEAR WARRANTY
From Date of Purchase
FSP@replacement parts and repair labor to correct defects
in materials or workmanship. Service must be provlded by an
authorized WhirlpoolSM service company.
LIMITED FOUR-YEAR WARRANYY
FSPreplacement magnetron
in materials or workmanship.
Second Through Fifth Year
From Date of Purchase
WHIRLPOOL
WILL PAY FOR
tube on microwave
I
I
ovens If defective
WILL NOT PAY FOR
A. Servlce calls to:
1. Correct the installation of the microwave oven.
2. Instruct You how to use the microwave oven.
3. Replace house fuses or correct house wiring.
4. Replace owner accessible Ilght bulbs.
B. Repairs when microwave oven Is used In other than normal, single-family household use.
C. Pickup and delivery This product is designed to be repaired In the home.
D. Damage to microwave oven caused by accident, misuse, fire, flood, acts of God or use of
products not approved by Whlrlpool.
E. Any labor costs during limited warranty
F. Repalrs to parts or systems caused by unauthorized modifications made to the appliance.
WHIRLPOOLCORPORATION SHALL NOT BELIABLEFOR INCIDENTAL OR CONSEQUENTIAL DAMAGES. Some states
do not allow the exclusion or Ilmltation of incidental or consequentlal damages, so this Ilmitation or exclusion
may not apply to You. Thls warrantY gives You specific legal rights, and You may also have other rights which
vary from state to state.
Outside the United States, a different warranty may also apply. For details, please contact Your authorized
Whirlpool dlstributor or military exchange.
If You need service. first see the “Service and Assistance” section of this book. After checking “Service and
Assistance:’ addltional help can be found by calling our Consumer Assistance Center telephone number,
1-800-253-1301,
from anywhere in the U.S.
@ Registered
Trademark/SM
Service
Mark of Whirlpool
Corporation
Pari No. 4076056Al4358290
01992 Whirlpool Corporation
lakers.
Dishwashers.
Buill-In
Ovens an3 Suriace Units. Ranges. Microwave
Prlnted
Ovens. hash Compactors.
Room Air Conditioners.
Oehumidilien.
Aulomalic
Washers. Clolhes Dryen.
In Korea
Freezers
Relrlgeral~lr-FM