1
RODGERS
INSTRUMENT
CORPORATION
·owner's Manual
RODGERSINSTRUMENTSLLC
A
PATENTS
WARNING:
ATIENTION:
G.B. 1312161
F.R.G. 22 02 658
CANADIAN 951550
(1974)
TO REDUCE THE RISK OF
FIRE OR ELECTRIC
SHOCK, DO NOT EXPOSE
THIS APPLIANCE TO RAIN
OR MOISTURE.
RISQUE DE CHOC ELECTRIQUE NE PAS OUVRIR
~''''''""''''''''"'''''"'''''''''''''"''''"''"'''"''VI.'''"N>.~'\""''''''""''"'''~"'""''"""''''"'''''''''''''"'l
I
~
CAUTION· TO REDUCE THE RISK OF
•
.
ELECTRICAL SHOCK.
~
DO NOT REMOVE COVER OR BACK.
I
I NO USER-SERVICEABLE PARTS INSIDE.
I The
lightning flash with arrowhead symbol, within
an equilateral triangle, is intended to alert the user
~
~ to the presence of uninsulated "dangerous voltage"
~ within the product's enclosure that may be of
sufficient magnitude to constitute a risk of electrical
~ shock to persons.
I
I
The exclamation point within the equilateral triangle
is intended to alert the user to the presence of
REFER SERVICING TO QUALIFIED
1important operating and maintenance (servicing)
~~ ~r~':~ons in the literature accompanying the
~
~
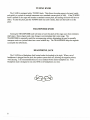
NOTICE TO USERS
Information in this document is subject to change without notice. No
part of this manual may be translated into any language, stored in a
retrieval system, reproduced or transmitted in· any form or by any
means, electronic or mechanical, including photocopying and recording,
for any purpose without the express written permission of Rodgers
Instrument Corporation.
ROD_RODGERS INSTRUMENTS LLC
ION
1300 N.E. 25th Avenue
Hillsboro, Oregon 97124
Tel: (503) 648-4181 • Fax :(503) 681-0444
RODGERS CANADA
5480 Parkwood Way
Richmond, B.C. V6V 2M4
(604) 270-6332
©Copyright 1992, Rodgers Instrument Corporation, a member of the Roland Group. All rights reserved. Printed In the United States of America.
Rodgers® Classic Organsru , Rodgers® Classic Keyboardsru and Rodgers® DVM'w (Digital Voice Module) are trademarks of
Rodgers Instrument Corporation.
- - - - - - - - - - - --·-·--·---------
---
.
SAFETY INSTRUCTIONS
INSTRUCTIONS PERTAINING TO A RISK OF FIRE,
ELECTRIC SHOCK OR INJURY TO PERSONS
IMPORTANT SAFETY INSTRUCTIONS
WARNING: When using this instrument, always follow basic precautions, including the following:
1.
2.
Read all the instructions before using, adjusting or
repairing this instrument.
To reduce the risk of injury, supervise children closely
when they are around the instrument.
10. Unplug the power cord of the instrument from the
power source when left unattended for a long period of
time.
11. Do not walk on or place objects on top of the power
cord.
3.
Use this instrument only in the manner recommended
by Rodgers Instrument Corporation.
12. Do not pull the cord to unplug. Hold the plug when
unplugging from the power source.
4.
5.
Do not use this instrument near water, for example,
near a swimming pool or a damp/wet room .
Use of this instrument, either alone or in combination
with an amplifier and headphones or speakers, may be
capable of producing sound levels that could cause
permanent hearing loss. DO NOT operate for a long
period of time at a high volume level or at a level that is
uncomfortable. If you experience any hearing loss or
ringing in the ears, you should consult an audiologist.
6.
Locate the instrument so its position does not interfere
with its proper ventilation.
7.
Locate the instrument away from heat sources such as
radiators, heat registers or other products that radiate
heat directly onto the instrument.
8.
Protect the instrument from dust as much as possible.
9.
Connect the instrument to a power source only of the
type described in the operating instructions or as
marked on the instrument. Do NOT attempt to defeat
the grounding connection of the three-prong
attachment plug. This is a safety feature. If you are
unable to insert the plug into the outlet, contact an
electrician to replace your obsolete outlet. Do NOT
defeat the safety purpose of the plug.
13. When setting up with other instruments or peripherals,
follow the procedures in accordance with Rodgers'
owner's manual.
14. Take care that objects do not fall or liquids spill into the
instrument.
15. Service the instrument with qualified service personnel
when:
a.
The power cord or plug has been damaged.
b.
Objects have fallen or liquid has spilled into the
instrument.
c.
The instrument has been exposed to rain or other
weather damage.
d.
The instrument does not appear to operate
normally or exhibits a marked change in
performance.
e.
The instrument has been dropped or the
enclosure has been damaged.
16. Do not attempt to service the instrument beyond that
described in the owner's manual. Refer all other
servicing to qualified technical service personnel.
WARNING: THIS INSTRUMENT MUST BE EARTII GROUNDED.
You must GROUND instruments equipped with a TYPE AC, 3 WIRE GROUND PLUG.
SAVE THESE INSTRUCTIONS
1
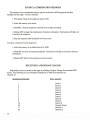
ASSEMBLY INSTRUCTIONS
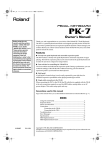
Step 1.
Step 2.
Place top on base aligning keyhole (A)
with pin (B). Lower into position until you
feel it drop into place.
With top (key deck) and base in position with pin and
and keyhole as shown (C), slide top forward so
brackets at front of base are aligned with the holes in
the bottom of the key deck (D).
""\.
~
~
?--~~
...........
~
~
'<\
Keyhole (A)
=--;:;?
:• ,...
__/y
::>:::>
'
~
_<
-
Pin (B)
~II~.
Step 3.
Screw Thumbscrew (E) through bracket
into deck (0).
Step 4.
To make electrical connections:
1. Remove grille cloth (which is attached with valera).
2. Plug in connectors as shown in illustration.
3.
NOTE:
Dis-assembly is the
reverse of assembly.
ii
Replace grille cloth.
FCC
NOTICE
Radio and Television Interference
The Rodgers Classic Keyboard uses and generates small amounts of radiofrequency (RF) energy. The instrument complies with the limits set for Class B
digital devices. FCC Rules, Part 15, Subpart B defme the limits for radio and
television interference in a residential installation.
Follow the installation and the use instructions in this manual, or the instrument
could potentially cause interference with some radio or television reception. In
the unlikely event this occurs, we encourage the user to try the following
corrective measures:
./
Turn the instrument OFF to see if it is the actual source of the
interference.
Disconnect the peripheral devices and their input/ output
cables one at a time. If the interference stops, it is caused by
the peripheral device or its 1/0 cable.
Try coiling and uncoiling the instrument's power cord in
different ways.
Connect the instrument's power cord to a power outlet on a
different circuit.
Move the instrument farther away from the radio or television
receiver.
Turn the radio or television receiver until the interference
stops.
Connect the radio or television receiver to a different power
circuit .
./
Reorient or move the receiver antenna farther away from the
instrument. Consider installing a rooftop antenna with coaxial
cable lead -in between the antenna and receiver.
Consult the nearest Rodgers Classic Keyboards dealer for more
information if the above corrective measures don't remove the
interference.
lll
Table of Contents
CAUTIONS and Notice to Users
Safety Instructions
Assembly Instructions
FCC Notice
Table of Contents
inside cover
i
ii
lll
iv
Overview of the C-445E
page 1
Brief Tour
Turn On!furn Off
Divisions
Selecting Or Retiring A Stop
Combination Action
Couplers
Tremulants
Expression Pedals
Great to Swell Expression Coupler
The Bass Coupler
The Melody Coupler
Tuning Knob
Transposer Knob
Headphone Jack
page
page
page
page
page
page
page
page
page
page
page
page
page
page
2
2
2
2
3
4
4
5
5
6
7
8
8
8
MIDI (Musical Instrument Digital Interface)
Sending a Program Change
Velocity Information
Channel Reassignment
Octave Transpose
Enabling/Disabling MIDI Master Channels
Saving a Combination Memory
Receiving a Program Change
Local On/Off
Returning to Default Settings
Common MIDI Connections
page
page
page
page
page
page
page
page
page
page
page
9
9
9
10
10
10
12
12
13
13
14
Specifications
page 15
Suggested Registrations
page 16
Care and Maintenance
page 29
MIDI Implementation
page 30
iv
•
I OVERVIEW OF THE C-445 E I
Congratulations on your purchase of a Rodgers Classic Keyboards® C-445E. The C-445E
is a high quality church organ in both sound and construction, designed to provide years of
reliable service.
The C-445E is a two-manual classical organ that incorporates an eclectic specification and
authentic pipe organ sounds. In addition to a built-in two-channel stereo audio system, the
C-445E has provisions for additional amplification and speakers.
The C-445E utilizes lighted tilt tab stop controls. Traditional couplers are included, as well
as an adjustable combination action (pistons) with two memories.
The Rodgers C-445E is completely voiced and tuned for optimum tonal authenticity. A
Rodgers factory-trained technician can provide additional voicing and finishing as required.
These instruments offer full MIDI (Musical Instrument Digital Interface) capability,
allowing the organist to control other MIDI devices (keyboards, sequencers, rhythm units,
sound modules, etc.). MIDI allows the performer full recording and playback capabilities.
Thank you for choosing a Rodgers Classic Keyboards® C-445E. Through the most
advanced technology available, Rodgers Instrument Corporation delivers proven reliability
and tradition of musical excellence and innovation marking our position as The Sound Choice!
1
To get started, here is a brief tour of the basic operations of Rodgers C-445E:
TURN ON/TURN OFF
To turn the organ on, press the power rocker switch at the top (1 ). In approximately 5 seconds, the
the SET piston will light, indicating the power is on and the organ is ready to play. To turn the power
off, press the power rocker switch at the bottom (0). The power to the organ is off.
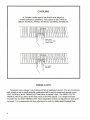
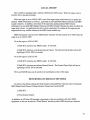
DIVISIONS
The following groupings of stops (tilt tabs) affect the indicated manuals (keyboards)
or pedalboard:
COUPLERS 0
SWELL-------;===]__--.,
PEDAL-----,
_j_
\
I kffl·"fi+IHJ
l
\
I
""':FRAI.S
It----
•••••
'< ,.,,,,,,I'S
. • • • • 1111 ...... ' ' .......
~~
J
~
GT. & PEDAL EXPRESS, r L L EXPRESSION
~~-fl!
\~-----'
SELECTING OR RETIRING A STOP
Press the bottom of the desired tilt tab to tum it on. It will light, indicating it is on. Press the top of
the tilt tab to turn off the stop. The light will go off, indicating the stop is off.
2
COMBINATION ACTION
(Pistons)
The C-445E features a combination action easily changed by the organist from the console. The
organist can pre-select favorite registrations and make rapid changes in tone color using this
advanced system. The pistons will light when pressed.
The C-445E combination action includes ten general pistons, a SET piston, a GENERAL CANCEL
piston, a dual memory combination action (M2) and ten toe studs which duplicate the ten general
pistons.
GENERAL PISTONS 1-5
GENERAL PISTONS!Toe Studs)
~ 1-5
e.~e~~~~
~HOW
GENERAL PISTONS 6-10
Ill
GENERAL PISTONS !Toe Studsl
\
111
(1{1\1\1~
6-10
-·
TO SET THE PISTONS:
1. Select the stops desired.
2. Push the SET piston and hold.
3. While holding the SET piston, push the desired piston and then release both
pistons simultaneously.
(Note: On the C-445E, selecting M2 before steps 1-3 will activate a second
'memory, thereby doubling the number of combinations available.)
3
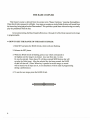
COUPLERS
~
Couplers enable stops of one division to be played on
another keyboard or pedalboard. The couplers on the C-445E are
GREAT TO PEDAL, SWELL TO PEDAL and SWELL TO GREAT.
Notes heard
with Swell To Great
coupler added
TREMULANTS
Tremulants create changes in pitch (sharp and flat) or amplitude (volume). The use of tremulants
adds warmth to solo or small ensemble combinations and is useful in gospel and romantic music.
The C-445E has a MAIN TREMULANT that affects all manual voices. The SWELL FLUTE
TREMULANT FULL affects all the flute voices on the Swell manual. It is a deeper and faster
tremulant than the MAIN TREMULANT. Each independent tremulant is adjustable for both speed
and depth. It is recommended that these adjustments be made by Authorized Personnel Only.
4
EXPRESSION PEDALS
(C-445E)
The pedal on the right controls the overall volume of the Swell division. The pedal on the left
controls the overall volume of the Great and Pedal divisions. These pedals are used to give variety
of expression to the music played. Pressing the pedal forward increases the volume; drawing back
decreases the volume.
GREAT TO SWELL EXPRESSION COUPLER
The Great to Swell Expression Coupler allows the Great and Swell divisions to be expressed by
using the expression pedal on the right.
5
THE BASS COUPLER
This feature's name is derived from the ancient term "Basso Continuo," meaning thoroughbass.
When this tilt tab is pressed, it will light. Any stops or couplers on in the Pedal division will sound from
the lowest key being played on the Great manual. This provides a pedal bass without having to actually
play the pedalboard with the feet.
In its normal setting, the Bass Coupler affects keys 1 through 24 of the Great manual, but its range
is programmable.
~HOW
TO SET THE RANGE OF THE BASS COUPLER:
1. Hold SET and press the BASS tilt tab, which will start flashing.
2. Release the SET piston.
3. While the BASS tilt tab is flashing, press a key which corresponds to
the highest note the range is to extend. Any note from key 1 to key
61 may be selected. Keys above 32 will play external MIDI devices but will
not play the Pedal stops. After the selected key has been pressed, the BASS
tilt tab will shut off. (Note: When key is pressed to set the range, no sound
will be heard even if stops are on, so no disturbance will be made if programming
during a performance.)
4. To use the new range, press the BASS tilt tab.
c:
6
THE MELODY COUPLER
When the MELODY tilt tab is pressed, it will light. Any stop or coupler of the Swell division will
sound from the highest key being played on the Great manual. This allows a solo melody and an
accompaniment to be played from the same manual.
In its normal setting, the Melody Coupler affects keys 25 through 61 on the Great manual, but its
range is programmable.
~HOW
TO SET THE RANGE OF THE MELODY COUPLER:
1. Hold SET and press the MELODY tilt tab, which starts flashing.
2. Release the SET piston.
3. While the MELODY tilt tab is flashing, press a key which corresponds to
the lowest note the range is to extend. Any note from key 1 to key 61 may be
selected. After the selected key has been pressed, the MELODY tilt tab will
stop flashing.
c:
:~
7
TUNING KNOB
The C-445E is equipped with a TUNING knob. This allows the entire organ to be tuned easily
and quickly to a piano or musical instrument not at standard concert pitch (A 440). If the TUNING
knob is pushed in, the organ will remain at standard concert pitch, and turning the knob will have no
effect. To alter the pitch, pull the TUNING knob out until it clicks, then turn the knob to set the
pitch.
TRANSPOSER KNOB
Turning the TRANS POSER knob will raise or lower the pitch of the organ up to four semitones
(half steps). Many singers need a key change to accommodate their voice range. The
TRANSPOSER is especially useful for accompanying soloists, eliminating the need to mentally
transpose music on a printed sheet into a more suitable key. The TRANS POSER helps the organist
accomplish this effortlessly.
HEADPHONE JACK
The C-445E has a Headphone Jack located under the keydesk to the right. When a set of
headphones is plugged into the jack, the speaker system shuts off, allowing the organist privacy
when playing. It is recommended that you use a standard 8 ohm stereo headphone set. Your
Headphone Jack is designed to run only ONE set of headphones at a time.
8
MIDI (Musical Instrument Digital Interface)
The Rodgers C-445E possesses some of the most advanced MIDI capabilities in the world.
MIDI voices are activated via three MIDI coupler tilt tabs. The MIDI channels these coupler tilt
tabs control are:
Great Channel
1*
MIDI ON GREAT
Swell Channel
2
MIDI ON SWELL
Pedal Channel
3
MIDI ON PEDAL
* May be changed to any of the sixteen MIDI channels.
To change this channel, see "Channel Reassignment"
SENDING A PROGRAM CHANGE
1. Hold SET and press the bottom of a MIDI coupler tilt tab. The tilt tab will flash,
indicating the MIDI Set Mode is active. Release SET and the MIDI coupler.
2. Choose the desired Program Change (sound), and press the corresponding key (see the
Program Change chart).
If SET is held while pressing a key to send a Program Change, the Program Change will be sent,
but the MIDI Set Mode will be "locked on." Once this happens, further Program Changes may
be sent by holding SET and pressing a corresponding key. This allows the organist to try several
sound selections until the appropriate one is found. The MIDI Set Mode will remain active until
the flashing MIDI coupler or General Cancel is pressed.
Once a Program Change has been sent on a MIDI coupler, that same Program Change will be
sent each time the tilt tab is activated. The Program Change will also be saved on any combination
piston including that MIDI coupler.
VELOCITY INFORMATION
As a default, the Great and Swell MIDI channels send detected velocity messages. The harder a
key is played, the louder the MIDI sound will be. The Pedal always sends a fixed velocity.
It is possible to have the Great or Swell MIDI coupler send a fixed velocity message. To change
the Great or Swell MIDI coupler from detected velocity to fixed velocity:
1. Hold SET and press the MIDI coupler to be changed. The coupler will flash. Release
SET and the MIDI coupler.
2. Press the sustain switch (located to the left of the Great expression pedal) to the left. The
coupler will stop flashing.
9
To change the coupler back to detected velocity, repeat steps 1 and 2 under "Velocity
Information." The velocity status of the Great and Swell MIDI couplers will be stored in the
combination action of the organ.
CHANNEL REASSIGNMENT
All MIDI couplers transmit on fixed channels except MIDI ON GREAT. To reset the transmit
channel for this coupler only:
1. Hold SET and press the bottom of MIDI ON GT. It will flash. Release SET and MIDI
ONGT.
2. Hold piston 1, and press any key on the Great manual between low C and tenor D# to
signify the desired MIDI channel. Low Cis Channell, low C# is Channel2, etc. The
MIDI ON GT coupler will stop flashing.
The new Great MIDI Channel assignment will be stored in the combination action of the organ.
OCTAVE TRANSPOSE
Normally, all MIDI couplers play at standard pitch (middle C =note 60). The Octave Transpose
parameter may be reset to cause any MIDI coupler to play one octave above or below standard pitch.
1. Hold SET and press the bottom of the desired MIDI coupler. It will flash. Release SET
and the MIDI coupler.
2. To transpose up one octave, turn the TRANS POSER knob to + 1, +2, +3 or +4.
3. To transpose down one octave, turn the TRANSPOSER knob to -1, -2, -3 or -4.
4. Exit this mode by pressing General Cancel.
5. Return the TRANSPOSER to the desired setting.
The Octave Transpose status of each MIDI coupler will be stored in the combination action of
the organ.
ENABLING/DISABLING MIDI MASTER CHANNELS
The following MIDI channels are used to control the organ through MIDI:
Great Master Channel
Swell Master Channel
Pedal Master Channel
12
13
14
The organ sends and receives MIDI information on these channels unless they are disabled.
10
It is possible to stop the transmission or reception of MIDI information on these Master
Channels.
To disable reception of information on a MIDI Master Channel:
1. Hold SET and press the bottom of the MIDI coupler corresponding to the channel to be
disabled. It will flash. Release SET and the MIDI coupler.
2. While the coupler is flashing, press the top of the MIDI coupler (as if turning off). It will
stop flashing.
To enable reception of information on a MIDI Master Channel:
1. Hold SET and press the bottom of the MIDI coupler corresponding to the channel to be
enabled. It will flash. Release SET and the MIDI coupler.
2. While the coupler is flashing, press the bottom of the MIDI coupler (as if turning on). It
will stop flashing.
When transmission on all MIDI Master Channels is inhibited, then no stop change (MIDI System
Exclusive stop change) is transmitted.
To disable transmission of information on a MIDI Master Channel:
1. Hold SET and press the MIDI coupler corresponding to the MIDI Master Channel to
disable. It will flash. Release the MIDI coupler.
2. While the coupler is flashing, hold SET and press the top of the MIDI coupler (as if
turning off). It will stop flashing.
To enable transmission of information on a MIDI Master Channel:
1. Hold SET and press the bottom of the MIDI coupler corresponding to the MIDI Master
Channel to enable. It will flash. Release the MIDI coupler.
2. While the coupler is flashing, hold SET and press the bottom of the MIDI coupler (as if
turning on). It will stop flashing.
The send and receive status of all MIDI Master Channels will be saved in the combination action
of the C-445E.
li
SAVING A COMBINATION MEMORY
The contents of any combination memory may be saved into a MIDI sequencer and later
reloaded into the organ. To save a memory:
1. The Master Clock on the sequencer must be ON.
2. Select the memory to be saved.
3. Hold SET. Start the sequencer, and wait for it to begin recording.
4. Release SET to begin the transmission of memory information. Each piston will light as it
is saved to the sequencer.
5. Stop the sequencer after all pistons have been saved.
To restore a memory from the sequencer:
1. Select the memory to be loaded into the C-445E.
2. Hold SET and start the sequencer playback. Each piston will light as it receives memory
information.
3. Release SET after the final memory as been received.
RECEIVING A PROGRAM CHANGE
Registrations may be selected on the organ by sending a Program Change from another MIDI
device. The following is a list of Program Changes the C-445E will respond to on
Channel12:
PROGRAM CHANGE
1
2
3
4
5
6
7
8
9
10
20
31
32
12
WILL SELECT
piston 1
piston 2
piston 3
piston 4
piston 5
piston 6
piston 7
piston 8
piston 9
piston 10
General Cancel
Memory 1
Memory2
LOCAL ON/OFF
The C-445E are equipped with a LOCAL ON/LOCAL OFF control. When the organ is set to
LOCAL ON, it operates normally.
When the organ is set to LOCAL OFF, none of the organ stops sound when keys or pedals are
pressed. MIDI information is, however, generated on activated MIDI Master Channels and MIDI
coupler channels. In addition, movement of the expression pedal generates MIDI volume
information on activated MIDI Master Channels and MIDI Coupler Channels but does not affect the
organ stop volume. An application for this is when sequencing, the volume of the organ may be
sequenced one way, and the volume of the MIDI voices another way.
MIDI information received on the MIDI Master Channels will still control the C-445E when the
organ is set to LOCAL OFF.
To set the organ to LOCAL OFF:
1. Hold SET, and press any MIDI coupler. It will flash.
2. Hold SET, and press and release General Cancel. The General Cancel light will go off,
signifying LOCAL OFF is activated.
To set the organ to LOCAL ON:
1. Hold SET, and press any MIDI coupler. It will flash.
2. Hold SET, and press and release General Cancel. The General Cancel light will go on,
signifying LOCAL ON is activated.
The Local On/Off status can be saved in the combination action of the organ.
RETURNING TO DEFAULT SETTINGS
To return to the default settings for Send Channel, Detected/Fixed Velocity, Octave Transpose,
MIDI Master Send Channel, Primary Receive Channel and Local On/Off:
1. Hold SET.
2. Press General Cancel.
In addition, an All Notes Off message is generated to clear any problems with other MIDI
equipment, so this can be used as a "Panic Button" should any other MIDI devices get confused.
13
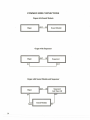
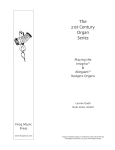
COMMON MIDI CONNECTIONS
Organ with Sound Module
~~~
==.~IIOUT
=Organ
mil
SoundModule
II
Organ with Sequencer
OUT
Organ
I
I
rn]
Sequencer
I
lOUT
INI
Organ with Sound Module and Sequencer
I
Organ
OUT
IN
I
Sequencer
SoftThru ON
OUT
IN
m]
14
Sound Module
lm
II
C-445E SPECIFICATION
I
GREAT ORGAN
PEDAL ORGAN
Lieblich Bourdon 16'
Principal 8'
Rohrflote 8'
Flauto Dolce 8'
Flute Celeste 8'
Octave 4'
Spitzflote 4'
Super Octave 2'
Quintflote 1 1/3'
Mixture N
Cromorne 8'
Swell to Great
SWELL ORGAN
Bourdon 8'
Viola 8'
Viola Celeste 8'
Prestant 4'
Koppelflote 4'
Nazard 2 2/3'
Blockflote 2'
Tierce 1 3/5'
Plein Jeu IV
Contre Basson 16'
Trompette 8'
Hautbois 8'
Principal 16'
Subbass 16'
Octave 8'
Gedackt 8'
Choral Bass 4'
Fagott 16'
Great to Pedal
Swell to Pedal
GENERAL
Tremulant (Great and Swell)
Swell Flute Tremulant Full
Bass Coupler
Melody Coupler
Great to Swell Expression
MIDI on Pedal
MIDI on Swell
MIDI on Great
ACCESSORIES
Transposer Knob
Tuning Knob
Headphone Jack
Headphone Volume Level
Reverb Level
External Audio In/External Audio Out
Expression Pedal (Great/Pedal)
Expression Pedal (Swell)
10 General Pistons (dual memory)
Memory 2 Piston (lighted)
10 General Toe Studs
(duplicate of thumb pistons)
Set
General Cancel
15
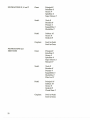
SUGGESTED
REGISTRATIONS
The following pages of registrations are guidelines for selecting appropriate stops to match broad
suggestions given in most printed organ literature. There will be variances of registration, depending
upon the music, acoustics of the room, and the spirit of the performance.
GREAT ORGAN
Given Suggestions
Appropriate registrations
FLUTE
Rohrflote S'
SOFfFLUTE
Flute CelesteS'
FOUNDATIONS p
Rohrflote S'
Flute Dolce S'
Spitzflote 4'
FOUNDATIONS mf
Principal S'
Spitzflote 4'
FOUNDATIONS f
PrincipalS'
Rohrflote S'
Octave 4'
Spitzflote 4'
FOUNDATIONS ff
Principal S'
Rohrflote S'
Octave 4'
Spitzflote 4'
Super Octave 2'
Mixture IV
FULL GREAT
Lieblich Bourdon 16'
PrincipalS'
Rohrflote S'
Octave 4'
Super Octave 2'
Quintflote 1 1/3'
Mixture IV
CromomeS'
16
SWELL ORGAN
Given Suggestions
Appropriate Registrations
STOPPED FLUTE
Bourdon 8'
STRINGS
Viola 8'
Viola Celeste 8'
STRING ENSEMBLE
Viola 8'
Viola Celeste 8'
Bourdon 8'
Koppelflote 4'
Tremulant
SOLO REED I mf
Hautbois 8'
SOLO REED Ilmf
Contre Basson 16' (play 8va)
SOLO REED/
Trompette 8'
CORNET
Bourdon 8'
Koppelflote 4'
Nazard 2 2/3'
Blockflote 2'
Tierce 1 3/5'
FOUNDATIONS mf
Viola 8'
Bourdon 8'
Koppelflote 4'
FOUNDATIONS/
Viola 8'
Bourdon 8'
Prestant 4'
Koppelflote 4'
Blockflote 2'
FOUNDATIONS ff
Viola 8'
Bourdon 8'
Prestant 4'
Koppelflote 4'
Blockflote 2'
Plein Jeu IV
17
FULL SWELL
Viola 8'
Bourdon 8'
Prestant 4'
Koppelflote 4' ·
Blockflote 2'
Plein Jeu IV
Contre Basson 16'
Trompette 8'
Hautbois 8'
PEDAL ORGAN
Given Suggestions
Appropriate Registrations
SOFfBASS
Subbass 16'
FLUTES
Subbass 16'
Gedackt 8'
FOUNDATIONS f
Subbass 16'
Principal 16'
Gedackt 8'
Octave 8'
Choral Bass 4'
FOUNDATIONS ff
Subbass 16'
Principal 16'
Gedackt 8'
Octave 8'
Choral Bass 4'
FULL PEDAL
Subbass 16'
Principal 16'
Gedackt 8'
Octave 8'
Choral Bass 4'
Fagott 16'
18
ENSEMBLE COMBINATIONS
SOFf PRAYER HYMN
STRING CHORUS
FULL STRING CHORUS
Great:
Flute Celeste 8'
Swell:
Viola 8'
Viola Celeste 8'
Pedal:
Subbass 16'
Couplers:
Swell to Pedal
Swell to Great
Great:
Principal 8'
Flute Celeste 8'
Swell:
Viola 8'
Viola Celeste 8'
Koppelflote 4'
Pedal:
Subbass 16'
Couplers:
Swell to Pedal
Swell to Great
Great:
Rohrflote 8'
Flute Celeste 8'
Spitzflote 4'
Swell:
Viola 8'
Viola Celeste 8'
Bourdon 8'
Prestant 4'
Koppelflote 4'
Tremulant
Pedal:
Subbass 16'
Couplers:
Swell to Pedal
Swell to Great
19
SOFT FOUNDATIONS
FOUNDATIONS 8' mf
FOUNDATIONS 8' and 4'
20
Great:
· Rohrflote 8'
Swell:
Viola 8'
Bourdon 8'
Pedal:
Subbass 16'
Couplers:
Swell to Pedal
Swell to Great
Great:
PrincipalS'
Spitzflote 4'
Swell:
Viola 8'
Bourdon 8'
Koppelflote 4'
Pedal:
Subbass 16'
Couplers:
Swell to Pedal
Swell to Great
Great:
Principal 8'
Octave 4'
Swell:
Viola 8'
Bourdon 8'
Prestant 4'
Koppelflote 4'
Pedal:
Subbass 16'
Gedackt 8'
Couplers:
Swell to Pedal
Swell to Great
FOUNDATIONS 8' mf
FOUNDATIONS 8' and 4'
Great:
Principal 8'
Spitzflote 4'
Swell:
Viola 8'
Bourdon 8'
Koppelflote 4'
Pedal:
Subbass 16'
Couplers:
Swell to Pedal
Swell to Great
Great:
PrincipalS'
Octave 4'
Spitzflote 4'
Swell:
Viola 8'
Bourdon 8'
Prestant 4'
Koppelflote 4'
Pedal:
Subbass 16'
Gedackt 8'
Couplers:
Swell to Pedal
Swell to Great
21
FOUNDATIONS 8', 4' and 2'
FOUNDATIONS and
MIXTURES
22
Great:
Principal 8'
Rohrflote 8'
Octave 4'
Spitzflote 4'
Super Octave 2'
Swell:
Viola 8'
Bourdon 8'
Prestant 4'
Koppelflote 4'
Blockflote 2'
Pedal:
Subbass 16'
Octave 8'
Gedackt 8'
Couplers:
Swell to Pedal
Swell to Great
Great:
Principal 8'
Rohrflote 8'
Octave 4'
Spitzflote 4'
Super Octave 2'
Mixture IV
Swell:
Viola 8'
Bourdon 8'
Prestant 4'
Koppelflote 4'
Blockflote 2'
Plein Jeu IV
Pedal:
Principal16'
Subbass 16'
Octave 8'
Gedackt 8'
Choral Bass 4'
Couplers:
Swell to Pedal
Swell to Great
FOUNDATIONS,
MIXTURES and REEDS
Great:
PrincipalS'
Rohrflote 8'
Octave 4'
Spitzflote 4'
Super Octave 2'
Mixture IV
Swell:
Viola 8'
Bourdon 8'
Prestant 4'
Koppelflote 4'
Blockflote 2'
Plein Jeu IV
Contre Basson 16'
Trompette 8'
Hautbois 8'
Pedal:
Principal 16'
Subbass 16'
Octave 8'
Gedackt 8'
Choral Bass 4'
Fagott 16'
Couplers:
Swell to Pedal
Swell to Great
\
23
FOUNDATIONS, MIXTURES
AND REEDS
24
Great:
Principal 8'
Rohrflote 8'
Octave 4'
Spitzflote 4'
Super Octave 2'
Mixture IV
Swell:
Viola 8'
Bourdon 8'
Prestant 4'
Koppelflote 4'
Blockflote 2'
Plein Jeu IV
Contre Basson 16'
Trompette 8'
Pedal:
Principal 16'
Subbass 16'
Octave 8'
Gedackt 8'
Choral Bass 4'
Fagott 16'
Couplers:
Swell to Pedal
Swell to Great
ENGLISH CATIIEDRAL
CLASSIC CHORUS
(FOR BACH)
TRIO PLAYING
Great:
PrincipalS'
Rohrflote 8'
Spitzflote 4'
Swell:
Lieblich Bourdon 16'
Viola 8'
Bourdon 8'
Prestant 4'
Koppelflote 4'
Blockflote 2'
Contre Basson 16'
Trompette 8'
Hautbois 8'
Pedal:
Principal 16'
Subbass 16'
Couplers:
Swell to Pedal
Swell to Great
Great:
Principal 8'
Octave 4'
Super Octave 2'
Mixture IV
Swell:
Bourdon 8'
Prestant 4'
Blockflote 2'
Pedal:
Subbass 16'
Octave 8'
Choral Bass 4'
Couplers:
Great to Pedal
Great:
Rohrflote 8'
Spitzflote 4'
Quintflote 1 1/3'
Swell:
Bourdon 8'
Blockflote 2'
Pedal:
Subbass 16'
Gedackt 8'
25
CORNET
FNE SOLO VOICES
(GREAT)
FNE SOLO VOICES
(SWELL)
26
Great:
Rohrflote 8'
Swell:
Bourdon 8'
Nazard 2 2/3'
Pedal:
Subbass 16'
Couplers:
Great to Pedal
Great: (1)
Rohrflote 8'
(2)
Spitzflote 4'
(3)
Rohrflote 8'
Spitzflote 4'
(4)
Cromorne 8'
(5)
Cromorne 8'
Spitzflote 4'
Swell: (1)
Hautbois 8'
(2)
Contre Basson 16'
(3)
Trompette 8'
(4)
Bourdon 8'
Nazard 2 2/3'
(5)
Bourdon 8'
Koppelflote 4'
Nazard 2 2/3'
Tremulant
FOURACCO~ANmMENT
VOICES (GREAT)
Great: (1)
FIVE ACCO~ANIMENT
VOICES (SWELL)
TWO ACCOMPANIMENT
VOICES (PEDAL)
TRUMPET TUNE
Flute Dolce 8'
(2)
Flute Celeste 8'
(3)
Rohrflote 8'
(4)
Rohrflote 8'
Spitzflote 4'
(1)
Viola 8'
Viola Celeste 8'
(2)
Bourdon 8'
(3)
Bourdon 8'
Koppelflote 4'
(4)
Viola 8'
Bourdon 8'
(5)
Viola 8'
Prestant 4'
(1)
Subbass 16'
(2)
Subbass 16'
Gedackt 8'
Great:
Principal 8'
Rohrflote 8'
Spitzflote 4'
Swell:
Trompette 8'
Hautbois 8'
Pedal:
Subbass 16'
Couplers:
Great to Pedal
Melody (optional)
27
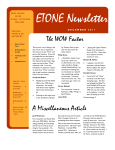
Rodgers Electronic
Model: 445
MIDI Implementation Chart
Function
Transmitted
Recognized
12-14
*1
Version: 1.0
Remarks
Basic
Default:
1-3,12-14
Channel
Changed:
1-16
Mode
Default:
Messages:
Altered:
Mode 3
X
,.,.,.,.,.,.,.,.,.,.,.,.,.,.,.,.,.,.,.,.
Mode3
X
Note
Number
22-112
22-112
True Voice
Velocity
NoteOn:
NoteOff:
0
0
X
Key's:
Ch's:
X
X
X
X
X
X
7
0
0
Channel12:
Great Expression
Channel13:
Swell Expression
Channel14:
Pedal Expression
64
0
X
MIDI on GT Channel
After
Touch
Pitch Bender
"'1
........................................
X
Control
Change
1-128
Program
Change
True#
System Exclusive
1-10,20,31,32
........................................
0
*2
........................................
0
Common
:SongPos
:SongSel
:Tune
X
X
X
X
System
Real Time
:Clock
X
:Commands X
0
System
Aux
Messages
Notes:
:Local ON/OFF
:All Notes Off
:Active Sense
:Reset
"'1
"'2
"'3
X
0 (123)
0
X
"'2
X
X
X
*3
X
0 (123)
0
X
Able to choose between 0 and X.
SysEx used for stop changes, combination memory dumps.
Received Start sends current stop and expression status.
Received Stop restores expression to shoe positions.
Received Continue sets expression to values at last Stop.
Mode 1: OMNI ON, POLY
Mode 3: OMNI OFF, POLY
30
12=Great 13=Swell
14=Pedal
MIDI on GT only
Mode 2: OMNI ON, MONO
Mode 4; OMNI OFF, MONO
0
X
Yes
No
Rodgers Instrument Corporation
MIDI System Exclusive Code
Rodgers organs use a subset of the Roland standard MIDI System Exclusive
format. All Rodgers SysEx packets use the Roland "Data Set" command, listed
under "One Way Transfer Procedure" in the Roland System Exclusive format
specification. The first five bytes of this type of packet are as follows:
Byte
Function
FOH
41H
0
30H
12H
Begin System Exclusive
Roland/Rodgers SysEx ID
DeviceiD
Model ID (30 = organ)
Data Set Command
This header is then followed by the message body. The message body contains a subcommand byte, an
optional offset byte and a variable number of data bytes followed by a checksum byte and a MIDI End
Exclusive byte (F7). The checksum byte value is such that if all bytes beginning with the subcommand
byte and ending with the checksum byte are added, the lower 7 bits of the result will be all zeroes.
The following messages are used by Rodgers as of 7/15/91:
12
Stop Change
This message is transmitted each time one or more stops, couplers, or auxiliary controls changes
state. The state of each control is represented as a bit in one of the message data bytes. The
assignment of controls to specific bits is standardized for all Rodgers organs by use of the
master code assignment list included herein. Controls which are on are represented by ones in
the bit map. This message is transmitted on the Sequencer and Pipe ports only on organs which
have a separate MIDI Instrument port. It can, however, be received on the Instrument port as
well.
Subcommand byte:
01H
Offset byte:
OOH - 22H
This byte indicates the offset of the first data byte from the beginning of
the bit map. Normally, this will be zero, and the entire map (35 bytes) will
be transmitted. It is possible, though, to send only part of the map
beginning with the byte indicated by this value.
Data Bytes:
dd, dd, ...
The data bytes represent the new state of the bit map beginning at the
offset specified above. Any number of data bytes up to the full length of
the bit map may be sent, although the entire map is usually transmitted.
Refer to the included chart for stop map assignments.
31
22.
Memory Dump
This message is transmitted when the organist sends ("dumps") a combination memory to a sequencer.
The body of the message contains a portion of the data from a combination memory; several such
messages are usually necessary to transmit the complete contents of a memory.
Subcommand byte:
03H
Offset byte:
mm
This byte contains the zero-indexed number of the combination memory
being dumped.
Data Bytes:
dd, dd, ...
The data for the memory is converted from one byte with 8 significant
bits to two bytes with 4 significant bits each. The high order bits are
contained in the low order nibble of the first byte. The low order bits are
contained in the low order nibble of the second byte. The contents of the
piston data structure is proprietary and not disclosed.
Table 1. Stop SysEx Code Assignments
STOP BYTE BIT
STOP NAME
(GREAT)
1
0
1
3
0
2
3
4
5
1
2
1
3
1
5
6
6
1
7
2
1
8
9
2
2
3
6
10
3
0
11
3
4
12
4
1
13
14
15
16
17
18
19
20
21
22
23
24
7
8
8
5
0
1
8
4
8' Principal
8' Rohrflote
8' Flauto Dolce
8' Flute Celeste
4' Octave
4' Spitzflote
2' Superoctave
11/3' Quint
IV Mixture
III Scharf
8' Cromorne
Chimes
(SWELL)
32
9
3
9
9
4
5
10
10
10
0
4
11
6
1
11
2
16' Lieblich Bourdon
8' Viola
8' Viola Celeste
8' Bourdon
4' Prestant
4' Koppelflote
2 2/3' Nazard
2' Blockflote
IV PleinJeu
16' Contre Basson
8' Trompette
8' Hautbois
25
26
27
28
29
30
(PEDAL)
21
3
21
4
2
22
22
4
22
6
24
2
31
32
33
34
35
(COUPLERS AND OTHER CONTROLS)
25
3
Great to Pedal
25
5
Swell to Pedal
26
6
Swell to Great
31
2
Main Trernulant (Great and Swell)
31
3
Swell Flute Trernulant Full
16' Principal
16' Subbass
8' Octave
8' Gedackt
4' Choralbass
16' Fagott
33
Printed in the U.S.A. PIN 1905-231