1
ModeJ
No.
919o751110
919,152361
o
Safety
Guidelines
o
Assembmy
o
Operation
o
Maintenance
o
o
Repair
Parts
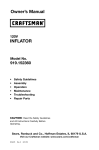
CAUT|ON:
Read the Safety Guidelines
and All instructions CarefulIy Before
Operating.
Sears,
Roebuck
and Co., Hoffman
Visit our Oraftsman
A10087
Rev, 0
1/25/05
website:
Estates,
mL60179
www, sears,com/craftsman
U.S.A.
WARRANTY ................................................
SPECIFICATION CHART .....................................
SAFETY GUIDELINES=DEFINITIONS
...........................
IMPORTANT SAFETY INSTRUCTIONS ........................
2
3
3
3-8
GLOSSARY ................................................
ACCESSORIES
............................................
ASSEMBLY ................................................
INSTALLATION ..........................................
OPERATION ...........................................
8
8
9
9-10
t 1-14
MAINTENANCE ............................................
STORAGE ................................................
TROUBLESHOOTING
GUIDE ................................
REPAIR PARTS ............................................
ESPANOL ..............................................
14
t4
15
16
t7-30
HOW TO ORDER REPAIR PARTS ......................
FULL
ONE YEAR
WARRANTY
AiR
back cover
COMPRESSOR
If this CRAFTSMAN Air Compressor fails due to a defect in material or
workmanship within one year from the date of purchase, Sears will at
its option repair or replace it free of charge= Contact your nearest Sears
Service Center (1-800-4-MY-HOME ¢_)to arrange for repair, or return the Air
Compressor to the place of purchase for replacement.
If this Air Compressor is used for commemia! or rental purposes, this warranty
applies for only ninety days from the date of purchase=
This warranty gives you specific legal rights and you may have other rights
which vary from state to state.
Sears, Roebuck
A10087
and Co., Dept. 817WA, Hoffman
2= ENG
Estates,
IL 60179
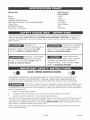
Model No,
919o751110
919o152361
1.875
1.25
120/60/1
15 amps
Time Delay
2.5
125 PSI
Bore
Stroke
Voltage/Hertz/Phase
Minimum Branch Circuit Requirement
Fuse Type
SCFM@ 30 psig
Maximum Pressure
This manual contains information that is important for you to know and understand, This information
relates to protecting YOUR SAFETY and PREVENTING EQBtPMENT
PROBLEMS, To help you
recognize this information, we use the symbols below, Please read the manual and pay attention to
these sections,
situation
which,
result in death
which,
death
Indicates an
imminently
hazardous
if not avoided, wHm
or serious
if not avoided,
or serious
Indicates a potentially
hazardous situation
which, if not avoided, _
result in
minor or moderate
inulAQ_.
in'u_AQl.
Used without the
safety alert symbol
indicates a potentially hazardous
situation which, if not avoided, may
result in property
damacLe.
coumd result in
injury..
SAVE THESE iNSTRUCTiONS
IMPROPER OPERATION OR MAINTENANCE OF THIS PRODUCT COULD RESULT
IN SERIOUS INJURY AND PROPERTY DAMAGE. READ AND UNDERSTAND ALL
WARNINGS AND OPERATING INSTRUCTIONS BEFORE USING THIS EQUIPMENT.
_Some
dust created by power sanding, sawing, grinding, drilling, and
other construction activities contains chemicals known (to the State
of California) to cause cancer, birth defects or other reproductive harm. Some example of
these chemicals are:
_'
lead from lead-based
_'
crystalline silica from bricks and cement and other masonry products
paints
_'
arsenic and chromium
from chemically-treated
lumber
Your risk from these exposures varies, depending on how often you do this type of work.
To reduce your exposure to these chemicals: work in a well ventilated area, and work
with approved safety equipment, always wear MSNA/NIOSN
approved, properly fitting
face mask or respirator when using such tools.
When using air tools, basic safety precautions
risk of personal injury.
should always be followed
3= ENG
to reduce the
A10087
Save these
instructions
improper operation or maintenance of this product could result in serious injury and
property damage. Read and understand all warnings and operation instructions before
using this equipment.
m'
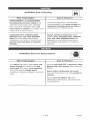
WARNING:
Risk of e×plosion
What Could
Happen
or fire
How To Prevent mt
mtis normaR for eReetrical contacts
within the motor
J!!
Always operate the inflator in a well
ventilated area free of combustible
materiams, gasoline, or solvent vapors.
to spark.
mfelectrical sparks from inflator come
into contact with flammable
vapors,
they may ignite, causing fire or
explosion.
Store flammable materials in a secure
beation away from inflator.
Restricting
any of the inflator ventiRation
openings will cause serious overheating
and could cause fire.
Never phce objects against or on top
of inflator. Operate inflator in an open
area at least 12 inches away from any
wall or obstruction
that would restrict
the flow of fresh air to the ventilation
openings.
Operate inflator in a clean, dry well
ventilated area. Do not operate unit in
any confined area.
Unattended
operation of this product
could resuRt in personaR injury or
property damage. To reduce the risk of
fire, do not allow the inflator to operate
unattended.
A10087
ABways remain in attendance
with the
product when it is operating.
Always disconnect
ebctricam power by
moving on/off switch to the off position
and unpRug the power cord.
4-ENG
_m
WARNING:
Risk
of Bursting
_[_J
How To Prevent mt
What Coumd Happen
ATTACHMENTS
I
& ACCESSORIES:
Exceeding the pressure rating of air
operated accessories, tires, inflatable
balls, and other inflatables items can
cause them to expmode or fly apart, and
could result in serious injury.
Follow the equipment manufacturers
recommendation and never exceed the
maximum allowable pressure rating of
attachments or inflatable items.
Unattended tires, inflatable bans,
inflatabBe toys, and other inflatable
items can over inflate very quickly
sometimes in a matter of seconds and
resumt in personam injury or property
damage.
ABways remain in attendance when
inflating tires, inflatabBe bans, inflatable
toys, and other inflatabBe items. Be
prepared to stop inflator when item is
fully inflated, sometimes in a matter of
seconds.
iiiiiii_,
WARNING:
What Could
The inflator
Risk from
D
Fraying Objects
Happen
air stream can cause soft
tissue damage to exposed skin and
can propeB dirt, chips, loose particles,
and small objects at high speed,
resulting in property damage or personal
injury.
Now To Prevent
It
Always wear ANSI Z87.1 approved safety
gBasses with side shieMs when using the
inflator.
Never direct compressed
air toward
any part of the body or at other people
animals.
or
Always turn the inflator off before
attempting maintenance, attaching tools,
or accessories.
5= ENG
A10087
_D
WARNING:
what
Risk
of Emectricam Shock
I_
How To Prevent
Could Happen
Your inflator is powered by electricity.
Like any other electrically powered
device, If it is not used properly it may
cause electric shock.
I
it
Never operate the inflator outdoors
it is raining or in wet conditions.
when
Never operate inflator with protective
covers removed or damaged.
ABways replace damaged or worn
eRectric cords before operating
inflator.
Repairs attempted by unqualified
personnel can result in serious injury
or death by electrocution.
Any electrical wiring or repairs required
on this product should be performed
by
authorized service center personnel
in accordance with national and local
electrical codes.
Electrical Grounding: Failure to provide
adequate grounding to this product
could result in serious injury or death
from electrocution.
See grounding
Make certain
that the eBectrical circuit
to which the inflator is connected provides
proper eBectrical grounding, correct
voltage, and adequate fuse protection.
instructions.
When operating
GFCI outlet.
WARNING:
What Could
Risk
outdoors
use
to Breathing
Happen
How To Prevent
The compressed
air directly from your
inflator is not safe for breathing. The air
stream may contain carbon monoxide,
toxic vapors, or solid particles from
the tank. Breathing these contaminants
can cause serious injury or death.
A10087
inflator
It
Air obtained directly from the inflator
should never be used to supply air for
human consumption.
In order to use air
produced by this inflator for breathing,
suitable filters and in-line safety
equipment must be property installed.
In=line filters and safety equipment used
in conjunction with the inflator must be
capaMe of treating air to aH applicable
Iocam and federal codes prior to human
consumption.
6-ENG
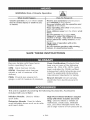
WARNING:
Risk of Burns
What Could
Never touch any exposed metal parts
on inflator during or immediately after
operation, mnflator will remain hot for
several minutes after operation.
Do not reach around protective shrouds
or attempt maintenance
until unit has
been allowed to cool.
Touching exposed metal such as the
inflator head or outlet tubes, can result
in serious burns.
WARNING:
Risk from
Moving
Parts
How To Prevent
What Could Happen
It
Moving parts such as the pulley, flywheel,
and belt can cause serious injury if they
come into contact with you, your clothing,
loose hair, or jewelery.
Never operate the inflator with guards
or covers which are damaged or
removed.
Attempting
to operate inflator with
damaged or missing parts or attempting
to repair inflator with protective shrouds
removed can expose you to moving parts
and can result in serious injury.
Any repairs required on this product
should be performed
by authorized
service center personnel
WARNING:
Risk of FaIHng
Now To Prevent
What Could Happen
An inflator can fan from a table,
workbench, or roof causing damage to
the inflator and couBd result in serious
injury
or death to the operator.
It
Always operate inflator in a stabBe
secure position to prevent accidental
movement of the unit. Never operate
inflator on a roof or other elevated
position.
7- ENG
A10087
iiiiiiii_,_,
WARNING:
Risk of Unsafe Operation
What Could Happen
How 3"oPrevent Jt
Unsafe operatien of your inflator ceu[d
lead to serieus injury or death to you
or ethers.
Review and understand all instructions
and warnings inthis manual.
Become familiar with the operatien and
controls of the inflator.
Keep operating area clear of all persons,
pets, and obstacles.
Keep children away from the inflator at a[[
times.
Do not operate the product when
fatigued or under the influence of
alcohol or drugs. Stay alert at a[[ times.
Never defeat the safety features of this
product.
Equip area of eperation with a fire
extinguisher.
Do not operate machine with missing,
broken, or unautherized parts.
SAVE THESE
INSTRUCTIONS
Become familiar with these terms
before operating the unit.
Code Certification:
Products that
bear one or more of the following
marks: UL, CUL, ETL, CETL, have
been evaluated by OSHA certified
independent safety laboratories and
meet the applicable Underwriters
Laboratories Standards for Safety=
CFM: Cubic feet per minute.
SCFM: Standard cubic feet per
minute; a unit of measure of air
delivery.
£SlG: Pounds per square inch
gauge; a unit of measure of pressure.
Branch Circuit: Circuit carrying
electricity from electrica! panel to
outlet.
This unit is capable of powering the following Accessories.
included with your inflator:
inflation Needme: Used to inflate
sport bails.
Extension Nozzle: Used to inflate
small inflatable items such as air rafts
and beach balls.
A10087
Accessories
High FBow inflator/Deflator adapter
body with three nozzmes and sea[
ring: Used to inflate or deflate air
mattresses, small boats, inflatable
toys, and other inflatable items that
use a large volume of low-pressure air.
8- ENG
Contents
of Carton
To Remove
1 - Inflator equipped with hose and
universal valve adapter
1 - Accessories Kit
1-
inflator
from
Carton
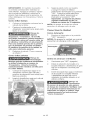
1.
Grasp handle and lift the inflator
out of the carton.
2.
Remove all packaging from
inflator and discard.
1,
The cord set and plug with this
unit contains a grounding pin.
This plug MUST be used with a
grounded outlet.
Inflator Needle
1 - Extension Nozzle
1 - Nigh Flow Inflator/Defiator
adapter body with three
nozzles and seal ring
NOW TO SET UP YOUR UNIT
Location
of the inflator
IMPORTANT: The outlet being used
must be installed and grounded in
accordance with alI local codes and
ordinances.
Locate the inflator in a clean, dry
and well ventilated area. The inflator
pump and housing are designed
to allow for proper cooling= The
ventilation openings on the inflator
are necessary to maintain proper
operating temperature. Do not place
rags or other containers on or near
these openings=
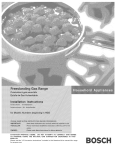
GROUNDmNG
2.
Make sure the outlet being used
has the same configuration
as the grounded plug. DO
NOT USE AN ADAPTER, See
illustration.
INSTRUCTIONS
Grounded
Risk of Electrical
Shock. In the
event of a short circuit, grounding
reduces the risk of shock by
providing an escape wire for the
electric current. This inflator must
be propermy grounded.
Outlets
Groundling Pin
3.
The inflator is equipped with a cord
having a grounding wire with an
appropriate grounding plug (see
following illustrations). The ptug must
be used with an outlet that has been
installed and grounded in accordance
with all local codes and ordinances.
4.
9- ENG
Inspect the plug and cord before
each use. Do not use if there are
signs of damage.
If these grounding instructions
are not completely understood,
or if in doubt as to whether the
inflator is properly grounded,
have the installation checked by
a qualified electrician.
A10087
GROUNDING
Risk of Electrical
Shock, IMPROPER
CAN RESULT IN
ELECTRICAL
SHOCK,
Voltage
Do not modify the plug provided, If
it does not fit the avaiBable outlet,
a correct outlet should be installed
by a qualified electrician,
Repairs to the cord set or plug
MUST be made by a qualified
emectrician,
Extension
If an extension cord must be used, be
sure it is:
a 3-wire extension cord that has
a 3-blade grounding ptug, and a
3-slot receptacle that will accept
the ptug on the product
1.
Voitage supply through branch
circuit is 15 amps.
2.
Circuit is not used to supply any
other electrical needs (lights,
appliances, etc.).
3.
Extension cords comply with
specifications.
4.
Circuit is equipped with a
15 amp circuit breaker or 15
amp time detay fuse. NOTE: If
compressor is connected to a
circuit protected by fuses, use
only time delay fuses. Time delay
fuses should be marked "D" in
Canada and "T" in the US.
in good condition
no longer than 50 feet
A10087
Protection
Certain inflators can be operated
on a 15 amp circuit if the following
conditions are met.
Cords
16 gauge (AWG) or larger. (Wire
size increases as gauge number
decreases. 14, 12, 10, and 8
AWG may also be used.
and Circuit
Refer to the specification chart for the
voltage and minimum branch circuit
requirements.
If any of the above conditions
cannot be met, or if operation of
the compressor repeatedly causes
interruption of the power, it may be
necessary to operate it from a 20
amp circuit. It is not necessary to
change the cord set.
10-ENG
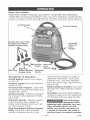
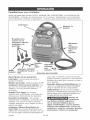
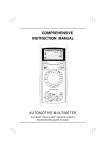
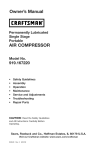
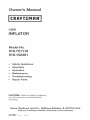
Know Your inflator
READ THiS OWNER'S MANUAL AND SAFETY RULES BEFORE OPERATING
YOUR UNIT. Compare the ilIustrations with your unit to familiarize yourself with the
location of various controls and adjustments. Save this manua! for future reference.
On/Off
Switch
Pressure
NozzRes to be used with
the High Now inflator/
Deflator adapter body
Hose with
Universal
VaBve
Adapter
Inflation
NeedRe
Seal Ring
Inflator/Deflator
Adapter Body
Gauge
Universal
VaBve
\'Extension
Nozzle
Description
of Operation
On/Off Switch: Used to turn inflator
on and off.
Pressure Gauge: Gives the pressure
reading in PSi.
Universal Vamve Adapter: Used with
accessories included with inflator and
standard tire valves.
Inflation Needme: Attaches directly to
the universal valve adapter to inflate
sport bails.
Extension Nozzme: Attaches directly
to the universal valve adapter to
inflate small inflatable items such as
air rafts and beach balls.
Nigh Flow Inflator/Deflator
Adapter
Body: Used with inflator/deflator
nozzles it attaches directly to the
universa! valve adapter to inflate or
deflate air mattresses, small boats,
inflatable toys, and other inflatable
items that use a large volume of lowpressure air.
Inflator/Deflator
Nozzles: Used with
the high flow inflator/deflator adapter
body.
Sea_ Ring: used with inflator/deflator
nozzles to prevent air from leaking out
of inflatables with very large air inlets.
Risk of Bursting.
Unattended tires,
inflatable baBIs, inflatabBe toys, and
other inflatabme items can overinflate very quickBy, sometimes in
a matter of seconds, and result in
personal injury or property damage,
11-ENG
A10087
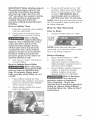
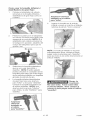
How to use High Flow Inflator/
Deflator
Adapter
Body
1. Place the universal valve adapter
over high flow inflator/deflator
adapter body as shown.
5.
Insert nozzle into inflatable and
then start inflator, see "How to
Start" paragraph.
Press lever on universal valve
adapter down to Iock in piace.
NOTE: if the universal valve
adapter will not lock in place pulI
it away from the adapter body so
it is not flush.
not flush
NOTE: if inflatable is not getting
firm enough, place thumb over the
"deflation" outlet to aiIow air to go
directly into the inflatable.
Choose nozzle to be used to
inflate or deflate. NOTE: The sea!
ring may be used with any of the
nozzles to prevent air from leaking
out of inflatables with very large
air inlets.
The high flow inflate/deflate
adapter body attachment has an
"inflation" outlet and "deflation"
outlet. Attach the nozzle to
the preferred outlet. NOTE:
"Inflation" and "Deflation" are
marked at outlets.
Risk of Bursting,
DO NOT overinflate, Keeping thumb over
""Deflation" outlet coumd cause
inflatable to over-inflate° Use
caution when pmacing thumb over
""Deflation" outmet,
Nozzle
attached to
"deflation"
outlet
A10087
12-ENG
IMPORTANT: While inflating ebjects
the pressure gauge will net read
cerrectmy. Semetimee the gauge
will read very high. Turn the unit
"eff" and amlew the needle te eettme,
this win previde an appreximate
reading. Step and check the
pressure reading frequent{y when
inflating.
How to inflate Tires
1.
Place the universal valve adapter
over tire valve stem.
2.
Press lever on universal valve
adapter down to lock in place.
to inflate
Sport
2.
How to Use Your Unit
On/Off
Switch
NOTE: When the unit has been
turned eft, it is normal te hear a short
hiss of air being released.
Before Starting:
1. Place On/Off switch to "OFF".
2. Attach inflation needle,
extension nozzle, or high flew
inflator/deflator adapter body to
universal valve adapter.
3.
Insert inflation needle, extension
nozzle, or high flow inflater/
deflator adapter body with
desired nozzle into inflatable.
Balls
Risk ef Bursting.
Most sports bails
with no initiai air win fib in Bess
than 10 seconds. Watch sport
bans carefully while filling, do not
everfilL
1.
Place On/Off switch in the "ON"
position. When sport ball is firm
place On/Off switch in the "OFF"
positien. IMPORTANT: Mest
sperts bails with ne initiam air
will fill in less than 10 seconds.
NOTE: When the unit has been turned
off, it is normal to hear a short hiss of
air being released.
Bow to Stop:
1. Set the On/Off switch to "OFF".
Risk ef Fraying
Objects/Bursting
Objects. Over inflating tire eeuM
cause the tire te burst er the
universal valve adapter te pep
off the vamvestem and become
a projectile. Use a tire pressure
gauge to ensure an accurate tire
pressure reading, because the
pressure gauge en the unit is for
generai reference onmy.
3. See "Now to Start" instructions
to start inflater.
Bow
3.
Place inflator needle into the
universal valve adapter and press
lever on universal valve adapter
down to Iock in place.
Insert inflater needle into sport
bal! to be inflated.
Risk ef Bursting.
Tee much air
pressure causes a hazardous
risk of bursting.
Check the
manufacturer's
maximum pressure
rating for objects being inflated.
Carefully fellew the "Now te Start"
instructions.
13-ENG
A10087
How to Start:
1. Place On/Off switch to "OFF".
2.
Plug the power cord into the
grounded outlet.
NOTE: Before turning the inflator on
know the desired pressure (measured
in PSi).
3. Place On/Off switch to "ON" to
start inflator, if using the pressure
gauge watch it closely and when
it reaches the desired pressure
place the on/off switch in the
"OFF" position.
IMPORTANT: Watch inflatable
carefully while filling; do not overfill.
1.
t.
2.
IMPORTANT: While inflating objects
the pressure gauge will not read
correctly. Sometimes the gauge will
read very high. Turn the unit "off"
and allow the needle to settle, this
will provide an approximate reading.
Stop and check the pressure reading
frequently when inflating.
NOTE: The pressure gauge on the
unit is for general reference only. To
ensure the most accurate pressure
reading use a separate pressure
gauge (not included) designed for the
object being inflated.
NOTE: When the unit has been
turned off, it is normal to hear a short
hiss of air being released.
2.
Wipe plastic parts clean using
mild soap and warm water.
4.
Coil the air hose around shroud
and snap into hose snap.
Place the On/Off switch to "OFF"
and unplug the cord.
Set the On/Off switch to "OFF"
and unplug the cord.
Store accessories in the storage
bag located on back of unit.
The storage bag has a smaller
compartment to hold sma!ler
accessories.
Smaller
Compartment
Hose Snap
Wind the electrical cord loosely
around the inflator and snap it
onto itself for storage.
A10087
5.
14-ENG
Store the inflator in a clean and
dry location.
Risk of Unsafe Operation. Vomtage sources, moving parts,
or compressed
air sources are exposed when repairing
the compressor.
Personam injury can occur. Unpmug the compressor
before
attempting any repairs.
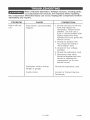
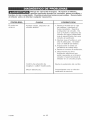
PROBLEM
Motor will not
run.
CAUSE
CORRECTION
Fuse blown, circuit breaker
tripped.
1. Check fuse box for blown
fuse and replace as
necessary. Reset circuit
breaker. Do not use a
fuse or circuit breaker with
higher rating than that
specified for your particular
branch circuit.
2. Check for proper fuse.
You should be using a
"Time Delay" fuse.
3. Check for low voltage
problem.
4. Check the extension cord.
5. Disconnect the other
electrical appliances from
circuit or operate the
compressor on its own
branch circuit.
Extension cord is wrong
length or gauge.
Check the extension cord.
Faulty motor.
Contact a Trained Service
Technician.
15-ENG
A10087
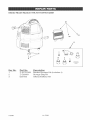
inflator Model Number
919,751110/919,152361
3
_No°
1
Part No,
Z-SST-5309
2
Z-D29391
3
D29185
A10087
Description
Rubber Bumper Kit (includes 4)
Storage Bag Kit
hfiator/Deflator
Kit
16= ENG
GARANTIA ................................................
17
ESPECiFiCACiONES
.......................................
DEFINICIONES DE NORMAS DE SEGURIDAD ..................
INSTRUCCIONES IMPORTANTES DE SEGURIDAD ...........
18
18
18-23
GLOSARIO ................................................
ACCESORIOS
............................................
ENSAMBLAJE .............................................
INSTALACION ..........................................
OPERACION ...........................................
23
23
24
24-25
26-29
MANTI::NIMIENTO ..........................................
ALMACENAJE .............................................
GUIA DE DIAGNOSTICO DE PROBLEMAS
REPUESTOS ..............................................
INGLI_S ................................................
COMO ORDENAR
REPUESTOS
29
29
30
16
1-17
.....................
.......................
Contratapa
GARANT[A TOTAL DE UN Al_O DEL OOMPRESOR
DE A[RE
Si este compresor de abe Craftsman fa[lase debido a defectos de materiales
o de fabricaci6n dentro del aSo de su fecha de compra, Sears, a su opci6n,
Io reparara o reempiazara sin costo alguno. Comunfquese con el Centro
de Servicio Sears mas cercano (1-800-4-MY-HOME) para coordinar su
reparaci6n, o devue[va el compresor de aire al Jugar donde Io compr6 para
que Io cambien.
Si este compresor de aire se usase con fines comemiaies o para alquiler, esta
garantfa se aplica s6[o durante Jos primeros noventa dfas a partir de su fecha
de compra.
Esta garantfa Ie otorga derechos especfficos y usted podria tenet otros
derechos que varian de un estado a otro.
Sears, Roebuck
and Co., Dept. 817WA, Hoffman
17- SP
Estates,
IL 60179
A10087
°
Modeb
,
®
No.
-
iiiiii,,
919.751110
919.152361
1,875" (47mm)
1,25" (32ram)
120/60/1
15 Amps=
Di_metro del cilindro
Carrera del pist6n
Volt aje/Hercios/Fases
Requisite mfnimo de circuito
Tipo de fusibleRetardo
Pies3/min a 30 PSIG
Presi6n maxima
2,5
125 Lb/Pulg 2 (PSI)
Este manual contiene importante informaci6n para que usted sepa y comprenda. Esta
informaci6n se relaciona con la protecci6n de SU SEGURIDAD Y LA PREVENCION
DE PROBLEMAS AL EQUIPO. Para ayudarlo a reconocer esa informaci6n, utilizamos
los sfmbolos indicados mas abajo= Sfrvase leer el manual y prestar atenci6n a dichos
sfmbolos=
,
Indicaunasituacian
potencialmente
peligrosa, que si no se evita, podfia
causar lesiones menores o moderadas.
Indica una situaci6n
de inminente riesgo,
que si no se evita, causara la muerte o
lesiones serias.
_
o.,
_
Indica una
situacian
alerta indica una situacian potencialmente
riesgosa la que, que si no se evita, podria
causar daSos a la _iedad.
potencialmente riesgosa, que si no
se evita, podr_a causar la muerte o
lesiones serias.
CONSERVE
m=STAS|NSTRUCCiONm=S
LA OPERACION INAPROPIADA DE ESTA UNIDAD PUEDE CAUSAR LESIONES SERIAS
Y DAI_OS A LA PROPIEDAD. LEA Y ENTIENDA TODAS LAS ADVERTENCIAS DE
SEGURIDAD E INSTRUCCIONES DE OPERACION ANTES DE USAR ESTE EQUIPO.
_l._l!._-_._[l_J_
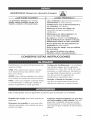
AIgunos pones generados per lijadoras, sierras,
esmerHadoras,
taladros y otras aetividades
de
construcci6n
contienen qu_micos conocidos en el estado de California pot causar
cancer, defeetos de nacimiento y otras lesiones al sistema reproductive.
ABgunos ejempbs
de 6stos son:
,, PIomo de pinturas
a base de plomo.
,, Cristales
de s_liee de ladriHos,
cemento
.
y cromo
para el tratamiento
Ars6nico
de qu_micos
Su riesgo per e×posci6n
de trabajo.
vafia dependiendo
y otros componentes
de mamposter_a.
de la madera.
de la frecuencia
que usted haga ese tipo
Para redueir la exposici6n a eaes qu_mieos, trabaje en un area bJen ventilada
use irnpRernentos de seguridad.
Siempre use mascara o respirador aprobado
MSHA/NIOSH
bien puestos en la eara cuando use esas herramientas.
Cuando se operen herramientas
neumatieas, siempre se deben temar
basicas de seguridad para reducir el riesgo de lesiones personales.
A10087
18= SP
y
per
preeauciones
Conserve
estas
instrucciones
La operaci6n y el mantenimiento inadecuados de esta unidad pueden causar lesiones
serias y da[ios a la propiedad.
Lea y entienda todas las advertencias e instrucciones de
operaci6n antes de opere esta unidad.
iiiiiiiii_
.....
ADVERTENCIA:
o
.....
Riesgo de expmosiSn o incendio
_,QUE PUEDE OCURRIR?
Es norrnsR que los contactoe
en el motor emitan ehispas.
_,COMO PREVENIRLO?
eR_ctricos
Siempre opere eminflsdor de aire en
_reas bien ventiladas, sin materiales
cornbustibBes ni vapores de gasoRina ni
de somventes
Si Rasehispss el6ctricas del inflador
entran en contacto con vapores
inflamsbBes, pueden eneenderse
esussndo un ineendio o uns explosi6n.
Gusrdsr Rss substsnciss
inflsrnables
un lugar seguro lejos del inflsdor.
en
Ls obstrucci6n
de cualquier sberturs de
ventimaci6n deB inflador puede causar un
recalentamiento serio y un ineendio.
Nunca comoque objetos contra ni
encima del inflador. Opere eB inflsdor
en un _rea abierta a per Io menos 30 cm
(12"} de cusmquier pared u obstrucci6n
que pueda restringir el flujo de sire fresco
per las aberturas de ventilaci6n=
Opere el inflador en un _rea limpia, seca y
bien ventilada= No opere Is unidad en un
&tea eonfinada.
Ls opersei6n desatendids
de esta
unidad puede csussr lesiones
personales o daSos a Is propiedad.
Pars reducir el riesgo de incendio,
no permits que el inflsdor funcione
desatendido.
Siempre permsnezca
stendiendo
esta
unidad cuando est6 en funcionamiento.
Siempre ap_guela poniendo el
interrupter
en ""OFF"" y desenchufeRs
del tomaeorriente.
19= SP
A10087
iiio
ADVERTENCIA:
__LQUE
Riesgo
o'
de revenataz6n
PUEDE OCURRIR?
ADITAMENTOS
_[_J-JI
_,.C6MO PREVENmRLO?
Y ACCESORIOS:
Exceder Racapacidad de presi6n de
los accesorios neum_ticos, Ilantas,
pelotas y artfculos inflables puede
hacerRos reventar o salir disparados
eausando mesiones serias o da_os a _a
Siempre observe las recomendaciones
del
fabricante del equipo y nunea exceda la
presi6n ma×ima especificada
para un
aditamento o artfculo inflable=
propiedad
Las Hantas, peRotas, juguetes y
otros art_euRos inflables pueden
sobreinflarse
r_pidamente,
algunas
veces en segundos y reventar
eausando lesiones personales
o
daSos a la propiedad.
ADVERTENCIA:
.
Riesgo
Siempre permanezca atendiendo esta
unidad cuando est6 infiando Hantas,
peBotas, juguetes y etros articulos
inflables. Est6 listo a detener el inflador
cuando el articulo este completamente
inflado, algunas veces sSIo unos segundos=
de objetos
propumsados
zQUE PUEDE OCURRmR?
_:,C6M O PREVENURLO?
El chorro de aire deR inflador puede
lesionar el tejido humano bBando
expuesto y puede irnpumsar tierra,
particulas sueltas y objetos pequefios
a alta veBocidad, causando da_ios
materiales o lesiones personales
AI usar el inflador, siempre usar galas de
seguridad con protectores
laterales que
cumplan con la norma ansi Z87.1=
Nunca apunte el chorro hacia partes del
cuerpo, otras personas o animales=
Siempre apague eB inflador
intentar darle mantenimiento
herramientas o accesorios=
A10087
20-SP
antes de
o conectar
_0
ADVERTENCmA:
Riesgo
de cheque
el_ctrico
_,QU_ PUEDE OCURRmR?
_C6MO
El inflador opera con eBectricidad.
Come cualquier otro dispositivo el6ctrico
y puede causar cheque el_etrieo si no
se usa adeeuadamente.
I_
I
PREVENURLO?
Nunca opere el infladoren eBe×terior cuando
eet6 Hoviendo o en condiciones mojadaa.
Nunca opere eBinflador sin las cubiertaa
proteetoras
o si est_n daSadas.
Siempre reemplace
eR_etrieos daSadoa
_ere
eB inflador.
los cordones
o gastados antes de
Las reparaciones
efectuadas per
personal no calificado pueden
eausar lesiones aerias o muerte per
eleetroeuei6n.
Todo cabBeado o reparaci6n el_ctrica
que esta unidad requiera debe hacerla
personam ealifieado de un servicentro
autorizado acatando los c6digos
el6ctricos nacional y locales.
Conexi6n a tierra: Si no
unidad adeeuadamente
eauaar lesiones aerias
a eRectrocuei6n.
Vet las instrucciones de
aplicables.
Asegurese que el circuite el_ctrico al
cual est6 conectado el inflador, provea
eonexi6n adecuada a tierra deB voltaje
eorreeto y tenga proteeeiSn adeeuada
mediante fusibles.
Amusar eR inflador en e×teriores,
eneh_3feRo a un tomaeorriente
con GFCI.
se eoneeta esta
a tierra, podr_a
o muerte debido
conexi6n a tierra
ADVERTENCIA:
Riesgo a la respiraci6n
2,C6M0
El aire comprimido directo del inflador no
es seguro para respirar. El chorm de aire
puede contener mon6xido de carbono,
vapores t6xicos o particulas s61idas
provenientes del tanque. Respirar estos
contaminantes puede causar lesiones
serias o muerte.
PREVENmRLO?
El aire que se obtiene directamente
del inflador nunca debe uaarse para
consume humane. Para ello se deben
usar fHtres en la I[nea y un equipo de
seguridad adeeuadamente
instaladoa
que, en conjunci6n
con el inflador,
produzean aire apto para consume
humane cumpliendo
previamente con
redes los eSdigos locales y federales.
21- SP
A10087
ADVERTENCIA:
Riesgo
de quemaduras
PUEDE OCURRIR?
Nunca
EBcontacto con piezas de metal
expuestas, como el cabezal del inflador
o los tubos de salida puede cauear
quemadurae
eerias=
ADVERTENCIA:
toeaP
Roe componentee
de
metam del infmador que est_n expuestas
durante o inmediatamente despu6s de
la operaci6n= Eminflador pePmaneeer_
caliente pot varies rninutos despu6s de
la operaclon=
No toque las cubiertas protectoras
ni intente daPle mantenimiento
a la
unidad haeta que se ee enfP_e=
Riesgo de piezas movibBes
_QUE PUEDE OCURRIR?
_.C6rvlO PREVENmRLO?
Las piezas movibBes como la polea, volante
o la correa, pueden eaueaP Beeiones sepias
si entran en contacto con el operador, su
ropa, cabello o joyas sueltas=
Nunca opePaP el infladoP sin lae
eubiePtas o con las eubiertae daSadas.
mntentaP operar o daPle rnantenimiento
al inflador sin las cubiertas protectoras
o siestas est_n da[iadas puede exponer
al operador a piezas movibles puede
eausaP lesionee sepias.
Cualquier PepaPaci6n que esta unidad
requiera debe hacerla el personal del
centPe de eervieio autoPizado=
O
ADVERTENCIA:
__
Riesgo
de caidas
,_QU¢: PUEDE OCURRIR?
_,C6MO PREVENIRLO?
Siempre opePe eRinfladoP en una
poaici6n eatable y seguPa para evitar su
movimiento accidental.
Nunca opere
el infladoP eobPe un techo o posici6n
elevada.
El inflador puede caePse de la
mesa, banco de trabajo o del techo
daS_ndoee y podP_a causaP leeiones
sepias o Barnuerta del opePadoP.
A10087
22-SP
iiiiiiiii_
....
ADVERTENCIA:
o
Riesgo pot operaci6n
ii_,,
insegura
_QUE PUEDE OCURRIR?
_C6MO
La operacidn insegura del inflador
puede causar mesiones serias o Ra
muerte a ueted u otras personae.
Lea y entienda
PREVENIRLO?
todas las instrucciones
este manual.
adverteneias
en
Familiar_eese
los controles
con el funcionamiento
del inflador.
y
y
Mantenga Razona de trabajo sin
personas, animales dom6sticos y
obst_culos.
Mantenga a los niSos alejados
inflador en rode momento.
del
No opere la unidad si est_ fatigado o
bajo mainflueneia de aBcohol o drogas.
Mant_ngase alerta en redo memento.
Nunea desactive los meeanismos de
eeguridad de esta unidad.
Dote el _rea de tabajo
de ineendioe.
con un e×tintor
No operae la unidad con piezas
famtantes, rotas o desautorizadas.
CONSERVE
Familiadcese
con estos t_rminos
ESTAS mNSTRUCCmONES
antes de
C6digos de Certificacidn:
Las unidades
que exhiben alguno de los siguientes
sfmbolos: UL, CUL, ETL, CETL han side
opere la unidad.
CFM: Pies cObicos per minuto. Unidad
de medida de flujo equivalente a 28,3
litros pot minuto.
evaluadas y certificadas pot laboratories
de seguridad independientes y cumplen
con las normas de seguridad de
Underwriters Laboratories (UL).
Cireuito o Rarnal de Circuito: Circuito
SCFM: Pies cL_bicos est_ndar per minute.
Una unidad de medida del aire producido.
PSIG: Libras pot pulgada cuadrada lefdas
en el man6metro. Unidad de medida de
presi6n equivalente
que Ileva la electricidad del panel de
distribuci6n el6ctrica al tomacorriente.
a 47,88 pascales.
q
Esta unidad puede usar los siguientes
accesorios
BoquiHa tipo aguja: para inflar pelotas de
deportes.
Extensi6n de boquiHa: se usa para inflar
articulos pequeNos como balsas de aire y
pelotas de playa.
que se incluyen con el inflador.
Adaptador inflador!desinflador
de gran flujo
con tres boquiltas y anillo seHador : se usa
para inflar o desinflar colchones de aire,
botes pequer3os y otros articulos inflables
que usan un gran volumen de aire de poca
presi6n.
23- SP
A10087
Contenido
de la Caja
Saque
1= Inflador con manguera y
adaptador universal para v_lvulas
1= Juego de accesorios
1 - Boquilla
1 = Extensi6n
el inflador
de la caja
1.
Agarre el inflador del asa y levantarlo
para sacarlo del cart6n.
2.
Saque todo el material de embalaje y
descartarlo.
1.
El enchufe del cord6n provisto tiene
una clavija para conexi6n a tierra.
Este enchufe debe conectarse a un
tomacorriente conectado a tierra.
tipo aguja para inflar
de boquilla
1 - Adaptador inflador/desinflador
de
gran flujo con tres boquillas y anillo
sellador
COMO ARMAR LA UNIDAD
Ubicaci6n
del inflador
Ubique el inflador en un lugar limpio, seco
y bien ventilado. La bomba del inflador y
su cubierta est_.n diseSadas para permititr
su enfriamiento adecuado. Las aberturas
IMPORTANTE: El tomacorriente que se
utilise debe estar instalado y conectado
a tierra de acuerdo a los c6digos y
ordenanzas locales.
en la unidad son necesarias para su
enfriamiento, no las obstruya con trapos
ni coloque otros contenedores u objetos
cerca de las aberturas.
Cerciorarse que el tomacorriente a
usarse tenga la misma configuraci6n
del enchufe con conexi6n a tierra.
NO USAR ADAPTADOR DE TIPO
ALGUNO.
Ver la ilustraci6n.
mNSTRUCCmONES
PARA
CONECTAR
A TmERRA
_.__
Riesgo de
cheque
el6ctrico.
En case de cortocircuito,
la cone×i6n a tierra reduce el riesgo
de cheque el6ctrico proveyendo una
via de escape a la corriente el6ctrica.
Este inflador debe coneetarse a tierra
adecuadarnente.
El inflador de aire est_ equipado con
un cord6n que tiene un alambre para
conectar a tierra y un enchufe adecuado
para tierra. El enchufe debe conectarse
a un tomacorriente instalado a tierra de
acuerdo con los c6digos y ordenanzas
locales.
A10087
ufe
_
Toma
conexi6n
Clavi!para
24-SP
tierra
a
tierra
3,
Antes de cada use, inspeccionar si el
cord6n y el enchufe tienen dafios.
4.
Si no entiende estas instrucciones
completamente,
o si tiene dudas si
el inflador esta conectado a tierra
correctament, haga que revisar
la instalaci6n por un electricista
calificado.
Riesge de
cheque
el6ctrico.
LA CONEXION INADECUADA
A TIERRA PUEDE CAUSAR CHEQUE
ELECTRICO.
Voltaje
No modifique
el enchufe provisto.
Si
no encaja en el tomacorriente,
un
eleetricista
califieado debe instalar un
tomacorriente
adecuado.
Ciertos modelos de infladores pueden
opere en circuito de 15 Amp. si es que:
Las reparaciones del cord6n y deR
enchufe s6Ro lae debe HACER un
eleetrisieta califieado.
Cables de e×tens}6n
eU_ctrica
Si - no obstante - debe utilizarse una
extensi6n de cable, asegOrese de que:
e
La extensi6n el6ctrica de 3
,,
,,
,,
deB Circuito
1.
El voltaje en circuito de
suministro es de 15 amperios.
2.
El circuito no se usa para suministrar
electricidad a otros equipos,
artefactos, luces, etc.
3.
Los cordones de extensi6n
con las especificaciones.
4.
El circuito estA equipado con
interrupter de circuito de 15 Amp.
o un fusible de retardo de 15 Amp.
Usar un fusible de retardo con la
marca "D" en Canada o con la marca
"T" en los EE.UU.
conductores, tenga un enchufe de
conexi6n a tierra de 3 hojas, y que
exista un recept_culo que acepte el
enchufe del producto.
Est6 en buenas condiciones.
No mAs largo que 50 pies (15,2 m).
Calibre 16 (AWG) o mayor. (La medida
de los cables se incrementa a medida
que su nOmero ordinal decrece. 14,
12, 10, y 8 AWG pueden ser usados
tambi6n.
y Protecci6n
Para los requerimientos de protecci6n de
voltaje y circuito del inflador, referirse a la
tabla especificaciones.
cumplen
Si no puede cumplirse alguna de las
condiciones mencionadas arriba,
o si la operaci6n del inflador causa
interrupciones repetidas de energJa,
puede ser necesario opere el inflador en
un circuito de 20 Amp. No es necesario
cambiar el cord6n.
25- SP
A10087
Famiiiaricese
con el infiador
Antes de opere esta unidad, LEA EL MANUAL DEL PROPIETARIO Y LAS REGLAS DE
SEGURIDAD. Compare las ilustraciones con la unidad y familiadcese con la ubicaci6n
de los diferentes controles y reguladores. Conserve 6ste manual para referencia futura.
Interruptor
Boquillas para
usarse con eB
adaptador inflador
desinflador
de
gran f(ujo
SeHador
Descripcion
/
flujo
E×tensi6n
para bobuilla
para inflar o desinflar colchones de aire,
botes pequefios, juguetes y otros artfculos
inflables que usan gran volumen de aire a
poca presi6n.
de la operaci6n
mnterruptor: Se usa para encender y
apague el inflador.
Medidor de Presi6n: Mide la presi6n en PSI
Adaptador
UniversaR para V_mvulas: Se
usa con los accesorios provistos con el
inflador y con las v_lvulas est_ndar
de Ilantas.
BoquiHa Tipo Aguja: Se conecta
directamente al adaptador universal para
v_lvulas para inflar pelotas de deportes.
E×tensi6n de BoquHla:
Se conecta
directamente al adaptador universal para
v_lvulas y se usa se usa para articulos
inflables pequeBos come balsas de aire y
pelotas de playa.
Adaptador
mnflador/Desinflador
de
Gran Fmujo: Se conecta directamente al
adaptador universal para v_lvulas y se usa
con las boquillas infladoras/desinfladoras
A10087
BoquiHas Infladoras/Desinfladoras:
Se
usan con el adaptador inflador/desinflador
de gran volumen de aire a baja presi6n.
AniHo SeHador: Se usa con las boquillas
infladoras / desinfladoras para evitar que el
aire se fugue de los art[culos inflables con
boquilla grande de entrada aire.
_
Riesgo de
reventaz6n.
Las Hantas, pelotas, juguetes y
otros articulos infBables que se
dejen desatendidos,
a veces pueden
inflarse muy r_pidamente,
a veees en
segundos y reventar causando lesiones
personales
o daSos a la propiedad.
26- SP
Como usar
desinfladora
1=
la boquiIBa infmadora /
de gran flujo:
Coloque el adaptador de v_lvula
universal en la boquilla infladora /
desinfladora de gran flujo como se
muestra.
5.
2.
Insertar la boquilla en el art{culo
inflable y poner en marcha el inflador,
referirse al p_rrafo "Come arrancar".
Presione la palanca en el adaptador
de v_lvula universal hacia abajo para
asegurarla en posici6n. NOTA: Si el
adaptador para vAIvula universal no
se asegura en posici6n, sepArelo del
cuerpo del adaptador para que no
quede a ras.
NO
a rae
NOTA: si el artfculo inflable no se pone
suficientemente firme, coloque el dedo
pulgar sobre la abertura para "desinflar"
para que todo el aire entre directamente
art[culo inflable.
3.
Seleccione la boquilla adaptadora
que se va a usar para inflar o
desinflar. NOTA: El anillo sellador
puede colocarse en cualquiera de las
boquillas para evitar que el aire fugue
de los artfculos inflables con boquillas
grandes de entrada de aire.
4.
La boquilla infladora/desinfladora
de gran flujo tiene una abertura
para "inflar" y otra para "desinflar".
Conecte la boquilla adaptadora en
el orificio preferido. NOTA: una
abertura est_ marcada "Inflation"
para inflar y la otra "Deflation" para
desinflar.
al
_[_F_j_
Rie sg o de
reventaz6n.
NO sobre inflar. Puede sobre inflar
el art_culo inflable. Tenet cuidado al
colocar eRdedo pulgar sobre el orificio
"desinflar".
Adaptador
Universal
instalado en
el orificio
para"desinflar"
27- SP
A10087
mMPORTANTE:. El medidor de presi6n
no medira correctamente mientras se
3.
est6 inflando. Apague la unidad y espere
que la aguja se estabilice, entonces la
presi6n que indique ser_ la aproxima. AI
inflar, det6ngase con frecuencia y mida la
presi6n.
Como inflar Ilantas:
1.
Coloque el adaptador
v_lvula de la Ilanta.
universal en la
2.
Presione la palanquita en el
Adaptador universal hacia abajo para
fijarlo en posici6n.
_
Riesgo de
objetos
disparados / reventados.
Si se infla
una Hanta demasiado, puede reventar o
el Adaptador universal
puede samtar de
la v_lvula y convertirse
en un proyeetil.
Para una medida precisa de la presi6n,
use un medidor de presiSn de Ilantas.
El medidor de presiSn de Ba unidad es
s61o para referencia general.
3.
Sujete la pelota como se muestra
y ponga en marcha el inflador
presionando el interruptor a la posici6n
"ON". Cuando la pelota est6 firme,
apague el inflador presionando el
interruptor a la posici6n "OFF".
Importante:
La mayoria de peBotas
earentes totalmente de aire, se
infBar_n en menos de 10 segundos.
NOTA: AI apagar la unidad es normal
escuchar un escape corto de aire.
Como Usar la Unidad
Como
1.
detenerla:
Presione el interruptor
"OFF" (apagado).
a la posici6n
NOTA: AI apagar la unidad es norma!
escuchar
un escape corto de aire.
Referirse al p_rrafo "Come arrancar
el inflador".
Oomo
_
inflar
pe_otas
Antes
Rieego de
Reventazdn.
Muehas peRotas totaRmente desinfRadas
se inflan totalmente en menos de
Coloque la boquilla tipo aguja en el
Adaptador universal para v_lvulas y
presione la palanquita hacia abajo para
fijarla en posici6n.
2.
tnserte la boquilla tipo aguja en la v_lvula
de la pelota que se va a inflar.
eg inflador:
1.
Cerciorarse que "OFF" (apagado)
2n
Instale la extensi6n de boquilla o la
boquilla infladora / desinfladora de gran
flujo en el Adaptador universal para
valvulas.
10 segundos.
Observe la pelota
euidadosamente
mientras se infla para
no sobre inflarla.
1.
de arrancar
Inserte la boquilla tipo aguja, la extensi6n
de la boquilla o la boquilla infladora
/ desinfladora de gran flujo con el
adaptador de boquilla deseado en el
articulo a inflarse.
_
Riesgo de
ReventazSn.
EBe×ceso de presi6n de aire genera
un riesgo de reventazSn. Verifique eual
es la presiSn m_×irna indicada per el
fabricante del objeto a inflarse. $iga
euidadosamente
las instrueciones
"Como Comenzar".
A10087
28-SP
Oomo
1.
2.
IMPORTANTE:
aPranc_P:
Coloque el interruptor en la posici6n
"OFF" (apagado).
Enchufe el cord6n del inflador a un
tomacorriente conectado a tierra.
NOTA: Antes de arrancar el inflador,
inf6rmese de la presi6n de aire deseada
(medida en PSI).
3.
Para arrancar el inflador, presione
el interruptor a la posici6n "ON"
(arrancar). Si se va a usar el medidor
de presi6n, obs6rvelo detenidamente.
Cuando la presi6n Ilegue al nivel
deseado, presione el interrupter a la
posici6n "OFF" (apagado).
Observe bien los artfculos
que se inflan para no sobre inflarlos.
IMPORTANTE:. El medidor de presi6n
no medir_ correctamente mientras se
est6 inflando. Algunas veces el medira
demasiado alto.
Apague la unidad y espere que la aguja se
estabilice, entonces la presi6n que indique
serA la aproxima. AI inflar, det6ngase con
frecuencia y mida la presi6n.
NOTA: El medidor de presi6n en la unidad
s61o es para referencia general. Para
una medici6n precisa, use un medidor
de presi6n separado (no se incluye), que
est6 dise_ado para el objeto que se est6
inflando.
NOTA: AI apagar la unidad es normal
escuchar un escape corto de aire.
Limpieza
1.
Coloque el interrupter en la posici6n
"OFF" (apagado) y desenchufe el
cord6n.
1.
Coloque el interruptor en la posici6n
"OFF" (apagado) y desenchufar el
cord6n.
2.
Guarde los accesorios en la bolsa
ubicada atr_s de la unidad. La bolsa
tiene un compartimiento pequeF_o
para guardar los accesorios mAs
pequefios.
Compartimiento
peqae_o
2.
Frote las partes plAsticas con agua
tibia y jab6n suave.
4.
Enrolle la manguera de aire en
forma suelta alrededor de la parte
superior del casco y enganchela en la
abrazadera.
Abrazadera
para
[a manguera
Enrolle el cord6n en forma suelta
alrededor de la unidad y enganche el
enchufe en el cord6n.
5.
29- SP
Guarde elinflador
y seco.
en unlugarlimpio
A10087
I_[_
Rieego de operaci6n insegura.
AI reparar el inflador,
quedan e×puestas fuentee de corriente,
piezae movibBes o
fuentee de aire comprimido.
Pueden produciree Resiones pereonales.
Deeenchufar
el inflador antes de intentar eualquier reparaei6n.
PROBLEMA
El motor no
arranca
CORRECCION
CAUSA
Fusible volado, disyuntor
circuito abierto.
de
1. Revise el fusible en la caja
de fusibles y c_mbielo si
fuese necesario. Reactive
el disyuntor de circuito. No
use un fusible o disyuntor de
circuito de mayor capacidad
que el especificado para ese
circuito en particular.
2. Revisar que el fusible en uso
sea el adecuado. Se debe
usar un fusible de retardo.
3. Inspeccione si existe un
problema de voltaje bajo.
4. Revise el cord6n de extensi6n.
5. Desconecte los otros
artefactos el6ctricos que
est6n operando en el mismo
circuito o hacer funcionar el
inflador en un circuito propio.
Cord6n de extensi6n
de
Revise la extensi6n
del cord6n
Iongitud o calibre inadecuado.
Motor defectuoso.
A10087
Comuniquese con un t6cnico
calificado de servicio.
30-SP
31-SP
A10087
Your Home
For repair - in your home - of all major brand appiiances,
iawn and garden equipment, or heating and cooiing systems,
no matter who made it, no matter who soJd it!
For !he repiacement parts, accessories and
owner s manuais that you need to doqt-yourseif.
For Sears professionai instaiiation of home appiiances
and items Hikegarage door openers and water heaters.
1-800-4-MY-HOME ®
Anytime, day or night
(1-800-469-4663)
(U.S,A. and Canada)
www.sears_cora
www_sears_ca
Our Home
For repair of carry-in products like vacuums, lawn equipment,
and electronics, call or go on-line for the nearest
Sears Parts and Repair Center.
1-800-488-1222
Anytime,
day or night (U,S.A,
only)
www_aeara_com
To purchase a protection agreement (U.S.A.)
or maintenance agreement (Canada) on a product serviced by Sears:
1-800-827-6655 (U.S.A.)
Para pedir servicio de reparaci6n
a domicilio,y para ordenar piezas:
! -888-SU-HOG.a_q_
c:e!!!
1-800-361-6665 (Canada)
Au Canada pour service en franqais:
1.800.LE.FOYERMC
sM
(1-800-533-6937)
(1"688-784"6427)
@ SearA Roebuck
(6 Registered
(6 Mama
Mc Marque
www.sears, ca
and Co
Trademark
Registrada
/ TM Trademark
/ T_ Marca
de commerce
/ s_ Service
de Fabrica
/ MD Marque
/ SM Mama
dapos_e
Mark
of Sears,
de Servicio
de Sears,
Roebuck
Roebuck
de Sears,
and Co.
and Co
Roebuck
and Co