1
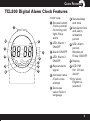
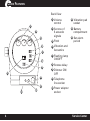
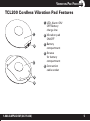
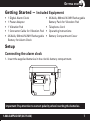
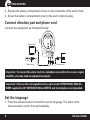
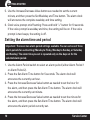
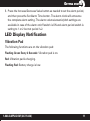
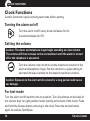
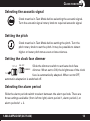
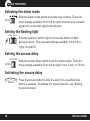
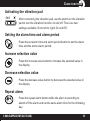
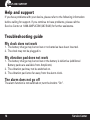
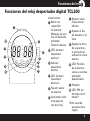
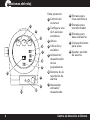
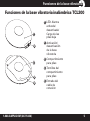
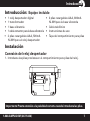
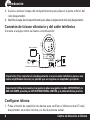
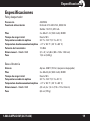
TCL200
User Guide
CONTENTS
Digital Alarm Clock Features ............. 3
Clock Functions ................................. 12
Cordless Vibration Pad Features ....... 5
Help and Support .............................. 16
Important Safety Instructions ........... 6
Troubleshooting Guide ..................... 16
Included Equipment ............................ 7
Maintenance and Warranty .............. 17
Setup .................................................... 7
Technical Details................................ 19
LED Display Notification ................... 11
FCC Compliance
The FCC requires that you will be advised of certain requirements involving the use of this telephone.
1. This equipment complies with Part 68 of the FCC rules. A label on the base unit of this equipment contains, among other information, the ACTA Registration Number
(US:AAAEQ##TXXXX) and the Ringer Equivalence Number (REN) for this equipment. You must, upon request, provide this information to your telephone company.
2. An applicable certification jacks Universal Service Order Codes (USOC) for the equipment is provided (i.e., RJ11C) in the packaging with each piece of approved
terminal equipment.
3. A plug and jack used to connect this equipment to the premises wiring and telephone network must comply with the applicable FCC Part 68 rules and requirements
adopted by the ACTA. A compliant telephone cord and modular plug is provided with this product. It is designed to be connected to a compatible modular jack that is
also compliant. See installation instructions for details.
4. The REN is useful to determine the quantity of devices you may connect to your telephone line and still have all of those devices ring when your number is called.
In most, but not all areas, the sum of the REN of all devices should not exceed fi ve (5.0). To be certain of the number of devices you may connect to your line, as
determined by the REN, you should call your local telephone company to determine the maximum REN for your calling area.
NOTICE: If your home has specially wired alarm equipment connected to the telephone line, ensure the installation of this equipment does not disable your alarm
equipment. If you have questions about what will disable alarm equipment, consult your telephone company or a qualified installer.
5. If your telephone causes harm to the telephone network, the telephone company may discontinue your service temporarily. If possible, they will notify you in
advance. But if advance notice is not practical, you will be notified as soon as possible. You will be advised of your right to file a complaint with the FCC.
6. Your telephone company may make changes to its facilities, equipment, operations or procedures that could affect the proper operation of your equipment. If they
do, you will be given advance notice so as to give you an opportunity to maintain uninterrupted service.
7. If you experience trouble with the telephone, please contact the Amplicom Service Center at 1-866-AMPLICOM (267-5426) for repair/warranty information. The
telephone company may ask you to disconnect this equipment from the network until the problem have been corrected or you are sure that the equipment is not
malfunctioning.
8. This equipment may not be used on coin service provided by the telephone company. Connection to party lines is subject to state tariffs. (Contact your state public
utility commission or corporation commission for information.)
This device complies with Part 15 of the FCC Rules. Operation is subject to the following two conditions: (1) This device may not cause harmful interference, and (2) this
device must accept any interference received, including interference that may cause undesired operation. Privacy of communications may not be ensured when using
this phone. Changes or modifications not expressly approved in writing by Amplicom may void the user’s authority to operate this equipment.
Some cordless phones operate at frequencies that may cause interference to nearby TVs and VCRs; to minimize or prevent such interference, the base of the cordless
phone should not be placed near or on top of a TV or VCR; and, if interference is experienced, moving the cordless telephone farther away from the TV or VCR will
often reduce or eliminate the interference.
2
Instructions available in other languages at www.amplicomusa.com.
CLOCK FEATURES
TCL200 Digital Alarm Clock Features
Front View
1 Snooze button
/Voice prompt
/Incoming call
light /Stop
alarm
11
12
12
22
2 LED: Alarm 1
ON/OFF
1111
33
10
10
44
99
55
66
88
77
3 Alarm ON/OFF
4 LED: Alarm 2
ON/OFF
5 Repeat alarm
signal
6 Increase value
/Clock voice
prompt
7 Decrease
8 Set weekday
and time
9 Set alarm time
and alarm
activation
period
10 LED: Alarm
period,
Monday to
Friday ON/OFF
11 Display
12 LED: PM
(for 12-hour
clock)*
*Only when
English is
selected
value /Select
language
3
3
CLOCK FEATURES
Back View
13 Volume
control
13
13
14 Set one of
14
14
15
15
5 acoustic
signals
15 Pitch
16
16
17
17
22 Vibration pad
socket
23 Battery
compartment
24 Set alarm
period
16 Vibration and
Acoustics
17 Flashing lamp
18
18
19
19
24
24
ON/OFF
18 Snooze delay
19 Dimmer ON/
OFF
20
20
20 Telephone
line socket
21
21
23
23
4
22
22
21 Power adapter
socket
Service Center
VIBRATION PAD FEATURES
TCL200 Cordless Vibration Pad Features
1 LED: Alarm ON/
OFF/Battery
charge low
1
2 Vibration pad
ON/OFF
22
3 Battery
compartment
4 Screws
33
for battery
compartment
5 Connection
cable socket
44
55
1-866-AMPLICOM (267-5426)
5
SAFETY
Important Safety Instructions
Read this operating manual thoroughly.
SAVE THESE INSTRUCTIONS
Intended use
This alarm clock is designed to provide an acoustic alarm or alert signal at a set
time or on receipt of a telephone call. Any other use is considered unintended
use. Unauthorized modification or reconstruction is not permitted. Do not open
the device and attempt any repair work yourself.
Installation location
Prevent excessive exposure to smoke, dust, vibration, chemicals, moisture, heat
and direct sunlight.
Heart pacemaker
Always maintain a distance of at least 6 inches from implanted heart
pacemakers to prevent any possible interference.
6
Service Center
GETTING STARTED
Getting Started — Included Equipment
•
•
•
•
•
1 Digital Alarm Clock
1 Power Adapter
1 Vibration Pad
1 Connector Cable for Vibration Pad
2XAAA, 500mA Ni-MH Rechargable
Battery for Alarm Clock
•
•
•
•
3XAAA, 800mA Ni-MH Rechargable
Battery Pack for Vibration Pad
Telephone Cord
Operating Instructions
Battery Compartment Cover
Setup
Connecting the alarm clock
1. Insert the supplied batteries in the clock’s battery compartment.
Important: Pay attention to correct polarity when inserting the batteries.
1-866-AMPLICOM (267-5426)
7
GETTING STARTED
2. Replace the battery compartment cover on the underside of the alarm clock.
3. Screw the battery compartment cover to the alarm clock housing.
Connect vibration pad and phone cord
Connect the equipment as illustrated below:
Vibration Pad
Power Supply
Telephone Line
Important: To connect the alarm clock to a telephone connection for use as a signal
amplifier, you may need an appropriate adapter.
Important: Only use the rechargeable battery pack model GPHCH73N07, 800mAh
NiMH supplied by GPI INTERNATIONAL LIMITED and the telephone cord provided.
Set the language
1. Press the snooze button to check the current language. The alarm clock
announces the current time and weekday.
8
Service Center
GETTING STARTED
2. To change the language, hold down the select language button for 10
seconds. The alarm clock will announce the time and weekday — in the next
language.
3. The languages will change in the following order: German, French, Italian,
Spanish, and English.
Set the weekday and time
1. Press the Set Weekday and Time button for 5 seconds. The alarm will
announce the weekday currently set.
2. Use the Increase/Decrease Value buttons as needed to set the current
weekday. The alarm clock will announce the weekday currently set.
Important: If the language is set to English, you can then select the time format.
Press the Increase/Decrease Value buttons to select between the 12 and 24-hour
display. Press the Set Weekday and Time button to confirm the setting. Skip Step 3
below.
3. Press the Set Weekday and Time button to confirm the setting. The alarm
clock will announce the time currently set.
4. Use the Increase/Decrease Value buttons as needed to set the current hour,
and then press the Set Weekday and Time button. The alarm clock will
announce the minute currently set.
1-866-AMPLICOM (267-5426)
9
GETTING STARTED
5. Use the Increase/Decrease Value buttons as needed to set the current
minute, and then press the Set Weekday and Time button. The alarm clock
will announce the complete weekday and time setting.
6. Clock voice prompt on/off setting: Press and hold “+” button for 10 seconds.
If the voice prompt is weekday and time, the setting will be on. If the voice
prompt is two beeps, the setting is off.
Setting the alarm time and period
Important: There are two alarm period settings available. You can set one of three
alarm periods for each setting (Monday to Friday, Monday to Sunday, or Saturday
and Sunday). The alarm time you set is repeated only on the days set for the
selected alarm period.
1. Use the Alarm Period switch to select an alarm period (either Alarm Period 1
or Alarm Period 2).
2. Press the Set Alarm Time button for 5 seconds. The alarm clock will
announce the currently set hour.
3. Press the Increase/Decrease Value button as needed to set the hour for
the alarm, and then press the Set Alarm Time button. The alarm clock will
announce the currently set minute.
4. Press the Increase/Decrease Value button as needed to set the minute for
the alarm, and then press the Set Alarm Time button. The alarm clock will
announce the alarm period currently set.
10
Service Center
GETTING STARTED
5. Press the Increase/Decrease Value button as needed to set the alarm period,
and then press the Set Alarm Time button. The alarm clock will announce
the complete alarm setting. The alarm volume/acoustic/pitch settings are
available in case of the alarm on/off switch is ON and alarm period switch is
setting to 1 or 2 but not period 1+2.
LED Display Notification
Vibration Pad
The following functions are on the vibration pad:
Flashing Green Every 2 Seconds: Vibration pad is on.
Red: Vibration pad is charging.
Flashing Red: Battery charge is low.
1-866-AMPLICOM (267-5426)
11
CLOCK FUNCTIONS
Clock Functions
Certain functions require entering test mode before setting.
Turning the alarm on/off
Turn the alarm on/off rotary knob clockwise for On.
Counterclockwise for Off.
Setting the volume
Caution: The alarm and telephone ringer begin sounding at a low volume.
The volume will then increase to the set maximum until the alarm is turned
off or the telephone is answered.
Turn the volume rotary knob to set the maximum volume for the
alarm and telephone ringer. Set the volume to a quiet setting to
start and increase it slowly to the desired maximum volume.
Caution: Exposure to the alarm at full volume for a long period could cause
ear damage.
For test mode
Turn the alarm on/off switch to the on position. Turn all switches on the back of
the clock to their far right position (when looking at the back of the clock). Press
and hold the Snooze button and plug in the clock. Press the snooze button
again to activate Test Mode.
12
Service Center
CLOCK FUNCTIONS
Selecting the acoustic signal
Clock must be in Test Mode before selecting the acoustic signal.
Turn the acoustic signal rotary knob to required acoustic signal.
Setting the pitch
Clock must be in Test Mode before setting the pitch. Turn the
pitch rotary knob to set the pitch. It may be possible to detect
higher or lower pitch tones even at low volumes.
Setting the clock face dimmer
Slide the dimmer switch to activate clock face
dimmer. When set to ON, the brightness of the clock
1+2
face is automatically adapted. When set to OFF,
automatic adaptation is switched off.
1 2 1+2
ON OFF
DIMMER
Selecting the alarm period
Slide the alarm period switch to select between the alarm periods. There are
three settings available: (from left to right) alarm period 1, alarm period 2, or
alarm periods 1 + 2.
1-866-AMPLICOM (267-5426)
13
CLOCK FUNCTIONS
Selecting the alarm mode
Slide the alarm mode switch to set the type of alarm. There are
three settings available: (from left to right) vibration only, acoustic
signal only or acoustic signal and vibration.
MODE
Setting the flashing light
ON OFF
Slide the switch to set the light in the snooze button to flash
during an alarm. There are two settings available: (from left to
right) On and Off.
Setting the snooze delay
0m 5m 15m
SNOOZE
Slide the snooze delay switch to set the snooze delay. There are
three settings available: (from left to right) 0 min, 5 min, or 15 min.
Activating the snooze delay
SNOOZE
14
Press the snooze button to stop the alarm for a specified time
before it resumes. To activate the snooze function, see “Setting
the snooze delay”.
Service Center
CLOCK FUNCTIONS
Activating the vibration pad
After connecting the vibration pad, use the switch on the vibration
pad to turn the vibration function on and off. There are two
settings available: (from left to right) On and Off.
Setting the alarm time and alarm period
Press the set alarm time and alarm period button to set the alarm
time and the active alarm period.
Increase selection value
Press the increase value button to increase the selected value in
the display.
Decrease selection value
Press the decrease value button to decrease the selected value in
the display.
Repeat alarm
Press the repeat alarm button while the alarm is sounding to
switch off the alarm and set the same alarm time for the following
day.
1-866-AMPLICOM (267-5426)
15
HELP AND SUPPORT
Help and support
If you have problems with your device, please refer to the following information
before calling for support. If you continue to have problems, please call the
Service Center at 1-866-AMPLICOM (267-5426) for further assistance.
Troubleshooting guide
My clock does not work
1. The battery charge may be too low or no batteries have been inserted.
2. The clock may not be plugged in.
My vibration pad does not work
1. The battery charge may be too low or the battery is defective (additional
Battery packs are available from Amplicom).
2. The vibration pad may not be switched on.
3. The vibration pad is too far away from the alarm clock.
The alarm does not go off
The alarm function is not switched on; turn the knob to “On”.
16
Service Center
MAINTENANCE AND WARRANTY
Maintenance and Warranty
Maintenance
•
•
Please clean your equipment’s surfaces with a soft, lint-free cloth.
Never use cleaning agents or solvents.
Warranty
AMPLICOM equipment is produced and tested according to the latest
production methods. The implementation of carefully chosen materials and
highly developed technologies ensure trouble free functioning and a long
service life. The terms of the warranty do not apply where the cause of the
equipment malfunction is the fault of the telephone network operator or any
interposed private branch extension system. The terms of the warranty do not
apply to the rechargeable battery pack or power packs used in the products.
The period of warranty is 24 months from the date of purchase.
All deficiencies resulting from material of production faults which occur during
the period of warranty will be eliminated free of charge. Rights to claims under
the terms of warranty are annulled following intervention by the purchaser or
third parties. Damage caused as a result of improper handling or operation,
incorrect positioning or storing, improper connection or installation, Acts of
God or other external influence are not covered by the terms of warranty.
In the case of complaints, we reserve the right to repair or replace defect
parts or provide a replacement device. Replacement parts or devices become
our property.
Rights to compensation in the case of damage are excluded where there is no
evidence of intent or gross negligence by the manufacturer.
1-866-AMPLICOM (267-5426)
17
MAINTENANCE AND WARRANTY
If your equipment shows signs of defect during the period of warranty, please
return to the sales outlet in which you purchased the AMPLICOM equipment
together with the purchase receipt. All rights to claims under the terms of
warranty in accordance with this agreement must be asserted exclusively with
regard to your sales outlet.
Two years after the purchase of our products, claims under the terms of
warranty can no longer be asserted.
Declaration of conformity
The ETL Listed Mark is an alternative to the CSA and UL marks. ETL
Testing Laboratories owned by Intertek Testing Services (ITS) is
recognized by OSHA as a Nationally Recognized Testing Laboratory
(NRTL). ITS tests products according to nearly 200 safety and
performance standards. The ETL Listed Mark is accepted throughout the United
States when denoting compliance with nationally recognized standards such as
ANSI, IEC, UL, and CSA.
This certification mark indicates that the product has been tested to and has
met the minimum requirements of a widely recognized (consensus) U.S.
product safety standard, that the manufacturing site has been audited, and that
the applicant has agreed to a program of periodic factory follow-up inspections
to verify continued conformance.
18
Service Center
TECHNICAL DETAILS
Technical details
Alarm Clock
Frequency
Power supply
Batteries
Initial charging time
Optimum ambient temperature
Optimum storage temperature
Transmission power
Dimensions L / W / H
Weight
433 MHz
Input: 210-240 VAC, 50/60Hz
Output: 12VDC, 670mA
2 x AAA 1.2 V, 500 mAh, NiMH
Up to 16 hrs
32˚F to 104˚F (0˚C to 40˚C)
-4˚F to 140˚F (-20˚C to 60˚C)
10 dBm
3.1 x 5.1 x 5.8 in (80 x 130 x 146 mm)
12.2 oz (346 g)
Vibration pad
Range
Batteries
Initial charging time
Optimum ambient temperature
Optimum storage temperature
Dimensions L / W / H
Weight
1-866-AMPLICOM (267-5426)
Approx. 328 ft (clear space)
3 x AAA 3.6 V, 800 mAh, NiMH
Up to 16 hrs
32˚F to 104˚F (0˚C to 40˚C)
-4˚F to 140˚F (-20˚C to 60˚C)
4.5 x 4.3 x 1.4 in (115 x 110 x 35 mm)
6.3 oz (178 g)
19
THIS PAGE LEFT INTENTIONALLY BLANK
TCL200
Guía del
usuario
Índice
Funciones del reloj despertador......... 3
Funciones de la base vibratoria
inalámbrica........................................... 5
Instrucciones importantes de
seguridad.............................................. 6
Equipo incluido..................................... 7
Instalación............................................. 7
Notificación por LED.......................... 11
Funciones del reloj............................. 12
Ayuda y asistencia técnica................ 16
Guía para la solución de problemas.16
Mantenimiento y garantía................. 17
Especificaciones................................. 19
Cumplimiento con la FCC
La FCC (Comisión Federal de Comunicaciones) exige que usted conozca ciertos requisitos con relación al uso de este teléfono.
1. Este equipo cumple con la Parte 68 de las normas de la FCC. En la parte inferior de este equipo se encuentra una etiqueta que contiene información que detalla, entre
otras cosas, el número de registro del ACTA (Comité Administrativo para Accesorios Terminales) (US:AAAEQ##TXXXX) y el REN (número de equivalencia de timbre)
correspondientes a este equipo. Si se le solicita, deberá proporcionar esta información a su compañía de teléfono.
2. En el embalaje, con cada artículo del equipo terminal aprobado se incluyen clavijas de conexión certificadas aplicables en conformidad con los Códigos Universales de
Órdenes de Servicio (USOC), por ejemplo RJ11C.
3. El enchufe y las clavijas de conexión utilizados para conectar este equipo al cableado de las instalaciones y a la red telefónica deben cumplir con las normas y los requisitos
aplicables de la Parte 68 de la FCC adoptados por el ACTA. Con este producto se provee un cable de teléfono y un enchufe modular que cumplen con las normas. Está
diseñado para poder conectarse a un conector modular compatible que también esté autorizado. Para más información, consulte las instrucciones de instalación.
4. El REN ayuda a determinar la cantidad de dispositivos que puede conectar a su línea telefónica sin que dichos dispositivos dejen de sonar al recibir llamadas. En la mayoría
de las áreas, pero no en todas, la suma del REN de todos los dispositivos no debe ser mayor que cinco (5,0). Para cerciorarse de la cantidad de dispositivos que puede
conectar a la línea, según el total de los números REN, comuníquese con su compañía de teléfono local para determinar el máximo de REN para su área de llamada.
AVISO: Si su hogar cuenta con un equipo de alarma con cableado especial conectado a la línea telefónica, asegúrese de que la instalación de este equipo no desactive el
equipo de alarma. Si tiene dudas sobre los factores que desactivan el equipo de alarma, consulte a la compañía de teléfono o a personal de instalación calificado.
5. Si su teléfono ocasiona daños a la red de telefonía, la compañía de teléfono podría interrumpir el servicio temporalmente. Si es posible, le notificarán con anticipación. Sin
embargo, si la notificación anticipada no es viable, le notificarán tan pronto como sea posible. Asimismo, le informarán sobre su derecho a presentar una queja ante la FCC.
6. La compañía de teléfono puede efectuar cambios en las instalaciones, los equipos, la manera de operar o los procedimientos que podrían afectar el funcionamiento
adecuado de su equipo. En ese caso, recibirá un aviso previo para permitirle hacer los cambios necesarios para tener servicio sin interrupción.
7. Si tiene problemas con el teléfono, comuníquese con el Centro de Atención al Cliente de Amplicom al número 1-866-AMPLICOM (267-5426) para obtener información sobre
la garantía o reparaciones. La compañía de teléfono puede pedirle que desconecte el equipo de la red hasta que el problema se haya solucionado o hasta que esté seguro de
que el equipo funciona correctamente.
8. Este equipo no puede ser usado con el servicio de monedas provisto por la compañía de teléfono. La conexión a una línea compartida está sujeta a las tarifas del estado.
(Para obtener más información, comuníquese con la comisión de servicios públicos estatal o la comisión de corporaciones).
Este dispositivo cumple con la Parte 15 de las normas de la FCC. El funcionamiento está sujeto a las siguientes dos condiciones: (1) Este dispositivo no debe causar
interferencias perjudiciales, y (2) este dispositivo debe aceptar cualquier interferencia recibida, incluidas aquellas que puedan provocar un mal funcionamiento. Al usar este
teléfono, no se puede garantizar la privacidad de las comunicaciones. Los cambios o las modificaciones realizadas a este equipo que no estén expresamente aprobados por
escrito por Amplicom pueden invalidar el derecho del usuario a utilizar el equipo.
Algunos teléfonos inalámbricos funcionan en frecuencias que pueden causar interferencia con televisores o videocaseteras que se encuentren cerca. Para minimizar o
evitar dicha interferencia, la base del teléfono inalámbrico no debe colocarse cerca o encima del televisor o la videocasetera. Si se produce interferencia, alejar el teléfono
inalámbrico del televisor o la videocasetera con frecuencia puede reducirla o eliminarla.
2
Instrucciones disponibles en otros idiomas en www.amplicomusa.com.
Funciones del reloj
Funciones del reloj despertador digital TCL200
Vista frontal
1 Botón de
repetición
de alarma/
Mensaje de voz
/luz de llamada
entrante/
Detener alarma
11
12
12
22
1111
33
10
10
44
55
99
66
88
77
2 LED: Activar/
desactivar
alarma 1
3 Activar/
desactivar
alarma
4 LED: Activar/
desactivar
alarma 2
5 Repetir señal
de alarma
6 Aumentar valor
/mensaje de
voz del reloj
3
7 Reducir valor
/Seleccionar
idioma
8 Ajustar el día
de semana y la
hora
9 Ajustar la hora
de la alarma y
el período de
activación de la
alarma
10 LED: Período
de la alarma,
Lunes a viernes
activado/
desactivado
11 Pantalla
12 LED: PM (en
formato de 12
horas)*
*Sólo cuando
se selecciona
inglés
3
Funciones del reloj
Vista posterior
13 Control del
volumen
13
13
14 Configure una
14
14
15
15
16
16
17
17
18
18
19
19
15 Altura
16 Vibración y
acústica
17 Activación/
desactivación
de luz
parpadeante
línea telefónica
21 Entrada para
transformador
22 Entrada para
base vibratoria
23 Compartimiento
para pilas
24 Ajustar período
de alarma
18 Demora de la
24
24
20
20
21
21
23
23
4
de 5 señales
acústicas
20 Entrada para
22
22
repetición de
alarma
19 Atenuador
activado/
desactivado
Centro de Atención al Cliente
Funciones de la base vibratoria
Funciones de la base vibratoria inalámbrica TCL200
1 LED: Alarma
1
22
33
activada/
desactivada/
Carga de las
pilas baja
2 Activación/
desactivación
de la base
vibratoria
3 Compartimiento
para pilas
4 Tornillos del
44
55
1-866-AMPLICOM (267-5426)
compartimiento
para pilas
5 Entrada del
cable de
conexión
5
Seguridad
Instrucciones importantes de seguridad
Lea detenidamente este manual de uso.
GUARDE ESTAS INSTRUCCIONES
Uso previsto
Este reloj despertador está diseñado para emitir una alarma acústica o señal
de alerta a una hora prefijada o al recibir una llamada telefónica. Cualquier
otro uso se considera no conforme al objetivo previsto. No se permite ninguna
modificación ni reconstrucción no autorizada. No abra el dispositivo ni intente
repararlo solo.
Ubicación para la instalación
Evite la exposición excesiva a humo, polvo, vibración, productos químicos,
humedad, calor y rayos directos del sol.
Marcapasos
Mantenga siempre una distancia de al menos 6 pulgadas (15 cm) desde
marcapasos implantados para evitar posibles interferencias.
6
Centro de Atención al Cliente
Introducción
Introducción: Equipo incluido
•
•
•
•
•
1 reloj despertador digital
1 transformador
1 base vibratoria
1 cable conector para la base vibratoria
2 pilas recargables AAA, 500mA
Ni-MH para el reloj despertador
• 3 pilas recargables AAA, 800mA
Ni-MH para la base vibratoria
• Cable telefónico
• Instrucciones de uso
• Tapa del compartimiento para pilas
Instalación
Conexión del reloj despertador
1. Introduzca las pilas provistas en el compartimiento para pilas del reloj.
Importante: Preste atención a la polaridad correcta cuando introduzca las pilas.
1-866-AMPLICOM (267-5426)
7
Introducción
2. Vuelva a colocar la tapa del compartimiento para pilas en la parte inferior del
reloj despertador.
3. Atornille la tapa del compartimiento para pilas al alojamiento del reloj despertador.
Conexión de la base vibratoria y del cable telefónico
Conecte el equipo como se ilustra a continuación:
Base vibratoria
Fuente de alimentación
Línea telefónica
Importante: Para conectar el reloj despertador a una conexión telefónica para su uso
como amplificador de señal, es posible que se requiera un adaptador apropiado.
Importante: Utilice únicamente el conjunto de pilas recargables modelo GPHCH73N07, de
800 mAh NiMH, provisto por GPI INTERNATIONAL LIMITED, y el cable telefónico provisto.
Configurar idioma
1. Pulse el botón de repetición de alarma para verificar el idioma actual. El reloj
despertador anunciará la hora y el día de semana actual.
8
Centro de Atención al Cliente
Introducción
2. Para cambiar el idioma, mantenga pulsado el botón de selección de idioma
durante 10 segundos. El reloj despertador anunciará la hora y el día de
semana (en el siguiente idioma).
3. Los idiomas cambiarán en el siguiente orden: alemán, francés, italiano,
español e inglés.
Ajustar el día de semana y la hora
1. Mantenga pulsado el botón de ajuste de día de semana y hora durante 5
segundos. El reloj despertador anunciará el día de semana actualmente ajustado.
2. Utilice los botones para aumentar/reducir valor según resulte necesario
para ajustar el día de semana actual. El reloj despertador anunciará el día de
semana actualmente ajustado.
Importante: Si el idioma se selecciona en inglés, puede elegir el formato de hora.
Pulse los botones para aumentar/reducir valor para seleccionar el formato de 12 o
el de 24 horas. Pulse el botón de ajuste de día de semana y hora para confirmar el
ajuste. Saltee el paso 3 siguiente.
3. Pulse el botón de ajuste de día de semana y hora para confirmar el ajuste. El
reloj despertador anunciará la hora actualmente ajustada.
4. Utilice los botones para aumentar/reducir valor según resulte necesario para
ajustar la hora actual y luego pulse el botón de ajuste de día de semana y
hora. El reloj despertador anunciará los minutos actualmente ajustados.
1-866-AMPLICOM (267-5426)
9
Introducción
5. Utilice los botones para aumentar/reducir valor según resulte necesario
para ajustar los minutos actuales y luego pulse el botón de ajuste de día de
semana y hora. El reloj despertador anunciará el ajuste completo de día de
semana y hora.
6. Configuración activada/desactivada de mensaje de voz del reloj: Pulse y
mantenga presionado el botón “+” durante 10 segundos. Si el mensaje de
voz es el día de semana y la hora, la configuración estará activada. Si el
mensaje de voz son dos pitidos, la configuración está desactivada.
Ajuste de la hora y el período de la alarma
Importante: Hay dos ajustes de período de alarma disponibles. Puede optar por
uno de tres períodos de alarma para cada ajuste (lunes a viernes, lunes a sábado,
o sábado y domingo). La alarma que configure se repetirá únicamente los días
correspondientes al período de alarma seleccionado.
1. Utilice el interruptor de período de alarma para seleccionar un período de
alarma (período de alarma 1 o período de alarma 2).
2. Mantenga pulsado el botón de ajuste de hora de la alarma durante 5
segundos. El reloj despertador anunciará la hora actualmente ajustada.
3. Pulse el botón para aumentar/reducir valor según resulte necesario para fijar
la hora de la alarma y luego pulse el botón de ajuste de hora de la alarma. El
reloj despertador anunciará los minutos actualmente ajustados.
4. Pulse el botón para aumentar/reducir valor según resulte necesario para fijar
los minutos de la alarma y luego pulse el botón de ajuste de hora de la alarma.
El reloj despertador anunciará el período de alarma actualmente ajustado.
10
Centro de Atención al Cliente
Introducción
5. Pulse el botón para aumentar/reducir valor según resulte necesario para fijar
el período de alarma y luego pulse el botón de ajuste de hora de la alarma.
El reloj despertador anunciará el ajuste completo de la alarma. Los ajustes
de volumen/señal acústica/altura pueden realizarse si el interruptor de
activación/desactivación de la alarma está en la posición de activación y el
interruptor de período de alarma está en la posición 1 o 2, pero no 1+2.
Notificación por LED
Base vibratoria
Las siguientes funciones se muestran en la base vibratoria:
Verde parpadeante cada 2 segundos: La base vibratoria está activada.
Rojo: La base vibratoria se está cargando.
Rojo parpadeante: La carga de las pilas está baja.
1-866-AMPLICOM (267-5426)
11
Funciones del reloj
Funciones del reloj
Ciertas funciones requieren el ingreso al modo de prueba antes de realizar el ajuste.
Activar y desactivar la alarma
Gire la perilla para activar/desactivar la alarma en sentido horario
para activarla. Gírela en sentido antihorario para desactivarla.
Ajuste del volumen
Precaución: El timbre de la alarma y del teléfono comienza a sonar a bajo
volumen. El volumen aumenta hasta el valor máximo ajustado hasta que se
apaga la alarma o se contesta el teléfono.
Gire la perilla de volumen para ajustar el volumen máximo del timbre
de la alarma y del teléfono. Ajuste el volumen a un valor silencioso para
comenzar, con un aumento gradual al volumen máximo deseado.
Precaución: La exposición a la alarma a todo volumen durante un período
prolongado puede provocar lesiones auditivas.
Activación del modo de prueba
Deslice el interruptor de activación/desactivación de la alarma a la posición de
activación. Deslice todos los interruptores de la parte posterior del reloj hacia
la posición extrema derecha (mirando hacia la parte posterior del reloj). Pulse y
mantenga presionado el botón de repetición de alarma y enchufe el reloj. Vuelva
a pulsar el botón de repetición de alarma para activar el modo de prueba.
12
Centro de Atención al Cliente
Funciones del reloj
Selección de la señal acústica
El reloj debe estar en el modo de prueba para seleccionar la señal
acústica. Gire la perilla de señal acústica para elegir la señal
acústica que desee.
Ajuste de la altura
El reloj debe estar en el modo de prueba para seleccionar la altura.
Gire la perilla de altura para ajustar la altura. Es posible discernir
tonos a altura mayor o menor incluso en un volumen bajo.
Ajuste del atenuador de la esfera del reloj
Deslice el interruptor del atenuador para activar el
atenuador de la esfera del reloj. Cuando se ajusta en ON,
1+2
el brillo de la esfera del reloj se atenúa automáticamente.
Cuando se ajusta en OFF, la atenuación automática queda desactivada.
1 2 1+2
ON OFF
ATENUADOR
Selección del período de alarma
Deslice el interruptor de período de alarma para seleccionar el período de
alarma. Hay tres ajustes disponibles: (de izquierda a derecha) período de
alarma 1, período de alarma 2, o períodos de alarma 1 + 2.
1-866-AMPLICOM (267-5426)
13
Funciones del reloj
Ajuste del modo de alarma
Deslice el interruptor de modo de alarma para ajustar el tipo de alarma.
Hay tres ajustes disponibles: (de izquierda a derecha) vibración
solamente, señal acústica solamente o señal acústica y vibración.
MODO
Ajuste de la luz parpadeante
ON OFF
Deslice el interruptor para hacer que la luz del botón de repetición de
alarma parpadee mientras suene la alarma. Hay dos ajustes
disponibles: (de izquierda a derecha) activado (On) y desactivado (Off).
Ajuste de la demora de la repetición de alarma
0m 5m 15m
REPETICIÓN
DE ALARMA
Deslice el interruptor de demora de repetición de alarma para
ajustar la demora. Hay tres ajustes disponibles: (de izquierda a
derecha) 0 min, 5 min o 15 min.
Activación de la demora de la repetición de alarma
REPETICIÓN
DE ALARMA
14
Pulse el botón de repetición de alarma para detener la alarma
durante un período determinado antes de que vuelva a sonar.
Para activar la función de repetición de alarma, consulte “Ajuste
de la demora de la repetición de alarma”.
Centro de Atención al Cliente
Funciones del reloj
Activación de la base vibratoria
Después de conectar la base vibratoria, active o desactive la función
de vibración con el interruptor de la base vibratoria. Hay dos ajustes
disponibles: (de izquierda a derecha) activado y desactivado.
Ajuste de la hora y el período de la alarma
Pulse el botón de ajuste de hora y período de la alarma para fijar
la hora de la alarma y el período de alarma activo.
Aumentar el valor de la selección
Pulse el botón de aumento de valor para aumentar el valor
seleccionado en la pantalla.
Reducir el valor de la selección
Pulse el botón de reducción de valor para reducir el valor
seleccionado en la pantalla.
Repetir alarma
Pulse el botón de repetición de alarma mientras la alarma esté
sonando para detenerla y fijar la misma hora de alarma para el
día siguiente.
1-866-AMPLICOM (267-5426)
15
Ayuda y asistencia técnica
Ayuda y asistencia técnica
Si tiene problemas con el reloj, consulte la siguiente información antes de
llamar al servicio de asistencia técnica. Si continúa teniendo problemas, llame
al Centro de Atención al Cliente al 1-866-AMPLICOM (267-5426) para recibir
asistencia.
Guía para la solución de problemas
El reloj no funciona
1. Las pilas tienen muy poca carga o no se introdujeron pilas.
2. El reloj no está enchufado.
La base vibratoria no funciona
1. Las pilas tienen muy poca carga o son defectuosas (puede solicitar a
Amplicom otro conjunto de pilas).
2. La base vibratoria no está activada.
3. La base vibratoria está demasiado lejos del reloj despertador.
La alarma no se activa
La función de alarma no está activada; gire la perilla a la posición de activación.
16
Centro de Atención al Cliente
Mantenimiento y garantía
Mantenimiento y garantía
Mantenimiento
• Limpie las superficies del equipo con un paño suave sin pelusa.
• Nunca use agentes limpiadores ni disolventes.
Garantía
El equipo AMPLICOM ha sido producido y probado de acuerdo con los
métodos de producción más recientes. La implementación de materiales
cuidadosamente seleccionados y de tecnologías altamente desarrolladas
garantiza el funcionamiento sin inconvenientes y una gran durabilidad. Los
términos de la garantía no tienen validez si la causa del desperfecto del equipo
es culpa del operador de la red de telefonía o de otro sistema de extensiones
privado interpuesto. Los términos de la garantía no cubren el conjunto de pilas
recargables ni los conjuntos de alimentación utilizados en los productos. El
período de la garantía es de 24 meses desde la fecha de compra.
Todos los problemas ocasionados por defectos en el material de producción
que se produzcan dentro del período de la garantía serán corregidos sin
cargo. El derecho de reclamación conforme a los términos de la garantía
será invalidado tras la intervención del comprador o de terceros. Los daños
provocados por la manipulación o el uso incorrectos, la ubicación o el
almacenamiento incorrectos, la conexión o instalación incorrecta, caso fortuito
u otros factores externos no están cubiertos por los términos de la garantía.
En el caso de reclamos, nos reservamos el derecho de reparar o cambiar las
piezas defectuosas o proporcionar un dispositivo de reemplazo. Los repuestos
o dispositivos son de nuestra propiedad. El derecho a compensación en caso
1-866-AMPLICOM (267-5426)
17
Mantenimiento y garantía
de daños queda excluido si no hay pruebas de intención o negligencia grave
por parte del fabricante. Si su equipo AMPLICOM muestra indicios de defectos
durante el período de la garantía, devuélvalo al punto de venta donde lo haya
comprado junto con el recibo de compra. Todos los derechos de reclamo
bajo los términos de la garantía en conformidad con este acuerdo deben
reivindicarse exclusivamente en el punto de venta donde haya adquirido el
producto.
No podrá realizar reclamos bajo los términos de la garantía una vez que
transcurran dos años desde la fecha de compra de nuestros productos.
Declaración de conformidad
La marca de certificación ETL constituye una alternativa a las marcas
CSA y UL. ETL Testing Laboratories, de propiedad de Intertek Testing
Services (ITS), tiene el reconocimiento de OSHA como laboratorio
de pruebas con reconocimiento nacional (NRTL). ITS prueba productos en
conformidad con casi 200 normas de seguridad y rendimiento. La marca de
certificación ETL es aceptada en todo los Estados Unidos cuando indica el
cumplimiento de las normas con reconocimiento nacional tales como ANSI,
IEC, UL y CSA.
Esta marca de certificación indica que el producto ha sido probado y reúne los
requisitos mínimos de una norma de seguridad de los productos de los EE. UU.
con amplio reconocimiento (consenso), que la planta de fabricación ha sido
auditada y que el solicitante aceptó un programa de inspecciones periódicas de
seguimiento en planta para la verificación de la continuidad del cumplimiento.
18
Centro de Atención al Cliente
Especificaciones
Especificaciones
Reloj despertador
Frecuencia
Fuente de alimentación
Pilas
Tiempo de carga inicial
Temperatura ambiente óptima
Temperatura de almacenamiento óptima
Potencia de transmisión
Dimensiones L / Anch / Alt
Peso
433 MHz
Entrada: 210-240 VCA, 50/60 Hz
Salida: 12 VCC, 670 mA
2 x AAA 1.2 V, 500 mAh, NiMH
Hasta 16 h
32 ˚F a 104 ˚F (0 ˚C a 40 ˚C)
-4 ˚F a 140 ˚F (-20 ˚C a 60 ˚C)
10 dBm
3,1 x 5,1 x 5,8 in (80 x 130 x 146 mm)
12,2 oz (346 g)
Base vibratoria
Alcance
Pilas
Tiempo de carga inicial
Temperatura ambiente óptima
Temperatura de almacenamiento óptima
Dimensiones L / Anch / Alt
Peso
1-866-AMPLICOM (267-5426)
Aprox. 328 ft (100 m) (espacio despejado)
3 x AAA 3,6 V, 800 mAh, NiMH
Hasta 16 h
32 ˚F a 104 ˚F (0 ˚C a 40 ˚C)
-4 ˚F a 140 ˚F (-20 ˚C a 60 ˚C)
4,5 x 4,3 x 1,4 in (115 x 110 x 35 mm)
6,3 oz (178 g)
19
Questions?
¿Dudas?
Amplicom USA Service Center
310 Ambrose Avenue
Nashville, TN 37207
V/TTY:
1-866-AMPLICOM (267-5426)
www.amplicomusa.com
Distributed by: Amplicom USA LLC
Distribuido por: Amplicom USA LLC
Made In China
Hecho en China