1
S_S/AVRS
USE & CARE
MANUAL
STOCK NO.
89950
89951
89952
Kenmor'e
KNOW YOUR OVEN
Read this booklet so you will be
able to enjoy all the features of
your Kenmore MicrowaveConvection Oven.
Record the Model No. and the
Serial No. (found on the label
on the left side of control panel)
in the space below.
ICROWAVE-CONVECTION
OVE
Use and Care
nual
Model No.
Serial No.
Keep this manual for
future reference.
3874W500863
Sears, Roebuck and Co., Hoffman Estates, IL 60179, U.S.A.
iMPORTANT
SAFETY
INSTRUCTIONS
The Sears Kenmore Microwave Oven, though simple to use, is not a toy.
Respect it as an electric cooking appliance. Become familiar with microwave energy, its uses and limitations.
The safety instructions below wil! tell you how to use your oven to avoid harm to yourself and/or damage to your oven.
READ ALL THE INSTRUCTIONS
DO NOT ALLOW
CHILDREN
BEFORE
USING YOUR
OVEN.
TO USE THIS OVEN WITHOUT
,& WARNING!
CLOSE
SUPERVISION!
YOUR SAFETY FIRST!
,_
PRECAUTIONSTO AVOID POSSIBLE EXPOSURETO
EXCESSIVEMICROWAVE
e DO NOT ATTEMPT TO OPERATE THIS OVEN
WITH THE DOOR OPEN, since open-door operation
can result in harmful exposure to microwave energy.
It is important not to defeat or tamper with the safety
interlocks.
t DO NOT OPERATE THE OVEN IF IT IS DAMAGED.
It is particularly important that the oven door close
properly and that there is no damage to the:
o door (bent),
• hinges and latches (broken or loosened),
o door seals and sealing surfaces.
o DO NOT PLACE ANY OBJECT BETWEEN THE
OVEN FRONT FACE AND THE DOOR, or allow soil
or cleaner residue to accumulate on sealing surfaces.
® THE OVEN SHOULD NOT BE ADJUSTED OR
REPAIRED by anyone except properly qualified
service personnel.
WARNING-To reduce the risk of burns, electric shock, fire,
injuryto persons or exposure to excessive microwave energy:
® Do not use corrosive chemicals or vapors, such as
sulfide and chloride, in this appliance. This type of
oven is specifically designed to heat, cook or dry food.
It is not designed for industrial or laboratory use.
® Do not use or store this appliance outdoors. Do not
use this product near water - for example, near a
kitchen sink, in a wet basement, or near a swimming
pool.
® Do not use the oven for storage purposes. Do not
leave paper products, cooking utensils, or food in the
oven when not in use.
® Clean the ventilating hood frequently. Do not allow
grease to accumulate on the hood or the filters.
® When flaming foods under the hood, turn the fan off.
The fan, if operating, may spread the flame.
® Suitable for use above both gas and electric cooking
equipment 36 inches or tess wide.
e Use care when cleaning the vent hood filters.
Corrosive cleaning agents, such as lye-based oven
cleaners, may damage the filters.
IMPORTANT
SAFETY HNSTRUCTIONS
® WHEN CLEANING THE DOOR AND THE SURFACES THAT TOUCH THE DOOR, USE ONLY MILD, NONABRASIVE SOAPS OR DETERGENTS AND A SPONGE OR SOFT CLOTH.
= DO NOT TAMPER WITH THE BUILT-IN SAFETY SWITCHES ON THE OVEN DOOR!
The oven has several built-in safety switches to make sure the power is off when the door is open.
® IF YOUR OVEN IS DROPPED OR DAMAGED, HAVE IT THOROUGHLY CHECKED BY A QUALIFIED
TECHNICIAN BEFORE USING IT AGAIN.
TO AVOID
SERVICE
A FIRE HAZARD:
® DO NOT SEVERELY OVERCOOK FOODS. Severely overcooked foods can start a fire in the oven. Watch the oven
carefully, especially if you have paper, plastic, or other combustibles in the oven.
® DO NOT STORE COMBUSTIBLE ITEMS (bread, cookies, etc.) IN THE OVEN, because if lightning strikes the power
lines, it may cause the oven to turn on.
• DO NOT USE WIldE TWIST-TIES IN THE OVEN. Be sure to inspect purchased items for wire twist-ties and remove
them before placing the item in the oven.
IF A FIRE SHOULD
START:
® KEEP THE OVEN DOOR CLOSED.
o TURN THE OVEN OFF.
® DISCONNECT THE POWER CORD OR SHUT OFF THE POWER AT THE FUSE OR CIRCUIT BREAKER PANEL.
TO AVOID
ELECTRIC
SHOCK:
® THIS APPLIANCE MUST BE GROUNDED! Connect it only to a properly grounded outlet.
See the ELE_CTRICAL GROUNDING INSTRUCTIONS
on page 6.
® DO NOT OPERATE THIS APPLIANCE IF IT HAS A DAMAGED CORD OR PLUG, if it is not working properly or if it
has been damaged or dropped.
o DO NOT IMMERSE THE ELECTRICAL CORD OR PLUG IN WATER.
® KEEP THE CORD AWAY FROM HEATED SURFACES.
TO AVOID
IMPROPERLY
COOKING
SOME
FOODS,
Some foods or containers should not be used with this microwave oven. Personal injury could result.
® DO NOT HEAT ANY TYPES OF BABY BOTTLES OR BABY FOOD IN THIS OVEN. Uneven heating may occur and
possibly cause personal injury.
® DO NOT HEAT SMALL-NECKED CONTAINERS, such as syrup bottles, in this microwave oven.
® DO NOT DEEP-FAT FRY IN YOUR MICROWAVE OVEN. This is not a safe procedure in a confined cavity.
® DO NOT ATTEMPT HOME CANNING IN YOUR MICROWAVE OVEN. It is impossible to be sure all areas of the jar
have reached boiling temperature for the proper processing time.
® DO NOT HEAT THE FOLLOWING ITEMS IN THE MICROWAVE OVEN: whole eggs in the shell; water with oil or fat;
sealed containers or closed glass jars. These items may explode.
iMPORTANT
SAFETY iNSTRUCTiONS
CAUTION
TAKE
GOOD CARE OF YOUR OVEN TO KEEP IT TROUBLE-FREE.
IN GENERAL:
®
•
•
o
®
DO NOT USE THIS OVEN FOR COMMERCIAL PURPOSES. It is made for household use only.
Install or locate your oven according to the instructions in this manual. Be sure the oven is level.
Use your oven only for the operations described in this manual.
Do not cover or block any openings in the oven.
Do not run the oven empty, without food in it.
PRESERVE
THE OVEN
FLOOR:
• DO NOT HEAT THE OVEN FLOOR EXCESSIVELY.
• Do not allow the gray film on special microwave-cooking packages (Example:french fries) to touch the oven floor.
Put the package on a microwave-safe dish.
e Do not cook anything directly on the oven floor. Use a microwave-safe dish.
e Keep a browning dish at least 3/16 inch above the oven floor. Carefully read and follow the instructions for the
browning dish. If you use a browning dish incorrectly, you could damage the oven floor.
PRESERVE
o
•
o
e
®
PROBE:
Do not leave the temperature probe unplugged in the cavity when you operate the oven.
Keep the temperature probe at least one inch away from the walls, top and bottom of the oven cavity.
Do not plug the pointed end of the temperature probe into the socket inside the cavity.
Do not use the temperature probe in a regular oven. The probe is designed for this microwave oven only.
Remove the temperature probe from the socket after each use. Use a pot holder, because the wire, plug and sensor
sections may be hot.
PRESERVE
®
o
o
®
THETEMPERATURE
THE METAL
RACK:
Remove the metal rack from the oven when you are not using it.
Do not use the oven empty with the metal rack in it.
The metal rack may get hot while cooking. Use pot holders to remove it after cooking.
Do not use foil or metal containers on the metal rack when using the oven in the microwave mode.
SAV
THESE INSTRUCT!
TABLE OF CONTENTS
page
IMPORTANT SAFETY INSTRUCTIONS
.....................................................................................................................
IMPORTANT INFORMATION ABOUT YOUR OVEN ..................................................................................................
Location of Model Number ..........................................................................................................................
Oven Specifications ............ .........................................................................................................................
Electrical Rating ...........................................................................................................................................
Electrical Requirements ...............................................................................................................................
Electrical Grounding Instructions .................................................................................................................
INSTALLATION
INSTRUCTIONS
...............................................................................................................................
Oven Parts ...................................................................................................................................................
Set the Time of Day .....................................................................................................................................
Insert/Clean The Grease Filters ..................................................................................................................
OVEN CONTROL PANEL ...........................................................................................................................................
INTRODUCTION
TO MICROWAVE COOKING ..........................................................................................................
QUICK REFERENCE GUIDE ......................................................................................................................................
SPECIAL FEATURES/FUNCTIONS
............................................................................................................................
Child Lock/Quick On/Timed/Hold Warm ......................................................................................................
Memory/Temp/Fan/Light
.............................................................................................................................
USING THE METAl. RACK .........................................................................................................................................
DIRECTIONS FOR MICROWAVE COOKING .............................................................................................................
Sensor Cook ................................................................................................................................................
Adding Or Subtracting Cook Time/Popcorn
................................................................................................
Auto Reheat (Room Temp, Frozen Temp) ..................................................................................................
Auto Roast ...................................................................................................................................................
Multi-Stage Cooking ....................................................................................................................................
Hi-Power/Multi-Power
Cooking ....................................................................................................................
Table of Multi-Power Settings ......................................................................................................................
Temperature Controlled "Hi-Power"#'Multi-Power"
Cooking ........................................................................
Temperature Probe
.....................................................................................
Temperature Controlled Cooking ................................................................................................................
AUTO DEFROST .........................................................................................................................................................
Auto Defrost Sequence Table .....................................................................................................................
General Guidelines
.......................................................................................................
Auto Defrost Instructions .............................................................................................................................
AUTO DEFROST CHART ......................................................................................................................................
INTRODUCTION TO CONVECTION COOKING .........................................................................................................
Convection Baking With/Without Preheating ...............................................................................................
Convection Broiling ......................................................................................................................................
DIRECTIONS FOR CONVECTION COOKING ............................................................................................................
Convenience Foods Cooking Chart .............................................................................................................
Convection Cooking With Temperature Probe ............................................................................................
Temperature Probe Convection Cooking Chart ...................................................................
:................
INTRODUCTION TO COMBINATION
COOKING .......................................................................................................
Combination Baking/Roasting Without Preheating ......................................................................................
Combination Baking/Roasting With Preheating ...........................................................................................
Auto Combination ........................................................................................................................................
Auto Combination Chart ..............................................................................................................................
DIRECTIONS FOR COMBINATION COOKING ..........................................................................................................
Combination Cooking With Temperature Probe ..........................................................................................
Temperature Probe combination Cooking Chart ...................................................................................
UTENSIl. GUIDE ..........................................................................................................................................................
CARE AND CLEANING ...............................................................................................................................................
General ........................................................................................................................................................
Temperature Probe .....................................................................................................................................
Metal Rack
............................................................
Grease Filters
...................................................................................
Charcoal Filter Replacement
.................................................................................................
Work Light Replacement
.......................................................................
QUESTIONS AND ANSWERS ..............................................................................................................................
BEFORE CALLING FOR SERVICE ............................................................................................................................
SEARS SERVICE • o_, ......
.............................................................
•
•
• • .....
,., ............
o,.o.o,••.o•ooo,,oo•o,,,.o.oo
o
"We Service What We Sell"
SEARS WARRANTY
...................................................................................................................................
Back
2
6
6
6
6
6
6
7
7
8
8
9
16
11
12
12
13
14
15
15
16
16
17
18
19
20
21
21
22
23
23
23
24
25, 26
27
28
28
29
29
30
30, 31
32
33
33
33
33
34
34
34, 35
36
37
37
37
37
37
38
38
39, 40
41
42
Cever
iMPORTANT
INFORMATION
ABOUT YOUR OVEN
Enjoy a new cooking experience from Sears. PLEASE READ THIS MANUAL.
It will tell you how to use all the fine features of this microwave oven, including Automatic Defrost, Multi-Stage Cooking,
Temperature Controlled Cooking, Automatic Cook, Sensor Cook, Convection!Combination
Cooking, Popcorn, the Child
Lock, and Quick On. You can Hold food at WARM while you finish the rest of your meal. With the touch of one keypad,
you can cook foods automatically and prepare roasts to desired temperature doneness.
Advice on the use and care of Sears appliances is always available at your nearest Sears store.
LOCATION
OF MODEL NUMBER
To request service, information or replacement pads, Sears will require the complete model number of your microwave
oven. The number is on the control panel side as shown in the illustration below. It looks like this: 721.8000000.
OVEN SPECIFICATIONS
Output
Power
850W (IEC 705 Rating Standard)
1350W (Heater)
29-.7/8" x 14" x 16-3/16"
1.1 Cu.Ft
69 Ibs
Outer Dimensions
Cavity Volume
Net Weight
Model Number Label
ELECTRICALRATING
* Electrical Rating of the Oven: 120 V AC. 60 Hz.
* 1300Watts 12 Amperes (Microwave oven only)
* 1500Watts 13 Amperes
(Microwave oven + Cooktop Lamps + Ventilation
ELECTRICAL
Fan.)
REQUIREMENTS
The oven is designed to operate on a Standard 120 volt/60 Hz household outlet. Be sure the circuit is at least 15
amperes and the microwave oven is the only appliance on the circuit. It is also not designed for 50 Hz or any circuit
other than 120 volt/60 Hz circuit.
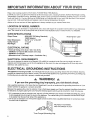
ELECTRICAL
GROUNDING
iNSTRUCTIONS
This appliance must be grounded. If an electrical short circuit occurs, grounding reduces the. risk of electric shock by
providing an escape wire for the electric current. The cord for this appliance has a grounding wire with a grounding plug.
Put the plug into an outlet that is properly installed and grounded.
WARNING!
if you use the grounding plug improperly, you risk electric shock.
Ask a qualified electrician or the Sears Service Department if you do not understand the grounding instructions or if you
wonder whether the appliance is properly grounded.
Because this appliance fits under the cabinet, it has a short power-supply cord. See the separate Installation Instructions
for directions on properly placing the cord. Keep the electrical power cord dry and do not pinch or crush it in any way.
1. If it is necessary to use an extension cord, use only a 3-wire extension cord that has a 3-blade grounding plug, and a
3-slot receptacle that will accept the plug on the appliance. The marked rating of the extension cord should be equal
to or greater than the electrical rating of the appliance or,
2. Do not use an extension cord. If the power supply cord is too short, have a qualified electrician or serviceman install
an outlet near the appliance.
PROPERLY POLARIZED
AND GROUNDED OUTLET
Three-Pronged
(Grounding) Plug
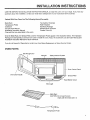
iNSTALLATiON iNSTRUCTiONS
USE THE SEPARATE INSTALLATION INSTRUCTION MANUAL to install this oven over your range. If you have any
questions about the installation, contact your local Sears salesperson or your local Sears Service Center.
Packed With Your Oven Are The Following Items (One each) :
Metal Rack
Temperature Probe
Cookbook
Use and Care Manual
Installation Instruction Manual
Charcoal filter (pre-assembled in the oven)
Top Cabinet Template
Wall Template
Hardware Package
Damper/Duct connector
Grease Filters (2)
Only the Metal Rack, the Grease Filter, and the Temperature Probe appear in the illustration below. The Hardware
Package and Damper/duct connector are used to install the oven. Keep the Cookbook, Use and Care Manual,and
Installation Instruction Manual for future reference.
If you do not have all of these items, contact your local Sears Salesperson or Sears Service Center.
OVEN PARTS
See-through Door
Vent grill
Safety Interlock System
-
Oven Door Handle
Oven Control Panel
Grease Filter
Hood Bottom Cover
Work Light
Metal Rack
CAUTION: Do not use the oven
empty with the metal rack in it.
Temperature Probe
iNSTALLATiON iNSTRUCTiONS
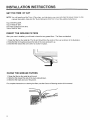
SET THE TIME
OF DAY
NOTE: You will need to set the Time of Day when you first plug in your oven and when the power comes on after
a power interruption. (See also the "Quick Reference Chart" for Time of Day setting instructions.)
Touch
Touch
Touch
Touch
STOP/CLEAR.
TIME OF DAY.
the numbers for the time.
TIME OF DAY.
INSERT
THE GREASE
FILTERS
After your oven is installed, you will need to insert the two grease filters. The filters are identical.
1. Grasp the filter by the metal tab. The tab end should face the center of the oven as shown in the illustration.
2. Slide the filter in the groove toward the side of the oven and push it up.
3. Slide the filter toward the oven center to anchor it in place.
CLEAN
THE GREASE
FILTERS
1. Grasp the filter by the metal tab at the end.
2. Slide the filter toward the side of the oven and pull down.
3. Slide the filter back and out of the groove.
For complete instructions on cleaning the filters, see the Care and Cleaning section of this manual.
OVEN CONTROL
PANEL
When you first plug in your oven, "0" will appear in the display window.
DisplayUsed to show time of
day, cooking time,
cooking power level,
cooking temperature,
and miscellaneous
indicators during
cooking functions.
Temp-
Usedfor temperature
probe cooking.
Time.Used in setting
cooking time.
Numbers*
Used to enter the:
• Time of day
• Cooking Time
• Cooking Powers
- Food temperatures
Quick-onUsed to select and
cook from 1 to 9
minutes automatically
at 100% power.
Hold WarmUsed to keep hot, cooked
foods safely warm in your
microwave oven up to
60 minutes.
PopcornUsed to pop popcorn.
CookUsed to sensor
cooking.
Time of dayUsed in setting time
of day.
Room TempUsed to reheat foods
at room temperature.
MemoryUsed for memory entry
and memory recall of
a cooking program.
Frozen TempUsed to reheat
frozen foods.
Stop/ClearUsed to stop the oven
or clear all entries
except time of day.
ConvectionUsed in setting
convection cooking or
preheat.
Auto CookUsed to cook
common foods
without needing to
program times and
cook powers.
-- Combination=
Used in setting
combination
cooking or preheat.
Auto DefrostUsed to thaw frozen
meat, poultry, and fish.
Power Level=
Used to select
cooking power
levels.
Fan Control PadUsed to turn on the fan
at high speed or low
speed and turn off
the fan.
StartStarts the oven.
Work Light Pad- -Used to turn the work
light on/off in either
the high or night
modes.
Auto CombinationUsed in setting weight
combination cooking.
--
Auto RoastUsed to roast with
the temperature probe.
iNTRODUCTiON
TO MICROWAVE
COOKING
To get the best results from your microwave oven, read and follow the guidelines below.
Microwave cooking distributes heat differently from stove or oven cooking. In microwave cooking, food on the outside
of the dish absorbs more energy (and cooks more quickly) than food at the center. Arrange the food to allow for even
exposure to the microwave energy. Because foods are different, you need to arrange and cook them differently.
o STORAGE TEMPERATURE: Foods taken from the freezer or refrigerator take longer to cook than the same foods
at room temperature. The time for recipes in this book is based on the normal storage temperature of the food.
• SIZE: Small pieces of food cook faster than large ones; pieces similar in size and shape cook more evenly. For even
cooking, reduce the power when cooking large pieces of food.
® QUANTITY: Small amounts of food usually take less time than large amounts.
• SHAPE: Thin areas-and corners cook faster. Round shapes and rings cook more evenly because microwaves
penetrate foods to about 1 inch from the top, bottom, and sides.
• TEXTURE: Dense foods, such as potatoes, take longer to cook or heat than light, porous foods, such as bread, rolls,
or a piece of cake. Cook foods with a delicate texture at lower power levels to'avoid toughening.
,,, NATURAL MOISTURE:
molecules.
Very moist foods cook more evenly because microwave energy is attracted to water
• TURN OVER foods like pork chops, baking potatoes, roasts, or whole cauliflower halfway through the cooking time to
expose all sides to equal amounts of microwave energy.
t STIR foods such as casseroles and vegetables from the outside to the center to distribute the heat evenly and speed
cooking. Constant stirring is not necessary.
o ARRANGE unevenly shaped foods, such as chicken pieces or salmon steaks, with the thicker, meatier parts toward
the outside of the dish.
® SHIELD, with SMALL pieces of aluminum foil, parts of food that may cook quickly, such as wing tips and leg ends of
poultry.
o PLACE delicate areas of foods, such as asparagus tips, toward the center of the dish.
• COVER AND LET STAND those foods uneven in moisture so heat can spread evenly.
o LET IT STAND: After you remove the food from the microwave, cover food with foil or casserole lid and let it stand to
finish cooking in the center and avoid overcooking the outer edges. The length of standing time depends on the
density and surface area of the food.
Check the Questions and Answers section on pages 39-40 for more tips on cooking successfully with your microwave
oven.
!
t
10
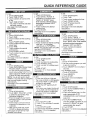
QUICK REFERENCE
Of-
_mbers
for correct time
of day.
4. Touch TIME OF DAY*.
* You "lock" in the time and start
the clock running.
(See page 8 for more detailed
instructions.)
--
,
OO
To Set:
1, Touch STOP/CLEAR.
2. Touch TIME.
3. Touch numbers for first cooking
time.
4. Touch POWER LEVEL.
5. Touch number for first cooking
power level.
6. Touch TIME.
7. Touch numbers for second
cooking time.
8. Touch POWER LEVEL.
9. Touch number for second cooking
power level,
10. Touch START.
(See page 18 for more detailed
instructions.)
•
D
To Set:
1. Touch STOP/CLEAR.
2. Touch POPCORN, ROOM TEMP,
FROZEN TEMP or COOK.
3. For the COOK sensor program,
touch code number from 1 to 7 to
select appropriate COOK sequence.
(Others will start automatically.)
NOTE: You do not need to touch
START. 3 seconds after touching the
pad the oven begins cooking
automatically.
(See page 15 for more detailed
instructions)
To Set:
t, Touch STOP/CLEAR.
2, Touch MEAT, POULTRY or FISH
to select the appropriate Auto
Defrosting Sequence.
3. Enter the weight of your food in
decimals from 0.1 to 9.9 pounds.
4. Touch START.
5. At the beeps, turn food over by
following the instructions in the
cookbook.
6. After turning food over, touch
START to resume defrosting.
(See pages 23 and 24 for more
detailed instructions.)
=
_r
•
To Set:
1. Touch STOP/CLEAR.
2. Touch BAKE or ROAST. If
preheating is required, touch
"BAKE" or "ROAST" twice.
Enter desired preheat/cooking
temperature between 150°F
and 450°F.
3. Touch numbers for desired
cooking time.
4. Touch START.
(See page 33 for more detailed
instructions.)
0
•
O0
To Set:
1. Touch STOPICLEAR.
2. Touch QUICK ON.
3. Touch number for desired cooking
time from 1 to 9 minutes.
( Cooking is on HI-POWER.)
NOTE: This function starts only after
touching STOP/CLEAR.
(See page 12 for more detailed
instructions.)
°e
D
DO
To Set:
1. Touch STOP/CLEAR.
2. Touch TIME.
3. Touch numbers for cooking time.
4. Touch POWER LEVEL.
5. Touch number for cooking power
level.
6. Touch START.
(See page 19 for more detailed
instructions.)
To Set:
1. Touch the HIGH or LOW pad.
" Fan runs at HIGH or LOW speeds.
" Touch the HIGH or LOW pad to
change the fan speed.
2. Touch the OFF pad to turn off
the fan.
" If the oven over-heats, the fan will
run by itself until the temperature
of the oven drops to a safe level.
(See page 13 for more detailed
instructions.)
D
GUIDE
O
To Set:
1. Touch STOP/CLEAR.
2. Touch "0" for more than 2 seconds.
To cancel:
1. Touch STOP/CLEAR.
2. Touch "0" for more than 2 seconds.
(See page 12 for more detailed
instructions.)
To Set:
1. Touch
2. Touch
3. Touch
4. Touch
STOP/CLEAR.
TIME.
correct numbers for time.
POWER LEVEL.
5. Touch "0" (power level 0).
6. Touch START.
(See page 12 for more detailed
instructions.)
•
•
0
-
To Set:
1. Touch STOP/CLEAR.
2. Touch BAKE or BROIL. If
preheating is required for BAKE,
touch "BAKE" twice. Enter desired
preheat/cooking temperature
between 150°F and 450°F.
3. Touch numbers for desired
cooking time.
4. Touch START.
(See page 28 for more detailed
instructions.)
O -
To Set:
1. Touch STOP/CLEAR.
2. Set the cooking program you wish
to put into memory.
3. Touch MEMORY for more than 2
seconds.
For MEMORY recall
1. Touch STOP/CLEAR.
2. Touch MEMORY.
3. Touch START.
(See page 13 for more detailed
instructions.)
,|
To Set:
1. Touch
2. Touch
AUTO
3. Enter
0
Oe,
STOP/CLEAR.
AUTO COMBINATION or
ROAST.
code number from 1 to 6 to
select appropriate AUTO
COMBINATION or AUTO ROAST
sequence.
4. For AUTO COMBINATION,
enter the weight or quantity of your
food.(AUTO ROAST wilt start
automatically after step 3.)
5. Touch START.
(See page 17 or 33 for more detailed
instructions.)
11
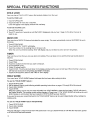
SPECIAL
FEATURES/FUNCTIONS
CHILD LOCK
Your oven has a "CHILD LOCK" feature that protects children from the oven.
To set the Child Lock:
1. Touch STOP/CLEAR.
2. Touch and hold "0" more than 2 seconds.
LOCK will appear in the display window with one beep.
To Cancel the Child Lock:
1. Touch STOP/CLEAR.
2. Touch "0" more than 2 seconds or until the"LOCK" disappears and you hear 1 beep. At this time, the oven is
ready to use.
QUICK ON
Your oven has a QUICK ON feature that starts the oven simply. The oven automatically
9 minutes.
cooks at HI-POWER for up to
1. Touch STOP/CLEAR.
2. Touch QUICK ON. "QUICK" will display.
3. Touch the number for the cooking time in minutes (1-9).
When the oven has finished cooking, "End" will display and you will hear two short and one long beeps.
TIMER
Your oven has a timer that you can use when not cooking. The oven does not run and the timer just counts down in
seconds.
1.
2.
3.
4.
5.
6.
Touch STOP/CLEAR.
Touch TIME.
Touch the numbers for the time you want to measure.
Touch POWER LEVEL.
Touch "0" (power level 0).
Touch START. The time will count down in the display window but the oven will not heat. When the time is over you
will hear two short and one long beeps and "END" will display.
7. Touch STOP/CLEAR to return to the TIME OF DAY display.
HOLD WARM
Your oven has a "HOLD WARM" feature that keeps the food warm after cooking is done.
To use the "HOLD WARM" feature •
1. Touch STOP/CLEAR.
2. Set the desired cooking cycle following suitable operating instructions on pages 12 through 38 in this manual.
3. Touch HOLD WARM.
4. Touch START.
When the cooking cycle is over, the oven will switch into "HOLD WARM" to keep the food warm. "HOLD" will show in
the Display Window. The cooking control setting changes to Power Level 1. The "HOLD WARM" will continue for up to
60:00 minutes or until the door has been opened or STOP/CLEAR has been touched.
If you want to keep your cooked food warm, the "HOLD WARM" feature can be used independently
cooking cycle.
without setting the
To use the "HOLD WARM" feature independently:
1. Touch STOP/CLEAR.
2, Touch HOLD WARM.
3. Touch START.
The oven will begin to keep the food warm with power level 1 for up to 60:00 minutes or until the door has been opened
or STOP/CLEAR has been touched.
12
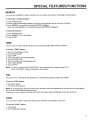
SPECIAL FEATURES/FUNCTIONS
MEMORY
Your oven has a MEMORY feature that allows you to program one single or multi-stage cooking program.
To memorize a cooking program:
1. Touch STOP/CLEAR.
2. Set the single or multi-stage program you wish to put into memory (set as you would normally).
3. Touch MEMORY for more than 3 seconds ENTER will display.
When you touch MEMORY, no beep will be heard until ENTER is displayed.
To recall the memory :
1. Touch STOP/CLEAR.
2. Touch MEMORY. CALL will display.
3. Touch START.
TEMP
Your oven has a "Temp" feature that allows you to keep food warm after cooking is finished.
To use the "TEMP" feature
:
1. Plug in the Temperature Probe.
2. Touch STOP/CLEAR.
3. Touch TEMP.
4. Touch the numbers for food temperature.
5. Touch POWER LEVEL.
6. Touch the number for cooking power level.
7. Touch HOLD WARM.
8. Touch START.
NOTE: You do not need to touch POWER LEVEL when cooking with the highest power ("HI").
To set "HI-POWER" Cooking, skip steps 5 and 6 above.
FAN
Your oven has a "FAN" feature that allows you to ventilate during electric or gas oven cooking.
To use the "FAN" feature:
1. Choose fan speed.
2. Turn off fan when desired.
NOTE: If the temperature gets too hot around the microwave oven, the exhaust fan in the vent hood will automatically
turn on at the LOW setting to protect the oven.
If may stay on up to an hour to cool the oven. When this occurs, the FAN OFF pad will not turn the fan off.
LIGHT
Your oven has a "LIGHT" feature that allows you to illuminate on the electric or gas oven.
To use the "LIGHT"
feature:
1. Choose light.
2. Turn off light when desired.
13
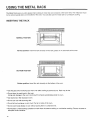
USING THE METAL RACK
The Metal Rack gives you extra space when cooking in more than one container at the same time. The metal rack must
not be turned upside-down on the bottom of the oven. You can also use the metal rack for convection cooking.
INSERTING
THE RACK
NORMAL POSITION
0
Normal
position: Insert the rack securely on the rack guides on the side walls of the oven.
BOTTOM POSITION
Bottom position: Insert the rack securely on the bottom of the oven.
o Use hot pads when removing rack from oven after cooking to prevent burns. Rack may be hot.
• Do not store the metal rack in the oven.
Arcing and damage to the oven could result if someone accidentally starts the oven.
o Use rack only in the microwave oven.
® Do not use rack with browning dish.
• Do not let food container on rack touch the top or sides of the oven.
® Do not cook foods directly on rack without putting them in containers first.
® Do not place a metal cooking container on rack when microwave cooking or combination cooking. Place a microwavesafe plate under container.
14
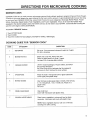
DIRECTIONS
SENSOR
FOR MICROWAVE
COOKING
COOK
SENSOR COOK lets you cook common microwave-prepared
foods without needing to program times and Cook Powers.
A sensor in your oven detects the vapor released by the food, and the amount of vapor detected tells the oven how long
to cook your food. SENSOR COOK has preset Cook Powers for seven categories: Beverage, Baked Potato, Frozen
Entree, Casserole, Baked Goods, Fresh Vegetables, and Frozen Vegetables. All you do is touch the Number Pad
assigned to the desired category (see chart below) and you do not need to touch START. 3 seconds after touching the
pad, the oven begins cooking automatically.
To use the "SENSOR"
feature:
1. Touch STOP/CLEAR.
2. Touch COOK.
3. Touch the number for food category. Example for setting 1 (Beverage).
COOKING
CODE 1
GUIDE'FOR
"SENSOR
CATEGORY
COOK"
DIRECTION
1
BEVERAGE
No cover. Use uncovered microproof cup(s) or mug(s).
Stir after reheating.
2
BAKED POTATO
Wash and scrub well. Pierce with fork.
Place on paper towel in a circle 1" apart.
Let stand 3 to 5 minutes after cooking.
3
FROZEN ENTREE
!
I
I
CASSEROLE
Use the original package of frozen entree, and follow
!
I
[
the package directions.
But if the cover is film, perforate the film instead of
removing it. (Don't remove the cover wholly.)
Place the food in microproof bowl or glass casserole.
Cover tightly with plastic wrap.
I
BAKED GOODS
Use microwave safe paper plate or towels. One serving
is 1 to 2 doughnuts, 1 roll, 1 muffin, etc. Place on a
paper towel.
No cover.
FRESH VEGETABLES
Use small bowl.
Cover with microwave safe plastic wrap.
FROZEN VEGETABLES
Place frozen vegetable in microproof bowl or glass
casserole. Add water and cover with plastic wrap.
NOTE: Most vegetables improve with 2 to 3 minutes
standing time after cooking.
15
DiRECTiONS
ADDING
FOR MICROWAVE COOKING
OR SUBTRACTING
COOK TIME
(SENSOR COOK, POPCORN and AUTO REHEAT)
If the preset cooking time is too long or too short you can increase or decrease cooking time by 10% after choosing one
of the following functions.
1. To increase time by 10%.
o Touch "9", then "MORE" will blink.
2. To decrese time by 10%.
o Touch "7", then "LESS" will blink.
3. To reset to the original cook time.
• Touch "8", then "NORMAL" will blink.
o You can only increase or decrease cooking time before cooking starts.
o You do not need to touch "START". 3 seconds after touching the pad the oven begins cooking automatically.
POPCORN
Your oven has a "POPCORN"
To use the "POPCORN"
feature that allows you to cook POPCORN
by simply touching the POPCORN pad.
feature.
1. Touch STOP/CLEAR.
2. Touch POPCORN. A sensor in your oven detects the vapor released by the popcorn, and the amount of vapor
detected tells the oven how long to cook.
® You do not need to touch START. 3 seconds after touching the pad, the oven begins cooking automatically.
• Use popcorn packages made especially for microwave cooking. Pop only one 1.75 oz. or 3.5 oz. bag at a time.
Do not double the quantity.
o Place the popcorn bag on the bottom of the oven.
o Do not place the bag on paper or plaslic cookware or on turntables which are not an original part of the oven.
• Do not leave the oven unattended while popping corn.
• Remove the bag from the oven carefully. The popcorn and steam are extremely hot. Open the bag carefully by pulling
the top diagonal corners.
• Do not reheat unpopped kernels or re-use the bag.
o Never pop corn in a brown paper bag.
• When using Jumbo prepackaged popcorn bags, follow the manufacturer's directions.
Do not use the POPCORN pad.
o Cooking performance may vary with brand. Try several brands to decide which gives best popping results.
For best results, use fresh bags of popcorn.
AUTO REHEAT
(ROOM TEMP. or FROZEN TEMP.)
Most microwave ovens require the selection of the power level and time for cooking or reheating. Your new oven makes
reheating foods more convenient. A sensor in your oven detects the vapor released by the food, and the amount of vapor
detected tells the oven how long to heat your food. To reheat food that is at room temperature, touch ROOM TEMP. To
reheat food that is frozen, touch FROZEN TEMP.
To reheat foods, simply follow the steps below:
1. Touch STOP/CLEAR.
2. Touch ROOM TEMP or FROZEN TEMP pad.
3. The oven will begin heating, automatically. ROOM (or FROZEN) will display and the remaining time will begin counting
down.
16
DIRECTIONS
FOR MICROWAVE
COOKING
AUTO ROAST
This function allows you to roast food with the Temperature Probe, without needing to enter a final food temperature.
The probe will turn the oven off when it senses the preprogrammed final food temperature for the food category you
chose.
To roast foods,
simply
follow the steps below:
1. Touch STOP/CLEAR.
2. Touch AUTO ROAST. Code will display.
3. Enter code number from 1 to 6 to select the desired category.
You do not need to touch START.
COOKING
CODE
1
6
GUIDE
3 seconds after touching the pad the oven begins cooking automatically.
FOR "AUTO
CATEGORY
ROAST"
DIRECTION
Roast Beef (rare)
Put tip of probe in center of largest muscle, blJt not touching fat or bone.
Shield top of roast with aluminum foil, sauce or vegetables. Cover roast with foil
after cooking and let stand a few minutes.
Roast Beef (medium)
Put tip of probe in center of largest muscle, but not touching fat or bone.
Shield top of roast with aluminum foil, sauce or vegetables. Cover roast with foil
after cooking and let stand a few minutes.
Roast Beef (well)
Put tip of probe in center of largest muscle, but not touching fat or bone.
Shield top of roast with aluminum foil, sauce or vegetables. Cover roast with foil
after cooking and let stand a few minutes.
Roast Pork (well)
Put tip of probe in center of largest muscle, but not touching fat or bone.
Shield top of roast with aluminum foil, sauce or vegetables. Cover roast with foil
after cooking and let stand a few minutes.
Poultry
Shield the wing tips with aluminum foil. Put tip of probe in the thickest muscle,
not touching fat or bone. Check with thermometer in 2-3 places to ensure adequate
doneness.
Casserole
Make casseroles from precooked foods. Position tip of probe in center of food.
Stir before serving.
17
DiRECTiONS
MULTI-STAGE
FOR MICROWAVE
COOKING
COOKING
Multi-Stage cooking allows you to set the oven to cook in two stages at different power levels for a specific time or
temperature.
Example:
We are multi-cooking for two-stages.
WHAT YOU DO
First stage: 4 rain. at "HP power Second Stage: 10min. at "6" Power.
WHAT THE OVEN DOES
1. Touch STOP/CLEAR.
Erases all previous settings.
2. Touch TIME.
The "ENTER" "COOK" and "TIME"
COMMENTS/NOTES
This begins the First Stage.
will blink. The display window will
show "0".
uJ
3. Touch 4-0-0 to set the time.
(Example: Cooking Rice)
"4:00" displays (4 minutes)
The "ENTER" and "START" will
blink.
4. Touch POWER LEVEL.
"P-HI" displays. The "ENTER",
"PWR" and "COOK" will blink.
5. Touch the number for the
cooking power level.
The number you selected displays.
(HI for the first stage.)
You have just set the First Stage.
1. Touch TIME.
The "ENTER" "COOK" and "TIME"
will blink. The display window will
show "0".
Begin Second Stage.
2. Touch 1-0-0-0 to set the time.
(Example: Cooking Rice)
"10:00" displays (10 minutes)
The "ENTER" and "START" will
blink.
"P-60" displays. The "ENTER"
and "START" will blink.
3. Touch POWER LEVEL.
"P-HI" displays. The "ENTER",
"PWR" and "COOK" will blink,
The oven operates at HI power
unless you set it lower.
4. Touch number 6 to set the
power level,
"P-60" displays. The "ENTER"
and "START" will blink.
You have just set the Second
Stage.
5. Touch START.
The oven begins to cook.
"4:00" displays,
When the 4 minutes are over, 2
short beeps will sound. The oven
changes to the Second Stage.
o')
H
I
ILl
(_
18
DiRECTiONS
HI=POWER/MULTI-POWER
FOR MICROWAVE
COOKING
COOKING
"HI" is the highest cooking power possible with your microwave oven. It is the best setting for cooking foods that have
high water content, such as coffee, or soups or foods that need fast cooking to maintain their natural flavor and texture,
_ikefish, vegetables, and most casseroles.
But "HI" power cooking does not always give you the best results with foods that need slow cooking, such as roasts,
baked goods, or custards. Your oven has 9 power settings in addition to "HI". The cookbook tells you which power
setting to use for the food you are cooking. In addition, the Cooking Guide for Multi-Power Settings gives you some
examples of foods that you would cook at each power level. Follow the directions below to cook at any power level.
Example:
You are warming 6 doughnuts at power level "8" for 1-1/2minutes.
WHAT YOU DO
WHAT THE OVEN DOES
COMMENTS/NOTES
1. Touch STOP/CLEAR.
The oven beeps and all previous
settings are erased.
The oven always retains the
TIME OF DAY unless you unplug
the oven or the power is interrupted.
2. Touch TIME.
"0" displays and "ENTER", "COOK"
and "TIME" blink.
The oven is ready for the cooking
time setting.
3. Touch the numbers for the
cooking time you want.
Example: For six doughnuts
at 1-1/2 minutes, touch "1-3-0".
The cooking time displays, and
"ENTER" and "START" blink in
The timer is a digital clock divided
into 60 sec., 1_2min. = 30 sec.,
not .5 as on a calculator.
display.
NOTE: If you want to cook at HI-POWER, go to Step 5. Unless you want to change the POWER LEVEL, the
oven always cooks at HI-POWER.
4. Touch POWER LEVEL.
"P-HI" is displayed. The "ENTER",
"PWR" and "COOK" blink.
The oven is ready for your power
setting.
5. Touch the number for the power
level you want.
Example: To warm the
doughnuts at 80% of power,
touch "8".
"P-80" is displayed.
The "ENTER" and "START" blink.
If you want to change the power
level, touch POWER LEVEL again
and select another power level.
6. Touch START.
The oven begins cooking, counting
down the cooking time in seconds,
alternating with "P-80" power level
i in the display.
I When cooking is finished, you hear two
I short and one long beeps and "End"
i
L displays. The oven shuts itself off.
NOTE: To stir or turn the food during cooking, open the oven door and stir or turn the food. Close the oven door
and touch START. The oven will count down the time left.
19
DiRECTiONS
TABLE
OF MULTI-POWER
FOR MICROWAVE
COOKING
SETTINGS
The nine power levels in addition to "HI" allow you to choose the best power level for the food you are cooking.
Below are listed all the power levels,examples of foods best cooked at each level, and the amount of microwave
power you are using. Check your cookbook for detailed directions.
POWER LEVEL
10
"HI"
MICROWAVE
100%
OUTPUT
USE
_,Boil water.
• Cook ground beef.
Q Make candy.
• Cook fresh fruits and vegetables.
e Cook fish, and poultry.
o Preheat browning dish.
9O%
• Reheat meat slices quickly.
e Saute onions, celery, and green pepper.
80%
e All reheating.
e Cooking scrambled eggs.
70%
• Cook quickly breads and cereal products.
o Cook cheese dishes,veal.
• Cook cakes,muffins,brownies,cup
cakes.
6
60%
o Cook pasta.
5
50%
• Cook meats,whole poultry.
e Cook custard.
o Cook whole chicken,turkey,spare
ribs,rib roast,sirloin roast.
40%
o Cook less tender cuts of meat.
o Reheat frozen convenience foods..
30%
o Thawing meat,poultry,and seafood.
o Cooking small quantities of food.
e Finish cooking casserole,stew,and some sauces.
2
20%
• Soften butter and cream cheese.
® Heating small amounts of food.
1
10%
® Soften ice cream.
® Raise yeast dough.
0
® Standing time.
® Independent timer.
J
2O
DiRECTiONS
TEMPERATURE
CONTROLLED
FOR MICROWAVE
"HI=POWER"/"MULTI-POWER"
COOKING
COOKING
When you do temperature controlled cooking, you do not set the time, but set the TEMP to cook the food to the desired
temperature. The temperature you set is the TEMPERATURE OF THE FOOD, not the temperature of the oven as in
conventional cooking. You use the temperature probe to measure the internal temperature of the food.
However, you do not have to cook the food at HI-POWER, but may set the POWER LEVEL appropriate to the kind of
food, according to the recipes in your cookbook.
You may set temperatures from 100°F to 200°F, one degree at a time. The oven will show rise in temperatures by
degrees, beginning at 100°F. If the food temperature measures less than 100°F, "COOL" will display until the food
reaches 100°F.
TEMPERATURE
See the illustration
PROBE
below for the parts of the temperature
probe.
Temperature
Probe Sensor - the pointed end of the probe that you plug into the food.
Sensitive Area of the Sensor - the first inch, or tip, of the temperature probe sensor,
Plug - the blunt end of-the temperature probe that you plug into the socket in the oven right wall.
Socket - the outlet in the right wall of the oven.
PLUG
SOCKET
SENSITIVE AREA
TEMPERATURE
PROBE
TEMPERATURE
"TEMPERATURE
CONTROLLED"
POINTS
PROBE SENSOR
TO REMEMBER
® Place the temperature probe sensor into the thickest
part of the meat or in the center of the food to be
reheated. Avoid touching bone or fat.
® Place the first inch of the sensor in the densest part
of the food to be cooked.
® Turn meat between first and second settings.
® Remove the temperature probe from the oven after
use.
® Use a hot pad. The temperature probe will be hot.
® Refer to the cookbook for other information.
• Do not operate the oven empty with the temperature
probe plugged in.
®Do not leave the temperature probe unplugged in the
cavity while operating the oven.
• Do not let the temperature probe touch the side walls,
ceramic plate, or door of the cavity during cooking.
® Do not plug the pointed end of the temperature probe
into the socket inside the cavity.
® Do not use the temperature probe in a regular oven.
The probe was designed for the microwave oven only.
21
DiRECTiONS
TEMPERATURE
FOR MICROWAVE
CONTROLLED
COOKING
COOKING
General Instructions:
1. Place the first inch of the temperature probe into the side ol the food.
Keep the probe level or on an angle, as shown.
DO NOT put the temperature probe in from the top.
2. Plug the temperature probe plug into the socket
on the right wall of the oven.
NOTE: Be sure the entire metal end is in the socket.
CAUTION
Do not plug
Continue
the pointed
end of the temperature
probe
into the socket!
with Steps 3-7 in the table below.
WHAT YOU DO
COMMENTS/NOTES
WHAT THE OVEN DOES
3. Touch STOP/CLEAR.
I
4. Touch TEMP.
5. Touch the numbers to set the
food doneness temperature.
Example: touch "1-2-0".
The oven beeps.
The oven is clear of all previous
settings.
The "°F" display and "ENTER",
"COOK" and "TEMP" blink.
The oven is ready for your temperature
setting for Stage 1 (if you are doing
multi-stage cooking.)
The numbers display with "°F".
"120°F '' displays.
"ENTER" and "START" blink.
You are cooking at "HI-POWER" until
you set the power level.
NOTE: If you want to cook at "HI-POWER",
6. Touch POWER LEVEL and the
number for desired power level.
Example: Touch"8" to set power.
7. Touch START.
you do not need to touch POWER LEVEL. Go to step 7.
The "P-80" displays and "ENTER"
and "START" blink.
The oven has accepted your
power setting.
The power level of the oven is 80%.
The oven begins to cook and as soon
as the temperature rises above 100°F,
you will see the temperature of the food
rising in the display window. The display
window will show "COOL" until the
temperature
rises above 100°F.
NOTE: If you do not plug the temperature probe into the socket and then try to start temperature controlled cooking,
"PROBE" will display and disappear with two short beeps. Plug the probe into the socket and go back to
Step 3. When the food reaches the temperature you have set, you will hear two short beeps and one long
beep.
NOTE: The highest temperature
you can set is 200°F.
i
CAUTION
When you remove
l
22
the temperature
probe, use a pot holder
sensor sections
may be hot.
because
the wire, plug,
and
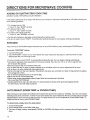
AUTO DEFROST
Your microwave oven is preset with three defrost sequences. The Auto Defrost method is the best way to defrost frozen
foods. The Auto Defrost Sequence Table below provides some basic guidelines for using the three defrost sequences.
The cookbook will give you the specific recommended defrost sequence for the food you are defrosting.
AUTO DEFROST
SEQUENCE
SEQUENCE
MEAT
TABLE
FOOD
® BEEF ........................ Ground beef (bulk), Round steak, Tenderloin
steak, Pot roast, Rib roast, Rump roast, Chuck
roast. Stew Beef, Ground beef (Patties)
o LAMB ....................... Chops (1-inch, thick),
Rolled roast
Cubes for stew
• PORK ...................... Chops (1/2-inch thick), Spareribs, Country-
BASE
QTY.
MIN./MAX.
FOOD
1 lb.
0.1/9.9 Ibs.
1 lb.
0.1/9.9 Ibs.
1 lb.
0.1/9.9 Ibs.
style ribs. Rolled roast, Sausage (links),
Hot dogs
• VEAL ....................... Cutlets (Ibs., 1/2-inch thick)
POULTRY
o CHICKEN
................ Whole (under 4 Ibs.), Breast (boneless)
Cut up.
• CORNISH HENS ...... Whole
• TURKEY .................. Breast (under 6 tbs.)
FISH
GENERAL
o FISH ........................ Fish fillets, Fish steak, whole fish
o SHELL FISH ............ Lobster tails, Crab meat, Shrimp, Scallops
GUIDELINES
The benefit of this AUTO DEFROST feature is automatic setting and control of defrosting. But, just as in conventional
defrosting, you must check the food during the defrosting time. Here are some important tips to remember about
defrosting.
For best results when defrosting, remember
o
®
•
•
o
o
:
Do not defrost less than 1/4 lb. of ground beef.
Freeze ground beef in a doughnut shape.
Press down the center of ground beef patties before freezing.
Meats, fish or poultry up to 6 Ibs. defrost best.
To reduce moisture loss, defrost meats just before cooking.
To defrost convenience foods, follow package directions.
To prepare the item for defrosting, remember :
Remove the packaging.
NOTE : If the package is microwavable,
pierce the package several times.
o Note the weight of the item on the package.
o When you calculate the weight of the item, round it to the nearest lower decimal.
(Example : 4 oz.=.2 lb.; 8 oz=.5 lb.; 12 oz=.7 lb.; 16 oz=l lb.)
• Remove metal twist ties from the packaging.
= For best results, remove meat, poultry, and fish from the original wrapper. The wrapper can hold steam and juice close
to the food and cause the outer surface to cook.
® If removing the wrapper is difficult, defrost the wrapped food for about 1/4 of the defrosting time (displayed at the
beginning of the defrost cycle). Then remove the food from the oven and remove the wrapping.
Return the food to the oven and touch START.
23
AUTO DEFROST
Prepare the food for defrosting.
• Place the food in a flat, shallow baking dish or use a microwave roasting rack in the dish to catch drippings.
• Pierce meats with a casing, such as hot dogs and sausage, to allow steam to escape.
® Cover fatty or thin areas of meat with a small amount of foil before defrosting to prevent them from cooking.
During the defrosting
cycle, remember:
• Check the food. If items often cook at the edges when defrosting, reduce the weight you set.
® Be sure to turn, stir or rotate the food as directed.
After defrosting,
•
o
•
•
•
remember:
Be sure all areas of the food item are totally defrosted.
Pierce dense roasts with a skewer to check whether defrosting is complete.
Rinse poultry and seafood in cold water.
Remove the giblets from poultry and rinse ice crystals out of the cavity.
Food should still be some what icy in the center when you remove it from the oven.
NOTE : Do not confuse Power Level 3, used to thaw or reheat convenient foods or small bread items, with AUTO
DEFROST. Power Level 3 is a low-energy setting used to cook foods that need slow or gentle cooking.
AUTO DEFROST
INSTRUCTIONS
Follow the steps below to set your oven for Auto Defrost. Here we use 2 Ibs. 8 oz. of ground beef as an example.
WHAT YOU DO
WHAT THE OVEN DOES
NOTES/COMMENTS
1. Touch STOP/CLEAR.
Erases all previous settings.
2. Touch MEAT.
The "ENTER" and "WEIGHT" will
blink, "MEAT" "AUTO" and "DEFR"
light will show.
3. Enter the weight of your food in
decimal increments from 0.1 to 9.9 Ibs.
Convert ounces to the closest tenth
2.5 LBS displays. The "ENTER ....
and "START" wilt be blink.
4 oz.=.2 lb.;8 oz.= .5 lb.;
12 oz.=.7 Ib.;16 oz.=l lb.
4. Touch START.
Counts down the time of the first
stage. Five long beeps sound at
the end of the first stage.
The oven controls three
power levels automatically.
5. Open the door to separate, rearrange,
cover or turn over the food.
The oven stops.
Follow recipe directions.
6. Touch START to continue.
Time remaining displays.
Standing time is included
in the Auto Defrost sequence.
of a pound.
Example : 2 Ibs. 8oz. = 2.5 Ibs.
At the end of the sequence, two short beeps and one long beep will sound and "END" displays.
The oven shuts off automatically.
24
AUTO DEFROST
CHART
The defrosting categories in this chart have been made specifically for use with the "AUTO DEFROST" feature
AUTOMATIC
FOOD
SETTING
DEFROST
AT BEEP
BEEF
GUIDE
- MEAT
SPECIAL INSTRUCTIONS
Meat of irregular shape and large, fatty cuts of meat
should have the narrow or fatty areas shielded with
foil at the beginning of a defrost sequence.
Do not defrost less than !/4 lb.
Freeze in doughnut shape.
Ground beef
(bulk)
MEAT
Remove thawed portions with fork.
Turn over. Return remainder to oven.
Ground beef
(patties)
MEAT
Separate and rearrange.
Do not defrost less than two 4 oz.patties.
Depress center when freezing.
Round
steak
MEAT
Turn over. Cover warm areas with
aluminum foil.
Place on a microwavable
roast rack.
Tenderloin
steak
MEAT
Turn over. Cover warm areas with
aluminum foil.
Place on a microwavable
roast rack.
Stew beef
MEAT
Remove thawed portions with fork.
Separate remainder.
Return remainder to oven.
Place on a microwavable
roast rack.
Pot roast,
chuck roast
MEAT
Turn over. Cover warm areas with
aluminum foil.
Place on a microwavable
roast rack.
Rib roast
MEAT
Turn over. Cover warm areas with
aluminum foil.
Place on a microwavable roast rack.
Rolled rump
roast
MEAT
Turn over. Cover warm areas with
aluminum foil,
Place on a microwavable roast rack.
MEAT
Remove thawed portions with fork.
Return remainder to oven.
Place in a microwavable
MEAT
Separate and rearrange.
LAMB
Cubes for
stew
Chops
(1-inch
thick)
PORK
Chops
(1/2-inch
thick)
baking dish.
Place on a microwavable roast rack.
MEAT
Separate and rearrange.
Place on a microwavable roast rack.
Hot dogs
Spareribs
Countrystyle ribs
MEAT
Separate and rearrange.
Turn over. Cover warm areas with
aluminum foil.
Place on a microwavable roast rack.
Place on a microwavable roast rack.
Sausage,
links
MEAT
Separate and rearrange.
Place on a microwavable
Sausage,
bulk
MEAT
Remove thawed portions with fork.
Turn over. Return remainder to oven.
Place in a microwavable baking dish.
Loin roast,
boneless
MEAT
Turn over. Cover warm areas with
aluminum foil.
Place on a microwavable
roast rack.
roast rack.
25
AUTO DEFROST
CHART
AUTOMATIC
FOOD
DEFROST
GUIDE
- POULTRY
SETTING
AT BEEP
SPECIAL INSTRUCTIONS
POULTRY
Turn over. Finish defrosting breastside down, Cover warm areas with
aluminum foil.
Place chicken breast-side-up on a microwavable
roast rack. Finish defrosting by immersing in cold
water.
Remove giblets when chicken is partially defrosted.
Turn over. Cover warm areas with
aluminum foil. Separate pieces and
rearrange.
Place on a microwavable roast rack.
Finish defrosting by immersing in cold water.
Turn over. Cover warm areas with
aluminum foil.
Place on a microwavable
Turn over. Cover warm areas with
aluminum foil.
Place on a microwavable roast rack.
Finish defrosting by immersing in cold water.
CHICKEN
Whole
(under
4 Ibs.)
Cut-up
CORNISH HENS
Whole
POULTRY
roast rack.
Finish defrosting by immersing
in cold water.
TURKEY
Breast
(under
6 Ibs.)
POULTRY
AUTOMATIC
FOOD
DEFROST
GUIDE - FISH AND SHELLFISH
AT BEEP
SETTING
SPECIAL INSTRUCTIONS
FISH
Fillets
FISH
Turn over. Separate fillets when
partially thawed if possible.
Place in a microwavable baking dish.
Carefully separate fillets under cold water.
Steaks
FISH
Separate and rearrange.
Place in a microwavable baking dish.
Run cold water over to finish defrosting.
Whole
FISH
Turn Over.
Place in a microwavable baking dish.
Cover head and tail with foil; do not let foil touch
sides of microwave. Finish defrosting by
immersing in cold water.
Crabmeat
FISH
Break apart. Turn Over.
Place in a microwavable
baking dish.
Lobster tails
FISH
Turn Over and rearrange.
Place in a microwavable
baking dish.
Shrimp
FISH
Separate and rearrange.
Place in a microwavable
baking dish.
Scallops
FISH
Separate and rearrange.
Place in a microwavable
baking dish.
SHELLFISH
26
iNTRODUCTiON
TO CONVECTION
COOKING
Convection ovens are not new. They have been a favorite of professional bakers for many years. Both conventional and
convection ovens cook food with heat generated by gas or electricity. In a conventional oven, air remains stationary; the
heat rises to the top of the oven and is not evenly distributed throughout the oven interior. In a convection oven, a fan
circulates the warm air. The continuous flow of warm air around food in a convection oven causes it to be cooked more
evenly and somewhat faster than it can be cooked by motionless air in a conventional oven. Convection cooking, with its
circulating hot, dry air, is a superb cooking method for baked goods, roasts, poultry and other foods that require a crisp,
browned surface.
Your oven uses convection cooking whenever you use the Convection Command
Pads.
® Do not cover baking rack with aluminum foil. It interferes with the flow of air that cooks the food.
® Round pizza pans are excellent cooking utensils for many convection-only
Choose pans that do not have extended handles.
o Use convection
cooking.
items.
cooking for items like souffles, breads, cookies, angel food cakes, pizza, and for some meat and fish
o You do not need to use any special techniques to adapt your favorite oven recipes to convection cooking; however,
you may need to lower some temperatures or reduce some cooking times from the convection oven cooking directions.
See examples in your Cookbook and in the charts in this section.
o When baking cakes, cookies, breads, rolls or other baked foods, most recipes call for preheating.
oven just as you do a regular oven. You can start heavier dense foods such as meats, casseroles,
preheating.
e All heatproof
Preheat the empty
and poultry without
cookware or metal utensils can be used in convection cooking.
• As in conventional cooking, the distance of the food from the heat source affects cooking results. Follow Cookbook
recipes and refer to the charts in this Use and Care Guide. It is also helpful to find a similar recipe in the Cookbook
index and to refer to the recipe's suggested techniques.
• Use metal utensils only for convection cooking. Never use for microwave or combination
damage to the oven may occur.
• After preheating,
minutes.
if you do not open the door, the oven will automatically
cooking since arcing and
hold at the preheated temperature
for 30
• You can set up to three convection cycles.
(Example for two crust pies: you can set the oven to preheat for baking at 425°F and to finish baking at 350°F.)
27
INTRODUCTION
TO CONVECTION
COOKING
CONVECTION BAKING WITHOUT PREHEATING
(meats, casseroles and poultry)
1. Touch STOP/CLEAR.
2. Touch BAKE.
3. Touch numbers for the baking temperature (optional).
You can enter a temperature between 150°F and 450°F. Example for 325°F: Touch "3-2-5".
NOTE: To clear the temperature you entered, touch CONVECTION
You can then reenter the cooking temperature, if desired.
BAKE before entering a bake time.
4. Touch numbers tor cooking time.
You can enter a time up to 99 minutes, 99 seconds. Example for 20 minutes: Touch "2-0-0-0".
5. Touch START.
You can see the cooking temperature anytime during cooking by touching CONVECTION BAKE. The cooking
temperature will show for two seconds.
CONVECTION
BAKING
WITH PREHEATING.
Many food can be cooked using this method. Convection cooking temperatures
The oven is usually preheated before cooking.
range from 150°F to 450°F.
t. Touch STOP!CLEAR.
2. Touch BAKE twice.
3. Touch numbers for the Preheat/Cooking temperature.
You can enter a temperature between 150°F and 450°F. Example for 325°F: Touch "3-2-5".
4. Touch numbers for cooking time.
You can enter a time up to 99 minutes, 99 seconds. Example for 20 minutes: Touch "2-0-0-0".
5. Touch START.
After preheating, open the door, put food in oven and close the door.
NOTES:
® If you open the door or touch STOP/CLEAR during preheating, preheating will stop.
To resume preheating, close the door and touch START.
® When the oven reaches the set preheat temperature, four tones will sound and the oven will automatically hold that
temperature for 30 minutes.
6. Touch START.
You can see the cooking temperature anytime during cooking by touching CONVECTION BAKE. The cooking
temperature will show for two seconds.
CONVECTION
BROILING
1. Touch STOP/CLEAR.
2. Touch BROIL.
3. Touch numbers for cooking time.
You can enter a time up to 99 minutes, 99 seconds. Example for 20 minutes: Touch "2-0-0-0".
4. Touch START.
After preheating, open the door, put food in oven and close the door.
NOTES:
® Oven will preheat to 450°F.
e If you open the door or touch STOP/CLEAR during preheating, preheating will stop.
To resume preheating, close the door and touch START.
® When the oven reaches the set preheat temperature, four tones will sound and the oven will automatically
temperature
5. Touch START.
You can see the cooking temperature anytime during cooking by touching CONVECTION
temperature will show for two seconds.
28
hold that
for 30 minutes.
BROIL. The cooking
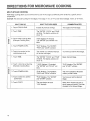
DiRECTiONS
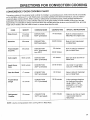
CONVENIENCE
FOODS COOKING
FOR CONVECTION
COOKING
CHART
Convection cooking of convenience foods is similar to cooking in a conventional oven. Select items that fit conveniently
on the turntable, such as an 8 b2-inch frozen pizza. Convection preheat to the desired temperature, and use metal or
ovenproof glass cooking utensils. When cooking or baking these convenience foods, follow package directions for
preparation and selecting the correct container. Because of the great variety of foods available, times given here are
approximate. It is advisable to always check food about five minutes before the minimum recommended time, and cook
longer only if needed. Use oven mitts to insert or remove items from the oven.
FOOD
Pizza (frozen)
Brownies
SIZE/WT
COOKING MODE
13 ounces
(8 1/2inch)
CONVECTION
20ounces
CONVECTION
COOKING TIME
14-16 minutes
Bake in ovenproof pan on
Metal Rack for crisper crust.
23-26 minutes
Bake in 9-inch square pan
on Metal Rack.
30 minutes
Bake in metal or ovenproof
pan on Metal Rack.
400°F (preheated)
350 ° F(preheated)
Frozen Double
Crust Pie
Cake Layers
26 ounces
CONVECTION
425°F (preheated)
then 350°F
18-25 ounces
CONVECTION
30-35 minutes
45 minutes
325°F (preheated)
Apple Sauce
Cake
Date Nut Bread
18-25 ounces
CONVECTION
30-35 minutes
350°F (preheated)
17 ounces
CONVECTION
40 minutes
350°F (preheated)
Dough
16 ounces
CONVECTION
375°F (preheated)
Refrigerated
Cookies
20 ounces
CONVECTION
Frozen Bread
350°F (preheated)
SPECIAL INSTRUCTIONS
Back one layer at a time on
Metal Rack.
Use metal 10-cup fluted
tube pan on Metal Rack.
Bake in 9x5-inch metal loaf
pan on Metal Rack.
25-30 minutes
Follow package directions
for thawing and proofing
dough. Bake in metal
greased 8112 X 41/2 X 21!2inch loaf pan on Metal
Rack.
8-9_/2 minutes
Bake six at a time on metal
round cookie sheet on
Metal Rack.
NOTE: Use the normal position when cooking with the Metal Rack.
29
DiRECTiONS
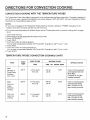
CONVECTION
FOR CONVECTION
COOKING
COOKING
WITH THE TEMPERATURE
PROBE
The Temperature Probe helps take the guesswork out of cooking roasts and larger casseroles. The probe is designed to
turn off the oven when it senses the temperature you chose (between 100°F and 200°F). See your Cookbook for helpful
information on cooking different types of food.
NOTES:
® If you have not plugged in the Temperature Probe properly or if probe is defective, "PROBE" will appear on the
Display, three tones will sound, and the oven will not turn on.
® For correct probe temperatures
30-31.
1.
2.
3.
4.
Insert
Place
Touch
Touch
for different foods, see the "Temperature
probe convection cooking chart" on pages
probe into food.
food in oven and plug probe into socket on oven wall.
STOP/CLEAR.
TEMP.
5. Touch the number for food temperature.
You can enter a temperature between 100°F and 200°F. Example for "L60°F: Touch "1-6-0".
6. Touch BAKE.
7. Touch the number for cooking temperature.
You can enter a temperature between 150°F and 450°F. Example for 325°F: Touch "3-2-5".
8. Touch START.
TEMPERATURE
FOOD
PROBE CONVECTION
COOKING
CHART
OVEN
TEMP
FIRST STAGE
325OF
4-5 min per Ib
Turn over
4-6 min
per Ib
155°F
Cook in microwaveproof
and heatproof dish with
Metal Rack.
Let stand 10 min after
cooking (covered).
350°F
5-7 min per Ib
Turn over
6-8 min
per Ib
165oF
Cook in microwaveproof
and heatproof baking
dish. Let stand 10 min
SECOND STAGE
SPECIAL NOTES
TIME
TIME
OR
PROBE TEMP
Veal
Shoulder or
Rump Roast,
boneless
(3-3 112Ibs)
Pork
Pork Loin
Roast,
Boneless
after cooking (covered).
(4-5 Ibs)
Pork Loin,
center cut
(4-5 Ibs)
3O
350°F
5-7 min per Ib
Turn over
6-8 min
per Ib
165°F
Cook in microwaveproof
and heatproof baking
dish. Let stand 10 min
after cooking (covered).
DiRECTiONS
TEMPERATURE
FOOD
FOR CONVECTION
PROBE CONVECTION
OVEN
TEMP
FIRST STAGE
COOKING
COOKING
CHART
SECOND STAGE
SPECIAL NOTES
TIME
TIME
OR
PROBE TEMP
Beef
Meat Loaf
350°F
35 rain
160°F
6 min
Rare:120°F
per Ib
Med:130°F
(11/2-13/4Ibs)
Beef Rib
Roast,
boneless
Beef Rib
Roast, with
bone (5 Ibs)
Beef Pot
Roast,
boneless
(3 Ibs)
Lamb
Lamb Leg or
Shoulder
Roast, with
bone
(6112Ibs)
Lamb Roast,
boneless
(3-4 Ibs)
350°F
5 min per Ib
Turn over
Preheat.
Let stand 5-10 min.
Cook in microwaveproof
and heatproof dish with
Metal Rack.
Let stand 10 min after
cooking (covered.).
350°F
7 min per Ib
Fat-side down
Turn over
8-10 min
per Ib
Rare:120°F
Med:130°F
Well:140°F
Cook in microwaveproof
and heatproof dish.
Let stand 10 min after cooking (covered).
350°F
350°F
7 min per Ib
Turn over
8-10 min
per Ib
Med:130°F
WelI:140°F
Cook in covered
4 min per Ib
Fat-side down
Turn over
5-7 rain
per Ib
Rare:145°F
Med:155°F
Well:165°F
Cook in microwaveproof
and heatproof dish with
Metal Rack.
Let stand 10 rain after
microwaveproof and
heatproof casserole or
cooking bag.
cooking (covered).
•350OF
5 min per Ib
Fat-side down
Turn over
4-6 rain
per lb
150°F
Cook in microwaveproof
and heatproof dish with
Metal Rack.
Let stand 10 min after
cooking (covered).
NOTE: Use the normal position when cooking with the Metal Rack.
31
iNTRODUCTiON
TO COMBiNATiON
COOKING
Some foods benefit from the combination of cooking by microwave energy and convection heat. This combination
method allows you to take advantage of the speed moisture retention of microwave cooking and the crisping and
browning effect of hot, dry air. For example, microwave energy will speed cooking and keep meat and poultry moist on
the inside while convection heat crisps and browns the surface.
When you use the micro/convection method, your oven wil! alternate automatically back and forth between both cooking
methods and the results will delight and amaze you.
Your oven has two preprogrammed settings that make it easy to cook with both convection heat and microwave energy
automatically.
MICROWAVE
CONVECTION
COMBINATION
(MICROWAVE/CONVECTION)
All utensils used for micro/convection cooking must be BOTH microwaveproof and heatproof. Oven-tempered heatproof
glass, china, and pottery that do not have metal trim or glaze are the best choice. THE METAL RACK MAY BE USED IN
COMBINATION COOKING ONLY WHEN SPECIFICALLY INDICATED IN A RECIPE.
However, METAL PANS MUST NEVER BE PLACED ON THE METAL RACK IN COMBINATION COOKING. It any
metal touches the metal rack during a microwave cycle, arcing may occur and your oven may be damaged.
® Meats may be roasted directly on the Metal Rack or in a shallow roasting pan placed on the rack. When using the
Metal Rack. Please check your Cookbook for information on proper use.
• Less tender cuts of beef can be roasted and tenderized
using oven cooking bags.
® When baking, check for doneness after cooking time is up. If not completely done, let stand in oven for a few minutes
to complete cooking.
NOTE: During combination baking, some baking utensils may cause arcing when they come in contact with the oven
walls or metal racks. Arcing is a discharge of electricity that occurs when microwaves come in contact
with metal. If arcing occurs, place a heatproof dish between the pan and the Metal Rack. If arcing occurs with
other baking utensils, stop using them for combination cooking.
32
INTRODUCTION
COMBINATION
BAKING/ROASTING
TO COMBiNATiON
WITHOUT
COOKING
PREHEATING
1. Touch STOP/CLEAR.
2. Touch BAKE or ROAST.
3. Touch numbers for food temperature.
You can enter a temperature between 150°F and 450°F. Example for 325°F: Touch "3-2-5".
4. Touch numbers for cooking time.
You can enter a time up to 99 minutes, 99 seconds. Example for 20 minutes: Touch "2-0-0-0".
5. Touch START.
You can see the cooking temperature anytime during cooking by touching COMBINATION BAKE (when baking)or
COMBINATION ROAST (when roasting). The cooking temperature will show for two seconds.
COMBINATION
BAKING/ROASTING
WITH PREHEATING
1. Touch STOP/CLEAR.
2. Touch BAKE or ROAST twice.
3. Touch numbers for preheat/cooking temperature.
You can enter a temperature between 150°F and 450°F. Example for 325°F: Touch "3-2-5".
4. T_uch numbers for cooking time.
You can enter a time up to 99 minutes, 99 seconds. Example for 20 minutes: Touch "2-0-0-0".
5. Touch START.
After preheating, open the door, put food in oven and close the door.
NOTES:
® If you open the door or touch STOP/CLEAR during preheating, preheating will stop. To resume preheating, close the
door and touch START.
• When the oven reaches the set preheat temperature, four tones will sound and the oven will automatically hold that
temperature for 30 minutes.
6. Touch START.
You can see the cooking temperature anytime during cooking by touching COMBINATION BAKE (when baking) or
COMBINATION ROAST (when roasting). The cooking temperature will show for two seconds.
AUTO COMBINATION
AUTO COMBINATION lets you cook with both microwaves and convection heat, without needing to set a cooking time
or Cook Power. A!I you do is choose the category of the food you are cooking and enter the weight or quantity. See the
"Auto combination chart" on the this page for the settings available to you.
1. Touch STOP/CLEAR.
2. Touch AUTO COMBINATION.
3. Touch the number for food category.
Example for setting 1. (hamburger)
4. Touch numbers for food weight or quantity.
5. Touch START.
After preheating, open the door, put food in oven and close the door.
6. Touch START.
At beep(five tones) open the door, turn over the food and close the door.
7. Touch START to continue.
AUTO COMBINATION
CHART
FOOD
SETTING
QUANTITY/WEIGHT
YOU CAN COOK
1
Hamburger
0.3 - 2.0 Ibs
2
Chicken Piece
0.5 - 3.0 Ibs
3
Whole Chicken
2.0 - 3.5 Ibs
4
Turkey
4.0 - 9.0 Ibs
5
Cake
1 layer/2
6
Bread
1 loaf/2 loaves
layers
33
DiRECTiONS
COMBINATION
FOR COMBiNATiON
COOKING
COOKING
WITH THE TEMPERATURE
PROBE
The Temperature Probe helps take the guesswork out of cooking roasts and larger casseroles. The probe is designed to
turn off the oven when it senses the temperature you chose (between 100°F and 200°F) has been reached.
See your Cookbook for helpful information on cooking different types of food.
NOTES:
® If you have not plugged in the Temperature Probe properly or if the probe is defective, "PROBE" will appear on the
Display, three tones will sound, and the oven will not turn on.
o For correct probe temperatures
page 34-35.
for different foods, see the "Temperature
probe combination
cooking chart" on
1.
2.
3.
4.
5.
Insert probe into food.
Place food in oven and plug probe into socket on oven wall.
Touch STOP/CLEAR.
Touch TEMP.
Touch numbers for food temperature.
You can enter a temperature between 100°F and 200°F. Example for 160°F : Touch "1-6-0".
6. Touch BAKE or ROAST.
7. Touch numbers for co.0king temperature.
You can enter a temperature between 150°F and 450°F. Example for 325°F : Touch '3-2-5".
8. Touch START.
TEMPERATURE
FOOD
PROBE
OVEN
TEMP
COMBINATION
COOKING
FIRST STAGE
CHART
SECOND STAGE
SPECIAL
TIME
TIME
OR
NOTES
PROBE TEMP
Beef
Meat Loaf
(1112-13/4lbs)
350°F
Beef Rib
Roast,
boneless
350°F
5 min perlb
Turn over
Beef Rib
Roast, with
bone (5 lbs)
350°F
7 min per Ib
Fat-side down
Turn over
Beef Pot
Roast,
boneless
350°F
(3 Ibs)
34
35 min
160°F
Preheat.
Let sland 5-10 min.
6 min
per Ib
Rare:120°F
Med:130°F
Cook in microwaveproof
and heatproof dish with
Metal Rack.
Let stand 10 rain after
cooking (covered.).
8-10 min
per Ib
Rare:120°F
Med:130°F
WeII:140°F
Cook in microwaveproof
and heatproof dish.
Let stand 10 min after
cooking (covered).
8-10 min
per Ib
Med:130°F
Well:140_F
Cook in covered
microwaveproof and
heatproof casserole or
cooking bag.
7 min per Ib
Turn over
DiRECTiONS
TEMPERATURE
FOOD
Lamb
Lamb Leg or
Shoulder
Roast, with
bone
(61/2tbs)
Lamb
Roast,
boneless
PROBE
FOR COMBiNATiON
COMBINATION
OVEN
TEMP
FIRST STAGE
350°F
4 Tin per Ib
Fat-side down
Turn over
COOKING
COOKING
CHART
SECOND STAGE
SPECIAL NOTES
TIME
TIME
OR
PROBE TEMP
5-7 min
Rare:145°F
per Ib
Med:155°F
WelI:165°F
Cook in microwaveproof
and heatproof dish with
Metal Rack.
Let stand 10 Tin after
cooking (covered).
350°F
5 Tin per Ib
Fat-side down
Turn over
4-6 min
150°F
Cook in microwaveproof
and heatproof dish with
Metal Rack.
Let stand 10 Tin after
cooking (covered).
325°F
4-5 Tin per Ib
Turn over
4-6 Tin
per Ib
155°F
Cook in microwaveproof
and heatproof dish with
Metal Rack.
Let stand 10 Tin after
cooking (covered).
Port Loin
Roast,
boneless
(4-5 Ibs)
350°F
5-7 Tin per Ib
Turn over
6-8 Tin
per Ib
165°F
Cook in microwaveproof
and heatproof baking
dish. Let stand 10 Tin
after cooking (covered).
Pork Loin,
center cut
(4-5 Ibs)
350°F
5-7 min per Ib
Turn over
6-8 Tin
per Ib
165°F
Cook in microwaveproof
and heatproof baking
dish. Let stand 10 Tin
after cooking (covered).
per Ib
(3-4 Ibs)
Veal
Shoulder or
Rump
Roast,
boneless
(3-3112Ibs)
Pork
35
UTENSIL GUIDE
You can use a variety of utensils and materials in your microwave-convection
oven. For your safety and to prevent
damage to utensils and your oven, choose appropriate utensils and materials for each cooking method.
The list below is a general guide to help you select the correct utensils and materials.
UTENSILS
MATERIAL
Ceramic
&
Glass
MICROWAVE
COOKING
COMBINATION
COOKING
CONVECTION
COOKING
Ceramic
YES
YES
YES
Ovenproot, Heat-Tempered,
Microwave-Safe Glassware
YES
YES
YES
NO
NO
YES
NO
NO
YES
YES
YES
YES
YES
YES
YES
Regular Ovenproof
YES
YES
YES
Heat-Tempered
YES
NO
NO
Bake/Roast Rack
NO
NO
YES
Metal Baking Pan
NO
NO
YES
Glassware with Metal
Decoration
Lead Glass
China
Without Metal Decoration
(Ovenproof and HeatTempered)
Pottery
Plastic
Metal
Ware
Aluminum
YES
Foil
Paper
YES
NO
NO
YES
NO
NO
Wax Paper
YES
NO
NO
Plastic Wrap
YES
NO
NO
Straw,
Cups, Plates, Towels
Wicker, Wood
YES: Utensils to use
NO: Utensils to avoid
" Refer to "Introduction
36
to microwave cooking" on page 10 and "Question And Answers" on page 39 for proper use.
CARE AND CLEANING
GENERAL
For best performance and safety, keep the oven clean inside and outside. Take special care to keep the inner door
panel and the oven front frame free of food or grease build-up.
NEVER USE ROUGH POWDERS OR PADS. Wipe the microwave oven inside and out, including the hood bottom
cover, with a soft cloth and a warm (not hot) mild detergent solution. Then rinse and wipe dry.
Use a chrome cleaner and polish on chrome, metal and aluminum surfaces.
Wipe spatters immediately with a wet paper towel, especially after cooking chicken or bacon.
Clean your oven weekly or more often, if needed.
Temperature
Probe
Remove the temperature
probe from the socket after each use.
CAUTION
Use a pot holder because the wire, plug, and sensor sections may be hot.
Clean the probe with a mild detergent solution. Then rinse and wipe dry.
Clean the sensor with a soft, damp cloth. Dry before using again.
Metal
Rack
Remove the metal rack to clean it at the sink.
Use a mild detergent solution. Then rinse and wipe dry.
Grease Filters
Remove the metal mesh grease filters on the hood bottom cover for washing at the sink. To remove each filter :
1. Grasp the tab at the end of the filter, as shown.
2. Slide the filter toward each side of the oven.
3. Pull it downward and out.
Use a warm detergent solution, rinse and wipe dry.
DO NOT USE AMMONIA to clean an aluminum mesh filter.
Do not run the hood fan without the filter.
To reinstall the filter, slide it into the side slot, then push up and toward oven center to lock.
The filter should be completely dry before reinstalling into the oven.
37
CARE AND CLEANaNG
Charcoal
Filter
Replacement
If your oven is vented inside, the charcoal filter needs replacing every 6 to 12 months, and more often if necessary.
The charcoal filter removes odors and smoke from the vented air. If you start smelling cooking odors
or see some smoke, you need to replace the charcoal filter. Here's how:
1. To order a new charcoal filter, contact the Parts Department at your nearest Sears Store or Service Center or call
1-800-FQN-PART(1-800-366-7278).
Specify the model number of your oven (found on the model number plate on the left side of control panel) and order
replacement part #507269.
2. Remove the two vent grille mounting screws.
If the screws are not accessible, remove the oven from the wall.
3.
4.
5.
6.
Tip the grille forward, then lift it out.
Lift the back of the charcoal filter and slide it toward you.
Slide a new charcoal filter into place.
Put the grille back on with the mounting screws.
Work
Light
Replacement
When either bulb in the work light burns out, you will need to replace it with a 30 watt appliance bulb.
1. Disconnect the power at the circuit breaker or unplug the power cord.
2. Remove the phillips head screw from the work light cover. Right side will drop.
3. Unhook tab at left side.
4. Unscrew the burned out bulb and replace with one of the same size and wattage (30 watts).
5. Replace the work light cover and the screw.
6. Reconnect the power.
7. Set the Time of Day (see Page 8).
38
QUESTIONS AND ANSWERS
OPERATION
Q. What is wrong when the oven light will not glow during cooking or when the oven door is open?
A. There may be several reasons why the oven light will not glow. Perhaps:
The door is not closed & locked. Push the door firmly to be sure that the door is locked properly.
o The tight bulb has burned out.
Q. Why does steam come out of the vent grill?
A. Steam is normally produced during cooking. The microwave oven has been designed to vent this steam out the left
side vent.
Q. Will the microwave oven be damaged if it operates empty?
A. Yes. Never operate the oven empty.
Q. Does microwave energy pass through the viewing screen in the door?
A_ No. The metal screen bounces back the energy to the oven Cavity. The holes (or ports) are made to allow light to pass
through. They do not let microwave energy pass through.
Q. Why does the "beep" tone sound when a "pad" on the control panel is touched?
A. The "beep" tone sounds to assure that the setting is being properly entered.
Q. Can my microwave oven be damaged if food is cooked for too long a period of time?
A. Like any other cooking appliance, it is possible to destroy food by overcooking, which may result in smoke and even
possible fire damage to the inside of the oven. It is always best to stay with the oven while it is cooking. See the
"Safety Instructions" on pages 2, 3, and 4.
Q. Why does the hood fan start when I have not pushed the Fan Control
A. The hood fan starts automatically to prevent the oven from overheating.
Button?
Q. When the oven is plugged into a wall outlet for the first time, it may not work properly. What is wrong?
A. Only when the oven is plugged in for the first time or when power starts again after a power outage, the
microcomputer in the oven may become scrambled and not work as it was programmed to work. Unplug the oven
from the 120V household outlet and then plug it back in. The microcomputer will reset and work properly afterward.
Q. Why do I see light reflection around the outer case?
A. This light is from the oven light located outside the cavity.
Q. How can I be sure the oven is turned off when the hood fan is running?
A. The hood fan may be louder than the oven. If you are not sure the oven is off, turn off the hood fan and check to see if
the oven is operating. The oven is designed to turn off automatically when you open the door.
If, for some reason, you are still not satisfied, have your oven checked.
FOODS
Q. What is wrong when baked foods have a hard, dry, brown spot?
A. A hard, dry, brown spot shows overcooking. Shorten the cooking or reheating time.
Q. Why do eggs sometimes pop?
A. When baking, frying or poaching eggs, the yolk may pop due to steam build-up inside the yolk membrane.
this build-up, simply pierce the yolk with a toothpick before cooking it.
To prevent
39
QUESTIONS
AND ANSWERS
CAUTION
Never microwave
eggs in the shell.
Q. Why are scrambled eggs sometimes a little dry after cooking?
A. Eggs dry out if they are overcooked. Though you use the same recipe each time, you may need to vary the cooking
time for one of these reasons:
•
•
•
o
Eggs vary in size.
Eggs are at room temperature one time and at refrigerator temperature another time.
The shape of utensils vary,making cooking time vary also.
Eggs continue cooking during standing time.
Q. Is it possible to pop corn in a microwave oven?
A. Yes, if using one of the two methods described below.
1. Microwave-popping devices designed for microwave cooking
2. Prepackaged commercial microwave popcorn that suggests specific times and power outputs needed for an
acceptable final product.
FOLLOW EXACT DIRECTIONS GIVEN BY EACH MANUFACTURER FOR THE POPCORN POPPING PRODUCT
AND DO NOT LEAVE THE OVEN UNATTENDED WHILE THE CORN IS BEING POPPED.
IF THE CORN FAILS TO POP AFTER THE SUGGESTED
COULD RESULT IN AN OVEN FIRE.
TIMES, DISCONTINUE COOKING. OVERCOOKING
CAUTION
Never use a brown paper bag for popping
corn.
Q. What is wrong when three potatoes bake thoroughly and the fourth one is still not cooked?
A. The fourth potato may be slightly heavier than the others, and should be cooked 30 to 60 seconds longer.
Remember to allow space around each potato when baking. Also, for more even cooking, put the potatoes in a circle.
Q. Why do baked apples sometimes burst during cooking?
A. The peeling has not been removed from the top half of each apple to allow for expansion of the interior of the apple
during cooking. As in regular cooking the interior of the apple expands during cooking.
Q. How do you avoid boilovers?
A. When cooking foods that tend to boil over, use a larger utensil than usual for cooking. If you open door or press
STOP, the food will stop boiling. (Remember to press START again after closing the the door to restart the cooking
cycle.)
Q. Why is standing time necessary after microwave cooking is over?
A. Standing time allows foods to continue cooking evenly throughout for a few moments after the actual microwave oven
cooking cycle. The amount of standing time depends on the density of the food.
Q. Why is additional time required for cooking food stored in the refrigerator?
A. As in conventional cooking, the initial temperature of food affects total cooking time.
Refrigerated foods take more time to cook than foods stored at room temperature.
4O
BEFORE
CALLING
FOR SERVICE
You can often correct operating problems yourself. If your microwave oven fails to work properly,locate
problem in the list below and try the solutions listed for each problem.
the operating
If the microwave oven still does not work properly, contact the nearest Sears Service Center by calling I_800-4-REPAIR
(1-800-473-7247). Sears Service Centers are fully equipped to handle your service requirements.
PROBLEM
:
Oven will not start
,_ Is the power cord plugged in?
o Is the door closed?
o Is the cooking time set?
Is the temperature set or probe plugged in?
Arcing or Sparking
• Are you using the approved cookware?
o Is the temperature probe properly positioned?
o Is the oven empty?
Incorrect time of day
• Have you tried to reset?
Probe Light Flashes
• Is the temperature probe properly plugged in?
Unevenly Cooked Foods
• Are you using the approved cookware?
o Were the foods turned or stirred?
o Were the foods completely defrosted?
® Was the time/cooking power level correct?
Overcooked
Foods
e Is the temperature probe properly positioned?
• Was the time/cooking power level correct?
o Was the temperature setting correct?
Undercooked
e
o
o
®
o
®
Foods
Are you using the approved cookware?
Is the temperature probe properly positioned?
Were the foods completely defrosted?
Was the time/cooking power level correct?
Was the temperature control setting correct?
Are the ventilation ports clear?
Improper Defrosting
o Are you using the approved cookware?
® Were the foods turned or stirred?
® Was the time/cooking power level correct?
® Did you use the metal rack?
41
SEARS SERVICE
"WE SERVICE WHAT WE SELL"
"We Service What We Sell" is our assurance to you that you can depend on Sears for service because Sears Service is
nationwide.
Your Sears Kenmore Microwave Oven has added value when you consider that Sears has a service unit near you,
staffed by Sears Trained Technicians - professional technicians specifically trained on Sears Kenmore Microwave
Ovens, having the parts, tools and equipment to insure lhat we meet our pledge to you -" We Service What We Sell!"
TO FURTHER ADD TO THE VALUE OF YOUR
BUY A SEARS MAINTENANCE
AGREEMENT
Sears Kenmore Microwave Ovens are designed,
manufactured, and tested to give you years of dependable
operation. Yet, any modern appliance may require
service from time to time. A Sears Maintenance
Agreement is more than an extension of the Warranty.
It provides complete protection from unexpected
repair bills and undue inconvenience. It assures yo u of
maximum efficiency from your microwave oven.
Here's a comparative Warranty and Maintenance
Agreement chart showing you the benefits of a Sears
Microwave Oven Maintenance Agreement.
MICROWAVE
OVEN,
1st Yr.
2nd Yr.
thru
5th Yr.
1. Replacement of
defective parts other
than magnetron.
W
MA
2. Replacement
magnetron.
W
W
MA
MA
YEARS OF OWNERSHIP
COVERAGE
of
3. Annual preventive
maintenance check at
your request.
W - WARRANTY
MA - MAINTENANCE AGREEMENT
Contact your Sears salesperson or local Sears Service Center today and purchase a Sears Maintenance
Agreement.
FEDERAL COMMUNICATIONS
COMMISSION
RADIO FREQUENCY
INTERFERENCE
STATEMENT ( U.S.A. ONLY)
WARNING:
This equipment generates and uses ISM frequency energy and if not installed and used properly, that is in strict
accordance with the manufacturer's instructions, may cause interference to radio and television reception. It has
been type tested and found to comply with limits for ISM Equipment pursuant to part 18 of FCC Rules, which are
designed to provide reasonable protection against such interference in a residential installation. However, there is
no guarantee that interference will not occur in a particular installation.
If this equipment does cause interference to radio or television reception, which can be determined by turning the
equipment off and on, the user is encouraged to try to correct the interference by one or more of the following:
•
®
o
o
Reorient the receiving antenna of the radio or television.
Relocate the Microwave Oven with respect to the receiver.
Move the microwave oven away from the receiver.
Plug the microwave oven into a different outlet so that the microwave oven and the receiver are on different
branch circuits.
THE MANUFACTURER is not responsible for any radio or TV interference caused by UNAUTHORIZED
MODIFICATION to this microwave oven. It is the responsibility of the user to correct such interference.
42
Kenmore
USE & CARE
MANUAL
STOCK NO.
89950
89951
89952
OWAVE-CONVECTION
OVE
WARRANTY
FULL
ONE
YEAR
WARRANTY
ON MICROWAVE
OVEN
FOR ONE YEAR FROM THE DATE OF PURCHASE,
IF THIS
KENMORE MICROWAVE
OVEN FAILS DUE TO A DEFECT IN
MATERIAL OR WORKMANSHIP,
FREE OF CHARGE.
SEARS
FULL
ON THE MAGNETRON
FIVE YEAR
WARRANTY
WILL REPAIR
IT
FOR FIVE YEARS FROM THE DATE OF PURCHASE,
IF THE
MAGNETRON
IN THIS KENMORE MICROWAVE
OVEN FAILS
DUE TO A DEFECT IN MATERIAL OR WORKMANSHIP,
SEARS WILL REPAIR IT FREE OF CHARGE.
THE ABOVE WARRANTY
COVERAGE
APPLIES ONLY TO
MICROWAVE
OVENS WHICH ARE USED FOR PRIVATE
HOUSEHOLD
PURPOSES.
WARRANTY
SERVICE
IS AVAILABLE
BY SIMPLY
CONTACTING
THE NEAREST
SEARS STORE
SERVICE
CENTER
IN THE UNITED STATES.
THIS WARRANTY
APPLIES ONLY WHILE
IN USE IN THE UNITED STATES.
OR
THIS PRODUCT
IS
THIS WARRANTY
GIVES YOU SPECIFIC LEGAL RIGHTS,
AND YOU MAY ALSO HAVE OTHER RIGHTS WHICH VARY
FROM STATE TO STATE.
Sears, Roebuck and Co., Dept.
817WA, Hoffman Estates, IL 60179
Printed in Korea
Part No.: 3874W500863
Sears, Roebuck and Co., Hoffmen Estates, IL 60179, U.S.A.