1
Q Y t,G
Model:
,, MER5870,
MEP5770,
ME$5570,
ME$5770,
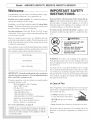
PORTANT
Congratulations
Your complete
on your choice of a Maytag
satisfaction is very important
SAFETY
electric range.
to us.
Read this user's guide carefully.
It is intended
operate and maintain your new range.
Read and fi_llow all instructMns bef_re ush_g this appliance to prevent the potential risk of fire, electric shock,
personal injury or damage to the appliance as a result of
improper usage of the appliance. Use appliance only for
its intended purpose as described in this guide.
to help you
In addition, you will find a booklet entitled "Cooking Made
Simple." It contains information on selecting cookware and
provides baking, roasting and broiling tips.
"Ib ensm-e
Save time and money. Check the "Before You Call" section
of this guide. It lists causes of minor operating problems that
you can correct yourself.
be properly
cian.
proper
and safe operatiom
installed
and grounded
However, should you need service, it is helpful to have the
model and serial numbers available. This information can be
found on the data plate located
or under the control panel.
ME$5870
Appliance
by a qualified
must
techni-
,d_WARNING
® ALL RANGES CAN TiP AND
CAUSE iNJURiES TO
PERSONS
on the storage drawer f]ame
These numbers are also on the Product Registration card that
came with your appliance. Before sending in this card, record
these numbers akmg with the purchase date bek)w.
® iNSTALL ANTI-TIP DEVICE
PACKED WiTH RANGE
® FOLLOW ALL iNSTALLATiON
iNSTRUCTiONS
Model Number
WARNING: To reduce risk of tipping of the appliance
from abnormal usage or by excessive loading of the oven
door, the appliance must be secure by a properly installed
anti-tip device.
Serial Number
iiiiiiiiiiiiiiiiiiiiiiii
DateofPmvhase
iiiiiiiiiiiiiiiiiiiiiiii
IMPORTANT:
Keep this guide
and the sales receipt
in a
iiiiiiiiiiiiiiiiiiiiiiii
plaee
lor uturer4 renee.Proololoriginal
parehase
iiiiiiiiiiiiiiiiiiiiiiii
dateisneededlorwarrantyserviee.
iiiiiiiiiiiiiiiiiiiiiii[
If you have questions, write us (include your model number
iiiiiiiiiiiiiiiiiiiiiiii
andphonenumber)
orcall:
iiiiiiiiiiiiiiiiiiiiiiii
Maytag Appliances Sales Company
in Case of Fire
iiiiiiiiiiiiiiiiiiiiiiii
attn:CA R MCen er
iiiiiiiiiiiiiiiiiiiiiiii
iiiiiiiiiiiiiiiiiiiiiiii
To check if device is properly installed, remove storage
drawer and look underneath range to make sure one of the
rear leveling legs is properly engaged in the bracket slot.
The anti-tip device secures the rear leveling leg to the floor
when properly engaged. You should check this anytime
the range has been moved.
Turn off appliance and ventilating hood to avoid spreading the flame. Extinguish flame then turn on hood to re-
P.O. Box2370
Clevehmd, TN 37320-2370
iiiiiiiiiiiiiiiiiiiiiiii 1-800-688-9900 (USA)
move smoke and odor.
iiiiiiiiiiiiiiiiiiiiiiii
iiiiiiiiiiiiiiiiiiiiiiii
iiiiiiiiiiiiiiiiiiiiiii[
o CooMop:
1-800-688-2002
(CANADA)
1-800-688-2080
( U.S. TTY for deaf, hearing
impaired or speech impaired)
l[nternet:
NEVER pick up or move a flaming pan.
http://www.maytag.com
iiiiiiiiiiiiiiiiiiiiiiii
orservieein ormation,
seepage2 .
iiiiiiiiiiiiiiiiiiiiiiii
NOTE'{
!!! our c0ntinuing
o Oven:
eff0_t to impr_ye the qua!ity
iiiiiiiiiiiiiiiiiiiiiii:
and performance
of our cooking products, it may be
iiiiiiiiiiiiiiiiiiiiiiii
inec es_ary t° make c!aanges t0 the api?!iance with0ut
fire or flame
in a pan with a lid or cookie sheet.
iiiiiiiiiiiiiiiiiiiiiiii (Mon.-Fri.,Sam-SpmEastemTime)
iiiiiiiiiiiiiiiiiiiiiiii
Smother
_.
]
Smother
fire or flame by closing the oven door.
Do not use water on grease fires. Use baking soda, a dry
chemical or foam-type extinguisher
to smother fire or
f[ alTI e.
iiiiiiiiiiiiiiiiiiiiiiii
iiiiiiiiiiiiiiiiiiiiiiiiiiiiiiiiiiiiiiiiiiiiiiiiiiiiiiiiiiiiiiiiiiiiiiiiiiiiiiiiiiiiiiiiiiiiiiiii
ii!i!i!i!i!i!i!i!i!i!i!i!i!i!i!i!i!i!i!i!i!i!i!i!i!i!i!i!i!i!i!i!i!i!i!
iiiiiii
iiiiiii
iiiiiiiiiiiiiiiii
General
Instructions
This appliance is equipped with different
size surface elements. Select pans having
flat bottoms large enough to cover element.
Proper relationship of pan to element will
improve cooking efficiency.
WARNING: NEVER use appliance door, o1
drawer, if equipped, as a step stool or seat as
this may result in possible tipping of the appliance, damage to the appliance, and serious
If pan is smaller than element, a portim3 of
the element will be exposed to dhect contact and couM ignite clothing or potholder.
If appliance is installed ueara window, proper
precautions should be taken to prevent curtains
from bnowiug over surface elements.
Only certain types of glass, glass/ceramic, ceramic, earthenware,
or other glazed utensils are suitable for cooktop or oven service
without breaking due to the sudden change in temperature. For
_ow utensil manufacturer's hlstructions when using glass.
NEVER use appliance to warm or heat the
room. Failure to follow this instruction can head
to possible burns, injury, fire, or damage to the
appliance.
NEVER wear noose-fitting or hanging garmerits while using the appliance. Clothing
could catch utensil handles or ignite and cause
burns if garment comes in contact with hot
This appliance has been tested %r safe per%finance using conventioual cookware. Do not use any devices or accessories that
are not specifically recommended in this manual. Do not use eyeHd covers, stove top grills o1 add-on oven convection systems.
The use of devices or accessories that are not expressly recommended in this manual can create serious safety hazards, result
in performance problems, and reduce the life of the components
of this appliance.
i
To ensure proper operation and to avoid damage to the appliance or possible injury, do not adjust, service, repair or replace
any part of the appliance unless specifically recommended in
this guide. Refer all other servicing to a qualified technician.
Turn pan handle toward center ofcooktop, not
out into the room o1 over another surface eleof flammable materiMs, or spillage if pan is
accideutly bumped or reached by, small children.
NEVER store or use gasoline or other combustible or flammable materials in the oven, near surface units or in the vicinity
of this appliance as fumes could create a fire hazard or an explosiml.
To prevent damage to removable heating elements, do not immerse, soak or clean in a dishwasher or self-clean oven. A damaged element could short resulting in a fire or shock hazard.
To prevent grease fires, do not let cooking grease or other flammable materials accumulate in or near the appliance.
Make sure drip bowls are in place as absence of these bowls during cooking could damage whqug.
Use only dry potholders. Moist or damp
potholders on hot surfaces may result hl a
steam burn. Do not _et potholders touch ]lot
heating elements. Do not use a towel or
other bulky cloth which could easily touch
G ass-Ceramic
]lot heathlg elements and ignite
Cooktop
(select
mode_s)
NEVER cook on broken cooktop, ffcooktop should break, cleaning solutions and spillovers may penetrate the broken cooktop
and create a risk of electric shock. Contact a qualified technician
Always turn off all comro_s wheu cooking is completed.
NEVER heat unopened containers on the surface unit or in the
oven. Pressure build-up in the container may cause container to
burst resulting in burns, hijury or damage to the appliance.
Clean
fumes
towel
avoid
NEVER use aluminum %iI to line drip bowls, or to cover an
oven rack or oven bottom. Misuse could result in risk of electric shock, fire, or damage to the appliance.
dhected in this guide.
....
cooktop with caution. Some cleaners can produce noxious
Kapplied to a hot surface. Ifa wet spmlge, cloth, or paper
is used to wipe spills on a hot cooking area, be carefu_ to
steam bum.
Use %il only as
Deep Fat Fryers
Use extreme caution when movhlg the grease pan o1 disposing
of hot grease. Allow grease to cool before attempting to move
pan.
Cooktop
NEVER leave surface units unattended especially when using
high heat settings. An unattended boilover could cause smoking and a greasy spillover can cause a fhe.
2
Oven
ChiM Safety
Use care when opening door. Let hot air o1 steam escape before
removing o1 replacing foo&
NEVER leave children alone or unsupervised
appliance is in use or is still hot.
For proper oven operatiml and performance,
do not Nock or obstruct oven vent duct.
NEVER
CAUTK)N:
NEVER store items of inter-
est to children in cabinets above an appliance or on backguard of a range. Children
climbing on appliance, door or drawer to
reach items could damage the appliance or
be burned or seriously injured.
while oven is hot, do not let potholder contact hot heating element in oven.
Oven
Clean onny parts listed in this guide. Do not clean door gasket.
The gasket is essential for a good seal. Care shouM be taken not
to rub, damage, or move the gasket.
Do not use oven cleaners. No commercial
allow children to sit or stand on
any part of the appliance as they could be
Always place oven racks in desired locations
while oven is cool. If rack must be moved
SelfoCieaning
in area where
oven cleaner or oven
liner protective coating of any kind should be used in or around
any part of the oven.
Before self-cneaning the oven, remove broiler pan, oven racks and
other utensils to prevent excessive smoking, discoloration of the
oven racks or possible damage to utensils.
Children must be taught that the appliance
and utensils in or on it can be ]lot. Let ]lot
utensils cool in a safe place, out of reach of
small children. Children should be taught that an appliance is
not a toy. Children should not be allowed to play with controls
or other parts of the mlit.
Ventilating
Hoods
Wipe up excessive spillovers, especially greasy spills, before the
clean cycle to prevent smoking, flare-ups or flaming.
Clean range hood and filters frequently to prevent grease or
other flammable materials from accumulating on hood or filter
and to avoid grease fires.
It is normal for the cooktop to become hot during a clean cycle.
Therefore, avoid touching the cooktop during a clean cycle.
Turn the fan on when flambding foods (such as Cherry Jubilee)
under the hood.
Slide-in and drop-in ranges feature a cooling fan which operates
automatically during a clean cycle. If the fan does not turn on,
cancel the clean operation and contact an authorized servicer.
Heating
E ements
NEVER touch surface or ove_ heafi_g dements,
dements, or i_terior surfaces of ovem
areas _ear
Heating elements may be hot even though they are dark in color.
Areas near surface elements and interior surfaces of an oven may
become hot enough to cause burns. During and after use, do not
touch or let clothing or other flammaNe materials contact heating elements, areas near elements, or interior surfaces of oven
until they have had sufficient time to cool.
Other potentkdly hot surfaces include: Cooktop, areas facing the
cooktop, oven vent, and surfaces near the vent opening, oven door,
areas around the door and oven window,
important
Safety Notice
and Warning
The California Safe Drinking Water and 'I_xic Enforcement
Act of 1986 (Proposition 65) requires the Governor of California to publish a list of substances known to the State of California to cause cancer or reproductive harm, and requires businesses to warn customers of potential exposures to such substances.
Users of this appliance are hereby warned that when the oven
is engaged in the self-clean cycle, there may be some low level
exposure to some of the listed substances, including carbon
monoxide. Exposure to these substances can be minimized by
properly venting the oven to the outdoors during the self-clean
cycle by opening a window and/or door in the room where the
appliance is located.
IMPORTANT:
Never keep pet birds in the kitchen or in rooms
where the fumes from the kitchen could reach. Birds have a very
sensitive respiratory system. Fumes released during an oven
seK-cleaning cycle may be harmful or fatal to birds. Fumes
released due to overheated cooking oil, fat, margarine and
overheated non-stick cookware may be equaHy harmful
a
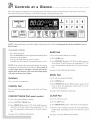
ELECTRONIC
OVEN CONTROL
(pages 5-8)
OVEN LIGHT
CONTROLPANEL_
SWITCH
(page 15)
_, SURFACE CONTROLS
"_* AND iNDiCATOR
LIGHT
SURFACE CONTROLS
ANDINDtCATOR
LIGHT
(page 9)
(page9)
OVEN VENT (page 15)
HOT SURFACE
iNDiCATORS
SURFACE
(page 11)
ELEMENTS
(page 10 & 11 )
BROIL
COOKTOP
(not shown,
(page 10 & 11)
" RACK
ANTFTIP
ELEMENT
page 16)
SUPPORTS
BRACKET
(page 23)
LEVELING
LEG
(page 23)
BAKE
ELEMENT
(page 12)
DATA
PLATE
_ _'
OVEN WINDOW
STORAGE
DRAWER
DOOR GASKET
(page 23)
S#de4n
and Drop-In
Control
Panel Located
Above
the Oven Door
,}
o
%
o°
t o
o
o
o
o
o
o
oe
o_
o
o
o
o
o
co
oi
o
o
OVEN LIGHT
SWITCH
(page 15)
SURFACE
AND INDICATOR
(page 9)
DUAL ELEMENT
SWmTCH
CONTROLS
MGHT
ELECTRONIC
(pages 5-8)
4
OVEN CONTROL
(page 9)
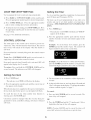
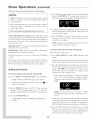
The control panel is designed for ease in programming. The display window on the electronic
timer and oven functions. Indicator words flash to prompt your programming
steps.
control shows time of day,
4
CONVECTBAKE ]
BAKE
CLEAN
TIME / TIME /
i
NOTE: Styling and features may differ slightly depending
Bake featm-e.
on the model. Control
Press the Preset (0) pad or the appropriate number pads to
enter time or temperature.
A beep will sound when any pad is touched.
A double beep will sound if a programming error occurs.
Four seconds
temperature
seconds
after entering
will automatically
elapse
betrveen
n umber pads, the function
wig return to the previous
Convect
BAKE Pad
Press the desired pad.
NOTE:
panel shown above includes
the number,
be entered.
touching
wiH be caneeled
di&lay.
1° Press BAKE
pad
than
30
and
the
baking or roasting.
pad.
2. Press PRESET (0) pad for 350°F. Each additional press
of the Preset (0) pad will raise the temperature 25 °. Or,
press the appropriate number pads for desired temperatu re.
the time or
If more
a function
Use for conventional
See page 12 for additional
information.
and the display
BROIL Pad
Numbers
Use for top browning
Use to set time or temperature.
1o Press BROIL
CANCEL
2. Press PRESET (0) pad for HI broil, press again for LO
broil, or press the appropriate number pads to set desired broil temperature.
Use to cancel
functions.
CONVECT
Pad
all programming
except
Clock
and Timer
See page
BAKE
Use for convection
and broiling.
pad.
16 for additional
information.
CLEAN Pad
Pad (select modols)
Use to set self-clean
baking or roasting.
cycle.
1. Press CLEAN
pad.
2. Press PRESET (0) pad for 325°F. Each additional press
of the Preset (0) pad will raise the temperature 25 °. Or,
press the appropriate number pads for desired temperature.
2. Press PRESET
(0) pad for °'3:0(Y' hours of cleaning time.
See page [2 for additional
See pages
t. Press CONVECT
BAKE
pad.
3. If more or less cleaning is desired, press the appropriate
number pads. Cleaning time may be set between 2 and 4
hours.
information.
5
18-19 for additional
information.
¸iiiiiiii
iiiiii
iiiiii
iiiiii
iiiiii
COOK TIME/STOP
Use to program
1. Press BAKE
TIME Pads
Setting
the oven to start and stop automatically.
or CONVECT
Press the appropriate
BAKE
(select
Use to set and then signal the completion
models)
pad.
number pads for desired temperature.
2. Press COOK TIME
pads to enter cooking
pad. Press the appropriate
time in hours and minutes.
number
3. To delay tile start of cooking, press STOP TIME pad. Press
the appropriate number pads to enter the time you want the
oven to stop.
See page 17 for additional
CONTROL
up to 99 hours and .59 minutes
of a time period
(99:59).
The timer can be used independently
of any other oven
activity and can be set while another oven function is
TIlE TIMER DOES NOT CONTROL
TIlE
operating.
OVEN.
1. Press TIMER
,_ Tile indicator
pad.
word TIMER
will flash and '_0HR:00"
appears in the display.
information.
2. Press tile appropriate
number pads until tile desired
number of minutes or hours and minutes appear in tl_e
display.
LOCK Pad
The touch pads on the control can be locked to prevent unwanted use. They will not function when locked. The current
time of day will remain in the display when this f)ature is
activated.
If an oven function
be locked.
the Timer
is currently being used, the controls
cannot
To set: Press CONTROL
LOCK pad for :everal seconds.
single beep will sound when control is locked.
If any pad is pressed when Control Lock 1,'activated,
appear in the display for 15 seconds.
Example:
To set the Timer for 5 minutes, press the
TIMER pad and d_e number 5 pad. The control will
begin countdown after a four second delay.
A
Example:
To set the Timer for _ hour and 30 minutes,
press the TIMER pad and the numbers 1,3,0 pads. Tile
control will begin countdown after a four second delay.
OFF will
To restore: Press and hold tile CONTROL
LOCK pad f?_r
several seconds. Tile indicator word OFF will disappear.
Setting
the Clock
1. Press CLOCK
_,Tile indicator
pad.
3. Tile last minute
seconds.
word TIME will flash in the display.
2. Press the appropriate number pads until tl_e correct
day appears in the display.
time of
When electrical power is supplied or after apower interruption,
the last clock time before power was interrupted will flash.
To recall the time of day when
showing, press the CLOCK pad.
anod_er
time function
of the countdown
will be displayed
as
4. At tile end of the time set, one king beep will sound and
"End" will appear in the display. To change the number
of timer reminder signals, see page 7.
To cancel:
is
Clock time cannot be changed when the oven has been programmed for clock controlled cooking, self-clean or delayed
self-clean.
1. Press and hold TIMER pad for several
time of day will reappear.
seconds.
Tile
OR
2. Press the TIMER pad and the "0" number pad. After a
slight delay the time of day will reappear.
NOT[T: Press#_g CANCEL pad to caducei the timer will
caducei ALL selected ove_,/imctio_s
except the timer.
Controls
at
a
G_ance
Timer Beep Options
You have
a choice
of three "end
of timer"
remhrder
signMs:
Option 1: One beep at the end of"the timer operatkm, then,
one beep every 30 seconds for the next five minutes or until
tire CANCEL pad is pressed.
Option 2: One beep at the end of tire timer operation, then,
one beep every minute for tire next 12 hours or until tire
CANCEL pad is pressed.
Option 3 (default option): One beep at tire end of the timer
operation, then, no other beeps.
Setting
the Timer Beeps
to Press the TIMER and CANCEL
and hoM for several seconds.
Display will show the indicator word TIMER
and the current option - 1,2, or 3.
2. Press the appropriate number pad (1,2, or 3) to select the
option you wish. The current time of day will reappear in
the display after four seconds.
Clock Controlled
Oven
Cooking Beep Options
You have a choice of three "end of t_med cook" reminder
signals
[?_r programmed
cooking:
UUUUUUUUUUUi_
UUUUUUUUUUUi_
UUUUUUUUUUUi_
UUUUUUUUUUUi_
UUUUUUUUUUUi_
UUUUUUUUUUUi_
UUUUUUUUUUUi_
UUUUUUUUUUUi_
UUUUUUUUUUUi_
UUUUUUUUUUUi_
UUUUUUUUUUUi_
UUUUUUUUUUUi_
Option
1 (default option):
UUUUUUUUUUUi_
UUUUUUUUUUUi_
UUUUUUUUUUUi_
UUUUUUUUUUUi_
UUUUUUUUUUUi_
UUUUUUUUUUUi_
UUUUUUUUUUUi_
UUUUUUUUUUUi_
UUUUUUUUUUUi_
UUUUUUUUUUUi_
UUUUUUUUUUUi_
UUUUUUUUUUUi_
Option 2: Four beeps at the end of cooking, then, one beep
every minute for the next 12 hours or until the CANCEL pad
is pressed.
UUUUUUUUUUUi_
UUUUUUUUUUUi_
UUUUUUUUUUUi_
UUUUUUUUUUUi_
UUUUUUUUUUUi_
UUUUUUUUUUUi_
UUUUUUUUUUUi_
UUUUUUUUUUUi_
UUUUUUUUUUUi_
UUUUUUUUUUUi_
UUUUUUUUUUUi_
UUUUUUUUUUUi_
UUUUUUUUUUUi_
UUUUUUUUUUUi_
UUUUUUUUUUUi_
UUUUUUUUUUUi_
UUUUUUUUUUUi_
UUUUUUUUUUUi_
UUUUUUUUUUUi_
UUUUUUUUUUUi_
UUUUUUUUUUUi_
UUUUUUUUUUUi_
UUUUUUUUUUUi_
UUUUUUUUUUUi_
UUUUUUUUUUUi_
UUUUUUUUUUUi_
UUUUUUUUUUUi_
UUUUUUUUUUUi_
UUUUUUUUUUUi_
UUUUUUUUUUUi_
UUUUUUUUUUUi_
UUUUUUUUUUUi_
UUUUUUUUUUUi_
UUUUUUUUUUUi_
UUUUUUUUUUUi_
UUUUUUUUUUUi_
UUUUUUUUUUUi_
UUUUUUUUUUUi_
UUUUUUUUUUUi_
UUUUUUUUUUUi_
UUUUUUUUUUUi_
UUUUUUUUUUUi_
UUUUUUUUUUUi_
Option
Four beeps at the end of cooking
then, one beep every 30 seconds for the next five minutes or
until the CANCEL pad is pressed.
beeps.
3: Four beeps at the end of cooking,
then, no other
Contro#ed
Beeps
1o Press COOK TIME and CANCEL
time and hokl for several seconds.
pads at the same
A single beep will sound.
Display will show the indicator
current option - 1,2, or 3.
word COOK and the
2. Press the appropriate number pad ( l, 2, or 3) to select the
option you wish. The current time of day will reappear
in the display af}er four seconds.
Cancel
pad: at the same time
A single beep will sound.
iiiiiiiiiiiiiiiiiiiiiii
UUUUUUUUUUUi_
UUUUUUUUUUUi_
UUUUUUUUUUUi_
UUUUUUUUUUUi_
UUUUUUUUUUUi_
UUUUUUUUUUUi_
UUUUUUUUUUUi_
UUUUUUUUUUUi_
UUUUUUUUUUUi_
UUUUUUUUUUUi_
UUUUUUUUUUUi_
UUUUUUUUUUUi_
UUUUUUUUUUUi_
UUUUUUUUUUUi_
UUUUUUUUUUUi_
UUUUUUUUUUUi_
UUUUUUUUUUUi_
UUUUUUUUUUUi_
UUUUUUUUUUUi_
UUUUUUUUUUUi_
UUUUUUUUUUUi_
UUUUUUUUUUUi_
UUUUUUUUUUUi_
UUUUUUUUUUUi_
UUUUUUUUUUUi_
UUUUUUUUUUUi_
UUUUUUUUUUUi_
UUUUUUUUUUUi_
UUUUUUUUUUUi_
UUUUUUUUUUUi_
UUUUUUUUUUUi_
UUUUUUUUUUUi_
Setting Clock
Oven Cooking
Clock Display
Option
If you prefer that the time of day not be displayed:
1. Pre, ,'CLOCK and CANCEL pad, at tile :ame tmle and
hold for several seconds. Tile time of day will disappear
in the display.
2. Press CLOCK pad to briefly recall the time of day, if
desired. The time of day will appear in the display for
four seconds.
_
To restore: Pre_SS: the CLOCK
and CANCEL pads at the
same time and hokt for several seconds. Tile time of day
will reappear in the display.
Automatic
Oven Turn Off/Sabbath
Mode Option
Tile oven will automatically turn off after 12 hours, if you
accidentally leave it on. You may deactivate this feature,
if desired.
To Eliminate
_2 Hour
Turn Off
1o Press the CLOCK pad and hoM for several seconds until
"12" appears in the display. The indicator word TIME
will flash in the display.
2. Press any number pad until 8888 appears in the display.
Current time of day will reappear after four seconds.
To restore:
Press the CLOCK pad and hold for several
seconds or until 8888 appears. Press "l "number pad. "12"
will appear briefly in the display followed by the current
time of day.
7
iiiiiiiiiiiiiiiiiiiiiiiiiiiiiiiiiiiiiiiiiiiiiiiiiiiiiiiiiiiiiiiiiiiiiiiiiiiiiiiiiiiiiiiiiiiiiiiiiiiiii
Oven Temperature
Adjustment
Option
If you think the oven should be hotter or cooler, you can adjust
it youmeK. To decide how much to change the oven temperature, set the temperature 25°F higher or lower than the temperature in your recipe, then bake. The results of"the "test" should
give you an idea of"how much to adjust the temperature.
,. If the oven temperature was previously adjusted, the
change will be displayed. For example, if the oven
temperature was reduced by 15 °, the display will
show -15 ° .
5, When you have made the adjustment,
press the
CANCEL pad and the time of day will reappear in the
display. The oven will now bake at the adjusted
To adjust the oven temperature:
1, Press the BAKE pad.
2. Enter 550 ° by pressing
temperature.
the number
3. Press and hold the BAKE
appears in the display.
pads "5, 5, 0".
pad for several seconds
NOTE: Do not change the temperature
10 ° at a time be%re testing the oven.
until 0 °
It is not necessary to readjust the oven temperature if there
is a power interruption. This adjustment will not affect
broil or clean temperatures.
4. Press any number pad to change the temperature. Each time
a pad is pressed, the temperature changes by 5°F.
,. Press repeatedly to reach +35°F. Continue
to reduce the temperature up to -35°F.
setting more than
pressing
Surface Cooking CAUTIONS:
Before Cooking
. Always place a pan on the surface unit before you turn it on. To
preveut damage to range, never operate surface unit without a
NEVER use the cooktop as a stor%e m'ea%r,hod or cookware
(legu_ up messy sp_lls as soon as possible.
Other
Tips
o To dimiuae the hazard of reaching over hot stmthce elemeuts, do not install cabinet storage directly above a unit.
During Cooking
If storage _s provided, limH it to items that are iufl'equently
used and can be safely stored in an m_easubjected to heat.
• Be sure you krtow which knob controls which surface umt.
Make sure you turned on the correct surface umt.
Temperaures may be unsafe %r items such as volaiie liquids. cleaners or aerosol sprays.
- Begin cooking on a higher heat setting then reduce to a lower
semng to complete the operation. Never use a high heat setting
for extended cooking.
• Aerosol-type spray cans are EXPLOSIVE or highly flammane when _xposed to heat. Avoid their use or storage nero"
NEVER allow a pan to boil dry This could damage the pgmand
• NEVER touch cooktop until it has cooled. Expect some pmls of
the cooktop, especially around the surface units, to becmne
warm or hot during cooking. Use potholders to protect hands.
After CooMng
o NEVER leave a_y items, especMly plastic items, on the
cooktop. The hot air from the vent may tgnite flammable
_tems, melt or soften plastics, or increase pressure in closed
comamers causing them to burst.
, NEVER allow almnim_m fbil, meat probes or any other meta]
object, other than a pan on a surface element, to contact
heating elements.
• Be sure su fface element a_d surface indicator li_,ht are off after
cooking.
8
Use to turn on the surface
elements.
An infinite choice of
heat settings is available from LOW to HIGH. The knobs can
be set on or between any of the settings.
Setting
the Controls
Suggested
The size and type of cookware will affect the heat setting.
For information on cookware and other factors affecting
heat settings, refer to "Cooking
Made Simple" booklet.
Setting
L Place pan on surface element.
2. Push in and turn the knob in either direction
Use to bring liquid to a boil blanch,
or reach pressure h_ a pressure cooker.
Always reduce settfl*g to a k_wer heat
wheu liquids begin to boil or foods
begh_ to cook.
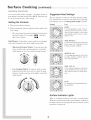
The control panel is marked to identifly which element
the knob controls. For example, ,151,
,11111,
indicates
right front element.
,11111,
•
MED. HIGH (8):
Use to browu meal hea_ oil fbr deep {ht
frying, sau_e or fry, Maimain fast boil
for large amounts of _iquids.
Dual Element = Select glass-ceramic
surfaces are equipped
with a dual element located in the right front position.
Slide-in
arid Drop-In
Models:
To operate,
Uses
HIGH:
to the desired
heat setting.
®
Heat Settings
press the
rocker switch on the control panel up to control the
small element or down to control the large element.
MEDIUM (4-6):
Use _o maimain modera[e _o slow boil
for k_rge amouuts of _iquids and fbr
most fryh_g opem_kms.
CCCCIIII
iiiiiiiiiiiiiiiiiiiiiiii
iiiiiiiiiiiiiiiiiiiiiii:
_'
®
_
iiiiiiiiiiiiiiiiiiiiiiii
iiiiiiiiiiiiiiii)_i!i%!i!_%!ii!;i;!ii;i,_;'i_i_<_'_!i;i;i_ii!i!i!_!!ii!i_i
@
°
MED. LOW (2):
Use to cou[hme cooking covered foods
and to maintain pressure in most pressure cookers and s[ew or steam operations.
iiiiiiiiiiiiiiiiiiiiiiii Free-Standing
Models: To operate, push in on the
iiiiiiiiiiiiiiiiiiiiiiii control knob and turn to the left to control the large
iiiiiiiiiiiiiiiiiiiiiiii
e ement,
orpush
inand
turntotherighttocontro
the
iiiiiiiiiiiiiiiiiiiiiiii
smalle_ement
LOW:
Use to keep tbods warm and meh chocola{e and butter.
iiiiiiiii!!!Q_
i_iiiiiiiiiiiiiiiiiiiiiiii
,i!i!_ii_ii_ii_ii_ii_:_i_i_i_i_iii_ii_ii_ilili
Surface
_ndicator
Lights
There is an indicator light by each pair of control knobs.
When one or both of the surface control knobs is turned on,
the light will turn on. The light will turn off when the surface
element(s) is turned off.
iiiiiiiiiiiiiiiiiiiiiiiiiiiiiiiiiiiiiiiiiiiiiiiiiiiiiiiiiiiiiiiiiiiiiiiiiiiiiiiiiiiiiiiiiiiiiiiiiiiiiiiiiiiiiiiiiiiiiiiiiiiiiiiiiiiiiiiiiiiiiiiiiiiiiiiiiiiii
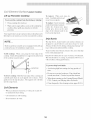
Lil-up
Porceltin
Cooktop
When cool, raise
ment. Carefully pull out and
away from receptacle.
To
ele-
Fe]n_oYe:
To top|ace:
l[nsert terminals
on the element into receptacle.
Guide the element
into place.
Gently press down on the outer
edge of the element until it sits
porcelain°
Your range features an upswept porcelain cooktop that can be
lifted up for convenient access to the area under the cooktop.
level on the drip bowl.
TERMINALS
Drip Bowls
NOTE...
Slide-in and drop-in models are not equipped with a lift-up
cooktop because of installation requirements.
To lift cooktop:
When cool, grasp the front edge of the
cooktop. Gently lift up until the two support rods at the front
of the cooktop
snap into place.
The drip bowls, located under each surface element, are
designed to catch boilovers
and must always be used.
Absence of these bowls during cooking may damage wiring or other parts underneath the cooktop.
To prevent the risk of electric shock or fire, never line drip
bowls with aluminum foil.
Drip bowls will discolor or craze over time, if overheated.
This discoloratkm
or crazing is permanent. However, it
will not affect cooking performance.
To protect
_-_
SUPPORT
ROD
drip bowl finish:
* Avoid using high heat settings for long periods
t
of
{1me.
* Do not use oversized
extend
To lower cooktop: Hold the front edge of the cooktop and
carefully push back on each support rod to release. Then
gently lower the top into place. The support rods will slide
into the range frame.
Clean fiequently.
When an element is turned on, it will cycle on and off
to maintain the heat setting.
are self-cleaning.
Do not immerse
more than 1-2 inches
Pans should not
be) ond the element.
* When home canning, usethe Canning Element (Model
CEIL Contact your Ma) tag dealer for details.
Coil Elements
Coil elements
cookware.
in water.
10
_See cleaning section,
pages 20-2 l.J
Surface
(select
Cooking
(continued}
_,
_ o_.
_.
,_,
_, _,_ _,
_ o_.
_.
,_, _ _ _ _ _
models)
Tips to Protect
Glass-Ceramic
the
Surface
Before first use, clean the cooktop
cleaning chart on pages 20-21.
On Canadian flee-standing
models, the right front element may not operate during a self-clean cycle.
On
When a control is turned on, a red glow from the element
can be seen through the glass-ceramic
surface.
The
element will cycle on and off to maintain the preset heat
setting.
Glass-ceramic
cooktops retain heat for a period of time
after the unit is turned off. When the HOT SURFACE
light turns off (see below),
enough
the element
will be cool
to touch.
Glass-Ceramic
Cooking
Areas
The cooking areas on your range are identified by permanent patterns on the glass-ceramic
surface. For most efficient cooking, fit the pan size to the element size.
Pans should notextendmore
than 1/2 to finch beyondthe
cooking area. (For more information on cookware, refer to
"Cooking Made Simlfle" booklet.)
Hot Surface
Lights
Each element has a HOT SURFACE
indicatorlight.
A light will be
illuminated
when the
matching surface
element is hot. It
will remain on, even after
the control is turned off, until the
area has cooled. They are located
f?ont center of the cooktop.
at the
in the
®
Do not use glass pans.
®
Do not allow plastic, sugar or %ods with high sugar
content to melt onto the hot cooktop. If these acciden-
Canadian slide-in and drop-in models, none of the surface burners will operate during self-clean. This is normal.
Cooktop may emit a light smoke and odor the first few
times the cooktop is used. This is normal.
as directed
They may scratch the surface.
tally melt onto the cooktop, clean
cleaning chart, pages 20-21.)
immediately.
®
Never use cooktop
®
Never cook food directly on the surface.
®
Never let a pan boil dry as this will permanently
the surface and pan.
(See
as a work surface or cutting board.
damage
Never use foil-type disposable containers or place a
trivet or wok ring between the surface and pan. These
items can mark or etch the top.
Do not slide aluminum pans across a hot surface. The
pans may leave marks which need to be removed
promptly.
(See cleaning chart, pages 20-21).
Make sure the surface and the pan bottom
before turning on to prevent scratches.
are clean
, Oven
,
Be sure all packing
material
is removed
from oven
Man,° aerosol-type spray cans are EXPLOSIVE
exposed to heat and rnay be highly flammable.
their use or storage near the oven.
when
Avoid
Allow steam and llot air to escape betore reacl_ing rote
the oven to check, add or remove food.
.
Prepared Food Warning:
Follow %od manufacturer's
instructions. If a plastic frozen toed container and/or its
cover distorts, warps, or is otherwise damaged during
cooking, immedia :e12ydiscard the food and its contNner.
The food coul_ be contaminated.
o Follow the manufacturer's
cooking hags.
directions
The temperature
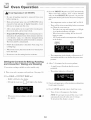
can be set from 100°F to 550°F.
There will be a four second delay before oven turns
on. When the oven turns on:
,
-
3. Press the PRESET (0) pad to set 350°F automatically.
When convection cooking, 325°F will be automatically set when PRESET (0) is pressed. Or press the
appropriate number pads fbr the desired oven temperature.
Operation CAUTIONS:
-
The bake icon (top and bottom bars) will light.
A red preheat indicator will light.
When convection cooking, the fan icon will
begin to rotate.
100°F or the actual oven temperature will appear
in the display.
PREHEAT
INDICATOR
BAKE
SYMBOL
when using oven
When oven is in use. the area nero the oven vent may feel
hot to the _ouch.
Do not use oven for storing food or cookware.
The temperature in the display will increase in 5°
increments until the oven reaches the preset temperature.
Setting the Controls for BaMng, Roasting,
and Convection*
BaMng and Roasting
*Convection
cooking
available
or CONVECT
BAKE
(See page
for the oven to preheat.
,, A single beep will indicate that the oven is
preheated.
on select models only.
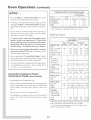
1o Place oven racks on proper rack positions.
2. Press BAKE
4. Allow 7-14 minutes
,_ The preheat indicator
14.)
will turn off.
pad.
BAKE will flash in the display.
(100 and the oven icon
[
I will light in the display.
t___J
5. Check cooking progress at the minimum
Cook lon_er ff needed.
6o Press CANCEL
,,
When convection
also appear.
cooking
is selected, a fan icon _
cooking time.
pad and remove food from oven.
Time of day will reappear
in the display.
NOTE: If you fbrget to turn off the oven, it will
automatically turn off at the end of 12 hours.
To deactivate this f)ature, see pg.7.
will
12
Cooking
NOTES...
for Convenience
[
Press the BAKE or CONVECT
BAKE pad to recall
the preselected temperature during preheat
To change oven temperature
appropriate
appropriate
tnre.
Chart
during cooking,
Convenience Foods
press the
i
BAKE or CONVECT
BAKE pad and the
number pads fbr the desired oven tempera-
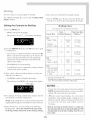
French Fries
Position
3
3
Pizza
Foods
Convect Bake
Oven Not Preheated
Temp. OF
400 °
450 °
400 °
3
Minutes *
13-18
15-25
13-18
'+The ti rues given are based on speci fic brands of m ixes of reci pes
tested. Actual thnes will depend (m the ones yon cook.
If more than 30 seconds elapse between pressing a
function pad and pressing a number pad, the display
will return to the previous display.
As a genera! rub, when convection
baMng (select
models), set the oven temperature 250F lower than
Convect Bake
(sdeet models)
the conventional
recipe or prepared
mix directions.
BaMng time will be the same to a Dw mBmtes less
than directions.
(See Baking Chart next column.)
Product & Type
* When convection roasting (select models), roasting
times are generally 25-30 % lesso (Maintain conventional roasting temperatures.t
+ Seeroastin_chart
for recommended
additional
baking
in CooMngMade
Simple booklet
roasting temperature and times, and
and convection
cooking
Rack
Preheated
Preheated
Position (OF)**
Min2*'
.
Layer, t'*
), 2 Paas
Sheet, 9x13'!
2 or 3
3
1
%
.25 o
325°
350°
18-23
20-30
23-28
Cupcakes _2 Pa*s
3
325°
13-18
350°
350°
375°
350°
Bake
Min.*
23-28
2545
28-38
18-23
Two Crest, - )
tips.
o You may find that the cooking times and temperatures
wiry slightly from your old oven. This is normal. Every
oven
has owncharacteri<cs.
aaaaaaaaaaaaaaaaaaaaaaa
Sugar
B_ownies - 9x13"
Convection
Cooking of Frozen
Convenience
Foods (se_ect mode_s)
Rolls
Preheating
Conventional
the oven is not necessary.
3
3500-400° 35-60 )TS°
a?q° 45-60
._
-_=
2
325<375 ° 35-50 .50
% o-400 o 35-50
3
325<350 ° 8-12
3
2
325<375 ° 6-10
325°
20-26
350-.75
o g o 8-12
350-400° %11
350°
25-31
2 or 3
3
350°
13-23
375°
18-28
3500-375° 9-14 3.7.5°-400 o 12-15
2or3
2or3
3
3250-350° 35-50 3500-375° 50-60
3750-400° 6-12 400 o-4:.950 8-15
3500-400° 10-20 3750-425
° 15-25
Breads, Qmck
Follow package recommendations
for oven temperature,
foil covering and the use of cookie sheets. Cooking times
willbesim+,r.(Seechartaboveright someexcep-
Mnfi_s
t ons.t
Most foods are cooked
on rack position #3.
For mnltiple rack cooking
with convection,
and 4 or #_, 3 and .5. Pizzas
sheets,
use racks #2
fbrk.
shonk] be placed on cookie
3
3
400°
325°
45-50
45-55
425°
.50 o
55-65
55-65
* The times given am based on specific brands of mixes or recipes
tested. Actual thnes wild depend on the ones you bake.
** The Convect Bake temperature is 250F bwer
mended on package mix or recipe.
a
than recom-
Half
Convectkm
ranges
areequipped
withthreeracks.Conventkmal
ranges
areequipped
withtworacks.
Rack
(select mode/s)
The Half Rack Accessory
provides space for a vegetable dish when a large
roaster is on the lower rack.
To install in oven:
Thestop
raCkSedge.are
designed
withalock-
1. Always install half rack
when oven is cool.
untilit stopsatthelock-stopposition;lift
uponthefrontoftherack
To remove:Pullrackstraight
out
andpull out.
2. To install, grasp top center of the half rack. Align the
side arm support between the top fourth and fifth oven
rack guides. Insert the two tabs on the back frame of the
half rack into the slots on the upper left rear of the oven
wall.
To replace:
Place rack on the rack support in the oven; tilt the
front end up slightly; slide rack back until it clears the lock-stop
positkm; lower front and slide back into the oven.
3. Push firmly on the top surface of the half rack until the
tabs slide into the slots and the half rack side arm
Do not cover an entire rack with aluminum Jbi/ or place foi/
on the oven bottom°
Baking results will be affected and
damage may occur to the oven bottom°
support
rests on the fourth oven rack guide.
4. Check for proper installation by placing your hand on
the top surface of the half rack and pressing down
Rack Positions
To remove from the oven:
_¢__
5
RACK 5 (highest position):
For toasting bread or broiling thin, non-fatty foods.
4
3
2
1
RACK
4:
Used for most broiling.
RACK
3:
Three rack convection baking
(semect modems)
When the oven is cool, grasp the top
center of the half rack and pull upward until the back tabs on the rack
slide out of the oven back slots.
NOTES...
Used for most baked goods on a cookie sheet or jelly roll
pan, layer cakes, fruit pies, or frozen convenience foods.
RACK
baking
t:
Used for roasting large cuts of meat and poultry,
f_ozen pies, dessert souffles or angel food cake.
Multiple
ca
For best results, allow two inches between
placed on the rack and the oven side wall.
ca
When opening the oven door, allow steam and hot air to
escape before reaching into the oven to remove food.
ca
Use caution when removing items from the half rack to
avoid burns.
o
Carefully remove items from the newer rack to avoid
disturbing the half rack.
2:
Used for roasting small cuts of meat, casseroles,
kmves of bread, bundt cakes or custard pies.
RACK
Do not use cookware that extends beyond edge of rack.
Rack
Cooking:
Two rack: (select models with convection
and all conventional
baking)
Use rack positions 2 and 4, or i and 4.
The half rack is available as an accessory.
your Maytag dealer for the "HALFRACK"
sory kit.
baking
Three rack: (Convection baking only, select models)
Use rack positions 1,3 and 5 (see illus, above).
14
the pan
Contact
acces-
When the oven is in use the area near the vent may feel
warm or hot to the touch° Never block t|_e vent opening°
The oven light automatically
comes
on when the
oven door is opened. When the door is closed, press
the rocker switch on the control panel to turn the
light on or off.
A cooling fan is featured on slide-in and drop-in ranges. The
fan automatically turns on whenever the oven is set for a
broiling or cleaning operation. The fan will also turn on during
some baking operations. When the oven is turned offaud has
cooled, the cooling fan will automatically turn off.
A convection fan (select models) is used to circulate hot ah
in the oven when the convection feature is selected. It automatically turns on whenever the CONVECT pad is pressed
and will turn off when CONVECT is canceled.
NOTE: The convection fan will automatically
the oven door is opened.
stop whenever
iiiiiiiiiiiiii_{
HHHHHHHH_
iiiiiiiiiiiiiiiii
!!!!!!!!!!!!!!!!!!!
Forbestresults,useapandesigned
for broilh_g.
6. Turn meat once about halfway
For additkmalbroilingtips,ref_rto the_CookingMade
Simple"booklet.
Setting
the Controls
1. Press the BROIL
,_ BROIL
through
iiiiiiiiill
cooking.
7. Press CANCEL
pad. Remove food and broiler pan
from the oven. Time of day will reappear in the display.
for Broiling
Chart time based on a preheated broil eicmcnL
pad.
will flash in the display.
Type of Meat
_, 000 and the oven icon
U
Position*
4
4
2. Press the PRESET
to set LO broil.
Doneness
(Minutes)**
will light in the display.
Medium
We] H
We] H
15-18 ram.
3 or 4
We] H
(LO Broi [)
30-45 ram.
4
4
Fkd_y
FN_y
8-12 ram.
10-15 ram.
(0) pad to enter HI broil. Press again
Pieces
The oven has a variable
broil feature which means HI,
LO or a specific broil temperature can be selected. To
select a specific temperature, press the appropriate
number pads for the temperature desired after 000
appears in tl_e display.
Select HI broil for normal broiling.
Select LO broil for low temperature
cooking foods such as poultry.
broiling
of kruger
Warm
3. There will be a four second delay before oven turns on.
When the oven turns on:
,. The BROIL
,, The indicator
WeJH
will remain
BROIL
22-26 ram.
,I The top rack position is #5.
,1,1BroHMg times are approximate
and may vary depending
meal Turn meat halfway through cooking times.
symbol will light in the display.
word BROIL
8-12 ram.
in the display.
on d_e
SYMBOL
NOTES...
,, If more than 3(} seconds elapse between pressing the
BROIL pad and number pad, the oven is not set and the
display will return to the previous display.
4. For optimum browning, preheat three minutes
broil element is red before adding food.
until the
HI broil is used %r most broiling. Use a lower broil
temperature
when broiling longer cooking foods or
thin pieces of food. The lower temperature allows food
to cook to the well done stage without excessive
browning.
NOTE: Expect broil times to increase and browning to be
slightly lighter if appliance is installed on a 208 volt circuit.
5. Place food in oven. Cook according to the following
Broiling Chart. Oven door MUST be left open at the
broil stop position (about [bur inches) during cooking.
o Slide-in and drop-in models feature a cooling fan
that automatically
turns on during broiling and will
automatically
turn off after broiling when the oven
has cooled.
16
iiiiiiiiiiii
iiiiiiiiiiiiii
Oven
Operation
4. Press appropriate hum ber pads to enter cooking hours and
mhmtes. EXAMPLE:
if cooking time selected for
baking is 2 hours and 30 minutes, the display will show:
NOTES:
° Highly perishable foods such as dairy products, pork,
poultry or seafood are not recommended
for delayed
cook operations.
° Clock controlled baking is not recommended
items that require a preheated
oven, such
cookies and breads.
, The dock
must be functionh_g
%r baked
as cakes,
and ¢orrect|y
5° At the end of the clock controlled cook time, the oven will
shut off automatically. END will light in the display and
four beeps will be heard.
set.
Clock Controlled
Oven Cooking is used to turn the oven off
at a preset time of day or delay the star_ and then turn off the
oven. This feature can be used with either oven cooking or
self-cleaning.
See page 19 for instructions on delaying the
start of a clean cycle.
Immediate
Start: Oven turns on immediately
cally turns off at a preset time.
and automati-
Delayed Start: Delays the start of cooking
automatically
turns off at a preset time.
or cleaning
Cook time can be set for up to 11 hours
(11:59).
and 59 minutes
NOTE: If yon wish to change the beeps at the end of
clock controlled cooking, see page 7.
To Dday the Start and Tm'n Off AutomatkaHy:
and
1-4. Follow preceding steps 1-4.
5. Press STOP TIME
display.
If more than 30 seconds elapse between pressing a function
pad and pressing the appropriate number pads, the oven is
NOT set and display will return to the previous display.
Setting the Controls
To Start hnmediatdy
6o Press CANCEL pad. Remove food from the oven. If the
program is not canceled, there will be one beep every 30
seconds for five minutes.
and Tm'n Off AutomatkaHy:
iiiiiiiiiiiiiiiiiiiiiiii
I.Press
the.A.E
orCONVECT,A.E
(se,ect
mode,s
pad
iiiiiiiiiiiiiiiiiiiiiii_
pad. STOP TIME will flash in the
Display will show the calculated stop time based on the
current time of day and the cook time previously entered.
6. Press the appropriate pads to enter the time you wish the
oven to stop. A stop time can only be accepted for later Jn
the day. EXAMPLE:
[f at 10:00 you set the oven for
350°F and 2 hours and 30 minutes of cooking time, the
calculated stop time would be 12:30.
If you want the stop time to be 1:30, press the number
pads "1,3,0". Four seconds later, the display will show
1:30 akmg with the indicator words DELAY, STOP
TIME.
iiiiiiiiiiiiiiiiiiiiiiii
BAKEw, f ashand000w, appear, thed sp ay
iiiiiiiiiiiiiiiiiiiiiiii Whenconvectioncookh_gisselected,
afanicm_
_will
iiiiiiiiiiiiiiiiiiiiiiii
appear, thed sp a>
iiiiiiiiiiiiiiiiiiiiiiii
iiiiiiiiiiiiiiiiiiiiiiii
iiiiiiiiiiiiiiiiiiiiiii
2. Press the PRESET
(0) pad to set. 50 °F. When convection
iiiiiiiiiiiiiiiiiiiiiiii
cooking,
325°v
wi.automatically
beset Or,pressthe
iiiiiiiiiiiiiiiiiiiiiiii
appr°priatenumberpadsf°rthedeshed°ventemperature"
iiiiiiiiiiiiiiiiiiiiiii
iiiiiiiiiiiiiiiiiiiiiiii
3. PresstheCOOKTiMEpad.
NOTE: It is not necessary to set a start time. Control
will determine when to start the oven based on cook
time set.
7. At the end of the delayed period, the DELAY indicator
word will go offand the oven will begin to heat. At the end
of the Cook Time, the oven will shut off automatically,
END will light in the display and four beeps will be heard.
COOK TiME will flash and 0HR:00 will Hght in the
iiiiiiiiiiiiiiiiiiiiiiiiiiiiiiiiiiiiiiiiiiiiiii
display.
8. Press CANCEL pad. Remove food from the oven. If the
program is not canceled, there will be a beep evey 30
seconds for five minutes. If you wish to change the beeps
at the end of clock-controlled cooking, see page 7.
17
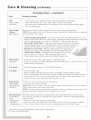
Care and
Sdf-Clean
Cleaning
®®@®@®@®@®@®@®@®@®@®@®@®@®@®@®@®@®
To prevent damage, do not clean or rub the gasket
aroandthe
oven door, The gasket is designed to seal in
heat during the clean cycle.
CAUTIONS:
o
, It is normal tbr parts of the ran_,e
to become
hot during
Wipe up excess grease or spillovers from the oven bof
tom to prevent excessive smoking, flare-ups or flaming
during the clean cycle. For ease of cleaning, the heating
element can be lifted slightly (1 to 1_/2 inches).
a clean cycle.
Avoid toucim_g cooktop, door, window
area during a clean cycle.
* To prevent
or oven vent
damage to oven door. do not attemp_ to
open the door v hen the LOCK indicator
displayed.
* Do not use commercial
Wipe up sugary and acid spillovers such as sweet potatoes, tomato or milk-based sauces. Porcelain enamel is
acid resistant, not acid proof. The porcelain finish may
discolor if acid spills are not wiped up prior to a selfclean cycle.
word is
oven cleaner,s on the self-clean
oven finish o_ around any part of the oven as they will
damage the finish or parrs.
Setting
The self-clean cycle uses above normal cooking temperatures
to automatically clean the entire oven interior.
for SelfoClean
1. Clo:eS oven door.
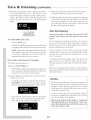
2. Press CLEAN
It is normal for flare-ups, smoking or flaming to occur during
cleaning if the oven is heavily soiled. It is better to clean the
oven regularly rather than to wait until there is a heavy buildup of soil in the oven.
During the cleaning process, the kitchen
ventilated to help eliminate normal odors
the Controls
,_ CLEAN
diq)lay.
pad.
will flash
and"
-:
"will
light in the
,. Ifdoorhasnotbeenclosed,
door wfllh_htmthe
display and a signal will beep until the door is
closed and the CLEAN pad is pressed again.
should be well
associated with
cleaning.
The cleaning time can be varied depending
3. Press PRESET (0) pad for : O0 hours of cleaning
time for an average soiled oven. Or, press the appropriate number pads for the desired cleaning time
between two and four hours.
on the amount of
soil. Press the appropriate number pads to set any amount of
time between two and four hours. "2:00" hours of cleaning for
light soil, up to "4:00" hours of cleaning for heavy soil.
4. Four seconds after entering
oven door will automatically
Before
Self-Cleaning
as the light may burn
,, CLEAN
Remove broiler pan, all pans and the oven racks from the
oven. The oven racks will discolor and may not slide easily
_wcle°
Clean oven frame, door frame
(area outside the door gasket)
and around the opening in the
door gasket with a nonabrasive
cleaning
agent such as Bon
Ami or detergent
and water.
These areas are not exposed to
cleaning
temperatures
and
should be cleaned
clean cycle.
to prevent
time, the
,, LOCK will appear in the display.
Turn off the oven light before cleaning
out during the clean cycle.
after a se(f-clean
the cleaning
lock.
soil from baking on during the
18
symbol will appear in the display.
Care
C|eanlng
(continued)
5. When the cleanh_g time has been completed, the indicatot word CLEAN will mm off. The indicator word
6. When the oven begins to clean, tile CLEAN symbol
will light and DELAY will go off ill the display.
LOCK will remain on until the oven has cooled (approx.
1 hour). When the oven has cooled, the indicator word
LOCK will turn off" and the door
unlock.
®®®®@@@@@@®@®@®@®@®@®@®@®@®@®@®
7. When the clean time has been completed,
word CLEAN will turn off. The indicator
will automatically
the indicator
word LOCK
will remain on until the oven has cooled. When the oven
has cooled, the indicator word LOCK will turn off and
the door will automatically
unlock.
LOCKISSTILL
DOOR
OPENED
Self-Clean
D_PLAYED.
Cycle:
IfLOCK is NOTdisplayed,open
oven door. If'LOCK
is displayed, allow oven to cool. then open oven door.
Some soil may leave a light gray, powdery ash which can
be removed with a damp cloth. If soil remains, it indicates
that the clean cycle was not long enough. The soil will be
removed during the next clean cycle.
NOTE:
on the length of time the oven had
If the oven racks were left in the oven and do not slide
it may take up to an hour for tile oven
When the oven is cool. the door will
smoothly after a clean cycle, wipe racks and embossed rack
supports with a small amount of vegetable oil to restore
ease of movement.
,,_ Press CANCEL
o
About one hour after the end of the clean cycle, the LOCK
indicator word will turn oJ]: At this point, the door can be
opened.
UNTILLOCKIS
NO LONGER
To Cancel
After Serf-Cleaning
ENGAGED.
CANNOTBE
pad.
Depending
been cleaning,
to cool down.
automatically
unlock and call be opened.
A white discoloration
may appear after cleaning if acid or
sugary foods were not wiped up before tile clean cycle.
This discoloration
is normal and will NOT aff)ct performance.
.................
If you wish to delay the start of cleaning:
1-3. Follow preceding
steps 1-3.
4. Press the STOP TIME
pad.
Fine lines may appear in the porcelain resulting from the
heating and cooling of the finish. This is normal and will not
affect performance.
STOP TIME will flash ill the display and display will
show calculated stop time based on the current time of
day and the clean time previously entered.
8° Press the appropriate
number pads to enter the time you
NOTES...
wish the oven to stop.
A stop time call only be accepted for later in the day.
EXAMPLE:
If at 9:00 you set the oven to clean for
three hours, the calculated stop time would be '_12:00".
The first few times the oven is cleaned, some smoke and
odor may be detected. This is normal and will lessen or
disappear with use. If the oven is heavily soiled, or if the
broiler pan was accidentally left in the oven, excessive
smoke and odor may occur.
As the oven heats and cools, you may hear sounds of
metal parts expanding and contracting.
This is normal
and will not damage your appliance.
If you want the stop time to be 1:00, press tile number
pads °'l,0,0". Four seconds later, tile display will
show 1:00 and the indicator word DELAY.
Slide-in and drop-in
models feature a cooling fan
that automaticM|y
turns on dm'ing the clean cycle
and will automatically
turn off after the clean cycle
when the oven has cooled.
19
Cleaning CAUTIONS:
Be sure appliance is off and all parts are cool before
handling or cleaning°
This is to avoid damage and
0 To prevent staining or discoloration,
after each use.
possible
o
burns,
If a part is removed,
clean appliance
be sure it is correctly
replaced.
Cleaning Chart
Parts
Broiler
Cleaning
Pan
Procedure
Never cover insert with aluminum foil as this prevents the fat from draining to the pan below.
Pnace soapy cloth over insert and pan; let soak to noosen soil
Wash in warm soapy water. Use soap filled scotRring pad to remove stubborn soil.
Broih pan and insert can be cleaned h3 dishwasher.
o When cool, wash with soapy water, rinse and buff the surface.
o For heavier soil use a miM abrasive cleaner such as baking soda or Bon Ami*, rubbing with the
grain to avoid streaking the surface. Rinse and buff.
To prevent scratching, do not use abrasive cleaners.
To restore Juster and remove streaks, follow with Stainness Steel Magic Spray* (Part #20000008)**.
Chrome will permanently discolor if soil is allowed to bake on.
o To activate "Connol Lock" for cleaning, see page 6.
Wipe with a damp cloth and dry.
Gnass cleaners may be used if sprayed on a cloth first. DO NOT spray directly on eontrot pad and
display area.
Control
Knobs
Drip Bowls,
_ Remove knobs h3 the OFF position by puHh3g forward.
Wash, rinse and dry. Do not use abrasive cleanh3g agents as they may scratch the finish.
o Turn on each element to be sure the knobs have been correctly replaced.
Porcelain may discolor or craze if overheated. This is normaJ and will not affect cooking performance.
When cook wash after each use, rinse and dry to prevent staining or discoloration. May be washed
h3 the dishwasher.
heavy soil soak in hot sudsy water, then use miM abrasive cleaner such as Soft Scrub*
and a pJastic scouring pad.
For burned on soik remove from range, place on newspapers and carefully spray with
commerciN oven cleaner. (Do z_ot .spray surromTding su;faces.) Place h3 plastic bag and allow
to soak several hours. Wearing rubber gJoves, remove from bag, wash, rinse and dry.
To clean
When cool, wash with warm soapy water, rinse and dry. Never wipe a warm or hot smface with
a damp cloth as this may damage the surface and may cause a steam burn.
For stubborn soil use miM_y abrasive cleaning agents such as baking soda paste or Bon Ami.*
Do not use abrasive, caustic or harsh cleaning agents such as steel wool pads or oven cleaners.
These products will scratch or permanently damage the surface.
NOTE: Use dry towel or cloth to wipe up s_ills, especially acid or suga U spills, Surface may
discolor or dull (f soil is not immediately removed. This is especially important for white
surfaees.
* Brand names are registered trademarks
** To order call 1-800-688-8408.
of the respective mamffacturers.
morc...
20
]
Parts
Cleanh_g Procedure
[
Avoid using excessive amounts of water which may seep under o1 behind glass.
Wash with soap and water or glass cleaner. Rinse with clear water and dry.
Do not use abrasive materials such as scouring pads, steel wool or powdered cleaning agents.
They will damage _lass.
,
w
Never use owe1*clea,_ers, chlorine bleach, ammotfia or glass cleaners with ammolUa.
NOTE: Call an authorized servicer {fthe glass-ceramic top should crack, break or {{metal or alumitTum
/bil should melt ot* the cooktop.
Genem'M Cleaning and Light Soi|- Use soap and water and a clean cloth o1 paper towel, o1 nonabrasive cleaner such as Bon Ami #. Rinse and dry. Commercial cooktop cleaners may also be used
such as Cooktop Cleaning Creme (Part No. 20000001)'>L Follow package directions.
scrubber. Reapply cleaner. Cover with damp paper towels to keep cleaner moist. Let/
stand for 30 to 45 minutes. Scrub again to remove remaining stain. Rinse and dry. _
/
Burned-on. or Crusty... .S°!ls - Hold razor.
. ,, blade
.... sc aper at 30 ° a _gle a _d very /7/_ .> /; '
carefully scrape off so I Clea_ relm _,_ soil w t_ l_et _od desc bed above
_ Heavy Soils or Metal Marks- Gently scrub with Cooktop Cleanhlg Creme and a plastic / _J
_¢Melted Sugar or Plastic - 11_l_ed ately mr 1 ele l_e it to LOW a _d sc ape _fol_ _ot st face to a cool aea T_e_ ttlelel_e_tOFFa_dcool
Clean residue with razor blade scraper and Cooktop Cleaning Creme.
Metal Finishes
- Trim parts
"-<
Wash with soap and water, a glass cleaner, or mild Hquid sprays.
,,, To prevent scratching or duNing of the finish, do not use mildly abrasive, abrasive, harsh or caustic
I cleaners such as oven cleaners.
i
Oven interior
I_ Follow
Over Racks
pages 18-19 for Self-Cleaning
Oven.
' ',, Clean with soapy water.
_ Remove stubborn soil with cleansing powder or soap-fiNed scouring pad. Rinse and dry.
i
Racks will permanently discolor and may not slide smoothly if left in the oven during a self-dean
I
.
instructions on
_
_
_,
¢o
operation. If this occurs, wipe the rack and embossed rack supports with a small amount of vegcrane oil to restore ease of movement, then wipe off excess oil.
I
'
_
_"
+"
<
+"
'
">
¢
<
<
>
+,
>
+,
,
PJastk Finishes
- Door bandies
- Backguard trim
- End caps
, _¢When cool, clean with soap and water, rinse and dry.
, _. Use a glass cleaner and a soft cloth.
NOTE: Never use ove_ cleaners, abrasive or caustic liquid or powdered clea_sers o**plasticfi_fishes.
77,ese clea_h_g age_ts will scratch or marfinish.
NOTE: To preve**t stah_i_g or discolorations, wipe up fat, grease or acid (tomato, lemo_, l,i_egar, milk,
ji'uitjuice, mari,_ade) immediately with a d/)' paper towel or cloth.
PorceJain Ename|
- Control Pane|
Area
- Cooktop (cod)
- Trim @assceramic surfaces)
Porcelain enamel is glass fused on metal and may crack or chip with misuse. It is acid resistant,
not acid proof. All spillovers, especially acid or sugar spillovers, should be wiped up immediately
I with a dry cloth.
_ When cool wash with soapy water, rinse and dry.
' ,,, Never wipe off a warm or hot surface with a damp cloth. This may cause cracking o1 chipping.
_¢Never use oven cleaners, abrasive o1"caustic cleaning agents on exterior finish of range.
* Brand names are registered
iiiiiiiiiiiiiiiiiiiiiii
**Toordercall
trademarks
of the respective mamffacturers.
[-800-688-8408.
iiiiiiiiiiiiiiiiiiiiiii
iiiiiiiiiiiiiiiiiiiiiii
...............................................................................................................................................
21
N
Cleaning
inte
Products
Oven Door
Because of the many new cleaning products introduced in the
marketplace each year, it is not possible to list all products that
can be safely used to clean this appliance. Listed below are just
a few examples of recommended products.
READ
THE MANUFACTURER'S
INSTRUCTIONS
to be
,
Do not place excessive weight on or stand on an
open oven door. This ,:ould cause the range to tip
over break the door or injure the user.
*
Do not atte rapt to open or close door or operate
oven until door is properly Jeplaced.
,
Never place fingers between hinge and fiont oven
trame. Hinge ai,ns are spring mounted° if accidentally hit, the hinge will slam shut against oven
tiame and could il_iure your fingers.
sure the cleaner can be saf)ly used on this appliance.
To determine
if a cleaning
product
is safe, test a small incon-
spicuous area using a very light pressure to see if the surface
may scratch or discolor. This is particularly
important for
porcelain enamel, highly polished, shiny, painted, or plastic
surfaces.
TheJblIowing
selection:
brands may help you to make an appropriate
Glass Cleaners" - Cinch, Glass Plus, Windex.
cleaners with ammonia
Dishwashing
MiM Liquid
Liquid
on glass-ceramic
Detergents
Spray Cleaners
Mildly
Cleaners
Abrasive
cooking
- Fantastik,
Formula
409 Glass
or LiquM
2_
Grasp door at each side.
to lift door.
Do not use the door handle
3. Lift up evenly until door
clears hinge arms.
409.
To replace:
& Surface,
1. Grasp door at each side.
2. Align slots in the door with
the hinge arms on the range.
- Bon Ami, paste of baking soda and
Powder
1o When cool, open the oven door to the broil stop
position (opened about four inches).
surfaces.)
- Dawn, Ivory, Joy.
Multi-Surface
Cleaners - Formula
Windex Glass & Surface.
Nonabrasive
water.
(Avoid glass
To remove:
3_
Cleaners" - Ajax, Bar-
keepers Friend, Cameo, Soft Scrub, Smart Cleanser. (Note:
If the cleaner is recommended
for use on plastic, glass, or
porcelain finishes, it can be used on the same type of
appliance finish.)
Nonabrasive
or Seratehless
Plasfie or Nylon Scouring
Pads orSponges - Chore Boy Plastic Cleaning Puff, Scrunge
Scrub Sponges, Scotch-Brite No Scratch Pads.
NOTE': The oven door on a new range may feel
"spongy" when it is closed. This is normal and will
decrease with use.
Oven Window
To protect
are registered
the oven door window:
Do not use abrasive cleaning agents such as steel
wool scouring pads or powdered cleansers as they
may scratch the glass.
Abrasive Scouring Pads - S.O.S., Brillo Steel Wool Soap,
Scotch-Brite Wool Soap Pads.
(Brand names¢br the above cleaning products
trademarks ().[the respective man@critters.)
Slide the door down onto the hinge arms until the door
is completely seated on the hinges. Push down on the
top comers of the door to completely seat door on
hinges. Door should not appear crooked.
2_
Do not hit the glass with pots, pans, furniture,
other objects.
toys, or
3. Do not close the oven door until the oven racks are in
place.
22
Scratching, hitting, jarring or stressing the glass may
weaken its structure causing an increased risk of breakage at a later date.
Oven Light
_,
,
Storage
mode_s)
CAUTIONS:
Disconnect
bulb.
power to range
before replacing
light
flammable
Use a dry potholder to prevent
when replacing bulb.
°
Drawer (select
in this drawer: The drawer
may
become too warm for these items when
the oven is in use.
possible harm to hands
Be sure bulb is cool beibre touching
materials
bulb.
The storage drawer can be removed to allow you to clean
under the range.
Do not touch hot bulb with a damp cloth as this may
cause the bulb to break.
To remove:
To replace
1. Empty drawer
oven light bulb:
2o Lift up the front of the drawer.
When oven is cool, hold bulb cover in place, then slide wire
retainer off cover. NOLO': Bulb cover will fall if not held in
.
place while removing
retainer.
2. Remove
3, Pull out to the second stop position.
BULBCOVER
wire
4, Grasp sides and lift drawer up and out.
bulb cover
To replace:
and light bulb.
1o Fit the ends of the drawer
range.
3, Replace with a 40
watt
appliance
bu
5. Reconnect
bulb cover and secure
power to range.
with wire retainer.
3, Lift drawer up again and push until drawer is closed.
Reset clock.
Convenience
Levering
Legs (select
(Canadian
mode_s)
, CAUTION:
*
glides into the rails in the
2, Lift up front of drawer and gently push in to the first
stop position.
WIRE
RETAINER
lb.
4o Replace
and pull out to the first stop position.
Be sure the anti-tip bracket secures one of the rear
leveling !eg s tO the fie0 r. T his bracket prevents the
range from accidentally tipping.
Outtet
mode_s only)
The convenience
outlet is located on the lower left side
of the backguard.
waffle irons.
It is useful for small appliances
such as
When u sing the outlet be sure the appliance cord does not
rest on or near the surface element. If the surface element
is turned on, the cord and outlet will be damaged.
The convenience
outlet circuit breaker may trip if the
small appliance plugged into it exceeds 10 amps. To
reset the circuit breaker, press the switch located on the
lower edge of the backguard. (See illustration below.)
CIRCUIT BREAKER SWITCH
23
Part or all of' the
appliance does
not work.
.
.
•
•
•
Check to be sure plug is securely inserted into receptacle.
Check or re-set circuit breaker. Check or replace fuse.
Check power supply.
Check if surface and/or oven controls have been properly set. See pages 9, 10 & 12.
Check if oven door is unlocked after a self-clean cycle. See page 19.
Check if oven is set for a delayed cook or clean program. See pages 12 & 18.
NOJT: On Canadian models, the rightJkont element on glass_ceramic cooking surfaces
may not operate during a selJ:clean cycle. None of the surface elements on slide_in or
dropdn models will operate during se{f_cleam
Surface or oven
elements fail to
operate or heat
.
°
If)od.
*
°
•
•
Check to be sure plug is securely inserted into receptacle.
Check or re-set circuit breaker. Check or replace fuse.
Check power supply.
Check if surface and/or oven controls have been properly set. See pages 9, l0 & 12.
Check if coil element is properly installed. See page 10.
Check if oven is set in a delayed oven operation.
Check to see if coil elements need to be replaced.
1[. Tiny scratches or abrasions.
Check to make sure cooktop and pan bottom are clean. Do not slide glass or metal pans
across top. Make sure pan bottom is not rough. Use the recommended
cleaning
agents. See page 22.
Glass-ceramic
surface shows wear.
2. Metal marks.
. Do not slide metal pans across top. If it happens, clean when cool with Cooktop
Cleaning Creme. See page 21.
3, Brown streaks and specks.
• Spills not removed promptly. Wiping with soiled cloth or sponge. Pan bottom not clean.
4, Areas with a metallic sheen.
o Mineral deposits from water and food.
5° Pitting or flaking.
• Sugary boilovers that were not removed
•
Baking
results
not what
are
you
°
*
expected.
°
•
•
•
•
See page 21.
Check the oven temperature selected. Make sure oven is preheated when recipe or
directions recommend preheat.
Check rack positions. See page 13.
Use correct pan. Dark pans produce dark browning. Shiny pans produce light browning.
See "Cooking
Made Simple" booklet for more information on bakeware.
Check the use of foil in the oven. Never use foil to cover an entire oven rack. Place a
small piece of foil on the rack below the pan to catch spillovers.
Check pan placement. Stagger pans when using two racks. Allow 1-2 inches between
pans and oven walls.
Make sure the oven vent has not been blocked. See page 15 fbr location.
Check to make sure range is level.
Check oven temperatures
when convection baking (select models). Decrease conventional baking temperature by 25°F.
Temperatures
Baking results
differ from
previous oven.
promptly.
often vary between
a new oven and an old one. As ovens age, the oven
temperature often "drifts" and may become hotter or cooler. See page 8 fbr instructions
on adjusting the oven temperature.
NOTE: It is not recommended to adjust the temperature if only one or two recipes are
in question.
24
Food
Check if oven controls
is not
broiling
properly,
,
o
o
•
•
_
,
e
Oven smokes
excessively during
broiling.
Oven
will no_:
self-clean.
Oven did not clean
properly,
(;re;
d;;i
wi'il_n;[
,
•
There is a strong odor or
light smoke when oven
is turned on,
....
A fan sound can be
heard (select models).
Food too close to element.
See page 16 for more information.
•
Check if controls
•
•
Check to make sure the cycle is not set for a delayed
Check if door is closed.
•
°
Longer cleaning time may be needed.
Excessive spillovers, especially sugary and/or acid foods, were not removed
to the self-clean cycle.
* ();e'n°i,:itirlo;
completion
are set properly.
See page 18 and 19.
is°st'ill l_o°t.' Ail(;x_ ;tb'0;t'oi_i
of a self-clean
start.
l_o'u; _,; ih; (,;ei_ _tl ;o'01_aft;;
prior
thl
cycle. The door can be opened when the LOCK indicator
word is not displayed.
* This is normal when cooking food high in moisture.
° Excessive moisture was used when cleaning the window.
•
•
•
This is normal for a new range and will disappear after a few uses. Initiating a clean
cycle will "burn of_" the smells more quickly.
Turning on a ventilation fan will help remove the smoke and/or odor.
Excessive food soils on the oven bottom. Use a self-clean cycle.
o This is the cooling
the oven cools.
fan and is normal.
•
_F" plus a number
appears
in display.
,
* Broiler insert covered with aluminum foil.
* Trim excess fat from meat prior to broiling.
• A soiled broiler pan was used.
cycle,
Mois[ure condensation
collects on oven window.
set. See page 16.
Check oven rack positions. See page 16.
Broil element was not preheated.
Aluminum foil was incorrectly used. Never line the broiler insert with foil.
Ovendoorwasclosedduringbroiling.
Leavefl_edooropentothefirststopposition
(about 4 inches).
E,,
unlock after
self-clean
have been properly
The fan will continue
to run after use until
This is called a fault code. If a fault code appears in the display and beeps sound,
_
pre::SS the CANCEL
pad. If the fault code and beeps continue, disconnect power
to the appliance. Wait a few minutes, fl_en reconnect power. If fault code and beeps
still continue, disconnect power to the appliance and call an authorized servicer.
o If the oven is heavily soiled, excessive flare-ups may result in a fault code during
a clean cycle. Press CANCEL pad and allow the oven to cool for one hour, then
reset the clean cycle. If the fault code and beeps still continue, disconnect power
to the appliance and call an authorized servicer.
25
!!!!!!!!!!!!!!!!!_
if You Need Service
Call the dealer from whom your applialce was pro'chased or call Maytag Appliances Sales Company, Maytag
Customer Assistance at 1-800-688-9900
USA or 1-800-688-2002.
CANADA to locate an authorized servicer.
iiiiiiiiiiiiiiiii
.....
•
Be sure to retain proof ot purchase to verify warranty status. Refer
information on owner's responsibilities
lot warranty service°
If the dealer or service company cannot resolve the problem,
CAIR' SNI Center. RO. Box 2370. Cleveland. TN 37320-2370.
CANADA,
U°S. customers
using TTY for deaf. hearing
impaired
of your deMer or selwicer:
of the problem you are having:
e. Proof of purchase
sMes recmpt).
User's guides, service manuals
Maytag Customer Assistance.
and parts catalogs
for further
call 1-800-688-2080.
please include the following
are available
26
(next page)
write to Maytag Appliances Sales Company, Attn:
or call 1-800-688-99U0° USA or 1-800-688-2002o
or speech impaired,
NOTE: When writing or calling about a service problem,
a. Your name. address and telephone number:
b. Model number and seria;{ number:
c. Name mad address
d. A clear description
to WARRANTY
from Maytag Apphances
information:
Sales Company.
=Parts and Labor
FM! One Year Warranty
For one (1) year from the original retail purchase date, any part wMch _ails h+normal home use will be repaired or replaced
fi'ee of charge.
Limited
Warranties
: Parts
Only
Second Year : After the first year flTom the origina_ purchase date, parts which _bil in uormal home use will be repah:ed or
replaced free of charge [br the part itself, with the owner paying aH other costs, including lab(m mileage and transportatkm.
Third Through
Fifth Year : From the original purchase date, parts listed below wMch fail in normal home use will be
repaired or replaced fiee of charge fi3r the part itself, with the owner payh+g all other costs, h+cludh+g lab(m mileage and
,
Electronic
,
Glass-ceramic
+ Electric
Canadian
Controls
Cooktop:
Heating
Elements:
due to thermal
surface,
breakage.
broil and bake elements
on electric
cooking
appliances.
Residents
The abuve warrauties only cover an appliance installed hi Camda that has been certified or listed by appropriate
test ageucies Ibr compliance
to a National Standard of Canada unless the appliance was brought into Canada due tu transfer of
resideuce from the United Stales to Canada.
Limited Warranty
Outside the United States and Canada
: Parts OMy
For two (2) years from the date of original retail purchase, any part which fails in normal home use will be repaired or
replaced free of charge [br the part itself, with the owner paying aH other costs, including lab(m mileage and transportation.
The ._7)ec+ji'cwarranties e.wressed above are the ONLY warranties provided by the manufacturer.
.s?)ecffi'c legal rights, and you may also have other rights which vary.fi:om state to state.
What is Not Covered
These Warranties:
3+ Light bulbs.
4+ Products
a. Improper h+staHation, delivery, or mainteuance.
b+ Any repaiJ; modification,
a_teration, or a<[iustmeut
not authorized
by the manufacturer
or an
authorized servicm:
d. [ucorrect
e+ Improper
abuse, accideuts,
or unrcasunaNe
electric current, voltage,
setting of any control
Form No, A/05/00
R)r commercial
or industrial
use.
call to:
b° [ustruct the user on the proper use of the product.
c. Tran spoil the appliance to the servicec
or supply.
6+ Consequeutial
or h+cideutal damages sustah+ed by any
pers(m as a result of any breach of these warranties.
have
o 403 West Fom'th Street
Part No, 8113P281-60
purchased
.q° The cost of service or service
a+ Correct h+staHafion errors.
use.
2+ Warranties are void if the original serial numbers
been removed, altered, or cannot be readily
determ h+ed.
MAYTAG
give you
By
L Conditions and damages resulting from any of the
e. Misuse,
These warranties
Some states do not allow the excluskm
consequentia_
or inckleutal
exclusion may not apply.
North
o P.O. Box 39 o Newton,
http://www,tnaytag.com
damages,
or limitation
of
so the above
Iowa 50208
Litho U.S.A ,