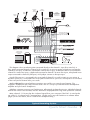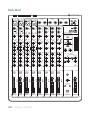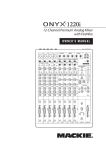
1
12-Channel Premium Analog Mixer
with FireWire
QUICK START GUIDE
1
ON
2
YX MIC PRE
ON
3
YX MIC PRE
ON
4
YX MIC PRE
ON
CTRL - RM OUT
MAIN OUT
ALT 3-4 OUT
BAL/UNBAL
BAL/UNBAL
BAL/UNBAL
TAPE
L
YX MIC PRE
IN
L
R
LINE IN 5-6
1
2
4
LINE IN 7-8
L
L/3
R
LINE IN 9-10
L
LINE
LINE
LINE
(MONO)
(MONO)
(MONO)
(MONO)
BAL/UNBAL
BAL/UNBAL
BAL/UNBAL
BAL/UNBAL
BAL/UNBAL
BAL/UNBAL
BAL/UNBAL
LINE
HI-Z
75Hz
18dB/OCT
30
U
40
20
U
40
20
U
40
20
U
U
U
U
CTRL ROOM/PHONES
SOURCE
U
40
GAIN
60
U
-20dB +40dB
R
R
PREMIUM ANALOG MIXER w/ PERKINS EQ & FIREWIRE
30
GAIN
60
U
-20dB +40dB
R
48V
30
GAIN
R
48V
30
60
U
-20dB +40dB
75Hz
18dB/OCT
48V
GAIN
60
U
-20dB +40dB
R
L
L
LINE
LINE
HI-Z
OUT
R/4
LINE IN 11-12
BAL/UNBAL
48V
20
3
L
GAIN
-20dB
GAIN
-20dB
+20dB
GAIN
-20dB
+20dB
-20dB
+20dB
0dB=0dBu
L
GAIN
SEND
SEND
PRE
POST
U
PRE
POST
U
EQ
1k
U
1k
-15
+15
1k
+15
+15
-15
+15
U
+15
3
0
HIGH
12kHz
-15
TAPE
LINE
FW 1-2
HIGH
12kHz
-15
10
6
EQ
U
HIGH
12kHz
INPUT
PRE
POST
EQ
U
HIGH
12kHz
SEND
PRE
POST
EQ
U
HIGH
12kHz
SEND
PRE
POST
EQ
HIGH
-15
+15
SEND
PRE
POST
EQ
12kHz
-15
+15
U
HIGH
12kHz
SEND
PRE
POST
EQ
HIGH
-15
SEND
CLIP
15
MAIN MIX
SEND
R
20
+20dB
FW 1-2
12kHz
2
ALT 3-4
+15
-15
LEVEL
SET
4
1k
7
FREQ
100
8k
FREQ
100
U
8k
U
U
U
AUX
AUX
1
OO
MAX
MAX
2
OO
MAX
2
OO
MAX
PAN
L
R
MAX
MAX
L
R
R
MAX
MAX
R
MAX
MAX
2
OO
MAX
R
L
R
1
MAX
L
R
MAX
L
MUTE
MUTE
MUTE
MUTE
MUTE
MUTE
MUTE
ALT 3/4
ALT 3/4
ALT 3/4
ALT 3/4
ALT 3/4
ALT 3/4
ALT 3/4
5
U
5
dB
10
5
OL
- 20
U
5
dB
10
5
OL
- 20
U
5
dB
10
5
OL
- 20
U
5
dB
10
5
OL
- 20
dB
10
5
U
OL
5
OL
5
- 20
- 20
U
5
OO
+15
- 20
+10
OO
+10
2
POWER
MIC
dB
10
5
OL
1
OO
RTN TO
AUX1
2
dB
10
5
U
PRE
POST
+15
R
MUTE
dB
10
OO
PAN
ALT 3/4
dB
10
1
PRE
POST
2
OO
PAN
RETURN
SEND
AUX
OO
MAX
PAN
AUX MASTER
+15
2
OO
PAN
L
MAX
RUDE
SOLO
PHONES
80Hz
-15
1
OO
MAX
OO
LOW
AUX
1
OO
2
OO
+15
AUX
1
OO
PAN
L
30
MAX
CONTROL
ROOM
U
80Hz
-15
AUX
2
OO
+15
20
+15
-15
LOW
80Hz
-15
1
PAN
L
+15
10
ASSIGN TO
MAIN MIX
MID
2.5kHz
U
LOW
80Hz
-15
MAX
2
OO
PAN
U
AUX
OO
+15
-15
LOW
80Hz
+15
1
OO
U
MID
2.5kHz
OO
U
AUX
1
OO
+15
-15
LOW
-15
+15
+15
-15
U
80Hz
-15
+15
U
MID
2.5kHz
+15
LOW
80Hz
-15
U
MID
2.5kHz
MID
-15
+15
LOW
80Hz
+15
U
8k
MID
-15
+15
LOW
-15
FREQ
100
U
MID
-15
+15
8k
U
U
MID
-15
FREQ
100
U
5
10
10
10
10
10
10
10
10
20
20
20
20
20
20
20
20
30
30
30
30
30
30
30
30
40
50
60
40
50
60
40
50
60
40
50
60
40
50
60
40
50
60
40
50
60
40
50
60
OO
OO
OO
OO
OO
OO
OO
OO
5
U
OL
OO
- 20
MAX
5
LEVEL
10
DESTINATION
20
30
PHONES
AUX
1-2
40
50
60
OO
TALKBACK
SOLO
SOLO
1
SOLO
2
SOLO
3
SOLO
4
SOLO
5-6
SOLO
7-8
SOLO
9-10
11-12
TALKBACK
MAIN MIX
Important Safety Instructions
1.
2.
3.
4.
5.
6.
7.
Read these instructions.
Keep these instructions.
Heed all warnings.
Follow all instructions.
Do not use this apparatus near water.
Clean only with a dry cloth.
Do not block any ventilation openings. Install in accordance with the
manufacturer’s instructions.
8. Do not install near any heat sources such as radiators, heat registers,
stoves, or other apparatus (including amplifiers) that produce heat.
9. Do not defeat the safety purpose of the polarized or grounding-type
plug. A polarized plug has two blades with one wider than the other.
A grounding-type plug has two blades and a third grounding prong.
The wide blade or the third prong are provided for your safety. If the
provided plug does not fit into your outlet, consult an electrician for
replacement of the obsolete outlet.
10. Protect the power cord from being walked on or pinched particularly at
plugs, convenience receptacles, and the point where they exit from the
apparatus.
11. Only use attachments/accessories specified by the manufacturer.
PORTABLE CART
12. Use only with a cart, stand, tripod, bracket, or
WARNING
table specified by the manufacturer, or sold with
the apparatus. When a cart is used, use caution
when moving the cart/apparatus combination to
avoid injury from tip-over.
13. Unplug this apparatus during lightning storms or
when unused for long periods of time.
14. Refer all servicing to qualified service personnel. Servicing is required
when the apparatus has been damaged in any way, such as powersupply cord or plug is damaged, liquid has been spilled or objects have
fallen into the apparatus, the apparatus has been exposed to rain or
moisture, does not operate normally, or has been dropped.
15. This apparatus shall not be exposed to dripping or splashing, and no
object filled with liquids, such as vases or beer glasses, shall be placed
on the apparatus.
16. Do not overload wall outlets and extension cords as this can result in a
risk of fire or electric shock.
17. This apparatus has been designed with Class-I construction and must
be connected to a mains socket outlet with a protective earthing connection (the third grounding prong).
18. This apparatus has been equipped with a rocker-style AC mains power
switch. This switch is located on the rear panel and should remain
readily accessible to the user.
19. The MAINS plug or an appliance coupler is used as the disconnect
device, so the disconnect device shall remain readily operable.
CAUTION
AVIS
RISK OF ELECTRIC SHOCK. DO NOT OPEN
RISQUE DE CHOC ELECTRIQUE. NE PAS OUVRIR
CAUTION: TO REDUCE THE RISK OF ELECTRIC SHOCK DO NOT REMOVE COVER (OR BACK)
NO USER-SERVICEABLE PARTS INSIDE. REFER SERVICING TO QUALIFIED PERSONNEL
ATTENTION: POUR EVITER LES RISQUES DE CHOC ELECTRIQUE, NE PAS ENLEVER LE COUVERCLE.
AUCUN ENTRETIEN DE PIECES INTERIEURES PAR L'USAGER.
CONFIER L'ENTRETIEN AU PERSONNEL QUALIFIE.
AVIS: POUR EVITER LES RISQUES D'INCENDIE OU D'ELECTROCUTION, N'EXPOSEZ PAS CET ARTICLE
A LA PLUIE OU A L'HUMIDITE
The lightning flash with arrowhead symbol within an equilateral triangle is
intended to alert the user to the presence of uninsulated "dangerous
voltage" within the product's enclosure, that may be of sufficient magnitude
to constitute a risk of electric shock to persons.
Le symbole éclair avec point de flèche à l'intérieur d'un triangle équilatéral
est utilisé pour alerter l'utilisateur de la présence à l'intérieur du coffret de
"voltage dangereux" non isolé d'ampleur suffisante pour constituer un risque
d'éléctrocution.
The exclamation point within an equilateral triangle is intended to alert the
user of the presence of important operating and maintenance (servicing)
instructions in the literature accompanying the appliance.
Le point d'exclamation à l'intérieur d'un triangle équilatéral est employé
pour alerter les utilisateurs de la présence d'instructions importantes pour le
fonctionnement et l'entretien (service) dans le livret d'instruction
accompagnant l'appareil.
2 Onyx 1220i
20. NOTE: This equipment has been tested and found to comply with
the limits for a Class B digital device, pursuant to part 15 of the FCC
Rules. These limits are designed to provide reasonable protection
against harmful interference in a residential installation. This equipment generates, uses, and can radiate radio frequency energy and, if
not installed and used in accordance with the instructions, may cause
harmful interference to radio communications. However, there is no
guarantee that interference will not occur in a particular installation. If
this equipment does cause harmful interference to radio or television
reception, which can be determined by turning the equipment off and
on, the user is encouraged to try to correct the interference by one or
more of the following measures:
• Reorient or relocate the receiving antenna.
• Increase the separation between the equipment and the
receiver.
• Connect the equipment into an outlet on a circuit different from
that to which the receiver is connected.
• Consult the dealer or an experienced radio/TV technician for
help.
CAUTION: Changes or modifications to this device not expressly
approved by LOUD Technologies Inc. could void the user's authority to
operate the equipment under FCC rules.
21. This apparatus does not exceed the Class A/Class B (whichever is
applicable) limits for radio noise emissions from digital apparatus as
set out in the radio interference regulations of the Canadian Department
of Communications.
ATTENTION — Le présent appareil numérique n’émet pas de bruits
radioélectriques dépassant las limites applicables aux appareils
numériques de class A/de class B (selon le cas) prescrites dans le
réglement sur le brouillage radioélectrique édicté par les ministere des
communications du Canada.
22. Exposure to extremely high noise levels may cause permanent hearing
loss. Individuals vary considerably in susceptibility to noise-induced
hearing loss, but nearly everyone will lose some hearing if exposed to
sufficiently intense noise for a period of time. The U.S. Government’s
Occupational Safety and Health Administration (OSHA) has specified
the permissible noise level exposures shown in the following chart.
According to OSHA, any exposure in excess of these permissible limits
could result in some hearing loss. To ensure against potentially dangerous exposure to high sound pressure levels, it is recommended that all
persons exposed to equipment capable of producing high sound pressure levels use hearing protectors while the equipment is in operation.
Ear plugs or protectors in the ear canals or over the ears must be worn
when operating the equipment in order to prevent permanent hearing
loss if exposure is in excess of the limits set forth here:
Duration,
per day in
hours
8
6
4
3
2
1.5
1
Sound Level
dBA, Slow
Response
90
92
95
97
100
102
105
0.5
110
0.25 or less 115
Typical Example
Duo in small club
Subway Train
Very loud classical music
Woody and Anita screaming about
deadlines
Loudest parts at a rock concert
WARNING — To reduce the risk of fire or electric shock, do not
expose this apparatus to rain or moisture.
Correct disposal of this product. This symbol indicates that this product should not be disposed of with your household waste, according to the WEEE Directive (2002/96/EC) and your national law. This product
should be handed over to an authorized collection site for recycling waste electrical and electronic equipment (EEE). Improper handling of this type of waste could have a possible negative impact on the environment and
human health due to potentially hazardous substances that are generally associated with EEE. At the same time, your cooperation in the correct disposal of this product will contribute to the effective usage of natural
resources. For more information about where you can drop off your waste equipment for recycling, please contact your local city office, waste authority, or your household waste disposal service.
Introduction
Thank you for choosing a lovely Mackie Onyx 1220i
professional compact mixer. It has built-in FireWire,
our premium precision-engineered studio-grade Onyx
mic preamps, along with the newest features and latest
technologies for live sound reinforcement and analog
or digital studio recording, all in a durable, road-worthy
package.
We realize that you must be really keen
to try out your new mixer. Please read
the safety instructions on page 2 and this
page, and then have a look through some
of the features and details in this quick start guide. A
full manual is available on www.mackie.com.
Set the levels
It’s not even necessary to hear what you’re doing to set
optimal levels. But if you’d like to: Plug headphones into
the phones output jack, then turn up the phones knob
just a little.
1. Turn on the mixer by pressing the top edge of
the power switch.
2. For one channel, press the solo switch in, and
the rude solo light will turn on.
3. Play something into that input at real-world
levels.
4. Adjust that channel's gain control until the
right main meter stays around the 0 dB LED
(marked "level set").
5. Disengage the channel's solo switch.
Setup
Use the mixer in a nice clean and dry environment,
free from dryer lint and dust bunnies.
Zero the controls
6. Repeat steps 2 to 5 for the remaining channels.
7. Turn up a channel fader to the "U" mark.
8. Slowly turn up the main mix fader until you
hear the signals in your speakers or
headphones.
9. If needed, apply some channel EQ wisely.
1. Fully turn down all the knobs to minimum,
except for the channel EQ and pan controls,
which should be centered.
10. Adjust the channel levels to get the best mix.
Keep the gain controls and faders fully down on
unused channels.
2. Make sure all buttons are in the out position.
11. During the performance, if you notice a channel
OL LED turning on during peaks, carefully turn
down that channel's gain control until OL does
not turn on.
Connections
1. Make sure the AC power switch is off before
making any connections.
2. Push the linecord securely into the IEC
connector on the rear panel, and plug it into a
3-prong AC outlet. The mixer can accept any
AC voltage ranging from 100 VAC to 240 VAC.
3. Plug a balanced microphone into one of the mic
XLR (3-pin) connectors. Or connect any linelevel signal (keyboard, or guitar preamp) to a
line input jack using a TS or TRS 1/4" plug.
4. If your microphone requires phantom power,
press in the 48V phantom power button.
5. You can connect a guitar directly to line inputs
1 or 2 without the need for a DI box. Press a
hi-z switch if you connect a guitar directly.
6. The insert jacks of channels 1 to 4 can be used
to connect an external effects or dynamics
processor into the channel signal chain.
7. Connect the main outputs of the mixer (either
XLR or TRS 1/4") to the line-level inputs of your
amplifier (with speakers already attached) or
to the line-level inputs of powered speakers.
Part No. SW0804 Rev. B
©2010 LOUD Technologies Inc. All Rights Reserved.
FireWire
•
See page 15 for details of getting started with
FireWire. PC drivers are on the supplied
CD-ROM. Mac OS X contains built-in drivers.
CONTENTS
IMPORTANT SAFETY INSTRUCTIONS ........................ 2
INTRODUCTION ...................................................... 3
FEATURES ............................................................... 4
SETTING UP A SYSTEM ............................................ 6
MICROPHONES ....................................................... 8
LINE-LEVEL SOURCES AND GUITARS......................... 9
AUX 1 AND AUX 2 ................................................ 10
CONTROL ROOM/PHONES/METERS ...................... 11
MAIN MIX ............................................................ 12
ALT 3-4 ............................................................... 13
TALKBACK ............................................................ 14
FIREWIRE ............................................................. 15
TECHNICAL INFORMATION .................................... 18
TRACK SHEET........................................................ 20
BLOCK DIAGRAM .................................................. 22
MACKIE LIMITED WARRANTY ................................ 23
Quick Start Guide 3
Features
REAR PANEL
27. MID EQ LEVEL (CH. 5-12)
1.
2.
AC POWER CONNECTION
POWER SWITCH
28. LOW EQ LEVEL
29. AUX SEND 1 AND 2 LEVEL
3.
FIREWIRE CONNECTIONS
30. PAN CONTROL
4.
MAIN MIX XLR OUTPUTS
31. MUTE/ALT 3-4 SWITCH
5.
6.
7.
MAIN OUTPUT LEVEL (+4 dB/MIC)
AUX SEND 1 AND 2
AUX RETURN 1 AND 2
32. –20 AND OL LEDS
33. CHANNEL FADER
34. SOLO SWITCH
8.
INSERT (CH. 1-4)
MASTER SECTION
CONNECTION SECTION
9. MIC INPUTS
10. MONO LINE INPUTS (CH. 1-4)
35. CONTROL ROOM SOURCE: MAIN MIX
36. CONTROL ROOM SOURCE: TAPE, FW 1-2, ALT 3-4
37. ASSIGN CONTROL ROOM SOURCE TO MAIN MIX
11. STEREO LINE INPUTS (CH. 5-12)
38. CONTROL ROOM LEVEL
12. CONTROL-ROOM OUTPUTS
13. MAIN MIX 1/4" OUTPUTS
14. ALT 3-4 OUTPUTS
39. PHONES LEVEL
40. LEFT/RIGHT LEVEL METERS
41. RUDE SOLO LIGHT
15. TAPE INPUTS
42. AUX MASTER SEND 1 AND 2 LEVELS
16. TAPE OUTPUTS
17. HEADPHONE OUTPUT
CHANNEL CONTROLS
18. HI-Z SWITCH (CH. 1 AND 2 ONLY)
19. LOW CUT SWITCH (CH.1-4 ONLY)
20. 48V PHANTOM POWER (MIC ONLY)
21. GAIN CONTROL
22. SEND FIREWIRE PRE/POST EQ
23. CH.11-12 INPUT (LINE OR FW 1-2)
24. HIGH EQ LEVEL
25. MID EQ FREQUENCY (CH. 1-4)
26. MID EQ LEVEL (CH. 1-4)
43.
44.
45.
46.
47.
48.
49.
50.
51.
AUX SEND PRE/POST SWITCH
AUX MASTER RETURN 1 AND 2 LEVELS
AUX RETURN AUX 2 TO AUX1
POWER LED
TALKBACK MICROPHONE
TALKBACK LEVEL
TALKBACK DESTINATION: PHONES, AUX 1-2
TALKBACK ON SWITCH
MAIN MIX FADER
( PRE-FADER / PRE EQ
FIREWIRE
MAIN OUT
AUX SEND
1
BALANCED
POWER
R
2
4
4
8
BAL/UNBAL
2
R
2
MIC
5
AUX RETURN
L BAL/UNBAL R
1
L
7
+ 4dB
MAIN OUTPUT
LEVEL
1
L
3
1
TIP SEND / RING RETURN )
CHANNEL INSERT
3
2
6
1. AC POWER CONNECTION
2. POWER SWITCH
This is a standard 3-prong IEC power connector.
Connect the supplied detachable linecord to the power
receptacle, and plug the other end of the linecord into
an AC outlet. The mixer can accept any AC voltage
ranging from 100 VAC to 240 VAC.
Press the top of this rocker switch inwards to turn on
the mixer. The front panel power LED will glow with
happiness and the mixer will be fully operational.
4 Onyx 1220i
1
O
M
NYX IC PR
2
E
O
M
NYX IC PR
3
E
O
M
NYX IC PR
4
E
O
M
NYX IC PR
CTRL - RM OUT
MAIN OUT
ALT 3-4 OUT
BAL/UNBAL
BAL/UNBAL
BAL/UNBAL
12
13
14
L
R
LINE IN 5-6
1
2
3
4
LINE
LINE
LINE
LINE
BAL/UNBAL
BAL/UNBAL
BAL/UNBAL
BAL/UNBAL
LINE
HI-Z
48V
30
21
20
U
LINE
HI-Z
20
40
GAIN
20
11
40
20
R/4
17
L
L
(MONO)
(MONO)
BAL/UNBAL
BAL/UNBAL
BAL/UNBAL
BAL/UNBAL
R
R
R
U
U
CTRL ROOM/PHONES
SOURCE
U
40
GAIN
60
U
-20dB +40dB
R
LINE IN 11-12
(MONO)
U
U
GAIN
60
U
-20dB +40dB
L
GAIN
-20dB
GAIN
-20dB
+20dB
GAIN
-20dB
+20dB
GAIN
-20dB
+20dB
SEND
22
SEND
PRE
POST
U
U
EQ
24
1k
FREQ
8k
100
8k
26
-15
+15
AUX
29
AUX
1
MAX
29
MAX
2
OO
MAX
MAX
2
OO
MAX
PAN
MAX
PAN
+15
MAX
PAN
38
MAX
AUX
1
MAX
MAX
2
OO
MAX
2
OO
PAN
MAX
MAX
PAN
1
OO
MAX
PAN
OO
PRE
POST
OO
+15
MAX
PAN
R
L
RTN TO
AUX1
R
L
R
L
R
L
R
L
R
L
R
L
MUTE
MUTE
MUTE
MUTE
MUTE
MUTE
ALT 3/4
ALT 3/4
ALT 3/4
ALT 3/4
ALT 3/4
ALT 3/4
ALT 3/4
ALT 3/4
U
5
32
OL
- 20
dB
10
dB
10
dB
10
dB
10
dB
10
dB
10
dB
10
5
5
5
5
5
5
5
U
5
OL
- 20
U
5
OL
- 20
U
5
OL
- 20
U
OL
5
U
OL
5
- 20
- 20
U
5
OL
- 20
+10
OO
+10
2
2
+15
R
MUTE
5
44
OO
PAN
MUTE
dB
10
33
1
46
L
41
RETURN
1
PRE
POST
43 42
MAX
2
OO
45
30
31
RUDE
SOLO
AUX MASTER
SEND
AUX
2
OO
30
PHONES
+15
1
OO
20
80Hz
-15
AUX
1
OO
7
10
LOW
80Hz
+15
LEVEL
SET
4
MAX
OO
CONTROL
ROOM
LOW
-15
AUX
OO
MAX
+15
2
+15
-15
U
80Hz
-15
2
OO
+15
LOW
80Hz
-15
1
OO
MID
2.5kHz
U
LOW
AUX
2
OO
U
80Hz
+15
1
OO
MID
2.5kHz
-15
3
37
39
ASSIGN TO
MAIN MIX
OO
U
AUX
1
OO
+15
-15
LOW
-15
MID
+15
80Hz
+15
+15
-15
U
2.5kHz
40
6
ALT 3-4
FW 1-2
12kHz
U
MID
MID
LOW
-15
27
U
10
+15
-15
CLIP
15
0
HIGH
12kHz
+15
-15
2.5kHz
U
80Hz
+15
8k
-15
+15
LOW
-15
U
U
U
80Hz
OO
-15
+15
LOW
+15
100
MID
U
28
8k
MID
U
-15
100
FREQ
U
MID
-15
FREQ
U
HIGH
12kHz
+15
-15
R
20
36
TAPE
LINE
FW 1-2
U
1k
FREQ
U
HIGH
12kHz
+15
-15
23
EQ
U
L
INPUT
PRE
POST
EQ
U
HIGH
12kHz
+15
SEND
PRE
POST
EQ
U
HIGH
-15
+15
SEND
PRE
POST
EQ
12kHz
1k
25
U
HIGH
-15
+15
SEND
PRE
POST
EQ
12kHz
-15
1k
100
U
HIGH
12kHz
+15
SEND
PRE
POST
EQ
HIGH
-15
SEND
PRE
POST
0dB=0dBu
35
+20dB
MAIN MIX
SEND
OUT
PREMIUM ANALOG MIXER w/ PERKINS EQ & FIREWIRE
30
U
GAIN
60
U
-20dB +40dB
L
LINE IN 9-10
IN
L/3
R
48V
30
40
LINE IN 7-8
R
48V
30
U
L
(MONO)
75Hz
18dB/OCT
48V
20
60
U
-20dB +40dB
75Hz
18dB/OCT
L
E
9
10
18
19
15 TAPE 16
U
5
10
10
10
10
10
10
10
10
20
20
20
20
20
20
20
20
30
30
30
30
30
30
30
30
40
50
60
40
50
60
40
50
60
40
50
60
40
50
60
40
50
60
40
50
60
40
50
60
OO
OO
OO
OO
OO
OO
OO
OO
POWER
47
MIC
dB
10
5
OL
48
U
OO
- 20
MAX
5
LEVEL
51
10
DESTINATION
49
20
30
PHONES
AUX
1-2
40
50
60
OO
50
34
TALKBACK
SOLO
SOLO
1
SOLO
2
SOLO
3
SOLO
4
SOLO
5-6
SOLO
7-8
SOLO
9-10
11-12
TALKBACK
MAIN MIX
Quick Start Guide 5
Setting up a system
Microphones
Electric
Guitar
Bass
Guitar
iPod
Docking Station
1
YX
ON
2
MIC PR
E
ON
3
YX MIC PRE
YX
ON
4
MIC PR
E
ON
CTRL - RM OUT
MAIN OUT
ALT 3-4 OUT
BAL/UNBAL
BAL/UNBAL
BAL/UNBAL
TAPE
IN
L
R
LINE IN 5-6
Amplifier
Modeler
1
press HI-Z
button
2
4
LINE IN 7-8
L
L/3
R
LINE IN 9-10
L
L
LINE
LINE
LINE
(MONO)
(MONO)
(MONO)
(MONO)
BAL/UNBAL
BAL/UNBAL
BAL/UNBAL
BAL/UNBAL
BAL/UNBAL
BAL/UNBAL
BAL/UNBAL
48V
75Hz
18dB/OCT
30
40
20
40
20
40
20
U
U
U
GAIN
60
U
-20dB +40dB
GAIN
CTRL ROOM/PHONES
SOURCE
U
-20dB
GAIN
-20dB
+20dB
GAIN
-20dB
+20dB
-20dB
+20dB
0dB=0dBu
L
GAIN
SEND
SEND
PRE
POST
Drum
Machine
U
+20dB
1k
1k
1k
12kHz
+15
-15
12kHz
+15
-15
10
6
HIGH
12kHz
FW 1-2
12kHz
+15
-15
3
0
HIGH
2
ALT 3-4
+15
-15
LEVEL
SET
4
1k
100
8k
FREQ
100
U
8k
MAX
OO
MAX
MAX
OO
R
MAX
MAX
R
MAX
MAX
OO
MAX
MAX
MAX
OO
MAX
OO
R
OO
R
L
MUTE
MUTE
MUTE
MUTE
MUTE
MUTE
MUTE
ALT 3/4
ALT 3/4
ALT 3/4
ALT 3/4
ALT 3/4
ALT 3/4
5
U
5
5
OL
- 20
U
5
dB
10
5
OL
- 20
U
5
dB
10
5
U
OL
5
- 20
dB
10
5
OL
- 20
dB
10
5
U
5
5
- 20
U
OL
- 20
5
OO
+10
MIC
dB
10
5
U
OL
5
- 20
10
10
10
10
10
10
10
10
20
20
20
20
20
20
20
20
30
30
30
30
30
30
30
30
40
50
60
40
50
60
40
50
60
40
50
60
40
50
60
40
50
60
40
50
60
40
50
60
OO
OO
OO
OO
OO
OO
OO
OO
Aux Send 2 in POST mode
for external processor
POWER
dB
10
5
U
OL
+10
2
+15
OO
R
ALT 3/4
dB
10
1
OO
RTN TO
AUX1
5
U
OL
OO
- 20
MAX
5
LEVEL
10
DESTINATION
20
30
AUX
1-2
PHONES
40
50
60
OO
Send
TALKBACK
SOLO
SOLO
1
SOLO
2
SOLO
3
SOLO
4
SOLO
5-6
SOLO
7-8
SOLO
9-10
11-12
TALKBACK
MAIN MIX
Return
Send
Return
Send
Return
Laptop Computer
with audio
production software
HD1531
Powered
Speaker
Main Left
PAN
MUTE
dB
10
+15
OO
2
PRE
POST
MAX
ALT 3/4
dB
10
1
PRE
POST
2
MAX
RETURN
SEND
1
PAN
L
Aux Send 1 in PRE mode
for stage monitors
AUX MASTER
AUX
2
PAN
L
+15
1
MAX
RUDE
SOLO
80Hz
-15
AUX
2
OO
R
OO
1
PAN
L
+15
MAX
OO
PHONES
LOW
80Hz
-15
AUX
2
OO
R
+15
1
PAN
L
30
MAX
CONTROL
ROOM
LOW
80Hz
-15
AUX
2
PAN
L
OO
1
OO
MID
2.5kHz
U
LOW
80Hz
+15
20
+15
-15
U
LOW
-15
AUX
2
PAN
L
OO
1
MAX
MID
OO
80Hz
+15
10
ASSIGN TO
MAIN MIX
2.5kHz
+15
-15
U
LOW
-15
AUX
2
PAN
R
OO
MID
2.5kHz
+15
-15
U
80Hz
+15
1
2
MID
+15
-15
U
+15
LOW
-15
U
2.5kHz
MID
-15
U
AUX
1
U
U
80Hz
+15
U
8k
MID
+15
LOW
-15
OO
100
U
AUX
MAX
FREQ
U
-15
+15
80Hz
OO
8k
MID
-15
LOW
+15
L
100
U
-15
OO
FREQ
U
MID
+15
U
HD1801
Powered
Subwoofers
HIGH
TAPE
LINE
FW 1-2
U
7
FREQ
-15
HD1531
Powered
Speaker
Main Right
+15
EQ
U
CLIP
15
INPUT
PRE
POST
EQ
U
HIGH
12kHz
-15
+15
SEND
PRE
POST
EQ
HIGH
12kHz
-15
+15
SEND
PRE
POST
U
EQ
HIGH
12kHz
-15
SEND
PRE
POST
U
EQ
HIGH
12kHz
+15
SEND
PRE
POST
U
EQ
HIGH
-15
SEND
PRE
POST
U
EQ
R
20
MAIN MIX
SEND
Keyboard
R
U
40
GAIN
60
U
-20dB +40dB
R
PREMIUM ANALOG MIXER w/ PERKINS EQ & FIREWIRE
30
U
GAIN
60
U
-20dB +40dB
R
48V
30
U
GAIN
R
48V
30
U
60
U
-20dB +40dB
75Hz
18dB/OCT
48V
R
LINE IN 11-12
L
LINE
LINE
HI-Z
OUT
R/4
BAL/UNBAL
LINE
HI-Z
20
3
L
Headphones
L
YX MIC PRE
Compressor (Vocals)
HD1801
Powered
Subwoofers
Compressor (Vocals)
Dynamics Processor (Bass)
DESIGNED BY MACKOIDS IN WOODINVILLE, WA, USA • MANUFACTURED IN CHINA • FABRIQUE EN CHINE
"MACKIE" & "ONYX" ARE TRADEMARKS OF LOUD TECHNOLOGIES INC. • COPYRIGHT ©2008
( PRE-FADER / PRE EQ
FIREWIRE
MAIN OUT
AUX SEND
1
BALANCED
POWER
R
BAL/UNBAL
2
MAIN OUTPUT
LEVEL
TIP SEND / RING RETURN )
CHANNEL INSERT
3
2
4
1
L
R
2
AUX RETURN
L BAL/UNBAL R
1
Digital Delay
(Aux Send 2)
L
+ 4dB
MIC
Return
Send
Mackie SRM450v2 Powered Speakers
(Stage Monitors) Aux Send 1
This diagram shows an electric guitar connected to the channel 1 line iput input via an amplifier
modeller, a bass guitar connected directly to channel 2 (hi-z switch in), microphones connected to
channel 3 and 4 mic inputs, a drum machine connected to channel 5-6 stereo line inputs, and a
keyboard connected to channel 11-12 stereo line inputs. An iPod dock connects to the tape input.
A dynamics processor is connected to the insert jack of channel 2 to work its magic on your bass.
Vocal compressors are connected to the channel 3 and 4 inserts.
A delay processor receives a mono input from aux 2 send (in post-fader mode), and its stereo outputs
connect to the stereo aux 1 return inputs.
A plethora of SRM450v2 powered speakers are strewn across the stage as monitors for the band; they
are connected to the aux 1 send jack (in pre-fader mode). Headphones are used to monitor levels.
The club is driven by connecting quad HD1801 powered subwoofers and a pair of HD1531 powered
speakers to the main left and right outputs.
A laptop computer connects to a FireWire port, allowing the 2-channel main mix, individual channels,
and the aux sends to be recorded. Two channels can be played back from your audio production
software. These can enter as either a source for the control room and phones, or channels 11 and 12.
Typical Club System
6 Onyx 1220i
Studio
Microphone
Acoustic
Guitar
mic’d up
Mackie
HR824mk2
Powered Reference
Monitors for
Control Room
Bass
Guitar
Electric
Guitar
CD Player
1
YX
ON
2
MIC PR
E
ON
3
YX MIC PRE
YX
ON
4
MIC PR
E
ON
CTRL - RM OUT
MAIN OUT
ALT 3-4 OUT
BAL/UNBAL
BAL/UNBAL
BAL/UNBAL
Engineer’s
Headphones
TAPE
L
YX MIC PRE
IN
L
R
LINE IN 5-6
1
press HI-Z
buttons
2
LINE
LINE
BAL/UNBAL
BAL/UNBAL
LINE
HI-Z
LINE
HI-Z
48V
30
20
3
40
20
40
20
40
L
L
(MONO)
(MONO)
(MONO)
BAL/UNBAL
BAL/UNBAL
BAL/UNBAL
20
R
R
R
PREMIUM ANALOG MIXER w/ PERKINS EQ & FIREWIRE
U
U
U
U
CTRL ROOM/PHONES
SOURCE
U
40
GAIN
60
U
-20dB +40dB
L
(MONO)
BAL/UNBAL
R
GAIN
60
U
-20dB +40dB
OUT
R
LINE IN 11-12
LINE
30
U
GAIN
60
U
-20dB +40dB
L
LINE IN 9-10
R/4
48V
30
U
GAIN
LINE IN 7-8
L/3
R
BAL/UNBAL
75Hz
18dB/OCT
48V
30
U
60
U
-20dB +40dB
4
LINE
BAL/UNBAL
75Hz
18dB/OCT
48V
L
GAIN
-20dB
GAIN
-20dB
+20dB
GAIN
-20dB
+20dB
0dB=0dBu
L
GAIN
-20dB
+20dB
SEND
SEND
PRE
POST
U
PRE
POST
U
EQ
U
1k
HIGH
12kHz
+15
-15
3
0
HIGH
12kHz
FW 1-2
12kHz
+15
-15
TAPE
LINE
FW 1-2
U
HIGH
12kHz
+15
-15
10
6
EQ
U
CLIP
15
INPUT
PRE
POST
EQ
U
HIGH
12kHz
+15
SEND
PRE
POST
EQ
U
HIGH
-15
+15
1k
SEND
PRE
POST
EQ
12kHz
-15
+15
U
HIGH
12kHz
-15
SEND
PRE
POST
EQ
HIGH
12kHz
+15
1k
SEND
PRE
POST
EQ
HIGH
-15
SEND
R
20
+20dB
MAIN MIX
SEND
2
ALT 3-4
+15
-15
LEVEL
SET
4
1k
press FW 1-2 button (
)
to pass FW 1-2 computer
output into channels 11-12
7
FREQ
100
8k
FREQ
100
U
8k
MAX
MAX
2
OO
MAX
2
OO
MAX
PAN
L
Electronic
Drum Kit
R
MAX
PAN
L
R
80Hz
MAX
MAX
MAX
MAX
MAX
OO
PAN
L
R
R
OO
MAX
PAN
L
1
MAX
PRE
POST
OO
PRE
POST
OO
+15
2
MAX
PAN
L
1
MAX
RETURN
SEND
AUX
OO
2
MAX
AUX MASTER
+15
1
2
OO
-15
AUX
OO
RUDE
SOLO
80Hz
+15
1
MAX
OO
PHONES
LOW
80Hz
-15
AUX
OO
2
OO
R
+15
1
PAN
L
80Hz
-15
AUX
OO
2
OO
R
+15
1
PAN
L
80Hz
-15
AUX
2
OO
30
MAX
CONTROL
ROOM
U
LOW
1
OO
+10
OO
+10
RTN TO
AUX1
2
2
+15
PAN
R
L
POWER
R
Keyboard
MUTE
MUTE
MUTE
MUTE
MUTE
MUTE
MUTE
MUTE
ALT 3/4
ALT 3/4
ALT 3/4
ALT 3/4
ALT 3/4
ALT 3/4
ALT 3/4
ALT 3/4
dB
10
dB
10
dB
10
dB
10
dB
10
dB
10
dB
10
dB
10
5
5
5
5
5
5
5
5
U
5
OL
- 20
U
5
OL
- 20
U
5
U
OL
5
- 20
OL
- 20
U
U
OL
5
U
OL
5
- 20
- 20
5
U
OL
5
- 20
10
10
10
10
10
10
10
10
20
20
20
20
20
20
20
20
30
30
30
30
30
30
30
30
40
50
60
40
50
60
40
50
60
40
50
60
40
50
60
40
50
60
40
50
60
40
50
60
OO
Keyboard
MAX
2.5kHz
+15
-15
OO
+15
1
OO
2.5kHz
U
LOW
20
MID
+15
-15
U
LOW
10
ASSIGN TO
MAIN MIX
MID
2.5kHz
+15
-15
U
AUX
OO
+15
-15
LOW
-15
+15
1
MID
2.5kHz
MID
U
+15
80Hz
-15
+15
AUX
OO
U
MID
U
LOW
80Hz
-15
1
U
8k
-15
+15
U
AUX
U
U
LOW
80Hz
+15
100
MID
-15
+15
U
LOW
-15
8k
FREQ
U
MID
-15
+15
U
OO
100
U
MID
-15
FREQ
OO
OO
OO
OO
OO
OO
Send
MIC
dB
10
5
U
OL
OO
- 20
MAX
5
LEVEL
SOLO
1
SOLO
2
SOLO
3
SOLO
4
SOLO
30
AUX
1-2
PHONES
5-6
7-8
OO
Return
SOLO
9-10
Send
40
50
60
OO
SOLO
Compressor (Vocals)
20
TALKBACK
SOLO
Return
10
DESTINATION
11-12
TALKBACK
Dynamics Processor (Bass)
MAIN MIX
Computer with
audio production
software
Send
Return
Multi FX Processor (Guitar)
Headphones
DESIGNED BY MACKOIDS IN WOODINVILLE, WA, USA • MANUFACTURED IN CHINA • FABRIQUE EN CHINE
"MACKIE" & "ONYX" ARE TRADEMARKS OF LOUD TECHNOLOGIES INC. • COPYRIGHT ©2008
( PRE-FADER / PRE EQ
FIREWIRE
MAIN OUT
AUX SEND
1
BALANCED
POWER
R
CHANNEL INSERT
3
2
R
AUX RETURN
L BAL/UNBAL R
BAL/UNBAL
2
MAIN OUTPUT
LEVEL
TIP SEND / RING RETURN )
4
1
L
2
1
L
+ 4dB
MIC
Headphone Amp
This diagram shows an electric guitar connected directly to the channel 1 input (hi-z switch in), a
bass guitar connected directly to channel 2 (hi-z switch in), an acoustic guitar microphone connected to
channel 3 mic input, a studio mic connected to channel 4 mic input, an electronic drum set connected to
channel 5-6 stereo line inputs, a keyboard connected to channel 7-8 stereo line inputs, a keyboard mono
output connected to channel 9 (left input). A CD player connects to the tape input.
A multi-FX processor is connected to the insert jack of channel 1 to work its magic on your guitar. A
dynamics processor is connected to the insert jack of channel 2 for your bass. A compressor is connected
to the insert jack of channel 4 for your vocals.
Mackie HR824mk2 powered reference monitors are used for your control room listening. The
engineer's headphones are used to monitor levels. Aux 2 is set up to provide the feed to a headphone
amplifier and your band's headphones.
A desktop computer connects to a FireWire port, allowing the 2-channel main mix, individual channels,
and the aux sends to be recorded, and two channels to be played back using audio production software.
Mixer channels 11-12 can play the 2-channel signals from your computer if the FW 1-2 switch at the
top of the 11-12 channel strip is engaged. Aux 1 and 2 can be sent via FireWire to a software effects
plugin. (In the case above, aux 2 is used for the headphone amp.)
Typical Recording System
Quick Start Guide 7
Microphones
INSERTS
Connect your microphones to the female XLR
connectors on mono channels 1-4. The microphone
preamps feature our Onyx design, with super high
fidelity and headroom. Professional ribbon, dynamic,
and condenser mics all sound excellent through these
inputs.
Channels 1-4 have insert jacks on the rear panel.
These allow you to send the mic and line signals out
to an external device, and back in again on the same
connector. For example, vocals benefit from having an
external vocal compressor. These compress the level
of the signals when they reach a certain threshold, and
help prevent overloading.
Microphone-level signals are passed through these
splendid microphone preamplifiers to become line-level
signals.
SETTING THE MICROPHONE GAIN
48V PHANTOM POWER
Press the 48V phantom power switch if your microphones
need it. Most modern professional condenser mics
require 48V phantom power, which lets the mixer send
low-current DC voltage to the mic’s electronics through
the same wires that carry audio.
Never plug single-ended (unbalanced) microphones,
or ribbon mics into the mic input jacks if phantom
power is on. Do not plug instrument outputs into the
mic XLR input jacks with phantom power on, unless you
are certain it is safe to do so.
LOW CUT
Mono channels 1-4 each have a low-cut switch (often
referred to as a high-pass filter) that cuts bass
frequencies below 75 Hz. This will reduce the thumps
and bangs due to stage noise and rumble, and mic
handling.
We recommend that you use low-cut on every
microphone application except kick drum, bass guitar,
or bassy synth patches.
The gain controls allow you to set your input signals
to an optimum level: not so hot that the mixer is
overloaded, and not so low that the signal is lost in
noise. For a signal entering the XLR mic inputs, the
adjustment range is from 0 to 60 dB. Use the following
procedure for setting the gain just right:
1. Press the solo switch at the bottom of the
channel your microphone is connected to. The
rude solo light will flash to remind you that
what you are listening to in the control room
and headphones, and shown on the main right
meter is the soloed channel.
2. Sing/talk/shout/scream into the microphone at
typical loudness levels.
3. Adjust the channel gain control until the right
main meter level is hovering around the 0 dB
mark (labeled "level set").
4. Now that the gain is set correctly, disengage
solo.
5. During a performance, if you notice that the OL
(overload) LED comes on next to the channel
fader, carefully decrease the gain until OL no
longer comes on.
Using the low cut switch also allows you to add some
bass EQ to your vocals without boosting the really-low
lows.
( PRE-FADER / PRE EQ
FIREWIRE
MAIN OUT
AUX SEND
1
BALANCED
POWER
R
TIP SEND / RING RETURN )
CHANNEL INSERT
3
2
4
1
L
BAL/UNBAL
2
AUX RETURN
L BAL/UNBAL R
2
R
1
Inserts
L
+ 4dB
MAIN OUTPUT
LEVEL
MIC
EQUALIZATION
Mono channels 1-4 have a 3-band EQ, with shelvinglow, shelving-high and peaking-mid. The frequency of
the mid can be adjusted from 100 Hz to 8 kHz.
This loving attention to detail in the mid EQ section is
ideal for vocal equalization, so you might consider using
channels 1 to 4 for your main vocal microphones.
XLR Mic
Inputs
1
ON
2
YX MIC PRE
ON
ON
4
YX MIC PRE
ON
CTRL - RM OUT
MAIN OUT
ALT 3-4 OUT
BAL/UNBAL
BAL/UNBAL
BAL/UNBAL
L
R
LINE IN 5-6
Low Cut
48V
Gain
1
2
LINE
LINE
BAL/UNBAL
BAL/UNBAL
LINE
HI-Z
LINE
HI-Z
48V
40
20
40
20
L
40
20
(MONO)
(MONO)
BAL/UNBAL
BAL/UNBAL
R
R
R
PREMIUM ANALOG MIXER w/ PERKINS EQ & FIREWIRE
U
U
U
U
CTRL ROOM/PHONES
SOURCE
U
40
GAIN
60
U
-20dB +40dB
R
L
L
(MONO)
BAL/UNBAL
GAIN
60
U
-20dB +40dB
L
(MONO)
BAL/UNBAL
R
OUT
R/4
LINE IN 11-12
LINE
30
U
GAIN
60
U
-20dB +40dB
L
L/3
R
LINE IN 9-10
48V
30
U
GAIN
60
U
-20dB +40dB
4
L
LINE IN 7-8
BAL/UNBAL
75Hz
18dB/OCT
48V
30
U
GAIN
-20dB
GAIN
-20dB
+20dB
GAIN
-20dB
+20dB
-20dB
+20dB
0dB=0dBu
L
GAIN
SEND
SEND
PRE
POST
U
PRE
POST
U
EQ
U
1k
+15
3
0
HIGH
12kHz
+15
-15
TAPE
LINE
FW 1-2
U
HIGH
12kHz
+15
-15
10
6
EQ
U
HIGH
12kHz
CLIP
15
INPUT
PRE
POST
EQ
U
HIGH
+15
-15
SEND
PRE
POST
EQ
U
EQ
12kHz
-15
+15
1k
SEND
PRE
POST
HIGH
12kHz
-15
+15
U
HIGH
12kHz
-15
SEND
PRE
POST
EQ
HIGH
12kHz
SEND
PRE
POST
EQ
HIGH
+15
SEND
R
20
+20dB
MAIN MIX
SEND
1k
FW 1-2
12kHz
2
ALT 3-4
+15
-15
LEVEL
SET
4
1k
Level
Set
7
FREQ
100
8k
FREQ
100
U
8k
+15
-15
+15
-15
MID
+15
-15
LOW
80Hz
LOW
80Hz
+15
LOW
80Hz
-15
+15
LOW
80Hz
-15
+15
+15
AUX
AUX
1
1
1
1
1
1
1
MAX
MAX
MAX
2
OO
R
OO
MAX
OO
R
MAX
2
MAX
PAN
L
OO
OO
R
MAX
OO
2
MAX
PAN
L
OO
OO
R
OO
2
MAX
MAX
R
L
R
1
OO
R
L
MUTE
MUTE
MUTE
MUTE
MUTE
MUTE
MUTE
ALT 3/4
ALT 3/4
ALT 3/4
ALT 3/4
ALT 3/4
ALT 3/4
5
U
5
5
OL
- 20
U
5
dB
10
5
OL
- 20
U
5
dB
10
5
OL
- 20
U
5
dB
10
5
OL
- 20
dB
10
5
U
OL
5
OL
5
- 20
- 20
U
5
+15
MIC
- 20
OO
+10
2
dB
10
5
OL
+10
POWER
dB
10
5
U
OO
R
ALT 3/4
dB
10
1
OO
RTN TO
AUX1
PAN
MUTE
dB
10
+15
2
PRE
POST
MAX
ALT 3/4
dB
10
OO
2
PAN
L
1
PRE
POST
MAX
RETURN
SEND
AUX
OO
MAX
PAN
AUX MASTER
+15
2
OO
PAN
L
MAX
2
OO
PAN
L
MAX
RUDE
SOLO
80Hz
-15
AUX
MAX
OO
PHONES
LOW
80Hz
-15
AUX
OO
MAX
CONTROL
ROOM
U
AUX
MAX
30
+15
-15
U
U
20
MID
2.5kHz
OO
U
10
ASSIGN TO
MAIN MIX
2.5kHz
AUX
PAN
L
MID
-15
MID
2.5kHz
AUX
2
OO
MID
U
+15
LOW
+15
U
2.5kHz
U
80Hz
-15
U
8k
-15
+15
LOW
+15
U
U
U
80Hz
-15
100
MID
-15
+15
U
+15
8k
MID
-15
+15
LOW
OO
100
FREQ
U
MID
-15
FREQ
U
U
Solo
3
LINE
BAL/UNBAL
75Hz
18dB/OCT
48V
30
20
-15
EQ
TAPE
YX MIC PRE
IN
-15
8 Onyx 1220i
3
YX MIC PRE
U
5
10
10
10
10
10
10
10
10
20
20
20
20
20
20
20
20
30
30
30
30
30
30
30
30
40
50
60
40
50
60
40
50
60
40
50
60
40
50
60
40
50
60
40
50
60
40
50
60
OO
OO
OO
OO
OO
OO
OO
OO
5
U
OL
OO
- 20
MAX
5
LEVEL
10
DESTINATION
20
30
PHONES
AUX
1-2
40
50
60
OO
TALKBACK
SOLO
SOLO
1
SOLO
2
SOLO
3
SOLO
4
SOLO
5-6
SOLO
7-8
SOLO
9-10
11-12
TALKBACK
MAIN MIX
Line-level Sources and Guitars
Connect your line-level sources to the 1/4" TRS line
input connectors. Channels 1-4 have mono line inputs,
and channels 5-12 are stereo. Each line input can
accept TRS balanced or TS unbalanced sources.
Line-level sources include keyboards, drum machines,
electronic drum kits, CD players, iPod® docks, guitar
preamp outputs and so on.
If you have a mono source and the mono channels are
already in use, plug it into the left input (labeled left/
mono) of the stereo channels, and the signal will appear
equally on the left and right of the main mix.
If you have a stereo source and want to use channels
1 and 2 for example, plug the left side into channel 1,
and set the pan control fully-left. Plug the right side into
channel 2 and set the pan control fully-right.
LINE/HI-Z
Engage this switch if you want to connect guitars
directly to the 1/4" line inputs of channels 1 or 2.
For line-level sources, disengage this switch.
To connect guitars to other channels, you will need a
DI box, or they will not sound good, particularly the high
frequency response. This applies to most mixers and
channels in general, unless they have a hi-z switch.
LOW CUT
The tape output is a copy of the main mix (post
fader), suitable for analog recording, sending to the
inputs of an external amplifier, or sound card etc.
SETTING THE LINE INPUT GAIN
The gain controls allow you to set your input signals
to an optimum level: not so hot that the mixer is
overloaded, and not so low that the signal is lost in
noise. For a signal entering the TRS 1/4" line inputs,
the adjustment range is -20 dB to +40 dB for channels
1-4, and -20 dB to +20 dB for channels 5-12. Use the
following procedure for setting the gain just right:
1. Press the solo switch at the bottom of the
channel your source is connected to. The rude
solo light will flash to remind you that the
source playing in the control room,
headphones, and the right main meter is the
soloed channel.
2. Play your source at typical loudness levels.
3. Adjust the channel gain control until the right
main meter level is hovering around the 0 dB
mark (labeled "level set").
4. Now the gain is set correctly, disengage solo.
5. During a performance, if you notice that the
OL (overload) LED next to the channel fader
turns on, carefully decrease the gain until OL
no longer comes on.
Channels 1-4 have a low-cut switch that cuts bass
frequencies below 75 Hz. The low cut switch affects the
line and mic inputs.
EQUALIZATION
Mono channels 1-4 have a 3-band EQ, with shelvinglow, peaking-mid, and shelving-high controls. The mid
frequency is adjustable from 100 Hz to 8 kHz.
Stereo channels 5-12 have a stereo 3-band EQ with
shelving-low, peaking-mid, and shelving-high.
Stereo Line Inputs
Tape In/Out
Mono
Line
Inputs
1
ON
ON
3
YX MIC PRE
ON
4
YX MIC PRE
ON
CTRL - RM OUT
MAIN OUT
ALT 3-4 OUT
BAL/UNBAL
BAL/UNBAL
BAL/UNBAL
Hi-z
Low Cut
Gain
L
1
2
LINE
LINE
BAL/UNBAL
BAL/UNBAL
LINE
HI-Z
LINE
HI-Z
48V
R
40
20
40
20
40
20
(MONO)
(MONO)
BAL/UNBAL
BAL/UNBAL
R
R
R
PREMIUM ANALOG MIXER w/ PERKINS EQ & FIREWIRE
U
U
U
U
CTRL ROOM/PHONES
SOURCE
U
40
GAIN
60
U
-20dB +40dB
R
L
L
(MONO)
BAL/UNBAL
GAIN
60
U
-20dB +40dB
L
(MONO)
BAL/UNBAL
R
OUT
R/4
LINE IN 11-12
LINE
30
U
GAIN
60
U
-20dB +40dB
L
L/3
R
LINE IN 9-10
48V
30
U
GAIN
60
U
-20dB +40dB
4
L
LINE IN 7-8
BAL/UNBAL
75Hz
18dB/OCT
48V
30
U
GAIN
-20dB
GAIN
-20dB
+20dB
GAIN
-20dB
+20dB
-20dB
+20dB
0dB=0dBu
L
GAIN
SEND
SEND
SEND
-15
+15
-15
+15
1k
-15
+15
1k
+15
HIGH
12kHz
+15
-15
+15
10
+15
3
0
HIGH
12kHz
-15
TAPE
LINE
FW 1-2
U
HIGH
12kHz
-15
INPUT
6
EQ
U
CLIP
15
PRE
POST
EQ
U
HIGH
12kHz
SEND
PRE
POST
EQ
HIGH
12kHz
SEND
PRE
POST
U
EQ
HIGH
12kHz
SEND
PRE
POST
U
EQ
HIGH
1k
SEND
PRE
POST
U
EQ
12kHz
-15
SEND
PRE
POST
U
EQ
FW 1-2
12kHz
2
ALT 3-4
+15
-15
LEVEL
SET
4
1k
Level
Set
7
FREQ
100
8k
FREQ
100
U
8k
OO
MID
2.5kHz
U
LOW
80Hz
LOW
80Hz
-15
+15
LOW
80Hz
-15
+15
+15
AUX
AUX
1
1
1
1
1
1
1
1
MAX
MAX
2
OO
R
MAX
OO
R
MAX
2
MAX
PAN
L
OO
OO
R
MAX
OO
2
MAX
PAN
L
OO
OO
R
OO
2
MAX
MAX
R
MAX
PAN
L
R
OO
L
OO
R
L
MUTE
MUTE
MUTE
MUTE
MUTE
MUTE
ALT 3/4
ALT 3/4
ALT 3/4
ALT 3/4
ALT 3/4
ALT 3/4
dB
10
5
dB
10
5
- 20
U
5
dB
10
5
OL
- 20
U
5
dB
10
5
OL
- 20
U
5
dB
10
5
OL
- 20
dB
10
5
U
OL
5
OL
5
- 20
- 20
U
5
+15
MIC
- 20
OO
+10
2
dB
10
5
OL
+10
POWER
dB
10
5
U
OO
R
MUTE
OL
1
OO
RTN TO
AUX1
PAN
ALT 3/4
5
+15
2
PRE
POST
MAX
MUTE
dB
10
1
OO
2
PAN
RETURN
SEND
PRE
POST
MAX
2
OO
PAN
L
MAX
2
OO
PAN
L
MAX
ALT 3/4
U
AUX MASTER
+15
AUX
OO
RUDE
SOLO
80Hz
-15
AUX
MAX
MAX
OO
PHONES
LOW
80Hz
-15
AUX
OO
MAX
CONTROL
ROOM
U
AUX
MAX
30
+15
-15
OO
+15
20
MID
2.5kHz
+15
-15
U
10
ASSIGN TO
MAIN MIX
MID
2.5kHz
+15
-15
U
LOW
-15
+15
+15
-15
U
AUX
PAN
L
MID
2.5kHz
MID
80Hz
-15
U
AUX
2
OO
8k
LOW
80Hz
+15
U
+15
U
LOW
80Hz
U
U
-15
+15
U
LOW
-15
100
MID
-15
+15
U
+15
8k
FREQ
U
MID
-15
+15
U
-15
100
U
MID
-15
FREQ
Tape
R
20
+20dB
MAIN MIX
HIGH
Solo
3
LINE
BAL/UNBAL
75Hz
18dB/OCT
48V
30
20
PRE
POST
TAPE IN and TAPE OUT
L
IN
U
These EQ options allow a lot of adjustment to your
line-level sources and guitars. Apply EQ wisely and
carefully, like makeup. (Too much and things can turn
ugly.)
TAPE
YX MIC PRE
LINE IN 5-6
EQ
Use these RCA unbalanced stereo inputs to connect
the line-level outputs from sources such as tape decks,
CD/DVD players and iPod® docks. Engage the tape
switch to listen in your control room or phones. Engage
"assign to main mix" to add the sounds to the main mix.
For example, you can play intermission music, or listen
to rare reference material of your band getting it right.
2
YX MIC PRE
U
5
10
10
10
10
10
10
10
10
20
20
20
20
20
20
20
20
30
30
30
30
30
30
30
30
40
50
60
40
50
60
40
50
60
40
50
60
40
50
60
40
50
60
40
50
60
40
50
60
OO
OO
OO
OO
OO
OO
OO
OO
5
U
OL
OO
- 20
MAX
5
LEVEL
10
DESTINATION
20
30
PHONES
AUX
1-2
40
50
60
OO
TALKBACK
SOLO
SOLO
1
SOLO
2
SOLO
3
SOLO
4
SOLO
5-6
SOLO
7-8
SOLO
9-10
11-12
TALKBACK
MAIN MIX
Quick Start Guide 9
Aux 1 and Aux 2
AUX SEND 1 and 2
AUX RETURN 1 and 2
The 1/4" TRS aux sends on the rear panel allow you
to send balanced or unbalanced line-level outputs to
external effects devices or stage monitors, independent
of the main mix.
These 1/4" TRS stereo input connectors allow you to
add the stereo processed output from external effects
processors or other devices to the main mix. Adjust the
level of the incoming signals with the aux return master
controls.
Aux send 1 and aux send 2 are independent of each
other, so you can set up two separate aux mixes. The
aux 1 send output signal is the sum of all the channels
whose aux 1 send control is set to more than minimum.
The aux 2 send is the sum of all the channels whose aux
2 send control is set to more than minimum. The overall
aux output level can be adjusted with the aux send
master controls.
Alternatively, you can use these inputs to add any
stereo line-level signals to your main mix, so it could be
another line-level source, not just an effects
processor. If you are connecting a mono source, use the
left (mono) aux return input, and the mono signals will
appear on both sides of the main mix.
RETURN to AUX 1
AUX SEND 1-2 and FIREWIRE
The aux sends are always available as FireWire signals
13 and 14 to send to a computer. For example, you can
use your computer with audio production software and
effects plugins, as an effects host. This substitutes
wonderfully for an outboard hardware effects processor.
The signals going into aux return 2 can also be added
to aux send 1 by engaging the return to aux 1 switch.
For example, you could add the effects returned from
an external effects processor fed by aux send 2, to your
stage monitors fed by aux 1.
See page 16 for an example of setting up a software
effects processor using the aux sends and FireWire.
Performance will vary based on system hardware.
Aux Sends
PRE or POST
( PRE-FADER / PRE EQ
FIREWIRE
The aux sends can either be pre channel fader or post
channel fader, depending on the position of the pre/post
switches in the aux master section.
2
1
2
YX MIC PRE
ON
4
YX MIC PRE
ON
1
CTRL - RM OUT
MAIN OUT
ALT 3-4 OUT
BAL/UNBAL
BAL/UNBAL
BAL/UNBAL
L
L
1
2
LINE
LINE
BAL/UNBAL
BAL/UNBAL
LINE
HI-Z
LINE
HI-Z
48V
R
40
20
L
40
GAIN
60
U
-20dB +40dB
20
40
GAIN
60
U
-20dB +40dB
(MONO)
(MONO)
BAL/UNBAL
BAL/UNBAL
20
R
R
PREMIUM ANALOG MIXER w/ PERKINS EQ & FIREWIRE
U
U
U
U
CTRL ROOM/PHONES
SOURCE
U
40
GAIN
60
U
-20dB +40dB
R
GAIN
60
U
-20dB +40dB
R
L
L
(MONO)
BAL/UNBAL
30
U
L
(MONO)
BAL/UNBAL
R
OUT
R/4
LINE IN 11-12
48V
30
U
L
L/3
R
LINE IN 9-10
LINE
48V
30
U
4
L
LINE IN 7-8
BAL/UNBAL
75Hz
18dB/OCT
48V
30
20
3
LINE
BAL/UNBAL
75Hz
18dB/OCT
GAIN
-20dB
GAIN
-20dB
+20dB
GAIN
-20dB
+20dB
-20dB
+20dB
0dB=0dBu
L
GAIN
SEND
SEND
PRE
POST
U
PRE
POST
U
EQ
U
1k
+15
3
0
HIGH
12kHz
+15
-15
TAPE
LINE
FW 1-2
U
HIGH
12kHz
+15
-15
10
6
EQ
U
HIGH
12kHz
CLIP
15
INPUT
PRE
POST
EQ
U
HIGH
+15
-15
SEND
PRE
POST
EQ
U
EQ
12kHz
-15
+15
1k
SEND
PRE
POST
HIGH
12kHz
-15
+15
U
HIGH
12kHz
-15
SEND
PRE
POST
EQ
HIGH
12kHz
+15
1k
SEND
PRE
POST
EQ
HIGH
-15
SEND
R
20
+20dB
MAIN MIX
SEND
Aux Returns
TAPE
YX MIC PRE
LINE IN 5-6
FW 1-2
12kHz
2
ALT 3-4
+15
-15
LEVEL
SET
4
1k
7
FREQ
100
8k
FREQ
100
8k
OO
MID
+15
-15
80Hz
80Hz
+15
LOW
80Hz
-15
+15
LOW
80Hz
-15
+15
+15
AUX
AUX
AUX
1
1
1
1
MAX
MAX
MAX
2
OO
R
OO
MAX
OO
R
MAX
2
MAX
PAN
L
OO
OO
R
MAX
OO
2
MAX
PAN
L
OO
OO
R
OO
2
MAX
MAX
R
L
R
1
OO
R
L
MUTE
MUTE
MUTE
MUTE
MUTE
MUTE
MUTE
ALT 3/4
ALT 3/4
ALT 3/4
ALT 3/4
ALT 3/4
ALT 3/4
dB
10
5
dB
10
5
OL
- 20
U
5
dB
10
5
OL
- 20
U
5
dB
10
5
OL
- 20
U
5
dB
10
5
OL
- 20
dB
10
5
U
OL
5
OL
5
- 20
- 20
U
5
+15
MIC
- 20
OO
+10
2
dB
10
5
OL
+10
POWER
dB
10
5
U
OO
R
ALT 3/4
5
1
OO
RTN TO
AUX1
PAN
MUTE
U
+15
2
PRE
POST
MAX
ALT 3/4
dB
10
OO
2
PAN
L
1
PRE
POST
MAX
RETURN
SEND
AUX
OO
MAX
PAN
AUX MASTER
+15
2
OO
PAN
L
MAX
2
OO
PAN
L
MAX
RUDE
SOLO
80Hz
-15
AUX
1
MAX
OO
PHONES
LOW
80Hz
-15
AUX
1
OO
30
MAX
OO
CONTROL
ROOM
U
AUX
MAX
2.5kHz
+15
-15
U
LOW
20
MID
2.5kHz
+15
-15
U
10
ASSIGN TO
MAIN MIX
MID
2.5kHz
+15
-15
U
LOW
-15
MID
2.5kHz
MID
U
+15
U
+15
U
1
PAN
L
8k
-15
LOW
-15
U
U
80Hz
+15
U
AUX
2
OO
100
MID
+15
U
LOW
-15
+15
8k
FREQ
U
-15
+15
U
80Hz
Aux 1
Aux 2
100
MID
-15
LOW
-15
FREQ
U
MID
+15
U
U
5
10
10
10
10
10
10
10
10
20
20
20
20
20
20
20
20
30
30
30
30
30
30
30
30
40
50
60
40
50
60
40
50
60
40
50
60
40
50
60
40
50
60
40
50
60
40
50
60
OO
OO
OO
OO
OO
OO
OO
OO
5
U
OL
OO
- 20
MAX
5
LEVEL
10
DESTINATION
20
30
PHONES
AUX
1-2
40
50
60
OO
TALKBACK
SOLO
SOLO
1
10 Onyx 1220i
ON
AUX RETURN
L BAL/UNBAL R
2
R
MIC
IN
U
The pre-fader aux sends are post-EQ, so they are
affected by the channel EQ controls. The circuit boards
can be modified so the pre-fader aux sends are pre-EQ
instead of post-EQ. For example, your stage monitors
will not be affected by any channel EQ adjustments.
This modification can be done by an authorized service
center. Contact our technical support chaps for details.
3
YX MIC PRE
1
+ 4dB
MAIN OUTPUT
LEVEL
ON
TIP SEND / RING RETURN )
CHANNEL INSERT
3
2
4
L
BAL/UNBAL
-15
Modification: Pre-EQ Aux Sends
AUX SEND
1
BALANCED
R
For stage monitor work, use PRE, so the stage
monitors do not increase in volume when the channel
fader is adjusted. This allows you to set up the
monitor mix and levels just right, and not have it change
every time a channel level is adjusted. Stage monitors
can either be passive speakers powered by an external
amplifier, or powered speakers with their own amplifier.
For external processors, use POST. In this way, the
feed to external processors will vary in level if the
channel fader is adjusted. For example, the level of any
returned effect (like an echo) will also change if the
channel level is changed, keeping them in the same
ratio (wet/dry).
MAIN OUT
POWER
SOLO
2
SOLO
3
SOLO
4
SOLO
5-6
SOLO
7-8
SOLO
9-10
11-12
TALKBACK
Pre/Post
Aux Send Masters
MAIN MIX
Aux Return
Masters
Return to Aux 1
Control Room/Phones/Meters
CONTROL ROOM OUTPUTS
Assign to Main Mix
The 1/4" TRS stereo control room outputs can be used
to run a separate sound system in a control room or a
different zone. Connect these outputs to the line-level
inputs of an amplifier running passive studio monitors,
or to the inputs of powered studio monitors.
Except for the main mix, whatever is selected as a
source for your control room and phones can also be
routed to the main mix by pressing this switch. The
main mix does not play in the control room or phones if
this switch is engaged.
The headphones play the same program material as
the control room. The meters show the levels prior to
the control room and phones level controls.
CONTROL ROOM/PHONES SOURCE
The source that plays in the control room,
headphones, and meters is selected using the switches
in the control room/phones source matrix:
•
Main mix
•
Tape
•
Alt 3-4
•
FW 1-2: The stereo FireWire 1-2 output from
your computer
•
A combination of all four above
If you do not select one of these, there will be no
sound in the control room or phones, and no indication
on the meters (unless a solo button is engaged).
SOLO
Whenever solo is engaged, all control room/
headphone source selections (main mix, alt 3-4, tape,
and FireWire) are defeated, and you will only hear the
soloed channel(s) in the headphones and control room.
This gives you the opportunity to audition the channels
before they are added to the main mix or alt 3-4 mix.
The main mix continues to play, so the show can still go
on during solo.
When a channel is soled, you can adjust the channel
gain until your input source reaches the 0 dB LED in the
right meter.
Solo signals reaching the headphones and control
room are not affected by the channel level or main level,
therefore turn down the phones level and control room
level first, as soloed channels may be loud.
Main Mix
Select main mix to listen to the main mix in the
control room or headphones. The meters show the level
after the main mix fader.
Control Room
Outputs
Tape
1
ON
Select tape to listen to the RCA tape input in the
control room or headphones. The meters show the level
coming in from your tape or CD player. Press assign to
main mix to play intermission music in your main mix.
2
YX MIC PRE
ON
3
YX MIC PRE
ON
4
YX MIC PRE
ON
CTRL - RM OUT
MAIN OUT
ALT 3-4 OUT
BAL/UNBAL
BAL/UNBAL
BAL/UNBAL
TAPE
L
YX MIC PRE
IN
L
R
LINE IN 5-6
1
2
LINE
LINE
BAL/UNBAL
BAL/UNBAL
LINE
HI-Z
LINE
HI-Z
48V
40
20
40
20
(MONO)
(MONO)
BAL/UNBAL
BAL/UNBAL
40
20
U
U
CTRL ROOM/PHONES
SOURCE
U
40
GAIN
60
U
-20dB +40dB
Headphones
R
R
PREMIUM ANALOG MIXER w/ PERKINS EQ & FIREWIRE
U
U
GAIN
60
U
-20dB +40dB
R
R
L
L
(MONO)
BAL/UNBAL
R
30
U
GAIN
60
U
-20dB +40dB
L
(MONO)
BAL/UNBAL
48V
30
U
GAIN
L
OUT
R/4
LINE IN 11-12
LINE
48V
30
U
60
U
-20dB +40dB
4
L/3
R
LINE IN 9-10
BAL/UNBAL
75Hz
18dB/OCT
48V
30
20
3
LINE
BAL/UNBAL
75Hz
18dB/OCT
L
LINE IN 7-8
GAIN
-20dB
GAIN
-20dB
+20dB
GAIN
-20dB
+20dB
-20dB
+20dB
0dB=0dBu
L
GAIN
SEND
SEND
PRE
POST
U
PRE
POST
U
EQ
-15
+15
1k
-15
+15
1k
-15
+15
1k
+15
+15
-15
+15
+15
FW 1-2
12kHz
3
2
ALT 3-4
+15
-15
LEVEL
SET
4
1k
7
FREQ
Alt 3-4
100
8k
FREQ
100
U
8k
U
FW 1-2
+15
OO
MAX
+15
OO
MAX
AUX
OO
MAX
R
L
R
-15
+15
OO
MAX
MAX
L
+15
OO
MAX
MAX
L
+15
OO
MAX
MAX
OO
MAX
MAX
OO
MAX
MAX
L
MUTE
MUTE
MUTE
MUTE
MUTE
MUTE
MUTE
ALT 3/4
ALT 3/4
ALT 3/4
ALT 3/4
ALT 3/4
ALT 3/4
dB
10
dB
10
dB
10
dB
10
5
5
5
5
5
5
5
U
U
U
U
U
U
U
OL
- 20
5
OL
- 20
5
OL
- 20
5
OL
- 20
OL
5
OL
5
- 20
- 20
5
OO
OL
- 20
+10
+15
OO
+10
2
POWER
MIC
dB
10
5
U
5
1
OO
RTN TO
AUX1
R
ALT 3/4
dB
10
+15
Assign to Main Mix
Phones Level
Control Room
Level
PAN
MUTE
dB
10
OO
2
PRE
POST
MAX
RETURN
1
PRE
POST
2
OO
R
RUDE
SOLO
SEND
1
PAN
L
MAX
AUX MASTER
AUX
2
OO
R
+15
1
PAN
L
-15
AUX
2
OO
R
+15
1
PAN
L
-15
OO
PHONES
80Hz
ALT 3/4
dB
10
MAX
LOW
80Hz
AUX
2
OO
R
-15
1
PAN
LOW
80Hz
AUX
2
OO
R
-15
1
PAN
30
CONTROL
ROOM
U
LOW
80Hz
AUX
2
OO
2.5kHz
+15
-15
U
U
LOW
80Hz
1
PAN
2.5kHz
+15
-15
20
MID
OO
U
LOW
AUX
2
PAN
L
MAX
1
2
MAX
OO
AUX
1
OO
+15
MID
2.5kHz
+15
-15
10
ASSIGN TO
MAIN MIX
+15
U
80Hz
-15
+15
-15
U
MID
2.5kHz
LOW
80Hz
U
MID
MID
-15
+15
U
LOW
-15
U
8k
MID
-15
+15
U
80Hz
-15
100
U
U
MID
-15
+15
8k
FREQ
U
LOW
Select alt 3-4 to listen to the alt 3-4 mix in the control
room or headphones. This is a stereo mix of any
channels that have their mute/alt 3-4 switch engaged.
This can be used for cueing up sources prior to "going
live," and for other useful reasons. The meters show the
level of the alt 3-4 output.
100
U
MID
-15
FREQ
Control Room/
Phones Source
0
HIGH
12kHz
-15
TAPE
LINE
FW 1-2
U
HIGH
12kHz
-15
10
6
EQ
U
HIGH
12kHz
CLIP
15
INPUT
PRE
POST
EQ
U
HIGH
12kHz
SEND
PRE
POST
EQ
HIGH
12kHz
SEND
PRE
POST
U
EQ
HIGH
12kHz
SEND
PRE
POST
U
EQ
HIGH
12kHz
SEND
PRE
POST
U
EQ
HIGH
-15
SEND
R
20
+20dB
MAIN MIX
SEND
5
10
10
10
10
10
10
10
10
20
20
20
20
20
20
20
20
30
30
30
30
30
30
30
30
40
50
60
40
50
60
40
50
60
40
50
60
40
50
60
40
50
60
40
50
60
40
50
60
OO
OO
OO
OO
OO
OO
OO
OO
dB
10
5
U
OL
OO
- 20
MAX
5
LEVEL
10
DESTINATION
20
30
PHONES
AUX
1-2
40
50
60
OO
TALKBACK
SOLO
SOLO
1
SOLO
2
SOLO
3
SOLO
4
SOLO
5-6
SOLO
7-8
SOLO
9-10
11-12
TALKBACK
MAIN MIX
Select FW 1-2 to listen in the control room or
headphones to the FireWire 1 and 2 audio streams
coming from your computer. The meters will show the
levels of the signals coming in from your computer.
Quick Start Guide 11
Main Mix
XLR MAIN OUTPUTS
MAIN MIX and FIREWIRE
The male XLR output connectors provide a balanced
line-level signal that represents the end of the mixer
chain, where your fully mixed stereo main mix signals
enter the real world. Connect these outputs to the
inputs of your main power amplifiers, powered
speakers, or serial effects processor (or a graphic
equalizer or compressor/limiter). The output provides a
fully balanced signal playing the same program material
as the 1/4" TRS main outs.
The main mix can be sent to your computer via two
dedicated Firewire signals. The output is not affected by
the main mix fader, allowing you to record the main mix
of live performances. The left main mix will appear on
FireWire output channel 15, and the right on
channel 16.
MAIN OUTPUT LEVEL (+4 dB/MIC)
When this recessed switch is out (+4 dB), the XLR
main outputs provide a "+4 dBu" line-level signal. You
can then connect these outputs to the line-level inputs
of power amplifiers, powered loudspeakers, or serial
processors. In a studio setting, you could connect the
main mix to the inputs of a professional stereo recorder.
In addition to recording the main mix using FireWire,
you can record individual channels using FireWire, for
studio mixing at a later date. See page 15.
TAPE OUT
This RCA unbalanced output is a copy of the main mix
(post fader). You can use it to record the main mix on
an analog tape deck for example.
When the switch is pushed in (mic), the XLR main
outputs are attenuated to microphone level. You can
then connect these outputs safely to the microphone
inputs of another mixer, providing a submix for
keyboards or drums, for example, in a live sound
application. The main outputs can then be plugged
directly into a stage snake, and appear back at the front
of house console like any other microphone level source.
When mic is engaged, you can safely plug the XLR
main output into another mixer's microphone input,
even if it provides 48 V phantom power.
( PRE-FADER / PRE EQ
FIREWIRE
MAIN OUT
R
2
2
1
L
MIC
1/4" TRS Main Outputs Tape Out
1
ON
2
YX MIC PRE
ON
3
YX MIC PRE
ON
4
YX MIC PRE
ON
CTRL - RM OUT
MAIN OUT
ALT 3-4 OUT
BAL/UNBAL
BAL/UNBAL
BAL/UNBAL
TAPE
L
YX MIC PRE
IN
1
2
LINE
LINE
BAL/UNBAL
BAL/UNBAL
LINE
HI-Z
LINE
HI-Z
48V
3
R
40
20
40
60
U
-20dB +40dB
20
40
(MONO)
(MONO)
BAL/UNBAL
BAL/UNBAL
R
20
R
R
PREMIUM ANALOG MIXER w/ PERKINS EQ & FIREWIRE
U
U
U
U
CTRL ROOM/PHONES
SOURCE
U
40
GAIN
60
U
-20dB +40dB
R
L
L
(MONO)
BAL/UNBAL
GAIN
60
U
-20dB +40dB
L
(MONO)
BAL/UNBAL
R
OUT
R/4
LINE IN 11-12
LINE
30
U
GAIN
60
U
-20dB +40dB
L
L/3
R
LINE IN 9-10
48V
30
U
GAIN
L
LINE IN 7-8
BAL/UNBAL
75Hz
18dB/OCT
48V
30
U
4
LINE
BAL/UNBAL
75Hz
18dB/OCT
48V
30
20
GAIN
-20dB
GAIN
-20dB
+20dB
GAIN
-20dB
+20dB
-20dB
+20dB
0dB=0dBu
L
GAIN
SEND
SEND
PRE
POST
U
PRE
POST
U
EQ
U
1k
+15
3
0
HIGH
12kHz
+15
-15
TAPE
LINE
FW 1-2
U
HIGH
12kHz
+15
-15
10
6
EQ
U
HIGH
12kHz
CLIP
15
INPUT
PRE
POST
EQ
U
HIGH
+15
-15
SEND
PRE
POST
EQ
U
EQ
12kHz
-15
+15
1k
SEND
PRE
POST
HIGH
12kHz
-15
+15
U
HIGH
12kHz
-15
SEND
PRE
POST
EQ
HIGH
12kHz
+15
1k
SEND
PRE
POST
EQ
HIGH
-15
SEND
R
20
+20dB
MAIN MIX
SEND
FW 1-2
12kHz
2
ALT 3-4
+15
-15
LEVEL
SET
4
1k
7
FREQ
100
8k
FREQ
100
U
8k
MID
2.5kHz
80Hz
80Hz
+15
LOW
80Hz
-15
+15
LOW
80Hz
-15
+15
80Hz
-15
+15
AUX
AUX
AUX
AUX
1
1
1
1
1
MAX
MAX
2
OO
R
MAX
OO
R
MAX
2
MAX
PAN
L
OO
OO
R
MAX
OO
2
MAX
PAN
L
OO
OO
R
OO
2
MAX
MAX
R
MAX
PAN
L
R
OO
L
OO
R
L
MUTE
MUTE
MUTE
MUTE
MUTE
MUTE
ALT 3/4
ALT 3/4
ALT 3/4
ALT 3/4
ALT 3/4
ALT 3/4
dB
10
dB
10
dB
10
dB
10
dB
10
dB
10
dB
10
dB
10
5
5
5
5
5
5
5
5
5
- 20
5
- 20
U
5
OL
- 20
U
5
OL
- 20
U
OL
5
U
OL
5
- 20
- 20
U
5
OL
- 20
OO
+15
+10
OO
+10
2
POWER
R
MUTE
OL
1
OO
RTN TO
AUX1
PAN
ALT 3/4
U
+15
2
PRE
POST
MAX
MUTE
OL
1
OO
2
PAN
RETURN
SEND
PRE
POST
MAX
2
OO
PAN
L
MAX
2
OO
PAN
L
MAX
ALT 3/4
U
AUX MASTER
+15
AUX
1
OO
RUDE
SOLO
80Hz
-15
AUX
MAX
MAX
OO
PHONES
LOW
1
OO
MAX
OO
CONTROL
ROOM
U
AUX
MAX
30
+15
-15
U
LOW
20
MID
2.5kHz
+15
-15
U
LOW
-15
MID
2.5kHz
+15
-15
U
10
ASSIGN TO
MAIN MIX
1
PAN
L
MID
+15
-15
U
+15
U
+15
U
2.5kHz
MID
-15
LOW
-15
U
U
MID
+15
80Hz
+15
U
8k
AUX
2
OO
100
U
LOW
-15
FREQ
U
80Hz
+15
8k
-15
+15
U
LOW
OO
100
MID
-15
+15
U
-15
FREQ
U
MID
-15
12 Onyx 1220i
1
Main Output Level +4dB/Mic
L
If the gain of each channel has been set up correctly
for all your microphones, line-level sources, guitars, and
so on, then these channels can be added to the main
mix by careful adjustment of the channel faders. The
main mix fader is then used to turn the complete main
mix level up and down.
R
AUX RETURN
L BAL/UNBAL R
XLR Main Outputs
LINE IN 5-6
This is the main stereo fader that adjusts the level of
the XLR and 1/4" main outputs, and the tape output. It
does not affect the FireWire output of the main mix.
CHANNEL INSERT
3
2
+ 4dB
MAIN OUTPUT
LEVEL
1/4" TRS MAIN OUTPUTS
MAIN MIX FADER
TIP SEND / RING RETURN )
4
L
BAL/UNBAL
The switch is recessed, to reduce the chance of
accidently turning it on or off when plugging things in.
These 1/4" TRS output connectors provide the
balanced or unbalanced line-level output of the main
mix. This is the same signal that appears at the XLR
main outputs, except it is not affected by the main
output level switch.
AUX SEND
1
BALANCED
POWER
U
5
10
10
10
10
10
10
10
10
20
20
20
20
20
20
20
20
30
30
30
30
30
30
30
30
40
50
60
40
50
60
40
50
60
40
50
60
40
50
60
40
50
60
40
50
60
40
50
60
OO
OO
OO
OO
OO
OO
OO
OO
MIC
dB
10
5
U
OL
OO
- 20
MAX
5
LEVEL
10
DESTINATION
20
30
PHONES
AUX
1-2
40
50
60
OO
TALKBACK
SOLO
SOLO
1
SOLO
2
SOLO
3
SOLO
4
SOLO
5-6
SOLO
7-8
SOLO
9-10
11-12
TALKBACK
MAIN MIX
Main Mix Fader
Alt 3-4
MUTE/ALT 3-4 SWITCHES
Every time a bell rings, an Angel gets its wings. In a
similar way, every time a mute switch is pressed, that
channel is muted in the main mix and appears in the
alt 3-4 outputs instead.
If you just want to mute the channels, then don't
connect the alt 3-4 outputs to anything.
Muted channels can still be soloed to audition them
in the headphones and control room, and to adjust and
check the channel gain levels.
ALT 3-4 OUTPUTS
These 1/4" TRS jacks provide a balanced line-level
signal that can provide an alternate stereo mix for
recording or subgrouping.
Connect these outputs to the inputs of an amplifier,
powered speaker, or recording device. If you want to
think up some good uses for the alt 3-4 outputs then go
ahead.
For example, these outputs could be used to send
particular channels to another zone, or you could create
a sub-mix of several drum microphones. The alt 3-4
submix can then be routed to the control room and
phones, by pressing the control room alt 3-4 switch, and
then added to the main mix with the control room
"assign to main mix" switch.
The alt 3-4 output doesn’t have a master level control.
All the channels assigned to the alt 3-4 bus are summed
together (post-fader and pan) and sent directly to the
alt 3-4 out.
Alt 3-4 outputs
1
ON
2
YX MIC PRE
ON
3
YX MIC PRE
ON
4
YX MIC PRE
ON
CTRL - RM OUT
MAIN OUT
ALT 3-4 OUT
BAL/UNBAL
BAL/UNBAL
BAL/UNBAL
TAPE
L
YX MIC PRE
IN
L
R
LINE IN 5-6
1
2
LINE
LINE
BAL/UNBAL
BAL/UNBAL
LINE
HI-Z
LINE
HI-Z
48V
30
20
3
40
20
40
60
U
-20dB +40dB
20
60
U
-20dB +40dB
(MONO)
(MONO)
(MONO)
BAL/UNBAL
BAL/UNBAL
BAL/UNBAL
40
20
R
R
PREMIUM ANALOG MIXER w/ PERKINS EQ & FIREWIRE
U
U
U
U
CTRL ROOM/PHONES
SOURCE
U
40
GAIN
60
U
-20dB +40dB
R
GAIN
60
U
-20dB +40dB
R
L
L
(MONO)
BAL/UNBAL
30
U
GAIN
L
LINE
R
OUT
R/4
LINE IN 11-12
48V
30
U
GAIN
L
R
LINE IN 9-10
BAL/UNBAL
75Hz
18dB/OCT
48V
30
U
4
LINE
BAL/UNBAL
75Hz
18dB/OCT
48V
L
LINE IN 7-8
L/3
GAIN
-20dB
GAIN
-20dB
+20dB
GAIN
-20dB
+20dB
-20dB
+20dB
0dB=0dBu
L
GAIN
SEND
SEND
PRE
POST
U
1k
1k
1k
+15
3
0
HIGH
12kHz
+15
-15
TAPE
LINE
FW 1-2
U
HIGH
12kHz
+15
10
6
EQ
U
HIGH
-15
INPUT
PRE
POST
EQ
U
12kHz
+15
-15
SEND
PRE
POST
EQ
HIGH
12kHz
-15
+15
SEND
PRE
POST
U
EQ
HIGH
12kHz
-15
+15
SEND
PRE
POST
U
EQ
HIGH
12kHz
-15
+15
SEND
PRE
POST
U
EQ
HIGH
12kHz
-15
SEND
PRE
POST
U
EQ
HIGH
CLIP
15
MAIN MIX
SEND
R
20
+20dB
FW 1-2
12kHz
2
ALT 3-4
+15
-15
LEVEL
SET
4
1k
7
FREQ
100
8k
FREQ
100
U
8k
Mute/Alt 3-4
switches
MID
2.5kHz
LOW
80Hz
LOW
80Hz
-15
+15
LOW
80Hz
-15
+15
+15
80Hz
-15
AUX
AUX
AUX
AUX
1
1
1
1
1
1
1
1
MAX
MAX
OO
MAX
2
OO
R
MAX
OO
R
MAX
2
MAX
PAN
L
OO
OO
R
MAX
OO
2
MAX
PAN
L
OO
OO
R
OO
2
MAX
MAX
R
MAX
PAN
L
R
OO
L
OO
R
L
MUTE
MUTE
MUTE
MUTE
MUTE
MUTE
ALT 3/4
ALT 3/4
ALT 3/4
ALT 3/4
ALT 3/4
ALT 3/4
dB
10
dB
10
dB
10
dB
10
dB
10
dB
10
dB
10
dB
10
5
5
5
5
5
5
5
5
5
- 20
5
- 20
U
5
OL
- 20
U
5
OL
- 20
U
OL
5
U
OL
5
- 20
- 20
U
5
OL
- 20
OO
+15
+10
OO
+10
2
POWER
R
MUTE
OL
1
OO
RTN TO
AUX1
PAN
ALT 3/4
U
+15
2
PRE
POST
MAX
MUTE
OL
1
OO
2
PAN
RETURN
SEND
PRE
POST
MAX
2
OO
PAN
L
MAX
2
OO
PAN
L
MAX
ALT 3/4
U
AUX MASTER
+15
AUX
OO
RUDE
SOLO
PHONES
LOW
80Hz
-15
MAX
OO
CONTROL
ROOM
U
AUX
MAX
30
MAX
OO
+15
20
+15
-15
U
AUX
PAN
L
MID
2.5kHz
+15
-15
U
LOW
80Hz
-15
MID
2.5kHz
+15
-15
U
10
ASSIGN TO
MAIN MIX
AUX
2
OO
MID
+15
-15
U
+15
U
+15
U
2.5kHz
MID
-15
LOW
-15
U
U
80Hz
+15
U
8k
MID
+15
LOW
80Hz
OO
100
U
LOW
-15
FREQ
U
-15
+15
U
+15
8k
MID
-15
+15
U
-15
100
U
MID
-15
FREQ
Control Room/
Phones Source
Alt 3-4
Assign to Main
Mix
U
5
10
10
10
10
10
10
10
10
20
20
20
20
20
20
20
20
30
30
30
30
30
30
30
30
40
50
60
40
50
60
40
50
60
40
50
60
40
50
60
40
50
60
40
50
60
40
50
60
OO
OO
OO
OO
OO
OO
OO
OO
MIC
dB
10
5
U
OL
OO
- 20
MAX
5
LEVEL
Main Mix Level
10
DESTINATION
20
30
PHONES
AUX
1-2
40
50
60
OO
TALKBACK
SOLO
SOLO
1
SOLO
2
SOLO
3
SOLO
4
SOLO
5-6
SOLO
7-8
SOLO
9-10
11-12
TALKBACK
MAIN MIX
Quick Start Guide 13
Talkback
The mixer's built-in microphone allows you to talk to
the band through the phones outputs or stage monitors.
This can often be charming, pleasant, informative, and
enlightening.
TALKBACK MIC
The omni-directional dynamic microphone will pick
up your voice from anywhere in front of the mixer. Any
hint of exasperation and despair in your voice will be
faithfully picked up.
TALKBACK Switch
Press this switch in to talk. This is a momentary
switch, and as long as you hold it in, talkback is
activated.
DESTINATION: PHONES, AUX 1-2
Push in the phones talkback destination switch to
communicate with the talent in the studio through the
headphones during a recording session.
The aux 1-2 talkback destination switch routes the
talkback signal to the aux send 1 and 2 outputs. Use this
to communicate with the musicians through their stage
monitors when you are setting up a live performance.
In a studio, the aux out could be fed to the input of a
headphone amplifier feeding several sets of headphones.
It is fine to have both talkback destination switches
pushed in at the same time. If you don’t have either
switch pushed in, the talkback signal won’t go
anywhere.
When it is pressed in, the control room outputs are
attenuated (ducked) to allow your voice to come
through clearly.
Aux Sends
TALKBACK LEVEL
Use the talkback level knob to control the level of the
signal from the internal microphone.
( PRE-FADER / PRE EQ
FIREWIRE
MAIN OUT
AUX SEND
1
BALANCED
POWER
R
BAL/UNBAL
1. Start with this level turned down.
2
1
ON
2
YX MIC PRE
ON
3
YX MIC PRE
ON
4
YX MIC PRE
ON
1
AUX RETURN
L BAL/UNBAL R
2
R
1
L
+ 4dB
MAIN OUTPUT
LEVEL
2. Select the destination: either headphones
and/or aux 1-2, and make sure the phones level
or aux send master levels are set up nicely.
TIP SEND / RING RETURN )
CHANNEL INSERT
3
2
4
L
MIC
CTRL - RM OUT
MAIN OUT
ALT 3-4 OUT
BAL/UNBAL
BAL/UNBAL
BAL/UNBAL
TAPE
L
YX MIC PRE
IN
3. Press the talkback switch as you talk.
4. Slowly turn the talkback level knob up until
they can hear you in phones or monitors.
L
1
2
LINE
LINE
BAL/UNBAL
BAL/UNBAL
LINE
HI-Z
LINE
HI-Z
48V
30
20
40
20
4
40
20
L
(MONO)
(MONO)
(MONO)
BAL/UNBAL
BAL/UNBAL
BAL/UNBAL
R
40
20
U
U
CTRL ROOM/PHONES
SOURCE
U
40
GAIN
60
U
-20dB +40dB
Headphones
R
R
PREMIUM ANALOG MIXER w/ PERKINS EQ & FIREWIRE
U
U
GAIN
60
U
-20dB +40dB
R
L
L
(MONO)
BAL/UNBAL
R
OUT
R/4
LINE IN 11-12
LINE
30
U
GAIN
60
U
-20dB +40dB
L
L/3
R
LINE IN 9-10
48V
30
U
GAIN
L
LINE IN 7-8
BAL/UNBAL
75Hz
18dB/OCT
48V
30
U
60
U
-20dB +40dB
GAIN
-20dB
GAIN
-20dB
+20dB
GAIN
-20dB
+20dB
0dB=0dBu
L
GAIN
-20dB
+20dB
SEND
SEND
PRE
POST
U
EQ
U
1k
+15
U
3
0
HIGH
12kHz
+15
-15
TAPE
LINE
FW 1-2
HIGH
12kHz
+15
-15
10
6
EQ
U
HIGH
12kHz
CLIP
15
INPUT
PRE
POST
EQ
U
HIGH
+15
-15
SEND
PRE
POST
EQ
U
EQ
12kHz
-15
+15
1k
SEND
PRE
POST
HIGH
12kHz
-15
+15
U
HIGH
12kHz
-15
SEND
PRE
POST
EQ
HIGH
12kHz
+15
1k
SEND
PRE
POST
EQ
HIGH
-15
SEND
R
20
+20dB
MAIN MIX
SEND
U
FW 1-2
12kHz
2
ALT 3-4
+15
-15
LEVEL
SET
4
1k
7
FREQ
100
8k
FREQ
100
U
8k
OO
LOW
LOW
80Hz
+15
LOW
80Hz
-15
+15
LOW
80Hz
-15
+15
+15
AUX
AUX
AUX
1
1
1
1
MAX
MAX
MAX
2
OO
R
OO
MAX
OO
R
MAX
2
MAX
PAN
L
OO
OO
R
MAX
OO
2
MAX
PAN
L
OO
OO
R
OO
2
MAX
MAX
R
L
R
1
OO
R
L
MUTE
MUTE
MUTE
MUTE
MUTE
MUTE
MUTE
ALT 3/4
ALT 3/4
ALT 3/4
ALT 3/4
ALT 3/4
ALT 3/4
dB
10
dB
10
dB
10
dB
10
5
5
5
5
5
5
5
U
U
U
U
U
U
U
OL
- 20
5
OL
- 20
5
OL
- 20
5
OL
- 20
OL
5
OL
5
- 20
- 20
5
OL
- 20
+10
+15
OO
+10
2
POWER
MIC
dB
10
5
U
5
OO
R
ALT 3/4
dB
10
1
OO
RTN TO
AUX1
PAN
MUTE
dB
10
+15
2
PRE
POST
MAX
ALT 3/4
dB
10
OO
2
PAN
L
1
PRE
POST
MAX
RETURN
SEND
AUX
OO
MAX
PAN
AUX MASTER
+15
2
OO
PAN
L
MAX
2
OO
PAN
L
MAX
RUDE
SOLO
80Hz
-15
AUX
1
MAX
OO
PHONES
LOW
80Hz
-15
AUX
OO
30
MAX
OO
CONTROL
ROOM
U
1
MAX
2.5kHz
+15
-15
U
AUX
20
MID
2.5kHz
+15
-15
U
1
PAN
L
2.5kHz
+15
-15
10
ASSIGN TO
MAIN MIX
MID
AUX
2
OO
+15
-15
U
80Hz
-15
MID
2.5kHz
MID
U
+15
LOW
+15
U
MID
U
80Hz
-15
U
8k
-15
+15
LOW
+15
U
U
U
80Hz
-15
100
MID
-15
+15
U
+15
8k
MID
-15
+15
LOW
-15
100
FREQ
U
MID
-15
FREQ
U
U
Once you have set the level, you can leave it there for
the duration of the session or gig.
3
LINE
BAL/UNBAL
75Hz
18dB/OCT
48V
PRE
POST
5. Release the talkback switch when you are
finished talking.
R
LINE IN 5-6
5
10
10
10
10
10
10
10
10
20
20
20
20
20
20
20
20
30
30
30
30
30
30
30
30
40
50
60
40
50
60
40
50
60
40
50
60
40
50
60
40
50
60
40
50
60
40
50
60
OO
OO
OO
OO
OO
OO
OO
OO
dB
10
5
U
OL
OO
- 20
MAX
5
LEVEL
10
DESTINATION
20
30
PHONES
AUX
1-2
40
50
60
OO
TALKBACK
SOLO
SOLO
1
SOLO
2
SOLO
3
SOLO
4
SOLO
5-6
SOLO
7-8
SOLO
9-10
11-12
TALKBACK
MAIN MIX
Built-in Microphone
Destination
Talkback Switch
14 Onyx 1220i
Talkback
Level
FireWire Connections
FireWire
The mixer comes with a CD containing the PC driver
software needed to use your mixer's internal FireWire
interface. Macintosh OS X contains built-in drivers, and
no software installation is required.
Please check our website (www.mackie.com) for
any updated PC drivers that may exist. If one does,
download this installer and follow the instructions that
accompany the download. Otherwise, continue on with
the CD installation instructions listed below.
( PRE-FADER / PRE EQ
FIREWIRE
BAL/UNBAL
2
1
ON
2
YX MIC PRE
ON
1
2
LINE
LINE
BAL/UNBAL
BAL/UNBAL
LINE
HI-Z
LINE
HI-Z
48V
FW Pre
or Post
30
20
40
20
40
4. Click the Audio Devices tab, and select
Onyx-i in the “Properties For” drop-down box.
5. Here you can see the settings for the mixer.
You can also choose it as your default input or
output, as well as designate it to be used for
system sound output.
6. You’re ready to go with any Mac OS X Core
Audio host application (i.e., Tracktion, Logic,
Cubase, Nuendo, Live, Digital Performer, etc.).
MAIN OUT
ALT 3-4 OUT
BAL/UNBAL
BAL/UNBAL
BAL/UNBAL
R
4
20
40
LINE IN 7-8
L
L/3
R
LINE IN 9-10
L
TAPE
L
L
(MONO)
(MONO)
(MONO)
BAL/UNBAL
BAL/UNBAL
BAL/UNBAL
R
20
PREMIUM ANALOG MIXER w/ PERKINS EQ & FIREWIRE
U
U
U
U
CTRL ROOM/PHONES
SOURCE
U
40
GAIN
60
U
-20dB +40dB
Headphones
R
R
48V
GAIN
R
L
L
(MONO)
BAL/UNBAL
R
OUT
R/4
LINE IN 11-12
LINE
30
U
60
U
-20dB +40dB
L
BAL/UNBAL
48V
GAIN
60
U
-20dB +40dB
GAIN
-20dB
GAIN
-20dB
+20dB
GAIN
-20dB
+20dB
0dB=0dBu
L
GAIN
-20dB
+20dB
SEND
SEND
PRE
POST
U
PRE
POST
U
EQ
1k
1k
1k
+15
+15
+15
+15
FW 1-2
3
0
HIGH
12kHz
-15
TAPE
LINE
FW 1-2
U
HIGH
12kHz
-15
10
6
EQ
U
HIGH
FW 1-2
12kHz
2
ALT 3-4
+15
-15
LEVEL
SET
4
1k
7
FREQ
100
8k
FREQ
100
8k
-15
-15
+15
-15
+15
MAX
+15
OO
MAX
AUX
MAX
R
MAX
MAX
MAX
MAX
MAX
MAX
MAX
MAX
MAX
L
MUTE
MUTE
MUTE
MUTE
MUTE
MUTE
MUTE
ALT 3/4
ALT 3/4
ALT 3/4
ALT 3/4
ALT 3/4
ALT 3/4
dB
10
dB
10
dB
10
dB
10
5
5
5
5
5
5
5
U
U
U
U
U
U
U
OL
- 20
5
OL
- 20
5
OL
- 20
5
OL
- 20
OL
5
OL
5
- 20
- 20
5
OO
OL
- 20
1
OO
+10
OO
+10
RTN TO
AUX1
2
+15
2
POWER
MIC
dB
10
5
U
5
PRE
POST
+15
R
ALT 3/4
dB
10
OO
PAN
MUTE
dB
10
RETURN
1
PRE
POST
2
OO
R
RUDE
SOLO
SEND
1
PAN
L
MAX
OO
PHONES
AUX MASTER
AUX
2
OO
R
OO
1
PAN
L
+15
ALT 3/4
dB
10
MAX
80Hz
-15
AUX
2
OO
R
OO
1
PAN
L
+15
Assign to
main mix
LOW
80Hz
-15
AUX
2
OO
R
OO
1
PAN
L
+15
20
30
CONTROL
ROOM
LOW
80Hz
-15
AUX
2
OO
R
MAX
1
PAN
L
OO
AUX
2
MAX
PAN
L
OO
+15
U
LOW
80Hz
-15
10
ASSIGN TO
MAIN MIX
MID
2.5kHz
+15
-15
U
U
LOW
80Hz
+15
1
OO
U
MID
2.5kHz
+15
-15
OO
U
LOW
-15
AUX
2
MAX
PAN
R
MAX
U
MID
2.5kHz
+15
-15
+15
80Hz
OO
+15
-15
U
LOW
+15
1
OO
-15
+15
-15
AUX
1
U
MID
2.5kHz
MID
U
80Hz
-15
U
8k
U
LOW
80Hz
OO
FREQ
100
MID
U
LOW
+15
8k
U
MID
U
-15
OO
FREQ
100
U
Line/FW 1-2
CLIP
15
INPUT
PRE
POST
EQ
U
12kHz
-15
SEND
PRE
POST
EQ
HIGH
12kHz
-15
+15
SEND
PRE
POST
U
EQ
HIGH
12kHz
-15
SEND
PRE
POST
U
EQ
HIGH
12kHz
+15
SEND
PRE
POST
U
EQ
HIGH
-15
+15
SEND
R
20
+20dB
MAIN MIX
SEND
-15
4. In the details that follow, ignore any attempt
to connect to Windows Update to find the
software. Also ignore any warnings about the
software not having passed Windows testing.
Trust software from LOUD Technologies, Inc.
3. Go to the applications folder, open the utilities
folder, and double-click “Audio MIDI Setup.”
1
MIC
CTRL - RM OUT
75Hz
18dB/OCT
30
U
GAIN
12kHz
3. The Windows application (XP or Vista) will
start its "Found New Hardware" wizard.
2. Turn on your mixer.
3
LINE
30
U
60
U
-20dB +40dB
L
1. Connect a FireWire cable from your mixer to a
FireWire port on your Mac.
AUX RETURN
L BAL/UNBAL R
2
R
+ 4dB
YX MIC PRE
BAL/UNBAL
75Hz
18dB/OCT
48V
HIGH
2. Turn on your mixer.
INSTALLATION ON A MAC:
ON
LINE IN 5-6
2
9. In your audio software application, select and
activate all the inputs from the mixer and the
outputs to the mixer.
4
YX MIC PRE
L
1. Connect a FireWire cable from your mixer to a
FireWire port on your computer.
8. For Windows XP users, depending upon your
configuration, repeat steps 1-7 if prompted to
install a second driver.
ON
1
IN
MID
7. Select "Install," and the driver software should
be installed.
3
YX MIC PRE
TIP SEND / RING RETURN )
CHANNEL INSERT
3
2
4
L
MAIN OUTPUT
LEVEL
U
6. You will be prompted to insert the CD that
came with your mixer. Do so.
AUX SEND
1
BALANCED
R
INSTALLATION ON A PC:
5. Select "Locate and install driver software that
came with your device."
MAIN OUT
POWER
5
10
10
10
10
10
10
10
10
20
20
20
20
20
20
20
20
30
30
30
30
30
30
30
30
40
50
60
40
50
60
40
50
60
40
50
60
40
50
60
40
50
60
40
50
60
40
50
60
OO
OO
OO
OO
OO
OO
OO
OO
Aux
master
controls
dB
10
5
U
OL
OO
- 20
MAX
5
LEVEL
10
DESTINATION
20
30
PHONES
AUX
1-2
40
50
60
OO
TALKBACK
SOLO
SOLO
1
SOLO
2
SOLO
3
SOLO
4
SOLO
5-6
SOLO
7-8
SOLO
9-10
11-12
TALKBACK
MAIN MIX
7. In your audio software applications, select and
activate the inputs from the mixer and outputs
to the mixer.
FIREWIRE CONNECTIONS
Two FireWire connectors allow the transfer of
digital audio to and from your computer or digital audio
workstation (DAW). There are two identical connectors,
but you only need one. The other is used for connecting
additional devices if your mixer is using up your
computer's only FireWire connector. For example, you
could daisy-chain multiple Onyx 1220i mixers or add an
external hard drive since the FireWire connectors are
run in serial. Performance will vary based on system
hardware.
The FireWire interface provides the following outputs
to your computer:
•
Individual channels, tapped pre-fader, and
either pre-EQ, or post-EQ (your choice).
•
Aux send 1 and 2 for effects plug-in routing.
•
Left/right main mix. The left/right main mix at
the FireWire output is not affected by the main
mix fader (important for recording live).
Use FireWire to record a live performance directly
to your computer, then mixdown to a stereo mix later.
Or you can use it to turn your Onyx mixer into a highquality computer audio interface for your DAW.
Quick Start Guide 15
FireWire also provides a return for two channels from
your computer to your mixer:
•
•
•
These can be routed through the control
room/phones via the FW 1-2 button, to monitor
the computer audio through your control room
speakers or headphones (or through the main
speakers if assign to main mix is selected).
Alternatively, these same two channels can
be routed through channels 11 and 12, and
treated just like any other channel, with
adjustment for gain, EQ, level, and pan, as
well as to solo, and add to the main mix and
aux send 1 and 2. In this way, your stereo
computer source can be used alongside the
other channels as "just another source" in the
band, such as a virtual instrument, or the
output of a guitar going through
amp-modelling software. This routing is done
using the FW/line input selector switch on
channels 11/12.
CONTROL ROOM FW 1-2
If this is engaged, you can listen to FireWire 1 and 2
playback from your computer in the control room and
headphones. This can also be added to the main mix if
control room assign to main mix is engaged. See below.
ASSIGN TO MAIN MIX
Engage the control room FW 1-2 switch and the
"assign to main mix" switch to play two tracks directly
from your computer through the control room/phones
source matrix and into the main mix. This is great for
listening to iTunes® or other pre-recorded material from
your computer.
FireWire Connections
Note: Route the two channels from your
computer through the control room/
headphones or through channels 11 and 12.
Do not use both.
( PRE-FADER / PRE EQ
FIREWIRE
MAIN OUT
AUX SEND
1
BALANCED
POWER
R
CHANNEL INSERT
3
2
R
AUX RETURN
L BAL/UNBAL R
BAL/UNBAL
2
1
ON
2
YX MIC PRE
ON
3
YX MIC PRE
ON
4
YX MIC PRE
ON
1
2
1
L
+ 4dB
MAIN OUTPUT
LEVEL
FIREWIRE PRE/POST
TIP SEND / RING RETURN )
4
L
MIC
CTRL - RM OUT
MAIN OUT
ALT 3-4 OUT
BAL/UNBAL
BAL/UNBAL
BAL/UNBAL
TAPE
L
YX MIC PRE
IN
Each channel of the mixer can send a FireWire output
to your computer or DAW. The FireWire output from
each channel can be tapped before (pre) or after (post) FW Pre
or Post
the channel EQ. (The output is pre-fader.)
L
1
2
LINE
LINE
BAL/UNBAL
BAL/UNBAL
LINE
HI-Z
LINE
HI-Z
48V
30
20
40
20
40
SEND
SEND
40
(MONO)
(MONO)
BAL/UNBAL
BAL/UNBAL
20
U
U
CTRL ROOM/PHONES
SOURCE
U
40
GAIN
60
U
-20dB +40dB
Headphones
R
R
PREMIUM ANALOG MIXER w/ PERKINS EQ & FIREWIRE
U
U
GAIN
SEND
PRE
POST
U
GAIN
-20dB
SEND
PRE
POST
U
EQ
GAIN
-20dB
+20dB
GAIN
-20dB
+20dB
0dB=0dBu
L
GAIN
-20dB
+20dB
1k
1k
+15
12kHz
+15
-15
3
0
HIGH
12kHz
+15
-15
FW 1-2
10
TAPE
LINE
FW 1-2
U
HIGH
12kHz
+15
-15
INPUT
6
EQ
U
HIGH
FW 1-2
12kHz
2
ALT 3-4
+15
-15
LEVEL
SET
4
1k
7
FREQ
8k
FREQ
100
U
8k
-15
+15
MAX
OO
MAX
OO
MAX
PAN
R
MAX
OO
MAX
PAN
L
R
MAX
2
OO
MAX
L
R
MAX
OO
R
MAX
MAX
OO
MAX
R
MAX
PAN
L
R
OO
R
L
MUTE
MUTE
MUTE
MUTE
MUTE
MUTE
ALT 3/4
ALT 3/4
ALT 3/4
ALT 3/4
ALT 3/4
ALT 3/4
dB
10
5
dB
10
5
- 20
U
5
dB
10
5
OL
- 20
U
5
dB
10
5
OL
- 20
U
5
dB
10
5
OL
- 20
dB
10
5
U
OL
5
OL
5
- 20
- 20
U
5
+15
MIC
- 20
OO
+10
2
dB
10
5
OL
+10
POWER
dB
10
5
U
OO
R
MUTE
OL
1
OO
RTN TO
AUX1
PAN
ALT 3/4
5
+15
2
PRE
POST
MAX
MUTE
U
OO
2
PAN
L
1
PRE
POST
MAX
RETURN
SEND
1
OO
2
OO
PAN
L
MAX
RUDE
SOLO
AUX MASTER
AUX
1
OO
2
MAX
OO
PHONES
+15
ALT 3/4
dB
10
MAX
80Hz
-15
AUX
1
OO
2
PAN
L
AUX
1
OO
+15
U
5
10
10
10
10
10
10
10
10
20
20
20
20
20
20
20
20
30
30
30
30
30
30
30
30
40
50
60
40
50
60
40
50
60
40
50
60
40
50
60
40
50
60
40
50
60
40
50
60
OO
OO
OO
OO
OO
OO
OO
OO
5
U
OL
OO
- 20
MAX
5
LEVEL
10
DESTINATION
20
30
PHONES
AUX
1-2
40
50
60
OO
TALKBACK
SOLO
SOLO
1
SOLO
2
SOLO
3
SOLO
4
SOLO
5-6
SOLO
7-8
SOLO
9-10
Assign to
main mix
LOW
80Hz
-15
AUX
2
PAN
30
CONTROL
ROOM
LOW
80Hz
+15
20
+15
-15
U
LOW
-15
10
ASSIGN TO
MAIN MIX
MID
2.5kHz
U
U
80Hz
+15
1
OO
+15
-15
LOW
-15
AUX
1
OO
2
U
MID
2.5kHz
OO
U
80Hz
+15
AUX
1
OO
2
+15
-15
LOW
-15
U
MID
2.5kHz
+15
80Hz
+15
+15
-15
U
LOW
-15
AUX
1
MAX
-15
+15
80Hz
+15
U
MID
2.5kHz
MID
U
LOW
-15
AUX
OO
-15
+15
80Hz
U
8k
MID
U
LOW
+15
FREQ
100
U
MID
U
-15
8k
U
MID
-15
FREQ
100
U
Line/FW 1-2
CLIP
15
PRE
POST
EQ
U
R
20
+20dB
SEND
PRE
POST
EQ
HIGH
12kHz
-15
+15
SEND
PRE
POST
U
EQ
HIGH
12kHz
-15
SEND
PRE
POST
U
EQ
HIGH
12kHz
+15
SEND
PRE
POST
U
EQ
HIGH
-15
+15
100
L
16 Onyx 1220i
(MONO)
BAL/UNBAL
R
R
L
L
(MONO)
BAL/UNBAL
30
U
60
U
-20dB +40dB
L
LINE
R
OUT
R/4
LINE IN 11-12
MAIN MIX
1k
Channel 11 and 12 can either be fed from the
1/4" stereo line-level inputs, or by FireWire outputs
1 and 2 from your computer. This switch lets you choose
which to use. Either way, channels 11 and 12 receive
line-level analog audio signals just prior to the gain
control, so channel setup, gain adjustment and EQ
adjustment are the same for line or FireWire.
20
GAIN
60
U
-20dB +40dB
L
L/3
R
LINE IN 9-10
48V
30
U
GAIN
12kHz
INPUT (LINE or FW 1-2)
4
L
LINE IN 7-8
BAL/UNBAL
75Hz
18dB/OCT
48V
30
U
60
U
-20dB +40dB
-15
If you would rather record the straight signals from a
live performance, and EQ them later in your DAW, then
set this switch to pre. This is good for live work, where
you may have added EQ to adjust for the room, and yet
not want this added to your recording.
3
LINE
BAL/UNBAL
75Hz
18dB/OCT
48V
HIGH
If you want the mixer EQ to affect the FireWire
recording, then set this switch to post. This is useful
in recording channels in a studio (where the recording
includes the beneficial effect of our Perkins EQ).
R
LINE IN 5-6
11-12
TALKBACK
MAIN MIX
Aux
master
controls
AUX SEND 1-2
Post-Fader FireWire Sends
A direct copy of the aux send 1 and 2 outputs can
be sent via FireWire to your computer. This makes it
possible to use a software effects processor instead of an
expensive external processor.
The post-EQ channel FireWire sends are pre-fader,
but the circuit boards can be modified so that they are
post-fader instead. This allows the channel fader to
control the level of the FireWire sends from each
channel.
To setup a software effects processor:
•
Set up an aux send in post mode, by pressing
the post switch in the aux master section.
•
Aux send FireWire outputs 13 and 14 are
available for your computer.
•
Pass this through your audio production
software running effects plugins.
•
Return the processed output to mixer channels
11 and 12 (input switch set to FW 1-2).
•
Alternatively bring the processed sounds into
the control room (engage FW 1-2) and add it to
the main mix (engage assign to main mix).
•
You can even use the computer as two separate
independent mono in, stereo out processors.
Have aux 1 go into one plugin, and aux 2 go into
a different one. The stereo outputs of both
plugins are combined back into the stereo
stream coming back to the mixer. Again,
performance will vary based on system
hardware.
MAIN MIX
The left and right main mix is always available on
FireWire channels 15 and 16 to send to your computer.
For example, you can record the live performance main
mix onto your computer. The output level to your
computer is not affected by the main mix level control.
Modifications:
The following FireWire modifications can be done by
an authorized service center. Authorized service centers
may be found online at:
www.mackie.com/scripts/service_centers/search.asp
Please contact our technical support department if you
are having trouble finding an authorized service center
in your area.
Post-Insert FireWire Sends
The pre-EQ channel FireWire sends are pre-insert,
but the circuit boards can be modified so that they are
post-insert instead. This allows for the use of an
external processor on the mic signal, sending the result
to the FireWire, while still pre-EQ.
Quick Start Guide 17
Technical Information
Specifications
Noise Characteristics:
Distortion (THD+N):
Equivalent Input Noise (EIN), mic input at insert, 150 Ω source
impedance, 20 to 20 kHz:
20 Hz to 20 kHz, 20 Hz to 80 kHz bandwidth
60 dB (max) gain:
40 dB gain:
-127 dBu
-126.5 dBu
Equivalent Input Noise (EIN), mic input at insert, 50 Ω source
impedance, A-weighted:
60 dB (max) gain:
-130.5 dBu
40 dB gain:
-130 dBu
Output Noise Figure (1/4" Main out, all channels assigned to
main, Gain knobs at unity, 20 Hz to 30 kHz):
Main Mix knob down, channel Level knobs down:
-102 dBu (-106 dB SNR,
ref +4 dBu)
Main Mix knob unity, channel Level knobs down:
-96 dBu (-100 dB SNR,
ref +4 dBu)
Main Mix knob unity, channel Level knobs unity:
-93 dBu (-97 dB SNR,
ref +4 dBu)
FireWire Through (Record + Playback) Dynamic Range:
0 dBu mic input, to DAW, routed back to mixer direct to Control
Room, all gain stages unity, 20 Hz to 20 kHz:
44.1 kHz sample rate:
-104 dB
96 kHz sample rate:
-106.5 dB
Mic input at insert
(+4 dBu in, 0 dB gain, +4 dBu out):
0.0015%
Mic input at insert
(-36 dBu in, +40 dB gain, +4 dBu out): 0.017%
Stereo channel line input to any output
(+4 dBu in, all gain stages at unity +4 dBu out): 0.005%
FireWire in and out (+4 dBu in, mic input to FireWire send,
returned to Control Room, all gain stages at unity):
44.1 kHz sample rate:
0.01%, 20 Hz to 2 kHz
0.02%, 2 kHz to 20 kHz
96 kHz sample rate:
0.01%, 10 Hz to 1 kHz
0.03%, 1 kHz to 47 kHz
Attenuation and Crosstalk:
@ 1 kHz relative to 0 dBu
Main Mix knob down:
-85 dBu
Channel Alt/Mute switch engaged:
-95 dBu
Channel Level knob down:
-95 dBu
Common Mode Rejection Ratio (CMRR):
Mic input to insert, max gain, 1 kHz, 150 ohm termination:
-70 dB
Maximum Input Levels:
Frequency Response:
Mic input to any output (all gain stages at unity):
+0/-0.5 dB,
20 Hz to 20 kHz
Stereo channel line input to any output (all gain stages unity):
+0/-0.5 dB,
20 Hz to 20 kHz
FireWire in and out (mic input to FireWire send, returned to
Control Room, all gain stages at unity):
44.1 kHz sample rate:
+/-0.5 dB,
20 Hz to 20kHz
-3 dB at 21 kHz
96 kHz sample rate:
+/-0.5 dB,
20 Hz to 20 kHz
-3 dB at 45 kHz
Mic input, gain at min (0 dB):
+22 dBu
Mic input, gain at max (60 dB):
–38 dBu
Line input, gain at -20 dB:
+22 dBu
Instrument input, gain at -20 dB:
+22 dBu
Tape input:
+12 dBu
Aux return:
+22 dBu
Maximum Output Levels:
All outputs:
+22 dBu
Equalization
Mono Channels
Low:
±15 dB at 80 Hz
Mid frequency:
100 Hz to 8 kHz
Mid gain:
±15 dB
High:
±15 dB at 12 kHz
Stereo Channels:
18 Onyx 1220i
Low:
±15 dB at 80 Hz
Mid:
±15 dB at 2.5 kHz
High:
±15 dB at 12 kHz
FireWire
Output Impedance:
Sample Rates Available:
Buffer Size:
Resolution:
44.1 kHz, 48 kHz,
88.2 kHz, 96 kHz
Main XLR output:
100 Ω balanced
Phones output:
75 Ω
32 (44.1 kHz and 48 kHz
only), 64, 128, 256, 512,
1024, 2048 samples
All other outputs:
300 Ω
AC Power Requirements:
24-bit
Power Consumption:
30 Watts
Universal AC Power Supply:
100 VAC – 240 VAC,
50-60 Hz
Meters
2-segment pre-fader channel meters:
OL (+18 dBu), -20 dBu
12-segment pre-fader Control Room meters:
OL (+20 dBu), +15, +10,
+6, +3, 0, -2, -4, -7, -10,
-20, -30 (0 VU = 0 dBu)
Input Impedance:
Mic input:
2.8 kΩ balanced
Hi-Z input:
1 MΩ unbalanced
Mono channel line input:
30 kΩ balanced
15 kΩ unbalanced
Stereo Channel line input:
20 kΩ balanced
10 kΩ unbalanced
Physical Dimensions and Weight
Height:
16.75 in/420 mm
Width
12.25 in/310 mm
Depth:
3.85 in/96 mm
Weight:
13.5 lb/6 kg
Options:
Rack Mount Kit
LOUD Technologies Inc. is always striving to improve our products
by incorporating new and improved materials, components, and
manufacturing methods. Therefore, we reserve the right to change
these specifications at any time without notice.
“Mackie,” and the “Running Man” are registered trademarks of LOUD
Technologies Inc. All other brand names mentioned are trademarks
or registered trademarks of their respective holders, and are hereby
acknowledged.
Dimensions
The technical writer responsible for this manual tends to fade in and
out of various different realities, depending on how many cups of tea
he has had. Please check our website for any updates to this manual,
or updates to the PC drivers: www.mackie.com.
WEIGHT
3.85 in / 96 mm
13.5 lb
6 kg
©2010 LOUD Technologies Inc. All Rights Reserved.
3.85 in/
96 mm
48V
48V
48V
48V
48V
48V
48V
16.75 in / 420 mm
16.1 in / 408.7 mm
10 rack spaces
48V
MUTE
SOLO
MUTE
MUTE
MUTE
MUTE
MUTE
MUTE
MUTE
MUTE
OL
OL
OL
OL
OL
OL
OL
OL
- 20
- 20
- 20
- 20
- 20
- 20
- 20
- 20
SOLO
SOLO
SOLO
SOLO
SOLO
SOLO
SOLO
SOLO
12.25 in/ 310 mm
MUTE
MUTE
MUTE
MUTE
MUTE
MUTE
MUTE
OL
OL
OL
OL
OL
OL
OL
OL
- 20
- 20
- 20
- 20
- 20
- 20
- 20
- 20
SOLO
SOLO
SOLO
SOLO
SOLO
SOLO
SOLO
19.0 in/ 482.6 mm
1.9 in / 47.7 mm
With Optional Rack Ear Kit
Need help with your new mixer?
• Visit www.mackie.com and click Support to find: FAQs, manuals, addendums, and other useful
information.
• Email us at: [email protected].
• Telephone 1-800-898-3211 to speak with one of our splendid technical support chaps (Monday
through Friday, normal business hours, PST).
Quick Start Guide 19
Track Sheet
1
O
2
M
NYX IC PRE
O
3
M
NYX IC PRE
O
4
M
NYX IC PRE
O
CTRL - RM OUT
MAIN OUT
ALT 3-4 OUT
BAL/UNBAL
BAL/UNBAL
BAL/UNBAL
TAPE
L
M
NYX IC PRE
IN
L
R
LINE IN 5-6
LINE IN 7-8
L/3
R
LINE IN 9-10
1
2
3
4
LINE
LINE
LINE
(MONO)
(MONO)
(MONO)
(MONO)
BAL/UNBAL
BAL/UNBAL
BAL/UNBAL
BAL/UNBAL
BAL/UNBAL
BAL/UNBAL
BAL/UNBAL
LINE
HI-Z
48V
BAL/UNBAL
75Hz
18dB/OCT
20
40
GAIN
60
U
-20dB +40dB
20
40
GAIN
60
U
-20dB +40dB
U
U
20
U
U
CTRL ROOM/PHONES
SOURCE
U
40
GAIN
60
U
-20dB +40dB
R
R
PREMIUM ANALOG MIXER w/ PERKINS EQ & FIREWIRE
30
U
R
GAIN
60
U
-20dB +40dB
R
L
L
48V
30
U
L
R
48V
30
40
75Hz
18dB/OCT
48V
30
U
L
R/4
LINE IN 11-12
LINE
LINE
HI-Z
20
L
OUT
GAIN
-20dB
GAIN
-20dB
+20dB
GAIN
-20dB
+20dB
-20dB
+20dB
0dB=0dBu
L
GAIN
+20dB
SEND
SEND
PRE
POST
U
U
EQ
1k
-15
+15
+15
+15
-15
+15
+15
3
0
HIGH
12kHz
-15
TAPE
LINE
FW 1-2
U
HIGH
12kHz
-15
10
6
EQ
U
HIGH
12kHz
INPUT
PRE
POST
EQ
U
HIGH
12kHz
SEND
PRE
POST
EQ
U
HIGH
1k
SEND
PRE
POST
EQ
12kHz
-15
+15
U
HIGH
1k
SEND
PRE
POST
EQ
12kHz
-15
+15
U
HIGH
12kHz
SEND
PRE
POST
EQ
HIGH
-15
SEND
PRE
POST
CLIP
15
MAIN MIX
SEND
R
20
ALT 3-4
FW 1-2
12kHz
2
+15
-15
LEVEL
SET
4
1k
7
FREQ
100
8k
FREQ
100
U
8k
-15
+15
AUX
MAX
2
OO
MAX
2
OO
MAX
PAN
L
R
MAX
MAX
PAN
L
R
MAX
L
MAX
R
2
OO
MAX
R
MAX
PAN
L
R
1
OO
MAX
MAX
PAN
L
R
L
MUTE
MUTE
MUTE
MUTE
MUTE
MUTE
ALT 3/4
ALT 3/4
ALT 3/4
ALT 3/4
ALT 3/4
ALT 3/4
ALT 3/4
ALT 3/4
dB
10
dB
10
dB
10
dB
10
dB
10
dB
10
dB
10
dB
10
5
5
5
5
5
5
5
5
OL
- 20
U
5
OL
- 20
U
5
OL
- 20
U
5
OL
- 20
U
OL
5
U
OL
5
- 20
- 20
U
5
OL
- 20
PRE
POST
OO
+15
1
OO
+10
OO
+10
RTN TO
AUX1
2
+15
2
POWER
R
MUTE
5
OO
PAN
MUTE
U
1
PRE
POST
2
OO
RETURN
SEND
AUX
2
OO
PAN
L
MAX
AUX MASTER
+15
1
OO
RUDE
SOLO
80Hz
-15
AUX
1
MAX
2
OO
+15
MAX
OO
PHONES
LOW
80Hz
-15
AUX
OO
PAN
L
+15
1
MAX
2
R
MAX
CONTROL
ROOM
LOW
80Hz
-15
AUX
OO
MAX
PAN
30
+15
-15
U
LOW
80Hz
+15
1
OO
+15
20
MID
2.5kHz
U
LOW
-15
AUX
2
OO
U
80Hz
OO
MID
2.5kHz
-15
10
ASSIGN TO
MAIN MIX
OO
+15
1
OO
+15
-15
LOW
-15
MID
2.5kHz
U
AUX
1
OO
+15
-15
U
+15
80Hz
AUX
1
MAX
MID
MID
LOW
+15
U
2.5kHz
U
80Hz
-15
U
8k
-15
+15
LOW
+15
U
U
U
80Hz
OO
-15
+15
LOW
-15
100
MID
U
+15
8k
FREQ
U
MID
U
-15
100
U
MID
-15
FREQ
U
5
10
10
10
10
10
10
10
10
20
20
20
20
20
20
20
20
30
30
30
30
30
30
30
30
40
50
60
40
50
60
40
50
60
40
50
60
40
50
60
40
50
60
40
50
60
40
50
60
OO
OO
OO
OO
OO
OO
OO
OO
MIC
dB
10
5
U
OL
OO
- 20
MAX
5
LEVEL
10
DESTINATION
20
30
PHONES
AUX
1-2
40
50
60
OO
TALKBACK
SOLO
SOLO
1
SOLO
2
SOLO
3
20 Onyx 1220i
SOLO
4
SOLO
5-6
SOLO
7-8
SOLO
9-10
11-12
TALKBACK
MAIN MIX
Track Sheet
• Session:
• Date:
• Notes:
Quick Start Guide 21
22 Onyx 1220i
Phantom
Line
FW
Line
Hi-Z
75Hz
Bypass
Low Cut
HPF
-20 ~ +20dB
Gain
(Ch.11-12 only)
-
+
Mic: 0 ~ +60dB
Line: -20 ~ +40dB
Gain
-
+
Insert
2.5K
80
HI
Level
To FW
To FW
12K
HI
12K
FW Tap
Pre
Post
MID
2.5K
MID
LO
80
LO
Mod Pt
Pre
Post
12K
HI
Mod Pt
Talkback
Mod Pt
PK
-20
To FW
100~8K
80
FW Tap
3-Band EQ
Mod Pt
MID
3-Band EQ
LO
Mod Pt
Level
PK
-20
to Main L/R
to Aux1
Main L/R
Alt 3/4
to Aux1-2
Talkback Assign
to Phones
Level
Level
Solo
Pan
Solo
Mod Pt
Aux Sends
Level
Pan
Main L/R
Alt 3/4
SoloLogic
Solo(PFL)
Aux 2 (post)
Aux 2 (pre)
Aux 1 (post)
Aux 1 (pre)
R/4
Alt L/3
R
Main
L
NOTE: Switches are shown in the default (out) position.
NOTE: Modifications (marked MOD above) must be undertaken by authorized LOUD service centers only
Internal
Talkback mic
R
Aux Return 2
L
R
Aux Return 1
L
(Ch.11-12 only)
Input from FW 2 ret
Stereo
Channels
5-12
R
L
(Ch.11-12 only)
Input from FW 1 ret
Ch 1-2
Line
Hi-Z
Mic
Line
Mic
Mono
Channels 1-4
48V
pre
post
Aux 2
pre
post
Aux 1
Solo sum
Aux 2 sum
C/R Source
Alt3/4
FW 1-2 to
Ch 11-12
Aux 2 level
Aux 1 level
C/R to Main
off
Main
CD/Tape
Main level
Aux 1 sum
L
CD/Tape in
R
Alt R/4 sum
Alt L/3 sum
R sum
L sum
C/R
dim
Meter
Channel 1-12
direct outs
off
Firewire1-2 to C/R
Solo logic
C/R
R
C/R
L
RUDE
SOLO
LED
+4dBu
Mic level
FW 13-14
FW 1-12
FW 15-16
Control
Room
level
Firewire
outputs
Phones
level
Aux 2 Out
Aux 1 Out
Firewire I/O
Phones
R
L
Control
Room Out
Left/3
Alt out
Right/4
Tape
Right
Bal/Unbal
Bal
Main Out
Bal/Unbal
Left
Bal
Tape
Block Diagram
SoloLogic
Solo(PFL)
Aux 2 (post)
Aux 2 (pre)
Aux 1 (post)
Aux 1 (pre)
R/4
L/3 Alt
R Main
L
Mackie Limited Warranty
Please keep your sales receipt in a safe place.
This Limited Product Warranty (“Product Warranty”) is provided by LOUD Technologies Inc. (“LOUD”)
and is applicable to products purchased in the United States or Canada through a LOUD-authorized
reseller or dealer. The Product Warranty will not extend to anyone other than the original purchaser of
the product (hereinafter, “Customer,” “you” or “your”).
For products purchased outside the U.S. or Canada, please visit www.mackie.com/warranty to find
contact information for your local distributor, and information on any warranty coverage provided by the
distributor in your local market.
LOUD warrants to Customer that the product will be free from defects in materials and workmanship
under normal use during the Warranty Period. If the product fails to conform to the warranty then LOUD
or its authorized service representative will at its option, either repair or replace any such nonconforming
product, provided that Customer gives notice of the noncompliance within the Warranty Period to the
Company at: www.mackie.com/support or by calling LOUD technical support at 1.800.898.3211 (tollfree in the U.S. and Canada) during normal business hours Pacific Time, excluding weekends or LOUD
holidays. Please retain the original dated sales receipt as evidence of the date of purchase. You will need it
to obtain any warranty service.
For full terms and conditions, as well as the specific duration of the Warranty for this product, please visit
www.mackie.com/warranty.
The Product Warranty, together with your invoice or receipt, and the terms and conditions located
at www.mackie.com/warranty constitutes the entire agreement, and supersedes any and all prior
agreements between LOUD and Customer related to the subject matter hereof. No amendment,
modification or waiver of any of the provisions of this Product Warranty will be valid unless set forth in a
written instrument signed by the party to be bound thereby.
Quick Start Guide 23
16220 Wood-Red Road NE • Woodinville, WA 98072 • USA
United States and Canada: 800.898.3211
Europe, Asia, Central and South America: 425.487.4333
Middle East and Africa: 31.20.654.4000
Fax: 425.487.4337 • www.mackie.com
E-mail: [email protected]