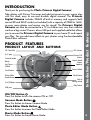
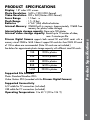
1
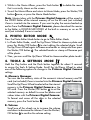
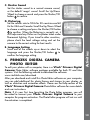
Princess Digital Camera
2011
© Disney
91-009626-007-000
Thank you for purchasing the VTech® Princess Digital Camera!
Take photos with Disney Princesses and add princesses to your movie clips
with this sleek, easy to use and durable digital camera! The Princess
Digital Camera includes 256MB of built-in memory and supports both
normal SD and SDHC cards (not included) with a capacity of 32MB to 16GB,
so even more photos and movies can be stored! The Princess Digital
Camera can also be connected to a TV so children can view their creative
work on a big screen! There is also a USB port and supplied cable that allows
you to connect the Princess Digital Camera to your home PC and import
your files. You can add more effects to your photos using the downloadable
Photo Editor software.
Product Features
Product Layout and BUTTONS
SD Card Slot
LCD Screen
A/V port
Shutter/OK
button
Camera Mode
Button
Up/Down
Wheel
Movie Mode
Button
Speaker
Trash Button
Zoom Wheel
Photo Editor
Mode Button
Flash Button
On/Off Button
USB port
Tools &
Settings Mode
Play Button
Introduction/Product Features
INTRODUCTION
ON/OFF Button
Press this button to turn the camera ON or OFF.
Camera Mode Button
Press this button to choose Camera Mode.
Photo Editor Mode Button
Press this button to access the Photo Editor Mode.
Movie Mode Button
Press this button to choose Movie Mode.
3
Tools & Settings Mode
Hold down the Camera Mode Button and Photo Editor Mode Button together
for approximately 2 seconds to access the Tools & Settings Mode.
Play Button
Press this button to view saved photos in Camera Mode, play a slideshow, or
view saved videos in Movie Mode.
Up/Down Wheel
Scroll the wheel up/down to make a selection.
Shutter/OK Button
Press this button to take a photo, start/stop recording a movie, or to confirm
a choice or action.
Flash Button
Press this button to choose between Flash On, Flash Off, and Auto Flash. The
Auto Flash mode will use flash when it detects that it is necessary. When the
flash is ready to use, a lightning bolt icon will appear in the upper left corner
of the screen in Camera Mode.
Trash Button
Press this button to delete the selected file.
A/V Port
Plug the included A/V cable into the A/V port on the camera to connect to
your TV.
Product Features
Zoom Wheel
Scroll the wheel to zoom in and out while previewing pictures or movies.
USB Port
Plug the included USB cable into the USB port on the camera to connect to
your PC.
INCLUDED IN THIS PACKAGE
• 1 VTech® Princess Digital Camera
• 1 A/V cable
• 1 USB cable
• 1 user’s manual
• 1 wrist strap
WARNING:All packing materials, such as tape, plastic sheets,
packaging locks and tags are not part of this toy,
and should be discarded for your child’s safety.
4
Display: 1.8” color LCD screen
Photo Resolution: 1600 x 1200 (JPEG format)
Video Resolution: 320 x 240 (Motion JPEG format)
Focus Range
: 1.5 feet - ∞
Flash Range
: 1.5 - 8 feet
Batteries
: 4 “AA” (LR6) alkaline batteries
Internal Memory: 256MB built-in memory (approximately 196MB free
memory for photo/video storage)
Internal photo storage capacity: Store up to 500 photos
Internal video storage capacity: Record up to 10 minutes of video, max. 5 minutes per file.
Princess Digital Camera supports both normal SD and SDHC cards with a
memory size of 32MB to 16GB. It doesn’t support SD cards less than 32MB. SD cards
of 1GB or above are recommended. (Note: SD cards are not included.)
See below for approximate photo storage capacity with different sized SD cards:
1GB
2000+ photos
2GB
4000+ photos
4GB
8000+ photos
8GB
16000+ photos
16GB
32000+ photos
Supported File Formats:
Photo: Standard Baseline JPEG.
Video: Motion JPEG (recorded with the Princess Digital Camera).
Product Specifications
PRODUCT SPECIFICATIONS
Supported Connectivity:
A/V cable for TV connection (included).
USB cable for PC connection (included).
o
o
Operating Temperature: 0 to 40 C (32 to 104 F)
5
Battery Installation
Note: Adult assembly is required
for battery installation.
• Make sure the camera is turned
OFF.
• Locate the battery covers on the
bottom of the camera. Loosen the screws using a cross-head screwdriver
and remove the battery covers.
• Install 4 new “AA” batteries (2 on each side) as illustrated above. (the use
of new alkaline batteries is recommended for maximum performance.)
• Replace the battery covers and tighten the screws. Do not over-tighten the screws.
Warning: To avoid damage to any saved data, please do not remove the
batteries while the camera is switched on.
BATTERY NOTICE
• The use of new alkaline batteries is recommended for maximum
performance.
• Non-rechargeable batteries are not to be recharged.
• Rechargeable batteries are to be removed from the toy before being
charged (if removable).
• Rechargeable batteries are only to be charged under adult supervision (if
removable).
• Do not mix old and new batteries.
• Do not mix batteries of different types: alkaline, standard (carbon-zinc) or
rechargeable (nickel-cadmium)
• Only batteries of the same or equivalent type as recommended are to be
used;
• Batteries are to be inserted with the correct polarity.
• Exhausted batteries are to be removed from the toy.
• The supply terminals are not to be short-circuited.
• The toy is not to be connected to more than the recommended number of
power supplies.
• Do not dispose of batteries in fire.
Getting Started/Battery Notice
GETTING STARTED
6
• Make sure the camera is turned OFF.
• Locate the SD card slot at the top of the
camera.
• Pull up the rubber cover.
• Insert the SD card (not included) as illustrated
on the right.
TO BEGIN USING the Princess Digital
Camera
• Press the ON/OFF Button to turn on the camera.
• If it’s the first time you have powered on the Princess Digital Camera,
you will need to select the language you want to use. Scroll the Up/Down
Wheel and press the Shutter/OK button to select the language. If you want
to select a different language later, please go to Tools & Settings Mode,
select the language menu, and then choose the language you want.
• After turning on, the Princess Digital Camera will go directly to the
Camera Mode.
• To go to Movie Mode, press the Movie Mode button. To access the Tools
& Settings Mode, hold down the Play button and Flash button together for
approximately 2 seconds.
• To connect to a TV or PC, follow the instructions in the ‘Connecting to a TV’
or ‘Connecting to a PC’ illustrations.
• Press the ON/OFF Button again to turn the unit off.
BATTERY STATUS
When the batteries are running out, the low battery symbol will be displayed
.
Automatic Shut-Off
To preserve battery life, the Princess Digital Camera will automatically
turn off after several minutes without input. The camera can be turned on
again by pressing the ON/OFF Button.
To Begin Using the Princess Digital Camera
SD Card Insertion
7
Connecting to a TV
Connect your Princess Digital Camera to a TV or monitor
on
using the supplied A/V cable. Insert the A/V cable into the A/V port
your Princess Digital Camera. Insert the colored plugs on the A/V cable
into the matching color video and audio input ports on your TV set.
Connecting to a PC
You can connect the Princess Digital Camera to a computer using the
included USB cable. Once connected, you can upload and download files to
the Princess Digital Camera by accessing your camera as a removable
storage device.
• Locate the USB port
on the back of your camera.
• Pull up the rubber cover.
• Insert the USB cable (smaller end) into the USB port on the camera.
• Insert the larger end of the USB cable into a USB port on the computer. A
USB port is usually marked with this symbol
.
MINIMUM SYSTEM REQUIREMENTS FOR PC CONNECTION:
Microsoft® Windows® XP, Windows Vista® or Windows® 7 Operating System
Mac OS X version 10.5 or 10.6
Note: Once the camera is connected to the PC, the Princess Digital
Camera will automatically turn on and enter the USB mode to enable the
PC connection. Do not disconnect the camera or computer while files are
uploading or downloading.
To Begin Using the Princess Digital Camera
Note: Before connecting your Princess Digital Camera to a TV,
check to make sure that the camera is working properly.
8
To avoid any potential damage to your Princess Digital
Camera:
• When the USB cable is not connected to the unit, please ensure the USB
rubber cover on the unit is fully covering the USB port.
• When the unit is not connected to a TV, please ensure the TV jack rubber
cover is fitted in place.
• Please ensure the SD card slot rubber cover is fitted in place.
ACTIVITIES
1. Camera MODE
A. Photo Taking
• In Camera Mode, user can look at the LCD screen to
see the photo subject.
• While holding the camera steady, press the Shutter/OK
button on the top of the camera to take a picture.
• You can scroll the Zoom Wheel up or down to increase or reduce the level
of digital zoom.
• You can also choose to add different photo frames to your photos, or
stamps of Disney Princesses. Scroll the Up/Down Wheel to choose one
option. After choosing an option, take a photo as usual and that frame
or stamp will be added to the photo. If you don’t want to add a border or
stamp, press the Camera Mode button
to remove it.
Activities
Press the Camera Mode button to go to Camera Mode.
Flash modes usage:
Flash mode
Optimum distance for using
Low flash
1.5 – 2 feet
Auto flash
2.5 – 3.5 feet
High flash
3.5 – 8 feet
• When the Princess Digital Camera is first turned ON, it will be set to autoflash
mode. It will use the flash when it detects that it is necessary. When the flash
is ready to use, a lightning bolt icon will display at the top left corner of the screen.
To change your flash settings, press the Flash button to switch between autoflash
, low flash
, high flash
or flash off .
9
Warning: To avoid eye damage, turn off the flash when you’re taking a
close-up picture of a person or animal.
Note: If the batteries are too weak, the autoflash feature may not be
available. The following icon will appear: .
B. Viewing Photos
• To view the photos you’ve taken, press the Play button
to enter the
Photo Album. Scroll the Up/Down Wheel to view the next or previous
picture stored in the album. To return to Camera Mode, press the Shutter/
OK button , or the Camera Mode button.
C. Slide Show
again and it will start to
• While in Photo Album, press the Play button
display the photos in a slideshow. To return to Camera Mode, press the
Shutter/OK button or Camera Mode button.
• While in the Photo Album or slideshow, press the Trash button
the photo that is currently shown on the screen.
to delete
Note: Photos taken with the Princess Digital Camera will be saved in
the PHOTO folder. If you want to view your own photos, please save them to
the folder DOWNLOAD\PHOTO in the built-in memory or on an SD card
(not included) if one is inserted into the camera. The Princess Digital
Camera only supports Standard Baseline JPEG.
Activities
D. Delete a Photo
2. Movie MODE
Press the Movie Mode button to go to Movie Mode.
• In Movie Mode, you can take digital video movies
with the Princess Digital Camera. Press the
Shutter/OK button on the top of the camera to start
or to stop movie recording.
• Scroll the Zoom Wheel to increase or reduce the level
of digital zoom.
• To add a frame to the movie before starting to record, scroll the Up/Down
Wheel to choose a frame for the video. Then, press the Shutter/OK button
to start recording a movie. The frame can’t be changed during the recording.
• To watch the movies you’ve recorded, press the Play button
to enter the
Movie Album, then scroll the Up/Down Wheel to choose the movie that
to start the movie. While
you want to watch, and press the Play button
watching movies, you can scroll the Zoom Wheel to adjust the volume.
10
• While in the Movie Album, press the Trash button
to delete the movie
that is currently shown on the screen.
• To exit the Movie Album and return to Movie Mode, press the Shutter/OK
button once, or press the Movie Mode button.
Note: Movies taken with the Princess Digital Camera will be saved in
the VIDEO folder of the internal memory or on the SD card (not included)
if one is inserted into the camera. If you want to play the movies backed up
earlier from the Princess Digital Camera, please download the movies
to the folder in DOWNLOAD\VIDEO of the built-in memory or on an SD
card (not included) if one is inserted.
Press the Photo Editor Mode button to go to Photo Editor Mode.
• In Photo Editor Mode, scroll the Up/Down Wheel to choose a photo and
press the Shutter/OK button
to start editing the selected photo. Scroll
the Up/Down Wheel again to choose one border or stamp and then press
the Shutter/OK button . The selected border or stamp will become part
of the photo.
• Then, you can scroll the Up/Down Wheel to choose another photo to edit.
4. Tools & Settings MODE
Hold the Play button and the Flash button together for about 2 seconds
to access the Tools & Setting Mode. Scroll the Up/Down Wheel to select
one of the following options to change in the Princess Digital Camera
settings.
Activities
3. Photo Editor MODE
A. Memory Manager
You can see the memory status of the camera’s internal memory and SD
card (not included) if one is inserted into the Princess Digital Camera.
Scroll the Up/Down Wheel to select either the internal
memory in the Princess Digital Camera or the
SD card. Press the Shutter/OK button
to set the
selected memory as default to save the photos and
videos taken with the Princess Digital Camera.
To format and erase all the data in the selected
memory, press the Trash button .
B. Volume
Scroll one of the wheels up to increase the volume
and down to decrease the volume. Press the Shutter/
OK button to confirm the volume setting.
11
C. Shutter Sound
Set the shutter sound to a normal camera sound,
or the default ‘magic’ sound. Scroll the Up/Down
Wheel to choose a sound and press the Shutter/OK
button to confirm.
E. Language Setting
Scroll one of the wheels up or down to select the
to
language and press the Shutter/OK button
confirm the language setting.
5. Princess Digital Camera
Photo Editor
To edit your photos with a computer, there is a VTech® Princess Digital
Camera Photo Editor software package available for both PC and Mac
systems. Visit the following website to download the software:
www.vtechkids.com/download
After you download and install this Photo Editor software on your computer,
you can add additional fun photo frames and stamps to your photos, as
well as distortion and animation effects. Please see the Help section of the
VTech® Princess Digital Camera Photo Editor software for more details
and user instructions.
Note: If it’s your first time launching the Photo Editor program, you will
be asked to connect your VTech® Princess Digital Camera to your
computer for program activation. The Photo Editor program will not run until
the activation is completed.
Activities
D. Flickering
Set the refresh rate to 50Hz for EU countries and 60
Hz for USA and Canada. Scroll the Up/Down Wheel
to choose a setting and press the Shutter/OK button
to confirm. When the flickering is correctly set, it
will help avoid any flicker on the photos taken under
fluorescent lighting. If you travel to other countries,
please check the local voltage rating and set the
camera to the correct setting for best results.
12
For PC Users:
• Pentium® 4 CPU, 1 GHz or above
• 256 MB RAM (512 MB recommended)
• Graphic card with 1024x768 at 24 bit color
• Monitor Resolution: 1024x768
• 300MB Hard disk space
• Windows® compatible sound card and speakers
• Microsoft® Windows® XP, Windows Vista® or Windows® 7 Operating
System
For Macintosh Users:
• Macintosh Computer with an Intel (1GHz or faster) processor
• 256 MB RAM (512 MB recommended)
• 300MB Hard disk space
• Mac OS X version 10.5 or 10.6
Internet Connection is required for software download.
Microsoft®, Windows® and Windows Vista® are either registered trademarks or trademarks
of Microsoft Corporation in the United States and/or other countries. Intel®, Pentium® are
trademarks of Intel Corporation in the United States and other countries. Macintosh, Mac and
Mac OS are trademarks of Apple Inc., registered in the United States and other countries. All
other trademarks are the property of their respective owners.
SOFTWARE RESTRICTIONS
If the Software provides you with the ability to download, print and/or save
images containing Disney’s copyrighted characters and/or artwork, this
License only permits you to do so for your PERSONAL, NON-COMMERCIAL,
and NON-GOVERNMENTAL use (e.g., you may not sell or publicly display
such images), provided that you preserve all copyright notices that are
included with the images as generated by the Software. You may not use
images generated by the Software in any advertising or promotional materials,
whether for profit or not for profit. You may share images generated by the
Software with others (as long as such use is consistent with the restrictions
described above), but you may not publicly distribute any such images via
the Internet or otherwise or post such images to any website or to any other
publicly accessible electronic forum. If any such image (a) is solely created by
you, and (b) does not contain, reference or incorporate, and is not in any way
based upon, any Disney copyrighted character, artwork or other material,
the restrictions in this paragraph shall not apply. Use of images generated
by the Software for any purpose not specifically permitted by this License is a
violation of Disney’s copyrights, trademarks and/or other proprietary rights
and is a breach of this License, entitling Disney to immediately terminate this
License.
Computer System Requirements
COMPUTER SYSTEM REQUIREMENTS
13
CARE & MAINTENANCE
WARNING
A very small percentage of the public, due to an existing condition, may
experience epileptic seizures or momentary loss of consciousness when
viewing certain types of flashing colors or patterns, especially on television.
While the Princess Digital Camera does not contribute to any additional
risks, we do recommend that parents supervise their children while they
play video games. If your child experiences dizziness, altered vision,
disorientation, or convulsions, discontinue use immediately and consult your
doctor. Please note that focusing on a television screen at close range and
handling a Princess Digital Camera as a controller for a prolonged
period of time may cause fatigue or discomfort. We recommend that children
take a 15 minute break for every hour of play.
TROUBLESHOOTING
Go through this section if you experience difficulty in operating the Princess
Digital Camera.
Problem
Program stops
working
Image taken is not
clear
Solution
Care & Maintenance
1.Keep the camera clean by wiping it with a slightly damp cloth.
2.Keep the camera out of direct sunlight and away from any direct heat
source.
3.Remove the batteries when the camera is not in use for an extended period
of time.
4.Do not drop the camera on a hard surface and do not expose it to or
immerse it in water.
1.Interrupt the power supply by removing the
batteries.
2.Let the camera sit for a few minutes without
batteries, then replace the batteries.
3.Turn the unit on. The unit should now be ready to
play again.
4.If the unit still does not work, replace the batteries
with an entire set of new batteries.
Check that the camera lens protection window
is clean.
14
1.Make sure there are 4 “AA” batteries in the
camera. Hold the ON/OFF button for 2 seconds
to turn it on.
2.Make sure the camera is not connected to a TV
with the A/V cable.
There is no picture
on the TV screen
1.Make sure that there are batteries in the camera
and that the TV is plugged into a power outlet.
2.Make sure that the camera is turned on and the
TV is turned on.
3.Check the connections on the A/V cable between
the camera and the TV and review the appropriate
connection procedure in this manual.
4.Make sure that all cable plugs are securely
inserted into the appropriate ports.
5.Make sure that the TV is tuned to the appropriate
input channel.
No sound on TV
1.Check if the TV volume is turned off or muted.
2.Try to increase the volume.
3.Check the audio and video connections between
the camera and the TV.
4.Make sure that the TV is tuned to the appropriate
input channel.
Picture is rolling or
bars and lines are
visible on TV screen
Try to adjust the vertical or horizontal hold
controls (if available) on your TV.
Cannot connect
to PC
Check the connections on the USB cable between
the camera and the PC and review the appropriate
connection procedure in this manual.
Cannot save files
Troubleshooting
Display on the
Princess Digital
Camera LCD does
not turn on
1.Check the memory status of both the built-in
Princess Digital Camera memory and the
SD card (not included), if one is inserted into the
camera.
2.Check your memory default setting (see procedure
in Memory Manager section). If it is set to use an
SD card (not included), check to make sure that
the SD card is not write-protected.
15
1.Check if the SD card is correctly inserted.
2.Check if the SD card is less than 32MB in
capacity. The Princess Digital Camera
doesn’t support SD cards of less than 32MB.
3.Check to see if it is the correct type of card. The
Princess Digital Camera doesn’t support
MMC or other formats.
Can’t view the
downloaded JPEG
file
Please check if the downloaded JPEG is Standard
Baseline JPEG format. Other formats such as
Progressive or CMYK JPEG are not supported.
The size of the Please back up all the files in the memory and
internal memory or
then format the internal memory or SD card.
SD card (if inserted)
seems to reduce after
a sudden battery
failure during video
recording.
If you have a problem that cannot be solved by using this manual, we
encourage you to visit us online or contact our Customer Services Department
with any problems and/or suggestions that you might have. Our support
representative will be happy to assist you.
Before requesting support, please be ready to provide or include the
information below:
• The name of your product or model number (the model number is typically
located on the back or bottom of your product).
• The specific problem you are experiencing.
• The actions you took right before the problem occurred.
Internet: www.vtechkids.com, or www.vtechcanada.com
Phone: 1-800-521-2010 in the U.S., or 1-877-352-8697 in Canada.
Important Note
SD Card can’t be
detected
16
VTech® Electronics North America, L.L.C. and its suppliers assume
no responsibility for any damage or loss resulting from the use of this
handbook. VTech® Electronics North America, L.L.C. and its suppliers
assume no responsibility for any loss or claims by third parties that may
arise through the use of this product. VTech® Electronics North America,
L.L.C. and its suppliers assume no responsibility for any damage or loss
caused by deletion of data as a result of malfunction, dead battery, or
repairs.
Company: VTech® Electronics North America, L.L.C.
Address: 1155 West Dundee Road, Suite 130, Arlington Heights, IL, 60004
USA
Phone: 1-800-521-2010 in the U.S., or 1-877-352-8697 in Canada.
IMPORTANT NOTE:
Creating and developing Preschool Learning™ products is
accompanied by a responsibility that we at VTech® take very seriously.
We make every effort to ensure the accuracy of the information which
forms the value of our products. However, errors sometimes can occur.
It is important for you to know that we stand behind our products and
encourage you to call our Consumer Services Department at 1-800-5212010 in the U.S., or 1-877-352-8697 in Canada with any problems and/
or suggestions that you might have. A service representative will be happy
to help you.
Important Note
DISCLAIMER AND LIMITATION
OF LIABILITY
Note:
This equipment has been tested and found to comply with the limits for a
Class B digital device, pursuant to Part 15 of the FCC Rules. These limits are
designed to provide reasonable protection against harmful interference in
a residential installation. This equipment generates, uses and can radiate
radio frequency energy and, if not installed and used in accordance with
the instructions, may cause harmful interference to radio communications.
However, there is no guarantee that interference will not occur in a particular
installation. If this equipment does cause harmful interference to radio or
television reception, which can be determined by turning the equipment off
and on, the user is encouraged to try to correct the interference by one or
more of the following measures:
• Reorient or relocate the receiving antenna.
17
• Increase the separation between the equipment and receiver.
• Connect the equipment into an outlet on a circuit different from that to
which the receiver is connected.
• Consult the dealer or an experienced radio/TV technician for help.
Caution: Changes or modifications not expressly approved by the party
responsible for compliance could void the user’s authority to operate the
equipment.
THIS DEVICE COMPLIES WITH PART 15 OF THE FCC RULES.
OPERATION IS SUBJECT TO THE FOLLOWING TWO CONDITIONS:
(1) THIS DEVICE MAY NOT CAUSE HARMFUL INTERFERENCE, AND
(2) THIS DEVICE MUST ACCEPT ANY INTERFERENCE RECEIVED,
INCLUDING INTERFERENCE THAT MAY CAUSE UNDESIRED
OPERATION.
THIS CLASS B DIGITAL APPARATUS COMPLIES WITH CANADIAN
ICES-003.
CET APPAREIL NUMÉRIQUE DE LA CLASSE B EST CONFORME À LA
NORME NMB-003 DU CANADA.
18
Wrist Strap Attachment Instructions
Step 1
Locate the thread loop on the end
of the strap. Insert it into the groove
behind the bar and then push it
through.
Step 2
Feed the end of the strap up
through the loop and pull it all the
way through.
Step 3
Make sure the loop is securely
tightened around the bar.