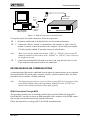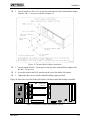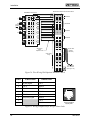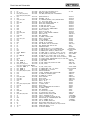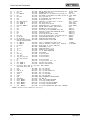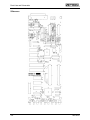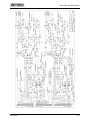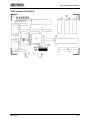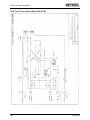
1
ZETRON Model 640 DAPT XTRA Paging Terminal Installation and Repair Part No. 025-9416C Copyright © 2004 by Zetron, Inc. All Rights Reserved Statements WARRANTY Zetron’s warranty is published in the current Zetron United States Price Book. LIMITATION OF LIABILITY Zetron makes no representation with respect to the contents of this document and/or the contents, performance, and function of any accompanying software and specifically disclaims any warranties, expressed or implied, as to merchantability, fitness for purpose sold, description, or quality. Further, Zetron reserves the right to revise this document or the accompanying software and to make changes in it from time to time without obligation to notify any person or organization of such revisions or changes. This document and any accompanying software are provided “as is.” Zetron shall not under any circumstances be responsible for any indirect, special, incidental, or consequential damages or losses to the buyer or any third party arising out of or connected with the buyer’s purchase and use of Zetron’s products or services. COPYRIGHT This publication is protected by copyright by Zetron, Inc. and all rights are reserved worldwide. This publication may not, in whole or in part, be copied, photocopied, reproduced, translated, or reduced to any electronic medium or machine-readable form without prior written consent from Zetron, Inc. The software in this product is protected by copyright by Zetron, Inc. and remains the property of Zetron, Inc. Reproduction, duplication, or disclosure is not permitted without prior written consent of Zetron, Inc. TRADEMARKS Zetron is a registered trademark of Zetron, Inc. All other product names in this document are trademarks or registered trademarks of their respective owners. 025-9416 iii Statements FEDERAL COMMUNICATIONS COMMISSION (FCC) REGULATIONS 1. This device complies with Part 68 of the FCC rules. The FCC registration number of this device, the ringer equivalence number, the facility interface code (end-to-end 02LS2 and 02GS2, DID 02RV2-T, E&M TL11M telco end and TL11E Zetron end), service order code (9.0Y and AS.3) and the connection jack type (RJ21X, RJ2GX, RJ2EX), if requested, must be reported to the telephone company. The FCC registration number and the ringer equivalence number may be found on the label attached to the device. 2. The ringer equivalence number (REN) is used to determine the quantity of devices which may be connected to the telephone line. Excessive RENs on the telephone line may result in the devices not ringing in response to an incoming call. The sum of ringer equivalence numbers for all devices connected to a single telephone line should not exceed five (5.0) for reliable operation. To be certain of the number of devices that may be connected to a line, as determined by the total RENs, contact the local telephone company. 3. If this device causes harm to the telephone network, the telephone company will notify you in advance that temporary discontinuance of service may be required. If advance notice is not practical, the telephone company will notify you as soon as possible. You will also be advised of your right to file a complaint with the FCC if you believe it is necessary. 4. The telephone company may make changes in its facilities, equipment, operations or procedures that could affect the operation of this equipment. If this happens, the telephone company will provide advance notice in order for you to make necessary modifications to maintain uninterrupted service. 5. This device must not be installed on coin-operated telephone lines or party lines. 6. Repair work on this device must be done by Zetron, Inc. or a Zetron authorized repair station. If this device is causing harm to the telephone network the telephone company may request that you disconnect the equipment until the problem is resolved. This equipment has been tested and found to comply with the limits for a Class A digital device, pursuant to Part 15 of the FCC Rules. These limits are designed to provide reasonable protection against harmful interference when the equipment is operated in a commercial environment. This equipment generates, uses, and can radiate radio frequency energy and, if not installed and used in accordance with the instruction manual, may cause harmful interference to radio communications. Operation of this equipment in a residential area is likely to cause harmful interference in which case the user will be required to correct the interference at his or her own expense. Changes or modifications not expressly approved by the manager of Zetron’s compliance department can void the FCC authorization to operate equipment. iv 025-9416 Statements INDUSTRY CANADA REGISTRATION NOTICE: The Industry Canada label identifies certified equipment. This certification means that the equipment meets certain telecommunications network protective, operational and safety requirements as prescribed in the appropriate Terminal Equipment Technical Requirements document(s). The Department does not guarantee the equipment will operate to the user’s satisfaction. Before installing this equipment, users should ensure that it is permissible to be connected to the facilities of the local telecommunications company. The equipment must also be installed using an acceptable method of connection. The customer should be aware that compliance with the above conditions may not prevent degradation of service in some situations. Repairs to certified equipment should be coordinated by a representative designated by the supplier. Any repairs or alterations made by the user to this equipment, or equipment malfunctions, may give the telecommunications company cause to request the user to disconnect the equipment. Users should ensure for their own protection that the electrical ground connections of the power utility, telephone lines and internal metallic water pipe system, if present, are connected together. This precaution may be particularly important in rural areas. CAUTION: Users should not attempt to make such connections themselves, but should contact the appropriate electric inspection authority, or electrician, as appropriate. NOTICE: The Ringer Equivalence Number (REN) assigned to each terminal device provides an indication of the maximum number of terminals allowed to be connected to a telephone interface. The termination on an interface may consist of any combination of devices subject only to the requirement that the sum of the Ringer Equivalence Numbers of all the devices does not exceed 5. CANADIAN EMC COMPLIANCE NOTICE This Class A digital apparatus meets all requirements of the Canadian Interference-Causing Equipment Regulations. AVIS CANADIEN Cet appareil numérique de la classe A respecte toutes les exigences du Règlement sur le matériel brouilleur du Canada. 025-9416 v Statements vi 025-9416 Contents CONTENTS WARRANTY.............................................................................................................. iii LIMITATION OF LIABILITY ................................................................................ iii COPYRIGHT............................................................................................................. iii TRADEMARKS......................................................................................................... iii FEDERAL COMMUNICATIONS COMMISSION (FCC) REGULATIONS..... iv INDUSTRY CANADA REGISTRATION.................................................................v CANADIAN EMC COMPLIANCE NOTICE..........................................................v AVIS CANADIEN........................................................................................................v INTRODUCTION MODEL 640 OVERVIEW ..........................................................................................1 FEATURES ..................................................................................................................1 Messaging Formats .........................................................................................................................1 Telephone Interfaces .......................................................................................................................2 Priority Paging ................................................................................................................................2 Pager Formats .................................................................................................................................2 Remote Transmitter Control ..........................................................................................................3 Easy System Management ..............................................................................................................3 Wide-Area Networking with TNPP or TAP ..................................................................................3 Other Features.................................................................................................................................3 SYSTEM APPLICATIONS ........................................................................................4 Health Care and Public Safety .......................................................................................................4 In-Plant Systems..............................................................................................................................4 Small Market Service Providers ....................................................................................................4 MANUAL USAGE .......................................................................................................5 Organization of Sections.................................................................................................................5 Text Notational Conventions ..........................................................................................................6 Related Manuals..............................................................................................................................6 SPECIFICATIONS GENERAL....................................................................................................................9 PHYSICAL...................................................................................................................9 ENVIRONMENTAL ...................................................................................................9 ALPHANUMERIC PAGING ...................................................................................10 Modem Input .................................................................................................................................10 Direct Serial Input.........................................................................................................................10 025-9416 vii Contents VOICE CAPABILITIES ...........................................................................................10 TELEPHONE INTERFACES ..................................................................................11 TRANSMITTER INTERFACE ...............................................................................11 SYSTEM MANAGEMENT......................................................................................12 TNPP INTERFACE (Optional) ................................................................................12 TAP Inbound (Optional)............................................................................................13 TAP Outdial (Optional) .............................................................................................13 HARDWARE OVERVIEW MODEL 640 ARCHITECTURE ..............................................................................15 OPERATING POWER..............................................................................................16 MAIN PROCESSOR MOTHERBOARD ...............................................................17 Paging Terminal Timing ...............................................................................................................17 PCM Highway ...............................................................................................................................17 Voice Prompts And Storage ..........................................................................................................17 DRAM Memory.............................................................................................................................18 Maintenance Modem.....................................................................................................................18 Expansion Slots..............................................................................................................................18 External Hardware Interfaces .....................................................................................................18 Jumper Settings.............................................................................................................................18 PERIPHERAL MOTHERBOARD..........................................................................20 Trunk Card Slots...........................................................................................................................20 Trunk And Radio Station Interface .............................................................................................20 Adjustment Pots ............................................................................................................................21 Jumper Settings.............................................................................................................................21 DUAL TRUNK INTERFACE BOARD ...................................................................22 Line Type Matrix Card.................................................................................................................22 External RS-232 Ports ..................................................................................................................23 Modem Interfaces..........................................................................................................................23 Audio Level Adjustments..............................................................................................................23 DID Trunk Configuration.............................................................................................................24 End-to-End Trunk Configuration................................................................................................25 Ground Start Trunk Configuration .............................................................................................25 E&M Trunk Configurations.........................................................................................................25 DUAL TRUNK 4-WIRE AUDIO INTERFACE BOARD......................................26 ROM DISK BOARD..................................................................................................27 Jumper Settings.............................................................................................................................27 RAM DISK BOARD..................................................................................................28 Jumper Settings.............................................................................................................................28 TNPP INTERFACE ...................................................................................................28 TAP Inbound..................................................................................................................................28 TAP Outdial ...................................................................................................................................28 viii 025-9416 Contents PARALLEL PRINTER CARD.................................................................................29 DUAL DIAL CLICK CARD .....................................................................................29 DUAL MF DECODER CARD..................................................................................29 FRONT PANEL LEDs...............................................................................................29 COMMUNICATIONS SETUP OVERVIEW OF MODEL 640 COMMUNICATION ............................................31 Interface Flexibility .......................................................................................................................31 Communications Software ...........................................................................................................31 Computer Requirements...............................................................................................................32 MCU INSTALLATION.............................................................................................32 TERMINAL HARDWARE CONNECTIONS ........................................................34 Local Serial Connection................................................................................................................34 Remote Modem Connection .........................................................................................................36 ESTABLISHING ZLINK COMMUNICATIONS ..................................................37 ZLINK Connection Through MCU .............................................................................................37 ZLINK Connection Through Another Terminal Emulator .......................................................41 Troubleshooting the ZLINK Connection ....................................................................................43 INSTALLATION INTRODUCTION......................................................................................................48 Installation Overview....................................................................................................................48 Installation Warning .....................................................................................................................49 Initial Unpacking and Inspection.................................................................................................49 CHOOSING AN INSTALLATION METHOD.......................................................49 Optional Installation Interface Assembly....................................................................................49 66-Type Punchdown Block Installation.......................................................................................50 TELCO CONNECTIONS.........................................................................................51 Ground Reference and Lightning Protection..............................................................................52 Installation Interface Assembly....................................................................................................52 66-Type Punchdown Block Installation.......................................................................................55 RADIO STATION CONNECTIONS .......................................................................61 Installation Interface Assembly....................................................................................................62 66-Type Punchdown Block Installation.......................................................................................64 RF EQUIPMENT INTERFACING..........................................................................66 Modifications For TTL Data Outputs .........................................................................................67 RF Station Jumper Settings..........................................................................................................67 Colocated Transmitters.................................................................................................................68 Remotely Located Transmitters ...................................................................................................73 Combined Local and Remote Transmitters ................................................................................74 RF and Microwave Transmitter Link Controllers .....................................................................76 Transmitter Controllers................................................................................................................79 025-9416 ix Contents ADJUSTMENT PROCEDURES OVERVIEW ...............................................................................................................85 Measurement Conventions ...........................................................................................................85 TRUNK CARD LEVELS..........................................................................................85 Test Equipment..............................................................................................................................86 FROM TEL Adjustment ...............................................................................................................86 Hybrid (BAL R and BAL C) Adjustment....................................................................................89 STATION INTERFACE ALIGNMENT PROCEDURE........................................90 Test Equipment..............................................................................................................................90 Database Setup ..............................................................................................................................90 VOICE Audio Adjustment............................................................................................................93 TONE Audio Adjustment .............................................................................................................94 Transmitter Digital Deviation Adjustment..................................................................................95 DIAL CLICK CARD LEVEL ADJUSTMENT ......................................................95 Test Equipment..............................................................................................................................95 OPTIONAL EQUIPMENT INSTALLATION DUAL TRUNK CARD...............................................................................................97 TNPP INTERFACE ...................................................................................................98 Installation Procedure...................................................................................................................98 RS-232 Interface Ports..................................................................................................................99 TAP OUTDIAL OPTION..........................................................................................99 Installation Procedures .................................................................................................................99 DIAL CLICK DECODER.......................................................................................108 Installation ...................................................................................................................................108 Level Adjustment ........................................................................................................................109 DUAL MULTI-FREQUENCY (MF) DECODER.................................................110 Installation ................................................................................................................................... 111 PARALLEL PRINTER CARD...............................................................................112 Installation ...................................................................................................................................112 CONNECTION TO AN EXTERNAL ALARM....................................................113 VOICE PROMPTS OVERVIEW .............................................................................................................115 Custom Voice Prompts................................................................................................................115 Database Configuration..............................................................................................................115 VOICE PROMPT CATEGORIES.........................................................................115 VOICE PROMPT ACCESS NUMBER.................................................................116 CUSTOMIZING THE VOICE PROMPTS...........................................................117 Backing Up Voice Prompts .........................................................................................................117 Accessing Voice Prompt Programming Mode...........................................................................118 Recording Tips: ...........................................................................................................................119 x 025-9416 Contents RESTORING VOICE PROMPTS .........................................................................120 Customized Prompts ...................................................................................................................120 Factory-Recorded Prompts ........................................................................................................120 TROUBLESHOOTING and REPAIR TROUBLESHOOTING THE PAGING PROCESS.............................................123 Paging Input ................................................................................................................................123 Paging Output .............................................................................................................................124 FRONT PANEL LEDs.............................................................................................126 PROGRESS TONES................................................................................................127 TROUBLESHOOTING TNPP PAGING...............................................................128 TNPP Interface LEDs .................................................................................................................128 Testing the TNPP Card ...............................................................................................................129 Network Interface Unit (niu) Diagnostics .................................................................................130 TNPP Packet Troubleshooting ...................................................................................................130 Traffic Command ........................................................................................................................133 RESTORING THE DEFAULT DATABASES.......................................................135 Reformatting the RAM Disk ......................................................................................................136 TROUBLESHOOTING ZLINK COMMUNICATIONS.....................................137 GLOSSARY PARTS LISTS AND SCHEMATICS V53 MOTHERBOARD (702-9673G).....................................................................159 Parts List ......................................................................................................................................159 Schematic .....................................................................................................................................162 Silkscreen .....................................................................................................................................170 PERIPHERAL BOARD (702-9360G.2) .................................................................171 Parts List ......................................................................................................................................171 Schematic .....................................................................................................................................173 Silkscreen .....................................................................................................................................178 DUAL TRUNK (702-9361D) ...................................................................................179 Parts List ......................................................................................................................................179 Schematic .....................................................................................................................................181 Silkscreen .....................................................................................................................................184 COMPONENT LOCATIONS ................................................................................185 Dual Dial Click (702-9119C).......................................................................................................185 Dual MF (702-9197D.1)...............................................................................................................185 RAM Disk (702-9386B)...............................................................................................................186 ROM Disk (702-9389B)...............................................................................................................186 TNPP Interface (702-9362C.2) ...................................................................................................187 Terminal Block Adapter (702-9470B) ........................................................................................188 025-9416 xi Contents CONFIGURATION DIAGRAMS..........................................................................189 Dual Trunk Telco DID (024-0076A)...........................................................................................189 Dual Trunk Telco End-to-End (024-0077A) ..............................................................................190 Dual Trunk Telco E&M (024-0078A) ........................................................................................191 Dual Trunk Telco Ground Start (024-0079A) ...........................................................................192 INDEX xii 025-9416 Introduction INTRODUCTION Zetron Model 640 Paging Terminal MODEL 640 OVERVIEW The Model 640 is a low cost, fully automatic dial-access paging terminal. The Model 640 is specifically designed to provide flexible paging for industrial plants, hospitals, and low RCC applications. The Model 640 supplies the interface between the telephone and radio systems for paging applications. It performs selective signaling activation and message transmission. Through comprehensive advanced software, the Model 640 provides features found on terminals costing significantly more. State-of-the-art microprocessor circuitry combined with meticulous engineering provides paging capabilities which rival much larger paging terminals. Even the newest alphanumeric digital display paging formats can be encoded by the Model 640. In addition, the Model 640 provides a variety of interface capabilities required for connection to the telco network, analog and digital radio systems, health care nurse call systems, and telephone answering service consoles. FEATURES Every feature available in the Model 640 is designed to create a small, but versatile and easily managed paging system. Messaging Formats The Model 640 supports six types of pages - tone-only (alert), standard voice, live voice (breakthrough), numeric-only display, alphanumeric display, and talkback. A tone-only page alerts the customer that someone has called them, but cannot indicate who or include any other information. Standard voice pages play a caller-recorded voice message over a built-in speaker on the pager. Live voice paging immediately cuts audio through from the calling party out over the air 025-9416 1 Introduction (like a public announcement system). Numeric pages display a set of numbers (usually a phone number) that the caller keys in by way of DTMF telephone. Alphanumeric pages are text messages sent to alphanumeric-compatible display pagers. Alpha messages can be generated through a variety of input devices, including a standard touch-tone telephone. Talkback paging connects the caller directly with a paging customer who has a portable radio for 2-way communications. System Voice Prompts The Model 640 DAPT XTRA comes with prerecorded voice prompts that guide callers through the paging entry process. The prompts can be customized by the system operator, if desired. In addition, voice prompts can be enabled and disabled for the entire system, for a specific trunk, or for an individual subscriber. Voice Storage The Model 640 DAPT XTRA stores up to 280 seconds of pooled voice storage to support voice pages. The silence compression feature eliminates pauses in the caller’s voice message to maximize storage space. The voice memory also is used to save messages that are interrupted by a breakthrough page for later retransmission. Telephone Interfaces The Model 640 is flexible enough to interface with a wide variety of telephone line types. In addition, all four trunks (with two dual-trunk cards installed) can be serviced by a different type of line. The paging terminal is compatible with E&M, DID, and End-to-End phone lines. The telephone interfaces can be initiated by ground start, loop start or wink start, depending on the specific trunk configuration. The 640 can also be connected to a PABX, an RS-232 input device, or a Zetron Model 103 (manual paging entry station). In addition, the Model 640 can be configured to decode several types of signaling protocols. The dial click and MF (multi-frequency) options allow the paging terminal to accept feed digits other than standard DTMF. Priority Paging The Model 640 supports four paging priority levels. The two highest levels of priority are nextout (where the page immediately moves to the front of the queue) and breakthrough (where the page is immediately cut through to live air). Priority can be assigned per-subscriber or trunk line. Priority paging is essential in emergency response applications, where people must receive notification in a timely manner. In addition, priority allows TNPP-networked systems to give local paging subscribers faster service than roaming customers. Pager Formats The Model 640 supports nearly every kind of paging format available on the market (2-tone, 5/6tone, HSC, Golay, POCSAG, and FLEX are among the standard capabilities). This allows for easy upgrade transitions to newer formats and cost-effective use of older pagers. 2 025-9416 Introduction Remote Transmitter Control The Model 640 is equipped with a modem and tone encoder to remotely control transmitters over a radio or wireline link The Model 640 can control any transmitter capable of decoding analog Motorola PURC tones. A Zetron Model 66 Transmitter can be added to control other types of transmitters that do not use the PURC protocol. Remote control is useful when the transmitter cannot be colocated with the paging terminal or when pages are being sent to transmitters in several zones. The Model 640 is capable of sending pages to up to 16 transmitter zones. In addition, pages can be repeated up to four times with different zone addresses, to extend the coverage area without purchasing costly simulcast equipment. Easy System Management The Model 640 provides several features that simplify system management. Three separate software programs come with the paging terminal. Each is installed on the office computer or is resident on the paging terminal RAM drive. The software modules are used to view and edit all aspects of the Model 640’s operation. MCU is the software package provided for office computer communications with the paging terminal. It allows the system operator to monitor system traffic (log files) and view statistics and call counts. In addition, the ZLINK portion of MCU enables the user to link into the terminal and execute various commands. Some of the most useful operations include generating test pages and viewing trunk card configuration and activity. The Model 640 subscriber database is stored in the paging terminal and can be accessed by way of MCU or through another communications program, such as ProComm®. It configures the all system and user operating parameters. The databases determine how the paging terminal communicates with the telco and the transmission equipment. Wide-Area Networking with TNPP or TAP The Model 640 provides two optional methods of increasing the paging coverage area. This ensures that customers can travel outside their local area and remain accessible. TNPP (Telocator Network Paging Protocol) paging is a popular means of passing pages over a wide region. When the Model 640 is equipped with the TNPP option, it can exchange tone-only and alphanumeric display pages with other paging terminals. Pages are passed through the TNPP network with a variety of media, including dedicated wireline, packet radio, and satellite downlink. TAP (Telocator Alphanumeric Protocol) is an economical alternative to TNPP networking. It provides many of the same features, but without the expense of an RF transmission media. TAP sends pages from the Model 640 to other terminals on a dial-up phone connection by way of modem. Other Features The Model 640 has many other useful features, including: • 1,500 subscriber capacity • Two telephone interfaces (expandable to four) 025-9416 3 Introduction • Repeat paging • Flexible programming of multiple pager groups • Support for alpha modem plus voice and numeric message entry on every telephone interface • Multiple serial interfaces for direct alpha message entry • Canned alphanumeric messages • Modem access for programming through any dial-up line • System alarm output • Autobauding of the maintenance modem at 300 and 1200 baud • Flexible password protection for individual databases, subscriber phone numbers, alphanumeric entry access, and paging terminal ZLINK connections SYSTEM APPLICATIONS The Model 640 is suitable for a wide variety of paging applications. The paging terminal is flexible and easy to operate, making it the ideal choice for many paging providers. Health Care and Public Safety The Model 640 is ideal in systems where fast, reliable paging is essential. The terminal provides priority paging, including live breakthrough, for immediate notification of emergency response teams. Detailed system logs of every page are available to track incident response and manage risk. In addition, most nurse call systems and other alphanumeric input stations are easily interfaced with the paging terminal to send detailed messages to key personnel. The Model 640 also provides an alarm output for immediate recognition of paging terminal failure. In-Plant Systems Many in-plant applications, including industrial, government agencies, and institutions, demand specific paging operations. The Model 640 trunks can be individually configured to interface with several telephone line types. This allows possible system access from an internal PABX, a remote telephone company central office, and a local telephone operator. The paging terminal also offers talkback paging for two-way communications with mobile or portable radios. In addition, the Model 640 has one alarm output to identify when the terminal is not operating properly. Small Market Service Providers The Model 640 is well suited for smaller RCC and PCP systems. The paging terminal is flexible and allows painless system growth with TNPP networking and a variety of equipment interface capabilities. Call counting, system statistics, and traffic monitoring all make system management simple and efficient, even for first-time paging providers. In addition, the system voice prompts 4 025-9416 Introduction and voice paging features provide personalized messaging and a professional sound that customers can easily appreciate (DAPT XTRA only). MANUAL USAGE Understanding what the manual is saying helps you to install, program, and troubleshoot your system more quickly and easily. This section orients you on the way things are presented, so that we can “speak the same language.” Descriptions follow of the way things are identified throughout the manual, and where to find what you are looking for quickly and easily. Organization of Sections The manual is split into several sections so that you can find the exact information you need and any related topics. The sections are organized as follows: Specifications This section lists the detailed operating characteristics and hardware specifications of the Model 640. Hardware Overview This section provides an introduction to the hardware components that make up the Model 640 paging terminal. Each board (standard and optional) is described and illustrated to help familiarize you with the system. This includes locations and settings for all jumpers, potentiometers, and external interfaces. Communications Setup This section describes how to link an office computer to the paging terminal. This provides an easily accessible communications link to the paging terminal to simplify the hardware installation described in Section 5. Installation This section describes how to install and setup the Model 640. Section 5 covers installation of the radio station (transmitter and receiver) and telco connections. Adjustment procedures are also described in this section. Adjustment Procedures This section describes how to adjust many of the hardware components for optimum performance. The procedures include communications with the telco trunks and radio station equipment. Optional Equipment Installation This section describes how to install each of the optional boards and interfaces available for the Model 640. This section can be used to add field-upgrades, verify factory-installed boards, or familiarize the technician with the components installed in the paging terminal and the entire system architecture. 025-9416 5 Introduction Voice Prompts This section describes how to access, backup, customize, and restore the Model 640 system voice prompts. This section only applies to the DAPT XTRA. Troubleshooting and Repair This section provides some useful troubleshooting and repair tips. It helps the system operator identify and correct possible problems with the system. This section allows the system operator to perform some simple repairs and modifications without the assistance of Zetron technicians. Included are front panel LED indications, progress tone descriptions, and ZLINK troubleshooting procedures. Glossary of Terms This section defines many of the industry-specific technical terms used in this manual. Schematics and Parts Lists This section provides the parts lists and schematic diagrams of the Model 640 hardware. This may be useful for troubleshooting, repair, and interfacing the paging terminal with other equipment. Text Notational Conventions Notational conventions are the manual text styles that identify specific types of words. For instance, it is important that you know which words refer to filenames, operator commands, screen quotes, manual titles, etc. The notational conventions will help you understand what is being said. Table 1 summarizes the text styles used in this manual. Table 1. Sample Table 1. Summary of Manual Text Notational Styles What it Means <xxxx> the text inside the < > identifies a keyboard entry, do not include the < > in your entry (for example, <Tab> means press the “Tab” key) Xxxx the text that is Initial Capitalized within a sentence refers to a database or MCU menu or field (for example, Choose Locations from the Edit menu) XXXX the text in SMALL CAPITAL LETTERS is a system configuration filename xxxx the text in courier font is a screen view in MCU, the database, or ZLINK [following a plus (+) prompt] X ‘xxxx’ the number inside a circle identifies a unique part of a diagram or figure the text in the ‘single quotes’ is a database field entry or a system filename Related Manuals Two manuals describe the Model 640. Each manual can stand alone, but cannot cover all of the information necessary to install, configure and maintain an efficient system. 6 025-9416 Introduction The Model 640 DAPT XTRA Installation and Repair Manual (Part No. 025-9416) covers the hardware components of the paging terminal, installation and maintenance. This manual should be used to perform the initial installation of the paging terminal. It also provides useful troubleshooting procedures for situations when the Model 640 is not functioning as expected. The Model 640 Operating and Programming Manual (Part No. 025-9417) describes how to program the database and use the paging terminal effectively. This manual should be used to perform initial programming of the subscribers, telco line types, transmitters, and telephone access databases. It should be used by the system operator(s) to learn the databases and general use of the paging terminal. This manual also provides a useful reference during the hardware installation procedure. Zetron recommends storing the manuals in a convenient location. For instance, the installation manual should be colocated with the equipment, and the programming manual should be colocated with the office computer. In addition, when contacting Zetron applications engineers it is very helpful if the appropriate manual(s) are handy for quick reference. 025-9416 7 Introduction 8 025-9416 Specifications SPECIFICATIONS GENERAL Call Capacity 1,500 subscribers Signaling Formats 2-tone Motorola, GE, Reach (plus custom tones and timing) 5/6-tone HSC (Hexadecimal Sequential Code) GSC (Golay Sequential Code) POCSAG (Post Office Code Standardization Advisory Group) 512 and 1200 Baud, plus voice (also known as CCIR) RPC No.1 (International Radio Consultative Committee Radio Paging Code No.1) FLEX NEC D3 Multitone Mark Series I - VI Blick RDS (optional) Power Supply 115/230 VAC ±15%, 47-63 Hz, 80W PHYSICAL Dimensions 5.25 in H × 17 in W × 15.5 in D 19 in rack-mount ears Weight 16 lb. ENVIRONMENTAL Operating Temperature 32°F- 122°F (0°C - 50°C) without floppy disk 41°F- 113°F (5°C - 45°C) with floppy disk Maximum Humidity 90% non-condensing (without floppy disk) 80% non-condensing (with floppy disk) 025-9416 9 Specifications ALPHANUMERIC PAGING Maximum characters 500 Protocols TAP (Telocator Alphanumeric Protocol) Manual VDT operator support Canned Alpha Messages 100 field-programmable messages of 30 characters each caller-initiated by telephone DTMF input Modem Input Number of Interfaces One (1) modem per telephone interface. Each trunk is fieldconfigurable for either direct serial or telephone access. Selection of either mode disables the other. Telephone interface can handle modem and tone/voice/numeric traffic on a per-call basis. Modem Type Bell 103/212 CCITT V.21/V.22 Baud Rates 300, 1200 Direct Serial Input Number of Interfaces One (1) serial port per telephone interface. Each trunk is fieldconfigurable for either direct serial or trunk telephone access. Selection of either mode disables the other. Baud Rates 150, 300, 600, 1200 Signals Supported RS-232C - Tx Data, Rx Data, GND Null modem configuration Connector (2) DB 9-pin female RS-232 ports VOICE CAPABILITIES Pooled Voice Storage 280 seconds Number of Simultaneous Voice Channels 5 maximum Silence Compression 65,000 levels of sensitivity programmable 255 levels of time threshold programmable Voice Prompts Storage 90 seconds Customizable by way of telephone by system operator No. of Voice Prompts 16 10 025-9416 Specifications TELEPHONE INTERFACES Number of Interfaces 2 (expandable to 4) Line Types Each telco trunk field-configurable for any one of: • • • End-to-End (typical “home” type line) DID (Dedicated Inbound Dialing); immediate start or wink start protocol PABX E&M Tie Trunk Type I (2-Wire Hybrid audio) Input Signaling DTMF or Pulse Feed Digits Optional MF type 2A decoder Optional Dial Click decoder Line Coupling 600Ω transformer, adjustable balance duplex hybrid Connector Male 50-pin connector similar to RJ2GX TRANSMITTER INTERFACE Transmit Audio Balanced 600Ω transformer 250-3500 Hz ±1dB Selectable flat tone or –6 dB per octave de-emphasis Selectable flat voice or +6 dB per octave pre-emphasis Receive Audio Balanced 600Ω transformer Adjustable level -20 to +10 dBm Selectable flat tone or –6 dB per octave de-emphasis Format Encoding Analog frequency accuracy ± .02% Analog tone distortion < 0.2% Digital data stability ±2 ppm Control Relays Analog PTT Digital PTT Auxiliary PTT Digital Data RS-232C compatible Null modem cable Field-programmable polarity and timing CAS / COR Input Selectable polarity, TTL or contact closure Transmitter Request RS-232C Transmitter Busy Selectable Polarity, TTL or contact closure Station ID Field-programmable, 1200 Hz CW Morse Code at 20 WPM 025-9416 11 Specifications Zone Address Select 4 binary outputs (for 16 zones) Open collector outputs, 40 mA sink Up to 4 sequenced zones per package Tone Remote Control Motorola PURC (analog) transmitter access knockdown tones SYSTEM MANAGEMENT Modem Access Bell 212 Protocol 1200 Baud Accessible through any dial-up telephone interface. Direct Serial Access Selectable Baud Rate: 300, 600, 1200, 2400, 4800, 9600 Female DB 9-pin connector with cable (709-7211) (convert to mate with male DB 25-pin) Pager Groups 50 programmable groups Up to 10 members per group Groups can be members of other groups System Log Paging Reports Date, time, input port, pager ID, page type, page length, contents of numeric page Traffic Statistics Trunk busy time on hourly basis Page queuing wait time on hourly basis Maximum and average values 7-day history 25 pager service programming templates for easy pager setup Editing Operation parameter editor for easy system operator control TNPP INTERFACE (OPTIONAL) Number of Direct Connections 2 Number of Addressable 32 inbound Nodes 32 outbound Network Link Media Capability Dedicated wireline Packet radio Wireline packet network Satellite downlink (simplex receive) Baud Rates 300, 1200, 2400 Interface Type Serial RS-232C Null Modem (Tx Data, Rx Data, GND) Connectors Female DB 9-pin Supplied cable (709-7212) (converts to mate with female DB-25) 12 025-9416 Specifications TAP INBOUND (OPTIONAL) Number of Interfaces 2 Baud Rates 300, 1200, 2400, 4800, or 9600 Interface Type Serial RS-232C Null Modem (Tx Data, Rx Data, GND) Connectors Female DB 9-pin Supplied cable (709-7212) (converts to mate with female DB-25) TAP OUTDIAL (OPTIONAL) Number of Interfaces 1 Baud Rates 300, 1200, 2400, 4800, or 9600 Interface Type Serial RS-232C Null Modem (Tx Data, Rx Data, GND) Connectors Male DB 9-pin 025-9416 13 Specifications 14 025-9416 Hardware Overview HARDWARE OVERVIEW MODEL 640 ARCHITECTURE The Model 640 consists of several circuit boards in a compact, computer-like chassis. The basic unit is comprised of the main processor motherboard, a peripheral motherboard, a dual trunk interface, a ROM disk board, and a RAM disk board. In addition to the standard boards, a TNPP, TAP outdial, or dual serial board can be added for networking purposes. A second dual trunk interface can be added, along with MF or dial click decoder options for the trunks. Each of the standard and optional circuit boards are illustrated and described in the following subsections. Figure 1 shows a top view photograph of the Model 640 with the top cover removed. The unit shown has one optional board installed - a second dual trunk card. Figure 1. Model 640 with Top Cover Removed Figure 2 and Figure 3 are provided to help locate each of the main components of the Model 640. Each item in the illustrations is labeled with a number for easy cross-reference from the text in the following subsections (numbers in parenthesis). See Section 11 for more detailed schematics and circuit board silkscreens. 025-9416 15 Hardware Overview Peripheral Mother Board 4 1 MB SIMMs “DRAM” Volatile Memory Main Processor Board 2 Dual Trunk Card - Trunks A & B 5 Dual Trunk Card - Trunks C & D ROM Disk Board RAM Disk Board Spare Card Slot Parallel Printer Card * 8 6 7 TNPP Card * 9 10 Power Supply Module 1 3 * Optional Boards for the Model 640 Figure 2. Top View of Model 640 Chassis Dual Trunk Serial Ports 13 11 KEYBOARD Connector Fuse 18 Local COM Port 17 12 AC Power Connector Adjustment Pots 14 Trunk & Radio 15 Station Interface 16 FAULT Connector Figure 3. Rear View of Model 640 Chassis OPERATING POWER The internal power supply (item #1, Figure 2) in the Model 640 operates from 115VAC (item #12, Figure 3) and provides all internal operating voltages, including the 48 volt supply for DID telephone trunks. A power supply configured for 240VAC operation may be ordered as an option. 16 025-9416 Hardware Overview An uninterruptible power supply (UPS) option (Part No. 802-9049) obtains standby power from storage batteries and keeps the system operating through brownouts and blackouts. Zetron’s standard UPS is a 400 VA unit with built-in batteries that provide 30 minutes of emergency power. Higher capacity UPS options may be available as required. Other UPS equipment can provide more capacity and can even power radio equipment. For applications assistance, contact the Zetron Mobile and Paging Systems Division. The power supply is protected by a 1 amp UL approved fuse (item #11, Figure 3). The fuse can be checked or replaced by unscrewing the cover counter-clockwise. MAIN PROCESSOR MOTHERBOARD Advanced large-scale integrated (LSI) circuits comprise an entire computer onto the 8-in × 14-in main processor motherboard (Part No. 702-9673). The main processor (item #2, Figure 2) includes 2 MB or more of volatile DRAM (item #3, Figure 2). Paging software loaded from the plug-in ROM disk (item #6, Figure 2) at power-on operates in the DRAM memory, and acts as traffic manager and diagnostic maintenance controller of the microprocessors on the peripheral motherboard (item #4, Figure 2). Paging Terminal Timing The main processor board contains power-on reset timing and a watchdog circuit to help recover from any software faults or high-energy noise interference. The watchdog timer must be written to by the system once a second to keep it from initializing a reset pulse. A real-time clock also provides the central timing for the PCM digitized audio highway used by the peripheral motherboard for passing audio to and from the trunks and station output. PCM Highway The PCM highway is composed of three signals: data, clock, and sync. Data is a time-multiplexed serial signal and can be encoded and decoded by the trunk or station sections of the Model 640. The clock signal is a 1.544 MHz square wave, which synchronizes the serial data. Eight clock pulses constitute a slot. Audio is converted into 8-bit words and presented in one slot. 24 slots constitute a frame. The sync pulse marks the beginning of a frame and is one clock cycle of duration with a period of about 125 microseconds (8 kHz sampling rate). Each slot can be thought of as a channel carrying unidirectional audio information (just like a radio channel). Voice Prompts And Storage The main processor board is the source of all the telephone prompts. Prompting tones are generated on dedicated PCM channel slots for 1 kHz beep, out of service whoop, telco dial tone, telco ringing sound, and telco busy sound. Voice recording and playback functions are also performed on the main processor board (DAPT XTRA only). Voice to and from the PCM highway is compressed or expanded using ADPCM transcoders. The compressed live voice data is stored in the EMS area of DRAM. Compressed voice prompts are stored on the battery backed non-volatile RAM disk. 025-9416 17 Hardware Overview DRAM Memory The DRAM memory (item #3, Figure 2) physically resides in one or more single in-line memory module (SIMM) units installed into J9, J10, and J11. The base area of DRAM memory is loaded with the operating software for the Model 640 paging terminal. This plug-in board is also used for non-volatile storage of the subscriber database. The EMS area of the DRAM memory is used as a storage buffer for the ADPCM voice storage and playback functions. Maintenance Modem The main processor board contains a modem for remote communications and system management. The modem is accessed through any one of the trunk interfaces. Once a unique phone number is programmed into the terminal database, the 640 can be called from any remote PC. Expansion Slots A custom expansion slot (J8) is provided for installation of the optional TNPP interface card (item #8, Figure 2). This card facilitates wide area networks involving multiple paging terminals. The main processor board has two PC-type expansion slots, which are used for the printer port or other options. The printer card can be installed in either slot. The printer option (Part No. 9509758) allows a parallel printer to be connected to the paging terminal for real-time printing of page logging (system activity). External Hardware Interfaces The main board has three connections exposed through the rear of the Model 640 chassis. The FAULT connector (item #16, Figure 3) indicates a paging terminal failure for interface to an alarm system. The male 6-pin Wiedmueller connector has three usable output pins from an onboard relay. The COM PORT connector (item #17, Figure 3) provides an RS-232 interface for local PC or dumb terminal communications. A 10-foot serial cable (Part No. 709-7211) is provided with the Model 640 for this connection. The 9-pin port can be configured for baud rates up to 9600. The KEYBOARD connector (item #18, Figure 3) was used in conjunction with the Model 640 Console option, which is no longer sold. The connector is identical to a PC keyboard interface. Jumper Settings Figure 4 shows the location of each jumper on the currently shipping V53 main processor circuit board. 18 025-9416 Hardware Overview JP10 JP9 a b JP11 JP6 a b JP12 Front of Model 640 Chassis JP3 JP1 JP8 b b a b JP7 a JP2 a JP5 ⇒ JP14 JP4 JP13 Figure 4. Main Board Jumper Locations (Top View) The jumpers are used as noted in Table 2. CAUTION Jumpers 1-9 and 11 on the main processor motherboard (Part No. 702-9673) should not be changed. These jumpers are factory set, based on the custom system ordered. This information is provided for reference only. Table 2. Table 2. Main Board Jumper Settings Jumper Function Settings Default JP1 Sets ROM memory size IN OUT IN JP2 Identifies ROM memory size IN OUT IN JP3 Provides reset to the keyboard interface port IN - reset OUT OUT JP4 ISA interrupts expansion IN OUT OUT JP5 Disables watchdog timeout during initialization A B - disabled A JP6 RESERVED A B B JP7 Disables RAM parity error interrupt IN - disabled OUT JP8 Sets non-volatile RAM size A B JP9 Enables RAM disk reformat (in conjunction with JP10) IN - reformat OUT 025-9416 OUT A OUT 19 Hardware Overview Jumper Function Settings Default JP10 Disables logon password Enables RAM disk reformat (in conjunction with JP9) IN password disabled / reformat OUT password enabled JP11 Sets voice RAM size A - 32 to 128 KB B - 256 to 512 KB JP12 System reset IN - reset OUT JP13 Disables system watchdog IN - disabled OUT IN JP14 Sets video display (monitor) type A - VGA B - TTL mono A Note: OUT A OUT JP9 and JP10 are used to reformat the RAM disk. Do NOT install both jumpers unless reformatting is required. PERIPHERAL MOTHERBOARD The peripheral board (Part No. 702-9360) integrates the CPU functions of the trunk cards with those of the radio station section. A ribbon cable interfaces this board (item #4, Figure 2) with the main processor board. The paging software communicates with the peripheral board processors through two dual-port RAMs (U29, U30). Each RAM has a unique select address and can be individually chosen to appear in the I/O map of the system. Trunk Card Slots The dual trunk interface board (item #5, Figure 2) (Part No. 702-9361) or the dual trunk 4-wire audio interface (Part No. 702-9488) installs onto the peripheral motherboard for telco connections. One dual trunk interface is standard on the Model 640. It installs into J3 and J5 on the peripheral board for trunks A and B. An optional second trunk card can be installed into J2 and J4 for trunks C and D. These cards interface the telco, PABX, or RF/µwave link trunk equipment to the paging transceiver through the peripheral motherboard. Trunk And Radio Station Interface An RJ21 connector (item #15, Figure 3) on the rear of the peripheral board provides the telco trunk and radio station external interfaces. This male 50-pin connector facilitates signals for up to four telco trunks, each following the RJ2DX convention (6-wire modular telco jack), and a radio station interface for control of up to 16 zones. 20 025-9416 Hardware Overview Adjustment Pots Three adjustment pots (item #14, Figure 3) on the peripheral board control audio levels to and from the radio station card. They are accessed from the rear panel of the Model 640 chassis. The RX adjustment controls the audio input level for the talkback feature. The TONE adjustment controls the paging tone output level to the transmitter, while the VOICE pot controls the voice audio output level to the transmitter. Refer to Section 6 for details on adjustment procedures. Jumper Settings The jumpers on the Model 640 peripheral board control RF broadcast station interface parameters. Figure 5 shows the locations of each jumper on the peripheral processor circuit board. JP1 a JP3 b a b b a b a JP5 b a JP6 JP4 JP10 JP2 Front of Model 640 Chassis JP8 JP9 a b JP7 b ⇒ a Figure 5. Peripheral Board Jumper Locations (Top View) The jumpers on the peripheral motherboard are used as noted in Table 3. Table 3. Jumper Table 3. Peripheral Mother Board Jumper Settings Function Settings Default JP1 Receive voice audio from Talkback pager A - flat B - de-emphasized A JP2 Transmit tone to transmitter A - flat B - pre-emphasized A JP3 Enables Talkback audio path or separate tone output A - tone output B - Talkback enabled (tx and rx audio) B JP4 COR (busy) polarity A - active high B - active low B JP5 Transmit voice audio to transmitter A - flat B - pre-emphasized A JP6 Terminal busy polarity A - active high B - active low B JP7 Factory test only (µProcessor U20 XIRQ) IN OUT 025-9416 OUT 21 Hardware Overview Jumper Function Settings Default JP8 Factory test only IN OUT OUT JP9 Factory test only IN OUT OUT JP10 Factory test only (µProcessor U33 XIRQ) IN OUT OUT DUAL TRUNK INTERFACE BOARD The dual trunk interface board (Part No. 702-9361) connects two telephone lines to the paging terminal. Telephone lines are brought to the dual trunk interface board (item #5, Figure 2) through the peripheral board from the male 50-pin connector on the rear of the unit (item #15, Figure 3). The lines associated with trunks A and B are brought to the dual trunk installed in the rightmost slot, J3/J5. The lines associated with trunks C and D are brought to the dual trunk installed in the leftmost slot, J2/J4. Line Type Matrix Card The dual trunk interface board can service four telephone line types. A four-position dual trunk matrix card (Part No. 702-9122) determines the type of interface for each line of the trunk card. The two trunks need not be set to the same line type. Each position of the matrix card enables the Model 640 to interface to one or more telephone line types as indicated below: • DID Loop start trunks: C.O. selector level Local PABX • E-E End-to-End loop start trunks (also called “POTS”- plain old telephone service) RS-232 port for TAP input • E&M DID trunk, reverse battery supervision PABX tie trunk with 2-wire audio signaling • GND ST Ground start End-to-End trunks Note: The matrix cards and line types are factory set for the custom application described to Zetron technical staff when ordering. In general, the matrix cards should be left in the factory settings unless the telephone line configuration changes. The matrix card in socket J3 of the dual trunk interface board configures trunk A and the matrix card in J4 configures trunk B. The selected line type is indicated by the matrix card marking that is on the bottom side of the socket (when trunk card is installed on peripheral board) labeled “1” on the dual trunk board as shown in Figure 6. 22 025-9416 Hardware Overview Dual Trunk Matrix Card DID Trunk B Socket Selected Line Type Bottom Edge Connector J4 Trunk A Socket J3 J1 J2 Figure 6. Dual Trunk Interface Matrix Cards For Simplified schematic diagrams of the four telco trunk types serviced by the matrix card, see “Configuration Diagrams” in Section 11. External RS-232 Ports Two 9-pin serial ports on the rear of the trunk card provide interface to an alphanumeric input device. The Model 640 supports the TAP (Telocator alphanumeric protocol) for alphanumeric display paging. A paging entry station can be directly connected to the DB-9 ports to enable an operator to manually enter alphanumeric pages into the paging terminal. Note: Each RS-232 port that is active replaces a trunk. As a result, the total number of inputs always remains 4 (if a second trunk card is installed). For example, if one TAP port is used, then only 3 trunks remain available for telco paging activity. Modem Interfaces A DUART (U15) on each dual trunk board interfaces the standard modems (U21, U22) with the peripheral board processor. It also provides some general purpose I/O functions for the processor. The modem interfaces may be disabled in order to enable RS-232 alpha interfaces through standard rear panel DB-9 connectors. Audio Level Adjustments Four audio level adjustment are located on the front of the dual trunk interface for each trunk. Figure 7 shows the front panel of the Model 640. Each trunk has three pots and one switch that define the audio levels. In addition, three front-panel LEDs identify operation of each trunk (12 total). See Section 6 for detailed adjustment procedures. 025-9416 23 Hardware Overview MODEL 640 DAPT XTRA AGC KILL FROM TEL BAL R BAL C TRUNK A TRUNK B TRUNK C MODEM ACT COM ANS READY LINE TRUNK D ANA PTT DIG PTT BUSY Figure 7. Model 640 DAPT XTRA Front Panel Notes On Figure 7: 1. The trunk LEDs (ACT, ANS, and LINE) are identical for each of the four available trunks. 2. The adjustment pots are identical for each of the four available trunks, but the AGC KILL switch is on the outside of the associated pots (above the top banks, and below the bottom banks). The four upper adjustments on the left bank define audio for trunk C; the lower four define audio for trunk D. The four upper adjustments on the right bank define audio for trunk A; the lower four define audio for trunk B. 3. The floppy disk drive shown is optional. The slot is covered when no disk drive is installed. The AGC KILL (automatic gain control) switch adjusts voice audio levels on the telephone interface line. The AGC compensates for the call-to-call changes in the loudness of the caller’s voice and the gain of each phone call. The voice audio signal is appropriately amplified and then fed to an envelope detector, modem, DTMF detector, and CODECs for each trunk. The FROM TEL adjustment controls silence deletion in the audio provided on the telco trunk. Generally, silence deletion is increased by turning the pot counterclockwise. The BAL R and BAL C pots effectively cancel out the outgoing audio from the incoming audio (that is, “sidetone”). Full-duplex hybrids separate the incoming and outgoing audio. The two balance controls are used to “match” the hybrid to the telephone lines. A better impedance match yields less reflected impedance and improved audio isolation. DID Trunk Configuration The DID configuration, illustrated in Section 11 (Part No. 024-0076), provides a balanced 48VDC battery current with full-duplex hybrid audio signaling to the TIP1 / RING1 pair of the telco interconnect. A loop closure at the telco CO or PABX is sensed by the resistor bridge and transistor circuitry, which drives the loop detect opto-isolator. When the telco equipment closes the loop and begins to send feed digits, the loop detect alerts the dual trunk card to receive the inbound signaling (feed digits), which may be pulse, MF, or DTMF format. After feed digit transmission is completed, the call enters page entry mode. The call is terminated from the telco CO or PABX by opening the TIP/RING LOOP. The Model 640 reverses battery to disconnect the DID line. 24 025-9416 Hardware Overview End-to-End Trunk Configuration The end-to-end trunk configuration is illustrated in Section 11 (Part No. 024-0077). Battery voltage is provided by the telco equipment; typically TIP (+), RING (-). A bi-directional optoisolator monitors the TIP/RING pair to detect inbound ringing from the telco or PABX equipment. After ring detection, the loop relay closure completes the TIP/RING circuit loop to answer inbound ringing. After the telco equipment detects loop current, ringing is halted and audio is connected for conversation mode. To initiate an outbound call, the TIP/RING loop is closed by the loop relay. After the telco equipment has detected loop current, dial tone is transmitted from telco, until dialed digits are received from the subscriber equipment (Model 640 trunk card). After dialing is complete, the line is placed into conversation mode while the destination telco equipment processes dialout, etc. The call is terminated from the telco CO or PABX by opening the TIP/RING loop. The Model 640 opens the loop relay to break the TIP/RING current and disconnect the end-to-end line. Ground Start Trunk Configuration The PABX ground start trunk configuration is illustrated in Section 11 (Part No. 024-0079). This circuit is an inbound-only configuration; that is, the Model 640 cannot originate ground start calls to PABX equipment. This is not a problem since paging is one-way communication. For the PABX ground start trunk, -48 VDC battery is provided from the Model 640 DAPT (as opposed to being provided by the TELCO CO for subscriber ground start service). When idle, the TIP is floating (not connected) and the RING is biased to -48 VDC through the ground start detection opto-isolator (lower 4N26 shown in 024-0079). The PABX or telco equipment must short the RING to ground briefly to initiate inbound dialing to the Model 640. Once the ground pulse has been detected, the loop relay closes, isolating the ground start detector and connecting battery to the TIP/RING loop. A brief period of time lapses wherein the PABX continues to hold the RING to ground until loop current is detected by the PABX. During this interval the -48 VDC ballast lamp glows brighter than normal (appears as a brighter flash). Once the PABX has detected loop current, the ground start is removed and the TIP/RING loop is closed. Digits are dialed into the Model 640 and conversation mode is initiated. The call is terminated by either the PABX or the Model 640 opening the TIP/RING loop. E&M Trunk Configurations There are two E&M configurations available for the Model 640 chassis. The Dual Trunk Interface card (Part No. 702-9361) can be configured for E&M trunks using the matrix plug or an optional Dual Trunk 4-Wire Audio Interface (Part No. 702-9488) can be installed in the second trunk card slot. The configurations are compared in Table 4. The major difference between the two setups is the number of signaling leads used for the audio portion of the channel. The TO TEL and FROM TEL audio paths are completely isolated between the two directional signal pairs in the 4-wire configuration. 025-9416 25 Hardware Overview Table 4. Table 4. E&M Trunk Configurations # of Leads Immediate Start Wink Start Lead Supervision Hybridized Full-Duplex Dual Trunk Interface in E&M Configuration 2 ü ü ü ü Dual Trunk 4-Wire Audio Interface Configuration 4 ü ü ü For a simplified configuration schematic of the E&M signaling, see “Configuration Diagrams” in Section 11. E&M Immediate Start Telco, PABX, or RF/µwave link equipment initiate inbound calling to the Model 640 through Mlead signaling. When -48 VDC (-24 VDC OK) is applied to the M-lead, the loop detect line goes low initiating pulse, DTMF, or MF detection as programmed. The dialup equipment transmits the feed digits to the Model 640. After the dialed digits have been decoded, the E-lead is grounded, conversation mode begins, and the calling party is prompted for their page entry. The call is terminated when the telco equipment drops the M-lead voltage, or when the Model 640 opens the E-lead. E&M Wink Start Telco, PABX, or RF/µwave link equipment initiate inbound calling to the Model 640 through M-lead signaling. When -48 VDC (-24 VDC OK) is applied to the M-lead, the loop detect line goes low. The Model 640 “winks” to the dialup equipment by flashing the E-lead to ground for approximately 240 mS. After the wink has been recognized, the dialup equipment transmits the feed digits to the Model 640. After the dialed digits have been decoded, the E-lead is grounded, conversation mode begins, and the calling party is prompted for their page entry. The call is terminated when the telco equipment drops the M-lead voltage, or when the Model 640 opens the E-lead. Note: -5 VDC or -12 VDC M-lead detection can be obtained by removing R6 (Trunk A) or R9 (Trunk B) from the Dual Trunk 4-Wire Audio Interface board (Part No. 702-9488). DUAL TRUNK 4-WIRE AUDIO INTERFACE BOARD The dual trunk 4-wire audio interface card (Part No. 702-9488) is essentially a dual trunk interface board with the telco hybrid circuitry removed to provide separate TO TEL and FROM TEL audio paths with no sidetone. The board is loaded with a dual matrix card (Part No. 7029122) for each trunk in order to provide E-lead signaling. These must be configured for E&M operation as described on page 22. 26 025-9416 Hardware Overview CAUTION DID, end-to-end, and ground start matrix configurations do NOT function properly for the Dual Trunk 4-Wire Audio Interface Board. Refer to “E&M Trunk Configurations” on page 25 for operational descriptions of this interface. ROM DISK BOARD The ROM (read-only memory) disk (Part No. 702-9389) stores all of the paging software for the peripheral and main processor boards. It plugs directly into an expansion slot on the main processor board. The paging terminal reads from the ROM disk on power up. The ROM disk (item #6, Figure 2) consists of four 128KB (1MB configuration) ROM chips in most applications. It is designed to support a total of eight ROM chips which can be 128KB or 256KB (1M or 2M bit) devices. Updated software is supplied on a new ROM disk. The single board approach simplifies field installation of new software. Jumper Settings Figure 8 shows the locations of each jumper on the ROM disk board. ROM RAM JP1 1 JP2 9 To Main Processor Motherboard ⇓ Figure 8. ROM/RAM Disk Board Jumper Locations (Side View) The jumpers on the ROM disk are used as follows: JP1 This 9-pin jumper determines the memory configuration for the ROM disk. Four, 2-pin jumpers should connect the pins, based on the type of memory chips. For a standard 1MB setup (128KB chips), jumpers should connect pins 2 and 3, 4 and 5, 6 and 7, 8 and 9. For a 2MB setup (256KB chips), jumpers should connect pins 1 and 2, 3 and 4, 5 and 6, 7 and 8. JP2 This jumper selects the card as a ROM or RAM disk. The 2-position jumper should be installed next to the appropriate label. 025-9416 27 Hardware Overview RAM DISK BOARD The RAM (random access memory) disk (Part No. 702-9386) stores the voice prompts and database information. It could also contain paging software in some circumstances to avoid updates to the ROM disk board. The RAM disk (item #7, Figure 2) is essentially like a hard drive in a computer. The RAM disk board is very similar to the ROM disk in design. It usually includes four 128KB RAM chips along with the associated battery back-up circuitry. Some applications will require more storage. There can be a total of eight 128KB RAM chips installed for a total of 1MB of non-volatile storage. While the RAM disk is protected by plastic on the solder-side, care should be taken when working around the RAM disk board. If it becomes corrupt (due to static discharge, lightning, etc.), the contents will be lost and a reformat process must take place. Refer to Section 9 for information on reformatting the RAM disk. After the reformat, the database and prompts must be reloaded by the restore process. Contact the factory if you suspect the RAM disk is damaged. Jumper Settings The jumper locations and settings on the RAM disk are identical to those on the ROM disk. They should be set appropriately for the installed configuration as shown in Figure 8 and described in the preceding paragraph. TNPP INTERFACE The TNPP (Telocator Network Paging Protocol) interface board (Part No. 702-9362) enables the Model 640 to receive and pass pages to increase the paging region. The TNPP interface plugs into the main processor motherboard at J8. The board (item #8, Figure 2) comes with two bidirectional 9-pin serial ports for easy connection to the network link. The TNPP Options (Part No. 950-9294 dual interface and Part No. 950-9470 unidirectional interface for satellite downlink or ZAPP! alphanumeric entry stations) setup the paging terminal for wide-area network paging. See Section 9 for details on the six LEDs on the TNPP interface. The Dual Serial Card Option (Part No. 950-9469) enables the Model 640 to receive alphanumeric input. The DB-9 connectors are used just like the trunk card RS-232 serial ports. TAP Inbound The Model 640 can support inbound TAP (Telocator Alphanumeric Protocol) calls by way of the modem capability built into the dual trunk interface boards. Any one of the four possible telephone trunk inputs may be configured to handle the inbound TAP calls. TAP Outdial The TNPP board is also used for TAP outdial applications. When an external modem is interfaced with this card, the Model 640 can send display pages to other TAP-compatible paging terminals on a dial-up connection. 28 025-9416 Hardware Overview PARALLEL PRINTER CARD The parallel printer option (Part No. 950-9758) enables the Model 640 to print the system log data in real-time. When the printer card is installed in either expansion slot (items #9 and #10, Figure 2), a printer can be connected to the DB-25 that is exposed through the rear of the chassis. Any standard serial printer cable works. DUAL DIAL CLICK CARD The dual dial click decoder option (Part No. 702-9119) enables the Model 640 to process digits dialed by rotary telephones. Dial clicks are different from dial pulses. The Model 640 can decode dial pulses without the optional dial click decoder board. DUAL MF DECODER CARD The dual multifrequency decoder option (Part No. 702-9197) allows the Model 640 to accept MF digit feed from DID and E&M 2- or 4-wire trunks. MF is a dual-tone signaling format similar to standard touch-tone (DTMF). FRONT PANEL LEDS The Model 640 has 18 red LEDs on its front panel. Many of the LEDs serve the same function, but for different trunks. Refer to Figure 7 for the location of each LED. Table 5 describes the operation of each LED. Note: 025-9416 The Model 640 has four LINE, ANS, and ACT LEDs - each trunk has its own set. They operate identically for each trunk. 29 Description Indicates the Model 640 is powered up and ready for operation. Indicates local ZLINK communication between the office computer (or dumb terminal) and the Model 640. Indicates modem ZLINK communication between the office computer and the Model 640. Indicates the trunk (phone line) is in use; that is, loop current is being drawn from a DID telco line. Indicates trunk supervision (answer status) between the CO and the Model 640. Indicates digit feed or voice activity on the trunk. Indicates paging (voice or tones) transmission to radio station. Indicates paging (binary digital) transmission to radio station. Indicates the radio channel is busy. The transmitter may be shared (cross-busy applications). LED Label READY 30 COM MODEM LINE ANS ACT ANA PTT DIG PTT BUSY When the transmission equipment asserts a busy condition (pin 41 of trunk and radio station interface connector). When sending digital pages. When sending analog pages. During most of initial boot-up cycle. During pulse telco calls and DTMF digit decoding When the trunk is initially answered and during active telco calls. During DID DTMF telco calls. When the trunk is initially answered and during active telco calls. May flicker rapidly enough to appear solid-on during data transfers. May flicker rapidly enough to appear solid-on during data transfers. Whenever power is on and boot-up cycle is complete. Solid ON Conditions Blinks twice at beginning of boot-up and then flickers rapidly at end of boot cycle. Blinks during DID DTMF telco calls. Blinks during end-to-end and pulse telco calls Blinks intermittently during boot-up cycle. Short flash every 3 seconds indicates ZLINK connection is active, but no data is being transferred. Blinks intermittently during boot-up cycle. Short flash every 3 seconds indicates ZLINK connection is active, but no data is being transferred. Not during normal operation. Blinking ON/OFF Conditions Hardware Overview Table 5. Operation of Front Panel LEDs 025-9416 Communications Setup COMMUNICATIONS SETUP OVERVIEW OF MODEL 640 COMMUNICATION Communicating with the Model 640 can be achieved several ways. Zetron has designed the paging terminal to allow for programming flexibility and convenience. A communications link with the Model 640 should be established before the system is interfaced to the radio station and telco. This order of installation aids the technician in “seeing” what is going on with the paging terminal. Diagnostics and testing are simplified when the communication link is already available. In addition, the three software modules included with the Model 640 can help any technician understand how the system is designed and meant to be operated. Setting up the communications link is established in four major steps: 1) Determine the type of communication link best for the custom system application. 2) Install MCU on the office PC (if applicable). 3) Make the appropriate hardware connections between the terminal and the Model 640. 4) Establish the ZLINK communication with the paging terminal. Each of the four installation procedures in this section lists and describes the specific steps to access the paging terminal. Carefully follow each checklist, in order. Some of the subsections may not be required. Simply skip the procedures that do not apply to the specific application. Note: This section only includes the basics on using MCU for ZLINK communications. Refer to the Model 640 Operating and Programming Manual (Part No. 025-9417) for details on the software operation of the paging terminal. Interface Flexibility The Model 640 is very flexible regarding programming access. The system programmer can gain access by way of several hardware configurations: • Local serial-interfaced PC running dumb terminal emulator software (MCU or equivalent) • Remotely located PC with a modem interface running dumb terminal emulator software • Local serial-interfaced dumb terminal Communications Software Each of the hardware interfaces may require one or more of the three software tools shipped with the Model 640. Each software module is designed for use with the others or as a stand-alone interface. Refer to the Model 640 Operating and Programming Manual (Part No. 025-9417) for more details on software programming and operation. 025-9416 31 Communications Setup MCU (Model 640 Communications Utility) MCU is a user-friendly interface to all aspects of the Model 640 programming. It can be accessed only from a personal computer connected to the Model 640 by way of modem or local serial cable. MCU provides easy-to-follow pull-down menus, on-screen help, and a useful tutorial that overviews the hardware and software of the paging terminal. MCU allows the system operator to monitor system traffic (log files) and view statistics and call counts. MCU also provides system management with ZLINK interface to the paging terminal. ZLINK (Plus Prompt “+” Commands) “Plus Prompt” commands are available either through MCU, ZLINK connection or by way of an alternate communications program, such as ProComm® or Kermit™. ZLINK programming is intended for use by advanced programming personnel only. ZLINK is much like DOS in format and provides over 60 commands for monitoring and managing the paging terminal’s operation. These commands are generally diagnostic in nature, but also include commands to access the database and common service-related items. In addition, ZLINK provides commands to generate test pages and view trunk card configuration and activity. Model 640 Subscriber Database The Model 640 database can be accessed by way of MCU or another communications program. Any dumb terminal or personal computer can link directly into the Model 640 database, stored on the RAM disk. The database configures system parameters such as subscribers, telephone line operation, transmitter operation, and general system operation. Computer Requirements The following minimum computer configuration is required to operate MCU: • IBM-compatible PC • 640 KB of RAM • 1 MB of available hard disk space • 3½-in floppy disk drive • Microsoft DOS Version 3 and above, or Windows 95, 98 • Modem (internal or external) if the office computer and Model 640 are not located within 60 feet of one another MCU INSTALLATION The MCU communications program should be installed on the office computer’s hard drive. Note: MCU cannot be used with a dumb terminal or console kit communications setup. If the system application is not using a computer, skip this section. To install MCU on the office computer, follow the steps below: 32 025-9416 Communications Setup q 1. Start up the office computer. From the Windows Desktop, switch to the DOS command-line prompt. q 2. Insert the MCU installation diskette into the appropriate floppy drive. (Drive A: in the following examples.) q 3. Switch to drive A: (if the blinking DOS prompt is not already “A:\>”), by typing: A: q 4. At the DOS “A:” prompt, type: INSTALL <Enter> The installation program presents the screen shown in Figure 9. q 5. Enter “y” if the default installation directory is acceptable. Enter “n” to choose a different installation directory. The instructions shown below appear. Restart the installation at the DOS prompt using a command that specifies the desired installation directory as described in the help screen. -------------------------------------------------------------------------This installs MCU, the Zetron 640 Series Office Computer Software, onto a HARD DISK IBM PC or clone. _ This will install from the floppy disk in drive: A: This will install to the drive and directory: C:\MCU _ (if you get a DOS error next, choose Fail) _ Are the above drive letters and path OK? (y/n) Figure 9. MCU Installation Screen q 6. Enter “y” at the “Do you wish to do the installation (y/n)?” prompt to begin transferring the files to the office computer. The installation process is done automatically and the DOS prompt returns. 025-9416 33 Communications Setup Are the above drive letters and path OK? (y/n) n -------------------------------------------------------------------------To specify different floppy drive, hard drive, or path, do: floppy:install1 floppy harddisk directory _ for instance, doing just "install1" from drive A is equivalent to specifying: a:install1 A C MCU _ _where the "a:" specifies the drive where the floppy disk is, the "A" specifies the same drive (don't include a colon), the "C" specifies the drive letter where the Office Software will be installed (no colon), and the "MCU" specifies the directory where the Office Software will be placed. (the directory will be created if it doesn't exist, but any parent directories must already exist; don't specify a leading backslash). You can type upper or lower case letters, it doesn't matter. You can leave out the harddisk and directory if C:\MCU destination is OK. _ Returning to DOS now, please wait a moment. A:\ > Figure 10. MCU Installation Help Screen TERMINAL HARDWARE CONNECTIONS This subsection describes the four installation procedures available for Model 640 communications. Follow the steps for the connection type selected above. Note: Even though several console interfaces are available, only one ZLINK connection can be active at any given time. Local Serial Connection Use an RS-232 serial connection if the computer is located close to the Model 640 (distances under 60 feet). A direct connection between the serial port of the Model 640 Paging Terminal and a serial port on the office computer can communicate at rates up to 9600 baud. The communication rates are lower with longer cables. Serial cables longer than 60 feet are not recommended, since induced EMI and other problems may arise, causing communications interference. Worse yet, a long serial cable in the wrong RF environment could possibly inject RFI into the Model 640 system, creating background noise or operational interference. The advantages of the serial interface are: • no additional phone lines are required to link up to the terminal • the communications rate is usually faster and more reliable • one of the paging terminal trunks does not have to be tied up for ZLINK programming and database modification 34 025-9416 Communications Setup Installation Procedure To setup the system for local RS-232 connection, follow the steps below: q 1. Determine the office computer’s serial communication port (usually COM1 or COM2) and the connector type (DB-9 or DB-25). q 2. Obtain or make an appropriate RS-232 connector cable. It should have a male 9-pin connector at one end and a female 9-pin or 25-pin connector for the computer’s serial port at the other end. A Zetron ZLINK (Part No. 709-7565) cable provides connection to a 9-pin computer COM port. If the office computer has a 25-pin COM port, a standard adapter (DB-9 male to DB25 female) can be used to mate the Zetron cable to the computer. Otherwise, a cable can be constructed using the pinouts as described in Figure 11. 1 5 5 6 male Model 640 (1) DCD (2) Rx (3) Tx (4) DTR (5) GND (6) DSR (7) RTS (8) CTS (9) RING shield 1 9 9 6 female Computer (DB-25) (20) DTR (2) Tx (3) Rx (8) DCD (7) GND (6) DSR (5) CTS (4) RTS (22) RING (1) shield Female DB-9 (4) DTR (3) Tx (2) Rx (1) DCD (5) GND (6) DSR (8) CTS (7) RTS (9) RING shield Figure 11. ZLINK Cable (Part No. 709-7565) Pin Configuration q 3. Make the hardware connections between the computer and the Model 640 as shown in Figure 12. Note that there are several 9-pin serial inputs on the back panel of the paging terminal. The local connection port (labeled “COM PORT”) is located on the lower right back panel of the Model 640 chassis. 025-9416 35 Communications Setup Zetron ZLINK Cable Part No. 709-7211 Local RS-232 “COM PORT” RS-232 COM port IBM-Compatible Office Computer Model 640 Figure 12. Local Serial Connection to Model 640 Remote Modem Connection Note: Zetron recommends that a temporary local connection (usually with a laptop PC) be made for installation diagnostics. Refer to “Local Serial Connection” on page 34 for details. Once you have completed all the installation procedures described in Section 5, return to this subsection and modify the communications link accordingly. If a temporary local connection cannot be made for installation purposes, skip to Section 5 and complete the “Telco Connections” procedure before trying to make a remote modem connection. Use a modem connection if the office computer cannot be located at the Model 640 site. A PC modem and two separate phone lines are required for this type of communication. One phone line interfaces to the computer’s modem, and the other interfaces to any trunk of the Model 640 (with internal modem). A dedicated phone line is not required for the computer’s modem. However, a separate line is more efficient for data transfer and system monitoring, since customer traffic is not impeded. Zetron recommends that the modem phone line: • is separate from any of the lines into the paging terminal trunk cards • is a standard end-to-end, loop start line • does not have a Call Waiting feature • is dedicated to ZLINK maintenance use Installation Procedure Figure 13 illustrates the hardware connections between the office computer and a remotely located Model 640. 36 025-9416 Communications Setup PSTN To Telephone Trunk Cards RJ-11 phone line IBM-Compatible Office Computer To Internal or external modem Model 640 Figure 13. Modem Connection to the Model 640 To setup the system for modem connection, follow the steps below: q 1. Determine which trunk of the Model 640 to use for modem maintenance. q 2. Connect the office PC modem to a standard telco line using RJ-11 cable. If the PC modem is external, connect the modem to the computer’s serial COM port using RS232 cable (usually standard 25-pin male connectors on both ends). Note: q Make sure to use the modem jacks labeled “LINE” or “TELCO” if an external PC modem is installed. Do not connect to the “PHONE” or “LOCAL” jacks, as they are for telephone sets only. 3. Connect the desired Model 640 trunk to an end-to-end, loop start telco line. Use the 50-pin trunk and radio station interface for connections. ESTABLISHING ZLINK COMMUNICATIONS A communications link must be established once the physical connections have been completed between the Model 640 and the office computer, console, or dumb terminal. Follow one of the procedures below to initiate a ZLINK connection. Note: This subsection gives only an overview of how to setup MCU for test purposes. Refer to the Model 640 Operating and Programming Manual (Part No. 025-9417) for details on the software operation of the paging terminal. ZLINK Connection Through MCU This procedure describes how to establish communications with the Model 640 using MCU. Recall that MCU can only be run on an IBM-compatible office computer. If the ZLINK connection is made with a dumb terminal only, skip this subsection. Follow the steps below to configure MCU for ZLINK communications. 025-9416 37 Communications Setup CAUTION Do not attempt to run MCU from MS Windows. The computer will not be able to link properly to the paging terminal and a system crash may result. q 1. Boot up the office computer in MS DOS. q 2. Change to the MCU installation directory (default \MCU), by typing: CD MCU q 3. Run MCU, by typing: MCU q 4. From the MCU main menu, select Edit, Locations. The Locations Index window appears. q 5. Press <F9> to start a new record. The Comm Window shown in Figure 14 appears. Figure 14. MCU Comm Window q 6. Enter an appropriate name for the Paging Terminal Site. The name is a text string, up to 8 characters in length. q 7. If the ZLINK connection is made by a remotely located PC modem, enter the complete Phone Number to dial for site connection. Use the following special characters as needed (refer to modem manual for supported commands): , = insert a pause in the dialing sequence P = use pulse dialing Example: For DID lines that require (4-digit) overdial of the subscriber PhoneNumber, 38 025-9416 Communications Setup enter “1-aaa-xxx-xxxx,,,,,0555”. 1-aaa-xxx-xxxx = paging terminal phone number; 1 + area code (aaa) ,,,,, = pauses to allow the paging terminal to prepare for overdialing 0555 = default ConsoleNumber q 8. Alternately, if the ZLINK connection is local (computer or dumb terminal), indicate the appropriate baud rate for serial communications and identify the connection is local as “B#L”. B = indicates the baud rate is to follow # = the communications speed (any rate between 512 and 9600) L = local connection Example: For 4800 baud local communication enter “B4800L”. q 9. Enter the Password for ZLINK access to the paging terminal. The password is a text string, up to 9 characters in length. Spaces are allowed and the password is casesensitive. I CAUTION Write the password down in a safe place, in case it is forgotten. Do NOT give the password to unauthorized personnel. q 10. Enter the number of the computer’s Comm Port used to connect to the Model 640. 14 are the allowed entries. If the communication port is a non-standard type, identify the port as follows: pBASEaaaIRQx p = port # (5 -9 allowed) aaa = base I/O address of the port x = IRQ address to use (2 - 7 allowed, usually 3 or 4) q 11. Once all the fields in the Comm window are properly entered, save the record and exit to the MCU main menu by pressing <Esc>. Note: If a remote connection (modem) to the paging terminal will be used, it is recommended that a temporary local connection (usually with a laptop computer) be made for installation diagnostics. Refer to “Local Serial Connection” on page 34 for details. q 12. Power up the Model 640 and let it complete its boot sequence (all lights have extinguished except the READY light is on solid). q 13. Select Comm, Zlink from the main menu. MCU attempts to make a connection with the Model 640. 025-9416 39 Communications Setup q 14. Once a communications link has been established, the introductory screen shown in Figure 15 appears. q 15. The plus prompt (+) is displayed and a ZLINK connection has been successfully established. The Model 640 computer is now logged on. Figure 15. Introductory ZLINK Screen Adjusting the Modem Initialization String If the site connection is made through the office PC’s modem, it may be necessary to alter the modem initialization string to ensure proper handshaking. If you encounter connection problems and a 14.4 Kbps, or faster, modem is being used, it may be necessary to disable some of the modem’s capabilities that the M640 does not require. The most features most commonly disabled are the following: Data Compression Error Correction Flow Control For example, on US Robotics modems the initialization string is as follows: AT&M0&K0&I0&H0&N2& (All entered in caps) The commands in this string equate to the following: 40 AT Get modem’s attention &M0 Error Control disabled &K0 Data Compression disabled &I0 RX Flow Control disable &H0 TX Flow Control disable &N2 Force modem to 1200 baud 025-9416 Communications Setup Note: The initialization string for other modem brands may vary. Always consult the documentation for your modem to confirm the correct commands. The following steps will allow you to change the modem initialization string: q 1. Exit MCU to DOS. (Hit <Esc> repeatedly or select Other, Exit.) q 2. Change to the \MCU directory (if not already there), by typing at the DOS prompt: CD C:\MCU\<my site name> q 3. At the DOS prompt type “EDIT modem.ini”. q 4. Enter the new initialization string to disable the features previously mentioned. Do not insert spaces between commands; the string should be continuou. q 5. Save the file and then exit to DOS. The next time the location is ZLINKed, the computer will look at the “modem.ini” file for the appropriate modem commands. Note: If you are unsure about modem initialization commands, contact Zetron Mobile and Paging Systems technical support for assistance. Be sure to have your modem manual handy for easy reference before calling. Troubleshooting the MCU Interface If the ZLINK interface is not successfully established with the paging terminal, recheck each of the following: þ all communication parameters defined in MCU, especially the Password and Phone Number fields þ all hardware connections between the office computer and the paging terminal þ all telco connections to the ZLINK trunk (if using a modem interface) ZLINK Connection Through Another Terminal Emulator This procedure describes how to establish communication with the Model 640 using an alternate terminal emulator program. (In the examples below, ProComm® is used.) Note: Zetron recommends the use of MCU for communication between the office computer and the Model 640. This procedure is included for completeness, but is not the best means of linking to the paging terminal. Use the following steps to configure the communications software for ZLINK interface: q 1. Boot up the office computer. q 2. Power up the Model 640 and let it complete its boot sequence (all lights have extinguished except the READY light is on solid). 025-9416 41 Communications Setup q 3. Run the communications software. For example, type: PROCOMM from the \ProComm® directory. q 4. Change the communications parameters to: Local Connection • • • • 4800 baud serial connection no parity 8 bits per word 1 stop bit Modem Connection • • • • 1200 baud no parity 8 bits per word 1 stop bit In ProComm®, this is accomplished by hitting <Alt> + <P> to enter the line settings window. Then select #11 (or #9) and press <Enter> to choose the parameters above. q 5. Change the COM port selection to identify the computer’s RS-232 or modem port. In ProComm® this is accomplished by selecting #22 (COM1), 23 (COM2), 24 (COM3), or 25 (COM4) from the line settings window. q 6. Press <Esc> to save the parameter settings and return to the communication screen. q 7. For a modem connection, enter the phone number into the dialing directory and initiate dialing. In ProComm®, this is accomplished by hitting <Alt> + <D> to enter the autodialing window. Then enter a new line number (1 - 10 are available). Enter the appropriate dialing string (phone number including all access codes, prefixes and area codes) to connect to the paging terminal. q Note: 42 8. Some strange control characters are printed to the screen. These characters are normal and indicate that the Model 640 is looking for a ZLINK connection. Wait a few seconds and then press <Enter> three times. Once a communications link has been established, the password entry screen shown in Figure 16 appears. If a remote connection (modem) to the paging terminal will be used, it is recommended that a temporary local connection (usually with a laptop PC) be made for installation diagnostics. Refer to “Local Serial Connection” on page 34 for details. 025-9416 Communications Setup Figure 16. ZLINK Password Request Screen from ProComm® q 9. The paging terminal is shipped from the factory with no password initially programmed. Press <Enter> and the introductory screen shown previously in Figure 15 appears. q 10. The plus prompt (+) is displayed and a ZLINK connection has been successfully established. The Model 640 console is now logged on. Troubleshooting the Emulator Interface If the ZLINK interface is not successfully established with the paging terminal, recheck each of the following: þ all communication parameters defined in the terminal emulator program, especially the phone number and baud rate þ all hardware connections between the office computer and the paging terminal þ all telco connections to the maintenance trunk (if using a modem interface) Troubleshooting the ZLINK Connection The rest of this section troubleshoots faulty connections between the office computer and the paging terminal. If you have successfully linked up to your terminal, you need not read it. Otherwise, please read through it before calling for assistance. 025-9416 43 Communications Setup Control Characters Some unusual and special control characters are often written to the screen during the initial ZLINK interface. These symbols are normal and indicate that the terminal is attempting to handshake with the Model 640 to establish a communications link. However, if the screen displays strange characters and a ZLINK connection cannot be established, the “ansi.sys” driver may not be properly installed on the office computer. The characters may include, but are not limited to arrows, brackets, numbers, and other rather strange characters. To remedy the situation, add the following line to the “config.sys” file on the computer’s boot disk: DEVICE=ANSI.SYS Jumper Settings The Model 640 does not immediately recognize switch or jumper setting changes. After any changes are made, turn the equipment off, then back on to reinitialize the hardware. Active ZLINK Connections The office computer (PC) can talk to the paging terminal through the phone lines by way of modem, or through a local serial connection. Only one access method should be active at any given time. Zetron recommends consistently using only one interface method to avoid accidental communications conflicts. CAUTION Always turn off the computer or paging terminal before inserting or removing boards! Zetron Communications Software The ZLINK software is more sensitive to hardware configuration than dumb terminal emulator programs such as Crosstalk. ZLINK may not work correctly, even when another communications program runs okay on the same machine without changing anything. The steps below should resolve any problems. Please note that once configured properly for ZLINK, other communication programs should still run without any problem. Note: When ZLINK starts up, both the serial port and modem are reset to communicate properly with the Model 640. There is no need to manually configure stop bits, parity, etc. - ZLINK does it automatically. Serial Ports If the office computer is locally connected to the paging terminal and a link cannot be established, this subsection provides some possible solutions. A serial port is required for external modem and local connections to the paging terminal. If the office computer does not already have a built-in serial port available, one may need to be purchased and installed. Contact a computer repair and sales company for details and options. ZLINK supports two serial ports directly (more can be addressed): 44 025-9416 Communications Setup • COM1 is at I/O address 03F8h and uses IRQ4 • COM2 is at I/O address 02F8h and uses IRQ3 • COM3 is at I/O address 03E8h and uses IRQ4 • COM4 is at I/O address 02E8h and uses IRQ3 Troubleshooting Checklist To avoid potential serial port problems, check the following: q Ensure that a serial port is present and addressed to COM1, COM2, COM3, or COM4. Usually the COM port number is set by way of DIP switches on the serial board or computer BIOS. Check your PC manuals for details. q Ensure that the serial port is active. Some computers allow disabling/enabling of the ports, usually by way of DIP switches. Check the PC and modem manuals for details. q Ensure that the interrupts are set correctly and are active on the serial port. Some serial boards or ports can be setup for use with any interrupt signal. Check for the correct IRQ settings as listed above. q Ensure that there are no serial port conflicts. If the computer has two serial ports, one must be COM1, the other COM2. If two ports are assigned the same COM port number, neither will function reliably. q Recheck the pin configuration of the ZLINK cable, per Figure 11. Note: Many PC cards perform several functions. For instance, a memory expansion card may also have a serial port. It is important to note that the computer may have an extra, unused serial port. Modem Connections Most modems on the market today function based on software commands instead of hardware switches or jumpers. An “initialization string” of commands can be sent to the modem to configure which features are enabled or disabled. If the modem in the Model 640 responds to an incoming call, but a serial connection cannot be established, then a revised modem initialization string may be required to disable some of the default settings common in the newer, high-speed modems (14.4 Kbps and faster). The features in the modem installed in the PC that typically need to be disabled are: Data Compression Error Correction Flow Control For example, the following set of commands would be appropriate to initialize a US Robotics modem: AT&M0&K0&I0&H0&N2 025-9416 45 Communications Setup The commands in this string equate to the following: Note: AT Get modem’s attention &M0 Error Control disabled &K0 Data Compression disabled &I0 RX Flow Control disable &H0 TX Flow Control disable &N2 Force modem to 1200 baud Do not assume that the computer’s modem responds to the above commands exactly as described. Always check the modem manual for custom initialization commands and their use. The following steps will allow you to change the modem initialization string: q 1. Exit MCU to DOS. (Hit <Esc> repeatedly or select Other, Exit.) q 2. Change to the \MCU directory (if not already there), by typing at the DOS prompt: CD C:\MCU\<my site name> q 3. At the DOS prompt type “EDIT modem.ini”. q 4. Enter the new initialization string to disable the features previously mentioned. Do not insert spaces between commands; the string should be continuous. q 5. Save the file and then exit to DOS. The next time the location is ZLINKed, the computer will look at the “modem.ini” file for the appropriate modem commands. Note: If you are unsure about modem initialization commands, contact Zetron Mobile and Paging Systems technical support for assistance. Be sure to have your modem manual handy for easy reference before calling. Troubleshooting Checklist To avoid potential serial port problems, check the following: q Verify that the dial string to the terminal is correct. • 46 If dialing over an End-to-End (POTS) line, you should hear/see the following events at the modem installed on the PC when the MCU is dialing the Model 640. 1. Dial tone, followed by a string of Touch Tone digits 2. One to three rings 3. Model 640 answers with prompt “At the tone, enter your pager number.”, followed by a beep prompt. 4. The PC sends the console access number (usually 0555 or 555) by way of the modem as a string of Touch Tone digits. 5. The Model 640 returns a solid modem tone followed shortly by the modem carrier “hiss” as it attempts to establish a connection. 025-9416 Communications Setup 6. The modem speaker is muted and the prompt “Connect 1200” appears on the screen of the PC. 7. The top menu for programming the Model 640 is displayed on the monitor. • If dialing over a DID line, you should hear/see the following events at the modem installed on the PC when the MCU is dialing the Model 640. 1. Dial tone, followed by a string of Touch Tone digits 2. One to three rings 3. The Model 640 answers with a solid modem tone followed shortly by the modem carrier “hiss” as it attempts to establish a connection. 4. The modem speaker is muted and the prompt “Connect 1200” appears on the screen of the PC. 5. The top menu for programming the Model 640 is displayed on the monitor. q If the modem in the PC and the modem in the Model 640 q Information in the EDIT LOCATIONS in MCU is correct EE line = (area code)nnn-nnnn,,,,,,<console access number> DID line = (area code)nnn-nnnn (⇐ number = console access number) q Verify that no one is connected to the Model 640 by way of the local ZLink Comm port q Verify that the ready light on the Model 640 is lit. q Verify that no switch-boxes need to be switched. q Verify that the telephone line is not shared with a FAX machine or another modem device (this applies to End-to-End lines only) q Verify all telephone line connections. q Ensure that if the phone line to the paging terminal has some kind of switch, it is in the proper position. For example, a switch to select a desk phone or the Model 640 should be set to access the paging terminal. q Ensure that no FAX machines or other modems are on the telephone line. Note: 025-9416 If all of the above checks and suggestions have been used and a ZLINK is still not possible, contact Zetron technical support for assistance. 47 Installation INSTALLATION INTRODUCTION This section contains the information necessary to install the paging terminal. This includes making connections to both the telco and radio station equipment. The information is presented in the form of checklists and step-by-step procedures. Where appropriate, procedures in this section refer to detailed information contained elsewhere in the manual. Installation Overview Initial installation of the Model 640 is usually accomplished in six major steps: q 1. Install the provided software modules on the office computer’s hard disk. q 2. Connect the office computer or console and establish a communications link. q 3. Connect all trunks (2 or 4) to the telco central office (CO) or private access branch exchange (PABX). q 4. Connect to the radio system (transmitter and receiver links). q 5. Enter pagers into the database and perform some test paging operations. Adjust the equipment levels for the appropriate connections. q 6. Mount and connect the working system into its permanent installation. Steps #1 and #2 should have been completed in Section 4. Installation steps #3-5, plus several minor transition steps, are presented in this section. Each procedure lists and describes the specific steps to take during installation of the paging terminal. Note: This section only includes the basics on setting up the Model 640 database for test purposes and using MCU for communications. Refer to the Model 640 Operating and Programming Manual (Part No. 025-9417) for details on the software operation of the paging terminal. The installation procedures were designed with the assumption that the Model 640 was already factory configured with the correct number of trunks. It is also assumed that any other system customization (such as optional equipment) was completed prior to shipment. If optional equipment needs to be installed, refer to Section 7 before continuing with the standard installation. To install the paging terminal, carefully follow each of the procedures in this section (in order). Some of the subsections may not be required. Simply skip the procedures that do not apply to the specific application. 48 025-9416 Installation Installation Warning This equipment generates and uses radio frequency energy. If the Model 640 is not installed and used in accordance with this manual, it may cause interference to radio communications. The Model 640 should only be installed by experienced radio and paging systems personnel. Specialized knowledge in telephone systems is also critical for interfacing the Model 640 with the telephone network. CAUTION Always power down the paging terminal before removing or installing cards. The Model 640 is not designed for “hot” removal/insertion of cards. Initial Unpacking and Inspection The following procedure prepares the technician for the actual installation of the paging terminal. It includes a general familiarization with the hardware and confirmation of the correct custom system ordered from Zetron. Some or all of this procedure may have been completed already. Skip any steps that are superfluous. q 1. Unpack the Model 640 from its box. q 2. Remove the six screws that hold the paging terminal top cover in place. q 3. Remove the top cover of the Model 640 and set it and the screws aside in a safe place. q 4. Check the unit against the order receipt to ensure that all purchased options were shipped from the factory. Refer to Section 3 for details on the location and operation of each card (standard and optional) in the Model 640 chassis. q 5. Make sure all circuit cards, in each and every occupied slot, are firmly seated. CHOOSING AN INSTALLATION METHOD There are basically two interface options available for dividing the telco and radio connections. Each method can be modified in an endless variety of ways for a custom application. Optional Installation Interface Assembly This optional kit (Part No. 950-9334) includes a terminal block adapter for telco and radio station connections. The terminal block adapter plugs directly into the RJ21 connector on the rear of the Model 640 chassis. It provides two Wiedmueller connectors for the radio station interface and four RJ14 phone jacks for the telco interface. Figure 17 illustrates the basic connections with the installation interface assembly option. 025-9416 49 Installation Telco Terminal Block Adapter Model 640 rear panel Radio Station Equipment (Co-located transmitter, Tx link controller, etc.) Figure 17. System Configuration with the Optional Installation Interface Assembly 66-Type Punchdown Block Installation The other method of installation requires a 66-type punchdown block (Part No. 802-0093 or 8020263) and a female 25-pair cable (Part No. 709-0004) to split the radio station and telco wiring out of the Model 640’s RJ21 connector. This interface method is more flexible than the optional installation interface assembly, but it requires more extensive knowledge of telephone line types and signaling formats. Figure 18 illustrates the basic connections with the 66-type punchdown block. 50 025-9416 Installation 66-type punchdown block Telco Radio Station Equipment (Co-located transmitter, Tx link controller, etc.) Model 640 Figure 18. System Configuration with a 66-Type Punchdown Block TELCO CONNECTIONS The male 50-pin RJ21 connector on the rear of the Model 640 provides both trunk and radio station interfaces for the paging terminal. As a result, even though the telco and transmitter connections are accomplished separately (different installation instructions), they are not totally unrelated. The following table shows the telco pinouts for the RJ21 connector. Shading indicates the lead pairings for each of the four available trunks. This information is also printed on the rear panel of the paging terminal for convenience. Pin #1 is the first signal - top, left and pin #50 is the last signal - bottom, right. Table 6. RJ21 Telco Pin Configuration Pin # 025-9416 Label Description 1 RING 1-A ring lead 1 for trunk A 2 RING 2-A ring lead 2 for trunk A 3 M-A M (mouth) lead for trunk A 4 RING 1-B ring lead 1 for trunk B 5 RING 2-B ring lead 2 for trunk B 6 M-B M (mouth) lead for trunk B 7 RING 1-C ring lead 1 for trunk C 8 RING 2-C ring lead 2 for trunk C 9 M-C M (mouth) lead for trunk C 10 RING 1-D ring lead 1 for trunk D 11 RING 2-D ring lead 2 for trunk D 51 Installation Pin # Label Description 12 M-D M (mouth) lead for trunk D 26 TIP 1-A tip lead 1 for trunk A 27 TIP 2-A tip lead 2 for trunk A 28 E-A E (ear) lead for trunk A 29 TIP 1-B tip lead 1 for trunk B 30 TIP 2-B tip lead 2 for trunk B 31 E-B E (ear) lead for trunk B 32 TIP 1-C tip lead 1 for trunk C 33 TIP 2-C tip lead 2 for trunk C 34 E-C E (ear) lead for trunk C 35 TIP 1-D tip lead 1 for trunk D 36 TIP 2-D tip lead 2 for trunk D 37 E-D E (ear) lead for trunk D Ground Reference and Lightning Protection TELCO or PABX interfaces to the Model 640 should always include a ground reference connection. Ground start and E&M wink start applications cannot operate reliably without this ground reference. To ground the cabinet chassis to a common earth connection, use any of the screws holding the rear panel in place and connect to the telephone demarcation block ground point, using 16 AWG wire or larger. Tying two or three overhand knots in the wire inductively blocks lightning paths from the telephone equipment, but may also block RF grounding. CAUTION The Model 640 does not provide any integrated lightning defense. Use additional equipment, such as Zetron’s Deadbolt, to protect your investment. Installation Interface Assembly The optional installation interface assembly (Part No. 950-9334) provides all of the hardware necessary for easy connection to the telco and the radio station equipment. The kit includes a terminal block adapter board (Part No. 702-9470) that plugs directly into the RJ21 connector on the rear of the Model 640. The adapter provides two male, 12-pin, Weidmuellers for connection to the radio station (separate analog and digital) and four standard, 6-wire, phone jacks for telco connections. Terminal Block Adapter Installation Follow the steps below to install the terminal block adapter on the rear panel of the Model 640. q 52 1. Power-down the paging terminal. 025-9416 Installation q 2. Loosely attach two 440 × 5/16-in spacers to the bottom of the terminal block adapter with two 440 ? 1-in screws as shown in Figure 19. Figure 19. Terminal Block Adapter Installation q 3. Loosely attach the 440 × 1/8-in spacer to the top of the terminal block adapter with the 440 × 3/8-in screw. q 4. Secure the board to the RJ21 interface on the rear of the Model 640 chassis. q 5. Tighten the three screws into the standoffs and the paging terminal. Figure 20 shows the rear of the Model 640 chassis with the terminal block adapter installed. Terminal Block Adapter Option 702-9470 Figure 20. Installed Terminal Block Adapter Option 025-9416 53 Installation Note: Once the terminal block adapter is installed, the serial ports for trunks C and D (if a second dual trunk card is installed) are partially blocked. This should not create a problem as long as all alphanumeric serial input is directed to trunks A and/or B. Be aware of this minor inconvenience when configuring the trunks in the database to avoid extra work. Telco Interface to the Terminal Block Adapter Once the terminal block adapter is properly connected to the Model 640, the trunk lines can be interfaced to the telco phone lines. Generally, each of the four phone jacks on the adapter are connected to standard wall jacks with RJ14 cabling. However, some applications may require different telco wiring. Follow the steps below to connect the terminal block adapter to the telephone lines: q 1. Power-down the paging terminal. q Use the supplied telephone cords (Part No. 709-7000) or make an appropriate cable for each of the active trunk interfaces (two or four, depending on the number of trunk cards installed). One end of each cable should have an RJ14, 6-pin plug for the connection to the terminal block adapter jacks. The other end should have whatever type of connector is required for the specific application. 2. Table 7 shows the pinouts for the jacks on the terminal block adapter (J1 - J4). Table 7. Telco Interface (J1 - J4) Pin Configuration for Terminal Block Adapter q 54 Pin # Wiring Connection 1 (top) E (ear) lead 2 Tip lead 2 3 Ring lead 1 4 Tip lead 1 5 Ring lead 2 6 (bottom) M (mouth) lead 3. Connect a clamp-on ferrite (Part No. 305-2025) to the Model 640 end of each telephone cord as shown in Figure 21. Four ferrites are supplied with the installation interface assembly option for suppressing RF noise interference. 025-9416 Installation To telco connection To Model 640 terminal block adapter Figure 21. Clamp-On Ferrite (Part No. 305-2025) Installation CAUTION Four clamp-on ferrites (Part No. 305-2025) are supplied with the optional terminal block adapter kit. The ferrites must be installed on each phone cord, immediately adjacent to the Model 640 chassis. Failure to properly install the ferrites may result in radio interference! q 4. Plug a cord into each of the telco jacks on the terminal block adapter. q 5. Connect the other end of each cord to the telephone line. Telco connections for the optional installation interface assembly are complete. Proceed to “RADIO STATION CONNECTIONS” on page 61. 66-Type Punchdown Block Installation Zetron offers two versions of the 66-type punchdown block for installation of the Model 640. The most flexible punchdown block (Part No. 802-0093) provides 50 terminals and a female RJ21 25-pair connector jack on either side of the block. The other punchdown block (Part No. 802-0263) provides only one RJ21 jack and has an easy-to-spot orange cover. Both blocks can be used for any type of connections, but each has advantages for specific applications. Both punchdown blocks are configured with 50 rows (each corresponding to a pin) and four columns (terminals per row). The two left terminals in each row are electrically identical, as are the two right terminals. Paired bridging clips and fused bridging clips are available from other vendors to connect the two sides of the punchdown block. Punchdown Block Installation Zetron recommends using a female-to-male 25-pair cable (Part No. 709-0004) and a 66-type punchdown block (Part No. 802-0093) to interface the Model 640 to both the telco and the radio station. Figure 22 illustrates the hardware connections between the Model 640 and the punchdown block. 025-9416 55 Installation 66-type punchdown block (Part No. 802-0093 or 802-0263) R J 2 1 25-pair cable (Part No. 709-0004) To RJ21 radio station and telco interface R J 2 1 Figure 22. Punchdown Block Installation Follow the steps below to connect the punchdown block to the paging terminal: q 1. Power-down the paging terminal. q 2. Obtain or make a cable with a female 50-pin connector (to Model 640) on one end and either flying leads or a male 50-pin connector (to punchdown block) on the other end. Refer to Table 6 for the telco pin configuration of the RJ21 connector on the rear panel of the paging terminal. q 3. Plug the female connector into the RJ21 interface on the rear of the Model 640. q 4. Plug the male connector into one of the RJ21 interfaces on the punchdown block. Be sure to make the Model 640 connections on one side and the radio station and telco connections on the opposite side. If using flying leads instead of a male RJ21 connector, punchdown the telco leads in the appropriate places. q 5. Attach the punchdown block to a wall or fixture where it is easily accessible. Telco Interface to the Zetron Punchdown Block The interface to a central office (CO) or private access branch exchange (PABX) is typically provided by way of one of two hardware configurations: 56 • a 25-pair 66-type punchdown block • standard RJ-type phone jacks 025-9416 Installation Telco Punchdown Block Interface The block typically has telco wiring on one side and open terminals on the other side. To interface the phone company’s punchdown block to the Model 640, a second punchdown block is usually required to split the radio station and trunk wiring out of the RJ21 connector (already installed above). Figure 23 illustrates the hardware connections between a common telco 66-type punchdown block and the Zetron punchdown block. The block provides eight trunks, although the Model 640 only uses a maximum of four trunks. Notice that the telco line type in the figure is 4-wire E&M. Telco Punchdown Block (4-wire E & M) To telco interface R J 2 1 bridging clips T1 R1 T2 R2 E M T1 R1 T2 R2 E M T1 R1 T2 R2 E M T1 R1 T2 R2 E M T1 R1 T2 R2 E M T1 R1 T2 R2 E M T1 R1 T2 R2 E M T1 R1 T2 R2 E M G G 26 1 27 2 28 3 29 4 30 5 31 6 32 7 33 8 34 9 35 10 36 11 37 12 38 13 39 14 40 15 41 16 42 17 43 18 44 19 45 20 46 21 47 22 48 23 49 24 50 25 Model 640 Interface Punchdown Block R J 2 1 T1 R1 T2 R2 E M T1 R1 T2 R2 E M T1 R1 T2 R2 E M T1 R1 T2 R2 E M standard 26 gauge telephone wire radio station wiring G G 26 1 27 2 28 3 29 4 30 5 31 6 32 7 33 8 34 9 35 10 36 11 37 12 38 13 39 14 40 15 41 16 42 17 43 18 44 19 45 20 46 21 47 22 48 23 49 24 50 25 TRUNK A TRUNK B TRUNK C TRUNK D R J 2 1 25-pair cable (Part No. 709-0004) To Model 640 RJ21 interface (See Figure 5-6) Figure 23. E&M 4-Wire Telco Interface Follow the steps below to interface to the telco punchdown block: q 1. Power-down the paging terminal. 025-9416 57 Installation q 2. Connect the leads for each Model 640 trunk as shown in Figure 23, using standard 26 AWG wire-wrap wire. Wiring configuration varies by telephone line type. The figure above shows the wiring configuration for an E&M 4-wire telco punchdown block. Notes: Many applications do not require all six of the available phone line pins. For example, a typical 2-wire telco interface only requires the TIP and RING leads for each trunk. Contact the telephone service provider to determine the line types and punchdown configuration. It may be wise to wire up all six leads and then use bridging clips to connect only the necessary leads. That way, any future changes in the telco line type will not require complete rewiring of the paging terminal interface. Table 8. E&M 4-Wire Type I TELCO / PABX Interface RJ21X pinout Trunk # Signal Name Wire Color (Body/Stripe) RJ21X pinout Trunk # Signal Name Wire Color (Body/Stripe) 1 2 3 4 5 6 7 8 9 10 11 1 1 1 2 2 2 3 3 3 4 4 RING RING1 M RING RING1 M RING RING1 M RING RING1 BLU / WHI ORG / WHI GRN / WHI BRN / WHI SLA / WHI BLU / RED ORG / RED GRN / RED BRN / RED SLA / RED BLU / BLK 26 27 28 29 30 31 32 33 34 35 36 1 1 1 2 2 2 3 3 3 4 4 TIP TIP1 E TIP TIP1 E TIP TIP1 E TIP TIP1 WHI / BLU WHI / ORG WHI / GRN WHI / BRN WHI / SLA RED / BLU RED / ORG RED / GRN RED / BRN RED / SLA BLK / BLU 12 13 14 15 16 17 18 19 20 21 22 23 24 25 4 5 5 5 6 6 6 7 7 7 8 8 8 M RING RING1 M RING RING1 M RING RING1 M RING RING1 M ORG / BLK GRN / BLK BRN / BLK SLA / BLK BLU / YEL ORG / YEL GRN / YEL BRN / YEL SLA / YEL BLU / VIO ORG / VIO GRN / VIO BRN / VIO SLA / VIO 37 38 39 40 41 42 43 44 45 46 47 48 49 50 CHASSIS GROUND 4 E 5 TIP 5 TIP1 5 E 6 TIP 6 TIP1 6 E 7 TIP 7 TIP1 7 E 8 TIP 8 TIP1 8 E CHASSIS GROUND BLK / ORG BLK / GRN BLK / BRN BLK / SLA YEL / BLU YEL / ORG YEL / GRN YEL / BRN YEL / SLA VIO / BLU VIO / ORG VIO / GRN VIO / BRN VIO / SLA Notes on Table 8: 1. 2. 58 Colors are abbreviated as follows: BLK = black BLU = blue ORG = orange VIO = violet BRN = brown SLA = slate (grey) GRN = green The E (ear) leads provide “to telco” supervision. The M (mouth) leads provide “from telco” supervision. 025-9416 Installation 3. The RING/TIP pair provides two-way audio for DID, end-to-end, and E&M 2-wire tie trunks. The pair also provides “to telco” for E&M 4-wire to CO trunks. 4. The RING1/TIP1 pair is not used with DID, end-to-end, and most E&M 2-wire tie trunks. The pair only provides “from telco” for E&M 4-wire to CO trunks. q 3. Use bridging clips or wire to connect the middle terminals of each row. Again, the appropriate connections depend on the telephone line types. For end-to-end, loop or ground start and DID trunks, cross connect only the TIP/RING pair from the Zetron terminal to the phone company block. For E&M trunks, cross connect the TIP/RING and E/M pairs or directly terminate the RJ21 jack of the Zetron terminal to the phone company block. q 4. Trim any excess wire from each punchdown terminal to ensure good electrical contact. q 5. Label the punchdown block to identify each of the leads. This will simplify troubleshooting and repair later. Telco connections for the punchdown block are complete. Proceed to the “RADIO STATION CONNECTIONS” subsection on page 61. Telco Phone Jack Interface In some applications, the telephone interface is provided with standard wall phone jacks (RJ type) instead of a punchdown block. This may be the case in a residence or converted office building. If wall jacks are available, Zetron recommends using the optional installation interface assembly described on page 49 that includes the easy-to-install terminal block adapter. However, an optional RJ66M425 block (Part No. 802-0264) is also available from Zetron for this type of telco connection. The optional block provides six 8-pin RJ phone jacks for the telco interface. Figure 24 illustrates the hardware connections between the Model 640 punchdown block and the RJ66M425 telco block. The block provides six trunks, although the Model 640 only uses a maximum of four trunks. Notice that the telco line type in the figure is 4-wire E&M. Connections for each trunk will vary slightly, depending on the signaling type. Follow the steps below to interface to the optional RJ66M425 block: q 1. Power-down the paging terminal. q 2. Connect the leads for each Model 640 trunk as shown in Figure 24, using standard 26 AWG wire-wrap wire. Wiring configuration varies by telephone line type (E&M 4wire shown in the illustration). Figure 25 compares the pin configurations of the two RJ-type phone jacks. Note: 025-9416 The punchdown terminals on the optional RJ66M425 block do not function electrically like those on the other punchdown blocks described earlier. The four terminals in each row are separated into TIP and RING connections as shown in Figure 24. 59 Installation Model 640 Interface Punchdown Block RJ66M425 Telco Block T R J1 J2 To telco interface J3 J4 J5 J6 J1P1 J1P2 J1P3 J1P4 J2P1 J2P2 J2P3 J2P4 J3P1 J3P2 J3P3 J3P4 J4P1 J4P2 J4P3 J4P4 J5P1 J5P2 J5P3 J5P4 J6P1 J6P2 J6P3 J6P4 T R R J 2 1 T R T1 R1 T2 R2 E M T1 R1 T2 R2 E M T1 R1 T2 R2 E M T1 R1 T2 R2 E M T R standard 26 gauge telephone wire radio station wiring G 26 1 27 2 28 3 29 4 30 5 31 6 32 7 33 8 34 9 35 10 36 11 37 12 38 13 39 14 40 15 41 16 42 17 43 18 44 19 45 20 46 21 47 22 48 23 49 24 50 TRUNK A TRUNK B TRUNK C TRUNK D 25-pair cable (Part No. 709-0004) R J 2 1 To Model 640 RJ21 interface (See Figure 5-6) Figure 24. Telco Wiring With Optional RJ66M425 Block Pin # 6-Wire Lead 8-Wire Lead 1 E (ear) signal TIP 2 2 TIP 2 RING 2 3 RING 1 TIP 3 4 TIP 1 RING 1 5 RING 2 TIP 1 6 M (mouth) signal RING 3 7 TIP 4 8 RING 4 1 1 6 8 1 4 8-wire miniature keyed jacks Figure 25. Wiring Comparison for RJ-Type Phone Jacks 60 025-9416 Installation Note: It is important to remember that pin #1 for a 6-pin jack does not correspond to pin #1 for an 8-pin jack. See the wiring configurations in Figure 25. q 3. Trim any excess wire from each punchdown terminal to ensure good electrical contact. q 4. Label the punchdown block to identify each of the leads. This will simplify troubleshooting and repair later. Telco connections for the optional RJ66M425 punchdown block are complete. RADIO STATION CONNECTIONS As described earlier under “TELCO CONNECTIONS” on page 51, the male 50-pin RJ21 connector on the rear of the Model 640 provides both trunk and radio station interfaces for the paging terminal. This subsection details radio station installation for each type of connection available. Use only the instructions that apply to the interface method (terminal block adapter or punchdown block) already chosen for connections to the telco. There are basically two interface options available for separating out the telco and radio connections. Each method of installation can be modified in an endless variety of ways for a custom application. The two unique hardware interfaces are: • Zetron’s optional installation interface assembly (Part No. 950-9334) • A female to male 50-pin interface cable (Part No. 709-0004) and a 66-type punchdown block (Part No. 802-0093 or 802-0263). Figure 26 shows the pin configuration for the radio station and telco interface connector on the rear of the Model 640. pin 1 pin 25 pin 26 pin 50 Figure 26. 50-pin Radio Station and Trunk Interface Table 9 shows the radio station pinouts for the RJ21 connector. This information is also printed on the rear panel of the paging terminal for convenience. Notes on Table 9: †Relay contacts rated to 30 VAC/DC, 1 amp or 120 VAC, 0.5 amp. * TTL, RS-232, CMOS levels: (Unless indicated otherwise, signal is compatible with all three levels) TTL: OFF = 0 VDC to 0.8 VDC ON = +2.4 VDC to +5.0 VDC RS-232: OFF = -3 VDC to -12 VDC ON = +3 VDC to +12 VDC CMOS: same as TTL, except no pull-up resister load 025-9416 61 Installation Table 9. RJ21 Radio Station Pin Configuration Pin # Label Description 13 38 REC AUDIO HI REC AUDIO LO Receives audio (600 ohm balanced) input from radio station. Transformer-coupled audio for talkback (2-way) paging applications. 14 DIG MODE Output (RS-232 voltage level*) keys up transmitter in digital mode. 15 40 XMIT AUDIO HI XMIT AUDIO LO 600 ohm balanced audio output to transmitter (tone, voice, modem). 16 COR / CAS Input from radio station indicating channel busy. COR inhibits transmission until “clear.” Usually connected to radio COR or CAS output signal. Can be used as analog clear to send (CTS) input from a transmitter link controller. * 17 GROUND Signal ground, used with signals 14, 39, 16, 41, 42, 21, 22, 46, 47. Not the same as chassis ground (pins #49, 50). 18 19 43 ANA PTT COM ANA PTT NC ANA PTT NO Outputs (common, normally open, normally closed) indicate analog paging audio is being sent to the transmitter. Can be used as analog request to send (RTS) outputs to a transmitter link controller. † 20 44 45 DIG PTT COM DIG PTT NC DIG PTT NO Outputs (common, normally open, normally closed) indicate digital paging data is being sent to the transmitter. Can be used as digital request to send (RTS) outputs to a transmitter link controller. † 21 22 46 47 ZONE ADR 8 ZONE ADR 2 ZONE ADR 4 ZONE ADR 1 Outputs indicate, along with XMIT REQUEST, whether the selected radio RF paging zone is “clear” or “busy”. The zone address is coded in binary 3 2 1 0 bits 8 (2 ), 4 (2 ), 2 (2 ), 1 (2 ). (For example, 8=ON, 4=OFF, 2=OFF, 3 0 1=ON corresponds to zone #9 (1x2 + 1x2 ). Each signal requires a pullup resistor to 5 volts, able to sink 40 mA to signal ground to drive relays or a transmitter link controller. Signal between 0 and 0.8 V is equivalent to a logic 1 (ON). 23 24 48 AUX PTT NO AUX PTT COM AUX PTT NC Auxiliary outputs (common, normally open, normally closed) activate after XMIT REQUEST and before ANA or DIG PTT. Useful to busy out other control equipment sharing the transmitter. † 39 XMIT REQUEST Output requesting radio transmission. RS-232 voltage level compatible. * 41 BUSY Input from other paging equipment sharing the transmitter. Inhibits the Model 640 from keying PTT. Paging terminal stops transmitting at end of paging batch if busy asserted. Can be used as digital clear to send (CTS) input from a transmitter link controller. * 42 DIG DATA Output carries binary digital paging data. RS-232 voltage level compatible. * 49, 50 GROUND Connected to protective chassis ground for cable shielding and RFI protection. Not the same as signal ground (pin #17). Installation Interface Assembly The optional installation interface assembly (Part No. 950-9334) provides two male, 12-pin, Wiedmueller connectors for radio station interface (separate analog and digital). If the assembly is being used for the RJ21 interface, it should have been installed already and connected to the telco. 62 025-9416 Installation Follow the steps below to interface the terminal block adapter to the radio station equipment: q 1. Power-down the paging terminal. q 2. Obtain or make cabling for either one or both radio station connections (P1 - analog, P2 - digital). Both interfaces require male 12-pin Wiedmueller connectors on the Model 640 end. 3. Table 10 shows the pin configuration of each interface. Also, refer to Table 9 for descriptions of each signal and its application. Table 10. Terminal Block Adapter Radio Station Wiring Configuration Pin # q P1: Radio Analog P2: Radio Digital 1 GND GND 2 Tx Audio Low Terminal Busy 3 Tx Audio High Zone BCD Bit 1 4 COR Zone BCD Bit 2 5 Analog PTT - NO Zone BCD Bit 4 6 Analog PTT - COM Zone BCD Bit 8 7 Analog PTT - NC Digital PTT - NO 8 AUX PTT - NO Digital PTT - COM 9 AUX PTT - COM Digital PTT - NC 10 AUX PTT - NC Digital Mode 11 Rx Audio Low Request Transmit 12 Rx Audio High Digital Data 3. Install a cylindrical ferrite (Part No. 305-0735) over each half of the Model 640 end of the split cabling as shown in Figure 27. Two ferrites are supplied with the installation interface assembly option for suppressing RF noise interference. q 4. Use the included cable ties (Part No. 265-0001) to secure the individual wires together at the ends and in the middle of each half of the cabling, as shown in the illustration above. q 5. Attach an appropriate connector to the other end of the cabling for the radio station interface. The type of connector is governed by the specific equipment used. Refer to “RF EQUIPMENT INTERFACING” on page 66 for details on many of the possible transmitter equipment interfaces. 025-9416 63 Installation To radio station connection Cylindrical ferrites (Part No. 305-0735) 5.8” Cable ties (Part No. 265-0001) 12 position Wiedmuellers (Part No. 401-0016) Connect to terminal block adapter Figure 27. Radio Station Interface Cabling to Terminal Block Adapter Note: Zetron recommends using stranded wire for the radio station interface, as it provides superior durability. The wire should be at least 14 gauge. It is also useful to have different colored wrap to easily identify each signal lead. 66-Type Punchdown Block Installation If the telco connections were made using a 66-type punchdown block, then the lower half of the block (pins #13-25 and 38-50) provides the leads for the radio station interface. Refer to Table 9 for descriptions of each pin on the Model 640 RJ21 connector. Follow the steps below to interface the radio station equipment to the optional punchdown block: q 1. Power-down the paging terminal. q 2. Connect the leads for each required radio signal to the punchdown terminal as shown in Figure 28. 64 025-9416 Installation q 3. Use bridging clips or wire to connect the middle terminal of each row, as needed. q 4. Trim any excess wire from each punchdown terminal to ensure good electrical contact. q 5. Label the punchdown block or leads to identify each of the radio signals. This will simplify troubleshooting and repair later. q 6. Either make an appropriate cable and connector for the radio station interface or directly cross-wire the punchdown terminals to the radio equipment. The type of connection is governed by the specific equipment used. Refer to “RF EQUIPMENT INTERFACING” on page 66 for details on many of the possible transmitter equipment interfaces. Note: 025-9416 Zetron recommends using stranded wire for the radio station interface, as it provides superior durability. The wire should be at least 14 gauge. It is also useful to have different colored wrap to easily identify each signal lead. 65 Installation Model 640 Interface Punchdown Block telco wiring R J 2 1 REC AUDIO LO REC AUDIO HI XMIT REQUEST DIGITAL MODE XMIT AUDIO LO XMIT AUDIO HI BUSY COR/CAS DIG DATA GND ANA PTT NO ANA PTT COM DIG PTT NC ANA PTT NC DIG PTT NO DIG PTT COM ZONE ADR 4 ZONE ADR 8 ZONE ADR 1 ZONE ADR 2 AUX PTT NC AUX PTT NO GND AUX PTT COM T1 R1 T2 R2 E M T1 R1 T2 R2 E M T1 R1 T2 R2 E M T1 R1 T2 R2 E M 26 1 27 2 28 3 29 4 30 5 31 6 32 7 33 8 34 9 35 10 36 11 37 12 38 13 39 14 40 15 41 16 42 17 43 18 44 19 45 20 46 21 47 22 48 23 49 24 50 G TRUNK A TRUNK B TRUNK C TRUNK D R J 2 1 25-pair cable (Part No. 709-0004) To Model 640 RJ21 interface (See Figure 5-6) Figure 28. Punchdown Block Radio Connections RF EQUIPMENT INTERFACING The Model 640 provides complete radio station interface flexibility. As a result, many manufacturers and types of RF equipment can be connected to the paging terminal. The radio station output of the Model 640 allows three basic transmitter configurations: • local transmitter • remote transmitter(s) 66 025-9416 Installation • combination (local and remote transmitters) The following subsections overview the basic connections between the Model 640 and a variety of common RF equipment — transmitters, controllers, and link equipment. Modifications For TTL Data Outputs In some system applications, RS-232 data output levels are not desired for the radio station connections. If either the DIG DATA (pin #42) or the DIG MODE (pin #14) signals need to be pulled down for TTL data, insert the simple circuit shown in Figure 29 between the Model 640 output and the transmitter input. +5V 3.3kΩ ¼W Data output from Model 640 TTL level output to transmitter 10kΩ ¼W Figure 29. RS-232 to TTL Data Level Conversion RF Station Jumper Settings The Model 640 uses jumper settings and potentiometer adjustments to provide the needed radio station output flexibility. The jumpers on the peripheral motherboard control RF broadcast station interface parameters. Note: Improper jumper settings can result in pager decoding errors or poor audio quality. Figure 30 shows the locations of each jumper on the peripheral processor circuit board. JP 1 a b a JP3 b a b a JP5 b a JP6 JP4 JP10 JP2 JP7 JP8 JP a b b Front of Model 640 Chassis ⇒ a Figure 30. Peripheral Board Jumper Locations (Top View) 025-9416 67 Installation The highlighted jumpers on the peripheral motherboard control the station output as described in Table 11. Table 11. Peripheral Mother Board Jumper Settings Jumper Function Settings Default JP1 Receive voice audio from Talkback pager A - flat B - de-emphasized A JP2 Transmit tone to transmitter A - flat B - pre-emphasized A JP3 Enables Talkback audio path or separate tone output A - tone output B - Talkback enabled (tx and rx audio) B JP4 COR (busy) polarity A - active high B - active low B JP5 Transmit voice audio to transmitter A - flat B - pre-emphasized A JP6 Terminal busy polarity A - active high B - active low B Colocated Transmitters Direct cable hookup between the Model 640 and a colocated radio transmitter is commonly used for local area paging, such as hospital and industrial plant applications. The General Electric MASTR II is an example of this type of transmitter. It is capable of digital paging using GE’s modulator conversion kit. The cable hookup depends on the specific radio station used. The Model 640 interface may be accomplished by way of an RJ21X punchdown block (see “66-Type Punchdown Block Installation” on page 55), or by way of an optional terminal block adapter (see “Installation Interface Assembly” on page 52). 68 025-9416 Installation Generic Transmitter Interface Figure 31 describes the basic radio station interface configuration for the Model 640. Model 640 RJ21 Radio Station Output Paging Transmitter Signal Inputs DIG MODE (14) DIGITAL RTS XMIT AUDIO HI (15) AUDIO INPUT HI AUX PTT NO (23) LOCAL PTT DIG DATA (42) DIGITAL DATA 1 (40) AUDIO INPUT LO AUX PTT COM (24) GROUND (17) XMIT AUDIO LO GROUND Figure 31. Wiring Configuration for Colocated Radio Station Notes on Figure 31: 1. For single-ended systems, the XMIT AUDIO LO signal should be tied to GROUND. For balanced 600Ω systems, the XMIT AUDIO LO signal should be tied to AUDIO INPUT LO. 2. If a Motorola PURC® transmitter is used, disable the built-in UDS 202 modem. 3. In the Model 640 Transmitter Key Up Control database set: • the ModeSgnlPlrty parameter to “high” for digital • the DigDataPolarity parameter to “0” for inverted data 025-9416 69 Installation Motorola PURC® Transmitter Interface Direct cable hookup between the Model 640 radio station interface and a colocated Motorola Paging Universal Remote Control (PURC®) transmitter is shown in Figure 32. The wiring configuration depends on whether the transmitter has a “unified” or “non-unified” backplane. The Motorola pin numbers refer to the backplane terminal blocks (TB). Motorola PURC® Transmitter Model 640 RJ21 Radio Station Output Signal Name Unified (TRN4860) Pin # Non-Unified (TRN5349) Pin # AUX PTT NO (23) LOCAL PTT TB3 - 8 TB2 - 8 DIG DATA (42) RECEIVE DATA TB3 - 13 TB2 - 2 DIG MODE (14) CARRIER DETECT TB3 - 19 TB2 - 17 XMIT AUDIO HI (15) UNNOTCHED AUDIO TB3 - 20 TB2 - 18 XMIT AUDIO LO (40) AUX PTT COM (24) GROUND (17) GROUND TB3 - 1 TB2 - 1 Figure 32. Wiring Configuration for Colocated Motorola PURC® Station Notes on Figure 32: 1. If the Motorola PURC® transmitter is equipped with a built-in UDS 202 modem, disable it. 2. The following parameter settings are typical for connection to a Motorola PURC® transmitter. In the Model 640 Key Up Control database set: 3. 70 • the ModeSgnlPlrty parameter to “high” for digital • the DigDataPolarity parameter to “0” for inverted data Other various timing parameters, such as PTT keying and analog/digital mode change delay, are also set in the Model 640 databases. 025-9416 Installation Miscellaneous Motorola Transmitter Interfaces Figure 33 illustrates a direct connection to a colocated Nucleus NAC transmitter. The pin numbers refer to the J17 and J15 inputs on the transmitter. Model 640 RJ21 Radio Station Output Motorola Nucleus Transmitter Signal Inputs ANA PTT NO (43) (J17-10) EXT KEY REQUEST DIG DATA (42) (J15-3) EXT PAGING DATA XMIT AUDIO LO (40) (J17-28) LINE IN 1- ANA PTT COM (18) GROUND (17) (J17-7) GROUND XMIT AUDIO HI (15) (J17-3) LINE IN 1+ DIG MODE (14) (J17-35) EXT MODE REQUEST Figure 33. Wiring Configuration for Colocated Nucleus Transmitter Figure 34 illustrates a direct connection to a colocated Motorola Radius GM300 transmitter. The pin numbers refer to the J3 accessories input on the transmitter. Model 640 RJ21 Radio Station Output Motorola GM300 Transmitter Signal Inputs (J3) DIG DATA (42) (5) FLAT TX AUDIO XMIT AUDIO LO (40) (7) GROUND AUX PTT COM (24) GROUND (17) AUX PTT NO (23) (3) PTT XMIT AUDIO HI (15) (2) MIC AUDIO Figure 34. Wiring Configuration for Colocated GM300 Transmitter 025-9416 71 Installation Glenayre Transmitter Interface Figure 35 illustrates a direct connection to a colocated Glenayre transmitter. The Glenayre pin numbers refer to the backplane terminal block connector (TB1). Model 640 RJ21 Radio Station Output Glenayre Paging Transmitter Signal Inputs (TB1) XMIT AUDIO LO (40) (2) LINE IN + AUX PTT NO (23) (7) TX IN XMIT AUDIO HI (15) (1) LINE IN - AUX PTT COM (24) GROUND (17) (8) GROUND Data Input (DB-25) (7) GROUND (18) CD DIG DATA (42) (5) RTS DIG MODE (14) (3) DATA IN Figure 35. Wiring Configuration for Colocated Glenayre Transmitter Notes on Figure 35: The following parameter settings are typical for connection to a Glenayre transmitter. In the Model 640 Transmitter Key Up Control database: • Set the ModeSgnlPlrty parameter to “high” for digital. • If the transmitter keys, but the digital pagers do not alert, try setting the DigDataPolarity parameter to “0”. Quintron 1000 Exciter Interface Figure 36 illustrates a typical cable hookup between the Model 640 radio station interface and a Quintron 1000 Exciter. Model 640 RJ21 Radio Station Output Paging Exciter Signal Inputs DIG MODE (14) Mode Select XMIT AUDIO HI (15) Flat AUX PTT NO (23) Key In XMIT AUDIO LO (40) Flat DIG DATA (42) Data AUX PTT COM (24) GROUND (17) GROUND Figure 36. Wiring Configuration for Quintron 1000 Exciter 72 025-9416 Installation Remotely Located Transmitters Most radio stations for wide area paging are located at a distance from the Model 640 paging terminal. To accommodate this type of application, the station card can be programmed for single- or multiple-site remote control. (Set in the Model 640 transmitter databases. See the Model 640 Operating and Programming Manual, Part No. 025-9417, for details.) The remote control is compatible with Motorola PURC® transmitter control shelf equipment or a Zetron Model 66 Transmitter Control Panel. When so equipped, the Zetron station card can directly drive a dedicated line or link transmitter with just a few wires. Figure 37 illustrates the basic connections between the Model 640 and a link transmitter. In this application, the colocated equipment sends pages out to the main paging transmitter by way of RF or microwave link. RF or µwave link Model 640 with PURC®-compatible station output Link Transmitter Tx Audio HI/LO Aux PTT NO Aux COM Tone Audio PTT Ground Link Receiver Zetron Model 66 PURC Paging Transmitter PURC® tone signal leads Figure 37. Remote Transmitter Connected by way of RF Link Notes on Figure 37: The following parameter settings are typical for connection to a Model 66 or a Motorola PURC® transmitter. In the Model 640 database set: Transmitter Key Type database (these value correspond to default “purc” record): StaRmtCtrl = purc ModeTime = 100 ms DigDataPolarity = “0” for inverted data Transmitter Key Up Control database: KeyUpDelay = 420 ms HLGT (set to 120 ms for HLGT plus 300 ms per RF link delay 1 link = 420, 2 links = 720, etc.) Figure 38 illustrates the basic connections between the Model 640 and a leased telco trunk. In this application the remotely located transmitter (and controller) are directly connected to the phone line and keyed by the TIP and RING pair. 025-9416 73 Installation PURC® tone signal leads via phone line Tx Audio Hi Tx Audio Lo RING TIP PSTN Model 640 with PURC®-compatible station output RING TIP Tone Audio Hi Tone Audio Lo Zetron Model 66 PURC® Paging Transmitter Figure 38. Remote Transmitter Connected by way of Leased Telco Line Combined Local and Remote Transmitters Many applications require several transmitters to cover a specified region. Often times a single transmitter is located at the main paging site with the Model 640 and one or more transmitters are located in remote areas to increase the coverage area. The remote transmitters can be linked to the paging terminal by way of either or both of the methods described earlier. Figure 39 illustrates the basic connections between the Model 640 radio station output and both a local paging transmitter and a link transmitter. In this example, the Model 640 sends pages to three coverage zones - one local and two remote. 74 025-9416 Installation Remote Zone #01 Zetron Model 66 Local Zone #00 Link Receiver PURC Paging Transmitter RF or µwave link Model 640 Station Output Remote Zone #02 Local Paging Transmitter Link Transmitter Zetron Model 66 Link Receiver PURC Paging Transmitter Figure 39. Combination Transmitter Connections For this type of generic transmitter setup, use the cable hookup described in Figure 40. Be aware that different brands of transmitters may require different signal leads. 025-9416 75 Installation Model 640 Radio Station Output Local Paging Transmitter Inputs DIG DATA (42) DIGITAL DATA DIG MODE (14) DIGITAL MODE 1 (47) AUX PTT NO (23) XMIT AUDIO HI (15) AUX PTT COM (18) GROUND (17) 2 (40) ZONE ADR 1 XMIT AUDIO LO NC PUSH TO TALK NO NC AUDIO HI NO GROUND AUDIO LO Link Transmitter Signal Inputs PUSH TO TALK AUDIO HI GROUND AUDIO LO Figure 40. Wiring Configuration for Combination Transmitter Control Notes on Figure 40: 1. The zone output drives the PTT and audio relays. The local transmitter is zone #00 and the link transmitter is zone #01. (Zone address outputs from the Model 640 are active low.) 2. The audio low signal is not hooked to a separate relay because internal coils connect it to the audio high circuit. This ensures that both high and low audio are sent together. RF and Microwave Transmitter Link Controllers A transmitter link controller is used when the Model 640 station interface is not sufficient to drive the link transmitter (non-PURC® applications). The transmitter link controller is installed at the paging terminal site between the Model 640 and the link transmitter. See Figure 37 for the basic system configuration. 76 025-9416 Installation Generic Transmitter Link Controller Interface Figure 41 illustrates a typical cable hookup between the Model 640 radio station interface and most brands of transmitter link controllers such as a Quintron Omega, Microlink 20T, or Motorola DDC. (For connections to a Motorola PSC or SSC transmitter link controller, see the signaling description in the following subsection.) Model 640 RJ21 Radio Station Output Transmitter Link Controller Signal Inputs 1 (47) ZONE ADDRESS 1 (46) ZONE ADDRESS DIG PTT NO (45) DIGITAL REQUEST ANA PTT NO (43) ANALOG REQUEST DIG DATA (42) DIGITAL DATA 2 (41) CTS DIGITAL XMIT AUDIO LO (40) TONE AUDIO LO 1 (22) ZONE ADDRESS ZONE ADR 8 1 (21) ZONE ADDRESS DIG PTT COM (20) ANA PTT COM (18) GROUND (17) GROUND COR / CAS (16) CTS ANALOG XMIT AUDIO HI (15) TONE AUDIO HI ZONE ADR 1 ZONE ADR 4 BUSY ZONE ADR 2 2 Figure 41. Wiring Configuration for Transmitter Link Controller Notes on Figure 41: 1. Zone address outputs from the Model 640 are active low. 2. Default polarity for the COR and BUSY inputs are active low (0 volts = logic “1”). The busy LED should not be lit when idle. If reversed polarity is desired, move jumpers JP4 and JP6 on the peripheral board to position A active high. 3. The following parameter settings are typical in the Model 640 database. In the Transmitter Key Type database set: ModeTime = 50 ms BusyTime = 25 ms StaRmtCtrl = RTS/CTS 025-9416 77 Installation Motorola PSC/SSC Transmitter Link Controller Interface Figure 42 illustrates a typical cable hookup between the Model 640 radio station interface and a Motorola PURC® Station Controller (PSC) or Simulcast System Controller (SSC). Note that a Motorola PSC or SSC requires an external 202 type modem to encode the digital paging data. Zetron’s multiple-site remote control feature for the Model 640 radio station provides an alternate to most Motorola PSC and SSC applications. Motorola PSC or SSC Signal Inputs Model 640 RJ21 Radio Station Output 1 (47) ZONE (SSC only) 1 (46) ZONE (SSC only) DIG PTT NO (45) KD (key digital) ANA PTT NO (43) KA (key analog) 2 (41) CPB (Clear to Page Binary) XMIT AUDIO LO (40) Tone 1 (22) ZONE (SSC only) 1 (21) ZONE (SSC only) ZONE ADR 1 ZONE ADR 4 BUSY ZONE ADR 2 ZONE ADR 8 UDS 202 Modem DIG DATA (42) TX TIP RTS RING MODEM (Tip lead) MODEM (Ring lead) +12v GND DIG PTT COM (20) ANA PTT COM (18) GROUND (17) GROUND COR / CAS (16) CPA (Clear to Page Analog) XMIT AUDIO HI (15) Tone 2 Figure 42. Wiring Configuration for Motorola PSC/SSC Link Controller Notes on Figure 42: 1. Zone address outputs from the Model 640 are active low. 2. Default polarity for the COR and BUSY inputs are active low (0 volts = logic “1”). The busy LED should not be lit when idle. If reversed polarity is desired, move jumpers JP4 and JP6 on the peripheral board to position A active high. 3. Line out signals from the Motorola PSC/SSC drive the link. 4. Make sure the modem is a 202, not a 212. 78 025-9416 Installation 5. 6. If an SSC is not working, check that the CPA line jumper is set for CPA to CPA, not CPA to CPB. The following parameter settings are typical in the Model 640 database. In the Transmitter Key Type database set: ModeTime = 50 ms BusyTime = 25 ms StaRmtCtrl = RTS/CTS DigDataPolarity = “0” for inverted data In the Transmitter Key Up Control database set: ModeSgnlPlrty = “high” for digital Transmitter Controllers Transmitter controllers are used between the paging input (either directly from the paging terminal or on an RF/microwave downlink) and the paging transmitter. The transmitter controller governs how the transmitter sends out pages. It can determine whether the pages are analog or digital and demodulate the FSK signals from the paging terminal (in digital mode). Model 66 Transmitter Controller Interface At the radio site, a Zetron Model 66 Transmitter Controller provides the remote paging transmitter interface by way of telco line or µwave/RF link. The Model 66 controls analog and digital paging for transmitters from Quintron, General Electric, Glenayre, Neutec, Spectrum, and other manufacturers. The Model 66 supports both PURC® and dual-frequency tone remote operation. See Figure 37 and Figure 38 for basic system applications requiring a transmitter controller. Figure 43 illustrates the direct cable hookup between the Model 66 and a generic paging transmitter. The link input (RF, microwave, or telco) to the Model 66 should be connected to the FROM LINK pins (J3 - 4, 5) on the rear panel of the transmitter controller. Refer to the Model 66 Transmitter Controller Operation and Installation Manual (Part No. 025-9078) for more details. Model 66 Transmitter Output (J2) Paging Transmitter Signal Inputs TO TX HI (2) UNNOTCHED AUDIO ANA PTT N/O (4) LOCAL PTT DIG PTT N/O (7) DIG DATA (10) DIGITAL DATA DIG MODE (11) DIGITAL RTS TO TX LO (1) ANA PTT COM (5) DIG PTT COM (8) GROUND (3) GROUND Figure 43. Wiring Configuration for Model 66 Transmitter Controller Note: 025-9416 The polarity for the DIG DATA and DIG MODE outputs is selected with jumpers (JP3 and JP2) in the Model 66. 79 Installation In an alternate application, the Model 66 can be colocated with the Model 640 and the transmitter for simulcast systems. The connections between the Model 66 and the paging transmitter are identical to those shown in Figure 43. Figure 44 illustrates the connections between the paging terminal and the Model 66. Model 66 Link (J3) Signal Inputs Model 640 RJ21 Radio Station Output TX AUDIO HI (15) (5) FROM LINK HI XMIT AUDIO LO (40) (4) FROM LINK LO GROUND (17) (9) GROUND Figure 44. Model 66 Colocated with Model 640 for Simulcast Application Model 68 Transmitter System Controller Interface When a Zetron Model 68 Transmitter System Controller is interfaced to the Model 640, the paging output can be directed to up to 16 transmitter zones. The Model 68 steers the output from the paging terminal to any one of 2-16 local or remote paging transmitters, dependent upon installed options. For technical details related to operation and/or installation of the Model 68, refer to the Model 68 Transmitter System Controller Operating and Installation Manual (Part No. 025-9089). Figure 45 shows the layout of the Model 68 radio station connectors. 50-pin interface (J1) to paging terminal 26 1 50-pin interfaces (J19-J22) to paging transmitters 1 25 1 25 m m 26 50 26 50 1 25 m 26 50 1 6 J2 50 25 J1 1 25 m 26 50 Figure 45. Model 68 Rear Panel Connectors The specific wiring connections between the Model 68 and the Model 640 depend on the telco and radio station installation method previously chosen. Recall that the 50-pin RJ21 connector on the Model 640 provides both trunk and radio station signals for the paging terminal. The two basic installation methods are the terminal block adapter and one or more 66-type punchdown blocks. Note: 80 A special software update is required to interface the Model 68 to the Model 640. The programming ensures that the AUX and DIG PTT both key prior to the HLGT (high 025-9416 Installation level guard tone) to avoid missed digital data. Contact Zetron Mobile and Paging Systems Division technical support for assistance. Installation Interface Assembly The optional terminal block adapter (Part No. 702-9470) provides the simplest direct interface between the Model 640 and Model 68. A specially designed cable (Part No. 709-7398) can be purchased to connect the terminal block adapter to the transmitter system controller. Figure 46 illustrates the basic connections for this method of installation. RJ-type cables TELCO CO Remote PC PC, console kit, or dumb terminal Part No. 709-7398 Model 640 Model 68 Figure 46. Model 640 to Model 68 Terminal Block Adapter Interface The Model 640 to Model 68 direct interface cable is illustrated in Figure 47. The signal pinout is included for easy reference. 025-9416 81 Installation P1 1 J1 Centronics 50-pin Female 12 P2 1 12 GND TX AUDIO LO TX AUDIO HI COR NO - A PTT COM - A PTT NC - A PTT NO - AUX PTT COM - AUX PTT NC - AUX PTT RX AUDIO LO RX AUDIO HI GND TERM BUSY 1 BCD ZONE 2 BCD ZONE 4 BCD ZONE 8 BCD ZONE NO - DIGPTT COM - DIGPTT NC - DIGPTT DIG MODE REQ XMTR DIG DATA Figure 47. Model 640 to Model 68 Direct Interface Cable 66-Type Punchdown Block Installation The punchdown block interface is more complicated, but also more flexible. Figure 48 illustrates the basic connections for this method of installation. Interface via “RJ” 4-wire or 6-wire cables and RJ66M425 terminal block, or direct crosswire to telco terminations. TELCO CO PC, console kit, or dumb terminal Remote PC Model 640 Part No. 709-0004 Model 68 Part No. 709-0004 Figure 48. Model 640 to Model 68 Punchdown Block Interface 82 025-9416 Installation Notes on Figure 48: 1. The cross-wiring between the two punchdown blocks is not as straight-forward as Figure 48 may suggest. Wiring is dependent on the telco line types and the system application. 2. In the Transmitter Key Type database set: M68 = “On” 3. In the Transmitter Key Up Control database set: RqstSgnlPlrty = “high” Be sure to consult Table 12 before making a cable or cross-wiring the punchdown blocks. Also refer to the Model 68 Transmitter System Controller Operating and Installation Manual (Part No. 025-9089) for details on connecting the unit to other radio station equipment. Table 12. Model 640 to Model 68 Interface Wiring Configuration MODEL 640 Signal Name MODEL 68 50-pin RJ21 Output (J1) Terminal Block Output 50-pin RJ21 Input (J1) REC AUDIO HI 13 P1-12 1 DIG MODE 14 P2-10 2 XMIT AUDIO LO 15 P1-2 3 COR / CAS 16 P1-4 4 GROUND (signal) 17 P1-1 5 ANA PTT COM 18 P1-6 6 ANA PTT NC 19 P1-7 7 DIG PTT COM 20 P2-8 8 ZONE ADR 8 21 P2-6 9 ZONE ADR 2 22 P2-4 10 AUX PTT NO 23 P1-8 11 AUX PTT COM 24 P1-9 12 REC AUDIO LO 38 P1-11 26 XMIT REQUEST 39 P2-11 27 XMIT AUDIO LO 40 P1-2 28 BUSY 41 P2-2 29 DIG DATA 42 P2-12 30 ANA PTT NO 43 P1-5 31 DIG PTT NC 44 P2-9 32 DIG PTT NO 45 P2-7 33 ZONE ADR 4 46 P2-5 34 ZONE ADR 1 47 P2-3 35 AUX PTT NC 48 P1-10 36 49, 50 P2-1 37 GROUND (chassis) 025-9416 83 Installation 84 025-9416 Adjustment Procedures ADJUSTMENT PROCEDURES OVERVIEW The following procedures describe the level adjustments necessary to make the Model 640 operate properly. Each procedure should be performed following the initial installation process and whenever the hardware configuration changes. For example, if the telephone line signaling format changes, or if new options are purchased, the appropriate levels should be readjusted. In addition to adjusting the paging terminal interfaces when hardware changes, some adjustments should be performed as part of regular maintenance. Measurement Conventions The following conventions are used in each of the adjustment procedures. All trunk level readings are expressed in decibels (dB) and AC volts RMS (Vrms). All dB readings have been determined using a bridging (high impedance) AC voltmeter calibrated in decibels referenced to 1 milliwatt dissipated into a 600 ohm load (dBm). All voltage readings have been obtained using an AC true-RMS voltmeter measuring sinusoidal waveforms. Note: The measurements are NOT made in dBm because the line termination may not necessarily be 600 ohm. WARNING: Field technicians must be sure lines are connected (terminated) properly before setting adjustments. If assistance is needed to complete any of the adjustments, contact Zetron technical support. TRUNK CARD LEVELS The following procedures apply to both types of trunk cards (standard and 4-wire audio dual trunk interface). Each telephone interface line requires three separate adjustments: • audio level from the telco (labeled FROM TEL) • telco line balance R (labeled BAL R) • telco line balance C (labeled BAL C) These potentiometers have been set at the factory, but usually need to be field-adjusted to match actual phone line characteristics. The voice audio on each telephone interface line has a gain control, which automatically compensates for differences in caller loudness and call-to-call gain changes. The AGC KILL switch is used in conjunction with the three pots to make accurate adjustments. 025-9416 85 Adjustment Procedures Test Equipment The following equipment is required to adjust the trunk card levels: • buttset • digital voltmeter (DVM) • miniature flat head screwdriver • small Phillips head screwdriver • touch-tone phone Notes: The trunk card adjustments are very important. They affect background noise immunity when recording voice prompts, speech silence compression, DTMF key decoding, VOX disconnect features (if used), and modem communications. Follow each procedure carefully. FROM TEL Adjustment In general, leave FROM TEL in the factory adjusted position. If there is too much silence deletion, then turn the pot clockwise. If there is not enough silence deletion, then turn the pot counterclockwise. Follow the steps below to perform the factory adjustment for FROM TEL: q 1. Remove the top cover of the Model 640 chassis (if not already done). q 2. Remove the plate covering the trunk adjustment pots. q 3. Create a new Class of Service in the Model 640 database as follows: 86 • Select 1 - Subscriber Phone Numbers from the main menu. • Select 2 - Class of Service from the Subscriber Phone Numbers menu. • Enter N to create a New record. • Fill in the record as shown in Figure 49. 025-9416 Adjustment Procedures D i s p l a y R e Choose c o ranydlogical name that describes the class. ServiceName: test_v Priority: B PromptName: standard DeliveryName: standard PagerDefinition: 2tone VoiceLimit: 131 DisplayLimit: 0 EmptyMsg: Y Talkback: N Breakthrough priority sends the page out “live” over the air. Give the entry the maximum voice limit. (<cr>, P, D, M, N, L, F, T, B, ?, .) Entry: Figure 49. Model 640 Database 2-Tone Class of Service Record q 4. Save the record by entering S. q 5. Create a new Subscribers record as follows: • Enter a period (.) to back out to the Subscriber Phone Numbers menu. • Select 1 - Subscribers. • Enter N to create a New record. • Fill in the record as shown in Figure 50. D i s p l a y PhoneNumber: 999 SubscriberName: test01 ServiceName: test_v Capcode: C247 SecurityCode : Status: V CallCount: 0 R e c o r d Any unused phone number Corresponds to class of service created in step #3 Must be valid record for testing (<cr>, P, D, M, N, L, F, Z, S, T, B, ?, .) Entry: Figure 50. Model 640 Database 2-Tone Subscribers Record q 6. Save the record by entering S. q 7. Connect the voltmeter to the appropriate pins that extend off the sides of the potentiometers. Use the top and bottom pins to adjust trunk A/C. Use the middle and bottom pins to adjust trunk B/D. Refer to Figure 51. 025-9416 87 Adjustment Procedures MODEL 640 DAPT XTRA TRUNK C TRUNK D GROUND ANS A B TRUNK D TRUNK C LINE AGC KILL FROM TEL BAL R BAL C AGC KILL FROM TEL BAL R BAL C ACT LINE ANS ACT ANA PTT DIG PTT BUSY Figure 51. Trunk Card Level Adjustments q 8. Set the meter range for 3-5 VAC. q 9. Connect a buttset or equivalent high impedance monitor to the appropriate trunk. q 10. Dial into the trunk (using any touch-tone phone) by way of the local telco CO. q 11. Verify that the line under test is the same line dialed by monitoring the line for voice on the buttset. (Speak into the telephone and listen on the buttset.) If no audio is heard, redial to access the correct trunk. q 12. Press and hold down one of the telephone’s touch-tone keys. (‘A’ transmits the highest and lowest DTMF frequencies - 697 and 1633 Hz. If the phone does not have an ‘A’ key, ‘3’ is the next widest tone pair - 697 and 1477 Hz.) q 13. Set the AGC KILL switch to the kill position (toward the rear of the chassis). The figure above shows the location of the AGC KILL switch and the potentiometers. Do NOT kill the gain control until ready to make actual adjustments, as DTMF decoding usually does not work with this setting. q 14. Adjust the FROM TEL pot until the voltmeter reads 3.0 VRMS ± 0.25 VRMS. q 15. Set the AGC KILL switch back to the normal position (toward the front of the chassis). q 16. Verify that the FROM TEL DTMF level is ≈ -8 dB (435 mVrms) with the gain control active. Note: q This tunes the knee of the AGC circuit for optimum operation. 17. Hang up the telephone and terminate the call. The FROM TEL adjustment is complete. 88 025-9416 Adjustment Procedures Hybrid (BAL R and BAL C) Adjustment The BAL R and BAL C potentiometers isolate the trunk card audio output (TO TEL) from the telco line input audio (FROM TEL). The two audio paths are separated into transmit and receive. This is accomplished by adjusting the resistive and capacitive impedance of the active hybrid balance circuit. Some adjustment is usually required to compensate for the particular telephone line impedance to the telco central office. The audible result of proper hybrid adjustment is elimination of sidetone (microphone audio) heard in the earpiece of the line. If the phone lines are swapped around or the telco changes the lines, this procedure should be performed again. The telco CO occasionally “rotates” lines, swapping a different hybrid line termination circuit for the previously existing circuit. This is common during routine maintenance of the trunk. Since the telephone company may perform such updates unannounced, it is good practice to readjust the hybrids every 2-4 months. Note: If the system application uses voice prompts or alphanumeric modem paging, the hybrid circuit balance is particularly important to eliminate audio distortion and sidetone (echo) problems. Follow the steps below to perform the BAL R and BAL C adjustments: q 1. Remove the top cover of the Model 640 chassis (if not already done). q 2. Remove the plate covering the trunk adjustment pots. q 3. Connect the voltmeter to the appropriate pins that extend off the sides of the potentiometers. Refer to Figure 51. q 4. Set the meter range to 2 VRMS AC or less. q 5. Dial (using any touch-tone phone) into the trunk by way of the local telco CO. q 6. Enter the System Prompt Access PhoneNumber (0200 default in the Model 640 database). The paging terminal responds with 1 long and 4 short beeps. q 7. After the beeps, enter the SecurityCode (0200 default in the Model 640 database). The paging terminal responds with 3 short beeps. Note: If either of the above numbers does not work, enter the Model 640 database to verify the access numbers. From the main menu, select 1 - System Access Phone Numbers. Then select 3 - System Prompt Access to view the current settings. q 8. After the beeps, enter 999. The paging terminal responds with a single beep, followed by a long pause (approximately 5 seconds). Then a continuous 1000 Hz tone plays. q 9. Set the AGC KILL switch to the kill position (toward the rear of the chassis). Do NOT kill the gain control until ready to make actual adjustments, as DTMF decoding usually does not work with this setting. q 10. While the 1000 Hz tone is playing, adjust the BAL C pot for a minimum reading on the voltmeter. q 11. Likewise, adjust the BAL R pot for a minimum reading on the voltmeter. 025-9416 89 Adjustment Procedures q 12. Repeat steps #8 and #9 until the pot settings make little difference. q 13. Set the AGC KILL switch back to the normal position (toward the front of the chassis). Note: q This adjustment minimizes signal bleeding from the TO TEL back into the FROM TEL. 14. Hang up the telephone and terminate the call. The hybrid adjustment is complete. STATION INTERFACE ALIGNMENT PROCEDURE The following alignment procedures assure correct radio station interface and optimum signal levels. The radio station alignment consists of three separate adjustments: • paging tone (digital) output level to the transmitter (labeled TONE) • voice audio (analog) output level to the transmitter (labeled VOICE) • transmitter digital deviation Test Equipment The following test equipment is required to align the radio station interface levels: • touch-tone (DTMF) telephone • AC digital voltmeter (DVM) • communications service monitor Database Setup Several test records must be created in the Model 640 database before the actual adjustments can be performed. Follow the steps below to setup the Model 640 database for each of the station adjustments: q 90 1. Create a new Pager Definition in the Model 640 database as follows: • Select 1 - Subscriber Phone Numbers from the main menu. • Select 5 - Pager Definitions Databases from the Subscriber Phone Numbers menu. • Select 1 - TwoTone from the Pager Definitions menu. • Enter N to create a New record. • Fill in the record as shown below. 025-9416 Adjustment Procedures Entry: n PagerDefinition: 2t=vtest SecondsTone1: 12 SecondsGap: 00.00 SecondsTone2: 12 Choose any logical name that describes the pager type. Enter the maximum tone length. (A, R, S,?) Entry: Figure 52. Model 640 Database 2-Tone Pager Definitions Record q 2. Save the record by entering S. q 3. Create a new Class of Service in the Model 640 database as follows: • Enter a period (.) to back out to the Subscriber Phone Numbers menu. • Select 2 - Class of Service. • Enter N to create a New record. • Fill in the record as shown in Figure 53. D i s p l a y R e Choose c o ranydlogical name that describes the class. ServiceName: 2ttest Priority: B PromptName: standard DeliveryName: standard PagerDefinition: 2t+vtest VoiceLimit: 60 DisplayLimit: 25 EmptyMsg: Y Talkback: N Breakthrough priority sends the page out “live” over the air. Coresponds to the pager definition created in step #1. Give the entry the adequate voice and display limits. (<cr>, P, D, M, N, L, F, T, B, ?, .) Entry: Figure 53. Model 640 Database 2-Tone Class of Service Record q 4. Save the record by entering S. q 5. Create a new Subscriber in the Model 640 database as follows: 025-9416 • Enter a period (.) to back out to the Subscriber Phone Numbers menu. • Select 1 - Subscribers. • Enter N to create a New record. • Fill in the record as shown in Figure 54. 91 Adjustment Procedures D i s p l a y R e c o Choose r d any logical name that describes the subscriber. PhoneNumber: 9991 SubscriberName: 2tone+voice test1 Corresponds to ServiceName: 2ttest class of service Capcode: 05000.0 10000.0 created in step #3 SecurityCode : This tells the M640 that the pager is 2Status: V tone and its frequencies are 500 and CallCount: 0 1000 Hz. Note that the tones need to be entered in tenths of a Hz. 500 Hz, 1000.) Hz) (<cr>, P, D, M, N, L, (Ex: F,5000 Z,= S, T,10000 B, =?, Entry: Figure 54. Model 640 Database 2-Tone Subscriber Record q 6. Save the record by entering S. q 7. Enter N to create another Subscriber record. q 8. Fill in the record identical to Figure 54, modifying the fields as follows: • enter 9992 for the PhoneNumber (or an appropriate #) • enter 2tone+voice test2 for the SubscriberName (or suitable alternative) • enter 10000 and 20000 for the Capcode (1000 Hz and 2000 Hz) q 9. Save the record by entering S. q 10. If the application requires digital paging, create a new Subscriber in the Model 640 database as follows: 92 • Enter a period (.) to back out to the Subscriber Phone Numbers menu. • Select 1 - Subscribers. • Enter N to create a New record. • Fill in the record similarly to the subscriber shown in Figure 55. 025-9416 Adjustment Procedures D i s p l a y R e c o r d PhoneNumber: 9993 SubscriberName: pocsag test ServiceName: pocdsply Capcode: 1234567 SecurityCode: Status: V CallCount: 0 (<cr>, P, D, M, N, L, F, Z, S, T, B, ?, .) Entry: Figure 55. Model 640 Database POCSAG Subscriber Record Note: The example shows a POCSAG pager, but another type of digital pager record will also work. Program a record that corresponds to the equipment you intend to use. The Model 640 database programming for the radio station adjustments is complete. Continue with the alignment procedures below. VOICE Audio Adjustment Follow the steps below to perform the VOICE audio adjustment: q 1. Call the first 2-tone test pager defined in Figure 54. The Model 640 responds with 3 short beeps to indicate the start of voice message recording. q 2. Hold down a key on the touch-tone phone, so that a long tone is recorded. q 3. Hang up or press pound (#) to terminate recording. q 4. Use the radio service monitor to measure the RF deviation of the transmission. While the long DTMF tone is playing, adjust the VOICE potentiometer on the rear panel of the paging terminal for about 3.0 - 4.0 kHz deviation. Figure 56 shows the location of the radio station pots. 025-9416 93 Adjustment Procedures RX TONE VOICE ADJUST Figure 56. Rear View of Model 640 Chassis q 4. Call the pager again. q 5. During the recording time, speak a test voice message. q 6. Use the radio service monitor to measure the RF deviation of the voice transmission. While the page is being sent, check the deviation again to ensure that it is about 4.5 kHz during the peak voice levels. q 7. Hang up or press pound (#) to terminate recording. The VOICE audio adjustment is complete. TONE Audio Adjustment Follow the steps below to perform the TONE audio adjustment: q 1. Call the first 2-tone test pager defined in Figure 54. The Model 640 responds with 3 short beeps to indicate the start of voice message recording. q 2. Immediately hang up to terminate recording. Note: The EmptyMsg field in the Class of Service must be set to Y for this adjustment to work. Otherwise a hang-up cannot initiate a page. q 3. Use the radio service monitor to measure the RF deviation of the transmission. While the tones are playing, adjust the TONE pot on the rear panel of the paging terminal for about 3.0 - 4.0 kHz deviation. q 4. Make sure that the deviation level does not vary when the paging tones change from 500 Hz to 1000 Hz. q 5. Repeat steps #1 - #3 using the second 2-tone test pager (1000 Hz and 2000 Hz). q 6. Ensure that the deviation level is consistent for each of the paging tones. 94 025-9416 Adjustment Procedures Note: Deviation levels that vary with frequency may indicate improper bandpass (preemphasis) characteristics in the audio processing circuitry fed to the modulator. Verify correct jumper settings The TONE audio adjustment is complete. Transmitter Digital Deviation Adjustment RF deviation levels on binary digital transmissions are determined by your transmitter, not by the station interface. Typically, digital paging involves modulating the RF carrier with a serial data stream followed by audio messages. A digital “high” shifts the carrier frequency higher (fc + fdev), while a digital “low” shifts the carrier lower in frequency (fc - fdev). Follow the steps below to perform the DIGITAL deviation adjustment: q 1. Call the digital pager defined in Figure 55. q 2. Enter a long numeric display message (any numbers) after the Model 640 prompts. The more digits entered, the easier this adjustment will be. We recommend entering at least 20 DTMF digits. q 3. Use the radio service monitor to measure the digital deviation of the transmission. While the message is playing, adjust the transmitter for 4.5 - 5.0 kHz deviation. The digital deviation adjustment is complete. DIAL CLICK CARD LEVEL ADJUSTMENT This procedure sets up the optional dial click decoder for the specific phone line. Refer to Section 7 for details on field-installation of the dial click board. It is a good idea to readjust the dial click card once in a while to ensure optimum digit decoding. Zetron recommends readjusting the decoder 2 or 3 times a year. Test Equipment The following test equipment is required for the adjustment: • Touch-tone telephone • Rotary dial telephone • Phone cord “Y” connector for 2 telephones • Extender Card (Part No. 705-9431) Note: The audio levels recognized by the dial click card depend only on the adjustment pots (R6, R30). The FROM TEL pot on the trunk card has no effect on dial click decoding. Follow the steps below to adjust the dial click levels: q 1. Power-down the paging terminal. q 2. Remove the top cover. 025-9416 95 Adjustment Procedures q 3. Unscrew the card guide from the back of the chassis for the dual trunk on which the dial click decoder is to be adjusted. Pull the dual trunk from its connectors. q 4. Plug the extender card into the connectors on the paging terminal peripheral board where the dual trunk was installed. Then plug the dual trunk into the extender card. This enables easy access to the dial click pots for adjustment. Note: If an extender card is not available and trunk A or B needs adjustment, remove the other dual trunk card (C/D) to perform the procedure. q 5. Power-up the paging terminal and let it complete its boot sequence (all lights have extinguished, except the READY LED is on solid). q 6. Connect the two telephones together with the Y connector into the same trunk of the Model 640. q 7. Call into the paging terminal with the touch-tone phone and access a tone+voice pager previously programmed with lots of voice time (for example, 60 seconds). q 8. During the voice recording time, pick up the rotary telephone and hang up the touchtone telephone. Be sure to hang up, otherwise unwanted noise and phone line loading may change the sounds of the “clicks.” q 9. Start dialing digits while adjusting the appropriate pot on the dial click card. R6 is located at the top of the card and defines trunk A/C. R30 is located at the bottom of the card and defines trunk B/D. Begin the adjustment from the fully counter-clockwise position and rotate the pot clockwise until the light on the card blinks consistently with each dial click (two blinks for each click). q Optimum adjustments vary, and software settings should be re-checked. (Typical pot setting ≈ midrange.) 10. Once the card is adjusted, power-down the Model 640. q 11. If an extender card was used, remove it and reinstall the trunk card. If a second trunk card was removed for the adjustment procedure, reinstall it. q 12. Replace the top cover of the paging terminal and secure it with screws. Note: 96 If the dial click card is newly installed, some modifications to the Model 640 database are required. Refer to the Model 640 Operating and Programming Manual (Part No. 025-9417) for details on trunk configuration. 025-9416 Optional Equipment Installation OPTIONAL EQUIPMENT INSTALLATION This section provides installation instructions for several hardware options that may need to be field-installed (upgrades after initial installation). These procedures can also be used to identify where the optional cards are installed in the factory-configured system and how they are connected to the rest of the Model 640 processor boards. DUAL TRUNK CARD A standard Model 640 comes equipped with one dual trunk interface (Part No. 702-9361) card. The unit can be upgraded to support a second dual trunk card, bringing the total number of trunks up to four (two per card). Either one or both of the trunk cards may be optional, dual-trunk, 4-wire, audio cards (Part No. 702-9488) for 4-wire audio circuits (for example, E&M, 4-wire RF/µwave links, T1 trunks, etc.) Follow the steps below to install either type of dual trunk card: q 1. Power-down the paging terminal. q 2. Remove the top cover. q 3. Verify that the matrix cards are configured for the appropriate line types. The matrix plug in J3 defines trunk C and J4 defines trunk D. See “Line Type Matrix Card” in Section 3 for details on the matrix card settings. q 4. Plug the dual trunk into the left connectors (J2 and J4) on the peripheral board. Again, refer to Section 3 for illustrations of the dual trunk and its placement in the Model 640 chassis. q 5. Secure the card guide to the top of the back panel with the provided screw. q 6. Power-up the unit and let it complete its boot sequence (all lights have extinguished, except the READY LED is on solid). q 7. Access the Model 640 database and edit the Trunks database to configure trunks C and D. Refer to the Model 640 Operating and Programming Manual (Part No. 0259417) for details on how to edit these databases. q 8. After the databases have been setup, reboot the Model 640 to initialize the changes. q 9. Refer to Section 6 for detailed adjustment procedures and level settings. 025-9416 97 Optional Equipment Installation TNPP INTERFACE Several networking options include the TNPP interface (Part No. 702-9362) card. The following figure gives an overview of M640 TNPP capcode paging flow: Installation Procedure q 1. Power-down the paging terminal. q 2. Remove the top cover. q 3. Plug the TNPP card into connector J8, located in the middle, rear of the chassis. Refer to Section 3 for illustrations of the Model 640 and the correct location of each interface card. q 4. Secure the card guide to the top of the back panel with the provided screw. q 5. Power-up the unit and let it complete its boot sequence (all lights have extinguished, except the READY LED is on solid). q 6. The Model 640 software requires several changes to implement the TNPP card. Refer to the Model 640 Operating and Programming Manual (Part No. 025-9417) for details on how to edit the databases and system files. q 7. After the paging terminal has been configured, reboot the Model 640 to initialize the TNPP option. 98 025-9416 Optional Equipment Installation RS-232 Interface Ports The Model 640 TNPP interface card has two DB-9 ports that provide two-way communications with the network link equipment. Zetron offers a cable (Part No. 702-7211) specially designed to connect the RS-232 port to a standard 25-pin interface. If a 9-pin connector is preferred, use a common 9-to-25-pin adapter cable. These should be readily available at any computer store. Otherwise, use the pinouts shown in Figure 57 to create an appropriate cable. Leads 5-9 do not require a connection on either end. Model 640 Male 9-pin shield DTR (1) TNPP Link Female 9-pin shield (4) DCD Receive (2) (3) Transmit Transmit (3) (2) Receive DCD (4) (1) DTR GND (5) (5) GND Figure 57. Pin Configuration for TNPP Link Cable TAP OUTDIAL OPTION The TAP Outdial is part number 950-9613. Parts included in this option are: • M640 2-Port Serial Card (part number 702-9362) • M640 Modem Interface Cable (part number 709-7329) • External Modem The figure below gives an overview of M640 TAP Outdial operation: Installation Procedures Note: If a 2-Port Serial Card (part number 702-9362) is already installed in J8 (center slot) of your M640, do not proceed with this installation. Call Zetron M640 Technical Engineering at 425-820-6363. Tools required for installation are: • IBM-compatible PC running M640 Communications Utility, with ability to connect to M640 by either modem or RS0-232 serial port • #10 Phillips screwdriver Note: If you need assistance with any of these procedures, please complete Table 1 and fax it, along with your Z-number, to Zetron at 425-820-7031, ATTN: M640 Technical Engineering. Then call M640 Technical Engineering at 425-820-6363. 025-9416 99 Optional Equipment Installation External Paging Provider Destination Parameter RAW Oparam Programming The term oparam is short for operating parameter. Oparams define the requirements for connecting with an external paging provider from your M640 by way of the TAP protocol. 1. Gather the following information: • Modem numbers of all remote paging providers that pages will be sent to • TAP data transfer baud rate for each provider (we support up to 9600 baud) • Data bits, data parity, and stop bits for each provider (usually 7 data bits, even parity, and 1 stop bit for TAP) • Whether provider requires 10-digit subscriber IDs • If 10-digit subscriber IDs required, the area code for each remote paging provider • Arbitrary 8-character destination names for all paging providers to be dialed (for example, PAGENET to dial “Paging Network Inc.”) Please use Table 1 to record the required information for each provider. 100 025-9416 Optional Equipment Installation Table 1: 8-character Name Internal dest number (aribitrary) (fixed internally) Modem Ph# to provider Baud Rate(300,1200, 2400,4800,9600) Data Bits, Parity, Stop Bits (usually e,7,1) Req’s 10 digit ID’s (Y/N) Area Code if requires 10 digit ID’s TAP00 TAP01 TAP02 TAP03 TAP04 TAP05 TAP06 TAP07 TAP08 TAP09 2. Back up all M640 database. 3. From the main menu in MCU, select COMM then ZLINK. This should connect with the M640 and display a + prompt. 4. Access the RAW oparam programming menu. a. At the + prompt press Enter. The Model 640 Databases menu should display, and you should have a flashing cursor at the Entry prompt. b. At the Entry prompt type the word RAW and press Enter. The following prompt appears. (N, ?, .) Entry: 5. Create RAW oparams. a. At the Entry prompt enter the letter N (for New Entry). The following prompt appears. RawName: (8 chars) ? b. At the RawName prompt enter 00baud. The following prompt appears. OparamData: (70 chars) ? c. At the OparamData prompt enter the following line of code and, using the information from table 1, substitute the variables 0x and 0y as necessary per Tables 2 and 3. 10 00 05 02 00 0x 0y 20 Table 2: 0x 00 01 05 06 02 025-9416 Sets baud rate to 300 baud 1200 baud 2400 baud 4800 baud 9600 baud 101 Optional Equipment Installation Table 3: 0y Sets data, parity, and stop bits to 7 data bits, EVEN parity, 1 stop bit 7 data bits, ODD parity, 1 stop bit 8 data bits, NO parity, 1 stop bit 00 01 02 The RawName and line of code should be displayed back to you as follows. This example assumes 9600,e,7,1. RawName: 00baud OparamData: 10 00 05 02 00 02 00 20 (A, R, S, ?) Entry: d. Verify the RawName and line of code are correct. If so, proceed. If not, press R (for Redo), then reenter the parameters as per above. e. At the Entry prompt enter S (for Save) to save the settings. The RawName and line of code should be displayed back to you. f. Repeat steps b-e for each of the RawNames in Table 4. Enter the OparamData as shown in the table, following the notes as applicable for the bold parameters. Table 4: RawName OparamData 00batch 10 00 0B 01 00 01 00 3C 00 F0 03 84 00 00session 10 00 0A 04 00 00 00 02 06 10 01 03 00 00page 10 00 06 05 00 07 05 01 07 00retry 10 00 0E 06 00 07 03 03 07 00 08 00 20 00 20 00 10 00area 10 00 05 0D 00 aa aa aa (See Note 4) 00dial 10 00 0X 03 (See Notes 1-3) 00 OL 2C nn nn nn nn nn nn nn nn nn nn 02 00 Note 1: If you do not need to dial a digit to get an outside line, omit OL and 2C. If you need to dial a digit to get an outside line, replace OL with the ASCII value for the digit to be dialed, per Table 5, and include 2C. Note 2: Replace all nn’s with the ASCII values for the DTMF digits to be dialed to connect with the remote paging provider’s modem, per Table 5. Table 5: 102 DTMF Digit Decimal Value ASCII Value 0 1 2 3 4 5 30 31 32 33 34 35 025-9416 Optional Equipment Installation DTMF Digit Decimal Value ASCII Value 6 7 8 9 36 37 38 39 Note 3: Replace 0X with the hexadecimal value for the total number of bytes following it, including the 00 at the end of the string, per Table 6. For example, for the entry shown in Table 4 it would be 15 decimal, which converts to 0F hex. Table 6: Decimal Hex Decimal Hex 0 1 2 3 4 5 6 7 8 9 10 11 12 13 14 15 00 01 02 03 04 05 06 07 08 09 0A 0B 0C 0D 0E 0F 16 17 18 19 20 21 22 23 24 25 26 27 28 29 30 31 10 11 12 13 14 15 16 17 18 19 1A 1B 1C 1D 1E 1F Note 4: If remote provider requires 10-digit Ids, replace aa aa aa with the ASCII values for the area code to be prefixed to the ID number sent to the remote provider, per Table 5. g. At the Entry prompt enter L (for List all raw oparams). h. When prompted to send the information to the printer, type N for No. i. Verify all RawNames and OparamData. If you need to change any of them, press Enter to get to the RawName that you want to change, then enter M (for Modify), then repeat the steps as necessary. 6. Go back to step 5 and repeat the data entry process for the rest of the internal destinations from Table 1, but make the following changes: • Increment the RawNames for each successive TAP destination. That is, instead of entering 00baud, 00session, etc., as you did for TAP00, enter 01baud, 01session, etc., for TAP01; 02baud, 02session, etc., for TAP02; and so on. 025-9416 103 Optional Equipment Installation • In Table 4 the 5th byte of each line of OparamData is 00. That corresponds to the TAP number, so increment it also. 7. Enter the RawNames and OparamData listed in Table 7 to initialize the external modem. Table 7: MDM-1 10 00 14 F8 41 54 26 46 26 4D 30 26 4B 30 26 48 30 26 42 31 58 33 0D MDM-2 10 00 06 F6 41 54 42 31 0D M640 System Programming This section requires you to connect with the system, upload the new software, retrieve current configuration files, edit them with a text editor, and return the edited files to the system. Note: If you need assistance with this please call M640 technical engineering at 1-425-820-6363 and an M640 technical engineer will assist you. Please have your Z-number and Table 1 completed and ready to fax before you call. 1. Save the new image file (that was sent to you on a floppy disk or e-mailed to you) to the C:\MCU folder. 2. From the main menu in MCU, select COMM then ZLINK. This should connect with the M640 and display a + prompt. 3. At the + prompt enter: dos copy c:\mcu\filename.img where filename.img is the name of the image file. The message “1 file copied” should appear when the copy is completed. 4. At the + prompt enter: put filename.img The message “Put complete” should appear when the transfer is completed. This may take a few minutes if connected by way of modem. 5. Modify configuration file Config.cds. CAUTION: Incorrect configuration of this file could disable your system. a. At the + prompt enter: get config.cds The message “Get complete” should appear when the transfer is completed. b. At the + prompt enter: dos edit config.cds c. Find the line that reads: 16 8 a:\zdir\oldfilename.img where oldfilename.img is the name of your old image file. d. If there is a semi-colon at the beginning of this line, delete it. e. Edit the line so that it reads as follows: 104 025-9416 Optional Equipment Installation 16 8 c:\zdir\newfilename.img where newfilename.img is the name of your new image file. f. Save the file by pressing Alt+F, then S. g. Exit the file by pressing Alt+F, then X. h. At the + prompt enter: put config.cds 6. Modify configuration file Network.cus. a. At the + prompt enter: ls network.cus If the file is not found, enter: get network.cus b. At the + prompt enter: dos edit network.cus c. Add a line of the following form for each internal destination entry in Table 1. Place doublequotes around the 8-character name. outbound "8-char name from Table 1" 3 TAP00D x|yS Include the x|yS part only if also sending pages to the local RF paging transmitter. For x put the RF Channel (for example, 1). For y put the RF Zone (for example, 0). d. Save the file by pressing Alt+F, then S. e. Exit the file by pressing Alt+F, then X. f. At the + prompt enter: put network.cus M640 Subscriber Database Programming This section defines how the actual ID# on your system will be routed externally to an ID# on the remote paging provider’s system. Note: You can enter ? at any prompt for a list of options and/or descriptions of the parameter. 1. Set up the Class of Delivery Service database. a. From the Model 640 Databases menu select 1 - Subscriber Phone Numbers. b. From the Subscriber Phone Numbers menu select 4 - Class of Delivery Service Database. c. At the Entry prompt enter N (for New). d. Enter the following information. Delivery: 8-character name from Table 1 Firstzone: (none — just press spacebar) FirstRepeat: 0 FirstDelay: 0 025-9416 105 Optional Equipment Installation SecondZone: (none — just press spacebar) SecondRepeat: 0 SecondDelay: 0 ThirdZone: (none — just press spacebar) ThirdRepeat: 0 ThirdDelay: 0 ForthZone: (none — just press spacebar) ForthRepeat: 0 ForthDelay: 0 e. Enter S (for Save). f. Repeat steps c-e for all 8-character names from Table 1. 2. Set up the Class of Service database. a. From the Model 640 Databases menu select 1 - Subscriber Phone Numbers. b. From the Subscriber Phone Numbers menu select 2 – Class of Service. c. At the Entry prompt enter N (for New). d. Enter the following information. ServiceName (arbitrary) Priority L PromptName Standard DeliveryName 8-character name from Table 1 PagerDefinition (Pocsag, Golay, or New Flex) VoiceLimit 00 DiplayLimit (any limit up to 500 characters) EmptyMsg N TalkBack N e. Enter S (for Save). f. Repeat steps c-e for all 8-character names from Table 1. 3. Program subscribers. a. From the Model 640 Databases menu select 1 - Subscriber Phone Numbers. b. From the Subscriber Phone Numbers menu select 1 – Subscriber. c. At the Entry prompt enter N (for New). d. Enter the following information. 106 PhoneNumber (7-digit ID number) SubscriberName (last 7 digits of ID # on remote system) ServiceName (ServiceName from step 2) Capcode (Pager-specific; enter a dummy capcode if no local page needed) SecurityCode (only if needed) 025-9416 Optional Equipment Installation Status V CallCount 0 2-port Serial Card Hardware Installation 1. Power down M640. 2. Remove top cover. 3. Locate and remove the card slot cover for J8. 4. Install M640 2-port serial card into slot J8. Secure with screw removed in step 3. 5. Power up M640. Modem Setup and Interfacing 1. Connect 9-pin end of cable 709-7329 to port 1 of M640 2-port serial card. 2. Connect 25-pin end of cable 709-7329 to external modem. 3. Connect power supply to modem and plug into AC power. 4. Connect phone line to RJ11 “Telco” jack of the modem. Testing and Debugging 1. From the main menu in MCU, select COMM then ZLINK. This should connect with the M640 and display a + prompt. 2. At the + prompt enter: Traffic -ar 3. Send a page to one of the subscribers set up in step 3 under M640 Subscriber Database Programming. 4. Verify that you hear the following sequence from the modem. a. Modem comes “Off Hook” and you hear dial tone. b. Modem dials paging provider’s modem #. c. Paging provider’s modem answers and modems negotiate connection. 5. Verify you see a posting similar to the following in the Traffic screen for the subscriber under test. 820-6363 page sent 07:59:25a 1 8BO TAP00D ID [7-digit ID#] D 4 <message> 6. If test was successful, build and test all other subscribers. If test was not successful, and/or you see the error message “Page No Xmit” in the Traffic screen, review all of your programming, then retest. 025-9416 107 Optional Equipment Installation DIAL CLICK DECODER The dual dial click decoder option (Part No. 702-9119) enables the terminal to process numbers dialed by rotary telephones. Dial clicks are distinctly different from dial pulses. The Model 640 decodes dial pulses without the optional dual dial click decoder board. Installation To install this option onto a dual trunk card (Part No. 702-9361 or 702-9488) of the Model 640, proceed as follows: CAUTION Please exercise electro-static discharge (ESD) precautions when handling all parts. q 1. Power-down the paging terminal. q 2. Remove the top cover. q 3. Unscrew the card guide from the back of the chassis for the dual trunk that the dial click decoder is to be installed onto. Pull the dual trunk from its connectors. q 4. Mount the supplied standoff near the center of the board as shown in Figure 58. Dual Trunk Card (Part No. 702-9361) standoff mount J5 Dial Click Board (Part No. 702-9119) P2 P1 Figure 58. Dial Click Board Installation q 5. Install the dual dial click board into the 10-pin female connector (J5) on the dual trunk. The card should extend toward the rear of the dual trunk board. Bolt the board to the standoff installed in Step 4. q 6. Plug the supplied extender card into the connectors on the paging terminal peripheral board where the dual trunk was installed. Then plug the dual trunk into the extender card. This enables easy access to the dial click pots for adjustment. Note: 108 If an extender card is not available and trunk A or B needs adjustment, remove the other dual trunk card (C/D) to perform the procedure. 025-9416 Optional Equipment Installation q 7. Power-up the unit and let it complete its boot sequence (all lights have extinguished, except the READY LED is on solid). q 8. Access the Model 640 database and edit the Dial Click database to enable the option. Then edit the Trunks database to enable the option on the desired trunk. Refer to the Model 640 Operating and Programming Manual (Part No. 025-9417) for details on how to edit these databases. q 9. After the databases have been setup, reboot the Model 640 to initialize the dial click option. q 10. Follow the procedure below to adjust the dial click pots. Level Adjustment This procedure sets up the dial click decoder for the specific phone line. The following test equipment is required for the adjustment: • Touch-tone telephone • Rotary dial telephone • Phone cord “Y” connector for 2 telephones • Extender Card (Part No. 705-9431) Note: The audio levels recognized by the dial click card depend only on the adjustment pots (R6, R30). The FROM TEL pot on the trunk card has no effect on dial click decoding. Follow the steps below to adjust the dial click levels: q 1. Connect the two telephones together with the Y connector into the same trunk of the Model 640. q 2. Call into the paging terminal with the touch-tone phone and access a tone+voice pager previously programmed with lots of voice time (for example, 60 seconds). q 3. During the voice recording time, pick up the rotary telephone and hang-up the touchtone telephone. Be sure to hang-up, otherwise unwanted noise and phone line loading may change the sounds of the “clicks.” q 4. Start dialing digits while adjusting the appropriate pot on the dial click card. R6 is located at the top of the card and defines trunk A/C. R30 is located at the bottom of the card and defines trunk B/D. Begin the adjustment from the fully counter-clockwise position and rotate the pot clockwise until the light on the card blinks consistently with each dial click (two blinks for each click). Optimum adjustments vary, and software settings should be re-checked. (Typical pot setting ≈ midrange.) q 5. Once the card is adjusted, power-down the Model 640. 025-9416 109 Optional Equipment Installation q 6. If an extender card was used, remove it and reinstall the trunk card. If a second trunk card was removed for the adjustment procedure, reinstall it. q 7. Replace the top cover of the paging terminal and secure it with screws. DUAL MULTI-FREQUENCY (MF) DECODER The multi frequency decoder option (Part No. 702-9197) allows the terminal to accept MF digit feed from direct inward dial (DID) trunks or E&M 2- or 4-wire trunks emulating DID. Note: MF is not the same as DTMF (touch-tone) signaling. The multifrequency option will not decode DTMF feed digits. MF is a dual-tone signaling method similar to the common touch-tone DTMF (dual tone multi frequency) protocol. Both formats use two combined tones. MF tones, however, are different frequencies from DTMF tones. Also, the MF protocol involves rigid timing constraints and framing characters, so that a DID line with four feed digits actually sends six characters which can NOT decode properly as DTMF. MF service can be indirectly tested with most RF service monitors, using their DTMF decoders AC coupled to the telco pair. If MF feed digit service decodes properly as DTMF characters with no framing digits, then contact the telco service provider to correct the situation. If feed digits plus two extra characters are observed and do not properly decode as DTMF and if the tone bursts are not clipped, the MF digits are probably acceptable. The telco technician should have an MF decoder to verify feed digits if necessary. The MF option board (Part No. 702-9297) installs onto the dual trunk board to decode these tones. Essentially, it provides a specialized tone decoder chip for each half of the dual trunk. JP1 is used only for production testing of MF tone generation. Table 13 shows tone pairs for MF and DTMF protocols to illustrate the differences. Table 13. MF and DTMF Tone Pair Comparison 110 Coded Digit MF Format Name Tone Pair Frequencies MF Format Tones DTMF Format Tones 1 1 700, 900 697, 1209 2 2 700, 1100 697, 1336 3 3 900, 1100 697, 1477 4 4 700, 1300 770, 1209 5 5 900, 1300 770, 1336 6 6 1100, 1300 770, 1477 7 7 700, 1500 852, 1209 8 8 900, 1500 852, 1336 9 9 1100, 1500 852, 1477 025-9416 Optional Equipment Installation Coded Digit MF Format Name Tone Pair Frequencies MF Format Tones DTMF Format Tones * --- NO TONE 941, 1209 0 --- NO TONE 941, 1336 # --- NO TONE 941, 1477 A 0 1300, 1500 697, 1633 B KP 1100, 1700 770, 1633 C ST 1500, 1700 852, 1633 D ST1 900, 1700 941, 1633 E ST2 1300, 1700 NO TONE F ST3 700, 1700 NO TONE Installation Follow the steps below to install this option onto a dual trunk card (either 702-9361 or 702-9488) of the Model 640: q 1. Power-down the paging terminal. q 2. Remove the top cover. q 3. Unscrew the card guide from the back of the chassis for the dual trunk that the MF decoder is to be installed onto. Pull the dual trunk from its connectors. q 4. Mount the supplied standoff as shown in Figure 59. Dual Trunk Card (Part No. 702-9361) MF Board (Part No. 702-9197) P3 P1 P2 standoff mount Figure 59. Multifrequency Board Installation q 5. Install the multifrequency board onto the 34-pin male connector (J5) on the dual trunk. The board should extend toward the front of the dual trunk board. Bolt the MF board to the standoff installed in Step 4. q 6. Reinstall the dual trunk card in the Model 640 chassis and secure the card guide to the chassis. 025-9416 111 Optional Equipment Installation q 7. Replace the top cover of the paging terminal and secure with screws. q 8. Power-up the unit and let it complete its boot sequence (all lights have extinguished, except the READY LED is on solid). q 9. Access the Model 640 database and edit the Trunk Line Type database to setup a line with multifrequency signaling. Then edit the Trunks database to enable the option on the desired trunk. Refer to the Model 640 Operating and Programming Manual (Part No. 025-9417) for details on how to edit these databases. q 10. After the databases have been setup, reboot the Model 640 to initialize the MF option. No hardware adjustments are required for the MF decoder option. PARALLEL PRINTER CARD The printer option (Part No. 950-9758) enables a parallel printer to be connected to the Model 640. The printer provides a real-time hard copy of the system events (log file data). This is useful for monitoring traffic and analysis of the system functions, throughput, and efficiency. The printer records paging input and output, network link status, and ZLINK session activity. Once the printer option is installed, all system activity is sent to the printer. Be sure to keep the printer powered-up and loaded with paper to ensure that no events are missed. Installation Follow the steps below to install the optional printer card (Part No. 702-9359) into the Model 640 chassis. CAUTION Please exercise electro-static discharge (ESD) precautions when handling all parts. q 112 1. Verify that all of the printer card jumpers are set appropriately. Figure 60 shows the configuration and locations of the critical jumpers. (The jumpers should have been set at the factory, but it is a good idea to double check.) 025-9416 Optional Equipment Installation 1 3 2 HDD FDC COMA LPT JP1 COMB JP2 1 3 2 Not installed PRT 3 4 5 7 9 111215 JP3 JP4 MODE Figure 60. Parallel Printer Card q 2. Power-down the paging terminal. q 3. Remove the top cover. q 4. Plug the printer card into connector J5, located at the left rear of the Model 640 chassis. If a video controller card is already installed into the J5 connector, use J4 instead. q 5. Secure the card guide to the top of the back panel with the provided screw. q 6. Connect a standard parallel printer cable between the female DB-25 on the rear of the newly installed card and the printer. q 7. Power-up the unit and let it complete its boot sequence (all lights have extinguished, except the READY LED is on solid). Note: If the printer card is installed as a field-upgrade, contact Zetron technical support to complete the required software update. CONNECTION TO AN EXTERNAL ALARM The Model 640 has a 6-pin FAULT connector for interface to an external alarm system. The male Weidmüller connector provides 3 usable signals from an onboard relay. The fault interface signals terminal failure conditions to the connected equipment. This is useful in applications where the correct paging operation is critical, such as emergency response and nuclear plants. Use the pinouts shown in Table 14 to create an appropriate cable for the FAULT connector. Table 14. FAULT Connector Pin Configuration Pin # 025-9416 FAULT Output Signal 1 Relay normally closed (NC) 2 Relay common (COM) 3 Relay normally open (NO) 113 Optional Equipment Installation 114 025-9416 Voice Prompts VOICE PROMPTS OVERVIEW The Model 640 DAPT XTRA is equipped to play high quality verbal prompting messages (that is, voice prompts) in addition to tone prompts. Voice prompts guide callers through the process of placing a page to a subscriber on the system. When used efficiently, voice prompts personalize the paging system and make it more user-friendly. Knowledgeable callers can always override voice prompts by pressing the “*” key on their telephone to speed up call processing. Note: The “*” cancel function can only operate reliably if the telephone hybrid circuits are correctly balanced. See Section 6 for details on telco adjustment procedures. The voice prompts are high fidelity voice recordings, not synthesized audio. They are stored as files on the non-volatile RAM disk, and copied into pooled voice storage when the Model 640 is turned on. Custom Voice Prompts The Model 640 is shipped with system voice prompt files recorded at the Zetron factory. These prompts are recorded in English by an American woman. You may wish to replace these prompts with a language or dialect more appropriate to your region or country. Personalized prompts can be recorded to replace the default voice at any time by telephone. When a custom prompt is recorded, the new version is automatically copied to the RAM disk. However, custom prompts should be backed up (preferably using MCU) in case of accidental erasure. The original factory-recorded voice prompts are stored on the office computer hard drive for backup purposes when MCU is installed. Database Configuration The prompts are configured on a per trunk and per subscriber class of service basis in the Model 640 database. The database defines which prompts are played when and to whom. VOICE PROMPT CATEGORIES The user-definable system voice prompts are divided into four categories in the Model 640 database. The Class of Prompt Service has fields that determine whether each of the four categories of voice prompts are played to the subscribers. In addition, some of the prompts are played to all callers, as defined by the paging terminal software. Figure 61 shows the default Class of Prompt Service record “standard.” 025-9416 115 Voice Prompts D i s p l a y R e c o r d PromptName: standard WelcomePrompt: Y MessagePrompt: Y SecurityPrompt: N ThankYouPrompt: Y (<cr>, P, D, M, N, L, F, T, B, ?, .) Entry: Figure 61. Default Class of Prompt Service Record Table 15 describes which voice prompt(s) each field controls and their purposes. Note that the “Category” column corresponds to the Class of Prompt Service fields. Table 15. Voice Prompt Categories Category Prompt Name Purpose Welcome System Welcome Plays when the caller accesses the system. No response from the caller is required. Message Voice Message Prompts caller to speak a voice message for recording and later transmission to a voice pager. Display Message Prompts caller to key in a numeric display message for storage and later transmission to a display pager. Security Code Prompts caller to enter a security code to page the selected subscriber. Function Code Prompts caller to enter the function for paging the subscriber's pager. The pager has been programmed with function code "Cf" where f is the default function code if the caller does not enter one, or with "CN" which means the call will not go through unless the caller enters an appropriate function code. Thank You Plays when paging software has successfully accepted and stored the paging message from the caller. Many system operators use this prompt for advertising. Security Thank You VOICE PROMPT ACCESS NUMBER A System Prompt Access Number must be programmed in the Model 640 database before any voice prompts can be recorded or deleted. The access number allows an authorized system operator or technician to enter voice prompt recording mode. Follow the steps below to setup an access number in the database: q 1. Select 2 - System Access Phone Numbers from the database main menu. q 2. Select 3 - System Prompt Access from the System Access Phone Numbers menu. The default record shown in Figure 62 appears. 116 025-9416 Voice Prompts PhoneNumber: 200 VoiceLimit: 10 SecurityCode: 0200 (D, M, N, ?, .) Entry: Figure 62. Default System Prompt Access Record q 3. Modify the record as needed. The fields are used as follows: Note: • PhoneNumber is the number to call to access voice prompt recording. • VoiceLimit is the maximum length of each voice prompt. The prompts do not have to be this long. In fact, it is a good idea to keep the prompts concise. Long prompts make the system inefficient by increasing call times and taxing disk space. The paging terminal is designed to store approximately 60 seconds of voice prompts. • SecurityCode is the four-digit number that must be overdialed to access voice prompt recording. If this field is left blank, the security feature is disabled. It is not a good idea to allow voice prompts to have “security-free” access. Anyone that accidentally dials the Voice Prompt Access PhoneNumber will be dumped into programming mode. Prompts could easily be destroyed. q 4. Once the appropriate modifications are made (if any), save the record by entering S. q 5. Exit the database to the plus (+) prompt by entering consecutive periods (.). q 6. Type “reboot” to reset the paging terminal and make the database changes take effect. CUSTOMIZING THE VOICE PROMPTS A touch-tone phone is required to actually record, delete, and play the voice prompts. The telephone should generate DTMF dialing tones. While it is possible to access the prompts with a rotary dial telephone and the dial click decoder option, this is not recommended, as dial clicks cannot be decoded as reliably as DTMF. Backing Up Voice Prompts Zetron recommends backing up any custom voice prompts in case they are ever needed. Follow the steps below to make a backup of the current voice prompts: Note: This only applies if custom prompts have been previously recorded. Otherwise, the original system prompts are available in the C:\MCU\PROMPTS subdirectory. q 1. Enter the Model 640 Communications Utility (MCU) program. q 2. Move the cursor to the Backup menu using the arrow keys (← and →). 025-9416 117 Voice Prompts q 3. Press <Enter> to view the menu choices. q 4. Highlight vOice Prompts and press <Enter>. q 5. MCU links to the paging terminal and obtains copies of each voice prompt file automatically. The screen shows status information about each file and the success of the backup. The voice prompt files are stored to the subdirectory that corresponds to the paging terminal site (C:\MCU\<sitename>). See the Model 640 Operating and Programming Manual (Part No. 0259417) for more details on the backup and restoration procedures. Accessing Voice Prompt Programming Mode The Model 640 voice prompts are accessed by a telco call into one of the available trunks. It is also possible to record new prompts by plugging a touch-tone phone directly into the paging terminal. Note: Before attempting to record voice prompts, be sure the line type configuration in the Model 640 database and the matrix plugs are set appropriately. To access the prompts by way of a directly connected phone (not through the telco connection), set the line type to DID Loop Start in the database, and put the matrix plug in the DID position. Follow the steps below to access programming mode: q 1. Use a touch-tone phone to access one of the Model 640 the trunks by way of the telco or a direct connection into the paging terminal. If calling by way of the telco, dial the PhoneNumber programmed previously in “VOICE PROMPT ACCESS NUMBER” on page 116. If using a directly connected telephone, overdial the PhoneNumber. The default entry is ‘0200’ in the Model 640 database. q 2. When the paging terminal responds with 1 long and 4 short beeps, enter the SecurityCode. The default entry is ‘0200’ in the Model 640 database. The Model 640 should respond with 3 short beeps to indicate that voice prompt programming mode is active. q 3. Enter a digit sequence that corresponds to the type of action desired. Table 16 shows the programming codes for playing, recording, and deleting each of the 16 available voice prompts. These codes are interpreted as follows: Note: 118 • 001 - 072: 0 = record new prompts • 300 - 372, 999: 3 = play existing prompts • 601 - 672: 6 = delete existing prompts The portion of the voice prompts in parenthesis are provided as suggestions for modification of the default messages. 025-9416 Voice Prompts Table 16. Voice Command Chart Command # Rec Play Del Zetron Preferred Wording Voice File Name --- 300 --- Plays all voice prompts in order. 001 301 601 System welcome - "You have reached our paging terminal (XYZ Communications)." sys_welc.ome 002 302 602 Voice message - "At the tone, please speak your message." sys_vmsg 003 303 603 Display message - "At the tone, please key in your message." sys_dmsg 004 304 604 Thank you - "Thank you for calling (XYZ Communications)." sys_than.kyo 005 305 605 Pager function code - "At the tone, key in the pager function code." fcode_in.put 006 306 606 End-to-End overdial - "At the tone, enter the pager number." sys_end_.end 007 307 607 Security code (for accessing client) - "At the tone, enter the security code." security._co 010 310 610 Bad number prompt - "The number you have dialed is not in service." bad_numb.er 030 330 630 Talkback processing - "Your call is being processed." sys_proc.ess 031 331 631 Talkback queue entered message - "Another call is in progress, please wait." sys_busy 032 332 632 Talkback message queued - "The system is busy, please call back later." (Also used for a generic "System Busy" prompt.) try_late.r 033 333 633 Talkback, no answer to ring-out - "The pager did not answer, please try again later." no_answe.r 034 334 634 Talkback, mobile activity or call limit, timer expiration - "Your time limit has expired." sys_time.out 035 335 635 Test page prompt, used in conjunction with the ZLINK "page" command for issuing test pages (refer to Section 6). "This is a test page from a Zetron paging terminal." voice_te.st 071 371 671 System load management - "Your call cannot be processed at this time. Please try again later." load_mgm.t 072 372 672 System error - "Your call cannot be processed. (Please call _____ to report the problem.)" sys_erro.r --- 999 --- Plays Test Tone to set the telephone balance and levels for inbound and outbound trunks. Recording Tips: To ensure the highest quality recordings possible, follow these tips: • Make sure that there is no background noise in the room from which you are calling into the paging terminal. 025-9416 119 Voice Prompts • Make sure that Silence Compression is turned on (set by way of raw oparams). See the Model 640 Operating and Programming Manual (Part No. 025-9417) for details. • Programming is simplified if VoxDisconnect is enabled. (Set in the Telephone Line Databases.) This ensures that the recording will time out after a specified interval of silence. • Five short beeps indicate successful completion of a command. • Three short beeps indicate the paging terminal is waiting to accept another command. • A slow busy signal indicates an incorrect command code. • After speaking the new prompt, wait quietly until a confirmation tone is played. RESTORING VOICE PROMPTS The original factory prompts are stored on the PC hard drive when MCU is installed. These prompts should be kept in the event that the custom prompts are deleted or corrupted. Customized Prompts Follow the steps below to restore custom voice prompts to the paging terminal: Note: Custom prompts can only be restored if backup copies of the files were previously made. Do backups every time the prompts are modified! Refer to “Backing Up Voice Prompts” on page 117. q 1. Enter the Model 640 Communications Utility (MCU) program. q 2. Move the cursor to the Restore menu using the arrow keys (← and →). q 3. Press <Enter> to view the menu choices. q 4. Highlight vOice Prompts and press <Enter>. q 5. MCU links to the paging terminal and transfers copies of each voice prompt file automatically. The screen shows status information about each file and the success of the restoration. Factory-Recorded Prompts Follow the steps below to restore the original system voice prompts to the paging terminal: q 1. If custom prompts currently reside in the paging terminal, you may want to make backup copies now. Refer to “Backing Up Voice Prompts” on page 117. q 2. Check the current contents of the site subdirectory (C:\MCU\<sitename>) for voice files. This can be accomplished by way of the DOS “dir” and “ls” commands or using the Windows “File Manager” utility. There are 16 voice files identified by an underscore character (_) within the file name. For example, ‘bad_numb.er’ and ‘sys_busy’. Refer to Table 16 for the description and name of each voice file. If the site subdirectory already contains voice files, delete them now or move them to another directory for safekeeping (not C:\MCU\PROMPTS). 120 025-9416 Voice Prompts q 3. Copy the original prompt files and ‘ld1.bat’ from the C:\MCU\PROMPTS directory to the C:\MCU\<sitename> directory. This can be accomplished by way of the DOS “copy” command or using the Windows “File Manager” utility. Note: Be sure to perform a copy, rather than a move. This will ensure that the original voice prompts will remain in their backup location for future use. q 4. Enter the Model 640 Communications Utility (MCU) program. q 5. Move the cursor to the Restore menu using the arrow keys (← and →). q 6. Press <Enter> to view the menu choices. q 7. Highlight vOice Prompts and press <Enter>. q 8. MCU links to the paging terminal and transfers each voice prompt file automatically. The screen shows status information about each file and the success of the restoration. See the Model 640 Operating and Programming Manual (Part No. 025-9417) for more details on the backup and restoration procedures. 025-9416 121 Voice Prompts 122 025-9416 Troubleshooting and Repair TROUBLESHOOTING AND REPAIR TROUBLESHOOTING THE PAGING PROCESS This section provides troubleshooting charts to help solve some of the problems that can occur with the paging terminal or any of the peripheral equipment connected to it. Many times the paging terminal is operating properly, but as a result of some programming or configuration error, it appears to malfunction. The troubleshooting charts include descriptions of symptoms, causes, and remedies. The paging process is broken down into three basic parts for troubleshooting simplicity: • paging input • page processing within the Model 640 • paging transmission output The second step of the page processing — the things that are controlled by the Model 640’s hardware and software — are transparent to the system operator and the paging subscribers. The result is that troubleshooting falls into only two categories - pages that are not successfully input to the paging terminal and pages that are not successfully transmitted. In many situations, the common problems that arise are a result of faulty communications between the paging terminal and the input and output equipment it is interfaced to. Paging Input The first step in the paging process is the input to the paging terminal. This can consist of telephone calls into the paging terminal, local alphanumeric paging input, or any network link input. Problems in getting a page into the paging terminal can involve the telco connections and settings, the serial input connections or the Line Type Database parameters. Use Table 17 to help isolate and correct problems that may appear with the paging terminal. The italicized words in the table are used to guide the system operator to the specific sight or sound that defines the problem. They allow a quick scan of the table for the appropriate entry. Table 17. Troubleshooting Paging Input to the Model 640 Symptom Possible Problems Solutions Trunk won’t answer an end-toend line type and: LINE LED doesn’t light 025-9416 Matrix plug incorrectly set Verify matrix position. Telco problems Verify phone lines wired at punchdown block. 123 Troubleshooting and Repair Symptom LINE LED lights Possible Problems Solutions Incorrect Model 640 database parameters Verify Telephone Line database settings. Matrix plug incorrectly set Verify matrix position. Incorrect database parameters Verify Telephone Line database settings are DID wink start. CO sending MF, not DTMF Change CO service to DTMF or pulse. (or) DID line doesn’t receive feed digits from the CO and: LINE LED lights, silence on phone Order MF decoder option LINE LED blinks, busy on phone TIP and RING leads reversed Reverse the TIP and RING connections. Caller hears a whooping sound when calling a DID line. Receiving invalid feed digits from the CO Verify the Telephone Line databases for the correct ValidNumber settings. The Model 640 does not detect star (*) override function during voice prompts. Telephone transmits timed DTMF Verify that the telephone sends DTMF tones for the duration keys are held. Hybrids (BAL R and BAL C) not balanced Readjust the trunk hybrids (BAL R and BAL C). Feed digit decoding is intermittent or inconsistent. The trunk card levels are out of balance. Readjust the trunk hybrids (BAL R and BAL C). The levels should be reset regularly (every 2-4 months). Caller hears busy tones before the end of paging. FROM TEL level is too low Readjust the FROM TEL levels per Section 6. Model 640 accepts the pager # or a call from a DID line. Caller hears a busy signal during or following a display message entry. Terminal was expecting a Function Code Listen to phone line to verify DTMF or dial clicks. Overdial digits not being passed by the CO from a pulse phone Order dial click decoder option. (or) Readjust the dial click card per Section 6. Paging Output The final step in the paging process is the output from the paging terminal. This may include communication with RF link transmitters, colocated transmitters, TNPP output links, etc. Problems in getting a page sent can involve the radio station connections, settings, and level adjustments, the serial output connections, or the Transmitter Database parameters. The paging output troubleshooting is split into three categories - general problems, display paging problems, and voice paging problems. Use Table 18 to help isolate and correct general problems that may appear with output from the paging terminal. 124 025-9416 Troubleshooting and Repair Table 18. Troubleshooting General Paging Output From the Model 640 Symptom Page is transmitted, but pager does not alert. Page is transmitted, but pager only alerts sometimes. Zone outputs do not change. Possible Problems Solution Incorrect capcode Edit subscriber Capcode. Verify 2-tone frequencies. Incorrect function code Edit Pager Definition FunctionCode field. Insufficient RF deviation Readjust the station TONE pot for 3.5 kHz deviation per Section 6. RF frequency is off Adjust the transmitter center frequency to match pagers. Digital polarity reversed Edit DigDataPolarity field in Transmitter Key Type database. Insufficient RF deviation Readjust the station TONE pot for 3.5 kHz deviation per Section 6. RF frequency is off Readjust the transmitter digital for 4.5 kHz deviation per Section 6. Insufficient tone duration Edit the 2-tone pager definition fields SecondsTone1/2 appropriately No pull-up resistors Install pull-up resistors to +5 volts at the zone outputs (pins 21, 22, 46, and 47). Use Table 19 to help isolate and correct problems that may appear with display paging (numeric or alphanumeric) output from the Model 640. Table 19. Troubleshooting Display Paging Output from the Model 640 Symptom Terminal accepts display page, but does not transmit. Pager alerts, but display is unintelligible. 025-9416 Possible Problems Solution Subscriber record programmed with an illegal function code Edit appropriate Pager Definition FunctionCode field. Voice and display limits both programmed as nonzero Only HSC pagers allow both display and voice paging. Modify one limit to equal zero. COR / terminal busy on Fix radio station connection. Alpha data to numeric pager or vice versa Edit Pager Definition Alpha field. Incorrect function code Edit Pager Definition FunctionCode field. Insufficient RF deviation Readjust the station TONE pot for 3.5 kHz deviation per Section 6. RF frequency off Readjust the transmitter digital for 4.5 kHz deviation per Section 6. 125 Troubleshooting and Repair Symptom Possible Problems Pager alerts, but display characters are missing. Insufficient DTMF level Solution Readjust the FROM TEL levels per Section 6. Use Table 20 to help isolate and correct problems that may appear with voice paging output from the Model 640. The italicized words in the table are used to guide the system operator to the specific sight or sound that defines the problem. They allow a quick scan of the table for the appropriate entry. Table 20. Troubleshooting Voice Paging Output from the Model 640 Symptom Possible Problems Hum or buzz present during voice page. Too much background noise present during voice page. Voice quiet at first, then increases during voice page. Solution Over deviation Reduce the station VOICE pot setting. Telco line imbalance Call the telco CO. Overdriving transmitter Reduce the station VOICE pot setting. Trunk AGC too hot Readjust the FROM TEL levels per Section 6. Hybrid not balanced Readjust the BAL R and BAL C levels per Section 6. FRONT PANEL LEDS The front panel lights indicate the status of hardware and software signals in the system. They can provide valuable information when troubleshooting paging operations. Table 21 outlines the meaning of the lights labeled LINE, ANS, or ACT which relate to communication between the CPU and the microprocessor on the peripheral board. As parts of the paging software become active, the LEDs illuminate in different ways as described below. Also, refer to Section 3 for a description of each LED. Table 21. Troubleshooting Front Panel LED Operation Software Step LEDs Light Activity Power on all ACT all solid on Boot-up sequence READY comes on solid at end of cycle - ready for paging all ACT all solid on, then rapidly blinking until end of cycle MODEM, COM intermittent flickering throughout cycle active trunk (A-D): LINE blinks for end-to-end and pulse on for trunk answer New telco call 126 025-9416 Troubleshooting and Repair Software Step LEDs Light Activity ACT on for pulse and during DTMF digit decoding ANS on for trunk answer blinks for DID DTMF Active telco call active trunk (A-D): LINE, ANS ACT Active paging solid on on when receiving FROM TEL audio ANA PTT on when transmitting paging tones or voice DIG PTT on when transmitting binary digital paging data BUSY on if radio station is already active (in cross-busy applications) Modem ZLINK active MODEM solid on or rapid flickering during modem data transfer between PC and Model 640 short flashes every 3 seconds when link is active, but data is not transferring Local ZLINK active COM solid on or rapid flickering during serial data transfer between PC and Model 640 short flashes every 3 seconds when link is active, but data is not transferring PROGRESS TONES The progress tones output by the Model 640 provide valuable clues about the paging process. If the system operator is familiar with the tones, troubleshooting the paging terminal is vastly simplified. Table 22 describes each progress tone issued by the paging terminal and when it plays. Table 22. Troubleshooting Progress Tones Audible Tones Frequencies beep 1000 Hz 700 msec Prompt to enter pager # for end-to-end or voice message ring 440 + 480 Hz on - 2 secs off - 2 secs Connecting to terminal, please wait di di dit 1000 Hz di - 50 msec off - 50 msec Prompt to enter a numeric display message or FunctionCode dah di di di dit 1000 Hz dah - 250 msec off - 35 msec di - 35 msec Prompt for subscriber’s SecurityCode 025-9416 Cadence Indicated Activity 127 Troubleshooting and Repair Audible Tones Frequencies Cadence Indicated Activity di di di di dit 1000 Hz di - 50 msec off - 50 msec Page has been accepted busy 480 + 620 Hz on - 500 msec off - 500 msec Invalid subscriber ID, page rejected, or other error fast busy 480 + 620 Hz on - 250 msec off - 250 msec End of telco call TROUBLESHOOTING TNPP PAGING Most problems that occur with TNPP paging involve a network link that is down. In effect, the paging terminal cannot connect to the receiving link and send pages. A down link may be the result of modem communication errors, a faulty RF link, transmitter deviation, or any other problems with the network link equipment. In addition, the test light on the TNPP interface card may flash to indicate the link is down. Many times the TNPP problem occurs on a per-page basis. That is, some TNPP pages are correctly received and/or sent, but others fail. These types of errors are indicated by descriptive response messages in the log files. Sometimes the destination node is invalid or undefined. Usually if the Model 640 is unable to pass pages on to another paging terminal (TNPP node), the logs show a “page no dest” response. Note: Zetron recommends enlisting the assistance of a Mobile and Paging Systems Division applications engineer to troubleshoot TNPP problems. This subsection is only provided as a general overview of the errors that can occur with a TNPP-equipped paging terminal. TNPP Interface LEDs The TNPP interface card has six red LEDs that identify operation of the card. Although these LEDs are not visible if the top panel of the Model 640 chassis is installed, it is important to describe them for troubleshooting purposes. If a malfunction of the TNPP interface is suspected, remove the top panel of the paging terminal and observe the operation of the LEDs at the middle rear of the chassis. Figure 63 shows a side view of the TNPP interface board (Part No. 7029362). 128 025-9416 Troubleshooting and Repair RXB TXB TXA RXA TST2 TST1 J1 - Serial Port A J2 - Serial Port B ⇐ Rear of Model 640 Chassis To Main Processor Board (J8) ⇓ Figure 63. TNPP Interface Board LEDs Table 23 describes each of the LEDs on the TNPP interface card. Table 23. Function of TNPP Interface Card LEDs Label Identifies Operation TST1 Test 1 Lights to indicate a self-test of the DB-9 serial port J1. TST2 Test 2 Lights to indicate a self-test of the DB-9 serial port J2. TXB Transmit B - output Lights to indicate that RS-232 serial data is being transmitted out port J2. RXB Receive B - input Lights to indicate that RS-232 serial data is being received on port J2. TXA Transmit A - output Lights to indicate that RS-232 serial data is being transmitted out port J1. RXA Receive A - input Lights to indicate that RS-232 serial data is being received on port J1. The two test LEDs should light continuously during the boot-up cycle, then flicker and go out right before the terminal enters operational mode (the front panel “READY” LED is lit). Testing the TNPP Card Another way to troubleshoot the TNPP link status is to short the transmit and receive signals (pins 2 and 3) on the serial interface port together. This effectively sends the pages out and right back into the TNPP card. Once the pins are connected, the network link should report as “up.” If this does not produce a cyclical passing of pages, then the interface card itself is malfunctioning. 025-9416 129 Troubleshooting and Repair Network Interface Unit (niu) Diagnostics When a down TNPP link is suspected, the niu command provides some useful diagnostics of the network interface unit. The command can be issued from the plus prompt (+) to determine the nature of the trouble. In addition, the -l switch tells the paging terminal to provide information on the status of each link. For a detailed description of the niu command, see the Model 640 Operating and Programming Manual (Part No. 025-9417). TNPP Packet Troubleshooting The TNPP protocol uses mostly printable ASCII characters transmitted by way of asynchronous RS-232 data communication. As a result, troubleshooting can be done with a dumb-terminal emulator on an IBM PC. Problems are often caused by faulty data communications between TNPP nodes. Inaccurate destination ID programming is another source of difficulties. Both types of trouble can be detected by monitoring the received and transmitted data with a PC. A dedicated dumb terminal or PC is needed for TNPP packet troubleshooting (not the same PC used for MCU and ZLINK operations). Viewcom is an inexpensive terminal emulator program that works well for this application. Do not use ProComm® or Crosstalk, as these types of communications packages tend to strip useful control characters from the packets. In addition, a cable is required to connect the PC's receive data line in parallel with either the transmit (pin 2) or receive data (pin 3) signal of the TNPP serial port under test. The TNPP protocol sends RS-232 data packets one after another. The paging packets contain no carriage returns or line feeds so the data might look a bit confusing. Once you know what to look for, you can pick out packets easily. All packets start with an SOH (start of header) character, which looks like an outline of a smiley face. Note: The TNPP information provided in this section is only meant to be a basic overview of the specification and its uses. Contact Zetron to order full detailed documentation on TNPP. Packet Structure A TNPP packet is a maximum of 1024 characters long and includes six pieces of information. The basic structure is shown in Figure 64. The shaded boxes are broken down in the following subsections. SOH (1) Header (12) STX (1) Data block(s) (N) End flag (1) BCC (2) Figure 64. General TNPP Packet Structure The fields are defined as follows: ♦ Start of header flag SOH “J.” This field is 1 character long and remains constant. ♦ Header The header is 12 characters long. It includes the packet addressing information for routing through the TNPP network. The Model 640 looks at the destination address and serial number to determine if it should page the subsequent data blocks. See Table 24 for details on the header fields. ♦ Start of text flag STX “ .” This field is 1 character long and remains constant. 130 025-9416 Troubleshooting and Repair ♦ Data block(s) Each data block contains one page. A TNPP packet can contain more than one data block if each page contains the same routing information (same header). This field is limited in size only by the 1024 character maximum per packet. The Model 640 supports both full capcode paging and ID paging for TNPP networking. Each type of data block has a slightly different format. See Table 25 and Figure 67 for details on the data block fields. ♦ End Flag ETX “♥.” This field is 1 character long and remains constant. ♦ CRC-16 BCC (block check code) The CRC-16 is a 2-character error-detection protocol. Usually the CRC information consists of strange looking control characters. Communication errors are very unlikely to go undetected when using CRC-16. Here is how a typical capcode page packet might look on a PC: JDE000801015C AGNA@C0040067298888005♥=K CRC Header Page Block Because the delimiters in the packet are control characters, some terminal emulators might show the funny characters like: ^ADE000801015C^BAGNA@C0040067298888005^C=K Header Elements The packet header is 12 characters in length and includes four pieces of information. The header structure is shown in Figure 65. Destination address (4) Inertia (2) Source address (4) Serial number (2) Figure 65. Header Structure Table 24 describes each header element and the possible values. Note that the “Example” column identifies the element in the example packet above. Table 24. TNPP Packet Header Fields Example Valid Entries Description DE00 4 hex digits 0001 - FFFF Destination address - the node the packet designated for 08 2 hex digits 00 - FF Inertia - controls the maximum number of “hops” in a network 0101 4 hex digits 0001 - FFFF Source address - the originating node 025-9416 131 Troubleshooting and Repair Example Valid Entries 5C Description 2 hex digits 01 - FF Packet serial number - differentiates between redundant and original packets Data Block Elements The data block is of variable length. Recall that several data blocks can be included in one packet. Each block must end with an ETB (end of text block) character and the last block must end with an ETX (end of text) character. The block format depends on whether the TNPP format is capcode or ID paging. The data block structure for an ID page is shown in Figure 66. Block type Function code Identifier Message text End flag (1) (1) (10) (N) (1) Figure 66. Data Block Structure for an ID Page The data block structure for a capcode page is shown in Figure 67. Block type Page type Page class RF channel RF zone Function code Capcode Message text End flag (1) (1) (1) (1) (1) (1) (8) (N) (1) Figure 67. Data Block Structure for a Capcode Page Table 25 describes each data block element and the possible values. Note that the shading in each row identifies whether the fields are used in a capcode page (no shading), an ID page (light grey), or both (dark grey). The “Example” column shows the elements in the example packet on page 131, where applicable. Redundant Packets In simplex systems, the originating encoder is not aware of errors and should transmit the packet multiple times. TNPP has serial numbers on all packets so the redundant packets are ignored by the Model 640 if they have already been received and processed without error. If reliable data circuits are used, this retransmission procedure may not be necessary. Table 25. Explanation of TNPP Packet Data Block Characters Example Valid Entries Description A A = full capcode page B = ID page Block type flag G G = Golay P = 512 baud POCSAG p = 1200 baud POCSAG Q = 2400 baud POCSAG 2 = 2-tone 5 = 5/6-tone H = HSC N = NEC D3 B = Blick M = Multitone Page type (format) 132 025-9416 Troubleshooting and Repair Example Valid Entries Description N N = numeric A = alphanumeric B = beep (tone-only) Page class A A=1 C=3 B=2 D=4 RF channel designator @ A=1 C=3 B=2 D=4 RF zone designator (same as channel designator) C 1-F Page function code - 1 hex digit 00400672 5 - 7 digit capcode with leading zeros (hex F indicates 5/6-tone) Pager capcode - always 8 ASCII characters replaces capcode 20 - FE hex Identifier - customer ID, always 10 ASCII characters 98888005 depends on pager type Message - variable length ♥ constant value ASCII value 03 or ^C End of text (ETX) character Traffic Command The traffic command provides another way to troubleshoot individual TNPP pages. The command is available from the plus prompt (+) and identifies the status of each page sent and received by the Model 640. Table 26 shows the TNPP packet responses provided by the traffic command, what they mean, and some solutions to failed pages. Table 26. Outbound TNPP Page Responses TNPP Response Description Solution ACK Acknowledge - the packet was received by the destination node. The page was successful. No solution required. CAN Cannot acknowledge - the destination node did not recognize the node ID or did not like something about the page. The page failed. Double check the destination node ID. Ensure that the information in the TNPP packet is valid: capcode or pager ID, page class, page type, etc. NAK No acknowledge - the page was not properly received by the destination node. The page failed. Check the RF link for excessive noise and proper configuration and connections. Ensure that the information in the TNPP packet is valid: capcode or pager ID, page class, page type, etc. 025-9416 133 Troubleshooting and Repair TNPP Response RS Description Resend - the destination node could not accept the page at this time. An <RS> response usually indicates one of three conditions: • the link is too busy (too much traffic or too many long messages) • the destination node is too busy • the page is to long for the destination node to handle The page failed. Solution Check the RF link for excessive traffic. Check the destination node for excessive traffic. Ensure that the page is not too long for the destination node to process. In most situations, the page can be resent when traffic conditions die down. Zetron has attempted to provide as much information about failed pages as possible. As a result, the traffic command also includes some information pertaining to TNPP pages that is not defined in the specification. These messages are summarized in Table 27. Table 27. TNPP-Related Traffic Messages Traffic Message Description Solution(s) port link up Indicates that the other node is up and running. This message is a response to a link test. No solution required. The other node is available to accept TNPP pages. port link down Indicates that the connection to the other node is down. Do not send any pages to this node until a “port link up” message is received. port reset sent Indicates that the Model 640 has sent a reset packet to the other node. No solution required. This is done when first connecting to the other node. port reset seen Indicates that the Model 640 has received a reset packet from the other node. No solution required. This is done when the other node is first connecting to the Model 640. page no dest Inbound page - indicates that the received page was incorrectly addressed. (wrong node ID) Outbound page - indicates that the destination address is incorrect. (wrong node ID or name) Check the NETWORK.CUS file for missing paging link information. page bad dest Indicates that the Model 640 does not recognize the destination node ID. Check node ID programming. page dest down Indicates that the outbound port is currently down. Usually a handshaking problem. Wait for node to come back up before resending the page. Check the TNPP card for proper transmission per “Testing the TNPP Card” on page 129. port unk node Indicates that the inbound packet was received on a port that did not recognize the destination address. Check the TNPP routing. 134 025-9416 Troubleshooting and Repair Traffic Message Description Solution(s) page timed out Indicates that the outbound page did not receive a response within the specified time-out interval. Check the link connection for excessive noise or a weak signal. This may indicate the network packet modem(s) successfully sent the packet, but the round trip time was too long. packet timed out Indicates that the inbound packet was not received successfully. Usually there was too long of a gap between characters. Check the link. A noise burst on an RF or phone link could cause this problem. If this message appears consistently, check the inter-node link connection. packet too far Indicates that the inbound packet had an inertia value of one. Check the network programming for conflicting or incomplete routing data. The source node may have inertia set too low. packet too big Indicates that an inbound packet appears to exceed the character limit (1024 bytes). Check link for noise or excessive traffic on a simplex or blink link. Check that incoming packet is within the 1024 maximum. packet bad CRC Indicates that the inbound packet failed the CRC error check. Check link for noise or interference. If this message appears consistently, check the inter-node link connection. packet SUB-ETB Indicates that the inbound packet had a non-standard control sequence. The end of text block character appeared as an escaped character pair, <SUB>W. Some TNPP implementations send this character sequence. Check with Zetron for software modifications to accommodate this anomaly. In rare cases, the <ETB> is actually part of the message. For further details on the traffic command and examples of its format, see the Model 640 Operating and Programming Manual (Part No. 025-9417). RESTORING THE DEFAULT DATABASES The default database configuration can be restored at any time by reformatting the RAM disk. This procedure may be required in the event of a corrupted database that is unrecoverable, a BIOS upgrade, installation of a new ROM card, or other hardware or software changes which significantly affect the data processing architecture. Following a RAM disk reformat, the Model 640 database requires complete re-programming. CAUTION This procedure destroys all data on the RAM disk! Before starting the reformat, backup the database and system voice prompts using MCU V2.2 or later. Verify the integrity of the backup by printing out a copy of the backup database. Please consult Zetron technical support if assistance is required. 025-9416 135 Troubleshooting and Repair Reformatting the RAM Disk Follow the procedure below to test, format, and copy the standard databases onto the RAM disk: [ ] 1. Ensure that a backup of the current databases and voice prompts is available. The data will need to be restored following the reformat procedure. Refer to the Model 640 Operating and Programming Manual (Part No. 025-9417) for details. [ ] 2. Verify that the ROM disk EPROMs (Part No. 601-0329) are version 2.01 or later. [ ] 3. Power down the paging terminal. [ ] 4. If this reformat coincides with a ROM disk software update, remove the current ROM disk (Part No. 702-9389) and replace it with the new one. If only the ROM disk EPROMs are being updated, remove the ROM disk. Then remove the EPROMs from the disk and replace them with the new ones. The new chips should be installed in U1-U4. [ ] 5. Verify that the BIOS version is 1.0 for the currently shipping V53 microprocessor (Part No. 601-0696). The BIOS EPROM is located to the immediate left of the RAM disk on the main processor board. [ ] 6. Install JP9 and JP10 on the main processor board. The jumpers are located together on the right rear corner of the board, next to the ROM disk. [ ] 7. Power-up the paging terminal. [ ] 8. The front panel COM and MODEM lights (on the left) blink in the sequence shown in Table 28. Table 28. LED Operation during RAM Reformat Procedure LED Blinking Sequence Time Between Sequences Description COM + MODEM twice 1 sec after power up CPU self test COM + MODEM twice 30 seconds COM once 5 seconds COM + MODEM twice 50 seconds COM once 5 seconds COM + MODEM twice 10 seconds COM + MODEM twice 15 seconds COM twice 10 seconds COM + MODEM twice 10 seconds COM twice 5 seconds COM + MODEM twice 10 seconds COM + MODEM twice 15 seconds COM three times 5 seconds Start of stage 3 COM + MODEM twice COM three times 25 seconds* End of reformat Start of stage 1 End of stage 1 Start of stage 2 End of stage 2 * This sequence repeats every 10 seconds until the paging terminal is turned off. 136 025-9416 Troubleshooting and Repair Notes: Any errors during the reformat procedure are indicated in the following manner: Fast toggle of the COM and MODEM lights followed by the COM light blinking either once, twice, or three times indicates the stage at which the reformat encountered an error. Then the MODEM light blinks several times indicating a specific error. This sequence repeats every 10 seconds. Contact Zetron Technical Support for assistance. [ ] 9. Once the “End of reformat” sequence is reached, power down the paging terminal. [ ] 10. Remove JP9 and JP10. (Leave JP10 in to disable the logon password. See Section 3 for details.) [ ] 11. Power-up the Model 640 and wait for completion of the boot sequence. [ ] 12. Use MCU to restore the databases and voice prompts to the RAM disk. [ ] 13. Reboot the terminal to initialize the database restoration. The paging terminal is ready for normal operation. Note: When updating from a version 1.11 or earlier ROM disk, the DigDataPolarity field in the Transmitter Key Up Control database should be reversed (from the previous setting) following the reformat procedure. TROUBLESHOOTING ZLINK COMMUNICATIONS The communications program that is required to access the paging terminal from a remote site (ZLINK.EXE) should have been installed on the office computer (as a part of MCU) in Section 4. Since the computer environment is the hardest for us to predict and control, problems may vary from incompatibility with modems to incorrect cables for the application. Note: Remember that most configuration changes require a reboot for the paging terminal to recognize the updates. This includes hardware settings (jumpers and switches) and Model 640 database updates except in the Subscribers and System Databases. Table 29 contains information on isolating communication problems between the Model 640 and the office computer. Table 29. ZLINK Troubleshooting Guide Symptom Error “no response...” 025-9416 Possible Problems Solution Com port contention Check that the modem is configured for a unique port number. Modem not configured for “word result codes” Check the modem manual for the proper DIP switch settings. External modem cable is pinned out incorrectly Check that the cable passes the signals from pins 2-8 and 20 directly between the computer and the modem. 137 Troubleshooting and Repair Symptom Possible Problems Solution Terminal not answering the line Verify that the Model 640 is operating correctly. Verify that the database line type configuration settings are correct. Verify that the matrix plug is installed in the proper position. Phone number dialing string is incorrect Select Edit, Locations in MCU to modify the phone # field. Ensure that the entry does not confuse local and modem settings. Computer calls, Model 640 responds “no carrier...” Modem not configured for “word result codes” Check the modem manual for the proper DIP switch settings. Computer calls, Model 640 responds “connect,” but no Line is too noisy or signal is too quiet Call the paging terminal and listen to the modem tones. Try a different phone line or modem. If Model 640 has console option, console may already be logged on Verify that a console kit is not logged on. Log off, if already ZLINKed. Only one ZLINK connection can be active at any given time. Error “baud rate wrong OR cable unplugged OR using modem COMM port OR terminal off” Any one or combination of the four errors listed Verify the baud rate, cable hookup, and terminal power. Using MCU from a MS Windows DOS-shell Do NOT attempt to use MCU from Windows. Exit to DOS and restart MCU. Error “no response from modem” Phone number dialing string is incorrect Select Edit, Locations in MCU to modify the phone # field. Ensure that the entry does not confuse local and modem settings. Modem initialization string is incorrect Create or modify ‘modem.ini’ file in the appropriate site subdirectory. See Section 4 for details. Can’t ZLINK from a dumb terminal (not same as console kit) DTR signal miscommunication Disconnect the DTR pin (4) and attempt to ZLINK again. Once connection is established, reconnect signal. System doesn’t recognize database changes Modifications haven’t been updated to the paging terminal RAM disk Execute the ZLINK reboot command to initialize changes. Error “no carrier...” “ready” 138 025-9416 Glossary GLOSSARY This glossary provides definitions of some industry-specific terms. Many of the glossary words are defined loosely because they are used in a wide variety of applications. In addition, some of the glossary words can be defined differently when they are out-of-context. These glossary definitions are meant to be applied only to the text of this and other related Zetron manuals. Term Definition ACK A response from a TNPP paging encoder that a paging packet was successfully received. The ACKnowledgment tells the sending node that the packet need not be resent. ACT LEDs Four lights (one for each trunk) on the front of the paging terminal that indicate trunk activity. The ACT LED lights when the trunk is receiving digit feed or voice input. AGC (Automatic Gain Control) A circuit feature designed to maintain constant signal output levels. The AGC automatically and continuously modifies the amplification of the varying input signal. Alarm A monitor of specific critical conditions at the site. Alert A method of notifying someone that a specific condition exists. A page is an alert; it lets the subscriber know that someone is trying to reach them. Alphanumeric Paging Display paging that combines alphabetic and numeric characters to form a text message. An alphanumeric page can include symbols, such as punctuation marks, depending on the paging format and terminal software. ANA PTT LED A light on the front of the paging terminal that indicates the analog push-to-talk is active. The ANA PTT LED lights when the radio station is sending voice or tone audio. ANS LED Four lights (one for each trunk) on the front of the paging terminal that indicate the trunk has been answered. The ANS LED lights when trunk supervision between the telco CO and the Model 640 has been initiated. Answer Originate Defines the handshaking protocol used for communication between modems. When the answer originate mode is reversed, the modem that initiates a call acts as though it were receiving a call. This handshaking sequence “tricks” the other modem into thinking it initiated the call. See also Handshaking. The human equivalent of reverse answer originate would be calling someone and starting the conversation with, “why did you call me?” 025-9416 139 Glossar Term Definition ASCII Character A letter, number, or symbol belonging to the American Standard Character set. The standard includes 256 characters, each identified by a three-digit decimal number (000-255). Audio Identifies anything that is “heard,” either by the human ear or by some equipment. In the Model 640, audio can indicate incoming trunk data (voice, DTMF, or serial) or outgoing station data (voice, serial, digital, or analog). Autoformatting A feature that defines the way numeric display messages are printed in the pager display window. Autoformatting inserts spaces and hyphens for numbers greater than 6 digits in length. Formatted pages are usually easier for the subscriber to decipher. Batching The way in which the paging terminal radio station groups pages for transmission. Each batch contains pages of like format and priority. Batching organization uses airtime efficiently and allows pagers with the same preamble to use battery saver mode. Battery Saver A circuit used in some pagers to extend battery life. Battery saver essentially allows the pager to use minimal battery power to monitor airwaves for a “wake up” signal (preamble), before going into a fully operational mode. Baud Rate The communications speed (in bits per second) of a modem or serial computer interface. Blick An older analog pager format that is similar to Multitone in functionality. The Blick format supports tone and numeric display pages. The Blick capcode is a 5-digit number. Boot Sequence The cycle the paging terminal goes through upon power-up to load and initialize all software, hardware, and database operations. The sequence lasts around 1½ minutes for the Model 640. Breakthrough The highest paging priority assignment where the page is immediately cut-through on the air for live voice. Breakthrough pages should be used only in emergency situations as they severely hamper paging efficiency. Bridging Clips An electrical conductor used to connect signal leads on the opposing sides of a punchdown block. Some clips are fused to alleviate equipment damage in circuit overload conditions. Broadcast A transmission delivery to at least 2 radio stations simultaneously. A broadcast is usually received over a bus-type local network or satellite. Buffer A temporary storage area for holding pages or other data. Most buffers operate generally on a first-in, first-out (FIFO) basis like a fast-food drive-through line. 140 025-9416 Glossary Term Definition Busy An already-in-use condition in the radio transmission equipment or phone line. BUSY LED A light on the front panel of the paging terminal that indicates when the radio station is currently being used. This LED corresponds to the busy input signal (pin #41) on the trunk and radio station interface connector. Buttset A modified telephone designed for troubleshooting and repair of telecommunications equipment. Cable An electrical interface comprised of one or more wires used to transmit a current or signal. Cable Ties Small plastic fasteners included with the installation interface assembly option. Cable ties are used to secure several wires together in a neat, organized bundle. CAN A response from a TNPP paging encoder that a paging packet was unsuccessfully received. The CANnot acknowledgment tells the sending node that the packet is formatted or addressed incorrectly and was not delivered. Canned Messages A Model 640 database that provides commonly used text phrases for alphanumeric display pagers. Callers can piece together canned messages to send an alphanumeric page from a standard touch-tone phone. Call Counts A counter that records and increments the number of calls received by each subscriber. The call counts are used for billing and for traffic management. Capacity An average amount of traffic that a circuit can handle. The capacity is given as a guide for maximum consistent load on a system. Capcode A pager “address” number that allows callers and the paging terminal to identify the specific subscriber being contacted. It indicates the format and duration of the signaling tones. The capcode is up to 8 characters long and is defined by the unique pager format (Golay, POCSAG, 2-tone, etc.). Carrier A physical connection carrying more than one communication channel. Carrier Operated Relay (COR) A data input that determines when the transmission path is already busy. Carrier Detect (CD) A data input that indicates when a modem connection has been established with another computer. Central Office (C.O.) The telephone company’s circuits that connect a private network to a public switched network. 025-9416 141 Glossar Term Definition Channel An electronics communications path. A narrow band of frequencies (assigned by the FCC) that a radio system must operate within to avoid interference with other adjacent channels. Circuit A pathway for electrical signals. Class of Service (COS) A set of operating parameters that defines certain paging subscribers. The class of service identifies settings like paging coverage zones, voice and display page limits, caller security codes, etc. Clear to Send (CTS) A data input that determines when the line is clear (not busy) for transmission of information. Colocated Refers to two or more pieces of paging equipment that are located at the same site. This type of system allows for direct cable hookup, rather than modem or RF-type connections. COM LED A light on the front panel of the paging terminal indicating when a local serial communications link has been established between the Model 640 and a computer or dumb terminal. This LED flashes rapidly during data transfers and flashes intermittently when a link is present but no data is being transferred. COM Port A serial communications connector. On the Model 640, the COM port is used for ZLINK connection to the PC’s own COM port. Most COM ports follow the RS-232 conventions for serial interface. Coverage The useable radio time and geographic area of a system. CPU (Central Processing Unit) The “brains” of a computer or paging terminal. The CPU controls data acquisition, processing, and transfer to other peripheral cards in the hardware. CRC (Cyclical Redundancy Check) An error-detection process used in the TNPP protocol. The CRC computes a general polynomial based on the entire TNPP binary data packet. In the protocol packet structure, the CRC occupies the last 2 bytes of data. Clear to Send (CTS) A data input that indicates when it is okay to send data to the radio station equipment. This signal is used in cross-busy applications to ensure that two encoders do not attempt to key up simultaneously. Current The flow of electricity through a circuit (measured in amperes). Database A software program that stores many records of information. Each record shares the same parameters (with different settings). A database can be sorted by each of its characteristics. In the Model 640, the databases store valuable system information including subscriber records, transmitter settings, and telephone trunk descriptions. Data Terminal Ready (DTR) A data output that determines when the receiving party is set to accept information. 142 025-9416 Glossary Term Definition Decoder A device that receives input data and translates it into a usable format. Delay The time difference between initiation of an event and the response. Destination The final paging terminal or coverage region (TNPP node address) for which a page is intended. Deviation Level The range of variation of a specific tone level. The tone deviation is usually set between 3.0 and 4.0 kHz for the Model 640 radio station audio. Dial Click The audio data produced by a rotary dial telephone. The “clicks” are a result of the phone line loop current being broken and reconnected. Each digit is a series of one to ten clicks produced by a rotary phone. Dial tone A phone line condition that indicates to the calling party that the exchange is ready to receive digits (either DTMF or MF). DID (Direct Inward Dial) A type of phone line (from the CO) that transfers the last few digits of the phone number dialed. A DID line allows direct dialing to a PBX network without operator assistance. DIG PTT LED A light on the front of the paging terminal that indicates the digital push-to-talk is active. The DIG PTT LED lights when the radio station is sending digital paging data. Disable To make a feature or system inoperative. Disable Tones PURC tones that tell the transmitter to disregard the paging data to follow. Also referred to as knockdown or death tones, they allow the transmitter to only send pages intended for its area of coverage. Display Message The text that is sent to a numeric or alphanumeric pager. DTR (Data Terminal Ready) An output signal that indicates to the receiving equipment that the sender is ready to transmit data. DTMF (Dual Tone Multi-Frequency) A common touch-tone protocol used in telephone equipment. DTMF combines two voice-band tone signals into one “beat” frequency. DTMF signaling provides 16 distinct signals. Dual Trunk Card A card that can be used in the paging terminal to provide two incoming telephone trunk interfaces. Each half of the dual trunk has a modem, a 9-pin serial port, and can be configured for DID, end-toend, E&M, or ground start signaling. Dumb Terminal A “brainless” computer. A dumb terminal consists of a monitor and a keyboard. Often times a computer is made to look like a dumb terminal through the use of a terminal emulator software program. A dumb terminal can be connected to the Model 640 to access the plus (+) prompt commands and system databases. 025-9416 143 Glossar Term Definition DVM (Digital Voltmeter) A piece of test and repair equipment used to measure electrical power in volts. E (ear) Lead The receive line of an E&M trunk. E&M A telephone line type that indicates seizure and supervision on two separate wires. E and M refer to the two data wires - Ear (receive) and Mouth (transmit). Empty Message A tone-only alert that is received by a pager. An empty message is sent when the caller fails to key in a valid page and the EmptyMsg field is set to ‘Y’ in the corresponding Pager Definition database. Encoder A converter used to create a message in a specific format. End-to-End A standard telephone line type like that available in a home. Also referred to as a POTS (plain old telephone service) line. ETB (End Of Text Block) An ASCII character that indicates the end of a TNPP packet text block. If the packet only contains one text block, the ETB is not used. The ETB is always followed by another text block. The last text block in a packet is flagged with an ETX character. ETX (End Of Text) An ASCII character (♥) that indicates the end of the text in a TNPP packet. Every TNPP packet should contain this character. Exciter The portion of the transmitter that creates the radio signals. The exciter processes the paging data and sends it to the power amplifier circuitry in the transmitter. Extender Card A circuit board designed to physically raise one of the Model 640 trunk cards up out of the chassis for pot adjustments. The extender card plugs directly into the trunk card slot and then accepts the trunk card on top of it. Falsing The erroneous activation of a decoding device as a result of misleading signals. Falsing in the paging world is when a pager alerts that should not have. FAULT Connector A male 6-pin Wiedmueller connector on the rear panel of the Model 640 chassis. The fault interface indicates a paging terminal malfunction. This connector is usually interfaced to an alarm for applications where paging terminal operation is critical (hospitals, emergency response centers, etc.). FCC Federal Communications Commission. The U.S. government agency that regulates non-governmental domestic communications systems. Feed Digits The DTMF signals sent to the paging equipment by the telco CO. The feed usually ranges from three to seven digits. In the Model 640 Trunk Valid Numbers database, the FeedDigits field identifies how many digits the paging terminal should expect to receive on a given trunk. 144 025-9416 Glossary Term Definition Ferrite A metal casing designed to block RF noise interference from the radio station equipment. Six ferrites are included in the installation interface assembly option to protect each of the telco trunk and the radio station connectors. Field A parameter in the Model 640 database that requires a formatted entry. Each database record is made up of one or more fields. Field-Upgrade A modification to the paging terminal equipment that is performed by a technician at the site. Field-upgrades are any changes that are not made at the Zetron factory, prior to shipment. Flying Leads The ends of any cable that does not have a standard connector (phone plug, Wiedmueller, DB-9, etc.) attached to it. The flying leads are each of the separate signal leads that are available for termination. Foreign Exchange (FX) A telco service provider for compact communities distant from the local exchange. A foreign exchange service is usually provided at reduced costs compared to a regular long-distance carrier. Foreign Key (FK) A database field that points to another database record located elsewhere. A foreign key field must identify another record that has been previously created in the system. This structure effectively creates a “nesting” structure where a record contains more data than it first appears to. Frequency An alternating current (AC) signal’s cycles per second (Hz). Frequency Shift Keying (FSK) A method of translating analog modem tones into usable digital data for the transmitter. Function Code A variable entry that indicates a specific set of operating parameters for a pager. The function codes available are determined by the pager format (Golay, 2-tone, etc.) and model. Function codes usually correspond to operations such as paging types (voice, tone, numeric, alphanumeric, etc.), the number of display characters, and the number and type of signal alerts (beeps, tones, etc.). Function Tones PURC tones that indicate the mode (analog or digital) that the transmitter should key up in. Function tones indicate the end of the key up sequence from the radio station. 5/6-tone An analog pager format based on the 2-tone format. The 5/6-tone format supports tone and voice paging and battery saver operation like 2-tone. However, the 5/6-tone format increases the number of available pagers in a system significantly, while cutting transmission time. Gap Time The space between transmission of the first and second alert tones for a 2-tone pager. The gap time allows the pager a chance to accurately identify the addressing information. Other gap times are used during transmissions between mode (analog and digital) changes. 025-9416 145 Glossar Term Definition Glare A condition caused when opposite ends of a loop start telephone line are seized simultaneously. A glare condition results in misdirected or incomplete calls. Golay Sequential Code (GSC) A high-capacity digital paging format. Golay is registered to Motorola and features advanced error-correction and fade resistance. The GSC format supports tone, voice, numeric, and alphanumeric paging. Ground Start A telephone signaling protocol where a ground condition represents seizure of the phone line by the originating equipment. Group Call A feature that allows several pagers in a specified group to be alerted simultaneously. Group paging is commonly used for alerting emergency response teams. Guard Tones PURC tones that indicate the first part of the transmitter key up sequence. Guard tones are sent by the radio station to effectively “warm up” the transmitter. Handshaking The initial communications between modems to establish a connection. Handshaking allows modems to confirm communications parameters such as baud rate, parity, and number of stop bits. Histogram A statistical graph of paging terminal history produced by MCU. Histograms for the Model 640 show the peak and average values for each hour in the last 7 days. Hook Refers to the telephone cradle. A phone is idle in the on-hook condition and busy (in use) in the off-hook condition. Generally, loop current flows during the off-hook condition. Hot Installation A method of adding circuit boards to the paging terminal while it is currently up and running. Zetron paging terminals do NOT support hot installation. The Model 640 must be powered down before any cards are installed or removed to avoid damage to the products. HSC (Hexadecimal Sequential Code) A paging format similar to 5/6-tone pagers. The HSC format supports tone, voice, and numeric display pages and battery saver operation. The HSC capcode combines a 5-digit address with a service block and beep duration. Hybrids Two potentiometers that isolate the FROM TEL and TO TEL audio signals. The hybrids (BAL R and BAL C) eliminate sidetone when properly adjusted for the specific telco line impedance. Immediate Start A telephone signaling protocol that does not require a start indication. The CO sends digits to the terminal immediately after the line is answered. Interface A connection between multiple pieces of hardware equipment. 146 025-9416 Glossary Term Definition Interference Any noise source that impairs the communication link between two pieces of equipment. Interference can affect telephone connections, RF and µwave connections, and paging transmissions. Initialization String See Modem Initialization String. Installation Interface Assembly An optional kit that simplifies the radio station and telco connections to the Model 640. The option includes a terminal block adapter, 2 Wiedmueller connectors, wire wrap cabling, phone cabling, and ferrites for noise protection. The terminal block adapter plugs directly into the RJ21 on the rear of the paging terminal chassis to separate the receive and transmit signals. Jumper A hardware connection between two electrical pins. A jumper is a small plastic rectangle with metal pin holes in the center to conduct electricity between the signals. LED (Light Emitting Diode) A small round light that identifies portions of the paging terminal operation. Most of the Model 640 LEDs are visible on the front panel of the chassis. However, the optional TNPP interface card also has several LEDs that can be observed by simply removing the top cover of the terminal. LINE LED Four lights (one for each trunk) on the front of the paging terminal that indicate trunk activity. The ACT LED lights whenever loop current is present on the trunk. Line Type The signaling format used by the telco CO to connect the phone line. The line type usually determines the number of signal leads used, their functions, and the way a call is initiated. The most commonly used types are E&M, end-to-end, and DID. Link A communication connection used to pass information to a remote location or another piece of equipment. See ZLINK and RF Link. Local Connection A cable interface between two pieces of equipment that are located at the same site. For example, a local connection can be between the office computer and the paging terminal or the paging terminal and the transmitter equipment. Log Files ASCII files that store virtually every detail about the paging terminal’s activity. The log files are a useful diagnostic tool when troubleshooting malfunctions and failed pages. The Model 640 stores two log files. Loop Start A telephone signaling protocol that initiates a call upon connection of the tip and ring leads (loop closed). Main Processor Motherboard The circuitry in the Model 640 that performs traffic management for all the page processing. The main processor controls paging terminal timing, the PCM highway signals, voice prompt processing and storage, and all of the system operating software. 025-9416 147 Glossar Term Definition Maintenance Port An RS-232 data communication interface between the Model 640 and the office PC. It can be either a local serial connection or a remote modem connection. The maintenance port is needed for updating the database and modifying system operating characteristics. Zetron strongly recommends that a modem maintenance port be available at all times for factory support and troubleshooting. Matrix Plug A small four-position circuit card that plugs into the dual trunk card to set the telco line type. Each trunk card has two matrix plugs; one for each of the trunks. The label on bottom of the matrix plug facing the rear of the trunk card indicates the current line type configuration. MCU (Model 640 Communication Utility) Zetron’s communication software for use with the Model 640 paging terminal. MCU provides a user-friendly interface to the paging terminal for system management, ZLINK maintenance, and database programming. MCU uses a local serial connection or a remote modem link to communicate with the Model 640. Menu Any set of options that allows the user to navigate through the database or communication functions. A menu does not allow the operator to enter or alter any data directly; it simply provides a path to a database record or another menu. Microwave (µwave) Radio frequency commonly used for long-distance telephone communications. (Frequencies above one gigahertz - 1,000 MHz.) M (mouth) Lead The transmit line of an E&M trunk. Modem A computer communications device that transmits and receives analog data over telephone lines for remotely located systems. Modem Initialization String A set of commands issued to a modem to define its operating characteristics. The modem initialization string usually consists of standard Hayes “AT” commands. Refer to the modem manual for modelspecific commands. MODEM LED A light on the front panel of the paging terminal indicating when a modem communications link has been established between the Model 640 and the office computer. This LED flashes rapidly during data transfers and flashes intermittently when a link is present but no data is being transferred. Morse Code ID A station identification sequence assigned by the FCC when an RF transmission site license is acquired. The ID is usually a set of 8-10 call letters that uniquely identify the licensee. The ID is played over the air at a specified interval to comply with FCC regulations. Multi-frequency (MF) A touch-tone protocol used in telephone equipment. MF is similar to DTMF, but uses different combinations from another tone set. Unlike DTMF, MF signaling is used between switches in the network rather than by the subscriber. 148 025-9416 Glossary Term Definition Multitone A digital pager format that supports tone, voice, and numeric pages. Although somewhat obscure, Multitone pagers are popular for health care applications where combined voice and display messages (such as a patient room number) are desired. NAK A TNPP packet response that a page was not properly received by the destination node. A No AcKnowledge response can indicate too much RF link noise or invalid packet data (capcode, pager format, etc.) NEC D3 A medium-speed digital pager format that supports tone and numeric display pages. The format is very similar to 2-tone in functionality. Network A set of communications lines or devices that are connected together to provide greater coverage area and availability. See also TNPP and TAP Protocol. Nextout An emergency priority that allows a page to move immediately to the front of the queue. Nextout pages take priority over all other pages, except breakthrough. Node A single TNPP address. Each node is identified by a unique four-digit number. The node usually indicates the paging system where a page originates or is destined. Noise Any interference in a communications link. In the paging world, noise can cause missed or garbled pages, false alerts, and inaccurate data. Numeric Display Paging A display paging format that combines numeric characters to form a phone number message. Numeric pages can include spaces and hyphens, depending on pager type and terminal software. Nurse Call System A display page (usually alphanumeric) input device used in hospital applications. Most nurse call systems allow an operator to manually enter pages to an in-house paging terminal for immediate alert of medical situations. The nurse call input device usually interfaces with the Model 640 by way of a local serial connection for reliability and fast system response. Outdial TAP A common means of sending a small to medium volume of alphanumeric pages to another paging terminal, usually through a dial-up connection. Outdial TAP pages can only be sent to the node address for which the page is intended - the page cannot be passed through a series of networked terminals. Outdial TAP is limited by its inability to support capcode paging, or send function codes and priority pages. Overdial Touch-tone signals sent to the hardware from a modem or telephone keypad. Overdial often indicates that tones are dialed before the prompt is through playing. 025-9416 149 Glossar Term Definition Packet A page or set of pages sent between TNPP nodes. Each packet can contain several blocks of data, up to 1024 total characters. A block contains one page and identifies parameters such as the page type, the subscriber ID or capcode, the origination and destination nodes, and the message text. Packet Modem A modem designed for sending TNPP page packets. The packet modem is usually dedicated to TNPP paging applications. Pager A small portable radio receiver that notifies the subscriber almost immediately when someone has called them. Most pagers beep or vibrate to signal a call. Pager Definition A database that defines how a pager should function. Each format (Golay, POCSAG, etc.) has its own set of parameters that make up the database. Most formats include settings like function codes, display message autoformatting, and alert signal timing. Paging Format The parameters that define how a pager communicates with the paging terminal. The format designates specialized codes and carriers that are compatible with the pager. Some of the commonly used formats are POCSAG, Golay, and FLEX. Paging Terminal The processing unit that receives incoming paging data (by way of phone line or RF/µwave link), encodes it, and passes it to the paging subscriber. The paging terminal defines who is paged (subscribers), when they are paged (priority and repeats), where they are paged (transmitter coverage zones), how they are paged (tone, voice, display, etc.), and what they are paged with (pager format). Password Any security word (letters or numbers) that is required for access to a specific part of the paging terminal operation. The Model 640 allows password programming to access ZLINK communications, specific databases (by way of MCU privileges), individual trunks and subscribers. All passwords can be bypassed - that is, made inoperable. PBX Private Branch Exchange. A private telephone network switch that connects lines at a single site to the public switched network. Peripheral Motherboard The secondary processor board in the Model 640 that interfaces the radio station and trunk card portions of the paging terminal to the main processor. The peripheral board has an RJ21 connector that provides signals for the telco and transmission equipment interface. Pin-out A description of each signal lead for an interface connector or cable. The pin-out identifies each signal by name, number, and function so that the proper connections can be made between equipment. 150 025-9416 Glossary Term Definition Plus (+) Prompt The actual prompt that indicates a ZLINK connection has been established and the terminal is awaiting a command. The plus prompt is similar to a DOS prompt. It allows the user over 60 commands that provide maintenance and diagnostics of the paging terminal. When the system operator is at the plus prompt, the <Enter> key can be pressed to access the Model 640 databases. POCSAG (Post Office Code Standardization Advisory Group) A high-speed digital paging code format that supports tone, voice, numeric, alphanumeric, and group paging. POCSAG offers 3 data speeds (512, 1200, and 2400 baud) and over 2 million capcodes. Polarity The electrical signal “orientation”. The polarity determines whether a high signal (usually +5 volts) is identified as a digital 0 or 1. Generally, data polarity settings allow the system to be easily customized for interface with different manufacturers’ equipment. Port A pathway for information passing. Most ports have connectors for hookup to other equipment. Examples: RS-232 serial ports - DB-9, DB-25, etc., RJ-type telephone connectors - RJ-21, RJ-11, etc., and Wiedmueller connectors. Potentiometer (pot) An analog circuit adjustment control for setting levels. Most pots look like screws and can be set using a small flathead screwdriver. Preamble The first part of a pager signaling address. The preamble effectively increases the number of available capcodes per pager type and allows the pagers to use battery saver operation. The preamble says to the pagers, “hey you guys with black hair, blue eyes, and 10 fingers, (or the equivalent in paging-speak) pay attention to the following pages!” Primary Key (PK) The main field in a Model 640 database that uniquely identifies each record. The primary key cannot be identical for two records. By convention, the primary key is usually the first field in each record. Priority Paging Paging speed based on subscriber rank. Pages designated with higher priority are transmitted faster than standard pages. The Model 640 offers four levels of priority: low, high, nextout, and breakthrough. Privileges A feature in MCU that allows the system operator to assign password protection to individual databases in the paging terminal. MCU provides three levels of privilege assignments - standard (everyone can view and edit the database), read-only (everyone can view, but only users with the appropriate password can edit the database), no access (only users with the appropriate password can view and edit the database). In addition, MCU sets a fourth password to allow access to reassigning the privilege levels themselves. 025-9416 151 Glossar Term Definition Progress Tones Different tones and beeps the paging terminal plays to callers to indicate what the Model 640 is doing. Progress tones are invaluable when troubleshooting paging malfunctions. Different tone sequences allow the experienced technician to identify when an error occurred and what the source of the error may be. Prompts A tone or voice message that guides a user through the paging process, telling the user when and what type of action is appropriate. Protocol The rules of operation that govern a communication network. PSTN Public Switched Telephone Network. A commonly accessed domestic telecommunications network provided by the telephone company. PTT (Push-to-Talk) On a mobile radio, the button that must be pushed to access the communication system and transmit. On a transmitter, the signal input that is used to key up the unit before sending data. Punchdown Block A terminal block that connects pairs of wire together by insulation displacement. 66-type punchdown blocks are commonly used by telephone companies to bring trunks (up to 25, 2-wire) into a building. PURC® (Paging Universal Remote Control) A protocol that defines the signals and key sequence used to control a remotely located paging transmitter. The PURC protocol is a trademark of Motorola and is commonly used in paging transmitters. Queue The prioritized, orderly “waiting line” for access to a system. In paging, the queue refers to the order in which pages are batched for transmission - generally first in, first out (FIFO). RF (Radio Frequency) The portion of the electromagnetic spectrum used for audio communications (around 10 kHz). RF Link A communications interface between equipment by way of the radio frequency. RF links are commonly used to send paging data to remotely located transmitters to increase the coverage area. Radio Station The transmission equipment. The radio station includes all link transmitters and receivers, paging transmitters, link controllers and any other simulcast or encoding equipment used to get pages from one place to another. In the paging terminal, the term refers generally to the output section of the processor. RAM Disk Storage in the Model 640 for the voice prompts and database files. It functions essentially like the hard disk in a computer. The RAM disk is written to on boot up from the nonvolatile ROM disk. Range The usable coverage area of a radio system or transmitter. READY LED A light on the front panel of the paging terminal, indicating when the Model 640 has completed its boot sequence and is ready for paging input. It should be solid on at all times during normal operation. 152 025-9416 Glossary Term Definition Receiver An RF unit that accepts incoming signals, extracts the audio portion, amplifies it, and converts it back to the original sound waves. Record A unique set of database parameters. Each database contains one or more records that define some portion of the paging terminal operation. For example, in the Subscriber database, individual paging customers have a record that defines their service. Reformat A reset of the original skeleton databases from the ROM disk. When the RAM disk is reformatted, all the current databases and voice prompts are erased. Do NOT perform a reformat unless current copies of the system files are available. Remote Connection A communications interface made between two pieces of equipment that are not located at the same site. The remote connection can refer to a modem link between the office computer and the paging terminal or an RF or µwave link between the paging terminal and a transmitter. Remote Control See PURC®. Repeater A radio station that rebroadcasts input data to increase the coverage area of a given system. Repeat Page A resend of a page that ensures the subscriber receives notification. Repeat pages are often sent for pages that are critical and need to be “guaranteed.” Request to Send (RTS) A data output that announces to the receiving party that data is ready for transmission and requests a chance to send it. Result Codes Modem communication codes that identify the success of data transmissions. Result codes tell the sending modem whether or not the information was received and accepted. 1. One of the two signaling leads used in most telephone line types. Part of the tip and ring audio pair. Ring 2. An audible ring is returned to the calling party to indicate that the line has been connected and the called telephone is ringing. Also an alert ring notifies a called subscriber of an incoming call. Roaming Refers to a paging subscriber traveling outside of their “home” area and accessing another site. Paging service can be provided to roaming subscribers by way of a networked paging encoder at the remote site. ROM Disk The nonvolatile Model 640 card that stores read-only data. The ROM disk stores the original system voice prompts and skeleton databases, and the paging terminal software. Rotary Dialing See Dial Click. 025-9416 153 Glossar Term Definition Routing The data path through which calls or information are passed. In a TNPP or TAP system, routing is the sequence in which a page is passed between paging terminals. Satellite An orbiting system in space that receives radio communications from earth transmitters and resends the information to remote locations. Security Code A number required to access some portion of the paging terminal operation. Different security codes can be enabled to access system voice prompt programming mode and individual subscribers. Sensitivity The minimum input signal strength required to receive a given radio transmission. Sequenced Subscribers Two or more subscriber records that have either consecutively numbered capcodes, or phone numbers, or both. A set of sequenced Subscriber records can easily be created using the S command. Sidetone An undesirable audio echo that occurs when the audio hybrids are not properly balanced. Sidetone is caused when the FROM TEL and TO TEL connections are not isolated from one another. Signaling The exchange of information between functional parts of a communication system. Telephone signaling generally refers to the type of trunk (DID, end-to-end, etc.) and the call initiation circuit (loop, ground, or wink start). Silence Compression A feature in the paging terminal that eliminates periods of excessive silence from voice recordings. Silence compression can be enabled to shorten custom voice prompts and voice pages in which the speaker pauses too much between phrases. Simulcasting Simultaneous transmission of paging data from several transmitters in overlapping regions to achieve wide-area coverage. Simulcasting requires a high degree of accuracy to avoid garbled signals. Site The radio equipment at a single location. The site may consist of a single paging terminal or several terminals with connected equipment. Sorting A method of organizing database records so the pertinent data is easily recognized. For example, it may be useful to sort the Subscriber database by name to locate a specific customer’s record. The Model 640 databases can be sorted by any field using the F (ind) command. Source The origination of some type of data. Often the source refers to the TNPP node from which a page originated. Note that the source node is not necessarily the paging terminal that sent the page directly to the Model 640. SOH (Start of Header) An ASCII character used in TNPP packets to indicate the beginning of the packet header data. (The header identifies the packet.) The SOH character (J) should be included in every valid TNPP packet. 154 025-9416 Glossary Term Definition Static Interfering noise picked up by a receiver. Static is often caused by lightning or conflicting man-made electrical products. Station See Radio Station. Statistics A mathematical analysis of data. The Model 640 offers statistics on many characteristics of the paging system. For example, a statistics file is available that shows the average and maximum number of pages transmitted per minute. Statistics can be viewed using either ZLINK or MCU. Statistics help the system operator manage the paging terminal more efficiently, identify the need for more resources, and troubleshoot throughput problems. STX (Start of text) An ASCII character used in TNPP packets to indicate the beginning of the message data. The STX character (J) should be included in every valid TNPP packet. Subscriber A paging customer. In the Model 640 databases, a subscriber is a record that identifies the customer’s name, phone number, pager capcode, security code, status, call count, and class of service. Supervision When a switching network monitors the status of a telephone line for the duration of a call. Switch A telecommunication device that connects multiple line inputs and outputs. The switch controls the routing and organization of the data transmission paths. System Configuration Files Several customized files stored in the Model 640 that define the operating characteristics of the paging terminal. System configuration files are factory programmed and are usually only modified by qualified Zetron personnel. Talkback Paging A feature in the Model 640 that allows a subscriber with a mobile radio to be connected with a caller for 2-way communication. When the paging terminal receives a talkback call, the subscriber is paged to alert them of a waiting caller. When the subscriber calls into the paging terminal, they are automatically connected to the calling party. Telco A local telephone service provider. The telco leases line types and services to customers. TAP (Telocator Alphanumeric Paging) Protocol A standardized alphanumeric paging format that enables paging encoders to pass pages between remote sites. TAP networking is similar to TNPP, but the format is less rigid, allowing for a greater variety of paging types and data. TNPP (Telocator Network Paging Protocol) The most popular format for wide-area paging networks. TNPP supports both capcode and ID paging in virtually every format available. The protocol uses RS-232 data in ASCII character format to send and receive pages between remote paging encoders. 025-9416 155 Glossar Term Definition Terminal Block Adapter An optional interface card for simplified connections to the radio station and telco equipment. The terminal block adapter is part of the installation interface assembly option and plugs easily into the rear panel RJ21 connector. It splits the 50 signals into four 8-pin telephone jacks and two 12-pin Wiedmueller connectors for the analog and digital portions of the transmitter interface. Terminal Emulator A software communications program that mimics a dumb terminal. A terminal emulator program can be used on the office computer to interface with the Model 640 for ZLINK communications. Throughput The paging channel input and output efficiency. Throughput refers to the ability of the paging terminal to accept, process, and transmit pages in a timely fashion. Tie Trunk A telephone circuit that connects two PBXs. A tie trunk is generally a leased line at a cut-rate. Time-out A specified time limit in which a certain condition must be met before a default action takes place. For example, the maximum time a caller is allowed between keying DTMF digits before the paging terminal considers the page complete. Time stamp An attachment that indicates the current time. Each page is time stamped as soon as it is received by the paging terminal. Tip One of the two signaling leads used in most telephone line types. Part of the tip and ring audio pair. Tone-only Paging A page that only causes the pager to alert (beep, vibrate, etc.). A toneonly page does not include a display or voice message to relay any further information to the subscriber. Touch-tone Telephone push-button dialing. See also DTMF. 1. The frequency, volume, and duration of calls on a radio system. Traffic 2. A plus (+) prompt command that displays a real-time log of paging terminal activity. Transmission Broadcast of communications data over a specific frequency range. Transmitter A device used to send RF data to remotely located receiving equipment. Transmitters can send data in a variety of frequencies, formats, and power levels (determines range). Transmitter Controller A piece of equipment that governs how the paging transmitter sends out pages. The transmitter controller is physically installed between the paging input and the transmitter. The controller differentiates between digital and analog transmission modes and demodulates FSK signals from the paging terminal. A transmitter controller is required when the radio station output of the paging terminal is not adequate to drive the transmitter, when the transmitter is not PURC-compatible, 156 025-9416 Glossary Term Definition when the transmitter is remotely located, or when the transmitter is part of a simulcast system. Transmitter Link Controller A piece of equipment that governs how the link transmitter sends out data. The transmitter link controller performs the same functions as a transmitter controller, except it is interfaced to a link transmitter rather than the paging transmitter. Transmitter Zone See Zone. Trunk A wireline data path between communications switching equipment. On the paging terminal, a trunk describes an input/output port for passing paging information. Trunk Card A dual-port telephone line interface for the paging terminal. A Zetron trunk card can also receive RS-232 serial data and communicate with remote equipment by way of a modem. The trunk card can be configured to connect to a variety of telephone line types and data input devices. Tutorial An educational lesson about the operating characteristics and programming procedures for the Model 640 paging terminal. The tutorial is part of the MCU software and provides a convenient on-line method of learning about the paging terminal for first-time users. 2-tone An older analog paging format. The 2-tone format supports tone and voice pages. This format sends two separate tone signals that identify the pager address. The 2-tone format is compatible with battery saver transmissions and group calls. UPS An uninterruptible power supply that obtains standby power from storage batteries to sustain system operation through brownouts and blackouts. Video Controller Card An optional interface card included with the console kit. The video controller card is installed in one of the open slots on the left side of the paging terminal motherboard. The card provides a serial port that connects to a monochrome display terminal for ZLINK access. 1. A paging format that records a caller’s live voice message and replays it out the speaker in the pager. Voice paging is most commonly used in medical (hospital and nurse call) applications. Voice Paging 025-9416 2. A feature Zetron prefers to call “PageSaver”. PageSaver actually stores voice messages on to a separate hard disk for later retrieval by the subscriber (like voice messaging). The PageSaver option is only available on the 2000 Series paging terminals. 157 Glossar Term Definition Voice Prompts A voice message that guides a caller in using the paging system. Voice prompts tell the user when and what type of action is appropriate. The voice prompts are recorded at the Zetron factory, however, they can be field-recorded for custom applications. Voice Storage The amount of memory available in the paging terminal for temporary storage of recorded voice pages and system voice prompts. Note that the Model 640 does not provide permanent storage of voice pages. The message is stored only until it is transmitted, then it is permanently purged from memory. Warm Up A pre-transmission period in which the paging transmitter is allowed to fully power up and prepare to send data. The warm up period aligns the transmitter for digital keying. The warm up is also referred to as high reliability mode. Watchdog An emergency monitoring system that oversees the operation of the paging terminal’s ZPAGE software. The watchdog expects to see a reset signal at specified intervals. If the software fails and the watchdog is not “kicked” at the expected time, the terminal reboots to reestablish proper operation. WATS (Wide Area Telecom Service) A long-distance telephone service provided by the telco for bulk-rate billing. Usually toll-free business “800” numbers are referred to as WATS lines. Wink Start A telephone signaling protocol that initiates a call with a current “wink.” The wink consists of an on-hook condition followed rapidly by an off-hook and another on-hook. Zone The geographic coverage region of a paging transmitter. In a paging system that reaches several areas, each zone identifies a transmitter and locale to which the subscriber can travel and still receive pages. Zone Address A label that uniquely identifies a transmitter coverage region. In the Model 640, the zone addresses range from 0 to 15. The zone address (node) for TNPP applications is generally a four-digit number. ZLINK Zetron’s communication software for linking into the paging terminal. The ZLINK program is similar to DOS in format and actually includes some useful commands from that operating system. ZLINK provides advanced diagnostics and maintenance features for the paging terminal. ZLINK has been rolled into the MCU program for ease of use and convenience. 158 025-9416 Parts Lists and Schematics PARTS LISTS AND SCHEMATICS V53 MOTHERBOARD (702-9673G) Parts List LEGEND: + = OPTION # = NOT INSTALLED ^ = INSTALLED ON HIGHER ASSY ZETRON MODEL 640 V53 MAIN PROCESSOR MOTHERBOARD PARTS LIST: 702-9673G Item 1 2 3 4 5 Qty 1 5 2 2 6 6 7 8 1 2 20 9 9 10 11 12 13 14 15 16 17 18 19 20 21 22 1 1 2 4 1 2 1 1 2 4 1 1 70 23 24 25 1 1 7 Reference Part No. R24 101-0049 R39,R40,R41,R44,R49 101-0057 R20,R21 101-0061 R4,R3 101-0065 R30,R42,R45,R46, 101-0073 R47,R48 R7 101-0075 R34,R35 101-0081 R9,R10,R11,R12,R13, 101-0085 R14,R15,R16,R19,R22, R23,R25,R26,R27,R28, R29,R32,R33,R43,R52 R1,R2,R5,R8,R17,R18, 101-0097 R31,R37,R38 R6 101-0145 R36 101-0148 R50,R51 109-0049 RP3,RP4,RP5,RP6 119-0002 RP2 119-0003 RP8,RP7 119-0005 RP1 119-0006 C6 150-0024 C52,C53 150-0033 C1,C2,C4,C5 151-0005 C3 151-0028 C25 151-0120 C7,C8,C10,C11,C12, 151-0180 C13,C14,C15,C16,C17, C18,C19,C20,C21,C22, C23,C24,C26,C27,C28, C29,C30,C31,C32,C34, C35,C36,C39,C46,C47, C48,C49,C50,C51,C54, C55,C56,C57,C58,C59, C60,C61,C62,C63,C64, C65,C66,C67,C68,C69, C70,C71,C72,C73,C74, C75,C76,C77,C78,C79, C80,C81,C82,C83,C84, C85,C86,C87,C88,C89 NOTE 7 C40 151-0199 C33 152-0089 C37,C38,C41,C42, 154-0100 C43,C44,C45 025-9416 Description RESISTOR,100 OHM,1/4W,5%,CARBON FILM RESISTOR,220 OHM,1/4W,5%,CARBON FILM RESISTOR,330 OHM,1/4W,5%,CARBON FILM RESISTOR,470 OHM,1/4W,5%,CARBON FILM RESISTOR,1.0K OHM,1/4W,5%,CARBON FILM Mfc. # 100 220 330 470 1.0K RESISTOR,1.5K OHM,1/4W,5%,CARBON FILM RESISTOR,2.2K OHM,1/4W,5%,CARBON FILM RESISTOR,3.3K OHM,1/4W,5%,CARBON FILM 1.5K 2.2K 3.3K RESISTOR,10K OHM,1/4W,5%,CARBON FILM 10K RESISTOR,1.0M OHM,1/4W,5%,CARBON FILM RESISTOR,2.0M OHM,1/4W,5%,CARBON FILM RESISTOR,100 OHM,1/8W,5%,CARBON FILM R-NETWORK,47 OHM x 5,ISOLATED,SIP-10 R-NETWORK,3.3K OHM x 7 BUSSED,SIP-08 R-NETWORK,3.3K OHM x 9,BUSSED,SIP-10 R-NETWORK,10K OHM x 9,BUSSED,SIP-10 CAP,24pF,1KV,10%,CERAMIC DISC CAP,33pF,1KV,10%,CERAMIC DISC,750 PPM/C CAP,47pF,100V,10%,CERAMIC NPO CAP,270pF,100V,10%,CERAMIC NPO CAP,.01uF,50V,10%,CERAMIC X7R CAP,.1uF,50V,20%,CERAMIC Z5U 1.0M 2.0M 100 1/8W 47 3.3K 3.3K 10K 24pF 33pF 47pF 270pF .01 .1 CAP,.47uF,50V,5%,POLYESTER CAP,.001uF,50V,5%,POLYESTER CAP,10uF,16V,10%,TANTALUM .47 .001 10 TANT 159 Parts Lists and Schematics 26 27 28 1 3 9 29 30 31 32 33 34 35 36 37 38 39 40 41 42 43 44 45 46 47 48 49 50 51 52 53 54 55 56 57 58 59 60 61 62 1 1 3 1 2 1 1 1 1 1 2 3 1 2 1 3 1 1 1 1 1 1 1 1 1 0 1 1 1 0 1 1 1 9 63 64 65 66 67 68 69 70 71 72 73 74 75 76 77 78 79 80 81 82 83 84 85 86 87 88 89 90 91 2 1 1 5 1 1 1 3 2 2 1 1 5 2 1 1 1 2 1 4 1 1 1 1 1 1 1 2 1 160 C9 155-0056 E1,E2,E3 305-0001 DS1,DS2,DS3,DS4, 311-0011 DS5,DS6,DS7,DS8,DS9 U21 314-4125 U65 314-4138 U56,U71,U83 314-4161 U12 314-4175 U45,U60 314-4244 U15 314-4245 U24 314-4251 U42 314-4257 U49 314-4259 U10 314-4373 U85,U6 314-4374 U25,U26,U46 314-4393 U57 314-4873 U39,U18 314-7404 U38 314-7420 U22,U33,U37 314-7474 U51 314-7485 U36 314-7486 U47 314-7492 U5 315-7406 U1 315-7407 U3 316-7705 U2 317-5406 U77 321-0130 U43 321-0222 U59# NOTE 4 321-1001 U34 321-3054 U9 NOTE 6 321-6264 U7 321-6450 U23# 321-7023 U8 321-8242 U66 NOTE 1 322-1604 U62 NOTE 1 322-1618 U14,U31,U50,U53, 322-2210 U73,U75,U78,U79,U81 NOTE 1 U16,U20 NOTE 1 322-2211 U27 NOTE 1 322-7256 U11 NOTE 1 322-7512 U55,U64,U69,U74,U80 323-7730 U32 324-4060 U30 324-4132 U35 324-7410 U54,U61,U68 325-4244 U72,U67 325-4245 U58,U63 325-4374 U19 326-4139 U82 326-4153 U17,U28,U29,U76,U84 326-4157 U70,U4 326-4273 U13 326-4657 U52 326-7400 U44 326-7404 U86,U87 326-7474 U48 327-7474 CR1,CR2,CR3,CR4 342-3009 Y1 376-0185 Y3 376-1106 U40 376-1431 Y2 376-3088 U41 376-3200 K1 380-0030 J2 401-0021 J6,J7 401-0063 J3 401-0129 CAP,22uF,50V,20%,AXIAL,Al-E BEAD,3B FERRITE,W/LEADS LED,RED,DIFFUSED,5mm CYLINDRICAL 22 50V QUAD BUFFER TS 74LS125 DECODER 1 OF 8 74LS138 IC,COUNTER,BINARY,4-BIT,PRESETTABLE 74LS161 IC, FLIP FLOP,QUAD 74LS175 OCTAL BUS DRIVER NON-INV TS 74LS244 OCTAL BUS TRANSCEIVER 74LS245 IC,MUX,TRI STATE 74LS251 IC,MUX,NON-INV TS,QUAD 74LS257 IC,LATCH,8 BIT,ADDRESSABLE 74LS259 OCTAL LATCH TS 74LS373 OCTAL D-FF REG TS 74LS374 DUAL 4 STAGE BINARY COUNTER 74LS393 DUAL 4BIT FF 74ALS873 HEX INVERTER 74LS04 IC,NAND,4 INPUT,DUAL 74LS20 DUAL D FLIP FLOP 74LS74 4 BIT COMPARE 74LS85 IC,XOR,W INPUT,DUAL 74LS86 DIVIDE BY 6 COUNTER 74LS92 HEX BUFFER INV OC HIGH-VOLT 7406 O/C HEX BUFFER NON-INV OC HIV 7407 POWER ON RESET TL7705 IC,DRIVER,RS-232,+-12V POWER,DUAL MC145406 IC,RAM,1K,DUAL PORT,120nS OR BETTER 1K RAM 12ONS IC,MODEM,1200 BAUD,5V,SINGLE CHIP 73K212 IC,SRAM,128K x 8,100nS, 50uA,0 TO 70C 128Kx8 SRAM IC,PCM,CODEC,U-LAW,SERIAL I/O,DUAL 5V 3054 CODEC IC,RAM,8K x 8,150nS (OnS write hold) 8KX8 IC,UART,2 BYTE FIFO (SEE ALSO 321-8250) 16450 UART IC,16 BIT HIGH INTEGRATION UP,132 PIN PGA V53 AT KEYBOARD CONTROLLER UPI-42 IC,PAL,16R4 16R4 PAL IC,PAL,16R8,25NS,100mA ICC-MAX 16R8 PAL IC,PAL,22V10 22V10 PAL IC,PAL,22V10,10nS IC,EPROM,CMOS,32K x 8,250nS IC,EPROM,64K x 8,120nS ADPCM EN/DECODE 14-BIT COUNTER WITH OSCILLATOR IC,NAND,HC,SCHMIDT,QUAD IC,NAND,HC,3 INPUT OCTAL BUFFER OCTAL XCVR OCTAL DFF REG TS DUAL 1 OF 4 DUAL 4 IN MULTI 2 INPUT MULTI OCTAL DFF OCTAL TRANSCEIVER WITH PARITY IC,NAND,F,QUAD HEX INVERTER IC,FLIPFLOP,D,F,DUAL IC,FLIPFLOP,D,ACT,DUAL DIODE,SILICON,100V,250MW XTAL,1.8432MHZ,HC-49 XTAL,11.0592MHZ,CL=18pF,HC-49 OSCILLATOR,14.31818MHZ,MINI-DIP XTAL,3.088MHZ,HC-18 OSC,32.000MHZ,MINI-DIP RELAY,DPDT MINI-DIP,12 V COIL CONN,D-SUB,9 PIN,FEMALE,PC-RA,PLASTIC CONN,CARD EDGE,2 x 25 6 POS RA HEADER 22V10-10PAL 27C256 EPROM 27C512 77C30 74HC4060 74HC132 74HC10 74HCT244 74HCT245 74HCT374 74F139 74F153 74F157 74F273 74F657 74F00 74F04 74F74 74ACT74 1N4148 1.8432MHZ 11.0592MHZ 14.318MHZ 3.088MHZ 32.000MHZ 025-9416 Parts Lists and Schematics 92 93 94 95 96 1 2 1 1 8 97 9 98 6 99 100 101 102 103 104 105 106 107 108 109 1 3 1 1 3 1 1 2 1 2 7 110 111 2 11 112 113 114 115 116 117 118 119 120 121 122 123 124 125 126 127 128 129 130 131 132 133 3 1 1 1 1 9 1 1 1 1 1 1 1 1 1 1 1 1 1 1 1 1 J1 J5,J4 J8 P1 TP1,TP2,TP3,TP4, TP5,TP6,TP7,TP8 JP1,JP2,JP3,JP4,JP7, JP9,JP10,JP12,JP13 JP5,JP6,P8,JP8,JP11, JP14 P6 P4,P5,P7 P2 NOTE 3 P3 J9,J10,J11 XJ2 NOTE 2 XJ2 NOTE 2 XJ10,11 U59 NOTE 4 XJ2 XJP5,8,11 (POS A) XJP6,14 (POS B) XJP1,2 (IN) XU62,66 XU14,16,20,31,50,53, 73,75,78,79,81 XU9,11,27 XU59 XU8 PCB XU9 NOTE 6 XDS1-9 XU27 NOTE 8 XU31 NOTE 8 XU73 NOTE 8 XU62 NOTE 8 XU66 NOTE 8 XU75 NOTE 8 XU78 NOTE 8 XU79 NOTE 8 XU81 NOTE 8 XU50 NOTE 8 XU16 NOTE 8 XU20 NOTE 8 XU14 NOTE 8 XU53 NOTE 8 XU11 NOTE 8 P4-7 NOTE 5 401-0217 401-0256 401-0843 401-2648 403-0001 CONN,DIN,5 PIN 18/31 DUAL ISA CONNECTOR 2 X 15 EDGE CONNECTOR 8-POS MALE .156" CTRS SQR 01 OF 401-0052 403-0002 02 OF 401-0052 403-0003 03 OF 401-0052 403-0017 403-0215 404-1004 404-1217 407-0030 210-0001 220-0102 321-1009 321-8256 401-0042 402-3040 17 OF 401-0052 30 OF 401-0052 [15 x 2] 04 OF 401-1364 34 OF 401-1364 [17 x 2] SKT,SIMM,30 PIN NUT, KEP, 4-40, S-Zn SCREW,4-40 x 3/8 PAN PHILLIPS 1 MEG x 9 DRAM SIMM 32K X 8 RAM LP DB LOCK SCREW MINI JUMPER 407-0020 407-0023 SKT, 20 PIN DIP SKT, 24 PIN SKINNY DIP 407-0028 407-0032 407-0044 410-9673B 416-1216 417-0010 601-0312 601-0313 601-0315 601-0318 601-0319 601-0320 601-0321 601-0322 601-0323 601-0324 601-0592 601-0593 601-0594 601-0595 601-0696 702-9722B SKT, 28 PIN DIP SKT, 32 PIN DIP SKT, 44 PIN PLCC M640 V53 MAIN PROCESSOR MOTHERBOARD, PCB 28 PIN BAT/WATCH LED MOUNT RA V2.0 M640 PCM TONE SOFTWARE V2.0 M640 PCM DECODE SOFTWARE V2.0 M640 PERIPHERAL DECODE 2 SOFTWARE V1.0 M640 CONTROL REGISTER 1 SOFTWARE V2.0 M640 CONTROL REGISTER 2 SOFTWARE V1.0 M640 DATA REGISTER LOW SOFTWARE V1.0 M640 DATA REGISTER HIGH SOFTWARE V1.0 M640 ADDRESS REGISTER SOFTWARE V1.0 M640 CONDITION MUX SOFTWARE V1.0 M640 CHANNEL ENABLE SOFTWARE V1.0 M640 V53 CONTROL DECODE SOFTWARE V1.0 M640 V53 DRAM INTERFACE SOFTWARE V1.0 M640 V53 PERIPHERAL DECODE 1 SOFTWARE V1.0 M640 V53 ADPCM INTERFACE SOFTWARE V4.0 M640 V53 DOS SOFTWARE M640 V53 ADAPTOR BOARD HPD43256-15L NOTES: (Notes are for production use only.) 025-9416 161 Parts Lists and Schematics Schematic 162 025-9416 Parts Lists and Schematics 025-9416 163 Parts Lists and Schematics 164 025-9416 Parts Lists and Schematics 025-9416 165 Parts Lists and Schematics 166 025-9416 Parts Lists and Schematics 025-9416 167 Parts Lists and Schematics 168 025-9416 Parts Lists and Schematics 025-9416 169 Parts Lists and Schematics Silkscreen 170 025-9416 Parts Lists and Schematics PERIPHERAL BOARD (702-9360G.2) Parts List LEGEND: # = NOT INSTALLED ^ = INSTALLED ON HIGHER ASSY + = OPTION (INSTALLED PER CUSTOMER ORDER) ZETRON MODEL 640 PERIPHERAL MOTHER BOARD PARTS LIST: 702-9360G.2 Item 1 2 3 4 Qty 6 3 2 9 5 6 7 5 1 9 8 9 2 17 10 11 12 13 14 15 16 17 18 19 20 21 22 23 1 2 4 2 2 1 2 2 1 1 3 1 6 9 24 25 26 1 1 36 27 28 29 30 31 32 4 3 2 1 2 9 33 34 35 36 37 38 39 40 2 1 1 1 1 4 1 1 Reference Part No. R4,R5,R6,R7,R19,R20 101-0047 R63,R65,R68 101-0057 R8,R11 101-0068 R13,R34,R40,R59, 101-0073 R60,R61,R62,R66,R67 R31,R47,R48,R49,R50 101-0081 R69 101-0083 R10,R15,R22,R23, 101-0085 R24,R25,R26,R27,R35 R70,R42 101-0089 R16,R17,R18,R30, 101-0097 R32,R43,R44,R45,R46, R52,R53,R54,R55,R56, R57,R64,R71 R33 101-0101 R39,R21 101-0103 R9,R14,R28,R41 101-0107 R12,R29 101-0113 R38,R37 101-0121 R51 101-0145 RV2,RV1 105-0001 R2,R3 108-1502 R1 108-1503 RP3 119-0004 RPX1,RPX2,RP2 NOTE 4 119-0008 RP1 119-0021 C3,C4,C5,C6,C17,C18 150-0096 C11,C12,C14,C16, 151-0047 C20,C23,C60,C61,C62 C63 151-0120 C22 151-0130 C7,C8,C9,C15,C21, 151-0180 C24,C25,C29,C30,C31, C32,C33,C34,C35,C36, C37,C38,C39,C40,C41, C42,C43,C44,C45,C46, C47,C48,C49,C50,C51, C52,C53,C56,C57,C58,C59 C10,C26,C27,C54 151-0199 C1,C2,C13 152-0085 C19,C55 152-0092 C28 154-0025 T2,T1 305-0600 DS1,DS2,DS3,DS4, 311-0011 DS5,DS6,DS7,DS8,DS9 U23,U24 314-4377 U7 314-7400 U21 314-7404 U1 315-7406 VR1 316-0005 U5,U6,U8,U14 316-0353 U2 317-1488 U32 317-5406 025-9416 Description RESISTOR,47 OHM,1/4W,5%,CARBON FILM RESISTOR,220 OHM,1/4W,5%,CARBON FILM RESISTOR,620 OHM,1/4W,5%,CARBON FILM RESISTOR,1.0K OHM,1/4W,5%,CARBON FILM Mfg.Part # 47 220 620 1.0K RESISTOR,2.2K OHM,1/4W,5%,CARBON FILM RESISTOR,2.7K OHM,1/4W,5%,CARBON FILM RESISTOR,3.3K OHM,1/4W,5%,CARBON FILM 2.2K 2.7K 3.3K RESISTOR,4.7K OHM,1/4W,5%,CARBON FILM RESISTOR,10K OHM,1/4W,5%,CARBON FILM 4.7K 10K RESISTOR,15K OHM,1/4W,5%,CARBON FILM RESISTOR,18K OHM,1/4W,5%,CARBON FILM RESISTOR,27K OHM,1/4W,5%,CARBON FILM RESISTOR,47K OHM,1/4W,5%,CARBON FILM RESISTOR,100K OHM,1/4W,5%,CARBON FILM RESISTOR,1.0M OHM,1/4W,5%,CARBON FILM VARISTOR,250VAC,70J POT,5K OHM,10 TURN,R/A POT,50K OHM,10 TURN,R/A R-NETWORK,1K OHM x 7,BUSSED,SIP-08 R-NETWORK,10K OHM x 7,BUSSED,SIP-08 R-NETWORK,R/2R,100K/200K,SIP-10 CAP,1000pF,1KV,10%,CERAMIC DISC,Y5P CAP,470pF,100V,10%,CERAMIC NPO 15K 18K 27K 47K 100K 1.0M 250VAC 5K 10T 50K 10T 1K 10K 100K/200K .001 1KV 470pF CAP,.01uF,50V,10%,CERAMIC X7R CAP,.047uF,50V,10%,CERAMIC X7R CAP,.1uF,50V,20%,CERAMIC Z5U .01 .047 .1 CAP,.47uF,50V,5%,POLYESTER CAP,.01uF,50V,5%,POLYESTER CAP,.0022uF,50V,5%,POLYESTER CAP,1uF,35V,10%,TANTALUM XFMR,600:600 DRY TELCO,1500 VAC HIPOT LED,RED,DIFFUSED,5mm CYLINDRICAL .47 .01 .0022 50V 1 TANT FLIP-FLOP,D,LS,W/ENABLE,OCTAL,DIP-20 NAND,LS,QUAD,DIP-14 INVERTER,LS,HEX,DIP-14 BUFFER,INVERTING,OC,HIGH-VOLT,HEX,DIP-14 REGULATOR,5V,LOW POWER,TO-92 OP-AMP,BIFET,DUAL,DIP-8 DRIVER,RS-232,QUAD,DIP-14 DRIVER,RS-232,+-12V POWER,DUAL,DIP-16 74LS377 74LS00 74LS04 7406 O/C 78L05 353 1488 MC145406 171 Parts Lists and Schematics 41 42 43 44 45 46 47 48 49 50 51 52 53 54 55 56 57 58 59 60 61 2 1 1 1 2 1 1 4 1 1 2 1 1 1 1 1 1 2 3 4 10 62 63 64 65 66 67 68 69 70 71 72 1 1 3 1 2 1 2 1 2 2 8 73 74 75 76 77 1 1 1 1 6 78 79 80 81 82 83 84 85 86 87 88 89 90 1 1 3 2 1 1 1 9 1 1 1 1 1 U25,U26 321-0130 RAM,1K,DUAL PORT,120nS OR BETTER,DIP-48 U16 321-0202 DECODER,DTMF,DIP-18 U4 NOTE 2 321-0751 MICRO,CMOS,3.5 TO 12MHZ,0 TO 70C,DIP-24 U12 321-3054 PCM,CODEC,u-LAW,SERIAL I/O,DUAL,5V,DIP-16 U15,U34 321-3155 PCM, TSAC,DIP-20 U33 321-6813 UP-HC,NON-MUX W/CS,3MHZ,PLCC-68 U20 321-6816 UP-HC MOS,PLCC-52 U17,U18,U29,U30 321-8256 SRAM,32K x 8,100nS,50uA, 0 TO 70C U22 NOTE 2 322-2210 PAL,22V10,DIP-24 U31 NOTE 2 322-2211 PAL,22V10,10nS,DIP-24 U19,U28 NOTE 2 322-7128 EPROM,CMOS,16K x 8,250nS,DIP-28 U13 323-4053 ANALOG SWITCH,TRIPLE SPDT,DIP-16 U27 324-4154 DECODER,HC,1 OF 16,DIP-24 U10 325-4174 FLIP-FLOP,D,HCT,W/COMMON CLK & RST U9 325-4245 XCVR,HCT,3-STATE,NON-INVERTING,OCTAL U11 325-4373 LATCH,HCT,OCTAL U3 325-4374 FLIP-FLOP,D,HCT,REG 3-STATE U36,U35 325-7474 FLIP-FLOP,D,HCT,W/SET & RST,DUAL,DIP-14 Q1,Q2,Q3 340-0014 XSTR,NPN,DARLINGTON,0.5A 30V, Q4,Q5,Q6,Q7 340-3904 XSTR,NPN,40V/200MA,TO92 CR1,CR2,CR3,CR4,CR5, 342-3009 DIODE,SILICON,100V,250MW CR6,CR7,CR8,CR9,CR10 Y1 NOTE 1 376-0358 XTAL,3.579545MHZ,CL=18pF,HC-49 Y2 NOTE 5 376-1474 TCXO,14.7456MHZ,+-1PPM 0-50C,+-1PPM/YR K1,K2,K3 380-0030 RELAY,DPDT,12 V COIL,MINI-DIP P1 401-0029 CONN,POWER,3 PIN J4,J5 401-0062 CONN,CARD EDGE,2 x 31 J1 401-0206 CONN,RJ21,50 PIN,MALE J3,J2 401-0843 2 X 15 EDGE CONNECTOR P2 401-6006 6-POS MALE TP1,TP2 403-0001 01 OF 401-0052 JP7,JP10 403-0002 02 OF 401-0052 JP1,JP2,JP3,JP4, 403-0003 03 OF 401-0052 JP5,JP6,JP8,JP9 P4 403-0006 06 OF 401-0052 P3 404-1217 34 OF 401-1364 [17 x 2] XJ1 NOTE 3 210-0001 440 KEP NUT PLATED XJ1 NOTE 3 220-0103 440x1/2 PAN PHILLIPS XJP1,XJP2,XJP5 (POS A) 402-3040 MINI JUMPER XJP3,XJP4,XJP6 (POS B) XU2 407-0014 SKT, 14 PIN DIP XU32 407-0016 SKT, 16 PIN DIP XU4,22,31 407-0023 SKT, 24 PIN SKINNY DIP XU19,28 407-0028 SKT, 28 PIN DIP XU20 407-0052 SKT, 52 PIN QUAD XU33 407-0068 SKT, 68 PIN QUAD PCB 410-9360D M640 PERIPHERAL MOTHER BOARD XDS1-DS9 417-0010 LED MNT RA XU28 NOTE 2 601-0325 V2A5 640 TRUNK SOFTWARE XU31 NOTE 2 601-0326 V1.00 640 TRUNK DECODE XU19 NOTE 2 601-0327 V1.01 640 STATION SOFTWARE XU22 NOTE 2 601-0328 V1.00 640 STATION DECODE XU4 NOTE 2 601-0361 V1.00 640 TRANSMITTER TONE ASIC SOFTWARE 1K RAM 12ONS 75T202 ASIC 001 3054 CODEC 3155 68HC11F1 68HC11E0 32K x 8 SRAM 22V10 PAL 22V10-10PAL 27128 EPROM 4053 74HC154 74HCT174 74HCT245 74HCT373 74HCT374 74HCT74 MPSA14 2N3904 1N4148 3.58MHZ 14.7456MHZ NOTES: (Notes are for production use only.) 172 025-9416 Parts Lists and Schematics Schematic 025-9416 173 Parts Lists and Schematics 174 025-9416 Parts Lists and Schematics 025-9416 175 Parts Lists and Schematics 176 025-9416 Parts Lists and Schematics 025-9416 177 Parts Lists and Schematics Silkscreen 178 025-9416 Parts Lists and Schematics DUAL TRUNK (702-9361D) Parts List LEGEND: + = # = ^ = = = OPTION, INSTALL PER CUSTOMER ORDER NOT INSTALLED INSTALLED ON HIGHER ASSY SUBSTITUTE PART ZETRON MODEL 640 DUAL TRUNK INTERFACE BOARD PARTS LIST: 702-9361D Item 1 2 3 4 Qty 2 2 4 8 5 6 6 7 4 8 8 9 10 2 4 7 11 12 13 14 15 16 2 2 2 2 2 6 17 6 18 19 20 21 22 23 2 2 2 2 4 8 24 25 26 27 28 29 30 4 4 2 1 4 2 2 29 31 32 33 34 35 36 37 38 39 40 2 2 4 4 4 3 2 2 2 0 Reference R34,R71 R6,R9 R37,R72,R94,R95 R33,R36,R45,R46,R47, R67,R69,R83 R54,R57,R61,R62,R89, R92 R11,R13,R15,R17 R5,R7,R48,R49,R50, R84,R85,R86 R63,R60 R41,R55,R76,R90 R8,R10,R42,R43,R44, R59,R77 R87,R52 R56,R91 R22,R21 R75,R40 R35,R68 R1,R3,R53,R58,R88, R93 R2,R4,R38,R39,R73, R74 R16,R12 R79,R78 R51,R70 R14,R18 R26,R27,R30,R31 R19,R20,R23,R24,R25, R28,R29,R32 RV1,RV2,RV3,RV4 R64,R65,R80,R81 R82,R66 RP1 C57,C58,C59,C60 C45,C10 C12,C46 C9,C11,C14,C15,C17, C19,C20,C21,C22,C23, C26,C27,C28,C30,C31, C32,C35,C36,C38,C39, C40,C42,C47,C48,C50, C51,C54,C61,C62 C8,C43 C6,C5 C24,C25,C29,C33 C7,C41,C44,C52 C16,C18,C53,C55 C34,C37,C56 C1,C2 C13,C49 C4,C3 T2#,T3#,T5#,T6# 025-9416 Part No. 101-0049 101-0057 101-0063 101-0065 Description RESISTOR,100 RESISTOR,220 RESISTOR,430 RESISTOR,470 101-0073 RESISTOR,1.0K OHM,1/4W,5%,CARBON FILM 1.0K 101-0075 101-0081 RESISTOR,1.5K OHM,1/4W,5%,CARBON FILM RESISTOR,2.2K OHM,1/4W,5%,CARBON FILM 1.5K 2.2K 101-0085 101-0089 101-0097 RESISTOR,3.3K OHM,1/4W,5%,CARBON FILM RESISTOR,4.7K OHM,1/4W,5%,CARBON FILM RESISTOR,10K OHM,1/4W,5%,CARBON FILM 3.3K 4.7K 10K 101-0101 101-0104 101-0105 101-0107 101-0118 101-0121 RESISTOR,15K OHM,1/4W,5%,CARBON FILM RESISTOR,20K OHM,1/4W,5%,CARBON FILM RESISTOR,22K OHM,1/4W,5%,CARBON FILM RESISTOR,27K OHM,1/4W,5%,CARBON FILM RESISTOR,75K OHM,1/4W,5%,CARBON FILM RESISTOR,100K OHM,1/4W,5%,CARBON FILM 15K 20K 22K 27K 75K 100K 101-0129 RESISTOR,220K OHM,1/4W,5%,CARBON FILM 220K 101-0145 101-0148 101-0150 103-3300 104-0048 104-0114 RESISTOR,1.0M OHM,1/4W,5%,CARBON FILM RESISTOR,2.0M OHM,1/4W,5%,CARBON FILM RESISTOR,2.7M OHM,1/4W,5%,CARBON FILM RESISTOR,3.3K OHM,1W,5%,CARBON FILM RESISTOR,75.00 OHM,1/2W,0.1%,50PPM/C RESISTOR,49.9K OHM,1/8W,0.1%,25PPM/C 1.0M 2.0M 2.7M 3.3K 1W 75 1/2W .1% 49.9K .1% 105-0001 108-1502 108-1503 119-0005 150-0033 151-0010 151-0130 151-0180 VARISTOR,250VAC,70J POT,5K OHM,10 TURN,R/A POT,50K OHM,10 TURN,R/A R-NETWORK,3.3K OHM x 9,BUSSED,SIP-10 CAP,33pF,1KV,10%,CERAMIC DISC,750 PPM/C CAP,100pF,100V,10%,CERAMIC NPO CAP,.047uF,50V,10%,CERAMIC X7R CAP,.1uF,50V,20%,CERAMIC Z5U 250VAC 5K 10T 50K 10T 3.3K 33pF 100pF .047 .1 152-0012 152-0021 152-0085 152-0090 154-0025 154-0100 155-0012 155-0052 155-0079 305-0600 CAP,.1uF,50V,5%,POLYESTER CAP,.47uF,250V,10%,POLYESTER CAP,.01uF,50V,5%,POLYESTER CAP,.001uF,50V,2%,POLYPROPYLENE CAP,1uF,35V,10%,TANTALUM CAP,10uF,16V,10%,TANTALUM CAP,2.2uF,100V,-20%,RADIAL, Al-E CAP,10uF,35V,20%,RADIAL,Al-E CAP,100uF,100V,20%,RADIAL,Al-E XFMR,600:600 DRY TELCO,1500 VAC HIPOT .1 .47 250V .01 .001 2% 1 TANT 10 TANT 2.2 100V 10 100 100V OHM,1/4W,5%,CARBON OHM,1/4W,5%,CARBON OHM,1/4W,5%,CARBON OHM,1/4W,5%,CARBON FILM FILM FILM FILM Mfc. Part # 100 220 430 470 179 Parts Lists and Schematics 41 42 43 44 45 46 47 48 49 50 51 52 53 54 55 56 57 58 59 60 61 62 63 64 65 66 67 68 69 70 71 72 73 74 75 76 77 78 79 80 81 82 83 2 4 4 2 1 4 1 2 2 1 2 2 1 2 1 2 2 2 4 2 4 2 2 2 2 2 1 2 1 3 4 4 2 2 4 2 6 2 2 1 1 1 2 T1,T4 U2,U3,U5,U6 DS1,DS2,DS3,DS4 NOTE U4,U1 U11 U7,U13,U20,U23 U9 U17,U16 U22,U21 U15 U18,U19 U8,U14 U10 Q6,Q8 U12 Q4,Q2 Q7,Q5 Q3,Q1 CR3,CR4,CR6,CR7 CR5,CR10 CR1,CR2,CR8,CR9 SW2,SW1 Y1,Y2 NOTE 1 K2,K1 J2,J1 J3,J4 J5 TP4,TP5 P3 TP1,TP2,TP3 XJ1,2 (2 EA) XJ1,2 (2 EA) XJ1,2 NOTE 2 XU1,4 XU7,13,20,23 XU10,11 XU8,9,12,14,18,19 XU16,17 XU21,22 XU15 PCB NOTE 2 XJ3,4 NOTE 3 305-1540 XFMR,TELCO HYBRID,SMALL SIZE 311-0008 OPTO ISOLATOR,CTR>20%,2500 VRMS 4N26 4 311-0028 LAMP,INCANDESCENT,28V,T1-3/4,WIRE TERMINAL 2187 311-1001 OPTO ISOLATOR,BI-POLAR H11AA1 314-4125 BUFFER,LS,3-STATE,QUAD,DIP-14 74LS125 316-0353 OP-AMP,BIFET,DUAL,DIP-8 353 317-5406 DRIVER,RS-232,+-12V POWER,DUAL,DIP-16 MC145406 321-0202 DECODER,DTMF,DIP-18 75T202 321-0222 MODEM,1200 BAUD,5V,SINGLE CHIP,DIP-28 73K212 321-2181 UART,2681,DUAL,DIP-40 2681 321-3054 PCM,CODEC,u-LAW,SERIAL I/O,DUAL,5V 3054 CODEC 323-4053 ANALOG SWITCH,TRIPLE SPDT,DIP-16 4053 324-7414 INVERTER,SCHMITT,MOTOROLA THRESHOLDS, 74HC14 340-0202 XSTR,JFET,N-CHANNEL,VGS >-4.0,TO-92 J202 340-2003 RELAY DRIVER 50V/.5A,-20 to +85C,DIP-16 2003 340-3904 XSTR,NPN,40V/200MA,TO92 2N3904 340-3906 XSTR,PNP,40V/200MA,TO92 2N3906 340-4250 XSTR,PNP,60V BETA >250 (USE 340-0250) MPS4250A 342-3009 DIODE,SILICON,100V,250MW 1N4148 343-3029 DIODE,1W 5.1V +-5% MOTOROLA ONLY 5.1V 343-3035 DIODE,ZENER,12V,1W,5% 12V 371-0012 SWITCH,SLIDE,SPDT,TOP ACTUATED,.100CTR,PCB MNT 376-1106 XTAL,11.0592MHZ,CL=18pF,HC-49 11.0592MHZ 380-0030 RELAY,DPDT,12 V COIL,MINI-DIP 401-0021 CONN,D-SUB,9,FEMALE,PCB-RA,PLASTIC 401-0102 CONN,CARD EDGE,30 PIN 401-6001 10-POS FEMALE 403-0001 01 OF 401-0052 404-1217 34 OF 401-1364 [17 x 2] 406-0001 01 OF 401-0108 210-0001 440 KEP NUT PLATED 220-0102 440X3/8 PAN PHILLIPS 401-0042 DB LOCK SCREWS 407-0006 SKT, 06 PIN DIP 407-0008 SKT, 08 PIN DIP 407-0014 SKT, 14 PIN DIP 407-0016 SKT, 16 PIN DIP 407-0018 SKT, 18 PIN DIP 407-0028 SKT, 28 PIN DIP 407-0040 SKT, 40 PIN DIP 410-9361B M640 DUAL TRUNK INTERFACE BOARD 415-9573A DUAL DB9 PLATE 702-9122C MATRIX PLUG NOTES: (Notes are for production use only.) 180 025-9416 Parts Lists and Schematics Schematic 025-9416 181 Parts Lists and Schematics 182 025-9416 Parts Lists and Schematics 025-9416 183 Parts Lists and Schematics Silkscreen 184 025-9416 Parts Lists and Schematics COMPONENT LOCATIONS Dual Dial Click (702-9119C) Dual MF (702-9197D.1) 025-9416 185 Parts Lists and Schematics RAM Disk (702-9386B) ROM Disk (702-9389B) 186 025-9416 Parts Lists and Schematics TNPP Interface (702-9362C.2) 025-9416 187 Parts Lists and Schematics Terminal Block Adapter (702-9470B) 188 025-9416 Parts Lists and Schematics CONFIGURATION DIAGRAMS Dual Trunk Telco DID (024-0076A) 025-9416 189 Parts Lists and Schematics Dual Trunk Telco End-to-End (024-0077A) 190 025-9416 Parts Lists and Schematics Dual Trunk Telco E&M (024-0078A) 025-9416 191 Parts Lists and Schematics Dual Trunk Telco Ground Start (024-0079A) 192 025-9416 Parts Lists and Schematics INDEX A adjustments audio from telephone, 86 dial click, 95, 109 digital deviation to transmitter, 95 hybrid balance, 89 level audio, 23 making measurements, 85 overview of procedures, 85 paging tone level to transmitter, 94 pots, 21 test equipment dial click, 95 station interface, 90 trunk card levels, 86 trunk card levels, 85 voice level to transmitter, 93 ADPCM transcoders, 17 AGC kill, 24 alarm, external, 113 alphanumeric paging, 2, 10, 139 ansi.sys characters, 44 architecture, 15 ASCII character, 140 audio from telephone, 86 level adjustments, 23 paging tone level to transmitter, 94 voice level to transmitter, 93 automatic gain control (AGC), 139 B backing up voice prompt files, 117 battery saver, 140 breakthrough, 140 buttset, 141 025-9416 C canned messages, 141 capcode, 141 chassis grounding, 52 clamp-on ferrites, 55 class of service (COS), 142 co-located transmitters, 68 COM PORT, 18 communications conflicts, 44 communications software MCU, 32 ZLINK, 32 computer requirements, 32 connectors RJ21 (50-pin), 51, 61 RJ45 (8-pin), 59 Crosstalk, 44 D decibels, 85 deviation level, 143 dial click, 143 decoder card, 29, 108 threshold adjustment, 95 DID trunk configuration, 24 digital deviation to transmitter, 95 display paging output, troubleshooting, 125 DRAM memory, 18 DTMF signaling, 2 tone frequencies, 110 dual trunk 4-wire audio interface, 26 dual trunk interface board, 20, 22 DUART, 23 dumb terminal, 143 193 E E&M, 144 E&M trunk configuration, 25 end-to-end, 144 end-to-end trunk configuration, 25 expansion slots, 18 external alarm, connecting to fault connector, 113 external hardware interfaces, 18 external serial ports, 23 F fault connector, connecting to external alarm, 113 features, 3 feed digits, 144 ferrite, 145 ferrites, clamp-on, 55 front panel diagram, 24 LEDs, 29 test points, 88 function code, 145 function tones, 145 G ground refference, 52 ground start, 25, 52 grounding chassis, 52 H handshaking, 146 hardware, unpacking & inspection, 49 hybrid balance, 89 hybrid ballance, 24 I immediate start, 26, 146 installation 66-type punchdown, 50, 55 dial click, 108 dual trunk card, 97 external alarm, 113 MCU software, 32 optional equipment, 97 overview, 48 parallel printer card, 112 RS-232 ports, 99 terminal block adaptor, 52 TNPP interface, 98 warning, 49 interfaces dual trunk 4-wire audio, 26 dual trunk board, 20, 22 external hardware, 18 Glenayre transmitter, 72 installation interface assembly, 49 radio station, 20, 61 radio station, 66-type punchdown block, 64 radio station, optional, 62 telephone, 2 telephone to punchdown block, 57 telephone wall-jacks, 59 terminal block adapter, 52, 54, 59 TNPP, 28 introduction, manual, 1 J jumper settings general, 44 main board, 18 peripheral board, 21 RAM disk board, 28 ROM disk board, 27 L LEDs act, 30 ana PTT, 30 ans, 30 busy, 30 com, 30 dig PTT, 30 front panel, 29 025-9416 Parts Lists and Schematics line, 30 modem, 30 operation during RAM reformat, 136 ready, 30 TNPP interface card, 128 troubleshooting operation, 126 level adjustment pots, 21 line type matrix, 22 local serial connection, 34 log files, 147 M maintenance, modem, 18 manual layout, 5 related manuals, 6 matrix plug, 148 MCU, 3, 31, 32 installation, 32 troubleshooting interface, 41 measurements, 85 messages canned alpha, 10 formats, 2 MF, 148 decoder card, 29, 110 signaling, 2 tone frequencies, 110 model 66, 3, 73, 79 model 68, 80 modem, 148 DUART, 23 initialization string, 40, 45 maintenance, 18 remote connection, 36 motherboard main processor, 17 peripheral, 20 N network interface diagnostics, 130 numeric pages, 2 025-9416 O options dial click decoder, 29, 108 dual trunk card, 97 installation interface assembly, 49 MF decoder, 29, 110 parallel printer port, 29, 112 RS-232 ports, 99 terminal block adapter, 52 TNPP interface, 98 P pager formats, 2 pages alphanumeric, 2, 10 formats, 2 numeric, 2 priority paging, 2 talkback, 2 tone-only, 2 paging input, troubleshooting, 123 paging output, troubleshooting, 124 paging tone level to transmitter, 94 parallel printer port, 29 PC hardware requirements, 32 PCM highway, 17 power supply, 16 printer port, 29 priority paging, 2, 151 ProComm, 3, 41 progress tones, 152 progress tones, using for troubleshooting, 127 prompts backing up, 117 customizing, 115 programming, 118 recording tips, 119 restoring, 120 voice prompts, 2 punchdown 66-type, installation, 50, 55 model 68 interface, 82 195 telephone interface to block, 57 PURC, 3, 70, 152 R radio station 66-type punchdown installation, 64 interface, 61 jumper settings, 67 optional interface, 62 pin configuration, 62 radio station interface, 20 RAM disk, 152 RAM disk board, 28 recording voice prompts, 119 reformatting RAM disk, 136 reset timer, 17 restoring default databases, 135 restoring voice prompts, 120 ROM disk, 153 ROM disk board, 27 S serial communication local, 34 modem, internal, 36 port I/O address and interupt, 44 ports, external, 23 troubleshooting, 45, 46 settings jumpers, general, 44 jumpers, main board, 18 jumpers, peripheral board, 21 jumpers, RAM disk board, 28 jumpers, ROM disk board, 27 RF station jumpers, 67 signaling DTMF, 2 formats, 9 MF, 2 silence compression, 10, 154 simulcasting, 154 subscriber database, 32 system applications, 4 detailed logs, 4 features, 3 management, MCU, 3 timing issues, 17 T talkback pages, 2 TAP, 3, 28, 155 technical support, 17 telephone connectors, RJ21 (50-pin), 51 dual trunk board, 20 interfaces, 2 line type matrix, 22 punchdown block interface, 57 terminal block adapter, 54, 59 trunks, 4 test equipment dial click, 95 station interface alignment, 90 trunk card levels, 86 test points, 88 testing TNPP card, 129 TNPP, 3, 5, 28, 98, 155 TNPP packet packet structure, 130 TNPP traffic command, 133 tone-only pages, 2 traffic command, TNPP, 133 traffic statistics, 12 transmitter control link controllers, 76 local, 68, 70, 74 model 66, 79 model 68, 80 remote, 3, 73, 74 transmitter interface generic, 69 Glenayre, 72 GM300, 71 Nucleus NAC, 71 PURC, 70 025-9416 Parts Lists and Schematics Quintron 1000, 72 troubleshooting display paging output, 125 LED operation, 126 LEDs on TNPP interface card, 128 MCU interface, 41 paging input, 123 paging output, 124 serial communications, 45, 46 TNPP packets, 130 TNPP paging, 128 using network interface diagnostics, 130 using progress tones, 127 ZLINK, 43, 137 ZLINK/terminal emulator interface, 43 trunk card, 157 trunk type DID, 24 E&M, 25 E&M wink start, 26 end-to-end, 25 ground start, 25 multiple types, 4 TTL data outputs, 67 025-9416 U unpacking & inspection, 49 UPS, 17, 157 V voice level to transmitter, 93 voice prompts, 2, 10, 17, 115 access number, 116 categories, 115 customizing, 115 making back ups, 117 programming, 118 recording tips, 119 restoring, 120 voice storage, 2, 10, 17 volts (RMS), 85 W watchdog, 158 watchdog reset timer, 17 wink start, 26, 52 Z ZLINK, 3, 31, 32, 158 connecting via MCU, 37 via terminal emulator, 41 197 025-9416