1
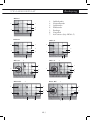
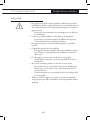
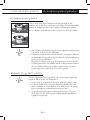
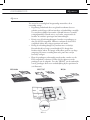
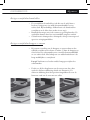
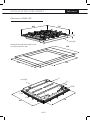
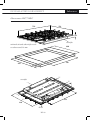
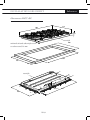
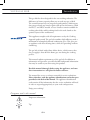
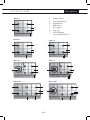
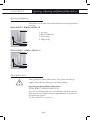
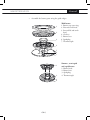
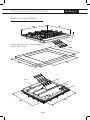
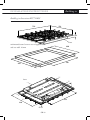
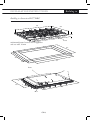
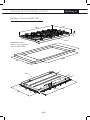
adjust thickness HG42..C HG62..B HG62..C HG77..B HG77..C HG92..B HG92..C HG97..B HG97..C Het toestel-identificatieplaatje bevindt zich aan de onderkant van het toestel. The appliance identification card is located on the bottom of the appliance. Handleiding Manual Plak hier het toestel-identificatieplaatje. Stick the appliance identification card here. Houd, wanneer u contact opneemt met de serviceafdeling, het complete typenummer bij de hand. When contacting the service department, have the complete type number to hand. Adressen en telefoonnummers van de serviceorganisatie vindt u op de garantiekaart. 700002804000 You will find the addresses and phone numbers of the service organisation on the guarantee card. NL / BE Gebruiksaanwijzing Installatievoorschrift 3 - 19 20 - 32 Instructions for use Installation guide 3 - 19 20 - 32 GB / IRL 2 Inhoud HANDLEIDING Uw gaskookplaat Inleiding Beschrijving Veiligheidsvoorschriften 4 5 6-7-8 Bediening Ontsteken, instellen en vlambeveiliging Extra eigenschappen elektronische vlambeveiliging 9 - 10 10 - 11 De kookplaat optimaal gebruiken 12 - 13 Algemeen 14 - 18 Comfortabel koken Onderhoud Statuscodes Tabel 19 Storingen Storingstabel 20 - 21 Algemeen Inbouwen Gastechnische gegevens 22 - 23 24 - 32 33 Installatievoorschrift Bijlage Afvoeren toestel en verpakking Technische gegevens NL 3 34 34 Inleiding UW GASKOOKPLAAT Deze gaskookplaat is ontworpen voor de echte kookliefhebber. De verschillen in brandercapaciteit zorgen ervoor dat u ieder gerecht kunt bereiden. Dankzij de in de knoppen geïntegreerde vonkontsteking ontsteekt én bedient u de branders met één hand. Bij type HG77 en HG97 blijven er door de ruime plaatsing van de wokbranders tijdens het wokken minimaal 2 branders vrij voor het bereiden van andere gerechten. Dit toestel voldoet aan alle eisen die gelden voor het Kookkeurmerk. Dit betekent dat de gaskookplaat hoog rendement koppelt aan een minimum aan onvolledige verbrandingsgassen. Hiermee beschikt u over een toestel met korte aankooktijden, terwijl er ook uitstekend op gesudderd kan worden. De gaskookplaat is voorzien van een vlambeveiliging die ervoor zorgt dat de gastoevoer gesloten wordt als de vlam tijdens het kookproces dooft. In deze handleiding staat beschreven op welke manier u de gaskook plaat zo optimaal mogelijk kunt benutten. Naast informatie over de bediening treft u ook achtergrondinformatie aan die u van dienst kan zijn bij het gebruik van dit product. Lees eerst de gebruiksaanwijzing geheel en aandachtig door voordat u het apparaat gaat gebruiken en bewaar deze zorgvuldig voor latere raadpleging. De handleiding dient bovendien als referentie voor de servicedienst. Plak daarom het los bijgeleverde gegevensplaatje in het daarvoor bestemde kader, achter in de handleiding. Het gegevensplaatje bevat alle informatie die de servicedienst nodig heeft om adequaat op uw vragen te reageren. Veel kookplezier! Gebruikte pictogrammen Belangrijk om te weten Tip NL 4 Beschrijving UW GASKOOKPLAAT HG42..C 2 1. 2. 3. 4. 5. 6. 7. 1 6 3 2 Sudderbrander Normaalbrander Sterkbrander Wokbrander Pandrager Vangschaal Aan-/uittoets (bijv. HG62..C) 5 HG62..B HG62..C 2 1 2 1 6 3 6 3 2 2 5 HG77..B 7 5 HG77..C 2 2 1 4 1 4 6 3 6 3 5 HG92..B/C 7 5 2 HG97..B/C 1 1 3 6 3 7 5 1 2 4 6 3 2 7 NL 5 5 Veiligheidsvoorschriften UW GASKOOKPLAAT Waar u op moet letten •• Zorg voor voldoende ventilatie tijdens het gebruik. ºº Houd natuurlijke ventilatie-openingen open. ºº Bij langdurig gebruik van de kookplaat is extra ventilatie noodzakelijk. Zet bijvoorbeeld een raam open of installeer een mechanische ventilator. •• Gebruik de kookplaat alleen voor het bereiden van gerechten. ºº Het toestel is niet geschikt om ruimtes te verwarmen. •• Flambeer nooit onder een afzuigkap. ºº Door de hoge vlammen kan brand ontstaan, ook bij een uitgeschakelde ventilator. •• De branderdelen zijn heet tijdens en direct na het gebruik. ºº Vermijd directe aanraking en contact met niet-hittebestendige materialen. ºº Dompel hete branderdoppen en pandragers nooit onder in koud water. Door de snelle afkoeling kan het emaille beschadigen. •• De afstand van de pan tot een knop of niet-hittebestendige wand moet altijd groter zijn dan twee centimeter. ºº Bij kleinere afstanden kunnen door de hoge temperatuur de knoppen of de wand verkleuren en/of vervormen. •• Gebruik altijd de pandragers en geschikt kookgerei. ºº Plaats de pan altijd op de pandrager. Het plaatsen van de pan direct op de branderdop kan tot gevaarlijke situaties leiden. ºº Aluminium bakjes of folie zijn niet geschikt als kookgerei. Ze kunnen inbranden op de branderdoppen en pandragers. •• Plaatsen van branderdelen en pandragers. ºº De kookplaat kan alleen goed functioneren wanneer de branderdelen via de geleidingsnokken in elkaar zijn gezet. ºº Zorg ervoor dat de pandragers recht tegen elkaar en vlak op de RVS-vangschaal liggen. Alleen op deze manier kunnen de pannen stabiel geplaatst worden. NL 6 Veiligheidsvoorschriften UW GASKOOKPLAAT Veilig gebruik •• H et apparaat wordt heet tijdens gebruik en blijft dit enige tijd na uitschakeling. Raak het apparaat daarom niet aan zolang het heet is. •• Trek altijd ovenwanten aan of gebruik pannenlappen als u met het apparaat werkt. ºº Zorg ervoor dat ovenwanten of pannenlappen niet te dicht bij de vlam komen. •• Verwarm geen dichte blikken en dergelijke op de kookplaat. ºº Er ontstaat een overdruk waardoor de blikken uiteenspatten. U kunt zich hierdoor verwonden/verbranden. •• Het apparaat mag niet in de buitenlucht geplaatst en gebruikt worden. •• Gebruik het apparaat niet als werkblad. ºº Het apparaat kan per ongeluk worden ingeschakeld of nog heet zijn, waardoor voorwerpen kunnen smelten, heet worden of vlam vatten. •• Dek het apparaat nooit af met een doek of iets dergelijks. ºº Als het apparaat nog heet is of wordt ingeschakeld, bestaat er brandgevaar. •• Wees extra voorzichtig wanneer u met olie of vetten werkt. ºº Oververhitte olie of vetten kunnen vlam vatten. Brandgevaar! ºº Mocht het vet of olie vlam vatten, gebruik dan nooit water voor het blussen! ºº Doof de vlammen met een geschikte deksel, een vochtige doek of iets dergelijks. •• Wanneer onder het apparaat een lade zit, zonder tussenbodem, mogen daarin geen licht ontvlambare voorwerpen/stoffen worden bewaard. NL 7 Veiligheidsvoorschriften UW GASKOOKPLAAT Kinderen •• H et apparaat is niet bedoeld voor gebruik door hulpbehoevenden, kleine kinderen en/of personen met gebrek aan ervaring en kennis, tenzij zij goede begeleiding krijgen of geïnstrueerd zijn in het veilig gebruiken van het apparaat door een persoon die verantwoordelijk is voor hun veiligheid. •• Laat kinderen nooit met het apparaat spelen. Zorg dat kinderen zich niet zonder toezicht in de buurt van het apparaat bevinden. •• Het apparaat wordt tijdens het gebruik heet en blijft enige tijd heet na uitschakeling. •• Bewaar geen voorwerpen in kastjes boven of achter het apparaat die voor kinderen interessant zijn. •• Kinderen kunnen verbrandingen oplopen als zij pannen van het apparaat trekken. Bij de vakhandelaar is een speciaal rek verkrijgbaar dat ervoor zorgt dat kinderen niet meer bij het apparaat kunnen. •• Wanneer de veiligheidsinstructies en waarschuwingen niet worden opgevolgd, kan de fabrikant niet aansprakelijk worden gesteld voor de schade die daarvan het gevolg is. NL 8 Ontsteken, instellen en vlambeveiliging BEDIENING Ontsteken en instellen Elke brander kan traploos worden geregeld tussen vol- en kleinstand. HG62..B/HG77..B/HG92..B/HG97..B 1. 0-stand 1 2. Zone-aanduiding 3. Kleinstand 4. Volstand 3 4 2 HG62..C/HG77..C/HG92..C/HG97..C 1 3 4 2 Vlambeveiliging Uw gaskookplaat is uitgerust met vlambeveiliging. Deze zorgt ervoor dat de gastoevoer gesloten wordt als de vlam tijdens het kookproces dooft. Bediening thermische vlambeveiliging (HG62..B/HG77..B/HG92..B/HG97..B) Druk de bedieningsknop in en draai deze linksom. Houd de bedieningsknop, in volstand, ongeveer 3 seconden ingedrukt nadat de brander is ontstoken. De vlambeveiliging schakelt in. NL 9 BEDIENING Ontsteken, instellen en vlambeveiliging Bediening elektronische vlambeveiliging (HG62..C/HG77..C /HG92..C/HG97..C) Druk de centrale aan-/uittoets in. De knop licht groen op. Draai daarna de gewenste bedieningsknop linksom. U hoeft de knop niet ingedrukt of vast te houden. De brander ontsteekt direct. De vlambeveiliging controleert of er een vlam aanwezig is. Indien na het koken alle regelknoppen op de 0-stand staan, gaat de centrale aan-/uittoets automatisch uit na 3 minuten. Frontbediening (HG42..C) Druk de bedieningsknop op de oven of het bedieningspaneel in en draai deze linksom naar de ontsteekzone. De brander ontsteekt direct. De vlambeveiliging schakelt in. U hoeft de knop niet ingedrukt of vast te houden. Deze kookplaat is tevens voorzien van herontsteking en kookduur begrenzing Extra eigenschappen elektronische vlambeveiliging (HG62..C/HG77..C/HG92..C/HG97..C) Wanneer uw gaskookplaat uitgerust is met elektronische vlam beveiliging, kunt u gebruik maken van de volgende functies: Herontsteking Wanneer de vlam gedoofd wordt tijdens het kookproces wordt automatisch geprobeerd om de vlam weer tot stand te brengen. Wanneer daarna binnen 10 seconden geen vlam wordt waargenomen, wordt de gastoevoer naar de brander afgesloten. Noodstop Wanneer u de gaskookplaat in één keer uit moet schakelen kan dat door de centrale aan-/uittoets in te drukken. NL 10 BEDIENING Ontsteken, instellen en vlambeveiliging Kinderslot U kunt de gaskookplaat vergrendelen. Onbedoeld ontsteken van de branders wordt hiermee voorkomen. De gaskookplaat is te ver-/ontgrendelen door de aan-/uittoets 5 seconden in te drukken. Tijdens het koken kunt u het kinderslot niet inschakelen. Kookduurbegrenzing Als een brander gedurende een ongebruikelijk lange tijd (ca. 6 uur) aan is, wordt deze automatisch uitgeschakeld. Statuscodes De status van de gaskookplaat wordt weergegeven door de verlichting in de aan-/uittoets. In het overzicht op pagina 17 leest u welke code bij welke status hoort. NL 11 De kookplaat optimaal gebruiken COMFORTABEL KOKEN De kookplaat optimaal gebruiken Zorg er altijd voor dat de vlammen onder de pan blijven. Als vlammen om de pan heen spelen gaat veel energie verloren. Bovendien kunnen de handgrepen dan te heet worden. Gebruik geen pannen met een kleinere bodemdiameter dan 12 cm. Deze staan niet stabiel. Fout Goed •• ( Roer)bakken, doorkoken van grote hoeveelheden en frituren kunt u het beste op de sterk- of wokbrander. •• Gebruik de sudderbrander voor het bereiden van sauzen, sudderen en doorkoken van gerechten. Op de volstand is deze brander groot genoeg voor het doorkoken. •• Kook met het deksel op de pan. U bespaart dan tot 50% energie. •• Gebruik pannen met een vlakke, schone en droge bodem. Pannen met een vlakke bodem staan stabiel en pannen met een schone bodem dragen de warmte beter over op het gerecht. Wokbrander (bij type HG77 en HG97) Met de wokbrander kunt u gerechten op een zeer hoge temperatuur bereiden. Het is hierbij van belang dat u: •• van te voren de ingrediënten in reepjes, plakjes of stukjes snijdt; •• bij het roerbakken olie van goede kwaliteit gebruikt, zoals olijf-, maïs-, zonnebloem- of arachideolie. Een klein beetje is al genoeg. Boter en margarine verbranden door de grote hitte; •• de gerechten met de langste bereidingstijd het eerst in de pan doet, zodat aan het eind van de bereidingstijd alle ingrediënten tegelijk (beet)gaar zijn. NL 12 COMFORTABEL KOKEN De kookplaat optimaal gebruiken Gebruik van het wok-hulprooster Het hulprooster dat ten behoeve van de wokbrander is meegeleverd, of als accessoire verkrijgbaar is, zorgt voor extra stabiliteit bij een wok met een ronde bodem. Het wok-hulprooster valt met speciale uitsparingen over de standaard wok-pandrager. NL 13 Algemeen ONDERHOUD Algemeen Uw toestel is vervaardigd uit hoogwaardige materialen, die u eenvoudig reinigt. •• Regelmatig onderhoud direct na gebruik voorkomt dat overgekookt voedsel lange tijd kan inwerken en hardnekkige, moeilijk te verwijderen vlekken veroorzaakt. Gebruik hiervoor een mild reinigingsmiddel. Gebruik niet te veel vocht, aangezien dit de brander of ventilatie-openingen kan binnendringen. •• Reinig eerst de bedieningsknoppen, branders en pandragers en dan pas de RVS-vangschaal. Hiermee voorkomt u dat de RVSvangschaal tijdens het reinigen opnieuw vuil wordt. •• Reinig de ontstekingsbougies bij voorkeur met een doekje. Betracht hierbij wel enige voorzichtigheid. De bougie kan hierdoor defect raken. De bougie werkt alleen goed in een droge omgeving. Bij zware vervuiling kunt u de punt met een fijn borsteltje reinigen. •• Plaats de pandragers rechtstandig naar beneden, zonder over de RVS-vangschaal te schuiven. Denkt u bij het plaatsen van de pandragers aan de volgorde. De tekst ‘FRONT’ aan de onderzijde van de pandragers dient voor verduidelijking bij het positioneren (zie illustratie). HG42/62 HG77/97 NL 14 HG92 Algemeen ONDERHOUD •• Z et de branderdelen in elkaar met behulp van de geleidings nokken. 1 2 3 1 4 2 Wokbrander 1. Branderdeksel buiten 2. Branderkop buiten 3. Branderkop en deksel binnen 4. Branderring 5. Branderkelk 6. Bougie 7. Thermokoppel 5 6 7 3 4 1 2 1 2 3 4 NL 15 Sudder-, normaalen sterkbrander 1. Branderkop 2. Branderkelk 3. Bougie 4. Thermokoppel 3 4 5 6 7 Algemeen ONDERHOUD Hardnekkige vlekken op emaille (pandragers, branderdoppen en vangschalen) •• H ardnekkige vlekken kunt u het beste verwijderen met een vloeibaar reinigingsmiddel. Gebruik nooit schuurpoeders, schuurpads, scherpe voorwerpen of agressieve reinigingsmiddelen. Hardnekkige vlekken op roestvaststaal (vangschalen) •• M et name overgekookte rode kool, rode bieten, ketjap, appel moes, rabarber en andere sterk suikerhoudende voedingsmiddelen en zure vloeistoffen kunnen een verkleuring van het oppervlak veroorzaken. Wanneer u hardnekkige vlekken op roestvast staal wilt verwijderen kunt u het beste een roestvaststaal reini gingsmiddel gebruiken. Poets dan wel altijd met de structuur van het staal mee om glansplekken te voorkomen (schades die hierdoor ontstaan vallen niet onder de garantie!). •• Wanneer de vlekken met de hierboven beschreven methode niet te verwijderen zijn, kunt u de kookplaat reinigen met een speciale roestvaststaalreiniger (zie hiervoor onze website ‘www.atagservice.nl’). Houd er echter rekening mee dat u de hele vangschaal moet behandelen om ‘kleurverschil’ te voorkomen. U moet de vangschaal bovendien nabehandelen met een glans- of onderhoudsmiddel voor roestvaststaal. Het is overigens normaal dat het oppervlak gedurende de levenscyclus enigszins verkleurt. Reinigen pandragers •• H et emaille op de pandragers is geschikt voor reiniging in de vaatwasser. De verbinding met de rubber voetjes echter niet. Reinig de pandragers zelf daarom niet in de vaatwasser. Bovendien kan bij reiniging in de vaatwasser lichte verkleuring van de pandragers optreden. Bij verlies van de rubber voetjes zal de pandrager de vangschaal beschadigen. Messing wokbranderdelen •• E nkele delen van de wokbrander zijn vervaardigd uit messing. Het is normaal dat de kleur van het messing verandert als gevolg van de hoge temperaturen die tijdens het wokken ontstaan. NL 16 Algemeen ONDERHOUD Reinigen verwijderbare branderdelen •• D e verwijderbare branderdelen (ook die van de wok) kunt u het beste reinigen met een mild schoonmaakmiddel en een zachte doek. Bij hardnekkige vlekken kunt u de branderdelen verwijderen en de delen laten weken in een sopje. •• Branderdelen mogen niet in de vaatwasser gereinigd worden. De onderdelen kunnen door het vaatwasmiddel aangetast worden! •• Gebruik nooit schuurpoeders, schuurpads, scherpe voorwerpen of agressieve reinigingsmiddelen. Reinigen verwijderbare knoppen en rozetten •• B ij extreme vervuiling van de knoppen en rozetten kunt u deze tijdelijk verwijderen om schoon te maken. U kunt de knoppen en rozetten het best schoonmaken met een mild schoonmaakmiddel en een zachte doek. Met behulp van een rubberhandschoen is de knop makkelijker te verwijderen! Let op! Voorkom teveel vocht rond de knopsgaten tijdens het schoonmaken. •• D enkt u er bij het herplaatsen van de rozetten aan dat u deze onder de siliconen afdichtring schuift (zie illustraties). De siliconen afdichting heeft drie positioneringnokken die over de binnenste rand van de rozet moeten vallen. NL 17 Algemeen ONDERHOUD Keradur® branderkelken •• D e branderkelken zijn voorzien van een unieke Keradur® toplaag. De speciale vuilafstotende lak is voorzien van een keramische vulling die het schoonmaken vergemakkelijkt en de duurzaamheid van de branders sterk verbetert. De branderkelken kunt u het beste reinigen met een mild schoonmaakmiddel en een zachte doek. ATAG Shine •• A tag Nederland heeft een serie exclusieve schoonmaakmiddelen samengesteld. Deze zijn te verkrijgen via de website ‘www.atagservice.nl’. Hier vindt u ook diverse schoonmaak- en gebruikerstips. NL 18 Tabel STATUSCODES Aan-/uittoets De aan-/uittoets op de HG….C toestellen kan een aantal functies en foutmeldingen weergeven. SYMPTOOM STATUS OPLOSSING LED’s in de knop branden niet. Toestel is uitgeschakeld. - Groene LED in de knop brandt continu. Toestel is ingeschakeld. - Groene LED in de knop knippert. Kinderslot. Wanneer u nog een keer de aan-/uitknop bedient en deze 5 seconden ingedrukt houdt, kunt u uw kookplaat weer gewoon gebruiken. Groene en rode LED in de knop knipperen beurtelings. Er is een fout opgetreden bij het herontsteken. Controleer de gastoevoer naar uw kookplaat en/of de branderkoppen goed gepositioneerd zijn. Draai alle knoppen naar de 0-positie en probeer opnieuw te ontsteken. Rode LED in de knop knippert. Uw kookplaat is te warm. Laat uw kookplaat afkoelen. U kunt daarna uw kookplaat weer gewoon gebruiken. Rode LED in de knop brandt Er is een fout opgetreden in de elektronica in uw continu. kookplaat. NL 19 Neem contact op met de servicedienst. Storingstabel STORINGEN Storingstabel Wanneer u twijfelt over de goede werking van uw gaskookplaat betekent dit niet automatisch dat er een defect is. Controleer in elk geval de volgende punten in onderstaande tabel of kijk voor meer informatie op de website ‘www.atagservice.nl’. SYMPTOOM MOGELIJKE OORZAAK Het ruikt naar gas in de omgeving van het toestel. De aansluiting van het toestel Sluit de gashoofdkraan. lekt. Neem contact op met uw installateur. Een brander ontsteekt niet. Stekker niet in stopcontact. Steek de stekker in het stopcontact. Zekering defect/zekering in meterkast uitgeschakeld. Monteer een nieuwe zekering of schakel de zekering weer in. Bougie vervuild/vochtig. Reinig/droog de bougie. Branderdelen niet juist geplaatst. Zet de branderdelen via de centreernokken in elkaar. Branderdelen vervuild/ vochtig. Reinig/droog de branderdelen. Let er hierbij op dat de uitstroomgaten open zijn. Hoofdgaskraan gesloten. Open de hoofdgaskraan. Storing aan het gasnet. Informeer bij uw gasleverancier. Gasfles of -tank is leeg. Sluit een nieuwe gasfles aan of laat de tank vullen. NL 20 OPLOSSING Storingstabel STORINGEN SYMPTOOM MOGELIJKE OORZAAK OPLOSSING Een brander ontsteekt niet. Verkeerd soort gas gebruikt. Controleer of het gebruikte gas geschikt is voor het toestel. Indien dit niet juist is, neem dan contact op met uw installateur. Bedieningsknop niet diep genoeg ingedrukt. (Alleen van toepassing op de B versies. Voor elektronisch beveiligde toestellen, zie tabel aan-/uittoets). Houd de bedieningsknop voldoende diep ingedrukt tussen vol- en kleinstand. Bij eerste gebruik kan dit langer duren i.v.m. aanvoer van gas. De brander brandt niet egaal. Branderdelen niet juist geplaatst. Zet de branderdelen via de centreernokken in elkaar. Branderdelen vervuild/ vochtig. Reinig/droog de branderdelen. Let er hierbij op dat de uitstroomgaten open zijn. Verkeerd soort gas gebruikt. Controleer of het gebruikte gas geschikt is voor het toestel. Indien dit niet juist is, neem dan contact op met uw installateur. De brander dooft na ontsteken. Houd de bedieningsknop Bedieningsknop niet lang minimaal 5 seconden genoeg ingedrukt. (Alleen van toepassing op de ingedrukt. B versies. Voor elektronisch beveiligde toestellen, zie tabel aan-/uittoets). NL 21 INSTALLATIEVOORSCHRIFT Algemeen Dit toestel mag alleen door een erkend installateur worden aangesloten. Let op! De gassoort en het land waarvoor het toestel is ingericht staan vermeld op het gegevensplaatje. Dit is een klasse 3 toestel. Gasaansluiting •• D e gasaansluiting moet voldoen aan de nationale en lokale voorschriften. •• Wij adviseren de kookplaat aan te sluiten met een vaste leiding. Aansluiting door middel van een speciaal daarvoor bestemde veiligheidsslang is ook toegestaan. •• Achter een oven moet een volledig metalen slang worden gebruikt. Let op! •• Een veiligheidsslang mag niet worden geknikt en niet in aanraking komen met bewegende delen van het keukenmeubel. •• In alle gevallen moet er voor het toestel een aansluitkraan geplaatst worden op een makkelijk bereikbare plaats. •• Voordat u het toestel in gebruik neemt moet u de aansluitingen met zeepsop controleren op gasdichtheid. Elektrische aansluiting 230V - 50Hz - 1.1 VA (bij ..B toestellen) 230V - 50Hz - 5.1 VA (bij ..C toestellen) •• D e elektrische aansluiting moet voldoen aan de nationale en lokale voorschriften. •• Wandcontactdoos en stekker moeten altijd bereikbaar blijven. •• Als u een vaste aansluiting wilt maken, moet u er voor zorgen dat er een omnipolaire schakelaar met een contactafstand van minimaal 3 mm in de toevoerleiding wordt aangebracht. •• Het apparaat mag niet via een verdeelstekker of verlengsnoer op het elektriciteitsnet worden aangesloten. Hiermee kan veilig gebruik van het apparaat niet worden gewaarborgd. NL 22 INSTALLATIEVOORSCHRIFT Algemeen Let op! Dit toestel moet altijd geaard zijn. Laat installatie-, onderhouds- en reparatiewerkzaamheden uitsluitend uitvoeren door vakmensen die door de fabrikant zijn geautoriseerd, anders vervalt de garantie. Bij installatie-, onderhouds- en reparatiewerkzaamheden moet het apparaat spanningsvrij gemaakt worden. Het apparaat is alleen spanningsvrij als: •• de hoofdschakelaar van de huisinstallatie is uitgeschakeld, of •• de zekering van de huisinstallatie er geheel is uitgedraaid, of •• de stekker uit het stopcontact is getrokken. Defecte onderdelen mogen alleen vervangen worden door originele Atag onderdelen. Alleen van die onderdelen kan Atag garanderen dat zij aan de veiligheidseisen voldoen. Indien de aansluitkabel beschadigd is mag deze alleen worden vervangen door de fabrikant, zijn service-organisatie of gelijkwaardig gekwalificeerde personen, teneinde gevaarlijke situaties te voorkomen. NL 23 INSTALLATIEVOORSCHRIFT Inbouwen Kookplaat voorbereiden Monteer de bijgeleverde knie op de gasaansluiting van het toestel. 1/2” ISO 228 (recht) 1/2” ISO 10226-1 (conisch) Afdichtring Alleen voor Frankrijk: 1/2” ISO 228 (recht) 1/2” ISO 228 (recht) Afdichtring Uitsparing in werkblad zagen •• Z aag de uitsparing in het werkblad. Doe dit zeer nauwkeurig (zie inbouwmaten). •• Als het werkblad van hout is, behandel dan de kopse kanten van het werkblad met afdichtvernis, om uitzetten van het werkblad door vocht te voorkomen. NL 24 INSTALLATIEVOORSCHRIFT Inbouwen Bevestigingspunten montagebeugels Voor de bevestigingspunten van de montagebeugels, zie 1* in de illustraties met inbouwmaten vanaf pagina 24. dunne werbladen dunne werbladen Schroefgat voor montagebeugel Dunne werkbladen dunne werbladen dikke werkbladen dikke werkbladen Dikke werkbladen dikke werkbladen Afdichtband plaatsen Verwijder de beschermfolie van de afdichtband (A) en plak de band op de rand van het aanrecht. A A NL 25 Inbouwen INSTALLATIEVOORSCHRIFT Inbouwmaten HG42..C 600 526 43 voorzijde minimale afstand achterzijde toestel tot achterwand: 10 mm 600 560 490 60 1* voorzijde 1* 20 G1/2’’ 1* 1* 550 480 NL 26 Inbouwen INSTALLATIEVOORSCHRIFT Inbouwmaten HG62..B/C 600 526 43 voorzijde minimale afstand achterzijde toestel tot achterwand: 10 mm 600 560 490 60 1* voorzijde 1* 20 G1/2’’ 1* 1* 550 480 NL 27 Inbouwen INSTALLATIEVOORSCHRIFT Inbouwmaten HG7711B/C 750 526 43 voorzijde minimale afstand achterzijde toestel tot achterwand: 10 mm 600 560 490 60 1* voorzijde 1* 593 1* 1* 550 480 G1/2’’ NL 28 Inbouwen INSTALLATIEVOORSCHRIFT Inbouwmaten HG7792B/C 750 526 43 voorzijde minimale afstand achterzijde toestel tot achterwand: 10 mm 600 490 690 60 voorzijde 1* 1* 480 1* 20 G1/2’’ NL 29 680 1* Inbouwen INSTALLATIEVOORSCHRIFT Inbouwmaten HG92..B/C 526 900 43 voorzijde 600 minimale afstand achterzijde toestel tot achterwand: 10 mm 860 490 60 1* voorzijde 1* 515 1* 480 G1/2’’ 1* NL 30 850 Inbouwen INSTALLATIEVOORSCHRIFT Inbouwmaten HG97..B/C 526 900 43 voorzijde 600 minimale afstand achterzijde toestel tot achterwand: 10 mm 860 490 60 1* voorzijde 1* 515 1* 480 G1/2’’ 1* NL 31 850 Inbouwen INSTALLATIEVOORSCHRIFT Benodigde vrije ruimte rondom Een gaskookplaat ontwikkelt warmte. Laat voldoende ruimte vrij tot niet hittebestendige materialen. Let ook op bij materialen die kunnen verkleuren (zoals roestvaststaal). min. 650 mm min. 450 mm min. 600 mm (HG42/HG62) min. 750 mm (HG77) min. 900 mm (HG92/97) min. 100 mm min. 100 mm De kookplaat mag naast slechts één verticale wand ingebouwd worden. Let op! De onderzijde van de kookplaat wordt heet. Leg geen brandbare spullen in een lade wanneer deze direct onder de kookplaat is gemonteerd. Toestel plaatsen en aansluitingen maken •• P laats het toestel in het werkblad en zet het vast met de bijgeleverde montagebeugels en schroeven. •• Maak de gasaansluiting. •• Controleer de aansluiting met zeepsop op gasdichtheid. •• Sluit het toestel aan op het elektriciteitsnet. NL 32 Gastechnische gegevens INSTALLATIEVOORSCHRIFT Brander- G25/25 G20/20 G25/20 G30/29 G31/29 G31/36 G30/50 G31/50 mbar mbar mbar mbar mbar mbar mbar mbar G31/67 mbar (kW) (kW) (kW) (kW / g/h) (kW / g/h) (kW / g/h) (kW / g/h) (kW / g/h) (kW / g/h) 1.00 1.00 0.90 0.90 / 65 0.79 / 57 0.90 / 65 1.00 / 72 0.88 / 63 1.00 / 72 type Sudder Normaal 2.00 2.00 1.80 1.60 / 115 1.41 / 101 1.60 / 115 2.00 / 144 1.76 / 127 2.00 / 144 Sterk 3.00 3.00 2.70 2.30 / 166 2.02 / 146 2.30 / 166 2.70 / 194 2.38 / 171 2.70 / 194 Wok 4.50 4.50 4.50 3.50 / 252 3.08 / 222 3.50 / 252 4.00 / 288 3.52 / 253 4.00 / 288 NL 33 Afvoeren toestel en verpakking BIJLAGE Afvoeren toestel en verpakking Bij de vervaardiging van dit toestel is gebruik gemaakt van duurzame materialen. Dit toestel moet aan het eind van zijn levenscyclus op verantwoorde wijze worden afgevoerd. De overheid kan u hierover informatie verschaffen. De verpakking van het toestel is recyclebaar. Gebruikt kunnen zijn: •• karton; •• polyethyleenfolie (PE); •• CFK- vrij polystyreen (PS- hardschuim). Deze materialen dient u op verantwoorde wijze en conform de overheidsbepalingen af te voeren. Om op de verplichting tot gescheiden verwerking van elektrische huishoudelijke apparatuur te wijzen, is op het product het symbool van een doorgekruiste vuilnisbak aangebracht. Dit betekent dat het apparaat aan het einde van zijn levensduur niet bij het gewone huisvuil mag worden gevoegd. Het toestel moet naar een speciaal centrum voor gescheiden afvalinzameling van de gemeente worden gebracht of naar een verkooppunt dat deze service verschaft. Het apart verwerken van huishoudelijke apparaten voorkomt mogelijk negatieve gevolgen voor het milieu en de gezondheid die door een ongeschikte verwerking ontstaat. Het zorgt ervoor dat de materialen waaruit het apparaat bestaat, teruggewonnen kunnen worden om een aanmerkelijke besparing van energie en grondstoffen te verkrijgen. Technische gegevens Op het gegevensplaatje aan de onderzijde van het toestel worden de totale aansluitwaarde, de vereiste spanning en de frequentie aangegeven. NL 34 Contents MANUAL Your gas hob Introduction Description Safety instructions 4 5 6-7-8 Controls Igniting, adjusting and flame failure device Extra characteristics electronic flame failure device 9 - 10 10 - 11 Optimal use of the hob 12 - 13 General 14 - 18 Comfortable cooking Maintenance Status codes Table 19 Faults Faults table 20 - 21 Installation instructions General Building in Gas information 22 - 23 24 - 32 33 Appendix Disposal of packaging and appliance Technical data GB 3 34 34 Introduction YOUR Gas hob This gas hob has been designed for the true cooking enthusiast. The differences in burner capacity allow you to cook any type of dish. The control buttons have an integrated spark iginition, which means that you need only one hand to ignite and operate the burners. With the HG77 and HG97 models, at least 2 burners remain available for cooking other dishes while cooking food in the wok, thanks to the spacious layout of the wok burners. This appliance complies with all requirements set by the Cooking Approval quality mark. The gas hob combines high efficiency with a minimum of incompletely burned combustion gases. This gives you an appliance with short heating times, while also providing excellent simmering. The gas hob is fitted with a flame failure device, which ensures that the gas supply is shut off if the flame goes out during the cooking process. This manual explains optimum use of the gas hob. In addition to information on operation, you will also find background information that may be useful to you when using this product. Read the manual thorougly before using the appliance, and store these instructions in a safe place for future reference. The manual also serves as reference material for service technicians. Please, therefore, stick the appliance identification card in the space provided, at the back of the manual. The appliance identification card contains all the information that the service technician will need in order to respond appropriately to your needs and questions. Enjoy your cooking! Pictograms used in this manual Important information Tip GB 4 Description YOUR Gas hob 1. 2. 3. 4. 5. 6. 7. HG42..C 2 1 6 3 2 Simmer burner Semi-rapid burner Rapid burner Wok burner Pan support Drip tray On/Off button (for example HG62..C) 5 HG62..B HG62..C 2 1 2 1 6 3 6 3 2 2 5 HG77..B 7 5 HG77..C 2 2 1 4 1 4 6 3 6 3 5 HG92..B/C 7 5 2 HG97..B/C 1 1 3 6 3 7 5 1 2 4 6 3 2 7 GB 5 5 Safety instructions YOUR Gas hob What you should pay attention to •• Ensure that there is adequate ventilation during use. ºº Keep natural ventilation openings open. ºº When using the hob for long periods, extra ventilation is necessary. Open a window for instance or install a mechanical fan. •• Use the hob only for preparing dishes. ºº The appliance is not suitable for space heating. •• Never flambé under an extractor hood. ºº The high flames can cause a fire, even if the fan is switched off. •• The burner parts are hot during and immediately after use. ºº Do not touch them, and avoid contact with non-heat-resistant materials. ºº Never immerse hot burner parts in cold water. The rapid cooling can damage the enamel. •• The distance from the pan to a knob or non-heat-resistant wall should always be greater than two centimetres. ºº In case of smaller distances the high temperature may cause the knobs or wall to discolour and/or distort. •• Always use the pan supports and suitable cooking utensils. ºº Always place the pan on the pan support. Placing the pan directly on the burner head can result in dangerous situations. ºº Aluminium trays or foil are not suitable as cooking utensils. They can become burnt into the burners and pan supports. •• Installing burner parts and pan supports. ºº The hob can only function effectively if the burner parts have been assembled using the guide ridges. ºº Ensure that the pan supports lie properly against each other and flat on the drip tray. Only then can the pans be positioned stably. GB 6 Safety instructions YOUR GASHOB Safe use •• Th e device will become hot during use and will remain so for some time after it has been switched off. So please be sure not to touch the device while it is hot. •• Always wear oven gloves or use oven cloths when operating the device. ºº Keep oven gloves or oven cloths away from the flame. •• Do not warm closed tins and such like on the hob. ºº There will be a buildup of pressure that will cause tins to explode. You might get injured or scalded. •• The device is not to be positioned nor used outdoors. •• Do not use the device as a worktop. ºº The device may be switched on by accident or still be hot, which means objects could melt, become hot or catch fire. •• Never cover the device with a cloth or something similar. ºº If the device is still hot or is switched on, there is a risk of fire. •• Be extra careful when using oils or fats. ºº Overheated oil or fats may catch fire. Risk of fire! ºº Under no circumstances should you use water to try and extinguish the flames if the oil or fat were to catch fire! ºº Extinguish the flames with a suitable lid, a damp cloth or some such object. •• If there is a drawer underneath the device, without an intermediate bottom, this should not be used to store highly flammable objects/materials. GB 7 Safety instructions YOUR GASHOB Children •• Th is appliance is not intended for use by persons (including children) with reduced physical, sensory or mental capabilities, or lack of experience and knowledge, unless they have been given supervision or instruction concerning use of the appliance by a person responsible for their safety. •• Never let children play with this device. Children are not to be allowed near the device unsupervised. •• The device will become hot during use and will remain hot for some time after it has been switched off. •• Do not keep objects in cupboards above or behind the device that children might find interesting. •• Children may sustain burns when they pull pots or pans off the device. A special frame that stops children from getting close to the device is available from the specialist dealer. •• If the safety instructions and warnings are not heeded, the manufacturer can not be held liable for any consequential damage. GB 8 Igniting, adjusting and flame failure device CONTROLS Igniting and adjusting Each burner can be adjusted continuously between the high and low positions. HG62..B/HG77..B/HG92..B/HG97..B 1 1. 2. 3. 4. 0-setting Burner indication Low setting High setting 3 4 2 HG62..C/HG77..C/HG92..C/HG97..C 1 3 4 2 Flame failure device Your gas hob has a flame failure device. This ensures that the gas supply is shut off if the flame goes out during cooking. Operating the thermal flame failure device (HG62..B/HG77..B/HG92..B/HG97..B) Press the control knob and turn it anti-clockwise. Hold the control knob pressed (in the high setting) for approximately 3 seconds after the burner has ignited. The flame failure device switches on. GB 9 CONTROLS Igniting, adjusting and flame failure device Operating the electronic flame failure device (HG62..C/HG77..C /HG92..C/HG97..C) Press the central On/Off button. The green button is lit. Turn the required control knob anti-clockwise. There is no need to keep the knob depressed or to hold it. The burner ignites immediately. The flame failure device checks to see if there is a flame. If all the control knobs are turned to the 0-setting, the central On/Off button automatically turns off after 3 minutes. Operation from the front (HG42..C) Depress the control knob on the oven or the control panel and turn it anti-clockwise towards the ignition zone. The burner ignites immediately. The flame failure device will switch on. There is no need to keep the knob depressed or to hold it. This hob is also equipped with a re-ignition device and a cooking time limiter Extra characteristics electronic flame failure device (HG62..C/HG77..C/HG92..C/HG97..C) If your gas hob comes with an electronic flame failure device, you can use the following features: Re-ignition If the flame goes out during cooking, the device will automatically attempt to restart the flame. If no flame is detected within 10 seconds of the attempt to re-ignite the burner, the gas supply to the burner will be cut off. Emergency stop If you need to switch off the gas hob in one go, press the central On/Off button. Childproof lock You can lock the gas hob. This prevents the accidental ignition of the burners. The gas hob can be locked and unlocked by depressing the GB 10 CONTROLS Igniting, adjusting and flame failure device On/Off button for 5 seconds. You cannot switch on the childproof lock during cooking. Cooking time limiter If a burner has been on for an unusually long time (approximately 6 hours), it will be turned off automatically. Status codes The gas hob status will be indicated by the light in the On/Off button. The overview on page 17 show you which code goes with which status.. GB 11 COMFORTABLE COOKING Optimal use of the inhoud hob Optimal use of the hob Always ensure that the flames remain below the pan. If flames play around the pan, a lot of energy is lost. In addition, the handles can get too hot. Do not use pans with a base diameter less than 12 cm. Smaller pans will not be stable. Wrong Right •• W hen frying, stir-frying, heating through large quantities and deepfrying it is best to use the rapid or wok burner. •• Preparing sauces, simmering and boiling can be done best on the simmer burner. On its high setting this burner is large enough for cooking food right through. •• Cook with the lid on the pan. This way you save up to 50% energy. •• Use pans with a flat, clean, dry base. Pans with a flat base stand stably and pans with a clean base transfer the heat more effectively to the food. Wokburner (type HG77 and HG97) With the wok burner you can prepare dishes at a very high temperature. For this purpose it is important: •• to cut the ingredients into strips, slices or pieces before cooking; •• to use good-quality oil, such as olive, maize, sunflower or peanut oil when stir-frying. A small quantity is enough. Butter and margarine on the other hand will burn because of the high heat; •• to place the dishes with the longest cooking time in the pan first, so that at the end of the cooking time all ingredients are cooked al dente at the same time. GB 12 COMFORTABLE COOKING Optimal use of the hob Use of the wok auxiliary support The auxiliary support supplied for the wok burner or available as an accessory provides additional stability in case of a wok with a round base. The auxiliary support for the wok has special recesses so it can be positioned neatly on top of the standard wok pan support. GB 13 General MAINTENANCE General Your appliance has been manufactured from high-grade materials, which are easy for you to clean. •• Regular cleaning immediately after use prevents over-cooked food being able to become ingrained and cause stubborn stains that are difficult to remove. Use a mild cleaning agent. •• Clean the control knobs, burners and pan supports first and then the stainless steel drip tray. This avoids the stainless steel drip tray getting dirty again during cleaning. •• Clean the spark plugs preferably with a cloth. Do this carefully. the spark plug can become defective. The sparkplug will only operate correctly in a dry environment. If the plug is very dirty, you may clean the point with a tiny brush. •• Set the pan supports down vertically, without sliding them over the stainless steel drip tray. Place the pan supports back in the right order. The text ‘FRONT’ at the bottom of all pan supports helps positioning these parts (see illustrations). HG42/62 HG77/97 GB 14 HG92 General MAINTENANCE •• Assemble the burner parts using the guide ridges. 1 2 3 1 Wok burner 1. Burner cap outer ring 2. External torch head 3. Internal lid and torch head 4. Gas base 5. Burner base 6. Sparkplug 7. Thermocouple 4 2 5 6 7 3 4 1 2 1 2 3 4 GB 15 Simmer-, semi-rapid and rapid burner 1. Burner head 2. Burner base 3. Sparkplug 4. Thermocouple 3 4 5 6 7 General MAINTENANCE Stubborn stains on enamel (pan supports, burner caps and drip trays) •• R emove with a non-abrasive cream. Never use scouring powder, scouring pads, sharp objects or aggressive cleansing agents. Stubborn stains on stainless steel (drip trays) •• I f spilled, acid fluids and sugary foodstuffs like red cabbage, beetroot, soy sauce, applesauce and rhubarb may cause the surface to discolour. Stubborn stains on stainless steel are best removed with a cleaning agent for stainless steel. Always polish in the direction of the steel structure to avoid shine spots. (This kind of damage is not covered by the warranty!) •• If the above methods do not remove the stains, clean the plate with a special cleaning agent for stainless steel (see our website ‘www.atagservice.nl’). Remember to treat the entire drip tray in order to avoid discolouring. Also, as a follow-up treat the drip tray with a polish or maintenance agent for stainless steel. Please note that over the years the surface will slightly discolour. Cleaning the pan support •• Th e enamel on the pan supports is suitable for cleaning by dishwasher. However, the connection with the rubber feet is not. Therefore do not clean the pan supports in the dishwasher. Moreover, the pan supports might show some discoloration if they were washed in the dishwasher. If the rubber feet are lost, the pan support is likely to damage the drip tray. Brass wok burner parts •• A few parts of the work burner are made from brass. It is normal for the colour of the brass to change as a result of the high temperatures that occur when cooking with a wok. GB 16 General MAINTENANCE Cleaning removable burner components •• Th e removable burner components (including wok) are best cleaned with a mild cleaning product and a soft cloth. In the case of obstinate stains you can soak the parts in hot suds. •• Burner parts should not be cleaned in the dishwasher. The parts may be damaged by the dishwasher detergent! •• Never use scouring powder, scouring pads, sharp objects or aggressive cleansing agents. Cleaning removable knobs and rosettes •• I f the knobs and rosettes are very dirty, you can remove them temporarily to clean them. The knobs and rosettes are best cleaned with a mild cleaning product and a soft cloth. Wearing rubber gloves makes it easier to remove the knob! Attention! Avoid an excess of moisture around the knob holes when cleaning. •• W hen you install the rosettes, remember to push them under the silicone sealing ring (see illustration). The silicone sealing ring has three positioning ridges which fit on the inner circle of the rosette. GB 17 General MAINTENANCE Keradur® burner bases •• Th e burner bases have a unique Keradur® surface coating. The special dirt-repelling lacquer has a ceramic filling which makes cleaning easier and substantially improves the durability of the burners. The burner bases are best cleaned with a mild cleaning product and a soft cloth. ATAG Shine •• A tag Nederland supplies a range of cleaning agents under the name ATAG Shine. These can be obtained at the website at ‘www.atagservice.nl’, where you will also find various cleaning and operating tips. GB 18 Table STATUSCODES On/Off button The On/Off button on the HG….C appliances can indicate a number of functions and faults. SYMPTOM STATUS LEDs in the button aren’t shining. The appliance is switched off. - SOLUTION Green LED in the button is shining continuous. The appliance is turned on. - Green LED in the button is blinking. Child lock. Hold the on/off button pressed in for 5 seconds and you can use the gas hob again. Green and red LED in the A fault occurred by reigniting Check the gas supply to button are blinking after each a burner. your gas hob and/wether the other. burner parts are positioned in the right way. Turn every button to the 0-setting and try to ignite the burner again. Red LED in the button is blinking. Your gas hob has become too hot. Let your gas hob cool down and you can use it again. Red LED in the button is shining continuous. A fault occurred in the electronics of your gas hob. Contact your service centre. GB 19 Faults table FAULTS Faults table If the appliance does not work properly, this does not always mean that it is defective. Try to deal with the problem yourself first by checking the points mentioned below in the table or visit our website ‘www.atagservice.nl’ for more information. Fault Cause There is a smell of gas in the vicinity of the appliance. The gas connection of the gas Turn off the gas mains. hob is leaking. Contact your gas fitter. Solution A burner does not ignite. Plug not in socket. Push the plug into the socket. Fuse defective/fuse in meter cabinet switched off. Fit a new fuse or switch the automatic fuse back on. Sparkplug dirty/damp. Clean and dry the sparkplug. Burner parts not correctly installed. Assemble the burner parts using the centring ridges. Burner parts dirty/damp. Clean and dry the burner parts, making sure that the outflow holes are open. Main gas tap closed. Open the main gas tap. Fault in the gas network. Check with your gas supplier. Gas bottle or tank is empty. Connect a new gas bottle or have the tank filled. Wrong type of gas used. Check that the gas used is suitable for the appliance. If not, contact your gas fitter. GB 20 Faults table FAULTS Fault Cause Solution A burner does not ignite. Control knob not kept pressed in far enough. (Only for B versions. For electronically protected appliances, see the On/Off button table). Keep the control knob pressed in far enough between full and low. At first use this can take some more time because of the gas supply. The burner does not burn evenly. Burner parts incorrectly installed. Assemble the burner parts using the centring ridges. Burner parts dirty or damp. Clean and dry the burner parts, making sure that the outflow holes are open. Wrong type of gas used. Check that the gas used is suitable for the appliance. If not, contact your gas fitter. Control knob not kept pressed in long enough. (Only for B versions. For electronically protected appliances, see the On/Off button table). Keep the control knob pressed in for at least 5 seconds. The burner goes out after igniting. GB 21 INSTALLATION INSTRUCTIONS General This appliance should only be connected up by a registered installer! Caution! The type of gas and the country for which the appliance has been designed are indicated on the application identification card. This is a category 3 appliance. Gas connection •• Th e gas connection must comply with national and local regulations. •• We recommend that the hob be connected by means of a fixed pipe. Connection using a specially designed safety hose is also permitted. •• Behind an oven use must be made of a pipe made entirely out of metal. Warning! •• A safety hose may not be bent and must not come into contact with moving parts of kitchen units. •• In all cases the connection tap for the appliance must be positioned such that it is easily accessible. •• Before using the appliance for the first time check the connections using water and washing-up liquid to ensure that there are no gas leaks. Electrical connection 230V - 50Hz - 1.1 VA (for ..B appliances) 230V - 50Hz - 5.1 VA (for ..C appliances) •• Th e electrical connection must comply with national and local regulations. •• Wall socket and plug must be accessible at all times. •• If you want to make a fixed connection, ensure that a multi-pole switch with a distance between contacts of 3 mm is installed in the supply cable. GB 22 INSTALLATION INSTRUCTIONS General •• D o not use an adapter or an extension lead to connect the device to the electrical mains. Safe use of the device cannot be guaranteed with these accessories. Warning! This appliance must be earthed. Installation, maintenance or repairs should only be carried out by professionals who are authorized by the manufacturer, as failure to do so will void the warranty. The device should be disconnected from the mains prior to installation, maintenance or repairs. The device is only disconnected from the electric power if: •• the main switch of the electrical wiring/installation in the house is switched off, or •• the fuse for the electrical wiring/installation in the house has been completely removed, or •• the plug has been pulled out of the socket. Faulty parts may only be replaced by original Atag parts. Only those parts are guaranteed by Atag to meet the safety requirements. If the connecting cable is damaged, it may only be replaced by the manufacturer, the manufacturer’s service organisation or equivalently qualified persons, in order to avoid dangerous situations. GB 23 INSTALLATION INSTRUCTIONS Building in Preparing the hob Fit the elbow supplied on the appliance’s gas connection. 1/2” ISO 228 (straight) 1/2” ISO 10226-1 (conical) Sealing ring Only for France: 1/2” ISO 228 (straight) 1/2” ISO 228 (straight) Sealing ring Cut opening in worktop •• S aw the opening in the worktop. This should be done very accurately (see building in dimensions). •• If the woodtop is made of treated wood, then coat the sawn surfaces of the top with sealing varnish, to prevent moisture causing the top to swell. GB 24 INSTALLATION INSTRUCTIONS Building in Attachment points for mounting brackets See 1* in the illustrations of dimensions for Building in from page 24 onwards for the attachment points for mounting brackets. dunne werbladen dunne werbladen Screw hole for mounting bracket Thin worktops dunne werbladen dikke werkbladen dikke werkbladen Thick worktops dikke werkbladen Placing the sealing tape Remove the protective foil from the sealing tape (A) and apply the tape around the cut-out in the worktop. A A GB 25 Building in INSTALLATION INSTRUCTIONS Building in dimensions HG42..C 600 526 43 front minimum distance between rear of appliance and rear wall: 10 mm 600 560 490 60 1* front 1* 20 G1/2’’ 1* 1* 550 480 GB 26 Building in INSTALLATION INSTRUCTIONS Building in dimensions HG62..B/C 600 526 43 front minimum distance between rear of appliance and rear wall: 10 mm 600 560 490 60 1* front 1* 20 G1/2’’ 1* 1* 550 480 GB 27 Building in INSTALLATION INSTRUCTIONS Building in dimensions HG7711B/C 750 526 43 front minimum distance between rear of appliance and rear wall: 10 mm 600 560 490 60 1* front 1* 593 1* 1* 550 480 G1/2’’ GB 28 Building in INSTALLATION INSTRUCTIONS Building in dimensions HG7792B/C 750 526 43 front minimum distance between rear of appliance and rear wall: 10 mm 600 490 690 60 front 1* 1* 480 1* 20 G1/2’’ GB 29 680 1* Building in INSTALLATION INSTRUCTIONS Building in dimensions HG92..B/C 526 900 43 front minimum distance between rear of appliance and rear wall: 10 mm 600 860 490 60 1* front 1* 515 1* 480 G1/2’’ 1* GB 30 850 Building in INSTALLATION INSTRUCTIONS Building in dimensions HG97..B/C 526 900 43 front minimum distance between rear of appliance and rear wall: 10 mm 600 860 490 60 1* front 1* 515 1* 480 G1/2’’ 1* GB 31 850 INSTALLATION INSTRUCTIONS Building in Space to be left free around the appliance A hob generates heat. Leave a sufficient distance between the appliance and non heat-resistant materials. Take care also with materials that may discolour (such as stainless steel). min. 450 mm min. 650 mm min. 600 mm (HG42/HG62) min. 750 mm (HG77) min. 900 mm (HG92/97) min. 100 mm min. 100 mm The gas hob may only be built in next to one vertical wall. Caution! The bottom of the hob becomes hot. Do not place combustible items in a drawer if the drawer is fitted directly below the hob. Install appliance and make connections •• P lace the appliance in the worktop and secure it using the mounting brackets and screws supplied. •• Connect to the gas supply. •• Check with soap suds that the connection is gastight. •• Connect the appliance to mains electricity. GB 32 Gas information INSTALLATION INSTRUCTIONS G25/25 G20/20 G25/20 G30/29 G31/29 G31/36 G30/50 G31/50 mbar mbar mbar mbar mbar mbar mbar mbar G31/67 mbar Burnertype (kW) (kW) (kW) (kW / g/h) (kW / g/h) (kW / g/h) (kW / g/h) (kW / g/h) (kW / g/h) Simmer 1.00 1.00 0.90 0.90 / 65 0.79 / 57 0.90 / 65 1.00 / 72 0.88 / 63 1.00 / 72 Semi- 2.00 2.00 1.80 1.60 / 115 1.41 / 101 1.60 / 115 2.00 / 144 1.76 / 127 2.00 / 144 rapid Rapid 3.00 3.00 2.70 2.30 / 166 2.02 / 146 2.30 / 166 2.70 / 194 2.38 / 171 2.70 / 194 Wok 4.50 4.50 4.50 3.50 / 252 3.08 / 222 3.50 / 252 4.00 / 288 3.52 / 253 4.00 / 288 GB 33 Disposal of packaging and appliance APPENDIX Disposal of packaging and appliance In the manufacturing of this appliance durable materials were used. Make sure to dispose of this equipment responsibly at the end of its lifecycle. Ask the authorities for more information regarding this. The appliance packaging is recyclable. The following may have been used: •• cardboard; •• polythene film (PE); •• CFC-free polystyrene (PS hard foam). Dispose of these materials in a responsible manner and in accordance with government regulations. As a reminder of the need to dispose of household appliances separately, the product is marked with the symbol of a crossed-out wheeled dustbin. This means that at the end of its working life, the product must not be disposed of as urban waste. It must be taken to a special local authority differentiated waste collection centre or to a dealer providing this service. Disposing of a household appliance separately avoids possible negative consequences for the environment and health deriving from inappropriate disposal and enables the constituent materials to be recovered to obtain significant savings in energy and resources. Technical data On the label on the bottom of this equipment, you will find the total wattage, the required voltage and the frequency. GB 34 adjust thickness HG42..C HG62..B HG62..C HG77..B HG77..C HG92..B HG92..C HG97..B HG97..C Het toestel-identificatieplaatje bevindt zich aan de onderkant van het toestel. The appliance identification card is located on the bottom of the appliance. Handleiding Manual Plak hier het toestel-identificatieplaatje. Stick the appliance identification card here. Houd, wanneer u contact opneemt met de serviceafdeling, het complete typenummer bij de hand. When contacting the service department, have the complete type number to hand. Adressen en telefoonnummers van de serviceorganisatie vindt u op de garantiekaart. 700002804000 You will find the addresses and phone numbers of the service organisation on the guarantee card.


![[fr] Mode d`emploi ..............3](http://vs1.manualzilla.com/store/data/006398960_2-c7556031b398e26c9539303178b00fb6-150x150.png)