1
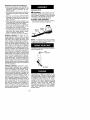
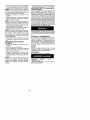
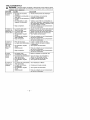
/
Trademark
Operator's Manual
Manual del Operador
Manuel de L'utilisateur
TWISTER
SB180
SB30
/
IMPORTANT MANUAL - Do not throw away
MANUAL IMPORTANTE
- No Io descarte
MANUEL IMPORTANT
- A Conserver
warnings
safetythe
instructions.
do follow
so canall
WARNING:and Read
operator's Failure
manual to
and
result in serious injury. Always wear eye protection.
ADVERTENClA:
Lea el manual del operador y siga todas
las advertencias e instrucciones de seguridad. El no
hacerlo puede resultar en lesiones graves.
AVERTISSEMENT: Lire le manuel de rutilisateur et bien
respecter tousles avertissements et toutes les instructions
de securit6. Tout defaut de le faire pourrait entraTner des
blessures graves.
Electrolux Home Products, Augusta, GA 30907
wcI Outdoor Products, Inc.
530088756
6/28/00
/
• Always store gasoline in a container
proved for flammable liquids.
OPERATE
YOUR UNIT SAFELY
,II_W,_HNIN_i:
Failure to follow all
Safety Rules and Precautions can result in
serious injury.
KNOW YOUR UNIT
• Read your Operator's
Manual carefully
until you completely understand and can
follow all warnings and safety instructions
before operating the unit.
• Restrict your unit to users who understand
and will follow all warnings and safety instructions in this manual.
PLAN AHEAD
• Always wear eye protection when operating, servicing, or pedorming maintenance
on your unit. Wearing eye protection will
help to prevent rocks or debris from being
blown or ricocheting into eyes and face
which can result in blindness and/or serious injury. Eye protection should meet the
requirements of ANSI Z87.1
• Always wear foot protection.
Do not go
barefoot or wear sandals.
• Always wear respirator or face mask when
working with unit in dusty environments.
• Secure hair above shoulder length. Secure or remove jewelry, loose clothing, or
clothing with loosely hanging straps, ties,
tassels, etc. They can be caught in moving
parts.
• Do not operate the unit when you are tired,
ill, upset, or if you are under the influence of
alcohol, drugs, or medication.
• Keep children, bystanders, and animals
away from work area a minimum of 30 feet
(10 m) when starting or operating unit. Do
not point the blower nozzle in the direction
of people or pets.
• Inspect the area before starting the unit.
Remove all debris and hard objects such
as rocks, glass, wire, etc. that can ricochet, be thrown, or otherwise cause injury
or damage during operation.
HANDLE
FUEL WITH CAUTION,
IT
IS HIGHLY FLAMMABLE
• Eliminate all sources of sparks or flame
(including smoking, open flames, or work
that can cause sparks) in the areas where
fuel is mixed, poured, or stored.
• Mix and pour fuel in an outdoor area; store
fuel in a cool, dry, well ventilated place; and
use an approved, marked container for all
fuel purposes.
• Do not smoke while handling fuel or while
operating the unit.
• Make sure the unit is properly assembled
and in good operating condition.
• Do not fill fuel tank while engine is hot or
running.
• Avoid spilling fuel or oil. Wipe up fuel spills
before starting engine.
• Move at least 10 feet 3 meters away from
fuel and fueling site before start ng engine.
-2-
4_I_WARNING:
ap-
Stop the engine before
opening the vacuum inlet door. The engine
must be stopped and the impeller blades no
longer turning to avoid serious injury from the
rotating blades.
• Inspect unit before each use for worn,
loose, missing, or damaged parts. Do not
use until unit is in proper working order.
• Keep outside surfaces free of oil and fuel
• Never start or run engine inside a closed
room or building. Breathing exhaust fumes
can kill.
• To avoid static electricity shock, do not
wear rubber gloves or any other insulated
gloves while operating the unit.
• Do not set unit on any surface excel_t a
clean, hard area while engine is running.
Debris such as gravel, sand, dust, grass,
etc. could be picked up by the air intake
and thrown out through discharge opening, damaging unit, property, or causing
serious injury to bystanders or operator.
• Avoid dangerous environments.
Do not
use in unventilated areas or where explosive vapors or carbon monoxide build up
could be present.
• Do not overreach or use from unstable
surfaces such as ladders, trees, steep
slopes, rooftops, etc Keep firm footing
and balance at all times.
• Never place objects inside the blower
tubes; always direct the blowing debris
away from people, animals, glass, and
solid objects such as trees, automobiles,
walls, etc. The force of air can cause
rocks, dirt, or sticks to be thrown or to ricochet which can hurt people or animals,
break glass, or cause other damage.
• Never run unit without the proper equipment attached. When using your unit as a
blower, always install blower tubes. When
using your unit as avacuum, always install
vacuum tubes and vacuum bag assembly.
Make sure vacuum bag assembly is completely zipped.
• Check air intake opening, blower tubes,
vacuum tubes, and elbow tube frequently,
always with the engine stopped and the
spark plug disconnected. Keep vents and
discharge tubes free of debris which can
accumulate and restrict proper air flow.
• Never place any object in the air intake
opening as this could restrict proper air
flow and cause damage to the unit
• Never use for spreading chemicals, fertilizers, or other substances which may contain toxic materials.
• To avoid spreading fire, do not use near
leaf or brush fires, fireplaces, barbecue
pits, ashtrays, etc.
• Use only for jobs explained in this manual.
MAINTAIN
YOUR UNIT PROPERLY
• Have all maintenance other than the recommended procedures described in the
Operator's
Manual performed by your
Service Dealer.
• Disconnect spark plug before performing
maintenance except for carburetor adjustments.
• Use only recommended WEED EATER
replacement parts; use of any other parts
may void your warranty and cause damage to your unit.
• Empty the fuel tank before storing the unit.
Use up fuel left in carburetor by starting the
engine and letting it run until it stops.
• Do not use any accessory or attachment
other than those recommended
by the
manufacturer for use with your unit.
• Do not store the unit or fuel in a closed area
where fuel vapors can reach sparks or an
open flame from water heaters, electric
motors or switches, furnaces, etc.
• Store in a dry area out of reach of children.
SPECIAL
NOTICE:
For users on U.S.
Forest Land and in some states, including
California(Public
Resources Codes 4442
and 4443), Idaho, Maine, Minnesota, New
Jersey, Oregon, and Washington: Certain internal combustion engines operated on forest, brush, and/or grass covered land in the
above areas are required to be equipped
with a spark arrestor, maintained in effective
working order, or the engine must be constructed, equipped, and maintained for the
prevention of fire. Check with your state or
local authorities for regulations pertaining to
these requirements. Failure to follow these
requirements is a violation of the law. This
unit is not factory equipped with a spark arrestor; however, a spark arrestor is available
as an optional part. If a spark arrestor is required in your area, contact your Authorized
Service Dealer for the correct kit. The spark
arrestor, blower tubes, and nozzles must be
assembled to the unit to be in full compliance
with the regulations.
SPECIAL
NOTICE:
Exposure to vibrations through prolonged
use of gasoline
powered hand tools could cause blood vessel or nerve damage in the fingers, hands,
and joints of people prone to circulation disorders or abnormal swelling. Prolonged use
in cold weather has been linked to blood vessel damage in otherwise healthy people. If
symptoms occur such as numbness, pain,
loss of strength, change in skin color or texture, or loss of feeling in the fingers, hands, or
joints, discontinue the use of this tool and
seek medical attention. An antivibrafion system does not guarantee the avoidance of
these problems. Users who operate power
tools on a continual and regular basis must
monitor closely their physical condition and
the condition of this tool.
-3-
PREPARATION
dmWARNIN_i:
If you receive your unit
assembled, check each step to insure your
unit is properly assembled. Follow all safety
information in the manual and on the unit.
• No tools are required for assembly.
BLOWER
TUBE ASSEMBLY
• Assemble the blower tube and nozzle to
the unit (turn clockwise to tighten).
NOTE: An optional vacuum kit is available
for your unit. See your local retailer or call
1-800-554-6723
for details.
YOU MUST make sure the tubes are secure
before using the unit.
_,_._
Eye
Protection
q
BLOWER
This engine is certified to operate on unleaded gasoline Gasoline must be mixed
with a good quality 2-cycle air-cooled engine
oil designed to be mixed at a ratio of 40:1.
Poulan/Weed
Eater brand oil is recommended. (A 40:1 ratio is obtained by mixing
3.2 ounces of oil with 1 gallon of unleaded
gasoline).
When mixing fuel follow the
instructions printed on the container. Always
read and follow safety rules under HANDLE
FUEL WITH CAUTION
in the SAFETY
RULES section.
TO STOP THE ENGINE:
• The ON/STOP switch is used to stop the engine. The switch stays in the ON position.
To stop engine, press and hold the switch
in the STOP position until the engine
comes to a complete stop.
BEFORE STARTING
THE ENGINE:
• Fuel the engine. Move at least 10 feet (3
meters) away from the fueling site.
• Hold the unit in the starting position as
shown. Make sure the blower end is directed away from people, animals, glass,
and solid objects.
STARTING
POSITION
• IbWAHNII_IL'i:
When starting engine,
hold the unit as illustrated. Do not set unit on
any surface except a clean, hard area when
starting engine or while engine is running.
Debris such as gravel, sand, dust, grass,
etc. could be picked up by the air intake and
thrown out through the discharge opening,
damaging the unit or property, or causing serious injury to bystanders or the operator.
Throttle
Trigger
hrottle
Lock
(shown in HALF CHOKE position)
STARTING
A COLD ENGINE
(or a
warm
engine
after running
out of
fuel)
• Move choke to FULL CHOKE position.
• Activate the throttle lock as follows:
• squeeze and hold throttle trigger;
• press and hold throttle lock, then
• release the throttle trigger
• Pull starter rope handle sharply until engine attempts to run, but NO MORE THAN
6 PULLS.
NOTE:: The engine may sound as if it is trying to start before the 6th pull. This sound
may be hard to hear. If so, go to the next step
immediately.
-4-
• Move choke to HALF CHOKE position.
• Pull starter rope handle sharply until engine runs, but no more than 6 pulls.
NOTE:
If engine has not started after 6
pulls, repeat all of the above steps.
• Allow engine to run for 10 to 15 seconds,
then move choke to OFF CHOKE position.
• Squeeze and release the throttle trigger to
release the throttle lock.
NOTE: If engine dies with choke at OFF
CHOKE position, move the choke to the
HALF CHOKE position and pull the starter
rope handle 5 moretimes
If engine does not
start and operate properly, refer to CARBURETOR ADJUSTMENTS.
• To stop engine, press and hold switch in
the OFF position.
STARTING
A WARM ENGINE:
• Move choke to HALF CHOKE position.
• Activate the throttle lock.
• Pull starter rope handle sharply until engine runs, but no more than 6 pulls.
• Move choke to OFF CHOKE position.
Then, squeeze and release the throttle
trigger to release the throttle lock.
NOTE: If engine does not run after 5 pulls, it
is probably flooded. Wait a few minutes and
repeat procedure
with choke at OFF
CHOKE.
• To stop engine, press and hold switch in
the OFF position.
DIFFICULT
STARTING
(or starting
a
flooded
engine)
Flooded engines can be started by placing
choke lever in the OFF CHOKE position. Activate the throttle lock, then, pull rope until engine starts. After the engine starts, squeeze
and release the throttle trigger to release the
throttle lock and allow engine to idle. Starting
could require pulling the starter rope handle
many times depending on how badly unit is
flooded. If unit still doesn't start, refer to the
TROUBLESHOOTING
TABLE
or call
1-800-554-6723.
We recommend all service and adjustments
not listed in this manual be performed by an
Authorized Service Dealer.
CARBURETOR
ADJUSTMENTS
Your carburetor
is equipped with limiter
caps. Carburetor adjustment is a complicated task. We recommend that you take
your unit to an Authorized Service Dealer.
Damage will occur if you turn the needles beyond the limiter stops.
SPARK PLUG
Replace spark plug yearly using a Champion
RCJ-8Y spark plug. Spark plug gap is ,025".
IGNITION
TIMING
Ignition timing is fixed, nonadjustable.
TROUBLESHOOTING
WARNING:
recommended
TROUBLE
TABLE
Always stop unit and disconnect spark plug before performing any of the
remedies below other than remedies that require operation of the unit.
CAUSE
Engine will not *
start.
•
•
•
REMEDY
Engine flooded.
Fuel tank empty.
Spark plug not firing.
Fuel not reaching carburetor.
• Compression
•
•
•
•
See "Starting Instructions."
Fill tank with correct fuel mixture.
Install new spark plug.
Check for dirty fuel filter; replace.
Check for kinked or split fuel line;
repair or replace.
• Contact Authorized Service Dealer.
low.
Engine will not
idle properly.
• Carburetor requires adjustment
• Crankshaft seals worn.
• Compression low.
• See "Carburetor Adjustments."
• Contact Authorized Service Dealer.
• Contact Authorized Service Dealer.
Engine will not
accelerate,
lacks power, or
dies under a
load.
•
•
•
•
•
•
•
•
•
•
Engine
smokes
• Choke partially on.
• Fuel mixture incorrect.
excessively.
Engine
runs hot.
•
•
•
•
•
•
Air filter dirty.
Spark plug fouled.
Carburetor requires adjustment
Carbon build up.
Compression low.
Air filter dirty.
Carburetor requires adjustment
Fuel mixture incorrect.
Spark plug incorrect.
Carburetor requires adjustment
Carbon build up.
Need Assistance? Call 1-800-554-6723.
Need a Service Part? Contact your retailer.
ELECTROLUX
HOME PRODUCTS, Division WCI Outdoor Products, Inc., warrants
to the original purchaser that each new
Weed Eater brand gasoline tool or attach=
ment is free from defects in material and
workmanship and agrees to repair or replace
under this warranty any defective gasoline
product or attachment as follows from the
original date of purchase.
2 YEARS - Parts and Labor, when used for
household purposes.
60 DAYS - Parts and Labor, when used for
commercial,
professional,
or income producing purposes.
30 DAYS - Parts and Labor, if used for rental
purposes.
This warranty is not transferable and does
not cover damage or liability caused by improper handling, improper maintenance, or
the use of accessories and/or attachments
not specifically
recommended
by ELECTROLUX HOME PRODUCTS for this tool.
Additionally, this warranty does not cover
-5-
Clean or replace air filter.
Clean or replace spark plug; re-gap
See "Carburetor Adjustments."
Contact Authorized Service Dealer.
Contact Authorized Service Dealer.
• Adjust choke.
• Empty fuel tank and refill with
correct fuel mixture.
• Clean or replace air filter.
• See "Carburetor Adjustments."
•
•
•
•
See "Fueling Your Unit."
Replace with correct spark plug.
See "Carburetor Adjustments."
Contact Authorized Service Dealer.
tune-ups, spark plugs, filters, starter ropes,
starter springs, cutting line, or rotating head
parts that will wear and require replacement
with reasonable use during the warranty period. This warranty does not cover predelivery setup or normal adjustments explained in
the operator's manual.
THIS WARRANTY GIVES YOU SPECIFIC
LEGAL RIGHTS, AND YOU MAY HAVE
OTHER RIGHTS WHICH VARY FROM
STATE TO STATE.
NO CLAIMS FOR CONSEQUENTIAL
OR
OTHER DAMAGES WILL BE ALLOWED,
AND THERE ARE NO OTHER EXPRESS
WARRANTIES
EXCEPT
THOSE
EXPRESSLY STIPULATED HEREIN.
SOME STATES DO NOT ALLOW LIMITATIONS ON HOW LONG AN IMPLIED WARRANTY LASTS OR THE EXCLUSION OR
LIMITATIONS OF INCIDENTAL OR CONSEQUENTIAL
DAMAGES,
SO
THE
ABOVE LIMITATIONS
OR EXCLUSION
MAY NOT APPLY TO YOU.
ELECTROLUX HOME PRODUCTS' policy
is to continuously
improve its products.
Therefore,
ELECTROLUX
HOME PRODUCTS reserves the right to change, modify, or discontinue models, designs, specifications, and accessories of all products at
any time without notice or obligation to any
purchaser.
YOUR WARRANTY
RIGHTS AND OBLIGATIONS:
The U. S. Environmental
Protection Agency and POULAN/WEED
EATER, DIVISION OF WCI OUTDOOR
PRODUCTS
are pIeased to explain the
emissions contro! system warranty on your
Iawn and garden equipment engine. All new
utility and lawn and garden equipment engines must be designed, built, and equipped
to meet the stringent anti-smog standards.
POULAN/WEED
EATER must warrant the
emission control system on your Iawn and
garden equipment engine for the periods of
time listed below provided there has been no
abuse, neglect, or improper maintenance of
your lawn and garden equipment engine.
Your emission control system includes parts
such as the carburetor and the ignition system. Where a warrantable condition exits,
POULAN/WEED
EATER will repair your
lawn and garden equipment engine at no
cost to you, Expenses covered under warranty include diagnosis, parts and labor.
MANUFACTURER'S
WARRANTY COVERAGE: If any emissions related part on
your engine (as listed under Emissions Control Warranty Parts List) is defective or a defect in the materials or workmanship of the
engine causes the failure of such an emission related pad, the part will be repaired or
replaced
by POULAN/WEED
EATER,
OWNER'S WARRANTY RESPONSIBILITIES: As the lawn and garden equipment engine owner, you are responsible for the performance of the required maintenance listed
in your Owner's Manual. POULAN/WEED
EATER recommends that you retain all receipts covering maintenance on your lawn
and garden equipment engine, but POULAN/WEED EATER cannot deny warranty
solely for the lack of receipts or for your failure to ensure the performance of all scheduled maintenance.
As the lawn and garden
equipment engine owner, you should be
aware that POULAN/WEED
EATER may
deny you warranty coverage if your lawn and
garden equipment engine or a pad of it has
failed due to abuse, neglect, improper maintenance, unapproved modifications,
or the
use of parts not made or approved by the
original equipment manufacturer.
You are
responsible for presenting your lawn and
garden equipment engine to a POULAN/
WEED EATER authorized repair center as
soon as a problem exists. Warranty repairs
should be completed in a reasonable amount
of time, not to exceed 30 days. If you have
any questions
regarding your warranty
rights and responsibilities,
you should contact your nearest authorized service center
or
call
POULAN/WEED
EATER
at
-6-
1-800-554-6723.
WARRANTY
COMMENCEMENT DATE: The warranty period
begins on the date the lawn and garden
equipment engine is purchased. LENGTH
OF COVERAGE: This warranty shall be for
a period of two years from the initial date of
purchase. WHAT IS COVERED: REPAIR
OR REPLACEMENT
OF PARTS. Repair or
replacement of any warranted part will be
performed at no charge to the owner at an
approved POULAN/WEED
EATER servicing center If you have any questions regarding your warranty rights and responsibilities,
you should contact your nearest authorized
service center or call POULAN/WEED EATER at f-800-554-6723
WARRANTY PERIOD: Any warranted part which is not
scheduled
for replacement
as required
maintenance, or which is scheduled only for
regular inspection to the effect of "repair or
replace as necessary" shall be warranted for
2 years. Any warranted part which is scheduled for replacement as required maintenance shall be warranted for the period of
time up to the first scheduled replacement
point for that part. DIAGNOSIS: The owner
shall not be charged for diagnostic labor
which leads to the determination that a warranted part is defective if the diagnostic work
is performed at an approved POULAN/
WEED EATER servicing center. CONSEQUENTIAL DAMAGES: POULAN/WEED
EATER may be liable for damages to other
engine components caused by the failure of
a warranted part still under warranty. WHAT
IS NOT COVERED: All failures caused by
abuse, neglect, or improper maintenance
are not covered. ADD-ON OR MODIFIED
PARTS: The use of add-on or modified pads
can be grounds for disallowing a warranty
claim. POULAN/WEED EATER is not liable to
cover failures of warranted parts caused by
the use of add-on or modified pads. HOW
TO FILE A CLAIM: If you have any questions regarding your warranty rights and responsibilities, you should contact your nearest authorized service center or call POULAN/WEED EATER at 1-800-554-6723.
WHERE TO GET WARRANTY SERVICE:
Warranty services or repairs shall be provided
at all POULAN/WEED EATER service centers. call: 1-800-554-6723
MAINTENANCE,
REPLACEMENT AND REPAIR OF EMISSION RELATED PARTS: Any POULAN/
WEED EATER approved replacement part
used in the performance of any warranty
maintenance or repair on emission related
parts will be provided without charge to the
owner if the part is under warranty. EMISSION CONTROL
WARRANTY
PARTS
LIST: Carburetor, Ignition System: Spark
Plug (covered up to maintenance schedule),
Ignition Module, MAINTENANCE
STATEMENT: The owner is responsible for the performance of nil required maintenance as defined in the owner's manual.
II_II,AUVI::HII:::NUIA:
El usuario debera obedecer todas las Reglas y Precauclones de Seguridad; de Io contrario podra
sufrir graves heridas.
CONOZCA
SU APARATO
• Antes de poner el aparato en functionamiento, lea cuidadosamente
el Manual del
Usuario hasta que haya comprendido
completamenta todas Ias advertencias e
instrucciones de seguridad y Ias pueda
cumplir.
• Limite el uso del aparato a aquellas personas aue hayan comprendido tadas las advertencias e instrucciones de seguridad
en este manual y que las vayan a cumplir.
PIENSE ANTES DE PROCEDER
• Use siempre protecciSn de o os al hacer
uso, servicio o mantenimiento del aparata.
El uso de protecciSn de ojos ayudarb en la
prevenci6n de ceguera y/o graves heridas
provocadas por piedras o escombros arojados que den o rebotan en los ojos y la
cara. La protecci6n de o os debe satisfacer los Requisitos Nacionales de Seguridad de ANSI Z87.1.
• Use siempre protecci6n en los pies. No
use el aparato descalzo ni con sandalias.
• Use siempre md=scara de filtraciSn o de
protecci6n al trabajar con el aparato en
amblentas potvorientas.
• Mantenga el cabello por encima de los
hombros, at#lndolo para tal efecto si es necesario. Use ropa a ustada, ya que la ropa
suelta, las joyas y la ropa con tiras, corbatas, borlas, etc., que cuelguen sueltas
pueden enredarse en las piezas en movimiento.
• No use el aparato cuando esta cansado,
enfermo, ansioso o bajo la influencia del
alcohol, drogas o remedios.
• Mantenga alos nitros, espectadores yanimales alejados a una distancia minima de
10 metros (30 pies) del #lrea de trabajo al
poner en marcha y al usar el aparato. No
der_ale la boquilla en Ia direccio" n de la personas o de animales dom6sticos.
• Inspeccione el #=reaantes de poner el aparata en marcha. Retire todos los escombros y objetos duros como piedras, vidrio,
alambre, etc. que puedan rebotar, ser arrojados o de cualquier otro modo provocar
heridas o daSos durante el uso.
MANEJE EL COMBUSTIBLE
CON
EXTREMO
CUIDADO,
ES ALTAMENTE INFLAMABLE
• Elimine todas las fuentes de chispas y llamas (entre elias los cigarrillos, clrarros,
etc., las llamas descubiertas y cualquier
actividad que genere chispas) en los lugares donde se mezcla, vierte y guarda el
combustible.
-7-
• Mezcle y vierta el combustible
afuera;
gud=rdelo en un lugar fresco, seco y bien
ventilado; use un recipiente aprobado y rotulado en todo trabajo que infolucre combustible.
• No fume al trabajor con combustible con ni
al usar el aparato.
• Aseg0rese que el aparato este correctmente armado yen buena condici6n de
funcionamiento.
• No abastezca el tanque de combustible el
motor en marcha.
• Evita derramar el combustible o el aceite.
Limpie todo los derrames de combustible
antes de poner el motor en marcha.
• AI6jese a una distancia minima de 3 metros (10 pies) del combustible ydel lugar de
abastecimiento antes de poner el motor en
marcha.
• Almacene siempre combustible en un recipiente aprobado para los liquidos inflamables.
USE EL APABATO
DE FOBMA
SEGURA
llOt, AUVI:::HII:::NUIA:
Para el motor
antes de abrir la compuerta de la entrada de
aspiraci6n. El motor debe estar parado y las
cuchillas de la helice completamenta detenidas para evitar graves heridas provocadas
pot las cuchillas girantes.
• Inspeccione
el aparato
integramenta
antes de cada uso para detactar piezas
gastadas, sueltas o dar_adas y piezas que
faltan. No use el aparato sin tanefio en
perfectas condiciones de funcionamiento.
• Mantenga la superficies enternas libres de
aceite y combustible.
• Nunca ponga el motor en marcha dentro
de un cuarto o un edificio cerrado. Respirat vapores de escape puede matario.
• Para evitar choque por electricidad est_cica, no use guantas de goma ni ning0n otro
guante aisiado al usar el aparato.
• Si el motor est#=en marcha, apoye el aparato t_nicamente en superficies limplas y
firmes.
El aparato podria succionar escombros tales como pedregullo, arena,
tierra, cesped, etc. pot la abertura de entrada y arrojarios violentamente por la avertura de propulsion, dar_ando el aparato y
otros bienes o causando graves heridas a
los espectadores o al usuario.
• Evite los ambientas peligrosos. No use el
aparato en lugares no ventilados o donde
pueda haber mon6xido de carbono o vapores explosivos acumulados
• No se incline excesivamente ni use el aparato con los pies en una superficie inestable como escaleras portal,tiles, _rboles,
declives acentuandos, tachos, tac. Mantenga el equilibrio y los pies en una superficie firme y estable en todo momento.
• Nunca coloque objetos dentro de los tubos
de propulsi6n; propulsione los escombros
siempre en direcci6n contraria a donde se
encuentren personas, animales, vidrio y
•
•
•
•
•
•
objetos solidos tales como los Arbotes, los
autom6viles, Ins paredes, etc. La fuerza
del aire puede arrojar o hacer rebotar piedras, tierra o palos que pueden herir a Ins
personas o los animales, romper vidrio o
causar otros hafios.
Nunca ponga el motor en marcha sin haber instalado el equipo apropiado. AI usar el
aparato como propulsor, instale siempre
los tubos de propulsi6n
AI usario como
aspirador, instale siernpre los tubos de aspiraci6n y el juego de bolso de aspiraci6n.
Aseg_rese de que el cierre de la bolsa
este complemente cerrado.
Inspeccione
la abertura de entrada de
aire, los tubos de propulsi6n, los tubos de
aspiraci6n y el tubo en "L" frecuentemente, siempre con el motor parado y la
bujia desconectada.
Mantenga Ins aberturns de ventilaci6n y los tubos de descarga libres de escombros que se puedan
acumular e impedir el flujo correcto de
aire.
Nunca coloque ningQn objeto en la abertura de entrada de aire y aque hacerlo podria
impedir el flujo correcto de aire y dafiar el
aparato.
Nunca use el aparato para esparcir substancias quimicas, fertilizantes ni ninguna
otras substancia que pueda contener materiales t6xicos.
Para evitar la propagaci6n de fuego, no
use el aparato cerca de Ins hogueras de
hojas o matorrales, Ins hogueras a lefia,
Ins parrillas, los ceniceros, etc.
Use el aparato exclusivamente
para los
fines explicados en este manual.
MANTENGA
DEBIDAMENTE
EL
APARATO
• Todo mantenimiento,
con excepci6n de
los procedimientos
recomendados
en el
Manual del Usuario debera ser efectuado
por el Proveedor de Servicio.
• Desconecte la bujia antes de hacer cualquier mantenimiento
menos el ajuste del
carburador
• Use exclusivamente los repuestos recomendados WEED EATER el uso de cualquier otro repuesto podria invalidar la garantia y dafiar el aparato.
• Vacie el tanque de combustible antes de
guardar el aparato. Consuma todo el combustible que queda en el carburador poniendo el motor en rnarcha y dejandolo en
marcha hata que pare soto.
• No use ningt_n accesorio ni juego de piezas optativo fuera de los recomendados
por el fabricante para uso con su aparato.
• No guarde ni el aparato ni el combustible
en un Iugar cerrado donde los vapores del
combustible puedan alcanzar chispas o
llamas descubiertas de Ins termotanques,
los motores e interruptores el6ctricos, los
calefactores centrales etc.
• Guarde el aparato en un lugar seco fuera
del alcanace de los nifios.
-8-
AVISO ESPECIAL:
Para los usuarios en
Tierras Forestadas Fiscales (U.S. Forest
Land) yen algunos estados, entre ellos California
(C6digos
de
Recursos
PQblicos--Public
Resouces
Codes--4442
y
4443),
Idaho,
Maine,
Minnesota,
New
Jersey, Oregon y Washington:
Es obligatorio equipar ciertos motores de combusti6n
interna operados en tierras con bosques,
matorrales y/o pasta en Ins areas mencionadas con rejilla antichispas mantenido en perfecto estado de funcionamiento.
De notener
rejilla antichispas, el motor debera estar elaborado, equipado y mantenido para la prevenci6n de incendios. Inf6rmese con Ins autoridades locales o estatales sobre los reglamentos que existen aI respecto. El no cumplir con estos requisitos anti-incendio
es
una infracci6n a ia ley. Este aparato no estA
equipado de fabrica con re ilia anti-chispas.
Sin embardo, se puede consequir la rejlla
antichispas como pieza optativa.
Si en su
zona la rejilla antichispas
es obligatoria,
entre en contacto con un Proveedor de Servico Autorizado (Authorized Service Dealer)
para obtener el uego correspondiente.
Es
obligatorio instalar la rejilla antichispas, los
tubos de propulsi6n y Ins boquiilas en el aparato para estar en completo cumplimiento
del reglamento.
AVISO ESPECIAL:
La exposici6n a Ins
vibraciones mediante el uso prolongado de
herramientas de fuerza de mano a gasolina
puede ausar dafios a los vasos snaguineos
o a los nervios en los dedos, Ins manos y Ins
coyunturas de Ins personas propensas a los
trastomos de la circulaci6n o a Ins hinchazones anormales.
El useo prolongado en
tiempo frio ha disc relaciondado con dafios
en
los
vasos
sanguineos
de
personas
que
por Io demAs gozan de perfecta salud. Si se
presentan sintomas como entumecimiento,
dotor, debilidad, cambio de color o textura de
la piel o falta de sentido en los dedos, Ins
manos o Ins coyunturas, deje de suar esta
herramienta y procure atenci6n m6dica. Los
sistemas anti-vibratorios
no garantizan que
se eviten estos problemas.
Los usuarios
que usen herramientas de fuerza de modo
habitual y continuo deben fiscalizar atentamente su condici6n fisico y Ins condiciones
dei aparato.
PREPARACION
ADVERTENCIA:
rato ya armado,
asequrarse que
mente armado.
ci6n de seguridad
to.
Si recibi6 el apaverifique cada paso para
el aparato este correctaObedezca toda la informaen el manual yen el apara-
• No se requieren
montaje.
herramientas
para el
INSTALLACION
DE LOS TUBOS
DE PROPULSION
• Junte el tubo propulsi6n y la boquilla al
aparato y girelos a la derecha (en el sentido deI reloj) para ajustarios.
Abertur
Tubo de
Propulsi6n
Propulsi6n
Boquilla
posici6n ON para hacer arrancar el motor.
Para parar el motor, presione y sostenga
el interruptor hasta que el motor se detenga.
ANTES DE PONER EL MOTOR EN
MARCHA:
• Abastezca el motor. ApArtese a por Io menos 3 metros (10 pies) del iugar de abastecimiento.
• Sostenga el aparato en la posici6n de arranqueilustrada.
Aseg_rese de que la boquilla de propulsi6n no est6 direccionada
hacia personas, animales, vidrio y objetos
s6tidos.
AVISO:
Un kit opcional del aspirador esta
disponible para este aparato. Entre en contacto
con
eI concesionario
o Ilame
1-800-554-6723
para los detalles.
ES OBLIGATORIO asegurarse que los tubos esten fijos antes de poner el aparato en
marcha.
de Ojos
POSICION DE
ARRANQUE
oADVERTENL;IA:
AI arrancar el
motor, sostenga el aparato como se ilustra
en la figura.
Apoye el aparato exclusivamente en una superficie
lirnpia y dura
siempre que vaya a efectuar el arranque y
siempre que tenga que apoyar el aparato
con el motor en marcha.
Los escombros
tales como el pedregullo, la arena, la tierra, el
cesped, etc., pueden ser succionados por la
entrada de aire y arrojados por la aberiura de
propuisi6n, dafiado el aparato u otros bienes
o causando graves heridas a los espectadotes
PROPULSOR
o aJ usuario.
GatJllo
Este motor estA habilitado para funcionar
con gasolina sin plomo. Antes de usar, se
deberA mezclar la gasolina con un aceite de
buena calidad para motores de 2 tiempos
enfriados a aire disefiado para ser usado en
una mezclacon proporci6n de40:1. Recomendamos el aceite marca Poulan/Weed Eater. (Se obtiene una proporci6n de 40:1 mezclando 3,2 onzas de aceite con cada gal6n
de gasolina sin plomo.) AI mezclar combustible, siga las instrucciones impresas en el
recipiente. Lea siempre y siga las reglas de
seguridad que se encuentran bajo TENGA
SUMO CUIDADO CON ELCOMBUSTIBLE
en la secci6n REGLAS DE SEGURIDAD.
PARA PARAR EL MOTOR:
• Se usa el interruptor ON/STOP para parar
el motor. El interruptor debera estar en ia
-9-
Acelerador
Palanca, del cebador
(visto en posJci6n HALF CHOKE)
PARA
ARRANCAR
CON
MOTOR
FRIO (O motor caliente
despues
de
quedar
sin combustible)
• Coloque el cebador en posici6n FULL
CHOKE.
• Accione el cierre del acelerador siguiendo
las siguientes instrucciones:
• apreite y sostenga el gatillo acelerador;
• presione y sostenga el cierre del acelerador, entonces
• suelte eI gatillo acelerador
• Tire firmemente del mango de la cuerda de
arranque hasta que el motor trate de arrancar, PERO NO MAS DE 6TIRONES.
AVISO:
El motor puede tratar de arrancar
antes del sexto tiron, pero suele ser dificil oirIo. Si el motor esta tratando de arrancar, prosiga de inmediato al pr6ximo paso.
• Coloque el cebador a la posici6n HALF
CHOKE.
• Tire del mango de la cuerda de arranque
hasta que el motor se ponga en marcha,
pero no m#_s de 6 veces.
AVISO: Si el motor no arranca despu6s de
6 tirones, repita todos los pasos anteriores.
• Permita que el motor marche por 10 a 15
segundos, para despues mover el cebadora la posici6n OFF CHOKE.
• Suelte el cierre del acelerador apretando y
luego soltando el gatillo interruptor.
AVISO:
Si el motor se detiene con el cebador en la posici6n OFF CHOKE, col6quelo
en la posici6n HALF CHOKE y tire la soga
otras 5 veces. Si el motor no arranca ni funciona debidamente,
consulte los AJUSTES
AL CARBURADOR.
• Para parar el motor, presione y sostenga
el interruptor hasta que el motor se detenga.
ARRANQUE
CON EL MOTOR
CALIENTE:
• Coloque el cebador en la posici6n HALF
CHOKE.
• Active el cierre del acelerador.
• Tire del mango de la cuerda de arranque
hasta que el motor se ponga en marcha,
pero no mas de 6 veces.
• Coloque el cebador a la posici6n OFF
CHOKE. Luego, suelte el cierre del acelerador apretando y soltando el gatillo aceIerador.
AVISO: Si el motor no
5 tirones, es probable
Espere varios minutos
miento con el cebador
CHOKE.
arranca despues de
que este ahogado.
y repita el procedien la posici6n OFF
-10-
• Para parar el motor, presione y sostenga el
interruptor hasta que el motor se detenga.
ARRANQUE
DIFICIL (0 arranque
de
motor ahogado)
Se pueden porter en marcha los motores ahogados, colocando la palanca del cebador en la
posici6n OFF CHOKE. Active el cierre del
acelerador; luego tire de la cuerda hasta que el
motor arranque. Despues que el motor haya
arrancado, apriete y suelte el gatillo acelerador
para permitir que el motor marche lentamente.
Que el motor arranque puede requerir que se
tire de la cuerda de arranque muchas feces,
esto dependerA de la cantidad de combustible
que est_ ahogado el aparato. Si el motor contint_a sin arrancar, refierase a Ia TABLA DIAGNOSTICA o Ilame al 1-800-235-5878.
Recomendamos que todo servicio y ajuste
no explicado en este manual sea efectuado
por un Concesionario de Servicio Autorizado.
AJUSTES
AL CARBURADOR
El carburador viene equipado con tapas limp
tadoras. El ajuste al carburador es un procedimiento complicado.
Recomendamos
que
lieve el aparato a un Concesionario de ServiceAutorizado.
El motor quedarA daSado si
ajusta las agujas mas alia de los limites de
las tapas.
BUJIA
Cambie la bujia anualmente por.una bujia
Champion RCJ8Y. La separac_on de los
electrodos es de 0,025 de pulgada.
ENCENDIDO
El encendido es f
ustable.
&Necesita
Ayuda?
1-800-554-6723.
&Necesita Repuesto?
con el concesionario.
Llame
al
Entre en contacto
TABLA
DIAGNOSTICA
WARNING:
Siempre apague el aparato y desconecte la bujia antes de hacer
cualquiera de las reparaciones recomendadas a continuaci6n que no requieran que
Ia aparato est6 en operaci6n.
SINTOMA
CAUSA
El motor no
arranca
SOLUClON
• El motor se encuentra
ahogado.
• El tanque de combustible
esta vacio.
• La bujia no esta haciendo
chispa.
• El combustible no esta
Ilegando al carburador.
• Baja compresi6n.
El motor no
mantiene debidamente la
marcha lenta
El motor no
acelera, le
falta potancia, o se
para baio
carga
El motor se
calienta demasiado
de Arranque",
• Llene el tanque con Ia mezcla
correcta de combustible.
• Instale una bujia nueva.
• Verifique que el filtro de combustible no
est_ sucio; cambielo Inspeccione la linea
de combustible; rep#_rela o cAmbiela si se
encuentra partida o torcida.
• Entre en contacto con su Concesionario
de Servicio Autorizado.
• La marcha lenta esta
fijada muy baja.
• La marcha lenta esta
fijada muy alta.
• El carburador requiere
ajuste.
• Las juntas del cig_e_al
estan gastadas.
• Baja compresi6n.
• Ajuste el tornillo de marcha ienta hacia la
derecha para aumentar las revoluciones.
• Ajuste el tornillo de marcha Ienta hacia la
izquierda para reducir las revoluciones.
• Vea "Aiustes al Carburador".
• Filtro de aire sucio.
• La bujia est#_ carbonizada.
• Limpie o cambie el filtro de aire.
• Limpie o cambie la bujia y recalibre
la separaci6n.
• Vea "Ajustes al Carburador".
• Entre en contacto con su Concesionario
de Servicio Autorizado.
• Entre en contaoto con su Concesionario
de Servicio Autorizado.
• El carburador requiere
ajuste.
• Carbonizaci6n.
• Entre en contacto con su Concesionario
de Servicio Autorizado.
• Entre en contaoto con su Concesionario
de Servicio Autorizado.
• Baja compresi6n.
El motor
humea excesivamente
• Vea las "lnstrucciones
• Ei cebador esta
parcilamente activado.
• La mezcla de combustible
esta equivocada.
• Filtro de aire sucio.
• El carburador requiere
ajuste.
• La mezcla de combustible
esta equivocada.
• La bujia no es la que
corresponde.
• El carburador requiere
ajuste.
• Carbonizaci6n.
• Mueva el cebador a ia posici6n Off.
• Vacie el tanque de combustible y
116nelo con la mezcla correcta.
• Limpie o cambie el filtro de aire.
• Vea "Ajustes al Carburador".
• Vea "Abastezca
eI Motor".
• Cambie pot ia bujia correcta.
• Vea "Ajustes al Carburador".
• Entre en contaoto con su Concesionario
de Servicio Autorizado.
-11 -
ELECTROLUX
HOME PRODUCTS
Division WCI Outdoor Products, Inc., garantiza
al comprador original que cada herramienta
nueva o accesorio nuevo a gasolina marca
Weed Eater sera libre de defectas de matariales y de mano de obra y que se compromete a reparar o reemplazar, bajo las condiclones de esta garantia, todo producto o accesorio a gasolina defectuoso como se detalla a continuaci6n, a partir de la fecha de
compra original:
2 Afios - Repuestas y Mano de Obra, cuando usado para prop6sitas dom6sticos.
60 Dias - Repuestos y Mano de Obra, si
usado para prop6sitas comerciales, profesionales o para producir ingresos.
30 Dias - Repuestos y Mano de Obra, si
usando para prop6sitos de alquiler.
Esta garantia no es transferible y no cubre
daflos ni responsabilidad
civil debidos a
manejo indebido, mantanimiento
incorrecta
ni uso de accesorios y/o juegos de piezas
adicionales
no recomendados
especificamente por ELECTROLUX
HOME PRODUCTS para esta herramienta.
Asimismo,
esta garantia no cubre afinaciones,
bujias,
filtros, sogas de arranque, resortas de arranque, Iinea de corte, ni piezas de cabezal rotatario que se gastan y requieren reemplazo
con el uso razonable duranta el periodo de
vigencia de la garantia. Esta garantia no
cubre la preparaci6n de pre-entrega,
normales explicados en el manual del usuario.
ESTA
GARANTIA
CONFIERE
DERECHOS JURIDICOS
ESPECIFICOS
AL
COMPRADOR,
QUE
PUEDE
TENER
OTROS
DERECHOS
QUE
VARIAN
ENTRE ESTADOS.
NO SE ADMITIRAN
RECLAMOS
POR
DAI_OS
C ONSECUENTES
NI
POR
OTROS DANOS NI SE APLICARA NINGUNA OTRA GARANTIA EXPRESA ADEMAS
DE AQUELLAS
EXPRESAMENTE
ESTIPULADAS EN LA PRESENTE,
ALGUNOS ESTADOS NO PERMITEN LIMITACIONES DEL PERIODO DE VIGENCIA
DE GARANTIAS LMPLICITAS, NO LA EXCLUSION DE DANOS CONSECUENTES
O INCIDENTALES, NI SU LIMITACION, DE
MODO QUE LA EXCLUSION Y LAS LIMITACIONES ANTERIORES
PUEDEN NO
TENER VALIDEZ EN SU CASO.
Es norma de ELECTROLUX HOME PRODUCTS mejorar sus productos continuamenta. Por Io tanta, ELEOTROLUX HOME
PRODUCTS se reserva el derecho de cambiar, modificar o descontinuar modelos, disefios, especificaciones
y accesorios de todos los productos en cualquier momenta sin
previo aviso no responsabilidad
para con
ning_n comprador.
-12-
SUS DERECHOS Y OBLIGAClONES
DE
GARAN TIA: La Agencia de Protacci6n
Ambiental de los Estados Unidos y POULAN/WEED EATER, DIVISION OF WCI
OUTDOOR PRODUCTS se complacen en
explicarle la garantia del sistama de control
de emis_ones en el motor de su equipo de
jardin y cesped. Todos los motores de equipc utilitario, de cesped yjardin nuevos deberan ser disefiados, construidos y equipados para satisfacer las normas rigurosas en
contra de la contaminaci6n
del ambienta.
POULAN/WEED EATER debera garantizar
el sistama de control de emisi6n en el motor
del equipo de cesped y ardin por los periodos de tiempo enumerados a continuaci6n,
estipulando que no haya habido ningSn tipo
de abuso, negligencia, o mantanimiento no
apropiado del motor de su equipo de cesped
yjardin. Su sistama de control de emisi6n incluye piezas Pales como el carburador y el
sistama de ignici6n. Cuando exista una condici6n bajo g.arantia, POULAN/WEED EATER reparara el motor de su equ_po de
cesped y jardin sin costa aIguno para ustad.
Los gastos cubiertos bajo garantia incluyen
diagn6stico, piezas y servicio. CUBIERTA
DE GARANTIA DEL FABRICANTE: Si cualquier pieza relacionada con Ia emisi6n en
su motor (como se enumeran en Ia Lista de
Piezas de Control de Emisi6n Bajo Garantia) se encontrara defectuosa o un defecto en los matariales o mano de obra del motor causara el real funcionamienta
de tal pieza relacionada con la emisi6n, esta pieza
sera reparada o reemplazada por POULAN/
WEED EATER. GARANTIA DE RESPONSABILIDAD DEL DUENO: Como dueflo del
equipo de c6sped y ardin, ustad es responsable del mantanimiento
requerido indicado
en el Manual del Usuario. POULAN/WEED
EATER recomienda que guarde tados los
recibos que cubren el mantanimienta
del
motor de su equipo de c_sped y jardin, pero
POULAN/WEED EATER no puede negar la
garantia _nicamenta por la falta de recibos o
por el incumplimienta de las indicaciones de
mantanimiento.
Como duefio del motor del
equipo de c6sped y jardin, ustad debe saber
que POULAN/WEED EATER puede negarle
la cubierta de garantia si el motor de su equ_po de c6sped y jardin o una pieza del mismo,
ha fallado debido al abuso, negligencia,
mantanimiento
no apropiado,
modificaciones sin aprobaci6n, o el uso de piezas
que no han sido hechas o aprobadas por el
fbricanta original del equipo. Usted ser_ el
responsable de presentar el motor del equipo de cesped y jardin a un centro de reparaciones autorizado POULAN/WEED EATER
tan pronto como surja el problema. Las reparaciones bajo garantia deberan set comple-
tadas en una cantidad razonable de tiempo,
no excediendo los 30 dias. Si cuenta con aIguna pregunta en referencia a sus derechos
y responsabilidades,
usted deber#_ entrar en
contacto con su centro de servioio autorizado mg=scercano o Ilamar a POULAN/WEED
EATER al 1-800-554-6723.
FECHA CEL
COMIENZO DE LA GARANTIA: El periodo
de garanfia comienza en la fecha en que se
compro el motor del equipo de cesped y
jardin. DURACION DE LA GARANTIA:
Esta garantia tiene un periodo de cubierta de
dos argos desde Ia fecha inicial de compra.
QUE CUBRE: REPARACIONES O REEMPLAZO DE PIEZAS. Las reparaciones o reemplazo de cuaiquier pieza en garantia
sergm efectuadas sin cargo alguno para el
duefio en un centro de servicio POULAN/
WEED EATER aprobado. Si tiene alguna
pregunta en relaci6n con sus derechos y responsabilidades
de garanfia, usted deber#=
comunioarse con su centro de servicio auto=
rizado mAs cercano o Ilamar a POULAN/
WEED EATER al 1-800-554-6723.
PERIODO DE GARANTIA: Cualquier pieza bajo
garantia que no este programada para set
reemplazada
como requisito del programa
de mantenimiento, o la cual este programada para set ins-peccionada
de forma regular
para efectos de "reparaciones o reemplazos
si es necesario" deber#= garantizarse por dos
argos. Cualquier pieza garantizada que est6
programada para set reemplazada como Io
es requerido por el programa de mantenimiento, deber#= ser garantizada por el periodo
de tiempo hasta el primer cambio programado para el reemplazo. DIAGNOSTICO: No
se deber#_ cargar aI duer_o ning_n tipo de recargos pot el servicio de diagn6stico el cual
nos conduce a la determinaci6n de que una
pieza bajo garantia est#_ defectuosa, si el trabajo de diagn6stico ha sido Ilevado a cabo
en un centro de servicio POULAN/WEED
-13-
EATER aprobado. DAI_IOS POR CONSECUECIA: POULAN/WEED
EATER puede
set responsable por dar_os a otros compo=
nentes del motor causados por el fallo de
una pieza garantizada mientras esta se encuentre en garantia. QUE NO CUBRE: To=
dos los fallos causados por el abuso, Ia negligencia, o el mantenimiento
no apropiado
no est#m cubiertos.
PIEZAS PARA ANADIR O MODIFICADAS:
El uso de piezas
ar_adidas o modificadas puede ser la base
para anular la garantia.
POULAN/WEED
EATER no se hace responsable de cubrir fallos de piezas garantizadas debido al uso de
piezas ar_adidas o modificadas.
COMO ENTABLAR UNA RECLAMACION:
Si cuenta
usted con alguna pregunta en referencia a
sus derechos y responsabilidades
de garantia, usted deber#= contactar asu centro de
servicio autorizado mas cercano o Ilamar a
POULAN/WEED
EATER
al
1-800-554-6723.
EN DONCE OBTENER
SERVlCIO DE GARANTIA: Servicio o reparaciones de garantia deberA ser provistas
por todos los centros de servicio POULAN/
WEED EATER. Ilame al: 1-800-554-6723.
MANTENIMIENTO, REEMPLAZO Y REPARACIONES DE PIEZAS RELACIONADAS
CON LA EMISION: Cualquier pieza de reemplazo POULAN/WEED
EATER aprobada
usada en la programaci6n de cualquier mantenimiento de garantia o reparaclon de piezas relacionadas con la emision ser#=provista al duer_o sin cargo alguno si la pieza se encuentra bajo garantia. LISTA DE PIEZAS
DE CONTROL DE EMISION RAJO GARANTIA: Carburador, Sistema de Ignici6n:
Bujia (cubierta t_nicamente hasta el periodo
del primer mantenimiento
programado),
Modulo de Ignici6n,
DECLARACION
DE
MANTENIMIENTO:
El duer_o es responsable de efectuar todo mantenimiento programado como Io define el Manual del Usuario.