1
CRI:iFTIHnN
_6
Operator's °Manual
g
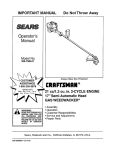
1.4 cu. in./24cc 2-Cycle
GASOLINE POWERED BLOWER
Model No.
358.797030
B
Ii
&
WARNING:
Read and follow all Safety Rules and Operating
Instructions before first use of this product.
For answers to your questions about this product:
Call 7 am-7 pro, Mon-Sat; Sun, 10 am-7 pm
[]
1-800-235-5878
Sears, Roebuck and Co., Hoffman Estates, IL 60179 USA
530-094583
11/20/96
WarrantyStatement
Safety Rules
Assembly
Operation
Maintenance
Service & Adjustments
2
2
4
6
8
9
Storage
TroubleshootingChart
PartsList
Spanish
Parts and Ordedng
9
10
11
14
Back
FULLTWO YEAR WARRANTY ON CRAFTSMAN® GAS BLOWER
Fortwo (2) years from date of purchase,when thisGas Bloweris maintained,
lubricated,and tuned up accordingto the instructionsin the operator'smanual,
Searswill repair,free of charge, any defectsin matedal or workmanship.
Thiswarrantyexcludesblowertubes, sparkplug,and air cleaner,whichare expendablepartsand becomeworn duringnormaluse.
Ifthisblowerisusedfor commercialpurposes,thiswarrantyappliesfor 90 daysfrom
thedate ofpurchase.Ifthis Blowerisused for rentalpurposes,thiswarrantyapplies
for30 daysfrom the date of purchase.This warrantyappliesonlywhiisthisproduct
is in use in the United States.
WARRANTY SERVICE IS AVAILABLEBY RETURNING THE BLOWER TO THE
NEAREST SEARS SERVICE CENTER IN THE UNITED STATES.
This warrantygivesyou specificlegal rights,and you may also have otherrights
whichvaryfrom state to state.
Sears, Roebuck end Co. Dept. DI817WA Hoffman Estates, IL 60179
Failuretofollow allSafetyRulesand Precautionscan resultin seriousinjury.
KNOW YOUR UNIT
- Read yourOperator'sManualcarefully untilyou completelyunderstand
and can followall warningsand
safetyrules beforeoperatingthe unit.
• Restrictunitto users who understand
and willfo!low all warningsand safety
rulesin this manual.
PLAN AHEAD
• Always wear eye protectionwhen operating,servicing,or performingmaintenancaon unit.Weadngeye protection willhelpto preventrocksor debris
from beingbrownor ricocheting
into
eyes and face whichcanresultin
btin_ess and/orseriousinjury.
• Alwayswear respiratoror face mask
when workingwith unitin dustyenvironments.
• Secure hair above shoulderlength.
Secure or removejewelry,loose
clothing,or clothingwith loosely
hangingstraps,ties, tassels,etc.
They can be caughtin movingparts.
-2-
• Do not operatethe unitwhen you are
tired, ill, upset,or if you are underthe
influenceof alcohol, drugs,or medication.
• Keep children,bystanders,and animals away from work area a minimum of 50 feet (15 m) when starting
or operatingunit.
• inspectthe area beforestartingthe
unit.Remove all debrisand hardobjectssuch as rocks,glass,wire,etc.
thatcan ricochet,be thrown,or otherwise causeinjuryor damage during
operation.
HANDLE FUEL WITH CAUTION
• Eliminateall sourcesof sparksor
flame (includingsmoking,open
flames, or work that can cause
sparks) inthe areas where fuel is
mixed,poured,or stored.
• Mix and pourfuel in an outdoorarea;
storefuel in a cool,dry,wellventilated
place;use an approved,markedcontainerfor all fuel purposes.
+ Do not smokewhilehandlingfuel or
whileoperatingthe unit.
• Do notfill fuel tankwhile engine is
Make sure vacuumbag assemblyis
running.
completetyzipped.
• Wipeup fuel spillsbeforestarlingen- ° Check air intakeopening,blower
gine.
tubes,and vacuumtubes frequently,
• Move at least 10 feet (3 meters)
alwayswith engine stoppedand
away from fuel and fuelingsite before
spark plugdisconnected.Keep vents
startingengine.
and dischargetubesfree of debris
whichcan accumulateand restrict
OPERATE YOUR UNIT SAFELY
properair flow.
• Stop the enginebefore openingthe
•
Never place any objectin the air invacuuminletdoor.The engine must
take openingas this couldrestrict
be stoppedand the impellerblades
properair flow and cause damageto
no longerturningto avoidseriousintheunit.
juryfrom the rotatingblades.
• Never usefor spreadingchemicals,
• Inspectunitbeforeeach use for
fertilizers, or othersubstanceswhich
worn,loose, missing,or damaged
may containtoxicmaterials.
parts.Do not use until unitis in
• To avoidspreadingfire, do not use
properworkingorder.
near leaf or brushfires,fireplaces,
• Keep outsidesurfaces free of oi!and
barbecuepits,ashtrays,etc.
fuel.
• Use onlyfor jobs explainedin this
° Never start or runengine insidea
manual.
closedroomor building.Breathing
exhaust fumes can kill.
MAINTAIN YOUR UNIT PROPERLY
• Haveall maintenanceotherthan the
• To avoidstaticelectdcityshock, do
not wear rubberglovesor any other
recommendedproceduresdescn'bed
insulatedgloveswhile operatingunit.
in the Operator'sManual performed
• Do not set uniton any surfaceexcept
by Sears Service.
a clean, hard area whileengine is
• Disconnectsparkplug beforeperrunning.Debrissuch as gravel,sand,
formingmaintenanceexceptfor car.
dust,grass, etc. could be pickedup
buretoradjustments.
bythe air intake and thrownout
• Use onlyrecommended CRAFTSthroughdischargeopening,damagMANereplacementparts;use of any
ing unit,property,or causingsedous
otherpartsmay voidyourwarranty
injuryto bystandersor operator.
and causedamage to your unit.
° Avoid dangerousenvironments.Do
• Emptyfuel tank beforestoringthe unit.
notuse in unventilatedareas or
Useup fuel leftin carburetorby starting
where explosivevapors or carbon
engineand lettingit rununtilitstops.
monoxidebuildup couldbe present.
• Do notuse any accessoryor attach.
° Do not overreachor use from unstamerit otherthan those recommended
ble surfacessuch as ladders,trees,
by manufacturerfor usewithyourunit.
steep slopes,rooftops,etc, Keep firm • Do not storethe unitor fuel in a
footing and balance at all times.
closedarea where fuel vaporscan
• Never place objectsinsidethe blower
reach sparksor an open flamefrom
tubes;alwaysdirectthe blowingdehot waterheaters,electricmotorsor
brisaway from people, animals,
switches,fumaces, etc.
glass,and solidobjectssuchas
• Store in a dry area out of reach of
trees, automobiles,walls, etc.The
children.
force of air can cause rocks,dirt, or
SPECIAL NOTICE: For userson U.S.
sticksto be thrownor to ricochet
ForestLandand in somestates, inwhich can hurtpeople or animals,
cludingCaltfomia(PublicResources
break glass,or cause otherdamage. Codes4442 and 4443), Idaho,Maine,
• Never rununitwithoutthe proper
Minnesota,New Jersey,Oregon,and
equipmentattached.When using
Washington:Certain internalcombusyour unitas a blower,alwaysinstall
tion enginesoperated on forest,brush,
blowertubas.When usingthe option- and/orgrass covered landin the above
al vacuumkit, always installvacuum
areas are requiredto be equippedwith
tubesand vacuumbag assembly.
a sparkarrestor,maintainedin effective
-3-
workingorder,or the engine mustbe
constructed,equipped,and maintained
for the preventionoffire. Check with
yourstate or localauthoritiesfor regulationspertainingto these requirements.Failureto follow these requirementsis a violationof the law. This unit
isnot factory equippedwitha spark arrestor,however,a sparkarrestoris
availableas an optionalpart. If a spark
arrestoris requiredin yourarea, contact Sears Service for the correctkiL
The spark arrestor,blowertubes,and
nozzlesmustbe assembledto unitto
be in full compliancewith regulations.
SPECIAL NOTICE: Exposureto vibrationsthroughprolongeduse of gasolinepoweredhand toolscouldcause
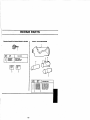
CARTON CONTENTS
Checkcartoncontentsagainstthe following lisL
Model 358.797030
• Blower
• Blowerfube
• 2-Cycle EngineOil
NOTE; It is normalfor the fuel filterto
rattlein the emptyfuel tank.
ASSEMBLY
WARNING: If receivedassembled,
repeat all stepsto ensureyourunitis
properlyassembledand all fasteners
are secure.
• No toolsare requiredfor assembly.
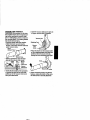
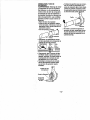
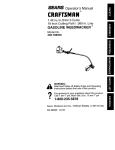
BLOWER TUBE ASSEMBLY
, Alignthe rib on the blowertube with
the groove in the bloweroutlet;slide
the tube intoplace.
_
_Btower
Outlet
Blower
Tube
Gmova-_ _
Rtb
• Tightenthe tube clamp by turningthe
knobclockwise.
• To removethe tube, rum the knob
counterclockwiseto loosendamp;
removetube.
-4-
bloodvessel or nerve damagein the
fingers, hands, and jointsofpeople
proneto circulationdisordersor abnormal swelling.Prolongeduse incold
weather has been linkedto bloodvessel damage in otherwisehealthy
people. If symptomsoccursuch as
numbness,pain, lossof strength,
changein skin coloror texture,or loss
of feeling in the fingers,hands,or
joints,discontinuethe useof this tool
and seek medicalattention.An
antivibraUon systemdoes not guarantee the avoidance ofthese problems.
Users who operate powertoolson a
continualand regularbasis mustmonitor closelytheirphysicalconditionand
the conditionof this tool.
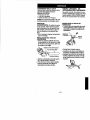
OPTIONAL VACUUM KIT
Yourblowercan be convertedto a vacuum by installingoptionalVacuumKit
#358.799900. This kitcan be purchased at your nearest Searsstore.
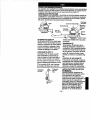
VACUUM BAG ASSEMBLY
• Placethe smallend of vacuumbag
overthe bloweroutletand clamp_.
Btower
Ve]cmStrap
Tightenthe Ve/crostrap securely.
•"Make sure the zipperon the bag is
closedcompletely.
• Secure the ends of the shoulder
strap by routingthe strapthroughthe
buckleas shown.
VACUUM
TUBEASSEMBLY
WARNING Stop engine and be sure
the impellerbladeshave stoppedturning beforeopeningthe vacuuminlet
door or attemptingto insertor remove
the vacuumtubes.The rotating blades
can
c=use
se_ousinju_.
• Remove blowertube fromengine.
• Alignthe lowervacuumtube as
shown. Push lowervacuumtube into
upper vacuumtube,
Upper
_._
Latch
,,__Areaj
Vacuumlnle L
_
/JJ_
\
-Hetaning
i Post \"_ _!-_L \_'t\l_
_
Vacuum
_
Inlet
t--
I _!
___j/
_
))J
//7
/_'
_°v°r
"_'-_ _7:::
_
VacuumTube-----_/.<_..._
"_
(
_ ) _
./ !
J_
_f /"
_
Lower
_
VacuumTube
• Inserta screwdriverintothe latch
area on the vacuum inletcover.
I
• Hold the vacuum inletcoveropen until uppervacuumtube is installed.
_,._,.--_
Blower
F _,.
Outlet
• Placethe hookson the vacuumtube
on the retainingposts;pivottube into
position.Securevacuumtube by
tuming the knobclockwiseuntiltight.
-i._ ",-,l((_'_ Vacuum
_
_/_.__
InletCover
Hooks
• Gentlytilt the handle ofthe screwdriver towardthe back ofthe unitwhile
° When convertingbackto the blower
pullingup on the vacuuminletcover
feature, make sure latchon the vacuwith yourother hand.
um inletcover is securelyfastened.
-5-
MULCHING
BLADES
Yourblower
isequipped
withmulching
blades
as a standardfeature.When usingthe
optionalvacuumattachment,the mulchingbladesautomaticallyreducedebrisat a
ratioof up to 16:1.
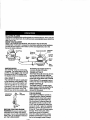
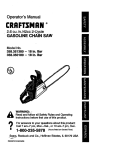
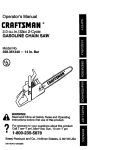
KNOW YOUR BLOWER
READ THIS OPERATOR'S MANUAL AND SAFETY RULES BEFORE
OPERATING YOUR UNIT. Compare the illustrationswithyour unitto familiarize
yourselfwiththe location of the vadouscontrolsand adjustments.Save this
manualfor futurereference,
SparkPlug
Pdmer(5_,
Button
"_J
_.
A..
Blower
SpeedControl(_) ON/STOP
Switch
_
_ I_. /
[)_--_'_
_---._-f--\
_:o,o(_) -_-'_-_o_.
FuelMix
FtltCap
'_ _/
Handle
ON/STOP SWITCH
The ON/STOP switchis used to stop
the engine.The switchstays in the ON
position.To stop engine,pushand hold
the switchin the STOP positionuntil
the engine comesto a completestop.
the StartingYourEnginesectionfor
completestartinginformation.
PRIMER BUTTON _)
The PrimerButton(_ removesair from
the fuel linesand fillsthem with fuel.
This allowsyou to startthe enginewith
COLD START (_
fewer pullson the starter rope. Activate
The Cold Start(_) helpsto supplyfuel
PrimerButton_) by pressingit and alto the carburetorduringstarting.This
lowing itto returnto its originalposition.
allows you to starta coldengine. ActiSPEED CONTROL _)
vate the Cold Start(_) by movingthe
The SpeedControl(_) controlsengine
Cold Start_ leverto the Start position. speed.Move itall the way forward for full
After enginehasstarted, moveCold
speedoperation.Move itall theway
Start(_) leverto the Run position.See
rearwardforidlespeed.
m i i =
OPERATING
POSITION
Eye
Protection
BEFORE STARTING ENGINE
WARNING: Be sureto read the fuel
informationin the safety rulesbefore
you begin. Ifyou do not understandthe
safetyrules, do not attemptto fuel your
unit.Call 1-800-235-5878.
-6-
FUELING ENGINE
This engine iscertifiedto operateon
unleadedgasoline.Beforeoperation,
gasolinemust be mixedwith a good
quality2.cycleair-cooledengine oil.
We recommendCraftsmanbrand oil.
Mix gasolineand oil at a ratioof 40:1
(A 40:1 ratiois obtainedby mixing3;2
ouncesof oilwith I gallonof unleaded
gasoline),DONOTUSEautomotiveoil
or boat oil.These oilswillcause engine
damage.When mixingfuel,follow
instructions
printedon container.
Once oilis addedto gasoline,shake
containermomentarily to assure that
the fuel is thoroughlymixed.Always
read and follow the safety rulesrelating dischargeopening,damagingthe unitor
tofuel beforefuelingyouruniL
property,or causingseriousinjuryto byIMPORTANT
standersor the operator.
Experienceindicatesthat alcohol
Speed I
blendedfuels (calledgasoholor using
ControlI
_
"_e
Switch
ethanolor methanol)canattract moisturewhichleadsto separationand
formation of acids duringstorage.Acidicgas can damage the fuel systemof
an engine whilein storage.
To avoidengineproblems,emptythe
LSeta_r
(_ --.___
fuel system beforestoragefor 30 days
STARTING A COLD ENGINE OR A
or longer.Drainthe gas tank, startthe
WARM ENGINE AFTER RUNNING
engineand let it run untilthe fuel lines
OUT OF FUEL
andcarburetorare empty.Usefresh
• Verifycoldstart lever (_) is in the
fuel nextseason.
Run position.
Neveruse engine or carburetorcleaner
• Press primerbutton(_) slowly12
productsin the fuel tankor permanent
times.
damage may occur.
•
Move speed controllever_) to fast
Fuelstabilizeris an acceptable alterna_i* position.
tivein minimizingthe formation of fuel
• Move cold startlever (_) to Start.
gumdepositsduringstorage.Crafts• Pullstarter ropeuntilenginestarts.
manbrand oil isalreadyblendedwith
fuel stabilizer.See the STORAGEsecMove coldstartlever (_ to Run if:
tionfor additionalinformation.
- Enginedoes notstartalter3 pulls,or
- after engine starts.
STOPPING YOUR ENGINE
• Run engine in the fast _-_ positionfor
• Tostop the engine,pressand hold
a 30 secondwarm-up.Then move
thestop (_ switchuntilengine stops.
speed controllever (_) to desired
STARTING YOUR ENGINE
speed: _ isfor fast engine speed,
BEFORE STARTING THE ENGINE
isfor slow enginespeed.
YouMUSTmake sure the tubes are se•
To
stopthe
engine, press and hold
cure beforeusingthe unit.
the stop (_ switchuntilenginestops.
• Fuelengine. Move at least 10 feet (3
FOR A WARM ENGINE
meters)away from the fueling site.
• Verifycoldstart lever (_) is in the
• Holdthe unitin the startingposition
Run position.
•as shown.Make sure the blowerend
• Move speed controllever (_) to the
is directedaway from people,anifast '_ position.
mals,glass,and solidobjects.
° Pullstarterrope untilenginestarts.If
engine does not start in 3 pulls,follow
coldengine startingprocedure.
• To stopthe engine, pressand hold
the stop O switchuntilenginestops.
DIFRCULT STARTING OR STARTING
A FLOODED ENGINE
Rcodedenginescan be startedbyplacingthe coldstartleverin the Run position.Move speedcontrolleverto fast
_a*; then,pullrope untilenginestarts.
WARNING: Whenstarlingengine,hold Afterenginestarts,movethespeedcontheunitas illustrated.
Do notset uniton
trolleverto _ to allowengineto idle.
anysurfaceexcepta clean,hardarea
Startingcouldrequirepullingthe starter
whenstartingengineor whileengineis
ropemanytimesdependingon how
running.Debrissuch as gravel,sand,
badlythe unitis flooded.Ifthe unitstill
dust,grass,etc.couldbe pickedup by
doesn'tstart,referto theTroubleshooting
the airintakeand thrown outthroughthe Chartor cell 1-800-235-5878.
-7-
CUSTOMER RESPONSIBILITIES
CARE & MAINTENANCE TASK
Check for Loosefastenersand pads
Check for damaged0r worn parts
Clean unitand labels
Cleanair filter
Replacesparkplug
Replacefuel filter
GENERALRECOMMENDATIONS
The warrantyon this unitdoes not cover itemsthat have been subjectedto
operatorabuseor negligence.To recalvefujivalue fromthe warranty,the
operatormust maintain unitas instructed in thismanual. Vadousadjustments
willneed to be made periodicallyto
properlymaintain yourunit.
CHECK FOR LOOSE
FASTENERS AND PARTS
• Spark PlugBoot
• Air Filter
• HousingScrews
WHEN TO PERFORM
Beforeeach use
Beforeeach use
After each use
Every5 hoursofoperation
Yeady
Yearly
Cleanln9 the air filter:
A dirtyair filterdecreasesengineperformanceand increasesfuel consumption and harmfulemissions.Always
clean afterevery5 hoursof operation.
.__
Air Filter
AirRlter
Cover
• Clean the coverand the area around
it to keep debrisfrom falling intothe
CHECK FOR DAMAGED OR
carburetorchamberwhen the cover
WORN PARTS
is removed.
Refer replacementof damaged/worn
• Remove partsas illustrated.
partsto yourSears Service Center.
• Wash the filter in soap and water,
• On/StopSwitch- EnsureOn/Stop
• Allowfilter to dry.
• Replace parts.
switchfunctionsproperly.
To stopengine,pushand hoJdswitchin the STOP REPLACE SPARK PLUG
positionuntilenginecomesto a comReplacespark plugeach year to enpletestop. Makesureenginestops;
sure the engine startseasier and runs
better,Set spark plug gap at .025 in.
thenrestartengineand continue.
• FuelTank- Do notuse unitif fueltank Ignitiontimingisfixed, nonadjustable.
• Twist,then pull offspark plugboot.
showssignsofdamage or leaks.
• Removespark plug from cylinderand
• OptionalVacuumBag - Do not use
discard.
vacuumbag if it istom or damaged.
• Replace withChampionRCJ-SY
CLEAN UNIT & LABELS
spark plugand tightenwith a 3/4 in.
socketwrench(10-12 ft,-Ibs).
• Cleanthe unitusinga dampcloth
• Reinstallthe spark plugboot.
witha milddetergent.
• Wipe offunitwith a clean dry cloth.
REPLACE FUEL FILTER
To replacefuel filter,drain unitby runCLEAN AIR FILTER
ningit dry of fuel, then removefuel cap/
Do not clean filterin gasolineor other
retainerassemblyfromtank. Pullfilter
flammablesolvent.Doingso can
from tank and remove itfrom the fuel
createa fire hazard or produceharmful line. Installnew fuel filteron fuel line;
evaporativeemissions.
reinstallpads.
Werecommend
allserviceandadjust- engine does notstart, referto troublementsnotlistedinthismanual
beper- shootingchart or call 1-800-235-5878.
formed by yourSears Service Center.
CARBURETOR ADJUSTMENT
Carburetoradjustmentis criticaland if
doneimproperlycan permanentlydamage the engineas well as the carburetor.tf you requirefurther assistanceor
are unsureaboutperformingthisprocedure,call ourcustomerassistance
helplineat 1-800-235-5878.
Old fuel, a dirtyair filter,a dirtyfuel filter, or flooding may give the impression
of an improperlyadjustedcarburetor.
Check theseconditionsbeforeadjustingthe carburetor.
The carburetorhas been carefullyset
at the factory. Adjustmentsmay be
necessaryif you noticeany of the followingconditions:
• Enginewilt not idle. See =IdleSpeed"
and =Mixture"under adjusting
procedure.
• Enginedies or hesitatesinstead of
accelerating.See =Acceleration
Check"underadjustingprocedure.
o Lossof power.See =Mixture" under
adjustingprocedure.
If engineperformanceis acceptableat
the presetpositions,no further adjustmentsare necessary.
_dleSpeed
Screw
Mixture Screw
(withUrniterCap)
ADJUSTING PROCEDURE
Idle Speed "IDLE"
Allow engineto idle.Adjust speed until
enginerunswithoutstalling.
° Turn clockwiseto increaseengine
speed if enginestalls or dies.
• Turncounterclockwiseto decrease
speed.
No furtheradjustments .performanceis satisfactory.
Mixture "MIX"
Allowengineto idle. Then accelerate
CARBURETOR PRESETS
the engineand note performance.If
When makingcarburetorpresetadjust- enginehesitates,bogsdown, or
ments,do not force plasticlimitercape smokesduringacceleration,tum mixbeyondthe stopsor damage willoccur. turs screwclockwisein 1/16-tumincreIf carburetorpresets are not needed,
ments untilperformanceis satisfactory.
proceedto =ADJUSTINGPROCEDURE, Repeat thisprocedureas necessary
Idle Speed."
forproperadjustment.After completing
To adjustpresets:
adjustments,checkfor acceleration.
• Turnthe mixturescrewcounterclock- Resetif necessary.
wise untilit stops.
Acceleration Check
° Turn the idlespeed screwclockwise If engine diesor hesitatesinsteadof
untilit stops. Now turn countemlock- accelerating, turn mixturescrew counwise4-1/2turns.
terclockwiseuntilyou have smoothacStartmotor,letit runfor 3 minutes,and celeration.Recheck and adjustas necproceedto the adjustment section.If
essaryfor acceptableperformance.
Prepareunitfor storageat end of season or if itwill not be used for 30 days
or more.
WARNING:
• Allowengineto cool, and secure the
unitbefore storingor transporting.
-9-
• Store unitand fuel in a well ventilated
area where fuel vaporscannotreach
sparksor open flamesfrom water
heaters,electricmotorsor switches,
furnaces, etc.
• Store unitwith all guardsin place.
stabilizer.If you do not use thisSeam
Positionunitso thatany sharpobject o_, you can add a fuel stabilizerto your
cannotaccidentallycauseinjury.
fuel tank.
• Store unit and fuel well out of the
INTERNAL ENGINE
reach of children.
• Remove spark plugand pour 1 teaEXTERNAL SURFACES
spoon of 40:1, 2-cycleengine oil(air
• Ifyour unitisto be storedfor a period
cooled)throughthe sparkpfugopenof time, clean it thoroughlybefore
ing. SJowlypul!the starterrope8 to
storage. Store in a clean dryarea.
10 times to distributeoil.
• Lightlyoilextema! metalsurfaces.
• Replace spark plugwith newone of
FUEL SYSTEM
recommendedtypeand heatrange.
Under Fueling Enginein the Operating • Clean air filter.
Sectionof this manual,see message
• Check entire unitfor loosescrews,
labeledIMPORTANTregardingthe use
nuts, and bolts. Replaceany damofgasoholin yourengine.
aged, broken,Orwornparts.
Fuelstabilizeris anacceptablealterna• At the beginningof the nextseason,
te in minimizing
theformationoffuel
use onlyfresh fuel havingthe proper
gumdepositsduringslom_ge,
Addstabigasolineto oil ratio.
lizerto gasdinein fuel tankor fuelstoragecontainer.Followthe mixin.structicns OTHER
found on stabi_er container.
Runengine • Do not store gasolinefrom one season to another.
at least5 minutesafteraddingstabilizer.
• Replace your gasolinecanif itstarts
CRAFTSMAN
40:1, 2-cycleengineoil
to rust.
(air cooled) is alreadyblendedwithfuel
TROUBLESHOOTING
CHART
TROUBLE
CAUSE
Enginewillnot _• Engineflooded.
start.
• Fueltankempty. .
• Sparkplugnotfiring.
• Fuelnotreaching
carburetor.
• Compression
low.
Engine will not
• Carburetorrequtresadjustment.
idleproperly. • Crankshaft
sealsworn.
• Compression
low.
, Enginewillnot
accelerate,
lackspower,or
diesundera
load,
Engine
smokes
excessively.
Engine
runshot.
•
•
•
°
•
°
•
•
•
•
•
•
•
REMEDY
Sea =StartingInstructions."
Filltankwithcorrect
fuelmixture.
tnstatlnewsparkplug.
Checkfor dirtyfuelfilter;,
replace.
Checkfor kinkedorsplitfueltins;
repairor replace.
• ContactSearsService.
•
•
•
•
• See _Carburstor
Adjustments."
• ContactSearsService.
• ContactSearsService.
• Cleanor replaceairfilter.
Airfilterdirty.
• Cleanor replacesparkplug;re-gap
Sparkplugfouled.
Carburstorrequiresadjustment_
• See "Carburetor
Adjustments."
Carbonbuildup.
; • ContactSearsService.
• ContactSearsService.
Compression
low,
Chokepartiafly
on.
• Adjustchoke.
Fuelmixtureincorrect.
• Emptyfueltankandrefillwith
correctrue!mixture.
Airfilterdirty.
• Cleanor replaceair filter.
Carburetor
requires
adjustment.
• See _Carburetor
Adjustments."
° See "FuelingYourUnit."
Fuelmixture
incorrect.
Sparkplugincorrect.
• Replacewithcorrectsparkplug.
Carburetor
requires
adjustment.• See=CarburetorAdjustments."
• ContactSearsService.
Carbonbuildup.
If situationsoccurwhichare not covered in this manual, use careand good
judgement. If you need assistance,contactyour Sears Service CentedDepartmentor call the CustomerAssistanceHelplineat 1-800-235-5878.
-10-
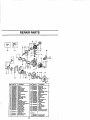
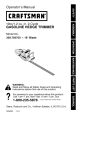
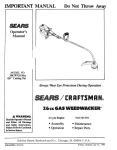
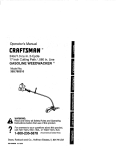
REPAIR PARTS
,_k
"
SEARS MODEL 358.797030
WARNING
All repal_ adjustments end
maintenance not €l_Crlbeel
I. the Operator's Manual
must be pe_ormed by quag.
fled eewJce personnel
24
25 26
48
49
19
17
39
40
45
J
41
27
42
14
12
47
1
48
16 30 29
44
]
28
32
43
Ref,
1.
2,
3,
4,
5_
6.
7,
8,
9.
I0+
I1.
12,
13,
14.
15.
16.
17,
18.
19.
20.
21,
22.
23.
24.
25.
26.
27.
Pad:NO,
530049_
_16209
530049_4
5_049_9
530015254
5300_5852
53O015775
530049SS4
530049495
530049494
,530069e2l
530049496
530049A_98
5304_044
530015966
530015849
530049315
5_04956_
530049325
53OO19246
530016211
53OO69572
530049537
530016212
530016207
!
,
Oesorlpttor*
BlowerTube
CarburetorAdaptor
Screw
"throttlePJete
ThrottleUnkage
Cl_okeLever
Wave Washer
Choke Slicer
Screw
Knob-ThrottleLever
Leazlwire-S_Ch
WTmClamp
CorbAss3,,
Lead_'re-Ground
Choke PJete
SP,_rertng
Cover L_toh
W
Screw
Air Box Cover
Knob=Chel(e Lever
Throttle Lever
Rlter-Choke Piete
Retainer-PurgeButton
Switch
Purge Button
Sp_ing-PurgeButton
Nut
28,
29,
30.
31.
_?..
33.
34,
35.
530049312
530049617
530049323
5300367_
530049311
530015_
530015880
530015820
37.
530049563
39.
40.
41,
42.
43.
44.
45.
46,
47.
48.
49.
5,._004_9314
5300158,80
530069247
5,3_014362
53OO49491
530049527
530069216
5..'30049386
530069813
530049316
530049383
Not Shown
53O084583
53O084403
530049290
11
DeeurlpUon
Housing-Left
Guide Starter Rope
leolator
I_Iulor
Housing-Right
Screw
Suew
BOR
Olamp-.a3!owerTube
Knob
Hsnd_e
Murmur
Cover
Screw
Line _Purge
FuetPl¢k-up Ass'y,
Fuel Tank Assay,
Gasket-Fuel Tank
Line I_Tank!Pu_le
Fuel Cap w/Retninur
Ga_et K'_
Nr Box
Air Rlter
OperatorManu_l
EngineStop Decal
Right Decal
II
I
i
ii
innll nlll
IHII
IIIHIIIII III
IIIIn
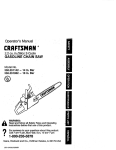
REPAIR PARTS
34
3347
35
[
86
36
37
4O
7
1 49
17
I
l_j
13 26 27
18
24
_:
45 3
22
32
11
12
5
13 14
I T'lr
6
IRef.
Part No.
1. 530015880
2.
530068_.32
3. 530069888
4. 530C_5.69
5. 530016164
&
530049501
7. 530015810
8. 530015815
9, 53001_40
10. 530029182
11, 530069817
12. 530095461
13_1 530015828
14, i 530626605
15, 530049318
16. 530402043
17. 530049297
lB. 530019181
19. 530049429
20. 530032125
21. 530032124
22. 530019179
2& 530015945
_4. 530_18
25.
530069819
E6,
530023817
27. 530016190
7468
16
Ref.
Des_ptlon
,Screw
Rote
Starter Pulley Kit
Starter Handle
Stader Sprbg
Fan HousingwfQeertng
8crew
8cmw
Isotator-pan Hag.
Eyelet
tmpel]er (Ind, 10)
MuinhB_.de Ass'y.
Washer-Flat
Nut
#tlat Door
Spring4=letumCover
Cra_case Cover
Gasket-Cree_<caselShrou
d
CranP.shettASS_.
Inner Beadng
Outer Bee_'fng
Crankcase Seal
Retaining PJng
Cra_k_
Ass'y÷
(tnca.20-23)
Flywhee!Ass'_.
(Incl. 26)
_d_ater
Dog
Flywheel Spaonr
12
Part
No.
28,
29,
80.
81,
530049713
530016203
530049454
530069816
Foam Seal
Muffler Bolt
Muffler Cover Plate
Muffer 10t
32.
3&
34,
530015941
530049502
530015953
Retainer Rtng-C'chaft
MufflerShield
,Screw
8p=rk Rug (RCJ-SY)
Gasket 10t
Air Dam
tgnitlon Module
Bolt
Spark._,restor
PistonRing
Retailer
ConnectingRod
35. Champion
86. 530069818
37,i 5_19247
38. 530039163
89,
530016208
40.
530069864
41.
530049903
42,
530015162
43. 530069615
Ass_.
44.
53006_812
45, i 530016226
46. 530032108
47. 530069665
4&
530019162
49. 53C016080
Pistonlot
(_n¢l,41 & 42}
PulteyRetainer
Beefing
rommat4gn. _odule
8P.m'/P-StmterPulley
Not Shown
530049820
530084404
Instru_
Dee_l
WarningDe¢_
I I In
n
i=
r
REPAIR PARTS
I
I
Carburetor Assernbtv Part Number 530069821 - 11NA-298_
Ootlon_l
-
Vacuum
lot _Lq_7_N
1
1
Key
No.
1
2
3
Part
No,
Descr_on
53003_1_
530069811
530069844
2
5
Umiter Cap
C_rb. Repair Kit
Gask_ti;Dla.KR
6
,11
3
2
KEY
NO.
1
2
-3
4
5
6
13
PART
NO.
_
530094653
530095589
530095468
530049485
530049686
DESCR|P'noN
Va¢ Bag w/Slrsp
VacTube-Upper
V=o T_be--Lower
Va¢ Tube-Upper
Knob-Vat Tube
Clip-Va¢ Tube
Declaraci6nde Garantfa
Reglasde Seguridad
Montaje
Uso
Mantenimiento
14
14
17
t9
21
Servicioy Ajustes
22
Almacenaje
23
TablaDiagn6stica
24
Listade Plazas Centrode Manual
Repuestosy Encargos Contratapa
GARANTIADE DOSA_IOS COMPLETOS PARAEL PROPULSOR DEAIRE A GASOLINA DE LA MARCA CRAFTSMAN
Durantedoe (2) afios a partirde la fecha de compra,siemprequa se haga el
mantenimiento,la lubricaci6ny los ajustes en este Propulsorde Aim a Gasolina
segtlnlas instruccionesde ueoy mantenimiento en el manualdel usuario,Searsm
reparar_cualquierdefectode material o mano de obragranturaitamente.
Estagarantfa excluyelostubosdel propulsorde alre, la bujfa y el fltro de aim,
qua son piezas prescindiblesqua se puedan gastar con el uso normal.
Sieste propulsorde aimes usadoconfines de usocomercial,esta garantfaaplicar&
solamentepor 90 dfasdespu_sde lafecha originalde compra.Sieste propuleoree
usadocon fines de alquiler,esta garantfa aplicardpor solo30 d{asdespu_sde la
fechaoriginal decompra.Estagarantfatiene validezexclusivamentecuandoel aparato es uUlizadodentin de los EstadosUnidos.
SE OBTEDRA SERVtCIO BAJOGARANTIA DEVOLVIENDO ELAPARATOAL
CENTRO DE SERVICIO SEARS MAS CERCANO EN LOS ESTADOS UNIDOS.
Esta garantfaconfiere detacheslegales especfficosal propletarfo,que tal vez
tenga asimismootrosderechosqua vari'anentre estados.
Sears, Roebuck and Co. Dept. DI81TWA Hoffman Estates, IL 60179
De no sumplircon todas I_s Reglas y • Use siempremascarillade filtraci6nO
Precaucionesde Seguddad, cotter&el
de protecci6npara la cara al trabajar
riesgode accidentesmuygraves.
en ambientespolvorientos.
CONOZCA SU APARATO
• Mantenga el cabellopor encimade
• Lea el Manual del Usuarfocuidadolos hombros,atdndolo para tat efecto
si es necesado. No usejoyas, ropa
samentehasta qua comprendaperfectarnente todas las advertenciase
suelta, ni ropa con liras,corbatas,
instruccionesde seguddady las puebodas, etc. qua cuelgenlibremente,
da cumplir,antesde ponerel aparato
porquepodrfanquedarenredadasen
en funcionamlento.
las piezas en movimiento del aparato.
• Limiteel uso del aparatoa aquellas
personasqua comprendantodas las
• No use el aparato estandocansado,
advertenciase |nstrucciones de seenfero,ansioso,ni bajola infuencia
guridaden este manualy vayan a
det alcohol,las drogasu otrosmedicumplircon elias.
camentos.
PIENSE ANTES DE PROCEDER
• Mantenga a nifios,espectadoresy
animalesa una distanciaminimade
• Use slempreproteccidnpara los ojos
al hacer uso, servicioo mantenimlen15 metros (50 pies) al poner en marto del aparato. El uso de proteci6nde
cha o al usar el aparato.
ojosayudard a prevenirla pdrdidade • Inspeccioneel d.reaantes de porter
la vistay/u otrasheddasgraves,proen matodoslos escombrosy objetos
vocadaspor piedras o escombrosue
s(_lidostalescomo piedras,vidrio,
rebotenen los ojosyen la cam at ser
alambre, etc, qua el aparatopueda
propulsadospot el aparato.
arrojar al aim o hacerrebotarcau-14-
sandoheridas
deesteo cualquier
ottomodedurante
elusedelmismo.
MANEJE
ELCOMBUSTIBLE
CONEXTREMeCUIDADO
• Eliminetodas lasposiblesfuentes de
chispano llamas (inclusivelos cigardflos,las llamas abertas,y cualquier
trabajo que causechispas)en las
dreas dondese mezcla,vierte o almacena el combustible.
° Mezcle y vierta el combustibleal aire
libre,almacene el combustibleen un
lugarfresco, seco y bienventilado;
sue un recipienteaprobado para
combus_blesy mamadopara todo
manejo de combusUble.
• No fume mientrastrabajacon el combustibleni cuando est_ haciendouse
del aparato.
° No Ilene el tanquede combustible
mientrasel motorse encuentreen
marcha.
° Limp_etodoslos derramesde combust_le antesde poner el aparatoen
mamha.
• Al6jeseper Io manes 3 metros(10
pies) de! combustibley del lugarde
abasteciminetoantesde ponerel
motoren marcha.
HAGA USO SEGURO DE SU
APARATO
• Detenga el motorantesde abrir la
compuertade entradade aire del aspirador. El motordeberd encontrarse
detenidoy las cuehillasdel impulsor
no deberdnestar girandopara evitar
sedos aecidentes provocadosper las
cuchillasgirantes.
• Verifiqueper inspecct6n,antesde
cada use, que no hayapiezas gastades, sueltas, ni dafiadaso piezas
que falten. No use el aparato hasta
que este se encuentreen perfectas
condicionesde funcionamiento.
• mantengalas superficiesextems
libresde aceitie y de combustible.
• Nuncaponga el motoren marcha ni
Io deje en mamha dentrode un recinto o edificiocerrado. Respirarlos vaporesdel combustiblele podriacausar la muerte.
• Para evitar el chequeper electricidad
estdtica,no use guantesde goma ni
ningLInotro guanteaislado al usar el
aparato.
° No apoye el aparato con el motoren
mamha en ningunasuperficieque no
-15-
est6 limpiao que no sea s6fida.El
aparatopodriaaspirarescombros
tales comegavilla,arena, polvo,
c_sped,etc. per la entradade aspiraci6n y arrojarlos per lasalidade propulsion,dafiandoel aparatoy/u otros
objetos,o causandograves heridas
a espectadoreso al usuario.
• Eviteambientespeligrosos.No use
el aparatoen lugaressinventilaci6n
ni dondepuda habervaporesexplosiveso mon6xidode carbono.
• No se extiendaexcesivamenteni usa
el aparatoen superficiesinestables
tales comeescaleras,drboles, declivesacentuadas,techos,etc. Mantenga el eqqilibrio,con los pies en
una superfieieestable en todomemento.
• Nunca coloqueobjetosdentrode los
tubes de propulsi6n;siempredirija
los escombrosen direcoi6ncontrada
a donde personas,animales,vidrierasu otrosobjetoss61idostales come
drboles, autom6viles,paredes,etc.
se encuantran.La fuerza del aim
puedearrojaro hacer rebotarpiedras,tierra o ramas, hidendoa personaso animales,rompiendovidderas
o causande otrosdafios.
• Nunca pongael aparatoan marcha
sin tonertodoet equipocorrespondiente instalado.AI usarel aparato
come pmpulsorde aim, siempre
instalelos tubes de pmpulsi6n.AI
usar el equipoopcionalde aspiraci6n,siempminstalelos tubes y la
bolsade aspiraci6n.AsegQreseque
la cremallerade la bolsade aspiraci6n se encuentreeompletamente
cerrada.
• Inspeccionefrecuentemente la abertufa de entradade aim, los tubesde
pmpulsin,lostubes de aspiraci6ny
el tube en forma de code siempre
con el motordetenidoy la bujfadesconectada.Mantenga las aberturas
de ventilaci6ny los tubes de descarga libresde escombrosque se pueden acumulary limitarla cir_ulaci6n
debida de aire.
• Nuncacoloqueobjetoalgunodentro
de la entradade aire ya que de hacado podrfa limitarla circulaci6nclaire
y dafiar el aparato.
• Nuncause el aparato para esparcir
substanciasqufmieas,fertilizantes u
!
otrassubstanciasque puedancontener materialest6xicos.
• Pare evitarla propagaci6nde incendios, no use el aparatocerca de hoguerasde hogassecaso de matortales, de hogaresde leSa, de parrillas, barbacoas,ceniceros,etc.
• Use el aparetoexclusivamentepare
los fines descdtosen este manual.
HAGA EL MANTENIMIENTO DEL
APARATO EN LA FORMA DEBIDA
• Permitaque todomantenimiento
aparte de losprocedimientosre.
omendadosdescritosen este Manual del Usuado,seen efectuadospor
un Centrode ServicioSears.
• Desconectela bujfa antesde hacer
cualquiermantenimiento,con la excepci6nde losajustes al carburador.
° Use exclusivamentelos repuestos
recomendadosd la maroa CRAFTSMAN; el uso de cualquierotto repuestopodrdinvalidar la garantfao
da_ar el aparato.
° Vacfa el tanquede combustibleantes
de almacenarel aparato.Consuma
el combustiblerestanteen el carburadorponiendoel motoren marsha y
dejdndoloen mamhahasteque se
_ste se detenga.
• No use ningdnaccesorio ni pieza
adicionalaparte de los recomendados pot el fabricante pare user con
su aparato.
• No almacene el aparato ni el combustibleen un recintocerradodonde
los vaporesdt combustiblepuedan
entrar en contactocon chispaso llamas abiertasprocedentesde calentadoresde ague, motoreso interruptoreseldctrieos,calefactorescentrales, etc.
• Almaceneel aparato en un lugar
seco, fuera del alcancede los niSos.
AVISO ESPECIAL: Para los usuarios
en TierrasForestadasen los Estados
Unidosyen algunos estados,incluyendo California(C6digosde Recummos
Pdblicos4442 y 4443), Idaho, Maine,
Minnesota,Nueva Jersey,Oreg6ny
Washington:Se requierea ciertosmotores de combusti6nintema operados
-16-
en tierrascubiertaspor bosques,matorralesy/o pasto,en lasdrea anteriormente mencionedas,que venganequipadoscon rejillaanti-chispas,mantenida en perfoectoestadode funcionamiento, o que el motorest_ construido
y equipadopare la prevenci6nde incendiosy mantenidocorrectamente,
Consultecon tas autoridedesestatales
o localesacerca de los reglamentsque
se relacionencon estosrequisitos,De
no cumplircon estosrequtsitos,usted
estate,en violaci6nde la ley.
Este aparato no viene equipdode
fdbdca con rejiltaanti-chispa;sin embargo la rejillaanti-chispaviene disponiblecomopieza opcional.Si se requiem reji[laanti-chispaen la Iocalidad
donde usted se encuentra,entre en
contactocon el Serviciode Searspare
obtener el equipode repuestoscorrespondiente.La rejillaanti-chispa,los tubos de pmpulsi6ny las boqutllasdeberdn ester instaladosen el aparato
pare estar en totalcumplimiento
con el
reglamento.
AVISO ESPECIAL: El estarexpuestoa
las vibracionesa trav6sdel uso prolongadode herramientasde fuerza a gasoline,puede causer dafiosa los vasos sangufneoso a los nerviosde los
dedos, las manos y las coyunturasa
aquellas personaspropensasa los
trastomosde la eirculaci6no alas hinchazones anormales. El usoprolongado en climes frfosha sidoasociado
con da_os a los vasossangufneosa
personas que pot otra parte se encuentran en perfectoestadode salud.
Si ocurrierasfntomastalescomoel entumecimiento,el dolor,la falta de sentido en los dedos, lasmanos o en las
coyunturas,pare de user esta mdquina
de inmediatoy procureatenci6nm_dica. Los sistemasde anti-vibraci6nno
garantizan que se evitantales problemas. Los usuariosque hacen usocontinuo y prelongadode las herramientas
de fuerza deben fiscaUzaratentamente
su estadoffsico y el estadodel aparato.
CONTENIDO DE LA CAJA
Verifiquequa todoslos arb'culosde la
sigu_entelistaest6n incluidos:
Modelo 358.797030
• Propulsorde Aire
• Tubo de Propulsi6n
• Aceitede Motor a 2 Tiempos
AVISO: Es normalqua el filtre de combustiblegolpetee en el tanque vac_'o.
EQUIPO OPCIONAL DE
ACCESORIOS DEL ASPIRADOR
So podr_ convertirel propulsoren aspiradorainstalandoel Juegopare Aspiradore optativoN_358.799900,disponibleen la sucursaSearsrodscemana.
MONTAJE
ADVERTENCIA: SI recibi6 el aparato ya armado, repitatodoslos pasos
pare asegumrsaquoel aparatohaya
sidoarmado correctamentey qua todos los fr]adoresse ecuentren bien
fijos.
• No se requiereningunaherramienta
para el montaje.
INSTALACION DEL TUBO DE
PROPULSION
• Alinee la moldura salientedef tubo
de propulsi6ncon la renura en la sallda de aire de la proputsora;girehasta encajar en su lugar.
MONTAJE DE LA BOLSA DE
ASPIRACION
• Coloque la punta pequefia de la bol*
sa de aspiraci6nsobre la saiida de
propulsi6ny sujete la peritlacon la
abrazadera.
Salida o Airodo|Propulsor
Tubode Propulsi6n
_' MolduraSatiento
• Apriete la abrazaderadel tubogirando la perillahacia la derecha.
• Pare removerel tubo, gire ta perilla
hacia la izquierdapara aflojarla
abrazadera;remueva el tubo.
Banda
• Ajustebien tabanda veicro,
• Asegdrese de qua la cremallerase
encuentrecompletamentecerrada.
• Asegure las puntasde la bandadel
hombrometiendo la banda a trav6s
de la hebillaccmose ilustraa continuaci6n.
/
-17-
MONTAJE DEL TUBO DE
ASPIRACION
ADVERTENCIA: Detenga el motor
y aseg(Jrese de que las cuchillas
del imputsor no se encuentren girando antes de abrir la compuerta
de entrada de aire del aspirador o
de intentar introducir o remover los
tubos de aspiraciSn. Las cuchillas
girantes podrfan causar serios accidentes.
• Retire el tobo de propulsi6n
• Alinee el tubo de aspiraci6n inferior
comose ilustra. Introduzca el tubo de
aspiraci6n inferiordentro de!tubo de
aspiraci6nsuperior.
TubodeAspiraci6n__
• Coloquelos ganchosque se encuentran en el tubo de aspiraci6nen el
postede retenci6n;gireel tubohasta
quedar en posici6n.Asegureel tubo
de aspiracidngirandola perillahacia
la derechahastaquedar ajustado.
io AI volvera convertirel aparatoen
propulsorde aire, aseg,_resede que
la parte ajustadade ta compuertde
entradade aim del aspiradorse encuentrebienflja.
• Introduzcaun destomillador dentro
del drea ajustadaen la compuertade
entradade aim del aspirador.
1%
Area
__
de Entrada
• Suavemente,gireel mangodel destomilladorhacia la parte traseradel
aparato, mientras,tire hacia ardba de
la compuertade la entradade aim
del aspiradorcon su otra mano.
• Sostengala compuertade entrada
de aire detaspiradorabiertahasta
que el tubode aspiraci6nquede
instalado.
2 i;2
o,ooo,aN
-18-
CUCHILLAS DESMENUZADORAS
Su propulsorviene equipadocon cuch,las desmenuzadorascomocaracter[stica
standard.Cuandouseeste accesorio opcionaldel aspirador,las cuchillasdesmenuzadorasreducirdnlos escombrosen una proporci6nde hasta 16:1.
CONOZCA SU PROPULSOR
LEA EL MANUAL DEL USUARIO Y SUS REGLAS DE SEGURIDAD ANTES DE
COMENZAR A USAR ESTE PRODUCTO. Comparelas ilustracionessiguientes
con su aparatopara familiadzame con ta Iocalizaci6nde los controlesy ajustes
del mismo.Guardeeste manual para futurasreferencias.
Controlde Ve]ocidad(_
Bombeador_)
Tubode
Propulsl6n
Interruptor
ON/STOP
Mezclade
Combustible.
Cuerda
\
iNTERRUPTOR ON/STOP
El interruptorON/STOP es usadopara
detenerel motor,el irrterruptorse mantendrden la posici6nON. Para detener
.el motor,presioney sostengael interruptoren la posici6nSTOP hastaque
el motorse detengaporcompleto.
ARRANQUE EN FRIO _),
Arranqueen Frfo _) ayuda a suplir
dconcombustibleelcarburadordumnte el arranque.Esto le permitirdarrancarel motorcuandose enouentre
fdr. Para activarel Arranqueen Frfr _
muevata palancadel Arranqueen Fda
_a la posicibn RUN. Yea la secci6n
de Arranquede Motorpara una infor.H
I
I
POSIC{ON
DE USO
MangoTrasero
maci6nmdsdetaUadasobre la puesta
en marcha.
BOMBEADOR _)
El Bombeador(_ retiraaim de las
Ifneasde combustibley las |lena con
combustible.Estole permitirdarrancar
el motorcon menostironesde la euerda de arranque.Para activarel Bombeador _ presioneel botbny luego
permitaque vuelvaa su posioi6noriginal
CONTROL DE VELOCIDAD (_El Contro_de Velocidad_, controlala
velocidad'delmotor.Mu_valototalmente
haciadelantepara conseguirmdxima
velocidad.Mudvalototalmentehacia
detrdspara ¢onsegutrla marchalenta.
I
Pmtecci6n
Pgralos
ANTES DE PONER EL MOTOR
EN MARCHA
ADVERTENCIA: AsegOrese de
haberlerdo toda la informaci6nsobre
el combustibleen las reglasde
seguridadantes de comenzar,Si no
comprendelas
intenteabacstecer el aparatocon
combustible.Llame al 1-800-235-5878.
ABASTEClMIENTO DEL MOTOR
Este motorestdhabilitadopara
funcionar con gasolinasin plomo.
Antesde usar,deberd mezclarla
gasolinacon un aceitede buena
jos
-19-
calidadpara motoresde 2 tiempos
enfriadosa aire.
Recomendarcosel aceite de la marcha
Weed Eater. Mezcle la gasolinacon el
aceite en la proporci6nde 40:1 (Se
obtieneuna proporci6nde 40:1
mezclando3.2 onzasde aceite con
cedegak_nde gasolinasin plomo).NO
USE aceite para autom6viles ni para
barcas.Estosaceites da_ardn el
motor.AI mezclarel combustible,siga
lasinstruccionesimpresasen el
recipiente.Una vez que haya aSadido
el aceite a la gasolna, agiteel
recipientebrevementepare asegurar
que el combustibleest_
completamentercezclado. SJemprelea
y siga las reglasde seguridadque
tienenque ver con el combustible
antesde abastecer el aparato.
IMPPORTANTE
La experienciaindicaque los combustiblesmezcladoscon alcohol, (los llarcados gasoholo los que tienenetano!
o metanol)puedenatraer hurcedad,Io
que puedecauser la separaci6ny la
formaci6nde tic!dosduranteel alrcacenaje.Lagasolina dcida puededa_ar
el sistercade combustibledel motor
duranteel almacenaje.
Pare evitarproblemascon el motor,
deberdvaciarse el sistemade combustibleantesde almacenarel aparato por
30 dfas o mds/
Vacfeel tanquede combustible,ponga
el motoren marcha y ddjele en marcha
hasteque las Ifneas de combustibley
el carburadorqueden vac|os.Use
combustiblefresco en la pro6x_matemrada.
_nca use productosde limplezade
motoro carburadoren el tanquede
corcbustibleyaque de hacedopuede
provocardanospermanentes.
Un estabilizadorde combustiblees
una altemativaaceptable pare minimizer la forrcaci6n de dep6sitosde goma
en el combustibledurante el alrcacenaje. Elaceite de la mamha Weed Eater vleneya mezcladocon estabilizador
de combustible. Vea la secci6nde ALMACENAJEpare mds informaci6n.
PARA DETENER EL MOTOR
• pare detener el motor,presioney
sostengael interruptorStop O has-.
ta que el motorse detenga.
PARA PONER EL MOTOR
EN MARCHA
ANTES DE PONER EL MOTOR EN
MARCHA
-20-
Es OBLIGATORIOasegurarse que los
tubosest_n bienfijosantes de usar el
aparato.
• Abastezca el motor, Ap_rtese porIo
menos 3 metros(10 pies) del lugar
de abastecirciento.
• Sostengael aparato en ta posici6n
de arranqueilustrada.Asegdresede
que la boquillade propulsi6nno est6
direccionadahacia personas,an!males, vidrterasy otrosobjetoss61idos.
ADVERTENCIA: AI arrancarel motor,sostengael aparatocomose iiustra
en lafigure. Apoye el aparato exclusivarcenteen una superficie!ircpiay
s61idasiempreque vaya a efecturae!
arranquey siempreque tenga que
apoyarel aparatocon el motoren Imarcha. Los escombrostales corcogravilla, arena, tierm, c_sped,etc,, pueden
ser succionadospor la entradade aim
y arrojadespor la salidade propulsi6n,
daSando el aparato u otros bienes
o causando graves heridas a espectadores o al usuario.
Controlde
Vetocidad _
_
Interruptor
Palancade _
Arr q en\
!
i"--1/
PARA ARRANCAR UN MOTOR FRIO
O CALIENTE DESPUES DE QUEDAR
SIN COMGBUST|BLE
• Lentamente presione el bombeador
12 veces.
• Mueva la palancadel cebadorala posici6n Full
• Mueva la palanca del aceleradorala
posici6n_.
• "l]rede la cuerda de arranquefirmercente hasta que el motorintentearrancar, pero no m_.sde 5 tirones(en
temperatures
pordebajo de los 30 ° F,
trate con 8 tironesde la cuerdade arranque).
AVISO: Si el motor trata de arrancar
antes del quinto tir6n, proceda con el
pasosiguienteinmediatamente.
* Mueva la palancadel cebadorala posici6nHalf Choke,
o Tire de la cuerda de arrenque firmernentehastaque el motorse pongaen
marcha, perono mdsde 5 tirones(en
temperaturespordebajo de los 30 ° F,
tratre con I0 tirones).Permita que el
motormarche pot 5 segundos,luego
mueva la palancadel cebadorala posioi6nOff Choke.
° Permita que el aparato mamhe por
otros30 segundoscon ]a palancadel
cebador en la posici6n Off Choke
antesdemoverla palancadelaceleradora la posici6n._P.
ARRANQUE DE MOTOR CALIENTE
CON COMBUSTIBLE
• Mueva la palancadel cebadora iaposici6nHalf Choke.
Mueva la palanca del aceleradorala
i posici6n_.
Tire de la cuerda de arranque firme.
mentehastaque el motorse ponga en
marcha, perono mdsde 5 veces.
• Permitaque el motormarchepor5 segundostuego, mueva la palancadel
cebadora a pisici6nOff Choke.
AVISO: lSi el motornoarranca,tirede la
cuerda de arranque otras5 veces.Si el
motorcontinuasm arrancar,probabtemente se eneuentreahogado.
ARRANQUE DE MOTOR AHOGADO
Mueva la palancadel cebadora la posici6nOff Choke. Mueva te palancadelaceleradorala posici6n,tB. Tire de la
cuerda de arranquepara aclararel moSi el motorno arranca despu6sde tirar tor del excesode combustible.Esto
de lacuerdapor 5 veces (en la posioi6n podrd,requerir que se tire de la cuerda
Half Choke),repitadel pasode comoar- de arranquemuchas veces.
rancar un motor"fifo". Si el motorper- Si el aparato contimla sin arrancar,yea
siste sin arrancar,proceda con "Arran- la Table Diagn6stica o llame al
1-800-235-5878.
que de MotorAhogado"i
RESPONSABILIDADDEL
USUARIO
TAREA DE CUIDADOY MANTENIMINENTO WHEN TO PERFORM
Verificarque no haya fijadoresflojos ni ptezas Antes de cada use
sueltas
Verificarque no haya piezas dafiadaso
Antes de cacJauso
gestadas
Umpiar el aparatoy susplasas
Limpiarel filtro de aire
Cambiarla buifa......
Cambiar el filtor deJcombustible
VERIFICAR QUE NO HAYA
PIEZAS SUELTAS NI FIJADORES FLOJOS
Cepuchade la Bujl'a
Ffltrode Aire
• Torn,losde la Caja
VERIFICAR QUE NO HAYA
PIEXZAS DAi_IADAS N!
GASTADAS
El Centrode ServicioSears deber&
efecturatodocambiode piezas danades o gastadas.
• InterruptorOn/Stop. Aseg6rasede
que el mterruptorOn/Stop funcione
de una forma apropiade,para detener el motor,presioney sostengael
interruptoren la posici6n Stop hasta
-21-
Despu_sde cada uso
Cada 5 horasde uso
Anualmente
Anualmente
que el motorse detengacompletamente. Aseg_resede que el motor
se detenga;luego vuelva a arrancar
el motory contin6e.
• Tanque de Compustible.Parede
user el aparato si hay indiciosde
dafios o p_rdidasen el tanquede
combustible.
• Bolasde la Aspiradora.Pare de user IIInl
la bolsa de aspiraci6nsi se enouentra de alquna manera rota o da_ada.
LIMPIE EL APARATO Y SBS
PLACAS
° Umpie el aparato usandoun trapo
hdmedocon detergentesuave.
• S_quelo con un trapo limpio,
I
LIMPIEEL FILTRODEAIRE
Nolimpis el fittrode airs con gasolina
el filtrose
i Permita9us
ave el filtrocon
agua yseque.
jab6n.
repongams piezas.
CAMBIE LA BUJIA
Cambiela bujfaanualmente.La separaci6nde los electrodosde ta bujfa
deberdser de .025 de pulgada. El encendidoes fijoy no es ajustable.
• Gire y luegoretirela capuchade la
bujfa.
• Retire ia bujfadetcilindroy des_chela.
• Cdmbielapot una bujfaRCJ-SY y
ajustelacon una llave de 3/4 de pulgada.
• Vuelva a instalarla capuoha.
ni ningdnotto solventeinflamable,ya
que de hacertopuedecrest peligrode
incendioy de emicionesevaporativas
noclvas.
Limpieza de! filtro del aire"
Losfiltros de airs suciosdisminuyenel
rendimientodel motore incrementanel
consumode combustibley la producci6n de emisionesnocivas.Siempre
limpieel filtrode airs despudsded
cada 5 boresde uso,
7_
Cubie_a
Fiitri de Airs _FeelAF'i:_er°
CAMBIE EL FILTRO DEL
COMBUSTIBLE
Pars cambiarel filtrodel combustible,
vacie el aparatode todocombustible
dejandoel motoren mamhahaste que
se detenga. Luego,remueva el montaje de la tapa/retenedordel tanque.
Tire del filtroque se encuentraen el
tanquey retfrelode la Ifnea de combustible.Instaleun filtor nuevoen la
Ifnea de combustible;vuelva a instalar
todas laspiezas.
• Limpiela cubiertay el drea contigua
pars evitarque caJgatierraen la
cdmara de| carburadorcuando
remuevala cubierta.
• Retire/as piezascomo se ilustra.
Recomendamosquetodoel mantenimiento y todoslos ajustes no listadosen
este manual sean efectuados pot un
Centro de ServicioAutorizado.
AJUSTES AL CARBURADOR
El ajusteal carburadores de vital importanciay si se haoe incorrectamente,
puededafiartanto el motorcomo el
carburadorpermanentemente.Si usted
necesitamdsayuda o no estdseguro
de c6mo hacerel procedimiento,flame
a_.nuestm
teldfonodo ayuda al consumidor,al 1-800-235-5878.
El combustiblevencido,el filtro de sire
o de combustiblesucios,o el motor
ahogadopuedendar la impresi6nde
carburaci6ndesajustada.Verifiqueestes condicionesantes de hacer cualquier ajuste.
El carburadorha sido cuidadosamente
ajustadoen la fdbrica. Posiblemente
serd necesarioI hacer ajustes si se
nota cualquierade las siguientescondie|ones:
• El motorno ands en mercha lenta.
Vea =mamhaLenta"y "Mezcla" bajo
procedimientode ajuste.
• El motorse pars o se ah0ga cuando
debe acelerar.Vea _Ajustede Aceler:
aci6n bajoprocedimientode ajuste.
•Falta de potencia.Vea "Mezcla" bajo
proeedimientode ajuste.
PUNTOS DE PRECALIBRACION
AI hacer ajustesno fueme tas tapes
limitadoras de pldsticomds slid de los
retenedoreso puede haber dafios. Si
no se necesitanlos puntosde precalF
braci6n,pass ala secci6nde "Procedimiento de Ajuste,Mamha Lenta'.
Parsajustar la precalibraci6n:
• Gire el tomlllode mezcla hacia la izquierdahaste que se detenga.
• Gire el tomitlode la marchalenta hacia la derechahasta que se detenga.
Luego,gfrelohacia la izquierda4
vueltasy media.
Pongael motoren marcha, permits
que marcheper 3 minutos, luego procede con la secci6nde ajustes.Si el
motorno arranca,veala table
diagn6sticao Ilameal 1-800-235-5878.
Si el funcionamiento del motores
aceptablecon la posieionesantsriores,
- 22 -
no hardfalta hacer rodsfalta hacer
rods ajustes.
(
• Gire hacia la derechapara inorementar ta veJocidaddel motorsi el motor
se ahoga o se apaga.
• Gire hacia la izquierdapara bajar las
revoluciones. No ser_ necesadoel
hacer m_s ajustessi el rendimiento
es satisfactorlo,
Lenta
Mezcla
Permita que el motortrabajeen marcha lenta,luegoacelere el motory
Tom_llo
d_la Marcha
tome nota del funcionamiento, si el moo'T-_miflode MezcTa
(contapaslimita.
tor se ahoga, no acelera bieno humea
doras)
al ace|erar,gireel tomiltode ajuste de
mezcfa hacia la derecha en incmmenPROCEDIMIENTO DE AJUSTE
Marcha Lenta
los de 1/16 de vuelta 0nicamentehasta obtener un funcionamientocatisfacPermitaclueel motortrabajeen marcha lenta.Ajuste las revolucioneshas- torio,Repita este procedimiento las
ta que el motorse mantenga en marveces que sea neossario hasta obtencha sin ahogarse.
er un rendimiento saUsfactorio,des• Gtrehacia la derecha para incremen- pu6s de completarestos ajustes, verifitar ta velocidaddel motorsi el motor
que la aceleraci6n. Ajuste nuevamente
se ahoga o se aparga.
si es neoesario.
• Gire el tomitlode |a marchalenta hacia la derechahasta que se detenga. Verificaci6n de Aceleraci6n
S! el motorse apaga o vacila en lugar
Luego,gfrelo hacia la izqulerda4
de acelerar,gireel tomillode ajuste de
vueltasy media.
PROCEDIM1ENTODE AJUflTE
mezcla hacia la izquierdahasta conseguiruna aceieraci6npareja, Verifique
_ Permita que el motortrabajeen marnuevamentey haga los ajustesnece" cha lenta. Ajustelas revolucloneshassariospara conseguirun funclona_ taque el motorse mantengaen marmiento aceptable.
cha sin ahogarse.
Prepareel aparatopara el almacenaje
al finalde la temporadao si ca a estar
sin usar porrods de 30 dfas.
ADVERTENClA:
• Permitaque el motorse enfrfey file
blen el aparato antesde guardarloo
tmnsportarlo.
• Guardeet aparatoy el combustible
en un tugar bien ventUadodonde los
vaporesde combustibleno puedan
entrar en contactocon chispaso llamas abiertas provenientesde termotanques, motoreso interruptores
el_ctricos,calefactorescentrales,etc.
• Guarde el aparato con todoslos protectoresen su lugar y colo_ue el
aparatode modoque las plezasfilosas no puedan causar betidespot
accidente.
- Guarde el aparatoy el combustible
comp.letamentefuera del alcance de
los nmos.
-23--
SUPERFICIES EXTERNAS
• Siva a almacenar el aparatopor un
periodolargo de tiempo, I/mpmlorigurosamenteprimero.Gu_rdeloen
un lugar limpioy seco.
• Apl_queuna pequeSacantidadde
aceitealas superficiesmetdlicas extemas.
SISTEMA DE COMBUSTIBLE
Bajo el Abastecimientodel Motor,en
laseccidnde Uso de este manual,yea
el mensaje marchadocomo IMPORTANTE referenteal uso de gasoholen
su motor,
Losestabilizadoresde combustible
son una alternativa aceptable para
minimizarla formaci6n de los depositos de gomadurante el almacenaje.
Afiada estabiiizadora la gasolinaen el
tanquede combustibleo en el recipientepara alacenaje de combustible.
Siga las instruccionesde mezcla que
se encuentranen losenvasesdel estabilizador,Pongael motoren mamhay
ddjeloen marchapor Io rrenos 5 minutos despu_sde habedepuestoel estabilizador El aceitede la mama Weed
Eater 40:1 para motores a 2 tiempos
(enfriadosa aire) ya viene mezclado
con estabilizadorde combustiblesi no
usa este aceite, entoncespuedea_adir un estabilizadoral tanque de combustible
INTERIOR DEL MOTOR
• Retirela bujfa y vierta una cucharadita de aceite 40:1 pare motores de 2
tiempos(enfriadosa aim) por la abertufa de la bujfa Lentamentetire de la
cuerdade arranquede 8 a 10 veces
para distribuirel aceite
TABLA
• Reemptacela bujfaconotra nueva
del tipo y de la gamade calor recomendados
Examinetodoel aparatopare verificar que no hayantomitlos,quebra
i das
Limpieel
filtro de airs
o gastadas
AI principiode la pr6ximatemporada,
use exclusivamentecombustible
nuevocon la proporcl6ncorrectade
gasolinay aceite
OTROS
• No guarde la _gasolinade una temporada a la sigutente
° Cambie el recipientsde gasolinesi
se empieza a oxidar
DIAGNOSTICA
PROBLEMA
E!motor no
arranca
SOWC=ON
CAUSA
• El motorestdahogado
• Eltanquede combustibleest_
vacfo
: La
bujfano hacechispa
Elcombustible
no estd
iltegandoal carburador
• La compresi6nestdbaja_
• Vea las =lnstruccionesde Arranque
* Liens el tanque con lamezcla
correctade combustible
• Instalsunabujfanueva
• Vedfiquesi el filtro de combustible
estd sucio;cdmbielo Verifiquesi
hay doblecesen la ffneade
combustibleo si dsta se encuentra
[ panda; repdralao cdmbiela
i - Entreen contactoconsuCentrode
Servicio
Elmotor no
enda en
marchalenta
comodebe
El carburadorrraquieraajuste
," Las juntasdel cig0etialestdn
gastadas
• Lacompresi6nestdbaja
• Vea"Ajustesal Carburado¢'
• Entreencontactoconsu Centro
de Serviclo.
• Entre encontactoconsuCentre
de $ervicio.
El motor no
acelera, te
faltapotencia
o seapaga
bejocarga
• ElfiltrodeaJraestd sucio
• Labujfa est_carbonizada
• Limpieo cambieel tiltrode airs.
• Limpieo cambiela bujfay calibre
fa separacldn.
• Vea "Ajustesa_Carburador".
• Entre en contactoconsu Centro
de Servicio,
• Entreen contactoconsuCentro
de Servicio,
* El carburadorrequieraajuste
• Acumutaci6nde carb6im
• Lacomprasi6n estd baja
El motor
• El cebadorest_ parcialmente
humea
excesivamente . accionado
Lamezcla de combustiblese
ha hechoincorrectarnente
• Elfiltrade aJraest_ sucio.
• El carburadorrequieraaJuste
Vea =Abastoc!mientode|Aparato;.
i uamD=ezaoujia pot la correcta
Vea "Ajustosal Carburador"
• Entre en contatoconsuCentrode
Sewicio
El motor
marcha
contern
_eratura
elevada
•
•
*
.
, La mezclade combustiblese
hehecho incorractamente
• Se ha instaladola bujraincorrecta
• Elcarburadorrequiere ajuste
• AcumulacJ6n
de carb6n.
Vea "Abastecimiento delAparato"
Cambie la bujfapor la corracta
Vea "Ajustas _dCarburador"
Entre en contatocon suCentrode
Servicio
Si situacionessurgieranno descritasen este manual, actue con cuidadoy useel
buensenUdocom0n Si necesitaraasistencia,entre en contactocon su Centro/
Departamentode ServicioSears o Ilame al Tel_fonode Ayudaal Consumidoral
1-800-235.5878
-24-
For the repair or replacement parts you need
delivered directly to your home
Call 7 am - 7 pm, 7 days a week
1-800-366-PART
(1-800-366-7278)
Para ordenar piezas con entrega a
domicilio - 1-800-659-7084
For in-home major brand repair service
Call 24 hours a day, 7 days a week
1-800-4-REPAIR
(1-800-473-7247)
Para pedir servicio de reparaci6n a
domicilio - 1-800-676-5811
For the location of a Sears Parts and
Repair Center in your area
Call 24 hours a day, 7 days a week
1-800-488-1222
For information on purchasing a Sears
Maintenance Agreement or to inquire
about an existing Agreement
Call 9 am - 5 pm, Monday-Saturday
1-800-827-6655
When requestingservice or orderingparts,always
provide thefollowinginformation:
•
•
ProductType
Model Number
•
•
Part Number
Part Description
America'sRepair Specialists