1
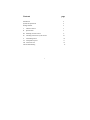
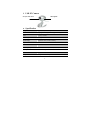
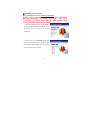
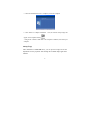
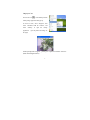
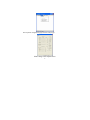
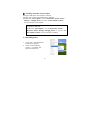
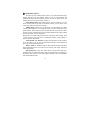
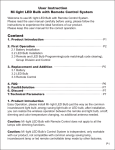
Model: PK-335
Contents
page
Introduction
2
System’s Requirements
2
Package Include
2
I.
USB PC Camera
3
II.
Specification
3
III. Installing Camera’s Driver
4
IV. Checking connection of your camera
V.
Uninstalling Driver
10
10
VI. Ulead photo express
11
VII. Ulead cool 360
VIII. Troubleshooting
12
13
1
Introduction
Welcome to the World of Digital Imaging.
The following information will guide you to install and use the PC Camera to
its full capabilities.
System’s requirements
•
•
Personal Computer, Laptop, Desktop, or IBM Compatible Computer
with Pentium 166MHz minimum, and with an active USB
(universal serial bus) port.
Windows 98/ME/2000/XP, CD-ROM drive, color monitor, mouse
and keyboard. For videoconference, Internet connection must be
equipped. Sound card with standard microphone input port.
Package includes
CD Installation Disc
PC Camera
(With USB cable and Mic. Jack)
2
I. USB PC Camera
Microphone
5-Layer Glass Lens
II.
Specification
Image Sensor:
1/4〃CMOS, 640×480pixels
Frame Rate:
30fps@640x480, @600x800, @320x240, @160x120
Lens:
F=2.0, f=3.6mm
View Angle:
72 degree
Focus Range:
Automatic focus, 10cm to infinity
Exposure Control:
Automatic
White Balance:
Automatic
Still Image Capture Res.:
600x800, 640X480, 352x288, 320x240, 160x120
Microphone
Built in Microphone
Flicker Control:
50Hz, 60Hz and None
Computer Port
USB port and Audio port
3
Ⅲ.Installing camera’s driver
Driver’s Installation Instruction for Windows 98/ME/2000/XP
NOTE: Please Uninstall All Previous Installed WEBCAM
BEFORE Installing A4 TECH ViewCAM.
DO NOT
CONNECT A4 TECH ViewCAM TO THE COMPUTER
UNTIL ITS DRIVER IS INSTALLED!
1. Insert the included CD into the CD-ROM:
The Autorun Menu Window will popup, move
the mouse cursor to and click on “Install
viewCAM”.
2. Please select your ViewCAM model and
click on the product image to install (As the
right image). Then dialogue box will appear
on the computer screen as below:
4
3.
Follow the on screen instruction to complete the installation process
5
4. When the Installation Process is completed, restart the Computer.
6. Click “Finish” to complete installation.
Now, the shortcut Amcap image will
appear on the computer desktop
7. Plug the PC Camera’s USB cable to the computer’s USB Port, and restart your
computer.
Amcap Usage
After installation of ViewCAM driver, you can pre-view image and set the
adjustments for the properties sheet through the included image application
software.
6
Image-preview
Click on the icon
on the desktop and the
Amcap image application will pop-up.
Or click on “start”, select “Program”, then
select “A4TECH USB PC Camera”, and
select
“Amcap”
application.
to
open
the
Amcap
(you may follow the image on
the right)
if Amcap image fails to appear,please go to “Options” and select “Preview”
(Refer to the diagram below)
7
Device description
Go to “Devices” and select “A4 Tech USB PC Camera”.
(Refer to below diagram)
Properties page configuration
Go to “Options”, then select “Video Capture Filter…”
(Refer to below diagram)
8
The Properties configuration page as below wills pop-up:
Most settings can be adjusted here.
9
Ⅳ. Checking connection of your camera
●
●
●
Plug the USB cable to the computer’s USB Port.
Restart your computer when Installation is completed.
Double click “My Computer” icon->Control Panel->System->Device
Manager ->Imaging Device; if you see “A4 Tech USB PC Camera”,
then your camera is now installed.
For Windows 2000 /XP:
Double click “My Computer”icon->Control Panel->System->
Hardware->Device Manager->Imaging Device; if you see “A4
Tech USB PC Camera”, then your camera is installed.
V .Uninstalling Driver
1.
2.
Click“Start”from the task bar
and choose “Programs”.
Select “A4 Tech USB PC
Camera ”->“Uninstall” and
follow the instructions.
10
Ⅵ. Ulead photo express
The latest version of Photo Express offers a new look that makes image
editing much more fun and intuitive. There are a lot of improvements and
enhancements that comes with Photo Express 4. Here are some of the new
features that you can expect in Photo Express 4.
Photo Management: With Photo Express' new user interface, it is now
easier to keep track of your files. In the Browse mode, you are able to view
your image, audio and video files visually.
Editing Photo: Express has a huge range of image editing tools, from
correcting the brightness of an image all the way to fancy Hollywood style
special effects. These tools are always ready at the click of your mouse. Photo
Express? Object oriented design and ready-made templates take image editing
into another realm, even for a beginner.
Brand New User Interface Photo Express has a brand new look and feel. With
a more intuitive layout and easier to understand interface, image editing is
made even easier than before.
Customizable User Interface: Change the appearance of the interface
to suit your taste. You can now download skins from the Ulead Website to
give your interface that unique look.
Browse Mode: A Windows Explorer like browsing feature that makes
photo management easier. You can also now browse your image, audio and
video files visually.
Internal Browser: Open any of the links to Ulead related Web sites,
available from the Ulead Links menu, right in the Photo Express Workspace.
Download extra content, presets and program updates in the Ulead Website
right inside Photo Express.
11
Batch Adjust: Do quick enhancements or file conversions to your
images. With Batch Adjust, you can apply the same enhancements or
conversions to all the selected images with just one click. There is no need for
you to do it one image at a time.
Enhanced Effects: Photo Express added more editing tools to the
different effects already existing before. Colored pencil, adding a signature
and stamp clone are just a few of the newly added tools in Photo Express 4.
Acquiring Images: In Photo Express 4, you can now capture still
images from your DV camera. There is also the auto slice feature in scanning
that lets you save images as separate files while scanning them all at once.
Share over the Web: With iMira, Ulead's new free photo sharing site,
you can now share those memorable photos over the net. Photo Express lets
you upload your photos to iMira right inside the program.
MORE! Just can't get enough of those extras that Ulead Products are
known for? In Photo Express, there are more decorative elements (over 500!),
more calendar styles (over 200!), more 3D folding card styles, more FREE
images (over 5000!) and more Web project templates (over 100!).
Ⅶ. Ulead cool 360
Taking great picture: Panoramic photos are substantially different from
other types of photographs and are much more challenging.
*
Take a lot of pictures. If you are using a digital camera, this isn’t really a
problem because the "film" is essentially free. Later, you can pick the best
images to use in your panorama.
*
Use landmarks at the edge of the frame and overlap images (minimum
of 15%).
12
*
Use a tripod. Even an inexpensive tripod can make the process of
getting god pictures easier.
Viewing panoramic images: Panoramic photos are substantially different
from other types of images, and therefore require a special viewer. Using the
Viewer is also very easy.
*
When the arrow cursor is visible, click the image and drag in the
direction you want to scroll in.
*
When the magnifying glass is visible (around the center of your image),
click and drag up to zoom out or drag down to zoom in.
Sharing images: 360°panoramic images are more than just large
versions of a normal image. To get the wraparound effect, these images must
be opened in a special viewer, which is included with the COOL 360 software.
Family and friends who do not have COOL 360 will not be able to view these
images unless you also send them the viewer. This is not a problem. When
you use the program to send e-mail, you can select Attach viewer to create a
self-executable file (*.EXE) that includes both the image and the viewer.
When someone double-clicks on the EXE file, the viewer automatically runs,
displaying your image and allowing them to use the mouse and keyboard to
navigate the panorama.
Setting up your e-mail program: Ulead COOL 360 automatically sends
your panorama by e-mail using your default MAPI e-mail client.
VIII. Troubleshooting
Question 1: Computer can’t detect the View Cam
Solving Method: Check if computer’s OS (Operating System), BIOS, USB
Port or installation errors occurs.
13
Steps: Windows 95 doesn’t support USB port. You have to update your
OS to Windows 98 or above to support USB port and ensure BIOS Setup and
USB settings are available. If the problem still occurs, please try connecting
the USB ViewCam to your machine via another USB socket.
Question 2: My video image is too dim or too light.
Solving Method: Adjust the brightness and contrast background.
Steps: Because the ViewCam can be easily affected by light, therefore, we
suggested proceeding from usage environment and screen object such as
increasing object brightness or moving light source.
Question 3: Color is defective
Problem: After installation, if you found the image is not as expected as you
want. Is the color part defective?
Solving Method: Adjust the color settings related to video snapping course
options or have the color settings related set as “ default “
Question4: Blank screen or black screen
Symptom: During the usage course after the image frame pops up, the
Blank screen or black screen will occur?
Method 1: Make sure that the ViewCam driver is installed fine.
Method 2: Ensure the “Preview" under “Option" tab is selected and applied.
Method 3: If your computer OS is first version of WIN 98, then you need to
update the OS to WIN98 SE or above or download DirectX8.0 or version
above patch application from site then reset your computer.
14
Question 5: Bloom screen occurs during the course of usage
Method 1: Check if USB power is clean, because the ViewCam is easily
affected. If the USB power wave is too large, then such problem will occur.
You may use another computer to test it.
Method 2: Check if the driver conflicts with other computer hardware
devices.
Method 3: Check the ViewCam driver and match it with ViewCam model;
in addition also use other video cards to confirm if the current video card and
its driver are incompatible with ViewCam.
Question 6 : The ViewCam can’t work normally under the
laptop/notebook
Because the USB ViewCam can easily conflicts with video card, therefore,
please follow this path: " my computer----> control panel -----> system----->
device management ----->Video Card
And other pointing devices ------>A4tech View Cam “, then define and
double-click “A4tech.port View Cam ".
After opened a window, please
check the tab "resource” to find the conflict information. If it is conflicted
with other video card, you should try to change an IRQ of them.
Question 7:Remote video isn’t smooth as expected
This issue is caused by two reasons:
1) The actual net band with is not enough and you are suggested to modify
the conference properties to decrease the video occupying bandwidth or to
reduce the contemporaneous windows numbers
2)
Please check the computer CPU space occupying rate and if it is too
high then please decrease it to reduce the contemporaneous windows
15
numbers.
Question 8:How come I couldn’t hear any sound via MSN Messenger
even after the successful installation of the driver?
1. Maybe the micro voice is not enable, so please click the voice icon in the
system tray at the right bottom of computer screen to check if the micro voice
is enable, if not, please enable it in the control volume.
2. Sometimes, the MSN messenger is too old to support both sound card
and your ViewCam, so please upgrade your MSN messenger to support your
ViewCam and sound card.
Question 9: How come the system always asks me to install the driver
while I have successfully installed?
A: Because you have plugged the ViewCam before installation. Please
follow the steps below to do the installation again.
1. Unplug the ViewCam from your computer
2. Uninstall the former driver
3. Restart your computer;
4. Install the driver;
5. Restart your computer;
6. Plug the ViewCam into your computer and let it search the hardware;
7. Restart your computer, and you should find it is ok now!
Question 10: There hasn’t any prompt authentication through the Microsoft
micro sign in the installation process, the system maybe unstable if continue
installing possibly. How deal with it?
Method: please still click " continue to install" .
16
Because this camera could not cause the unstable status of computer system.
TECH SUPPORT
For tech support, please visit our website at www.a4tech.com or
email us at [email protected]
17