1
1
Contents
1 Contents.................................................................................................................1 2 Intended use ..........................................................................................................3 3 Preliminary notes ...................................................................................................4 4 Copyright ................................................................................................................4 5 Manufacturer's information .....................................................................................4 6 Important safety information ...................................................................................5 6.1 Notes on operation/connection ..........................................................................6 6.2 General information ...........................................................................................7 6.3 Additional information ........................................................................................7 6.4 Children .............................................................................................................8 6.5 Persons with disabilities .....................................................................................8 6.6 Storage and transport ........................................................................................8 7 Disposal .................................................................................................................9 8 Items supplied ......................................................................................................10 9 Installation ............................................................................................................11 9.1 ISO connection ................................................................................................11 9.2 Installing the device .........................................................................................14 9.3 Removing the device .......................................................................................15 10 Overview of the device .........................................................................................16 10.1 Front ............................................................................................................16 10.2 Front (open).................................................................................................17 10.3 Display overview .........................................................................................18 10.4 Removing and attaching the operating panel ..............................................19 10.5 Button functions...........................................................................................20 10.6 Remote control ............................................................................................22 11 Basic functions .....................................................................................................23 11.1 The ON/OFF/MUTE button..........................................................................23 11.2 Volume control ............................................................................................23 11.3 Select button for settings (SEL) ...................................................................23 11.4 AS/PS button (Auto Store/Preset Scan) ......................................................25 11.5 DISP button (Display information) ...............................................................27 1
English
Contents - CRB-631
CRB-631 - Contents
11.6 Loading and ejecting a CD ..........................................................................27 11.7 Restoring the factory settings ......................................................................28 12 SD card slot and USB socket ...............................................................................29 12.1 USB socket and iPOD© support ..................................................................29 12.2 SD card slot .................................................................................................30 12.3 Record function ...........................................................................................30 13 Bluetooth function ................................................................................................32 13.1 Pairing the devices ......................................................................................32 13.2 Telephone functions (Bluetooth menu) ........................................................34 14 Care and maintenance .........................................................................................36 15 Troubleshooting ...................................................................................................37 16 Technical data ......................................................................................................39 17 Warranty information ............................................................................................40 18 Declaration of Conformity.....................................................................................41 19 Glossary ...............................................................................................................42 20 Index ....................................................................................................................44 2
2
Intended use
The car radio is an audio device for playing and listening to music (e.g. CD or radio)
and features an additional Bluetooth function. This Bluetooth function can be used to
connect your mobile phone to the car radio to make and receive calls. The SilverCrest
CRB-631 is designed exclusively for private, non-commercial use. Follow the
installation instructions in this guide and in the manual of your vehicle. The car radio
was only designed for use in a motor vehicle.
Any other use is contrary to its intended purpose. The manufacturer does not assume
any liability for improper use of the device. Unauthorised modifications or changes not
described in this user guide are not permitted.
3
English
Intended use - CRB-631
CRB-631 - Preliminary notes
3
Preliminary notes
Thank you for selecting our Bluetooth car radio SilverCrest CRB-631. In order for you
to use this device and all its features to their full advantage, we recommend that you
read the instructions in this guide before using it for the first time, even if you are
familiar with handling electronic devices. Please pay particular attention to the chapter
Important safety information. Store this guide in a safe place for future reference. If
you sell or transfer this device, always include this user guide.
We recommend keeping this guide in the glove compartment of your car. It is the most
important reference for handling the device.
For all product descriptions and user instructions, the German version is the ultimately
valid reference in the event of possible deviations in other languages.
The device should preferably be installed by an experienced person. Inexperienced
persons should consult an expert.
4
Copyright
The contents of this guide may not be reproduced, copied or otherwise duplicated in
electronic, mechanical, magnetic, optical, chemical, manual, or any other form without
the permission of our company, nor may they be stored in a search engine or
translated into another language.
5
Manufacturer's information
JNC Datum Tech GmbH
Benzstrasse 33
71083 Herrenberg
Germany
www.jnc-digital.de
Version: 1.0
Date of issue: 12.02.2010
4
Further information can be found at:
www.mysilvercrest.de
6
Important safety information
Please read and strictly observe the following
instructions!
This user guide occasionally contains special highlighted notes. These vary as follows:
Note:
Notes contain special information on
economical use
Caution!!
Notes marked with the word CAUTION or
the symbol
draw your attention to
potential damage to equipment or the
environment.
The device contains an integrated class 1 laser
(CD drive). This is installed at an inaccessible
location in the device and does not constitute a
health hazard.
Do not take the car radio apart, make any modifications or attempt to repair it
yourself.
Never open the case of the car radio; it does not contain any serviceable parts! If the
case is open, there is a risk of fatality due to electric shock.
The car radio and the accompanying components should never be exposed to
dripping or splashing water. Make sure that no containers filled with liquid, such as
bottles or cups, are placed in the vicinity of the device.
Make sure that the display is not subjected to any knocks. These could damage the
display.
Make sure you are familiar with the different functions of your device before you start
driving. Excessively high volumes can pose a risk for you and other road users.
Therefore always set the volume to a level at which ambient noises (horns, sirens
etc) can still be heard.
Multimedia CDs also include data files in addition to audio files. If you play such a CD
in spite of the warnings, loud noises can occur at a volume level which can constitute
a traffic hazard. In addition, power amplifiers and speakers can also be damaged as
a result.
Do not use the car radio at an excessively high volume. This can damage your
hearing.
Only make any adjustments to the settings when your vehicle is parked. Your
concentration might otherwise be negatively affected by the changes.
5
English
Important safety information - CRB-631
CRB-631 - Important safety information
6.1
Notes on operation/connection
Only connect the device to a 12V battery; the negative pole must be connected to
ground.
Do not switch on the radio for long periods of time if the vehicle engine is not running.
It has a comparatively high power consumption and can drain the battery to such a
low level that the engine cannot be started. Such a low charge also has a negative
effect on the life of the battery.
If you do not have sufficient knowledge to install the radio yourself, consult an expert.
Please note that any resulting costs will not be borne by JNC.
Before you install the device in the 1-DIN slot provided in the dashboard, take a look
at the wiring and make sure that all functions are in order.
Only use the accessories supplied with the device to ensure correct installation. The
use of parts which are not approved can cause malfunctions.
Please consult your car dealer if it is necessary to drill holes or make any other
modifications to your vehicle to install the device.
When installing the radio ensure that it does not impede the driver and cannot injure
passengers in the event of an accident.
This radio is designed for installation in vehicles with a 12V battery and with
connection of the negative pole to ground. Before installing the radio in RVs, trucks
or buses, always check the battery voltage.
Before starting installation work, disconnect the battery. This will prevent short
circuits.
When connecting the power amplifier and the other devices, comply with the
corresponding instructions in this user guide.
Secure the electric cables with clamps or adhesive tape. Protect cables laid on bare
metal surfaces by wrapping them in adhesive tape.
Lay and secure all cables so that they do not make contact with moving parts such
as the gear shift, hand brake or the rails of the seats.
Do not lay the cables at places which can become hot (e.g. heater outlets), as there
is the risk that the insulation could melt and cause a short circuit on the bodywork of
the vehicle.
Do not route the yellow wire of the battery connection into the engine compartment
through a drilled hole, as the insulation could be damaged and cause a dangerous
short circuit.
Do not shorten cables, as this could negatively affect the function of the protection
circuit.
Never tap the power supply by cutting into the insulation of the 12V connection cable
and connecting another consumer, as this would exceed the capacity of the cable
and cause overheating.
When replacing a fuse always ensure that it is replaced by a fuse of the same type
with the same specified amperage.
6
This radio may only be connected to high-performance speakers with a minimum
rating of 30 W and impedance ranging from 4 to 8 ohm. If speakers with a different
rating or impedance values are connected, the speakers can catch fire, start to
smoke or suffer damage.
When the power of this device is switched on, a control signal is output on the blue
wire. Connect this to the remote control connection of the external power amplifier or
the control relay of the car antenna (maximum of 300 mA 12 V). If the vehicle is
equipped with a screen antenna, this wire is connected to the supply terminal of the
antenna amplifier.
If the system is run with an external power amplifier, the blue wire should never be
connected to the supply terminal of the power amplifier. Also never connect the wire
to the supply terminal of the automatic antenna. Such a connection can cause
considerable power losses and malfunctions.
To prevent short circuits, all disconnected wires should always be wrapped with
insulation tape. In particular the supply cables of speakers which are not in use
should always be insulated with tape, as there is the risk of short circuits if the cables
are not insulated.
6.2
General information
Dirt or condensate on the lenses inside the device can prevent playback.
Never expose the device to direct sunlight, high dust concentrations, high
temperatures (above 60 °C) or a high air humidity (higher than 90 %). If the case
temperature is too high, cool the interior of the vehicle with the ventilation or air
conditioning system.
Do not switch the device on and off in quick succession. After switching the device
off, wait for at least 10 seconds before switching it on again.
Do not insert scratched, bent or broken CDs into the CD player. Never force a CD
into the device if it is not drawn in automatically.
6.3
Additional information
Playback of CDs which have been burned on a PC with the right format is generally
possible. It is, however, possible that the application software, the ambient settings or
other factors prevent playback (contact the software vendor for details.)
CD extra discs can be played back just like audio CDs.
Tracks recorded on CD-R/CD-RW discs (ID3TAG) and other text information
recorded on CD-R/CD-RW discs (ID3TAG) can be played back on this device.
If you play an CD-RW disc on this device, the time it takes for playback to start is
longer than for a conventional CD or a CD-R disc. Before using CD-R/CD-RW discs
always read the applicable operating instructions.
It is possible that not all functions are fully available when using some USB storage
devices.
7
English
Important safety information - CRB-631
CRB-631 - Important safety information
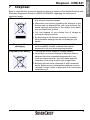
6.4
Children
Do not give your car radio and especially its accessories to children.
Never allow children to use electrical devices unsupervised. Children cannot always
recognise possible hazards.
Keep plastic packaging away from children as it poses a suffocation risk.
Keep the battery of the remote control away from children as it poses a suffocation
risk.
Children should always be supervised to ensure that they do not play with the device.
6.5
Persons with disabilities
Persons with physical, sensory or mental disabilities are not permitted to use this
device without adequate supervision or corresponding instruction and safety training.
6.6
Storage and transport
Keep the packaging for subsequent transport or sale at a place which is inaccessible
to children.
When storing the device, observe the storage temperature range of -30 °C to +80 °C.
To transport the device safely, fit the transport screws in the openings provided on
the top of the device.
8
7
Disposal
Bear in mind that this consumer electronic device is subject to the Waste Electrical and
Electronic Equipment Directive (WEEE) 2002/96/EC regarding the reduction of
electronic waste.
Disposal of the device
Disposal of the
packaging
Disposal of the battery
It is therefore not permitted to dispose of this device
with normal household waste.
Information and advice regarding the disposal of old
devices can be obtained from your local authority, the
waste disposal authorities or the retailer from which
you purchased this product.
You can dispose of your device free of charge at
municipal collection points.
By disposing of old devices correctly you prevent
environmental damage and do not endanger your
health.
The packaging for this product consists of 100%
environmentally friendly materials that can be
disposed of via your local recycling facilities.
The remote control contains a lithium battery.
Information on correct disposal of batteries can be
obtained from the competent department of your
local municipal authority, the local waste disposal
company or the shop in which you bought them.
Batteries should not be disposed of with household
waste. Batteries and rechargeable batteries must be
returned to retail outlets or disposed of at a municipal
collection point.
9
English
Disposal - CRB-631
CRB-631 - Items supplied
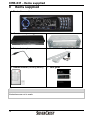
8
Items supplied
1. Bluetooth car radio
2. Case for the operating panel
3. Installation frame
4. External microphone
5. Installation fittings
6. Remote control (including battery)
7. User guide
Note:
Illustrations are not to scale.
10
9
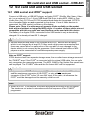
Installation
9.1
ISO connection
Power supply
The car radio has a built-in ISO connection and is supplied with the installation
brackets. It can be easily fitted into your vehicle. The diagram for the ISO connection
with which the majority of vehicles is equipped is shown below. If your vehicle does not
have an ISO connection, you can use an ISO adapter with free wires which is available
as an accessory to connect the radio. The wires can then be connected as shown
below.
Caution!!
Never connect cables to the system as long as it is connected to the battery.
Whenever the battery is disconnected, the memory is erased and the factory
settings are restored.
1
External microphone socket
2
Subwoofer OUT socket
3
LINE-OUT socket red/white (e.g. for amplifier)
4
Antenna socket
5
Fuse (15A)
6
ISO connections for the power supply (ISO-A) and speakers (ISO-B) (refer to
diagram on the next page)
11
English
Installation - CRB-631
CRB-631 - Installation
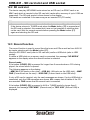
ISO-A
A4
Yellow B+ 12 V, direct battery
connection.
A5
Blue For the control input of an
external amplifier or to the
automatic antenna (max. 100 mA /
12 V).
A6
Orange For dimmer control
terminal. (If the headlights are
switched on, the display lighting is
dimmed)
A7
Red ACC. Connection of the
positive pole controlled by the
ignition key/switch (12 V).
A8
GND (ground) For an effective
ground connection to the vehicle
ISO-B
Front speakers
B3
B4
B5
B6
Right +
Right –
Left +
Left –
(grey)
(grey/black)
(white)
(white/black)
Rear speakers
B1
B2
B7
B8
Right +
Right –
Left +
Left –
(purple)
(purple/black)
(green)
(green/black)
Note on the assignment of the ISO-A connector
The diagram shows the most common pin assignment. Several car manufacturers
such as VW, Audi, Opel and Vauxhall reverse pins A7 and A4, and the preset
channels and other programmed settings are lost when the ignition is switched off.
For this reason follow the instructions given in your vehicle manual.
12
Speakers
Connect the speakers in accordance with the following diagram; incorrect connection
can cause damage to your radio or speakers.
Front left
Front right
Rear left
Rear right
Correct connection
Incorrect connection
Caution!!
Only use speakers which are not connected to ground.
Only use speakers with a minimum rating of 30 W; weaker speakers could be
damaged at a high volume.
Only use speakers with an impedance of 4 ~ 8 Ω (ohm). Speakers with a higher or
lower impedance could cause damage to your car radio.
Do not use speakers with a 3-wire connection and never connect the negative
pole of the speaker to the vehicle ground (GND). The car radio CRB-631 is
equipped with a BTL circuit (bridging circuit) and each speaker must therefore be
connected with insulated wires as shown in the wiring diagram.
The speaker cables and/or an optional external power amplifier must always be at
least 30 cm away from the antenna and/or all antenna extensions.
13
English
Installation - CRB-631
CRB-631 - Installation
9.2
Installing the device
If you do not have sufficient knowledge to install the radio yourself, consult an expert.
Please note that any resulting costs will not be borne by JNC.
Caution!!
Always observe the following safety instructions for connection of the device:
Read the entire installation section before connecting the device.
Disconnect the negative pole of the vehicle battery for the duration of the installation.
Observe the vehicle manufacturer’s safety instructions during installation.
The cross-section of the positive and negative cables must not be less than 2.5mm².
Do not connect any of the vehicle’s plugs and cables to the radio unless you have
the necessary specialised knowledge!
Depending on the design of your vehicle, installation may deviate from this
description.
JNC does not assume any liability for damage caused by faulty installation or
connection or for any resulting damage.
The device must be fitted in a horizontal position at an angle of less than 30°.
Before fitting the radio remove both transport screws on the top of the device
(attached with a red information label).
Fig. 1
1)
2)
3)
4)
14
Fig. 2
Place the installation frame into the 1-DIN installation slot in the dashboard
(Fig. 1).
Bend the securing tabs for fixing the installation frame outwards with a
screwdriver.
Screw the M5 bolt into the corresponding thread on the rear of the car radio.
Check the electrical connections as described above (either ISO connection or
single wires).
5)
6)
7)
Connect the ISO connectors A and B to the corresponding connections of the
radio.
Push the radio into the installation frame until it clicks into place (Fig. 1).
Then finish installation by placing the front trim frame onto the front of the car
radio (Fig. 1).
Note:
Only fit the operating panel when the car radio has been fully fitted. The
operating panel could otherwise be damaged when you push the car radio into
the slot when the panel is already fitted.
Steps 8 and 9 are only possible when the rear of the radio is accessible inside
the dashboard or console.
8)
9)
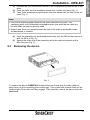
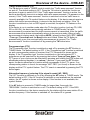
9.3
Push the assembly rail (perforated metal strip) onto the M5 bolt and secure it
with the M5 nut (Fig. 2).
Secure the other end of the assembly rail to the vehicle bodywork with a
Bt5x16 screw (Fig. 2).
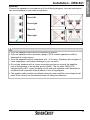
Removing the device
Fig. 3
To remove the device CAREFULLY remove the trim frame from the radio (without
using force, as the connecting pins could snap). Then insert both removal tools on the
left and right of the radio until they engage. Then carefully remove the device from the
dashboard.
15
English
Installation - CRB-631
CRB-631 - Overview of the device
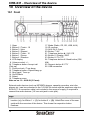
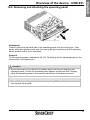
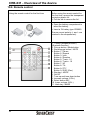
10 Overview of the device
10.1 Front
1. Open
2. Button 6 / Track + 10
3. Button 3 / Intro
4. Button 2 / Repeat
5. Button 5 / Track - 10
6. Button 1 / Pause
7. Button 4 / Random
8. LCD display
9. Volume control + / 10. Telephone button: Accept call
(Pick-up)
11. Previous track / Tune down
12. Telephone button: Reject/Hang up
13. Next track / Tune up
14. On/Off/Mute
15. Select
16. Telephone menu
Note on no. 19 - AUX-IN (3.5 mm):
17. Mode (Radio, CD, SD, USB, AUX)
18. IR receiver
19. AUX-IN (3.5 mm)
20. Button 7 / AF
21. Telephone button / AS / PS
22. Button 0 / Display / REC
23. Button 8 / TA / TP
24. Telephone button # / Band button (FM /
AM)
25. Numeric button 9 / PTY
26. USB connection
External audio devices (such as MP3/MP4 players, cassette recorders, mini-disc
players etc.) can be connected to the 3.5 AUX-IN socket with the earphone output or
AUX-OUT. A connection cable (not included in the scope of supply) is required to
connect the audio devices (3.5 mm mini-jack to mini-jack).
Note:
The corresponding button numbers are used in the following text for easier
location (e.g. for button 1 -> (1), for button 2 -> (2)). Unfold the cover of the user
guide with the overview of the device. This shows the respective button
numbers.
16
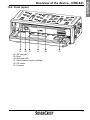
10.2 Front (open)
28. SD card slot
29. Eject
30. Anti-theft LED
31. Reset (restore factory settings)
32. CD loader
33. Contacts
17
English
Overview of the device - CRB-631
CRB-631 - Overview of the device
10.3 Display overview
An overview of the display is given here. Different symbols light up depending on the
operating mode, settings and the media used.
Symbol
DISC
EQ (POP, ROCK,
CLAS, FLAT)
LOUD
MUTE
LOC
INT
RPT
RDM
OGG, WMA, MP3
USB, M.CARD
TA, TP
EON
AF
PTY
18
Description
Lights up when a CD is inserted and read.
Lights up when one of the preset equalisers is switched on.
Lights up when the LOUD function is switched on.
Lights up when the mute function is activated.
Lights up when local mode is switched on.
Lights up when Intro is switched on.
Lights up when Repeat is switched on.
Lights up when Random is switched on.
OGG lights up when Ogg Vorbis audio files are played, WMA
lights up when WMA audio files are played and MP3 lights up
when MP3 audio files are played.
Lights up when a USB device or memory card are used.
Lights up if a station is broadcast in stereo.
Lights up when TA or TP is switched on.
Lights up when EON is switched on.
Lights up when AF is switched on.
Lights up when programme information is received.
Lights up when the Bluetooth functions are used.
10.4 Removing and attaching the operating panel
Attachment
Carefully place the left-hand side of the operating panel onto the locking pin. Then
gently push the right-hand side onto the locking pin and carefully push the operating
panel upwards until it clicks into place.
Removal
Tilt the operating panel outwards by 45° (1). Carefully push the operating panel to the
left and pull it out towards you.
Caution!!
Never exert force on the buttons or display when removing or attaching the
operating panel. Protect the operating panel against knocks and theft. Always
place the operating panel in the case provided when it has been removed.
Note:
Never tilt the operating panel outwards completely (90°), as the frame would
then impede its removal.
19
English
Overview of the device - CRB-631
CRB-631 - Overview of the device
10.5 Button functions
Button
Every
button
Plus (+)
Minus (-)
Mode
T-MENU
SEL
Button
Tune up
button
(►►▌)
Tune
down
button
(▌◄◄)
0 (DISP)
1 (PAU)
2 (RPT)
3 (INT)
4 (RDM)
5 (-10)
6 (+10)
7 (AF)
8 (TA)
9 (PTY)
(AS/PS)
# (Band)
20
Function
Switch on the device
- Switch off the device (press for longer than 2 seconds)
- Press briefly to activate MUTE
Volume / Increase
Volume / Decrease
Accept call (Pick-up)
Reject call (Hang up)
Switch between the functions (TUNER → CD → A2DP → SD →
USB → AUX → TUNER) (CD/A2DP/SD/USB are only displayed if
corresponding media are inserted/connected)
Selection button for standard settings
TUNER mode
- Automatic station search
(press briefly)
- Manual station search
(press for longer than 2
seconds)
- Select preset stations
(press briefly)
- Save current station (press
for longer than 2 seconds)
CD/SD/USB mode
- Next track (press briefly)
- Fast forward (press for longer than
2 seconds)
- Previous track (press briefly)
- Fast reverse (press for longer than
2 seconds)
Activate/deactivate Pause
Activate/deactivate "Repeat"
Activate/deactivate "Intro (10 secs.)"
Activate/deactivate "Random"
Go back 10 tracks
Go forward 10 tracks
Activate/deactivate "Alternative frequency" (refer to the following
pages)
Activate/deactivate "Traffic announcement" (refer to the following
pages)
Activate/deactivate "Programme type" (refer to the following pages)
Auto Store and Preset Scan
Selection of the frequency band (FM 1 → FM 2 → FM 3 → MW1 →
MW2 → FM 1)
Traffic announcement (TA)
The TA button is used in TUNER mode to switch the "Traffic announcement" function
on and off. The default setting is OFF. Press the TA button to switch the function on
and press it again to switch it off. If the "Traffic announcement" function is active, the
device automatically tunes into a station with traffic announcements (TA appears on the
screen). If the "Traffic announcement" function is switched on but no traffic news is
currently available, the TA symbol flashes on the display. If the device cannot receive a
station with traffic announcements, it returns to the previously set station. If the TA
function is switched on, but no RDS signal is received, the symbol TP flashes on the
display.
If the device is run in another mode when the TA function is active (such as CD, USB,
SD or AUX-IN), the device automatically switches to TUNER mode if a traffic
announcement is received and the traffic announcement is transmitted. After the traffic
announcement the device automatically returns to its previous mode. When a traffic
announcement is being made, the buttons AS/PS, (preset) buttons [1-6] / PTY / MODE
/ Tune up / Tune down and the Band button are locked. When the TA button is
pressed briefly once, the received traffic announcement is ignored. The "Traffic
announcement" function is switched off by pressing the TA button twice.
Programme type (PTY)
The "Programme type" function is switched on and off by pressing the PTY button in
TUNER mode. The default setting is OFF. If the "Programme type" function is switched
on and a corresponding station is received, the PTY information is shown on the
display. If the "Programme type" function is switched on, the last selected PTY
programme can be searched for by pressing the buttons Tune up/Tune down. The
PTY genre of your choice can be selected by pressing and holding the PTY button and
afterwards pressing the plus (+) or minus (-) buttons. If you press the PTY button
again, the device searches for a station which corresponds to this PTY genre. If no
corresponding station is found, the message "NOT FND" (not found) is shown on the
display and the PTY symbol flashes. The PTY search is cancelled by pressing the PTY
button again.
Alternative frequency (re-tuning if the signal is weak) (AF / REG)
The "AF" function is switched on or off by pressing the AF button in TUNER mode. The
default setting is OFF. If the AF function is switched on and available on the selected
station, the AF symbol is shown on the display. If the function is not available, the
symbol flashes.
If the AF button is pressed in TUNER mode for longer than 2 seconds, the
"REGIONAL" function is switched on or off. The default setting is OFF. If the REG
function is switched on, the device searches for the station with the same station ID on
another frequency. If the function is switched off, the station ID is ignored.
21
English
Overview of the device - CRB-631
CRB-631 - Overview of the device
10.6 Remote control
Using the remote control for the first time
Before using the remote control for
the first time, remove the transparent
protective plastic foil.
Pull the tab to remove the foil.
Open the battery compartment to
insert the battery.
Insert a 3V battery type CR2025.
Ensure correct polarity (+ and – are
marked in the compartment).
1. T-Menu (telephone menu)
(Bluetooth function)
2. Pick-up button / Mode button
3. Red hang-up button / MUTE
4. Button 1 / Pause
Button 2 / Repeat
Button 3 / Intro
Button 4 / Random
Button 5 / Track - 10
Button 6 / Track + 10
Button 7 / AF
Button 8 / TA
Button 9 / PTY
Button 0 / DISC (Rec)
5. Star key / AS/PS
6. On/Off
7. Tune up and tune down button
8. Increase volume (VOL+)
9. Select button SEL
10. Lower volume (VOL-)
11. Hash key / BAND
22
11 Basic functions
11.1 The ON/OFF/MUTE button
The device is switched on by pressing the ON/OFF button (14) or any other button on
the operating panel. The device is switched to MUTE by pressing the ON/OFF button
(14) briefly. Please note that all audio outputs are switched to mute as a result. The
MUTE symbol is shown on the display. The MUTE function is cancelled by pressing the
button (14) briefly again. If the ON/OFF button (14) is pressed for longer than 2
seconds, the device switches off.
11.2 Volume control
The volume can be increased or decreased by pressing the plus (+) and minus (-)
buttons (9). The volume can be adjusted over a range of 0 and 45. If the radio is
switched off at a volume which is below the default start-up volume, the device stores
this volume. The next time the device is switched on, the volume is automatically set at
this level. If the volume is higher than the default start-up volume when the device is
switched off, the default start-up volume level is automatically selected when it is
switched on again.
11.3 Select button for settings (SEL)
Audio settings Bass/Treble/Balance/Fader:
The audio functions can be selected in the following sequence by briefly pressing the
SEL button (15):
VOLUME → BASS → TREBLE → BALANCE → FADER →EXIT
Explanation of the functions:
Bass or Treble
Press the plus (+) or minus (-) (9) buttons to increase or decrease bass or treble.
Balance
Press the plus (+) or minus (-) buttons (9) to adjust the balance between the righthand channel (R) and the left-hand channel (L). The position 0 means that both
channels are balanced.
Fader
Press the plus (+) or minus (-) button (9) to increase and decrease the output from
either the front or rear speakers. Position 0 means that the front and rear speakers are
balanced.
23
English
Basic functions - CRB-631
CRB-631 - Basic functions
Default settings:
If the selection button (SEL) (15) is pressed for longer than 2 seconds, the default
settings menu is opened in the following sequence:
INVOL → ADJ → TAVOL → EON → REC → TELVOL → DSP → LOUD → LOC →
STEREO → EXIT
As soon as one of these items is selected, the setting can be modified by pressing the
plus (+) or minus (-) buttons (9).
Explanation of the functions:
INVOL (start-up volume)
Change the default start-up volume at which the device is switched on.
ADJ (clock)
Increase the hours (plus (+) button) or the minutes (minus (-) (9) button) of the clock
time.
TAVOL (volume of the traffic announcements)
Change the volume of the traffic announcements.
EON
Switch the function EON ON or OFF (the standard setting is ON).
REC (format for recording)
Select either the MP3 or WMA format for recording.
TELVOL (telephone volume) selected
Select the start-up volume of a call. The default setting is 25.
We recommend selecting a volume of below 35 for the best sound quality.
DSP (DIGITAL SOUND PROCESSOR)
Select one of the preset sound settings of the equaliser:
NONE → CLASSIC → ROCK → POP → FLAT → NONE
LOUD (permanent bass and treble boost)
Switch the function LOUD ON or OFF (the standard setting is OFF).
LOC
Switch the function LOC ON or OFF.
ON is selected for reception of a local station and OFF for the reception of more
distant stations.
STEREO
Select either MONO or STEREO for playback.
Note:
If no entries are made for 5 seconds, the display returns to the default setting in
the selected mode.
24
11.4 AS/PS button (Auto Store/Preset Scan)
In TUNER mode:
It is possible to control two different functions by pressing the AS/PS button (21) either
briefly or for longer than two seconds.
Press briefly
All stations saved on the preset buttons in the selected frequency band are scanned.
The preset stations are switched on for a short time (5 seconds). This procedure is
cancelled by pressing any button.
Press and hold (longer than 2 seconds)
Automatic station search is started by pressing the button for longer than 2 seconds.
The device then searches for stations in the selected frequency range and saves the
six stations with the strongest signal in the preset station memory.
The search is cancelled automatically when the end of the frequency range has been
reached, six stations are saved or if the AS/PS button (21) is pressed again.
In CD/MP3/SD/USB mode:
The search function is activated by pressing the AS/PS button (21).
Press the button again to select the following search criteria:
→TRACK NUMBER → TRACK NAME → FOLDER
Track number search
If the track number search is selected, three digits "001- - - - -" are shown on the
display.
Tune up button (►►▌) (13) / Tune down
button (▌◄◄)(11)
Select button (SEL) (15)
Band button (24)
Select the number of the track.
Confirm the selected number.
The track with the entered number is
played.
Note:
If the track cannot be found, the last track is played again and the search
function is cancelled.
25
English
Basic functions - CRB-631
CRB-631 - Basic functions
Alphabetical search (Track name)
If the alphabetic search function is selected, the three characters "A**- - - - -" are shown
on the display.
Plus (+) button / minus (-) button (9)
Tune up button (►►▌) (13) / Tune down
button (▌◄◄)(11)
Select button (SEL) (15)
Band button (24)
Enter the character.
Select the next or previous character.
The flashing character is confirmed.
Press the Band button twice. Playback
of the entered track is started.
Note:
Characters from "A" to "Z" and the digits "0" to "9" can be entered.
Repeat this procedure until the required characters are displayed.
If several files are found, the files can be opened by pressing the Tune up
(►►▌) (13) or Tune down buttons (▌◄◄)(11) and the desired track can be
confirmed by pressing the select button (SEL) (15) .
If the track is not found, the message "NO MATCH" is displayed, followed by "A
* * - - - - -" . The alphabetical search can then be repeated.
Folder search (only in MP3/SD/USB mode)
When the folder search is selected, "ROOT" is shown on the display.
Tune up button (►►▌) (13) / Tune down
button (▌◄◄)(11)
Band button (24)
You can navigate through sub-folders if
these are available.
Open the sub-folder or confirm playback
of the first file of the selected folder.
The device then starts playback of the
track of the selected (sub)folder.
Note:
If no entries are made for 5 seconds, the display returns to the default setting in
the selected mode. If the clock display is enabled, the device displays the clock
in standby mode.
26
11.5 DISP button (Display information)
You can navigate through the available display information by pressing the DISP button
(22).
In TUNER mode the default setting is the station name, and if this is not available, the
frequency is shown.
The sequence is:
→ Clock → PTY → Station name → Frequency
11.6 Loading and ejecting a CD
Insert one CD with the label side facing upwards and ensure that you do not touch the
data side with your fingers.
To open the operating panel press the corresponding button (OPEN). You can then
insert or eject a CD.
If there is still a CD in the device, first press the EJECT button.
Insert the CD carefully into the device without using force. It is automatically drawn
inside. As soon as the CD is loaded in the device, you can close the operating panel.
The device automatically reads a CD as soon as it is inserted. This takes a few
seconds and the device then starts playback of the CD.
Note:
If the device is in standby mode and a CD is either loaded or ejected, the device
automatically switches on.
27
English
Basic functions - CRB-631
CRB-631 - Basic functions
11.7 Restoring the factory settings
Ensure that there is no CD in the device. Press the button to open the operating panel
(OPEN) and then the EJECT button. Eject any loaded CD. To restore the factory
settings of the device, press the small reset button with a bent paper clip or a similar
pointed object.
28
12 SD card slot and USB socket
12.1 USB socket and iPOD© support
Connect a USB stick, a USB MP3 player, an Apple iPOD© (Shuffle, Mini, Nano, Video
etc.) or an external 2.5 or 1.8 inch USB Hard Disk Drive to play MP3, WMA or Ogg
Vorbis files. Only FAT16 and FAT32 formatted hard disks are recognised. NTFS or
Linux formatted disks are not supported by the device. If one of these devices is
connected, the USB symbol is shown on the display.
Please note: There is a wide range of memory sticks available on the market,
both with and without an integrated MP3 player. A number of these sticks are not
compatible with this car radio and can therefore not be used with this device.
©
The battery of an Apple iPOD connected to the USB socket is only automatically
charged if it is already at least 50 % charged.
Caution!!
Several external hard disks or MP4 players and iPOD© devices with a battery
which is not charged by at least 50 % have such a high power consumption that
these can cause failure or malfunction of the car radio or even damage to the
device which is not covered by the guarantee. Such external hard disks or MP4
players must be connected to a suitable separate power supply.
Note on iPOD© support:
iPOD© devices have two separate storage areas, the so-called mass storage area and
©
©
the iTUNES area. If the iPOD is connected with its original USB cable, the car radio
only recognises the mass storage area. The MP3, WMA or Ogg Vorbis files saved here
can be played. The iTUNES© area and the file format AAC are not supported.
Caution!!
Only connect an iPOD© with its original USB cable and not with the USB cable
and the earphones connector of the iPOD©, or only with the earphones
©
connector of the iPOD to the 3.5 mm AUX input of the radio, as otherwise the
iPOD© could be damaged and its warranty could be void.
Note:
When an iPOD© is connected, the tracks are played according to the file names.
The tracks are not sorted in accordance with the sequence of the iTUNES©
programme.
29
English
SD card slot and USB socket - CRB-631
CRB-631 - SD card slot and USB socket
12.2 SD card slot
The device can play MP3/WMA tracks stored on an SD card, an SDHC card or an
MMC card which is inserted in the SD card slot (cards with a memory of up to 8 GB are
supported). The SD card symbol is then shown on the display.
The tracks are controlled in the same way as an inserted CD (CD mode).
Note:
It can sometimes take several seconds for the device to read the data of a card.
If the device returns to TUNER mode when the Mode button (17) is pressed and
the SD card is selected, this means that it was not yet possible to read the data
on the card. Wait for several seconds before pressing the Mode button (17)
again and selecting the SD card.
12.3 Record function
The record function is used to record from the tuner and CDs as well as from AUX IN
by simple selection with the Mode button (17).
Insert an SD-/SDHC card (refer to SD card slot) and/or a USB stick (refer to USB
socket).
If neither a USB stick nor a memory card is connected, the message "NO MEDIA"
appears on the display when the record function is selected.
Record mode
If the button (0/DISP) (22) is pressed for longer than 2 seconds when a CD is being
played, the record menu is opened.
The following appears on the display:
→MMC ALL (All tracks on the card) →USB ALL (All tracks on the USB stick) →MMC
ONE (Current track on the card) →USB ONE (Current track on the USB stick)
If only a SD card is inserted, only the card messages are shown. If only a USB stick is
connected, only the USB messages are shown. ALL means that all tracks of the CD
are recorded. ONE means that the current track is recorded.
If the button (0/DISP) (22) is pressed in AUX or TUNER mode for longer than 2
seconds, the message "REC MMC" (Record card) or "REC USB" (Record USB) is
displayed.
30
Record mode
TUNER
CD
AUX
USB
SD
USB
Delete
SD
Note:
If no entries are made for 5 seconds, the display returns to the default setting in
the selected mode.
Start/stop recording
When you have selected the required recording mode, start recording by pressing the
Band button (24). Recording is indicated on the display by a flashing "R". The symbol
of the medium used for recording flashes (USB/M.Card).
Press the Band button (24) to stop recording. When recording is finished, the device
resumes playing from the selected data source.
Important!! Note on copy protection:
Always comply with the valid legal regulations for making copies of copyrightprotected media. In case of doubt contact a local expert.
Delete track (from the card/USB stick)
You can also delete tracks during playback from a USB or SD source.
To do this, select the track you wish to delete and press the (0/DISP) (22) button for at
least 2 seconds to activate the DELETE function.
Press the Band button (24) to delete the selected track.
31
English
SD card slot and USB socket - CRB-631
CRB-631 - Bluetooth function
13 Bluetooth function
The car radio is equipped with a Bluetooth function. You can use this function to
connect your mobile phone to the car radio and control all functions from the car radio.
You can listen to the caller on the car speakers and use the external microphone
without needing your hands. You can use the integrated dialling buttons on the
operating panel of the car radio to dial a number directly without having to use your
mobile phone while driving.
13.1 Pairing the devices
Start searching for a new Bluetooth device as described in the manual of your mobile
phone.
As soon as your phone finds "CAR RADIO", select "CAR RADIO", enter the code
"0000" and confirm with OK. Then enter the code on your mobile phone and confirm to
finish pairing.
The mobile phone is then paired with the car radio. To connect both devices confirm
pairing on your mobile phone. When the Bluetooth connection has been established
between your mobile phone and the car radio, the BTI icon is on or flashes on the
display.
Note:
The first time you use Bluetooth with your mobile phone and the car radio, you
have to pair the devices. When the devices have been paired once, it is not
necessary to repeat this procedure unless the car radio is fully disconnected
from the power supply.
The meaning of the Bluetooth BTI icon " " shown on the display
Flashes slowly (every 5 seconds): Standby
Flashes quickly (once per second): Connecting
Symbol on: Connected.
Suggestions:
1. Set "My phone's visibility" to "Show to all".
2. Confirm the setting with "Yes".
Note:
This device supports most mobile phones with a Bluetooth function such as
SAMSUNG, NOKIA, PANASONIC, SHARP, MOTOROLA, PHILIPS, SONY
ERICSSON, SAGEM etc. Please refer to your mobile phone’s user manual for
Bluetooth setup and operation.
Auto Connect
When the car radio is switched on, a connection is automatically made to the last
32
paired phone via Bluetooth after a search time of around one minute. If the radio
cannot find the paired phone, the search is stopped. If the device is in standby mode
(not connected), press and hold the T-MENU button (16) to activate the Auto Connect
function and start the search for the last paired mobile phone.
Streaming audio with A2DP (Advanced Audio Distribution Profile)
Music which you have stored on your mobile phone can be played wirelessly on the car
radio with the A2DP function and a mobile phone which supports the Bluetooth A2DP
protocol.
Establish a connection to your mobile phone via Bluetooth as previously described in
the section "Pairing the devices".
You can then play the track stored on your phone in the normal manner with the
playback function. The track is played on the speakers connected to the car radio.
"A2DP" is shown on the display.
AVRCP (Audio/Video Remote Control Profile)
With AVRCP it is possible to use your mobile phone as a remote control for audio
functions. The functions include pause, start and stop playback.
Note:
Please note that some functions may not be available depending on the
manufacturer and model.
Key assignment of the AVRCP functions:
First press "Play" on your mobile phone to start playing the selected track.
Press the preset 1 (PAUSE) (6) button on your car radio to pause or resume
playback of a track.
Press the Tune down button (▌◄◄) (11) to go back to the previous track.
Press the Tune up button (►►▌) (13) to go to the next track.
To stop playback, switch the music player of your mobile phone off.
33
English
Bluetooth function - CRB-631
CRB-631 - Bluetooth function
13.2 Telephone functions (Bluetooth menu)
Press the green call button
(10) to accept a call. Press the red reject/hang up
button
(12) to reject or finish a call.
When the car radio is paired and connected with a mobile phone, press the T-MENU
button (16) to open the telephone menu. This menu features several options.
One of the following functions can be selected from the following sequence with the
plus (+) and minus (-) (9) buttons:
D-DIAL → CALL LIST → L-DIAL.
Press the T-MENU button (16) again to open the selected menu.
D-Dial is the direct dial menu.
Call List is the list of the last dialled numbers.
L-Dial is used to redial the last number.
Note:
The call list and the redial numbers are only available if numbers have been
saved.
Direct dial (D-DIAL)
In the direct dial menu (D-Dial appears on the display), numbers can be entered
directly with the numeric buttons 0 – 9. Use the buttons # (24) or (21) (for any
entries) during the call.
If you enter a wrong digit, press the T-MENU button (16) to delete the last digit.
After entering a number manually, it can be dialled by pressing the green call button
(10) .
List of last dialled numbers (CALL LIST)
After selecting the call list (CALL LIST appears on the display), briefly press the TMENU button (16) to open the menu.
The previously dialled numbers appear on the display. Navigate through the list with
the plus (+) or minus (-) (9) buttons.
Press the green call button
(10) to dial the displayed number. Press the TMENU button (16) again to exit the menu and return to the previous mode.
Redialling the last number (L-DIAL)
After selecting this menu ("L-DIAL" appears on the display), press the T-MENU button
(16) briefly to open the menu ("REDIAL" appears on the display). Press the green call
button
(10) to redial the last number dialled.
Voice dialling
Voice dialling can be used to dial a phone number by speaking a command.
34
Note:
Please note that the voice dialling function is only available if it is supported by
your mobile phone.
The voice dialling function must be activated and set up on your mobile phone.
Voice dialling may need configuring on some mobile phones before it can be
used. Read the user manual of your mobile phone for more information.
Press the T-MENU button (16) for 2 seconds. The connected mobile phone then starts
voice dialling ("Voice DL" appears on the display).
Speak the name of the person you wish to call loudly and clearly and the device starts
dialling the corresponding number (if it was understood correctly). Press the T-MENU
button (16) briefly to cancel dialling.
Note:
Please note that some mobile phones may offer a selection of various names if
your voice command is not clearly assigned.
Call transferring (from the hands-free system to the mobile phone)
During a call press the green call button
(10) for two seconds to transfer the call
from the hands-free system to the mobile phone.
Press the green call button
(10) again to resume hands-free mode.
Delete paired phone
To delete a paired phone, briefly press the T-MENU button (16) in standby mode (when
no mobile phone is connected to the car radio via Bluetooth). "DEL PAIR" is shown on
the display.
Press the T-MENU button (16) again briefly to delete all paired mobile phones.
Call waiting
If a second call arrives while you are talking, you can accept this call by pressing the
green call button briefly
(10).
Press the Mode button (17) to switch between both callers.
Press the red reject/hang up button
(12) to reject the second call.
If for 8 seconds no button is pressed, a second caller is put on hold. Press the Mode
button (17) to switch between both callers.
35
English
Bluetooth function - CRB-631
CRB-631 - Care and maintenance
14 Care and maintenance
Your device is a product of high-quality design manufactured to stringent standards and
should be treated with care. Compliance with the following recommendations will
ensure that all warranty obligations are met.
Do not use harsh chemicals, cleaning solvents or strong detergents to clean the
device. If it requires cleaning, use a soft, clean and dry cloth.
Never use a rough cloth to wipe the operating panel. Only use a special microfibre
cloth.
If the car radio does not work correctly, please call the hotline for assistance.
Servicing is normally not necessary. If, however, the device should require
maintenance, ONLY have this done by authorised JNC technicians. Otherwise the
warranty will be void.
Care of CDs
Fingerprints and dust on the surface of the CD can negatively affect the sound
quality. Clean the CD regularly with a soft cotton cloth, starting in the centre and
moving outwards. Never use a circular motion when cleaning the CD.
Note:
Keep CDs away from direct sunlight and heat sources.
Never attach any labels or stickers to the CD.
Only use round CDs with a diameter of 12 cm. Never insert any other CD size or
type.
If a 12 cm CD is not removed within 15 seconds after it has been ejected, it is
automatically reloaded, but playback is not automatically started.
36
15 Troubleshooting
If a fault occurs, please first consult these instructions before you send the device in for
repair. If you are unable to solve a problem despite these instructions, please contact
our hotline. Do not try repairing the device yourself under any circumstances. This
would mean that the warranty would be void.
Problem
The frame cannot be
slid off the device
towards the rear.
Cause
The securing screws have
not been removed.
The release key was not
inserted correctly.
The device does not The connection cables
play back any music. have not been attached
correctly.
The "MUTE" or "Pause"
button has been pressed.
The device cannot be The operating panel is not
turned on.
inserted correctly.
The ignition is turned off.
The connection cables
have not been attached
correctly.
The fuse is blown.
The device does not The radio has not been
store the preset
connected correctly.
stations.
The device temperature is
too high.
Contacts A4 and A7 have
not been connected
properly or the vehicle
manufacturer has reversed
these.
The CD is not drawn The two securing screws
in completely.
have not been removed or
only partially.
Solution
Remove the securing screws and
try again.
Reinsert the key. Make sure that
the protrusion on the release key
points away from the device during
insertion.
Check that all cables have been
attached correctly.
Press the "MUTE" (14) or "Pause"
(6) button again.
Reinsert the operating panel.
Turn on the ignition.
Check that all cables have been
attached correctly.
Replace the fuse.
Check that all cables have been
attached correctly.
Lower the volume of the device.
Check the pin assignment.
Reverse the connections of the
cables on pins A4 and A7.
Remove the securing screws and
try again.
37
English
Troubleshooting - CRB-631
CRB-631 - Troubleshooting
Problem
The inserted CD
cannot be played.
Cause
The CD was inserted with
the printed side facing
downwards.
The CD has too many
scratches.
The CD is dirty.
The device temperature is
too high.
The CD contains incorrect
or faulty data.
Poor radio reception. Reception conditions are
poor.
The radio reception
The AF function is
is choppy or
activated.
frequently
interrupted.
The radio only
The REG function is
receives a few
activated.
stations
The music is only
The BALANCE and/or
played back by one
FADER settings are faulty.
speaker group.
NO FILE
The CD does not meet the
CompactDisc standard or
does not contain any MP3 /
WMA files.
Not all MP3/WMA
Wrong coding of the files
tracks are played
that are not being played
back.
back.
Too many files are stored
on the CD.
Solution
Flip the CD over and try again.
Create another CD from the
original or have the CD repaired.
Clean the CD (without cleaning
agents, just a lint-free cloth).
Lower the volume of the device.
The CD cannot be used with this
device. Burn your audio data onto
a separate data carrier and try
again.
Change your location to achieve
better reception.
Deactivate the AF function.
Deactivate the REG function.
Check the BALANCE or FADER
settings.
Create a CD that meets the
CompactDisc standard.
Recode the files.
A maximum of 1,000 tracks can be
handled per CD. Create a CD with
fewer than 1,000 tracks.
Note:
If you do not have sufficient knowledge to install the radio yourself, consult an
expert. Please note that any resulting costs will not be borne by JNC.
38
16 Technical data
Operating voltage
Maximum power consumption
Dimensions
Weight
Laser
Frequency range (CD)
Signal-to-noise ratio (CD)
Total harmonic distortion THD (CD)
Signal-to-noise ratio and dynamic range
(audio)
Total harmonic distortion THD
Amplifier output
Speaker impedance
FM frequency range
Sensitivity (FM) (Signal-to-noise ratio:
30dB)
Frequency response (FM)
Signal-to-noise ratio (FM)
MW frequency range
Sensitivity (MW) (signal-to-noise ratio:
20dB)
Signal-to-noise ratio (MW)
Antenna impedance
Frequency response (AUX IN)
Input impedance (AUX IN)
Signal-to-noise ratio (AUX IN)
Input level (AUX IN)
RCA output (audio)
Operating temperature range
Storage temperature range
USB memory capacity
SD/SD-HC/MMC card capacity
12 V DC (10.5 – 16 V DC)
<10 amps
1x DIN (W x D x H)
(178 mm x 175 mm x 50 mm)
1600 g
Semiconductor laser,
wavelength 650 nm, 780 nm
48 kHz pulse modulation
20 Hz – 20 kHz
60 dB
<0,5 %
≥80dB
0,1%
4 x 40 Watts (max.)
4-8Ω
87.5 - 108 MHz
15 dBµV
55 Hz - 10 kHz
50 dB
522 – 1,620 kHz
28 dBµV
40 dB
50 Ω
20 – 20,000 Hz
47 kΩ
70 dB
200 mV (2 V max.)
2.0 V (1 kHz. 0 dB) ± 0.2V
-20 °C – +60 °C
-30 °C – +80 °C
No limit
Up to 8 GB
39
English
Technical data - CRB-631
CRB-631 - Warranty information
17 Warranty information
This product has a three year guarantee from the date of purchase. For information on
our after sales service, please visit www.jnc-digital.de or call our hotline:
Country
Belgium
Denmark
Germany
England
Finland
France
Greece
Holland
Ireland
Italy
Croatia
Austria
Poland
Portugal
Sweden
Switzerland
Slovakia
Slovenia
Spain
Czech Republic
Hungary
40
Hotline No.
0800 72 178
8088 6906
01805 06 79 00
0844 385 0222
0800 11 66 99
0826 109 988
00800 49 12 91 51
08000 22 90 67
1890 944 848
800 788 035
0800 222 823
0820 901 113
00800 49 11 487
800 84 91 46
020 79 59 45
0844 220 330
0800 00 49 97
0800 80 182
902 886 189
800 14 28 43
06800 133 97
18 Declaration of Conformity
Conformity declaration
This declaration is applicable for the following products:
Device type: Bluetooth car radio
Type designation: CRB-631
We hereby confirm that the products meet the essential protection requirements
stipulated in the directives of the Council for harmonisation of the statutory provisions of
the Member States in accordance with the Radio Equipment and Telecommunications
Terminal Equipment Directive 1999/5/EC and the Automotive EMC Directive
2004/104/EC.
This declaration is made by:
JNC Datum Tech GmbH
Benzstrasse 33
D-71083 Herrenberg
The respective tests were executed by accredited test laboratories.
The following standards were applied for assessment of the products in accordance
with the Radio and Telecommunications Terminal Equipment Act:
EN 300328: V1.7.1
EN 301 489-2: V1.8.1 / EN 301489-17: 1.3.2
EN 60065: 2002 + A1: 2006
EN 50371: 2002
Herrenberg, 12 February 2010
Date, place
Legally valid signature of the distributor
41
English
Declaration of Conformity - CRB-631
CRB-631 - Glossary
19 Glossary
PTY (Programme type)
Many radio stations send signals which identify the type of programme they are
broadcasting. You can therefore select a programme type on your radio and the device
will search for a station with this programme. The following programme types can be
selected: Speech, News, Current Affairs, Information, Sport, Education, Drama,
Culture, Science, Varied Speech (Quizzes/Comedy), Pop Music, Rock Music,
M.O.R.M. Easy Listening, Classical, Other Music Types, Weather, Finance, Children,
Social, Religion, Phone in, Travel, Leisure, Jazz, Country, National, Oldies, Folk Music
and Documentations.
RDS (Radio Data System)
The RDS enables best possible use of your RDS-equipped radio device. The RDS
enables stations to send data which help you use your radio (e.g. short messages,
programme information, weather reports, general information, traffic news, music tracks
or phone numbers at which the station can be contacted etc.). RDS information is sent
by a large number of stations which broadcast on FM.
AF (Alternative frequencies)
The radio contains information on the frequencies of the nearest stations. This enables
it to use the strongest FM signal of the selected station. This is particularly useful and
convenient for you as a driver, as it is not necessary to readjust the radio when
travelling through the different transmission areas.
REG (Regional mode)
Many local stations only have a few frequencies and their transmission area is limited.
Several local stations have networked their stations which are spread over the entire
transmission area so that your radio can switch to another transmission point of the
same station if the signal becomes weak. If you wish to continue listening to the same
station irrespective of the strength and quality of the signal, leave the REG function
switched on as described on the previous pages.
TA and TP (Traffic Announcement and Traffic Programme)
If a local station broadcasts traffic announcements, the radio receives a corresponding
signal. This information can also be used without having to listen to the entire
programme of this station. If a traffic announcement is made, the radio automatically
interrupts the operation of the functions AUX / CD / USB / SD, transmits the
announcement and shows TRAFFIC on the display. After the announcement the device
returns to the previous mode, i.e. it switches over to AUX, CD, USB or SD.
EON (Enhanced Other Networks)
Your car radio is equipped with the EON (Enhanced Other Networks) function. It can
therefore switch over from a national station (e.g. RADIO ONE) to the traffic
42
announcement of a local station and return to the national station after the
announcement has been made. Example: You are listening to RADIO FOUR with the
traffic announcement (TA) function switched on or you are listening to a CD, or have
the volume turned down low. If the local station sends a traffic announcement, RADIO
FOUR sends an RDS signal that lets your radio transmit the traffic announcement of
the local station. The device already knows the frequency of the local station in this
area. The device first checks whether the signal of the local station is strong enough
and then switches over from RADIO FOUR, interrupts playback of other audio sources
for the duration of the announcement and increases the volume to the level set for
traffic announcements. At the end of the announcement the device switches back to its
previous setting. With the EON function the device already knows the frequencies of
the other local and national stations which can be received in this area. If you change
stations, the device already knows which frequencies it can select.
43
English
Glossary - CRB-631
CRB-631 - Index
20 Index
Additional information ........................ 7
Alphabetical search ......................... 26
Alternative frequency (AF/REG) ...... 21
AS/PS button ................................... 25
Audio settings .................................. 23
Auto Connect ................................... 32
AVRCP ............................................ 33
Basic functions ................................. 23
Bluetooth function ............................ 32
Bluetooth menu ................................ 34
Button functions ............................... 20
CALL LIST ....................................... 34
Call transferring ............................... 35
Call waiting ...................................... 35
Care and maintenance .................... 36
Care of CDs ..................................... 36
Children ............................................. 8
Contents ............................................ 1
Copyright ........................................... 4
Declaration of Conformity ................ 41
Delete paired phone ........................ 35
Delete track...................................... 31
Direct dial (D-DIAL) .......................... 34
DISP button ..................................... 27
Display ............................................. 18
Disposal ............................................. 9
EON ................................................. 42
Factory settings ............................... 28
Folder search ................................... 26
General information ........................... 7
Glossary........................................... 42
Hotline No. ....................................... 40
Important safety information .............. 5
Installation........................................ 11
Installing the device ......................... 14
Intended use ...................................... 3
44
iPOD© support .................................29
ISO connection .................................11
Items supplied ..................................10
Loading / ejecting a CD ....................27
Manufacturer's information .................4
Mode button .....................................20
Notes on connection ...........................6
Notes on operation .............................6
ON/OFF/MUTE .................................23
Overview of the device .....................16
Pairing the devices ...........................32
Persons with disabilities .....................8
Power supply ....................................11
Preliminary notes ................................4
Programme type (PTY).....................21
Record function ................................30
Record mode ....................................30
Redial (L-DIAL) .................................34
Remote control .................................22
Removing the device ........................15
SD card slot ......................................30
SEL button ........................................23
Speakers ..........................................13
Start/stop recording ..........................31
Storage and transport .........................8
Streaming audio with A2DP ..............33
Technical data ..................................39
Telephone functions .........................34
Track number search........................25
Traffic announcement (TA) ...............21
Troubleshooting ................................37
USB socket .......................................29
Voice dialling ....................................34
Volume control..................................23
Warranty information ........................40