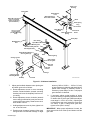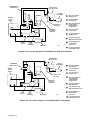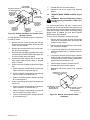
1
OM-889B February 1993 Eff. w/Serial Number KC237900 Processes Automatic Welding Description Automatic Welding Sidebeam Travel Master SB-10D Visit our website at www.MillerWelds.com From Miller to You Thank you and congratulations on choosing Miller. Now you can get the job done and get it done right. We know you don’t have time to do it any other way. That’s why when Niels Miller first started building arc welders in 1929, he made sure his products offered long-lasting value and superior quality. Like you, his customers couldn’t afford anything less. Miller products had to be more than the best they could be. They had to be the best you could buy. Today, the people that build and sell Miller products continue the tradition. They’re just as committed to providing equipment and service that meets the high standards of quality and value established in 1929. This Owner’s Manual is designed to help you get the most out of your Miller products. Please take time to read the Safety precautions. They will help you protect yourself against potential hazards on the worksite. We’ve made installation and operation quick and easy. With Miller you can count on years of reliable service with proper maintenance. And if for some reason the unit needs repair, there’s a Troubleshooting section that will help you Miller is the first welding figure out what the problem is. The parts list equipment manufacturer in will then help you to decide which exact part the U.S.A. to be registered to the ISO 9001 Quality System you may need to fix the problem. Warranty and Standard. service information for your particular model are also provided. Miller Electric manufactures a full line of welders and welding related equipment. For information on other quality Miller products, contact your local Miller distributor to receive the latest full line catalog or individual catalog sheets. To locate your nearest distributor or service agency call 1-800-4-A-Miller, or visit us at www.MillerWelds.com on the web. Working as hard as you do – every power source from Miller is backed by the most hassle-free warranty in the business. Miller offers a Technical Manual which provides more detailed service and parts information for your unit. To obtain a Technical Manual, contact your local distributor. Your distributor can also supply you with Welding Process Manuals such as SMAW, GTAW, GMAW, and GMAW-P. TABLE OF CONTENTS Section No. Page No. SECTION 1 – SAFETY PRECAUTIONS AND SIGNAL WORDS 1-1. 1-2. General Information And Safety . . . . . . . . . . . . . . . . . . . . . . . . . . . . . . . Safety Alert Symbol And Signal Words . . . . . . . . . . . . . . . . . . . . . . . . . 1 1 SECTION 2 – SPECIFICATIONS 2-1. Description . . . . . . . . . . . . . . . . . . . . . . . . . . . . . . . . . . . . . . . . . . . . . . . . . 2 SECTION 3 – INSTALLATION 3-1. 3-2. 3-3. 3-4. 3-5. 3-6. 3-7. 3-8. Location . . . . . . . . . . . . . . . . . . . . . . . . . . . . . . . . . . . . . . . . . . . . . . . . . . . . Supplied Equipment . . . . . . . . . . . . . . . . . . . . . . . . . . . . . . . . . . . . . . . . . . Beam Installation . . . . . . . . . . . . . . . . . . . . . . . . . . . . . . . . . . . . . . . . . . . . Carriage And Carriage Motor Installation . . . . . . . . . . . . . . . . . . . . . . . . Carriage Control Meter Display Selection Procedure . . . . . . . . . . . . . . Carriage Control Installation . . . . . . . . . . . . . . . . . . . . . . . . . . . . . . . . . . . Spool Support Assembly Installation . . . . . . . . . . . . . . . . . . . . . . . . . . . Electrical Connections . . . . . . . . . . . . . . . . . . . . . . . . . . . . . . . . . . . . . . . . 3 3 3 3 5 5 5 6 SECTION 4 – AUTOMATIC WELD CONTROL CONNECTIONS 4-1. Interconnecting Cord Selection . . . . . . . . . . . . . . . . . . . . . . . . . . . . . . . . 4-2. Standard Welding Connections . . . . . . . . . . . . . . . . . . . . . . . . . . . . . . . . Diagram 4-1. Connection Diagram For AUTOMATIC 1A Weld Control Models . . . . . . . . . . . . . . . . . . . . . . . . . . . . . . . . . . Diagram 4-2. Connection Diagram For AUTOMATIC 1DA Weld Control Models . . . . . . . . . . . . . . . . . . . . . . . . . . . . . . . . . . Diagram 4-3. Connection Diagram For AUTOMATIC 1DA-PS Weld Control Models . . . . . . . . . . . . . . . . . . . . . . . . . . . . . . . . . . Diagram 4-4. Connection Diagram For AUTOMATIC 2A Weld Control Models . . . . . . . . . . . . . . . . . . . . . . . . . . . . . . . . . . Diagram 4-5. Connection Diagram For SYSTEM 9A Weld Control Models . . . . . . . . . . . . . . . . . . . . . . . . . . . . . . . . . . 4-3. Skip Welding Connections . . . . . . . . . . . . . . . . . . . . . . . . . . . . . . . . . . . . 4-4. Remote Start/Stop Connections For Non-MILLER Automatic Weld Controls (For Non-MILLER Controls Only) . . . . . . . . . . . . . . . . . 6 7 8 9 9 10 10 11 13 SECTION 5 – CUSTOMER-SUPPLIED REMOTE CONTROL CONNECTIONS (Optional) 5-1. 5-2. 5-3. 5-4. 5-5. Required Equipment . . . . . . . . . . . . . . . . . . . . . . . . . . . . . . . . . . . . . . . . . Carriage Control Remote Start And Stop . . . . . . . . . . . . . . . . . . . . . . . . Remote Jog Direction . . . . . . . . . . . . . . . . . . . . . . . . . . . . . . . . . . . . . . . . Remote Travel Direction . . . . . . . . . . . . . . . . . . . . . . . . . . . . . . . . . . . . . . Remote Travel Speed Control . . . . . . . . . . . . . . . . . . . . . . . . . . . . . . . . . 14 14 15 15 16 SECTION 6 – OPERATOR CONTROLS 6-1. 6-2. 6-3. 6-4. 6-5. 6-6. 6-7. 6-8. Power Switch . . . . . . . . . . . . . . . . . . . . . . . . . . . . . . . . . . . . . . . . . . . . . . . Jog Direction Switch . . . . . . . . . . . . . . . . . . . . . . . . . . . . . . . . . . . . . . . . . Jog Speed Control . . . . . . . . . . . . . . . . . . . . . . . . . . . . . . . . . . . . . . . . . . . Travel Direction Switch . . . . . . . . . . . . . . . . . . . . . . . . . . . . . . . . . . . . . . . Travel Speed Control . . . . . . . . . . . . . . . . . . . . . . . . . . . . . . . . . . . . . . . . . Digital Meter . . . . . . . . . . . . . . . . . . . . . . . . . . . . . . . . . . . . . . . . . . . . . . . . Start/Stop Push Buttons . . . . . . . . . . . . . . . . . . . . . . . . . . . . . . . . . . . . . . Delay Time Control (Optional) . . . . . . . . . . . . . . . . . . . . . . . . . . . . . . . . . 17 17 17 17 18 18 18 18 Section No. Page No. SECTION 7 – SEQUENCE OF OPERATION 7-1. 7-2. 7-3. Gas Metal Arc Welding (GMAW) And Flux Cored Arc Welding (FCAW) - Continuous . . . . . . . . . . . . . . . . . . . . . . . . . . . . . . . . . Gas Metal Arc Welding (GMAW) And Flux Cored Arc Welding (FCAW) - Spot . . . . . . . . . . . . . . . . . . . . . . . . . . . . . . . . . . . . . . . Shutting Down . . . . . . . . . . . . . . . . . . . . . . . . . . . . . . . . . . . . . . . . . . . . . . 19 20 20 SECTION 8 – MAINTENANCE & TROUBLESHOOTING 8-1. 8-2. 8-3. 8-4. 8-5. Inspection And Upkeep . . . . . . . . . . . . . . . . . . . . . . . . . . . . . . . . . . . . . . . Overload Protection . . . . . . . . . . . . . . . . . . . . . . . . . . . . . . . . . . . . . . . . . . Reinstallation Of Hub Assembly . . . . . . . . . . . . . . . . . . . . . . . . . . . . . . . Brush Inspection And Replacement . . . . . . . . . . . . . . . . . . . . . . . . . . . . Troubleshooting . . . . . . . . . . . . . . . . . . . . . . . . . . . . . . . . . . . . . . . . . . . . . 21 21 21 22 23 SECTION 9 – ELECTRICAL DIAGRAMS Diagram 9-1. Diagram 9-2. Diagram 9-3. Diagram 9-4. Diagram 9-5. Diagram 9-6. Circuit Diagram . . . . . . . . . . . . . . . . . . . . . . . . . . . . . . . . . . . . . . . Wiring Diagram . . . . . . . . . . . . . . . . . . . . . . . . . . . . . . . . . . . . . . . Circuit Diagram For Motor Control Board PC1 . . . . . . . . . . . . . Circuit Diagram For Timer Board PC2 . . . . . . . . . . . . . . . . . . . . Circuit Diagram For Tachometer Board PC3 . . . . . . . . . . . . . . Circuit Diagram For Optional Remote Pendant Control RP-SB-10D . . . . . . . . . . . . . . . . . . . . . . . . . . . . . . . . . . . . 26 28 29 30 31 31 SECTION 10 – PARTS LIST Figure 10-1. Main Assembly (Section A) . . . . . . . . . . . . . . . . . . . . . . . . . . . . . . . Figure 10-1. Main Assembly (Section B) . . . . . . . . . . . . . . . . . . . . . . . . . . . . . . . Figure 10-2. Control Box . . . . . . . . . . . . . . . . . . . . . . . . . . . . . . . . . . . . . . . . . . . . 32 35 36 LIST OF CHARTS AND TABLES Table 2-1. Specifications . . . . . . . . . . . . . . . . . . . . . . . . . . . . . . . . . . . . . . . . . . . . Chart 2-1. Load Curve . . . . . . . . . . . . . . . . . . . . . . . . . . . . . . . . . . . . . . . . . . . . . . Table 4-1. Remote Start/Stop Connections To Automatic Weld Control . . . . Table 4-2. Skip Welding Connections . . . . . . . . . . . . . . . . . . . . . . . . . . . . . . . . . Table 8-1. Troubleshooting . . . . . . . . . . . . . . . . . . . . . . . . . . . . . . . . . . . . . . . . . . 1 1 7 12 23 SECTION 1 – SAFETY PRECAUTIONS AND SIGNAL WORDS 1-1. GENERAL INFORMATION AND SAFETY A. General Information presented in this manual and on various labels, tags, and plates on the unit pertains to equipment design, installation, operation, maintenance, and troubleshooting which should be read, understood, and followed for the safe and effective use of this equipment. The nameplate of this unit uses international symbols for labeling the front panel controls. The symbols also appear at the appropriate section in the text. B. Safety The installation, operation, maintenance, and troubleshooting of arc welding equipment requires practices and procedures which ensure personal safety and the safety of others. Therefore, this equipment is to be installed, operated, and maintained only by qualified persons in accordance with this manual and all safety precautions listed in the Arc Welding Safety Precautions in the welding power source Owner’s Manual. 1-2. SAFETY ALERT SYMBOL AND SIGNAL WORDS The following safety alert symbol and signal words are used throughout this manual to call attention to and identify different levels of hazard and special instructions. This safety alert symbol is used with the signal words WARNING and CAUTION to call attention to the safety statements. WARNING statements identify procedures or practices which must be followed to avoid serious personal injury or loss of life. CAUTION statements identify procedures or practices which must be followed to avoid minor personal injury or damage to this equipment. IMPORTANT statements identify special instructions necessary for the most efficient operation of this equipment. SECTION 2 – SPECIFICATIONS Table 2-1. Specifications Electrical Requirements For Carriage Control Beam Length 115 Volts, 2 Amps AC 50/60 Hz Total Length: 10 ft. (3 m) Carriage Travel Range: 8 ft. (2.4 m) Load Rating 250 lbs. (113 kg) at 2 ft. (0.6 m) From Face of Carriage Carriage Travel Speed Carriage Tracking Accuracy Shipping Weight 5 to 125 ipm (0.1 to 3.2 mpm) ± .015 in. (0.4 mm) 1240 lbs. (563 kg) Chart 2-1. Load Curve CAUTION: INCORRECT CARRIAGE LOADING can cause personal injury and equipment damage. • Net effective load must be in a downward direction. • Total load weight must fall within safe operating zone curve on Chart 2-1. The carriage will not resist upward loads. SA-121 962 OM-889 Page 1 S G K J I R H L M A B C D N E F P O O Q Q Side View Front View SD-122 295 Side View Inches Millimeters A B C D E F G H* I 1 14 12 16 24 40-1/2 6-1/4 54 79 25.4 355.6 304.8 406.4 609.6 1028.7 158.8 1371.6 2006.6 * Crossarm can also be mounted at 49-3/4 in. (1263.7 mm) or 58-1/4 in. (1479 mm). Front View J L M N O P Q R S 66-3/4 19-1/2 11-1/2 24 1 6 104-1/2 8 61-3/4 120 Millimeters 1695.5 495.3 292.1 609.6 25.4 152.4 2654.3 203.2 1568.5 3048 Inches K Figure 2-1. Dimensional View 2-1. DESCRIPTION The Sidebeam is a heavy-duty fixture designed to automate straight-line, horizontal manufacturing applications. The unit is equipped with an electronic Carriage Control which provides precise speed and direction control of the carriage. The Carriage Control is equipped with a digital meter and a ten-turn TRAVEL SPEED control which allows travel speeds to be precisely set and monitored during operation. The control is also equipped with a JOG SPEED control and JOG DIRECTION switch which allow the operator to position the carriage without affecting the actual process settings. The carriage can be manually moved along the beam by disengaging the motor release lever and rolling the carriage to the desired position. OM-889 Page 2 This equipment was designed primarily for Gas Metal Arc Welding (GMAW) and Submerged Arc Welding (SAW); however, because of its extreme joint following accuracy (± 0.015 in. or ±0.4 mm) and wide travel speed range (5 to 125 ipm; 0.1 to 3.2 mpm), it can also be used for other liner applications such as non-critical Gas Tungsten Arc Welding (GTAW) and plasma cutting. The Sidebeam can be used with various power sources and automatic weld controls. This unit is supplied with cords required for connections to any MILLER Automatic Weld Control. Additional accessory equipment may be mounted in the holes provided in the front face of the carriage and/or crossarm. SECTION 3 – INSTALLATION 3-1. LOCATION (Figures 2-1 And 3-1) 1. Secure beam mounting post assemblies to floor (hardware must be customer supplied). 2. Install beam onto mounting post assemblies using supplied 1/2-13 x 1-1/4 in. hardware. Tighten screws, then loosen them 1/4 turn. Select an installation site which provides the following: 1. Mounting surface capable of supporting weight of Sidebeam assembly 2. Adequate space for carriage travel and equipment installation 3. Install two supplied 1/2-13 x 1-1/4 in. leveling screws into underside of each mount bracket. 3. Correct input power supply 4. Adjust leveling screws until beam is level. 4. Adequate ventilation and fresh air supply 5. 5. No flammables Tighten beam mounting screws, securing beam to mounting post assemblies. 6. A clean and dry area 3-4. 7. Proper airflow around unit CARRIAGE AND CARRIAGE MOTOR INSTALLATION (Figure 3-1) 8. Adequate space for removing wrapper(s) and components for installation, inspection, maintenance, and repair functions. 1. Loosen securing nut on top side of each front cam follower (cam followers closest to front face of carriage). 2. Rotate the two front cam followers on carriage out as far as possible away from the two rear cam followers. Holes are provided in the mounting posts, carriage, and crossarm for installing equipment. 3-2. WARNING: IMPROPER LIFTING OR INSTALLING OF EQUIPMENT can cause personal injury and equipment damage. • Use equipment of adequate capacity to lift components. SUPPLIED EQUIPMENT (Figure 3-1) The following equipment is supplied as standard and requires installation or assembly: 1. Beam 2. Beam Mounting Posts 3. Carriage Control With Mounting Bracket 4. Crossarm 5. Carriage 6. Spool Support Assembly 7. Carriage Control Motor Assembly 8. Automatic Weld Control Interconnecting Cords (see Section 4 - AUTOMATIC WELD CONTROL CONNECTIONS) 3. IMPORTANT: If vertically installing carriage, tip bottom of carriage slightly upward to make installation easier. If sliding carriage onto end of beam, remove safety stop, but be sure to reinstall stop after carriage is installed. 4. BEAM INSTALLATION (Figure 3-1) WARNING: IMPROPER LIFTING OR INSTALLING OF EQUIPMENT can cause personal injury and equipment damage. • Use equipment of adequate capacity to lift components. • Use bolts and fasteners of adequate capacity to assemble and install unit. FALLING BEAM ASSEMBLY can cause serious personal injury and equipment damage. • Use 3/4 in. (19.1 mm) diameter SAE grade 5 noncorrosive steel hardware for securing beam mounting post assemblies to floor. Install the motor mounting bracket onto the carriage as follows: a. Install motor adjustment screw into threaded hole in motor mounting bracket (see Figure 3-1). Install screw so that head of screw will face motor when it is installed. IMPORTANT: Automatic Weld Control is not supplied as standard with this unit. 3-3. Install carriage onto beam by lowering it vertically from above the beam, or by sliding it horizontally onto the beam from either end. (After carriage is installed, be sure that bearing bar on top side of beam is located between the front and rear cam followers on the carriage.). b. Install lock nut onto end of adjustment screw. c. Install motor mounting bracket onto underside of carriage top surface using the supplied 3/8-16 x 7/8 in. button-head socket capscrews. 5. Install and secure motor into mounting bracket using the two supplied shoulder bolts. Install motor with motor cord up and motor spring ring facing the beam. Be sure that the motor pinion gear rides in the gear rack on the beam. 6. Install supplied motor engagement spring from ring on rear of motor casing to ring on back surface of carriage. OM-889 Page 3 Motor Cord And Plug Bearing Bar Motor Release Lever Motor Adjustment Screw And Lock Nut Beam (Be sure beam rests on horizontal surface of mounting post assemblies.) Motor Motor Spring Ring Pinion Gear Motor Mounting Bracket 1/2-13 x 1-1/4 in. Leveling Screw (2 In Each Mounting Post). Motor Engagement Spring Pinion Gear Guard Safety Stop Beam Mounting Post Riser Clamp Spool Mount Riser Spool Mounting Arm Hub Assembly Hex Nut Hub Support Shaft Motor Mounting Bracket Securing Screw (4) Hub Retaining Ring Carriage Control Cam Follower Securing Nut Rear Cam Follower Front Cam Follower Carriage Carriage Control Mounting Bracket End Cap Crossarm Ref. SD-122 294 Figure 3-1. Sidebeam Installation 7. Adjust gear backlash between motor pinion gear and beam gear rack as follows: a. Rotate adjustment screw in motor mounting bracket counterclockwise (towards mounting bracket) until screw is completely free from motor casing. b. Rotate adjustment screw clockwise (towards motor casing) until head of screw just comes in contact with motor casing. Rotate screw clockwise another 1/8 turn. c. Holding adjustment screw in place, tighten lock nut on end of screw. d. Examine gear clearance between pinion gear and gear rack from beneath carriage. A slight OM-889 Page 4 amount (0.002 to 0.005 in. – 0.05 to 0.13 mm) of gear clearance is desirable and should be apparent when carriage is manually moved. If necessary, repeat Steps 7a thru c until proper gear clearance is obtained. 8. If necessary, adjust vertical position of pinion gear by loosening or tightening adjustment screw on bottom side of pinion gear. (Maximum adjustment range is ± 1/32 in. or 0.8 mm.) If pinion gear is riding above gear rack, loosen the screw (turn out screw). If gear is riding below gear rack, tighten screw (turn in screw). IMPORTANT: When proper adjustment is made, the pinion gear will be flush at the top and bottom with the gear rack. 9. Install supplied pinion gear guard onto bottom side of motor casing. 1. Adjust position of front two cam rollers on carriage as follows: If applicable, remove the four screws securing the Carriage Control to the mounting bracket, and remove the control from the bracket. 10. 2. IMPORTANT: All directions, such as left or right, are with respect to the operator facing the carriage. Remove the securing screws from control wrapper, and remove wrapper. 3. Locate Meter Selection Switch on Timer Board PC2 (PC2 is located on the base panel in the control). Place Selection switch in desired position (IPM or MPM). 4. Reinstall and secure control wrapper. 5. Reposition and secure control onto control mounting bracket. 3-6. CARRIAGE CONTROL INSTALLATION (Figure 3-1) a. Be sure that a safety stop is installed onto each end of beam. b. Roll carriage to right end of beam. c. Using a 1/4 in. (6.4 mm) Allen wrench, rotate cam adjustment on underside of right, front cam follower until cam is as close to beam bearing bar as possible without touching it. d. Tighten nut on top side of cam follower. e. Roll carriage to left end of beam, and adjust position of left, front cam follower according to Steps 10c and d. 11. 3-5. Install motor release lever onto either side of motor casing with lever extending out over carriage. Secure lever to motor using supplied 5/16-18 button-head socket capscrews. 1. Install and secure end cap onto crossarm. 2. Install and secure crossarm onto front face of carriage using supplied 3/8-16 x 1-1/2 in. hardware. (Three mounting positions are available. Refer to Figure 3-1.) IMPORTANT: The crossarm may be shortened. Cut crossarm to desired length. 3. Install Carriage Control mounting bracket to either side of crossarm, and secure bracket using supplied 3/8-16 x 1 in. hardware. 4. Remove base mounting screws in Carriage Control, and install control onto mounting bracket, aligning mounting screws with holes in mounting bracket. 5. Reinstall base mounting screws. CARRIAGE CONTROL METER DISPLAY SELECTION PROCEDURE WARNING: ELECTRIC SHOCK can kill. • Do not touch live electrical parts. • Shut down Carriage Control and welding power source, and disconnect input power employing lockout/tagging procedures before inspecting, installing, or adjusting. Lockout/tagging procedures consist of removing input plug from receptacle, padlocking line disconnect switch in open position, removing fuses from fuse box, or shutting off and red-tagging circuit breaker or other disconnecting device. CAUTION: ELECTROSTATIC DISCHARGE (ESD) can damage circuit board components. • Put on properly grounded wrist strap BEFORE handling circuit boards. • Transport all static-sensitive components in proper static-shielding carriers or packages. • Perform work only at static-safe work area. The digital meter is capable of reading the travel or jog speed in inches per minute (ipm) or meters per minute (mpm). The unit is shipped with the meter set to display the speed in ipm. To change the meter display, proceed as follows: 3-7. SPOOL SUPPORT ASSEMBLY INSTALLATION (Figure 3-1) 1. Slip the riser clamp over the spool mount riser. 2. Install and secure riser assembly onto top of carriage using supplied 3/8-16 x 1-1/2 in. hex-head capscrews and associated hardware. 3. Install spool mounting arm onto riser, aligning mounting holes in arm with desired holes in riser. Secure arm using supplied 1/2-13 x 3-1/2 in. hexhead capscrews and associated hardware. 4. Install the hub assembly onto the spool mounting arm as follows: a. Remove hex nut from end of hub support shaft. b. Install the hub support shaft through the desired mounting hole in the mounting arm. c. Reinstall and secure hex nut onto end of support shaft. OM-889 Page 5 3-8. ELECTRICAL CONNECTIONS WARNING: ELECTRIC SHOCK can kill. • Do not touch live electrical parts. • Shut down Carriage Control and welding power source, and disconnect input power employing lockout/tagging procedures before inspecting, installing, or adjusting. Lockout/tagging procedures consist of removing plug from receptacle, padlocking line disconnect switch in open position, removing fuses from fuse box, or shutting off and red-tagging circuit breaker or other disconnecting device. Strain Relief Clamps 115 VAC Power Cord And Plug Motor Control Receptacle SA-122 297-A Figure 3-2. Electrical Connections To Carriage Control (Rear View Of Control) A. Connection To Carriage Control Motor (Figures 3-1 And 3-2) B. Connection Of Power Cord (Figure 3-2) Locate supplied 5 ft. (1.5 m) Motor Interconnecting Cord, and connect 14-pin plug on one end of cord to 14-socket plug on cord from Carriage Control motor (see Figure 3-1). This unit is supplied with a 25 ft. (7.6 m) long, three-conductor power cord with attached three-prong polarized plug. Connect the plug to a properly grounded and protected (fuses or circuit breakers) 115 VAC receptacle capable of handling at least 2 amperes. Connect remaining end of Motor Interconnecting Cord to Carriage Control as follows: align keyways, insert 14-pin plug from cord into 14-socket Motor Control receptacle on rear of Carriage Control (see Figure 3-2), and rotate threaded collar fully clockwise. C. Connection (Optional) To Automatic Weld Control See following Section 4 - AUTOMATIC WELD CONTROL CONNECTIONS (Optional). SECTION 4 – AUTOMATIC WELD CONTROL CONNECTIONS (Optional) IMPORTANT: This unit is supplied with interconnecting cords required for connections to the following MILLER weld control models: Automatic 1 or 1A Automatic 1D-DW or 1DA Automatic 1D-PS or 1DA-PS Automatic 2 or 2A System 9 or 9A To simplify installation, the weld control model will be identified by its latest model designator; therefore, the Automatic 1 or 1A is identified as the 1A model, the System 9 or 9A as the 9A model, etc. ic Weld Control. The normally-open relay contact is between terminals A and B on terminal strip 2T, and the normally-closed relay contact is between terminals B and C on 2T. Both contacts are energized whenever the Carriage Control START button is activated or the carriage control is remotely activated. Both relays deenergize when the Carriage Control STOP button, optional Remote Pendant Stop push button, or optional Limit Switch are activated. 2. Selection Select Remote Start/Stop cord as follows: a. Locate supplied bag with four interconnecting cords enclosed. b. For 2A models only, locate the 5 ft. (1.5 m) long cord with 10-pin plug. This cord is the 2A’s Remote Start/Stop cord. Disregard Step C and proceed to IMPORTANT block. IMPORTANT: The supplied cords may also be used with non-MILLER weld controls; however, it may be necessary to wire a different plug or cord to interface with a non-MILLER control. See Section 4-4 for Non-MILLER Automatic Weld Control connection instructions. c. 4-1. INTERCONNECTING CORD SELECTION A. Remote Start/Stop Cord 1. Function The Remote Start/Stop cord connects the Carriage Control to the Automatic Weld Control. When properly connected, the Remote Start/Stop cord enables the normally-open and normally-closed relay contact in the Carriage Control to remotely start and stop an AutomatOM-889 Page 6 For all models except the 2A, locate 6 ft. (1.8 m) long cord with spade terminals on each end, this cord is the Remote Start/Stop cord. IMPORTANT: To simplify installation, label the Remote Start/Stop cord with an “R” to represent Remote. The Remote Start/Stop cord will be referred to as cord R throughout the installation instructions. B. Carriage Movement Control Cord 1. Function WORN OR CUT CORD can cause serious personal injury or equipment damage. • Route and secure all cords from welding power source to Carriage Control and Automatic Weld Control over top of beam between carriage release lever and carriage motor casing. • Secure cords away from motor pinion gear and beam gear rack on back of beam. • Secure all cords away from work area. In normal operation, upon pressing the Carriage Control START button, the unit immediately starts welding, and the carriage immediately starts moving; however, installing the Carriage Movement Control cord allows the operator to coordinate fixture movement with the weld cycle. When the Carriage Movement Control cord is installed, the unit initiates the weld cycle upon pressing the START button, but the carriage will not move until the unit receives a command from the Automatic Weld Control. 2. Selection Select Carriage Movement Control cord as follows: Locate the supplied bag of interconnecting cords, and select Carriage Movement Control cord suitable for the Automatic Weld Control model as follows: Carriage Movement Control Cord Description A. Connections to Automatic Weld Control (Table 4-1) WARNING: Read and follow safety information at beginning of entire Section 4-2 before proceeding. Automatic Weld Control Model 1A 1DA 1DA-PS 6 ft. (1.8 m) long, Spade Terminal on Both Ends 6 ft. (1.8 m) long, Spade Terminal & Friction Lug Ends After following Section 4-1 to select appropriate Remote Start/Stop and Carriage Movement Control cords (cords R and C, respectively), refer to Diagrams 4-1 thru 4-5 and proceed as follows to connect cords to the Automatic Weld Control and Carriage Control. X X 2A 9A X X X 1. Loosen screw from door on upper panel of the weld control, and open door. 2. Use Table 4-1 to determine which jumper link to remove from terminal strip 1. (9A models do not require jumper link removal.) IMPORTANT: Retain jumper links for later installation. 3. For 2A models only, install 10-pin plug on end of cord R to 10-socket Remote Pendant control receptacle on right side panel of weld control as follows: align keyway, insert plug, and rotate threaded collar fully clockwise. Proceed to Step 6. 4. Loosen strain relief on right side of control. 5. To connect cord R to weld control, proceed as follows: IMPORTANT: To simplify installation, label the Carriage Movement Control cord with a “C” to represent Carriage. The Carriage Movement Control cord will be referred to as cord C throughout the installation instructions. IMPORTANT: After selecting interconnecting cords suitable for weld control, discard remaining cords supplied in bag. 4-2. STANDARD WELDING CONNECTIONS IMPORTANT: If Skip welding operation is desired, disregard Section 4-2 and proceed to Section 4-3. SKIP WELDING CONNECTIONS. WARNING: ELECTRIC SHOCK can kill. • Do not touch live electrical parts. • Shut down Carriage Control, Automatic Weld Control, and welding power source, and disconnect input power employing lockout/tagging procedures before making internal connections. Lockout/tagging procedures consist of removing input plug from receptacle, padlocking line disconnect switch in open position, removing fuses from fuse box, or shutting off and red-tagging circuit breaker or other disconnecting device. a. Route one end of cord R through clamp to terminal strip 1T. For 9A models only, route to terminal strip 2T. b. Use Table 4-1 to connect end of cord R to either terminal strip 1T or 2T (polarity is not important). Table 4-1. Remote Start/Stop Connections To Automatic Weld Control Automatic Weld Control Model Remove Jumper Link Between These Terminals* Connect Cord Between These Terminals* 1A G and H on 1T H and K on 1T 1DA E and F on 1T F and H on1T 1DA-PS F and G on 1T G and J on1T 2A K and L on 1T Install 10-pin plug. See proceeding Step 3. 9A NONE A and F on 2T OM-889 Page 7 *Terminals located on either terminal strip 1T or terminal strip 2T in weld control. 2. Remove the securing screws from control wrapper, and remove wrapper. To connect cord C to weld control, proceed as follows: 3. Loosen upper strain relief clamp on rear of control. a. For 2A models only, reinstall jumper link between terminals M and N of terminal strip 2T, and connect cord between terminals L and P of 2T. Proceed to Step 7. 4. To connect cord R to Carriage Control, proceed as follows: 6. a. Locate terminal strip 2T mounted vertically on a bracket within the Carriage Control. b. Route remaining spade terminal end of cord R through clamp to terminal strip 2T. b. For 9A models only, remove snubber at terminals G and H of terminal strip 3T, and connect cord between terminals G and H of 3T. Proceed to Step 7. c. c. For all models except the 2A and 9A, route end of cord C with friction terminals through clamp to receptacle RC4. (RC4 is located on component mounting panel on rear panel of unit, and connections can be made to its 3/16 inch male friction connectors.) 5. Tighten strain relief clamp, if applicable. 8. Close and secure access door. a. Locate terminal strip 1T mounted to the bottom panel of the Carriage Control. b. Route remaining spade terminal end of cord C to terminal strip 1T. c. B. Connections to Sidebeam Carriage Control Remove jumper links between terminals C and D and terminals K and L on terminal strip 1T. d. Connect friction terminals from cord to terminal D and L on terminal strip 1T. WARNING: Read and follow safety information at beginning of entire Section 4-2 before proceeding. 1. To connect cord C to Carriage Control, proceed as follows: IMPORTANT: If the Carriage Control is equipped with the optional Delay Time Control, disregard the following installation instructions, and refer to field installation instructions for Delay Time Control Option. d. Install friction terminals to terminals F and H of receptacle RC4. 7. Install spade terminals to terminals A and B on 2T. If applicable, remove the four screws securing the Carriage Control to the mounting bracket, and remove the control from the bracket. 6. Tighten strain relief clamp, and reinstall and secure control wrapper. 7. If applicable, reposition and secure control onto mounting bracket. Rear View Of Carriage Control AUTOMATIC 1A Weld Control E Carriage Drive Motor F elding Power Source F H A 25 ft. (8 m) Voltage Sensing Cord B 5 ft. (1.5 m) Motor Control Cord C 10 ft. (3 m) Shunt Control Cord D 25 ft. (8 m) Electrical Input/Contactor Control/Voltage Control Cord E 6 ft. (1.8 m) Remote Start/Stop Cord (Spade Terminal Ends) F 6 ft. (1.8 m) Carriage Movement Control Cord (Friction Lug and Spade Terminal Ends) G Accessory/External Control Device Connection H 5 ft. (1.5 m) Carriage Control Motor Cord A G E D D 115 VAC Cord And Plug C Automatic Flux Valve (Optional) B C A Shunt Control Wire Drive Assembly Workpiece S-0260 Diagram 4-1. Connection Diagram For AUTOMATIC 1A Weld Control Models OM-889 Page 8 AUTOMATIC 1DA Weld Control Rear View Of Carriage Control E Carriage Drive Motor F A 30 ft. (9 m) Voltage Sensing Cord B 5 ft. (1.5 m) Motor Control Cord C 10 ft. (3 m) Shunt Control Cord D 25 ft. (8 m) Electrical Input/Contactor Control/Voltage Control Cord E 6 ft. (1.8 m) Remote Start/Stop Cord (Spade Terminal Ends) F 6 ft. (1.8 m) Carriage Movement Control Cord (Friction Lug and Spade Terminal Ends) G Accessory/External Control Device Connection H 5 ft. (1.5 m) Carriage Control Motor Cord F elding Power Source A E B H G 115 VAC Cord And Plug D D C Automatic Flux Valve (Optional) B C A Shunt Control Wire Drive Assembly Workpiece S-0261 Diagram 4-2. Connection Diagram For AUTOMATIC 1DA Weld Control Models AUTOMATIC 1DA-PS Weld Control Rear View Of Carriage Control E Carriage Drive Motor F A 5 ft. (1.5 m) Motor Control Cord B 10 ft. (3 m) Shunt Control Cord C 25 ft. (8 m) Electrical Input/Contactor Control Cord D 25 ft. (8 m) Voltage Control Cord E 6 ft. (1.8 m) Remote Start/Stop Cord (Spade Terminal Ends) F 6 ft. (1.8 m) Carriage Movement Control Cord (Friction Lug and Spade Terminal Ends) G Accessory/External Control Device Connection H 5 ft. (1.5 m) Carriage Control Motor Cord F elding Power Source E H G D C C D 115 VAC Cord And Plug B Automatic Flux Valve (Optional) A B Shunt Control Wire Drive Assembly Workpiece S-0263 Diagram 4-3. Connection Diagram For AUTOMATIC 1DA-PS Weld Control Models OM-889 Page 9 AUTOMATIC 2A Weld Control Rear View Of Carriage Control E Carriage Drive Motor F Welding Power Source H F A E B G 115 VAC Cord And Plug D C A 25 ft. (8 m) Voltage Sensing Cord B 5 ft. (1.5 m) Motor Control Cord C 25 ft. (8 m) Electrical Input/Contactor Control/Voltage Control Cord D 10 ft. (3 m) Shunt Control Cord E 5 ft. (1.5 m) Remote Start/Stop Cord F 6 ft. (1.8 m) Carriage Movement Control Cord G Accessory/External Control Device Connection H 5 ft. (1.5 m) Carriage Control Motor Cord C Automatic Flux Valve (Optional) B D A Shunt Control Wire Drive Assembly Workpiece S-0232 Diagram 4-4. Connection Diagram For AUTOMATIC 2A Weld Control Models Rear View Of Carriage Control E + F F SYSTEM 9A Weld Control Welding Power Source Carriage Drive Motor E D B 30 ft. (9 m) Voltage Sensing Cord B 5 ft. (1.5 m) Motor Control Cord C 10 ft. (3 m) Shunt Control Cord D 25 ft. (8 m) Electrical Input/Contactor Control/Voltage Control Cord E 6 ft. (1.8 m) Remote Start/Stop Cord F 6 ft. (1.8 m) Carriage Movement Control Cord H A G 115 VAC Cord And Plug D Automatic Flux Valve (Optional) B C A Shunt Control A Wire Drive Assembly Workpiece S-0262 G Accessory/External Control Device Connection H 5 ft. (1.5 m) Carriage Control Motor Cord Diagram 4-5. Connection Diagram For SYSTEM 9A Weld Control Models OM-889 Page 10 4-3. SKIP WELDING CONNECTIONS IMPORTANT: Automatic Weld Controls without a digital panel are not capable of Skip Welding. B. Required Equipment The following cords must be obtained by the customer for skip weld connections: 1. A cord of proper type and length to make connections in the Automatic Weld Control. The cord should be a five-conductor cord connected to a triple-pole, single-throw switch. One conductor of the cord should tie together two switch commons of the triple-pole, single-throw switch. 2. A four-conductor cord of proper type and length to make connections from the Automatic Weld Control to the Sidebeam Carriage Control. WARNING: ELECTRIC SHOCK can kill. • Do not touch live electrical parts. • Shut down Carriage Control, Automatic Weld Control, and welding power source, and disconnect input power employing lockout/tagging procedures before making internal connections. Lockout/tagging procedures consist of removing input plug from receptacle, padlocking line disconnect switch in open position, removing fuses from fuse box, or shutting off and red-tagging circuit breaker or other disconnecting device. WORN OR CUT CORD can cause serious personal injury or equipment damage. • Route and secure all cords from welding power source to Carriage Control and Automatic Weld Control over top of beam between carriage release lever and carriage motor casing. • Secure cords away from motor pinion gear and beam gear rack on back of beam. • Secure all cords away from work area. C. Preparation For Skip Welding WARNING: Read and follow safety information at beginning of entire Section 4-3 before proceeding. If unit has not been previously installed for standard operation, disregard this section and proceed to Section D. If unit was previously installed for standard operation and the skip function is desired, proceed as follows: 1. Disconnect Cord At These Terminal Locations Automatic Weld Control Model Terminal Strip 1T Receptacle RC4 1A H and K F and H 1DA F and H F and H 1DA-PS G and J F and H A. Skip Welding Function Installing the Skip welding function is an alternative to the standard installation of this unit. The skip weld function cannot be used with the Adjustable Start Delay or RP-10D Pendant option. When the Sidebeam Carriage Control is modified to accommodate the skip weld function, the front panel START and STOP buttons are disabled, and, if applicable, the optional Limit Switches are disabled. After the skip welding installation is complete, closing a triple-pole, single-throw switch will start the weld cycle. The preflow and postflow times determine the length of time that weld output is NOT present, thereby determining the skip time. During the skip portion of the welding cycle (preflow and postflow periods), the carriage travels in the direction selected by the Sidebeam Carriage Control TRAVEL DIRECTION switch, and it travels at the speed set by the JOG SPEED control. Upon arc initiation, the carriage travels in the direction selected by the Carriage Control TRAVEL DIRECTION switch, and it travels at the speed set on the TRAVEL SPEED control. The unit will weld for the length of time set on the Automatic Weld Control SPOT TIME control. The unit automatically restarts the weld cycle as long as the triplepole, single-throw switch is closed and the SPOT/CONTINUOUS switch on the Automatic Weld Control is in the SPOT position. When the switch is opened, the weld cycle is stopped. Disconnect Automatic Weld Control cord from appropriate terminals on terminal strip 1T and receptacle RC4 according to the following table: 2. Disconnect Sidebeam Carriage Control cord from terminals A and B on 2T, and leads from cord to terminals D and L on terminal strip 1T. 3. Reinstall Carriage Control jumper links between terminals C and D and terminals K and L on terminal strip 1T, and proceed to Section D. D. Connections To Automatic Weld Control (Table 4-2 And Figure 4-1) WARNING: Read and follow safety information at beginning of entire Section 4-3 before proceeding. 1. Obtain both a five-conductor and a four-conductor cord as instructed Section 4-3B. 2. Loosen screw from door on upper panel of the weld control, and open door. 3. Loosen strain relief on right side of weld control, and route end of five-conductor cord not connected to switch through clamp to terminal strips 1T and 2T. 4. Use Table 4-2 to remove jumper link from weld control terminal strip 1T. OM-889 Page 11 5. Use Figure 4-1 to locate leads 1, 2, and 3 from the triple-pole, single-throw switch. IMPORTANT: The switch leads are not numbered. The leads are referred to as leads 1, 2, and 3 in Figure 4-1 to simplify installation. 6. Install lead 1 to terminal A of terminal strip 2T. 7. Use Table 4-2 to install leads 2 and 3 to appropriate terminals of terminal strip 1T. 8. Locate receptacle RC10 on component mounting panel on rear panel of unit. Connect one of the remaining leads to 3/16 in. friction terminals at terminal X of RC10. 9. Route the four-conductor cord from Step 1 through the strain relief clamp on the right side of the weld control, and splice one lead from the four-conductor cord to the remaining lead from the five-conductor cord. 10. Connect one of the three remaining leads from the four-conductor cord to terminal V on receptacle RC10. 11. Locate receptacle RC4 on component mounting panel on rear panel of unit. Connect the two remaining leads to 3/16 in. male friction connectors at terminals F and H on receptacle RC4. 12. Tighten strain relief clamp, and close and secure access door. Table 4-2. Skip Welding Connections (Between Automatic Weld Control And Customer-Supplied Switch) Automatic Weld Remove Jumper Link Switch-To-Terminal Strip Connections* Control Model Between These Terminals* Lead 1 Lead 2 Lead 3 1A G and H on 1T A on 2T G on 1T H on 1T 1DA E and F on 1T A on 2T E on 1T F on 1T 1DA-PS F and G on 1T A on 2T F on 1T G on 1T *Terminal connections located on either terminal strip 1T or terminal strip 2T in weld control. Five-Conductor Cord Triple-Pole, Single-Throw Switch Lead 1 Refer To Table 4-2 Lead 2 For Connections To AUTOMATIC Weld Control Lead 3 To Terminal X On RC10 To Terminal D On 1T Connections To AUTOMATIC Weld Control To Terminal V On RC10 To Terminal J On 1T To Terminal F On RC4 Connections To Carriage To Terminal L On 1T Control To Terminal H On RC4 To Terminal J On 1T Four-Conductor Cord Figure 4-1. Skip Welding Switch Connections (Triple-Pole Single-Throw Switch) OM-889 Page 12 SA-122 745 E. Connections To Sidebeam Carriage Control WARNING: Read and follow safety information at beginning of entire Section 4-3 before proceeding. 1. If applicable, remove the four screws securing the Carriage Control to the mounting bracket, and remove the control from the bracket. 2. Remove the securing screws from control wrapper, and remove wrapper. 3. Loosen upper strain relief clamp on rear of control, and route remaining end of four-conductor cord through clamp to terminal strip 1T. 4. Remove jumper links between terminals L and M on terminal strip 1T. 5. Connect lead spliced to lead in five-conductor cord (Section D, Step 9) to terminal D on 1T. 6. Connect lead installed to terminal V of receptacle RC10 in Automatic Weld Control to terminal J on 1T. 7. Connect lead installed to terminal F of receptacle RC4 in weld control to terminal L on 1T. 8. Connect lead installed to terminal H of receptacle RC4 in the weld control to terminal J on 1T. 9. Tighten strain relief clamp, and reinstall and secure control wrapper. 10. Reposition and secure control onto mounting bracket. 4-4. REMOTE START/STOP CONNECTIONS FOR NON-MILLER AUTOMATIC WELD CONTROLS (For Non-MILLER Controls Only) WARNING: ELECTRIC SHOCK can kill. • Do not touch live electrical parts. • Shut down Carriage Control, Automatic Weld Control, and welding power source, and disconnect input power employing lockout/tagging procedures before making internal connections. Lockout/tagging procedures consist of removing input plug from receptacle, padlocking line disconnect switch in open position, removing fuses from fuse box, or shutting off and red-tagging circuit breaker or other disconnecting device. WORN OR CUT CORD can cause serious personal injury or equipment damage. • Route and secure all cords from welding power source to Carriage Control and Automatic Weld Control over top of beam between carriage release lever and carriage motor casing. • Secure cords away from motor pinion gear and beam gear rack on back of beam. • Secure all cords away from work area. A. Carriage Control Relay Contact Selection WARNING: Read and follow safety information at beginning of entire Section 4-4 before proceeding. The Carriage Control is equipped with a normally-open and normally-closed relay contact which enables remote start and stop control of an Automatic Weld Control. The normally-open relay contact is between terminals A and B on terminal strip 2T, and the normallyclosed relay contact is between terminals B and C on 2T. Both contacts energize whenever the START button is activated or the weld control is remotely activated. Both relay contacts deenergize when the STOP button is activated (remote or front panel switch). Determine which connection the Automatic Weld Control requires (normally-open or normally-closed), and proceed to Section 4-4B. B. Interconnecting Cord Selection To determine if one of the supplied cords may be suitable for use with an Automatic Weld Control, compare the supplied cord connectors to the weld control connectors. If the supplied cords are not suitable for the weld control, either wire a plug or cord to interface with the weld control, or obtain interconnecting cords of proper type and length to make connections from Carriage Control to Automatic Weld Control. (Cords should be two-wire, No. 18, and as long as required for installation.) IMPORTANT: After selecting or obtaining cord suitable for weld control, discard remaining supplied cords, and proceed to Section 4-4C. C. Connections For Remote Start/Stop Control WARNING: Read and follow safety information at beginning of entire Section 4-4 before proceeding. To connect Carriage Control to provide remote start and stop control of an Automatic Weld Control, proceed as follows: 1. Remove four screws securing Carriage Control to the mounting bracket, and remove control from bracket. 2. Remove securing screws from control wrapper, and remove wrapper. 3. Loosen strain relief on clamp or rear of control, and route cord through clamp to terminal strip 2T. 4. If Automatic Weld Control requires installation to the normally-open relay contact, install leads from cord R to terminals A and B on terminal strip 2T. 5. If Automatic Weld Control requires installation to the normally-closed relay contact, install leads from cord R to terminals B and C on terminal strip 2T. 6. Reinstall and secure control wrapper. OM-889 Page 13 7. Reposition and secure control onto mounting bracket. switch is closed, or the unit receives a command from an external weld control. 8. Install remaining end of interconnecting cord to Automatic Weld Control according to its Owner’s Manual. To install the Fixture Delay switch, proceed as follows: 1. Remove the four screws securing the Carriage Control to the mounting bracket, and remove the control from the bracket. 2. Remove the securing screws from control wrapper, and remove wrapper. 3. Locate terminal strip 1T, and remove jumper links between terminals C and D and terminals K and L on 1T. 4. Connect a normally-open switch across terminals D and L on 1T. 5. Reinstall and secure control wrapper. 6. Reposition and secure control onto mounting bracket. D. Connections For Carriage Movement Control WARNING: Read and follow safety information at beginning of entire Section 4-4 before proceeding. In normal operation, upon pressing the START button the unit will immediately start welding, and the carriage will immediately start moving; however, installing a Fixture Start Delay switch, allows the operator to delay fixture movement after the START button is pressed. When a Fixture Start Delay switch is installed, the unit will start welding when the START button is pressed, but the carriage will not move until the Fixture Start Delay SECTION 5 – CUSTOMER-SUPPLIED REMOTE CONTROL CONNECTIONS (Optional) 5-1. REQUIRED EQUIPMENT Several optional controls are available to enhance the usability of the Sidebeam assembly. The Remote Pendant Control provides remote control of the START/ STOP push buttons, TRAVEL SPEED control, and TRAVEL DIRECTION and JOG DIRECTION switches. If the Remote Pendant Control is not obtained, the Carriage Control wiring can be modified to accommodate external (remote) switches for this control. To install remote switches, read the following safety information and proceed to the appropriate switch section: WARNING: ELECTRIC SHOCK can kill. • Do not touch live electrical parts. • Shut down Carriage Control, Automatic Weld Control, and welding power source, and disconnect input power employing lockout/tagging procedures before inspecting, installing, or adjusting. Lockout/tagging procedures consist of removing input plug from receptacle, padlocking line disconnect switch in open position, removing fuses from fuse box, or shutting off and red-tagging circuit breaker or other disconnecting device. 5-2. trol START and STOP push buttons; however, installing a maintained-contact (relay) switch for Remote Start and Stop control disables the front panel START push button, but the STOP push button will function if the operator keeps the button depressed. For example, if the remote start switch is in operation, and the operator presses the Carriage Control STOP button, the unit stops all operation until the front panel STOP button is released. To make Remote Start and Stop switch connections, proceed as follows: 1. Remove the four screws securing the Carriage Control to the mounting bracket, and remove the control from the bracket. 2. Remove the securing screws from control wrapper, and remove wrapper. 3. If installing a momentary-contact switch(es) for remote start and stop control, proceed to Step 4. If installing a maintained-contact (relay) switch, proceed to Step 5. 4. Install the momentary-contact start and stop switch(es) as follows: a. Loosen strain relief clamp on rear of control, and route cord from switch(es) through clamp to terminal strip 1T. CARRIAGE CONTROL REMOTE START AND STOP WARNING: Read and follow safety information at beginning of Section 5-1 before proceeding. For Remote Start and Stop control, a momentarycontact switch (or switches) or a maintained-contact (relay) switch must be connected to terminal strip 1T inside the Carriage Control. Installing the momentarycontact switch(es) does not disable the Carriage ConOM-889 Page 14 b. Remove jumper link between terminals M and L on 1T. c. Connect the two leads from the normally-open start switch to terminals M and J on 1T. d. Connect the two leads from the normallyclosed stop switch to terminals M and L on 1T. 5. Install the maintained-contact (relay) switch as follows: IMPORTANT: If the optional Limit Switch is installed, use a momentary-contact switch(es) for remote start and stop control (see Step 4). Using a maintainedcontact (relay) for remote start and stop control will render the optional Limit Switch inoperative. 4. a. Connect normally-open contact of pole corresponding to movement right to terminal E on terminal strip 2T and to terminal F on terminal strip 1T. a. Loosen strain relief clamp on rear of control, and route cord from switch through clamp to terminal strip 1T. b. Connect normally-open contact of pole corresponding to movement left to terminal F on 2T and to terminal E on 1T. b. Remove jumper link between terminals M and L on 1T. c. Connect the normally-open, maintainedcontact of the switch to terminals L and J on 1T. 6. Reinstall and secure control wrapper. 7. Reposition and secure control onto mounting bracket. 5-3. REMOTE JOG DIRECTION (Figure 5-1) WARNING: Read and follow safety information at beginning of Section 5-1 before proceeding. For Remote Jog Direction control, switch connections must be made to terminal strips 1T and 2T inside the Carriage Control. It is recommended that a springloaded, center-off, double-pole double-throw (DPDT) switch or two double-pole single-throw (DPST) switches be installed for remote jog control. When the Remote Jog Direction switch(es) is installed, the front panel JOG DIRECTION switch is still functional, and the jog speed must be controlled using the front panel JOG SPEED control. IMPORTANT: If jogging the unit and the START button is pressed, the unit will weld in the direction selected by the Jog Direction switch (remote switch or front panel switch). The unit will weld at the speed selected by the TRAVEL SPEED control. When the Jog Direction switch is released, the unit will weld in the direction selected by the Travel Direction switch (remote or front panel switch). The unit stops welding when the STOP button (remote or front panel switch) is activated. To make Remote Jog Direction switch connections, proceed as follows: 1. Remove the four screws securing the Carriage Control to the mounting bracket, and remove the control from the bracket. 2. Remove the securing screws from control wrapper, and remove wrapper. 3. Loosen strain relief clamp on rear of control, and route switch leads through clamp to terminal strips 1T and 2T. If installing a double-pole double-throw (DPDT) switch, install the switch as follows: Jog Right Switch Position Connect To Terminal E On Terminal Strip 1T Connect To Terminal F On Terminal Strip 2T Connect To Terminal E On Terminal Strip 2T Jog Left Switch Position Connect To Terminal F On Terminal Strip 1T Ref. SA-121 140 Figure 5-1. Switch Installation For Remote Jog Direction Control (Double-Pole Double-Throw Switch Shown) 5. If installing two double-pole single-throw (DPST) switches, install each switch as follows: c. Connect normally-open contact of switch to be used for jogging right to terminal E on terminal strip 2T and to terminal F on terminal strip 1T. d. Connect normally-open contact of switch to be used for jogging left to terminal F on 2T and to terminal E on 1T. 6. Reinstall and secure control wrapper. 7. Reposition and secure control onto mounting bracket. 5-4. REMOTE TRAVEL DIRECTION (Figure 5-2) WARNING: Read and follow safety information at beginning of Section 5-1 before proceeding. For remote travel direction control, a double-pole double-throw (DPDT), center-off switch must be connected to terminal strips 1T and 2T inside the Carriage Control. When the Remote Travel Direction switch is installed, the front panel TRAVEL DIRECTION switch is disabled; therefore, travel direction must be controlled using the Remote Travel Direction switch. Travel speed may be controlled by the front panel TRAVEL SPEED control, or it may be controlled remotely (see Section 5-5). OM-889 Page 15 Connect To Terminal F On Terminal Strip 2T Travel Right Switch Position Connect To Terminal D On Terminal Strip 1T Reinstall and secure control wrapper. 8. Reposition and secure control onto mounting bracket. 5-5. REMOTE TRAVEL SPEED CONTROL (Figure 5-3) Travel Left Switch Position Connect To Terminal F On Terminal Strip 1T Connect To Terminal G On Terminal Strip 1T 7. Connect To Terminal E On Terminal Strip 2T Connect To Terminal E On Terminal Strip 1T Ref. SA-121 140 Figure 5-2. Switch Installation For Remote Travel Direction Control To make Remote Travel Direction switch connections, proceed as follows: WARNING: Read and follow safety information at beginning of Section 5-1 before proceeding. It is recommended that a 10k ohm, 2 Watt ten-turn potentiometer be used for remote travel speed control. The potentiometer must be installed to terminal strip 2T inside the Carriage Control. When the Remote Travel Speed control is installed, the front panel TRAVEL SPEED control R4 is disabled. To make control connections, proceed as follows: 1. Remove the four screws securing the Carriage Control to the mounting bracket, and remove the control from the bracket. Remove the four screws securing the Carriage Control to the mounting bracket, and remove the control from the bracket. 2. 2. Remove the securing screws from control wrapper, and remove wrapper. Remove the securing screws from control wrapper, and remove wrapper. 3. 3. Disconnect the two leads connected to the center two terminals of TRAVEL DIRECTION switch S4, and secure leads away from switch. Locate lead 40 inside the unit (connected to terminal G at terminal strip 2T), and disconnect friction lugs. 4. Connect the clockwise (CW) terminal of potentiometer to lead J on terminal strip 2T, and connect counterclockwise (CCW) terminal (unmarked on potentiometer) to terminal H on 2T. 5. Connect wiper terminal to terminal G on 2T. 6. Reinstall and secure control wrapper. 7. Reposition and secure control onto mounting bracket. 1. 4. Loosen strain relief clamp on rear of control, and route switch leads through clamp to terminal strips 1T and 2T. 5. Connect one pole of switch as follows (see Figure 5-2): a. Connect terminal corresponding to movement right to terminal E on terminal strip 2T. b. Connect terminal corresponding to movement left to terminal F on terminal strip 2T. c. 6. CW Terminal – Connect To Terminal J On Terminal Strip 2T Connect common terminal of switch to terminal D on terminal strip 1T. Connect remaining pole of switch as follows (see Figure 5-2): d. Connect terminal corresponding to movement right to terminal F on terminal strip 1T. e. Connect terminal corresponding to movement left to terminal E on terminal strip 1T. f. Connect common terminal of switch to terminal G on terminal strip 1T. OM-889 Page 16 CW Terminal – Connect To Terminal H On Terminal Strip 2T Wiper Terminal – Connect To Terminal G On Terminal Strip 2T Ref. SA-121 140 Figure 5-3. Remote Travel Speed Control Installation SECTION 6 – OPERATOR CONTROLS Digital Meter Jog Speed Control Fuse F1 (See Section 8-2) Circuit Breaker CB1 (See Section 8-2) Power Switch Optional Delay Time Control Start Push Button Stop Push Button Jog Direction Switch Travel Direction Switch Travel Speed Control SA-122 296 Figure 6-1. Operator Controls 6-1. POWER SWITCH (Figure 6-1) POWER ON V OFF Placing the POWER switch in the ON position energizes the Carriage Control circuitry. When the Carriage Control is energized, the Travel Meter display comes on. Placing the POWER switch in the OFF position deenergizes the control. 6-2. JOG DIRECTION SWITCH (Figure 6-1) The JOG DIRECTION switch is a spring-loaded, double-pole double-throw (DPDT), center-off switch which allows the operator to jog the carriage in the selected direction at the speed selected on the JOG SPEED control (see Section 6-3). Holding the switch in the left or right position energizes the Carriage Control motor; releasing the switch stops the carriage. The JOG DIRECTION switch is not functional when the TRAVEL DIRECTION switch is actuated. IMPORTANT: If jogging the unit and the START button is pressed, the unit will weld in the direction selected by the JOG DIRECTION switch. The unit will weld at the speed selected by the TRAVEL SPEED control (see Section 6-5). When the JOG DIRECTION switch is released, the unit will weld in the direction selected by the TRAVEL DIRECTION switch. The unit stops welding when the STOP button is pressed. 6-3. JOG SPEED CONTROL (Figure 6-1) The JOG SPEED control is a one-turn potentiometer which provides a means of selecting the rate at which the carriage will jog in either direction on the beam. Rotating the control clockwise increases the jog speed, while rotating the control counterclockwise decreases jog speed. The scale surrounding the JOG SPEED control is based on a percentage of the maximum travel speed of the unit (125 ipm or 3.2 mpm); it does not represent an actual inches per minute or meters per minute value. The actual jog speed is displayed on the digital meter while the Carriage Control is in the jog mode of operation. IMPORTANT: This control may be adjusted while the carriage is moving. 6-4. TRAVEL DIRECTION SWITCH (Figure 6-1) The TRAVEL DIRECTION switch is a double-pole double-throw (DPDT), center-off switch that allows the operator to move the carriage either to the right or left on the beam. To use the TRAVEL DIRECTION SWITCH, place the switch in the position corresponding to the direction (right or left) that the carriage must travel, and press the START button. The carriage will travel at the speed selected on the TRAVEL SPEED control (see Section 6-5). When the TRAVEL DIRECTION switch is in the center position, the unit welds, but the carriage does not move. OM-889 Page 17 CAUTION: CHANGING POSITION OF WELD TRAVEL DIRECTION SWITCH while carriage is moving can damage unit. • Allow carriage to stop completely before changing travel direction. • Do not change position of TRAVEL DIRECTION switch (except to center (off) position) while carriage is moving. 6-5. 6-7. START/STOP PUSH BUTTONS (Figure 6-1) START TRAVEL SPEED CONTROL (Figure 6-1) STOP WELD CYCLE CARRIAGE The TRAVEL SPEED control is a ten-turn potentiometer which provides a means of selecting the rate at which the carriage will move in either direction on the beam. Rotating the control clockwise increases the travel speed, and rotating the control counterclockwise decreases travel speed. Maximum travel speed is 125 ipm (3.2 m). The selected travel speed is displayed on the digital meter. IMPORTANT: This control may be adjusted while the carriage is moving. The START/STOP push-buttons provide on/off control of carriage movement and the welding cycle. When the START button is pressed, the unit immediately starts welding, but the carriage will not move until a normallyopen contact between terminals D and L on terminal strip 1T is closed. The unit is shipped with the normallyopen contact of relay CR1 connected between terminals D and L on terminal strip 1T. If the Carriage Control is operated as it is shipped (with no wiring modifications), CR1 closes when the START button is pressed. Pressing the STOP button stops the carriage and signals the automatic weld control or user-supplied equipment to finish the weld. 6-8. 6-6. DIGITAL METER (Figure 6-1) The digital meter displays the carriage travel or jog speed in either inches per minute (ipm) or meters per minute (mpm), depending on the display mode selected. To preset travel speed, rotate the TRAVEL SPEED control until the meter displays the desired travel speed. During operation, the meter displays actual carriage travel speed. OM-889 Page 18 DELAY TIME CONTROL (Optional) (Figure 6-1) The DELAY TIME control is part of the Fixture Start Delay option. The control allows the operator to preselect the length of time from 0 (zero) to 2.5 seconds that the fixture will remain stationary after the START button is pressed. When the START button is pressed, the unit welds, but the carriage will not move until the DELAY TIME control has timed out. SECTION 7 – SEQUENCE OF OPERATION WARNING: ELECTRIC SHOCK can kill; MOVING PARTS can cause serious injury; IMPROPER AIR FLOW AND EXPOSURE TO ENVIRONMENT can damage internal parts. • Do not touch live electrical parts. • • Keep all covers in place while operating. WORN OR CUT CABLES can cause serious personal injury or equipment damage. • Route and secure all cables from welding power source to Carriage Control and Automatic Weld Control over top of beam between carriage release lever and carriage motor casing. • WARNING: Read and follow safety information at beginning of entire Section 7 before proceeding. 1. Install and connect unit as instructed in Section 3. 2. Install and connect Automatic Weld Control according to Section 4 (if applicable), and any auxiliary equipment according to its installation instructions. 3. Wear dry insulating gloves and clothing. 4. Connect work clamp to clean, bare metal at workpiece. 5. Select and obtain proper welding wire, and thread as instructed in wire drive assembly Owner’s Manual. 6. Energize welding power source and Carriage Control. 7. Set position of controls and switches on Carriage Control as follows: Secure all cables away from motor pinion gear and beam gear rack on back of beam. Secure all cables away from work area. ARC RAYS, SPARKS, AND HOT SURFACES can burn eyes and skin; NOISE can damage hearing. • Wear correct eye, ear, and body protection. a. Place Carriage Control TRAVEL DIRECTION switch in desired position. FUMES AND GASES can seriously harm your health. • Ventilate to keep from breathing fumes and gases. • b. Rotate TRAVEL SPEED control until the digital meter displays the desired travel speed. c. If ventilation is inadequate, use approved breathing device. WELDING WIRE can cause puncture wounds. • Do not point gun toward any part of the body, any conductive surface, or other personnel. HOT METAL, SPATTER, AND SLAG can cause fire and burns. • Watch for fire. • • GAS METAL ARC WELDING (GMAW) And FLUX CORED ARC WELDING (FCAW) - CONTINUOUS Keep away from pinch points. Warranty is void if the Carriage Control is operated with the wrapper removed. • 7-1. d. If applicable, set limit switch actuators. (Limit switches are not functional if the skip welding function is installed into the unit.) e. If applicable, rotate TIME DELAY control to the desired position. 8. Have a fire extinguisher nearby, and know how to use it. Energize Automatic Weld Control if applicable, and set position of its controls and switches as follows: a. Set wire feed speed controls and weld cycle timers to desired positions to program the weld cycle as instructed in weld control Owner’s Manual. Allow work and equipment to cool before handling. MAGNETIC FIELDS FROM HIGH CURRENTS can affect pacemaker operation. • Wearers should consult with their doctor before going near arc welding, gouging, or spot welding operations. See safety precautions listed in the Arc Welding Safety Precautions in the welding power source Owner’s Manual. If the skip welding function is installed into the unit and is not desired, rotate the JOG SPEED control to 0 (zero) to prevent the carriage from advancing during preflow and postflow periods. b. Place the SPOT-CONTINUOUS switch in the CONTINUOUS position. c. Turn on shielding gas at the source, and press PURGE button for one minute to purge the gas line. 9. Wear welding helmet with proper filter lens according to ANSI Z49.1. OM-889 Page 19 IMPORTANT: If Skip welding function is installed and BURNBACK and CRATER TIME controls are both set at minimum (0 seconds), unit may not advance at jog speed. To ensure proper Skip welding function, both the BURNBACK and CRATER TIME controls must be set to appropriate times for weld process. 10. 8. a. Set wire feed speed controls and weld cycle timers to desired positions to program the weld cycle as instructed in weld control Owner’s Manual. Press the START button on the Carriage Control, and begin operation. b. Place the SPOT-CONTINUOUS switch in the SPOT position. c. IMPORTANT: If the skip welding function is installed into the unit, the welding cycle must be started and stopped using the skip welding switch installed in Section 4-3. 7-2. GAS METAL ARC WELDING (GMAW) And FLUX CORED ARC WELDING (FCAW) SPOT IMPORTANT: A weld control with a digital panel is required for Spot Welding Operation. WARNING: Read and follow safety information at beginning of entire Section 7 before proceeding. Energize Automatic Weld Control, and set position of its controls and switches as follows: Rotate SPOT TIME control to the desired position. d. Turn on shielding gas at the source, and press PURGE button for one minute to purge the gas line. 9. Wear welding helmet with proper filter lens according to ANSI Z49.1. IMPORTANT: If Skip welding function is installed and BURNBACK and CRATER TIME controls are both set at minimum (0 seconds), unit may not advance at jog speed. To ensure proper Skip welding function, both the BURNBACK and CRATER TIME controls must be set to appropriate times for weld process. 1. Install and connect unit as instructed in Section 3. 10. 2. Install and connect Automatic Weld Control according to Section 4 (if applicable), and any auxiliary equipment according to its installation instructions. If the skip welding function is installed into the unit, the welding cycle must be started and stopped using the skip welding switch installed in Section 4-3. Proceed to Step 12. 11. Press the START button on the Carriage Control, and begin operation. 3. Wear dry insulating gloves and clothing. 4. Connect work clamp to clean, bare metal at workpiece. 5. Select and obtain proper welding wire, and thread as instructed in wire drive assembly Owner’s Manual. 6. Energize welding power source and Carriage Control. 7. Set position of controls and switches on Carriage Control as follows: a. Place Carriage Control TRAVEL DIRECTION switch in the OFF (center) position. IMPORTANT: The digital meter will display the travel speed set on the TRAVEL SPEED control; however, the carriage will not move because the TRAVEL DIRECTION switch must be in the OFF position for the spot welding operation. b. If the skip welding function is installed into the unit, rotate the TRAVEL SPEED control to 0 (zero). This will provide an automated spot welding sequence. c. If applicable, set limit switch actuators. d. If applicable, rotate TIME DELAY control to the desired position. OM-889 Page 20 IMPORTANT: Do not use the Automatic Weld Control START button to start the weld cycle. Use the Carriage Control START and STOP push buttons to control the weld cycle. Activating the weld control START button “momentarily” starts the preprogrammed weld cycle, but the carriage will not move. Releasing the START button stops the weld cycle. 12. 7-3. When weld is complete, activate the JOG switch to position carriage for next weld, if applicable. SHUTTING DOWN 1. Press STOP push button on Carriage Control, or place skip welding switch in Stop position, if applicable. 2. Place POWER Switch on Carriage Control and Automatic Weld Control in OFF position. 3. Turn off welding power source and all auxiliary equipment. 4. Turn off shielding gas at the source, if applicable. WARNING: HIGH CONCENTRATION OF SHIELDING GAS can harm health or kill. • Shut off gas supply when not in use. SECTION 8 – MAINTENANCE & TROUBLESHOOTING IMPORTANT: Every six months inspect the labels on the unit for legibility. All precautionary labels must be maintained in a clearly readable state and replaced when necessary. See Parts List for part number of precautionary labels. Lockout/tagging procedures consist of removing input plug from receptacle, padlocking line disconnect switch in open position, removing fuses from fuse box, or shutting off and red-tagging circuit breaker or other disconnecting device. 8-1. IMPROPER FUSE can damage unit. • Be sure replacement fuse is same size, type, and rating (see Parts List). INSPECTION AND UPKEEP Usage and shop conditions will determine the frequency and type of maintenance required. Inspect equipment as follows: WARNING: ELECTRIC SHOCK can kill; WELDING WIRE can cause puncture wounds; HOT SURFACES can burn skin. • Do not touch live electrical parts. • Shut down Carriage control and welding power source, and disconnect input power employing lockout/tagging procedures before inspecting or servicing. Lockout/tagging procedures consist of removing input plug from receptacle, padlocking line disconnect switch in open position, removing fuses from fuse box, or shutting off and red-tagging circuit breaker or other disconnecting device. • Do not point gun toward any part of the body, any conductive surface, or other personnel. • Allow equipment to cool before touching. 1. Every six months, clean dust, dirt, and weld spatter from the carriage auxiliary equipment, and especially from the carriage pinion gear and beam gear rack. IMPORTANT: Do not lubricate gears and gear racks. Lubricants promote dust and dirt accumulation. 2. Every month inspect carriage pinion gear and beam gear rack for alignment and wear. If gear is not aligned in rack, adjust position of gear according to Section 3-4. A. Motor Protection Circuit Breaker CB1 WARNING: Read and follow safety information at beginning of Section 8-2 before proceeding. The carriage drive motor is protected from damage due to overload by circuit breaker CB1. CB1 is an automatictrip type breaker. If CB1 opens, the motor will shut down, and the Carriage Control will immediately stop operating. If CB1 opens, locate and correct the problem, and manually reset CB1. B. Fuse F1 WARNING: Read and follow safety information at beginning of Section 8-2 before proceeding. Fuse F1 protects the unit from damage due to a short or overload. If this fuse should open, the unit would be completely inoperative. If F1 opens repeatedly, contact the nearest Factory Authorized Service Station. To replace fuse F1, proceed as follows: 1. Depress and rotate fuse holder cover counterclockwise. 2. Pull out fuse with cover when fuse holder cover is free. 3. Insert new fuse into fuse holder cover. 4. Install fuse with fuse holder cover back into unit. 3. Every three months, check carriage and auxiliary equipment for loose or damaged components. Repair or replace components as required. 5. Depress and rotate fuse holder cover clockwise until cover is secure. 4. Repair or replace, as required, all hose and cable; give particular attention to frayed and cracked insulation and areas where it enters equipment. 8-3. 5. Remove grease and dirt from components and moisture from electrical parts and cable. REINSTALLATION OF HUB ASSEMBLY (Figure 8-1) WARNING: ELECTRIC SHOCK can kill. • Do not touch live electrical parts. • Shut down Carriage control and welding power source, and disconnect input power employing lockout/tagging procedures before inspecting or servicing. Lockout/tagging procedures consist of removing input plug from receptacle, padlocking line disconnect switch in open position, removing fuses from fuse box, or shutting off and red-tagging circuit breaker or other disconnecting device. 8-2. OVERLOAD PROTECTION (Figure 6-1) WARNING: ELECTRIC SHOCK can kill. • Do not touch live electrical parts. • Shut down Carriage control and welding power source, and disconnect input power employing lockout/tagging procedures before inspecting or servicing. OM-889 Page 21 CAUTION: DISASSEMBLY OF MOTOR FIELD MAGNETS can result in personal injury and equipment damage. • Limit drive motor repairs to brush replacement. The field magnets are very strong. If disassembly is attempted, injury to fingers and hands may result from the rotor being drawn back into the motor. The field magnets are matched sets and operation may be affected if the magnets are tampered with. Warranty is void if the motor is tampered with. If it should become necessary to replace part or all of the hub assembly, reinstall the new hub assembly as follows: 1. Remove wire spool from hub. 2. Remove hub assembly and hub support shaft from spool mounting arm. 3. Reinstall new hub assembly onto hub support shaft in order given: a. Spring b. Keyed Washer c. 1. Open brush cap by sliding screwdriver under catch and lifting. Remove brush cap. 2. Grasp spring retaining bracket with long-nose pliers. 3. Push spring retaining bracket in slightly, and move towards brush. This should release the spring assembly, and it can be removed. 4. Pull brush out using brush pigtail. Fiber Washer d. Brake Washer e. Hub f. Brake Washer g. Fiber Washer 4. Reinstall hub support shaft through desired mounting hole in mounting arm. 5. Reinstall and secure hex nut onto end of support shaft. 6. Reinstall wire spool. Spring Fiber Washer Brake Washer Hub Spring Retaining Bracket Brush Brush Pigtail S-008 Figure 8-2. View of Spring Assembly And Brush When Brush Cap Is Opened Lock Nut Brake Washer Hub Support Shaft Fiber Washer 5. If the brushes are less than 1/4 in. (6.4 mm) long, replace them. Disconnect brush pigtail from brush box tab, and remove brush. 6. Connect new brush pigtail to brush box tab. 7. Route pigtail through slot in brush box. Be sure that the pigtail will not come into contact with a metal surface. 8. Insert brush into brush box. Be sure that the low end of the bevel on the top of the brush is towards the spring. 9. Using long-nose pliers, insert spring assembly beside brush, sliding the spring retaining bracket along the brush box wall. The spring retaining bracket hooks on the brush box wall as illustrated in Figure 8-3. 10. If the spring retaining bracket is in place, it will be against the brush box wall when pliers are released. 11. Be sure that the spring is in the proper position as shown in Figures 8-2 and 8-3. 12. Replace and latch the brush cap. 13. Reconnect power to all equipment, and resume operation. Keyed Washer Spring Retaining Ring Ref. SD-122 293 Figure 8-1. Reinstallation Of Hub Assembly 8-4. ÉÉÉÉ ÉÉÉÉ ÉÉ ÉÉÉÉ ÉÉ ÉÉ Brush Box BRUSH INSPECTION AND REPLACEMENT (Figures 8-2 And 8-3) WARNING: ELECTRIC SHOCK can kill. • Do not touch live electrical parts. • Shut down Carriage control and welding power source, and disconnect input power employing lockout/tagging procedures before inspecting or servicing. Lockout/tagging procedures consist of removing input plug from receptacle, padlocking line disconnect switch in open position, removing fuses from fuse box, or shutting off and red-tagging circuit breaker or other disconnecting device. OM-889 Page 22 Long-Nose Pliers Lockout/tagging procedures consist of removing input plug from receptacle, padlocking line disconnect switch in open position, removing fuses from fuse box, or shutting off and red-tagging circuit breaker or other disconnecting device. Spring Assembly Brush Box Tab Brush Brush Box MOVING PARTS can cause serious injury. • Keep clear of pinch points. HOT SURFACES can cause severe burns. • Allow cooling period before servicing. IMPORTANT: Spring assembly hooks here. S-0089 Figure 8-3. View of Spring Assembly And Brush From Armature End of Motor 8-5. TROUBLESHOOTING (Table 8-1) WARNING: ELECTRIC SHOCK can kill. • Do not touch live electrical parts. • Shut down Carriage control and welding power source, and disconnect input power employing lockout/tagging procedures before inspecting, maintaining, or servicing. It is assumed that the unit was properly installed according to Section 3 of this manual, the operator is familiar with the function of controls, the unit was working properly, and that the trouble is not related to the welding process. The following table is designed to diagnose and provide remedies for some of the troubles that may develop in this unit. Use this table in conjunction with the circuit diagram while performing troubleshooting procedures. If the trouble is not remedied after performing these procedures, the nearest Factory Authorized Service Station should be contacted. In all cases of equipment malfunction, the manufacturer’s recommendations should be strictly followed. Table 8-1. Troubleshooting TROUBLE No meter display with POWER switch S1 on. Carriage does not move when JOG switch is activated. PROBABLE CAUSE REMEDY 115 volts plug not secure in 115 volts ac receptacle on welding power source or duplex receptacle. Secure plug in receptacle. Circuit breaker CB1. Manually reset CB1 (see Section 8-2). Fuse F1. Check and replace F1, if necessary (see Section 8-2). Loose meter plug. Check and secure plug at meter base. Carriage Control POWER switch S1. Replace S1. Digital Meter. Replace meter. Timer Board PC2. Contact nearest Factory Authorized Service Station. Poor or incorrect connections to carriage drive motor. Check and secure connections between carriage motor and Carriage Control (see Section 3-8). Drive assembly not engaged. Engage drive assembly. JOG switch S2. Replace S2. Timer Board PC2. Contact nearest Factory Authorized Service Station. Motor Board PC1. Contact nearest Factory Authorized Service Station. Carriage drive motor. Check and replace drive motor, if necessary. OM-889 Page 23 Table 8-1. Troubleshooting (Continued) TROUBLE PROBABLE CAUSE REMEDY Carriage and auxiliary equipment (if applicable) do not start when START button PB1 is pressed. Improper jumper connections. Check and correct jumper connections according to Section 5 or the circuit diagram. Relay CR1. Check and replace CR1, if necessary. Auxiliary equipment start signal not received. Check all connections to auxiliary equipment to be sure that connections are correct and secure (see auxiliary equipment installation instructions). Poor or incorrect connections to carriage drive motor. Check and secure connections between carriage motor and Carriage Control (see Section 3-8). Tachometer Board PC3. Contact nearest Factory Authorized Service Station. TRAVEL SPEED control R4. Check and replace R4, if necessary. Motor Board PC1. Contact nearest Factory Authorized Service Station. Digital meter. Replace meter. Loose plug connections at rear of meter. Check and secure meter, if necessary. Digital meter. Check and replace meter, if necessary. Tachometer Board PC3. Contact nearest Factory Authorized Service Station. Plug PLG8 (pin DA on Timer Board PC2) disconnected from chassis ground. Be sure that connection between PLG8 and chassis ground is secure. Chassis ground connection not continuous with input power ground. Check to ensure ground control box has not been lifted and that continuity exists between chassis ground and input power ground. Carriage speed erratic or uncontrollable. Digital meter display erratic or not functioning. Digital meter display inaccurate. Excessive pinion gear wear. Carriage drive motor jumps out of gear rack or trips circuit breaker CB1. Meter Display switch S6 on Place S6 in correct position (see Section 3-5). Timer Board PC2 in wrong position. Mechanical binding or excessive loading. Check for binding, and correct the problem; if excessive loading, decrease load. Improper motor type. Be sure motor is slow-speed, digital motor (see Parts List). Gear mesh too tight. Adjust gear mesh according to Section 3-4. Excessive roller friction. Check roller assemblies for smooth, free operation; replace rollers as necessary. Mechanical binding or obstruc- Using the motor release lever, check carriage tion between motor pinion running clearance; remove obstruction and/or gear and beam gear track. correct binding condition. Excessive roller friction. OM-889 Page 24 Check roller assemblies for smooth, free operation; replace rollers as necessary. Notes OM-889 Page 25 SECTION 9 – ELECTRICAL DIAGRAMS Diagram 9-1. Circuit Diagram OM-889 Page 26 Circuit Diagram No. SD-128 724 OM-889 Page 27 OM-889 Page 28 Diagram 9-2. Wiring Diagram Wiring Diagram No. SC-128 770 OM-889 Page 29 Diagram 9-3. Circuit Diagram For Motor Control Board PC1 Circuit Diagram No. SD-083 388-B OM-889 Page 30 Diagram 9-4. Circuit Diagram For Timer Board PC2 Circuit Diagram No. SC-119 760-A Circuit Diagram No. SA-094 456-A Diagram 9-5. Circuit Diagram For Tachometer Board PC3 Circuit Diagram No. SA-119 758 Diagram 9-6. Circuit Diagram For Optional Remote Pendant Control RP-SB-10D OM-889 Page 31 OM-889 Page 32 55 1 54 Fig 10-2 2 53 3 4 5 7 52 8 51 9 2 10 12 13 14 15 48 44 43 42 41 40 29 37 28 38 27 39 24 36 33 32 31 30 35 45 23 Includes Items 23, 24 46 44 26 25 22 34 43 47 21 49 50 7 6 19 20 not available unless listed. Ref. SD-122 293-A . Hardware is common and Figure 10-1. Main Assembly (Section A) 6 11 17 16 18 SECTION 10 – PARTS LIST Item No. Dia. Mkgs. Part No. Description Quantity Figure 10-1. Main Assembly (Section A) . . . 1 . . . . . . . . . . . . . . 128 972 . . . 2 . . . . . . . . . . . . . . . 119 730 . . . 3 . . . . . . . . . . . . . . . 119 743 . . . 4 . . . . . . . . . . . . . . . 119 731 . . . 5 . . . . . . . . . . . . . . . 119 744 . . . 6 . . . . . . . . . . . . . . . 119 738 . . . 7 . . . . . . . . . . . . . . . 119 657 . . . 8 . . . . . . . . . . . . . . 120 122 . . . 9 . . . . . . . . . . . . . . . 118 806 . . 10 . . . . . . . . . . . . . . . 118 829 . . 11 . . . . . . . . . . . . . . . 118 118 . . 12 . . . . MOT . . . . 094 029 . . . . . . . . . . . . . . . . . . . *080 281 . . . . . . . . . . . . . . . . . . . 080 283 . . . . . . . . . . . . . . . . . . . 080 282 . . 13 . . . . . . . . . . . . . . 049 032 . . 14 . . . . . . . . . . . . . . 049 033 . . 15 . . . . . . . . . . . . . . 049 029 . . 16 . . . . . . . . . . . . . . . 110 733 . . 17 . . . . . . . . . . . . . . 049 030 . . 18 . . . . . . . . . . . . . . 047 636 . . . . . . . . . . . . . . . . . . . 079 535 . . 19 . . . . . . . . . . . . . . 079 739 . . 20 . . . . . . . . . . . . . . 081 630 . . 21 . . . . . . . . . . . . . . 049 031 . . 22 . . . . PC3 . . . . . . 110 738 . . 23 . . . . . . . . . . . . . . . 115 045 . . 24 . . . . . . . . . . . . . . 079 304 . . . . . . . . . . . . . . . . . . . 602 241 . . . . . . . . . . . . . . . . . . . 079 625 . . . . . . . . . . . . . . . . . . . 092 865 . . 25 . . . . . . . . . . . . . . 133 804 . . 26 . . . . . . . . . . . . . . . 118 117 . . 27 . . . . . . . . . . . . . . 005 936 . . 28 . . . . . . . . . . . . . . 602 213 . . 29 . . . . . . . . . . . . . . 010 910 . . 30 . . . . . . . . . . . . . . . 118 119 . . 31 . . . . . . . . . . . . . . 601 978 . . 32 . . . . . . . . . . . . . . 602 247 . . . . . . . . . . . . . . . . . . . 602 216 . . 33 . . . . . . . . . . . . . . 601 879 . . 34 . . . . . . . . . . . . . . . 118 040 . . 35 . . . . . . . . . . . . . . 122 629 . . 36 . . . . . . . . . . . . . . 072 094 . . 37 . . . . . . . . . . . . . . 058 427 . . 38 . . . . . . . . . . . . . . 141 700 . . 39 . . . . . . . . . . . . . . 605 941 . . 40 . . . . . . . . . . . . . . 154 098 . . 41 . . . . . . . . . . . . . . 010 233 . . 42 . . . . . . . . . . . . . . 057 971 . . 43 . . . . . . . . . . . . . . 010 191 . . 44 . . . . . . . . . . . . . . 058 628 . . 45 . . . . . . . . . . . . . . 058 428 . . 46 . . . . . . . . . . . . . . 135 205 . . 47 . . . . . . . . . . . . . . 120 134 . . 48 . . . . . . . . . . . . . . 123 670 . . CONTROL BOX, (Fig 10-2) . . . . . . . . . . . . . . . . . . . . . . . . . . . . . . . . . . . . . . . . . BRACKET, mtg lower cam follower . . . . . . . . . . . . . . . . . . . . . . . . . . . . . . . . . . CAM FOLLOWER, 1.250 dia x .750 wide . . . . . . . . . . . . . . . . . . . . . . . . . . . . . BRACKET, mtg upper cam follower . . . . . . . . . . . . . . . . . . . . . . . . . . . . . . . . . . WHEEL, 4.000dia x 1.500 wide . . . . . . . . . . . . . . . . . . . . . . . . . . . . . . . . . . . . . BRACKET, mtg wheels . . . . . . . . . . . . . . . . . . . . . . . . . . . . . . . . . . . . . . . . . . . . . BAR, stl .750dia x 4.000 . . . . . . . . . . . . . . . . . . . . . . . . . . . . . . . . . . . . . . . . . . . . SCREW, cap stl button sch .375-16 x .875 . . . . . . . . . . . . . . . . . . . . . . . . . . . . ARM, motor release . . . . . . . . . . . . . . . . . . . . . . . . . . . . . . . . . . . . . . . . . . . . . . . SCREW, shld stl sch .312-18 x .500 . . . . . . . . . . . . . . . . . . . . . . . . . . . . . . . . . MOTOR, drive (consisting of) . . . . . . . . . . . . . . . . . . . . . . . . . . . . . . . . . . . . . . . . . MOTOR, gear 1/8 hp 115VDC 2000RPM (consisting of) . . . . . . . . . . . . . . . . . . BRUSH . . . . . . . . . . . . . . . . . . . . . . . . . . . . . . . . . . . . . . . . . . . . . . . . . . . . . . . . . . COVER, brush . . . . . . . . . . . . . . . . . . . . . . . . . . . . . . . . . . . . . . . . . . . . . . . . . . . . SPRING BRUSH . . . . . . . . . . . . . . . . . . . . . . . . . . . . . . . . . . . . . . . . . . . . . . . . . . CLAMP, strain relief . . . . . . . . . . . . . . . . . . . . . . . . . . . . . . . . . . . . . . . . . . . . . . . . SPACER, housing tach . . . . . . . . . . . . . . . . . . . . . . . . . . . . . . . . . . . . . . . . . . . . . HOUSING, tach . . . . . . . . . . . . . . . . . . . . . . . . . . . . . . . . . . . . . . . . . . . . . . . . . . . OPTICAL ENCODER DISC . . . . . . . . . . . . . . . . . . . . . . . . . . . . . . . . . . . . . . . . . COVER, housing tach . . . . . . . . . . . . . . . . . . . . . . . . . . . . . . . . . . . . . . . . . . . . . . CONNECTOR PLUG & PINS, (consisting of) . . . . . . . . . . . . . . . . . . . . . . . . . . . . CONNECTOR, circ pin push-in 14-18ga Amp 66359-6 . . . . . . . . . . . . . . . . CONNECTOR, circ clamp str rlf Amp 206322-2 . . . . . . . . . . . . . . . . . . . . . . . . CABLE, motor 17.000 . . . . . . . . . . . . . . . . . . . . . . . . . . . . . . . . . . . . . . . . . . . . . . SHAFT, extension . . . . . . . . . . . . . . . . . . . . . . . . . . . . . . . . . . . . . . . . . . . . . . . . . CIRCUIT CARD, tach . . . . . . . . . . . . . . . . . . . . . . . . . . . . . . . . . . . . . . . . . . . . GEAR, motor driven . . . . . . . . . . . . . . . . . . . . . . . . . . . . . . . . . . . . . . . . . . . . . . . SCREW, cap stl sch slflkg .250-20 x .750 . . . . . . . . . . . . . . . . . . . . . . . . . . . . . WASHER, flat stl SAE .250 . . . . . . . . . . . . . . . . . . . . . . . . . . . . . . . . . . . . . . . . . WASHER, spring stl .500 . . . . . . . . . . . . . . . . . . . . . . . . . . . . . . . . . . . . . . . . . . . KEY, stl .122 x .123 x .750 . . . . . . . . . . . . . . . . . . . . . . . . . . . . . . . . . . . . . . . . BRACKET, mtg motor . . . . . . . . . . . . . . . . . . . . . . . . . . . . . . . . . . . . . . . . . . . . . . GUARD, pinion . . . . . . . . . . . . . . . . . . . . . . . . . . . . . . . . . . . . . . . . . . . . . . . . . . . SCREW, cap stl hexhd .375-16 x 1.500 . . . . . . . . . . . . . . . . . . . . . . . . . . . . . . WASHER, lock stl split .375 . . . . . . . . . . . . . . . . . . . . . . . . . . . . . . . . . . . . . . . . . WASHER, flat stl SAE .375 . . . . . . . . . . . . . . . . . . . . . . . . . . . . . . . . . . . . . . . . . CLAMP, riser . . . . . . . . . . . . . . . . . . . . . . . . . . . . . . . . . . . . . . . . . . . . . . . . . . . . . SCREW, cap stl hexhd .500-13 x 3.500 . . . . . . . . . . . . . . . . . . . . . . . . . . . . . . WASHER, flat stl SAE .500 . . . . . . . . . . . . . . . . . . . . . . . . . . . . . . . . . . . . . . . . . WASHER, lock stl split .500 . . . . . . . . . . . . . . . . . . . . . . . . . . . . . . . . . . . . . . . . . NUT, stl hex full fnsh .500-13 . . . . . . . . . . . . . . . . . . . . . . . . . . . . . . . . . . . . . . . . RISER, mtg spool & flux hopper . . . . . . . . . . . . . . . . . . . . . . . . . . . . . . . . . . . . . BRACKET, mtg spool . . . . . . . . . . . . . . . . . . . . . . . . . . . . . . . . . . . . . . . . . . . . . . HUB & SPINDLE, (consisting of) . . . . . . . . . . . . . . . . . . . . . . . . . . . . . . . . . . . . . . RING, rtng spool . . . . . . . . . . . . . . . . . . . . . . . . . . . . . . . . . . . . . . . . . . . . . . . . . . RING, rtng ext .625 shaft grv x .050thk . . . . . . . . . . . . . . . . . . . . . . . . . . . . . . . WASHER, flat stl .640 ID x 1.000 OD 14ga thk . . . . . . . . . . . . . . . . . . . . . . . . SHAFT, support spool . . . . . . . . . . . . . . . . . . . . . . . . . . . . . . . . . . . . . . . . . . . . . . SPRING, cprsn .970 OD x .120 wire x 1.250 . . . . . . . . . . . . . . . . . . . . . . . . . . WASHER, flat stl keyed 1.500dia x .125thk . . . . . . . . . . . . . . . . . . . . . . . . . . . WASHER, fbr .656 ID x 1.500 OD x .125thk . . . . . . . . . . . . . . . . . . . . . . . . . . . WASHER, brake stl . . . . . . . . . . . . . . . . . . . . . . . . . . . . . . . . . . . . . . . . . . . . . . . . HUB, spool . . . . . . . . . . . . . . . . . . . . . . . . . . . . . . . . . . . . . . . . . . . . . . . . . . . . . . . NUT, stl slflkg hex reg .625-11 w/nyl insert . . . . . . . . . . . . . . . . . . . . . . . . . . SPRING, ext .750 OD x .093 wire x 3.500 . . . . . . . . . . . . . . . . . . . . . . . . . . . . BRACKET, mtg motor . . . . . . . . . . . . . . . . . . . . . . . . . . . . . . . . . . . . . . . . . . . . 1 2 6 2 2 2 2 16 1 2 1 1 1 1 1 1 2 1 1 1 1 14 1 1 1 1 1 1 1 2 1 1 1 8 12 8 1 2 4 2 2 1 1 1 1 1 1 1 1 1 2 2 1 1 1 1 OM-889 Page 33 Item No. Dia. Mkgs. Part No. Description Quantity Figure 10-1. Main Assembly (Section A) (Continued) . . 49 . . . . . . . . . . . . . . 120 821 . . 50 . . . . . . . . . . . . . . 601 881 . . 51 . . . . . . . . . . . . . . . 119 737 . . 52 . . . . . . . . . . . . . . . 115 070 . . 53 . . . . . . . . . . . . . . . 117 987 . . 54 . . . . . . . . . . . . . . 122 630 . . 55 . . . . . . . . . . . . . . 601 965 . . . . . . . . . . . . . . . . . . . 092 176 . . . . . . . . . . . . . . . . . . . 047 636 . . . . . . . . . . . . . . . . . . . 079 535 . . . . . . . . . . . . . . . . . . . 073 139 . . . . . . . . . . . . . . . . . . . 079 739 . . . . . . . . . . . . . . . . . . . 071 892 . . . . . . . . . . . . . . . . . . . 079 534 . . . . . . . . . . . . . . . . . . . 048 144 . . SCREW, set stl sch .375-16 x .750 . . . . . . . . . . . . . . . . . . . . . . . . . . . . . . . . . . NUT, stl hex jam .500-20 . . . . . . . . . . . . . . . . . . . . . . . . . . . . . . . . . . . . . . . . . . . PLATE, face . . . . . . . . . . . . . . . . . . . . . . . . . . . . . . . . . . . . . . . . . . . . . . . . . . . . . . CROSS ARM, 2ft . . . . . . . . . . . . . . . . . . . . . . . . . . . . . . . . . . . . . . . . . . . . . . . . . . END CAP, cross arm . . . . . . . . . . . . . . . . . . . . . . . . . . . . . . . . . . . . . . . . . . . . . . BRACKET, control . . . . . . . . . . . . . . . . . . . . . . . . . . . . . . . . . . . . . . . . . . . . . . . . . SCREW, cap stl hexhd .375-16 x 1.000 . . . . . . . . . . . . . . . . . . . . . . . . . . . . . . CABLE, motor (consisting of) . . . . . . . . . . . . . . . . . . . . . . . . . . . . . . . . . . . . . . . . . CONNECTOR PLUG & PINS, (consisting of) . . . . . . . . . . . . . . . . . . . . . . . . . . . . CONNECTOR, circ pin push-in 14-18ga Amp 66359-6 . . . . . . . . . . . . . . . . CONNECTOR, circ clamp str rlf Amp 206322-2 . . . . . . . . . . . . . . . . . . . . . . . . CONNECTOR, circ clamp str rlf Amp 206322-2 . . . . . . . . . . . . . . . . . . . . . . . . CONNECTOR w/SOCKETS, (consisting of) . . . . . . . . . . . . . . . . . . . . . . . . . . . . . CONNECTOR, circ skt push-in 14-18ga Amp 66358-6 . . . . . . . . . . . . . . . . CONNECTOR, circ pin plug keying Amp 200821-1 . . . . . . . . . . . . . . . . . 2 6 1 1 2 1 4 1 1 14 5ft 2 1 14 2 *Recommended Spare Parts To maintain the factory original performance of your equipment, use only Manufacturer’s Suggested Replacement Parts. Model and serial number required when ordering parts from your local distributor. OM-889 Page 34 Item No. Part No. Description Quantity Figure 10-1. Main Assembly (Section B) ..... ..... ..... ..... ..... ..... ..... ..... ..... ..... ..... ..... ..... ..... ..... ..... 1 ......... 2 ......... 3 ......... 4 ......... 5 ......... 6 ......... 7 ......... 8 ......... 9 ......... 10 . . . . . . . . 11 . . . . . . . . . 12 . . . . . . . . 13 . . . . . . . . 14 . . . . . . . . 15 . . . . . . . . 16 . . . . . . . . 1 2 119 736 119 734 119 732 119 740 119 742 121 383 119 735 010 667 121 271 123 155 602 216 602 246 119 739 121 164 119 741 119 733 3 .. .. .. .. .. .. .. .. .. .. .. .. .. .. .. .. END CAP, beam . . . . . . . . . . . . . . . . . . . . . . . . . . . . . . . . . . . . . . . . . . . . . . . . . . . STOP . . . . . . . . . . . . . . . . . . . . . . . . . . . . . . . . . . . . . . . . . . . . . . . . . . . . . . . . . . . . BAR, top . . . . . . . . . . . . . . . . . . . . . . . . . . . . . . . . . . . . . . . . . . . . . . . . . . . . . . . . . BRACKET, mtg side beam . . . . . . . . . . . . . . . . . . . . . . . . . . . . . . . . . . . . . . . . . . GEAR RACK . . . . . . . . . . . . . . . . . . . . . . . . . . . . . . . . . . . . . . . . . . . . . . . . . . . . . . SCREW, cap stl sch .312-18 x .875 . . . . . . . . . . . . . . . . . . . . . . . . . . . . . . . . . . SPACER, gear rack . . . . . . . . . . . . . . . . . . . . . . . . . . . . . . . . . . . . . . . . . . . . . . . . SCREW, cap stl sch .250-20 x 2.250 . . . . . . . . . . . . . . . . . . . . . . . . . . . . . . . . . SCREW, cap stl sch .250-20 x .500 . . . . . . . . . . . . . . . . . . . . . . . . . . . . . . . . . . SCREW, cap stl hexhd .500-13 x 1.250 . . . . . . . . . . . . . . . . . . . . . . . . . . . . . . . WASHER, lock stl split .500 . . . . . . . . . . . . . . . . . . . . . . . . . . . . . . . . . . . . . . . . . WASHER, flat stl std .500 . . . . . . . . . . . . . . . . . . . . . . . . . . . . . . . . . . . . . . . . . . . POST, support fixed height . . . . . . . . . . . . . . . . . . . . . . . . . . . . . . . . . . . . . . . . . . SCREW, cap stl button sch 10-24 x .375 . . . . . . . . . . . . . . . . . . . . . . . . . . . . . . BEAM . . . . . . . . . . . . . . . . . . . . . . . . . . . . . . . . . . . . . . . . . . . . . . . . . . . . . . . . . . . . BAR, front . . . . . . . . . . . . . . . . . . . . . . . . . . . . . . . . . . . . . . . . . . . . . . . . . . . . . . . . 4 5 2 2 1 2 1 11 11 11 2 8 8 8 1 8 1 1 . Hardware is common and not available unless listed. 6 7 8 9 10 11 12 4 13 16 15 1 14 Ref. SD-122 293-A Figure 10-1. Main Assembly (Section B) To maintain the factory original performance of your equipment, use only Manufacturer’s Suggested Replacement Parts. Model and serial number required when ordering parts from your local distributor. OM-889 Page 35 OM-889 Page 36 47 46 45 37 39 44 48 43 53 42 52 2 1 51 3 49 41 6 7 40 8 9 10 11 Figure 10-2. Control Box 50 5 4 39 38 37 26 12 13 14 15 27 16 28 25 17 19 24 23 22 36 35 34 21 20 30 33 32 31 29 18 not available unless listed. SC-122 376-B . Hardware is common and Item No. Dia. Mkgs. Part No. Description 128 972 Figure 10-2. Control Box (Fig 10-1 Item 1) . . . 1 . . . . . . . . . . . . . . 123 154 . . . 2 . . . . . . . . . . . . . +115 937 . . . 3 . . . . PC2 . . . . . . 115 052 . . . . . . . . . . . . . . . . . . . 057 084 . . . . . . . . PLG10 . . . . 117 718 . . . . . . . . . . . . . . . . . . . 108 895 . . . . . . . . PLG2 . . . . . 115 091 . . . . . . . . . . . . . . . . . . . . 113 746 . . . . . . . . PLG8 . . . . 131 054 . . . . . . . . . . . . . . . . . . . . 113 746 . . . . . . . . PLG3 . . . . . 115 092 . . . . . . . . . . . . . . . . . . . . 113 746 . . . 4 . . . . . . . . . . . . . . 091 772 . . . 5 . . . . . . . . . . . . . . 079 844 . . . 6 . . . . CR1 . . . . . 095 033 . . . 7 . . . . . . . . . . . . . . . 027 811 . . . 8 . . . . . . . . . . . . . . 049 970 . . . 9 . . . . . . . . . . . . . . 048 029 . . 10 . . . . . C1 . . . . . 031 692 . . 11 . . . . . . . . . . . . . . 006 426 . . 12 . . . . SR1 . . . . . 035 704 . . 13 . . . . . . . . . . . . . . . 117 717 . . 14 . . . . RC5 . . . . . . 117 374 . . . . . . . . . . . . . . . . . . . . 111 030 . . 15 . . . . PC1 . . . . . 071 642 . . 16 . . . . . . . . . . . . . . . 115 936 . . 17 . . . . . . . . . . . . . . 010 301 . . 18 . . . . . . . . . . . . . . 073 914 . . 19 . . . . . R3 . . . . . 079 497 . . 20 . . . . . R1 . . . . . 030 844 . . 21 . . . . . . . . . . . . . . 056 170 . . 22 . . . . . . . . . . . . . . 030 949 . . 23 . . . . . . . . . . . . . . 010 199 . . 24 . . . . . . . . . . . . . . 010 913 . . 25 . . . . . 2T . . . . . 038 832 . . 26 . . . . CR4 . . . . . 109 006 . . 27 . . . . CR5 . . . . . 000 174 . . 28 . . . . . . . . . . . . . . 079 683 . . 29 . . . . . . . . . . . . . . 010 916 . . 30 . . . . . R2 . . . . . 030 941 . . 31 . . . PLG1 . . . . 073 690 . . 32 . . . . . . . . . . . . . . 007 826 . . 33 . . . . . . . . . . . . . . 010 476 . . 34 . . . . RC7 . . . . . 047 637 . . . . . . . . . . . . . . . . . . . 079 534 . . . . . . . . . . . . . . . . . . . 048 144 . . . . . . . . . . . . . . . . . . . 048 287 . . . . . . . . . . . . . . . . . . . 079 535 . . . . . . . . . . . . . . . . . . . 079 739 . . 35 . . . . . T1 . . . . . . 119 582 . . 36 . . . . . 1T . . . . . 038 856 . . . . . . . . . . . . . . . . . . . 601 219 . . 37 . . . . CB1 . . . . . . 011 991 . . 38 . . . . PB1 . . . . . 079 723 . . 39 . . . . PB2 . . . . . 079 724 . . 40 . . . LED1 . . . . . 118 034 Quantity . . LABEL, warning general precautionary . . . . . . . . . . . . . . . . . . . . . . . . . . . . . 1 . . WRAPPER . . . . . . . . . . . . . . . . . . . . . . . . . . . . . . . . . . . . . . . . . . . . . . . . . . . . . 1 . . CIRCUIT CARD, relay . . . . . . . . . . . . . . . . . . . . . . . . . . . . . . . . . . . . . . . . . . . 1 . . BUSHING, snap-in .250 ID x .375mtg hole . . . . . . . . . . . . . . . . . . . . . . . . . . 1 . . CONNECTOR, rect 10skt Amp 1-87499-7 . . . . . . . . . . . . . . . . . . . . . . . . . . 1 . . CONNECTOR, rect skt 24-20ga Amp 87309-9 . . . . . . . . . . . . . . . . . . . . . . 9 . . CONNECTOR PLUG & SOCKETS, (consisting of) . . . . . . . . . . . . . . . . . . . 1 . . . . CONNECTOR, rect skt 24-18ga Molex 39-00-0038 . . . . . . . . . . . . . . . . 10 . . CONNECTOR RECEPTACLE & SOCKETS, (consisting of) . . . . . . . . . . . 1 . . . . CONNECTOR, rect skt 24-18ga Molex 39-00-0038 . . . . . . . . . . . . . . . . 2 . . CONNECTOR PLUG & SOCKETS, (consisting of) . . . . . . . . . . . . . . . . . . . 1 . . . . CONNECTOR, rect skt 24-18ga Molex 39-00-0038 . . . . . . . . . . . . . . . . 8 . . STAND-OFF, No. 6-32 x .625 lg . . . . . . . . . . . . . . . . . . . . . . . . . . . . . . . . . . . 4 . . SPRING, hold down relay . . . . . . . . . . . . . . . . . . . . . . . . . . . . . . . . . . . . . . . . 1 . . RELAY, encl 24VAC 4PDT . . . . . . . . . . . . . . . . . . . . . . . . . . . . . . . . . . . . . . . . 1 . . SOCKET, relay . . . . . . . . . . . . . . . . . . . . . . . . . . . . . . . . . . . . . . . . . . . . . . . . . . 1 . . BRACKET, mtg relay . . . . . . . . . . . . . . . . . . . . . . . . . . . . . . . . . . . . . . . . . . . . 1 . . CLIP, retaining skt . . . . . . . . . . . . . . . . . . . . . . . . . . . . . . . . . . . . . . . . . . . . . . . 1 . . CAPACITOR, elctlt 750uf 200VDC . . . . . . . . . . . . . . . . . . . . . . . . . . . . . . . . . 1 . . CLAMP, capacitor 2.000 dia . . . . . . . . . . . . . . . . . . . . . . . . . . . . . . . . . . . . . . 1 . . RECTIFIER, integ 40A 800V . . . . . . . . . . . . . . . . . . . . . . . . . . . . . . . . . . . . . . 1 . . STAND-OFF, No. 4-40 x 1.625 lg . . . . . . . . . . . . . . . . . . . . . . . . . . . . . . . . . . 4 . . CONNECTOR, edge 22skt plug Amp 583282-1 . . . . . . . . . . . . . . . . . . . . . 1 . . CONNECTOR, edge skt 20-18ga Amp 583362-2 . . . . . . . . . . . . . . . . . . . . 16 . . CIRCUIT CARD, motor speed control . . . . . . . . . . . . . . . . . . . . . . . . . . . . . . 1 . . BRACKET, mtg term block . . . . . . . . . . . . . . . . . . . . . . . . . . . . . . . . . . . . . . . . 1 . . BUSHING, al .140 ID x .250 OD x .312 . . . . . . . . . . . . . . . . . . . . . . . . . . . . . 2 . . WASHER, centering .437 dia . . . . . . . . . . . . . . . . . . . . . . . . . . . . . . . . . . . . . 4 . . RESISTOR, WW fxd 25W 2K ohm . . . . . . . . . . . . . . . . . . . . . . . . . . . . . . . . . 1 . . RESISTOR, WW fxd 25W 25 ohm . . . . . . . . . . . . . . . . . . . . . . . . . . . . . . . . . 1 . . SHIELD, resistor . . . . . . . . . . . . . . . . . . . . . . . . . . . . . . . . . . . . . . . . . . . . . . . . 1 . . HEAT SINK . . . . . . . . . . . . . . . . . . . . . . . . . . . . . . . . . . . . . . . . . . . . . . . . . . . . . 1 . . TUBING, .275 ID x .048 wall x 1.000 . . . . . . . . . . . . . . . . . . . . . . . . . . . . . . . 2 . . WASHER, flat brs .218 ID x .460 OD x .031thk . . . . . . . . . . . . . . . . . . . . . . 4 . . BLOCK, term 20A 9P . . . . . . . . . . . . . . . . . . . . . . . . . . . . . . . . . . . . . . . . . . . . 1 . . RELAY, encl 24VAC DPDT . . . . . . . . . . . . . . . . . . . . . . . . . . . . . . . . . . . . . . . 1 . . RELAY, encl 24VAC 3PDT . . . . . . . . . . . . . . . . . . . . . . . . . . . . . . . . . . . . . . . . 1 . . HEAT SINK, resistor . . . . . . . . . . . . . . . . . . . . . . . . . . . . . . . . . . . . . . . . . . . . . 1 . . CONNECTOR, clamp cable .750 . . . . . . . . . . . . . . . . . . . . . . . . . . . . . . . . . . 2 . . RESISTOR, WW fxd 100W 5 ohm . . . . . . . . . . . . . . . . . . . . . . . . . . . . . . . . . 1 . . PLUG, str grd armd 2P3W 15A 125V . . . . . . . . . . . . . . . . . . . . . . . . . . . . . . 1 . . CABLE, port No. 18 3/c (order by ft) . . . . . . . . . . . . . . . . . . . . . . . . . . . . . . 26ft . . BUSHING, strain relief .625 ID . . . . . . . . . . . . . . . . . . . . . . . . . . . . . . . . . . . . 1 . . CONNECTOR & SOCKETS, (consisting of) . . . . . . . . . . . . . . . . . . . . . . . . . 1 . . . . CONNECTOR, circ skt push-in 14-18ga Amp 66358-6 . . . . . . . . . . . . . . 14 . . CONNECTOR, circ pin plug Amp 200821-1 . . . . . . . . . . . . . . . . . . . . . . . . . 2 . . CONNECTOR, circ 14pin plug Amp 206044-1 . . CONNECTOR, circ pin push-in 14-18ga Amp 66359-6 . . CONNECTOR, circ pin plug keying Amp 206322-2 . . TRANSFORMER, control . . . . . . . . . . . . . . . . . . . . . . . . . . . . . . . . . . . . . . . . 1 . . BLOCK, term 20A 14P . . . . . . . . . . . . . . . . . . . . . . . . . . . . . . . . . . . . . . . . . . . 1 . . LINK, jumper term blk 20A . . . . . . . . . . . . . . . . . . . . . . . . . . . . . . . . . . . . . . . . 7 . . CIRCUIT BREAKER, man reset 1P 1.5A 250V . . . . . . . . . . . . . . . . . . . . . . 1 . . SWITCH, PB MC SPDT 6A 125VAC green . . . . . . . . . . . . . . . . . . . . . . . . . 1 . . SWITCH, PB MC SPDT 6A 125VAC red . . . . . . . . . . . . . . . . . . . . . . . . . . . 1 . . METER, digital 0 to 2VDC . . . . . . . . . . . . . . . . . . . . . . . . . . . . . . . . . . . . . . . . 1 OM-889 Page 37 Item No. Dia. Mkgs. Part No. 128 972 . . 41 . . 42 . . 43 . . 44 . . 45 . . 46 . . 47 . . 48 . . 49 . . 50 . . 51 . . 52 . . 53 . . . . . . . . . . . . . . . 115 940 . . . . . . . . . . . . . . . . 046 432 . . . . . . . F1 . . . . . *073 426 . . . . . . . . . . . . . . . . 079 725 . . . . . . . . . . . . . . . . 097 922 . . . . . . . . . . . . . . . . 021 385 . . . . . . . . . . . . . . . . . 117 843 . . ......................... . . . . . S4 . . . . . 088 409 . . . . . . . R4 . . . . . 603 856 . . . . . . . S2 . . . . . . 117 719 . . . . . . . R5 . . . . . 073 562 . . . . . . . S1 . . . . . . 011 609 . . Description Quantity Figure 10-2. Control Box (Fig 10-1 Item 1) (Continued) CASE SECTION, front/bottom/rear . . . . . . . . . . . . . . . . . . . . . . . . . . . . . . . . HOLDER, fuse mintr . . . . . . . . . . . . . . . . . . . . . . . . . . . . . . . . . . . . . . . . . . . . . FUSE, mintr gl slo blo 5A . . . . . . . . . . . . . . . . . . . . . . . . . . . . . . . . . . . . . . . . . GUARD, switch al knurled . . . . . . . . . . . . . . . . . . . . . . . . . . . . . . . . . . . . . . . . KNOB, pointer . . . . . . . . . . . . . . . . . . . . . . . . . . . . . . . . . . . . . . . . . . . . . . . . . . BOOT, tgl switch lever . . . . . . . . . . . . . . . . . . . . . . . . . . . . . . . . . . . . . . . . . . . BEZEL, meter . . . . . . . . . . . . . . . . . . . . . . . . . . . . . . . . . . . . . . . . . . . . . . . . . . NAMEPLATE (order by model and serial number) . . . . . . . . . . . . . . . . . . . SWITCH, tgl DPDT 15A 125VAC . . . . . . . . . . . . . . . . . . . . . . . . . . . . . . . . . . POTENTIOMETER, WW sltd sft 10/T 2W 10K ohm . . . . . . . . . . . . . . . . . . SWITCH, tgl DPDT 6A 125V . . . . . . . . . . . . . . . . . . . . . . . . . . . . . . . . . . . . . . POTENTIOMETER, C sltd sft 1/T 2W 10K ohm . . . . . . . . . . . . . . . . . . . . . SWITCH, tgl SPDT 15A 125VAC . . . . . . . . . . . . . . . . . . . . . . . . . . . . . . . . . . 1 1 1 2 2 3 1 1 1 1 1 1 1 +When ordering a component originally displaying a precautionary label, the label should also be ordered. *Recommended Spare Parts. To maintain the factory original performance of your equipment, use only Manufacturer’s Suggested Replacement Parts. Model and serial number required when ordering parts from your local distributor. OM-889 Page 38 Effective January 1, 2000 (Equipment with a serial number preface of “LA” or newer) This limited warranty supersedes all previous Miller warranties and is exclusive with no other guarantees or warranties expressed or implied. Warranty Questions? Call 1-800-4-A-MILLER for your local Miller distributor. Your distributor also gives you ... Service You always get the fast, reliable response you need. Most replacement parts can be in your hands in 24 hours. Support Need fast answers to the tough welding questions? Contact your distributor. The expertise of the distributor and Miller is there to help you, every step of the way. * LIMITED WARRANTY – Subject to the terms and conditions below, Miller Electric Mfg. Co., Appleton, Wisconsin, warrants to its original retail purchaser that new Miller equipment sold after the effective date of this limited warranty is free of defects in material and workmanship at the time it is shipped by Miller. THIS WARRANTY IS EXPRESSLY IN LIEU OF ALL OTHER WARRANTIES, EXPRESS OR IMPLIED, INCLUDING THE WARRANTIES OF MERCHANTABILITY AND FITNESS. Within the warranty periods listed below, Miller will repair or replace any warranted parts or components that fail due to such defects in material or workmanship. Miller must be notified in writing within thirty (30) days of such defect or failure, at which time Miller will provide instructions on the warranty claim procedures to be followed. Miller shall honor warranty claims on warranted equipment listed below in the event of such a failure within the warranty time periods. All warranty time periods start on the date that the equipment was delivered to the original retail purchaser, or one year after the equipment is sent to a North American distributor or eighteen months after the equipment is sent to an International distributor. 1. 5 Years Parts – 3 Years Labor * * 2. 3 Years — Parts and Labor * * * * * * 3. Original main power rectifiers Inverters (input and output rectifiers only) Transformer/Rectifier Power Sources Plasma Arc Cutting Power Sources Semi-Automatic and Automatic Wire Feeders Inverter Power Supplies Intellitig Engine Driven Welding Generators (NOTE: Engines are warranted separately by the engine manufacturer.) 1 Year — Parts and Labor * * * * * * * * * * * * * * * * * DS-2 Wire Feeder Motor Driven Guns (w/exception of Spoolmate 185 & Spoolmate 250) Process Controllers Positioners and Controllers Automatic Motion Devices RFCS Foot Controls Induction Heating Power Sources Water Coolant Systems HF Units Grids Maxstar 140 Spot Welders Load Banks Miller Cyclomatic Equipment Running Gear/Trailers Plasma Cutting Torches (except APT & SAF Models) Field Options (NOTE: Field options are covered under True Blue for the remaining warranty period of the product they are installed in, or for a minimum of one year — whichever is greater.) 4. 6 Months — Batteries 5. 90 Days — Parts * * MIG Guns/TIG Torches Induction Heating Coils and Blankets * * * * * APT, ZIPCUT & PLAZCUT Model Plasma Cutting Torches Remote Controls Accessory Kits Replacement Parts (No labor) Spoolmate 185 & Spoolmate 250 Canvas Covers Miller’s True Blue Limited Warranty shall not apply to: 1. Consumable components; such as contact tips, cutting nozzles, contactors, brushes, slip rings, relays or parts that fail due to normal wear. 2. Items furnished by Miller, but manufactured by others, such as engines or trade accessories. These items are covered by the manufacturer’s warranty, if any. 3. Equipment that has been modified by any party other than Miller, or equipment that has been improperly installed, improperly operated or misused based upon industry standards, or equipment which has not had reasonable and necessary maintenance, or equipment which has been used for operation outside of the specifications for the equipment. MILLER PRODUCTS ARE INTENDED FOR PURCHASE AND USE BY COMMERCIAL/INDUSTRIAL USERS AND PERSONS TRAINED AND EXPERIENCED IN THE USE AND MAINTENANCE OF WELDING EQUIPMENT. In the event of a warranty claim covered by this warranty, the exclusive remedies shall be, at Miller’s option: (1) repair; or (2) replacement; or, where authorized in writing by Miller in appropriate cases, (3) the reasonable cost of repair or replacement at an authorized Miller service station; or (4) payment of or credit for the purchase price (less reasonable depreciation based upon actual use) upon return of the goods at customer’s risk and expense. Miller’s option of repair or replacement will be F.O.B., Factory at Appleton, Wisconsin, or F.O.B. at a Miller authorized service facility as determined by Miller. Therefore no compensation or reimbursement for transportation costs of any kind will be allowed. TO THE EXTENT PERMITTED BY LAW, THE REMEDIES PROVIDED HEREIN ARE THE SOLE AND EXCLUSIVE REMEDIES. IN NO EVENT SHALL MILLER BE LIABLE FOR DIRECT, INDIRECT, SPECIAL, INCIDENTAL OR CONSEQUENTIAL DAMAGES (INCLUDING LOSS OF PROFIT), WHETHER BASED ON CONTRACT, TORT OR ANY OTHER LEGAL THEORY. ANY EXPRESS WARRANTY NOT PROVIDED HEREIN AND ANY IMPLIED WARRANTY, GUARANTY OR REPRESENTATION AS TO PERFORMANCE, AND ANY REMEDY FOR BREACH OF CONTRACT TORT OR ANY OTHER LEGAL THEORY WHICH, BUT FOR THIS PROVISION, MIGHT ARISE BY IMPLICATION, OPERATION OF LAW, CUSTOM OF TRADE OR COURSE OF DEALING, INCLUDING ANY IMPLIED WARRANTY OF MERCHANTABILITY OR FITNESS FOR PARTICULAR PURPOSE, WITH RESPECT TO ANY AND ALL EQUIPMENT FURNISHED BY MILLER IS EXCLUDED AND DISCLAIMED BY MILLER. Some states in the U.S.A. do not allow limitations of how long an implied warranty lasts, or the exclusion of incidental, indirect, special or consequential damages, so the above limitation or exclusion may not apply to you. This warranty provides specific legal rights, and other rights may be available, but may vary from state to state. In Canada, legislation in some provinces provides for certain additional warranties or remedies other than as stated herein, and to the extent that they may not be waived, the limitations and exclusions set out above may not apply. This Limited Warranty provides specific legal rights, and other rights may be available, but may vary from province to province. miller_warr 7/00 Owner’s Record Please complete and retain with your personal records. Model Name Serial/Style Number Purchase Date (Date which equipment was delivered to original customer.) Distributor Address City State Zip For Service Call 1-800-4-A-Miller or see our website at www.MillerWelds.com to locate a DISTRIBUTOR or SERVICE AGENCY near you. Always provide Model Name and Serial/Style Number. Contact your Distributor for: Welding Supplies and Consumables Options and Accessories Personal Safety Equipment Service and Repair Miller Electric Mfg. Co. An Illinois Tool Works Company 1635 West Spencer Street Appleton, WI 54914 USA Replacement Parts Training (Schools, Videos, Books) International Headquarters–USA USA Phone: 920-735-4505 Auto-Attended USA & Canada FAX: 920-735-4134 International FAX: 920-735-4125 Technical Manuals (Servicing Information and Parts) Circuit Diagrams European Headquarters – United Kingdom Phone: 44 (0) 1204-593493 FAX: 44 (0) 1204-598066 Welding Process Handbooks www.MillerWelds.com Contact the Delivering Carrier for: File a claim for loss or damage during shipment. For assistance in filing or settling claims, contact your distributor and/or equipment manufacturer’s Transportation Department. PRINTED IN USA 2000 Miller Electric Mfg. Co. 6/00