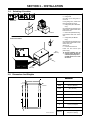
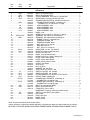
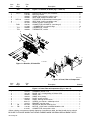
1
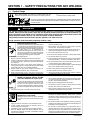
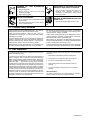
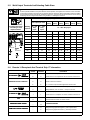
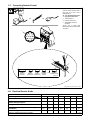
June 1996
Form: OM-278C
Effective With Serial No. KG054113
OWNER’S
MANUAL
Dimension™ 652 (60 Hz)
Dimension™ 812 (50/60 Hz)
CC/CV DC Welding Power Source For SMAW, GTAW, GMAW,
FCAW, SAW Welding, And CAC-A Cutting And Gouging
Model
650
Amp
IP
Rating
Rated
Welding
Output
21M
650 A @ 44
Volts DC,
100% Duty
Cycle
Amperage
/Voltage
Range DC
Max
OCV−DC
50 − 815 A
In CC Mode
72 (70) VDC
In
CC Mode
10 − 65 V In
CV Mode
70 (66) VDC
In
CV Mode
Amperes Input at Rated Load Output,
50 or 60 Hz, Three-Phase
230
V
380
V
400
V
440
V
460
V
520
V
575
V
KVA
KW
126
3.8*
77
1.9*
73
1.8*
66
1.6*
63
1.9*
54
1.1*
50.4
1.4*
50
1.52*
34.8
0.76*
*While idling
( ) Indicates specification differences for CE models
cover_om 4/95 − ST-800 091
© 1996 MILLER Electric Mfg. Co.
PRINTED IN USA
Declaration of Conformity For
European Community (CE) Products
NOTE
This information is provided for units with CE certification (see rating label on unit.)
Miller Electric Mfg. Co.
Manufacturer’s Name:
1635 W. Spencer Street
Appleton, WI 54914 USA
Manufacturer’s Address:
Declares that the product:
Dimension™ 812
conforms to the following Directives and Standards:
Directives
Electromagnetic compatibility Directives: 89/336/EEC, 92/31/EEC
Low Voltage Directive: 73/23/EEC
Machinery Directives: 89/392/EEC, 91/368/EEC, 93/C 133/04, 93/68/EEC
Standards
Safety Requirements for Arc Welding Equipment part 1: EN 60974-1: 1990
Arc Welding Equipment Part 1: Welding Power Sources: IEC 974-1
(April 1995 − Draft revision)
Degrees of Protection provided by Enclosures (IP code): IEC 529: 1989
Insulation coordination for equipment within low-voltage systems:
Part 1: Principles, requirements and tests: IEC 664-1: 1992
Electromagnetic compatibility (EMC) Product standard for arc welding equipment:
EN50199: August 1995
European Contact:
Telephone:
Fax:
dec_con1 10/95
Mr. Luigi Vacchini, Managing Director
MILLER Europe S.P.A.
Via Privata Iseo
20098 San Giuliano
Milanese, Italy
39(02)98290-1
39(02)98281-552
SECTION 1 − SAFETY PRECAUTIONS FOR ARC WELDING
OM-278C 6/96
safety_som1 4/95
1-1. Symbol Usage
Means Warning! Watch Out! There are possible hazards with this
procedure! The possible hazards are shown in the adjoining symbols.
Y Marks a special safety message.
. Means NOTE; not safety related.
This group of symbols means Warning! Watch Out! possible ELECTRIC SHOCK, MOVING PARTS,
and HOT PARTS hazards. Consult symbols and related instructions below for necessary actions to
avoid the hazards.
1-2. Arc Welding Hazards
WARNING
The symbols shown below are used throughout this manual to call attention to and identify possible
hazards. When you see the symbol, watch out, and follow the related instructions to avoid the hazard. The
safety information given below is only a summary of the more complete safety information found in the
Safety Standards listed in Section 1-4. Read and follow all Safety Standards.
Only qualified persons should install, operate, maintain, and repair this unit.
During operation, keep everybody, especially children, away.
ELECTRIC SHOCK can kill.
Touching live electrical parts can cause fatal shocks
or severe burns. The electrode and work circuit is
electrically live whenever the output is on. The input
power circuit and machine internal circuits are also
live when power is on. In semiautomatic or
automatic wire welding, the wire, wire reel, drive roll
housing, and all metal parts touching the welding
wire are electrically live. Incorrectly installed or
improperly grounded equipment is a hazard.
1. Do not touch live electrical parts.
2. Wear dry, hole-free insulating gloves and body protection.
3. Insulate yourself from work and ground using dry insulating mats
or covers big enough to prevent any physical contact with the
work or ground.
4. Disconnect input power or stop engine before installing or
servicing this equipment. Lockout/tagout input power according
to OSHA 29 CFR 1910.147 (see Safety Standards).
5. Properly install and ground this equipment according to its
Owner’s Manual and national, state, and local codes.
6. Always verify the supply ground − check and be sure that input
power cord ground wire is properly connected to ground terminal
ARC RAYS can burn eyes and skin;
NOISE can damage hearing; FLYING
SLAG OR SPARKS can injure eyes.
NOISE
Arc rays from the welding process produce intense
visible and invisible (ultraviolet and infrared) rays
that can burn eyes and skin. Noise from some
processes can damage hearing. Chipping, grinding,
and welds cooling throw off pieces of metal or slag.
7. When making input connections, attach proper grounding
conductor first − double-check connections.
8. Frequently inspect input power cord for damage or bare wiring −
replace cord immediately if damaged − bare wiring can kill.
9. Turn off all equipment when not in use.
10. Do not use worn, damaged, undersized, or poorly spliced cables.
11. Do not drape cables over your body.
12. If earth grounding of the workpiece is required, ground it directly
with a separate cable − do not use work clamp or work cable.
13. Do not touch electrode if you are in contact with the work, ground,
or another electrode from a different machine.
14. Use only well-maintained equipment. Repair or replace damaged
parts at once. Maintain unit according to manual.
15. Wear a safety harness if working above floor level.
16. Keep all panels and covers securely in place.
17. Clamp work cable with good metal-to-metal contact to workpiece
or worktable as near the weld as practical.
ARC RAYS
2. Wear a welding helmet fitted with a proper shade of filter to protect
your face and eyes when welding or watching (see ANSI Z49.1
and Z87.1 listed in Safety Standards).
3. Wear approved safety glasses with side shields.
4. Use protective screens or barriers to protect others from flash
and glare; warn others not to watch the arc.
5. Wear protective clothing made from durable, flame-resistant
material (wool and leather) and foot protection.
1. Use approved ear plugs or ear muffs if noise level is high.
FUMES AND GASES can
hazardous to your health.
in disconnect box or that cord plug is connected to a properly
grounded receptacle outlet.
be
Welding produces fumes and gases. Breathing
these fumes and gases can be hazardous to your
health.
1. Keep your head out of the fumes. Do not breathe the fumes.
2. If inside, ventilate the area and/or use exhaust at the arc to
remove welding fumes and gases.
3. If ventilation is poor, use an approved air-supplied respirator.
4. Read the Material Safety Data Sheets (MSDSs) and the
manufacturer’s instruction for metals, consumables, coatings,
cleaners, and degreasers.
5. Work in a confined space only if it is well ventilated, or while
wearing an air-supplied respirator. Always have a trained
watchperson nearby. Welding fumes and gases can displace air
and lower the oxygen level causing injury or death. Be sure the
breathing air is safe.
6. Do not weld in locations near degreasing, cleaning, or spraying
operations. The heat and rays of the arc can react with vapors to
form highly toxic and irritating gases.
7. Do not weld on coated metals, such as galvanized, lead, or
cadmium plated steel, unless the coating is removed from the
weld area, the area is well ventilated, and if necessary, while
wearing an air-supplied respirator. The coatings and any metals
containing these elements can give off toxic fumes if welded.
OM-278 Page 1
CYLINDERS can explode if damaged.
Shielding gas cylinders contain gas under high
pressure. If damaged, a cylinder can explode. Since
gas cylinders are normally part of the welding
process, be sure to treat them carefully.
1. Protect compressed gas cylinders from excessive heat,
mechanical shocks, slag, open flames, sparks, and arcs.
2. Install cylinders in an upright position by securing to a stationary
support or cylinder rack to prevent falling or tipping.
3. Keep cylinders away from any welding or other electrical circuits.
WELDING
explosion.
can
cause
fire
or
Welding on closed containers, such as tanks,
drums, or pipes, can cause them to blow up. Sparks
can fly off from the welding arc. The flying sparks,
hot workpiece, and hot equipment can cause fires
and burns. Accidental contact of electrode to metal
objects can cause sparks, explosion, overheating,
or fire. Check and be sure the area is safe before
doing any welding.
1. Protect yourself and others from flying sparks and hot metal.
2. Do not weld where flying sparks can strike flammable material.
3. Remove all flammables within 35 ft (10.7 m) of the welding arc. If
this is not possible, tightly cover them with approved covers.
4. Be alert that welding sparks and hot materials from welding can
easily go through small cracks and openings to adjacent areas.
4.
5.
6.
7.
Never drape a welding torch over a gas cylinder.
Never allow a welding electrode to touch any cylinder.
Never weld on a pressurized cylinder − explosion will result.
Use only correct shielding gas cylinders, regulators, hoses, and
fittings designed for the specific application; maintain them and
associated parts in good condition.
8. Turn face away from valve outlet when opening cylinder valve.
9. Keep protective cap in place over valve except when cylinder is in
use or connected for use.
10. Read and follow instructions on compressed gas cylinders,
associated equipment, and CGA publication P-1 listed in Safety
Standards.
5. Watch for fire, and keep a fire extinguisher nearby.
6. Be aware that welding on a ceiling, floor, bulkhead, or partition
can cause fire on the hidden side.
7. Do not weld on closed containers such as tanks, drums, or pipes,
unless they are properly prepared according to AWS F4.1 (see
Safety Standards).
8. Connect work cable to the work as close to the welding area as
practical to prevent welding current from traveling long, possibly
unknown paths and causing electric shock and fire hazards.
9. Do not use welder to thaw frozen pipes.
10. Remove stick electrode from holder or cut off welding wire at
contact tip when not in use.
11. Wear oil-free protective garments such as leather gloves, heavy
shirt, cuffless trousers, high shoes, and a cap.
12. Remove any combustibles, such as a butane lighter or matches,
from your person before doing any welding.
1-3. Additional Installation, Operation, And Maintenance Hazards
FIRE OR EXPLOSION can result from
placing unit on, over, or near
combustible surfaces.
1. Do not locate unit on, over, or near combustible
surfaces.
2. Do not install unit near flammables.
FALLING EQUIPMENT can cause
serious personal injury and equipment
damage.
1. Use lifting eye to lift unit only, NOT running gear,
gas cylinders, or any other accessories.
2. Use equipment of adequate capacity to lift unit.
3. If using lift forks to move unit, be sure forks are long
enough to extend beyond opposite side of unit.
HOT PARTS can cause severe burns.
1. Do not touch hot parts bare handed.
2. Allow cooling period before working on gun or
torch.
MOVING PARTS can cause injury.
1. Keep away from moving parts such as fans.
2. Keep all doors, panels, covers, and guards closed
and securely in place.
MAGNETIC
CURRENTS
operation.
FIELDS FROM HIGH
can affect pacemaker
1. Pacemaker wearers keep away.
2. Wearers should consult their doctor before going
near arc welding, gouging, or spot welding
operations.
OM-278 Page 2
MOVING PARTS can cause injury.
1. Keep away from moving parts.
2. Keep away from pinch points such as drive rolls.
FLYING PIECES OF METAL or DIRT can
injure eyes.
1. Wear safety glasses with side shields or face
shield.
WELDING WIRE can cause puncture
wounds.
1. Do not press gun trigger until instructed to do so.
2. Do not point gun toward any part of the body, other
people, or any metal when threading welding wire.
HIGH-FREQUENCY RADIATION can
interfere with radio navigation, safety
services,
computers,
and
communications equipment.
1. Have only qualified persons familiar with electronic
equipment perform this installation.
2. The user is responsible for having a qualified
electrician promptly correct any interference
problem resulting from the installation.
3. If notified by the FCC about interference, stop using
the equipment at once.
4. Have the installation regularly checked and
maintained.
5. Keep high-frequency source doors and panels
tightly shut, keep spark gaps at correct setting, and
use grounding and shielding to minimize the
possibility of interference.
OVERUSE can cause OVERHEATED
EQUIPMENT.
SIGNIFICANT DC VOLTAGE exists after
removal of input power on inverters.
1. Allow cooling period.
2. Reduce current or reduce duty cycle before
starting to weld again.
3. Follow rated duty cycle.
1. Turn Off inverter, disconnect input power, and
discharge input capacitors according to
instructions in Maintenance Section before
touching any parts.
STATIC ELECTRICITY can
parts on circuit boards.
damage
1. Put on grounded wrist strap BEFORE handling
boards or parts.
2. Use proper static-proof bags and boxes to store,
move, or ship PC boards.
BUILDUP OF SHIELDING GAS can harm
health or kill.
1. Shut off shielding gas supply when not in use.
1-4. Principal Safety Standards
Safety in Welding and Cutting, ANSI Standard Z49.1, from American
Welding Society, 550 N.W. LeJeune Rd, Miami FL 33126
Safety and Health Standards, OSHA 29 CFR 1910, from
Superintendent of Documents, U.S. Government Printing Office,
Washington, D.C. 20402.
Recommended Safe Practices for the Preparation for Welding and
Cutting of Containers That Have Held Hazardous Substances,
American Welding Society Standard AWS F4.1, from American
Welding Society, 550 N.W. LeJeune Rd, Miami, FL 33126
National Electrical Code, NFPA Standard 70, from National Fire
Protection Association, Batterymarch Park, Quincy, MA 02269.
Safe Handling of Compressed Gases in Cylinders, CGA Pamphlet
P-1, from Compressed Gas Association, 1235 Jefferson Davis
Highway, Suite 501, Arlington, VA 22202.
Code for Safety in Welding and Cutting, CSA Standard W117.2, from
Canadian Standards Association, Standards Sales, 178 Rexdale
Boulevard, Rexdale, Ontario, Canada M9W 1R3.
Safe Practices For Occupation And Educational Eye And Face
Protection, ANSI Standard Z87.1, from American National Standards
Institute, 1430 Broadway, New York, NY 10018.
Cutting And Welding Processes, NFPA Standard 51B, from National
Fire Protection Association, Batterymarch Park, Quincy, MA 02269.
1-5. EMF Information
Considerations About Welding And The Effects Of Low Frequency
Electric And Magnetic Fields
The following is a quotation from the General Conclusions Section of
the U.S. Congress, Office of Technology Assessment, Biological
Effects of Power Frequency Electric & Magnetic Fields − Background
Paper, OTA-BP-E-53 (Washington, DC: U.S. Government Printing
Office, May 1989): “. . . there is now a very large volume of scientific
findings based on experiments at the cellular level and from studies
with animals and people which clearly establish that low frequency
magnetic fields can interact with, and produce changes in, biological
systems. While most of this work is of very high quality, the results are
complex. Current scientific understanding does not yet allow us to
interpret the evidence in a single coherent framework. Even more
frustrating, it does not yet allow us to draw definite conclusions about
questions of possible risk or to offer clear science-based advice on
strategies to minimize or avoid potential risks.”
To reduce magnetic fields in the workplace, use the following
procedures:
1. Keep cables close together by twisting or taping them.
2. Arrange cables to one side and away from the operator.
3. Do not coil or drape cables around the body.
4. Keep welding power source and cables as far away as
practical.
5. Connect work clamp to workpiece as close to the weld as
possible.
About Pacemakers:
The above procedures are also recommended for pacemaker
wearers. Consult your doctor for complete information.
OM-278 Page 3
SECTION 2 − DEFINITIONS
2-1. Warning Label Definitions
Warning! Watch Out! There are
possible hazards as shown by the
symbols.
1
1.1
1.2
1.3
2
1
1.1
2.1
1.3
1.2
2.2
2.3
3
2
2.1
2.2
3.1
2.3
3.2
3
3.1
3.2
3.3
3.3
4
4.1
4
4.1
+
+
+
5
6
5
+
Electric shock from welding
electrode or wiring can kill.
Wear dry insulating gloves.
Do not touch electrode with
bare hand. Do not wear wet or
damaged gloves.
Protect yourself from electric
shock by insulating yourself
from work and ground.
Disconnect input plug or
power before working on
machine.
Breathing welding fumes can
be hazardous to your health.
Keep your head out of the
fumes.
Use forced ventilation or local
exhaust to remove the fumes.
Use ventilating fan to remove
fumes.
Welding sparks can cause
explosion or fire.
Keep flammables away from
welding. Do not weld near
flammables.
Welding sparks can cause
fires. Have a fire extinguisher
nearby, and have a
watchperson ready to use it.
Do not weld on drums or any
closed containers.
Arc rays can burn eyes and
injure skin.
Wear hat and safety glasses.
Use ear protection and button
shirt collar. Use welding
helmet with correct shade of
filter. Wear complete body
protection.
Become trained and read the
instructions before working on
the machine or welding.
Do not remove or paint over
(cover) the label.
6
S-176 254-A
1/96
OM-278 Page 4
Warning! Watch Out! There are
possible hazards as shown by the
symbols.
Electric shock from wiring can kill.
Disconnect input plug or power
before working on machine.
Read the Owner’s Manual before
working on this machine.
1
2
3
1
2
?
V
?
A
3
?
V
4
5
ÍÍÍ
ÍÍÍ
ÍÍÍ
ÍÍÍ
ÍÍÍ
5
3
Consult rating label for input
power requirements, and
check power available at the
job site − they must match.
Read Owner’s Manual and
inside labels for connection
points and procedures.
Move jumper links as shown
on inside label to match
voltage at job site.
Having a loop of extra length,
connect grounding conductor
first.
Connect line input conductors
as shown on inside label −
double-check all connections,
jumper link positions, and
input voltage before applying
power.
4
S-179 290
1/96
1
1
2
3
2
3
Warning! Watch Out! There
are possible hazards as
shown by the symbols.
Electric shock from wiring and
exposed weld terminals can
kill.
Close door before turning on
unit.
S-179 563
1/96
1
1
1
2
3
4
5
2
3
4
5
6
6
Warning! Watch Out! There
are possible hazards as
shown by the symbols.
Electric shock from welding
electrode or wiring can kill.
Sparks from arcing electrode
can cause explosion or fire −
disconnect cable for process
not in use.
Read Owner’s Manual for
connection procedures.
Electric shock from wiring can
kill.
Disconnect input power
before working on unit or
making terminal strip
connections.
Nameplate D-179 389
OM-278 Page 5
2-2. Manufacturer’s Rating Label For CE Products
For label location
see Section 3-1.
S-174 343
2-3. Symbols And Definitions
NOTE
A
U0
I1
IP
S
OM-278 Page 6
Some symbols are found only on CE products.
Amperes
Amperage/Voltage
Control−Panel
Gas Tungsten Arc
Welding (GTAW)
Shielded Metal Arc
Welding (SMAW)
Temperature
Wire Feeder
Arc Force (DIG)
Gas Metal Arc
Welding (GMAW)
Output
Circuit Breaker
Remote
Positive High Inductance Weld
Output Terminal
Positive Low Inductance Weld
Output Terminal
Negative Weld
Output Terminal
Input
On
Off
Percent
Direct Current
Conventional Load
Voltage
Line Connection
Duty Cycle
Three-Phase
Transformer
Rectifier
Rated No Load
Voltage (Average)
Primary Current
U1
I2
Primary Voltage
Rated Welding
Current
Degree Of
Protection
Three-Phase
Suitable For Areas
Of Increased
Shock Hazard
Protective Earth
(Ground)
U2
X
S1
KVA
V
Hz
Volts
Hertz
SECTION 3 − INSTALLATION
3-1. Selecting A Location
1
2
Lifting Eye
Lifting Forks
Use lifting eye or lifting forks to
move unit.
Movement
If using lifting forks, extend forks
beyond opposite side of unit.
1
3
Rating Label (Non CE Models
Only)
Use rating label to determine input
power needs. Label located under
front access door.
OR
2
4
Plate Label (CE Models Only)
Label located under front access
door.
5
Location And Airflow
6
Rating Label (CE Models
Only)
Use rating label to determine input
power needs. Label located on rear
access door (see
Section 2-2).
3
6
Line Disconnect Device
Locate unit near correct input
power supply.
18 in
(460 mm)
Y Special installation may be
required where gasoline or
volatile liquids are present −
see NEC Article 511 or CEC
Section 20.
4
5
18 in
(460 mm)
3-2. Dimensions And Weights
Dimensions
C
D
Height
27-1/4 in (692 mm)
Width
22-1/4 in (565 mm)
Depth
36 in (914 mm)
A
35 in (889 mm)
B
1-1/4 in (32 mm)
C
21 in (533 mm)
D
1-3/16 in (30 mm)
E
7/16 in (11 mm) Dia
E
4 Holes
A
Weight
B
Ref. ST-153 556-A
650 Amp
Net: 545 lb (247 kg)
Ship: 561 lb (254 kg)
OM-278 Page 7
3-3. Tipping
Y Be careful when placing or
moving unit over uneven
surfaces.
3-4. 115 VAC Receptacle And Circuit Breakers
Y Turn Off power before
connecting to receptacle.
1
115 V 15 A AC Receptacle
RC9
Power is shared between RC9 and
Remote 14 receptacle RC8 or
terminal strip 1T (see Section 3-7).
2
3
Circuit Breaker CB1
Circuit Breaker CB2
CB1 protects 115 volts ac portion of
RC8, 1T, and RC9 from overload.
3
2
CB2 protects 24 volts ac portion of
RC8 and 1T from overload.
Press button to reset breaker.
1
Ref. ST-800 166-A
OM-278 Page 8
3-5. Weld Output Terminals And Selecting Cable Sizes
Y ARC WELDING can cause Electromagnetic Interference.
To reduce possible interference, keep weld cables as short as possible, close together, and down low, such as on the floor.
Locate welding operation 100 meters from any sensitive electronic equipment. Be sure this welding machine is installed
and grounded according to this manual. If interference still occurs, the user must take extra measures such as moving
the welding machine, using shielded cables, using line filters, or shielding the work area.
Total Cable (Copper) Length In Weld Circuit Not Exceeding
100 ft (30 m) Or Less
Turn Off power before
connecting to weld
output terminals.
Positive
Negative
High
Inductance Positive
Low
Inductance
150 ft
(45 m)
200 ft
(60 m)
250 ft
(70 m)
300 ft
(90 m)
350 ft
(105 m)
400 ft
(120 m)
Welding
Amperes
10 − 60%
Duty
Cycle
60 − 100%
Duty
Cycle
100
4
4
4
3
2
1
1/0
1/0
150
3
3
2
1
1/0
2/0
3/0
3/0
200
3
2
1
1/0
2/0
3/0
4/0
4/0
250
2
1
1/0
2/0
3/0
4/0
2-2/0
2-2/0
300
1
1/0
2/0
3/0
4/0
2-2/0
2-3/0
2-3/0
350
1/0
2/0
3/0
4/0
2-2/0
2-3/0
2-3/0
2-4/0
400
1/0
2/0
3/0
4/0
2-2/0
2-3/0
2-4/0
2-4/0
500
2/0
3/0
4/0
2-2/0
2-3/0
2-4/0
3-3/0
3-3/0
600
3/0
4/0
2-2/0
2-3/0
2-4/0
3-3/0
3-4/0
3-4/0
700
4/0
2-2/0
2-3/0
2-4/0
3-3/0
3-4/0
3-4/0
4-4/0
800
4/0
2-2/0
2-3/0
2-4/0
3-4/0
3-4/0
4-4/0
4-4/0
10 − 100% Duty Cycle
Weld cable size (AWG) is based on either a 4 volts or less drop or a current density of at least 300 circular mils per ampere.
S-0007-D
3-6. Remote 14 Receptacle And Terminal Strip 1T Information
24 VOLTS AC
REMOTE OUTPUT CONTROL
115 VOLTS AC
GND
REMOTE POWER ON/OFF
REMOTE VOLTAGE SENSING
Socket
Terminal
Information
A
A
24 volts ac. Protected by circuit breaker CB2.
B
B
Contact closure to A completes 24 volts ac contactor control circuit.
C
C
Command reference; 0 to +10 volts dc.
D
D
Remote control circuit common.
E
E
0 to +10 volts dc input command signal from remote control.
F
*
Current feedback; 0 to +10 volts dc, 1 volt per 100 amperes.
H
*
Voltage feedback; 0 to +10 volts dc, 1 volt per 10 arc volts.
I
I
115 volts, 15 amperes, 60 Hz ac. Protected by circuit breaker CB1.
J
J
Contact closure to I completes 115 volts ac contactor control circuit.
K
K
Chassis common.
G
*
Circuit common for 24 and 115 volts ac circuits.
*
L
*
M
*
N
Voltage sensing signal from Negative (-) weld output terminal.
*
P
Voltage sensing signal from Positive (+) weld output terminal.
To remote On/Off switch.
switch
* Not Used
OM-278 Page 9
3-7. Connecting Remote Control
1
Remote 14 Receptacle RC8
Connect remote control to RC8. If
plug does not fit, wire cord to
terminal strip 1T.
Y Turn Off power before opening terminal strip cover.
OR
OR
2
3
4
Terminal Strip 1T
Remote Control Cord
Strain Relief (Customer
Supplied)
Secure cord in strain relief.
Reinstall and secure access panel.
Close door.
1
A
B
K
J
I
H
C L N
M
D
G
E F
2
3
C
E
REMOTE
OUTPUT
CONTROL
D
I
J
A
B
115 VAC
24VAC
REMOTE
REMOTE
CONTACTOR CONTACTOR
N
P
REMOTE
VOLTAGE
SENSE
K
GND
M
L
4
REMOTE
POWER ON/OFF
S-162 895-B
Ref. ST-800 170 / Ref. S-0004-A / S-0750
3-8. Electrical Service Guide
60 Hz Models
50 Hz Models
Input Voltage
230
460
575
380
400
440
520
Input Amperes At Rated Output
126
63
50.4
77
73
66
54
Max Recommended Standard Fuse Or Circuit
Breaker Rating In Amperes
200
90
80
125
110
100
80
1
6
6
4
4
4
6
180
(55)
284
(87)
444
(135)
290
(88)
321
(98)
389
(118)
363
(111)
6
8
8
6
6
8
Min Input Conductor Size In AWG/Kcmil
Max Recommended Input Conductor Length In
Feet (Meters)
Min Grounding Conductor Size In AWG/Kcmil
Reference: 1996 National Electrical Code (NEC)
OM-278 Page 10
8
S-0092-J
3-9. Placing Jumper Links And Connecting Input Power
230 VOLTS
460 VOLTS
575 VOLTS
Ref. S-174 973-A
220 VOLTS
380 VOLTS
400 VOLTS
440 VOLTS
1
(FACTORY OPTION)
Ref. S-174 975-A
380 VOLTS
520 VOLTS
2
GND/PE
Earth Ground
4
Do not overtighten
jumper link nuts.
L1 (U)
L2 (V)
L3 (W)
Connect GND/PE
Conductor First.
3
IMPORTANT
6
3
Input Contactor
5
L1 (U)
L2 (V)
L3 (W)
Tools Needed:
3/8 in
GND/
PE
Connect GND/PE
Conductor First.
3/8 in
Check input voltage available at site.
1
Jumper Link Label
Check label − only one is on unit.
2
Jumper Links
Move jumper links to match input voltage.
ST-800 103-A / Ref. ST-801 116
3 Input And Grounding Conductors
See Section 3-8.
4 Line Disconnect Device
See Section 3-8.
5 Reed Switch (Ground Current Sensor)
(Optional)
6
Grounding Conductor
If unit is equipped with optional ground
current sensor, route grounding conductor
through reed switch two times and connect
to ground terminal.
Close access door.
OM-278 Page 11
SECTION 4 − OPERATION
4-1. Controls
2
1
8
1
Arc Force (Dig) Control
Control increases SMAW short-circuit
amperage which allows the operator to use
a very short arc length without sticking the
electrode.
Set control at 0 for normal welding amperage. Turn clockwise to increase short-circuit
amperage.
2
Process Selector Switch
3
Amperage/Voltage Adjustment Control
3
4
7
6
When Process Selector switch is in the
SMAW position, read amperage from outer
scale. When Process Selector switch is in
the GMAW position, read voltage from the inner scale.
4
Digital Meters
5
Power Switch With Indicator Light
6
High Temperature Shutdown Light
7
Remote Amperage/Voltage Control
Switch
5
Ref. ST-800 166-B
For front panel control, place switch in Panel
position. For remote control, place switch in
Remote position, and connect remote device (see Section 3-7).
8 Output Switch (Contactor)
For front panel control of output, place switch
in Panel position. For remote control of output, place switch in Remote position, and
connect remote device (see
Section 3-7).
Y Turn Off power before connecting remote device.
4-2. Duty Cycle And Overheating
Duty Cycle is percentage of 10 minutes that unit can weld at rated load
without overheating.
If unit overheats, thermostat(s)
opens, output stops, and cooling
fan runs. Wait fifteen minutes for
unit to cool. Reduce amperage or
duty cycle before welding.
Y Exceeding duty cycle can
damage unit and void warranty.
100% Duty Cycle
Continuous Welding
Overheating
A/V
0
15
Minutes
OM-278 Page 12
OR
Reduce Duty Cycle
duty1 4/95 / Ref. SA-168 918
SECTION 5 − MAINTENANCE & TROUBLESHOOTING
5-1. Routine Maintenance
Y Disconnect power before maintaining.
3 Months
Clean And
Tighten
Weld
Terminals
Repair Or
Replace
Cracked
Weld
Cable
Replace
Unreadable
Labels
6 Months
Blow Out Or Vacuum
Inside,
During Heavy Service,
Clean Monthly
OR
5-2. Fuse F1
Y Turn Off power before opening rear access door.
1
1
Fuse F1 (See parts List For
Rating)
Fuse F1 protects control transformer from overload. If F1 opens, weld
output and fan motor stops. Replace F1.
Tools Needed:
3/8 in
Ref. ST-800 101-C
5-3. Troubleshooting
Trouble
No weld output; unit completely
inoperative; pilot light PL1 off.
Remedy
Place line disconnect device in On position (see Section 3-9).
Check for open line fuse(s), and replace if open (see Section 3-9).
Check for proper input power connections (see Section 3-9).
Check for proper jumper link position (see Section 3-9).
Check fuse F1, and replace if necessary (see Section 5-2).
OM-278 Page 13
Trouble
No weld output; pilot light PL1 on.
Remedy
Unit overheated. Allow unit to cool with fan On (see Section 4-2).
If using remote control, place Output (Contactor) switch in Remote 14 position, and connect remote
control (see Sections 3-6 and 3-7). If remote is not being used, place switch in On position (see Section 4-1).
Check, repair, or replace remote control.
Limited weld output and low
open-circuit voltage.
Check position of Remote Amperage/Voltage Control switch (see Section 4-1).
Check for open line fuse(s), and replace if open (see Section 3-9).
Check for proper input power connections (see Section 3-9).
Check for proper jumper link position (see Section 3-9).
Clean and tighten all weld output connections.
Unit provides only maximum or
minimum weld output.
Have Factory Authorized Service Agent check control board PC1 and hall device HD1.
Check position of Remote Amperage/Voltage Control switch (see Section 4-1).
Erratic or improper weld output.
Use proper size and type of weld cable (see Section 3-5).
Clean and tighten all weld connections.
Check wire feeder installation according to Owner’s Manual.
Check position of Process selector switch (see Section 4-1).
Have Factory Authorized Service Agent check control board PC1 and hall device HD1.
No 115 volts ac output at duplex receptacle, Remote 14 receptacle,
or terminal strip 1T.
Reset circuit breaker CB1 (see Section 3-4).
No 24 volts ac output at Remote 14 receptacle or terminal strip 1T.
Reset circuit breaker CB2 (see Section 3-4).
Fan not operating. Note: fan only runs
when cooling is necessary.
Check for and remove anything blocking fan movement.
Have Factory Authorized Service Agent check fan motor.
Wandering arc; poor control of arc
direction.
Reduce gas flow rate.
Select proper size tungsten.
Properly prepare tungsten.
Tungsten electrode oxidizing and not
remaining bright after conclusion of
weld.
Shield weld zone from drafts.
Increase postflow time.
Check and tighten all gas fittings.
Properly prepare tungsten.
Check for water in torch, and repair torch if necessary. See torch Owner’s Manual.
Digital meter not working properly.
OM-278 Page 14
Have Factory Authorized Service Agent check control board PC1 and connections, and replace if
necessary.
SECTION 6 − ELECTRICAL DIAGRAM
For Primary Circuit Diagram Portion, refer
to the Circuit Diagram located inside the
wrapper of the welding power source.
SC-175 485-A
Figure 6-1. Circuit Diagram
OM-278 Page 15
23
21
25
30
Fig 7-3
23
32
31
Fig 7-2
3
2
1
29
28
4
5
27
26
24
6
7
11
12
8
13
4
10
14
9
16
15
17 18
3
20
19
Fig 7-4
22
1
SECTION 7 − PARTS LIST
ST-800 703-A
Figure 7-1. Main Assembly (652 Model Illustrated)
OM-278 Page 16
Item
No.
Dia.
Mkgs.
Part
No.
Description
Quantity
Figure 7-1. Main Assembly
. . . 1 . . . . . . . . . . . . . . . . . . +179 432
. . . 2 . . . . . . . . . . . . . . . . . . . 179 431
. . . 3 . . . . . . . . . . . . . . . . . . . 164 700
. . . 4 . . . . . . . . . . . . . . . . . . . 162 816
. . . 5 . . . . . . . . . . . . . . . . . . . 162 820
. . . 6 . . . . . . . . . . . . . . . . . . . 162 830
. . . . . . . . . . . . . . . . . . . . . . . . . 604 536
. . . 7 . . . . . . . . . . . . . . . . . . . 177 279
. . . 8 . . . . . . . . . . . . . . . . . . . 134 201
. . . 9 . . . . . . . . . . . . . . . . . . . 162 821
. . . 10 . . . . . . . HD1 . . . . . . 148 417
. . . . . . . . . . . . PLG14 . . . . . 130 204
. . . . . . . . . . . . . . . . . . . . . . . . . 114 066
. . . 11 . . . . . . . . . . . . . . . . . . . 164 717
. . . 12 . . . . . . . . Z1 . . . . . . . 180 068
. . . 13 . . . . . . C21-23 . . . . . 163 906
. . . 13 . . . . . . C21-23 . . . . . 179 904
. . . 14 . . . . . . . . T2 . . . . . . . 159 042
. . . 14 . . . . . . . . T2 . . . . . . . 159 043
. . . 15 . . . . . . . TE1 . . . . . . 159 244
. . . 16 . . . . . . . . . . . . . . . . . . . 601 835
. . . 17 . . . . . . . . . . . . . . . . . . . 038 887
. . . . . . . . . . . . . . . . . . . . . . . . . 038 618
. . . . . . . . . . . . . . . . . . . . . . . . . 010 913
. . . . . . . . . . . . . . . . . . . . . . . . . 601 835
. . . 18 . . . . . . . . . . . . . . . . . . . 159 034
. . . 19 . . . . . . . . . . . . . . . . . . . . Fig 7-4
. . . 20 . . . . . . . . F1 . . . . . . *156 065
. . . 21 . . . . . . . . W . . . . . . . 160 794
. . . 22 . . . . . . . CR4 . . . . . ♦140 750
. . . 23 . . . . . . . . . . . . . . . . . . . 134 464
. . . 24 . . . . . . . . . . . . . . . . . . . 163 359
. . . 25 . . . . . . . . T1 . . . . . . . 169 072
. . . 26 . . . . . . . . . . . . . . . . . . . 169 154
. . . 27 . . . . . . . . . . . . . . . . . . . 169 153
. . . 25 . . . . . . . . T1 . . . . . . . 172 356
. . . 26 . . . . . . . . . . . . . . . . . . . 172 358
. . . 27 . . . . . . . . . . . . . . . . . . . 172 357
. . . 25 . . . . . . . . T1 . . . . . . . 177 312
. . . 26 . . . . . . . . . . . . . . . . . . . 177 313
. . . 27 . . . . . . . . . . . . . . . . . . . 177 314
. . . . . . . . . . . . TP1,2 . . . . . . 119 581
. . . . . . . . . . . . TP4,5 . . . . . . 168 891
. . . . . . . . . . . . . PLG6 . . . . . . 168 847
. . . . . . . . . . . . . . . . . . . . . . . . . 147 995
. . . . . . . . . . . . . RC6 . . . . . . 168 845
. . . . . . . . . . . . . . . . . . . . . . . . . 147 996
. . . . . . . . . . . . PLG13 . . . . . 169 242
. . . . . . . . . . . . . . . . . . . . . . . . . 009 419
. . . . . . . . . . . . . RC13 . . . . . . 169 241
. . . . . . . . . . . . . . . . . . . . . . . . . 009 418
. . . 28 . . . . . . . . . . . . . . . . . . . 144 468
. . . 29 . . . . . . . . . . . . . . . . . . . 605 538
. . . 30 . . . . . . . . . . . . . . . . . . . 161 294
. . . 31 . . . . . . . . . . . . . . . . . . . . Fig 7-2
. . . 32 . . . . . . . SR1 . . . . . . 175 072
. . . . . . . . . . . . . PLG7 . . . . . . 152 249
. . . . . . . . . . . . . . . . . . . . . . . . . 147 996
. . PANEL, side . . . . . . . . . . . . . . . . . . . . . . . . . . . . . . . . . . . . . . . . . . . . . .
. . COVER, top . . . . . . . . . . . . . . . . . . . . . . . . . . . . . . . . . . . . . . . . . . . . . .
. . BAFFLE, air . . . . . . . . . . . . . . . . . . . . . . . . . . . . . . . . . . . . . . . . . . . . . .
. . CHANNEL, upright . . . . . . . . . . . . . . . . . . . . . . . . . . . . . . . . . . . . . . . . .
. . BAR, mtg lift eye . . . . . . . . . . . . . . . . . . . . . . . . . . . . . . . . . . . . . . . . . .
. . LIFT EYE . . . . . . . . . . . . . . . . . . . . . . . . . . . . . . . . . . . . . . . . . . . . . . . . .
. . SCREW, .312-18 x 1.750hexhd gr 5 . . . . . . . . . . . . . . . . . . . . . . . . . .
. . GASKET, lift eye . . . . . . . . . . . . . . . . . . . . . . . . . . . . . . . . . . . . . . . . . .
. . STAND-OFF SUPPORT, PC card .312/.375 . . . . . . . . . . . . . . . . . . .
. . BRACKET, mtg LEM . . . . . . . . . . . . . . . . . . . . . . . . . . . . . . . . . . . . . . .
. . TRANSDUCER, current 1000A module . . . . . . . . . . . . . . . . . . . . . . .
. . CONNECTOR & SOCKETS, (consisting of) . . . . . . . . . . . . . . . . . . .
. . . . CONNECTOR, rect skt 20-14ga . . . . . . . . . . . . . . . . . . . . . . . . . . .
. . BUS BAR, stab jumper . . . . . . . . . . . . . . . . . . . . . . . . . . . . . . . . . . . . .
. . STABILIZER . . . . . . . . . . . . . . . . . . . . . . . . . . . . . . . . . . . . . . . . . . . . . .
. . CAPACITOR, (60Hz) . . . . . . . . . . . . . . . . . . . . . . . . . . . . . . . . . . . . . . .
. . CAPACITOR, (50Hz) . . . . . . . . . . . . . . . . . . . . . . . . . . . . . . . . . . . . . . .
. . TRANSFORMER, control 50VA 24V 230/460/575 (60Hz) . . . . . . .
. . TRANSFORMER, control 50Hz . . . . . . . . . . . . . . . . . . . . . . . . . . . . . .
. . PRIMARY BOX, (consisting of) . . . . . . . . . . . . . . . . . . . . . . . . . . . . . .
. . . . NUT, 10-32 brs . . . . . . . . . . . . . . . . . . . . . . . . . . . . . . . . . . . . . . . . . .
. . . . STUD, pri bd brs 10-32 x 1.375 . . . . . . . . . . . . . . . . . . . . . . . . . . . .
. . LINK, jumper term bd pri . . . . . . . . . . . . . . . . . . . . . . . . . . . . . . . . . . . .
. . WASHER, flat .218 ID brs . . . . . . . . . . . . . . . . . . . . . . . . . . . . . . . . . .
. . NUT, 10-32 brs . . . . . . . . . . . . . . . . . . . . . . . . . . . . . . . . . . . . . . . . . . . .
. . HOLDER, fuse mintr . . . . . . . . . . . . . . . . . . . . . . . . . . . . . . . . . . . . . . .
. . PANEL, rear w/components . . . . . . . . . . . . . . . . . . . . . . . . . . . . . . . . .
. . FUSE, crtg .5A 600V time delay . . . . . . . . . . . . . . . . . . . . . . . . . . . . .
. . CONTACTOR, def prp 75A 3P 24VAC . . . . . . . . . . . . . . . . . . . . . . . .
. . SWITCH, reed . . . . . . . . . . . . . . . . . . . . . . . . . . . . . . . . . . . . . . . . . . . .
. . LABEL, warning general precautionary . . . . . . . . . . . . . . . . . . . . . . .
. . BASE . . . . . . . . . . . . . . . . . . . . . . . . . . . . . . . . . . . . . . . . . . . . . . . . . . . .
. . TRANSFORMER, pwr main 230/460/575 (consisting of) . . . . . . . .
. . . . COIL, pri/sec 230/460/575 (center & RH) . . . . . . . . . . . . . . . . . . . .
. . . . COIL, pri/sec 230/460/575 (LH) . . . . . . . . . . . . . . . . . . . . . . . . . . . .
. . TRANSFORMER, pwr main 380/400/440 (consisting of) . . . . . . . .
. . . . COIL, pri/sec (center & RH) . . . . . . . . . . . . . . . . . . . . . . . . . . . . . . .
. . . . COIL, pri/sec (LH) . . . . . . . . . . . . . . . . . . . . . . . . . . . . . . . . . . . . . . .
. . TRANSFORMER, pwr main 380/500 (consisting of) . . . . . . . . . . . .
. . . . COIL, pri/sec No.1 . . . . . . . . . . . . . . . . . . . . . . . . . . . . . . . . . . . . . . .
. . . . COIL, pri/sec No. 2 . . . . . . . . . . . . . . . . . . . . . . . . . . . . . . . . . . . . . . .
. . . . THERMOSTAT, NC (Included w/T1) . . . . . . . . . . . . . . . . . . . . . . . .
. . . . THERMOSTAT, NC (Included w/T1) . . . . . . . . . . . . . . . . . . . . . . . .
. . CONNECTOR & SOCKETS, (consisting of) . . . . . . . . . . . . . . . . . . .
. . . . CONNECTOR, rect skt 22-18ga . . . . . . . . . . . . . . . . . . . . . . . . . . .
. . CONNECTOR & PINS, (consisting of) . . . . . . . . . . . . . . . . . . . . . . . .
. . . . CONNECTOR, rect pin 22-18ga . . . . . . . . . . . . . . . . . . . . . . . . . . .
. . CONNECTOR & PINS, (consisting of) . . . . . . . . . . . . . . . . . . . . . . . .
. . . . CONNECTOR, rect pin 20-14ga . . . . . . . . . . . . . . . . . . . . . . . . . . .
. . CONNECTOR & SOCKETS, (consisting of) . . . . . . . . . . . . . . . . . . .
. . . . CONNECTOR, rect skt 20-14ga . . . . . . . . . . . . . . . . . . . . . . . . . . .
. . STRIP, polyest gl lam .062 x 2.375 x 3.500 . . . . . . . . . . . . . . . . . . . .
. . CABLE TIE, 0-4.500 bundle . . . . . . . . . . . . . . . . . . . . . . . . . . . . . . . . .
. . BRACKET, mtg rectifier . . . . . . . . . . . . . . . . . . . . . . . . . . . . . . . . . . . . .
. . PANEL, front w/components . . . . . . . . . . . . . . . . . . . . . . . . . . . . . . . .
. . RECTIFIER, si diode (Fig 7-3) . . . . . . . . . . . . . . . . . . . . . . . . . . . . . . .
. . CONNECTOR & PINS, (consisting of) . . . . . . . . . . . . . . . . . . . . . . . .
. . . . CONNECTOR, rect pin 22-18ga . . . . . . . . . . . . . . . . . . . . . . . . . . .
2
1
2
4
2
1
2
1
4
1
1
1
3
1
1
3
3
1
1
1
24
24
8
24
24
1
1
1
1
1
2
1
1
2
1
1
2
1
1
1
2
2
2
1
12
1
12
1
9
1
9
4
4
2
1
1
1
15
OM-278 Page 17
Item
No.
Dia.
Mkgs.
Part
No.
Description
Quantity
Figure 7-1. Main Assembly (Continued)
. . . . . . . . . . . . . RC7 . . . . . . 168 846 . . CONNECTOR & SOCKETS, (consisting of) . . . . . . . . . . . . . . . . . . . 1
. . . . . . . . . . . . . . . . . . . . . . . . . 147 995 . . . . CONNECTOR, rect skt 22-18ga . . . . . . . . . . . . . . . . . . . . . . . . . . . 15
. . . . . . . . . . . . . . . . . . . . . . . . . 010 467 . . CONNECTOR, clamp cable 1.250 . . . . . . . . . . . . . . . . . . . . . . . . . . . 1
♦ Part of Option 042983 Ground Current Sensor.
+When ordering a component originally displaying a precautionary label, the label should also be ordered.
*Recommended Spare Parts.
BE SURE TO PROVIDE MODEL AND SERIAL NUMBER WHEN ORDERING REPLACEMENT PARTS.
Item
No.
Dia.
Mkgs.
Part
No.
Description
Quantity
Figure 7-2. Panel, Front w/Components (Fig 7-1 Item 31)
... 1 ...................
. . . 2 . . . . . . . PC1 . . . . . .
... 2 ...................
. . . . . . . . . . . . . PLG1 . . . . . .
. . . . . . . . . . . . . PLG3 . . . . . .
.........................
. . . . . . . . . . . . . PLG4 . . . . . .
.........................
. . . . . . . . . . . . . PLG5 . . . . . .
.........................
159 863
163 875
174 594
158 720
169 240
147 995
148 439
147 995
152 249
147 995
. . ELECTRONICS BOX . . . . . . . . . . . . . . . . . . . . . . . . . . . . . . . . . . . . . .
. . CIRCUIT CARD, control (60Hz) . . . . . . . . . . . . . . . . . . . . . . . . . . . . .
. . CIRCUIT CARD, control (50Hz) . . . . . . . . . . . . . . . . . . . . . . . . . . . . .
. . CONNECTOR & SOCKETS, (see Fig 7-3)
. . CONNECTOR & SOCKETS, (consisting of) . . . . . . . . . . . . . . . . . . .
. . . . CONNECTOR, rect skt 22-18ga . . . . . . . . . . . . . . . . . . . . . . . . . . .
. . CONNECTOR & SOCKETS, (consisting of) . . . . . . . . . . . . . . . . . . .
. . . . CONNECTOR, rect skt 22-18ga . . . . . . . . . . . . . . . . . . . . . . . . . . .
. . CONNECTOR & SOCKETS, (consisting of) . . . . . . . . . . . . . . . . . . .
. . . . CONNECTOR, rect skt 22-18ga . . . . . . . . . . . . . . . . . . . . . . . . . . .
1
1
1
1
20
1
10
1
15
5
6
7
8
2
3
1
9 10 17
10 17
4
18
30
29
17
28
40
29
27
30
26
31
32
39
34
38
33
22
25
16 15 14 13 12
24
11
23
21
35
37
36
20
ST-800 705-B
Figure 7-2. Panel, Front w/Components
OM-278 Page 18
19
Item
No.
Dia.
Mkgs.
Part
No.
Description
Quantity
Figure 7-2. Panel, Front w/Components (Fig 7-1 Item 31)
(Continued)
. . . 3 . . . . . . . CR3 . . . . . . 006 393 . . RELAY, encl 24VAC DPDT . . . . . . . . . . . . . . . . . . . . . . . . . . . . . . . . . .
. . . 4 . . . . . . . CR5 . . . . . ♦006 393 . . RELAY, encl 24VAC DPDT . . . . . . . . . . . . . . . . . . . . . . . . . . . . . . . . . .
. . . 5 . . . . . . CB1,2 . . . . . . 093 995 . . CIRCUIT BREAKER, man reset 1P 15A 250VAC . . . . . . . . . . . . . .
. . . 6 . . . . . . . RC9 . . . . . . 604 176 . . RECEPTACLE, str dx grd 2P3W 15A 125V . . . . . . . . . . . . . . . . . . .
. . . 7 . . . . . . . . . . . . . . . . . . . 163 855 . . CONNECTOR/CAPACITOR, w/leads (consisting of) . . . . . . . . . . . .
. . . . . . . . . . . . . RC8 . . . . . . 143 976 . . . . CONNECTOR & SOCKETS, (consisting of) . . . . . . . . . . . . . . . . .
. . . . . . . . . . . . . . . . . . . . . . . . . 079 534 . . . . . . CONNECTOR, circ skt push-in 14-18ga . . . . . . . . . . . . . . . . . . .
. . . . . . . . . . . . . . C3 . . . . . . . 163 863 . . . . LEAD ASSEMBLY, elect . . . . . . . . . . . . . . . . . . . . . . . . . . . . . . . . . .
. . . . . . . . . . . . . . C6 . . . . . . . 163 861 . . . . LEAD ASSEMBLY, elect . . . . . . . . . . . . . . . . . . . . . . . . . . . . . . . . . .
. . . . . . . . . . . . . C13 . . . . . . 163 858 . . . . LEAD ASSEMBLY, elect . . . . . . . . . . . . . . . . . . . . . . . . . . . . . . . . . .
. . . . . . . . . . . . . C14 . . . . . . 163 857 . . . . LEAD ASSEMBLY, elect . . . . . . . . . . . . . . . . . . . . . . . . . . . . . . . . . .
. . . 8 . . . . . . . . . . . . . . . . . . . 162 802 . . PANEL, front . . . . . . . . . . . . . . . . . . . . . . . . . . . . . . . . . . . . . . . . . . . . . .
. . . 9 . . . . . . . . . . . . . . . . . . . 161 303 . . SPRING, cprsn .600 OD x .072 wire x 1.500 lg . . . . . . . . . . . . . . . .
. . . 10 . . . . POS-CC,CV . . . 039 047 . . TERMINAL, pwr output red (consisting of) . . . . . . . . . . . . . . . . . . . .
. . . 11 . . . . . . . NEG . . . . . . 039 046 . . TERMINAL, pwr output black (consisting of) . . . . . . . . . . . . . . . . . . .
. . . 12 . . . . . . . . . . . . . . . . . . . 601 976 . . . . SCREW, .500-13 x 1.500hexhd stl . . . . . . . . . . . . . . . . . . . . . . . . .
. . . 13 . . . . . . . . . . . . . . . . . . . 039 049 . . . . TERMINAL BOARD, red . . . . . . . . . . . . . . . . . . . . . . . . . . . . . . . . . .
. . . 13 . . . . . . . . . . . . . . . . . . . 039 045 . . . . TERMINAL BOARD, black . . . . . . . . . . . . . . . . . . . . . . . . . . . . . . . .
. . . 14 . . . . . . . . . . . . . . . . . . . 601 880 . . . . NUT, .500-13 x .31 high stl . . . . . . . . . . . . . . . . . . . . . . . . . . . . . . . .
. . . 15 . . . . . . . . . . . . . . . . . . . 039 044 . . . . BUS BAR, term bd . . . . . . . . . . . . . . . . . . . . . . . . . . . . . . . . . . . . . . .
. . . 16 . . . . . . . . . . . . . . . . . . . 601 879 . . . . NUT, .500-13 x .44 high stl . . . . . . . . . . . . . . . . . . . . . . . . . . . . . . . .
. . . 17 . . . . . . C2,4,5 . . . . . 128 750 . . CAPACITOR, cer disc .1uf 500VDC . . . . . . . . . . . . . . . . . . . . . . . . . .
. . . 18 . . . . . . . R4,5 . . . . . . 136 076 . . RESISTOR, WW fxd 30W 200 ohm . . . . . . . . . . . . . . . . . . . . . . . . . .
. . . 19 . . . . . . . . 1T . . . . . . . 159 040 . . BLOCK, term 20A 12P . . . . . . . . . . . . . . . . . . . . . . . . . . . . . . . . . . . . .
. . . 20 . . . . . . . . . . . . . . . . . . . 162 828 . . PANEL, mtg rcpt/terminal strip . . . . . . . . . . . . . . . . . . . . . . . . . . . . . . .
. . . 21 . . . . . . . . . . . . . . . . . . . 070 371 . . BLANK, snap-in nyl 1.093/1.125mtg hole . . . . . . . . . . . . . . . . . . . . .
. . . 22 . . . . . . . . . . . . . . . . . . . 174 937 . . PLATE, control lower (60Hz) . . . . . . . . . . . . . . . . . . . . . . . . . . . . . . . .
. . . 22 . . . . . . . . . . . . . . . . . . . 179 389 . . PLATE, control lower (50Hz) . . . . . . . . . . . . . . . . . . . . . . . . . . . . . . . .
. . . 23 . . . . . . . . . . . . . . . . . . . 162 891 . . LABEL, warning electric shock . . . . . . . . . . . . . . . . . . . . . . . . . . . . . .
. . . 24 . . . . . . . . . . . . . . . . . . . 160 530 . . COVER, stud output . . . . . . . . . . . . . . . . . . . . . . . . . . . . . . . . . . . . . . .
. . . 25 . . . . . . . . . . . . . . . . . . . 160 935 . . CLIP, spring . . . . . . . . . . . . . . . . . . . . . . . . . . . . . . . . . . . . . . . . . . . . . . .
. . . 26 . . . . . . . . . . . . . . . . . . . 601 835 . . NUT, 10-32 brs . . . . . . . . . . . . . . . . . . . . . . . . . . . . . . . . . . . . . . . . . . . .
. . . . . . . . . . . . . . . . . . . . . . . . . 010 913 . . WASHER, flat .218 ID brs . . . . . . . . . . . . . . . . . . . . . . . . . . . . . . . . . .
. . . 27 . . . . . . . . . . . . . . . . . . . 038 887 . . STUD, pri bd brs 10-32 x 1.375 . . . . . . . . . . . . . . . . . . . . . . . . . . . . . .
. . . 28 . . . . . . . . S1 . . . . . . . 011 610 . . SWITCH, tgl SPDT 15A 125VAC . . . . . . . . . . . . . . . . . . . . . . . . . . . .
. . . 29 . . . . . . . S3,4 . . . . . . 011 609 . . SWITCH, tgl SPDT 15A 125VAC . . . . . . . . . . . . . . . . . . . . . . . . . . . .
. . . 30 . . . . . . . R1,2 . . . . . . 035 897 . . POTENTIOMETER, CP std slot 1/T 2W 1K ohm . . . . . . . . . . . . . . .
. . . 31 . . . . . . . PC2 . . . . . . 163 789 . . CIRCUIT CARD, digital meter . . . . . . . . . . . . . . . . . . . . . . . . . . . . . . .
. . . . . . . . . . . . PLG10 . . . . . 153 501 . . CONNECTOR & SOCKETS, (consisting of) . . . . . . . . . . . . . . . . . . .
. . . . . . . . . . . . . . . . . . . . . . . . . 147 995 . . . . CONNECTOR, rect skt 22-18ga . . . . . . . . . . . . . . . . . . . . . . . . . . .
. . . . . . . . . . . . PLG11 . . . . . 148 439 . . CONNECTOR & SOCKETS, (consisting of) . . . . . . . . . . . . . . . . . . .
. . . . . . . . . . . . . . . . . . . . . . . . . 147 995 . . . . CONNECTOR, rect skt 22-18ga . . . . . . . . . . . . . . . . . . . . . . . . . . .
. . . 32 . . . . . . . CR1 . . . . . . 134 163 . . RELAY, encl 24/120VAC DPDT . . . . . . . . . . . . . . . . . . . . . . . . . . . . . .
. . . 33 . . . . . . . CR2 . . . . . . 000 770 . . RELAY, encl 24VDC 3PDT . . . . . . . . . . . . . . . . . . . . . . . . . . . . . . . . . .
. . . 34 . . . . . . . . . . . . . . . . . . . 165 316 . . STAND-OFF, 6-32 x .875 lg . . . . . . . . . . . . . . . . . . . . . . . . . . . . . . . . .
. . . 35 . . . . . . . . . . . . . . . . . . . . . . . . . . . . . . NAMEPLATE, (order by model and serial number) . . . . . . . . . . . . .
. . . 36 . . . . . . . . S2 . . . . . . . 159 039 . . SWITCH, rocker SPDT 15A 125VAC . . . . . . . . . . . . . . . . . . . . . . . . .
. . . 37 . . . . . . . PL2 . . . . . . . 159 522 . . LED, yellow . . . . . . . . . . . . . . . . . . . . . . . . . . . . . . . . . . . . . . . . . . . . . . .
. . . 38 . . . . . . . . . . . . . . . . . . . 159 036 . . LENS, LED clear . . . . . . . . . . . . . . . . . . . . . . . . . . . . . . . . . . . . . . . . . .
. . . 39 . . . . . . . . . . . . . . . . . . . 097 924 . . KNOB, pointer . . . . . . . . . . . . . . . . . . . . . . . . . . . . . . . . . . . . . . . . . . . .
. . . 40 . . . . . . . . . . . . . . . . . . . 097 922 . . KNOB, pointer . . . . . . . . . . . . . . . . . . . . . . . . . . . . . . . . . . . . . . . . . . . .
1
1
2
1
1
1
14
1
1
1
1
1
3
2
1
1
1
1
1
1
1
3
2
1
1
1
1
1
1
1
3
2
1
1
1
2
1
1
1
6
1
10
1
1
4
1
1
1
1
1
1
♦Part of Option 042 983 Ground Current Sensor
+When ordering a component originally displaying a precautionary label, the label should also be ordered.
BE SURE TO PROVIDE MODEL AND SERIAL NUMBER WHEN ORDERING REPLACEMENT PARTS.
OM-278 Page 19
Item
No.
Dia.
Mkgs.
Part
No.
SR1
175 072
. . . 1 . . . . C7-12 . . . .
... 2 ...............
... 3 ...............
... 4 ...............
. . . 5 . . . SCR1-6 . . .
... 6 ...............
... 7 ...............
. . . . . . . . . . PLG1 . . . .
.....................
. . . . . . . . . . . TP3 . . . . .
. . . . . . . . . . . TP6 . . . . .
048 420
176 168
166 667
160 962
148 091
160 961
161 302
158 720
147 995
168 895
168 894
Description
Quantity
Figure 7-3. Rectifier, Si Diode (Fig 7-1 Item 32)
. . CAPACITOR, cer disc .01uf 1000VDC . . . . . . . . . . . . . . . . . . . . . . . . . . . .
. . BAR, mtg rectifier . . . . . . . . . . . . . . . . . . . . . . . . . . . . . . . . . . . . . . . . . . . . . .
. . CLAMP, spring thyristor rectifier 5.500 . . . . . . . . . . . . . . . . . . . . . . . . . . . .
. . HEAT SINK, rectifier snowflake .800 . . . . . . . . . . . . . . . . . . . . . . . . . . . . . .
. . THYRISTOR, SCR 300A 300V hockey puck . . . . . . . . . . . . . . . . . . . . . . .
. . HEAT SINK, rectifier snowflake 1.600 . . . . . . . . . . . . . . . . . . . . . . . . . . . . .
. . CLAMP, thyristor rectifier 5.500 . . . . . . . . . . . . . . . . . . . . . . . . . . . . . . . . . .
. . CONNECTOR & SOCKETS, (consisting of) . . . . . . . . . . . . . . . . . . . . . . .
. . . . CONNECTOR, rect skt 22-18ga . . . . . . . . . . . . . . . . . . . . . . . . . . . . . . . .
. . THERMOSTAT, rectifier . . . . . . . . . . . . . . . . . . . . . . . . . . . . . . . . . . . . . . . . .
. . THERMOSTAT, rectifier . . . . . . . . . . . . . . . . . . . . . . . . . . . . . . . . . . . . . . . . .
2
6
2
3
6
6
3
3
1
12
1
1
3
1
4
5
3
6
4
5
6
2
1
ST-800 696-A
7
Figure 7-3. Rectifier, Si Diode SR1
7
8
10
9
ST-800 707-A
Figure 7-4. Panel, Rear w/Components
Item
No.
Dia.
Mkgs.
Part
No.
Description
Quantity
Figure 7-4. Panel, Rear w/Components (Fig 7-1 Item 19)
. . . 1 . . . . . . . . . . . . . . . 124 275
. . . 2 . . . . . . . . . . . . . . . 180 165
. . . 3 . . . . . . . . . . . . . . . 162 807
. . . 4 . . . . . . . . . . . . . . . 168 343
. . . 5 . . . . . . . . . . . . . . +162 818
. . . 6 . . . . . . . . . . . . . . . 168 384
. . . 7 . . . . . . . . . . . . . . . 602 177
. . . 8 . . . . . . . . . . . . . . . 124 274
. . . 9 . . . . . R3 . . . . . . 097 459
. . . 10 . . . . . FM . . . . . 116 190
. . . . . . . . . . . . . . . . . . . . . 010 467
..
..
..
..
..
..
..
..
..
..
..
CHAMBER, plenum 14 in . . . . . . . . . . . . . . . . . . . . . . . . . . . . . . . . . . . . . . .
BLADE, fan 14 in 3wg 23deg .375 bore CCW . . . . . . . . . . . . . . . . . . . . . .
PANEL, rear . . . . . . . . . . . . . . . . . . . . . . . . . . . . . . . . . . . . . . . . . . . . . . . . . . .
HINGE, door primary . . . . . . . . . . . . . . . . . . . . . . . . . . . . . . . . . . . . . . . . . . .
DOOR, access primary . . . . . . . . . . . . . . . . . . . . . . . . . . . . . . . . . . . . . . . . .
LABEL, warning electric shock . . . . . . . . . . . . . . . . . . . . . . . . . . . . . . . . . . .
SCREW, set .250-20 x .250knrlpt sch stl . . . . . . . . . . . . . . . . . . . . . . . . . .
BRACKET, mtg fan motor . . . . . . . . . . . . . . . . . . . . . . . . . . . . . . . . . . . . . . .
RESISTOR, WW fxd 375W 20 ohm . . . . . . . . . . . . . . . . . . . . . . . . . . . . . .
MOTOR, 1/12HP 230V 1550RPM 50/60Hz 1.5A . . . . . . . . . . . . . . . . . . .
CONNECTOR, clamp cable 1.250 . . . . . . . . . . . . . . . . . . . . . . . . . . . . . . . .
+When ordering a component originally displaying a precautionary label, the label should also be ordered.
BE SURE TO PROVIDE MODEL AND SERIAL NUMBER WHEN ORDERING REPLACEMENT PARTS.
OM-278 Page 20
1
1
1
2
1
1
2
1
1
1
1
OPTIONS AND ACCESSORIES
A variety of optional controls and accessories allow you to tailor your Dimension welder to meet your specific
needs. All are specifically designed to be used with Dimension Series power sources, so you never have to worry
about compatibility.
REMOTE ON/OFF CONTROL
(#042 869)
Allows you to turn your Dimension
on or off from a distance of 20 ft
(6 m). This is especially useful if
your power source is located up in
a mezzanine. Connects to the
power source’s terminal strip.
POLARITY CONTROL
(#042 871)
This dual-function control is
designed for use with dual wire
feeders or any application where
electrical isolation and/or polarity
reversing of weld current is
required. Both functions can be
used at the same time.
CERTIFIED METERS
(#042 968 Factory)
These digital meters are certified
to an exact standard. Often
required for government work.
GROUND CURRENT SENSOR
(#042 983 Factory)
(#043 146 Field)
Disables power source if weld
current is present on primary
ground.
ENVIRONMENTAL
PROTECTION PACKAGE
(#043 049 Factory)
Internal machine components are
sprayed with a protective
polyurethane coating.
INTERNATIONAL CABLE
ADAPTER
(#168 077) Female 1 Qty.
Dinse brand insulated female
twistlock connector installs on
output stud, providing quick
disconnect of secondary weld
cables.
(#042 418) Male 1 Qty.
Cable mounted Dinse brand
insulated male twistlock connector
accepts #1 or #2 AWG cable sizes.
BALANCING/PARALLELING
CONTROL
(#042 810)
Allows you to parallel two
Dimensions in the constant voltage
mode while the control balances
the power source’s output
amperage throughout its operating
range. This control plugs directly
into the Dimension power supplies,
and is especially useful for
customers who need higher
amperages (for Submerged Arc).
STANDARD RUNNING GEAR
(#042 886)
The large 10-inch (254 mm) rear
wheels and 5-inch (127 mm) front
casters on this running gear
provide excellent mobility on the
shop floor, making it easier to
move the power source around
and over cables and cracks. Very
easy to install. Handles double as
weld cable holder.
ROUGH TERRAIN RUNNING
GEAR
(#043 043)
This two-wheel running gear
features pneumatic tires for extra
mobility. Handles double as a
cable holder.
CYLINDER RACK/LIFT
(#043 005)
Miller’s patent pending cylinder
rack features a lift which moves
the cylinders up onto the rack and
into position without manual
lifting! The rack accommodates
two cylinder bottles, and can be
attached directly to the running
gear.
STANDARD CYLINDER RACK
(#042 887)
Installs on standard running gear.
WELD CABLE HOLDER
(#043 055)
Attaches to front of power source,
allowing weld cables to be stored
near the control panel.
AIR FILTER KIT
(#042 939 Field)
Protect your Dimension from
dusty, dirty environments with this
reusable air filter that easily
attaches and detaches from the
front of the power source.
WATER COOLANT
SYSTEMS
For more information, see the
Miller Coolant Systems literature
sheet, Index No. AY/7.2.
WATERMATE 1A
(#042 495) 115 VAC
For use with water-cooled torches
rated up to 500 Amps. Vertical
design conveniently mounts to
Miller cylinder rack in place of one
cylinder.
COOLMATE 4
(#042 288)
For use with water-cooled torches
rated up to 600 Amps. Tough
molded polyethylene case with
carrying handle.
RADIATOR 1A
(#042 492) 115 VAC
RADIATOR 2A
(#042 493) 230 VAC
For use with water-cooled torches
rated up to 500 Amps.
GMAW/FCAW WELDING
S-22P12 WIRE FEEDER
(#125 616)
Compact, lightweight 24 VAC
constant speed semi-automatic
wire feeder provides portability and
access. Primarily designed for
gas-shielded wires.
Accommodates up to a 30 lb.
(13.6 kg), 12 in. (304 mm)
diameter spool. See literature,
Index No. M/7.0.
6/95
OPTIONS AND ACCESSORIES
S-22A WIRE FEEDER
(#115 396)
Lightweight, 24 VAC constant
speed semiautomatic wire feeder,
best suited for small diameter
wires. Accommodates up to a 60
lb. (27.2 kg) spool of welding wire
when using optional wire reel
assembly. See literature, Index No.
M/6.9.
60 SERIES WIRE FEEDERS
Heavy-duty, industrial, constant
speed 24 VAC semiautomatic wire
feeders in dual or single models,
with available digital meters. Ideal
for high duty cycle GMAW and
FCAW. Accommodates a wide
variety of wire sizes and types.
See literature, Index No. M/2.0.
SWINGARC ™ BOOM-MOUNTED
WIRE FEEDERS
Single and dual 24 VAC
semiautomatic wire feeders are
available with 12 ft. (3.7 m) and
16 ft. (4.9 m) booms. Ideal for long
reach and complete
maneuverability when working on
large weldments, or in
hard-to-reach areas. See literature,
Index No. M/13.0
HF-251D-1 HIGH-FREQUENCY
ARC STARTER/STABILIZER
(#042 388)
This portable 250 Amp, 60% duty
cycle unit adds high frequency to
the welding circuit to help start the
arc when using the GTAW (TIG)
process. Operates on 115 VAC
50/60/100 Hz. For more
information, see the literature
sheet, Index No. AY 5.1.
current and contactor control at
operator’s fingertips. Includes
28 ft. (8.5 m) cord and plug.
REMOTE CONTROLS AND
SWITCHES
RFC-14 FOOT CONTROL
(#129 339)
Heavy duty foot current and
contactor control. Includes 20 ft.
(6 m) cord and 14-pin plug.
RMLS-14
(#129 337)
Momentary- and maintainedcontact rocker switch for contactor
control. Push forward for
maintained contact and back for
momentary contact. Includes 20 ft.
(6 m) cord and 14-pin plug.
RCC-14 REMOTE CONTACTOR
AND CURRENT CONTROL
(#151 086)
Rotary motion fingertip control.
Fastens to TIG torch using two
Velcro strips. Allows complete
RHC-14 HAND CONTROL
(#129 340)
Miniature hand control for remote
current and contactor control.
Dimensions: 4 in. (102 mm) x 4 in.
(102 mm) x 3-1/4 in. (82 mm).
Includes 20 ft. (6 m) cord and
14-pin plug.
EXTENSION CABLES FOR
14-PIN PLUGS TO 14-PIN
SOCKETS
(#122 972) 10 ft. (3 m)
(#122 973) 25 ft. (7.6 m)
(#122 974) 50 ft. (15.2 m)
(#122 975) 75 ft. (22.8 m)
Extension cords make a direct
connection between the power
source and the accessory control.
No messy splicing or adapting
required.
6/95