1
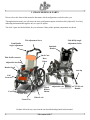
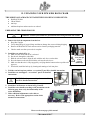
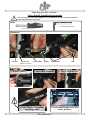
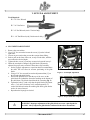
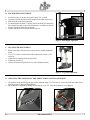
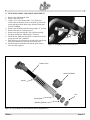
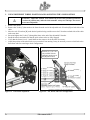
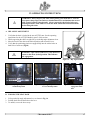
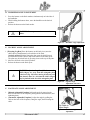
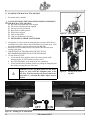
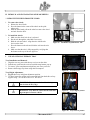
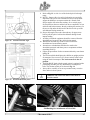
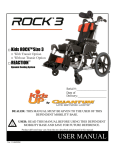
□Kids ROCKTM Size 2 □With Transit Option □Without Transit Option □REACTION™ Dynamic Seating System Serial #:____________________ Date of Delivery:___________________ by DEALER: THIS MANUAL MUST BE GIVEN TO THE USER OF THIS DEPENDENT MOBILITY BASE. USER: READ THIS MANUAL BEFORE USING THIS DEPENDENT MOBILITY BASE AND SAVE FOR FUTURE REFERENCE. Product delivered may vary from the one described and pictured in this manual. USER MANUAL Ver. 11-0603DM You have made a great choice for your child by choosing a Kids ROCK Chair. We believe that every child should be able to move to the best of their ability because “Movement is life!” We welcome questions and comments about our products and services. Please feel free to contact us using the information below: Manufacturer & U.S. Distributor by Quantum Montana 312 B Andrea Drive Belgrade, MT 59714 Toll Free: 877-454-3787 www.quantumrehab.com European Distributor Your Authorized Dealer is: Partnering Together to Mobilize Kids. HOGGI, GmbH Taunusstraße 17 56235 Ransbach-Baumbach Germany Tel.: 02623 92499-0 Fax: 02623 92499-99 Website: www.hoggi.de 2 “Movement is life!” TABLE OF CONTENTS I. CHAIR MODELS & PARTS .......................................................................................... 4 II. UNPACKING YOUR NEW KIDS ROCK CHAIR ...................................................... 5 III. READ BEFORE USING .............................................................................................. 7 IV. GENERAL WARNINGS ............................................................................................. 8 V. SET-UP & ADJUSTMENT ......................................................................................... 11 VI. OPERATING INSTRUCTIONS ................................................................................ 17 VII. MAINTENANCE ...................................................................................................... 24 VIII. MAINTENANCE RECORD ................................................................................... 25 “Movement is life!” 3 I. CHAIR MODELS & PARTS Please refer to the front of this manual to determine which configuration was delivered to you. Throughout this manual, you will notice the chair configuration option in brackets like [Adjustable Seat Pan], indicating information that applies only to a specific option. The chair’s parts are labeled below for your reference. Many of the optional components are shown. Tilt Adjustment Lever Fold & Hip Angle Adjustment Cable Push Handle Angle Adjustment Sunshade Bracket Back Cane Thin Profile Armrest Rear Wheel Adjustable Seat Pan Ratchet Lock Anti-tip Calf Protector Quick Release Button Foot Plate Adjustable Axle ACTIVE Lock Handle Caster Fork Wheel Lock Caster Tire Product delivered may vary from the one described and pictured in this manual. 4 “Movement is life!” II. UNPACKING YOUR NEW KIDS ROCK CHAIR THE ORIGINAL PACKAGE CONTAINS THE FOLLOWING COMPONENTS: Kids ROCK Chair 2 Rear Wheels Anti-tips Additional options and accessories as ordered. PREPARING THE CHAIR FOR USE: WARNING: Contact your health care professional before using this unit with a child. 1. Remove the chair & components from the box. Keep Box Upright Verify that package is in good shape and that no damage has occurred during shipping. Remove the Kids ROCK Chair and accessories from the packaging material. Check to make sure that your order is complete. 2. Install the rear wheels (Fig. A). A. Make sure the wheel lock lever is released. WARNING! B. Put the axle through the wheel hub. Verify that pin C. Hold the axle and wheel. Align the axle with the axle sleeve on the chair. is fully D. Press the button on the axle and slide the axle into the axle sleeve. engaged E. Make sure that the axle is fully engaged by verifying that the button on the top of the axle (button up) pops out. Figure A F. If included, install the hub cap by locating and rotating to lock into place. 3. Fold the seat back up into position—see section VI part B for detailed instructions. 4. Install the rear anti-tippers—see section V part E for detailed instructions. WARNING: Always use anti-tips. See section V part E for detailed instructions. 5. Install the Calf Protector as shown in Fig. D and E. 6. Install the active handle according to the instructions on the following page, then verify the functionality of the active mechanism. 7. Make additional adjustments to the chair as necessary. Refer to the appropriate section of this manual for instructions. Figure B Figure D: Calf Protector Installation Figure C Figure E Please see the next page of this manual. “Movement is life!” 5 Unpacking your chair continued… Active Handle Installation Instructions The active handle is removed for shipping to prevent damage to the chair. It must be installed to enable full functionality of the chair. Tools: 5/32 inch Allen Wrench 7/16 inch Nut Driver Hardware: Nyloc Nut Active Bar (Back bar on chair) Active Handle Spring Nylon Washer Bolt Instructions: 1. Attach Cables 2. Insert Bolt Assembly 4. Tool Tighten 3 Rotations after finger tight 6 3. Finger Tighten Nut 5. Verify that handle locks into active position. “Movement is life!” III. READ BEFORE USING A. READ MANUAL CAREFULLY & OFTEN Read manual completely before use! Familiarize yourself with the handling and functions of the product before use and practice them. You must read and fully understand the contents of this manual. Any caregiver that is going to operate this chair should also read the manual in full. You are responsible for the safety of your child. The safety of your child could be affected if you do not follow the instructions in this manual. Nevertheless, not all possible circumstances and unpredictable situations can be covered by this manual. Reason, care, and circumspection are not features of the product, they are required of persons who use the product. If instructions are not clear and further explanation is necessary, please contact your Kids Up dealer. If you do not follow all instructions and warnings, damage to the chair or serious injury may occur. B. DEFINITION OF SYMBOLS WARNING! The word “WARNING” and/or the symbol shown to the left indicate practices that are unsafe or dangerous and could result in serious injury or death to the occupant of this chair or others. WARNING! READ INSTRUCTION MANUAL! Additional symbols are defined throughout this manual along with operating instructions. C. CHOOSE THE RIGHT CHAIR & SAFETY OPTIONS There are several options available to meet the needs of children. Make sure that your (and your health care provider’s) choice of chair and other options takes into account your child’s comfort, positioning, physical limitations, and hazards that may be encountered during daily use. Operating the pushchair outside of the recommendations provided by the manufacturer can lead to a dangerous situation. The pushchair is not suitable for jogging, running, skating or similar activities. Swiveling front wheels tend to wobble at higher speed and can cause a sudden stop and tip over of the pushchair. Use the pushchair only at regular walking speed. Under no circumstance should you let go of the handlebar while pushing. Do not ever push the chair away. “Movement is life!” 7 IV. GENERAL WARNINGS WARNING: The operator/caregiver must read and understand this manual prior to operating this equipment. If you are unable to understand any part of the manual, contact your dealer for assistance. WARNING: The initial set up of this pushchair must be performed by a qualified technician. WARNING: Procedures other than those described in this manual must be performed by a qualified technician. WARNING: MAXIMUM WEIGHT LIMIT The weight carried by the Kids ROCK chair must NEVER exceed the total weight limit of 110 pounds. (Maximum occupant size plus any items carried.) When using the chair in transit, all items including positioning tray must be removed from the chair and secured separately. WARNING: REDUCING THE RISK OF AN ACCIDENT ALWAYS get properly trained and get comfortable operating the chair. ALWAYS watch for obstacles and avoid them as often as possible. ALWAYS use anti-tips. Make sure that the chair operates properly. Repair any problems before use. ALWAYS verify that the quick release axles are locked so that the back wheels do not come off. ALWAYS secure your child into the chair during use. WARNING: CHANGES & ADJUSTMENTS Adjustments made to the chair will change the balance and function of the chair and may increase risk of tip over — consult your supplier before making adjustments. Warranty will be voided if modifications that change the structure of the chair are made without authorization. WARNING: Avoid getting the chair wet as it may cause rust or corrosion. Dry the chair thoroughly if it is exposed to moisture. WARNING: EXTREME TEMPERATURES Do not leave the chair or child in the sun or near other heat sources since the surfaces on the chair may reach temperatures capable of burning the child. Do not leave the chair or child outside in cold temperatures because contact with a chair in temperatures below freezing could result in injury. Damage to the chair may also result from exposure to extreme hot or cold temperatures. 8 “Movement is life!” WARNING: The chair should only be used on solid, level ground. WARNING: Use chair as intended by manufacturer. For instance, do not drive into obstacles (including curbs and steps) without slowing down. WARNING: To clear obstacles such as curbs and steps, tilt the chair onto the rear wheels. Pull it backwards to go up. To descend, slowly lower it forward. WARNING: Do not go up or down stairs without the assistance of another person. If devices such as ramps or elevators are available, please use them. If they are not available, then the chair should be carried over the obstacle by two people. WARNING: Pay particular attention when on slopes and inclines to prevent: The child from falling out of the chair; The chair from tipping over; The chair from rolling away. WARNING: Before leaving the chair and before getting into and out of it, always engage the wheel locks. WARNING: Do not stand on the footplate when getting into or out of the chair. WARNING: LIFTING Only lift the chair by parts that are solidly attached. The chair should be lifted by the side frame members whenever possible. Always use two people to prevent injury and damage to the chair. WARNING: When your child reaches for objects in front, to the side, or behind the chair, be sure that they do not lean out of the chair too far since the shift in the center of gravity might cause the chair to tilt or tip over. WARNING: The handling of the chair is influenced by tire pressure. Correctly inflated tires considerably improve its maneuverability. The air pressure should be at least 29 PSI. WARNING: Please be aware that with certain footrest settings the footrest can collide with the front casters. “Movement is life!” 9 WARNING: Please keep packaging material away from children. Plastic packaging presents the danger of suffocation. WARNING: Never leave your child unattended in the chair even when they are strapped in and the wheel locks are engaged. WARNING: The chair is only intended to carry one child at a time. Do not carry more than one child at a time. WARNING: Whenever you change a setting on the chair, make sure that you firmly tighten any screws that have been loosened. WARNING: MOTOR VEHICLE SAFETY The front cover of this manual indicates whether your chair has the transit option installed. If your chair is not equipped with the transit option, do not use it as a seat in a motor vehicle. Transfer the child from the chair to an approved motor vehicle seat. If your chair is equipped with the transit option, refer to the section in this manual regarding use of this chair for transit. WARNING: TRANSIT USE Transit use and associated warnings are described in section VI part J. Follow all instructions carefully. WARNING: Never use this chair on an escalator because the chair may tip over. WARNING: The chair must be inspected and maintained per the chart in section VII: Maintenance. Problems detected must be repaired before the chair is used. WARNING: Many of the screws, bolts, and nuts used on this chair are specialized or high-strength fasteners. Only use fasteners purchased through an authorized supplier. WARNING: Do not put excessive force on the handlebar. 10 “Movement is life!” V. SET-UP & ADJUSTMENT Tools Required: 5/32” Hex Wrench 7/16” Nut Driver 3/4” End Wrench (Active Tension Only) 1-1/8” End Wrench (Adj. Position Axle Only) A. SEAT DEPTH ADJUSTMENT 1. Remove the seat cushion. 2. Use a 5/32” hex wrench to loosen the screws [A] on the left and right tubes. 3. Loosen any accessories that prevent the seat pan from sliding. 4. Push or pull on the front of the seat, evenly on both sides, until the seat reaches the desired depth. 5. Tighten the hex screws [A] and any accessories loosened in step 3. 6. When the seat depth is changed, the glide blocks [B] must be adjusted for proper active motion. Follow these steps carefully: a. Set the hip angle adjustment to a position that best accommodates the child. This will allow for accurate positioning of the glide blocks. b. Using a 5/32” hex wrench, loosen the adjustment bolts [C] on the left and right glide blocks. c. Position the glide blocks so that the top of the curve on the glide blocks are behind the front tube touching on the bottom of the shell frame. The blocks should touch the extrusion (Fig. 2). d. Tighten the bolts [C] and verify that the glide blocks [B] cannot move. Cycle active motion to verify smooth operation. If socket head bolt at location D contacts glide block, glide blocks need to be moved inward. e. Reposition the hip angle as desired. A C B Figure 1: Seat Depth Adjustment D Figure 2: Proper Glide Rest Adjustment WARNING: Improper adjustment of the glide block can create a pinch point for the child. Always adjust the glide block as indicated in the above instructions. “Movement is life!” 11 B. BACK HEIGHT ADJUSTMENT 1. 2. 3. 4. A Loosen the bolts [A] on the cane guides using 7/16” wrench. Loosen the laterals and other items attached to the back as necessary. Slide the back to the desired position For back heights less than 17 inches, remove the bolts [B] connecting the seat back crossbar to the seat back and move crossbar into desired position. Install the bolts [B] and tighten. 5. Tighten and check all items loosened in steps 1-4. B Figure 3: Back Height Adjustment C. LEG LENGTH ADJUSTMENT 1. Remove the fabric calf protector to expose the leg length adjustment block. 2. Use a 5/32” Allen wrench to loosen the 2 adjustment screws [C] on each side. 3. Adjust the leg length to the desired position. 4. Tighten the screws [C]. 5. Always install the calf protector to cover the adjustment block. C Figure 4: Leg Length Adjustment D. ADJUSTING THE POSITION OF THE ADDUCTORS & LATERAL SUPPORTS 1. The position of the lateral support plate can be adjusted using a 5/32” hex driver. Loosen the bolts and adjust to the desired position. Tighten the bolts (Fig. 5). 2. Hip width can be adjusted by adding or removing layers of 1/4” foam from adductor covers (Fig. 6). Figure 5: Lateral Plate Adjustment 12 “Movement is life!” Figure 6: Hip Width Adjustment E. INSTALLING & ADJUSTING THE ANTI-TIPS The anti-tips should be used at all times. The anti-tips should be positioned 1-1/2” to 2” off of the ground for proper function. They should also extend at least 4” beyond the point where the rear wheel contacts the ground. 1. To install the anti-tips, depress the snap button and insert into the tube as shown. 2. To remove, depress the snap button and remove the anti-tip from the tube. Figure 7: Anti-Tips WARNING: Anti-tip tubes can help keep your chair from tipping over backward in most normal conditions. When locked in place (in the “down” position), anti-tip should be between 1-1/2” and 2” off the ground. Adjust the height as necessary. a. If set too HIGH, they may not prevent a tip-over. b. If set too LOW, they may “hang up” on obstacles you can expect to encounter during normal use. If the chair catches on an obstacle, the chair may tip over. F. INSTALLATION OF PELVIC POSITIONING BELTS The child should always be secured in the chair with a positioning belt. Positioning belts should never be used for securement in motor vehicles. An additional automotive rated seat belt is required. 1. Remove the seat cushion. 2. Fig. 8 shows the attachment chafes to which a pelvic positioning belt may be attached. 3. Attach the belt according to the manufacturer’s instructions. 4. Set the seat cushion back in place. Attachment Locations Figure 8: Positioning Belt Attachment Locations WARNING: Positioning belts should never be used for securement in motor vehicles. An additional WC-19 compliant automotive type seat belt is required when the chair is used in vehicles. “Movement is life!” 13 G. EXTENSION LIMIT AND FORCE ADJUSTMENT 1. Remove the child from the chair. 2. Remove the rear wheel. 3. Using a 5/32” Allen wrench and a 7/16” Nut Driver, remove the bolt from the lower pivot block [A] below the spring and then pull the block away from the black plate as shown in Fig. 9. 4. Remove the nut from below the spring using a ¾” wrench. 5. Remove the spacer(s) and spring seat. 6. Remove the spring and replace with a different spring. 7. Install the spring seat. Install spacers if desired. 8. Install the nut. Make sure that there is compression on the spring when the nut is installed. 9. Slide the lower pivot block over the end of the round head bolt and reattach the pivot block to the black plate. 10. Install the wheels and make sure that the quick release axles are fully engaged. A Figure 9: Changing Extension Limit and Force Tension Tube Lower Pivot Block Spring Nut Spring Seat Spacers (optional) Figure 10: Upper Body Extension Limiter/Tensioner Exploded View 14 “Move- ment is H. EXTENSION LIMIT AND FORCE ADJUSTMENT [Active Leg Rest Only] 1. Remove the calf protector to expose the lower end of the knee angle tensioning device. 2. Slide the triangular plate [A] (near the child’s knees) toward the back of the chair to depress the button on the black ratchet. 3. Remove the bolt connecting the pivot block to the lower leg rest rigging. 4. Remove the pivot block and rubber bumper. 5. Use a ¾” wrench to remove the nut from the spring assembly. 6. Remove the springs and spring seat. 7. Change the spring. 8. Reinstall the spring seat. Install spacers if desired (Fig. 12). 9. Install the nut. The spring must be compressed slightly to install the nut. Use a ¾” wrench to tighten the nut until it is flush with the end of the tension tube. 10. Install the rubber bumper over the ¼” shaft. 11. Thread the pivot block onto the ¼” shaft. The pivot block does not have to be tight. Make sure that the shaft does not protrude into the ¼” hole for the bolt. Three to four turns of the pivot block is ideal. Thread-locking glue (such as Loctite) is NOT necessary since this part cannot rotate once installed. 12. Install the bolt to connect the pivot block to the lower leg rest rigging. 13. Reinstall the calf protector to cover the lower pivot point. Make sure calf protector is always installed. Tension Tube Barrel Nut Spring A Spring Seat Spacers (optional) Nut Figure 11: Slide Triangle to Allow Free Movement Bolt Bumper Pivot Block Figure 12: Knee Extension Limiter, Exploded View “Movement is life!” 15 I. USING DIFFERENT WHEEL POSITIONS AND ADJUSTING THE AXLE POSITION WARNING: Adjustable Position Axles should only be moved by qualified technicians. Certain axle positions may make the chair unstable. Always use anti-tips. The casters are not user adjustable. 1. Remove the wheels. 2. Remove the 3 bolts [C] that attach to the frame from the end of the adjustable axle U-bracket [B] on both sides of the chair. 3. Move the axle U-brackets [B] to the desired position being careful to move the U-brackets on both sides of the chair at the same time. 4. Insert and tighten the 3 bolts [C] through the frame at the end of the adjustable U-bracket. 5. Install the wheels and make sure that the quick release axles are fully engaged. 6. Verify that the frame is level – install shims on the casters to level the chair if necessary. 7. Adjust the position of the wheel locks to prevent wheel from turning. It may be necessary to move wheel lock to the front frame tube for some larger wheel configurations Positions 4, 5, 6, & 7 are only available with the Adjustable Position Axle Kit [B] (Shown Here) B (5” Caster) (5” Caster) (5” Caster) (5” Caster) C Figures 13: Axle Position Adjustment 16 Figures 14: Axle, Wheel, and Caster Configurations “Movement is life!” VI. OPERATING INSTRUCTIONS WARNING: Always inspect your chair before placing your child into it. Look for loose parts, sharp edges, hot surfaces, detached harnesses, mechanisms that are not fully engaged, and any other hazards. Always engage the wheel locks before performing a transfer of the child to or from the chair. Read this instruction manual before using this chair. A. HIP ANGLE ADJUSTMENT 1. Verify that the chair is locked in the non-ACTIVE state. See the operating instructions for the ACTIVE Handle in part G of this section. 2. While supporting the child’s weight, lift up on the hip angle adjustment lever. 3. Move the back of the chair to the desired position and release the lever. 4. Verify that the positioning pins have engaged fully into the recline holes on both sides of seat base (Fig.18). WARNING: Upon release of the lever, verify that lever returns to the down (locked) position. This indicates safe engagement. Figure 15: Hip Angle Positions Figure 16: Hip Angle Adjustment Lever in unlocked position Figure 17: Hip Angle Adjustment Lever in locked position Figure 18: Recline lock pin engaged in recline hole B. FOLDING THE SEAT BACK 1. Lift up on the hip angle adjustment lever as shown in Fig. 16. 2. Fold the back forward then release the lever. 3. To unfold, reverse the above steps. “Movement is life!” 17 C. TILT-IN-SPACE The Kids ROCK Chair is equipped with a tilt-in-space mechanism that pivots around a point near the child’s center of gravity. This mechanism reduces the feeling of falling that occurs when the chair is tilted. In addition, the tilt-in-space mechanism keeps the child’s center of gravity nearly the same in relation to the wheelbase of the chair so that the stability of the chair is not significantly changed by moving the tilt position. To adjust the tilt angle of the child: 1. Verify that the chair is in the locked state. See the operating instructions for the “ACTIVE mechanism” below. 2. While holding onto the handlebar, use the lever on the handlebar to release the tilt lock. 3. Move the child to the desired tilt angle. 4. Release the lever on the handlebar to engage the tilt lock. 5. Move up and down slightly on the handlebar to verify that the tilt lock is fully engaged. WARNING: In preparation to operate the tilt: Always verify that the arms of the child are stable on the armrests or within the armrests. Always verify that the child’s legs are stable on the footrest. Never place hands, feet or foreign objects into the tilt mechanism. Never add chair accessories that are not specifically designed for the Kids ROCK chair. Never exceed a tilted position that aligns the backrest parallel to the ground. WARNING: Always verify that tilt brackets are fully engaged into black plastic plate. 18 “Movement is life!” Figure 19: Tilt-in-Space Figure 20: Tilt Adjustment D. HANDLEBAR ANGLE ADJUSTMENT 1. Press the buttons on the black ratchets simultaneously on both sides of the handlebar. 2. While holding the buttons down, move the handlebar to the desired position. 3. Release the buttons on the black ratchet. Press WARNING: Do not put excessive stress on the handlebar. Figure 21: Handlebar Angle Adjustment E. LEG REST ANGLE ADJUSTMENT 1. [Elevating Leg Rest] Press the buttons on the black pivot (near the child’s knees) simultaneously on both sides of the chair. [Active Leg Rest] Slide the triangular plate (near the child’s knees) toward the front of the chair to depress the button on the black pivot. The plate may be locked back by pressing down on the top of the plate. 2. Move the foot bed to the desired position. 3. Release the button on the black pivot. 1 2 3 WARNING: [Active Leg Rest] Make sure the child’s fingers are away from the triangular plate at the knee (Fig. 22) before moving it between positions because there is a risk that the child’s fingers may be pinched in the slot of the triangular plate. Figure 22: Leg Rest Angle Adjustment with Active F. FOOTPLATE ANGLE ADJUSTMENT 1. [Manual Adjustable Footplate] Adjust the angle by removing the bolts on both sides of the footplate, placing them in different holes, and tightening them. 2. [Automatic Adjustable Footplate] Adjust the angle by pulling the cable on the back of the footplate, setting the angle, then releasing the cable. Pull Cable to Adjust Angle Figure 23: Foot Plate Angle Adjustment “Movement is life!” 19 G. ENABLING THE ROCK ACTIVE MOTION 1. Pre-motion safety checklist: YOU MUST VERIFY THE FOLLOWING PRIOR TO ENABLING THE ROCK ACTIVE MOTION: Hip Angle Adjustment pins fully engaged Tilt-in-space mechanism fully engaged Anti-tips correctly positioned Rear wheels in stable position Wheel locks engaged Chair on flat surface Clear area around chair and child NEVER LEAVE CHILD UNATTENDED 2. If leg motion is desired, slide the triangular plate (near the child’s knees) toward the front of the chair to depress the button on the black pivot. Lock the triangular plate by pressing down on the top (Fig. 25). 3. Rotate the ACTIVE handle into the ON position. The child may start moving at this point. 4. ADJUSTMENT OF THE HIP ANGLE OR TILT IS NOT RECOMMENDED WHEN THE ACTIVE IS ENABLED. 5. To turn off the ACTIVE: a. Use the handle bar to hold the chair in the down position while disengaging the ACTIVE handle to lock the active. b. Press forward slightly on the hand bar to lock completely. c. If foot bed motion was enabled, disable it by lifting the triangular plate then sliding it toward the rear of the chair. WARNING: [Active Leg Rest] Make sure the child’s fingers are away from the triangular plate at the knee (Fig. 25) before moving it between positions because there is a risk that the child’s fingers may be pinched. TWIST HANDLE TO UNLOCK 2 1 3 Figure 25: Turning on the Active Leg Rest ACTIVE ON Figure 26: Enabling the ACTIVE Motion 20 Figure 24: Active Mode “Movement is life!” H. REMOVAL AND INSTALLATION OF REAR WHEELS ** REMOVE THE CHILD FROM THE CHAIR 1. To remove the wheels: a. Release the wheel locks. b. Press the button in the center of the wheel on the quick release axle. b. With the same hand, pull on the wheel to remove the wheel and axle from the chair. 2. To install the wheels: a. Make sure the wheel lock lever is released. b. Put the axle through the wheel hub if necessary. b. Hold the axle and wheel. Align the axle with the axle sleeve on the chair. c. Press the button on the axle and slide the axle into the axle sleeve. d. Make sure that the axle is fully engaged by verifying that the button on the top of the axle pops out. I. Verify that pin is fully engaged (button up) Figure 27: Installation of Quick Release Axle USE OF OPTIONAL THERAPY TRAY Tray Installation and Removal: 1. Align the two tray posts with the tray receivers on the chair. 2. Push the tray posts into the receivers until the snap buttons pop up. 3. To remove, press snap buttons and pull tray out of tray receivers. 4. Remove the therapy tray when using chair in transport. Figure 28: Tray Receivers Tray Height Adjustment: 1. Fig. 29 shows tray in highest adjustment position. 2. To allow lower tray position remove nut and bolt from both sides of tray support using 7/16” nut driver and 5/32” hex driver. A WARNING: Tray must not be loaded with objects heavier than 11 lbs (5 kg). WARNING: Tray must be removed from chair during transport in a motor vehicle. Figure 29: Tray in highest position Figure 30: Tray in lowest position “Movement is life!” 21 J. USING THE Kids ROCK CHAIR FOR TRANSPORTATION IN MOTOR VEHICLES The Kids ROCK Chair is approved for transporting children in motor vehicles when it is equipped with the OPTIONAL transit feature and used in accordance with these instructions. The chair must be secured in a forward-facing position with a Wheelchair Tie-down and Occupant Restraint System (WTORS) which meets the requirements of SAE J2249 Recommended Practice—Wheelchair Tie-down and Occupant Restraint Systems For Use in Motor Vehicles. 1. IMPORTANT INFORMATION: a. This wheelchair conforms to and has been dynamically tested in compliance with ANSI/RESNA WC/Vol. 1 – Section 19.5.3. b. Securement points are in the locations shown in Fig. 31. 2. WARNINGS & INSTRUCTIONS: a. The Kids ROCK chair must be used as indicated in these instructions and the instructions supplied by the vehicle mounted tie-down manufacturer. b. Please contact Kids Up if you have any questions regarding use of the wheelchair for seating in a motor vehicle. Our contact information is in the front of this manual. c. Chair user should be transferred to the vehicle seat and use the vehicle-installed restraint system whenever possible. d. The Kids ROCK Chair can accommodate up to 110 lbs. Do not exceed this occupant weight. e. The Kids ROCK Chair must be placed in a forward-facing position, when used as a seat in a motor vehicle. Use an approved 4-point strap-type tie-down system. Use an approved 3-point belt for the occupant. Secure using the instructions provided with the tie-down system. f. Restraints should not be held away from the child’s body by wheelchair components. g. Belt restraints should be adjusted as snugly as is comfortable for the child. h. The Kids ROCK chair has been dynamically tested in a forward facing mode with the test device restrained by both pelvic and upper torso belts. Both pelvic and upper torso belts must be used to reduce the possibility of head and chest impacts with vehicle components. i. Only belt restraints that comply with the provisions of ANSI/RESNA WC/Vol. 1 – Section 19 4.9.2-4.9.5 and 5.2 that have been dynamically tested in accordance with Annex A & 5.3 of the same, should be installed on the wheelchair for use as a restraint in a motor vehicle. j. Postural supports and belts may be used IN ADDITION TO the occupant belt restraint, but should not be relied upon to replace occupant restraints that have been designed and tested for this purpose. RESTRAINTS SHOULD NOT BE HELD AWAY FROM BODY BY WHEELCHAIR COMPONENTS Figure 30 22 WARNING: DO NOT ATTACH TIE DOWNS ANYWHERE EXCEPT DESIGNATED TIE DOWN LOCATIONS! Figure 31: Securement Point Locations “Movement is life!” Figure 32: Desired Pelvic Belt Angle k. Refer to Fig. 32: A side view of the desired pelvic belt angle range. (1) NOTE 1: Steeper side-view pelvic-belt angles are especially important if the pelvic belt is intended to be used for postural support in addition to occupant restraint in a frontal crash. Steeper angles will reduce the tendency for a vertical gap to develop between the user and the belt due to compliance of seat cushions and belt movement, thereby reducing the tendency for the user to slip under the belt and for the belt to ride up on the soft abdomen during normal use. (2) Steeper belt angles also reduce the tendency for upper-torso belts to pull the pelvic belt into the abdomen during frontal impact loading. l. Auxiliary wheelchair equipment should be removed from the wheelchair and secured in the vehicle during transit. m. Wheelchair mounted trays must be removed from the wheelchair and secured during transit. n. Alterations or substitutions should not be made to the wheelchair structural and frame parts or components without consulting Kids Up. o. Follow the precautions for the recommended safety zone shown in Fig. 33. p. The recline and tilt should place the child in an upright position for transport. Never exceed a 30° (from vertical) recline when using the chair for transport. The Active must be in the off position. q. The Kids ROCK chair with the transit option is equipped with a pin/bushing assembly for easy attachment of certain pelvic belts. The location of this pin is shown in Fig. 34. r. Always drive carefully so as not to put unnecessary excessive force on the tie down system. WARNING: Do not use the chair if it has been involved in a crash. Figure 33: Recommended Safety Zone Pin/Bushing for Attachment of Pelvic Belt Figure 34: Pin/Bushing for Pelvic Belt “Movement is life!” 23 VII. MAINTENANCE Please consult your dealer should you have any questions about proper maintenance of your Kids ROCK Chair. Consistent thorough maintenance will extend the useful life of your chair. Improper maintenance will decrease the chair’s life significantly. Any damaged parts should be replaced before the chair is used. A maintenance chart is provided below. The chair should be cleaned regularly and should be serviced by an authorized dealer at least once per year. Warranty may be affected if proper maintenance is not performed at the specified intervals. There is a maintenance record on page 25 of this manual for your convenience. Frequency Kids ROCK Maintenance Chart Weekly Every 3 Months Check tire air pressure Check anti-tip tubes for damage Check for proper adjustment of wheels locks Check for proper caster alignment Verify all fasteners are tight Verify quick release axles function properly Check tilt bar for proper engagement into side Check tilt cable for damage Check wheels, tires, and spokes for damage [ACTIVE] Check function of active lock system [ACTIVE] Check function of active tension [ACTIVE] Verify smooth function, tight fasteners [ACTIVE] Check spring preload Check frame for damage Check all positioning shell parts for damage Check foot bed & headrest for damage Check side plates for damage We recommend that the chair be cleaned regularly. Clean all frame components and plastic parts using mild detergents only. Fabric parts may be washed at 86° F. If washed in a washing machine, put them in a linen bag or pillow case. Air dry. In most cases, wiping with a damp cloth is sufficient. Do not use your chair in salt water as severe damage may result. Keep sand or other particles from damaging the wheel bearings. 24 Every 6 Months “Movement is life!” We recommend that the chair be serviced annually by an authorized dealer. VIII. MAINTENANCE RECORD Date of purchase and serial number should be recorded on the front cover. Dealer information should be recorded inside the front cover. Date Service By Company Name Contact Person Description of Service “Movement is life!” 25 This page intentionally left blank. 26 “Movement is life!” This page intentionally left blank. “Movement is life!” 27 by Quantum Montana 312 B Andrea Drive Belgrade, MT 59714 PH: (877) 454-3787 www.quantumrehab.com © 2011 Pride Mobility, Inc.