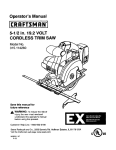
1
Operator's Manual
5-1/2 in. 18 VOLT
CORDLESS TRIM SAW
Model No.
315.114231
Save this manual for
future reference
WARNING:
Read and follow
all Safety Rules and Operaling
Inslructions before using this
product.
Customer
• Assembly
• Operation
• Maintenance
• Parts List
Help Line: 1-800-932-3188
Sears Roebuck and Co., 3333 Beverly Rd. Hoffman Estates,
Visit the Craftsman web page: www.sears.com
983000-281
3-03
• Safety
• Features
IL 60179 USA
•
TableOf Contents and Warranty ......................................................................................................................................
2
•
Introductionand General Safety Rules ........................................................................................................................
3-4
•
SpecificSafety Rules and Symbols .............................................................................................................................
4-7
•
ProductSpecifications,Unpacking,andAccessodes ...................................................................................................... 8
•
Features .....................................................................................................................................................................
8-10
• Assembly...................................................................................................................................................................
11-13
•
Operation .................................................................................................................................................................
13-19
•
Maintenance...................................................................................................................................................................
•
ExplodedV'mwAndRepair Parts List.......................................................................................................................
•
Parts Ordedng / Servico.................................................................................................................................................
20
22-23
24
FULL ONE YEAR WARRANTY ON CRAFTSMAN CORDLESS TRIM SAW
If this CRAFTSMANCordless Trim Saw fails to give complete satisfactionwithin one year from the date of purchase,
RETURN IT TO THE NEAREST SEARS STORE OR SEARS SERVICE CENTER IN THE UNITED STATES, and Sears
will repair it, free of charge.
If this CRAFTSMANCordless Trim Saw is used for commercial or rental purposes,this warranty applies for onlyg0 days
from the date of purchase,
This warranty gives you specificlegal rights,and you may also have other fightswhich vary from state to state,
Sears, Roebuck and Co., DopL 817 WA, Hoffman Estates, IL 60179
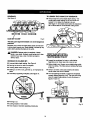
_l,
A
Look for this symbol to point out important safety precautions.
Your safety is involved.
It means attentionlll
WARNING:
O
The operation of any powertool can result in foreign objects beingthrown intoyour eyes, whichcan result
in severe eye damage, Before beginningpower tooloperation, always wear safety gogglesor safety
glasses with side shieldsand a full face shieldwhen needed, We recommendWide Vision Safety Mask
for use over eyeglasses or standard safety glasses with side shields,available at Sears Retail Stores,
Always wear eye protectionwhich is marked to comply with ANSI Z87.1.
2
Yourtrim sew has manyfeatures for making yourcutting
operationsmore pleasant and enjoyable. Safety,
performance and dependabilityhave been given top
priorityin the design of this tdm sew makingit easy to
maintainand operate.
A
_k
WARNING: Read and follow all instructions.
Failure to followall instructionslisted below, may
resultin electricshock, fire and/or sadous personal
injury.
Personal Safety
Stay alert, watch what you are doing and use
common eanea when operating a power tool. Do
not use tool while tired or under the influence of
drags, alcohol, or medication. A moment of inattentionwhile operatingpower tools may resultin serious
personal injury.
•
Dress properly. Do not wear loose clothing or
jewelry. Contain long hair. Keep your hair, clothing,
and gloves away from moving parts, Looseclothes,
jewelry,or long heir can be caught in moving parts,
Avoid accidental starting. Be sure switch is in the
locked or off position before inserting bsttery
pack. Carryingtools with your finger on the switchor
insertingthe battery peck intoa toolwith the switch on
invitesaccidents.
Work Area
Keep yourwork area clean and well lit. Cluttered
benches and dark areas inviteaccident.
•
Do not operate power tools in eaplosive strnospheres, such as in the presence of flammable
liquids, gases, or dust. Power tools create sparks
which may Ignitethe dust or fumes.
•
•
Keep bystandam, children, and visitors away while
operating a power tool, Distractionscan cause you
to lose control.
Electrical Safety
•
•
•
•
A bette|y operated tool with Integral bettados or a
separate be#ely pack must be recharged only with
the specified charger for the betteiy. A charger that
may be suitablefor one type of battery may create a
riskof fire when used with another battery.
Use bsttary operated tool only with specifically
designated battery pock. Use of any other batteries
may create a dsk of tire. Use only with batterypack
listed.
Use bettely only with charger listed.
MODEL
BA'rrERY PACK
CHARGER
item No. _ t1045
(1323905)
•
Remove adjusting keys orwrenchea before turning the tool on. A wrenchera key that is left attached
to a rotatingpert of the tool may resultin personal
injury,
•
Do not overreach. Keep proper footing and balance at all times. Proper footingand balance enable
petter controlof the tool in unexpectedsituations.
•
Use safety equipment. Always wear aye protection.
Dust mask, nonskidsafety shoes,hard hat, or hearing
protectionmustbe used for appropriateconditions.
Tool Use and Care
Do not abuse the cord. Never use the cord to carry
the charger. Keap cord away from heat, oil, chaq)
edges, or moving parts. Replace damaged cords
immediately. Damaged cords may create a fire.
315.114231
Do not attemptto usa the tool until
you have read thoroughlyand understandcompletely
the operator's manual, Pay close attentionto the
safety rules, includingDangers, Warnings, and
Cautions. If you usa this tool properlyand onlyfor
what it is intended,you will enjoy years of safe,
reliable service,
•
SAVE THESE INSTRUCTIONS
•
WARNING:
Ram No. _!11041
(1425301)
3
•
Usa clamps or other practical way to secure and
support the workplace to a stable plstfonn. Holding
the work by hand or againstyour body is unstableand
may lead to loss of control.
•
Do not force tool. Use the con'act tool for your
application. The correcttool will do the job be_rarand
safer at the rate for which it is designed.
Do not use tool if switch does not turn it on or off.
A toolthat cannot be controlledwith the switch is
dangerous and must be repaired.
Disconnect batter/pack from tool or place the
switch in the looked or off position before making
any adjustments, changing accoseodes, or stodng
tool. Such preventivesafety measures reduce the dsk
of starting the tool accidentally.
Store idle tools out of the mech of children and
other untrained persons. Toolsare dangerous in the
handsof untrainedusam.
•
Check for miaslignmeot or binding of moving
pe4s, breakage of paris, and any other condition
that may affect the tool's operation, if damaged,
have the tool serviced before using. Many accidents
are caused by poorlymaintainedtools.
•
Use only ecneasodas that are recommended by
the manufaotumr for your model. Accessoriesthat
may be suitablefor one tool, may create a risk of injury
when used on another tool.
Service
Tool se_ice must be performed by qualified repair
personnel. Service or maintenance performedby
unqualifiedpersonnelmay result in a risk of injury.
When batter/pack is not in use, keep it away from
other metal objects like: paper clips, coins, keys,
nails, screws, or other small metal objects that can
make a connection from one terminal to another.
Shortingthe battery terminals together may cause
sparks,bums, or a fire.
When servicing a tool, use only identical replace.
merit pads. Follow instructions in the Maintenance
section of this manual. Usa of unauthorizedparts or
failure to follow MaintenanceInstructionsmay create a
_sk of shockor injury.
Maintain tools with care. Keep cutting tools sharp
and clean. Properly maintainedtoolswith sharp
cuttingedges are less likelyto bind and are easier to
ccntrol.
•
Hold tool by insulated gripping surfaces when performing an operation where the cutting tool may contact
hidden wiring. Contact with a "live" wire will make exposed metal parts of the tool "live" and shock the operator.
Additional
•
•
Rules For Safe Operation
•
Know your power tool. Reed operator's manual
carefully. Learn its applications and limitations, as
well as the specific potential hmrds misted to
this tool. Followingthis rulewill reduce the risk of
electricshock,fire, or seriousinjury.
•
Make sure your extension cord is in good condition. When using an extension cord, be sure to use
one heavy enough to carry the current your product will drew. Awire gage size (A.W.G.) of at least
16 is recommended for an extension cord 100 f_st
or less in length. A cord exceeding 100 feet is not
recommended. If in doubt, use the next heavier
gage. The smaller the gage number, the heavier
the cord. An undersizedcordwill cause a drop in line
voltage resultingin lossof power and overheating.
•
Important Rules For Battery Tools
•
Batter/tools do not have to be plugged into an
electrical outlet; therefore, they are always in
operating condition. Be aware of possible hazards
when not using your better/tool or when changing accessories.
4
Do not place batter/tools or their baHefies near
fire or heat. This will reduce the risk of explosionand
possibleinjury.
Batteriesvent hydrogengas and can explode in the
presenceof a sourceof ignition,such as a pilot light.
To reduce the risk of sedous personal injury,never
use any cordlessproductin the presence of open
flame. An exploded battery can propeldebds and
chemicals. If exposed, flush with water immediately.
Do not charge baiter/tool in a damp orwet location. Followingthis rule will reducethe risk of electric
shock,tim, or seriouspersonal injury.
•
Your belier/tool
should be charged in a location
where the temperature is more than 50°F hut less
then 100°F. Followingthis rule will reducethe risk of
electricshock,fire, or serious personalinjury.
•
Under extreme usage or temperature conditions,
batter/leakage may occur. If liquid comas in
contact with your skin, wash immediately with
soap and water, then neutralize with leman juice or
vinegar. If liquid gets into your eyes, flush them
with clean water for at Isesl 10 minutes, then seek
immediate medical attention. Following this rule will
reducethe risk of serious personalinjury.
Additional Specific Safety Rules
•
DANGERI Keep hands away from cutting am and
blade. Keep your second hand on auxilianj handle
or motor housing. If both handsam holdingthe saw,
they cannot be cut by the blade,
•
Never use damaged or incorrect blade washers or
bolts. The blade washers and boltwere specially
designedfor your saw,for optimum performanceand
safety of operation.
•
Causes and Operator Prevention of Kickback:
•
Kasp your body positioned to either side of the
saw blade, but not in line with the sew blade.
KICKBACK could cause the saw to jump backwards.
Kickback is a sudden reactionto a pinched, bound,or
misalignedsaw blade, causing an unccntmlledsaw to
lift up and out of the workpiecetowardthe operator.
•
Do not reach underneath the work. The guard
cannot pmtactyou from the blade below the work.
•
Chack the lower guard for proper closing before
each use. Do not operate saw if lower guard does
not move freely and close instantly, Never clamp
or tie the lower guard into the open position. If
saw is accidentallydropped,lower guard may be bent.
Raise the lower guard with the retractinghandle and
make sure it movesfreely and does not touchthe
blade or any other part, in all angles and depthsof cut.
Check the operation and condition of the lower
guard spdng, If the guard and the spdng are not
operating properly, they must be serviced before
use. Lowerguard may operate sluggishlydue to
damaged parts,gummy deposits,or a buildupof
debds.
When the blade is pinchedor hound tightlyby the kerr
closingdown, the blade stallsand the motorreaction
drivesthe unit rapidlybeck towardthe operator.
•
•
Lower guard should be retracted manually only for
special cute such as =Pocket Cuts" and "Compound Cuts". Raise lower guard by Retracting
Handle. As soon as blade enters the mstadal,
lower guard must be released. For all other sawing,
the lower guard shouldoperate automatically.
•
Always obeerve that the lower guard is covedng
the blade before placing saw down on bench or
floor. An unprotected,coastingblade will cause the
saw to walk backwards, cuttingwhatever is in its path,
Be aware of the time it takes for the bladeto stop after
switchis released.
If the blade becomes twistedor misalignedin the cut,
the teeth at the back edge of the blade can dig intothe
top surface of the wood causing the blade to climbout
of the ken'and jump back toward the operator.
Kickback is a resultof tool misuse and/or incorract
operating proceduresor conditionsand can be
avoided by taking properprecautionsas given below:
•
•
•
When restarting a sew in the workplace, canter the
saw blade in the kerr and check that teeth are not
engaged into the mstedal. If saw blade is binding,it
may walk up or KICKBACKfrom the workpiecaas the
saw is restarted.
•
Support large panels to minimize the dsk of blade
pinching and KICKBACK. Large panels tend to sag
under theirown weight. Supportsmustbe placed
under the penal on bothsides, near the lineof cutand
near the edge of the panel.
•
Do not use dull or damaged blade. Unsharpenedor
impmpedy set bladesproducenarrow ken'causing
excessivefriction, blade binding,and KICKBACK.
•
Blade depth and bevel adjusting locking levera
must be tight and secure before making cut. If
blade adjustmentsh_ftswhilecutting,it will cause
bindingand KICKBACK.
•
Use extra caution when making a "Pocket Cut"
into existing walls or other blind areas. The protruding blade may cut objectsthat can cause KICKBACK.
NEVER hold piece being cut in your hands or
across your leg. It is important to supportthe work
properlyto minimizebody exposure,blade binding,or
lossof control.
•
Hold tool by insulating gripping sudecse when
performing an operation where the cutting tool
may contact hidden widng. Contactwith a "live"wire
will also make exposed metal parts of the tool"live"
and shockthe operator.
•
When dpping always use a rip fence for a straight
edge guide. This improvesthe accuracyof cutand
reducesthe chance of blade binding.
•
Always use blades with cowect size end shape
(diamond vs. round) arbor holes. Bladesthat do not
matchthe mountinghardware of the saw will run
eccentdcally,causing loss of control.
5
Maintain a finm grip on the sew and position your
body and arm in a way that allows you to resist
KICKBACK forces. KICKBACK forces can be controlled by the operator,if proper precautionsare taken.
When blade is binding, orwhen intemupting a cut
for any reason, release the trigger and hold the
saw motionless in the mutadal until the blade
comas to a complete stop. Never attempt to
remove the saw from the work or pull the sew
backward while the blade is in motion or KICKBACK may occur. Investigateand take corrective
actions to eliminatethe cause of blade binding.
•
Neverusea batterythat
has been dropbed or received a sharp blow, A damaged bakery is subjectto
explosion,Pmpedy dispose of a dropped battery
immediately. Failure to head this warning can result in
serious personal injury.
•
Do not operate charger if It has received a sharp
blow, been dropped, or othanNise damaged in any
way; take It to a qualified serviceman. Following this
rule will reducethe risk of electdc shock,fire, or
serious personal injury.
•
Before using battery charger, read ell instructions
and cautionary markings in this manual, on battery
charger, and product using battery charger. Following this rule will reducethe dskof electricshock,fire,
or sedouspersonal injury.
•
Do not dissessmbls charger, take it to a qualified
serviceman when ssrvica or repair is required.
Incorrect ressssmbly may result in a risk of electric shock or fire. Followingthis rulewill reducethe
dsk of electricshock,firs, or seriouspersonal injury,
•
To reduce dsk of injury, charge only nickelcadmium type rechargeeble bottedss. Other types
of batteries may burst causing personal injury end
damage. Followingthis rulewill reduce the dsk of
electric shook, tim, or sedous personal injury.
Do not expose charger to rein or snow. Following
this rule will reduce the dsk of electdc shock,fire, or
serious personalinjury.
•
To reduce the risk of electric shock, unplug
charger from outlet before attempting any mainte.anco or cleaning. Turning off controls will not
reduce this risk, Followingthis rulewill reducethe
dsk of electric shock'firs,or sedous personalinjury.
Do not use charger outdoors. Followingthis rulewill
reduce the risk of electric shock,fire, or sadous
personal injury.
Usa of an attachment not recommended oraold by
the battery charger manufacturer may result in •
risk of fire, electric shock, or injury to penmns.
Followingthis rule will reduce the risk of electric shock'
fire, or sedous personalinjury,
•
•
•
•
•
•
•
•
To reduce the dek of damage to charger body and
cord, pull by charger plug rathor than cord when
disconnecting charger. Following this rule will reduce
the risk of sedous personal injury.
Make sure cord is located so that it will not be
stepped on, tdpped over, or othanvise subjected to
damage or stress. Followingthis rule will reducethe
dsk of seriouspersonalinjury.
An extension cord should not be used unless
absolutely necsssmy. Use of improper extension
cord could resultin a dsk of fire end electric shock.If
extensioncord must be used, make sure:
a. That pins on plug of extension cordam the same
number,size and shape as those of plug on
charger.
50"
100"
Cord Size (AWG)
16
16
16
A
WARNING" . Some dust created by power sanding,
sawing, grinding, drilling, and other construction
activities contains chemicals known to cause
cancer, birth defects or other reproductive harm,
Some examples of these chemicals are:
• arsenic and chromium from chemicallytreated lumber.
Your risk from these exposures varies, depending
on how often you do this type of work. To reduce
your exposure to these chemicals: work in a wall
ventilated area, and work with approved safety
equipment, such as those dust masks that are
specially designed to filter out microscopicparticles.
Note: AWG = AmadcanWire Gage
•
Save thsse instructions. Refer to tbem frequently
and use them to instnJnt others who may use this
tool. if you loan someone this tool, loan them
these instructions also. Followingthis rule will
reduce the risk of electric shock'fire, or serious
personal injury,
• crystalline silica from bdcks and cement
and other masonry products, and
c. That wire size is large enough forAC ampere rating
of charger as specifiedbelow:
25"
•
• lead from lead-besed paints,
b. That extensioncord is pmpedywired and in good
electrical condition; and
Cord Length (Feet)
Dieconnect charger from power supply when not
in use. Followingthis rule will reduce the risk of
electricshock,tim, or serious personal injury,
RISK OF ELECTRIC SHOCK. DO NOT TOUCH
UNIHSULATED PORTION OF OUTPUT CONNECTOR OR UNINSULATED BA'I-rERY TERMINAL.
Donot operatechargerwith adarnaged cord or
plug. If damaged, have replaced immediately by a
qualified sstvicaman, Followingthis rulewillrsduce the
dsk of electricshock,fire,or serious personalinjury.
SAVE THESE INSTRUCTIONS
6
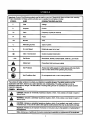
Important: Some of the followingsymbolsmay be used on yourtool, Please study them and leam their moaning.
Proper interpretationof these symbolswill allow you to operate the tool better and safer.
SYMBOL
NAME
DEBIGNATIONIEXPLANATION
V
Volts
Voltage
A
Amperes
Current
Hz
Hertz
Frequency (cyclesper second)
W
Watt
Power
min
Minutes
Time
ARematingCurrent
Type of current
no
No Load Speed
Rotational speed, at no load
[]
Class II Construction
Double-insulatedconstruction
.../min
Per Minute
Revolutions,strokes, surface speed, orbitsetc., per minute
Safety Alert
Preoauttonsthat involveyour safety
O
Eye Protection
and
a full face
shield
when operating
this product.
Alwayswear
,safety
gogglesor
safety glasseswith
,sideshields
_)
Wet ConditionsAlert
Do not expose to rain or use in damp locations.
,_
The purposeof safety symbols is to attract your attentionto possibledangers, The safety symbols, and the
explanationswith them, deserve your careful attention and understanding.The safety warningsdo not by
themselves eliminate any danger. The instructionsor warningsthey give am not substitutesfor proper accident
prevention measures.
SYMBOL
A
A
A,
MEANING
DANGER: Indicates an immlnontlyhazardous situation, which, if not avoided, will rasult in death or
sedcos injury.
WARNING: Indicates a potentiallyhazardous situation,which, if not avoided, could resultin death or
serious injury.
CAUTION: Indicates a potentiallyhazardous situation,which, if not avoided, may result in minor or
moderate injury.It may also be usedto alert against unsafe practicesthat may cause propertydamage.
Impodant: Advisesyou of importantinformationor instructionsvital to the operationor maintenanceof
the equipment.
Note: Advisesyou of additionalinformationconcerningthe operationor maintenanceof the equipment.
7
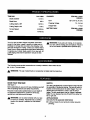
TRIMSAW
BladeDiameter
BladeArbor
315.114231
5-1/2in.
318in,
CuttingDepth at 900
1-9/16 in.
CuttingDepth at 450
1-118in,
No lead Speed
4,500/min,
Motor
18 Volt DC
CHARGER
Input
ITEM NO. 1 11041
(1425301)
120 V, 60 Hz, AC only
ChargingVoltage
7.2 - 24 Volt
Charge Rate
BA'I-FIERYPACK
Your trim saw has been shippedcompletelyassembled
exceptfor the blade. Inspect it carefullyto make sure no
breakage or damage has occurredduringshipping,If any
parts are damaged or missing,contact your nearestSears
Retail Store to obtain replacementparts beforeattempting
to operate saw. A blade, bladewrench (5 mm hex key), dp
guide (edge guide) and this operators manual are also
included,
1 Hour
ITEM NO. 9 11045
(1323905)
WARNING: If any partsare missing,do not operate
yoursaw until_e missingpatts are replaced,Failureto
do so could resultin passible seriouspersonalinjury.
The following recommendedaccessoriesare currentlyavailable at Bears Retail Stores,
• 5-1/2 in, Thin Kerr Blade
WARNING:
The use of attachmentsor aceassodes not listedmightbe hazardous.
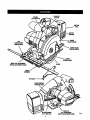
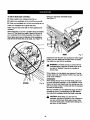
KNOW YOUR TRIM SAW
See Figure 1.
SWITC H
Your saw is equippedwith a lock-offbuttonwhich reduces
the possibilityof accidentalstarting. The lock-offbuttonis
located on the handle above the switchtdgger.You must
depressthe lock-offbuttonin order to pull the switch
trigger.The lock resetseach timethe trigger is released.
Note: You can depressthe iock-off buttonfrom either the
left or dght side.
Beforeattempting to use your tdm saw,familiarize yourself
with all operatingfeatures and safety requirements.
Features includeeasily operated bevel cut and depthof
cut adjustmentmechanisms;positive0° bevel stop;
spindlelock; and blade wrench storage.
APPLICATIONS
(Use only for the purposes lieted below)
,l_k WARNING: Do not allowfamiliarity with your saw
to make you careless. Remember that a careless
fraction of a second is sufficientto inflictsevere
injury.
•
8
Cuttingall types of wood products(lumber,plywood,
paneling).
LOCK-OFF
BUTrON
SPINDLE
LOCKBUTFON
BA'n'ERY
PACK
TRIGGER
RIP
GUIDE8CREW
(WINGSCREW)
BLADEGUARD
, LOWERBLADE
GUARDHANDLE
LOWER
BLADEGUARD
BEVELCUTADJUSTMENT
(BEVELADJUSTMENT
KNOB)
BLADE
BASE
ASSEMBLY
FlIPGUIDE
BLADEWRENCH
STORAGEAREA
BLADEWRENCH
(5 mmHE)(KEY)
9
DEPTHOF
CUTADJUSTMENT
(DEPTHADJUSTMENT
KNOB)
Fig. 1
LEDFUNCTIONS
OFCHARGER
LEDWILLBEONTO INDICATESTATUSOFCHARGERANDBATTERYPACK:
•
Red LED on = Fast chargingmode,
•
Green LED on = Fully charged and in tricklecharge mode,
•
Green LED on = When battery pack is insertedintocharger, indicates hot hatter/pack or that batterypack is out of or
below normaltemparatum range,
•
Yellow and Green LEDs on = Deeply dischargedor defective batter/pack.
•
No LED on = Defective charger or battery pack.
BATrERYPACK
SHOWNIN CHARGER
CHARGER
REDLEDONINDICATES
GREENLED ON AFTER FAST CHARGING
CYCLE, INDICATESFUlly CHARGEDBATrERY
PACKANDIN TRICKLECHARGEMODE
YEllOW ANDGREENLED6ONINDICATES
DEEPLY
DISCHARGER
ORDEFECTIVE
BA'I'rERYPACK,
Fig. 2
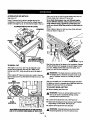
C HARG ER
See Figure 3.
Your charger has a "key hole" hanging feature for
convenient, space saving storage, Screws shouldbe
installed so that canter distancesare 4-1/2 inchesapart,
4-1/2In,
Fig, 3
10
LED FUNCTIONS OF CHARGER
LED WILL BE ON TO INDICATE STATUS OF
CHARGER AND BATTERY PACK:
WARNING: Do not allow familiaritywith your trim
sew to make you careless. Remember that a
careless fraction of a second is sufficientto inflict
severe injury.
BATTERY
PACK
The battery peck for your tool has bean shippedin a low
charge condition to preventpossibleproblems.Therefore,
you shouldcharge it until light on front of charger changes
from red to green,
Note: Batterieswill nut reach fullcharge the firsttime they
are charged, Allow several cycles (cuttingfollowed by
recharging)for them to become fully charged,
CHARGING BATTERY PACK
See Figure2.
•
Charge battery peck onlywith the charger provided.
•
Make sure power supply is normal household
voltage, 120 vo#s, 60 Hz, AC only.
Connect chargerto power supply.
•
•
•
Place battery pack in charger aligningraised ribon
battery peck with groove in charger. See Ffgure2.
Press down on battery packto be sure contacts on
battery peck engage probedywith contacts in charger,
•
Normally, the red LED on charger will come on, This
indicatescharger is in fast charging mode,
•
Red LED shouldremainon for approximately1 hour
than the green LED will come on, Green LED on
indicates battery peck is fully charged and charger is in
tdckie charge mode, Note: Green LED will remainon
until battery peck is removedfrom charger or charger
is disconnectedfrom power supply,
•
If bothyellow and green LED coma on, this indicatesa
deeply dischargedor defective battery pack.
•
The battery peck will become slightlywarm to the
touchwhile charging.This is normal and does not
indicate a problem.
•
•
Green LED on = Fully charged and in tricklecharge
mode,
•
Green LED on = When battery pack is insertedinto
charger, indicateshut battery pack or that batterypack
isout of or below normal temperaturerange.
•
Yellow and Green LEDs on = Deeply dischargedor
defective battery peck.
•
No LED on = Defective charger or battery peck.
_,
CAUTION: To preventdamage to battery pack,
remove battery peck from charger immediatelyif no
LED comes on. Ratum battery peck and charger to
your nearest Seers Service Canter for checking or
replacing,Also, ifyou are removingbattery peck from
charger and no LEDs am on, return both battery pack
and charger to your nearest Sears Service Center,
Do nut Insert another battery peck Into charger.A
damaged charger may damage a better/peck.
FOR RECHARGING
When usingyour tdm sew continuously, the batteries in
your battery peck will become hot.You should let • hot
battery pack cool down for approximately30 minutes
before attemptingto recharge,When the battery peck
becomes discharged and is hot,this will cause the green
LED to coma on insteadof the red LED. After 30 minutes,
reinsert battery peck in charger. If green LED continuesto
remain on, ratum battery peck to your nearest Sears
Repair Center for checking or replacing.
Note: This situationonly occurswhen continuous use of
your saw causes the bettedas to become hot. It does not
occur under normal circumstances.Refer to "CHARGING
BAI'TERY PACK" for normal recharging of bettafias. If
the charger does not charge your battery peck under
normal circumstances,return both the battery peck and
charger to your nearest Sears Repair Center for electrical
check.
If red LED does nut come on after 30 minutes,this
indicatesa defective battery peck and shouldbe
replaced.
After normal usage, a minimumof 1 hour of charging
time is requiredto fully recharge battery peck.
Red LED on = Fast chargingmode.
IMPORTANT INFORMATION
HOT BATTERY PACK
Allow battery pack to remain in charger for 15 to 30
minutes.When battery pack rsaches normalvoltage
range, red LED shouldcoma on.
•
•
IMPORTANT INFORMATION
COOL BATTERY PACK
FOR RECHARGING
If battery pack is below normal temperature range, the
green LED on charger will come on. Allow battery peck to
reach normal temperature, than the red LED will come on,
Note: Refer to "CHARGING BATTERY PACK" for
normal rechargingof batteries. If the charger does not
charge your battery peck under normal circumstances,
return both the battery pack and charger to your nearest
Sears Repair Center for electrical check.
Do not place charger and battery pack in an area of
extreme heat or cold, It willwork best at normal room
temperature,
Note: Charger and battery pack shouldbe placed in a
locationwhere the temperature is more than 50°F but
less than 100=F,
When battedes become fully charged, unplugcharger
from power supplyand remove the battery pack.
11
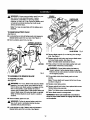
SRNDLE
LOCKBUTTON
WARNING:Alwaysremove
batterypackfrom your
sew when you are assemblingparts, making
adjustments,assemblingor removingblades,
cleaning, or when not in use. Removing battery pack
will prevent accidental startingthat could cause
serious personalinjury.
LOWERBLADE
GUARDHANDLE
Note: Your sew is assembled with the battery pack
attached,
TO REMOVE BATTERY
See Figure 4.
BLADE
PACK
•
Locate latches on side of battery pack and depress to
release battery pack from your sew. See Ffgure 4.
•
Remove battery pack from your sew.
DEPRE88LATCHr-._TO
RELEASE
BATI'ERY
PACK
INNER
BLADEWASHER
OUTER
BLADEWASHER
TO
REMOVE
BLADESCREW Fig. 5
TO
INSTALL
LATCHES
•
Remove blade wrench (5 mm hex key) from storage
area. See Figure 1.
•
Depress spindlelock button and remove blade screw
and outer blade washer, See Figure 5.
Note: Turnblade screwdcckwise to remove,
•
Wipe a drop of oil onto inner bladewasher and outer
blade washer where they contact blade.
WARNING: If inner blade washer has been removed, replace it before placingblade on spindle.
Failureto do so could cause an accidentsince blade
will not tighten pmpedy,
BATrF._RY
PACK
Fig, 4
TO ASSEMBLE
OR REMOVE BLADE
•
TO ASSEMBLE BLADE:
Note: The sew teeth paint upward at the frontof sew
as shownin figure 5.
See Figure 5.
WARNING: A5-1/2 in. blade is the maximum blade
capacity of your sew. Never use a blade that is too
thick to allow outer blade washer to engage with the
fiats on the spindle. Larger blades will come in
contact with the blade guard, while thicker blades will
prevent blade screwfrom securingblade on spindle,
Either of these situationscould resultin a serious
accident.
•
A
•
Fit sew blade insidelower blade guard and onto
spindle,
• Replace outer bladewasher.
•
Depress spindlelock button,than replace blade screw,
"nghtanblade screw securely,
Note: Turn blade screw countemlockwiseto tighten.
•
Ratum blade wrench to storage area.
REMEMBER: Never use a blade that is too thick to
allow the outer blade washer to engage with the fiats
on the spindle.
Remove battery pack from saw,
WARNING: Failure to remove battery pack from
sew could result in accidental startingcausing
passible serious personal injury.
Locate latcheson side of batterypack and depressto
release battery pack from yoursew. See F/gum 4.
12
TOREMOVE
BLADE
See Figure 6.
•
Remove batter/pack from saw,
WARN ING: Failure to remove battery back from
sew could result in accidental startingcausing
possiblesedous personal injury.
m Remove blade wrenchfrom storagearea. See/:?gum 1.
•
LATCHES
Position sew as shown in figure 5, depress spindlelock
button, and remove blade screw.
Note; Turn blade screw clockwiseto remove.
BATrERYPACK
M Remove outer bladewasher.See F/gum 5.
Fig. 7
BLADE GUARD SYSTEM
Note: Bledo can be removed at this point.
The lower blade guard attached to your tdm sew is
there for your protection and safety. It should never be
altered for any mason. If it becomes damaged or
begins to mtum slow or sluggish, do not operate your
sew until the damage has been repaired or replaced.
Always leave guard in operating position whon using
DEPRESSSPINDLE
LOCKBUTFON
SaW.
_k
LOOSEN
SCREW
DANGER: When sewing through workpiese,lower
blade guard does not cover blade on the underside of
workpiece,Since blade is e_pesed on undersideof
workpiece,keep handsand fingers away from cutting
area. Any part of your body coming in contact with
moving blade will resultin serious injury,
See Figure 8.
LOWERBLADEGUARD
IS IN UP POSITION
WHEN MAKINGA CUT
BLADE
WRENCH
TO
TIGHTEN
Fig. 6
TO INSTALL BATTERY PACK
See Figure 7.
Note: Battery pack is shipped in a low charge condition,
Therefore, it must be charged pdor to use. Refer to page
10, =CHARGING BATTERY PACK" for charging
instructions,
•
•
Place battery back in your sew. Align raised db on
battery back with groove inside sew, then slide battery
pack in saw as shown in figure 7,
BLADEEXPOSED
ON
UNDERSIDE
OFWORKPIECE
Make sure the latches on each side of your battery
back snap into place and battery pack is secured in
saw before beginningoperation,
Fig. 8
Never use sew when guard is not obamtingcorrectly.
Guard shouldbe checked for correct operation before
each use. If you drop your sew, checkthe lower blade
guard and bumperfor damage at all depth settingsbefore
reuse. Note: The guard is operatingcorrectly when it
moves freely and readilyratums to the closed position. If
for any reason your lower blade guard does notclose
freely, take itto the nearest Sears Parts and Repair Center
for service before using,
CAUTION: When placing battery back in your sew,
be sure raised fib on battery back aligns with groove
inside saw end latches snap into place properly,
Improper assembly can cause damage to sew and
battery peck.
13
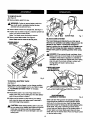
KICKBACK
See Figure 9.
nm
TO LESSEN THE CHANCE OF KICKBACK:
•
mum),
Always keep the correctblade depthsetting- the
correct blade depth settingfor all cuts should not
exceed 1/4 in. below the materialto be cut.
See Figure 11.One blade tooth belowthe matedal to
be cut w_rks bestfor most efficientcuttingaction.
K]CKBACK
lmalnk
BLADESETTOODEEP
Fig, 9
Tho best guard against kickback is to avoid dangomus
practices.
Kickbackoccurswhen the blade stalls rapidlyand the saw
is ddven back towardsyou. Blade stallingiscaused by any
actionwhich pinchesthe blade in the wood.
_k
DANGER: Release switchimmediately if blade
bindsor sew stalls. Kickback couldcause you to lose
control of your saw. Loss of controlcan lead to
sadous injury,
KICKBACK
IS CAUSED
CORRECT'
BLADEDEPTHSETrlNG•
BLADEEXPOSED
ONEBLADETOOTH
BELOWTHE MATERIAL
TOBECUT
BY:
Fig. 11
•
Inspectthe workpiece for knotsor nails before
beginninga cut. Never sew intoa knot or nail.
•
Make straight cuts,Always use a straightedge guide
when dp cutting.This helps preventtwistingthe blade
in the cut.
•
Incorrect blade depth setting,See Figure 9.
•
•
Sawing into knotsor nails in workpiece.
Twistingbladewhile makinga cut.
•
Making a cut with a dull, gummed up. or improperlyset
blade.
•
Always use clean, sharpand properlyset blades.
Never make cutswith dull blades,
•
Incorrectlysupportingworkplace. See Figure 10.
•
To avoid pinchingthe blade, supportthe workpieco
properly before beginninga cut. The right and wrong
ways to supportlarge pieces of work am shown in
figures 10 and 12.
Fig, 10
•
Forcinga cut,
• Cuttingwarped orwet lumber,
•
RIGHT
Tool misuse or incon'ectoperatingprocedures.
14
Fig. 12
• When making a cut use steady, even pressure,
Never force cuts.
STARTING A CUT
•
Know the right way to use your saw.
See Figure 14.
Do not cut waq_edor wet lumber,
• Always hold your saw firmlywith both hands and keep
your body in a balanced positionso as to resist the
forces of kickback should it occur,
When using your saw, always stay alelt and oxeroiso
control. Do not remove your saw from workplace
white the blade is moving,
DEPTH OF CUTADJUSTMENT
Always keep correct blade depth setting. The correct
blade depth setting for all cuts shouldnot exceed 1/4 inch
below the materialto be cut. More blade depthwill
increasethe chance of kickback and cause the cut to be
rough, One blade tooth below the matedal to be cut works
best for mostefficient cutting action.
TO ADJUST BLADE DEPTH
•
Remove battery pack from saw.
WARNING: Failure to remove battery packfrom
saw could result in accidental starting causing
possibleserious personal injury.
•
Fig, 14
Never use your saw as shown in figure 15.
Loosen depth adjustment knob. See Figure 13,
TORAISE
SAW
BASE
ASSEMBLY
TO
J
TO
LOOSEN
•
TIGHTEN
DEPTH
ADJUSTMENT
KNOB
Fig, 13
Hold base flat againstthe workpiece and raise or lower
saw untilthe required depth is reached.
WRONG
Fig. 15
Never place your hand on the workplace behind your
sewwhile making a cut.
• "13ghten
depth adjustment knob securely.
_k
15
WARNING: To make sawing easier and safer,
always maintain propercontrol of your saw, Loss of
controlof your saw could cause an accident resulting
in possibleserious injury.
TOHELPMAINTAINCONTROL:
Hold your sew firmly with both hands.
See Figure 17.
• Always supportyour workpiece near the cut.
•
Supportyour workpiece so the cutwill be on your left.
•
Clamp yourworkplece so itwill not move dudngthe cut.
Place your workpiece with its good side down,
Note: The good side is the side on whichappearance is
important,
Before beginninga cut, draw a guidelinealong the desired
line of cut. Then place front edge of base on that port of
yourworkpiece that is solidily supported, See F{gure 14.
Never place your saw on that part of the workpiece
that will fall off when the cut is made. See Ffgure 16.
RIGHT
Fig, 17
Depressthe lock-offbutton and squeeze the switchtdgger
to startyour saw, Always letthe blade reach full speed,
then guide your saw intothe workpiece.
_i,
WARNING: The blade coming in contactwith the
workpiece before it reaches full speed couldcause
your saw to "kickback" towardsyou resultingin
cedous Injury.
When makinga cut use steady, even pressure,Forcing
causes roughcuts, could shortenthe llfe of your sew and
could cause "kickback."
WRONG
REMEMBER:
When sewing throughwork, the lower blade guarddoes
not cover the blade, exposingit on the underside of work,
Keep your hands and fingers away from cuttingarea. Any
pert of your bodycoming in contact with the moving blade
will result in serious injury,
Fig, 16
After you completeyour cut release the trigger and allow
the blade to come to a complete stop. Do not remove
your saw from workpieee while the blade is moving.
_k
16
CAUTION: When liftingyour sew from the
workpiece,the blade is exposed on the undersideof
your sew until the lower blade guard closes, Make
sure lower blade guard is closed before setting your
saw downon work surface,
TO CROSS CUT OR RIP CUT
A width of cut scale has been providedon the base of
your saw. When making straightcross cutsor rip cuts, the
scale can be used to measure up to four inchesto the
right side of the blade. It can he used to measure up to
one inch to the left side of the blade.
When making a cross cut or rip cut, align your line of cut
with the outer blade guide notchon the saw base as
shown in figure 18.
TOPVIEWOFSAW
GUIDEUNE
RIP GUIDE (EDGE GUIDE)
BLADE
GUIDENOTCH
Use the rip guide providedwith your saw when making
wide rip cuts.A five inchscale has been providedon the
rip guide. When using the width of cut scale on the base
in combinationwith the rip guide, cuts can be made up to
6 in. to the left of the rip guide or 8-7/8 in. to the right of
the dp guide.
The rip guide helps preventthe bladefrom twistingin a
cut. The bladetwisting in a cut can cause kickback.
TO ASSEMBLE
•
RIP GUIDE
Remove battery pack from saw.
WARNING: Failure to remove battery pack from
saw could result in accidental startingcausing
possiblesedous personalinjury.
AUGNOUTERBLADEGUIDENOTCHONSAWBASEWITHUNE
OFCUTASSHOWNWHENMAKINGCRO6SCUTSOR RIPCUTS
Fig. 18
Since blade thicknessesvary, always make a trial cut in
scrap materialalong a guidelineto determine how much,
if any, the guideline must be offsetto producean accurate
cut.
Note: The distancefrom the line of cut to the guidelineis
the amount you shouldoffsetthe guideline.
RiP
GUIDESCREW
(WINGSCREW)
WIDTH OF CUT SCALE
See Figure 19.
I_IPGUIDE
(EDGEGUIDE)
BASE
ASSEMBLY
PLACERiP
GUIDETHRUHOLES
•
Fig. 20
Place rip guide through holes in saw base as shown in
figure 20.
• Adjust ripguide to the width needed.
• "nghtenrip guide screw (wing screw) securely,
CUTSCALE
When usinga rip guide, position the face of the dp guide
firmlyagainst the edge of workpiece, This makes for a
true cut withoutpinchingthe blade. The guidingedge of
workplece must be straightfor your cut to he straight. Use
caution to preventthe blade from bindingin the cut.
BLADE
Fig. 19
17
ALTERNATIVE
RIP METHOD
Alignyour line of cut with the inner blade guide notchon
the sew base when making45 ° bevel cuts.
See Figure 21.
Since blade thicknesses vanj and different angles
require different sottings, always make atdal cut in
scrap materiel along a guideline to determine how
much you should offset the guideline on the board to
be cut,
Using C-clamps, firmlyclamp a straightedge to the
workbaica and guide the sew along the straightedge to
achieve a straight dp cut. Do not bindthe blade in the cut.
ALTERNATIVE
METHODFORRIPCUTrlNG
WORI_ECE
When makinga bevel cut hold your sew firmly with both
handsas shown in figure 23,
STRAIGHT
EDGE
NOTE:C-CLAMP
BOTHENDSOFSTRAIGHT
EDGEBEFOREMAIONGCUT
Fig. 21
LOWER
BLADEGUARDFig. 23
Rest the front edge of the base on the workpieca, Depress
the lock-off button and squeeze the switchtrigger to start
your saw, Always let the blade reach full speed, then
guide your saw into the workpieco.
TO BEVEL CUT
The angle of cut of your sew may be adjusted to any
desired settingbetween zero and 50 °. Note: When
making cuts at 50 °, blade shouldbe set at full depth of
cut.
A
When making 45° bevel cuts, there is a notch in the sew
base to help you line up the blade with the line of cut. See
F/gum 22.
BEVEL
ADJUSTMENT
KNOB
WARNING: The blade coming in contact with the
workplace before it reaches full speed could cause
saw to "kickback" toward you resultingin serious
injury.
After you complete your cut release the triggerand allow
the blade to come to a complete stop, After the blade has
stopped, lift your sew from the workpiece.
TO ADJUST
•
BeVel
SCALE
BEVEL SETTING
Remove battery
pack from saw,
WARNING: Failure to remove battery pack from
saw could resultin accidental starting causing
possible serious personal injury.
W
•
BLADE
GUIDE NOTCH
Loosen bevel adjustment knob, See Figure 22.
• Raise motorhousingend ofsew untilyou reachdesired
angle settingon bevel scale.See FIgure22.
• Tighten bevel adjustment knobsecurely.
WARNING: Attemptingbevel cut withoutknob
securelytightened can resultin serious injury.
AUGNINNERBLADEGUIDENOTCHON SAWBASEWITH
UNE OFCUTAS SHOWNWHENMAIQNG45° BEVELCUTS
Fig. 22
18
POSITIVEO° BEVELSTOP
• Turn screw and adjust base until squarewith sew
blade.
See Figure 24.
• "13ghtan
hex nut and bevel adjustmentknobsecurely.
BEVEL
ADJUSTMENT
KNOB
_h
WARN ING: Attemptingto make cutswithout bevel
adjustment knob securelytightenedcan result in
serious injury.
TO POCKET CUT
See Figure 25.
A
HE)(NUT
BLADE
PosrI'IVE0°
BEVELSTOP
WARNING: ,aJways
adjustbevel settingto zero
before maldnga pocketcut. Attemptinga pocketcut at
any other settingcan resultin lossof controlofyour
caw possiblycausingseriousinjury.
Adjust the bevel settingto zero, cat bladeto correct blade
depth setting, and swingthe lower blade guard up using
the lower blade guard handle.
Always lisa the lower blade guard with the handle to
avoid serious injurj,
CARPENTER'S
80UARE
While holding lower blade guard by the handle, firmly rest
the front of the base flat againstthe workplace with the
rear of the handle raised so the blade does not touchthe
workpieca. See Figure 25.
LOWERBLADE
GUARDHANDLE
Fig. 24
Your caw has a positive0° bevel stop, that has been
factory adjusted to assure O° angle of your saw blade
when making 90° cuts, However, micalignmantcan occur
dudng shipping.
TO CHECK
•
_.
•
•
Remove battery back from caw.
WARNING: Failure to ramove battery back from
caw could result in accidental starting causing
possible serious personal injury,
Place your caw in an upside down positionon
workbench, See Figure 24.
POCKETCUT
Using a carpenter's square, check squareness of caw
blade to the base of your sew.
Depress the lock-offbuttonand squeeze the switchtdgger
to start your caw. Always let the blade reach full speed
then slowly lower blade into the wod_piace until base
is flat against workpieoe.
TO ADJUST
•
Remove battery pack from caw,
Alter you complete your cutraiease the tdggerand allowthe
bladeto come to a completestop,After the bladehas
stopped, remove it from the workpieoe,Comers may then be
clearedoutwith a hand saw or sabre saw.
,_k WARNING: Failure to remove battery pack from
caw could result In accidental starting causing
possible sadous personal injury.
•
•
LOWERBLADEGUARD
FIg. 25
Loosen bevel adjustment knob.
Loosen hax nut secudng adjustment screw.
WARNIN G: Never tie the lower blade guard in a
raised position, Leaving the blade exposedcould
lead to sedous injury.
19
A
WARNING:Whenservicing,
useonlyidentical
Craftsman
replacement
parts,Useofanyotherpart
maycreatea hazardorcauseproduct
damage,
Avoidusingsolvents
whencleaning
plasticparts.Most
plastics
aresusceptible
todamage
fromvadoustypesof
commercial
solvents
andmay be damaged by their use.
Do not abuse power tools. Abusive practicescan damage
toolas well as workpiece.
Use clean clothsto remove dirt, dust, oil, grease, etc.
_
_
Only the parts shownon parts list,page 23, are intended
to be repairedor replaced by the customer, All other parts
shouldbe replaced at a Sears Service Center.
WARNING: Do not at any time let brake fluids,
gasoline, patrcleum.-pased products,penetratingoils,
etc. come in contact with plastic parts. They contain
chemicalsthat can damage, weaken or destroy
plastic.
BATTERIES
To preservenatural resources,please
recycle or disposeof batteriesproperly.
Your saw's bakery pack is equipped with nickel-cadmium
recbargeable batteries. Length of service from each
charging will depend on the type of work you are doing.
This productcontains nickel-cadmium
batten/. Local, state, or federal laws may
prohibitdisposalof nickel-cadmium
batteries in ordinarytrash.
Consult your local waste authorityfor information
regardingavailable recyclingand/or disposaloptions.
The battedes in this tool have been designed to provide
maximum trouble free life. However, like all batteries, they
will eventually wear out. Do not disassemble battery pack
and attempt to replace the batteries. Handlingof these
battedes, especially when weadng dngs and jewelry,
could result in a serious bum.
BATFERY PACK REMOVAL AND PREPARATION
FOR RECYCLING
To obtain the longest possiblebattery life, we suggestthe
following:
•
WARNING: Do not attempt to modifythis tool or
craata accessoriesnot recommendedfor use with
this tool.Any such alterationor modificationis
misuse and could result in a hazardous condition
leadingto possiblesedous personalinjury,
_i
Store and charge your batteries in a cool area.
Temperatures above or below normal room
temperature will shorten battery life.
•
Never store battedes in a dischargedcondition.
Recharge them immediatelyafter they are discharged.
• All batteriesgradually lose their charge. The higherthe
temperature the quickerthey lose their charge. If you
store your toolfor long padods of time without using it,
recharge the battedes every month or two. This
practicewill prolongbattery life.
20
WARNING: Upon removal, cover the battery pack's
terminals with heavy duty adhesive tape. Do not
attempt to destroyor disassemble battery pack or
remove any of its components. Nickel-cadmium
battades mustbe recycledor disposedof properly.
Also, never touch bothterminalswith metal objects
and/or body parts as shortcircuitmay result. Keep
away from children.Failure to comply with these
warningscould resultin fire and/or sedous injury.
21
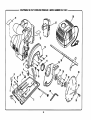
CRAFTSMAN
18 VOLT CORDLESS
TRIM SAW-
MODEL
NUMBER
315.114231
26
12
14
28
19
104_
6
T -j9
,
_
16
20
23
21 22
I
24
5
2
25
i
22
CRAFTSMAN
18 VOLT CORDLESS
TRIM SAW-
MODEL
NUMBER
315.11423t
1
The model numberwill be found on a plato attachedto the motorhousing,Always mention the model number in all correspondenceregardingyour
CORDLESS TRIM SAW or when orderingrepair parts.
SEE BACK
PAGE
FOR PARTS
ORDERING
I
INSTRUCTIONS
PARTS LIST
Key
NO.
Part
Number
1
975546-000
Cardage Bolt(MS x 102 ram) ..................... 1
16
6619302
Bumper Screw............................................ 1
2
3025516
Base Assembly.......................................... 1
17
6867201
3
975544-00O
LockNut ..................................................... 2
18
5599401
Torsio_ Spdng............................................ 1
Lower Blade Guard .................................... 1
4
5224502
Knob ........................................................... 2
19
6807001
Ball Bearing (NTN #6000ZZ) ..................... 1
5
975552-000
Spdng ......................................................... 1
20
6850303
Bearing Retainer ........................................ 1
6
975551-000
Wing Screw ................................................ 1
21
6620104
BearingRetainer Screw ............................. 4
7
975549-,000
Base Screw................................................ 1
22
6112004
Inner BladeWasher ................................... 1
8
975559000
Hex Nut ...................................................... 1
23
* 982296-001
Saw Blade .................................................. 1
Dsecrlptlon
Key
No.
Quan.
Part
Number
nelmrlptlon
Quse.
9
9755,58-000
Screw ......................................................... 1
24
975533-00O
Outer Blade Washer .................................. 1
10
975550-000
Carriage Bort(M6 x 13 ram) ....................... 1
25
975532-000
Blade Screw ............................................... 1
11
983726-001
Data Plate .................................................. 1
26
** Item No. _ 11041
Charger (1425301) ..................................... 1
12
975557-000
Warning Label............................................ 1
27
"_'Item No. 9 11045
Battery Pack (1323905) ............................. 1
13
64556O8
Upper BladeGuard .................................... 1
28
975554-000
Rip Guido ................................................... 1
14
6620803
Upper BladeGuard Screw ......................... 4
29
975553-000
Blade Wrench (5 mm Hex Key) ................. 1
15
5217802
Bumper ....................................................... 1
30
3073011
Carrying Case - NOtShown ...................... 1
983000-281
Operator's Manual
* Available At Your Nearest Sears Catalog Order Or Retail Store
** Can Be Purchased Thru RSO6 (Retail Special Order System)
23
Your Home
For repair-in your home-of all major brand appliances,
lawn and garden equipment, or heating and cooling systems,
no matter who made it, no matter who sold itl
For the replacement parts, accessories and
owner's manuals that you need to do-it-yourself.
For Sears professional installation of home appliances
and items like garage door openers and water heaters.
1-800.4-MY-HOME
®
(1_oo..4_9-4_s3)
Call any0me, day or night (U.S.A.
www,sears,com
and Canada)
www, sears,ca
Our Home
For repair of carry-in items like vacuums, lawn equipment,
and electronics, call or go on-line for the location of your nearest
Sears Parts & Repair Center.
1-800-488-1222
Call anytime, day or night (U.S.A. only)
www, sears,com
To purchase a protecUonagreement (U.S.A.)
or maintenance agreement (Canada) on a product serviced by Sears:
1-800-827-6655
(U.S.A.)
Para pedir sarvicio de reparacibn
a domicilio, y para ordenar piazas:
1-888-SU-HOGAR
sM
1-800-361-6665
(Canada)
Au Canada pour service en fran_;ais:
(1-888-784-6427)
1-800-LE-FOYER _c
(1-800-533-6937)
www.sears.ca
8E U 8
® RegisteredTradem_'k I TMTrademark/ au SendeeMKk ofSears. RoebuckandCo.
® Marea Reglotrade/ "rMMarca de F_bdcaI aMMaro=de Sen.'ldo de Sears, RodauGkandCo.
MCMarque de cornrneme/ M®Marque d6pos6ede Sear_ RoebuckandCo.
® Sea's, Roebuckand Co.