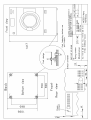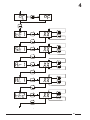
1
Manual / Handbuch Spare parts list / Ersatzteilliste Equipment Imp.-Exp. GmbH • Zitterpappelweg 9 D - 22391 Hamburg • Tel.: + 49 40 60009468-0 • Fax: + 49 40 536 75 01 E - M a i l : i n f o @ w e s c o - n a v y. c o m • w w w . w e s c o - n a v y. c o m • 1 Safety Instructions Non-observance of the safety instructions may lead to fire risk, electrical shock, and physical injury as well as to damage of the linen and the dryer. Before connecting the appliance, first read the installation and operation instructions. Installation shall be carried out according to the installation directives. All connections, electrical connections, gas supply, steam, earthing, etc. shall meet the local regulations and shall be effected by skilled and authorized personnel. (See chapter 3) To avoid the risk of electrocution, the earthing instructions shall be complied with. The appliance shall not be exposed to high humidity, or extreme high or low temperatures. The drier cannot be used in a closed room, where air supply is insufficient. If necessary, ventilation grids will be installed in the doors or windows. At the end of each working day, close off all mains supplies of gas, steam and current. Wait to carry out repairs or maintenance works to the machine until the drier has cooled down sufficiently and close off all supply conducts. (Current, gas and steam) - During and after use of the machine, the back panel can heat up, be careful for burns. - When repairing the machine, only use original spare parts. To avoid fire and explosion: - Keep the surrounding areas free of flammable and combustible products. - Regularly clean the drier, the ventilator and the surrounding areas of piled up dust. - The inner side of the drier drum and the exhaust tube shall be cleaned periodically by competent maintenance personnel. - Daily remove piled up dust from the filter and the inside of the filter compartment.- Do not use the drier to dry materials with a low melting temperature (PVC, foam rubber or rubbery materials). When you perceive a gas odour: - Immediately switch off the gas supply and ventilate the room. - Do not switch on electrical appliances and do not pull electrical switches. - Do not use matches or lighters. - Do not use a phone in the building. - Warn the fitter, and if so desired, the gas company, as soon as possible. Always allow for the washing instructions mentioned on the linen. Never allow children to play near a machine. 2 Only use the drier drum to dry textile that was washed in water. Only insert spin-dried linen in the drier. Do not use the appliance to dry materials with a low melting temperature (PVC, rubber,....). Do not dry products that still contain solvents, oils or other inflammable products. Do not dry curtains or other fibreglass textiles, except when the label indicates that this is allowed. The drier drum will not work when the front door or the dust filter door is open. - Never have the drier drum work when the door is open without considering the safety switches. Do not use the drier drum: - when it does not stop turning when the door is opened. - when parts are missing or broken. Remark: As a matter of course, these guidelines cannot avoid all risks of accidents. The operator should use the machine with the utmost care. Do not hesitate to contact the dealer when problems arise. Non-observance of the installation, maintenance and/or operation instructions prescribed by the manufacturer can cause physical injury and/or damage to property. REBUILDING THE DRIER FOR ANOTHER TYPE OF GAS - Rebuilding may only be carried out by competent and recognized personnel. - Installation shall be carried out according to the standards in force in the country where the machine is used. - Check the gas pressure of the installation. - Inform yourself on the type of gas. - Order the correct rebuilder set. - Insert the correct gas injection part in the machine. - Modify all data on the machine identification plate. • Gas type • Country of destination • Type of gas - When parts are removed, a leakage test shall be carried out to be sure that none of the fittings leak. APPLICABLE IN BELGIUM - For rebuilding the drier for another type of gas, always contact the manufacturer. - Can only be effected under the responsibility of the manufacturer. 3 3 Installation and connections General Carefully remove the packing from the dryer. Placing the dryer It is best to move the dryer by means of a palett truck. The dryer must be leveled. It is advisable to leave a space of minimum 60 cm open behind the dryer for serviceand maintenance-purposes. The walls, through which the exhaustpipe leads outside, should be made of incombustible material. The dryer should get sufficient air supply (750-DTI10 & DTI12, 1050-DTI14 m3/h). If necessary, ventilation grates should be placed in the doors and windows. Unsufficient supply of fresh air can cause overheat problems. Moreover, gas heated dryers can have ignition problems and this may result in an increasing energy consumption. Exhaust The exhaust can be ordered at the back or on top of the dryer. The exhaust pipes B22 needs to be made of heat-resistant material (150°C) and should have a minimum diameter of 150 mm. In order to ensure a good conduction of the vapours, this pipe should be kept as short as possible with a minimum of bends. If the exhaust pipe comes into a main pipe, then the angle may be maximum 45°. After the coupling of both pipes, the diameter of the main duct should be adapted. The diameter of this duct should at least be the sum of the 2 coupled ducts. The radius of the bends should preferably mesure 1,5 times the diameter of the exhaust pipe. In order to protect the tail end of the exhaust pipe against severe weather conditions, it may be bent down. Leave at least a free exhaust opening, which is twice as big as the diameter of the exhaust pipe. Avoid to use a cap on the tail end of the exhaust pipe. It is best to leave it free. If the exhaust duct doesn’t comply with the above mentionned requirements, then a series fan should be installed further down the pipe. Ignoring these installation instructions can lead to a counterpressure in the exhaust duct. This will make the heating function imperfectly and will consequently result in a poor drying quality and an increasing energy consumption. 4 3 Electric connection It is very important to have the electric connection done by a qualified technician, in order to make sure the installation is effected in accordance with the prevailing standards and instructions. Make sure that the voltage, which is to be connected, corresponds to the voltage mentioned on the serial number plate (A) at the back of the dryer. A The connection needs to be made in the wiring box at the back of the dryer. Remove the cover plate (C) in order to reach the connection clamps. D C The connection cable needs to be brought in through the swivel (D). The connection cable needs to be brought in through the swivel (H) on the side of It is necessary to ground the dryer for your personal safety and to ensure a good operation. 220/240V 3AC The 3 mains wires (L1), (L2) and (L3) should be connected to the 3 left clamps and the yellow/green grounding wire (PE) should be connected to the grounding clamp. It is necessary to provide in the connection circuit fuses, which are easy to reach. Value of the fuses : DTI10 - 220/240V: 40A DTI12 - 220/240V: 40A DTI14 - 220/240V: 63A 380/415V 3AC+N The 3 mains wires (L1), (L2) and (L3) should be connected to the 3 left clamps, the blue neutral (N) should be connected to the right clamp and the yellow/green grounding wire (PE) should be connected to the grounding clamp. It is necessary to provide in the connection circuit fuses, which are easy to reach. Value of the fuses : DTI10 - 380/415V: 25A DTI12 - 380/415V: 25A DTI14 - 380/415V: 40A 5 3 VERY IMPORTANT L1 L2 L3 N Fig: 1 Fig: 2 Fig: 3 When connecting the machine, the direction of rotation of the ventilator should be checked: Remove the lower front panel and the lint filter see fig. 1 Check the direction of rotation of the ventilator see fig. 2 (direction of the arrow) In case of a wrong direction of rotation: switch L1 and L2 (see fig. 3) THE MANUFACTURER IS NOT RESPONSIBLE FOR DAMAGES CAUSED BY NON-EXECUTION OF THESE INSTRUCTIONS 6 3 Connection of the central operating panel for coin operated dryers (option) A At right in the wiring box, you find a plate (209/00438/00) with the clamps (A), to where the central operating panel has to be connected. There are three possible versions as the departure voltage of the operating panel. 230V AC 24V AC _ 24V DC + Connection of the serial communication (option) If the dryer is connected to a payment system with serial communication, this connection should be fixed on this printboard (209/00540/00) by means of an RJ11. Connect the cable to the free connector on the printboard. Gas connection The gas supply pipe shall be connected to a gas tap (I) HTR-approved or according to the standards in force in the country where the machine is used. The connections shall be made by a competent and recognized skilled worker to be sure that the installation meets the standards and guidelines in force in the country where the drier is installed. The drier shall be connected to the type of gas and the gas pressure indicated on the machine identification plate. The use of too small gas lines can lead to insufficient gas supply, resulting in a bad heating up and bad drying results. I Test all couplings and connections for leakages (according to the installation standards in force in the country where the machine is installed) and never use a flame. It is important to always work with the correct gas pressure (see: Technical Information) to obtain a good ignition, heating-up and consequently a good functioning in general. After having connected the gas supply, the gas supply tap (I) in the drier shall be opened (by turning it clockwise). 7 4 Setting mode In this setting mode, there should be adjusted if the dryer has to be executed with a coinmeter or not, and 3 programs can be preprogrammed. DIP-switches There are 2 DIP-switches at the back of the printboard. A In order to reach the switches : - First remove the two screws (A) at the back of the dryer and then the top panel. B - The printboard is situated at the back of the control panel (B). - You can find the dip-switches at the back of the printboard. By means of the left switch, the manufacturer can adjust if the dryer needs to be executed with a coin operated dryer or not. If it concerns a coin operated dryer, the switch is put downwards (COIN). In case of an OPL dryer, the switch is put upwards (OPL). The right switch is put upwards (RUN). By putting this switch downwards (PRG), you can enter into the setting menu. Setting menu + The following buttons have a specific function in the setting menu: - Left button : decreases a value. - Middle button : confirms a value and/or continues. - Right button : increases a value. The setting menu is different for a dryer with or without coinmeter. 8 4 9 4 Opl-dryer °C or °F Select degrees °C or degrees °F by means of the "+ button" (right button). Confirm the selection by means of the middle button. TE I (Temperature program 1) Press the middle button to continue. XX If necessary, change this value (default 40°C/104°F) by means of the + or - button between 25°C/77°F and 90°C/194°F. - By pressing and releasing these buttons, the adjustment is increased or decreased with 1 unit. By keeping these buttons pressed, the value is continuously changed. - These standards prevail for all adjustments, which need to be changed. Value "0" can be adjusted here as well but is only valid in case of dryers, where the temperature adjustment is being made by means of a knob. Confirm the adjustment by means of the middle button. Ti I (Dry cycle program 1) Press the middle button to continue. XX If necessary, change this value (default 30) by means of the + or - button between 1 and 120 minutes. Confirm the adjustment by means of the middle button. For dryers without reversing, the program goes immediately to "TE2". St 1 (Stop time between left - right movement of the drum) Press the middle button to continue. XX Change if necessary this value (default 5 seconds) by means of + or - button between 0 and 10 seconds. Confirm the adjustment by means of the middle button. When "O" is filled in, the program goes immediately to "TE2". Because of this, the program will be executed without reversing. Ar 1 ( Action time of the drum right movement) Press the middle button to continue. XX Change if necessary this value (default 30 seconds) by means of the + or - button between 5 and 120 seconds. Confirm the adjustment by means of the middle button. AL 1 ( Action time of the drum left movement) Press the middle button to continue. XX Change if necessary this value (default 20 seconds) by means of the + or - button between 5 and 120 seconds. Confirm the adjustment by means of the middle button. 10 4 11 4 TE 2 (temperature program 2) Press the middle button to continue. XX If necessary, change this value (default 55°C/131°F) by means of the + or - button between 25°C/77°F and 90°C/194°F. Press the middle button to continue. Ti 2 (dry cycle program 2) Press the middle button to continue. XX If necessary, change this value (default 30) by means of the + or button between 1 and 120 minutes. Confirm the adjustment by means of the middle button. For dryers without reversing, the program goes immediately to "TE3". St 2 (Stop time between lift - right movement of the drum) Press the middle button to continue. XX Change if necessary this value (default 5 seconds) by means of the + or - button between 0 and 10 seconds. Confirm the adjustment by means of the middle button. When "0" is filled in, the program goes immediately to "TE3". Because of this, the program will be executed without reversing. Ar 2 ( Action time of the drum right movement) Press the middle button to continue. XX Change if necessary this value (default 30 seconds) by means of the + or - button between 5 and 120 seconds. Confirm the adjustment by means of the middle button. AL 2 ( Action time of the drum left movement) Press the middle button to continue. XX Change if necessary this value (default 20 seconds) by means of the + or - button between 5 and 120 seconds. Confirm the adjustment by means of the middle button. TE 3 (temperature program 3) Press the middle button to continue. XX If necessary, change this value (default 70°C/158°F) by means of the + or - button between 25°C/77°F and 90°C/194°F. Confirm the adjustment by means of the middle button. Ti 3 (dry cycle program 3) Press the middle button to continue. XX If necessary, change this value (default 30 minutes) by means of the + or - button between 1 and 120 minutes. Confirm the adjustment by means of the middle button. 12 4 13 4 For dryers without reversing, the program goes immediately to "Cd". St 3 (Stop time between lift - right movement of the drum) Press the middle button to continue. XX Change if necessary this value (default 5 seconds) by means of the + or - button between 0 and 10 seconds. Confirm the adjustment by means of the middle button. When "0" is filled in, the program goes immediately to "Cd". Because of this, the program will be executed withour reversing. Ar 3 (Action time of the drum right movement) Press the middle button to continue. XX Change if necessary this value (default 30 seconds) by means of the + or - button between 5 and 120 seconds. Confirm the adjustment by means of the middle button. AL 3 (Action time of the drum left movement) Press the middle button to continue. XX Change if necessary this value (default 20 seconds) by means of the + or - button between 5 and 120 seconds. Confirm the adjustment by means of the middle button. Cd (Cool down) This is the cool down cycle, which needs to be executed after the dry cycle. Press the middle button to continue. XX If necessary, change this value (default 5 minutes) by means of the + or button between 1 and 30 minutes. Confirm the adjustment by means of the middle button. FLS (Flash: alternate description of the remaining dry time and the dry temperature). Press the middle button to continue. YES or no Select by means of the + button. no: The remaining dry time will appear during operation. YES: Besides the remaining dry time, also the dry temperature is appearing alternately during operation. Confirm the adjustment by means of the middle button. rtP (Flash : Angabe der programmierten oder reellen Trockentemperatur). Press the middle button to continue. YES or no Select by means of the + button. no: only the programmed drying temperature will be displayed during the cycle YES: only the real drying temperature will be displayed during the cycle Confirm the adjustment by means of the middle button. 14 15 StM (Steam: steam heating) Push the middle button to continue. YES or no Select with the + button. YES: if the machine is warmed up with steam. In the other case, select no. Confirm the programmation with the middle button. TMP (temperature sensor test) Press the middle button to continue. XX° The drum temperature is appearing now as sensor test. Meanwhile the 3 lets are lichting alternately Press the middle button to continue. Hereafter, you automatically return to the beginning. The right DIP-switch needs to be put into the position "RUN" again. inHere the inlets are being checked. When the door is closed, LED 3 lights up. The dryer is equipped with a sensor measuring the rpm of the drum, the dash next to" in" will blink if the drum is turned by hand. Press the middle button to continue. 9 dashes appear temporarily on the display. This is the end of the setting menu. Then you automatically return to the beginning. The right dip switch now needs to be put in the position RUN again. 16 17 4 Coin-operated dryer Adr (address) If the dryer is connected to a payment system which puts the machines in a computer network, then the address of the dryer needs to be filled in. In the all other cases this parameter does not need to be changed. C1L (Coin 1 Low) Press the middle button to continue. XX This is the drying time which will be added each time a coin is inserted in coin 1. Change this value if necessary (default 10 minutes) between 1 and 30 minutes by means of the + or – button. Confirm the setting by means of the middle button. Remark If the dryer is connected to a system on which it is possible to determine a different rate according to the period of time (e.g. Sigma explorer), 3 rates (happy hour) can be programmed. (Low, Medium, High). In this case the time value of the lowest rate is put in. Press the middle button. Then give in the values for C1M (coin meter 1, middle rate), C1H (coin meter 1, highest rate), C2L (coin meter 2, lowest rate), C2M (coin meter 2, middle rate), C2H (coin meter 2, highest rate). If the dryer is equipped with a double coin meter, but is not connected to a system that can determine different rates, then it is only necessary to put in the value for C2L (coin meter 2, lowest rate). Add (minimum drying time) Press the middle button to continue. 18 4 19 4 °C or °F Select degrees °C or degrees °F by means of the “+ button” (right button). Confirm the selection by means of the middle button. TE I (temperature program 1) Press the middle button to continue. XX If necessary, change this value (default 40°C/104°F) by means of the + or - button between 25°C/77°F and 90°C/194°F. -Each time these buttons are pressed and released, the adjustment is being increased or decreased with 1 unit. By keeping these buttons pressed, the value is continuously changed. -These standards prevail for all adjustments, which need to be changed. Value "0" can be adjusted here as well but it is only valid in case of dryers, where the temperature adjustment is being made by means of a knob. Confirm the adjustment by means of the middle button. For dryers without reversing, the program goes immediately to "TE2". St 1 (Stop time between left - right movement of the drum) Press the middle button to continue. XX Change if necessary this value (default 5 seconds) by means of + or - button between 0 and 10 seconds. Confirm the adjustment by means of the middle button. When "O" is filled in, the program goes immediately to "TE2". Because of this, the program will be executed without reversing. Ar 1 (Action time of the drum right movement) Press the middle button to continue. XX Change if necessary this value (default 30 seconds) by means of the + or - button between 5 and 120 seconds. Confirm the adjustment by means of the middle button. AL1 (Action time of the drum left movement) Press the middle button to continue. XX Change if necessary this value (default 20 seconds) by means of the + or - button between 5 and 120 seconds. Confirm the adjustment by means of the middle button. TE 2 (Temperature program 2) Press the middle button to continue. XX If necessary, change this value (default 55°C/131°F) by means of the + or - button between 25°C/77°F and 90°C/194°F. Confirm the adjustment by means of the middle button. For dryers without reversing, the program goes immediately to "TE3". 20 4 21 4 St 2 (Stop time between left - right movement of the drum) Press the middle button to continue. XX Change if necessary this value (default 5 seconds) by means of the + or - button between 0 and 99 seconds. Confirm the adjustment by means of the middle button. When "0" is filled in, the program goes immediately to "TE3". Because of this, the program will be executed without reversing. Ar 2 ( Action time of the drum right movement) Press the middle button to continue. XX Change if necessary this value (default 30 seconds) by means of the + or - button between 5 and 120 seconds. Confirm the adjustment by means of the middle button. AL 2 ( Action time of the drum left movement) Press the middle button to continue. XX Change if necessary this value (default 20 seconds) by means of the + or - button between 5 and 120 seconds. Confirm the adjustment by means of the middle button. TE 3 (Temperature program 3) Press the middle button to continue. XX If necessary, change this value (default 70°C/158°F) by means of the + or - button between 25°F/77°F and 90°C/194°F. Confirm the adjustment by means of the middle button. For dryers without reversing, the program goes immediately to "Cd ". St 3 (Stop time between left - right movement of the drum) Press the middle button to continue. XX Change if necessary this value (default 5 seconds) by means of the + or - button between 0 and 10 seconds. Confirm the adjustment by means of the middle button. When "0" is filled in, the program goes immediately to "Cd ". Because of this, the program will be executed withour reversing. Ar 3 (Action time of the drum) Press the middle button to continue. XX Change if necessary this value (default 30 seconds) by means of the + or - button between 5 and 120 seconds. Confirm the adjustment by means of the middle button. AL 3 (Action time of the drum) Press the middle button to continue. XX Change if necessary this value (default 20 seconds) by means of the + or - button between 5 and 120 seconds. Confirm the adjustment by means of the middle button. 22 4 23 4 Cd (Cool down) This is the cool down time, which needs to be executed after the drying time. Press the middle button to continue. XX If necessary, change this value (default 5 minutes) by means of the + or - button between 1 and 30 minutes. Confirm the adjustment by means of the middle button. FLS (Flash: alternate description of the remaining drying time and the dry temperature). Press the middle button to continue. YES or no Select by means of the + button. no: The remaining drying time will appear during operation. YES:Besides the remaining drying time, also the dry temperature is appearing alternately during operation. Confirm the adjustment by means of the middle button. rtP (Flash : indication of the programmed or real drying temperature) Press the middle button to continue. YES or no Select by means of the + button. no: only the programmed drying temperature will be displayed during the cycle YES:only the real drying temperature will be displayed during the cycle Confirm the adjustment by means of the middle button. rEM (REMOTE START : central coinsystem) Press the middle button to continue YES or no Select by means of the + button YES : if the dryer is connected to a central operating panel (see 3. Installation and connection). Otherwise select no. Confirm the adjustment by means of the middle button. StM (Steam: steam heating) Push the middle button to continue. YES or no Select with the + button. YES: if the machine is warmed up with steam. In the other case, select no. Confirm the programmation with the middle button. 24 25 TMP (temperature sensor test) Press the middle button to continue. XX° The drum temperature is appearing now as sensortest. Meanwhile the 3 lets are lichting alternately Press the middle button to continue. in – Here the inlets are being checked. When coin meter 1 is closed, LED 1 lights up. When coin meter 2 is closed, LED 2 lights up. When the door is closed, LED 3 lights up. The dryer is equipped with a sensor measuring the rpm of the drum, the dash next to “in” will blink if the drum is turned by hand. Press the middle button to continue. 9 dashes appear temporarily on the display. This is the end of the setting menu. Then you automatically return to the beginning. The right dip switch now needs to be put in the position RUN again. 26 27 5 Operating instructions Opl-dryer When the dryer is connected to the electric power, 9 horizontal dashes appear for about 5 seconds. Then “O” appears on the display. Fill the drum Open the door and fill the drum. When the door is opened, “Dr” is blinking on the display. Disentangle the linen as good as possible in order to avoid it from sticking together. Only then, an optimal drying result can be obtained. Overloading the drum can also lead to bad drying results. After having closed the door, “O” is displayed again. Don’t ever dry fabrics, which can’t resist the dry temperature. Linen, which has been treated with inflammable products, needs to be aired first before being put into the drum. Change the preprogrammed cool down time. The preprogrammed cool down time can be changed once-only before starting a program. Keep the left or the right button pressed. After 5 seconds, the preprogrammed cool down time will be displayed. This time can be increased or decreased by means of the left or the right button (between 1 and 30 minutes). If the cool down time isn’t changed for about 5 seconds, then you automatically return to the start-adjustment (“O” is displayed again) and the changed cool down time is filed. This cool down time will be used once-only in the first drying cycle. 28 5 Select and start the drying cycle. Press 1 of the 3 buttons shortly and release it in order to start 1 of the preprogrammed drying programs (see adjustment menu). Left button (blue) Middle button (orange) Right button (red) Temperature Drying time Cool down time (40°C - 104°F) 30' 5' (55°C - 131°F) 30' 5' (70°C - 158°F) 30' 5' The led, next to the button, lights up when the cycle is started. Program development Display information : A drying cycle consists of “drying time + cool down time” (30 + 5 = 35 minutes). When the cycle is started, the remaining drying time (here 30) is displayed. The cool down time isn’t taken into account. When “YES” is choosen in the setting menu under “FLS”, then the dry time and the temperature are displayed alternately. When the temperature is indicated with degrees C, then the symbol (°) is displayed. When the temperature is indicated for values, less than 100°F, then this symbol “°F” is displayed. When the heating is activated, then the decimal point lights up. Change the remaining drying time. The remaining drying time can be reduced or extended by means of the left or the right button. If the drying time is reduced to “O”, then the cool down time starts. Temporary interruption of the remaining drying time. By opening the door, the cycle can be interrupted temporary in order to reload or to check the drying level. All functions stop, “Dr” is blinking on the display and the led of the button is also blinking. However, the drying time keeps on counting down. As soon as the door is closed, the cycle needs to be started again. Early termination of the drying cycle. By pressing the middle button and releasing it again, the drying cycle is terminated. “End” is displayed until the door is opened. 29 End of the drying time : change to cool down time When the drying time has come to an end (here 30 minutes), the cool down time is automatically started (here 5 minute). This cool down time is completely separated from the drying time. The remaining cool down time is displayed alternately with “Cd”. Remark : The cool down temperature isn’t displayed. When the cool down period is started, the remaining time can’t be changed anymore. Safety cooldown. If the cooldown time (here 5 minutes) has lapsed, and the temperature in the drum is higher than 40 °C, then the cooldown time will be automatically extended. (The cycle ends when the door is opened) End of the drying cycle. When the cool down time has come to an end (+ eventual safety cooldown), then the cycle is automatically terminated. (here after 30 + 5 = 35 minutes) “End” is displayed until the door is opened. During the drying time: - Do not use the emergency button to disconnect the dryer. - Take the linen out of the drum in case of interruption of the drying cycle, power failure or opening of the door 30 31 5 Coin- operated dryer When the dryer is connected to the electric power, 9 horizontal dashes appear for about 5 seconds. Then “PAY” appears on the display. Fill the drum Open the door and fill the drum. When the door is opened, “Dr” is blinking. Disentangle the linen as good as possible in order to avoid it from sticking together. Only then, an optimal drying result can be obtained. Overloading the drum can also lead to bad drying results. After having closed the door, “PAY” is displayed again. Don’t ever dry fabrics, which can’t resist the dry temperature. Linen, which has been treated with inflammable products, needs to be aired first before being put into the drum. Coin-insertion For each coin-insertion in the coinmeter, the time value (see setting menu Co 1 and Co 2) is added on the display. As long as the value of parameter “Add” (see setting menu) isn’t obtained, “Add” is displayed and needs to be extra. When sufficient coins have been inserted, the cycle time and “STA” are displayed alternately. The 3 leds, next to the push buttons, are blinking. Select and start the drying cycle Push 1 of the 3 buttons shortly and release it in order to start 1 of the preprogrammed drying programs (see setting menu). Left button (blue) Middle button (orange) Right button (red) Temperature Drying time Cool down time (40°C - 104°F) 30' 5' (55°C - 131°F) 30' 5' (70°C - 158°F) 30' 5' The led, next to the selected push button, keeps on blinking for about 10 seconds. During this time, the program can still be changed. Afterwards, the led keeps on lighting up constantly. 32 5 Program development Display information: When the cycle is started, the remaining drying time (here 30) is displayed. For a coin-operated dryer, the cool down time is included in the drying time. A drying cycle of 30 minutes consists of a drying time of 25 minutes + 5 minutes of cool down time. When “YES” is choosen in the setting menu under “FLS”, then the dry time and the temperature are displayed alternately. When the temperature is indicated with degrees "°C", then the symbol (°) is displayed. When the temperature is indicated for values, less than 100°F, then this symbol “°F” is displayed. When the heating is activated, the decimal point lights up. Temporary interruption or change of the drying cycle. By opening the door, the cycle can be interrupted temporary in order to reload, to check the drying level or to change the cycle. All functions stop, “Dr” is blinking on the display and all leds, next to the push buttons, are blinking as well. However, the drying time keeps on counting down. As soon as the door is closed, “STA” and the remaining cycle time are displayed alternately. Now the cycle, or, if necessary another cycle, needs to be started again. End of the drying time : change to cool down time. When the drying time has come to an end (here 25 minutes), the cool down time is automatically started (here 5 minutes). The user will not be informed of the start of the cool down period. Remark : When a coin is inserted in the coin meter during the cycle (also during the cool down period or when the door is opened), then this time will be added to the remaining cycle time. End of the drying cycle. When the cool down time has come to an end, then the cycle is automatically ended (here 25 + 5 = 30 minutes). “End” is displayed until the door is opened. During the drying time: - Do not use the emergency button to disconnect the dryer. - Take the linen out of the drum in case of interruption of the drying cycle, power failure or opening of the door 33 6 Technical remarks Gas Flow Interruption On a gas-heated drier, the electronic ignition will only try to ignite five times in a time span of 5 seconds. If this does not work, and the flame detector does not detect a flame (e.g. in the event of a gas flow interruption), the ignition relay is triggered. When the drying cycle is restarted, the reset button shall be pressed for three seconds in order to generate a new ignition. Electronic temperature protection When a temperature of 5°C or less, or of 120°C or more has been detected, the electronic temperature protection will be activated. During operation : Temperature higher than 120°C : Every action is interrupted. “tMp” is blinking on the display. Temperature lower than 5°C : The heating is interrupted but the cycle will be completed. “tMP” is blinking on the display at the end of the cycle. During non-operation : “tMP” is blinking on the display and the cycle can’t be started anymore. Because of these protections, the dryer can’t be used at a temperature of less than 5°C. Underpressure switch The underpressure switch is a protection which interrupts the heating, in case there is insufficient air supply. This can be the result of an inadequate exhaust (see installation), of a dirty filter (see maintenance). In case of a malfunction, " VEn " appears blinking on the display and the cycle continues without activating the heating. Rotation sensor In case the drum no longer rotates due to failure (for instance breakdown of a Vbelt), " rot " will appear blinking on the display if the machine is equipped with a rotation sensor (option) and the cycle continues without activating the heating. The rotation sensor is fixed at the back of the dryer near the drum axle. A If the machine is equipped with a rotation sensor, the bridge (A) on the printboard needs to be cut through. If not, the same error message will be shown on display. 34 7 Maintenance Cleaning It is advisable to remove all dust particles in and around the dryer at fixed times. It is best to determine these fixed times by experience, as they differ from place to place. The output of the dryer depends on a good air circulation. This airflow can be influenced by accumulation of dust particles. The dust particles of most fabrics are highly combustible. Accumulation of these dust particles means a potential fire risk. Daily Open the dust filter door and remove all the piled-up dust at the underside of the filter and inside the filter chamber. Monthly Remove all the dust out of the heating compartment and the burner. Dust, which enters into the burner, can combust. Gas- or steam heated dryers need to cleaned 2 times a month. Remove all the dust of the temperature sensor and the security thermostat. Every 3 months Remove all the dust and dirt of the motors, belts, etc. Checking (after the installation and every 3 months) Check if all safety devices still function such as overheat thermostat, sale switch, flame detection, door contacts etc. Check the belt tension. 35 7 Repair and aftersales service In case of important malfunctions and deficiencies, which you can’t resolve yourself, don’t hesitate to contact the technical service of your distributor. Data distributor: Name : .................................................................................. Adres: .................................................................................... Tel.:......................................................................................... Data dryer : Type:....................................................................................... Date of installation : . ............................................................. Installed by: ........................................................................... Serial number :....................................................................... Operation voltage and frequency : ........................................ Remarks : .............................................................................. The manufacturer reserves the right to change the contents of this instruction manual at all times and without previous notice. 36 Gelieve bij de bestelling onderdelen duidelijk het post en codenummer op te geven. Dank u When ordering, please give full description and state both position and code numbers. Thank you. Bei Bestellung von Ersazteilen bitte deutlich die Positions- und Kodenummer angeben. Danke. Pour vos commandes de piéces détachées, veuillez indiquer clairement les numéros de code et de position. Code: 249/00273/00 Date: 26/08/2008 Inhoudstafel Omhulsel voorkant elektrisch Omhulsel voorkant gas ............................................................ 1 ................................................................. 2 Brug elektrische onderdelen Thermostaat voelers ............................................................ ................................................................... Lagerhuis + kogellagers 3 4 ................................................................ 5 .............................................................. 6 Trommel + as + riemschijf Voorpaneel (boven) + kadran DX3RS ..................................................... 7 Voorpaneel (boven) + kadran (munt ) ..................................................... 8 .................................................... 9 ................................................................ 10 Voorpaneel (boven) + kadran PRO-HC Voorpaneel + PVC deur Stoffilter + voorpaneel onder ............................................................ 11 ........................................................... 12 ......................................................... 13 Huis gas brander ...................................................................... 14 Gas verwarming ...................................................................... 15 Motor (HANNING) + riemschijf Omhulsel achterkant + ventilator Elektrisch verwarmingssysteem Stoom verwarming .......................................................... .................................................................... 16 17 Contents Cabinet front electrically Cabinet front gas ................................................................ 1 ...................................................................... 2 Bridge electrical parts .................................................................. 3 Thermostat detectors .................................................................. 4 Bearing house + ball bearings Cylinder + axle + belt pulley ........................................................... 5 ............................................................. 6 Front panel (above) + facia panel DX3RS Front panel (above) + facia panel (coin) .................................................. 7 ................................................... 8 Front panel (above) + facia panel PRO-HC Frontpanel + PVC door ................................................ ................................................................. Dust filter + Front panel lower 9 10 ........................................................... 11 .......................................................... 12 Cabinet back + Fan .................................................................... 13 Housing gas burner ................................................................... 14 .......................................................................... 15 Motor (HANNING) + belt pulley Gas heating Electric heating system Steam heating ................................................................. 16 ........................................................................ 17 Index Carrosserie avant électrisé Carrosserie avant gaz .............................................................. ................................................................. Pont pièces détachées électriques Thermostat détecteurs 3 ................................................................. 4 ............................................................. 5 ................................................................ 6 Panneau avant (dessus) + kadran DX3RS ................................................. Panneau avant (dessus) + cadran (monnayeur) Panneau avant + PVC porte 8 ................................................ 9 ............................................................. 10 Filtre de poussière + Panneau avant inférieur Moteur (HANNING) + poulie 7 ............................................ Panneau avant (dessus) + kadran PRO-HC .............................................. ............................................................. Carrosserie arrière + Ventilateur 11 12 ......................................................... 13 ................................................................... 14 ...................................................................... 15 Boîtier brûleur à gaz Chauffage à gaz 2 ....................................................... Palier + roulements à billes Tambour + axe + poulie 1 Système de chauffage électrique Chauffage à vapeur ......................................................... ................................................................... 16 17 Inhalt Verkleidung hinten elektrisch ............................................................ 1 Verkleidung hinten gas ................................................................. 2 Brücke elektrische Teile ................................................................ 3 ..................................................................... 4 Thermostat Fühler Lagergehäuse + Kugellager ............................................................. Trommel + Achse + Keilriemenscheibe .................................................... Frontblende (oben) + Armaturenbrett DX3RS .............................................. Frontblende (oben) + Armaturenbrett (Münzprüfer) Frontblende (oben) + Armaturenbrett PRO-HC Frontblende + PVC Tür 9 10 11 12 ............................................................ 13 ..................................................................... 14 ......................................................................... 15 Haus Gasbrenner Elektrischer beheizungssystem Dampf Heizung ............................................. ................................................... Gehäuse Hinterseite + Lüfter Gas Heizung 7 8 .......................................................... Motor (HANNING) + Keilriemenscheibe 6 .......................................... ................................................................. Staubfilter + Frondblende Unter 5 .......................................................... 16 ....................................................................... 17 DTI10 - DTI14 (CD220-350) 1 160/00027/10 01 01 01 02 03 03 03 04 05 06 07 08 09 10 11 12 12 13 13 13 14 15 15 15 16 17 18 19 20 21 22 23 24 25 25 1 1 1 1 1 1 1 1 1 1 1 1 1 1 1 1 1 1 1 1 1 1 1 1 1 1 1 1 1 1 1 1 1 1 1 223/00174/00 223/00198/00 207/00014/00 203/00006/00 209/00005/00 204/00007/00 209/00006/01 211/00168/00 211/00171/00 203/00006/00 206/00027/00 160/00036/00 160/00035/00 160/00034/00 206/00099/00 160/00046/00 160/00045/00 160/00044/00 206/00099/00 160/00022/00 160/00033/00 160/00032/00 206/00099/00 206/00099/00 160/00023/00 206/00099/00 206/00099/00 160/00047/00 160/00059/00 160/00058/00 160/00057/00 206/00099/00 160/00027/30 160/00027/20 Code N° Rubber kabeldoorlaat 13mm (HF55) Rubber kabeldoorlaat 30mm Metaalschroef verzinkt M3x25 cilindrisch Sterrondel gefosfateerd M4 AZ DIN 6798 Weco 424 (aansluitklem 4-polig) Moer staal verzinkt M4 DIN 934 Weco 10/g aardingsklem net Wurgwartel M25 Moer wurgwartel M25 Sterrondel gefosfateerd M4 AZ DIN 6798 Persvijs staal verzinkt M4x10 DIN 933 Deksel CD350 skin plate Deksel CD220 skin plate Deksel CD165 skin plate Flensschroef met vertanding M6x16 Afdekplaat oven CD350 Afdekplaat oven CD220 Afdekplaat oven CD165 Flensschroef met vertanding M6x16 Rubber cable duct 13mm (HF55) Rubber cable duct 28mm Screw zincked M3x25 cyl. Castle washer M4 AZ DIN 6798 Weco 424 (connection 4-poles) Nut M4 DIN 934 Weco 10/g connection terminal controls-earth Cup nut M25 Nut for cup nut M25 Castle washer M4 AZ DIN 6798 Hexagon bolt zincked M4x10 DIN 933 Top panel CD350 skin plate Top panel CD220 skin plate Top panel CD165 skin plate Bolt with integrated lockwasher M6 X 16 Cover panel oven CD350 Cover panel oven CD220 Cover panel oven CD165 Bolt with integrated lockwasher M6 X 16 Back bridge CD165 ->CD350 CD165->CD350 CD165->CD350 Achterbrug CD165->CD350 Cover plate electrical connections CD165->CD350 CD165->CD350 Afdekplaat elektrische aansluiting Assembly plate electrical connection Bolt with integrated lockwasher M6 X 16 Bolt with integrated lockwasher M6 X 16 Back panel CD165->CD350 Bolt with integrated lockwasher M6 X 16 Bolt with integrated lockwasher M6 X 16 Intermediate plate oven- wiring CD165 Cabinet CD350 Cabinet CD220 Cabinet CD165 Bolt with integrated lockwasher M6 X 16 Protection plate wiring CD350 Protection plate wiring CD220 Protection plate wiring CD165 Description Montageplaat elektrische aansluiting Flensschroef met vertanding M6x16 Flensschroef met vertanding M6x16 Achterpaneel CD165->CD350 Flensschroef met vertanding M6x16 Flensschroef met vertanding M6x16 Tussenplaat oven- bedrading Omhulsel CD350 Omhulsel CD220 Omhulsel CD165 Flensschroef met vertanding M6x16 Afschermplaat bedrading CD350 Afschermplaat bedrading CD220 Afschermplaat bedrading CD165 Omschrijving Passe-câble en caoutchouc 13mm (HF55) Passe-câble 30mm Vis galvanisée M3x25 cyl. Rondelle étoile M4 AZ DIN 6798 Weco 424 (borne de raccordement 4-poles) Ecrou galvanisé M4 DIN 934 Weco 10/g borne de terre Serre-câble M25 Ecrou pour serre-câble M25 Rondelle étoile M4 AZ DIN 6798 Boulon galvanisé M4x10 DIN 933 Couvercle CD350 skin plate Couvercle CD220 skin plate Couvercle CD165 skin plate Boulon avec rondelle étoile intégrée M6 X 16 Couvercle four CD350 Couvercle four CD220 Couvercle four CD165 Boulon avec rondelle étoile intégrée M6 X 16 Pont arrière CD165 ->CD350 CD165->CD350 Plaquette fermeture raccordement électrique CD165->CD350 Plaque de montage raccordement électrique Boulon avec rondelle étoile intégrée M6 X 16 Boulon avec rondelle étoile intégrée M6 X 16 Panneau arrière CD165->CD350 Boulon avec rondelle étoile intégrée M6 X 16 Boulon avec rondelle étoile intégrée M6 X 16 Pièce intermédiaire four- cablage Carrosserie CD350 Carrosserie CD220 Carrosserie CD165 Boulon avec rondelle étoile intégrée M6 X 16 Pièce protectrice câblage CD350 Pièce protectrice câblage CD220 Pièce protectrice câblage CD165 Description Gummi Kabelrohr 13mm (HF55) Gummi Kabelrohr 30mm Senkschraube verzinkt M3x25 zylindrisch Fächerscheibe M4 AZ DIN 6798 Weco 424 (Anschlußklemme 4-polig) Mutter verzinkt M4 DIN 934 Weco 10/g Erdungklemme Netz Anbauverschraubung M25 Mutter für Anbauverschraubung M25 Fächerscheibe M4 AZ DIN 6798 Sechskantschraube verzinkt M4x10 DIN 933 Deckel CD350 skin plate Deckel CD220 skin plate Deckel CD165 skin plate Schraube mit Fächerscheibe M6 X 16 Abdeckplatte Ofen CD350 Abdeckplatte Ofen CD220 Abdeckplatte Ofen CD165 Schraube mit Fächerscheibe M6 X 16 Brücke-Hinterseite CD165 ->CD350 CD165->CD350 Abdeckplatte elektrischer Anschluss CD165->CD350 Montageplatte Elektrischer Anschluß Schraube mit Fächerscheibe M6 X 16 Schraube mit Fächerscheibe M6 X 16 Gehäusehinterteil CD165->CD350 Schraube mit Fächerscheibe M6 X 16 Schraube mit Fächerscheibe M6 X 16 Zwischenstück Ofen- Bedrahtung CD165 Gehäuse CD350 Gehäuse CD220 Gehäuse CD165 Schraube mit Fächerscheibe M6 X 16 Abschirmplatte Bedrahtung CD350 Abschirmplatte Bedrahtung CD220 Abschirmplatte Bedrahtung CD165 Bezeichnung DTI10 - DTI14 (CD 220-350) 1 223/00163/00 1 25 Code N° Rubber tige diam.7mm Omschrijving Duct tige 7mm Description Tuyau tige 7mm Description Rohr tige 7mm Bezeichnung DTI10 - DTI14 (CD 220-350) 2 160/00027/40 01 01 01 02 02 02 03 04 05 06 07 08 09 10 11 12 13 14 15 16 17 18 19 20 21 22 23 24 25 26 27 2 2 2 2 2 2 2 2 2 2 2 2 2 2 2 2 2 2 2 2 2 2 2 2 2 2 2 2 2 2 2 209/00005/00 203/00006/00 207/00014/00 204/00007/00 211/00171/00 211/00168/00 209/00006/01 203/00006/00 206/00027/00 206/00099/00 160/00083/00 160/00033/00 206/00099/00 206/00099/00 206/00099/00 206/00099/00 206/00099/00 160/00080/20 160/00080/15 206/00099/00 206/00099/00 260/00056/00 206/00099/00 160/00047/00 160/00059/10 160/00058/10 160/00057/10 160/00027/60 160/00027/50 Code N° Weco 424 (aansluitklem 4-polig) Sterrondel gefosfateerd M4 AZ DIN 6798 Metaalschroef verzinkt M3x25 cilindrisch Moer staal verzinkt M4 DIN 934 Moer wurgwartel M25 Wurgwartel M25 Weco 10/g aardingsklem net Sterrondel gefosfateerd M4 AZ DIN 6798 Persvijs staal verzinkt M4x10 DIN 933 Flensschroef met vertanding M6x16 Weco 424 (connection 4-poles) Castle washer M4 AZ DIN 6798 Screw zincked M3x25 cyl. Nut M4 DIN 934 Nut for cup nut M25 Cup nut M25 Weco 10/g connection terminal controls-earth Castle washer M4 AZ DIN 6798 Hexagon bolt zincked M4x10 DIN 933 Bolt with integrated lockwasher M6 X 16 Back bridge CD165 ->CD350 gas CD165->CD350 CD165->CD350 Achterbrug CD165->CD350 gas Cover plate electrical connections Bolt with integrated lockwasher M6 X 16 Bolt with integrated lockwasher M6 X 16 Bolt with integrated lockwasher M6 X 16 Bolt with integrated lockwasher M6 X 16 Bolt with integrated lockwasher M6 X 16 Back panel CD165->CD350 Back panel CD165->CD350 Bolt with integrated lockwasher M6 X 16 Bolt with integrated lockwasher M6 X 16 Gasket for front panel tub CD Bolt with integrated lockwasher M6 X 16 Intermediate plate oven- wiring CD165 Cabinet CD350 Cabinet CD220 Cabinet CD165 Protection plate wiring CD350 Protection plate wiring CD220 Protection plate wiring CD165 Description Afdekplaat elektrische aansluiting Flensschroef met vertanding M6x16 Flensschroef met vertanding M6x16 Flensschroef met vertanding M6x16 Flensschroef met vertanding M6x16 Flensschroef met vertanding M6x16 Achterpaneel CD165->CD350 Achterpaneel CD165->CD350 Flensschroef met vertanding M6x16 Flensschroef met vertanding M6x16 Afdichting voorpaneel kuip CD Flensschroef met vertanding M6x16 Tussenplaat oven- bedrading Omhulsel CD350 Omhulsel CD220 Omhulsel CD165 Afschermplaat bedrading CD350 Afschermplaat bedrading CD220 Afschermplaat bedrading CD165 Omschrijving Weco 424 (borne de raccordement 4-poles) Rondelle étoile M4 AZ DIN 6798 Vis galvanisée M3x25 cyl. Ecrou galvanisé M4 DIN 934 Ecrou pour serre-câble M25 Serre-câble M25 Weco 10/g borne de terre Rondelle étoile M4 AZ DIN 6798 Boulon galvanisé M4x10 DIN 933 Boulon avec rondelle étoile intégrée M6 X 16 Pont arrière CD165 ->CD350 gaz CD165->CD350 Plaquette fermeture raccordement électrique Boulon avec rondelle étoile intégrée M6 X 16 Boulon avec rondelle étoile intégrée M6 X 16 Boulon avec rondelle étoile intégrée M6 X 16 Boulon avec rondelle étoile intégrée M6 X 16 Boulon avec rondelle étoile intégrée M6 X 16 Panneau arrière CD165->CD350 Panneau arrière CD165->CD350 Boulon avec rondelle étoile intégrée M6 X 16 Boulon avec rondelle étoile intégrée M6 X 16 Joint panneau avant cuve CD Boulon avec rondelle étoile intégrée M6 X 16 Pièce intermédiaire four- cablage Carrosserie CD350 Carrosserie CD220 Carrosserie CD165 Pièce protectrice câblage CD350 Pièce protectrice câblage CD220 Pièce protectrice câblage CD165 Description Weco 424 (Anschlußklemme 4-polig) Fächerscheibe M4 AZ DIN 6798 Senkschraube verzinkt M3x25 zylindrisch Mutter verzinkt M4 DIN 934 Mutter für Anbauverschraubung M25 Anbauverschraubung M25 Weco 10/g Erdungklemme Netz Fächerscheibe M4 AZ DIN 6798 Sechskantschraube verzinkt M4x10 DIN 933 Schraube mit Fächerscheibe M6 X 16 Brücke-Hinterseite CD165 ->CD350 CD165->CD350 Abdeckplatte elektrischer Anschluss Schraube mit Fächerscheibe M6 X 16 Schraube mit Fächerscheibe M6 X 16 Schraube mit Fächerscheibe M6 X 16 Schraube mit Fächerscheibe M6 X 16 Schraube mit Fächerscheibe M6 X 16 Gehäusehinterteil CD165->CD350 Gehäusehinterteil CD165->CD350 Schraube mit Fächerscheibe M6 X 16 Schraube mit Fächerscheibe M6 X 16 Abdichtung Frontblende Bottich CD Schraube mit Fächerscheibe M6 X 16 Zwischenstück Ofen- Bedrahtung CD165 Gehäuse CD350 Gehäuse CD220 Gehäuse CD165 Abschirmplatte Bedrahtung CD350 Abschirmplatte Bedrahtung CD220 Abschirmplatte Bedrahtung CD165 Bezeichnung DTI10 - DTI14 (CD 220-350) 3 223/00212/00 01 02 03 04 04 05 06 07 08 09 10 11 12 13 14 15 16 3 3 3 3 3 3 3 3 3 3 3 3 3 3 3 3 3 260/00022/00 260/00023/00 209/00468/00 260/00036/00 260/00036/01 260/00035/00 260/00035/01 260/00016/00 260/00024/01 260/00024/00 160/00027/00 208/00007/00 260/00026/00 260/00025/00 260/00028/00 260/00019/00 Code N° ABB Kontaktor B6-30-10 24Volt ABB Kontaktor (Thermiek) T7DU/1,0(0,6-1A) Glaszekering 3A Flink 5x20 ABB Aansluitklem zekeringhouder M4/8SF ABB Aansluitklem zekeringhouder eindplaat ABB Aansluitklem M4/6 ABB Aansluitklem eindplaat Transformator STS 63/23/24 ABB reversing verbindingsklem BMS6-30 ABB Kontaktor reversing VB6A-30-10 24Volt Brug elektrische componenten CD165->CD350 Parkerschroef verzinkt N°6x3/8" DIN 7981 ABB Kontaktor A16-30-10-024 (30A) ABB Kontaktor A9-30-10 24V-25A ABB Hulpkontakt CA5-10 Onderdrukschakelaar C6065FH1086B Darm waterstandschakelaar (diam.7x3,3mm) Omschrijving ABB Contactor B6-30-10 24Volt T7DU/1,0(0,6-1A) ABB Contactor (Thermal overload relay) Fuse 3A fast 5x20 ABB Connection clamp fuse holder M4/8SF ABB Connection clamp fuse holder final plate ABB Connection clamp M4/6 ABB Connection clamp final plate Transformer STS 63/23/24 ABB reversing connecting link BMS6-30 ABB Contacteur B6-30-10 24Volt ABB Schütz B6-30-10 24Volt ABB Contacteur (thermique) T7DU/1,0(0,6-1A) Schütze (Thermik) T7DU/1,0(0,6-1A) Glassicherung 3A schnell 5X20 M4/8SF Fusible 3A rapide 5x20 ABB Anschlußklemme Sicherungshalter M4/8SF plate ABB Borne de raccordement porte-fusible ABB Anschlußklemme Sicherungshalter eind plaque final ABB Anschlußklemme M4/6 ABB Anschlußklemme eind plate Trafo STS 63/23/24 BMS6-30 ABB Reversierung Verbindungs Klemme ABB Schütz Reversierung VB6A-30-10 24Volt Montageplatte elektrische Teile CD165->CD350 Blechschraube verzinkt N°6x3/8" DIN 7981 ABB Schütz A16-30-10-024 (30A) ABB Schütz A9-30-10 24V-25A ABB Hilfskontaktstück CA5-10 Unterdruckschalter C6065FH1086B (diam.7x3,3mm) Gummi Rohr Wasserstandsregler Bezeichnung ABB Borne de raccordement porte-fusible ABB Borne de raccordement M4/6 ABB Borne de raccordement plaque final Transformateur STS 63/23/24 ABB inversion pièce de jonction BMS6-30 ABB Contacteur inversion VB6A-30-10 24Volt CD165->CD350 ABB Contactor reversing VB6A-30-10 24Volt Plaque de montage accessoires électrique CD165->CD350 Vis parker galvanisée N°6x3/8" DIN 7981 ABB Contacteur A16-30-10-024 (30A) ABB Contacteur A9-30-10 24V-25A ABB Contact auxiliaire CA5-10 Interrupteur de dépression C6065FH1086B Tuyau pressostat (diam.7x3,3mm) Description Mounting plate for electrical components Parkerscrew zincked N°6x3/8" DIN 7981 ABB Contactor A16-30-10-024 (30A) ABB Contactor A9-30-10 24V-25A ABB Auxiliary contact CA5-10 pressure switch C6065FH1086B Pipe water level switch (diam.7x3,3mm) Description DTI10 - DTI14 (CD 220-350) 4 900/00250/015 01 01 02 03 04 05 06 07 08 09 10 11 12 13 14 14 14 4 4 4 4 4 4 4 4 4 4 4 4 4 4 4 4 4 223/00174/00 223/00163/00 223/00198/00 900/00250/003 206/00027/00 203/00006/00 204/00007/00 254/00063/00 206/00027/00 203/00006/00 204/00007/00 204/00007/00 254/EA000/594 203/00006/00 206/00027/00 900/00250/016 Code N° PRO-HC Rubber kabeldoorlaat 13mm (HF55) Rubber tige diam.7mm Rubber kabeldoorlaat 30mm Thermostaat voeler LM35 CD165->CD350 Persvijs staal verzinkt M4x10 DIN 933 Sterrondel gefosfateerd M4 AZ DIN 6798 Moer staal verzinkt M4 DIN 934 Afscherming thermostaat/vochtmeeting Persvijs staal verzinkt M4x10 DIN 933 Sterrondel gefosfateerd M4 AZ DIN 6798 Moer staal verzinkt M4 DIN 934 Moer staal verzinkt M4 DIN 934 CIS veiligheidsthermostaat L220-60F Sterrondel gefosfateerd M4 AZ DIN 6798 Rubber cable duct 13mm (HF55) Duct tige 7mm Rubber cable duct 28mm Thermostat detector LM35 CD165->CD350 Hexagon bolt zincked M4x10 DIN 933 Castle washer M4 AZ DIN 6798 Nut M4 DIN 934 Protection thermostat/hygrometer Hexagon bolt zincked M4x10 DIN 933 Castle washer M4 AZ DIN 6798 Nut M4 DIN 934 Nut M4 DIN 934 CIS safety thermostat L220-60F Castle washer M4 AZ DIN 6798 Hexagon bolt zincked M4x10 DIN 933 PRO-HC Persvijs staal verzinkt M4x10 DIN 933 Thermostat/hygrometer detector + wire (long) PRO-HC Thermostaat/vochtmeeting voeler + kabel (lang) Thermostat/hygrometer detector + wire (short) PRO-HC Description Thermostaat/vochtmeeting voeler + kabel (kort) Omschrijving PRO-HC Thermostat/Hygrometer Fühler + Kabel (kurz) Bezeichnung Passe-câble en caoutchouc 13mm (HF55) Tuyau tige 7mm Passe-câble 30mm Détecteur thermostat LM35 CD165->CD350 Boulon galvanisé M4x10 DIN 933 Rondelle étoile M4 AZ DIN 6798 Ecrou galvanisé M4 DIN 934 Protecteur thermostat/hygromètre Boulon galvanisé M4x10 DIN 933 Rondelle étoile M4 AZ DIN 6798 Ecrou galvanisé M4 DIN 934 Ecrou galvanisé M4 DIN 934 CIS thermostat de sécurité L220-60F Rondelle étoile M4 AZ DIN 6798 Boulon galvanisé M4x10 DIN 933 Gummi Kabelrohr 13mm (HF55) Rohr tige 7mm Gummi Kabelrohr 30mm Thermostatfühler LM35 CD165->CD350 Sechskantschraube verzinkt M4x10 DIN 933 Fächerscheibe M4 AZ DIN 6798 Mutter verzinkt M4 DIN 934 Abschirmhaube Thermostat/Feuchtemesser Sechskantschraube verzinkt M4x10 DIN 933 Fächerscheibe M4 AZ DIN 6798 Mutter verzinkt M4 DIN 934 Mutter verzinkt M4 DIN 934 CIS Sicherheitsthermostat L220-60F Fächerscheibe M4 AZ DIN 6798 Sechskantschraube verzinkt M4x10 DIN 933 PRO-HC Thermostat/hygromètre + câble (long) PRO-HC Thermostat/Hygrometer Fühler + Kabel (lang) PRO-HC Thermostat/hygromètre + câble (court) Description DTI10 - DTI14 (CD 220-350) 5 206/00033/00 01 02 03 04 05 06 07 08 09 10 11 12 13 14 15 5 5 5 5 5 5 5 5 5 5 5 5 5 5 5 260/00008/00 206/00101/00 206/00099/00 160/00053/00 215/00001/03 212/00028/00 260/00003/00 203/00004/00 206/00013/00 215/00016/00 212/00028/00 201/00007/00 203/00004/00 Code N° zie blz 5,positie 14 Benaderingsschakelaar CD165->CD350 Moer M6 met geïntegreerde sterrondel Flensschroef met vertanding M6x16 CD165->CD350 Support benaderingsschakelaar Kogellager 6307-2z Veer cerclips J80 DIN472 Lagerhuis CD165->CD350 Sterrondel gefosfateerd M6 AZ DIN 6798 Persvijs staal verzinkt M6x20 DIN 933 Kogellager 6208-2z Veer cerclips J80 DIN472 Rondel zacht staal verzinkt 6,5x16x2 Sterrondel gefosfateerd M6 AZ DIN 6798 Persvijs staal verzinkt M6x25 DIN 933 Omschrijving see page 5,position 14 Speed sensor CD165->CD350 Nut with integrated castle washer M6 Bolt with integrated lockwasher M6 X 16 Support speed sensor CD165->CD350 Ball bearing 6307-2z Spring cerclips J80 DIN472 Bearing housing CD165->CD350 Castle washer M6 AZ DIN 6798 Hexagon bolt M6x20 DIN 933 Ball bearing 6208-2z Spring cerclips J80 DIN472 Washer 6,5x16x2 Castle washer M6 AZ DIN 6798 Hexagon bolt zincked M6x25 DIN 933 Description ref. page 5,position 14 Détecteur de vitesse CD165->CD350 Ecrou avec rondelle étoile intégrée M6 Boulon avec rondelle étoile intégrée M6 X 16 CD165->CD350 Support pour détecteur de vitesse Roulement à billes 6307-2z Cerclips J80 DIN472 Palier CD165->CD350 Rondelle étoile M6 AZ DIN 6798 Boulon galvanisé M6x20 DIN 933 Roulement à billes 6208-2z Cerclips J80 DIN472 Rondelle galvanisée 6,5x16x2 Rondelle étoile M6 AZ DIN 6798 Boulon galvanisé M6x25 DIN 933 Description ref. Pagina 5,Position 14 Geschwindigkeitsdetektor CD165->CD350 Mutter mit integrierte Fächerscheibe M6 Schraube mit Fächerscheibe M6 X 16 CD165->CD350 Stütz Geschwindigkeitsdetektor Kugellager 6307-2z Feder Nietstift J80 DIN472 Lagergehäuse CD165->CD350 Fächerscheibe M6 AZ DIN 6798 Sechskantschraube verzinkt M6x20 DIN 933 Kugellager 6208-2z Feder Nietstift J80 DIN472 Unterlegscheibe verzinkt 6,5x16x2 Fächerscheibe M6 AZ DIN 6798 Sechskantschraube verzinkt M6x25 DIN 933 Bezeichnung DTI10 - DTI14 (CD 220-350) 6 160/00005/00 01 01 01 02 03 04 05 06 07 08 09 10 11 12 6 6 6 6 6 6 6 6 6 6 6 6 6 6 215/00004/00 204/00007/00 203/00006/00 207/00031/00 206/00004/00 203/00001/00 201/00004/00 255/00117/00 260/00009/00 160/00007/00 160/00006/00 Code N° zie blz 6,positie 1 zie blz 6,positie 1 Tolerantiering trommelas Moer staal verzinkt M4 DIN 934 Sterrondel gefosfateerd M4 AZ DIN 6798 Metaalschroef verzinkt M4x20 cilindrisch DIN84 Persvijs staal verzinkt M12x25 DIN 933 Sterrondel gefosfateerd M12 AZ DIN 6798 Rondel zacht staal verzinkt 13,5x35x3 Riemschijf trommelas 280x31 V-riem 1752 PJ 8 Trommel + as kompleet CD350 Trommel + as kompleet CD220 Trommel+as kompleet CD165 Omschrijving see page 6,position 1 see page 6,position 1 Tolerance ring drum axle Nut M4 DIN 934 Castle washer M4 AZ DIN 6798 Screw zincked M4x20 cyl. DIN84 Hexagon bolt M12x25 DIN 933 Castle washer M12 AZ DIN 6798 Washer 13,5x35x3 Pulley drum axle 280x31 V-belt 1752 PJ 8 Drum+axle complete CD350 Drum+axle complete CD220 Drum+axle complete CD165 Description ref. page 6,position 1 ref. page 6,position 1 Bague de tolérance axe tambour Ecrou galvanisé M4 DIN 934 Rondelle étoile M4 AZ DIN 6798 Vis galvanisée M4x20 cyl. DIN84 Boulon galvanisé M12x25 DIN 933 Rondelle étoile M12 AZ DIN 6798 Rondelle galvanisée 13,5x35x3 Poulie axe tambour 280x31 Courroie 1752 PJ 8 Tambour+axe complète CD350 Tambour+axe complète CD220 Tambour+axe complète CD165 Description ref. Pagina 6,Position 1 ref. Pagina 6,Position 1 Toleranzring Trommelachse Mutter verzinkt M4 DIN 934 Fächerscheibe M4 AZ DIN 6798 DIN84 Senkschraube verzinkt M4x20 zylindrisch Sechskantschraube verzinkt M12x25 DIN 933 Fächerscheibe M12 AZ DIN 6798 Unterlegscheibe verzinkt 13,5x35x3 Riemenscheibe Trommelachse 280x31 Keilriemen 1752 PJ 8 Trommel+Achse komplett CD350 Trommel+Achse komplett CD220 Trommel+Achse komplett CD165 Bezeichnung DTI10 - DTI14 (CD 220-350) 7 160/00124/00 01 02 03 04 05 06 07 08 09 10 11 12 13 14 15 16 7 7 7 7 7 7 7 7 7 7 7 7 7 7 7 7 211/00122/00 223/00123/00 204/00114/00 206/00099/00 254/00067/00 209/00506/00 209/00099/20 209/00520/00 209/00099/21 209/00099/26 260/00045/00 204/00006/00 203/00005/00 117/00042/00 206/00054/00 Code N° Afstandshouder voor print 4,2x8x7,5MM Rondel skiffy 3,2 x 9 x 1,5 Moer zelfborgend M4 verzinkt DIN 985 Flensschroef met vertanding M6x16 Bedieningsprint DX3RS met fiches Glaszekering 200mA Flink 5x20 Drukknop rood noodstop ZB4-BS Telem.etiket [ZONDER TEKST] ZB2BY9101 Contact ZB4102 "c" Contact ZB4-BE102 "c" Bedieningsklever DX3RS Moer staal verzinkt M5 DIN 934 Sterrondel gefosfateerd M5 AZ DIN 6798 Borgstukje Persvijs staal verzinkt M5x12 DIN 933 Voorpaneel boven DX3RS (epoxy) Omschrijving Separator for printboards 4,5x8x7,5MM Washer skiffy 3,2 x 9 x 1,5 Selflocking nut M4 DIN 985 Bolt with integrated lockwasher M6 X 16 Control board DX3RS with plugs Fuse 200mA fast 5x20 Press button emergency stop ZB4-BS Telem sticker (WITHOUT TEXT) ZB2BY9101 Contact ZB4102 "c" Contact ZB4-BE102 "c" Operating sticker DX3RS Nut M5 DIN 934 Castle washer M5 AZ DIN 6798 Security ring bearing Hexagon bolt zincked M5x12 DIN 933 Upper front panel DX3RS OPL skin black Description 4,2x8x7,5MM Espacement pour plaquettes électr. Rondelle skiffy 3,2 x 9 x 1,5 Ecrou de sûreté M4 galvanisé DIN 985 Boulon avec rondelle étoile intégrée M6 X 16 Circuit imprimé DX3RS avec fiches Fusible 200mA rapide 5x20 Bouton-poussoir arrêt d'urgence ZB4-BS Telem.étiquette (SANS TEXTE) ZB2BY9101 Contact ZB4102 "c" Contact ZB4-BE102 "c" Autocollant pour commande DX3RS Ecrou galvanisé M5 DIN 934 Rondelle étoile M5 AZ DIN 6798 Pièce de sécurité Boulon galvanisé M5x12 DIN 933 Panneau frontal supérieur DX3RS (epoxy) Description Abstandshülse für Printplatte 4,2x8x7,5MM Unterlegscheibe skiffy 3,2 x 9 x 1,5 Sicherungsmutter M4 verzinkt DIN 985 Schraube mit Fächerscheibe M6 X 16 Platine DX3RS mit Kontaktstöpsel Glassicherung 200 MA schnell 5x20 Druckknopf Notstop ZB4-BS Telem.Aufkleber (Ohne Text) ZB2BY9101 Contact ZB4102 "c" KONTAKT ZB2-BE102 Bedienungsaufkleber DX3RS Mutter verzinkt M5 DIN 934 Fächerscheibe M5 AZ DIN 6798 Sicherungsstück Sechskantschraube verzinkt M5x12 DIN 933 Frontblende oben DX3RS (epoxy) Bezeichnung DTI10 - DTI14 (CD 220-350) 8 160/00125/00 01 02 03 04 05 06 07 08 08 09 10 10 10 10 10 11 12 13 14 15 16 17 18 8 8 8 8 8 8 8 8 8 8 8 8 8 8 8 8 8 8 8 8 8 8 8 211/00122/00 223/00123/00 204/00114/00 217/00060/00 254/00067/00 209/00506/00 206/00099/00 204/00007/00 209/00598/00 209/00610/00 209/00601/00 209/00600/00 209/00593/00 254/TU009/225 160/00127/50 160/00127/00 208/00026/00 260/00014/50 204/00006/00 203/00005/00 117/00042/00 206/00054/00 Code N° Afstandshouder voor print 4,2x8x7,5MM Rondel skiffy 3,2 x 9 x 1,5 Moer zelfborgend M4 verzinkt DIN 985 Bevestigingsstuk muntschakelaar + geldlade Bedieningsprint DX3RS met fiches Glaszekering 200mA Flink 5x20 Flensschroef met vertanding M6x16 Moer staal verzinkt M4 DIN 934 Elektronische muntschakelaar vierkant voor Muntschakelaar jeton "GETTONE" vierkant Muntschakelaar 1 + 2 Zwitserse FR Muntschakelaar 1 + 0,50 Euro Muntschakelaar jeton 10K Geldbakje compleet CIS.DESIGN beschermplaat geldbak enkel CD beschermplaat geldbak dubbel CD Blindklinknagel RVS dia 4 x10 Bedieningsklever DX3RS munt Moer staal verzinkt M5 DIN 934 Sterrondel gefosfateerd M5 AZ DIN 6798 Borgstukje Persvijs staal verzinkt M5x12 DIN 933 Voorpaneel boven DX3RS munt (epoxy) Omschrijving Separator for printboards 4,5x8x7,5MM Washer skiffy 3,2 x 9 x 1,5 Selflocking nut M4 DIN 985 Fastening piece coin meter + coin box Control board DX3RS with plugs Fuse 200mA fast 5x20 Bolt with integrated lockwasher M6 X 16 Nut M4 DIN 934 Electronic coin meter square front coin meter token "GETTONE" square Coin meter 1 + 2 Swiss francs Coin meter 1 + 0,50 Euro Coin meter token 10K Coin box complete CIS.DESIGN protection plate coin box single CD protection plate coin box double CD Blind revet RVS dia 4 x10 Operating sticker DX3RS coin Nut M5 DIN 934 Castle washer M5 AZ DIN 6798 Security ring bearing Hexagon bolt zincked M5x12 DIN 933 Upper front panel DX3RS coin skin black Description Mutter verzinkt M5 DIN 934 Fächerscheibe M5 AZ DIN 6798 Sicherungsstück Sechskantschraube verzinkt M5x12 DIN 933 Frontblende oben DX3RS Münz (epoxy) Bezeichnung 4,2x8x7,5MM Espacement pour plaquettes électr. Rondelle skiffy 3,2 x 9 x 1,5 Ecrou de sûreté M4 galvanisé DIN 985 Pièce de fixation monnayeur + bac à monnaie Circuit imprimé DX3RS avec fiches Fusible 200mA rapide 5x20 Boulon avec rondelle étoile intégrée M6 X 16 Ecrou galvanisé M4 DIN 934 Monnayeur électronique carré devant Monnayeur jeton "GETTONE" Carré Monnayeur 1 + 2 Franc suisse Monnayeur 1 + 0,50 Euro Monnayeur jeton 10K Bac à monnaie complet CIS.DESIGN plaque de protection sébile single CD plaque de protection sébile double CD Revet aveugle RVS dia 4 x10 Abstandshülse für Printplatte 4,2x8x7,5MM Unterlegscheibe skiffy 3,2 x 9 x 1,5 Sicherungsmutter M4 verzinkt DIN 985 Befestigungsstück Münzprüfer + Münzbehälter Platine DX3RS mit Kontaktstöpsel Glassicherung 200 MA schnell 5x20 Schraube mit Fächerscheibe M6 X 16 Mutter verzinkt M4 DIN 934 Münzprüfer elektronisch Quadrat vorn Münzprüfer Münze "GETTONE" Quadrat Münzprüfer 1 + 2 franc Suisse Münzprüfer 1 + 0,50 Euro Münzprüfer Wertmarke 10K Münzbehälter komplett CIS.DESIGN Abschirmplatte Münzbehälter einzig CD Abschirmplatte Münzbehälter doppelt CD Blindniete RVS dia 4 x10 Autocollant pour commande DX3RS monnayeur Bedienungsaufkleber DX3RS Münz Ecrou galvanisé M5 DIN 934 Rondelle étoile M5 AZ DIN 6798 Pièce de sécurité Boulon galvanisé M5x12 DIN 933 (epoxy) Panneau frontal supérieur DX3RS monnayeur Description DTI10 - DTI14 (CD 220-350) 9 160/00126/00 01 02 03 04 05 06 07 08 09 10 11 12 13 14 15 16 17 9 9 9 9 9 9 9 9 9 9 9 9 9 9 9 9 9 211/00122/00 223/00123/00 204/00114/00 254/00054/00 209/00506/00 209/00323/06 206/00099/00 209/00099/20 209/00520/00 209/00099/21 209/00099/26 260/00047/00 204/00006/00 203/00005/00 117/00042/00 206/00054/00 Code N° Afstandshouder voor print 4,2x8x7,5MM Rondel skiffy 3,2 x 9 x 1,5 Moer zelfborgend M4 verzinkt DIN 985 CIS print sturing kompleet (pro 1998) Glaszekering 200mA Flink 5x20 Eprom 27C2001 Flensschroef met vertanding M6x16 Drukknop rood noodstop ZB4-BS Telem.etiket [ZONDER TEKST] ZB2BY9101 Contact ZB4102 "c" Contact ZB4-BE102 "c" Bedieningsklever PRO-HC Moer staal verzinkt M5 DIN 934 Sterrondel gefosfateerd M5 AZ DIN 6798 Borgstukje Persvijs staal verzinkt M5x12 DIN 933 Kadran PRO-HC (epoxy) skin zwart Omschrijving Separator for printboards 4,5x8x7,5MM Washer skiffy 3,2 x 9 x 1,5 Selflocking nut M4 DIN 985 CIS printboard control (pro HC '98) Fuse 200mA fast 5x20 Eprom 27C2001 Bolt with integrated lockwasher M6 X 16 Press button emergency stop ZB4-BS Telem sticker (WITHOUT TEXT) ZB2BY9101 Contact ZB4102 "c" Contact ZB4-BE102 "c" Operating sticker PRO-HC Nut M5 DIN 934 Castle washer M5 AZ DIN 6798 Security ring bearing Hexagon bolt zincked M5x12 DIN 933 Facia panel PRO-HC CD skin black Description 4,2x8x7,5MM Espacement pour plaquettes électr. Rondelle skiffy 3,2 x 9 x 1,5 Ecrou de sûreté M4 galvanisé DIN 985 CIS platine électronique (PRO HC) Fusible 200mA rapide 5x20 Eprom 27C2001 - programmé Boulon avec rondelle étoile intégrée M6 X 16 Bouton-poussoir arrêt d'urgence ZB4-BS Telem.étiquette (SANS TEXTE) ZB2BY9101 Contact ZB4102 "c" Contact ZB4-BE102 "c" Autocollant pour commande PRO-HC Ecrou galvanisé M5 DIN 934 Rondelle étoile M5 AZ DIN 6798 Pièce de sécurité Boulon galvanisé M5x12 DIN 933 Cadran PRO-HC (epoxy) skin noir Description Abstandshülse für Printplatte 4,2x8x7,5MM Unterlegscheibe skiffy 3,2 x 9 x 1,5 Sicherungsmutter M4 verzinkt DIN 985 CIS Steuerungsplatine (PRO HC '98) Glassicherung 200 MA schnell 5x20 Eprom 27C2001 Schraube mit Fächerscheibe M6 X 16 Druckknopf Notstop ZB4-BS Telem.Aufkleber (Ohne Text) ZB2BY9101 Contact ZB4102 "c" KONTAKT ZB2-BE102 Bedienungsaufkleber PRO-HC Mutter verzinkt M5 DIN 934 Fächerscheibe M5 AZ DIN 6798 Sicherungsstück Sechskantschraube verzinkt M5x12 DIN 933 Frontblende oben PRO-HC (epoxy) Bezeichnung DTI10 - DTI14 (CD 220-350) 10 01 02 02 03 04 05 06 07 08 09 10 11 12 13 14 15 16 17 18 10 10 10 10 10 10 10 10 10 10 10 10 10 10 10 10 10 10 10 N° 206/00099/00 208/00026/00 254/TU002/876 206/00099/00 254/00011/00 254/SB000/967 254/MD000/359 254/00010/00 254/00013/00 202/00101/00 205/00107/00 207/00125/00 254/MD000/337 254/00010/01 208/00024/00 254/SB000/975 254/00017/00 254/ESA00/862 160/00021/02 Code Flensschroef met vertanding M6x16 Blindklinknagel RVS dia 4 x10 CIS pvc sluiter deur Flensschroef met vertanding M6x16 Deurglas diam.540mm Schroef afregelen PVC deur CIS rubberafdichting PVC deur CIS patrijspoort Scharnier patrijspoort Rondel RVS 6,4x12x1,6 A2 DIN 125 Tapbout M6x12 RVS A2 DIN 933 Sierbout RVS M6x25 Deurmagneet CIS PVC glashouder patrijspoort (3/SET) Spaanplaatschroef verzinkt 3,5x13 Parkervijs 6-32*1/4" phillips CIS pvc houder magneetschakelaar CIS magneetschakelaar (houder deur) Voorpaneel midden CD165->CD350 Omschrijving Bolt with integrated lockwasher M6 X 16 Blind revet RVS dia 4 x10 CIS pvc locking part for door Bolt with integrated lockwasher M6 X 16 Door glass diam. 540 mm Screw adjust PVC main door CIS rubber gasket PVC main door CIS door PVC Door hinge Washer st.st. 6,4x12,5x1,6 A2 DIN 125 Hexagon bolt st.st. M6x12 A2 DIN 933 Ornamental bolt st.st. M6x25 Coil for door CIS holder door glass PVC (3/set) Screw zincked 3,5x13 Parkerscrew 6-32*1/4 phillips CIS holder magnetic switch CIS coil switch (for door) Middle front panel CD165->CD350 Description Boulon avec rondelle étoile intégrée M6 X 16 Revet aveugle RVS dia 4 x10 CIS pièce obturatrice en PVC Boulon avec rondelle étoile intégrée M6 X 16 Verre hublot diam. 540mm Vis ajustent porte principale PVC CIS joint en caoutchouc porte principale PVC CIS porte PVC Charnière porte Rondelle inox 6,4x12,5x1,6 A2 DIN 125 Boulon inox M6x12 A2 DIN 933 Boulon ornemental inox M6x25 Bobine pour porte CIS porte-verre hublot (3/kit) Vis à bois galvanisée 3,5x13 Vis parker 6-32*1/4 phillips CIS support pour interrupteur magnétique CIS interrupteur magnétique pour porte Panneau avant central CD165->CD350 Description Schraube mit Fächerscheibe M6 X 16 Blindniete RVS dia 4 x10 CIS Verschlußteil PVC Schraube mit Fächerscheibe M6 X 16 Türglas Diam.540mm Schraube justieren PVC Haupttür CIS Gummidichtung PVC Haupttür CIS Tür PVC Türscharnier 125 Unterlegscheibe Nirosta 6,4x12,5x1,6 A2 DIN Sechskantschraube Nirosta M6x12 A2 DIN 933 Zierschraube rostfrei M6x25 Türmagnet CIS Türglashalterung PVC (3/Satz) Schraube verzinkt 3,5x13 Blechschraube 6-32*1/4 phillips CIS Halterung Magnetschalter CIS Magnetschalter für Tür Mithere Frontblende CD165->CD350 Bezeichnung DTI10 - DTI14 (CD 220-350) 11 01 02 03 04 05 06 07 08 11 11 11 11 11 11 11 11 N° 160/00028/50 260/00004/20 160/00021/03 204/00007/00 206/00027/00 260/00004/10 208/00101/00 Code Filterplaat + gaas CD drogers Handvat onderdeur SOUTHCO Voorpaneel onder CD165->CD350 zie blz 11,positie 2 Moer staal verzinkt M4 DIN 934 Persvijs staal verzinkt M4x10 DIN 933 Sluitstuk onderdeur SOUTHCO Parkerschroef RVS 6x1/2" DIN 7971 Omschrijving filtering plate + wire gauze CD dryers Handle lower front door SOUTHCO Lower front panel CD165->CD350 see page 11,position 2 Nut M4 DIN 934 Hexagon bolt zincked M4x10 DIN 933 Locking piece lower front door SOUTHCO Parkerscrew st.st.N?6x1/2" DIN 7971 Description Filtre de poussière + gaze CD séchoirs Poignée panneau avant inférieur SOUTHCO Panneau avant inférieur CD165->CD350 ref. page 11,position 2 Ecrou galvanisé M4 DIN 934 Boulon galvanisé M4x10 DIN 933 SOUTHCO Pièce fermeture panneau avant inférieur Vis parker inox N°6x1/2" DIN 7971 Description Staubfilter + Gaze CD Trockner Handgriff Frondblende unten SOUTHCO Untere Frontblende CD165->CD350 ref. Pagina 11,Position 2 Mutter verzinkt M4 DIN 934 Sechskantschraube verzinkt M4x10 DIN 933 Schlußteil Frondblende unten SOUTHCO 7971 Zylinder-Blechschraube rostfrei N°6x1/2" DIN Bezeichnung DTI10 - DTI14 (CD 220-350) 12 01 02 03 04 05 06 07 08 09 10 11 12 13 14 15 12 12 12 12 12 12 12 12 12 12 12 12 12 12 12 N° 260/00017/00 226/00010/00 206/00041/00 206/00101/00 160/00051/00 206/00099/00 206/00101/00 227/00175/00 260/00020/00 223/00007/00 160/00052/00 206/00014/00 206/00099/00 203/00002/00 206/00006/00 Code DI mangels WE55/73/110 Ressort tendeur du courroie + moteurs Boulon galvanisé M6x70 DIN 933 Ecrou avec rondelle étoile intégrée M6 Support tendeur de courroie CD165->CD350 Boulon avec rondelle étoile intégrée M6 X 16 Ecrou avec rondelle étoile intégrée M6 Moteur Hanning A111ZA18D-180 Tige moteur CD165->CD350 Tuyau accordeon bac à savon PB2->cuve Support tige moteur CD165->CD350 Boulon galvanisé M6x16 DIN 933 Boulon avec rondelle étoile intégrée M6 X 16 Rondelle étoile M10 AZ DIN 6798 Boulon galvanisé M10x25 DIN 933 Description V-Riemschijf motor 37PJ8 BORING 19H7 50Hz V-belt pulley motor 37PJ8 BORING 19H7 50Hz V-poulie moteur 37PJ8 BORING 19H7 50Hz Spring for motors WE55/73/110 and all ironers Hexagon bolt zincked M6x70 DIN 933 Nut with integrated castle washer M6 Support tightening-belt CD165->CD350 Bolt with integrated lockwasher M6 X 16 Nut with integrated castle washer M6 Motor Hanning A111ZA18D-180 Spindle for motor CD165->CD350 Hose soap dispenser PB2->tub Support spindle for motor CD165->CD350 Hexagon bolt M6x16 DIN 933 Bolt with integrated lockwasher M6 X 16 Castle washer M10 AZ DIN 6798 Hexagon bolt M10x25 DIN 933 Description Veer voor motoren WE 55/73/110 en alle Persvijs staal verzinkt M6x70 DIN 933 Moer M6 met geïntegreerde sterrondel Support riemspanner CD165->CD350 Flensschroef met vertanding M6x16 Moer M6 met geïntegreerde sterrondel Motor Hanning A111ZA18D-180 Tige motor CD165->CD350 Accordeondarm PB2->kuip Support tige motor CD165->CD350 Persvijs staal verzinkt M6x16 DIN 933 Flensschroef met vertanding M6x16 Sterrondel gefosfateerd M10 AZ DIN 6798 Persvijs staal verzinkt M10x25 DIN 933 Omschrijving 50Hz V-Riemenscheibe motor 37PJ8 BORING 19H7 WE55/73/110 Feder Mangelbänderspanner + Motoren Sechskantschraube verzinkt M6x70 DIN 933 Mutter mit integrierte Fächerscheibe M6 Stütz Riemenspanner CD165->CD350 Schraube mit Fächerscheibe M6 X 16 Mutter mit integrierte Fächerscheibe M6 Motor Hanning A111ZA18D-180 Zughaken für Motor CD165->CD350 PB2->Bottich Faltenschlauch Waschmittelbehälter Stütz Zughaken für Motor CD165->CD350 Sechskantschraube verzinkt M6x16 DIN 933 Schraube mit Fächerscheibe M6 X 16 Fächerscheibe M10 AZ DIN 6798 Sechskantschraube verzinkt M10x25 DIN 933 Bezeichnung DTI10 - DTI14 (CD 220-350) 13 01 01 01 02 03 03 04 13 13 13 13 13 13 13 N° 208/00101/00 160/00106/00 160/00093/00 260/00002/00 160/00059/10 160/00058/10 160/00057/10 Code Parkerschroef RVS 6x1/2" DIN 7971 Ventilatorplaat CD220 Ventilatorplaat CD165-350 Ventilator G4D200-DM-12-09 Omhulsel CD350 Omhulsel CD220 Omhulsel CD165 Omschrijving Parkerscrew st.st.N?6x1/2" DIN 7971 Ventilator plate CD220 Ventilator plate CD165-350 Fan G4D200-DM-12-09 Cabinet CD350 Cabinet CD220 Cabinet CD165 Description Vis parker inox N°6x1/2" DIN 7971 Plaque pour ventilateur CD220 Plaque pour ventilateur CD165-350 Ventilateur G4D200-DM-12-09 Carrosserie CD350 Carrosserie CD220 Carrosserie CD165 Description 7971 Zylinder-Blechschraube rostfrei N°6x1/2" DIN Lüfter platte CD220 Lüfter platte CD165-350 Lüfter G4D200-DM-12-09 Gehäuse CD350 Gehäuse CD220 Gehäuse CD165 Bezeichnung DTI10 - DTI14 (CD 220-350) 14 01 01 02 02 03 14 14 14 14 14 N° 206/00099/00 160/00129/00 160/00128/00 160/00084/00 160/00097/00 Code Flensschroef met vertanding M6x16 Huis gas brander CD165 Huis gas brander CD220-350 Deksel huis gas brander CD165 Deksel huis gas brander CD220-350 Omschrijving Bolt with integrated lockwasher M6 X 16 Housing gas burner CD165 Housing gas burner CD220-350 Cover for housing gas burner CD165 Cover for housing gas burner CD220-350 Description Boulon avec rondelle étoile intégrée M6 X 16 Chambre brûleur à gaz CD165 Chambre brûleur à gaz CD220-350 Couvercle pour chambre brûleur à gaz CD165 CD220-350 Couvercle pour chambre brûleur à gaz Description Schraube mit Fächerscheibe M6 X 16 Gehâuse Gasbrenner CD165 Gehâuse Gasbrenner CD220/350 Deckel für Gasbrenner CD165 Deckel für Gasbrenner CD220/350 Bezeichnung DTI10 - DTI14 (CD 220-350) 15 01 02 03 04 05 06 07 08 09 10 11 12 13 14 15 15 15 15 15 15 15 15 15 16 17 18 19 20 21 22 23 24 25 26 27 15 15 15 15 15 15 15 15 15 15 15 15 15 15 15 15 15 15 15 15 15 15 15 15 15 15 15 15 15 15 15 15 15 15 15 N° 205/00103/00 206/00101/00 206/00101/00 223/00291/00 223/00292/00 260/00066/00 260/00064/00 260/00066/00 260/00065/00 260/10003/225 260/10004/450 260/10004/150 260/10002/775 260/10003/975 260/10003/650 260/10002/375 260/10003/225 260/10003/000 260/00063/00 205/00116/00 203/00006/00 204/00105/00 160/00081/00 254/GA011/003 204/00105/00 204/00105/00 204/00105/00 203/00006/00 207/00031/00 160/00092/50 254/TU013/502 Code Tapbout M6x25 RVS A2 DIN 933 Moer M6 met geïntegreerde sterrondel Moer M6 met geïntegreerde sterrondel Buis 1/2" gastoevoer FS23G L=100 mm Elleboog M/V FIG92 1/2" zie blz 15,positie 21 Flens gasklep 30x30x17 zie blz 15,positie 21 Gasklep VK4105A2009B zie blz 15,positie 17 Flens gasklep 30x30x17 Reductie messing 1/2"-1/4" Gas inspuitstuk G25/3.225MM CD165 Gas inspuitstuk G25/4.45MM CD350 Gas inspuitstuk G20/4.15MM CD350 Gas inspuitstuk Propaan/2.775MM CD220 Gas inspuitstuk G25/3.975MM CD220 Gas inspuitstuk G20/3.650MM CD220 Gas inspuitstuk Propaan/2.375MM CD165 Gas inspuitstuk G25/3.225MM CD165 Gas inspuitstuk G20/3.000MM CD165 zie blz 15,positie 13 Gasontstekingsrelais S4965B10071 Tapbout M4x10 RVS A2 DIN 933 Sterrondel gefosfateerd M4 AZ DIN 6798 Moer roestvrij staal M4 DIN 934 Support gas ontstekingselectrode Gas ontstekingselectrode Moer roestvrij staal M4 DIN 934 Moer roestvrij staal M4 DIN 934 Moer roestvrij staal M4 DIN 934 Sterrondel gefosfateerd M4 AZ DIN 6798 Metaalschroef verzinkt M4x20 cilindrisch DIN84 Gas brander 50mm kompleet Gas brander 50mm Omschrijving Hexagon bolt st.st. M6x25 A2 DIN 933 Nut with integrated castle washer M6 Nut with integrated castle washer M6 black Tube R 1/2" for gas supply FS23G L=100 mm Elbow M/V FIG92 1/2" see page 15,position 21 Flange gas valve 30x30x17 see page 15,position 21 Gas valve VK4105A2009B see page 15,position 17 Flange gas valve 30x30x17 Reduction brass 1/2"-1/4" Gas orifice G25/3.225MM CD165 Gas orifice G25/4.45MM CD350 Gas orifice G20/4.15MM CD350 Gas orifice Propaan/2.775MM CD220 Gas orifice G25/3.975MM CD220 Gas orifice G20/3.650MM CD350 Gas orifice Propaan/2.375MM CD165 Gas orifice G25/3.225MM CD165 Gas orifice G20/3.000MM CD165 see page 15,position 13 Gas ignition relay S4965B10071 Hexagon bolt st.st. M4x10 A2 DIN 933 Castle washer M4 AZ DIN 6798 Nut stainless steel M4 DIN 934 Support gas ignition electrode Gas ignition electrode Nut stainless steel M4 DIN 934 Nut stainless steel M4 DIN 934 Nut stainless steel M4 DIN 934 Castle washer M4 AZ DIN 6798 Screw zincked M4x20 cyl. DIN84 Gas burner 50mm complete CD165-350 Gas burner 50 mm Description Boulon inox M6x25 A2 DIN 933 Ecrou avec rondelle étoile intégrée M6 Ecrou avec rondelle étoile intégrée M6 Tube 1/2" d'alimentation FS23G L=100 mm Ellbogen M/V FIG92 1/2" ref. page 15,position 21 Bride vanne de gaz 30x30x17 ref. page 15,position 21 Vanne de gaz VK4105A2009B ref. page 15,position 17 Bride vanne de gaz 30x30x17 Réduction en cuivre 1/2"-1/4" Gicleur pour gaz G25/3.225MM CD165 Gicleur pour gaz G25/4.45MM CD350 Gicleur pour gaz G20/4.15MM CD350 Gicleur pour gaz Propaan/2.775MM CD220 Gicleur pour gaz G25/3.975MM CD220 Gicleur pour gaz G20/25 3.650MM CD220 Gicleur pour gaz Propaan/2.375MM CD165 Gicleur pour gaz G25/3.225MM CD165 Gicleur pour gaz G20/3.000MM CD165 ref. page 15,position 13 Relais d'allumage gaz S4965B10071 Boulon inox M4x10 A2 DIN 933 Rondelle étoile M4 AZ DIN 6798 Ecrou inox M4 A2 DIN 934 Support gaz électrode d'allumage Gaz électrode d'allumage Ecrou inox M4 A2 DIN 934 Ecrou inox M4 A2 DIN 934 Ecrou inox M4 A2 DIN 934 Rondelle étoile M4 AZ DIN 6798 Vis galvanisée M4x20 cyl. DIN84 Brûleur à gaz 50 mm complète Brûleur à gaz 50 mm Description Sechskantschraube Nirosta M6x25 A2 DIN 933 Mutter mit integrierte Fächerscheibe M6 Mutter mit integrierte Fächerscheibe M6 Gaszuführungsrohr 1/2" FS23G L=100 mm Coude M/V FIG92 1/2" ref. Pagina 15,Position 21 Flansch gasventil 30x30x17 ref. Pagina 15,Position 21 Vanne de gaz VK4105A2009B ref. Pagina 15,Position 17 Flansch gasventil 30x30x17 Reduktion aus Messing 1/2"-1/4" Düse für gas G25/3.225MM CD165 Düse für gas G25/4.45MM CD350 Düse für gas G20/4.150MM CD220 Düse für gas Propaan/2.775MM CD220 Düse für gas G25/3.975MM CD220 Düse für gas G20/25 3.65MM A5 Düse für gas Propaan/2.375MM CD165 Düse für gas G25/3.225MM CD165 Düse für gas G20/3.000MM CD165 ref. Pagina 15,Position 13 Gaszündungsrelais S4965B10071 Sechskantschraube Nirosta M4x10 A2 DIN 933 Fächerscheibe M4 AZ DIN 6798 Mutter Nirosta M4 DIN 934 Support Gas Zündung electrode Gas Zündung electrode Mutter Nirosta M4 DIN 934 Mutter Nirosta M4 DIN 934 Mutter Nirosta M4 DIN 934 Fächerscheibe M4 AZ DIN 6798 DIN84 Senkschraube verzinkt M4x20 zylindrisch Gasbrenner 50 mm komplett Gasbrenner 50 mm Bezeichnung DTI10 - DTI14 (CD 220-350) 15 28 29 30 31 15 15 15 15 N° 207/00036/00 160/00107/00 160/00082/00 208/00014/00 Code Metaalschroef verzinkt M4x25 VK DIN965 Support (2) gasklep VK4105A2009B Support (1) gasklep VK4105A2009B Parkerschroef zeskant kop N°12x16 DIN 797 Omschrijving Screw zincked M4x25 VK DIN965 Support (2) gas valve VK4105A2009B Support (1) gas valve VK4105A2009B Parkerscrew 5,5X19 ZN DIN 7976C Description Vis galvanisée M4x25 VK DIN965 Support (2) vanne de gaz VK4105A2009B Support (1) vanne de gaz VK4105A2009B Vis parker galvanisée N°12x16 DIN 797 Description Senkschraube verzinkt M4x25 VK DIN965 Support (2) gasventil VK4105A2009B Support (1) gasventil VK4105A2009B 797 Blechschraube mit Sechskantkopf N°12x16 DIN Bezeichnung DTI10 - DTI14 (CD 220-350) 16 01 01 01 02 03 04 05 06 07 08 09 09 10 10 10 11 11 11 12 13 16 16 16 16 16 16 16 16 16 16 16 16 16 16 16 16 16 16 16 16 N° 206/00099/00 160/00048/02 160/00048/32 160/00048/22 160/00048/12 160/00048/33 160/00048/23 160/00048/13 260/00034/00 260/00013/00 160/00048/01 206/00099/00 206/00099/00 204/00007/00 203/00006/00 206/00027/00 254/EA000/243 160/00048/32 160/00048/22 160/00048/12 Code Flensschroef met vertanding M6x16 Onderdeel oven achterzijde CD165->CD350 Onderdeel oven zijkant rechts CD350 Onderdeel oven zijkant rechts CD220 Onderdeel oven zijkant rechts CD165 Onderdeel (support oven) CD350 Onderdeel (support oven) CD220 Onderdeel (support oven) CD165 Verwarmingselement 4,5KW Verwarmingselement 6KW HR ART.110569 Onderdeel oven voorzijde CD165->CD350 Flensschroef met vertanding M6x16 Flensschroef met vertanding M6x16 Moer staal verzinkt M4 DIN 934 Sterrondel gefosfateerd M4 AZ DIN 6798 Persvijs staal verzinkt M4x10 DIN 933 CIS veiligheidsthermostaat (el.verwarming) Onderdeel oven zijkant rechts CD350 Onderdeel oven zijkant rechts CD220 Onderdeel oven zijkant rechts CD165 Omschrijving Bolt with integrated lockwasher M6 X 16 Part oven back CD165->CD350 Part oven right side CD350 Part oven right side CD220 Part oven right side CD165 Part (support oven) CD350 Part (support oven) CD220 Part (support oven) CD165 Heating element 4,5KW Heating element 6KW HR ART.110569 Part oven front CD165->CD350 Bolt with integrated lockwasher M6 X 16 Bolt with integrated lockwasher M6 X 16 Nut M4 DIN 934 Castle washer M4 AZ DIN 6798 Hexagon bolt zincked M4x10 DIN 933 CIS safety thermostat (electric heating) Part oven right side CD350 Part oven right side CD220 Part oven right side CD165 Description Boulon avec rondelle étoile intégrée M6 X 16 Pièce détachée four derrière CD165->CD350 Pièce détachée four côté latéral droite CD350 Pièce détachée four côté latéral droite CD220 Pièce détachée four côté latéral droite CD165 Pièce détachée (support four) CD350 Pièce détachée (support four) CD220 Pièce détachée (support four) CD165 Résistance 4,5KW Résistance 6KW HR ART.110569 Pièce détachée four devant CD165->CD350 Boulon avec rondelle étoile intégrée M6 X 16 Boulon avec rondelle étoile intégrée M6 X 16 Ecrou galvanisé M4 DIN 934 Rondelle étoile M4 AZ DIN 6798 Boulon galvanisé M4x10 DIN 933 CIS thermostat de sécurité (Electr.) Pièce détachée four côté latéral droite CD350 Pièce détachée four côté latéral droite CD220 Pièce détachée four côté latéral droite CD165 Description Schraube mit Fächerscheibe M6 X 16 Ersatzteil Ofen Hinterseite CD165->CD350 Ersatzteil Ofen Seitenteil rechts CD350 Ersatzteil Ofen Seitenteil rechts CD220 Ersatzteil Ofen Seitenteil rechts CD165 Ersatzteil (Stütz Ofen) CD350 Ersatzteil (Stütz Ofen) CD220 Ersatzteil (Stütz Ofen) CD165 Heizelement 4,5KW Heizelement 6KW HR ART.110569 Ersatzteil Ofen Vorderseite CD165->CD350 Schraube mit Fächerscheibe M6 X 16 Schraube mit Fächerscheibe M6 X 16 Mutter verzinkt M4 DIN 934 Fächerscheibe M4 AZ DIN 6798 Sechskantschraube verzinkt M4x10 DIN 933 CIS Sicherheitsthermostat (Elektr.) Ersatzteil Ofen Seitenteil rechts CD350 Ersatzteil Ofen Seitenteil rechts CD220 Ersatzteil Ofen Seitenteil rechts CD165 Bezeichnung DTI10 - DTI14 (CD 220-350) 17 01 01 01 02 03 03 03 04 17 17 17 17 17 17 17 17 N° 206/00099/00 160/00070/00 160/00069/00 160/00068/00 206/00099/00 254/00029/00 254/00028/00 254/00027/00 Code Flensschroef met vertanding M6x16 Montageplaat stoombatterij CD350 Montageplaat stoombatterij CD220 Montageplaat stoombatterij CD165 Flensschroef met vertanding M6x16 Stoombatterij DR50/75-CD350 Stoombatterij DR30-CD220 Stoombatterij DR20-CD165 Omschrijving Bolt with integrated lockwasher M6 X 16 Mounting plate steam battery CD350 Mounting plate steam battery CD220 Mounting plate steam battery CD165 Bolt with integrated lockwasher M6 X 16 Steam coil DR50/75 Steam coil DR30-CD220 Steam coil DR20-CD165 Description Boulon avec rondelle étoile intégrée M6 X 16 Plaque de montage batterie vapeur CD350 Plaque de montage batterie vapeur CD220 Plaque de montage batterie vapeur CD165 Boulon avec rondelle étoile intégrée M6 X 16 Batterie vapeur DR50/75-CD350 Batterie vapeur DR30-CD220 Batterie vapeur DR20-CD165 Description Schraube mit Fächerscheibe M6 X 16 Montageplatte Dampfregister CD350 Montageplatte Dampfregister CD220 Montageplatte Dampfregister CD165 Schraube mit Fächerscheibe M6 X 16 Heizregister DR50/75-CD350 Heizregister DR30-CD220 Heizregister DR20-CD165 Bezeichnung