1
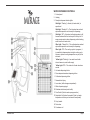
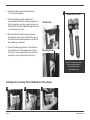
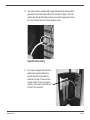
User Guide
Please Read This Instruction Manual Before Using Your Water Cooler
Water Bottle Dispenser
or Bottleless Dispenser
oaisiscoolers.com
™
Thank you for purchasing an Oasis Water Dispenser.
This unique design offers the benefits of
•
No more struggling and lifting of heavy water bottles
•
No more accidental water spillage during water bottle installation
•
No more looking at bruised and battered recycled water bottles
Please read the enclosed operating instructions carefully and retain this booklet for future reference. We have carefully engineered
your Water Dispenser to give you years of enjoyment and trouble free operation.
IMPORTANT SAFEGUARDS
•
Never turn the dispenser upside down or tilt more than 45 degrees. If the unit has been resting on its side for a long period
of time, place the water dispenser in the upright position for approximately 12 hours before turning it on.
•
For use with 3 or 5 gallon (12 or 19 liter) water bottles.
•
Never use this dispenser with water that is unsafe to drink or is from an unknown source.
•
Never use any other liquid in the dispenser other than known and microbiologically safe bottled water. Never allow children
to dispense hot water without proper and direct supervision.
•
This water dispenser is equipped with a grounded power cord plug for your safety.
•
Keep your water dispenser in a dry place away from direct sunlight.
•
Never put anything flammable close to the dispenser.
•
Leave a minimum of 2” (5 cm) around the back and sides of the dispenser for proper ventilation.
•
Always install your water dispenser on a level floor. Wait 3 minutes before restarting machine after shutting it down. Always
unplug the water dispenser before servicing.
•
Regular cleaning of your water dispenser is required for your warranty.
•
Please follow the cleaning instructions outlined in this manual and clean the dispenser every 4 months.
GROUNDING INSTRUCTIONS
•
Improper use of the grounding plug can result in a risk of electric shock causing serious injury, even death.
•
This appliance must be grounded. In the event of an electrical short circuit, grounding reduces the risk of electric shock by
providing an escape wire for the electric current.
•
This appliance is equipped with a power cord having a grounding wire with a grounding plug and must be connected
into a properly grounded polarized outlet. Consult a qualified electrician if the grounding instructions are not completely
understood, or if doubt exists as to whether the appliance is properly grounded. If the wall outlet is a standard 2 prong
outlet, it is your personal responsibility and obligation to have it replaced with a properly grounded 3-prong wall outlet.
•
Do not under any circumstances cut or remove the third (ground) prong from the power cord plug. Do not use an adapter
plug with this appliance.
•
Do not use an extension cord with this appliance. If the power cord is too short, have a qualified electrician install an
electrical outlet near the appliance.
Page 2
oasiscoolers.com
WATER DISPENSER CONTROLS
1. Control panel
2. Heating
3. Ready-to-dispense indicator lights
™
Red Light: “Flashing” = Heater (hot water tank) is
operational
Red Light: “Steady On” = The hot water has reached
optimum temperature and is ready for dispensing.
Red Light: “Off” = Hot water tank heating system is off,
however water within the tank may still be very hot. Always exercise caution when dispensing and/or draining
water from the hot water tank.
Blue Light: ‘’Steady On” = The cold water has reached
optimum temperature and is ready for dispensing.
Blue Light: “Off” =The cooling cycle is in progress, it
is possible to dispense water during the cooling cycle,
however, optimum cooling temperature may not yet be
achieved.
Yellow Light: “Flashing” = Low water level inside
internal reservoir, water bottle empty.
Yellow Light: “Off” = The status of all water levels are
normal.
4. Hot water dispensing button
5. Room temperature water dispensing button
6. Cold water dispensing button
7. Removable drip tray
8. Lower door (bottle storage compartment)
9. Water dispensing spigot
10.Stainless steel straw (water bottle)
11. Door Switch (Controls water pump operation)
12.Adjustable “cold” water thermostat. (Note: hot water
temperature is factory set and cannot be adjusted)
13.Carry handle
14.Drain valve
15.Condenser coil
oasiscoolers.com
Page 3
OPERATING INSTRUCTIONS
Initial Product Cleaning Procedure
Like most appliances, your water dispenser requires periodic maintenance for maximum
efficiency and performance and must be cleaned on a regular basis (i.e. every 4 months). To
maintain a hygienic environment within your water dispenser and prevent potential formation
(growth) of bacteria, we strongly recommend regular cleaning.
1. Make sure the lower compartment storage door is “open” (this will prevent activation of
the water pump).
2. Make sure the power cord is plugged into electrical outlet.
3. Using a clean jug/container pre-mix 4 cups / 1 L of White Vinegar with 4 cups / 1 L of
hot water. Place the jug/container on the floor of the bottle storage compartment. Insert
the stainless straw into the cleaning solution, (make sure the jug/container does not tip
over) and close the storage door. The water pump will start automatically and draw the
cleaning solution into the dispenser reservoirs. When all of the cleaning solution has
been drawn, the pump will continue to operate for approximately 20 seconds and stop
automatically, followed by a flashing yellow light (add water) condition (this is normal).
Simply open the storage to cancel the flashing yellow light. Allow the cleaning solution to
sit inside the dispenser for 20 minutes.
4. Place a jug/container under the dispensing spigots and press both the hot and cold dispensing buttons until the cleaning solution stops flowing. Discard cleaning solution.
5. Using a jug/container, drain the remaining cleaning solution from the internal reservoirs
by unscrewing the drain cap and removing the drain plug from the drain valve located at
the back of the unit. Discard the cleaning solution.
6. Re-install the drain plug and drain cap on the unit and flush the system using 2L clean
water only (no cleaning solution) following the same basic steps outlined above. (See
step # 3) Place jug/container under drain valve and remove drain cap and drain plug allowing rinse water to drain. When the rinse water stops flowing, re-install the drain plug
and drain cap and tighten. The cleaning process is now complete.
Page 4
oasiscoolers.com
Installing the Water Bottle
The Mirage can use 3 or 5
gallon water bottles. This
unit also easily converts to
a direct water line. Please
see page 7 for instructions
on installing this unit direct
to a water line and filtration
system.
IMPORTANT: Always wash your hands first before handling water bottle! Clean the top of the water bottle
with a clean cloth. Water bottles can be purchased from your local retailer.
1. Make sure the lower door (bottle storage compartment) is open. The water pump cannot operate as
long as the door is in the open position.
2. Remove the protective label from the top of the bottle. Do not remove the Bottle Cap. s
3. Most water bottles have a puncturable membrane in the top cap. To puncture the membrane, insert
the straw into the cap and push downward until the membrane opens. Insert the straw all the way into
the bottle until the bottom of the straw touches the bottom of the water bottle. NOTE: The water bottle
drinking straw features an exclusive telescopic design for use with either 18.9L (5gal) and 11.4L (3gal)
water bottles.(See Fig. 1 & Fig. 2) To adjust the length of the water bottle drinking straw, hold the upper
portion of the straw and simply pull/push the lower portion of the straw to the desired length.
4. To attach the water
bottle straw onto the
neck of the water
bottle, make sure the
handle is positioned
“horizontally” and
press firmly onto the
top of the bottle neck.
(See Fig. 3) When the
handle is in the “vertical” (locked) position, (See Fig. 4) it is
possible to lift/carry
the water bottle (the
Bottle Cap must be
in place to lift). However, when installing
the 18.9L (5gal) water
bottle inside the storage compartment, the
handle must be in the
“horizontal” position.
(See Fig. 3)
oasiscoolers.com
Page 5
IMPORTANT: DO NOT BREAK OR REMOVE THE SEAL FROM AROUND THE NECK OF THE
WATER BOTTLE, (See Fig. 5) OTHERWISE YOU WILL NOT BE ABLE TO LIFT/CARRY THE
WATER BOTTLE WITH THE CARRY HANDLE. (See Fig. 6)
5. To install the water bottle inside the bottle storage compartment, simply position the bottle in front of
storage compartment ramp and (push) slide inside using the side of your leg until the bottle comes to a
stop.
6. Close the lower compartment door and the water pump will start delivering water into the dispenser
automatically. When the internal reservoirs are full, the water pump will stop automatically.
NOTE: The water pump system also incorporates a special safety
feature that prevents/stops operation in the absence of water.
(i.e. empty water bottle conditions) Water pump operation is also
linked to a door switch system mounted inside the lower storage
compartment.
i.e. Door open = pump operation suspended.
Door closed = normal pump operation.
Dispensing Room and Cold Water
Place a glass under the dispensing spigot in the center of the
water outlet panel. For cold water, press/hold dispensing button
(#6) until the desired amount of water is dispensed and release.
For room temperature water, press/hold dispensing button (#5) until
the desired amount of water is dispensed and release.
Fig. 5 Water Bottle Seal Intact
Fig. 6 Water Bottle Seal Removed
Adjusting the Temperature (Cold water only)
By turning the thermostat at the back of the unit, the temperature can be adjusted by using a small flat
screwdriver. Turn the dial clockwise between the high (cool) and low (colder) levels until the desired
temperature is reached. If the water dispenser is not dispensing water, there could be a possible ice
build up due to the thermostat being set too cold. If this happens, unplug the dispenser overnight and
then reset. Set thermostat to a warmer setting, slowly increasing based on your use and need for cold
water.
Back of Cooler
Page 6
oasiscoolers.com
Converting to Direct Water Line (bottleless water option)
1. Your cooler comes set up for 3 gal. (11.4L) or 5 gal. (18.9L) bottle bottom load as shown
in figure “A”.
2. Disconnect the bottle siphon from the door by pulling the handle away for the door, as
shown by the arrow direction in figure “A”
3. Disconnect the water supply tube from the siphon cap elbow as shown if figure “B”, see
instructions below
A
4. After disconnecting the siphon, store in a safe place for future use. The siphon assembly
will fit in the open space by the condenser as shown in figure “C”
5. Connect the Stem Elbow that was supplied with your cooler to the water supply tube as
shown in figure D. The Stem Elbow is a ¼ stem connection that will be standard for your
filter system setup later in these instructions
Water tube to Elbow connect and
disconnect procedures
B
C
D
oasiscoolers.com
Page 7
6. Assemble the filter as per individual instructions. F - Filter set sold separately.
F
7. The filter bracket has several hole patterns to
accommodate different filter mounting configurations. It
may be necessary to provide your own holes per your
individual filter instructions. Note: Mounting screws are
not included with your cooler.
Oasis Green Filter
Filter Bracket
8. Mount the filters to the filter bracket per individual
instructions as show in figure G. Note. Follow any preflush instructions that were supplied with your filter set
before make any connections.
9. Connect the water supply tube with ¼ Stem Elbow to
the outlet side of your filter system shown in figure H.
Connect the ¼ tube (supplied with your cooler) to the
inlet side of your filter system as shown in figure I.
Mounting Screws
Green Filter replacement media
can be purchased online at:
www.oasiscoolers.com
www.oasisfilters.com
Installing and connecting Filters (OASIS Green Filter shown)
G
Page 8
H
I
oasiscoolers.com
10. Your cooler will come equipped with a supply tube bushing for the inlet tube to
pass thru the rear of the cooler similar to the one shown in figure J. Push the
supply tubing through this bushing to make your external supply water connection. Note: Observe all local and state plumbing codes.
Supplied tube bushing
11. Your cooler is equipped with open door
safety interlock system that will suspend all coolers functions while the
access door is open. The access door
must be shut for the cooler to operate
correctly. Follow start up instructions at
the front of this document.
oasiscoolers.com
Page 9
CLEANING AND MAINTENANCE
Like most appliances, your water dispenser requires periodic maintenance for maximum efficiency and performance and must be
cleaned on a regular basis (i.e. every 4 months).
To maintain a hygienic environment within your water dispenser and prevent potential formation (growth) of bacteria, we strongly
recommend regular cleaning.
Cleaning the Outside of the Water Dispenser
The outside of the dispenser can be wiped clean with clean solution or a mild soap and
water mixture. Never use harsh chemicals or abrasive cleaners. Rinse thoroughly with clean water and then dry surfaces.
Cleaning the Drip Tray
To remove the drip tray, (Fig. 8) pull the tray forward dislodging it from the guides.Drain and clean.
The drip tray should be emptied and cleaned regularly to remove spotting and any mineral deposits. Clean with cleaning
solution or a mild soap and water mixture. For tough deposits, add vinegar and let it soak until the deposits come loose.
Then wash, rinse and dry thoroughly. To replace, put the grill back on the tray and slide the tray onto the guides (not
dishwasher safe).
Cleaning the Condenser
Vacuum or sweep away the dust from the condenser coils at the back of the dispenser. For best results, you can purchase
a brush designed specifically for this purpose from your local appliance store. This will improve cooling and efficiency.
Draining the Reservoirs
Drain the reservoirs before and after cleaning, when going on long vacations or if not using the dispenser for long periods
of time.
IMPORTANT! Unplug the dispenser before performing this procedure.
Dispense hot water until temperature drops to a safe level to avoid the risk of scalding.
1.
2.
3.
4.
5.
Remove the water bottle
Press all 3 dispense buttons until water no longer comes out
Place a bucket beneath the drain valve on the back of the dispenser
Remove the cap and plug from the drain valve and let the water flow into the bucket
Replace the cap and plug
IMPORTANT: Collect the water in a container, not the drip tray.
6. Replace the water bottle (see Installing the Water Bottle)
Going Away on Vacation
When not using the dispenser for long periods of time or when going on vacation, conserve energy, unplug the dispenser and drain
the reservoirs (see Draining the Reservoirs). Follow Initial Product Cleaning Procedures upon return and startup of the dispenser.
Page 10
oasiscoolers.com
Problem
Possible Cause
Suggested Solution
Water dispenser is leaking
Drain cap and silicone seal are not secure.
Ensure seal is secure in drain plug and tighten
cap.
Water is not hot or cold enough
All the water in the tank has been used. Replace with full bottle and wait 60 minutes for
water to cool.
The unit is unplugged.
Plug into the outlet.
The circuit breaker is tripped or a fuse is blown.
Reset the breaker or replace the fuse.
Temperature limit tripped.
Allow the temperature of the hot water tank to
cool for approximately 15-30 minutes. The temperature limit thermostat will reset automatically
once sufficiently cooled and the cooling system
will reactivate automatically.
Thermostat needs to be adjusted colder.
Adjust thermostat between high (cool) and low
(colder) levels to achieve desired temperature.
Empty water bottle.
Replace with full bottle.
Mineral deposits clogging tanks. See Cleaning the Reservoirs.
Possible air pocket.
Push down on the dispenser buttons to prime
the unit.
Inspect water line for kinks.
When using direct water hookup;
slow or no water into the cooler
Possible ice build-up due to thermostat set too high.
Unplug overnight, then reset. Adjust thermostat
to high, slowly increasing based on desired use
and need for cold water.
Water dispenser is noisy
Bottle is making a gurgling noise as it fills the tank. This is normal.
Water dispenser is uneven. Make sure the dispenser is on an even surface
that can support its weight.
Water dispenser is not dispensing
water
oasiscoolers.com
Page 11
222 Campus View Blvd, Columbus, Ohio 43235
800.646.2747 | [email protected]
Oasis International is a WBENC—Certified Women’s Business Enterprise
OASIS is a registered trademark of LVD Acquisition, LLC dba Oasis International
© 2011 LVD Acquisition, LLC