1
Connectivity of
Rohde & Schwarz Signal
Generators
Application Note
Products:
|
R&SSMW200A
|
R&SSMU200A
|
R&SSMA100A
|
R&SSMBV100A
|
R&SSMJ100A
|
R&SAMU200A
|
R&SSMF100A
|
R&SSMC100A
|
R&SSMATE200A
|
R&SAFQ100B
|
R&SSMB100A
|
R&SAFQ100A
Thomas Braunstorfinger
04.2013-1GP72_1e
Application Note
This application note describes how
Rohde & Schwarz signal generators can be
connected to system controllers and external
PC peripherals such as USB memory sticks.
Table of Contents
1 Introduction ......................................................................................... 6
2 Feature Overview ................................................................................ 6
2.1
Security Aspects ..........................................................................................................8
2.2
Identifying/Addressing the Signal Generator Using a LAN Connection ................9
2.2.1
Finding Hostname and IP Address ..........................................................................10
2.2.2
Changing the Hostname ...........................................................................................11
2.2.3
Changing the IP Address ..........................................................................................12
2.2.4
Direct LAN Connection between Signal Generator and Controller ......................12
3 Remote Control ................................................................................. 14
3.1
Choosing the Right API .............................................................................................14
3.1.1
Using Instrument Drivers ..........................................................................................14
3.1.2
Directly Using VISA ...................................................................................................15
3.1.3
Using the Telnet Protocol without VISA ..................................................................17
3.1.4
Using Low-Level Drivers or Older APIs ...................................................................17
3.2
How to Use the Telnet Protocol / Socket API ..........................................................18
3.2.1
Manual Control of Instruments.................................................................................18
3.2.2
Programmatic Control of Instruments .....................................................................19
3.3
Using Serial and Bluetooth Connections ................................................................20
3.3.1
Bluetooth Remote Control ........................................................................................21
3.4
Comparing Speed ......................................................................................................24
3.5
Emulation of Other Instruments ...............................................................................25
4 Remote Operation ............................................................................. 27
1GP72_1e
4.1
Using Remote Desktop .............................................................................................28
4.1.1
Activating and Deactivating the Remote Desktop Server on the Instrument ......28
4.1.2
Starting the Remote Desktop Client ........................................................................29
4.2
Using VNC ..................................................................................................................30
4.2.1
Activating the VNC Server on the Instrument .........................................................30
4.2.2
Starting a VNC Client .................................................................................................31
4.2.3
Comparison of the three ways to establish a VNC connection ............................32
4.2.4
VNC to go (SMW only) ...............................................................................................32
4.3
Comparison of Remote Desktop with VNC .............................................................33
Rohde & Schwarz Connectivity of Rohde & Schwarz Signal Generators 3
5 Using PC Peripherals ....................................................................... 35
5.1
External Displays .......................................................................................................35
5.1.1
VGA Connector ..........................................................................................................35
5.1.2
DVI Connector ............................................................................................................36
5.1.3
No Video Connector ..................................................................................................36
5.2
Mice, Touchpads and Other USB Pointing Devices ...............................................37
5.3
External Keyboards ...................................................................................................37
5.4
USB Mass Memory Devices ......................................................................................39
6 File Transfer / File Sharing ............................................................... 40
6.1
Using FTP File Sharing..............................................................................................40
6.1.1
Using FTP with a Windows Client ............................................................................40
6.1.2
Using FTP with a Linux Client ..................................................................................40
6.2
Using SMB/SAMBA to Share Files with Linux-Based Signal Generators ............40
6.2.1
Using SMB/SAMBA with a Windows Client .............................................................45
6.2.2
Using SMB/SAMBA with a Linux Client ...................................................................45
6.3
Using SMB/SAMBA to Share Files with SMU, SMJ, SMATE, AMU and AFQ ........45
7 Abbreviations .................................................................................... 46
1GP72_1e
Rohde & Schwarz Connectivity of Rohde & Schwarz Signal Generators 4
Security Aspects
Abbreviations
The following abbreviations are used in this application note for Rohde & Schwarz test
equipment:
®
• The R&S SMW200A vector signal generator is referred to as the SMW.
®
• The R&S SMU200A vector signal generator is referred to as the SMU.
®
• The R&S SMATE200A vector signal generator is referred to as the SMATE.
®
• The R&S SMJ100A vector signal generator is referred to as the SMJ.
®
• The R&S AMU200A baseband signal generator and fading simulator is referred to as
the AMU.
®
®
• The R&S AFQ100A and R&S AFQ100B arbitrary waveform generators are referred
to as the AFQ.
®
• The R&S SMA100A signal generator is referred to as the SMA.
®
• The R&S SMB100A signal generator is referred to as the SMB.
®
• The R&S SMC100A signal generator is referred to as the SMC.
®
• The R&S SMF100A signal generator is referred to as the SMF.
®
• The R&S SMBV100A signal generator is referred to as the SMBV.
Trademarks
National Instruments, NI, ni.com, LabVIEW and LabWindows/CVI are trademarks of
National Instruments Corporation.
Other product and company names mentioned herein are trademarks or trade names
of their respective companies.
1GP72_1e
Rohde & Schwarz Connectivity of Rohde & Schwarz Signal Generators 5
Introduction
Security Aspects
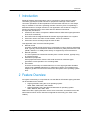
1 Introduction
Rohde & Schwarz signal generators can be connected in various ways to system
controllers (typically PCs) and external PC peripherals. Although most of these
connection operations are also explained in the instrument manuals, it is not always
easy to maintain an overview. Operating manuals commonly focus on explaining a
dedicated feature of a single instrument. This application note examines a range of
typical user tasks and how to solve them with the different instruments.
It is especially intended for:
● Customers who want to compare the different Rohde & Schwarz signal generators
in terms of connectivity
● Users who want to integrate Rohde & Schwarz signal generators into a system
● Users who need to use older control software, drivers or interfaces
● Users who want to exchange large amounts of data
This application note covers the following areas:
● Remote control
A system controller sends sequences of commands in order to perform automated
tests. Typically, Virtual Instrument Software Architecture (VISA) interfaces are used
(GPIB, LAN/VXI-11 or USB), either directly or supported by instrument drivers.
● Remote operation
The user operates the instrument manually from a remote location, typically using
an Internet browser.
● External PC peripherals
Some peripherals known from the PC world can also be used with signal
generators to ease operation or to exchange data.
● File transfer
There are several ways to transfer files from or to the signal generator. Besides
remote control (MMEM subsystem) or USB memory sticks, it is sometimes very
helpful to get direct access to the instrument’s file system at the operating system
level.
2 Feature Overview
As regards connectivity, it is important to note that Rohde & Schwarz signal generators
can be divided into two classes:
• Signal generators using the Linux operating system:
SMW, SMA, SMB, SMC, SMF, SMBV
• Signal generators using the Microsoft Windows XP operating system:
SMU, SMATE, SMJ, AMU, AFQ
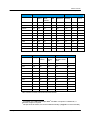
Within their class, signal generators use the same code base, and therefore have the
same features which can be used and configured the same way (see Table 1 and
Table 2).
1GP72_1e
Rohde & Schwarz Connectivity of Rohde & Schwarz Signal Generators 6
Feature Overview
Security Aspects
Feature
Remote control
Remote operation
Instrument
GPIB
LANVXI-11
LAN
Telnet
Protocol
USBTMC
RS232/
Bluetooth
Remote
Desktop
VNC
LXI
Class C
SMW
Yes
Yes
Yes
Yes
Yes1
No
Yes
No
SMU
Yes
Yes
Yes
No
No
Yes
No2
Yes
SMATE
Yes
Yes
Yes
No
No
Yes
No2
Yes
2
SMJ
Yes
Yes
Yes
No
No
Yes
No
Yes
AMU
Yes
Yes
Yes
No
No
Yes
No2
Yes
Yes
2
No
Yes
AFQ
Yes
Yes
Yes
No
No
SMA
Yes
Yes
Yes
Yes
Yes1
No
Yes
No
1
No
Yes
No
SMB
Yes
Yes
Yes
Yes
Yes
SMC
Yes
Yes
Yes
Yes
Yes1
No
Yes
No
SMF
Yes
Yes
Yes
Yes
Yes1
No
Yes
No
Yes
1
No
Yes
No
SMBV
Yes
Yes
Yes
Yes
Table 1: Feature overview, remote control and remote operation
Feature
External devices
File transfer
Instrument
Display
Keyboard
& Mouse
USB
memory
stick
SMB/Samba/
Windows shared
folder
FTP
SMW
No
Yes
Yes
Yes
Yes
SMU
VGA
Yes
Yes
Yes
No
SMATE
VGA
Yes
Yes
Yes
No
SMJ
VGA
Yes
Yes
Yes
No
AMU
VGA
Yes
Yes
Yes
No
AFQ
DVI
Yes
Yes
Yes
No
SMA
No
Yes
Yes
Yes
Yes
SMB
No
Yes
Yes
Yes
Yes
SMC
No
Yes
Yes
Yes
Yes
SMF
No
Yes
Yes
Yes
Yes
SMBV
No
Yes
Yes
Yes
Yes
Table 2: Feature overview, external devices and file transfer
1
®
For RS232, the USB serial adapter R&S TS-USB1 is required. For Bluetooth, a
bluetooth dongle is required.
2
Not part of the firmware, but can be installed manually (Ultr@VNC is recommended)
1GP72_1e
Rohde & Schwarz Connectivity of Rohde & Schwarz Signal Generators 7
Feature Overview
Security Aspects
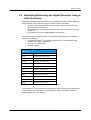
2.1 Security Aspects
Rohde & Schwarz signal generators can be connected in several ways, which enables
many powerful applications. However, all connections that can be used by authorized
users pose potential security risks as well. Please perform the following checks in
order to reduce these risks:
► Change the security password! By default, it is "123456" and can be changed
using the Setup/Security menu.
► Windows-based instruments: Change the user password (valid for remote
desktop)! By default, it is "instrument" and can be changed at the operating system
level (see operating manual) and by using the tool "Autologin", which is part of
code_samples.zip (to be downloaded from the Rohde & Schwarz website).
► Linux-based instruments: Change the user password (valid for VNC, FTP and
SMB/SAMBA)! By default, it is "instrument" and can be changed using the
Setup/Security Menu.
► Do you use LAN connections? If not, deactivate "LAN Connections" in the security
settings.
► Do you use USB devices beside mice and keyboards? If not, deactivate "USB
Device" in the security settings.
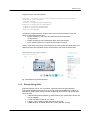
► If you use LAN connections, do you need to use remote operation (VNC or remote
desktop)? If not
- Windows-based instruments: Deactivate remote desktop (and VNC, if installed).
- Linux-based instruments: VNC can be deactivated, if a new firmware is installed.
Otherwise set a very secure instrument password.
For all Rohde & Schwarz signal generators, there are detailed papers explaining all
security aspects. At the instrument home page, please see Downloads/Security.
Fig. 1: Finding instrument security procedures (example for SMBV)
1GP72_1e
Rohde & Schwarz Connectivity of Rohde & Schwarz Signal Generators 8
Feature Overview
Identifying/Addressing the Signal Generator Using a LAN Connection
2.2 Identifying/Addressing the Signal Generator Using a
LAN Connection
All Rohde & Schwarz signal generators can be addressed by either their IP address or
their hostname. This is valid for all types of LAN connections including:
• Remote control using instrument drivers, directly VISA or the raw Ethernet /
telnet protocol (see chapter 3)
• Remote operation using remote desktop, a VNC client or a web browser (see
chapter 4)
• File transfer using FTP or SMB/SAMBA (see chapter 6)
All Rohde & Schwarz signal generators are delivered factory-preset to an individual
hostname consisting of
®
• “rs” (stands for R&S , not used with all instruments to avoid problems with
NetBIOS name length restrictions)
• The name of the instrument
• Its serial number
Default hostname of Rohde & Schwarz signal
generators
Instrument
Hostname
SMW
RSSMW200A<serial number>
SMU
RSSMU200A<serial number>
SMATE
SMATE200A<serial number>
SMJ
RSSMJ100A<serial number>
AMU
RSAMU200A<serial number>
AFQ
AFQ100A<serial number>
SMA
rssma100a<serial number>
SMB
rssmb100a<serial number>
SMC
rssmc100a<serial number>
SMF
rssmf100a<serial number>
SMBV
smbv100a<serial number>
Table 3: Default hostnames of Rohde & Schwarz signal generators
The hostname is very convenient to use because it does not change (IP addresses do
in DHCP networks) and is known (see table above) without checking the Network
Settings Dialog (see next chapter).
1GP72_1e
Rohde & Schwarz Connectivity of Rohde & Schwarz Signal Generators 9
Feature Overview
Identifying/Addressing the Signal Generator Using a LAN Connection
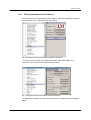
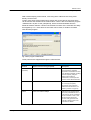
2.2.1 Finding Hostname and IP Address
For all instruments running Windows (SMU, SMATE, SMJ, AMU and AFQ), hostname
and IP address can be found in the LXI status dialog:
Fig. 2: Finding the hostname and IP address on Windows instruments
For all instruments running Linux (SMW, SMA, SMB, SMC, SMF, SMBV), this
information can be found in the Network Settings dialog:
Fig. 3: Finding the hostname and IP address on Linux instruments
For SMW this information is found in the network tab of the Remote Channel Settings
dialog.
1GP72_1e
Rohde & Schwarz Connectivity of Rohde & Schwarz Signal Generators 10
Feature Overview
Identifying/Addressing the Signal Generator Using a LAN Connection
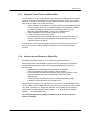
2.2.2 Changing the Hostname
A hostname is the unique name by which a network-attached instrument (such as a
Rohde & Schwarz signal generator) is known within a network. It is recommended not
to change this name, in order to avoid violations of this uniqueness and the loss of
simple identification.
However, if network policies require another name, it can be changed by following the
instructions given in the operating manual.
For all instruments running Windows (SMU, SMATE, SMJ, AMU and AFQ):
• Connect mouse and keyboard
• Move the mouse to the bottom of the screen
• Select
/instrument – right mouse button / properties
• Select tab “Computer Name” / Change …
• Enter the new name
• Press “OK” and restart the instrument
Fig. 4: Changing the hostname on Windows instruments
For all instruments running Linux (SMW, SMA, SMB, SMC, SMF, SMBV), the
hostname can be changed as follows:
• Select Setup/Protection and set protection level 1 (123456)
• Enter the Network Settings Dialog
• Change the hostname and press “Enter” (no restart required)
1GP72_1e
Rohde & Schwarz Connectivity of Rohde & Schwarz Signal Generators 11
Feature Overview
Identifying/Addressing the Signal Generator Using a LAN Connection
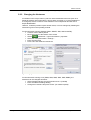
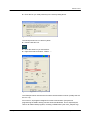
2.2.3 Changing the IP Address
For all instruments running Windows (SMU, SMATE, SMJ, AMU and AFQ) the IP
address can be changed at the operating system level, or, more elegantly, using the
LXI web server (a description of LXI can be found in chapter 5).
Just start an Internet browser and enter the instrument address, for example:
http://rssmf100a100113
("http://" is obsolete for all modern browsers)
Fig. 5: Changing the IP address on Windows instruments
For all instruments running Linux (SMW, SMA, SMB, SMC, SMF, SMBV), the IP
address can be changed in the Network Settings Dialog (SMW : Network tab of the
Remote Channel Settings Dialog)
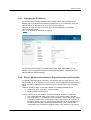
2.2.4 Direct LAN Connection between Signal Generator and Controller
If a Rohde & Schwarz signal generator is connected to the corporate network, it can
automatically get an IP address from the Dynamic Host Configuration Protocol (DHCP)
server and can be addressed by its hostname by the Domain Name Service (DNS)
server.
However, operation within a corporate network is not always possible due to
• Restrictions from corporate IT security policies
• Missing network infrastructure
In these cases a direct link between controller and signal generator is supported:
• Use a standard LAN cable (“patch cable”); no crossover cable is needed
• DHCP still works, i.e. a DHCP-like service within the instrument will also assign
a random IP address to it. If the network cable (connected to the controller) is
plugged in during power on, this address assignment will be completed by the
time the instrument has completely finished booting. If the network cable
(connected to the controller) is plugged in later, it may take up to one minute.
1GP72_1e
Rohde & Schwarz Connectivity of Rohde & Schwarz Signal Generators 12
Feature Overview
Identifying/Addressing the Signal Generator Using a LAN Connection
•
1GP72_1e
For SMW, SMA, SMB, SMC, SMF and SMBV signal generators, DNS still
works, meaning that the instrument can be found using its hostname.
Rohde & Schwarz Connectivity of Rohde & Schwarz Signal Generators 13
Remote Control
Choosing the Right API
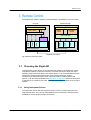
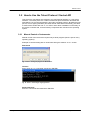
3 Remote Control
A simplified layer model is helpful in understanding the possibilities of remote control:
PC side
Instrument side
Application
Application
Instr. driver
Native
parser
VISA
…
Emulation
parser
SCPI manager
TCP/IP
Low-level drivers
LAN
USB
GPIB
USB
Serial
GPIB
LAN
Low-level drivers
Physical connection
Fig. 6: Remote control layer model
3.1 Choosing the Right API
The application (yellow block) on the left-hand side stands for the software a system
programmer writes to control the instrument. The other blocks are either part of the
operating system (low-level drivers and TCP/IP stack) or can be downloaded from the
instrument’s website (instrument drivers). VISA (Virtual Instrument System
Architecture) is delivered with all vector signal generators containing base band
options. It can also be downloaded from http://www.ni.com/visa/. Please be aware that
a valid license is needed to use VISA. Read the license terms carefully at the vendor's
website.
3.1.1 Using Instrument Drivers
The instrument drivers offer the highest level APIs, and are recommended for most
programming tasks. They can be downloaded from the instrument’s website and are
available for several programming environments.
1GP72_1e
Rohde & Schwarz Connectivity of Rohde & Schwarz Signal Generators 14
Remote Control
Choosing the Right API
A typical function call looks like this:
ViStatus _VI_FUNC rssma_confPowerResponseMeasurementDiagram
(ViSession instrSession,
ViInt32 sense,
ViReal64 frequencyYScaleMinimum,
ViReal64 frequencyYScaleMaximum,
ViReal64 powerYScaleMinimum,
ViReal64 powerYScaleMaximum,
ViInt32 senseMode)
To make the programmer's life simpler, these driver functions handle not only the
setting of the parameters but also
• Option checking (Is this command allowed with this instrument’s
configuration?)
• Range checking (Are the parameters within their valid range?)
• Error checking (Were the commands processed correctly?)
To learn more about these drivers and how they are used, please see application note
1MA153 and the documentation which can be found in the driver download area.
Fig. 7: Download area for instrument drivers
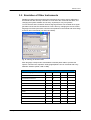
3.1.2 Directly Using VISA
Instrument drivers can be very convenient, especially when using the National
Instruments LabVIEW environment or when high level functionalities are needed, for
example for reading hard copies. However, bypassing these drivers may be the right
choice as well:
• If brand-new firmware releases (or beta versions) are used and the drivers are
not yet available
• If code size and/or speed is very critical
• If legacy code containing VISA calls has to be reused
• If SMW shall be controlled (with built-in code generator, see [2])
1GP72_1e
Rohde & Schwarz Connectivity of Rohde & Schwarz Signal Generators 15
Remote Control
Choosing the Right API
With most developing environments, code using driver calls and code using VISA
directly can be mixed.
To learn more about VISA programming, please refer to the various resources which
can be found at the websites of the VISA vendors. There is also a small demo program
“VISAterminal” as part of code_samples.zip, which can be downloaded from the
Rohde & Schwarz website. It shows how the basic functions of the VISA API can easily
be wrapped by a C++ class and how this class can be used, for instance to build a
VISA terminal program:
Fig. 8: Demo program "VISAterminal"
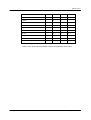
Three protocols are supported through the LAN interface:
Supported VISA LAN protocols
Protocol
Syntax of resource string (simplified)
Description
VXI-11
(standard)
TCPIP::host address::INSTR
Standard LAN protocol
recommended for standard
applications. Most features known
from GPIB are available, including
service requests, polling the
status byte and abort of
transmission. Several ports are
used to control data transmission.
Telnet/Socket
TCPIP::host address::5025::SOCKET
Alternative simple protocol based
on one single port (5025).
No support of the enhanced
features mentioned above, but
faster by a factor of 3 (typical)
HiSLIP
TCPIP::host address::hislip0
Fast as the raw socket protocol
and more possibilities as VXI-11.
This protocol can be considered
as the successor of VXI-11. Not
all instruments support this
protocol. See [4] and the user
manuals / release notes of the
instrument for details.
Table 4: Supported VISA LAN protocols
1GP72_1e
Rohde & Schwarz Connectivity of Rohde & Schwarz Signal Generators 16
Remote Control
Choosing the Right API
3.1.3 Using the Telnet Protocol without VISA
The VISA library is a very useful software layer, especially for abstracting the hardware
interface. It has been the standard API for T&M applications for several years, and is
widely used. However, when using LAN there are some situations where this software
layer cannot be used (or is not the best choice):
• VISA is generally not freeware, but must be licensed from National Instruments
or other vendors. The license is included with National Instruments hardware
or software and also with signal generator baseband options such as
®
SMU-B10 and R&S WinIQSIM™ options such as SMBV-K255.
• VISA is available for most operating systems, but not all.
• If code size and/or speed is very critical:
The network protocol VISA normally uses (“VXI-11”) is typically slower by a
factor of 3 than the telnet protocol (but the VISA socket protocol is nearly
equivalent in terms of speed).
In these cases, directly programming the telnet protocol (using a socket API) is the
best choice. Chapter 3.2 gives detailed instructions on how to use this software
interface.
3.1.4 Using Low-Level Drivers or Older APIs
Sometimes software developed a very long time ago must still be used.
Before VISA became the standard for remote control of measurement instruments,
several different drivers/APIs were used. Typical representatives of this driver
generation are
• GPIB NI488.2 for GPIB (also known as IEC625 or IEEE488)
(the most important functions are ibfind(), ibwrite, ibread() )
• The Windows API for serial communication (also known as RS232 or V24)
(the most important functions are CreateFile(), WriteComm() and
ReadComm())
• Programming the universal asynchronous receiver/transmitter (UART,
hardware component) directly at the register level.
Often porting to VISA-API is the right way to go. The remote commands (SCPI strings
such as “*RST” or “SOUR:BB:GSM:STAT ON”) and the logical structure of the program
can remain unchanged, so only the API calls have to be exchanged. For example,
switching from NI-488.2 (ibfind(), ibwrite, ibread(), …) to VISA (viOpen(), viWrite(),
viRead(), …) is comparatively easy.
For new developments we urgently recommend not to use these low-level
drivers or old APIs!
1GP72_1e
Rohde & Schwarz Connectivity of Rohde & Schwarz Signal Generators 17
Remote Control
How to Use the Telnet Protocol / Socket API
3.2 How to Use the Telnet Protocol / Socket API
This protocol is sometimes also referred to as “raw Ethernet interface” or “raw socket
interface”. The telnet protocol is a rather old Ethernet protocol between terminals and
workstations, but it is still supported by all modern operating systems. By default it uses
port 23, but for signal generators (and other Rohde & Schwarz instruments), port 5025
is used instead. Unlike with VXI-11, no VISA or other driver installation is necessary on
the remote controller side, as all necessary components are included in the operating
system.
3.2.1 Manual Control of Instruments
Manual control of the instrument requires only a telnet program (which is part of every
operating system).
Example of communicating with an instrument having the address 10.111.10.208
Start telnet
Fig. 9: Telnet - starting the program on Windows XP
Connect
Enter "open 10.111.10.84 5025" and press <ENTER>
Fig. 10: Telnet – connecting to signal generator
Send commands
Enter the commands terminated with <ENTER>
1GP72_1e
Rohde & Schwarz Connectivity of Rohde & Schwarz Signal Generators 18
Remote Control
How to Use the Telnet Protocol / Socket API
Fig. 11: Telnet – sending SCPI commands
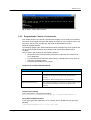
3.2.2 Programmatic Control of Instruments
This chapter shows how a simple command-line program can be written to send SCPI
commands to the signal generator and display the response. The complete source can
be found in the file code_samples.zip, which can be downloaded from the
Rohde & Schwarz website.
The following sample code “EthernetRawCommand” is designed for Linux systems but
can also be used with Windows (an example for Microsoft Visual Studio 2005 is
included).
Linux is used in this example for the following reasons:
• Most Linux users prefer the telnet protocol due to the lack of a VISA for their
Linux distribution
• The development environment (GNU suite) is a standard and can be seen as
part of the operating system
• Compiling and linking are very simple
Components of EthernetRawCommand
Components of EthernetRawCommand
Module
What it does
TcpClient.cpp/TcpClient.h
Implementation of the TcpClient class, which allows connecting,
disconnecting, sending and receiving to/from signal generator
(= server)
These files can easily be repurposed for other applications.
EthernetRawCommand.cpp
Uses TcpClient to establish a connection to the signal generator, send
a SCPI command and display the response in case of a query
command.
Table 5: Components of EthernetRawCommand
Compiling and linking
This is very simple – just type the following:
g++ TcpClient.cpp EthernetRawCommand.cpp –o EthernetRawCommand.out
Using EthernetRawCommand
If your signal generator address is 10.111.10.208, ask for its IDN string by typing the
following:
./EthernetRawCommand.out 10.111.10.208 *IDN?
1GP72_1e
Rohde & Schwarz Connectivity of Rohde & Schwarz Signal Generators 19
Remote Control
Using Serial and Bluetooth Connections
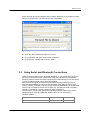
Code_samples.zip contains another demo program showing how to program sockets
with the QTCreator IDE. It is called Socket File Transmitter.
Fig. 12: Using the Socket File Transmitter
► Enter the device address and press "Connect".
► Press "Browse" and select a source file to transmit.
► Press the big "Transmit File to Device" button.
3.3 Using Serial and Bluetooth Connections
Serial connections (also known as RS232, COM port or V.24 connections) were very
popular for instrument remote control before LAN and USB became the standard.
Rohde & Schwarz instruments were equipped with serial interfaces for several years,
so a lot of software exists to drive these instruments.
Often these older signal generators must be replaced with modern instruments,
especially those listed on the cover of this application note, without changing the
system software or hardware. Where remote command compatibility can be achieved
with the help of emulation modes (see chapter 3.5), the lack of a serial (= RS232)
interface is sometimes a critical problem for these applications.
For this reason, all the signal generators frequently used for replacement can be
equipped with an external USB/serial adapter, which can be ordered from
Rohde & Schwarz:
Designation
Type
USB serial adapter for RS232 remote control
1GP72_1e
®
R&S TS-USB1
Order No.
6124.2531.00
Rohde & Schwarz Connectivity of Rohde & Schwarz Signal Generators 20
Remote Control
Using Serial and Bluetooth Connections
The interface parameters can be set in the Remote Channels Settings menu:
Fig. 13: Setting up the serial interface
Just connect the adapter to the Rohde & Schwarz signal generator (USB side) and a
RS232 cable (as used before with the old signal generator.)
Of course, serial communication is not restricted to replacement applications. A serial
API is part of every development environment and is also supported by the VISA layer.
If you are using VISA (for example with the VISA terminal of chapter 3.1.2) please be
aware that the standard baud rate is 9600, and set the signal generator to this value.
However, we do not recommended using the serial interface for new developments,
since LAN and USB are faster, cheaper and more reliable.
3.3.1 Bluetooth Remote Control
In spite of being no more than a legacy mode for traditional remote control, serial
communication is still the key to a useful wireless remote control mode: Bluetooth.
This mode is available for all Linux-based instruments: SMA, SMB, SMBV, SMC and
SMF.
On the instrument side, a Bluetooth USB dongle must be connected (not available from
Rohde & Schwarz but common in the PC world). On the PC side, Bluetooth is also
required, either built-in or likewise using a USB dongle.
Depending on the Bluetooth hardware and the propagation conditions, range and data
rate differ.
1GP72_1e
Rohde & Schwarz Connectivity of Rohde & Schwarz Signal Generators 21
Remote Control
Using Serial and Bluetooth Connections
► On the signal generator side, plug in a Bluetooth USB dongle
► Open the Security dialog and enter the Pin (any four-digit number)
Fig. 14: Input of the Bluetooth pin
► At the PC side, plug in another Bluetooth USB dongle (if not built-in, as in a
notebook)
The Bluetooth icon
will appear on the taskbar.
► Double-click the icon to start a configuration program (manufacturer-dependent)
Fig. 15: Searching for Bluetooth devices
All discovered Bluetooth devices will be shown, including your signal generator (here:
smbv).
► Double-click smbv.
1GP72_1e
Rohde & Schwarz Connectivity of Rohde & Schwarz Signal Generators 22
Remote Control
Using Serial and Bluetooth Connections
► Enter the Pin you used previously in the security dialog above.
Fig. 16: Pin input on PC side
The serial port service icon will turn yellow.
► Double-click this icon.
► Enter the same Pin you used before.
► Right-click smbv and select "Status …"
Fig. 17: Detecting the active COM port
The COM port which must be used for serial communication is shown (usually this will
be 14 or 15).
From now on, all programs designed for serial communication (except those
programming the UART directly) will also work with Bluetooth. This is especially the
case for all VISA-based programs, including “VISAterminal” (see code_samples.zip).
1GP72_1e
Rohde & Schwarz Connectivity of Rohde & Schwarz Signal Generators 23
Remote Control
Comparing Speed
The VISA resource string is accordingly ASRL14::INSTR or ASRL15::INSTR.
Fig. 18: Using the VISA terminal with Bluetooth
If no VISA programming API can be used, it is highly recommended to use a library
such as QExtSerialPort (http://sourceforge.net/projects/qextserialport/).
3.4 Comparing Speed
Choosing the right API often involves selecting the most appropriate physical interface
for remote transmission. Next to cabling costs, maximum distance, reliability,
availability and security requirements, speed is the most important criterion.
Transmission speed is determined by
• The maximum physical speed the hardware (interface chips) is capable of
• The performance of the software layers on the instrument and controller sides
• Overhead caused by higher layer protocols
• Processing speed of instrument and controller
• Size of the payload (the data to be sent or read)
The following values are typical for SMBV, and are also a good approach for the
bandwidth we can see with other signal generators:
Speed comparison of remote control interfaces
Interface
Time for *IDN? (including
reading the answer)
Transfer rate for big waveforms
(using MMEM commands)
VISA VXI-11
1.8 ms
1.7 Mbyte/s
VISA socket / telnet
0.9 ms
7 Mbyte/s
GPIB
1.0 ms
0.6 Mbyte/s
USB
1.2 ms
3.6 Mbyte/s
VISA Serial 9600 baud
100 ms
0.001 Mbyte/s
VISA Serial 115200 baud
29 ms
0.012 Mbyte/s
VISA Serial Bluetooth
10 ms to 70 ms
Up to 0.1 Mbyte/s
Table 6: Speed comparison of remote control interfaces
For a detailed speed comparison, see [4].
1GP72_1e
Rohde & Schwarz Connectivity of Rohde & Schwarz Signal Generators 24
Remote Control
Emulation of Other Instruments
3.5 Emulation of Other Instruments
Replacing existing instruments with new instruments can lead to serious difficulties if
the instruments are remotely controlled. In most cases the command sets differ, and
changing the system software can be tricky, especially for very old systems.
To overcome this issue, Rohde & Schwarz signal generators can emulate other signal
generators at the remote command level. This is done by changing the remote control
language from SCPI (the native command set explained in the manual and online help)
to that of other instruments (non-SCPI and SCPI).
Fig. 19: Choosing an emulation mode
Each language corresponds to a dedicated command parser able to process this
specific command set. Important: all languages/parsers can be combined with every
hardware interface (GPIB, LAN or USB).
Available emulations (January 2010)
Emulation language
SMA
SMB/SMC
SMBV
AF2023/AF2024
X
X
X
AF2030/AF2031/AF2032
X
X
X
AF2040/AF2041/AF2042
X
X
X
AF2050/AF2051/AF2052
X
X
X
AN680XX
X
E4428
X
X
X
X
E8257
X
X
X
X
HP8340
X
HP8360
X
HP8373
X
HP8642
1GP72_1e
SMF
X
Rohde & Schwarz Connectivity of Rohde & Schwarz Signal Generators 25
Remote Control
Emulation of Other Instruments
HP8643
X
X
X
HP8648
X
X
X
X
X
HP8657
HP8662
X
X
HP8663
X
X
HP8665
X
X
HP8673
X
N5181
X
RC3102
X
RSSMGU
X
RSSML
X
X
X
X
X
X
Table 7: Available remote emulations
To learn more about remote emulation, please see application note 1GP71.
1GP72_1e
Rohde & Schwarz Connectivity of Rohde & Schwarz Signal Generators 26
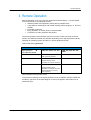
Remote Operation
Emulation of Other Instruments
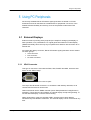
4 Remote Operation
Remote operation is not only a must for instruments without display – it is also helpful
for all instruments for the following reasons:
• Offsite operation and equipment-sharing among multiple users
• Long-distance maintenance and trouble-shooting without shipping, i.e. fast and
cheaply
• Extended screen size
• Easy generation of screen shots for documentation
• Connection to video projectors and printers
For remote operation the instrument (server) must have a LAN connection to the PC
(client). Two different methods are possible, depending on the signal generator (strictly
speaking its operating system) and the PC: remote desktop and VNC.
Valid combinations (preferred):
Combinations of signal generators and remote operation clients
Signal generators
SMU, SMJ, SMATE, AFQ, AMU
SMW, SMA, SMB, SMC, SMF,
SMBV
Windows XP / Vista
Remote Desktop
VNC (manually installed)
VNC
Linux
VNC
VNC
Client Operating System
(Remote desktop clients
available, for example “rdesktop”)
Mac OS
VNC
VNC
(Remote desktop clients
available, for example “Microsoft
Remote Desktop Connection
Client for Mac”)
Table 8: Available remote operation clients
To access the hard keys of the signal generator (such as PRESET, SETUP, FREQ and
all others), right-click on the block diagram. A menu bar appears, with buttons for all
instrument keys:
1GP72_1e
Rohde & Schwarz Connectivity of Rohde & Schwarz Signal Generators 27
Remote Operation
Fig. 20: The menu bar simulating the hard keys (SMW design)
4.1 Using Remote Desktop
Remote desktop uses the Microsoft RDP protocol, based on ITU-T T.128 (also known
as T.SHARE). This is the standard protocol for clients running on Microsoft operating
systems, and is available without any additional installation. Clients also exist for Linux
and Mac OS; just search the Internet for the tools mentioned above (Table 1).
4.1.1 Activating and Deactivating the Remote Desktop Server on the
Instrument
By default, the remote desktop is deactivated for security reasons. It must be activated
manually at the operating system level. It then remains activated until
• It is deactivated again manually
• A new operating system is installed (by Rohde & Schwarz service)
A firmware update does not alter the remote desktop settings.
This step is explained at length in the operating manual ("Manual Operation" chapter).
The most important steps are:
► Open Properties of the system
1GP72_1e
Rohde & Schwarz Connectivity of Rohde & Schwarz Signal Generators 28
Remote Operation
Using Remote Desktop
Fig. 21: Enabling remote desktop access (step 1)
► Activate switch "Allow users to connect remotely to this computer"
Fig. 22: Enabling remote desktop access (step 2)
The remote desktop can be deactivated by simply disabling the checkbox.
4.1.2 Starting the Remote Desktop Client
On the PC side (Windows PC), the remote desktop is started with
Start/All Programs/Accessories/Communications/Remote Desktop Connection.
Enter the hostname of the signal generator.
1GP72_1e
Rohde & Schwarz Connectivity of Rohde & Schwarz Signal Generators 29
Remote Operation
Using VNC
Fig. 23: Enabling remote desktop access (step 1)
Now press Connect.
Fig. 24: Enabling remote desktop access (step 2)
Enter the password (by default "instrument") and press OK.
4.2 Using VNC
Virtual Network Computing (VNC) is a graphical and platform-independent desktop
sharing system for remotely controlling another computer. Multiple clients can connect
to a VNC server simultaneously. Unlike with remote desktop, the instrument remains
locally operable during remote operation. Therefore VNC is ideally suited for remote
technical support and similar applications.
4.2.1 Activating the VNC Server on the Instrument
All signal generators based on Linux (SMW, SMA, SMB, SMC, SMF, SMBV) have a
built-in VNC server, which is always running. It does not need to be activated. This
server uses port 80, which is the standard HTTP port.
All signal generators based on Windows (SMU, SMATE, SMJ, AMU, AFQ) do not have
a VNC server on delivery. It must be installed using the following procedure:
1. Download UltraVNC (http://www.uvnc.com/download/index.html)
1GP72_1e
Rohde & Schwarz Connectivity of Rohde & Schwarz Signal Generators 30
Remote Operation
Using VNC
2. Install it on the instrument with default settings (using port 5800 for HTTP)
3. Grant permission in the firewall setting (Unblock)
Fig. 25: Unblock VNC
4. Set password
4.2.2 Starting a VNC Client
On the PC side, there are basically three options for displaying the instrument display:
1. Use the VNC client software (also downloadable from the same website as the
server)
2. Use any web browser (Java runtime is installed)
3. Use a web browser supporting HTML5 / web sockets (no Java runtime needed)
Enter the instrument address for instance
smate200a910287:5800
rssmw200a123456
The password is the user password, which is “instrument” by default and should be
changed:
• For Windows instruments: at the operating system level
• For Linux instruments: in the security settings
VNC connections can also be established from computers running Mac OS or Linux or
from mobile devices like smart phones and tablet PCs.
1GP72_1e
Rohde & Schwarz Connectivity of Rohde & Schwarz Signal Generators 31
Remote Operation
Using VNC
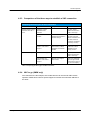
4.2.3 Comparison of the three ways to establish a VNC connection
Comparing the three types of VNC connections
Client device
VNC Client
Requirements
Remarks
Desktop system running
Windows, Mac OS or
Linux
UltraVNC or other
dedicated client
software
Must be installed
Very fast, several
options like full screen
mode or auto-login
Web browser with Java
runtime
Java runtime must be
installed and activated in
browser settings
Fast and convenient,
just enter instrument
address in address line
(but Java runtime is
sometimes considered
as security concern)
Tablet PC /smart phone
Web browser with
HTML5 / web socket
support
Browser must support
web sockets, no extra
installation or activation
needed
Slower than the other
modes but no extra
installation and no
security concern
Dedicated client app
Must be installed
Very fast, several
options like full screen
mode or auto-login
Web browser with
HTML5 / web socket
support
Browser must support
web sockets
Slower than dedicated
app but support of QR
code scanning “VNC tp
go” (see next chapter)
Table 9: Comparing the three types of VNC connections
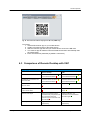
4.2.4 VNC to go (SMW only)
As mentioned in the last chapter, also mobile devices can be used for VNC remote
operation. SMW has a built in a special support to transmit the instrument address to
the client:
1GP72_1e
Rohde & Schwarz Connectivity of Rohde & Schwarz Signal Generators 32
Remote Operation
Fig. 26: The instrument address displayed as QR code (SMW only)
To use this:
1. Install a QR scanner app on your mobile device
2. Update your web browser to the latest version
3. Start the scanner app and hold your mobile device close to the QR code
4. The scanner app will read the instrument address and then automatically start
the web browser
5. Enter the instrument password (by default : instrument)
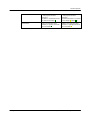
4.3 Comparison of Remote Desktop with VNC
Comparing remote desktop with VNC
Remote desktop
VNC
Windows-based instruments: ☺
Windows-based instruments:
Linux-based instruments:
Linux-based instruments: ☺
Usable with non-Windows PCs
and controllers
Windows-based instruments:
Windows-based instruments:
Linux-based instruments:
Linux-based instruments: ☺
Simultaneous operation locally
and one client
Only one user at a time
Supported
Simultaneous operation of two or
more remote clients
Only one remote client at a time
Supported, but operation slows
down
Remote client logoff
Before the instrument can be
operated locally, a keyboard must
be connected to enter the
password (or the instrument must
be rebooted)
Without notification, the
instrument can be used before
and after logoff ☺
Security
High; remote access can be
restricted by:
Medium; remote access can be
restricted by:
Usable with Windows PCs
1GP72_1e
☺
Rohde & Schwarz Connectivity of Rohde & Schwarz Signal Generators 33
Remote Operation
Comparison of Remote Desktop with VNC
Performance
- deactivating LAN
- changing the instrument
password
In addition, unauthorized access
is visible in the display ☺
- deactivating LAN
- changing the instrument
password
Unauthorized access is not visible
in the display
(SMW: ☺)
High; The protocol is vector
oriented, i.e. graphic commands
are transmitted ☺
Medium; The protocol is raster
oriented, i.e. (partial) screenshots
are transmitted
Table 10: Comparison of remote desktop with VNC
1GP72_1e
Rohde & Schwarz Connectivity of Rohde & Schwarz Signal Generators 34
Using PC Peripherals
External Displays
5 Using PC Peripherals
All currently available Rohde & Schwarz signal generators are based on PC-like
architectures and can therefore be extended with PC peripherals. Of course, in the
tradeoff between flexibility and security, some of the possible modes have been
restricted.
5.1 External Displays
External screens (including video projectors) are helpful for enlarging the display, to
ease operation or for presentations. For signal generators without on-board display
(SMATE and AFQ), this is the only way to operate them without LAN connection to an
external PC.
As regards the display connector, Rohde & Schwarz signal generators can be divided
into three groups:
• VGA connector
• DVI connector
• No video connector
5.1.1 VGA Connector
This type of connector is used with the SMU, SMJ, SMATE and AMU, which are also
known as the "SMU Family".
Fig. 27: Monitor / VGA connector on the rear panel
The 15-pin Sub-D female connector is in accordance with industry standard, so all
commercial VGA devices can be used.
Older instruments use the FMR6 controller (check Setup/Hardware Config/Common
Assembly). These devices cannot detect an external display except during booting. To
use the external display, connect it before booting.
Newer instruments, using the controller FMR7, are able to drive both displays
simultaneously with different resolutions. The external display can be connected at any
time.
1GP72_1e
Rohde & Schwarz Connectivity of Rohde & Schwarz Signal Generators 35
Using PC Peripherals
External Displays
5.1.2 DVI Connector
This connector is used with the AFQ100A and AFQ100B.
Fig. 28: Monitor analog connector on the rear panel
The connector complies with industry standard DVI-A, so all commercial DVI-A and
DVI-I devices can be used. In addition, VGA devices can also be connected using a
passive adapter plugged between the devices.
5.1.3 No Video Connector
All other signal generators (SMA, SMF, SMB, SMC and SMBV) are not equipped with a
connector for external displays. LAN remote operation (see
1GP72_1e
Rohde & Schwarz Connectivity of Rohde & Schwarz Signal Generators 36
Using PC Peripherals
Mice, Touchpads and Other USB Pointing Devices
Remote Operation) must be used if you wish to enlarge the display or connect it to a
video projector.
SMW is equipped with a DVI connector but the firmware does not (yet) support it. To
deliver the video signal to a big screen or video projector, connect a desktop computer
over LAN and run a VNC client.
5.2 Mice, Touchpads and Other USB Pointing Devices
All such external devices can be connected to all Rohde & Schwarz signal generators
as long as they comply with the USB Human Interface Device (HID) Class.
No additional driver installation is necessary.
An emulation of the hardkeys can be activated by pressing the right mouse button. If
working with Windows-based instruments such as the SMU, problems may occur when
switching between different applications where only parts of the user interface are
visible. This can be repaired as follows:
• Right-click
• Select "DIAGRAM"
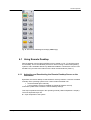
5.3 External Keyboards
The use of an external USB keyboard can make it easier to enter alphanumeric strings,
for instance for file names. Numerous different national keyboard layouts are available
for all Linux-based instruments:
1GP72_1e
Rohde & Schwarz Connectivity of Rohde & Schwarz Signal Generators 37
Using PC Peripherals
External Keyboards
Fig. 29: Select layout of external keyboard
For Windows-based instruments the selection is limited to English and German
layouts.
1GP72_1e
Rohde & Schwarz Connectivity of Rohde & Schwarz Signal Generators 38
Using PC Peripherals
USB Mass Memory Devices
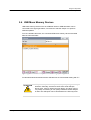
5.4 USB Mass Memory Devices
USB mass memory devices such as USB flash sticks or USB hard disks can be
connected to the signal generators, for instance to transfer setups or to perform
software updates.
For Linux-based instruments, the connected USB mass memory devices are listed
after the /var/user folder:
Fig. 30: Appearance of USB memory sticks in the file manager (SMW style)
For Windows-based instruments these USB devices are enumerated starting with "E:"
ATTENTION
1GP72_1e
USB ports can pose a security threat, especially in high-security
locations. Generally, this threat comes from small USB pen
drives (a.k.a. memory sticks, keychain drives, etc) which can be
very easily concealed, yet can quickly read/write several Gbytes
of data. The USB ports can be deactivated in the Security menu.
Rohde & Schwarz Connectivity of Rohde & Schwarz Signal Generators 39
File Transfer / File Sharing
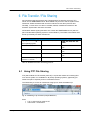
6 File Transfer / File Sharing
All Linux-based signal generators are equipped with a file transfer protocol (FTP)
server and an SMB/SAMBA server. Both enable easy access to the file system of the
instrument. Please be aware that access is restricted to user files (/var/user and
/var/hdd), i.e. files which can also be created, deleted, modified and used from the
firmware. System files cannot be accessed.
All Windows-based signal generators also contain the SMB/SAMBA server (which is
part of all Windows operating system’s "shared folders"). The folder to be shared must
be set up manually for these instruments.
Combinations of signal generators and file transfer / file sharing protocols
Signal generators
SMU, SMJ, SMATE, AFQ, AMU
SMW, SMA, SMB, SMC, SMF,
SMBV
Windows XP / Vista / Windows 7
SMB/SAMBA
SMB/SAMBA
FTP
Linux
SMB/SAMBA
SMB/SAMBA
FTP
Mac OS
SMB/SAMBA
SMB/SAMBA
FTP
client operating system
FTP
Almost all others, including
Windows 3.1 and DOS
Table 11: Available file transfer / file sharing protocols
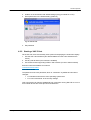
6.1 Using FTP File Sharing
FTP (which stands for "file transfer protocol") is a quite old method of accessing files
on a remote system. It is available for all (client) operating systems, graphically (for
instance as part of explorer) and on command line level.
The fastest way to access an instrument using ftp is to enter the address (or
hostname) in the address line of the explorer:
Fig. 31: establishing a ftp connection (example Windows 7)
Enter
•
•
1GP72_1e
Log on anonymously must be off
User name = "instrument"
Rohde & Schwarz Connectivity of Rohde & Schwarz Signal Generators 40
File Transfer / File Sharing
Using FTP File Sharing
•
Password = "instrument" (can be changed in the security dialog of the
instrument)
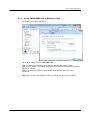
Then you can access the instrument like any other folder on your computer:
Fig. 32: accessing ftp folders (example Windows 7)
The share folder refers to the /var/user folder on the instrument. Files can be
transferred in both directions.
The update folder is used for network updates of the firmware. Just put an rsu file there
and the update starts automatically.
This method to establish a ftp connection works fine for all operating systems. The
connection is available as long as the user session persists. The way to set up a ftp
connection which is automatically reestablished after logon, depends on the operating
system. Two examples:
Windows XP
Start / My Network Places / Add Network Place
Network Address = ftp://<address or hostname>
The hostname can be found in the Network Setting dialog of the instrument.
Enter
•
•
User name = "instrument"
Password = "instrument" (can be changed in the security dialog of the
instrument)
The hard drive and the internal flash drive will be visible.
1GP72_1e
Rohde & Schwarz Connectivity of Rohde & Schwarz Signal Generators 41
File Transfer / File Sharing
Using FTP File Sharing
Ubuntu 8.10
Different Linux versions have slightly different ways of establishing permanent FTP
access.
► From the menu, select Places/Connect to Server
Fig. 33: Establishing an FTP connection (step 1)
► Enter the hostname (= Server) of the instrument
► Enter the password and press Connect
Fig. 34: Establishing an FTP connection (step 2)
► Press Connect
The remote folders will now become available.
1GP72_1e
Rohde & Schwarz Connectivity of Rohde & Schwarz Signal Generators 42
File Transfer / File Sharing
Using FTP File Sharing
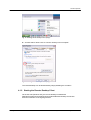
6.1.1 Using SMB/SAMBA with a Windows Client
Use Explorer and select Map Drive:
Fig. 35: Map a network drive to an SMB/SAMBA folder
Select a unused drive and enter the instrument address with trailing “\share”.
After pressing “Finish”, user name “instrument” and password (“instrument” by default)
have to be entered.
Now a new drive (for instance Z:) is available which refers to /var/user on the
instrument.
Mapping the update folder instead of share is possible with the same procedure.
1GP72_1e
Rohde & Schwarz Connectivity of Rohde & Schwarz Signal Generators 43
File Transfer / File Sharing
Using FTP File Sharing
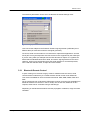
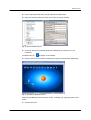
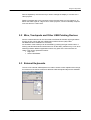
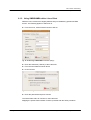
6.1.2 Using SMB/SAMBA with a Linux Client
Different Linux versions have slightly different ways of establishing permanent SMB
access. The following applies to Ubuntu 8.10.
► From the menu, select Places/Connect to Server
Fig. 36: Establishing a SMB/SAMBA connection (step 1)
► Enter the hostname (=Server) of the instrument
► Fill in the other fields as shown above
► Press Connect
Fig. 37: Establishing an SMB/SAMBA connection (step 2)
► Enter the password and press Connect
The share folder refers to /var/user on the instrument.
Mapping the update folder instead of share is possible with the same procedure.
1GP72_1e
Rohde & Schwarz Connectivity of Rohde & Schwarz Signal Generators 44
File Transfer / File Sharing
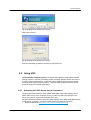
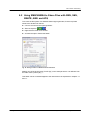
6.2 Using SMB/SAMBA to Share Files with SMU, SMJ,
SMATE, AMU and AFQ
To access the file system of a Windows-based signal generator, first the top folder
needs to be declared as shared:
► Connect a mouse to the signal generator
► Start the explorer
► Right-click the folder to be shared
► Activate the option "Share this folder"
Fig. 38: Sharing a folder on a Windows-based instrument
Make a note of the share name ("DATA (D)") in the example above. It is different from
the folder name ("DATA (D:)").
This folder can be accessed/mapped to the network drive as explained in chapters 1.1.
and 1.1.
1GP72_1e
Rohde & Schwarz Connectivity of Rohde & Schwarz Signal Generators 45
Abbreviations
Using SMB/SAMBA to Share Files with SMU, SMJ, SMATE, AMU and AFQ
7 Abbreviations
Abbreviation
Meaning
API
Application programming interface
DHCP
Dynamic Host Configuration Protocol
DNS
Domain Name Service
FTP
File transfer protocol
GPIB
General purpose instruction bus (parallel bus also known as
IEEE488/IEC625 bus)
IP address
Unique network address within a network
LAN
Local area network (also known as Ethernet)
PC
Personal computer typically running Microsoft Windows
SMB/SAMBA
Server message block (file transfer protocol, also known as Netbios protocol)
TCP/IP
Transmission Control Protocol / Internet Protocol
USB
Universal serial bus (standard connector for PCs and peripherals)
USB-TMC
Test and Measurement Class for USB instruments. These instruments can
be controlled using VISA.
VISA
Virtual Instrument Software Architecture (software layer for remote control)
VNC
Virtual network controlling (remote operation)
VXI-11
Standard LAN protocol for remote control of measurement instruments
8 References
Application Notes:
[1]
[2]
[3]
[4]
1GP72_1e
R&S, 1MA153,
Drivers
R&S, 1GP98,
R&S, 1GP71,
R&S, 1MA208,
Development Hints and Best Practices for Using Instrument
SCPI-Recorder
MATLAB Toolkit for R&S Signal Generators
Fast Instrument Control with HiSLIP
Rohde & Schwarz Connectivity of Rohde & Schwarz Signal Generators 46
About Rohde & Schwarz
Rohde & Schwarz is an independent group of
companies specializing in electronics. It is a
leading supplier of solutions in the fields of test
and measurement, broadcasting,
radiomonitoring and radiolocation, as well as
secure communications. Established more than
75 years ago, Rohde & Schwarz has a global
presence and a dedicated service network in
over 70 countries. Company headquarters are
in Munich, Germany.
Environmental commitment
● Energy-efficient products
● Continuous improvement in
environmental sustainability
● ISO 14001-certified environmental
management system
Regional contact
Europe, Africa, Middle East
+49 89 4129 12345
[email protected]
North America
1-888-TEST-RSA (1-888-837-8772)
[email protected]
Latin America
+1-410-910-7988
[email protected]
Asia/Pacific
+65 65 13 04 88
[email protected]
China
+86-800-810-8228 /+86-400-650-5896
[email protected]
This application note and the supplied
programs may only be used subject to the
conditions of use set forth in the download area
of the Rohde & Schwarz website.
R&S® is a registered trademark of Rohde & Schwarz
GmbH & Co. KG; Trade names are trademarks of the
owners.
.
Rohde & Schwarz GmbH & Co. KG
Mühldorfstraße 15 | D - 81671 München
Phone + 49 89 4129 - 0 | Fax + 49 89 4129 – 13777
www.rohde-schwarz.com