1
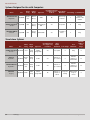
Intraoral Cameras
REALITY’S CHOICES
Systems Designed for Use with
Computers
1.
eVolution C-Series
Digital Doc
2a.
AcuCam Concept IVFWT
Gendex
2b.
ImageCam USB 2.0
Dentrix
Stand-Alone Systems
1.
AcuCam Concept IV
Gendex
2.
Aurora 2
Digital Doc
3.
eVolution M-Series
Digital Doc
4.
MicroPlus
Progeny
©2005 REALITY Publishing Co. Vol. 19
The Ratings
695
Intraoral Cameras
Systems Designed for Use with Computers
Camera
Casing
Camera
Weight
Light Source
Can light be turned off
to capture x-ray on
Image Capture
viewbox?
Mechanism
Camera
Cost
Focus Settings
Focus Mechanism
eVolution C-Series
Digital Doc
$4,995.00
Plastic/
steel
10.5oz/
297.7g
9 LED
No
Button on top
of camera
3
Intrusion/
extrusion of lens
chamber
AcuCam Concept IVFWT
Gendex
$5,290.00
Steel
12.3oz/
348.7g
75 Watt Halogen
bulb
Yes
Foot pedal
4
Ring
ImageCam USB 2.0
Dentrix
$5,550.00
Steel
11.5oz/
326.0g
75 Watt bulb
Yes
Foot pedal or
mouse
2
Ring
Stand-alone Systems
Camera
Cost
AcuCam Concept IV
$5,775.00
Gendex
Can light be turned
off to capture x-ray
on viewbox?
Image
Capture
Mechanism
Focus Settings
Focus
Mechanism
Maximum
number of
stored
images
Camera
Casing
Camera
Weight
Light Source
Steel
12.3oz/
348.7g
75 Watt
Halogen bulb
Yes
Foot pedal
4
Ring
4
Aurora 2
Digital Doc
$7,320.00
Plastic/
steel
10.5oz/
297.7g
9 LED
Yes
Button on
top of camera
3
Intrusion/
extrusion of
lens chamber
12
eVolution M-Series
Digital Doc
$5,595.00
Plastic/
steel
10.5oz/
297.7g
9 LED
Yes
Button on
top of camera
3
Intrusion/
extrusion of
lens chamber
12
MicroPlus
Progeny
$5,665.00
Plastic
10.0oz/
283.5g
6 Watt
Halogen bulb
No
Button on
left side of
camera
No specific
settings
Sliding switch
on top of
camera
4
696
The Ratings
©2005 REALITY Publishing Co. Vol. 19
Intraoral Cameras
An intraoral camera allows patients to see their mouths as we see
them, up close and in living color. We can show patients carious
lesions, fracture lines, leaking margins on old restorations, calculus, plaque, and exposed dentin when the enamel has been worn
away due to bruxing. It is a marvelous educational tool that is easily learned and incorporated into the dental office environment by
the entire staff.
Giving patients the ability to see their own mouths really
brings the concept of co-diagnosis alive. Ownership of any problem is now transferred to the patient, where it belongs in the first
place. When a patient can see his/her own mouth, aggressive salesmanship is less necessary (and probably less desirable in any
situation). This means that you won’t have to spend so much time
listening to the practice management “gurus” who keep trying to
teaching us those trite phrases which should be used to “close the
sale.”
Often, we will see a molar that has been previously restored
with amalgam and now has fractures all through the enamel.
Radiographically, this restoration might look quite small, but you
know there will be a battle with the insurance carrier over whether
the cusps should be covered or not. All of these systems can
accommodate a printer that produces a hard copy of the tooth
captured by the camera so it can be sent to the insurance company in lieu of, or in addition to, a radiograph. With a computerized
system, this process becomes even easier. The insurance form, digital x-ray, and intraoral camera image can all be sent via electronic
filing.
The uses of an intraoral camera are virtually limitless, ranging
from the hygiene room for recall exams, during the initial examinations and consultations, and even during restorative procedures.
For example, a patient complains about a tooth that is sensitive to
mastication. The tooth appears to have a fracture line running
mesiodistally, but the extent of the fracture is unknown. You open
the fracture line with a small diamond or an air abrasion unit and
use a caries detecting dye to stain it.
Once the extent of the fracture is evident and visible, you can
capture an image to show the patient what you are seeing. The
patient can then make an informed decision on the treatment
options. In this scenario, the patient can feel good about the decision-making process since he or she actually saw the problem with
his or her own eyes. You win since you do not have to convince
the patient that there is potentially a serious problem.
This example illustrates that it is important to have this equipment just as available as a handpiece. While stand-alone systems
may still have merit for small offices, multi-operatory, network
setups are definitely the way to go if you want high utilization.
System Components
Camera
Base Unit/Docking Station Usually sits in a nook in the cart,
mounted on the wall, or placed on a cabinet in the treatment
room. At least one system has a wireless docking station that does
not even require mounting and another has a USB connection
directly into the computer, eliminating this component entirely.
Wand/Handpiece Actual instrument that goes in the mouth and
records the images. Some wands have a set focal length while others have a focusing mechanism to vary the focal length. It may also
©2005 REALITY Publishing Co. Vol. 19
have the capture button for each image. All should provide custom
barriers for asepsis.
Footpedal
Most systems no longer include foot controls, at least as standard
equipment, for operation, although there are still some holdouts.
A footpedal is just one more item to move if you have a standalone system that is transferred from room to room. And it
clutters the floor. This is especially treacherous in the hygiene
room where the floor is already crowded with irrigators, ultrasonics, and handpiece foot controls.
Light Source
All the systems have automatically adjusted light sources to illuminate the field. The illumination of the subject is very important
for clear visualization.
Monitor
Usually, the bigger the better. But this depends on how far the
patient will be sitting from the monitor.
Printer
Printers are commodity items, with 5760 x 1440 optimized dpi
models selling for under $100. Therefore, it is easy to buy a high
resolution printer today. Once you purchase the printer, you
should try several settings to see which gives you the best images
for intraoral shots as well as x-ray prints, since you will probably
be using the printer for both, assuming you have switched to a
digital x-ray system. Using the glossy paper will also help to
improve the quality of the printed image.
VCR
Using a video recorder to record an intraoral tour of the mouth
used to be a common procedure, but most offices have discontinued its use, especially if you are using a computerized system.
However, it is still an option if this format appeals to you. One of
the reasons moving video was used in the past was that still images
take away the ability to show a patient what happens when you
gently probe a pocket and it begins to bleed profusely. Or, when
you are examining a carious pit, showing the patient how the
explorer actually “sticks” in the soft decay.
Computer
Buy the fastest model and as much memory as you can afford.
With the computerized systems, you don’t need any type of
recorder, since you save the images on the hard drive of the computer for recall whenever you need them. You can also do a video
tour of the mouth through the computer.
Cart
If you plan to move the system from room to room, you will need
a cart. The best ones are customized to your system and hide all
the cords. The only exception will be that if your office is networked or if you have a docking station in each room, you would
only have to move the camera.
The Ratings
697
Intraoral Cameras
Video Exam
Recline the patient in the dental chair, as you would for a conventional exam. Place the barrier-protected camera in the patient’s
mouth and start the exam in your usual intraoral location.
Depending on what type of system you have, you can capture
views of the four worst teeth (splitting the monitor screen into
more images makes them too small for any impact), every tooth,
or save the entire exam on your hard drive. It is much easier to
capture the images you wish to show the patient, rather than
attempting to let the patient watch live during the actual exam.
That approach does not allow you to point out areas of concern
on the screen and doesn’t let the patient ask questions.
When you finish the exam, sit the patient up and show
him/her the images. From a communication standpoint, it is
advantageous to sit by the patient’s side and use the mouse to
scroll through the captured images. You can use a small laser
pointer, an arrow, or draw with color (some software allows you to
do it) to pinpoint the areas of concern, thus keeping the “co-discovery” on a personal level and less of a “teacher lecturing the
student” approach.
POTENTIAL ADVANTAGES
+ Improved communication with patients
+ Increased acceptance of necessary treatment
+ More comprehensive dentistry — restoring more
quadrants than single teeth
+ Patients readily accept ownership of the problem
+ Appears state-of-the-art
+ Potential for increased referrals
+ Ability to generate hard copies for patients to show
to family
+ Easier insurance acceptance of treatment
+ Saves time — patients can see problems with their
own eyes
+ Minimizes patients’ fears that you are proposing
unnecessary treatment
POTENTIAL DISADVANTAGES
– Cost
– Space requirements (networked systems require minimal additional space)
– Training time (minimal)
698
The Ratings
©2005 REALITY Publishing Co. Vol. 19
Intraoral Cameras
Systems Designed for Use with Computers
eVolution C-Series
Digital Doc
(4.3)
NEW
Cost: $4,995.00
Includes:
• Camera module
• C-Series backpack
• S-Video and Composite cables
• 12v power supply
• 25 sheaths
Cost: $143.00 ($0.29 ea)
• Camera sheaths (500)
Additional and/or optional equipment/services
$400.00 Extended warranty/year
$995.00 C-Series backpack
1
Best illumination
Compatible with any management software
Sheaths must be pressed against lens
Activating capture button without moving
camera is tricky
Warranty: 2 years
Is delivery included? Yes.
Is installation included? Yes.
Is training included? Yes, by dealer or sales representative.
What if it needs repair? Call customer service. There is
a 72 hour turn around on all repairs.
Utilizes a SuperHAD 1/4” Sony high resolution CCD with
auto white balance and continuous variable speed shutter. Has a
105˚ field of view with 50x macro lens.
Camera Cord
Measures 6.0ft/1.8m. Beige color, very flexible. It is attached to
the backpack by beige cartridge module.
Is there a loaner program? No.
Camera
Steel casing except at front end, which is beige plastic. Weighs
about 10.5oz/297.7g with the cord. Length is 9.9in/25.1cm.
Diameter is 0.9in/2.2cm where you hold it, 0.7in/1.7cm at the
front end. Focal length is adjusted by the position of the lens
chamber, which is the constricted area near the front end. By
pulling the lens chamber out as far as it will go, you will be in the
close-up setting. You will see a red reference line near the base of
the lens chamber. The middle position, where the red reference
line is barely visible, gives you the two surfaces position. By pushing the lens chamber into the camera’s back end as far as it will go,
you will get to the full smile/full face position. When taking smile
images, a sheath is not recommended.While these adjustments are
not difficult, you probably will not be changing the settings during an exam.
There is also a small image capture plastic button on the top of
the camera, where you have access to it regardless of whether you
are right-handed or left-handed. This button is easy to activate
and doesn’t cause distortions in your image. You depress the button to capture and hold the button down to save. To recapture the
image, press the button once more to erase and to go live again.
©2005 REALITY Publishing Co. Vol. 19
Docking Station
Called a backpack measuring 11.0in/27.9cm in width,
6.0in/15.2cm in height, 2.0in/5.1cm in thickness. It is designed
to be mounted on the back of an LCD monitor, but there is no
adapter for a CRT. To remove the camera from the backpack is a
matter of just sliding it out. There is no switch for turning off the
light so you can capture an x-ray on a viewbox.
Light Source
Array of nine LEDs emitting high output TrueSpectrum light
arranged around three sides of the lens.
Footpedal
None.
Software
None. You connect via a capture cable to any software of your
choosing.
Directions
Simple cardboard foldout. Straightforward, easy to understand.
The Ratings
699
Intraoral Cameras
2a
AcuCam Concept IVFWT
Gendex
(4.1)
www.gendex.com
NEW
Cost: $5,290.00
Includes:
• Camera
• Docking Station
• Footswitch
• 50 sheaths
• Software Drivers 1.2b CD
Cost: $120.00 ($0.24 ea)
• Camera sheaths (500)
Additional and/or optional equipment/services
$1,500.00 Docking Station w/ footswitch
$630.00 1-year extended warranty
Warranty: 1 year.
Is delivery included? Varies by dealer.
Is installation included? Varies by dealer and type of installation needed.
Camera
Steel casing. Weighs about 12.3oz/348.7g with the cord.
Length is 7.5in/19.1cm. Diameter varies from 0.4in/1.0cm at
the active end to 0.9in/2.3cm where you will hold it at the back
end. Focal length is adjusted by rotating the adjustment ring at
the back end of the camera. While this is not a difficult maneuver, you probably will not be changing the settings during an
exam. There are four settings: (1) E mode is for extraoral use
and depth of focus is about 40mm (smile) to infinity (full face),
(2) W mode is for wide-angle intraoral viewing from two teeth to
a quadrant, (3) C mode is a close-up mode for viewing of one or
two teeth, and (4) M mode provides Macro focusing with an
increased magnification to as close as 1mm, which allows you to
see the minor cracks on teeth.
Utilizes a SuperHAD 1/4” Sony Grade 6 CCD. The video
processor technology provides automatic light intensity control,
which eliminates glare and reflections from amalgams and produces true intraoral colors. The direction of view is 62˚, which is
from 15˚ to 5.5˚ backward viewing. This improves overall access,
which enables easier viewing of the distal surfaces of second and
third molars. Unlike most intraoral cameras that use simple prisms
to obtain a 90˚-80˚ direction of view, which inverts the image, it
uses a non-inverting roof prism.
Camera Cord
Measures 6.0ft/1.8m. White color, not very flexible. It is attached
to the docking station by a metal cylinder that inserts into a simple recess. To remove the camera from the docking station, you
merely pull out the connector, a movement that can be done with
one hand. To reconnect the camera to the docking station, you
need to line up the red dot indicators before you completely insert
it. You will hear a slight click indicating that the camera is properly connected. Damage could occur to the camera and/or
docking station if this maneuver is not done properly.
700
The Ratings
Is training included? Yes, by the local Gendex representative.
What if it needs repair? Contact dealer or Gendex. System
will be replaced if in warranty, usually on the next business day.
Is there a loaner program? No, since replacement of defective unit negates the need for a loaner while the unit is under
warranty.
Four preset settings
FireWire connectivity is very fast
Full face is distorted
Switching focus during use is cumbersome
Docking Station
White plastic measuring 8.0in/20.3cm in width, 7.0in/17.8cm in
depth, and 2.5in/6.4cm in height. The control panel has only one
button that turns the light on and off. There are also two small
LEDs that glow green and amber. These lights indicate various
modes: (1) blinking green means the power is on and in stand-by
mode, (2) solid green means that the camera is active, (3) solid
amber means that another video source is selected, (4) blinking
amber means that it is in diagnostic mode, (5) both blinking happens only when the camera is plugged in, and (6) both solid means
something is wrong with the camera.
The right side has the camera bracket called the holster, which
can also be mounted where your handpieces are located. When the
camera is removed from the holster, the light is automatically activated.
©2005 REALITY Publishing Co. Vol. 19
Intraoral Cameras
Light Source
Uses a 75 watt halogen bulb. Transmitted through two bars on the
left and right of the lens.
Footpedal
Wired. Has two sections: C and M. C is for capture and M is for
memory. Click on C one time to freeze frame and click it once
again to retake. If you are satisfied with the image, click M once
to save the image.
Directions
175 pages in five languages. Covers how to operate, installation,
computer requirements, how to connect the system, how to place
the protective sheaths, how to replace the light bulb, cleaning and
sterilization. Well written and very detailed, relatively easy to
understand and follow with pictures and graphics.
Software
Vixwin Pro.
ImageCam USB 2.0
Dentrix
(4.1)
www.dentrix.com
2b
NEW
Cost: $5,550.00
Includes:
• Camera
• Docking Station
• 25 sheaths
Cost: $125.00 ($0.25 ea)
• Camera sheaths (500)
Additional and/or optional equipment/services
$1,450.00 USB 2.0 Docking Station
$300.00 Wireless Digital Footswitch
$630.00 1-year extended warranty
$995.00 Onsite training/8-hour day
Warranty: 1 year
Is delivery included? No.
Is installation included? No.
Is training included? No.
What if it needs repair? Dentrix will issue a call tag for
pick-up. Will be replaced at no charge within 30 days. After
that, it will be repaired at no charge for the first year.
Is there a loaner program? Yes, at no cost as long as the
unit is under warranty.
Wireless footswitch
Has graysclae setting for x-rays
Must have Image 4.0 to run
Must have Dentrix 10.5 to run Image 4.0
©2005 REALITY Publishing Co. Vol. 19
Camera
Steel casing. Weighs about 11.5oz/326.0g with the cord. Length is
6.9in/17.5cm. Diameter is 0.5in/1.3cm. Focal length is adjusted
by rotating the knurled adjustment ring at the back end of the
camera. While this is not a difficult maneuver, you probably will
not be changing the settings during an exam. There are two settings: (1)“M” is for a macro view close-up on half of a tooth or less
and (2) “I” setting is an infinite view, which allows you to switch
from Arch, Smile, Quadrant, or single tooth view without any
adjustments and keeps all images in focus. It does not have full
face (extraoral) capability.
Utilizes a SuperHAD 1/4” Sony Grade 6 CCD, which seems
to produce better colors than the 1/2” HyperHAD CCD
(although some of this is probably from the improved optical system). Has a 62˚ field of view with optical field flatteners. Also has
Digital Signal Processing to produce a high quality image, which
eliminates glare and reflections from amalgams and produces true
intraoral colors.
The Ratings
701
Intraoral Cameras
Camera Cord
Measures 5.8ft/1.8m. White color, not very flexible. It is attached
to the docking station by a silver box that is the size of a box of
kitchen matches. It is (LxWxH) 4 1/2” x 2 1/2” x 1 1/2”. This silver base is what needs to be removed from the docking station to
move the camera from room to room. There is only one way to
insert this box into the docking station making removing and
inserting very easy.
Docking Station
White plastic measuring 10.75in/27.3cm in width,
10.0in/25.4cm in depth, and 3.25in/8.3cm in height. The control
panel has four red control buttons: (1) On/Standby manually
turns the power on and off, (2) Color Preset 1/Color Preset 2
changes the color temperature of the light, (3) Normal/Super
Sharp increases or decreases image clarity, and (4) Light On/Light
Off/X-Ray turns the light on and off, or switches to gray scale for
viewing X-rays on a light box.
Light Source
Uses a 75 watt halogen bulb. Transmitted through two bars on the
left and right of the lens.
Footpedal
Wireless. Has two sections: Capture and Retake. Depress and
release Capture lever to freeze, then depress and hold Capture to
save, and depress and release Retake to erase and go back live.
Fairly easy to use.
Software
Dentrix Image 4.0 Intraoral and Dentrix Version 10.5.
Directions
None. However, there is a section in the Dentrix Image 4.0 user’s
guide on the camera and using it with the software.
Stand-Alone Systems
AcuCam Concept IV
1
Gendex
(4.3)
www.gendex.com
ENCORE
Cost: $5,775.00
Includes:
• Camera system
• Docking Station
• Footswitch
• Disposable Sheaths (50)
• RCA to BNC adapter and cable
Cost: $120.00 ($0.24 ea)
• Camera sheaths (500)
Warranty: 1 year
Is delivery included? Varies by dealer.
Is installation included? Varies by dealer and type of
installation needed.
Is training included? Yes, by the local Gendex
representative.
What if it needs repair? Contact dealer or Gendex.
System will be replaced if under warranty, usually on the
next business day.
Only camera that allows you manipulate to the
image w/o computer
Can see full image even if captured in quad
Docking station is large
Only stores four images
702
The Ratings
Is there a loaner program? No, since replacement of
defective unit negates the need for a loaner while the
unit is under warranty.
Camera
Steel casing. Weighs about 12.3oz/348.7g with the cord. Length is
7.5in/19.1cm. Diameter varies from 0.4in/1.0cm at the active end
to 0.9in/2.3cm where you will hold it at the back end. Focal
©2005 REALITY Publishing Co. Vol. 19
Intraoral Cameras
length is adjusted by rotating the adjustment ring at the back end
of the camera. While this is not a difficult maneuver, you probably will not be changing the settings during an exam. There are
four settings: (1) E mode is for extraoral use and depth of focus is
about 40mm (smile) to infinity (full face), (2) W mode is for
wide-angle intraoral viewing from two teeth to a quadrant, (3) C
mode is a close-up mode for viewing of one or two teeth, and (4)
M mode provides Macro focusing with an increased magnification
to as close as 1mm, which allows you to see the minor cracks on
teeth.
Utilizes a SuperHAD 1/4” Sony Grade 6 CCD. The video
processor technology provides automatic light intensity control,
which eliminates glare and reflections from amalgams and produces true intraoral colors. The direction of view is 62˚, which is
from 15˚ to 5.5˚ backward viewing. This improves overall access,
which enables easier viewing of the distal surfaces of second and
third molars. Unlike most intraoral cameras that use simple prisms
to obtain a 90˚-80˚ direction of view, which inverts the image, it
uses a non-inverting roof prism.
Maximum Number of Images That Can Be Stored
4
Camera Cord
Measures 6.0ft/1.8m. White color, not very flexible. It is attached
to the docking station by a metal cylinder that inserts into a simple recess. To remove the camera from the docking station, you
merely pull out the connector, a movement that can be done with
one hand. To reconnect the camera to the docking station, you
need to line up the red dot indicators before you completely insert
it. You will hear a slight click indicating that the camera is properly connected. Damage could occur to the camera and/or
docking station if this maneuver is not done properly.
©2005 REALITY Publishing Co. Vol. 19
Docking station
White plastic measuring 10.0in/25.4cm in width, 12.0in/30.5cm
in depth, and 3.5in/8.9cm in height. The camera sits in a convenient holder on the right side of the camera and automatically
turns on when picked up. It has six control buttons: (1) Printer
icon to facilitate printing. (2) Bulb icon that turns the light on or
off. (3) Page icon shows a 4-way split to indicate this will allow
you to capture four separate images on the screen. (4) Camera
icon indicating the capture function. (5) M/Hand piece icon button toggles between live images and images stored in memory. (6)
1/2 button lets you toggle between video signal 1 and 2.
There are also four manipulation buttons for the images: (1)
Tooth and a magnifying glass, which magnifies the image from the
center only. (2) Two teeth flipped vertically, to flip it. (3) Two
teeth left and right of each other that flips the image horizontally.
(4) Tooth with arrows circling it, which is for rotating the image.
Light Source
Uses a 75 watt halogen bulb. Transmitted through two bars on the
left and right of the lens.
Footpedal
Wired. Has two sections: C and M. C is for capture and M is for
memory. Click on C one time to freeze the image. If the captured
image is flickering on the screen, click C one more time. Then
click and hold down C to save the image to memory and to return
to the capture mode (live). Double-click C to print the image you
have captured (assuming the system is connected to a printer).
Click on M to preview pictures stored on to the memory board.
Directions
The instruction manual is 220 pages and includes five languages (44
pages per language). The manual covers operation, how to connect
the system, how to place the sheaths, how to replace the light bulb,
cleaning and sterilization, and warranty. It is spiral bound, well written and easy to understand and follow with pictures and graphics.
The Ratings
703
Intraoral Cameras
2
Aurora 2
Digital Doc
(4.2)
NEW
Cost: $6,995.00
Includes:
• Aurora 2 Camera
• Battery Charger
• NPF750 battery
• Charger power cable
• 25 sheaths
Cost: $325.00
Includes:
• Integration Kit for flat screen
• 4 channel wireless receiver
• Video cable
• Capture cable
Warranty: 2 years
Is delivery included? Yes.
Is installation included? Yes.
Is training included? Yes, by dealer or sales representative.
What if it needs repair? Call customer service. There is a
72 hour turn around on all repairs.
Is there a loaner program? No.
Wireless makes moving from room to room
effortless
Captures 12 images
No automatic counting mechanism when
capturing images
No image manipulation
Camera
Steel casing except at front end, which is beige plastic. Weighs
about 10.5oz/297.7g with the cord. Length is 9.9in/25.1cm.
Diameter is 0.9in/2.2cm where you hold it, 0.7in/1.7cm at the
front end. Focal length is adjusted by the position of the lens
chamber, which is the constricted area near the front end. By
pulling the lens chamber out as far as it will go, you will be in the
close-up setting. You will see a red reference line near the base of
the lens chamber. The middle position, where the red reference
line is barely visible, gives you the two surfaces position. By pushing the lens chamber into the camera’s back end as far as it will go,
you will get to the full smile/full face position. When taking smile
images, a sheath is not recommended.While these adjustments are
not difficult, you probably will not be changing the settings during an exam.
704
The Ratings
There is also a small image capture plastic button on the top of the
camera, where you have access to it regardless of whether you are
right-handed or left-handed. This button is easy to activate and
doesn’t cause distortions in your image. You depress the button to
capture and hold the button down to save. To recapture the image,
press the button once more to erase and to go live again.
Utilizes a SuperHAD 1/4” Sony high resolution CCD with
auto white balance and continuous variable speed shutter. Has a
105˚ field of view with 50x macro lens.
Maximum Number of Images That Can Be Stored
12
Camera Cord
Measures 6.0ft/1.8m. Beige color, very flexible. It is attached to
the memory capture module.
Docking Station
Not really a docking station, but really part of the camera called
the memory capture module. Beige in color and measures
6.0in/15.2cm in width, 5.5in/14.0cm in depth, and 2.0in/5.1cm
in height without the battery, which adds about 1.0in/2.5cm in
width. It has control board for seven different commands and one
indicator. The buttons have one-word descriptions for their
respective funcitions: (1) View to see captured images. (2) Live to
go into capture mode. (3) Next for scrolling forward through your
images. (4) Clear deletes all stored images. (5) Light turns the light
on or off. When the light is turned off, you can capture an x-ray
on a viewbox. Resulting image has the appearance of greyscale and
does not have a blue overtone. (6) Send will download stored
images to imaging software, assuming you have the software and a
capture cable. (7) On will activate/deactivate the camera. (8) Low
will illuminate orange when the battery is low.
Light Source
Array of nine LEDs emitting high output TrueSpectrum light
arranged around three sides of the lens.
Footpedal
None.
Directions
Simple cardboard foldout. Straightforward, easy to understand.
©2005 REALITY Publishing Co. Vol. 19
Intraoral Cameras
eVolution M-Series
Digital Doc
(4.1)
Camera
Steel casing except at front end, which is beige plastic. Weighs
about 10.5oz/297.7g with the cord. Length is 9.9in/25.1cm.
Diameter is 0.9in/2.2cm where you hold it, 0.7in/1.7cm at the
front end. Focal length is adjusted by the position of the lens
chamber, which is the constricted area near the front end. By
pulling the lens chamber out as far as it will go, you will be in the
close-up setting. You will see a red reference line near the base of
the lens chamber. The middle position, where the red reference
line is barely visible, gives you the two surfaces position. By pushing the lens chamber into the camera’s back end as far as it will go,
you will get to the full smile/full face position. When taking smile
images, a sheath is not recommended. While these adjustments
are not difficult, you probably will not be changing the settings
during an exam.
There is also a small image capture plastic button on the top of
the camera, where you have access to it regardless of whether you
are right-handed or left-handed. This button is easy to activate
and doesn’t cause distortions in your image. You depress the button to capture and hold the button down to save. To recapture the
image, press the button once more to erase and to go live again.
Utilizes a SuperHAD 1/4” Sony high resolution CCD with
auto white balance and continuous variable speed shutter. Has a
105˚ field of view with 50x macro lens.
Maximum Number of Images That Can Be Stored
12
Camera Cord
Measures 6.0ft/1.8m. Beige color, very flexible. It is attached to
the backpack by beige cartridge module.
Docking Station
Called a backpack, measuring 11.0in/27.9cm in width,
6.0in/15.2cm in height, 2.0in/5.1cm in thickness. It is designed
to be mounted on the back of an LCD monitor, but there is no
adapter for a CRT. To remove the camera from the backpack is a
matter of just sliding it out. Has its own capture board—you connect it directly to a monitor—a computer is not necessary.
Wireless Remote Control
Small, easily fits in your hand. The buttons have one-word
descriptions for their respective funcitions: (1) View to see captured images. (2) Live to go into capture mode. (3) Next for
scrolling forward through your images. (4) Prev for scrolling backward through your images. (5) Clear deletes all stored images. (6)
Light turns the light on or off. When the light is turned off, you
can capture an x-ray on a viewbox. Resulting image has the
appearance of greyscale and does not have a blue overtone. (7)
Save will save an image to imaging software, assuming you have
©2005 REALITY Publishing Co. Vol. 19
3
NEW
Cost: $5,595.00
Includes:
• Camera module
• M-Series backpack
• Wireless remote control
• S-Video and Composite cables
• 12v power supply
• 25 sheaths
Cost: $143.00 ($0.29 ea)
• Camera sheaths (500)
Additional and/or optional equipment/services
$400.00 Extended warranty/year
$1,395.00 M-Series backpack
Warranty: 2 years
Is delivery included? Yes.
Is installation included? Yes.
Is training included? Yes, by dealer or sales representative.
What if it needs repair? Call customer service. There is a 72
hour turn around on all repairs.
Is there a loaner program? No.
Best illumination
Remote control for viewing images
Sheaths must be pressed against lens
Activating capture button without moving
camera is tricky
the software and a capture cable. (8) Gain will increase the light
level mainly for extraoral images.
Light Source
Array of nine LEDs emitting high output TrueSpectrum light
arranged around three sides of the lens.
Footpedal
None.
Software
None. You connect via a capture cable to any software of your
choosing, although this system is really designed to be used without a computer.
Directions
Simple cardboard foldout. Straightforward, easy to understand.
The Ratings
705
Intraoral Cameras
4
MicroPlus
Progeny
(4.0)
www.progenydental.com
Cost: $5,665.00
Includes:
• Camera
• Multi-Operatory Docking Module
• RCA Video Cable
• SVHS Composite Video Cable
• MultiConnect Cable
• Power Supply Cable
• Disposable sheath sample pack (25)
Cost: $115.00 ($0.23 ea)
• Camera sheaths (500)
Additional and/or optional equipment/services
$360.00 Operatory Kit
$105.00 Footswitch
$495.00 1-year extended warranty
$39.00 Lamp
$80.00 Camera mount (wall or rail)
Warranty: 1 year
Handpiece with multi-features
Lightweight
Is delivery included? Depends on dealer.
Capture button changes sides when camera is
inverted
Focus adjustment difficult during use
Is training included? Yes, by dealer and/or Progeny.
Is installation included? Depends on dealer.
What if it needs repair? Call dealer.
Is there a loaner program? No.
Camera
White plastic with blue accents. Weighs about 10.0oz/283.5g
with the cord. Length is 8.3in/21.0cm long. Diameter varies from
0.5in/1.3cm at the active end to 1.0in/2.3cm where you will hold
it at the back end. The focus adjustment is done using your index
finger, simply sliding the switch on the top of the camera forward
and backward. The extreme forward position is for close-up views,
while the extreme back position is the full arch/smile/full face.
While this is not a difficult maneuver, you probably will not be
changing the settings during an exam.
There is also a small image capture blue button on the right
side where your right thumb would rest if you were right-handed.
Activating this button is easy unless you were left-handed, in
which case you would have to use your left middle finger.
Utilizes a Sony super color 1/4” CCD, with a field of view of
90º. They also have an electronic soft-start, single point illumination, automatic light source (which eliminates glare and
reflections from amalgams and produces true intraoral colors),
and automatic defogging.
Maximum Number of Images That Can Be Stored
4
Camera Cord
Measures 6.3ft/1.9m. Light blue color, very flexible. It is attached
to the docking station permanently. You can not remove the cam706
The Ratings
era from the docking station to remove the docking station and
camera to go to another room. You would have to unscrew the
video cable.
Docking Station
White plastic measuring 4.0in/10.2cm in width, 7.0in/17.8cm in
depth, and 1.5in/3.8cm in height. More of a connector than a
docking station, since the camera cannot be detached from it.
There is no switch for turning off the light so you can capture an
x-ray on a viewbox.
Light Source
Uses a 6 watt halogen bulb. Transmitted through two bars on the
left and right of the lens.
Foot pedal
Optional (we did not receive it for evaluation).
Directions
The instruction manual for the Micro is 15 pages. It covers the
operation, how to connect the system, how to place the protective
sheaths, how to replace the light bulb, cleaning and sterilization,
and warranty. These are well written and easy to understand and
follow with pictures and graphics.
©2005 REALITY Publishing Co. Vol. 19
Intraoral Cameras
REALITY
SYSTEMS DESIGNED FOR USE WITH
COMPUTERS
eVolution C-Series gives you a unique sliding mechanism to adjust the magnification ratio. Unlike rings that
have to be rotated, this focusing mechanism can be
used intraorally without much difficulty. However, the
position you choose can be inadvertently changed
when you pull the sheath tightly over the head and
shaft of the instrument. When the lens is fully extended, you are in the close-up mode, which allows you to
capture from a section of a tooth to one tooth. In the
intermediate setting, where the red band is just visible,
you can get a full arch and smile view, while the fully
intruded position provides the full face image.
Another feature is the plastic clad head. Although it
doesn’t protect the teeth from the “clanging” effect
totally, it is better in this respect than the all-metal
cameras. This is also the only system in this group with
pure white LED illumination. With the array of LEDs
encircling the lens on three sides, this type of illumination is more diffuse, like a ring light with a SLR camera.
There are very few shadows, making the images more
pleasant to view. Even the color of teeth looks more
natural under this light.
The very small base unit slides in and out of the
docking station very easily, making transporting it from
room to room a breeze. However, the protective
sheaths must be pressed onto the lens to avoid having
the images appear hazy. Capturing the image with the
top-mounted button is not difficult, but it takes some
stabilization not to move the camera when you press
the button.
AcuCam Concept IVFWT is the updated version of one
of the venerable names in this category, only now it
incorporates speedy image capturing with FireWire
technology. The camera itself has a focusing ring with
four settings. While this knob is easy to adjust extraorally, trying to do it in the mouth is cumbersome.
Luckily, you won’t have to change this focus very often
intraorally. With the four reference settings on the
focusing ring, you’ll know which one to use before you
ever place it in the mouth. The “C” setting gives you a
clear view of one tooth with very good color. The “E”
setting gives you a full face that appears slightly distorted, but the full smile is acceptable with proper
illumination. The “W” setting gives you the ability to
see quadrant views, with reasonably good illumination.
Finally, you can see small fractures in the enamel with
©2005 REALITY Publishing Co. Vol. 19
the “M” setting. You can turn off the light to capture
an x-ray, but the image has a blue cast to it. On the
other hand, the detachable holster is a very useful feature, since it allows you to mount the camera wherever
it is most convenient to you.
ImageCAM USB 2.0 is basically an updated version of
the same camera that has been available for several
years. It has two settings, with the “I” supposed to
allow you to go from a full arch to a single tooth without focusing. However, the single tooth view on this
setting is not very clear—the “M” setting is much better for a single tooth. However, the “I” does give you a
good smile view with the proper amount of illumination. This camera is also supposed to have an
auto-adjust feature on the light, which lessens or intensifies the illumination as needed. For example, when
you want a full arch view, it automatically increases the
light, and conversely, when you switch to a single-tooth
view, it decreases the amount of light as necessary.
However, this feature is not visibly apparent during use.
Nevertheless, the light transmitted by this camera was
the most intense by far.
On the control box, you can turn off the light and
change the image from color to grayscale if you want
to capture a radiograph on a viewbox—it is the only
system with this feature. The grayscale does give you a
better view of an x-ray than just turning off the light,
which allows you to view the x-ray but the image has a
blue overtone to it. There are also two different illumination settings: color preset 1 and color preset 2. We
were not able to see any difference whatsoever
between the two color presets. Nevertheless, the color
of the light itself is quite white. In addition, there are
also normal and supersharp capture modes. We again
were not able to see any differences between these
modes.
Furthermore, it is very easy to move this system from
room to room, especially with the optional wireless RF
footpedal—it is the only system with this feature.
However, without the footpedal, the only way to capture an image is by using the mouse, making the procedure a 2-person operation.
STAND-ALONE SYSTEMS
AcuCam Concept IV shares the same camera with the
FireWire computerized model. What makes this camera
stand out from the pack is the docking station, which is
The Ratings
707
Intraoral Cameras
the only one in this category that will allow you to
rotate the images and to turn them right side up,
zoom, and get a mirror view, all without connecting to
a computer. There are even icons on the soft-touch control panel telling you graphically the function of each
button. However, you can only save four images at
a time.
Aurora 2 shares the same camera with the Evolution Cseries. But what makes this product so unique and
convenient is its wireless docking station. While a wireless camera would be the ultimate, being able to walk
room to room with this system has many advantages,
especially if your practice is low volume and you would
be using the camera on only one patient at a time.
The docking station has all the functions that you need
for viewing the captured images. However, just like
with the Evolution M, you have to manually count the
images as you capture them.
Note: You can save the images and transfer them to
a computer or print them on a SD-compatible printer
by purchasing a Panasonic D-snap SV-AV50 video camera from any online vendor. You need, however, to purchase an additional integration kit from Digital Doc for
$375.00 to be able to connect to the Aurora 2.
eVolution M-Series shares the same camera with the
C-Series. Its base unit, however, has the addition of a RF
transmitter that communicates with the remote control
that is used to view your images. When you capture an
image, it is automatically saved, with 12 being the maximum. However, you have to keep a manual count of
these images—the camera doesn’t tell you how many
you have saved. The remote control is a very useful part
of the system, since it will let you sit side-by-side the
patient rather than having to be at the monitor.
Note: You can save the images and transfer them to
a computer or print them on a SD-compatible printer
by purchasing a Panasonic D-snap SV-AV50 video camera from any online vendor. A capture cable, however,
must be purchased from Digital Doc for $95.00 to be
able to connect to the M-Series.
Micro Plus is the only totally plastic-clad camera in this
section. This is a big advantage if you are prone to
“clanging” teeth, since the plastic won’t jar a patient if
it contacts a tooth the same way metal does. The small
focus button, located on top of the camera, merely
slides forward and backward and is the easiest of all to
adjust. When it is moved rearward as far back as it will
go, you are out of focus with the full face, but if you
move it slightly forward, you can capture a full face to
just about a smile view. With the focus button at midpoint, you can capture one tooth, while the view in the
extreme forward position is very close-up.
It has exceptionally good color and exhibits the ability to capture even half a tooth very clearly with excellent illumination. The quality of the images are crisp,
while the illumination system adjusts automatically
from full face views to a single tooth without affecting
overly dark or light images. However, while the capture
button on the left side of the handpiece seems to be in
perfect position for right-handers to use their thumb
when the camera is imaging mandibular teeth, it is just
the opposite when the camera is upside down to capture maxillary teeth. This reversal means their middle
finger instead of the thumb needs to be used. We
found this activation with the middle finger (assuming
you are using your index finger for focusing) cumbersome and not intuitive. And the button is very easy to
push and can, indeed, be accidentally activated easily.
The capture options are full or quadrant screens. To
enter into one mode or the other, you merely depress
and hold the capture button. You will then hear a series
of beeps that indicate you have changed the screen.
You can toggle back and forth between these views by
repeating this action. Once you fill the quad view with
four images, you will replace each image as you capture more views. However, you will lose these views as
soon as the camera is turned off.
Note: There is a computerized version of this system
called merely the Micro. The camera is identical, but it
does not have a capture board and it is somewhat less
expensive. We have evaluated this version in previous
years, but it was not submitted this year.
OTHER PRODUCTS IN THIS CATEGORY
708
FlexiScope Micro Vision
SciCan
Optum
CamSight
USBCam
Schick Technologies
HotRod Dental-Imager Camera
Imagin Systems
Sens-A-View II
Dent-X
ViperCam/ViperCam DV
Integra Medical
Imagin NewLook 2020
Imagin Systems
Sopro 595
Sopro
Vista Cam Omni ic4
Air Techniques
ME-15 wireless
Dent Corp
UltraCam
UltraCam
VistaCam Omni
Air Techniques
The Ratings
©2005 REALITY Publishing Co. Vol. 19