1
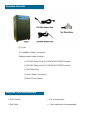
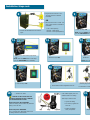
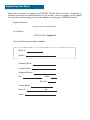
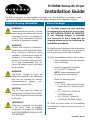
P1500W Series Air Dryer
Installation Guide
This guide covers basic air dryer installation and setup only. Once installation is complete, please
refer to the P1500W Series User’s Guide for more advanced setup and configuration options.
Safety & Warning Information
WARNING!
Internal surfaces may be hot. Use care
when coming into contact with internal
components as there is a potential for
some of these components to become
hot when in operation or standby.
WARNING!
Extreme care should be exercised to
avoid contact with live electrical circuits.
Many procedures performed during
installation of this air dryer require the
equipment to be running, creating a
situation for potential electrical shock.
It is highly recommended that you
remove all jewelry before performing
any procedures.
WARNING!
High Noise. Puregas air dryers are
meant to be installed in an unattended
area and are intended for network
telecommunication
facilities
(noncustomer premises) only.
CAUTION!
This Air Dryer does not contain an
internal Surge Protection Device (SPD).
If an SPD is required it must be supplied
by the user.
IMPORTANT!
Performing procedures not described
in this User’s Guide or installing
components not supplied by PUREGAS
is NOT RECOMMENDED AND MAY VOID
THE WARRANTY.
Before You Begin
1. Carefully inspect the unit, including
the shipping box as well as the air dryer,
for ANY DAMAGE CAUSED BY SHIPPING.
If any shipping damage is detected,
it is important to file a claim with the
shipping company prior to continuing the
installation procedures.
2. Read the entire Installation Guide to familiarize
yourself with the components and procedures
before performing the air dryer installation.
3. Verify the installation location of the air dryer:
• Well ventilated and free from abrasive
dust or chemicals.
• Ambient temperature is between
40° F and 85° F (optimum).
NOTE: Higher temperatures will
decrease component lifespan.
• Meets the following power
requirements:
• 50 / 60 Hz with minimum 15 amp
service with a 10 amp slow blow
fuse.
• 110 - 125 VAC for P1500W &
P1500WLP models.
• 208 - 230 VAC, 1 phase for
P1502W & P1502WLP models.
4. Notify the alarm center of the installation
and potential for alarms during the process (if
applicable).
P012166 - Rev. B
Included Contents
(1) Dryer
(1) Installation Guide (not shown)
Package located inside the dryer:
(1) 120 VAC Power Cord (for P1500W & P1500WLP models)
(1) 220 VAC Power Cord (for P1502W & P1502WLP models)
(1) Tee Tube Union
(1) User’s Guide (not shown)
(1) Mini CD (not shown)
Required Tools and Materials
• 9/16” wrench
• Cup of soapy water
• Box Cutter
• 1-inch paint brush (recommended)
Installation Steps
2
1
• Remove the dryer from box and all shipping
materials.
3
• Open panel latches and remove the front
panel.
4
• Check for loose parts, hoses, or wiring.
• Remove the ship-loose contents package.
5
• Remove the ship-loose contents package.
6
Place the dryer at desired operating
location:
• Set the dryer on a level floor.
• Install the dryer on an equipment rack
using optional Universal Rack Mounting Kit
(P011674).
• Remove and discard the three packing foam
blocks from around the compressor.
• Install the dryer on a wall using optional
Wall Mounting Kit (P011773).
7
• Verify that the dryer is powered OFF.
Installation Steps cont.
8
• Plug the Power Cord into a 110 125 VAC outlet for P1500W &
P1500WLP
9
OR
• Wire the Power Cord to a 208 - 230
VAC, 1 Phase outlet for P1502W &
P1502WLP:
• Connect the included Power Cord to the
dryer.
• Line – Black (Brown)
• Neutral – White (Blue)
• Ground – Green (Green/Yellow)
• Power the dryer ON.
NOTE: Press the RESET but
goes into SHUTDOWN due
12
11
• Let dryer run until Humidity drops below
2%.
NOTE: Press the RESET button if the dryer
goes into SHUTDOWN due to Humidity.
15
• Power the dryer ON.
13
• Remove the P
Outlet Port..
• Power the Dryer OFF.
NOTE: Save orifi
16
Set the Static Pressure:
• Pull the Static Pressure Regulator knob out.
18
• Check for air leaks.
CA
CAUTION: DO NOT SOAP TEST THE
HUMIDITY SENSOR FITTING. DAMAGE
TO THE SENSOR MAY OCCUR.
With Compressor NOT RUNNING:
Listen for ‘hissing’ sounds which may indicate a
fitting or hose air leak.
With Compressor RUNNING:
Use a 1-inch brush to dab soapy water on all
air fittings and hose connections.
If air bubbles appear, this is an
indication that air is leaking.
• Adjust knob until the
pressure gauge is 1
• Push knob in to lock
19
Take steps to seal the leak:
• Tighten the fitting
• Re-connect / tighten the
hose end
• Replace the fitting /
hose / component
• Repla
tton if the dryer
to Humidity.
10
Set the System Pressure:
• Adjust knob until the reading on the
pressure gauge is 80 PSI.
With compressor running • Pull the Capacity Control Valve knob out.
• Push knob in to lock.
14
Precision Bleed Orifice from the
• Connect the air supply line to the Outlet
Port.
fice for low flow applications.
e reading on the
17 PSI.
k.
ace and latch the front panel.
NOTE: When flow is minimal, install the
Tee Tube Union and Precision Bleed Orifice
removed previously.
17
Set the Outlet Pressure:
• Pull the Outlet Pressure Regulator knob out
(or loosen the retaining nut – LP Models).
20
• Connect alarm hookups (if applicable).
P
Please
le
refer to the P1500W Series User’s
G
Guide section on Operating Your Dryer.
Specifically, sub-sections:
Connecting to Common Alarm Terminals
Connecting to Power Fail Alarm Terminals
• Adjust knob until Outlet Pressure (OUTP)
reading is at desired setting.
• Push knob in to lock.
(or tighten the retaining nut – LP Models).
21
• REGISTER YOUR DRYER.
Installation Checklist
No shipping damage was detected.
Dryer location meets the following requirements:
o Well ventilated
o Free from abrasive dust or chemicals
o Ambient temperature is between 40° and 85° F (optimal)
Shipping foam blocks removed from around the compressor.
System Pressure is set to 80 PSI.
Static Pressure is set to 17 PSI.
No air leaks are present in the system.
No alarms are present on the Display Panel.
Registering Your Dryer
Please take a moment to register your PUREGAS P1500W Series Air Dryer. Registering is
necessary to activate the Limited Warranty on your product. Once you register, you are eligible
to receive free technical support, as well as updates concerning your PUREGAS products.
Register Online at:
www.puregas.com/registration
Or by Phone:
1-800-521-5351 (option 2)
Have the following information available:
Model #:
Serial #:
Company Name:
Location Name:
Shipping Address:
City:
State:
Zip Code:
Contact Name:
Phone #: (
Email:
)
-
ext.