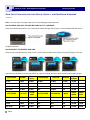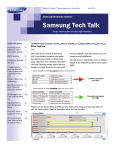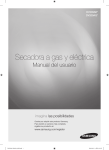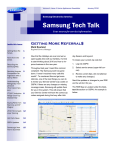
1
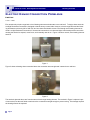
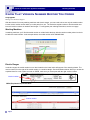
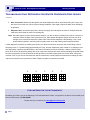
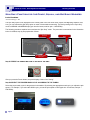
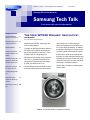
Volume 4, Issue 7 Home Appliances Newsletter July 2010 Samsung Electronics America Samsung Tech Talk Your source for service information Inside this issue: The New WF520 Washer: Innovative! 1 Electric Range Connection Problems 2 GSPN Updates 3 Know That Version Number Before You Order 4 Troubleshooting Re- 6 frigerator Water Dispenser Drip Issues Spin Only Function for Grace, Squall, and Big Bang Washers 8 New Mandatory Fields for Warranty Claims 9 Samsung’s KPI Boggle 10 The New WF520 Washer: Innovative! Jeff Brutman Assistant Publications Manager Introducing the WF520, Samsung’s new Front-Loading Washer. To begin, the WF520 provides a spacious 5.0 cubic feet of capacity which lets you get more wash done in less time— up to 31 bath towels in a single load. The WF520 also features the newly improved VRT Plus™ (Vibration Reduction Technology Plus™) which makes the washer so quiet you hardly know it’s on. The WF520 also helps eliminate the need for all those stain-treatment sticks with its new PowerFoam™ feature that predissolves detergent into a powerful foam for a more thorough washing. In addition, the WF520’s PureCycle™ function alerts you with a gentle chime after 40 washes that the drum needs to be cleaned, and then lets you clean detergent residue and dirt build-up from the drum with the press of a button using just hot water. No harsh chemicals or scrubbing needed. The WF520 is available in stainless platinum or white. Above: The WF520 Washer in Stainless Platinum Volume 4, Issue 7 Home Appliances Newsletter Samsung Tech Talk Electric Range Connection Problems Paul Pieri Trainer—RTSC Ever wonder why electric range bake or broil heating element terminals start to arc and burn? To begin, these terminals are High Resistance Connections, designed to handle heavy current loads. However, electric range bake and broil heating elements are driven by 220 to 240 VAC and can draw considerable current. Even though each heating element terminal is a High Resistance Connection, if the terminal connection is not clean and tight, heat develops at the connection causing the terminal to expand, come loose, and eventually start to arc. Figure 1 shows a normal, clean heating element terminal. Figure 1 Figure 2 shows a heating element terminal where the connection was not tight and it started to arc and burn. Figure 2 The terminals pictured above are from the same electric range heating element. The terminal in Figure 2 replaced a previous terminal, but the tech failed to make sure the connection was tight enough to prevent arcing. This damage required the heating element be replaced. Page 2 Volume 4, Issue 7 Home Appliances Newsletter Samsung Tech Talk GSPN Updates Jim Foster Manager, Training /Publications We encourage you to use our GSPN site to find the latest service bulletins to aid you with your repairs. http://service.samsungportal.com HA Service Bulletins uploaded to GSPN June, 2010 Bulletin Number Subject Applicable Models ASC20100608001 Washer display cycle time pausing during either the Sanitize or Pure Cycle wash modes. WF328, WF338,WF438, WF448, WF219,WF409, WF419, WF220,WF330, WF350 WF410 Parts change – 6/1/10 production. RSG257AABP/XAA ASC20100621002 RSG257AAPN/XAA RSG257AARS/XAA RSG257AAWP/XAA ASC20100624001 Dryer belt slides off the pulley when manually rotated counter-clockwise (ccw). DV209AEW/XAA DV209AGW/XAA DV219AEB/XAA DV219AEW/XAA DV219AGB/XAA DV219AGW/XAA ASC20100625001 Parts change. RB195ACBP/XAA RB197ACPN/XAA RB195ACPN/XAA RB197ACRS/XAA RB195ACWP/XAA RB197ACWP/XAA RB215ACBP/XAA RB217ACBP/XAA RB215ACPN/XAA RB217ACPN/XAA RB215ACWP/XAA RB217ACRS/XAA RB197ACBP/XAA RB217ACWP/XAA To access service bulletins on GSPN, first visit http://service.samsungportal.com. Login using your User ID and Password. Click on ―Documents‖ at the top, then ―Product Information‖ in the left column. The Product Information menu will appear. Click on ―Service Bulletin (Local) to bring up the Service Bulletins. To search for a bulletin, enter the bulletin number in the search window at the upper left. If for some reason, the bulletin does not appear, it can still be searched using the ―Select Depth 1, 2, and 3‖ drop-down menus. Page 3 Volume HomeAppliances AppliancesNewsletter Newsletter Volume 4, 4, Issue Issue 7 4 Home Samsung Samsung Tech Tech Talk Talk Know That Version Number Before You Order Tony Ippolito Manager HA Technical Support With the release of so many washing machines and electric ranges, you now need to know not only the model number but the correct version number when you order parts for a unit. The text below explains where to find the model numbers and version numbers on washers and ranges. For refrigerator part ordering information, see the next page. Washing Machines In washing machines, you’ll find the model number on a label inside the door with the version number printed on the label after the model number. In the example below, the model number is WF328AAW/XAA. Version number Electric Ranges In electric ranges, the model number is on a label located on the lower inside left support of the warming drawer. The version number is to the right of the model number, in a small rectangle See the illustration below. When you review the exploded view for a unit or place an order on GSPN, make sure you select parts with the right version number. Version number GSPN (Exploded View) Screen Shot Version number Page 4 Volume 4, Issue 7 Home Appliances Newsletter Samsung Tech Talk Know That Version Number Before You Order Continued Refrigerators Refrigerators are different. To order correctly, you need to use either the Model Code or the BOM name (and not the Basic Model Number). To find the French Door refrigerator Model Code or BOM name, first locate the labels attached to the refrigerator. The outside label is located on the bottom left side of the refrigerator. The inside label is located in the left internal cavity of the refrigerator. On the outside label, the Model Code is the fourth item from the top, above the serial number. On the inside label, the BOM name is the fourth and last item on the label, below the compressor number. See the illustration below. Use the Model Code or the BOM Name only for all parts ordering, Tech Support, and Warranty Claim processing needs. Remember this simple rule: The correct Model Code or BOM Name ends with XAA. Samsung Electronics America 105 Challenger Road Ridgefield Park, NJ 07660 The information in this newsletter is published for experienced repair technicians only and is not intended for use by the public. It does not contain warnings to advise non-technical individuals of possible dangers in attempting to service a product. Only experienced professional technicians should repair Phone: 201-229-4251 products powered by electricity. Any attempt to service or repair the product or products dealt with in this information by anyone else could result in serious injury or death. Information provided in this bulletin is subject to change or update without notice. Page 5 Volume 4, Issue 7 Home Appliances Newsletter Samsung Tech Talk Troubleshooting Refrigerator Water Dispenser Drip Issues Jim Swift HA Product Senior Manager Many Samsung refrigerators offer a built-in water dispenser. The water dispenser (and icemaker, if there is one) require water pressure of at least 20 pounds per square inch (PSI) to function properly. If the water pressure is below 20 PSI, there isn’t sufficient pressure on the water dispenser valves for them to close properly and this can lead to dripping. The units are designed with a one gallon, one tank or two tank water reservoir. The water reservoir is behind the crisper drawers and keeps the water cool. To determine the cause of any dripping, start by dispensing some water and then immediately shutting off the house water supply to the refrigerator. If the dripping stops, the dripping could be caused by low water pressure or a faulty valve. You need to make a proper evaluation of the water pressure before replacing the valve. If the dripping continues, proceed by checking all the junction points where air could infiltrate into the water line. 1. 2. 3. 4. 5. 6. House water supply Water input valve Filter cartridge Water reservoir Door Connector Guest Fitting Dispenser valve Shown above: All the junction points of the water line. A problem at any one of the six points can create an air leak and reduce the water pressure at the valves. To check the six junction points, follow these steps: 1. House Water Supply: Carefully inspect the supply line and the valve connection for signs of leakage. Depending on the mineral content in the water, there can be lime or calcium deposits that can create problems over time. Using a saddle valve in general is not a good idea as these can break down over time and create a leak. 2. Water Input Valve: Again inspect both the supply line and the valve connection for signs of leakage or deposits. Remove the supply line and inspect the valve for small particles like sand which could keep the valve from seating fully. 3. Filter Cartridge: There are ―generic‖ filter cartridges sold through various appliance retailers which closely resemble the original Samsung filter but do not seat properly against the filter housing. If the seat is not tight, air can infiltrate the system. 4. Water Reservoir: Depending on the model, this might be a one piece or two piece tank with two or four quick connect Guest Fittings. Inspect the Guest Fittings to ensure they are secure. Also inspect the plastic water lines and look for burrs or imperfections which might prevent the fitting from sealing properly. Page 6 Volume 4, Issue 7 Home Appliances Newsletter Samsung Tech Talk Troubleshooting Refrigerator Water Dispenser Drip Issues continued 5. Door Connection: Models with through the door water dispensers add an extra Guest Fitting in the top or bottom of the door so the door can be removed during installation. Once again, inspect the water lines and fittings for problems. 6. Dispenser Valve: As with the input valve, remove the supply line and inspect the valve for small particles like sand which would keep the valve from seating fully. Note: The water system is never under pressure therefore, you are not likely to identify an air leak by a wet joint or connector. When the water valve opens during use, water passes through the system and can suck air in through a poor connection between the water valve outlet and the dispenser. Unfortunately, even a small pinhole leak any where in the tubing will eventually create an air leak making visual inspection difficult. A solid diagnostic procedure for resolving drip issues is to disconnect the door connector (the Guest Fitting), insert a temporary piece of ¼‖ plastic tubing (approximately 24‖ long), and then dispense a glass of water. If no dripping occurs after dispensing, suspect a possible pinhole in the water line located in the door assembly. If water continues to drip, pinch off the end of the temporary tubing with a pair of pliers and energize the water valve by actuating the paddle. Keep the valve energized for at least 30 seconds to build pressure in the water system back to the valve. Next, remove the reservoir cover so you can see the water tank and the connections. Visually inspect all connections including the valve output to the reservoir for the presence of water. Repair or replace connections as needed. 2. F 3. 1. A F A A R O S T X P T T L F D S Q G O P S S O 4. T T A D S X A R H S T K T S W 5. R T Z A W O T D D R O N R E D O G D M E Please Send Us Your Comments! Something you’d like to see in the Samsung Tech Talk Newsletter? If there is a topic/issue we haven’t covered that you’d like us to write about, LET US KNOW! Please send your comments to: [email protected] Page 7 Volume 4, Issue 7 Home Appliances Newsletter Samsung Tech Talk Spin Only Function for the Grace, Squall, and Big Bang Washers Louis Picchione Assistant Manager—HA The Spin Only option is not displayed on the control panel of the new 2010 Grace, Squall, and Big Bang washers. However, you can activate the Spin Only option on each of these washers manually. The factory setting for the ―Spin Only‖ – Select medium the desired mode is NORMAL with MEDIUM spin (spin time 9#4minutes; spin—1200 RPMs). #1 - Press the power spin mode button The following procedure explains how to activate the ―Spin Only‖ mode. The procedure is summarized in the illustration below. A detailed, step-by-step explanation follows. #4 – Select the desired spin mode #1 - Press the power button #2 –Select the proper wash cycle #2 –Select the proper wash cycle Step #1 PRESS THE POWER BUTTON TO ACTIVATE THE UNIT. #3- Press and hold the spin button for 2-3 seconds #3- Press and hold the spin button for 2-3 seconds Step #1 PRESS THE POWER BUTTON TO ACTIVATE THE UNIT. Step #1 PRESS THE POWER BUTTON TO ACTIVATE THE UNIT. Press the power button to activate the washer. Once the unit is powered up the panel will display “Select Your Setting). Press the power button to activate the washer. Once the unit is powered up the panel will display “Select Your Setting). After you press the Power button, the panel displays ―Select Your Setting‖. Step #2 SELECT THE PROPER WASH CYCLE ACCORDING TO THE FABRIC. Select the proper wash cycle for the garment in the washer. By selecting the appropriate wash cycle, you adjust the spin speed . For example, if you select the WOOL cycle, you set the spin speed to LOW (spin time 10 minutes; low spin — 500 RPMs). Page 8 Volume 4, Issue 7 Home Appliances Newsletter Samsung Tech Talk Spin Only Function for the Grace, Squall, and Big Bang Washers continued Note: You must select the proper wash cycle to avoid damaging certain garments. Step #3 PRESS AND HOLD THE SPIN BUTTON FOR 2 TO 3 SECONDS. Press and hold the spin button for 2 to 3 seconds to activate the Spin Only function. A chime indicates that the unit is in the Spin Only mode. Step #4 SELECT THE DESIRED SPIN TIME. Once you have activated the Spin Only function, you can select a different spin setting. The factory setting for the Nor- mal wash cycle is Medium, but you can select Low, High, or Ex-High. When you select a different spin setting in Spin SPIN SPEED NORMAL HEAVY DUTY PERM PRESS SANITIZE BEDDING DEEP STEAM LOW 8 MIN 10 MIN 10 MIN 10 MIN 10 MIN 10 MIN MED 9 MIN 10 MIN 10 MIN 10 MIN 10 MIN 10 MIN HIGH 10 MIN 11 MIN 11 MIN 11 MIN N/A 11 MIN EX HIGH 11 MIN 12 MIN N/A 12 MIN N/A 12 MIN ACTIVE WEAR DEL/HAND/W SPIN SPEED ECO COLD STAIN CARE WOOL QUICK WASH RINSE+ SPIN LOW 8 MIN 9 MIN 10 MIN 7 MIN 10 MIN 9 MIN 10 MIN MED 8 MIN 10 MIN 10 MIN N/A N/A 9 MIN 10 MIN HIGH 9 MIN 11 MIN N/A N/A N/A 10 MIN 11 MIN EX HIGH 10 MIN 12 MIN N/A N/A N/A 11 MIN 12 MIN Page 9 Volume 4, Issue 7 Home Appliances Newsletter Samsung Tech Talk New Mandatory Fields For Warranty Claims Jet Nyamwange Warranty Department Please be advised that effective July 01, 2010 there are two additional mandatory fields you MUST complete when submitting your warranty claims to Samsung. These two new mandatory fields are listed below: Defect Description Repair Description The additional information from these new fields will provide us with valuable data which we will use: To analyze our defects and repair solutions. To prepare repair tips which will assist you in your future repairs and help you improve First Time Fix and reduce REDOs. The two new fields are highlighted in the illustration below: Note: You must still select the Defect and Repair Codes. Page 10 Samsu ng El ect ronics Am eric a Samsung Electronics America Samsung Electronics America SAMSUNG’S KPI Boggle Directions: In each table, find the KPI. 1. 3. X P T A A T O S T R F T F T A A F L S S O D R K R G O P S H T T D S Q X S S Z A T W A 5. Answers are on page 7. Page 11 2. 4. W D R G O R E D T O D M D N O E