1
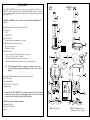
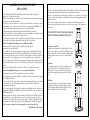
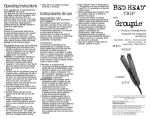
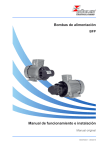
FP25C
Operation Manual for Waring
FP25 and FP25C Food Processors
IMPORTANT SAFEGUARDS
GROUNDING INSTRUCTIONS
When using electrical appliances, basic safety precautions should always be followed including these:
For your protection, this appliance is equipped with a 3-conductor cordset.
1. Read all instructions.
2. Blades are sharp. Handle carefully.
3. Your Waring® food processor is a piece of kitchen equipment and like all other kitchen equipment,
extreme care must be used when operating it. Although training requirements are minimal, only
responsible and prudent individuals should be allowed to operate this food processor.
4. To avoid injury, never place cutting blade or disc on base without first having put the bowl properly
in place.
5. Keep hands as well as spatulas and other utensils away from moving blades or discs while processing
food to prevent the possibility of severe personal injury or damage to the food processor. A plastic
scraper may be used, but must be used only when the food processor is not running.
6. To protect against risk of electrical shock, do not put base in water or other liquid.
7. Unplug from outlet when not in use, before putting on or taking off parts, before removing food from
workbowl, and before cleaning. To unplug, grasp plug and pull from electrical outlet. Never pull cord.
8. Avoid contacting moving parts. Never feed food by hand when slicing or shredding.
Always use food pusher.
9. Make sure motor has completely stopped before removing the lid.
10. Do not operate any appliance with a damaged cord or plug, or after appliance has been dropped or
damaged in any manner. Return appliance to the nearest authorized service facility for examination,
repair or adjustment.
11. The use of attachments not recommended or sold by Waring may cause fire, electric shock or injury.
12. Do not use outdoors.
13. Do not let cord hang over edge of table or counter, or touch hot surfaces.
14. This product is UL listed for commercial use. Use it only for food preparation as described in
this book.
15. Do not attempt to defeat the cover interlock mechanism.
16. Be certain cover is securely locked in place before operating appliance.
17. If the machine malfunctions for any reason, discard any food being processed at that time.
120 volt units are supplied with a molded 3-prong grounding-type plug (NEMA5-15P), and should be used
in combination with a properly connected grounding-type outlet as shown in Figure A.
If a grounding-type outlet is not available, an adapter, shown in Figure B, may be obtained to
enable a 2-slot wall outlet to be used with a 3-prong plug.
Referring to Figure C, the adapter must be grounded by attaching its grounding lug under the
screw of the outlet cover plate.
CAUTION: Before using an adapter, it must be determined that the outlet cover plate screw is
properly grounded. If in doubt, consult a licensed electrician. Never use an adapter unless you are
sure it is properly grounded.
NOTE: USE OF AN ADAPTER IS NOT PERMITTED IN CANADA. 220-240 volt “GS Safety
Approved” units are supplied with a molded European grounding-type plug (CEE 7/7).
220-240 volt standard units are supplied without a plug, and an appropriate one must be installed by user in
accordance with local electrical codes:
NOTE: USER-INSTALLED CORDSET PLUGS ARE NOT PERMITTED IN EUROPE.
SAVE THESE INSTRUCTIONS
2
3
INTRODUCTION
The Waring® FP25 and FP25C commercial food processors are the most versatile food processors in their
class. These professional machines take advantage of Waring’s forty years of commercial food service
experience as well as thirty years of food processing experience by the same technical, engineering,
manufacturing and development team that has made Waring the best known name in food processors.
These machines are both NSF and Commercial UL listed. The accessories are also NSF listed.
This instruction book describes two models. One model, the FP25, comes with a work bowl (also known as
a batch bowl) and a cutter blade (or S-Blade) to CHOP, GRIND, PUREE, MIX or KNEAD in the batch
bowl. WHAT MAKES THIS MACHINE UNIQUE IS THAT THE BATCH BOWL ALSO ALLOWS
YOU TO PROCESS IN THE BOWL, which means you can SHRED, GRATE, SLICE, or JULIENNE
in the bowl WITHOUT NEED OF A CONTINUOUS FEED CHUTE! The FP25 is shipped from our
factory with a starter kit that includes a 3⁄16" shredding disc, 5⁄32"slicing disc and 1⁄4" x 1⁄4" julienne disc.
The second model, the FP25C, comes with the same attachments as the FP25 but also INCLUDES a
CONTINUOUS FEED CHUTE to do large volume processing such as shredding, grating, slicing
and julienne.
Many additional processing accessories are available for both models. More will be added.
Size, Power and Convenience
The horsepower rating of this food processor is more powerful than other food processors of comparable
2.5-quart size.
The wide feed tube is convenient for large-volume processing of large foods; the motor shaft is of stainless
steel for durability; the housing, work bowl, chute, covers and pushers are all made from durable
polycarbonate for heavy use conditions and easy cleanup. The clear bowl and processing covers are
convenient for viewing food processing results, as well as extremely heavy duty for standing up to daily use.
CONTENTS
Important Safeguards . . . . . . . . . . . . . . . . . . . . . . . . . . . . . . . . . . . . . . . . . . . . . . . . . . . . . . . . . . . . . . . . . . . 2
Grounding Instructions . . . . . . . . . . . . . . . . . . . . . . . . . . . . . . . . . . . . . . . . . . . . . . . . . . . . . . . . . . . . . . . . . 3
Introduction . . . . . . . . . . . . . . . . . . . . . . . . . . . . . . . . . . . . . . . . . . . . . . . . . . . . . . . . . . . . . . . . . . . . . . . . . . 4
The Parts . . . . . . . . . . . . . . . . . . . . . . . . . . . . . . . . . . . . . . . . . . . . . . . . . . . . . . . . . . . . . . . . . . . . . . . . . . . . 6
Assembly of Batch Bowl Parts (Cutter Bowl), FP25 & FP25C . . . . . . . . . . . . . . . . . . . . . . . . . . . . . . . . . . 8
Disassembly of the Batch Bowl Parts, FP25 & FP25C . . . . . . . . . . . . . . . . . . . . . . . . . . . . . . . . . . . . . . . 10
Assembly of the Continuous Feed Chute Parts, FP25C . . . . . . . . . . . . . . . . . . . . . . . . . . . . . . . . . . . . . . 11
Disassembly of Continuous Feed Chute Parts, FP25C . . . . . . . . . . . . . . . . . . . . . . . . . . . . . . . . . . . . . . . 12
Operating the Controls . . . . . . . . . . . . . . . . . . . . . . . . . . . . . . . . . . . . . . . . . . . . . . . . . . . . . . . . . . . . . . . . 13
Food Preparation . . . . . . . . . . . . . . . . . . . . . . . . . . . . . . . . . . . . . . . . . . . . . . . . . . . . . . . . . . . . . . . . . . . . . 14
Food Pusher Selection . . . . . . . . . . . . . . . . . . . . . . . . . . . . . . . . . . . . . . . . . . . . . . . . . . . . . . . . . . . . . . . . . 14
Use Instructions for S-Blade (Cutter Blade) in the Batch Bowl. . . . . . . . . . . . . . . . . . . . . . . . . . . . . . . . . 15
Use Instructions for Accessory Discs in the Continuous Feed Chute . . . . . . . . . . . . . . . . . . . . . . . . . . . . 17
Accessory Disc Selection and Use . . . . . . . . . . . . . . . . . . . . . . . . . . . . . . . . . . . . . . . . . . . . . . . . . . . . . . . . 18
Slicing Discs . . . . . . . . . . . . . . . . . . . . . . . . . . . . . . . . . . . . . . . . . . . . . . . . . . . . . . . . . . . . . . . . . . . . . . 18
Slicing Operation . . . . . . . . . . . . . . . . . . . . . . . . . . . . . . . . . . . . . . . . . . . . . . . . . . . . . . . . . . . . . . . . . . 19
Pulping/Grating/Shredding Discs . . . . . . . . . . . . . . . . . . . . . . . . . . . . . . . . . . . . . . . . . . . . . . . . . . . . . 19
Grating Operation . . . . . . . . . . . . . . . . . . . . . . . . . . . . . . . . . . . . . . . . . . . . . . . . . . . . . . . . . . . . . . . . . 20
Julienne Discs . . . . . . . . . . . . . . . . . . . . . . . . . . . . . . . . . . . . . . . . . . . . . . . . . . . . . . . . . . . . . . . . . . . . . 20
Julienne Operation . . . . . . . . . . . . . . . . . . . . . . . . . . . . . . . . . . . . . . . . . . . . . . . . . . . . . . . . . . . . . . . . . 20
Troubleshooting . . . . . . . . . . . . . . . . . . . . . . . . . . . . . . . . . . . . . . . . . . . . . . . . . . . . . . . . . . . . . . . . . . . . . . 21
Safety Reset Switch . . . . . . . . . . . . . . . . . . . . . . . . . . . . . . . . . . . . . . . . . . . . . . . . . . . . . . . . . . . . . . . . . . . 22
Cleaning . . . . . . . . . . . . . . . . . . . . . . . . . . . . . . . . . . . . . . . . . . . . . . . . . . . . . . . . . . . . . . . . . . . . . . . . . . . . 22
Processing Tools . . . . . . . . . . . . . . . . . . . . . . . . . . . . . . . . . . . . . . . . . . . . . . . . . . . . . . . . . . . . . . . . . . . . . . 24
Limited Warranty. . . . . . . . . . . . . . . . . . . . . . . . . . . . . . . . . . . . . . . . . . . . . . . . . . . . . . . . . . . . . . . . . . . . . 25
Use the Waring food processor well and use it often. It will be an aid to making good food and plenty of it!
4
5
THE PARTS
BATCH
BOWL
The Waring FP25 and FP25C food processors are compact, easy-to-use appliances. Completely assembled, the FP25 is only 19" high (48.9cm) and stores conveniently when not in use. For more compact storage, the cover can be stored upside down with the feed tube in the bowl. When stored this way, the unit is
only 143⁄4" high (37.5 cm).
®
CONTINUOUS
FEED
5c
5c
The Waring FP25 and FP25C food processors both consist of the following standard parts and
accessories:
5b
1. Solid Polycarbonate Motor Base with vertical stainless steel shaft
2. Two Control Levers
a. ON
b. PULSE / OFF
3. Safety Interlock Tower
Prevents machine from operating until cover is in place
4. Clear Work Bowl with 63⁄4-inch diameter (17.1 cm)
Dry capacity of 2.5 quarts
Wet capacity of 1.5 quarts
5. Clear Work Bowl Cover
a. Large oval-shaped Feed Tube for maximum use of cutting surface
3
⁄8 inches (.953cm) x 23⁄4 inches (7.0 cm) wide
b. Large Pusher with full-size and reduced-size feed options
c. Small Pusher used within the large pusher for smaller vegetables, pepperoni, etc.
5b
5a
5a
12
5
13
6
7
8
9
Note: This combination pusher allows use of the entire feed tube for large foods and
provides controlled processing for small-diameter foods such as carrots, celery and
pepperoni.
6. Sharp and durable S-Blade (Cutter Blade) to chop, grind, purée, mix and knead
7. 4 mm, 5⁄32" Slicing Disc
8. 5 mm, 3⁄16" Shredding Disc
9. 6.5 mm x 6.5 mm, 1⁄4" x 1⁄4" Julienne Disc
10. Safety Reset Switch
Note that all of the FP25 and FP25C accessory discs have a unique offset stem. The design
of this stem increases the cutting / processing efficiency of these accessories. The stems can
be easily removed for cleaning in accordance with NSF guidelines.
The FP25C comes with these additional components:
11. Continuous Feed Chute
12. Clear Cover for Feed Chute
13. Slinger
6
11
4
3
3
10
1
2a
2b
FP25 is batch bowl model
2a
1
2b
FP25C is combination model with
batch bowl and continuous-feed parts
7
ASSEMBLY of BATCH BOWL PARTS
FP25 & FP25C
We will use the terms Work Bowl, Batch Bowl and Cutter Bowl interchangeably throughout this
instruction book. They mean the same thing.
• Clean and sanitize the motor base, and wash, rinse, and sanitize the bowl, cover, food pusher, food pusher
insert and processing tools prior to initial use.
• Place the base on a counter or table near a 3-prong electrical outlet. Position it so you look at the front
of the unit and can see the control levers. Be certain that the cord is unplugged and the OFF lever has
been pressed. Do not plug in the cord until the processor is completely assembled.
• Pick up the transparent work bowl, holding it in both hands with the handle toward you.
• Place the bowl on the base, fitting its central tube over the motor shaft on the base and placing its handle
slightly to the left of front-center (at about a 7-o’clock position).
• Press the bowl down so the lower rim fits around the circular platform. Turn the bowl counterclockwise
as far as it will go. It will lock into position with the tabs on the sides of the platform.
Read this if assembling the Batch Bowl parts to use S-Blade (Cutter Blade).
• Pick up the metal blade, noting the outline on tip and the shape on the bottom.
It matches the shape of the motor shaft.
• Place the S-Blade over the tip of the motor shaft, lining up the inside of the hub with the shaft. Press it
down firmly, rotating the center hub until the blade assembly is fully seated. It should easily drop into
place. Be sure it is pushed down as far as it will go. If it is not all the way down, it may become damaged.
Push only on the center section (plastic part); never touch the cutting blade as it is extremely sharp.
• Check to be sure the blade is all the way down by turning it back and forth while lightly pushing it down.
If properly installed and fully seated, the lower blade will be positioned just above the inside bottom of
the bowl.
• If processing food with the S-Blade, now is the time to add the food or liquid to the work bowl.
Read this if assembling Batch Bowl parts to use Accessory Discs in Batch Bowl.
• Do not put any food in the bowl before placing the accessory disc onto the shaft.
• Select the appropriate accessory disc: Grating disc, shredding disc, slicing disc, waved slicing disc, pulping
disc, or julienne/French fry disc.
• Each of these discs has a disc stem. The disc stem fits over the double flat in the food processor’s stainless
steel motor shaft. The stem will also fit inside either the clear plastic tube inside the bowl, or the
continuous feed chute and slinger.
• After selecting the appropriate disc, pick up the disc, either using the finger holes on the disc surface, or
holding the disc firmly between both hands. Be careful not to grab the blades or scrape your hands on the
shredding/grating nodules.
• Carefully guide the center disc hub over the metal shaft so the double flats on the shaft line up with the
disc stem. Put the disc on top of the shaft and rotate until it drops down and into place. Be sure it is
pushed down as far as it will go. Push on the outside rim only; never touch the cutting blades. It should
easily drop into place, but if not, then gently rock back and forth until you feel the disc drop into place.
Note: Do not put any food in the bowl before placing the accessory disc onto the shaft.
(Batch Bowl Assembly continued)
8
(Batch Bowl Assembly continued)
• Place the cover on the bowl, with the feed tube on the left, slightly toward the front. The locking tabs on
the cover should be at the left of the locking tabs on the front rim of the work bowl.
• Rotate the cover counterclockwise to lock it into place. When the cover is rotated into place, the safety
interlock tab on the back rim of the cover will deactivate the safety interlock mechanism located in the
safety interlock tower.
• The cover must be in place correctly, with the cover’s safety interlock tab firmly engaged with the
tower’s magnetic safety interlock mechanism, for the food processor to operate. This is an important
safety feature.
NEVER ATTEMPT TO START THE FOOD PROCESSOR
WITHOUT THE COVER LOCKED INTO POSITION.
Two Pushers for Feed Tube
Pick up the large food pusher and the small food pusher. The large
pusher is for processing larger vegetables. The smaller pusher nests
in the larger pusher and can be used for smaller vegetables, guiding
long thin vegetables for more precise cuts, or for jobs like slicing
pepperoni.
Large Pusher
Insert the small food pusher into the large food pusher opening.
When it is fully inserted, rotate the small pusher clockwise to
lock it into place. Now you are ready to insert the large pusher
into the feed tube opening. Drop the pusher in to the feed tube
gently.
Small Pusher
To use the small pusher, rotate it counterclockwise to disengage
the locking feature. Now you can lift the small pusher up and
out of the large pusher. When using the small pusher, the large
pusher becomes the feed tube for the small pusher.
9
DISASSEMBLY of BATCH BOWL PARTS
FP25 & FP25C
ALWAYS UNPLUG THE CORD BEFORE DISASSEMBLING.
• Turn the bowl cover clockwise until the safety interlock tab on the cover is disengaged from the magnetic
safety interlock switch in the tower, and the tabs are clear of the groove in the tower. The bowl handle
will be at a position between 7 o’clock and 9 o’clock. In this position you can lift the cover off the bowl.
• Remove the large food pusher from the feed tube. Remove the small pusher from the large pusher.
Disassembly when Removing the S-Blade
• Remove the work bowl from the unit by rotating clockwise (left) to disengage the tabs on the bottom of
the bowl platform from the work bowl. When the bowl handle is on the left (about 7 o’clock), you can
gently lift the bowl straight up and out.
It is recommended that you remove the bowl from the motor base before you remove the S-Blade.
• To remove the blade, keep a slight downward pressure on the top of the center hub of the blade while
removing the bowl from the motor base. This will form a seal to prevent food particles from spilling into
the center tube of the bowl, and onto the motor base or the work surface. Then remove the S-Blade from
the bowl. Handle the S-Blade with caution; the blades are extremely sharp.
Disassembly when Removing an Accessory Disc
• Do not remove the work bowl until the accessory disc is removed.
• To remove an accessory disc, insert your thumb and forefinger into the 2 finger holes in the surface
of the disc.
• Remove the work bowl from the unit by rotating clockwise (left) to disengage the tabs on the bottom of
the bowl platform from the work bowl. When the bowl handle is on the left (about 7 o’clock), you can
gently lift the bowl straight up and out.
ASSEMBLY of CONTINUOUS FEED CHUTE PARTS
FP25C
• Clean and sanitize the motor base, and wash, rinse, and sanitize the continuous feed chute, cover, slinger
disc, food pusher, food pusher insert and processing tools prior to initial use.
• Place the base on a counter or table near a 3-prong electrical outlet. Position it so that you are looking at
the front of the unit and can see the control levers. Be certain that the cord is unplugged and the OFF
lever has been pressed. Do not plug in the cord until the processor is completely assembled.
• Pick up the gray continuous feed chute, holding it in both hands with the chute pointing in the 4-o’clock
position. Place the chute on the base, fitting its center opening over the motor shaft. Align the bowl locking slots on the bottom of the chute to the left of the gray locking tabs on the side of the bowl platform
(motor base).
• Press the chute down so the round lower rim of the chute fits around the circular platform.
• Place the Slinger (or ejector disc) in the bowl, sliding it over the metal motor shaft until it reaches the
bottom of the chute.
• Select the appropriate UL listed accessory disc: Grating disc, shredding disc, slicing disc, waved slicing
disc, pulping disc, or julienne/French fry disc.
• Each of these discs has a disc stem. The disc stem fits over the double flat in the food processor’s stainless
steel motor shaft. The stem will fit inside either the clear plastic tube inside the bowl, or the continuous
feed chute and slinger.
• After selecting the appropriate disc, pick up the disc, either using the finger holes on the disc surface, or
holding the disc firmly between both hands. Be careful not to grab the blades or scrape your hands on the
shredding/grating nodules.
• Carefully guide the disc stem over the metal shaft so the double flats on the shaft line up with the matching shape of the disc stem. It should easily drop into place, but if not, gently rotate until you feel the disc
drop into place. Be sure it is pushed down as far as it will go.
Push on the outside rim only; never touch the cutting blades.
Do not put any food in the chute before placing the accessory disc
onto the shaft.
• Place the cover on top of the chute. Press down the cover until it is
fully seated on all sides. Rotate the cover lock mechanism until it
latches to the tab on the continuous feed chute. This will prevent the
lid from rising up during processing.
• Turn the chute and cover together, counterclockwise, until the discharge chute is in the 3-o’clock position and the locking tabs on the
motor base are engaged in the bowl locking slots on the bowl bottom.
• The interlock tab on the cover will simultaneously slide into the tower
safety interlock slot and engage the magnetic safety interlock switch.
The interlock switch prevents operation of the machine unless the
cover is in the proper position. With this switch engaged, the food
processor will operate, if the power is on and the controls are turned
to ON or PULSE.
NEVER ATTEMPT TO START THE FOOD
PROCESSOR WITHOUT THE CHUTE AND COVER
LOCKED INTO POSITION.
10
11
Two Pushers for Feed Tube
Pick up the large food pusher and the small food pusher. The large pusher is for processing larger vegetables. The smaller pusher nests in the larger pusher and can be used for smaller vegetables, guiding long thin
vegetables for more precise cuts and for jobs like slicing pepperoni.
Large Pusher
Insert the small food pusher into the large food pusher opening. When it is fully inserted, rotate the small
pusher clockwise to lock it into place. Now you are ready to insert the large pusher into the feed tube opening. Drop the pusher into the feed tube gently.
Small Pusher
To use the Small Pusher, rotate it counterclockwise to disengage the locking feature. Now you can lift the
small pusher up and out of the large pusher. When using the small pusher, the large pusher now becomes
the feed tube for the small pusher.
DISASSEMBLY of CONTINUOUS FEED CHUTE PARTS
FP25C
ALWAYS UNPLUG THE CORD BEFORE DISASSEMBLING.
• Turn the chute and cover clockwise until the safety interlock tab on the cover is disengaged from the
magnetic safety interlock switch in the tower, and the tabs are clear of the groove in the tower. When you
rotate the chute you will also disengage the bowl’s locking slots from the locking tabs on the motor base
platform.
• When the chute is in the 4-o’clock position, you can lift the cover off the chute. Remember to rotate the
cover lock to the open position before removing the cover.
• Remove the large food pusher from the feed tube. Remove the small pusher from the large pusher.
• To remove an accessory disc from the continuous feed chute, insert your thumb and forefinger into the
2 finger holes in the surface of the disc, and lift it straight up and off the drive shaft. An alternative way
to remove the disc is as follows: Place two fingers under each side of the disc and lift it straight up.
If you choose this method, be careful not to touch the blades as they are extremely sharp.
• Remove the continuous feed chute from the motor base. If the chute is pointing in the 4-o’clock position,
just lift it up. If not, rotate clockwise (left) to disengage the tabs on the bottom of the bowl platform
(motor base) from the slots on the bottom of the continuous feed chute.
OPERATING THE CONTROLS
• Plug the machine into an electrical outlet. The outlet must be 110/120 volts, 60Hz.
• There are two control levers located on the base of the machine. They are on the front and they give you
fingertip control of processing. They are large enough to find easily in case of emergency.
The two controls are:
ON
PULSE/OFF
How they work:
ON: Press the lever down to start the motor.
PULSE/OFF: To turn the motor off, press the lever down and release.
To pulse the motor, press the PULSE/OFF lever down, then release. The motor
will run as long as you hold the lever down; it stops when you release the lever. Try
it a few times.
How to Use
Continuous Use
For continuous processing, use the ON lever, which is located on the left.
Pulsing
The Pulsing function is intended for use with the S-Blade in the work bowl.
• For rapid on-off operation, called pulsing, use the PULSE / OFF lever located on the right.
The motor runs as long as you hold the lever down; it stops when you release the lever.
• You control pulsing. You control the duration of each pulse by the amount of time you hold the lever
down. You control the frequency of pulses by the rate at which you press the lever. The interval between
pulses must be long enough to allow everything in the work bowl to fall to the bottom.
• Pulsing gives you precise control over chopping, mincing, blending and mixing. You can process food to
any texture or consistency you want, from coarse to fine.
• Pulsing is also useful in processing hard foods. Pulse the food a few times to break up into smaller parts.
Then proceed with continuous use after the pieces are broken up and easier to process.
• Always use the PULSE /OFF lever for pulsing. Never move the bowl (or chute) and cover assembly on or
off to control pulses. It is less efficient and could damage the machine.
Turning Off
Always turn the machine off with the PULSE / OFF lever and wait until the blade or disc comes to a
complete stop before removing the pusher assembly. The motor stops within seconds after the machine
is turned off.
12
13
FOOD PREPARATION
• Prepare all food items to be processed by washing and peeling as required. Remove pits, stones, and
large seeds.
• Cut vegetables, meats, cheeses, etc. into sizes that will fit into your choice of small feed tube or large feed
tube for processing with accessory discs, or into sizes as required by your processing task.
• Preparation for slicing: Produce that is long and cylindrical such as carrots, cucumbers and celery should
be cut flat at both ends. This will provide a consistent slice for all food processed.
USE INSTRUCTIONS for S-BLADE (Cutter Blade)
in the BATCH BOWL
FP25 & FP25C
• The S-Blade (Cutter Blade) is designed for chopping, grinding, puréeing, blending, mixing, and kneading
of ingredients required in almost all recipes.
• Assemble the bowl and blade as instructed in the section titled “Assembly of Batch Bowl Parts,” (see page 8).
S-Blade Usage
Pushers are not required when processing in the bottom of the work bowl with the S-Blade. However, the
feed tube can be used for adding ingredients while the food processor is running. It is recommended that
the food pushers be left in place to prevent splashing and avoid unwanted additions to the work bowl.
Chopping and Mincing
• To chop or mince in the bowl, fill the bowl with food product up to the top of the bowl’s inner tube, or
up to 3⁄4 full.
• To chop or mince most effectively, you must quickly start and stop the blades to control the consistency of
the chop by pulsing. Use the Pulse lever to accomplish this as described under pulsing. Continue
pulsing until the desired consistency has been reached.
• If chopped foods are processed continuously, the food will be processed unevenly, i.e., food on the bottom
will be finely chopped and food on the top will be more coarse.
Small Pusher
This pusher with smaller chute is typically used when inserting vegetables vertically for smaller cuts. It
should be used when slicing foods such as carrots, celery, pepperoni, etc. when a consistent, flat result is
desired.
Chopping Meat
Place up to 2.5 pounds of approximately 2-inch squares of meat in the bowl and pulse the machine with the
pulse lever until the desired consistency has been reached. If the machine has trouble starting, reduce the
amount of meat in the bowl and start again.
This pusher is also desired when a shorter grate or shred is desired as opposed to a longer shred using the
larger feed tube and pusher.
Chopping Hard Cheese
Place up to 2 pounds of uniform 1-inch cubes of chilled cheese into the bowl and pulse the machine with
the pulse lever. For powdered cheese, pulse until the cheese is in small chunks (pea size), then allow the
processor to run continuously until you have fine powder. Cheese with high moisture content can ball up if
processed too long.
FOOD PUSHER SELECTION
The small pusher can be used with the julienne blade for vertical insertions that result in finely chopped
products such as onions or celery.
Large Pusher
This pusher with larger chute is typically used when inserting vegetables horizontally for longer cuts.
This pusher is used when a longer grate or shred is desired, such as long shreds or juliennes of peppers or
carrots. It is also used when processing large volumes of food or bulky food items such as potatoes or
onions.
Special Note: The continuous feed bowl and the batch bowl (work bowl) use the same food pushers. They
are interchangeable.
14
Chop Onions, Celery, Cabbage, etc.
Cut onions in quarters, and other vegetables into 2- or 3-inch cubes. Place the cubed food into the work
bowl up to the top of the bowl’s inner tube, and pulse until you reach the desired consistency.
Note: If you let the blade run too long, the ingredients on the bottom will become puréed or give you
uneven results.
Purée or Mix
To purée tomatoes, vegetables and fruits, make sauces, or mix and blend ingredients, place the ingredients
into the bowl, turn the unit on and allow it to run continuously until you reach the desired consistency.
Do not let the machine run unattended. If your recipe exceeds more than 1.8 quarts of wet ingredients,
please process in several batches.
15
Turn the Machine OFF with the OFF lever.
• Always switch the food processor off by pressing and releasing the PULSE/OFF lever. This assures that
the power is not supplied to the motor.
• Always switch the food processor off and wait until rotation stops before removing the cover.
• While the safety interlock switch will turn the machine off if the cover is rotated clockwise, or the cover is
removed while running, this should not be the means of ON/OFF operation.
• Before rotating the lid, always make sure the machine is off by pressing the PULSE/OFF lever as a
safety precaution, in the event that the machine was not turned off properly.
• When processing, it is recommended that the machine be operated on a 50% duty cycle, such as
5 minutes on/5 minutes off. This can be accomplished by processing for 5 minutes, then doing
5 minutes of food preparation. Please remember to turn off the machine when not in use.
16
USE INSTRUCTIONS for ACCESSORY DISCS
in the CONTINUOUS FEED CHUTE
FP25 & FP25C
• Assemble the bowl and accessory disc as instructed in the section titled, “Assembly of Batch Bowl Parts,”
(see page 8). Or, assemble the continuous feed chute and accessory disc as instructed in the section titled
“Assembly of Continuous Feed Chute Parts,” (see page 11).
• If required by your processing task, either:
• Stack the feed tube with food and position the large food pusher at the top of the stack,
or
• Place the large food pusher into the feed tube and remove the small feed pusher to use the smaller
feed chute located inside the large food pusher. This is described above (see page 12). Stack food
items in the small food chute. Position small food pusher at the top of the stack.
• Be sure the unit is off by pushing and releasing the PULSE/OFF lever.
• Insert the power cord plug into a properly grounded outlet of the correct voltage.
• Use the ON switch for continuous processing, or the PULSE/OFF lever for pulsing /on-off operation.
• Feed the items to be processed at a steady rate into the feed tube, using the food pusher to push the food
down. The same technique is used whether you choose to use the large pusher or the small pusher. Avoid
excessive force when using either one of the food pushers. Too much force may cause food items to jam in
the feed tube or damage the machine. ALWAYS USE THE LARGE FOOD PUSHER TO PUSH
FOOD ITEMS DOWN INTO THE LARGE FEED TUBE. IN THE SAME WAY, ALWAYS
USE THE SMALL FOOD PUSHER TO PUSH FOOD ITEMS DOWN INTO THE SMALL
FEED TUBE. NEVER PUT FINGERS, SPATULAS, OR OTHER UTENSILS INTO THE
LARGE FEED TUBE OR THE SMALL FEED TUBE CHANNEL.
• Never use the small food pusher in the large feed tube.
• When the bowl is full and / or you have finished your processing task with the bowl or continuous feed
chute, press the PULSE / OFF lever and let the processing disc come to a complete stop. Unplug the
unit. NEVER STOP THE FOOD PROCESSOR BY REMOVING THE PLUG FROM THE
OUTLET OR BY REMOVING THE COVER. ALWAYS STOP THE UNIT BY PRESSING
THE PULSE/OFF LEVER.
• Follow disassembly instructions for the bowl and continuous feed chute as appropriate. These are
described in the section titled “Disassembly of Batch Bowl Parts,” (see page 10), or the section titled
“Disassembly of Continuous Feed Chute Parts,” (see page 12).
When processing, it is recommended that the machine be operated on a 50% duty cycle, such as 5 minutes
on / 5 minutes off. This can be accomplished by processing for 5 minutes, then doing 5 minutes of food
preparation. Please remember to turn off the machine when not in use.
17
ACCESSORY DISC SELECTION AND USE
Slicing Operation
The FP25 and FP25C food processor disc accessories are made to perform a large variety of food processing tasks: slicing, waved slicing, grating, shredding, French fry and julienne cuts. As of this printing there
are a total of 21 accessory discs available for these functions. The 21 consist of the following:
8 slicing discs
1 pulping disc
1 waved slicing disc
2 grating discs
6 julienne/FF discs
3 shredding discs
Sizes are listed on page 24 under “Processing Tools”. Three (3) Accessory Discs are included with both the
FP25 and FP25C food processors. As of this printing they are:
BFP13 - 4 mm, 5⁄32" Slicing Disc
BFP33 - 5 mm, 3⁄16" Shredding Disc
BFP29 - 6.5 mm x 6.5 mm, 1⁄4" x 1⁄4" Julienne Disc
Slicing Discs
Size
Millimeters
0.8 mm
2 mm
3 mm
4 mm
Waved 1.5 mm
Size
Inches
1
⁄32"
5
⁄64"
1
⁄8"
5
⁄32"
1
⁄16"
Waring
Item No.
BFP14
BFP15
BFP31
BFP32
Pulping/Grating/Shredding Discs
Waring
Item No.
BFP17
BFP19
BFP21
Below are some uses and operation tips for your accessory discs.
Waring
Item No.
BFP10
BFP11
BFP12
BFP13
BFP16
Prepare all food items to be processed by washing and peeling as required. Remove pits, stones, and large
seeds. Be sure the food will fit into the proper feed chute. Foods such as carrots, cucumbers, etc., should
be cut flat at both ends to provide a consistent slice throughout the whole product. With foods like cabbage, lettuce or any product that has an undesirable core, the core should be removed. Medium size cabbage or lettuce heads may be cut into thirds to fit in the feed chute. Larger heads may need to be quartered. When food preparation is complete, fill the chosen feed chute, put the pusher in place, turn the
machine on and monitor the results.
Size
Millimeters
5 mm
6.5 mm
8 mm
10 mm
Size
Inches
3
⁄16"
1
⁄4"
5
⁄16"
3
⁄8"
BFP10 (1⁄32") is used for preparing very fine cuts. It can be used for preparation of Japanese-style
vegetables with foods placed in the pusher horizontally to get a long thin cut. This tool can also be
used for decorative cuts.
Size
Millimeters
0.4 mm Pulping
0.4 mm Grating
2 mm Grating
Size
Inches
1
⁄64"
1
⁄64"
5
⁄64"
Waring
Item No.
BFP22
BFP23
BFP24
BFP33
Size
Millimeters
4 mm Shredding
6.5 mm Shredding
8 mm Shredding
5 mm Shredding
Size
Inches
5
⁄32"
1
⁄4"
5
⁄16"
3
⁄16"
BFP19 (1⁄64" Fine Grate). Use this disc for extra fine grating of hard cheeses like Romano and Parmesan.
Also use this disc for cracker or cookie crumbs or dried bread crumbs. Caution: Do not use this disc for
soft cheeses or moist breads, as this will clog the disc and give poor results.
BFP21 (5⁄64") is a larger grating disc for medium and coarse grating. This is appropriate for processing
grated carrots, cheese and other foods. Select based on personal choice and specific applications for
grating cheese, carrots, etc.
BFP22 (5⁄32"), BFP23 (1⁄4"), BFP24 (5⁄16") BFP33 (5⁄16") are popular-size shredding discs. These discs have
a larger, better formed result with foods than grating patterns. They should be selected based on personal
choice and specific applications for shredding cheese (for pizza), or carrots, cabbage, and other vegetables
for preparing salads and side dishes.
BFP11 (5⁄64") is used to slice cucumbers, carrots, celery and other vegetables for salads and salad bars.
BFP13 (5⁄32") is a popular multiuse size for slicing. Ideal for salad bars, cucumber slices, carrot coins,
and sliced lettuce for deli sandwiches and tacos. This slicing disc can also be used to produce half-slices of
tomatoes, bell peppers, or onions.
BFP15 (1⁄4"). This size and larger sizes are ideal for making thicker slices for soups and stews.
BFP16 (1⁄16" Waved). This waved slicing disc is great for making decorative thin slices of carrots, celery, and
other vegetables. Ruffled potato slices can also be produced with this accessory.
18
19
Grating Operation
TROUBLESHOOTING
• Prepare all food items to be processed by washing and peeling as required. Remove pits, stones, and large
seeds. Be sure the food will fit into the proper feed chute.
• Select which feed tube to use. Horizontal placement of carrots will result in a long grated product, while
using the smaller chute and inserting the food vertically will give you a short grated product.
• For cheese grating or shredding it is recommended that the cheese be chilled first; otherwise it may
become gummy. A fine coating of cornstarch applied to the cheese can aid in keeping food separated;
cornstarch is tasteless and not visible.
• For grating cheese, it is recommended that a slight pulsating pressure be applied with the pusher, alternating push/no push until the cheese block is completely grated. Cheese grating puts more strain on the food
processor motor than other tasks and may cause overheating if too much pressure is applied in a continuous manner.
• You can typically expect to grate ten (10) pounds of cheese in about five (5) minutes. It is recommended
that you plan your food preparation in a manner that will allow for five minutes of grating, followed by 5
minutes of food preparation while the machine rests. After fifteen (15) minutes of continuous cheese grating, allow the machine to cool.
This section describes potential problems and the correct solutions for them. Problems that cannot be
solved with the guidelines listed below should be referred to one of the Waring Authorized Service Centers
for assistance. A listing of authorized service agencies is supplied with each Waring food processor.
Julienne Discs
Waring
Item No.
BFP25
BFP26
BFP27
Size
Millimeters
2 mm x 2 mm
2 mm x 4 mm
4 mm x 4 mm
Size
Inches
5
⁄64" x 5⁄64"
5
⁄64" x 5⁄32"
5
⁄32" x 5⁄32"
Waring
Item No.
BFP28
BFP29
BFP30
Size
Millimeters
2 mm x 6.5 mm
6.5 mm x 6.5 mm
8 mm straight FF
Size
Inches
5
⁄64" x 1⁄4"
1
⁄4" x 1⁄4"
5
⁄16" straight FF
FP25 and FP25C food processors come with a selection of six (6) different julienne plates with sizes up to
⁄16" x 5⁄16". The BFP29 is 1⁄4" x 1⁄4" square cut for making French fry cuts on potatoes, carrots, or other vegetables such as zucchini squash. For larger cuts, use the BFP30, which is 5⁄16" x 5⁄16".
• These julienne accessories can also chop or mince products such as onions or bell peppers that are quartered and gravity-fed through the larger feed tube. Foods including carrots and celery can be chopped
with these discs by inserting them into the feed tube vertically.
• Tomatoes can be diced with these 6.5mm, 8mm, and 10mm square julienne discs by quartering the tomato and processing using this plate. It is recommended that you use firm tomatoes.
• These and other julienne discs can be use to produce squash sticks, chopped celery, finely chopped onions
and julienne celery root.
• Meats and cheeses must not be processed with a julienne accessory. Damage may result.
5
Julienne Operation
Unit does not start when assembled correctly
• Pull the plug and try plugging into another outlet.
• Turn ON lever to ON.
• Make sure the bowl is properly positioned on the motor base, that the bowl or chute cover is on
properly, and that the safety interlock tab on the cover has properly engaged the safety interlock switch
in the tower.
Unit stops running during processing
• Turn unit OFF.
• Remove bowl attachment.
• Remove food being processed from inside the bowl.
• Reassemble unit, and run first with the bowl empty, then add food back into the bowl and try again.
Unit will not come up to full speed
• Bowl is overloaded – remove food being processed and reload using smaller quantities.
If unit does not operate after you have followed the above,
and have tried the Safety Reset Switch
• Check outlet to be sure there is current.
• Check to be sure circuit breaker is ON.
• Check to be sure the fuse is not blown if there are fuses on this circuit.
• Call local Waring service agency.
If unit starts to spark or smoke
• Turn unit off, unplug it, and call local factory-authorized service agency.
If food processor makes grinding noise
• Turn unit off, unplug, disassemble, check bowl and blade to see if they have been rubbing together.
• If bowl and blade are rubbing, call your authorized Waring service agency.
• Prepare all food items to be processed by washing and peeling as required. Remove pits, stones, and large
seeds. Be sure the food will fit into the proper feed chute.
• If a long horizontal cut is desired, for example with squash sticks, the food must be placed in the feed
chute horizontally, or on its side. For finely chopped food results, for example with chopped celery or
finely chopped onions, you must insert the vegetables vertically, or standing up. For a very fine chop of
onions, quarter the onion and gravity-feed it through the chute.
20
21
SAFETY RESET SWITCH
The SAFETY RESET SWITCH is provided for your convenience and to extend the life of your Waring
food processor. It is located on the back of your machine, on the safety interlock tower, protected by a
round finger hole. The switch button is red.
If the machine should become jammed or somehow overloaded, the safety-reset switch has a mechanism
that will shut down the motor to prevent overheating and to prevent damage to the motor.
How it works
If the machine becomes overloaded, the shaft and blade will stop turning, but you will hear a buzzing noise.
After a few seconds you will hear a click, and the buzzing noise will stop. This is the safety reset switch
shutting off the motor.
Possible causes of a motor shutdown
• Food becoming jammed between the processing plate and the bowl or cover.
• An unusually heavy load being processed for a lengthy period of time.
To restart the motor, follow these steps:
• Turn the machine OFF by pressing the PULSE/OFF lever.
• Unplug the machine.
• Clear the batch processing bowl (or continuous feed chute) of the food that caused the jamming
condition. It may be that you only need to remove some of the food.
• Wait for at least 1 minute to allow the motor to cool.
• Plug the unit into the appropriate electrical outlet.
• Press the red safety reset switch located on the back of the safety interlock tower.
• Press down the ON lever or the PULSE lever to restart the machine. We suggest pulsing to start the processing, as this will put less strain on the motor.
• If the machine does not start, wait for another minute and repeat this procedure.
CLEANING
Clean the food processor and accessories prior to initial use and after each use. Do not use harsh abrasivetype cleaners on any part of the food processor. Cleaning must follow NSF guidelines.
Some of the discs and blades have aluminum components. Whether cleaning them manually or in a
dishwasher, be sure to use a detergent that is safe for use with soft metals. Other types of cleaning
detergents can cause corrosion of soft metals.
A stiff bristle brush will help to knock food particles out of the crevices of the discs and blades before
washing. Handle very carefully as the blades are sharp.
Please note that all accessory discs and blades may be disassembled with a screwdriver for thorough
cleaning. This includes the cutting blades on the center hub of the S-blade. Handle the sharp S-blade
with care.
For manual cleaning, it is recommended that you use washing solutions based on non-sudsing detergents,
and chlorine-based sanitizing solutions that have a minimum chlorine concentration of 100 PPM.
The following washing, rinsing, and sanitizing solutions, or their equivalents, may be used:
SOLUTION
Washing
PRODUCT
Diversey®
Wyandotte
Diversol® BX/A or CX/A
Rinsing
Plain Water
Sanitizing
Clorox®
Institutional
DILUTION IN WATER
4 tablespoons per
gallon
TEMPERATURE
Hot 115°F (46°C)
Warm 95°F (35°C)
1 tablespoon per
gallon
Cold 50°F (10-21°C)
To clean and sanitize the motor base
Clean and sanitize the motor base prior to initial use and after each use. Unplug the unit, then wipe down
the exterior surfaces of the motor base with cloths or sponges dampened with a soluble detergent. Next,
wipe down with rinse water. Prevent liquid from running into the motor base by wringing out all excess
moisture from cloths or sponges before using them.
NEVER IMMERSE THE MOTOR BASE IN WATER OR ANY OTHER LIQUID.
Allow the unit to air-dry before using again.
Wash the motor shaft with a small brush.
Never use harsh abrasive-type cleaners on any part of the Commercial Food Processor.
Wash, rinse, sanitize and dry the bowl, continuous feed chute, covers, small food pusher, large food pusher,
accessory discs, S-blades and ejector /slinger disc prior to initial use, and after use, unless they will be used
again immediately. These items are all dishwasher-safe, and may be cleaned and rinsed in the dishwasher
instead of manually in the sink.
Wash and rinse all of the above items after each use.
22
23
PROCESSING TOOLS
LIMITED WARRANTY
At this printing, there are 21 processing accessories available for preparing food with your FP25 and
FP25C food processors.
Slicing Discs
Waring
Item No.
BFP10
BFP11
BFP12
BFP13
BFP14
BFP15
BFP31
BFP32
Shredding Discs
Size
Millimeters
0.8 mm
2 mm
3 mm
4 mm
5 mm
6.5 mm
8 mm
10 mm
Size
Inches
1
⁄32"
5
⁄64"
1
⁄8"
5
⁄32"
3
⁄16"
1
⁄4"
5
⁄16"
3
⁄8"
Waved Slicing Discs
Waring
Item No.
BFP16
Size
Millimeters
1.5 mm
Size
Inches
1
⁄16"
Size
Millimeters
0.4 mm
Size
Inches
1
⁄64"
Size
Millimeters
0.4 mm
2 mm
Size
Inches
1
⁄64"
5
⁄64"
Pulping Discs
Waring
Item No.
BFP17
FIVE YEAR LIMITED MOTOR WARRANTY
TWO YEAR LIMITED PARTS AND LABOR WARRANTY
Waring
Item No.
BFP22
BFP33
BFP23
BFP24
Size
Millimeters
4 mm
5 mm
6.5 mm
8 mm
Size
Inches
5
⁄32"
3
⁄16"
1
⁄4"
5
⁄16"
Size
Millimeters
2 mm x 2 mm
2 mm x 4 mm
4 mm x 4 mm
2 mm x 6.5 mm
6.5 mmx 6.5 mm
8 mm straight FF
Size
Inches
5
⁄64" x 5⁄64"
5
⁄64" x 5⁄32"
5
⁄32" x 5⁄32"
5
⁄64" x 1⁄4"
1
⁄4" x 1⁄4"
5
⁄16" straight FF
Julienne Discs
Waring
Item No.
BFP25
BFP26
BFP27
BFP28
BFP29
BFP30
Waring Commercial warrants that this product's motor shall be free from defects in material and
workmanship for a period of five years from the date of purchase when used with foodstuffs, nonabrasive
liquids (other than detergents) and nonabrasive semi-liquids, providing it has not been subject to loads
in excess of indicated rating. All other components are warranted for a period of two years from date
of purchase.
Under this warranty, the Waring Commercial division will repair or replace any part which, upon our
examination, is defective in materials and workmanship, provided the product is delivered prepaid to the
Waring Service Center, 314 Ella T. Grasso Ave., Torrington, CT 06790, or any factory-approved service
center.
This warranty does not: a) apply to any product which has become worn, defective, damaged or broken
due to use or due to repairs or servicing by other than the Waring Service Center or a Factory Approved
Service Center or due to abuse, misuse, overloading or tampering; b) cover incidental or consequential
damages of any kind.
This warranty is applicable only to appliances used in the United States or Canada; this supersedes all
other express product warranty or guaranty statements. For Waring products sold outside of the U.S. and
Canada the warranty is the responsibility of the local importer or distributor. This warranty may vary
according to local regulations.
This warranty is void if appliance is used on Direct Current (DC Current).
Grating Discs
Waring
Item No.
BFP19
BFP21
24
25
26
27
www.waringproducts.com
©2005
314 Ella T. Grasso Ave.
Torrington, CT 06790
05WC30026
Waring® is a registered trademark of Waring Products Division of Conair Corporation. Any other trademark or service marks
used herein are the trademarks or service marks of their respective owners.
IB-3672