1
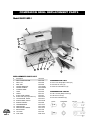
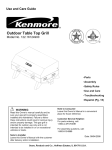
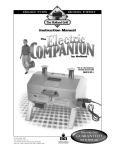
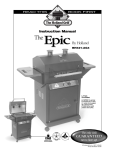
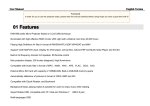
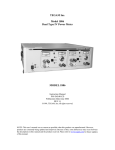
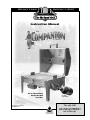
READ THIS
BOOK FIRST
®
Instruction Manual
The
by Holland
This Is A Revolutionary
Portable Gas Grill!
L.P. Tank
not included.
BH-212-MG-1
Companion 08/2000
PN MG1-004
The only Grill
GUARANTEED
BARBECUE INDUSTRY
ASSOCIATION MEMBER
not to flare up!
Dear Friend,
I wish to personally thank your for purchasing one of my
Holland Grills. It’s my goal that you, your family and friends
enjoy your grill for many years to come.
It’s important that you are aware that the Holland is unlike any other grill. By
design, it allows you to grill or smoke, without the fear of flare-ups commonly
associated with competitive brands. Now you can enjoy being with your
friends while preparing quality food without the worry and nuisance of trying
to control fires.
Not only will you be able to enjoy time with friends while you grill in comfort,
you’ll be able to do so for years to come. My grill is made of quality materials
which give it a sturdiness that will last for years. Unlike other grills on
the market, I do not intend for my customers to deal with a long list of
replacement parts and the inconvenience of waiting for the parts.
This grill was designed and made for your trouble-free outdoor
cooking.
Since the Holland does not operate like other grills, it is
important to me that you follow all the instructions. I have spent
a large portion of my life developing a product that is safe,
easy to use and grills to perfection; I personally want to know
your comments, questions or any problems that arise from the
grill or our field representatives.Please feel free to contact me
with your comments, or contact a local dealer who will help
you with parts, accessories, literature and warranty.
My patented no flare-up design
ensures your food can’t catch
on fire. Simply close the lid
and cook by time.
Thank you,
IT’S IMPORTANT THAT YOU, THE OWNER, READ THE ENTIRE MANUAL BEFORE
ASSEMBLING OR USING THE GRILL. IF YOU ALLOW SOMEONE ELSE TO USE YOUR
GRILL, MAKE SURE THEY HAVE READ THE INSTRUCTIONS AND UNDERSTAND THEM
BEFORE YOU LET THEM OPERATE THE GRILL.
COMPANION GRILL OWNERS MANUAL
Safety Information
The Fuel System
Please read carefully.
Gas grills are used SAFELY by millions of people when following
simple SAFETY precautions.
• IF YOU SMELL GAS:
1. SHUT OFF GAS TO THE APPLIANCE.
2. EXTINGUISH ANY OPEN FLAME.
3. OPEN LID.
4. IF ODOR CONTINUES, IMMEDIATELY CALL YOUR GAS
SUPPLIER OR FIRE DEPARTMENT.
• DO NOT STORE OR USE GASOLINE OR OTHER FLAMMABLE
VAPORS AND LIQUIDS IN THE VICINITY OF THIS OR ANY OTHER
APPLIANCE.
• AN LP CYLINDER NOT CONNECTED FOR USE SHALL NOT BE
STORED IN THE VICINITY OF THIS OR ANY OTHER APPLIANCE.
• THE GRILL SHOULD BE LIT AND ALLOWED TO OPERATE FOR AT
LEAST 30 MINUTES BEFORE USING FOR THE FIRST TIME TO
ALLOW PRESERVATIVE TO BURN OFF. AFTER SMOKE STOPS
COMING OUT OF STACKS, GRILL IS READY FOR YOUR USE AND
ENJOYMENT.
• THIS GRILL IS NOT FOR COMMERCIAL USE
• THIS COOKING APPLIANCE IS FOR OUTDOOR USE ONLY AND
SHALL NOT BE USED IN A BUILDING, GARAGE OR ANY OTHER
ENCLOSED AREA.
• EXCESSIVELY WINDY OR COLD CONDITIONS MAY AFFECT
GRILL COOKING PERFORMANCE.
• CHOOSE ONLY A LEVEL LOCATION FOR GRILL OPERATION. THE
HOLLAND GRILL MUST BE SITTING SECURELY ON A LEVEL
SURFACE FOR PROPER OPERATION AND EVEN HEAT
DISTRIBUTION.
• YOUR GRILL IS MADE FOR OUTDOOR USE ONLY
• THE VENT STACKS MUST BE IN THE “UP” POSITION DURING
GRILL USE.
• THE VENT STACKS AND THE AIR INTAKE OPENINGS SHOULD
NEVER BE BLOCKED OR CLOSED DURING GRILL OPERATION.
• A MINIMUM CLEARANCE OF 18 INCHES ON THE SIDES AND
BACK MUST BE KEPT BETWEEN THE GRILL AND COMBUSTIBLE
CONSTRUCTION. THE GRILL SHALL NOT BE LOCATED UNDER
OVERHEAD UNPROTECTED COMBUSTIBLE SURFACES.
®
MG1-1
• DO NOT STORE A SPARE LP GAS CYLINDER UNDER OR NEAR
THIS APPLIANCE.
The items in the fuel system are designed for operation with the
Holland Grill. They must not be replaced with any other brand.
(See parts list for replacement items.)
GAS BURNER: The gas burner is constructed of tubular stainless
steel and should not require maintenance other than inspection for
insects/nests inside the air intake slots.
BURNER VALVE/REGULATOR: The burner control is actually a
regulator/valve assembly. The regulator attaches directly to the end
of the burner, which extends out of the right end of the grill body.
The 1 pound PROPANE CYLINDER THREADS INTO THE REGULATOR.
The burner control operates in the following positions indicated by
the pointer at the top of the regulator as installed on the grill:
OFF - This stops the flow of gas to the burner.
PUSH TO TURN ON - You must push “IN” on the knob to release
the knob from the locked “OFF” position.
LIGHTING POSITION - This position allows flow of gas to light
grill.
HIGH - This position provides the highest gas flow and hottest
cooking temperatures.
MED - This position provides cooking temperatures between
HIGH and LOW.
LOW - This position provides the lowest cooking temperatures.
ONLY A FACTORY SUPPLIED GAS VALVE/REGULATOR
SHOULD BE USED. See parts list for replacement items.
LP GAS REGULATOR CAUTION
The gas pressure regulator provided with this appliance MUST be
used. This regulator is equipped with the required orifice and is set
for the required outlet pressure for this appliance. This combination
of orifice size and pressure regulation specifications provides the
cooking performance intended by The Holland Company.
Substitution of regulator by any other device or any other manufacturer is dangerous and could result in serious injury. (See parts
list for replacement items.)
LP GAS REGULATOR
The gas pressure regulator is shipped loose and must be installed
prior to operating your grill. This is a “slip-fit” requiring no tools. See
assembly instructions for proper installation. The regulator may be
removed from grill after use. Turn the regulator control knob to the
“OFF” position, disconnect the LP cylinder and allow the grill to
cool for at least 30 minutes prior to removing regulator.
Care should be taken to store the regulator in a clean, secure location
when the grill is not in use. The threaded cylinder connection area
should be kept clean and free of dust, dirt, sand or any foreign
materials. Clean both the regulator and LP cylinder threaded areas
prior to connecting cylinder to regulator.
PROPANE FUEL: Warning -- propane is a flammable gas. Improper
handling may result in an explosion and/or fire and serious accident or
injury.Your grill is designed to operate on Propane (LP) gas ONLY and
is equipped with the proper orifice for this gas.Caution: Do not connect
this grill to any gas supply other than Propane. Propane gas is heavier
than air and will settle in low areas. Make certain adequate ventilation
is available when using your grill and that the gas cylinder is stored
outside in a well ventilated area out of the reach of children when the
grill is not in use.
LP GAS CYLINDER: This grill is designed and intended to be used
with a disposable Propane cylinder with a nominal fuel weight of 1 lb.
Such a cylinder is approximately 4” in diameter and 7” long. The
Holland Grill does not include an LP gas cylinder. This must be purchased separately and is available at most hardware stores. The cylinder used must be constructed in accordance with the specifications for
LP cylinders of the U.S. Department of Transportation (DOT) DOT-39
NRC232/290 M1110.
THE LP GAS CYLINDER shall be used only outdoors in a well ventilated space and not in a building, garage, or any other enclosed area.
The Holland Grill may be stored indoors if the LP gas cylinder is
removed and stored outdoors.
The threaded cylinder connection area should be kept clean
and free of dust, dirt, sand or any foreign materials. Clean both
the regulator and LP cylinder threaded areas prior to connecting
cylinder to regulator.
Keep any electrical supply cord or fuel supply hose away from
any heated surfaces.
COOKING
TEMPERATURE SETTINGS
HIGH -- Approximately 450 degrees F
MED -- Approximately 400 degrees F
LOW -- Approximately 350 degrees F
NOTE: The “MED” setting will be most similar to other Holland
Grill models cooking performance.
NOTE: A disposable 1 lb. cylinder “NEAR EMPTY” has significantly reduced internal pressure and MAY affect the regulator’s ability
to accurately control gas flow. This MAY CAUSE somewhat hotter-than-normal cooking temperatures during the final few minutes
of cylinder use as it reaches “empty.”
NOTE: A disposable 1 lb. cylinder will provide approximately 4-6
hours of cooking time with the Holland Companion Grill.
The LP gas cylinder is provided with a threaded connection for
attachment directly to the gas regulator supplied with this appliance.
Care should be taken when threading the cylinder to the regulator to
engage threads correctly to achieve the proper and intended
connection. When disconnecting or connecting the gas cylinder, be
careful that the regulator does not strike the grill, the ground, or any
other surface. Replace the protective cap over the threaded cylinder
connection when removed from grill. If any difficulty at all is experienced when connecting or disconnecting the cylinder to the regulator
assembly, contact your local gas supplier for assistance.
When re-connecting the LP gas cylinder to the regulator, be sure to
hand-tighten until snug. This connection should be inspected for
damage and leak tested after re-connection.
®
MG1-2
COMPANION GRILL ASSEMBLY INSTRUCTIONS
The Holland Grill “Companion” model requires very
little assembly. The unit is mostly complete right
out of the box. Items that require actual assembly
are the (4) legs and the front lid-lifting handle. The
regulator is installed per grill use and removed
when grill is not in use.
Tools needed for assembly:
1. Phillips screwdriver
2. 3/8” nut driver
MODEL BH212 MG-1
BEFORE BEGINNING ASSEMBLY
Select a clean flat surface, such as a table top. Open and empty
box. Remove drip pan and other loose components packaged
inside body. Check contents with list below to make sure no
parts are missing.
CONTENTS LIST
# Description
1 GRILL BODY/LID ASSEMBLY
2 LEGS (4)
3 DRIP PAN
4 HANDLE BRACKET
5 HANDLE SPRING
6 COOKING GRID
7 REGULATOR
8 INSTRUCTIONS /DOCUMENTS
9 HARDWARE
10 GREASE PAN
11 DISPOSABLE GREASE PAN LINERS
12 CHIP TRAY
1
3
11
10
12
6
2
8
7
5
4
9
ASSEMBLY
1. On a clean flat surface, such as a table top, select the
following parts for assembly:
1. body assembly
2. legs (4)
Also locate (16) each from the hardware pack
#10-24 x 3/8” phillips screws
#10 lockwashers
#10-24 hex nuts
Refer to figure 2. Install each of the legs with (4) screws, lockwashers and locknuts as shown. LEAVE SCREWS LOOSE
UNTIL ALL LEGS ARE INSTALLED. With grill sitting on a flat
level surface, tighten screws.
®
MG1-3
2. Refer to figure 3. Select the following
parts for assembly:
4. Handle bracket
5. Handle spring
Also locate (2) of each of the following from the
hardware pack:
#10-24 x 3/8” phillips screws
#10 lockwashers
#10-24 hex nuts
figure 2.
figure 3.
Open grill lid. Locate
handle bracket against
lid front as shown.
Install screws, lockwashers and hex nuts
as shown. Tighten
screws. Install handle
spring onto bracket.
“pin” inside burner at bottom
“notch” at bottom
3. Locate the gas regulator. Grasp the regulator with the knob
facing directly “UP.”
1. Refer to figure 4a. Line up the collar on the regulator with
the open end of the burner tube. Note that the groove at
the bottom of the regulator collar must line up with the
retaining “pin” inside the burner tube AT THE BOTTOM.
2. Refer to figure 4b. Push regulator into open end of burner.
3. Refer to figure 4c. Once the regulator is in as far as it will
go, TURN it so knob is facing to the front of the grill.
2. push in
figure 4a.
figure 4b.
Note: Always make sure the regulator is secured in the
fully “locked-in” position BEFORE ATTACHING PROPANE
CYLINDER.
4. Be sure gas control knob is in the “OFF” position. Refer to
figure 6. Check to make sure threaded areas on cylinder
and regulator are clean. Thread propane cylinder to
engage threads correctly to achieve proper connection.
Removing propane cylinder: Refer to figure 6. Unthread
cylinder from regulator as shown.
3. rotate knob to front
To remove:
rotate knob to top to line up notch,
then pull away from burner tube
figure 4c.
STORE REGULATOR IN GRILL BODY WHEN NOT IN USE
figure 6
Installing
5. Place stacks in the UP position. Refer to figures 7a and 7b
for stack positioning information.
Note: THE GRILL IS TO BE OPERATED ONLY WITH THE
STACKS IN THE UP POSITION.
6. Locate the drip pan and position it into the grill body with the
drain pipe on the left. Make sure the drain pipe passes
through and is extending below the grill body bottom. The
mounting flanges of the drip pan should rest on the inset
flange in the grill body.
7. Locate the cooking grid and place it into the grill body bottom
so it is resting on the flanges of the drip pan.
Removing
Note: When the lid is closed and latched, the lid holds the
grid, which in turn is holding the drip pan in place. This is to
prevent these components from moving during transport.
8. Refer to figure 8.Insert grease pan into slide brackets at
bottom LEFT end of grill. You may need to lift drip pan up
inside grill to allow pan to slide into place. This keeps the
pan from accidentally moving out of position.
Note: You may use the grease pan with the disposable liners
or without. You may use the disposable liners with the pan
or by themselves.
LIGHTING INSTRUCTIONS
Refer to figure 9
1. Make sure the regulator is properly secured into the
burner end.
2. Make sure the propane cylinder is tightly threaded into the
regulator -- hand-tight only.
3. Place stacks in UP position.
4. OPEN LID. Always open lid when lighting.
5. Allow five minutes to air out.
6. Open lighting access hole in center of body front panel.
7. Insert match or lighter through access hole next to burner
tube. Keep flame next to burner while actuating gas control
knob on regulator.
figure 7a.
figure 7b.
Grasp lifting ring
and pull stack into
the up position.
When screw heads
come through
notches, rotate to
lock into position.
Reverse to lower
stacks.
®
figure 8.
MG1-4
8. Push gas/burner control knob “IN” and turn counter-clockwise
to “Lighting Position” while watching for burner flame.
9. If ignition does NOT occur in 3-5 seconds, turn burner off,
WAIT 5 MINUTES and repeat the lighting procedure.
Note: If for any reason the burner should go out, turn control
knob to OFF position. WAIT 5 MINUTES before attempting to
re-light.
If the grill fails to light after the second attempt, check with your
local dealer or The Holland Company for assistance.
figure 9.
Always open lid when lighting.
Open lighting access cover, insert match or
lighter next to burner.
Adjustment of air shutter: There is no need for and no provision
made for air shutter adjustment on this grill model.
With the burner lit, gently close lid and allow grill to warm up for
20-30 minutes prior to use.
TURNING GRILL OFF
NOTE: This Holland Grill model uses a multi-position
valve/regulator with the following operating positions:
OFF - This stops the flow of gas to the burner.
PUSH TO TURN ON - You must push “in” on the knob
to release if from the locked “OFF” position.
LIGHTING POSITION - This position allows flow of gas
to light grill.
HIGH - This position provides the highest gas flow and
hottest cooking temperature.
MED - This position provides cooking temperatures
between HIGH and LOW.
LOW - This provides he lowest cooking temperatures.
1. Open lid
2. Turn regulator control knob to “OFF.”
3. Caution: Do not attempt to re-light without following all
lighting instructions.
4. Allow grill body to cool at least 30 minutes before attempting
to move or transport.
CARE AND MAINTENANCE
There is very little care and maintenance needed. The Holland
Grill is designed and made of materials that will last many years
with normal use. Following these instructions will improve the
longevity and quality of cooking. To ensure safe operation of your
Holland Grill, the area for cooking should always be kept free of
combustible materials of any type, such as gasoline or other
flammable vapors or liquids.
1. Outside of body - This is stainless steel. It can be cleaned
easily with warm soapy water or any stainless steel cleaner.
2. Grid and Drip Pan - The grid is made of high quality stainless
steel. The grid should be brushed with a brass or stainless
steel brush immediately after removing food, while grill is still
warm. The drip pan is also stainless steel and can be
cleaned with a flat scraper such as a putty knife.
CAUTION: The drip pan must be kept clean and free of
HEAVY buildup for grill to perform properly and to eliminate
flare-ups. Drip pan should NOT be washed completely clean.
3. Inside Grill - Use warm soapy water to clean this area.
Do not allow grease to build up.
4. Drain Pipe - Drain pipe MUST be kept clear of grease and
food particles to allow grease to drain properly from drip pan.
This must be done to maintain proper operation of your grill.
5. General - This grill, like all equipment, will look better and last
longer if kept out of weather when not in use. CAUTION: DO
NOT store propane cylinders in enclosed spaces. When using
a cover or moving the grill, always wait until the grill has
cooled for at least 30 minutes.
®
MG1-5
Check to be sure all openings into grill body are free of blockages or debris. Make sure there are no objects or materials
blocking the flow of combustion or ventilation. Make sure the
stacks are in the “UP” position when using grill.
When grill is not in use, turn regulator knob to “OFF,” remove
propane cylinder from regulator and remove regulator from
burner.
For outdoor use only. If stored indoors, detach cylinder and
leave it outdoors.
Cylinders must be stored out of reach of children.
Check burner air inlet openings (behind inlet guard on right end
of body) for insect nests or blockages. Make sure the slots in
burner tube are open.
IMPORTANT
FIRST-TIME USE: It is important that the grill be lit and allowed
to operate at least 30 minutes before any food is placed on the
grill grid. Some smoke may appear during the initial operation of
the grill. This is normal. These are the preservatives used during
manufacturing. After initial heating, grill is ready for use. After
burning off the grill, spray the cooking grid, drip pan and inside of
the lid with PAM or similar spray, so food does not stick to the
grid and the inside is easier to clean.
THIS COOKING APPLIANCE IS FOR OUTDOOR USE ONLY
AND SHALL NOT BE USED IN A BUILDING, GARAGE OR ANY
OTHER ENCLOSED AREA.
MOVING INSTRUCTIONS
CAUTION: NEVER MOVE GRILL WITH BURNER LIT!
Transporting grill: Make sure gas control is “OFF.” Disconnect
propane cylinder from regulator. Remove regulator from grill. Be
sure grill has completely cooled (for at least 30 minutes.) Close
lid and secure latch. Place stacks in “DOWN” position if necessary. Carry grill by handle between stacks.
Note: It is best to leave the grease pan in place attached to the
bottom of the grill -- some grease may continue to drip from
drain pipe during transport.
Setting up for use: Find a flat surface. Grill MUST be on a level
surface to operate properly.
COOKING INSTRUCTIONS
ALLOW GRILL TO WARM UP WITH LID CLOSED FOR 20-30
MINUTES PRIOR TO COOKING.
1. It is important to realize that cooking on a Holland Grill uses
a different process in order for the grill to perform correctly. It
is essential that the lid remain closed while grilling.
3. This Holland Grill model is equipped with an adjustable
“HIGH/MED/LOW” burner control. This allows for complete
flexibility in cooking temperatures.
HIGH setting has a cooking temperature of approximately
450 degrees F.
MED is approximately 400 degrees F.
LOW is approximately 350 degrees F.
Note: The MED position provides cooking performance that is
MOST SIMILAR to other Holland Grills. The recipes and cooking
times noted in this manual are based on the 400 degree F. cooking temperature provided at the “MED” burner control setting. You
may use the “HIGH” setting to quickly pre-heat your grill, then
select the temperature you wish to cook at. Remember, you may
want to turn the food over at the half-way point in the cooking
time on short cooking-time foods.
4. The cooking times we suggest are only that -- suggestions.
You may want to vary the times as you become used to your
Holland Grill.
5. You may cook on the grill in any weather. If the temperature
is extremely hot or cold, it will slightly decrease or increase
your cooking times. Keep grill out of excessive winds when
operating, as it may increase cooking times.
GRILLING
1. Steak -- T-bone, 1” thick, Medium: Grill 10 minutes on each
side at MED setting.
2. Chicken -- Quarters, average size fryer: Cook skin side up for
30 minutes and skin side down for 30 minutes at MED
setting. Check for done-ness. If chicken is completely done,
only then dip or brush on the sauce of your choice. Put back
on grill for approximately 10 minutes longer. Note: You may
want to repeat this process one or two more times.
3. Pork ribs and chops, 3/4” thick: Grill 10 - 20 minutes on each
side, MED setting. When done, dip or brush on sauce. Put
back on grill for 5-10 minutes. Repeat if desired.
DRY SMOKING
Place Flav-O-Buds or chunks of your
favorite dry wood in the aluminum chip
tray. You can also use throwaway aluminum tart pans.
These can be placed in the
drip pan, sitting on the angled
surface near either end. Each
pan will smoke approximately
one hour depending on how
many chips are used. When
finished grilling, throw
away wood and
use fresh each
time you grill.
Note: Check drip pan pipe to be sure it is clear of debris.
2. IF YOU’RE LOOKING, YOU’RE NOT COOKING!
Since this grill uses a combination of direct and indirect heat,
the lid must remain closed at all times.
®
MG1-6
COMPANION GRILL REPLACEMENT PARTS
Model BH-212-MG-1
9
8
2
18
1
3
16
15
6
17
5
4
14
7
REPLACEMENTS PARTS LIST
®
MG1-7
#
Description
Stock No.
1
2
3
4
5
6
7
8
9
10
11
12
13
14
15
16
17
18
19
GRILL BODY BOTTOM
GRILL LID
DRIP PAN
HANDLE BRACKET
HANDLE SPRING
COOKING GRID
LEGS
HINGE
STACK TUBE ASSEM.
STACK CAP (SS pop-riveted on)
LIFTING RING, STACK
SPACER RING, STACK
MANUAL PACKET
HARDWARE BAG
GREASE PAN
GREASE PAN LINERS
REGULATOR
LID STOP
CHIP TRAY
MG1-100
MG1-200
MG1-600
SS1-202SS
MG1-202SS
MG1-300
MG1-550
MG1-101
MG1-201
MG1-201C
MG1-201L
MG1-201R
MG1-900
MG1-1014
MG1-1000
MG1-1010
MG1-109
MG1-120
BHA-3016
HARDWARE FOR LEGS
# 10-24 x 3/8” SS phillips screws (16)
# 10-24 SS hex nuts (16)
# 10 SS star lockwashers (16)
HARDWARE FOR STACKS
# 8-32 x 3/8” SS phillips screws (6)
# 8-32 SS hex nuts (6)
# 8 SS star lockwashers (6)
Screw
# 10
#8
Lockwasher
Hex nut
HOLLAND GRILLING TIME CHART
Grilling
Chicken
Chicken legs or thighs
Pork Chops
Steak
italian Sausage
Pork Sausage
Pork Ribs
Hamburger
Vegetables
Biscuits
3 lb. quartered or halves
1 inch thick
3/4 - 1 inch thick
Patty
Patty
All
Canned
40-60 minutes total grilling time
45 minutes
15 minutes each side
9 minutes each side
40 minutes
8 minutes each side
45 minutes
9 minutes each side
30-45 minutes total cooking time -- best in covered dish
9 minutes one side & 5 minutes other side
Smoking
Fish
20 minutes total
NOTE: Remember, the Holland Grill needs to warm up completely. The “HIGH” setting provides a cooking temperature of
approximately 450 degrees F. The “MED” setting provides a cooking temperature of approximately 400 degrees F. The “LOW”
setting provides a cooking temperature of approximately 350 degrees F. Use the “MED” setting with the cooking time shown above.
The cooking times shown above are based on 400 degrees F. cooking temperatures. All grill times are approximate, depending on
size, weight and individual taste preferences and ARE BASED ON THE “MED” SETTING. Use of the “HIGH” may shorten cooking
times. Use of the “LOW” may lengthen cooking times. Grill lid needs to remain closed at all times during grilling to be accurate with
this chart. Each time grill is opened during the grilling process, increase cooking time by approximately 10 minutes. A time chart
in any cookbook may also be of assistance.
GRILLING INSTRUCTIONS
Fish Grilling: Allow grill to warm up for 15 minutes. Place fish on grill and season to taste. Allow 20-30
minutes total grilling time, turning at half the grilling time if desired (turning is not necessary).
Chicken Halves or Quarters: Place on grill for 60 minutes. Turn at 30 minutes if desired.
Steak 3/4” - 1” thick: Allow grill to warm for 15 minutes, then place steaks on grill. Allow 6-10 minutes
per side. Ten minutes on each side will produce medium well to well done steaks.
Hamburger: Same as steak.
Ribs: Allow grill to warm for 15 minutes, place ribs on grill. Allow 40-60 minutes grilling time. Turn at half
the grilling time if desired (not necessary). Baste or dip in sauce at any time.
Whole chicken: Allow grill to warm up. Season chicken with Brad's seasoning
mix. Grill for 1 1/2 hours.
Turkey breast: Allow grill to warm up.Grill 10 minutes per pound, or until
internal temperature reaches 170 degrees F.
®
MG1-8
®
The Holland Grill Company, Inc.
600 Irving Parkway Holly Springs, NC 27540
Call 1-800-880-9766 or visit www.hollandgrill.com for a dealer near you.