1
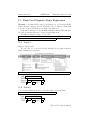
SMART CARDS LAB
UCL M.Sc. in Information Security 2011
Nicolas T. COURTOIS
Room 7.06a., Computer Science, University College London,
Gower Street, WC1E 6BT, London, UK
[email protected]
http://www.cs.ucl.ac.uk/staff/N.Courtois/
Abstract
This is an interactive pdf form to fill. It is not graded.
The form can be filled with Acrobat Reader or with other appropriate software, see below. BUT, beware: All changes to the document
are lost with Acrobat Reader, it is NOT able to save forms.
The document with changes can be saved reliably if it is opened
with the full ”professional” (paid) version of Adobe Acrobat. A free
and tested alternative (recommended) is FoxIt 3.1 which can be downloaded for free from the Internet. Further alternatives include printing
the document with a printer (real paper printer), or printing it as a pdf
file with GNU pdf creator (free), but this usually fails if we try to print
the whole document at once, which apparently can be circumvented
by printing a selection of pages at one time.
1
Copyright
The copyright for the present documents belongs to Nicolas T. Courtois
and University College London. This document cannot be distributed to
people not enrolled in COMPGA12 unless explicitly authorized by Nicolas
T. Courtois.
1
Smart Cards Lab
2
COMPGA12
University College London
Structure of the Smart Cards Lab
Students may skip some parts or do them in a different order.
• Section 4: Software Setup.
• Section 7: Smart card commands ABC.
• Section 8: How to identify smart card products and individual smart
cards by ATR and UID, anonymity issues. Anti-collision mechanisms.
• Section 11: Exploring an electronic passport.
• Section 12: Exploring RFID Memory Cards, Oyster Cards, Building
Passes etc.
• Section 14: Exploring GSM SIM Cards.
• Section 16: Exploring Magnetic Stripe Cards.
• Section 15: Exploring Chip and PIN cards.
• Section 17: Smart card development with C++.
• Section 18 Example of a timing Attack Project.
3
Expected Learning Outcomes
1. Understand security protocols used in real-life products.
2. Be able to develop arbitrary applications on a PC which can communicate with arbitrary smart cards.
3. Encourage students to do further research on security of smart card
products.
4. Have fun.
c
Nicolas
T. Courtois 2009-10
Smart Cards Lab
4
COMPGA12
University College London
Hardware and Software Setup
4.1
PC/SC Interface for Smart Card Readers
PC/SC Interface in Windows
Smart card commands are called APDUs, see Section 7.
In Windows, the support for smart card commands (APDUs) is included
through the so called PC/SC interface that is included in windows (uses
winscard.dll) and does not require any installation.
The only thing that needs to be installed are drivers for specific smart
card readers.
PC/SC Interface for Linux
The equivalent for Linux is called pcsc-lite. It needs to be installed (not
tested).
4.2
Recommended Smart Card And Contactless Readers
There are many smart card readers on the market. Many are not PC/SC
compliant, many are quite expensive, and many don’t work very well. Here
is the recommended selection of inexpensive, highly functional and highly
compatible smart card readers.
1. For cards with contact, we can use a very cheap smart card reader
PC/SC Silver PA748S (also sold under the brand Alcor Micro) which
costs about 6 GBP and can be purchased on ebay. This reader covers
both bank cards and SIM cards, however one should understand that
all cheap smart card readers suffer from the ”friction” problem: when
we insert the smart card repeatedly, the contacts will become used and
the smart card might eventually become damaged.
2. For contactless cards, we recommend ACR 122U or 122T (which is
the same but smaller in size). Each of these models costs about 40-50
GBP.
3. There is also an all-in-one reader: Omnikey 5321 which costs about 80
GBP. It contains two readers in one: an ISO wired smart card, and
an contactless RFID smart card. There are also adaptors to insert a
SIM card to Omnikey 5321.
c
Nicolas
T. Courtois 2009-10
Smart Cards Lab
4.3
COMPGA12
University College London
Drivers
For Windows:
For ACR122, and for Windows XP, drivers are in
\Smart Cards Lab docs and free software\drivers\
ACR 122 driver 09 2008\ACR122U_inst_Win_0101_P\
For ACR122, and for Windows Vista or 7, the drivers sometimes are not
needed (built-in CCID driver) and otherwise can be found in
\Smart Cards Lab docs and free software\drivers\
ACR122 Windows 7 drivers 2011\
Also drivers can be found on the Internet, for example at:
http://www.nfc-reader.com/acr122-drivers.php
A generic driver for PC/SC Silver PA748S is found in our smart card
lab folder (as well as on the original driver CDROM). The file name is
SmartCardReader_Driver_Generic_AU9520_4OSVista(x86x64)_Setup_
v1.2.4.27
For Omnikey 5321:
http://www.hidglobal.com/driverDownloads.php?techCat=19&prod_
id=171
(Remark: For the little blue reader (SIM cards only) the driver name
is Prolific USB-to-Serial Comm port but one should not use it. It does not
work with most of our software... It does not seem PC/SC complaint and
works with older software which communicates through the COM port directly).
For Linux drivers generally exist but we cannot guarantee if they actually
work.
4.4
APDU Tools
Tools that allow to send APDU commands and receive the answer of the
smart card.
APDU Tools - Linux
Not tested.
But we hear that: ”The opensc-tool utility can be used from the command line to perform ... operations such as getting the card ATR or sending
arbitrary APDU commands to a card.”
c
Nicolas
T. Courtois 2009-10
Smart Cards Lab
COMPGA12
University College London
http://linux.die.net/man/1/opensc-tool
Probably requires to install some packages such as openct and pcsc-lite...
APDU Tools - Windows (recommended)
Any of these can be used: (the first two are recommended):
1. A simple ready program SCardDemo.exe is provided in the folder
\APDUtools\SCardDemo.exe. The source code for this program is
essentially the same as the source code for TimingAttackDemo which
is provided, see also Section 17.
2. Another tool is C# Scriptor, a part of the Spring card tools suite: quick
install: http://www.springcard.com/download/usr/sdd4c0-ae.
exe
The package actually contains 3 free and open-source tools that work
under windows.
(a) PC/SC Diag, quick’n’dirty software to exchange APDUs.
(Win32 native, Visual C++ with MFC).
(b) C# Scriptor, a basic PC/SC scripting tool, a batch file or manual
entries.
(requires the .NET framework, written in C#).
(c) SCardToolkit – an advanced APDU software, comes with an impressive list of the APDUs supported by contactless cards.
(requires the .NET framework, written in C#).
Full SDK with source code: http://www.springcard.com/download/
find.php?file=pcsc-sdk.
3. CardEasy, included on a CD-ROM found in some books
c
Nicolas
T. Courtois 2009-10
Smart Cards Lab
5
COMPGA12
University College London
rfidiot library
The rfidiot library is developed by Adam Laurie, a well-known English security researcher. It works under Windows, Mac and Linux.
It is based on pyscard, a French Python library by Jean-Daniel Aussel from Gemalto and a few other Python
libraries such as pycrypt.
5.0.1
Installing and configuring rfidiot
We will only describe how to do things under Windows. Students can try
Linux or Mac on their own (more pain and more risky, maybe not everything
works).
Main page:
http://http://rfidiot.org/
Direct download for Windows:
http://rfidiot.org/RFIDIOt-Windows-0.1x.zip
Our recommended (older) version
\Smart Cards Lab docs and free software\drivers\
rfidiot\recommended\June 2009 with Python 25\
5.0.2
rfidiot - Installing Python
Install Python 2.5. There are problems with different versions of Python
that are incompatible with other versions of rfidiot. Typically Python 2.6.
does not work. Do use 2.5. May install from:
\Smart Cards Lab docs and free software\drivers\rfidiot\
recommended\June 2009 with Python 25\other packages needed\python-2.5.2.msi
5.0.3
rfidiot - Additional Python Libraries
Unless already included in Python distrib, typically the are not (needed for
Python 2.5) then also we need the following libraries. An archive of all these
cna be found at:
\Smart Cards Lab docs and free software\drivers\rfidiot\
recommended\June 2009 with Python 25\other packages needed\
The Python packages to be installed can also be found elsewhere:
c
Nicolas
T. Courtois 2009-10
Smart Cards Lab
COMPGA12
University College London
1. Install Python Imaging http://www.pythonware.com/products/
pil/
2. Install pyscard, http://pyscard.sourceforge.net/
3. Install pyserial, http://pyserial.sourceforge.net/
4. Install also pywin32-213.win32-py2.5 package (only sometimes needed).
http://sourceforge.net/projects/pywin32/.
5. Install pycrypt http://www.amk.ca/python/writing/pycrypt/
and http://www.pythonware.com/products/pil/
A ready installer for pycrypt is provided. It is BETTER than installers
found elsewhere on the Internet.
With other installers, to really install pycrypt, one does not have to copy the
files, just run from the package directory directly (can be from a USB drive):
setup.py build
test.py
This usually fails without Visual Studio 7 installed (might work with VS8
too)... Also known under names Visual Studio 7 == .NET == 2003. One
might use another release by fiddling with the python/Lib/distutils/ msvccompiler.pyc file that detects the compiler...
5.0.4
rfidiot - Additional OpenSSL Install
Install openssl Python library. This is only needed to access certain
electronic passports.
In our files it is found in
\Smart Cards Lab docs and free software\rfidiot\more\
Open SSL needed for certain passports only\openssl-0.9.8k\
See INSTALL.W32 for detailed instructions. It requires either of these
two:
1. cygwin with a C compiler and Perl installed,
2. Microsoft Visual Studio version 7 or 8 (recommended), or 9 or 10, already installed, and ActiveState Perl, available from http://www.activestate.com/ActivePerl.
c
Nicolas
T. Courtois 2009-10
Smart Cards Lab
5.0.5
COMPGA12
University College London
Installation Directory
Files from the rfidiot installation can be for example copied to
C:\Program Files\rfidiot
6
rfidiot Tips
Documentation: http://rfidiot.org/documentation.html
6.1
Change the Reader
Several Smart Card readers can be connected to a PC. Omnikey 5321 Actually contains two readers in one box. To change the smart card reader,
use -r0 or -r1, with any command:
C:\Program Files\rfidiot>isotype.py -r0
Reader: PCSC ACS ACR122 0
connecting to ACS ACR122 0
...
...
6.2
Sniff the APDUs
Use -d with any command:
isotype.py -d
...
...
> FF CA 00 00 00
< AC 23 FE 33 90 0
...
...
Here we recognize a basic standard command that works for most readers
and most smart cards:
GET CARD SERIAL NUMBER
CLA INS P1 P2 Le
FF
CA 00 00 00
c
Nicolas
T. Courtois 2009-10
Smart Cards Lab
7
COMPGA12
University College London
APDUs
Smart Card commands are called APDUs (Application Protocol Data Unit).
They are strings of bytes, written in order of their transmission.
The card is only answering to commands (master/slave principle, halfduplex) and never initiates any communication.
Quiz We call an C-APDU a:
APDU used in contactless smart
cards
string of bytes sent to the smart
card.
Quiz We call an R-APDU a:
string of bytes received from the
smart card
APDU that updates registers of
the reader.
7.1
Industrial standards
Quiz Cross-industry standardized APDU commands are described in
ISO 7816-1
ISO 7816-4.
Structure of an APDU
There are several possible cases, depending on the instruction.
Header - required
Body - optional
CLA INS P1 P2 Lc Data Le
Explanations:
CLA is the byte that identifies the type of command, the application,
and also indicates to what extent the command is complaint to ISO specs.
INS is a byte that encodes the instruction.
Quiz The optional field Lc is for:
size of the input data
length of the instruction.
Quiz The optional field Le is for:
length of the instruction
expected output size.
The size is always in bytes. Each field Lc or Le can be encoded on 1 or
3 bytes, but most of the time it is one byte and a number between 0 and
127. Any larger number requires encoding on 3 bytes.
If the command is successful, the answer should be:
c
Nicolas
T. Courtois 2009-10
Smart Cards Lab
COMPGA12
University College London
Some Application Independent Error Messages
These or similar codes will be used in bank cards, GSM etc.
.
7.2
Vendor Extensions
Specific families of smart cards will only use or implement some parts of
commands, that can have a slightly different behavior, or even differ considerably from ISO 7816-4.
For example:
Quiz The set of commands for GSM cards is specified in
ISO 7816-17
ETSI GSM 11-11.
Quiz In 3G (UMTS) mobile phones the smart cards are called USIM. The
set of commands for USIM cards is specified in
ISO 7816-18
ETSI TS 51.011.
Both these standards have many further extensions...
c
Nicolas
T. Courtois 2009-10
Smart Cards Lab
8
COMPGA12
University College London
How to Identify a Smart Card
Here there is no command. The command is to physically RESET the card
(for example switch the power off and on, or connect RESET contact C2
to VCC for a short while). Then the card responds with a string of bytes.
This is called ATR = Answer To Reset.
Quiz ATR is a nested structure defined in
ISO 7816-1
ISO 7816-3.
ATR is a sort of unique ID of a smart card product. For example ATR is
equal to 3B8F8001804F0CA000000306030001000000006A for MiFare Classic
used in the London Oyster card. A tool to identify the type of the smart card
from its ATR can be found at http://smartcard-atr.appspot.com/.
8.1
How to get ATR
Most smart card programs are able of displaying the ATR.
1. For example we can run SCardDemo.exe which will display ATR if
we press the button RESET.
it is included in our software distribution folder under is provided in
the folder \APDUtools\SCardDemo.exe. This program does not
require any installation and can be run directly.
2. A nice tool is PCSC diagnostic that comes with the free SpringCard
tools suite that comes with our lab installation. It will automatically
detect if a card was inserted and display the ATR.
3. Another method is to use cardselect.py or isotype.py that come with
rfidiot library. The second program gives some extra explanations
about the structure and the encoding of the ATR, as shown below.
4. And many other... including most APDU tools we have listed in Section 4.4.
8.2
Getting ATR With Rfidiot
Open a console box (cmd.exe, can for example be opened by clicking here:
file:///C:/windows/system32/cmd.exe) and type the following:
cd C:\Program Files\rfidiot
isotype.py
c
Nicolas
T. Courtois 2009-10
Smart Cards Lab
COMPGA12
University College London
This displays the ATR values and decodes them. This works well only
for contactless cards, and a few other. If this does not work, we can try also
cd C:\Program Files\rfidiot
cardselect.py
If still no success, try to disconnect the reader from the USB port, close
all the other applications that talk to smart cards, and connect only one
PC/SC reader at a time. One can otherwise use APDU software provided
such Spring Card tools, most programs display the ATR somewhere. If still
no success try PCSC diagnostic from the free SpringCard tools suite.
8.3
ATR with Explanations
Example with a MiFare Classic card (for example an Oyster card) and isotype command:
C:\Program Files\rfidiot>
isotype.py -r1 -d
isotype v0.1h (using RFIDIOt v0.1t)
Reader: PCSC ACS ACR122 0
connecting to ACS ACR122 0
> FF CA 00 00 00
< AC 23 FE 33 90 0
ID: AC23FE33
Tag is ISO 14443 A, part 3
ATR: 3B8F8001804F0CA000000306030001000000006A
3B Initial Header
8 No TA1, TB1, TC1 only TD1 is following
F 15 bytes historical data follow
8 No TA2, TB2, TC2 only TD2 is following
0 T = 0
0 No TA3, TB3, TC3, TD3 following
1 T = 1
Detected STORAGECARD
Historical: 804F0CA00000030603000100000000
80 Status indicator may be present (COMPACT-TLV
4F Application Identifier presence indicator
c
Nicolas
T. Courtois 2009-10
Smart Cards Lab
COMPGA12
RID:
University College London
0C 12 bytes follow
A000000306 PC/SC Workgroup
PIX: 03000100000000
SS: 03 ISO 14443 A, part 3
Name: 0001 Mifare Standard 1K
RFU: 00000000
Checksum TCK: 6A (OK)
The Initial Header
It specifies the relationship between A/Z and 0/1 where Z=high voltage,
A=low voltage.
This byte is either:
1. TS = ’3B’ for a direct convention [originates from Germany], where
A=0, Z=1.
2. TS = ’3F’ for the inverse convention [originates from France], with
A=1, Z=0.
Communication Protocols
The ATR specifies (among many other parameters) the protocol used in the
communication between the smart card and the reader. The most popular
protocols are T=0, T=1.
Quiz In GSM cards we use the:
byte-oriented protocol T=0
block-oriented protocol T=1.
Quiz In bank cards we use the:
byte-oriented protocol T=0
block-oriented protocol T=1.
The main difference between these two is that T=1 is more modern, has
extra CRC checks, T=0 only has parity checks (9 bits transmitted per byte).
Typically we don’t need to know if the serial communication between
the smart card and the reader uses the standard T=0 or T=1. The PC/SC
layer hides this detail from the programmer anyway, in both cases APDUs
are sent and received in the same way. They are just the strings of bytes.
Quiz In communication with an RFID reader we typically use the:
standard protocol T=0
we say that T=CL.
c
Nicolas
T. Courtois 2009-10
Smart Cards Lab
COMPGA12
University College London
In fact with an RFID reader there is no serial communication between
the card and the reader at all. The PC/SC layer and the reader basically
simulate the presence of a smart cards, so that RFID smart cards are seen
as normal smart cards with contact. So T=CL is just a convention to say it
is something completely different than T=0 or T=1, Commands are translated by the reader’s firmware in a non-transparent way. In fact this is an
important security feature, part of the security of the system is implemented
in a tamper-resistant chip on the smart card reader side. The hacker has no
idea what the RFID tag is actually sending and receiving.
Quiz With a native USB smart card, from the point of view of the PC/SC
layer, the card will appear as:
always block-oriented T=1
we will say that T=CL.
With modern readers and software the choice of communication protocol
is done automatically. The windows PC/SC layer hides the communication
protocol from us, so that the only thing we have to worry about is to send
and receive strings of bytes (APDUs).
8.4
Real-life ATR Examples
Again we type:
isotype.py
Example 1: London Oyster Card + ACR122 or Omnikey 5321 reader.
Your Oyster Card ATR:
The program will give you a number of explanations regarding the meaning of this ATR. Should be the same as in Section 8.3.
Example 2:
University building pass ATR (if different, type in manually):
Example 3:
Your bank card ATR (type in manually):
Copy here are the explanations given by the program:
c
Nicolas
T. Courtois 2009-10
Smart Cards Lab
COMPGA12
University College London
Example 4: You SIM card ATR (with a USB SIM reader, or with a
normal reader such as Omnikey 5321 and a simple adaptor. Type in the
ATR obtained:
Copy here are the explanations given by the program:
8.5
ATR and ATS, RFID/Contacless Cards
With RFID cards, there is no ATR. But there is ATS = Answer To Select.
Many RFID cards still don’t do have an ATS, then the windows PC/SC
interface will simulate/synthetise the answer and return an ATR that contains an ATS (that can also be simulated if not implemented).
8.6
Variable ATS
Example 5: Your Electronic Passport ATR (if different, type in manually):
Encoding: In these examples it is possible to see that ATR is 3B8C8001
+ 11 bytes ATS + checksum byte.
Remark: For older passports ATR is fixed, for more recent ones to protect people’s privacy they are variable (!). However in order for the passport
to provide a different ATR, one has to switch off and on the magnetic field
c
Nicolas
T. Courtois 2009-10
Smart Cards Lab
COMPGA12
University College London
that powers the passport (if the passport is continuously powered, the ATR
stays the same).
Your own passport:
Country:
⇒ UID is
, issued:
,
VERY IMPORTANT:
For the ATR to change, you MUST remove the passport from the magnetic field, and put it back again.
This is equivalent to RESET, (or power off and back on) for a normal
smart card with contact.
If the ATR for your passport is randomized, please provide 3 examples
to compare which parts change:
c
Nicolas
T. Courtois 2009-10
Smart Cards Lab
9
COMPGA12
University College London
Unique ID for RFID Tags:
It is fixed, usually stored in the first block, that is read-only, and can never
be changed. This read-only feature is currently the main reason why a blank
card cannot be used as a clone of an Oyster card (all the other data can be
copied).
Motto: software cannot be protected by software.
cd C:\Program Files\rfidiot
cardselect.py
Example 1: Your Oyster Card UID:
Example 2: Your university smart card UID:
9.1
Electronic Passports
Thing are not exactly the same with electronic passports.
Depending on the country the UID will be fixed, random, or will be
random and start with 08.
Your own passport:
Country:
⇒ UID is
10
, issued:
,
Further Identification
In many cards it is difficult to change the unique ID that is written in the
part of memory that can never be modified.
In addition it may be possible to further prove the authenticity of the
smart card data by a cryptogram or a digital signature, similar to the SDA
mechanism in bank cards. In fact typically the unique ID of the card that
is returned by cardselect.py or by the standard command GET CARD SERIAL NUMBER we exploit later, is too short to achieve this goal (typically
4 bytes, sometimes 6). Thus it is necessary to have longer authentication
data in smart cards. A full-fledged digital signature with public third-party
verifiability requires at least 320 bits, and frequently much more.
Another point is that counterfeit smart card chips exist in large quantities. It is important to be able to know which smart cards are genuine,
c
Nicolas
T. Courtois 2009-10
Smart Cards Lab
COMPGA12
University College London
because though the functionality implemented may seem the same, the security will usually be degraded in cloned products.
Interestingly, such authentication data available inside the smart card,
that can be protected against modification also by a hardware mechanism.
Then one card cannot be reprogrammed to simulate another card.
10.1
Further Identification and Trace-ability and Examples
For example Philips/NXP have in addition to their UID on 4 bytes, 11
extra bytes in the first block of the card, that cannot be changed. This
allows very easily for Philips NXP to identify counterfeit products, and for
example Fudan cloned cards from China have at this place a constant string
”08 04 00” followed by ”b c d e f g h i” in ASCII. They make it very clear
that these cards don’t come from Pilips/NXP.
Another example is the London Oyster card, where the block 4 can never
be modified AFTER the card issued, even if one knows all the secret keys
of the card. We ignore what data exactly are contained in this block but for
sure Oyster cards can be reliably traced.
c
Nicolas
T. Courtois 2009-10
Smart Cards Lab
11
COMPGA12
University College London
Exploring an Electronic Passport
We are going to implement (with high-level standard APDUs) the first steps
of a typical transaction between the RFID reader at the border, and an
electronic passport.
With any APDU tool we execute the following sequence:
GET CARD SERIAL NUMBER
CLA INS P1 P2 Le
FF
CA 00 00 00
Write here the answer received:
And here are some error messages you may get:
.
Then we execute a specific version of ISO SELECT FILE command:
SELECT FILE by an AID
CLA INS P1 P2 Le
00
A4 04 0C 07
AID
A0 00 00 02 47 10 01
The answer should be:
Then we execute a specific version of ISO SELECT FILE to select the
master file ’01 1E’ of the passport:
SELECT FILE by an FID
CLA INS P1 P2 Le
00
A4 02 0C 02
FID
01 1E
The answer should be:
c
Nicolas
T. Courtois 2009-10
Smart Cards Lab
11.1
COMPGA12
University College London
Basic Access Control
Now the reader and the passport do a mutual cryptographic authentication
as specified in the Basic Access Control. It is done following ISO 11770-2.
The high level description is as follows:
1. The passport and the terminal have a shared 224-bit double triple DES
key (written on 2 · 128 bits)
K = (KM AC , KEN C ),
computed from the MRZ.
2. The passport generates two randoms rA on 64 bits and KA on 128
bits.
The passport sends to the reader the card random
rA −→
.
3. The reader also choses two randoms rB on 64 bits and KB on 128 bits.
Then he computes the authenticated encryption cryptogram
←− EAK (rB , rA , KB )
that is 64+64+128 bits. These 256 bits are sent to the card
4. Then the passport checks the MAC, decrypts the triple (rB , rA , KB ),
checks if rA is the same as his own.
Then it computes and sends another authenticated cryptogram on 256
bits:
0
EAK (rA , rB
, KA ) −→
5. Then the terminal checks RB .
If correct, the final shared key is KA ⊕ KB on 128 bits.
c
Nicolas
T. Courtois 2009-10
Smart Cards Lab
COMPGA12
University College London
Here we will implement only the first step.
GET CHALLENGE
CLA INS P1 P2
00
84
00 00
Le
08
Where Le is the length of the expected answer, which is 64 bits.
The answer will be a 64-bit random:
We will stop the exploration ’by hand’ here, one now needs to compute
the correct cryptogram.
11.2
Basic Access Control with rfidiot
With rfidiot, the full Basic Access Control is implemented, and with the
MRZ of the passport, it is possible to read the files inside.
Please type in the second line of the MRZ (Machine Readable Zone)
of your passport (all the second line, including the eventual ¡¡¡¡¡¡¡ signs and
the last two characters):
Now type (adding quotation marks to the MRZ):
cd C:\Program Files\rfidiot
mrpkey.py -r0”
”
This program displays all the info contained in the passport.
Remark: if we execute it with -d option, it also displays all the cryptographic computations.
11.3
Better Software
Much better software, with a graphical interface was very recently released,
see http://sites.uclouvain.be/security/epassport.html.
Under windows it can sometimes be launched directly from the disk
provided for students. Launch ePassportViewer.exe.
Remark: Both this program, and rfidiot can produce very good log files
with all cryptographic computations detailed.
c
Nicolas
T. Courtois 2009-10
Smart Cards Lab
12
COMPGA12
University College London
High-Level Exploration of RFID Memory Cards
on the Example of MiFare Classic
We will be further exploring MiFare Classic cards.
12.1
Software and Hardware Setup and Troubleshooting
Again we use one of the APDU programs described in Section 4.4. (recommended software is one of the three
SpringCard tools that contains 3 programs, and EACH of these 3 programs allows to do the exercises.)
The exercise can be done with either ACR122 or Omnikey 5321. With
Omnikey 5321 one needs to be careful because it actually contains two readers in one. So one needs always to choose the right one at program startup,
OMNIKEY CardMan 5x21-CL 0, which is the contactless version.
At the beginning one needs to select the right reader. then one needs to
connect to the card.
If something goes wrong or a commands fail, one may to need to remove
the card, put it back again.
Because many protocols are stateful, for example, once we have done
a successful authentication some data can be read, otherwise the READ
instruction fails. Therefore it is important to do everything in order.
Again it can be sometimes useful to disconnect/reconnect the reader and
the card, (this is done at different levels with software buttons or with the
USB cable) and sometimes it is necessary to restart the software.
12.2
Which Cards to Use
MiFare Classic cards are the same as used in buildings, London Oyster
cards, OV-Chipkaarts in the Netherlands, Warsaw city cards, student cards
at many universities etc.
Here it is recommended to use blank cards, because we will be actually
modifying them, and it is very important to be careful and follow the instructions exactly and note the data obtained in the form so that we can
restore the previous data after changing them.
The original is known as Philips/NXP MF1 IC S50 but it exists also many other ”compatible” chips by
various manufacturers, including unlicensed (illegal) clones manufactured in China, India and Russia (they are
legal in these countries). More than 1 billion of these chips have been sold, 200 million are currently in circulation,
and 70 % of all contactless cards worldwide are MiFare Classic.
Quiz MiFare Classic follows (partly and with important variations) the following standard:
ISO 18000
ISO 14443 A
c
Nicolas
T. Courtois 2009-10
Smart Cards Lab
COMPGA12
University College London
Quiz The MiFare Classic card energy comes from:
a tiny battery
radio transmission
magnetic field
Quiz The MiFare Classic card radio communications operate at the frequency of:
13.56 MHz
125 KHz
900 MHz
Quiz The operating distance for MiFare Classic cards is up to
1 cm
10 cm
50 cm
Can I Do It On a Real Card?
Students can also do it on their student card or badge or other cards they
have including real transportation cards, if they know the key for it and
if they are confident that they will not make a mistake that will disable or
destroy your card. So one needs to be very attentive to instructions and also
do not remove the card from the reader’s field during write operations (according to the manufacturer this can permanently damage cards, or corrupt
the data in such a way that the previous state cannot be restored).
Moreover, you must restore your card to the previous state.
12.3
Card Layout
MiFare Classic has 16 sectors with 4 blocks each, which makes 64 sectors
total. Each block is 16 bytes which makes 1024 bytes total (1K).
c
Nicolas
T. Courtois 2009-10
Smart Cards Lab
COMPGA12
University College London
See mifare.pdf that is distributed with rfidiot library. Depending on
installation directory it could be here: file:///C:/Program%20Files/
rfidiot/mifare.pdf).
Each sector with 4 blocks can be accessed using the same key. We can
choose to use key A or key B. Here below we will be only using keys A. These
two keys assigned to each sector of 4 blocks are stored in the last block of
each sector (sector trailer) but typically (depending on access conditions)
cannot be read, can only be written.
12.4
More Details on MiFare Classic
A detailed specification of the MiFare Classic card including low-level commands cna be found here:
\Smart Cards Lab docs and free software\
documents\manufacturer data sheets\
It is also included with some CDs distributed with ACR 122 reader.
\Smart Cards Lab docs and free software\additional software packages\
Smart Card Focus ACR122 starter Kit with Sample C++ Code CD 2011\
User Manuals and Reference Materials\
A ready Python script for reading cards and copying them, provided
that they use default keys, is discussed in Section 13.11. A ready software
for Windows which allows to explore any card for which we know some cryptographic keys and to study and understand access conditions is discussed
in Section 13.12.
12.5
Which Block to Use
One cannot write on the block 0 that is read-only, and which is enforced by
the manufacturer in hardware and cannot be changed.
Please do not write on sector trailer blocks that are: 3, 7, 11, 15, 19, 23,
27, 31, 35, 39, 43, 47, 51, 55, 59, 63 because they contain secret keys that
will be overwritten
In UCL cards one can freely write on blocks 4-59 that are NOT used.
From now on we will be working on block number (some recommended
values are suggested):
c
Nicolas
T. Courtois 2009-10
Smart Cards Lab
12.6
COMPGA12
Which Key to Use
Please enter the key A for block
value):
13
University College London
of your card (or leave the default
Accessing MiFare Classic Cards
From now on, everything should work both with ACR122 and Omnikey 5321
readers.
13.1
Accessing MiFare Classic Cards - 1 Card
We send the following command:
GET CARD SERIAL NUMBER
CLA INS P1 P2 Le
FF
CA 00 00 00
Write here the answer bytes received:
13.2
Accessing MiFare Classic Cards - 2 Cards
In presence of two cards, for example the two card UIDs obtained in Section
and
) or any other two cards.
?? (they are
The reader will as a matter of fact use exactly one of them.
Everything below will work with one card, and also in the presence of
the second card, except that we will NOT be able to choose which card
we will working with. The reader does this choice during the anti-collision
stage which is hidden from us.
Write here the answer bytes received:
13.3
Installing the Key in the Reader Registers
The reader contains a chip with an implementation of Crypto-1 cipher that
needs to be initialized with the correct key.
Our key A for block
is:
We send the following command:
LOAD KEY IN RAM REGISTERS
c
Nicolas
T. Courtois 2009-10
Smart Cards Lab
CLA
FF
INS
82
COMPGA12
P1
20
Kt
00
Le
06
University College London
Key
Here P2=Kt is the key number, should be 0.
The answer should be:
13.4
Mutual Authentication
We use the following command:
MIFARE CLASSIC AUTHENTICATE
CLA INS P1
P2
Nb Kt
FF
88
00
60 00
Remark: We need to replace 60 by 61 if we are using the alternative key
B.
The answer should be:
13.5
Reading One Block
We use the following command:
MIFARE CLASSIC READ
CLA INS P1
P2
Le
FF
B0 00
10
Where Le is 16 = 0x10, the length of the answer expected.
Write the answer obtained here:
13.6
How Much Money is On Your Oyster Card?
This section can only be executed if the student knows one actual cryptographic key of their Oyster card. This is not easy because each Oyster
card has a different key. Several attacks allowing one to recover the key
have been developed, by the researchers at the Dutch university of Nijmegen. However the fastest and the most practical attack, which does
not require a costly pre-computation is the so called ”Dark Side” attack by
Courtois published in SECRYPT 2009. Some open source implementations
of this attack exist, see http://www.libnfc.org/community/topic/
98/mifare-classic-key-recovery-tool-dark-side-attack/
c
Nicolas
T. Courtois 2009-10
Smart Cards Lab
COMPGA12
University College London
Assuming that we know the key for a given Oyster card, how can we
know how much money there is currently on our card? First of all, the
exact amount cannot always be determined with certitude. This not as much
because of the complex pricing system used by Transport For London with
price capping and penalties for not touching out. But rather because in the
real life transactions are not always guaranteed to be billed properly. People
are frequently charged more than they should be, and if people complain
they get some of their money refunded, and therefore the current balance
written in the card may be altered. However we are able to get the figure
which in a typical case and if the card indeed has been used correctly, and
after touching-out, will be exactly the balance of a given card.
For this we need to read block 5 and block 6 of the Oyster card. We repeat the sequence LOAD KEY IN RAM REGISTERS, MIFARE CLASSIC
AUTHENTICATE described above (unless the key AND the block number
requested is the same as before.
Then we need to issue MIFARE CLASSIC READ twice for block 5 and
6, that according to MiFare Classic specification always use the same key. 2
x MIFARE CLASSIC READ for blocks 5 and 6
CLA INS P1 P2 Le
FF
B0 00 05 10
CLA
FF
INS
B0
P1
00
P2
06
Le
10
We get:
05.
06.
Now we need to look and the second block (not the third as it seems)
with numbering 1, 2, 3, 4, 5 . . . byte starting from the left, in each of these
blocks. It is a counter, and one of these two counters will be higher, for
example first will be 0x41 and the other will be 0x40. This means that we
need to use block 5 and discard block 6. Now we look at the two following
bytes 4th and 5th in the same block. The formula to compute the credit of
our card is as follows:
credit =
b5 · 256 + b4
200, 0
in British pounds[£]
c
Nicolas
T. Courtois 2009-10
Smart Cards Lab
13.7
COMPGA12
University College London
Writing One Block
We use the following command:
MIFARE CLASSIC WRITE
CLA INS P1
P2
Lc
FF
D6 00
10
Data
Where Data=
bytes.
The answer should be:
13.8
must be exactly 16
Reading The Block Again
We can verify if writing was done correctly:
MIFARE CLASSIC READ
CLA INS P1
P2
Le
FF
B0 00
10
Write the answer obtained here:
and compare to the data written:
13.9
Writing Again to Restore Previous Value
We do again:
UPDATE
CLA INS
FF
D6
P1
00
P2
Lc
10
Data
The answer should be:
13.10
Reading The Block Again
We can verify if writing was done correctly:
MIFARE CLASSIC READ
CLA INS P1
P2
Le
FF
B0 00
10
Write the answer obtained here:
c
Nicolas
T. Courtois 2009-10
Smart Cards Lab
COMPGA12
University College London
and compare to the data written:
13.11
Reading Script
To read several blocks at once with one key we can use the following program:
(with Omnikey we need -r1 option)
cd C:\Program Files\rfidiot
readmifaresimple.py -r0 0 64 FFFFFFFFFFFF AA
This reads all blocs from 0 to 63 with key A, or those for which the key
provided is correct.
We can try this with a building card and with key beeing either FFFFFFFFFFFF
(Philips/NXP default key) or with another popular default key A0A1A2A3A4A5A6
(known as the Infineon default key).
Typically at least one block is accessible with a default key, in many
cards all blocks 0-59 except 60-63 are accessible with one of the default
keys, and in some buildings all blocks without exception will be accessible
with one of the default keys.
c
Nicolas
T. Courtois 2009-10
Smart Cards Lab
13.12
COMPGA12
University College London
Ready Software - EasyKey
A ready Windows program to explore MiFare Classic cards is provided by
ACS, the manufacturer of ACR122 reader. It is called EasyKey, and is also
known as ACS MiFare Key Management Tool.
\Smart Cards Lab docs and free software\
APDU tools\ACR122U NFC Reader complete SDK with tools\setup.exe
During the installation select ’Advanced Installation’ and install only
the tools.
c
Nicolas
T. Courtois 2009-10
Smart Cards Lab
COMPGA12
University College London
It is a tool which allows to do arbitrary operations on MiFare Classic
cards. In particular it allows to understand various access conditions for
various sectors. (MiFare Classic has 16 sectors with 4 blocks each). The
reader must be warned that many operations will be irreversible and can
render the card impossible to use.
c
Nicolas
T. Courtois 2009-10
Smart Cards Lab
14
COMPGA12
University College London
GSM SIM Card Exploration
We mean a classical (2G) SIM card, what we present here also works on
many (but not all as it seems) 3G cards that are (not always?) backwards
compatible with 2G phones.
Quiz SIM stands for:
Standard ICC for Mobile (phones)
Subscriber Identity Module
Bibliography: The exact specifications of how a mobile phone communicates with a SIM card can be found in the ETSI GSM 11-11 document.
14.1
GSM SIM Card During a Phone Call
We will perform the following sequence of operations:
1. Select the file DFGSM , which is one of the two main directories on
each SIM card, the second being DFT ELECOM .
2. Verify the PIN (not needed if PIN inactive).
3. Run the GSM algorithm to obtain cryptographic keys for the authentication and encryption during the current phone call.
This is the strict minimum that needs to be executed for each phone call
(the phone does NOT know the secret key of the card and therefore cannot
replace the SIM card in these 3 operations, it can however cache the PIN so
that the user does not have to enter it each time).
14.2
Accessing DFGSM
First we execute the following:
GSM SELECT FILE (by FID)
CLA INS P1 P2 Le FID
A0
A4 00 00 02 7F 20
Where the FID of DFGSM is ’7F 20’.
The answer should be:
SW1 SW2
9F
Where
is the length of the response data
that we will now recover with GET RESPONSE command:
c
Nicolas
T. Courtois 2009-10
Smart Cards Lab
GET RESPONSE
CLA INS P1 P2
A0
C0 00 00
COMPGA12
University College London
Le
The answer is the FCI of the DFGSM directory.
Handling Errors
All the above should work for any 2G SIM card and for many if not all 3G
cards.
In case we recall some standard error messages:
.
Specific products and specific commands also frequently have special
error codes, one example will be seen below.
Decoding of Certain Bytes
According to GSM specs we can here look at certain bytes in FCI.
Byte 14 =
Byte 19 =
From these we learn that: The most significant bits of
is 0 if an only
if PIN1 is disabled.
is the ”CHV1 status” Typically the value of this byte
Th byte 19 =
is ’83’ where 8 means that the PIN1 has been initialized, and that there are
3 cardholder verification attempts left for this PIN.
14.3
Cardholder Verification
This should be done ONLY if the PIN1 is enabled, i.e.
’80’. Otherwise we skip this subsection.
GSM VERIFY CHV1
CLA INS P1 P2
A0
20
00 01
Le
08
is bigger than
CHV
where the PIN is encoded in ASCIII and extended to 8 bytes by FF FF
FF FF. For example the PIN 1234 is encoded as 31 32 33 34 FF FF FF FF.
The answer should be:
.
After 3 presentations of an incorrect PIN (that can be in different sessions, this counter is preserved in non-volatile memory) the card will be
blocked (but can be unblocked with UNBLOCK CHV function).
c
Nicolas
T. Courtois 2009-10
Smart Cards Lab
COMPGA12
University College London
However if the PIN is correct, the counter for the number of CHV attempts will be reset to 3.
14.4
Cryptographic Functionality of a SIM Card
Imagine that the base station in GMS sends to the mobile phone a 16-byte
random. Choose one example or write your own (the length MUST be 16
bytes):
RUN GSM ALGORITHM
CLA INS P1 P2 Le
A0
88
00 00 10
RAND
This command will work ONLY if DFGSM or a sub-directory is selected,
and if cardholder verification was performed.
The answer should be:
SW1 SW2
9F
Where
is the length of the response data that we will now recover
with GET RESPONSE command:
GET RESPONSE
CLA INS P1 P2
A0
C0 00 00
Le
The answer should now be split as 4+8+2:
Here SRES =
= A3(Ki,RAND) and
Kc=
= A8(Ki,RAND)
Starting from now, SRES will be sent to the base station, and the phone
conversation will be encrypted using A5/x algorithm with key Kc.
c
Nicolas
T. Courtois 2009-10
Smart Cards Lab
14.5
COMPGA12
University College London
An Embarrassing Discovery
If we do the above steps and are able to run RUN GSM ALGORITHM for
a SIM card from a number of countries the Kc keys obtained are typically
NOT random (!).
For example, depending on the card, the operator and the country, we
will see that no matter how many times we try, certain bits of the key
will always be 0. Thus, many SIM cards in various countries have been
deliberately weakened to generate weaker keys, probably so that to make
GSM communications easier to eavesdrop for the government.
To see this, just repeat the last RUN GSM ALGORITHM command and
change some bytes in the random. Repeat several times.
You may write below the results obtained:
Remark 1. This fact is known among some well-informed security
professionals, but it is NOT in general known to the public of the concerned
countries...
Remark 2. In contrast, UK SIM cards typically have keys on 64 bits.
c
Nicolas
T. Courtois 2009-10
Smart Cards Lab
15
COMPGA12
University College London
Bank Card Magnetic Stripe Exploration
Warning: your bank card belongs to your bank, not to you. It is specifically
written in card contracts. You are NOT allowed to do what you want with
your card. You are NOT allowed to hack your bank card.
Students are asked not to try anything with their current UK bank card.
We will experiment with some old and foreign bank cards.
Reading the magnetic stripe of your card:
15.1
Track 1
High resolution track.
We can only decode it if it is in the standard and popular format B.
Other formats are proprietary.
One can split it as follows:
PAN:
NAME:
Expires:
Service Code:
PVKI: PVV:
CVV:
15.2
Track 2
Low resolution ABA track. More or less the same, except the name.
One can split it as follows:
PAN:
Expires:
Service Code:
PVKI: PVV:
CVV:
c
Nicolas
T. Courtois 2009-10
Smart Cards Lab
15.3
COMPGA12
University College London
Decoding Service Code - 3 Digits
D1: Interchange and technology.
D2: Authorization processing.
D3: Range of goods and PIN requirements.
Example:
Glossary:
RFU = Reserved for Future Use,
IC = Intergrated Circuit, or chip
when feasible = each time the terminal accepts it, if the chip is broken or
missing the financial transaction should not be handled
Note: We see that second LS bit of D1 indicates that the chip is present
and must be used. Ross Anderson reported that by modifying this code one
could with certain terminals circumvent the chip and make the card much
easier to clone.
c
Nicolas
T. Courtois 2009-10
Smart Cards Lab
16
COMPGA12
University College London
Bank Card Chip Exploration
Warning: your bank card belongs to your bank, not to you. It is specifically
written in card contracts. You are NOT allowed to do what you want with
your card. You are NOT allowed to hack your bank card.
Here we will do some very simple tests with reading some public zones
of the card to establish the basic capabilities of each card. The functional
specifications of bank cards are public (EMV Co), and in addition the cards
also contain a lot of proprietary data objects (which we cannot decode).
Students are asked not to try anything with their current UK bank card.
We will experiment with some old and foreign bank cards.
16.1
Select The Master File
We will implement the beginning of a bank transaction.
The main file in a bank card is always called: 1PAY.SYS.DDF01 or in
hex: 31 50 41 59 2E 53 59 53 2E 44 44 46 30 31
We will send the following command:
SELECT FILE by an AID
CLA INS P1 P2 Lc
00
A4 04 00 0E
16.2
DataIn
31 50 41 59 2E 53 59 53 2E 44 44 46 30 31
Answer Status
Answer:
.
The answer is typically:
SW1 SW2
61
Le
Where
61 == Normal Processing.
Le = the length of the file 1PAY.SYS.DDF01.
Errors:
Some cards return a proprietary error message, for example 6E 00.
It can also be one of the standard error messages:
.
Other cards answer with
SW1 SW2
6A
82
c
Nicolas
T. Courtois 2009-10
Smart Cards Lab
COMPGA12
University College London
which means FILE NOT FOUND. For example certain cards from MasterCard. For these at least, all is not lost. We we can skip this and the next
sub section and go directly to Section 16.5 (!).
16.3
Select The Master File
In the case of Normal Processing (61 Le) one can issue a next command:
GET RESPONSE
CLA INS P1 P2
00
C0 00 00
Le
Le
Only then we get the actual file 1PAY.SYS.DDF01. It is always like this
with smart cards, very few commands ever return data, especially when the
length of the data is long or unknown in advance. One frequently needs to
use GET RESPONSE to get the ’response’ data from the previous command.
Response obtained:
16.4
FCI
The response here is the so called FCI: File Control Info = status of the file
1PAY.SYS.DDF01 selected.
Exists in many products, in bank cards uses specific conventions. General philosophy:
TLV objects: Tag - Length - Value.
FCI is a sequence of nested TLV objects of the form
6F Ln [8X Ln Object ] [8X Ln Object ] [8X Ln Object ] .... 90 00
Objects can be nested.
Example from one bank card with some explanations:
6F1A 840E 3150..........3031 A508 880102 5F2D 02 656E 9000
6F: FCI on 26 bytes:
84: DF Name (14 bytes): 1PAY.SYS.DDF01
A5: Proprietary Information (8 bytes):
88: Short File Identifier (1 bytes): 02
5F2D: Language Preference (2 bytes): en
Your own example split into pieces:
c
Nicolas
T. Courtois 2009-10
Smart Cards Lab
16.5
COMPGA12
University College London
Select The Application
Typically a bank card supports several applications. Applications are identified by AIDs.
Examples of AIDs:
VISA:
VISA Debit/Credit:
VISA Credit:
VISA Debit:
VISA Electron:
VISA Interlink:
VISA Plus:
VISA ATM:
MASTERCARD:
Maestro:
Maestro UK:
Maestro UK:
Maestro TEST:
Self Service:
American Express:
ExpressPay:
Link:
Alias AID:
a0
a0
a0
a0
a0
a0
a0
a0
a0
a0
a0
a0
b0
a0
a0
a0
a0
a0
00
00
00
00
00
00
00
00
00
00
00
00
12
00
00
00
00
00
00
00
00
00
00
00
00
00
00
00
00
00
34
00
00
00
00
00
00
00
00
00
00
00
00
00
00
00
00
00
56
00
00
00
00
00
03
03
03
03
03
03
03
03
04
04
05
05
78
24
25
25
29
29
10
10
10
20
30
80
99
10
30
00
00
10
10
10
10
10
10
99
10
60
01
01
01
02
10
00??
01
01 07 01
10 10
10 10
The application that will be used in a bank transaction is the one that
both the card and the terminal support, and the one with the highest priority.
For most UK bank cards, from the logo on the card, it is quite easy to
guess that the supported application will be at least one of these:
VISA:
MASTERCARD:
Maestro:
Thus we will use AID =
Its length in bytes is:
a0 00 00 00 03
a0 00 00 00 04 10 10
a0 00 00 00 04 30 60
.
.
Select The Application by AID
We send the following command:
c
Nicolas
T. Courtois 2009-10
Smart Cards Lab
COMPGA12
SELECT FILE by an AID
CLA INS P1 P2
Lc
00
A4 04 00
University College London
DataIn
Answer obtained:
SW1 SW2
61
If the answer was indeed of form ’61 Le’, we can issue a next command:
GET RESPONSE
CLA INS P1 P2
00
C0 00 00
Le
Response obtained:
16.6
About CLA
Quiz In very standard ISO 7816-4 commands we have typically:
INS=00
INS=04
Quiz In GSM commands we have typically:
INS=00
INS=A0
Quiz Nonstandard/proprietary commands and specific commands defined
in the EMV standard use frequently:
INS=80
16.7
INS=00
Initiate Application Processing
This informs the card that a new transaction will begin.
The terminal executes GET PROCESSING OPTIONS with a parameter, that are OPTIONAL optional terminal-resident data objects (specified
by a PDOL object provided by the card). We will assume here that this
option is not used (most of time it is the case) and therefore there will be
no terminal-resident data objects.
We send the following command:
GET PROCESSING OPTIONS
CLA INS P1 P2 Lc DataIn
80
A8 00 00 02
8300
Le
00
where Le = 0 is assumed.
c
Nicolas
T. Courtois 2009-10
Smart Cards Lab
COMPGA12
University College London
Answer obtained:
SW1 SW2
61
If the answer was indeed of form ’61 Le’, we will be able to recover the
answer:
GET RESPONSE
CLA INS P1 P2
00
C0 00 00
Le
Response obtained:
Here the card returns both:
1. Application Interchange Profile (AIP): supported functions (for example that the card supports SDA or DDA, and if the card supports
Cardholder verification)
2. Application File Locator (AFL): pointers to application data available
(At this stage the terminal also sees if the card has stored records of transactions preformed offline. These
will be taken into account in Terminal Risk Management).
16.8
Read Application Data
Now the terminal may read from the card all the data specified by the AFL.
If one objects repeats, some AFL object is missing, or some mandatory
object is not in AFL, or any kind of errors occurs, the terminal terminates
the transaction.
However according to the EMV spec it is not required that card verifies
that the terminal conforms to all of this
Therefore we skip this stage.
16.9
Offline Data Authentication
Here SDA, DDA or CDA can be performed.
This part is optional, or more precisely it can be performed later, and
typically the card does not check if it was performed.
We skip this part too.
c
Nicolas
T. Courtois 2009-10
Smart Cards Lab
16.10
COMPGA12
University College London
Cardholder Verification
In EMV many cardholder authentication methods are supported. But by
default most cards with PIN support the simplest unencrypted PIN verification (the PIN is sent in cleartext to the card).
Warning: typically, if one enters incorrect PIN 3 times, the card
chip will be blocked forever !
Before we try the PIN verification, let’s check how many trials are left.
Checking PIN Limits
Now we are able to read the field that contains the number of trials left for
PIN checking. We issue the following EMV command in two parts, first is
needed the determine the size of the file to retrieve:
EMV GET DATA OBJECT ’9F 17’
CLA INS P1 P2 Le
80
CA 9F 17 00
Answer obtained:
SW1 SW2
6C
If the answer was indeed of form ’6C Le’, we will be able to recover the
answer:
EMV GET DATA OBJECT ’9F 17’
CLA INS P1 P2
Lc
80
CA 9F 17
Response obtained:
FID Le Result
9F 17 01
Thus there are
OK
PIN tries left.
Checking the PIN
One should only do it if one actually knows the PIN and one is absolutely
certain if it is correct. Otherwise after
tries the card will never work
again.
To verify the PIN, we will use a standard ISO command (that also exists
in GSM cards and in many other cards). Here the PIN is the PIN pertaining
to a the current application, (not to the whole multi-application card), and
for this reason P2=’80’.
c
Nicolas
T. Courtois 2009-10
Smart Cards Lab
COMPGA12
University College London
One needs also to know how to encode the PIN and the special padding
that extends it to 8 bytes.
The encoding is somewhat strange, we simply write the decimal PIN as
text, treat it as a hex number, 4 digits makes 2 bytes, then we prepend ’24’,
and append five times ’FF’. Thus we get 8 bytes.
VERIFY CHV with DF-specific password (P2=80)
CLA INS P1 P2 Lc DataIn
00
20
00 80 08 24 (PIN in text) FF FF FF FF FF
The answer will be:
If the PIN is correct, the answer should be 90 00.
Please don’t try to find out what is the answer when the PIN is incorrect. This is very risky. If the PIN is already blocked, the answer is:
SW1 SW2
This bank card will not work anymore.
69
84
If the PIN is incorrect, but we have still several cardholder verification
SW1 SW2
Where
is the number
attempts left, the answer will be:
63
C
of PIN attempts left before the card will block itself forever.
Remark: From this we see that current bank cards have the capacity
to process at least twice longer PINs than commonly used (could be also be
longer with a better encoding). However very few banks use longer PINs.
c
Nicolas
T. Courtois 2009-10
Smart Cards Lab
16.11
COMPGA12
University College London
Further Exploration: chap.py
Adam Laurie wrote an open-source program to explore a bank card. It is
far from being perfect and 100 % compatible. Use at your own risk.
cd C:\Program Files\rfidiot
chap.py -h
ChAP.py [options] [PIN]
If the optional numeric PIN argument is given,
the PIN will be verified
(note that this updates the PIN Try Counter
and may result in the card being PIN blocked).
Options:
-a
-A
-d
-e
-f
-h
-o
-p
-r
-t
-v
Bruteforce AIDs
Print list of known AIDs
Debug - Show PC/SC APDU data
Bruteforce EMV AIDs
Bruteforce files
Print detailed help message
Output to files ([AID]-FILExxRECORDxx.HEX)
Bruteforce primitives
Raw output - do not interpret EMV data
Use T1 protocol (default is T0)
Verbose on
Warning: with the wrong PIN one can block the card totally!
c
Nicolas
T. Courtois 2009-10
Smart Cards Lab
17
COMPGA12
University College London
How to Become a Smart Card Developer
Any student vaguely familiar with Microsoft Visual Studio should be able
start developing smart card applications in 10 minutes. Below we explain
how and give example source code. More examples are found in the files
provided to students.
17.1
How to Send and Receive Commands
In fact, very little is needed to make an application that is able to communicate with a smart card, everything is implemented in a Microsoft winscard
library and winscard.dll which is included by default in all modern versions
of Windows and does not require any installation.
To use it we need the following two lines:
#include "winscard.h"
#pragma comment(lib, "winscard.lib")
This will give us PC/SC Support in our program: we will have access
to functions such as SCardConnect, SCardBeginTransaction, SCardStatus,
SCardTransmit etc. A number of examples on how to use these functions is
given in the Microsoft MSDN documentation. However this documentation
is insufficient to produce working code. in fact these instructions need to
be used in a certain sequence in order to work properly. In the most recent
book about Smart Cards edited by Keith Mayes et al from Royal Holloway,
authors provide a short example source code showing the right sequence.
However the code in the printed version of the book is incorrect and has
several bugs that are not easy to fix. We give a corrected version below.
//written by NCourtois based on MSDN help files
//and RHUL 2006 book example code (none worked initially)
#include "winscard.h"
#pragma comment(lib, "winscard.lib")
typedef unsigned int
ui32;
#define PCSC_ERROR(rv, text) \
if (rv != SCARD_S_SUCCESS) \
{ \
printf(text ": %s (0x%lX)\n", pcsc_stringify_error(rv), rv); \
} \
else \
c
Nicolas
T. Courtois 2009-10
Smart Cards Lab
COMPGA12
University College London
{ \
printf(text ": OK\n\n"); \
}
void print_hex(const byte* pbtData, const ui32 uiBytes)
{
ui32 uiPos;
for (uiPos=0; uiPos < uiBytes; uiPos++)
{
printf("%02X ",pbtData[uiPos]);
}
printf("\n");
}
void print_hex_nocr(const byte* pbtData, const ui32 uiBytes)
{
ui32 uiPos;
for (uiPos=0; uiPos < uiBytes; uiPos++)
{
printf("%02X ",pbtData[uiPos]);
}
//printf("\n");
}
int readhex(BYTE *bSend,char *Text)
{
int i=0,j=0;
while(Text[j])
{
while(!IsHex(Text[j]) && Text[j])
j++;
if(Text[j]) if(IsHex(Text[j]))
{
if(IsHex(Text[j+1]))
{
bSend[i]=(ReadHex(Text[j])<<4) + ReadHex(Text[j+1]);
j+=2;
}
else
{
c
Nicolas
T. Courtois 2009-10
Smart Cards Lab
COMPGA12
University College London
bSend[i]=ReadHex(Text[j]);
j++;
};
i++;
};
};
return i;
};
int PCSCExample(int readernb)
{
SCARDCONTEXT hContext; LONG lReturn,lReturn2;
// Establish the context.
lReturn = SCardEstablishContext(SCARD_SCOPE_USER,NULL,NULL,&hContext);
if ( SCARD_S_SUCCESS != lReturn )
PCSC_ERROR(lReturn, "SCardEstablishContext")
else
{
// Use the context as needed.
SCARDHANDLE
hCardHandle;
DWORD
dwAP;
//now list the readers
LPTSTR pmszReaders = NULL;//16-bit UNICODE characters
LPCTSTR AReader = NULL; LPCTSTR LastReader = NULL;
LPCTSTR MyReader = NULL;
//char WantReader2[] = "ACS ACR122";
DWORD
cch = SCARD_AUTOALLOCATE;
SCARD_IO_REQUEST *pioSendPci=NULL;
SCARD_IO_REQUEST *pioRecvPci=NULL;
lReturn = SCardListReaders(hContext,NULL,(LPTSTR)&pmszReaders,&cch );
if ( lReturn == SCARD_S_SUCCESS )
{
int nbReaders=0;
AReader = pmszReaders;
while ( ’\0’ != *AReader )
{
LastReader=AReader;
nbReaders++;
c
Nicolas
T. Courtois 2009-10
Smart Cards Lab
COMPGA12
University College London
// Display the value.
/*sprintf(CurrReader,"%S", AReader );
if(
strnicmp(CurrReader,WantReader1,6)==0 ||
strnicmp(CurrReader,WantReader2,6)==0
)
break;//*/
if(readernb==nbReaders-1)
{
MyReader=AReader;
}
// Advance to the next value.
AReader = AReader + wcslen(AReader) + 1;
};
if(readernb>nbReaders-1 && nbReaders>0)
{
MyReader=LastReader;
};
//now take MyReader
if(nbReaders>0)
{
printf(" Reader: %S\n", MyReader );
lReturn = SCardConnect( hContext,
(LPCTSTR)MyReader,SCARD_SHARE_SHARED,
SCARD_PROTOCOL_T0 | SCARD_PROTOCOL_T1,
&hCardHandle,&dwAP );
if ( SCARD_S_SUCCESS != lReturn )
{
PCSC_ERROR(lReturn, "SCardConnect")
return -1; // Or other appropriate action.
}
// Use the connection.
// Display the active protocol.
switch ( dwAP )
{
case SCARD_PROTOCOL_T0:
printf("Active protocol T=0\n");
break;
case SCARD_PROTOCOL_T1:
printf("Active protocol T=1\n");
c
Nicolas
T. Courtois 2009-10
Smart Cards Lab
COMPGA12
University College London
break;
case SCARD_PROTOCOL_UNDEFINED:
default:
printf("Active protocol unnegotiated or unknown\n");
break;
};
lReturn = SCardBeginTransaction( hCardHandle );
if ( SCARD_S_SUCCESS != lReturn )
PCSC_ERROR(lReturn, "SCardBeginTransaction")
if(1)//determine ATR, does not give anything with contactless
{
WCHAR szReader[200];DWORD cch = 200;
BYTE bAttr[32]={0};DWORD cByte = 32;
DWORD dwState, dwProtocol;LONG lReturn;
// Determine the status.
// hCardHandle was set by an earlier call to SCardConnect.
lReturn = SCardStatus(hCardHandle,
szReader,&cch,&dwState,&dwProtocol,
(LPBYTE)&bAttr,&cByte);
if ( SCARD_S_SUCCESS != lReturn )
{
PCSC_ERROR(lReturn, "SCardStatus")
return -2;
// or other appropriate action
}
else
{
switch ( dwState )
{
case SCARD_ABSENT:
printf("Card absent.\n");
break;
case SCARD_PRESENT:
printf("Card present.\n");
break;
case SCARD_SWALLOWED:
printf("Card swallowed.\n");
break;
c
Nicolas
T. Courtois 2009-10
Smart Cards Lab
COMPGA12
University College London
case SCARD_POWERED:
printf("Card has power.\n");
break;
case SCARD_NEGOTIABLE:
printf("Card reset and waiting PTS negotiation.\n");
break;
case SCARD_SPECIFIC:
printf("Card has specific communication protocols set.\n");
break;
default:
printf("Unknown or unexpected card state.\n");
break;
}
printf("ATR: ");
print_hex_nocr(bAttr,cByte);
printf("\n");
};
}
switch(dwAP)
{
case SCARD_PROTOCOL_T0:
pioSendPci = SCARD_PCI_T0;
break;
case SCARD_PROTOCOL_T1:
pioSendPci = SCARD_PCI_T1;
break;
default:
printf("Unknown protocol\n");
return -1;
}
//now transmit a single APDU
{
BYTE bSend[256]={0};
DWORD dwSend=0;
BYTE bRecv[32]={0};
DWORD dwRecv=0;
dwRecv = sizeof(bRecv);
dwSend=readhex(bSend, "FF CA 00 00 00");
//GET CARD SERIAL NUMBER
c
Nicolas
T. Courtois 2009-10
Smart Cards Lab
COMPGA12
University College London
printf("APDU: ");
print_hex_nocr(bSend,dwSend);
printf("\n");
lReturn = SCardTransmit(hCardHandle,
pioSendPci,bSend,dwSend,pioRecvPci,bRecv,&dwRecv );
if ( SCARD_S_SUCCESS != lReturn )
{
PCSC_ERROR(lReturn, "SCardTransmit")
return -3;
// or other appropriate error action
}
else
{
printf(" RE: ");
print_hex_nocr(bRecv,dwRecv);
printf("\n");
};
}
lReturn = SCardEndTransaction(hCardHandle,SCARD_UNPOWER_CARD);
if ( SCARD_S_SUCCESS != lReturn )
PCSC_ERROR(lReturn, "SCardEndTransaction")
lReturn = SCardDisconnect(hCardHandle,SCARD_RESET_CARD);
if ( SCARD_S_SUCCESS != lReturn )
{
PCSC_ERROR(lReturn, "SCardDisconnect")
return -4; // Or other appropriate action.
};
}
lReturn2 = SCardFreeMemory( hContext,
pmszReaders );
if ( SCARD_S_SUCCESS != lReturn2 )
PCSC_ERROR(lReturn2, "SCardFreeMemory")
}
//When done,
lReturn = SCardReleaseContext(hContext);
if ( SCARD_S_SUCCESS != lReturn )
PCSC_ERROR(lReturn2, "SCardReleaseContext")
};
return 0;
};
//#include <pcsclite.h>//needed only for pcsc_stringify_error
c
Nicolas
T. Courtois 2009-10
Smart Cards Lab
COMPGA12
University College London
char* pcsc_stringify_error(const long pcscError)
{
static char strError[75];
switch (pcscError)
{
case SCARD_S_SUCCESS:
(void)strncpy(strError, "Command successful.", sizeof(strError));
break;
case SCARD_E_CANCELLED:
(void)strncpy(strError, "Command cancelled.", sizeof(strError));
break;
case SCARD_E_CANT_DISPOSE:
(void)strncpy(strError, "Cannot dispose handle.", sizeof(strError));
break;
case SCARD_E_INSUFFICIENT_BUFFER:
(void)strncpy(strError, "Insufficient buffer.", sizeof(strError));
break;
case SCARD_E_INVALID_ATR:
(void)strncpy(strError, "Invalid ATR.", sizeof(strError));
break;
case SCARD_E_INVALID_HANDLE:
(void)strncpy(strError, "Invalid handle.", sizeof(strError));
break;
case SCARD_E_INVALID_PARAMETER:
(void)strncpy(strError, "Invalid parameter given.", sizeof(strError));
break;
case SCARD_E_INVALID_TARGET:
(void)strncpy(strError, "Invalid target given.", sizeof(strError));
break;
case SCARD_E_INVALID_VALUE:
(void)strncpy(strError, "Invalid value given.", sizeof(strError));
break;
case SCARD_E_NO_MEMORY:
(void)strncpy(strError, "Not enough memory.", sizeof(strError));
break;
case SCARD_F_COMM_ERROR:
(void)strncpy(strError, "RPC transport error.", sizeof(strError));
break;
case SCARD_F_INTERNAL_ERROR:
c
Nicolas
T. Courtois 2009-10
Smart Cards Lab
COMPGA12
University College London
(void)strncpy(strError, "Internal error.", sizeof(strError));
break;
case SCARD_F_UNKNOWN_ERROR:
(void)strncpy(strError, "Unknown error.", sizeof(strError));
break;
case SCARD_F_WAITED_TOO_LONG:
(void)strncpy(strError, "Waited too long.", sizeof(strError));
break;
case SCARD_E_UNKNOWN_READER:
(void)strncpy(strError, "Unknown reader specified.", sizeof(strError));
break;
case SCARD_E_TIMEOUT:
(void)strncpy(strError, "Command timeout.", sizeof(strError));
break;
case SCARD_E_SHARING_VIOLATION:
(void)strncpy(strError, "Sharing violation.", sizeof(strError));
break;
case SCARD_E_NO_SMARTCARD:
(void)strncpy(strError, "No smart card inserted.", sizeof(strError));
break;
case SCARD_E_UNKNOWN_CARD:
(void)strncpy(strError, "Unknown card.", sizeof(strError));
break;
case SCARD_E_PROTO_MISMATCH:
(void)strncpy(strError, "Card protocol mismatch.", sizeof(strError));
break;
case SCARD_E_NOT_READY:
(void)strncpy(strError, "Subsystem not ready.", sizeof(strError));
break;
case SCARD_E_SYSTEM_CANCELLED:
(void)strncpy(strError, "System cancelled.", sizeof(strError));
break;
case SCARD_E_NOT_TRANSACTED:
(void)strncpy(strError, "Transaction failed.", sizeof(strError));
break;
case SCARD_E_READER_UNAVAILABLE:
(void)strncpy(strError, "Reader is unavailable.", sizeof(strError));
break;
case SCARD_W_UNSUPPORTED_CARD:
(void)strncpy(strError, "Card is not supported.", sizeof(strError));
c
Nicolas
T. Courtois 2009-10
Smart Cards Lab
COMPGA12
University College London
break;
case SCARD_W_UNRESPONSIVE_CARD:
(void)strncpy(strError, "Card is unresponsive.", sizeof(strError));
break;
case SCARD_W_UNPOWERED_CARD:
(void)strncpy(strError, "Card is unpowered.", sizeof(strError));
break;
case SCARD_W_RESET_CARD:
(void)strncpy(strError, "Card was reset.", sizeof(strError));
break;
case SCARD_W_REMOVED_CARD:
(void)strncpy(strError, "Card was removed.", sizeof(strError));
break;
/* case SCARD_W_INSERTED_CARD:
(void)strncpy(strError, "Card was inserted.", sizeof(strError));
break;
case SCARD_E_UNSUPPORTED_FEATURE:
(void)strncpy(strError, "Feature not supported.", sizeof(strError));
break;//*/
case SCARD_E_PCI_TOO_SMALL:
(void)strncpy(strError, "PCI struct too small.", sizeof(strError));
break;
case SCARD_E_READER_UNSUPPORTED:
(void)strncpy(strError, "Reader is unsupported.", sizeof(strError));
break;
case SCARD_E_DUPLICATE_READER:
(void)strncpy(strError, "Reader already exists.", sizeof(strError));
break;
case SCARD_E_CARD_UNSUPPORTED:
(void)strncpy(strError, "Card is unsupported.", sizeof(strError));
break;
case SCARD_E_NO_SERVICE:
(void)strncpy(strError, "Service not available.", sizeof(strError));
break;
case SCARD_E_SERVICE_STOPPED:
(void)strncpy(strError, "Service was stopped.", sizeof(strError));
break;
case SCARD_E_NO_READERS_AVAILABLE:
(void)strncpy(strError, "Cannot find a smart card reader.", sizeof(strError
break;
c
Nicolas
T. Courtois 2009-10
Smart Cards Lab
COMPGA12
University College London
default:
/*(void)snprintf(strError, sizeof(strError)-1, "Unkown error: 0x%08lX",
pcscError);//*/
(void)sprintf(strError, "Unkown error: 0x%08lX",
pcscError);
};
/* add a null byte */
strError[sizeof(strError)-1] = ’\0’;
return strError;
}
c
Nicolas
T. Courtois 2009-10
Smart Cards Lab
17.2
COMPGA12
University College London
More Examples
Many ready Visual Studio and other development projects examples are provided with our collection of software. Thus one can easily develop Windows
applications with or without GUI which talk to smart cards.
1. Many examples can be found in the ACS 122 Software Development
Kit which contains examples of code for Borland Delphi 7, Java, MS
Visual Basic 6.0, MS Visual Basic.NET 2005, MS Visual C#.NET
2005, MS Visual C++ 2005 (x64) and MS Visual C++ 6.0. See
\Smart Cards Lab docs and free software\additional software packages\
Smart Card Focus ACR122 starter Kit with Sample C++ Code CD 2011
\Sample Codes\
2. The source code for several of Spring Card tools and other related
ready projects for Microsoft Visual Studio can be found on the Internet
or in:
\Smart Cards Lab docs and free software\
APDU tools\SpringCard tools\SDK\pcsc-sdk_1-04\pcsc-sdk_1-04\
3. Other examples can be found on the Internet (Google code, Source
Forge etc.)
4. For example, based on another open source code project, we have
developed a simple open-source timing attack that students can extend
or improve. It is further discussed below and can be found in
\Smart Cards Lab docs and free software\
APDU tools\TimingAttackDemo\
18
Timing Attacks
On almost any APDU command in the smart card lab one can try to do a
timing attack.
Remark: Please note that most smart card products are protected
against timing attacks.
c
Nicolas
T. Courtois 2009-10
Smart Cards Lab
18.1
COMPGA12
University College London
A Simple Timing Attack Project
For this we use the following program provided to students on a flash disk,
and based on a known open-source PC/SC project. The source code is
also given (so students can directly modify it by opening the .dsw file. )
To simply run it:
TimingAttackDemo.exe
which can be found in:
\Smart Cards Lab docs and free software\APDU tools\
TimingAttackDemo\sources\SCardDemo-Modif\Release\
How to use it: First open a reader and then type in an APDU command. Then press APDU button.
The timing information is displayed only in a log file, which will be
opened automatically at the end, after the program is closed by pressing
OK button.
Important: This timing attack is VERY imperfect, due to the latency
of the Windows OS, the USB port and the firmware of the smart card reader.
In order to get a precise result, one needs to repeat each command a large
number of times. this is also why it appears to freeze or it is slow.
The software provided is very simple: it can only do a loop on a single
command, it cannot execute a sequence of commands in a loop, and it
cannot power off or reset the card. Please improve it to execute sequences
of commands...
18.2
A Timing Attack on MiFare
This is just a very basic demonstration of the core principle. It does not
break MiFare authentication but shows that important timing differences
can be observed for real life products with extremely simple tools.
Here we will be executing a sequence of just two commands. It does not
matter the our tool will also repeat the first command 100 times to have
more precise timing.
Let’s take a MiFare Classic card with a known key, for example FFFFFFFFFFFF,
that is charged into memory. Then we will authenticate for block 0. this
gives, for example
APDU: FF82200006FFFFFFFFFFFF
Resp: (90 00)
c
Nicolas
T. Courtois 2009-10
Smart Cards Lab
COMPGA12
University College London
T ms: 31.210
APDU: FF8800006000
Resp: (90 00)
T ms: 62.759
In contrast, if the key is wrong, the second command takes much longer:
APDU: FF82200006FFFFFF000000
Resp: (90 00)
T ms: 31.779
APDU: FF8800006000
Resp: (90 00)
T ms: 136.417
Thus somebody that does not have the access to the USB port communications but only to their timing, can infer some information with certainty
(for example if the result of some cryptographic check is correct or not).
c
Nicolas
T. Courtois 2009-10