1
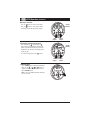
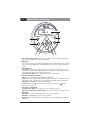
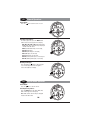
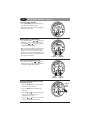
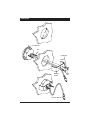
Operation
and Installation
Manual
ST
DIM
MODE
S-MOD
iPod MENU
VOL
MENU
ENT
BND
LOUD
MUTE
VOL
WRC-S1
Watertight Marine
Radio Controller
Introduction
Please take the time to read all of the information in this manual.
The WRC-S1 controls 2 different types of MB Quart systems:
• System with DVD player or,
• System with CD player.
Therefore this manual has 2 separate sections: DVD and CD. Consult your dealer to determine your type of
system.
Familiarity with operation will help you obtain the best possible performance from your new Marine Radio
Controller.
Safety Information
DO NOT OPEN COVERS AND DO NOT REPAIR BY
YOURSELF. PLEASE REFER SERVICING TO A
QUALIFIED TECHNICIAN.
CHANGES OR MODIFICATIONS TO THIS PRODUCT
NOT APPROVED BY THE MANUFACTURER WILL
VOID THE WARRANTY AND WILL VIOLATE FCC
APPROVAL.
Index
System with DVD Player
Button Locations and Functions . . . . . . . . . . . . . . . . . . . . . . . . . . . . . . . . . . . . . . . . . . . . . . . . . . .
General Operation . . . . . . . . . . . . . . . . . . . . . . . . . . . . . . . . . . . . . . . . . . . . . . . . . . . . . . . . . . . . . .
AM/FM Radio Operations. . . . . . . . . . . . . . . . . . . . . . . . . . . . . . . . . . . . . . . . . . . . . . . . . . . . . . . . .
Sound Controls . . . . . . . . . . . . . . . . . . . . . . . . . . . . . . . . . . . . . . . . . . . . . . . . . . . . . . . . . . . . . . . .
CD Operation (Compact Disc) . . . . . . . . . . . . . . . . . . . . . . . . . . . . . . . . . . . . . . . . . . . . . . . . . . . . .
MP3 Disc Operation. . . . . . . . . . . . . . . . . . . . . . . . . . . . . . . . . . . . . . . . . . . . . . . . . . . . . . . . . . . . .
DVD Operation. . . . . . . . . . . . . . . . . . . . . . . . . . . . . . . . . . . . . . . . . . . . . . . . . . . . . . . . . . . . . . . . .
3
4
4-5
6
6-7
7-8
8-9
System with CD Player
Button Locations and Functions . . . . . . . . . . . . . . . . . . . . . . . . . . . . . . . . . . . . . . . . . . . . . . . . . . .
General Operation . . . . . . . . . . . . . . . . . . . . . . . . . . . . . . . . . . . . . . . . . . . . . . . . . . . . . . . . . . . . . .
AM/FM Radio Operations. . . . . . . . . . . . . . . . . . . . . . . . . . . . . . . . . . . . . . . . . . . . . . . . . . . . . . . . .
Sound Controls . . . . . . . . . . . . . . . . . . . . . . . . . . . . . . . . . . . . . . . . . . . . . . . . . . . . . . . . . . . . . . . .
CD Operation (Compact Disc) . . . . . . . . . . . . . . . . . . . . . . . . . . . . . . . . . . . . . . . . . . . . . . . . . . . . .
MP3 Disc Operation. . . . . . . . . . . . . . . . . . . . . . . . . . . . . . . . . . . . . . . . . . . . . . . . . . . . . . . . . . . . .
10
11
11-12
13
13-14
14-15
CD Changer Operation . . . . . . . . . . . . . . . . . . . . . . . . . . . . . . . . . . . . . . . . . . . . . . . . . . . . . . . . . . . . . 15-16
Sirius
Sirius Satellite Radio Setup . . . . . . . . . . . . . . . . . . . . . . . . . . . . . . . . . . . . . . . . . . . . . . . . . . . . . . . 16
Sirius Satellite Radio Operation . . . . . . . . . . . . . . . . . . . . . . . . . . . . . . . . . . . . . . . . . . . . . . . . . . . . 17-18
IPOD Operation . . . . . . . . . . . . . . . . . . . . . . . . . . . . . . . . . . . . . . . . . . . . . . . . . . . . . . . . . . . . . . . . . . 18-20
USB Operation . . . . . . . . . . . . . . . . . . . . . . . . . . . . . . . . . . . . . . . . . . . . . . . . . . . . . . . . . . . . . . . . . . . 20
Auxiliary Audio Input Operation . . . . . . . . . . . . . . . . . . . . . . . . . . . . . . . . . . . . . . . . . . . . . . . . . . . . . . 21
Installation . . . . . . . . . . . . . . . . . . . . . . . . . . . . . . . . . . . . . . . . . . . . . . . . . . . . . . . . . . . . . . . . . . . . . . 22
Warranty . . . . . . . . . . . . . . . . . . . . . . . . . . . . . . . . . . . . . . . . . . . . . . . . . . . . . . . . . . . . . . . . . . . . . . . 23
2
DVD
Button Locations and Functions
ST
8
1
DIM
MODE
2
S-MOD
iPod MENU
VOL
MENU
7
6
ENT
BND
LOUD
MUTE
VOL
3
4
5
3
1. Power On/Off and Display Dimmer: Press to turn the unit on or off. Press and hold to dim the display. Press and hold again to restore display’s illumination.
2. Mode Button:
Press to change the play source: Radio, DVD, Audio/Video Input and Auxiliary Audio Input. Depending
on what other input sources are connected (IPOD, Sirius, USB and CD Changer) these play source
will also appear in the display.
3. Tune/Track Buttons:
Radio Mode: Press either button and the tuner will scan to the next strong station and stop. Then
press and hold either button until “MANUAL” appears in the display then release. Again press either
button until the desired radio station appears in the display.
CD and CD Changer Mode: Press to change the track to a lower or higher track.
4. Enter/Band and Loud Button (ENT BND):
Radio: Press to select AM1, AM2, FM1, FM2 and FM3 radio bands.
Loudness: Press and hold button until “LOUD ON” appears in the display to boost high and low tones
at low volume levels. To deactivate press and hold again until “LOUD OFF” appears in the display.
IPOD Mode: See IPOD Operation Section for more information.
5. Volume Control: Press the
decrease the volume level.
VOL
button to increase the volume level and press the
VOL
button to
6. DVD/CD Play/Pause and Mute Button:
DVD/CD and CD Changer Mode: Press to pause disc play, press again to resume play.
Radio, Sirius Satellite Radio and AUX Input Modes: Press to mute volume level. Press again to restore.
7. Menu Button:
Sirius Mode: See Sirius Satellite Radio Operation section for more information.
IPOD Mode: See IPOD Operation section for more information.
8. Display Area: This area displays all function information for the radio, DVD/CD player, auxiliary and
IPOD modes.
3
DVD
General Operations
Power On/Off:
Press the
button to turn the unit on or off.
ST
S MOD
Pod MENU
VOL
DM
MENU
ENT
BND
MODE
LOUD
MUTE
VOL
Selecting a Play Source:
To select a play source, press the MODE button
until the desired source appears in the display:
ST
AM1, AM2, FM1, FM2 or FM3 (AM and FM Radio),
Note: Radio station call letter may be displayed
instead of the radio band.
SIRIUS (Satellite Radio Input, if connected),
DVD PLAY (DVD Player),
USB PLAY (MP3 Player, if connected),
IPOD (IPOD Input, if connected)
CD-CH (CD Changer, if connected),
AUX IN (Auxiliary Audio Input, if connected) and
AV IN (Auxiliary Audio/Video Input)
DM
MODE
S MOD
Pod MENU
VOL
MENU
ENT
BND
LOUD
MUTE
VOL
Dimming the Display:
Press and hold the
button to dim the brightness of the display. Press and hold again to
restore the brightness of display.
ST
DIM
MODE
S MOD
iPod MENU
VOL
MENU
ENT
BND
LOUD
MUTE
VOL
Hold
DVD
AM/FM Radio Operation
Power On/Off:
Press the
button to turn the unit on.
ST
Selecting the Play Source:
Press the MODE button until “AM1, AM2, FM1,
FM2 or FM3” appears in the display.
Note: Radio station call letter may be displayed
instead of the radio band.
DIM
MODE
MENU
ENT
BND
LOUD
VOL
4
S MOD
iPod MENU
VOL
MUTE
DVD
AM/FM Radio Operation (Continued)
Selecting the AM or FM Band:
Press the ENT BND button repeatedly and select
from FM1, FM2, FM3, AM1 or AM2.
Note: Radio station call letter may be displayed
instead of the radio band.
DIM
S MOD
iPod MENU
VOL
MENU
ENT
BND
MODE
LOUD
MUTE
VOL
Manually Tuning in a Radio Station:
Press and hold either the
or
button until
“MANUAL” appears in the display then release.
Then press the
or
until the desired radio
station appears in the display.
Note: The unit will automatically switch from FM
Mono to FM Stereo when the signal strength
increases to a stereo level. If the stereo signal
should become weak, the unit will switch back to
Mono. FM stereo reception is indicated when the
“ST” appears in the display.
SW
DIM
MODE
S MOD
Pod MENU
VOL
MENU
ENT
BND
LOU
MUTE
VOL
Lower
Frequency
Higher
Frequency
Tuning in a Radio Station Using Seek:
Press and release either the
or
button
and the tuner will scan up to the next strong station and stop seeking and start playing.
DIM
MODE
S MOD
iPod MENU
VOL
MENU
ENT
BND
LOUD
MUTE
VOL
Lower
Frequency
Higher
Frequency
Scanning for FM Radio Stations According
to Program Type (PTY):
1. Press the ENT BND button to select either the
FM1, FM2 or FM3 radio band.
2. Press the MENU button to display the program type.
Program
Type
(PTY)
PTY
DIM
MODE
MENU
ENT
BND
VOL
3. Press the VOL or
to select the desired program type (PTY). (Example: News,
Information, Sports, etc.)
S MOD
iPod MENU
VOL
LOUD
MUTE
VOL
4. Press the
or
button to search a station
with the selected program type (PTY).
5
DVD
Sound Controls
Volume:
Increase the volume by pressing the
Decrease the volume by pressing the
VOL
button.
VOL
button.
Increase
S MOD
iPod MENU
VOL
MENU
ENT
BND
MODE
LOUD
MUTE
VOL
Decrease
Loudness:
To boost high and low tones at low volume levels, press and hold the ENT BND button until
“LOUD ON” appears in the display. To deselect,
press and hold the ENT BND button again until
“LOUD OFF” appears in the display.
SW
LO D
S MOD
iPod MENU
VOL
DIM
MENU
ENT
BND
MODE
LOUD
MUTE
VOL
Mute:
Press and release the MUTE button to mute the
volume level. If a CD is playing the MUTE button
will pause the disc. Press the MUTE button again
to restore the volume or resume playing the disc.
SW
S MOD
iPod MENU
VOL
DIM
ENT
BND
MODE
LOUD
MUTE
VOL
DVD
CD Operation
Power On/Off:
Press the
button to turn the unit on.
Load CD Disc into DVD Player:
The unit will automatically switch to the “DVD
PLAY” mode and start playing the CD.
DIM
Selecting the Play Source when the CD is
Already Loaded:
Press the MODE button until “DVD PLAY”
appears in the display.
6
MODE
MENU
S MOD
Pod MENU
VOL
MENU
ENT
BND
LOUD
VOL
MUTE
DVD
CD Operation (Continued)
CD Track Selection:
Press the
button to select a lower track.
Press the
button to select a higher track.
The track number will appear in the display.
Track
Number
DIM
S MOD
iPod MENU
VOL
MENU
ENT
BND
MODE
LOUD
MUTE
VOL
Lower
Frequency
Higher
Frequency
Pausing a CD:
Press the
button to pause the disc, press it
again to resume play.
DM
S MOD
Pod MENU
VOL
MENU
ENT
BND
MODE
LOUD
MUTE
VOL
DVD
MP3 Operation
Power On/Off:
Press the
button to turn the unit on.
Load MP3 Disc into DVD Player:
The unit will automatically switch to the “DVD
PLAY” mode and start playing the MP3 disc.
DM
Selecting the Play Source when the MP3
Disc is Already Loaded:
MODE
S MOD
Pod MENU
VOL
ENT
BND
LOUD
Press the MODE button until “DVD PLAY”
appears in the display.
MENU
MUTE
VOL
MP3 Track Selection:
Press the
button to select a lower track.
Press the
button to select a higher track.
The track number will appear in the display.
Track
Number
DIM
MODE
S MOD
iPod MENU
VOL
MENU
ENT
BND
LOUD
MUTE
VOL
Lower
Track
Higher
Track
7
DVD
MP3 Operation (Continued)
Pausing a Disc:
Press the
button to pause the disc, press it
again to resume play.
S MOD
Pod MENU
VOL
DM
MENU
ENT
BND
MODE
LOUD
MUTE
VOL
DVD
DVD Operation
Power On/Off:
Press the
button to turn the unit on.
Load CD Disc into DVD Player:
The unit will automatically switch to the “DVD
PLAY” mode and start playing the CD.
Selecting the Play Source when the CD is
Already Loaded:
S MOD
Pod MENU
VOL
DM
MENU
ENT
BND
MODE
LOUD
MUTE
VOL
Press the MODE button until “DVD PLAY”
appears in the display.
Playing a DVD:
Press the
button to play the disc.
DIM
MODE
S MOD
iPod MENU
VOL
MENU
ENT
BND
LOUD
MUTE
VOL
Pausing a DVD:
Press the
button to pause the disc, press it
again to resume play.
r
r
DIM
MODE
S MOD
iPod MENU
VOL
ENT
BND
LOUD
VOL
8
MENU
MUT
DVD
DVD Operation (Continued)
DVD Chaper Selection:
Press the
button to select a lower chapter.
Press the
button to select a higher chapter.
The chapter number will appear in the display.
Chapter
Number
DIM
MODE
S MOD
iPod MENU
VOL
MENU
ENT
BND
LOUD
MUTE
VOL
Higher
Chapter
Lower
Chapter
Fast Forward / Fast Reverse Disc Play:
Press and hold the
(fast forward) or
(fast reverse) button during play. Each time the
button is pressed and held, the speed of fast forward/fast reverse changes in the following order:
Chapter
Number
DIM
2X, 4X, 8X, 20X
To resume normal play, press the
button.
MODE
S MOD
iPod MENU
VOL
MENU
ENT
BND
LOUD
MUTE
VOL
Higher
Chapter
Lower
Chapter
DVD Setup Menu:
Press the MENU button to display the DVD Setup
Menu. Use the VOL , VOL ,
or
buttons to
navigate Setup Menu. Make a slection by pressing the ENT BND button.
Note: To access the DVD Setup Menu a DVD disc
has to be inserted.
DM
MODE
S MOD
Pod MENU
VOL
MENU
ENT
BND
LOUD
MUTE
VOL
9
CD
Button Locations and Functions
ST
8
1
DIM
MODE
2
S-MOD
iPod MENU
VOL
MENU
7
6
ENT
BND
LOUD
MUTE
VOL
3
4
5
3
1. Power On/Off and Display Dimmer: Press to turn the unit on or off. Press and hold to dim the display. Press and hold again to restore display’s illumination.
2. Mode Button:
Press to change the play source: Radio, CD and Auxillary Audio Input. Depending on what other input
sources are connected (IPOD, Sirius, USB and CD Changer) these play source will also appear in the
display.
3. Tune/Track Buttons:
Radio Mode: Press either button and the tuner will scan to the next strong station and stop. Then
press and hold either button until “MANUAL” appears in the display then release. Again press either
button until the desired radio station appears in the display.
CD and CD Changer Mode: Press to change the track to a lower or higher track.
4. Enter/Band and Loud Button (ENT BND):
Radio: Press to select AM1, AM2, FM1, FM2 and FM3 radio bands.
Loudness: Press and hold button until “LOUD ON” appears in the display to boost high and low tones
at low volume levels. To deactivate press and hold again until “LOUD OFF” appears in the display.
IPOD Mode: See IPOD Operation Section for more information.
5. Volume Control: Press the
decrease the volume level.
VOL
button to increase the volume level and press the
VOL
button to
6. CD Play/Pause and Mute Button:
CD and CD Changer Mode: Press to pause disc play, press again to resume play.
Radio, Sirius Satellite Radio and AUX Input Modes: Press to mute volume level. Press again to restore.
7. Menu Button:
Sirius Mode: See Sirius Satellite Radio Operation section for more information.
IPOD Mode: See IPOD Operation section for more information.
8. Display Area: This area displays all function information for the radio, DVD/CD player, auxiliary and
IPOD modes.
10
CD
General Operations
Power On/Off:
Press the
button to turn the unit on or off.
ST
S MOD
Pod MENU
VOL
DM
MENU
ENT
BND
MODE
LOUD
MUTE
VOL
Selecting a Play Source:
To select a play source, press the MODE button
until the desired source appears in the display:
ST
AM1, AM2, FM1, FM2 or FM3 (AM and FM Radio),
Note: Radio station call letter may be displayed
instead of the radio band.
SIRIUS (Satellite Radio Input, if connected),
CDP PLAY (CD Player),
USB PLAY (MP3 Player, if connected),
IPOD (IPOD Input, if connected)
CD-CH (CD Changer, if connected),
AUX1 IN (Auxiliary Audio Input, if connected) and
AUX2 IN (Auxiliary Audio Input, if connected)
DM
MODE
S MOD
Pod MENU
VOL
MENU
ENT
BND
LOUD
MUTE
VOL
Dimming the Display:
Press and hold the
button to dim the brightness of the display. Press and hold again to
restore the brightness of display.
ST
DIM
MODE
S MOD
iPod MENU
VOL
MENU
ENT
BND
LOUD
MUTE
VOL
Hold
CD
AM/FM Radio Operation
Power On/Off:
Press the
button to turn the unit on.
ST
Selecting the Play Source:
Press the MODE button until “AM1, AM2, FM1,
FM2 or FM3” appears in the display.
Note: Radio station call letter may be displayed
instead of the radio band.
DIM
MODE
S MOD
iPod MENU
VOL
MENU
ENT
BND
LOUD
MUTE
VOL
11
CD
AM/FM Radio Operation (Continued)
Selecting the AM or FM Band:
Press the ENT BND button repeatedly and select
from FM1, FM2, FM3, AM1 or AM2.
Note: Radio station call letter may be displayed
instead of the radio band.
DIM
S MOD
iPod MENU
VOL
MENU
ENT
BND
MODE
LOUD
MUTE
VOL
Manually Tuning in a Radio Station:
Press and hold either the
or
button until
“MANUAL” appears in the display then release.
Then press the
or
until the desired radio
station appears in the display.
Note: The unit will automatically switch from FM
Mono to FM Stereo when the signal strength
increases to a stereo level. If the stereo signal
should become weak, the unit will switch back to
Mono. FM stereo reception is indicated when the
“ST” appears in the display.
SW
DIM
MODE
S MOD
Pod MENU
VOL
MENU
ENT
BND
LOU
MUTE
VOL
Lower
Frequency
Higher
Frequency
Tuning in a Radio Station Using Seek:
Press and release either the
or
button
and the tuner will scan up to the next strong station and stop seeking and start playing.
DIM
MODE
S MOD
iPod MENU
VOL
MENU
ENT
BND
LOUD
MUTE
VOL
Lower
Frequency
Higher
Frequency
Scanning for FM Radio Stations According
to Program Type (PTY):
1. Press the ENT BND button to select either the
FM1, FM2 or FM3 radio band.
2. Press the MENU button to display the program type.
Program
Type
(PTY)
PTY
DIM
MODE
4. Press the
or
button to search a station
with the selected program type (PTY).
12
MENU
ENT
BND
VOL
3. Press the VOL or
to select the desired program type (PTY). (Example: News,
Information, Sports, etc.)
S MOD
iPod MENU
VOL
LOUD
VOL
MUTE
CD
Sound Controls
Volume:
Increase the volume by pressing the
Decrease the volume by pressing the
VOL
button.
VOL
button.
Increase
S MOD
iPod MENU
VOL
MENU
ENT
BND
MODE
LOUD
MUTE
VOL
Decrease
Loudness:
To boost high and low tones at low volume levels, press and hold the ENT BND button until
“LOUD ON” appears in the display. To deselect,
press and hold the ENT BND button again until
“LOUD OFF” appears in the display.
SW
LO D
DIM
S MOD
iPod MENU
VOL
MENU
ENT
BND
MODE
LOUD
MUTE
VOL
Mute:
Press and release the MUTE button to mute the
volume level. If a CD is playing the MUTE button
will pause the disc. Press the MUTE button again
to restore the volume or resume playing the disc.
SW
DIM
S MOD
iPod MENU
VOL
MENU
ENT
BND
MODE
LOUD
MUTE
VOL
CD
CD Operation
Power On/Off:
Press the
button to turn the unit on.
Load CD Disc into DVD Player:
The unit will automatically switch to the “CDP
PLAY” mode and start playing the CD.
DIM
Selecting the Play Source when the CD is
Already Loaded:
MODE
S MOD
iPod MENU
VOL
MENU
ENT
BND
LOUD
MUTE
VOL
Press the MODE button until “CDP PLAY”
appears in the display.
13
CD
CD Operation (Continued)
CD Track Selection:
Press the
button to select a lower track.
Press the
button to select a higher track.
The track number will appear in the display.
Elapse
Time
Track
Number
DIM
MODE
S MOD
iPod MENU
VOL
MENU
ENT
BND
LOUD
MUTE
VOL
Higher
Track
Lower
Track
Pausing a CD:
Press the
button to pause the disc, press it
again to resume play.
DM
S MOD
Pod MENU
VOL
MENU
ENT
BND
MODE
LOUD
MUTE
VOL
CD
MP3 Operation
Power On/Off:
Press the
button to turn the unit on.
Load MP3 Disc into DVD Player:
The unit will automatically switch to the “CDP
PLAY” mode and start playing the MP3 disc.
DM
Selecting the Play Source when the MP3
Disc is Already Loaded:
MODE
S MOD
Pod MENU
VOL
ENT
BND
LOUD
Press the MODE button until “CDP PLAY”
appears in the display.
MENU
MUTE
VOL
MP3 Track Selection:
Press the
button to select a lower track.
Press the
button to select a higher track.
The track number will appear in the display.
Track
Number
DIM
MODE
S MOD
iPod MENU
VOL
MENU
ENT
BND
LOUD
MUTE
VOL
Lower
Track
14
Higher
Track
CD
MP3 Operation (Continued)
Pausing a Disc:
Press the
button to pause the disc, press it
again to resume play.
S MOD
Pod MENU
VOL
DM
MENU
ENT
BND
MODE
LOUD
MUTE
VOL
CD Changer Operation (Option)
Power On/Off:
Press the
button to turn the unit on.
Load CD’s into Changer:
Insert the CD magazine into the external CD
changer.
DIM
Selecting the Play Source:
Press the MODE button until “CD-CH” appears in
the display.
S MOD
iPod MENU
VOL
MENU
ENT
BND
MODE
LOUD
MUTE
VOL
CD Track Selection:
Press the
button to select a lower track.
Press the
button to select a higher track.
The track number will appear in the display.
Track
Number
DM
MODE
S MOD
Pod MENU
VOL
MENU
ENT
BND
LOUD
MUTE
VOL
Lower
Frequency
Higher
Frequency
CD Disc Selection:
Disc
Number
1. Press the MENU button to and “DISC SEL”
appears in the display.
2. Press the
or
button to selected the
desired disc. The selected disc will appear in
the display.
DIM
MODE
S MOD
iPod MENU
VOL
MENU
ENT
BND
LOUD
MUTE
VOL
Lower
Disc
Higher
Disc
15
CD Changer Operation (Option) (Continued)
Pausing a CD:
Press the
button to pause the disc, press it
again to resume play.
S MOD
iPod MENU
VOL
DIM
MENU
ENT
BND
MODE
LOUD
MUTE
VOL
Sirius Satellite Radio Setup (Option)
Note: If your Sirius tuner is not activated, call 1-888-539-SIRIUS to activate. The Sirius Tuner ID Number
(ESN) is required during the activation process. Following the instructions below to access the Sirius
Tuner ID Number (ESN):
Accessing your Sirius Tuner ID Number (ESN):
1. Press the MODE button until “SIRIUS”
SAT
appears in the display area.
DM
MODE
S MOD
Pod MENU
VOL
MENU
ENT
BND
LOUD
MUTE
VOL
2. Press the MENU button until “DIR” appears in
the display area.
SAT
DIM
MODE
S MOD
Pod MENU
VOL
MENU
ENT
BND
LOUD
MUTE
VOL
3. Press the ENT BND button until “ESN = 00..”
appears in the display area. The ESN number
will scroll across the display.
SAT
DIM
MODE
S MOD
Pod MENU
VOL
ENT
BND
LOUD
VOL
4 Times
4. Press the ENT BND button again to exit.
16
MENU
MUTE
Sirius Satellite Radio Operation (Option)
Please note that satellite radio signal may be blocked by trees, buildings, bridges or tunnels.
Information display during reception:
ANTENNA ERROR: When an antenna issue exists.
ACQUIRING SIGNAL: When a channel is being tuned in (no signal is yet received).
INVALID CHANNEL: A channel without a broadcast has been selected, or the receiver may not be activated.
CALL 888-539-SIRIUS TO SUBSCRIBE: A channel not covered by your contract or the Sirius tuner is not
activated. Call Sirius Service Center 1-888-539-SIRIUS (7474), or visit them online at www.siriusradio.com.
Channel Selection Modes:
Channels are selected by the following methods:
• Manual Tuning: (Use the Manual Tuning method to scan thru the channels)
• Direct Tuning: (Use the Direct Tuning methods when you know the desired channel)
• Category Tuning: (Use the Category Tuning method when you know what category you want to scan
for a channel, feature not available with this controller)
For details, see the following operation descriptions:
Manual Tuning:
Press the
or
button until the desired
channel appears in the display.
SAT
DIM
MODE
SONG TI LE
S MOD
Pod MENU
VOL
MENU
ENT
BND
LOUD
MUTE
VOL
Higher
Channel
Lower
Channel
Direct Tuning:
1. Press the MENU button until “Direct-T”
appears in the display.
SAT
DIM
MODE
S MOD
iPod MENU
VOL
MENU
ENT
BND
LOUD
MUTE
VOL
2. Press the
or
button to select the first
number of the desired channel.
SAT
DM
MODE
S MOD
iPod MENU
VOL
MENU
ENT
BND
LOUD
MUTE
VOL
Lower
Number
Higher
Number
17
Sirius Satellite Radio Operation (Option) (Continued)
3. Press the MENU button to select the next
number of the channel. Use the
or
buttons to select the desired number. Repeat
this procedure for the third number.
SAT
DIM
S MOD
Pod MENU
VOL
MENU
ENT
BND
MODE
LOUD
MUTE
VOL
4. Press the ENT BND button and the channel
will start playing.
SAT
DIM
MODE
S MOD
Pod MENU
VOL
MENU
ENT
BND
LOU
MUTE
VOL
IPOD Operation
General Operations:
1. Press the
button to turn the unit on.
2. Connect an IPOD to the cable attached to the
radio.
3. The unit will automatically switch to the IPOD
mode and start playing.
Note: The IPOD controls will become inoperable
and the radio will now control the IPOD.
DIM
MODE
S MOD
iPod MENU
VOL
MENU
ENT
BND
LOUD
MUTE
VOL
IPOD Button Location and Functions:
1. Menu Button: Same operation as the MENU
button on an IPOD.
2. Next and Previous Button: Press these buttons
to scroll through the menu items, same operation as the IPOD’s Click Wheel.
3. Play/Pause Button ( ): Same operation as
the
button on an IPOD.
4. ENT BND Button: Same operation as the
Center Select button on an IPOD.
18
DIM
MODE
S MOD
iPod MENU
VOL
1
MENU
3
ENT
BND
OUD
UTE
2
VOL
2
4
IPOD Operation (Continued)
Browse for a Song:
1. Press the MENU button and either “PLAYLIST,
ARTIST, ALBUM GENRE, SONGS or COMPOSER” appears in the display.
DM
S MOD
Pod MENU
VOL
MENU
ENT
BND
MODE
LOUD
MUTE
VOL
2. Press the
or
SONGS menu.
button to select the
DM
MODE
S MOD
iPod MENU
VOL
MENU
ENT
BND
LOUD
MUTE
VOL
or
3. Slowly press the ENT BND button twice to
select the SONGS menu.
DIM
MODE
S MOD
iPod MENU
VOL
MENU
ENT
BND
LOUD
MUTE
VOL
4. Press the
button to select the desired
song from the menu. Once the
button has
been used to scrolled into the song list the
button can be used to scroll backwards.
DM
MODE
S MOD
iPod MENU
VOL
MENU
ENT
BND
LOUD
MUTE
VOL
5. Press the ENT BND button to start playing the
selected song.
DIM
MODE
S MOD
Pod MENU
VOL
MENU
ENT
BND
LOUD
MUTE
VOL
19
IPOD Operation (Continued)
Pausing a Track:
Press the
button to pause the track, press it
again to resume play.
DIM
MODE
S MOD
Pod MENU
VOL
MENU
ENT
BND
LOUD
MUTE
VOL
USB Operation
General Operations:
1. Press the
button to turn the unit On.
2. Connect a MP3 player to the USB socket.
3. The unit will automatically switch to the “USB
PLAY” mode and start playing.
Note: The controls on the MP3 player will become
inoperable and the MB Quart sytem will now control the MP3 player.
DIM
MODE
S MOD
iPod MENU
VOL
MENU
ENT
BND
LOUD
MUTE
VOL
Track Selection:
Press the
button to select a lower track.
Press the
button to select a higher track.
The track number will appear in the display.
Track
Number
DM
MODE
S MOD
Pod MENU
VOL
MENU
ENT
BND
LOUD
MUTE
VOL
Higher
Track
Lower
Track
Pausing a Track:
Press the
button to pause the track, press it
again to resume play.
DIM
MODE
S MOD
iPod MENU
VOL
ENT
BND
LOUD
VOL
20
MENU
MUTE
Auxiliary Audio Input Operation
Selecting an Audio Play Source:
1. Press the
button to turn the unit On.
2. Press the MODE button until “AUX1 IN, AUX2
IN, AV IN” appears in the display.
3. Refer to the audio device’s owners manual for
proper operation.
Note: The MB Quart system will not control the
auxiliary source but the sound controls can be
adjusted.
DM
MODE
S MOD
Pod MENU
VOL
MENU
ENT
BND
LOUD
MUTE
VOL
21
Installation
3”
Peel Off Paper
Bolt
Lock Washer
Washer
Mounting
Bracket
Connect to Radio
22
Wing
Nut
Warranty
LIMITED WARRANTY
This warranty will be honored only in U.S.A.
MB Quart offers to the original purchaser a one (1) year warranty period from date of purchase. Except
as specified below, this warranty covers all defects in material and workmanship in this component.
The following are not covered by the warranty:
1. Any product which is not distributed in the U.S.A. by TriStar Distributing or which is not purchased in the U.S.A. from an authorized TriStar Distributing dealer.
2. Any product on which the serial has been defaced, modified or removed,
3. Damage, deterioration or malfunction resulting from:
a. Any shipping damage (claims must be presented to the carrier).
b. Installation or removal of the product.
c. Accident, acts of nature, misuse, abuse, neglect, unauthorized product modification or failure
to follow instructions supplied with the product.
d. Repair or attempted repair by anyone not authorized by TriStar Distributing.
e. Any other cause that does not relate to a product defect.
If within the one-year warranty period your MB Quart marine product should fail, please contact the
dealer where the product was purchased to obtain authorization for warranty service. You must include
a copy of the original dated sales receipt as proof of warranty coverage. All warranty service returns
must be shipped freight prepaid. We will pay the return shipping charges, if repairs are covered by the
warranty and we are shipping within the United States.
After the warranty period if your MB Quart Marine Product ever needs service, please call 1-800-621-2278
and ask for the service department, to determine if the repairs are feasible.
LIMITATION OF IMPLIED WARRANTIES
ALL IMPLIED WARRANTIES, INCLUDING WARRANTIES OF MERCHANTABILITY AND FITNESS FOR A
PARTICULAR PURPOSE, ARE LIMITED IN DURATION TO THE LENGTH OF THIS WARRANTY.
EXCLUSION OF DAMAGES
TriStar Distributing liability for any defective product is limited to the repair or replacement of the product at our discretion. TriStar Distributing shall not be liable for:
1. Installation or removal, damage to other property caused by any defects in components, damages
based upon inconvenience, loss of use of the product; or any other damages, whether incidental,
consequential or otherwise.
2. Some states do not allow limitations on how long an implied warranty lasts and/or do not
allow the exclusion or limitation of incidental or consequential damages, so the above limitations
and exclusions may not apply to you.
This warranty gives you specific rights, and you may have other rights, which may vary from state to
state.
If a problem develops during or after the Limited Warranty Period; or if you have any questions regarding the operation of the product, you should contact TriStar Distributing warranty department.
TriStar Distributing
58263 Charlotte Avenue
Elkhart, Indiana 46517
800-621-2278
23
© Copyright 2008
MB Quart
WM1-CD-UM Rev. A
1-28-08