1
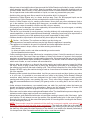
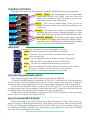
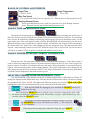
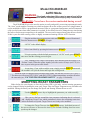
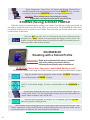
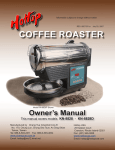
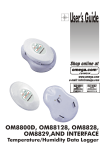
COFFEE
ROASTER
l
Mode
own
2K Sh
28BKN-88
Interim Update
KN-8828B-2K
February 2012
Manufactured by Chang Yue Industrial Corp.®
No. 170, Chung Lun, Chung Sha Tsun, An Ding Shian
Tainan, Taiwan
Tel: 886-6-593-2311 Fax: 886-6-593-4834
Hottop USA
25 Katelan Court
Cranston, Rhode Island 02921
Fax: (401) 946-0268
Email: [email protected]
Email: [email protected]
www.hottop.com.tw
www.hottopusa.com
Information contained herein subject to change without notice
THIS IS NOT A
COMPLETE MANUAL
WARNING!
This device is capable of high temperatures. If used without
due caution it can constitute a safety hazard. The outer
surface will become hot enough to cause very serious burns
and the bean roaster has the potential to ignite flammable
materials on, in, or near the roaster. The Hottop Coffee
Roaster can be operated in such a way as to create a fire
hazard by igniting the beans being roasted and/or the chaff
(a by-product of the roasting process). Always follow the
safety guidelines and usage directions in this manual, and
use common sense to avoid these situations
IF YOU DO NOT HAVE THE
COMPLETE OWNERS MANUAL
Go to
http://www.hottopusa.com
and download the current manual.
Understand, and follow all operating
instructions and safety warnings contained
inthis manual before operation. Always follow
the safety guidelines and heed all warnings
when using the Hottop Coffee Roaster.
2
KN-8828B-2K Interim Update
This update supplement supplies important information concerning
the changes made when the KN-8828B was updated with the new, more
accurate “K” style probe (see page
Identifying a “KN-8828B2K” Hottop Coffee Roaster Model
This Interim supplemental manual is written for the KN-8828B-2K. This
updated version can be easily identified by looking through the roasting chamber Viewing Window. On the rear wall of the roasting chamber, in approximately the three o’clock position, you will see the K-style sensor shown here.
“K” Sensor
Table of Contents
I - Important Safety Precautions ---------------------- 4
II - Model KN-8828B-2K ------------------------------------ 6
Understanding The LCD Display --------------------------------- 6
Storing (Saving) A Roast Profile ------------------------- 10
Roasting with a Stored Profile ---------------------------- 10
Getting the moist from your KN-8828B-2K ----------- 11
Control Functions ------------------------------------------- 7
Messages
-------------------------------------------------- 7
Factory Programmed Safety ----------------------------- 7
Roast Parameter Changes --------------------------------- 7
Range Of Control Adjustments --------------------------- 8
Target Time And Remaining Time ----------------------- 8
Target Temperature And Current Temperature ------ 8
Selecting Temperature Measurement Units ----------- 8
Auto Mode
---------------------------------------------------- 9
Modifying Roast Parameters ------------------------------- 9
All information in this manual is ©2007-2012 Chang Yue Industrial Corp.® and Hottop USA. No portion of
this manual may be reproduced without the expressed written permission of Chang Yue Industrial Corp.®.
3
I - IMPORTANT SAFETY PRECAUTIONS
When using this electrical appliance, these safety precautions must always be followed:
SAVE THESE INSTRUCTIONS in a safe place and REFER TO THEM OFTEN
WARNING: Read and Understand All Instructions, Precautions, Labels
and Warnings BEFORE Using This Coffee Roaster!
Keep these instructions for future reference and be sure anyone
operating the machine reads and understands them before allowing
them to use the Coffee Roaster. Feel free to contact your dealer before
operating this appliance if you have any questions.
• Never leave the Coffee Roaster unattended while in operation!
• Do not bypass, defeat, or remove any safety feature of the Hottop Coffee Roaster.
• The Emergency Eject Knob at the rear of the roaster is designed to be used for emergencies only (see
page 8 for details)
• The outer surface can be VERY hot! Do not touch hot surfaces. When necessary, use oven mitts
for removing or touching any hot parts. Do not reach over or across the Coffee Roaster while it is in
operation. Allow the machine to completely cool before disassembling, moving, or cleaning.
• At the end of the roasting cycle when the beans are ejected into the cooling tray they will be very hot.
Do not touch the beans until the cooling cycle has completed!
• The Coffee Roaster should not be used by children or in the presence of children.
• Use the Coffee Roaster only when fully assembled. Never operate the Hottop Coffee Roaster without
first attaching the heat protection grillwork. Discontinue use if any part becomes damaged, does not fit
properly, or if the machine does not operate properly. Do not attempt to service the machine yourself,
but seek repair or replacement from an authorized service center or your dealer.
• The use of accessory attachments other than those supplied or recommended by the manufacturer
may cause hazards and can void your warranty.
• This appliance is for indoor, household use only. This appliance is not for commercial use.
• To prevent electric shocks, never use water on or near the machine. Do not use where rain or water
can enter the machine. Do not immerse or spray the cord, the plug, or the base with water or other
liquids Other than as specifically described in this manual, do not wash the machine or any part in sink
or dishwasher.
• Arrange the cord so that it cannot be caught or tripped over. Do not allow cord to hang over edge of
table or counter. Keep cord away from all hot surfaces including those of the machine itself.
• Do not place the Coffee Roaster nor its cord on, in, or near a hot gas or electric burner, or in a heated
oven.
• A short power cord has been provided. An extension cord may be used if care is exercised during its
use. Use an extension cord rated at 8 amps or more. The cord should be arranged so it will not drape
over the counter or table top. Do not use an extension cord longer than is absolutely necessary. Always
grab the plug to disconnect the roaster from the wall socket. Never pull on the cord. Disconnect the
power cord when the Coffee Roaster is not in use.
• Use both hands to move the appliance. Never move this appliance when it is in operation. Allow
appliance to cool completely before moving.
• If the electric circuit is overloaded with other appliances, your Coffee Roaster may not operate properly.
This unit should be operated on a separate electrical circuit from other operating appliances.
• To clean the Coffee Roaster follow the included cleaning instructions in this manual. Unplug the unit
and allow it to completely cool before doing any cleaning or disassembly. Do all maintenance and
cleaning chores only when the machine is unplugged and completely cooled off. Refer to Chapter VIII
for more details on “Cleaning and Care”.
4
• Always leave at least eight inches of space around the Coffee Roaster on all sides for proper ventilation
when operating and until it has cooled. Keep the machine away from flammable materials such as
curtains, towels, walls, furniture, or any other materials Place on a heat-resistant surface when in use.
Do not operate near combustible materials or liquids, nor near any pressurized spray cans.
• Avoid touching moving parts. Never reach into the machine while it is plugged in.
• Operate the Coffee Roaster only in a clean, dust-free area. Dust, dirt, and sprayed liquids can be
drawn into the Coffee Roaster and can contaminate the coffee being roasted.
• Use the Coffee Roaster only for roasting coffee beans. Never place any other substances, food or
not, in the machine. Use of anything other than green, un-roasted coffee beans in the Hottop Coffee
Roaster may create a hazardous condition and will void your warranty.
• If the supply cord is damaged, it must be replaced by the manufacturer, its service agent, or similarly
qualified persons in order to avoid a hazard.
• This device is not intended for use by persons (including children) with reduced physical, sensory, or
mental capabilities, or lack of experience and knowledge, unless they have been given supervision or
instruction concerning use of the appliance by a person responsible for their safety.
• Children should be supervised to ensure that they do not play with the appliance.
•
Caution - Hot Surface. The surfaces are liable to get hot during use.
• The temperature of accessible surfaces may be high when the appliance is operating.
• This appliance is intended to be used in household and similar applications such as:
- staff kitchen areas in shops, offices, and other working environments
- farm houses
- by clients in hotels, motels, and other residential type environments
- bed and breakfast environments
• Coffee roasting produces smoke which can be a respiratory irritant. Control the smoke so it does not
enter the structure. Take care if there are children or elderly in the home or if anyone in the home has
respiratory or breathing problems. Avoid breathing the smoke. We recommend that you use the Coffee
Roaster in a place where ample ventilation is available- in the kitchen under an efficient range hood
which vents outside, or near a window with an exhaust fan.
• Always allow the machine to go through the entire roasting and cooling process (except for hitting
the “eject” button to stop a roast early or pulling the emergency eject knob in an emergency). Let
the machine turn itself off after each roasting cycle. This will help extend the life of the Hottop Coffee
Roaster. NEVER unplug the machine during a roast as it can cause a fire hazard and/or shorten the
life of the machine.
• Roasting coffee too dark should be avoided. Just like you can over-cook and burn food on your stove
or in your oven, it is possible to over-roast and burn coffee in the Hottop Coffee Roaster. Although
numerous safety features have been designed into the Hottop Coffee Roaster to safely perform
roasting and cooling cycles, over-roasting can occur. This is more likely to happen when using less
than the recommended amount of beans (250 grams) and/or on a setting that is too hot and/or too
long.
• Under extreme circumstances, over-roasted beans can catch fire, particularly when the beans are
ejected and become exposed to the atmosphere. Always use the indicated amount of beans (250
grams), and always monitor the progress of the roast to prevent over-roasting.
• Extra care must be taken when roasting decaffeinated coffee. The decaffeination process changes the
indicators used to judge roast level and over-roasting can result.
• Always have a spray bottle filled with water on hand when roasting to quench a fire if the beans ignite
upon ejection. Do not attempt to move the machine if the ejected beans ignite. In the case of ignition,
disconnect the machine, use the water-filled spray bottle or fire extinguisher to extinguish the flames,
and call emergency services.
• NOTE: Some models cannot be restarted until the chaff tray is removed, emptied, and replaced. For
all models, empty the chaff tray after every roasted batch. The chaff and coffee bits in the chaff tray
will become very hot during roasting. Chaff can ignite during the roasting process and may smolder in
the chaff tray. Use great care when disposing of the chaff as it can create a fire hazard, particularly if
it is dumped onto other flammable material soon after a roast has concluded.
5
II - Model KN-8828B-2K Color LCD Display
Auto Coffee Roaster with Manual Control
The KN-8828B-2K allows easy roasting of the coffee for new users, yet
supplies complete manual control for those who become advanced in their
roasting knowledge and are looking for a specific taste or roast level. Roast
Profiles can be saved for later use as well. Physically, it is the same as our other
model. The only difference is the user interface of the control panel.
In the Auto mode the user will find that with just three pushes of the START
button the coffee roasting process will begin. In the manual mode, all parameters of the roasting process
can be controlled by the user. These modes and how to operate them are fully described in this chapter.
UNDERSTANDING THE LCD DISPLAY
The first thing that you will notice is the colorful LCD display panel. This is the interface between the
user and the roaster. Let’s begin by understanding what is displayed here. Detailed instructions on how to
use the various functions of the KN-8828B-2K will be found on pages 15 through 17.
NOTE: The display components vary depending on which mode is in use. Only functions that are
currently available will be illuminated.
When first plugging the KN-8828B-2K roaster into an outlet the user is given the choice of whether
to enter “Auto” or “Manual” mode.
TIME
The countdown
timer will eject
the beans if it
reaches 00:00.
Format is mm:ss.
Powers up the machine,
selects modes, and allows
the machine to be stopped.
TEMPERATURE
If the roast reaches
the Target Temperature the beans will be
ejected. Also shows
the actual roasting
chamber temperature.
FAN SPEED
Displays main
exhaust fan
speed. Each bar
represents 25%.
6
HEATING ELEMENT
This displays the level of
power produced by the
heating element. Each
bar represents 10%.
Enters the selected mode
and then begins to roast.
During a roast this will eject the
beans and begin the cooling
mode. During programming
this works as an escape key,
taking you back one step in the
process, abandoning changes
made up to that point.
SELECT
The circular “Select” arrow
cycles through the display
to select which parameter to
adjust or display.
The up and down “Chevrons” are used to
raise and lower values of various
parameters such as time and fan speed.
CONTROL FUNCTIONS
To the right of the display are five buttons that control KN-8828B-2K (buttons do not illuminate).
POWER - START The largest button at the top of the display
controls both “POWER” and “START.” Only one of these two
choices will be illuminated in the LCD display at any given time
so the button is used for this dual function.
EJECT - This is always available during a roast. Use it to immediately stop the roasting process and send the beans into the
cooling tray.
SELECT - The circular arrow is used to cycle through the various
parameters that can be adjusted. Adjustable parameters are Target
Time, Target Temperature, Fan Speed and Heating Element Power.
CHEVRON ARROWS - The arrows are used to change each of the
four parameters. For example, select “Fan Speed” using the SELECT
Arrow then use the CHEVRON arrows to change the fan speed higher
or lower. It works the same for the other three parameters.
MESSAGES
At various times a message will appear in the display to alert you:
CHAF: The chaff tray needs to be emptied before continuing.
Stor - If you choose you may store into non-volatile memory the roast
which just took place
AUTO - The pre-programmed, factory default, automatic roasting mode.
18:00 and 420 F. are the default values for AUTO mode.
COOL - The roaster is cooling itself down before it can proceed.
Ad - These are roasting profile memory locations where you can store profiles
for future use. The three areas are named Ad1, Ad2, and Ad3.
P H - The roaster is preheating in preparation to roast coffee.
FACTORY PROGRAMMED SAFETY
There are three separate safety points programmed into the KN-8828B-2K:
1) If the KN-8828B-2K displays a temperature of 356F (180 C) within the first 8:30 of roasting time,
the unit will alert you with warning beeps. If you do not press a button (other than EJECT) within 20
seconds, the beans will be automatically ejected. Pressing a button continues the roast as programmed.
2) When the KN-8828B-2K displays a temperature of 395 F (or 202 C), the roaster will again alert
you with warning beeps. If you do not press a button (other than EJECT) within 20 seconds, the beans will
be automatically ejected. Pressing a button continues the roast as programmed.
3) When the KN-8828B-2K displays a temperature of 428 F (220 C), the beans will be immediately
ejected. There is no override for this safety function.
ROAST PARAMETER CHANGES
During the roasting process you can change any of these four parameters: Target Time, Target Temperature, Fan Speed, and Heating Element Power. These changes are temporarily memorized by the roaster. This “set” of adjustments and changes is called a “Profile.” When the roast is over and the cooling cycle
has completed, the display will show “Stor.” At this time you may choose to save the Profile so that this
same roast can be repeated again in the future.
7
RANGE OF CONTROL ADJUSTMENTS
Target Time
Target Temperature
10:00 to 25:00
167 to 428 F.
Main Fan Speed
Five speeds. Each of the four bars represent 25%. When no bars are showing the fan is off.
Heating Element Power
Eleven selectable heating levels. Each bar represents 10% of the heating element’s
power. When no bars are selected the heating element is off.
TARGET TIME and REMAINING TIME
During the actual roasting process the time display will countdown the remaining time in the roast. If
the Select arrow is used to choose the time display it becomes encircled (shown to the left). The remaining
time can now be modified by adding or subtracting time using the Chevron up and down arrows. At any
point in the roast, if the time display reaches 00:00 the KN-8828B-2K will automatically eject the beans.
When the display is not encircled (above right) the display will still show the amount of time remaining in
the current roast. The Target Time can be changed at any time during the roast. The total roast time (time
elapsed + time remaining) cannot exceed 25:00. When the Target Time is selected, the Up Chevron arrow
will not be available if 25:00 would be exceeded by the addition of more time.
TARGET TEMPERATURE and CURRENT TEMPERATURE
During the roast, the temperature display can show two different parameters. If the Select arrow is
used to choose the temperature display it becomes encircled (shown to the left). This is the Target Temperature which, if reached, will automatically eject the beans. When the display is not encircled (above
right) it is the current temperature in the roasting chamber. The Target Temperature can be changed at any
time during the roast up to the maximum of 428 F. If the Target Temperature is lowered to the point that it
equals the current temperature the beans will be ejected.
SELECTING TEMPERATURE MEASUREMENT UNITS
The KN-8828B-2K Coffee Roaster can be set to display temperatures in Fahrenheit or Celsius. To
change the displayed units follow these steps. This only needs to be done once unless you desire to change
the standard in the future. NOTE: Throughout the following step-by-step sections, black and yellow
highlighted words refer to the button selections on the control panel of the same name:
8
1
With the KN-8828B-2K unplugged, press and hold the SELECT button (3rd
button from the top).
2
While holding the SELECT button in, plug the power cord into an appropriate outlet. Hold
the button for about three additional seconds. The machine will give a quick double-beep. You
can now release the SELECT button.
3
The display will show the temperature standard. Change it by using
the CHEVRON arrow keys. The choices are either “C” for Celsius or
“F” for Fahrenheit.
4
When the preferred temperature standard is displayed, press EJECT.
Model KN-8828B-2K
AUTO Mode
WARNING: Read and understand this owner’s manual and all the
safety precautions before following these step-by-step instructions!
WARNING: Never leave the roaster unattended during a roast!
The KN-8828B-2K gives the user the option to easily and quickly roast using an automatic mode.
The “Auto” mode supplies a roasting curve that can begin with as few as three presses of a single button. It
can be modified to run for a programmed amount of time or a programed temperature and will automatically eject the beans when either parameter is reached. It also allows time to be changed at any time during
the roast or for the target temperature to be modified. The roast can be stopped at any time the user desires.
If this is your first time roasting coffee we highly recommend starting with the AUTO function.
1
Plug the machine into an appropriate outlet and POWER becomes illuminated.
Press the button next to POWER to begin.
2
“AUTO” is the default display.
3
Select Auto Mode by pressing the button next to START
4
To begin roasting with the default parameters of “AUTO” mode, press START
once more and the roasting process begins.
5
“PH” flashing in the Target Time display area indicates that the roaster is in
“Preheat” mode. When the roaster signals you with a series of beeps (at 167 F.) it is
time to pour in the green coffee beans.
6
At any time, if you wish to end the roast, simply press the EJECT button and
the machine will eject the beans and begin the cooling mode.
While the roast is in progress, there are three safety points. The first may occur at 356 F (180 C).
7 The other two will occur at 395 F (202 C) and 428 F (220 C) if those temperatures are achieved before
the roast ends (see “FACTORY PROGRAMMED SAFETY” on page 14 for details).
MODIFYING ROAST PARAMETERS
Either before the roast begins or after the Pre-Heat (PH) cycle ends, various roasting parameters
can be changed. Before beginning the roast, only Target Time and Target Temperature are available to be
modified. During the Roast you can change Fan Speed and Heating Element Power as well.
1
Use the SELECT Arrow key to highlight the parameter you wish to modify.
2
Here you see the box around the time parameter indicating that it is selected
and displaying Target Time which continuously shows the remaining roast time
before the beans are ejected. Target Time is now ready to be modified.
3
To change the Target Time use the CHEVRON arrows. Individual presses of
the arrows increase or decrease the time by ten seconds. Holding down an arrow
speeds up the changes.
(continued)
9
4
Target Temperature, Target Time, Fan Speed, and Heating Element Power
can all be adjusted at any time during the roast. Use the SELECT arrow to choose
a parameter, then use the CHEVRON arrows to change that parameter.
CAUTION: When adding time or increasing the roasting
temperature, care must be taken not to burn the beans.
STORING (Saving) A ROAST PROFILE
When the roast has completed and the cooling cycle is done, if you like the way the roast turned out
and wish to repeat this roast at any time in the future, you may save it. The KN-8828B-2K offers three,
non-volatile memory areas in which to store Profiles. Each area holds one Profile which can be easily
recalled for use in the future.
1
Select an “Ad’ area (Ad1, Ad2, or Ad3) using the Up or Down Chevron Arrows
and then press “Start” and the roast parameters and changes will be stored. The
Profile is saved in non-volatile memory and will be available to you until you save a
different profile in that memory location.
KN-8828B-2K
Roasting with a Stored Profile
Read and understand this owner’s manual
WARNING: and
all the safety precautions before
following these step-by-step instructions!
WARNING: Never leave the roaster unattended during a roast!
After you have saved a roast using the “STOR” function you can recall that roast and use it again.
1
Plug the machine into an appropriate outlet and the “POWER” illuminates.
Press the button next to POWER to begin.
2
“AUTO” is the default display. To select a stored profile use the CHEVRON arrows...
3
...and navigate through the choices to select the desired stored Profile. There are
a total of four choices- AUTO, and the three memory areas where the Profiles are
stored. These are named: Ad1, Ad2 & Ad3.
4
When the stored program you wish to use is displayed, press the START
button to begin the roasting process.
The remainder of the roasting process is the same as previously described above in the “Auto
5 Mode” instructions. If the selected Profile is modified during the roast, the new Profile can be
saved in the same or a different “Ad” area when the roast concludes.
10
Getting the Most From Your KN-8828B-2K
The KN-8828B-2K allows the user to adjust the power of the heating element as well as the speed of
the fan throughout the roast. This section is designed to show you how to use this control to more precisely
tailor the roast. The information contained in this section will also interest the users of the KN-8828P-2K.
Over the years, roasting theories concerning profiles have changed. A lot of that has been driven by
the amount of control the user has over the appliance they are using. Up to this point there have been few
home roasting devices that allow the user to control the roaster precisely. The KN-8828B-2K changes that.
During the roasting process the coffee undergoes a number of dramatic changes, and if the user pays
close attention, these changes will act as indicators and allow you to more-precisely control the roast. The
beans go through a number of color changes (see page 13), and even changes in their size. Chemically,
certain elements in the bean are changed, and at one point near the end of the roast the beans are actually
creating heat energy! As you become more familiar with those changes you will be able to predict what
you need to do. As with all electrical heating devices, there is a bit of lag time between making a change
in the heating level and the actual change in the environmental temperature, and the knowledge presented
here will help you predict when to make changes using the control panel of the KN-8828B-2K.
Refer to the following graph and read along, Highlighted red numbers in text “(1)” refer to the black
highlighted numbers in this graph:
11
6
15
12
16
7
3
1
5
2
4
8
9
14
10
13
This RED line data was taken from the LED display on the KN-8828B-2K. That is the temperature
which you will refer to when roasting. The other temperatures are from an after-market digital thermometer
added to our KN-8828B-2K test unit for the purpose of gathering the information for this graph. The BLUE
line is bean temperature from a probe in the bean mass itself, and the GREEN line is a thermo-sensor in
the hot air, in the drum, near the top of the roasting chamber. “Time” started when the beans were added
to the roaster. Note that all times and temperatures are for general reference only. Your results will vary
depending on various factors such as bean moisture level, air temperature, voltage supplied to the roaster,
amount of beans being roasted, condition of main filter, etc.
11
The roast used for the graph was done by programming the KN-8828B-2K for maximum time (25:00)
and maximum temperature (428 F.). Using these parameters, start the roast as instructed on page 17. Many
users have experimented with the temperature at which they add the beans to the roaster. In this roast the
beans were dropped in at an the “Beep” signal at a temperature of approximately 167 F. on the display
(1), as the red line indicates. You might try waiting until the display shows 200 to 225 F. and see how that
works for you. The amount of beans used also will affect the roast. To begin with we recommend using
250 grams. You may experiment later with 225 to 235 grams to see how this affects the roast, and most
importantly, the flavor. Smaller amounts of beans will speed the roast.
Remember that coffee is a food product.
The most important factor is
HOW THE COFFEE TASTES TO YOU!!
After you add the beans to the roaster they begin to absorb heat energy, transferred to them by convection (exposure to the hot air), conduction (through the hot metal of the drum), and to a lesser degree
radiation (radiant energy from the heating element).
When the roaster hits about 200F., turn the fan to 25% or 50% (2) for thirty seconds to one minute.
This will help clear moisture out of the roaster that comes from the beans. When the display temperature
reaches around 280 F. (3) the beans are about to enter the important drying phase. Watch through the
observation window on the front of the roaster and you will see the beans begin to change to a green color
as shown on page 13. Moisture in the beans is being removed and you might begin to notice a pleasant,
grassy smell somewhat reminiscent of a freshly mown lawn.
At this time it is important to allow the beans to lose their moisture throughout their structure. This
insures that the entire bean roasts evenly as the temperature rises later in the roast. Rushing through the
drying phase may roast the outer areas of the beans sufficiently, and the beans can look fine, but the inner
portions on the bean can be left at a lesser roast level causing unpleasant tastes in the cup.
To control the drying phase, at around 259F. set the fan to 25% (4) and at around 280 F., turn the heating element to about 70 or 80% (5). Once again, the fan will help clear humidity from the roaster which is
coming from the moisture inside the beans. The goal here is slow the increase in temperature in the roaster
until it reaches around 300F. which marks the end of this phase. This allows the temperature of the inside
of the beans to “catch up” with the temperature of the outer surface.
Note that when the heating element was turned down (5), it took some time for the temperature in
the roasting chamber to react to that event (6). As mentioned earlier in this section, this is normal for an
electrical heating element. Learning how to predict this is part of the learning process and being aware of
this will help you get the most out of your KN-8828B-2K when roasting manually.
Keep in mind that while attempting to control the temperature it is better to allow it to rise slowly
than to drop. If the temperature in the beans is allowed to drop during the roast it can lead to undesirable
results. Keeping the display temperature rising slowly during the drying phase will assure that the beans
are safe. As you get more experienced in use of the controls of the KN-8828B-2K you will be able to more
precisely control the temperature.
All this time you should keep an eye on the beans. They will go from light green to an amazing bright
green color. This marks the height of the drying phase. The bright green will begin to fade and they will
begin to turn tan in color. Around the time that the green color is beginning to fade it indicates that the
beans themselves are in the vicinity of 300 F. (7). This is the time to turn the heating element up to 100%
again (8). Shortly after that the smoke will increase and it is time to turn up the fan (9). Over the next four
minutes or so the temperature of the beans will continue to rise and the tan color begins to darken towards
cinnamon and brown. Watch carefully. At an indicated display temperature of around 360 F., the display
temperature will be showing the bean temperature as their temperature plots cross. This is a time when
things are happening quickly.
At around 370-375 F. an adjustment should be made. To keep the beans from going through the end of
the roast too quickly, it is time to turn the heating element down (10). Notice that even though the graph’s
green line (environmental temperature), begins to level off (11), the bean temperature is still rising (12)!
12
Just as you are entering first crack there is a chemical reaction going on in the beans called the Maillard
Reaction. Chemical changes in the beans are actually creating heat- the beans are becoming exothermic.
The sounds of first crack begins with a sound reminiscent of breaking small wooden sticks. It begins with
a few clicks and then increases in frequency. As first crack becomes more active, the heating element
should have already been turned down to around 50% (13). Depending on how things are going you may
need to turn the fan up as well (14).
Another change you will notice is that the beans are expanding. That is where the sounds of first crack
come from. You will observe that the level of the beans in the roasting chamber has risen against the glass.
They expand so much that they emit that distinct cracking sound.
The roast is nearing completion, and you are just minutes away from ejecting the beans. First Crack is
about to end at about an indicated 400 F. If you have done well up to this point, from the end of first crack
to the beginning of second crack you should have a pause of about two minutes (15). The exact length
of time does not have to be precise, but if you get about 1:30 to 2:00 minutes lull time between those two
periods you are doing a pretty good job.
As you can see, this roast progressed a little too quickly and the heating element should have been
turned down a little earlier and down to about 30% by the 13:30 time mark. This example is offered because it is important for you to realize that you shouldn’t hesitate to make adjustments other than those
specifically described in this section. The goal of this section is only to give you a better understanding of
what is happening so you can learn to control the process. Much like trying to write an article on how to
fry an egg, it is easy to tell someone to raise the pan to control the temperature of the pan as well as what
to watch for, but difficult to tell them exactly how high to raise the pan on the burner— knowing that takes
experience.
Notice again that even though you have turned the heating element’s power down to half, the temperature continues to rise. Listening carefully and you will begin to hear the first few clicks of second
crack. These sound like breaking toothpicks (16). It will start just like first crack, with a few stray clicks,
and then turn to a rapid series of those same sounds. If the number of these clicks per minute decreases
be wary! This is the time when coffee is becoming so dark that it can lose a lot of its flavor. When the
beans look oily or greasy, five seconds is a long time in the life of a roasting coffee bean. Even though the
graph line of the display temperature is now beginning to flatten, the bean temperature continues to rise
as second crack progresses.
This is the time you need to decide when to hit the eject button to end the roast. But when? There is no
one answer. When to end the roast depends on the coffee you are roasting and how it will be brewed, and
most importantly, your preferred taste. For Colombian coffee brewed as drip, I would recommend trying
a lighter roast than you may be accustomed to. Maybe hit eject just before second crack begins, or maybe
even predict second and eject the beans a minute before second crack starts. For an espresso blend, try
ejecting about ten seconds after second crack becomes active.
Over time, if you experiment with various roast levels you will be surprised at how the taste changes
depending on the various changes you make during the roast. Experiment! Don’t be afraid to try some
lighter roasted coffee. Try to vary the drying time. Try shorter or longer time periods between first and
second. Each of these changes will change the taste of the coffee- sometimes for the better, sometimes
not.
Be aware that as a general rule, the lighter the roast, the more the coffee benefits from a post-roast
rest period before first use. Some coffees actually benefit from a ten day rest, but about two to four days is
usually sufficient for most coffee.
Roasting coffee is part science and part art. We hope this section gave you a better understanding so
that , over time, you can use this scientific knowledge to become a coffee roasting artist.
13
Hottop Coffee Roaster
Owner’s Manual
INTERIM UPDATE
KN-8828B-2K
Manufactured by Chang Yue Industrial Corp.®
No. 170, Chung Lun, Chung Sha Tsun, An Ding Shian
Tainan, Taiwan
Tel: 886-6-593-2311 Fax: 886-6-593-4834
Hottop USA
25 Katelan Court
Cranston, Rhode Island 02921
Fax: (401) 946-0268
Email: [email protected]
Email: [email protected]
www.hottop.com.tw
14
www.hottopusa.com