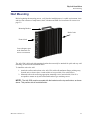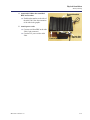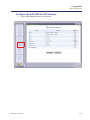
1
Adit 3500
USER MANUAL
Part Number: 770-0157 BA
Product Release: 1.6
September 2007
Copyright 2007 Carrier Access Corporation. All rights reserved.
The information presented in this manual is subject to change without notice and does not represent a commitment on the
part of Carrier Access Corporation. The hardware and software described herein are furnished under a license or nondisclosure agreement. The hardware, software, and manual may be used or copied only in accordance with the terms of this
agreement. It is against the law to reproduce, transmit, transcribe, store in a retrieval system, or translate into any medium
- electronic, mechanical, magnetic, optical, chemical, manual, or otherwise - any part of this manual or software supplied
with the Adit 3500 for any purpose other than the purchaser’s personal use without the express written permission of
Carrier Access Corporation.
The Carrier Access logo and Adit are registered trademarks of Carrier Access Corporation. All other brand or product
names are trademarks or registration trademarks of their respective companies or organizations.
Contact Information:
Carrier Access Corporation
5395 Pearl Parkway
Boulder, CO 80301-2490
Corporate Phone: (303) 442-5455
Fax: (303) 443-5908
www.carrieraccess.com
Customer Support Direct: (800) 786-9929
E-mail: [email protected]
PREFACE
Preface
Compliance
Safety of Information Technology Equipment
The Adit 3500 is safety certified by Underwriters Laboratories and is compliant with the following
safety standards for information technology equipment:
UL 60950-1
CSA 60950-1
FCC Requirements, Part 15
This device complies with Part 15 of the FCC Rules. Operation is subject to the following two
conditions:
This device may not cause harmful interference, and
This device must accept any interference received, including interference that may cause undesired operation
This equipment has been tested and found to comply with the limits for a Class A digital device
pursuant to Part 15 of the Federal Communications Rules. These limits are designed to provide
reasonable protection against harmful interference when equipment is operated in a commercial
environment. This equipment generates, uses, and can radiate radio frequency energy, and if not
installed and used in accordance with the instruction manual may cause harmful interference to
radio communications. Operation of this equipment in a residential area is likely to cause harmful
interference, in which case the user will be required to correct the interference at the user’s own
expense.
Preface
Compliance
FCC Requirements, Part 68
This equipment complies with Part 68 of the FCC rules and the requirements adopted by the ACTA.
On the rear panel of this equipment is a label that contains, among other information, a product
identifier in the format US:AAAEQ##TXXXX. If requested, this number must be provided to the
telephone company.
FCC Registration Number:
Service Center in the USA:
US: 2Z6ISNAN354126
Carrier Access Corporation
5395 Pearl Parkway
Boulder, CO 80301-2490
The Facility Interface Code (FIC) associated with each private line application represents the type
of service that will be provided by the telephone company. The following are currently registered:
Port:
T1 1.544Mbps
T1 1.544Mbps
T1 1.544Mbps
T1 1.544Mbps
FIC:
04DU9-BN
04DU9-DN
04DU9-1KN
04DU9-1SN
SOC:
6.0N
6.0N
6.0N
6.0N
Jack:
RJ48C
RJ48C
RJ48C
RJ48C
Plug and Jack Statement
A plug and jack used to connect this equipment to the premises wiring and telephone network must
comply with the applicable FCC Part 68 rules and requirements adopted by the ACTA. A compliant
telephone cord and modular plug is provided with this product. It is designed to be connected to a
compatible modular jack that is also compliant. See installation instructions for details.
Ringer Equivalence Number (REN)
The assignment of a Ringer Equivalence Number (REN) is not applicable for this device.
If the Adit 3500 causes harm to the telephone network, the telephone company will notify you in
advance. If advance notice proves impractical, the telephone company will notify the customer as
soon as possible. Also, you will be advised of your right to file a complaint with the FCC if you
believe such action is necessary.
The telephone company may make changes in its facilities, equipment operations, or procedures
that could affect the operation of the Adit 3500. If this occurs, the telephone company will provide
advance notice so that you may make necessary modifications to maintain uninterrupted service.
If you experience trouble with the Adit 3500, please first contact the distributor or dealer from
which you purchased the product and then, as a second point of contact, contact Carrier Access
Corporation for repair and/or warranty information.
If the trouble is causing harm to the telephone network, the telephone company may request that
you remove the Adit 3500 from the network until the problem is resolved. User repairs must not be
made. Doing so will void the warranty.
Do not install the Adit 3500 on public coin service provided by the telephone company. Connection
to Party Line service is subject to state tariffs. (Contact your state public utilities commission for
further information.)
To minimize damage caused by local lightning strikes and other electrical surges, it is
recommended that the customer install an AC surge arrestor in the AC outlet to which the Adit 3500
is connected.
iv
Adit 3500 - Release 1.6
Preface
Compliance
Industry Canada ICES-003
English
This class A digital apparatus complies with Canadian ICES-003.
French
Cet appareil numérique de la classe A est conforme à la norme NMB-003 du Canada.
Industry Canada CS-03
Registration Number: IC: 2638A-354126
This equipment meets the applicable Industry Canada Terminal Equipment Technical
Specifications. This is confirmed by the registration number. The abbreviation, IC, before the
registration number signifies that registration was performed based on a Declaration of Conformity
indicating that Industry Canada technical specifications were met. It does not imply that Industry
Canada approved the equipment.
The assignment of a Ringer Equivalence Number (REN) is not applicable for this device.
Before installing this equipment, users should ensure that it is permissible to be connected to the
facilities of the local telephone company. The equipment must also be installed using an acceptable
method of connection. The customer should be aware that compliance with the above conditions
may not prevent degradation of service in some situations.
Repairs to certified equipment should be coordinated by a representative designated by the supplier.
Any repairs or alternations made by the user to this equipment, or equipment malfunctions, may
give the telecommunications company cause to request the user to disconnect the equipment.
Users should ensure for their own protection that the electrical ground connections of the power
utility, telephone lines and internal metallic water pipe system, if present, are connected together.
This precaution may be particularly important in rural areas.
CAUTION! USERS SHOULD NOT ATTEMPT TO MAKE SUCH CONNECTIONS THEMSELVES, BUT
SHOULD CONTACT THE APPROPRIATE ELECTRIC INSPECTION AUTHORITY, OR ELECTRICIAN, AS
APPROPRIATE.
Adit 3500 - Release 1.6
v
Preface
Safety Information
Safety Information
CAUTION! ALWAYS USE CAUTION WHEN INSTALLING TELEPHONE LINES. READ THE CAUTIONS
BELOW FOR DETAILS ON SAFETY GUIDELINES TO PREVENT INJURY.
Never touch uninsulated telephone wires and terminals unless the telephone line has been
disconnected at the Network Interface (NI) as voltage potentials as high as 300 VAC may be
present across the transmit and receive pairs.
Only use No. 26 AWG or larger telecommunication line cord, to reduce the risk of fire.
Never install telephone wiring during a lightning storm.
Never install telephone jacks in wet locations unless the jack is specifically designed for wet
locations.
Refer to the installation section of this manual for a safe and proper installation procedure. All
wiring external to this equipment should follow the current provision of the National Electrical
Code.
Notices
This manual contains important information and warnings that must be followed to ensure safe
operation of the equipment.
DANGER! A DANGER NOTICE INDICATES THE PRESENCE OF A HAZARD THAT CAN OR WILL
CAUSE DEATH OR SEVERE PERSONAL INJURY IF THE HAZARD IS NOT AVOIDED.
CAUTION! A CAUTION NOTICE INDICATES THE POSSIBILITY OF INTERRUPTING NETWORK
SERVICE IF THE HAZARD IS NOT AVOIDED.
WARNING! A WARNING NOTICE INDICATES THE POSSIBILITY OF EQUIPMENT DAMAGE IF THE
HAZARD IS NOT AVOIDED.
NOTE: A Note indicates information to help you understand how to perform a procedure or how the
system works. Notes should be read before performing the required action.
vi
Adit 3500 - Release 1.6
Preface
Electrostatic Discharge (ESD) Precautions
Electrostatic Discharge (ESD) Precautions
ESD can damage processors, circuit cards, and other electronic components. Always observe the
following precautions before installing a system component.
1. Do not remove a component from its protective packaging until ready to install.
2. Wear a wrist grounding strap and attach it to a metal part of the system unit before handling
components. If a wrist strap is not available, maintain contact with the system unit throughout
any procedure requiring ESD protection.
WARNING! INTEGRATED CIRCUITS (ICS) ARE EXTREMELY SUSCEPTIBLE TO ELECTROSTATIC
DISCHARGE. UNLESS YOU ARE A QUALIFIED SERVICE TECHNICIAN WHO USES TOOLS AND
TECHNIQUES THAT CONFORM TO ACCEPTED INDUSTRY PRACTICES, DO NOT HANDLE ICS.
The ESD warning label appears on packages and storage bags that contain static-sensitive products and
components.
Adit 3500 - Release 1.6
vii
Preface
Warranty
Warranty
Carrier Access warrants to BUYER that Product Hardware will be free from substantial defect in
material and workmanship under normal use in accordance with its Documentation and given
proper installation and maintenance for period of five years from the date of shipment by Carrier
Access.
Carrier Access warrants that the Licensed Software, when used as permitted under its License
Terms and in accordance with the instructions and configurations described in the Documentation
(including use on Carrier Access product or a computer hardware and operating system platform
supported by Carrier Access), will operate substantially as described in the Documentation for a
period of ninety (90) days after date of shipment of the Licensed Software to BUYER.
This warranty shall not apply to Products or Software that have been either resold or transferred
from BUYER to any other party. Any such transfer voids the above warranty and related licenses.
Carrier Access offers expanded product care beyond what is covered by the warranty through
different support plans. The plans are designed to maximize network availability through advance
replacement for defective equipment. Please contact your Carrier Access representative for support
program details.
Warranty Procedure
BUYER must promptly notify Carrier Access of any defect in the Product or Software and comply
with Carrier Access' return/repair policy and procedures. Carrier Access or its agent will have the
right to inspect the Product or workmanship on BUYER's premises. With respect to a warranty
defect in Product hardware reported to Carrier Access by BUYER during the warranty period,
Carrier Access, as its sole obligation and BUYER's exclusive remedy for any breach of warranty,
will use commercially reasonable efforts, at its option, to:
a. repair, replace, or service at its factory or on the BUYER's premises the Product, or component therein,
or workmanship found to be defective so that the Product hardware operates substantially in accordance
with Carrier Access Documentation, or
b. credit BUYER for the Product in accordance with Carrier Access's depreciation policy.
With respect to a warranty defect in the Licensed Software reported to Carrier Access by BUYER
during the 90-day software warranty period, Carrier Access, at its own expense and as its sole
obligation and BUYER's exclusive remedy for any breach of the software warranty, will use
commercially reasonable efforts to, at its option,
a. correct any reproducible error in the Licensed Software, or
b. replace the defective Licensed Software, as follows:
Should a Severity 1 or 2 warranty defect with the Software occur during the 90-day warranty period,
Carrier Access will provide, in its sole determination, either
1. software to resolve the defect to be downloaded into the affected units by the BUYER, or
2. a documented workaround to address the issue.
Severity 1 issues are failures of the Licensed Software to comply with the Carrier Access software specifications and
that completely or severely affect the Carrier Access Product and its traffic or service capacity, or maintenance or
monitoring capabilities.
Severity 2 issues are failures of the Licensed Software to comply with the Carrier Access software specifications and
that result in a major degradation of the Carrier Access Product so as to impact its system or service performance, or
significant impairments to network operator control or effectiveness. Should a Severity 3 warranty defect with the
Licensed Software occur during the 90-day warranty period, Carrier Access will provide assistance to Buyer to
determine if a solution or workaround will be provided in a subsequent software release following the reported issue.
viii
Adit 3500 - Release 1.6
Preface
Warranty
Severity 3 issues are defined as failures of the Licensed Software to comply with the Carrier Access software
specifications but that do not significantly impair the function or service of the Carrier Access Product or the system.
Determination of Severity 1, 2 or 3 shall be made solely by Carrier Access following receipt of the reported problem.
Refurbished material may be used to repair or replace the Product. BUYER shall bear the risk of loss for Products
or Software returned to Carrier Access for repair, replacement, or service, and the same must be shipped pre-paid by
BUYER.
Requests for warranty services and troubleshooting must be made to, and will be provided by, the
Carrier Access Customer Support Center via telephone during the warranty period and during
normal business hours. Normal business hours for Carrier Access Customer Support Center are
7:00 a.m. to 6:00 p.m. Mountain Standard Time, Monday through Friday, excluding weekends and
standard Carrier Access recognized holidays.
Limitation of Warranty & Limitation of Remedies
Correction of defects by repair, replacement, or service will be at Carrier Access's option and
constitute Carrier Access' sole obligation and BUYER's sole and exclusive remedy under the
limited warranty. Any such error correction or replacement provided to BUYER does not extend
the original warranty period for hardware or software, respectively.
Carrier Access assumes no warranty or other liability with respect to defects in the Product or
Software caused by:
a. modification, repair, storage, installation, operation, or maintenance of the Product or Software by
anyone other than Carrier Access or its agent, or as authorized and in accordance with the Carrier
Access Documentation, or
b. the negligent, unlawful or other improper use or storage of the Product or Software, including its use
with incompatible equipment or software; or
c. fire, explosion, power failures, acts of God, or any other cause beyond Carrier Access' reasonable
control, or
d. handling or transportation after title of the Product passes to BUYER.
Other manufacturer's equipment or software purchased by Carrier Access and resold to BUYER
will be limited to that manufacturer's warranty. Carrier Access assumes no warranty liability for
other manufacturer's equipment or software furnished by BUYER.
BUYER UNDERSTANDS AND AGREES AS FOLLOWS: Except for the limited warranty set
forth above, the Product, License Software and all services performed by Carrier Access hereunder
are provided “as is”, without representations or warranties of any kind. Carrier Access does not
warrant that the Product, License Software, any hardware or software, or any update, upgrade, fix
or workaround furnished to BUYER will meet BUYER's requirements, that the operation thereof,
including any maintenance or major releases thereto will be uninterrupted or error-free.
THE WARRANTIES IN THIS AGREEMENT REPLACE ALL OTHER WARRANTIES,
EXPRESSED OR IMPLIED, AND ALL OTHER OBLIGATIONS OR LIABILITIES OF
CARRIER ACCESS, INCLUDING ANY WARRANTIES OF MERCHANTABILITY, FITNESS
FOR A PARTICULAR PURPOSE, NONINFRINGEMENT AND/OR ANY IMPLIED
WARRANTIES ARISING OUT OF COURSE OF PERFORMANCE OR COURSE OF
DEALING. ALL OTHER WARRANTIES ARE DISCLAIMED AND EXCLUDED BY
CARRIER ACCESS.
Adit 3500 - Release 1.6
ix
Preface
Warranty
THE REMEDIES CONTAINED IN THIS AGREEMENT WILL BE THE SOLE AND
EXCLUSIVE REMEDIES WHETHER IN CONTRACT, TORT, OR OTHERWISE, AND
CARRIER ACCESS WILL NOT BE LIABLE FOR INJURIES OR DAMAGES TO PERSONS
OR PROPERTY RESULTING FROM ANY CAUSE WHATSOEVER, WITH THE EXCEPTION
OF INJURIES OR DAMAGES CAUSED BY THE GROSS NEGLIGENCE OF CARRIER
ACCESS. THIS LIMITATION APPLIES TO ALL SERVICES, SOFTWARE, AND PRODUCTS
DURING AND AFTER THE WARRANTY PERIOD. IN NO EVENT WILL CARRIER ACCESS
BE LIABLE FOR ANY SPECIAL, INCIDENTAL, OR CONSEQUENTIAL DAMAGES, LOSS
OF DATA, OR COMMERCIAL LOSSES EVEN IF CARRIER ACCESS HAS BEEN ADVISED
THEREOF.
No agent, BUYER, or representative is authorized to make any warranties on behalf of Carrier
Access or to assume for Carrier Access any other liability in connection with any of Carrier Access's
Products, software, or services.
The foregoing summarizes Carrier Access' entire product and software warranties, which are
subject to change without notice.
Warranty Product Returns
Before returning any equipment to Carrier Access Corporation, first contact the distributor or dealer
from which you purchased the product.
A Return Material Authorization (RMA) number is required for all equipment returned to Carrier
Access Corporation. Call Carrier Access Corporation Customer Support at (800) 786-9929 or
(303) 442-5455 for RMA number, repair/warranty information and shipping instructions. Be
prepared to provide the following information:
Carrier Access Corporation serial number(s) from the system chassis or circuit card(s)
Name of distributor or dealer from which you purchased the product
Description of defect
x
Adit 3500 - Release 1.6
TABLE OF CONTENTS
Table of Contents
Preface
Compliance . . . . . . . . . . . . . . . . . . . . . . . . . . . . . . . . . . . . . . . . . . . . . . . . . . . . . . . . . . . . . . . . . . . iii
Safety of Information Technology Equipment . . . . . . . . . . . . . . . . . . . . . . . . . . . . . . . . . . . . iii
FCC Requirements, Part 15 . . . . . . . . . . . . . . . . . . . . . . . . . . . . . . . . . . . . . . . . . . . . . . . . . . . iii
FCC Requirements, Part 68 . . . . . . . . . . . . . . . . . . . . . . . . . . . . . . . . . . . . . . . . . . . . . . . . . . . iv
Industry Canada ICES-003 . . . . . . . . . . . . . . . . . . . . . . . . . . . . . . . . . . . . . . . . . . . . . . . . . . . .v
Industry Canada CS-03 . . . . . . . . . . . . . . . . . . . . . . . . . . . . . . . . . . . . . . . . . . . . . . . . . . . . . . .v
Safety Information . . . . . . . . . . . . . . . . . . . . . . . . . . . . . . . . . . . . . . . . . . . . . . . . . . . . . . . . . . . . . vi
Notices . . . . . . . . . . . . . . . . . . . . . . . . . . . . . . . . . . . . . . . . . . . . . . . . . . . . . . . . . . . . . . . . . . . . . . vi
Electrostatic Discharge (ESD) Precautions . . . . . . . . . . . . . . . . . . . . . . . . . . . . . . . . . . . . . . . . . . .vii
Warranty . . . . . . . . . . . . . . . . . . . . . . . . . . . . . . . . . . . . . . . . . . . . . . . . . . . . . . . . . . . . . . . . . . . . viii
Warranty Procedure . . . . . . . . . . . . . . . . . . . . . . . . . . . . . . . . . . . . . . . . . . . . . . . . . . . . . . . . viii
Limitation of Warranty & Limitation of Remedies . . . . . . . . . . . . . . . . . . . . . . . . . . . . . . . . . ix
Warranty Product Returns . . . . . . . . . . . . . . . . . . . . . . . . . . . . . . . . . . . . . . . . . . . . . . . . . . . . .x
1
Adit 3500 Base Platform
Overview . . . . . . . . . . . . . . . . . . . . . . . . . . . . . . . . . . . . . . . . . . . . . . . . . . . . . . . . . . . . . . . . . . . . 1-2
Converged IP Services without Sacrificing Performance. . . . . . . . . . . . . . . . . . . . . . . . . . . . 1-2
Carrier-Grade VoIP Service Delivery. . . . . . . . . . . . . . . . . . . . . . . . . . . . . . . . . . . . . . . . . . . 1-3
Simplified Configuration and Management . . . . . . . . . . . . . . . . . . . . . . . . . . . . . . . . . . . . . . 1-3
Key Benefits . . . . . . . . . . . . . . . . . . . . . . . . . . . . . . . . . . . . . . . . . . . . . . . . . . . . . . . . . . . . . . 1-3
Application Drawing . . . . . . . . . . . . . . . . . . . . . . . . . . . . . . . . . . . . . . . . . . . . . . . . . . . . . . . . . . . 1-4
Technical Specifications . . . . . . . . . . . . . . . . . . . . . . . . . . . . . . . . . . . . . . . . . . . . . . . . . . . . . . . . 1-5
Components . . . . . . . . . . . . . . . . . . . . . . . . . . . . . . . . . . . . . . . . . . . . . . . . . . . . . . . . . . . . . . 1-5
Interfaces. . . . . . . . . . . . . . . . . . . . . . . . . . . . . . . . . . . . . . . . . . . . . . . . . . . . . . . . . . . . . . . . . 1-5
Network Standards . . . . . . . . . . . . . . . . . . . . . . . . . . . . . . . . . . . . . . . . . . . . . . . . . . . . . . . . . 1-5
Voice Signaling (4 FXS Option) . . . . . . . . . . . . . . . . . . . . . . . . . . . . . . . . . . . . . . . . . . . . . . 1-5
Voice Processing and Mediation . . . . . . . . . . . . . . . . . . . . . . . . . . . . . . . . . . . . . . . . . . . . . . 1-6
Dial Plan Features . . . . . . . . . . . . . . . . . . . . . . . . . . . . . . . . . . . . . . . . . . . . . . . . . . . . . . . . . . 1-6
Routing and Policy Management . . . . . . . . . . . . . . . . . . . . . . . . . . . . . . . . . . . . . . . . . . . . . . 1-6
VPN . . . . . . . . . . . . . . . . . . . . . . . . . . . . . . . . . . . . . . . . . . . . . . . . . . . . . . . . . . . . . . . . . . . . 1-7
Router Performance . . . . . . . . . . . . . . . . . . . . . . . . . . . . . . . . . . . . . . . . . . . . . . . . . . . . . . . . 1-7
Quality of Service . . . . . . . . . . . . . . . . . . . . . . . . . . . . . . . . . . . . . . . . . . . . . . . . . . . . . . . . . . 1-7
Firewall Features. . . . . . . . . . . . . . . . . . . . . . . . . . . . . . . . . . . . . . . . . . . . . . . . . . . . . . . . . . . 1-7
Management . . . . . . . . . . . . . . . . . . . . . . . . . . . . . . . . . . . . . . . . . . . . . . . . . . . . . . . . . . . . . . 1-7
Power . . . . . . . . . . . . . . . . . . . . . . . . . . . . . . . . . . . . . . . . . . . . . . . . . . . . . . . . . . . . . . . . . . . 1-7
Regulatory Approvals . . . . . . . . . . . . . . . . . . . . . . . . . . . . . . . . . . . . . . . . . . . . . . . . . . . . . . . 1-8
Physical Information. . . . . . . . . . . . . . . . . . . . . . . . . . . . . . . . . . . . . . . . . . . . . . . . . . . . . . . . 1-8
Environment . . . . . . . . . . . . . . . . . . . . . . . . . . . . . . . . . . . . . . . . . . . . . . . . . . . . . . . . . . . . . . 1-8
Chassis . . . . . . . . . . . . . . . . . . . . . . . . . . . . . . . . . . . . . . . . . . . . . . . . . . . . . . . . . . . . . . . . . . . . . . 1-9
Table of Contents
2
Physical Installation
Unpacking and Inspection. . . . . . . . . . . . . . . . . . . . . . . . . . . . . . . . . . . . . . . . . . . . . . . . . . . . . . . 2-2
Installation Environment . . . . . . . . . . . . . . . . . . . . . . . . . . . . . . . . . . . . . . . . . . . . . . . . . . . . . . . . 2-2
User Safety . . . . . . . . . . . . . . . . . . . . . . . . . . . . . . . . . . . . . . . . . . . . . . . . . . . . . . . . . . . . . . . . . . 2-3
Adit 3500 Installation . . . . . . . . . . . . . . . . . . . . . . . . . . . . . . . . . . . . . . . . . . . . . . . . . . . . . . . . . . 2-4
Compliant Installation . . . . . . . . . . . . . . . . . . . . . . . . . . . . . . . . . . . . . . . . . . . . . . . . . . . . . . 2-5
Ferrite Beads . . . . . . . . . . . . . . . . . . . . . . . . . . . . . . . . . . . . . . . . . . . . . . . . . . . . . . . . . . . . . 2-6
Wall Mounting . . . . . . . . . . . . . . . . . . . . . . . . . . . . . . . . . . . . . . . . . . . . . . . . . . . . . . . . . . . . . . . 2-7
Rack Mounting (Optional Feature) . . . . . . . . . . . . . . . . . . . . . . . . . . . . . . . . . . . . . . . . . . . . . . . . 2-8
Battery Backup . . . . . . . . . . . . . . . . . . . . . . . . . . . . . . . . . . . . . . . . . . . . . . . . . . . . . . . . . . . . . . 2-10
Technical Specifications . . . . . . . . . . . . . . . . . . . . . . . . . . . . . . . . . . . . . . . . . . . . . . . . . . . 2-10
Installation . . . . . . . . . . . . . . . . . . . . . . . . . . . . . . . . . . . . . . . . . . . . . . . . . . . . . . . . . . . . . . 2-11
Adit 3500 Battery Backup Power Connector. . . . . . . . . . . . . . . . . . . . . . . . . . . . . . . . . . . . 2-15
3
Electrical Installation & Cabling
Adit 3500. . . . . . . . . . . . . . . . . . . . . . . . . . . . . . . . . . . . . . . . . . . . . . . . . . . . . . . . . . . . . . . . . . . .
Chassis Overview. . . . . . . . . . . . . . . . . . . . . . . . . . . . . . . . . . . . . . . . . . . . . . . . . . . . . . . . . .
Interface Connectors . . . . . . . . . . . . . . . . . . . . . . . . . . . . . . . . . . . . . . . . . . . . . . . . . . . . . . . . . . .
Grounding the Unit . . . . . . . . . . . . . . . . . . . . . . . . . . . . . . . . . . . . . . . . . . . . . . . . . . . . . . . .
12 VAC Power Connection . . . . . . . . . . . . . . . . . . . . . . . . . . . . . . . . . . . . . . . . . . . . . . . . . .
Battery Connection . . . . . . . . . . . . . . . . . . . . . . . . . . . . . . . . . . . . . . . . . . . . . . . . . . . . . . . .
DS1/E1 Connection Ports . . . . . . . . . . . . . . . . . . . . . . . . . . . . . . . . . . . . . . . . . . . . . . . . . . .
10/100Base-TX Ethernet . . . . . . . . . . . . . . . . . . . . . . . . . . . . . . . . . . . . . . . . . . . . . . . . . . . .
RS-232 Craft Port (Female DB-9) . . . . . . . . . . . . . . . . . . . . . . . . . . . . . . . . . . . . . . . . . . . . .
RJ-11 Connector . . . . . . . . . . . . . . . . . . . . . . . . . . . . . . . . . . . . . . . . . . . . . . . . . . . . . . . . . .
Reset Button . . . . . . . . . . . . . . . . . . . . . . . . . . . . . . . . . . . . . . . . . . . . . . . . . . . . . . . . . . . . . . . . .
Alarm/Status LEDs . . . . . . . . . . . . . . . . . . . . . . . . . . . . . . . . . . . . . . . . . . . . . . . . . . . . . . . . . . . .
4
3-2
3-2
3-3
3-3
3-4
3-4
3-5
3-6
3-7
3-7
3-8
3-8
Configuration
PC Network Configuration . . . . . . . . . . . . . . . . . . . . . . . . . . . . . . . . . . . . . . . . . . . . . . . . . . . . . . 4-2
LAN Connection . . . . . . . . . . . . . . . . . . . . . . . . . . . . . . . . . . . . . . . . . . . . . . . . . . . . . . . . . . 4-3
Internet Connection . . . . . . . . . . . . . . . . . . . . . . . . . . . . . . . . . . . . . . . . . . . . . . . . . . . . . . . . 4-3
Web-Based Management . . . . . . . . . . . . . . . . . . . . . . . . . . . . . . . . . . . . . . . . . . . . . . . . . . . . . . . 4-4
To access the management console . . . . . . . . . . . . . . . . . . . . . . . . . . . . . . . . . . . . . . . . . . . . 4-4
Setting up a CLI Connection. . . . . . . . . . . . . . . . . . . . . . . . . . . . . . . . . . . . . . . . . . . . . . . . . . . . . 4-5
Log in . . . . . . . . . . . . . . . . . . . . . . . . . . . . . . . . . . . . . . . . . . . . . . . . . . . . . . . . . . . . . . . . . . . . . . 4-6
Key Enabled Software Features . . . . . . . . . . . . . . . . . . . . . . . . . . . . . . . . . . . . . . . . . . . . . . . . . . 4-7
Basic Configuration. . . . . . . . . . . . . . . . . . . . . . . . . . . . . . . . . . . . . . . . . . . . . . . . . . . . . . . . . . . . 4-8
Setup Adit for access via Web-Browser . . . . . . . . . . . . . . . . . . . . . . . . . . . . . . . . . . . . . . . . 4-8
Restore Factory Defaults . . . . . . . . . . . . . . . . . . . . . . . . . . . . . . . . . . . . . . . . . . . . . . . . . . . . 4-9
Modify Default Admin User . . . . . . . . . . . . . . . . . . . . . . . . . . . . . . . . . . . . . . . . . . . . . . . . 4-10
Configure WAN Interface for Internet Connectivity . . . . . . . . . . . . . . . . . . . . . . . . . . . . . . 4-12
Configure the Adit 3500 as a SIP Gateway . . . . . . . . . . . . . . . . . . . . . . . . . . . . . . . . . . . . . 4-25
Glossary
Index
xii
Adit 3500 - Release 1.6
CHAPTER
1
Adit 3500 Base Platform
In this Chapter
Overview
Application Drawing
Technical Specifications
Chassis
Adit 3500 Base Platform
Overview
Overview
The Adit 3500 integrates the features of a trunk gateway, highperformance IPSec VPN-capable router,
and stateful firewall with flexible WAN options. It replaces multiple elements at the customer premises
that typically provide routing, security, and trunk gateway functions – offering a powerful blend of
speed, security, data and voice. Additionally a 4 FXS option provides connectivity for analog fax and
modems. This single platform offers scalability and high-performance for Internet and IP access, LANto-LAN connectivity over private and public networks, and VoIP PBX trunk service applications.
Converged IP Services without Sacrificing Performance
Unlike competing offerings, the Adit 3500 maintains 2xT1 wire-speed throughput with low latency for
all packet sizes. The Adit 3500’s VoIP-aware routing engine is based on advanced network processing
technology and enables converged IP applications without the typical degradation in performance seen
in other legacy solutions on the market. By integrating routing and security features into a single
processor, the Adit 3500 cost-effectively supports Network Address Translation (NAT/NAPT), stateful
packet inspection, flow classification, Application Layer Gateway (ALG), intrusion detection and
IPSec VPN tunneling. Access control lists also protect traffic flowing in and out of the network. The
integrated firewall keeps the network and LAN segments secure from intrusions and attacks while
allowing authorized access to network resources.
1-2
Adit 3500 - Release 1.6
Adit 3500 Base Platform
Overview
Carrier-Grade VoIP Service Delivery
The Adit 3500 is a carrier-class solution that enables the key calling features used by today’s business
services. Built on top of the base routing engine, the Adit 3500 provides a scalable, integrated SIP trunk
gateway that can terminate PBX traffic, and route both voice and data across public and private
networks. The routing engine supports small packet size characteristics of full-capacity voice and data
plus the Quality of Service necessary to deliver carrier-grade voice. The Adit 3500 also provides 4 FXS
ports to support Fax/Modem bypass as well as T.38 Fax Relay directly on the VoIP network.
Simplified Configuration and Management
The Adit 3500’s scalability does not increase its complexity. Both local and remote provisioning
issimplified through an easy-to-use web interface and an intuitive Command Line Interface. Remote
alarms from the Adit 3500 are reported via SNMP, Syslog, e-mail alerts, or through a web interface.
The platform can also be remotely configured and upgraded.
Key Benefits
SIP-PRI/CAS trunk capability for PBX trunk applications
WAN options include 2xT1 and Ethernet
2xT1- trunk capacity
Comprehensive routing, firewall, VoIP gateway, and integrated T1 in a single platform
4 FXS option for analog modems, fax and alarm
Adit 3500 - Release 1.6
1-3
Adit 3500 Base Platform
Application Drawing
Application Drawing
The Adit 3500 replaces multiple elements that typically exist at the customer premises that provide
routing, security, and trunk gateway functions.
Combining these elements into a single platform provides:
Scalability and high-performance for Internet and IP access
LAN-to-LAN connectivity over private and public networks
VoIP PBX trunk service applications
1-4
Adit 3500 - Release 1.6
Adit 3500 Base Platform
Technical Specifications
Technical Specifications
Components
Adit 3500 Platform
Hardware features (options)
- 4 FXS hardware option
Included Accessories
- Wall mount bracket
Optional 8-hour battery backup
Interfaces
(1) T1 WAN port (RJ-48C connector)
-
Framing for T1: SF (D4) or ESF
Line Code for T1: B8ZS or AMI
Internal or line-timed with dual sources
T1 Loop Codes and BERT testing
(1) T1-PRI/CAS port (RJ-48C connector)
- National ISDN-1/2
- Configurable to support most common CLASS 5 switches
- E&M: Wink Start, Immediate Start, Delay Dial
(1) 10/100Base-TX WAN port (RJ-45 connector)
(1) 10/100Base-TX LAN port (RJ-45 connector)
(1) RS-232 for local management (DB-9 connector)
Optional 2nd T1-PRI/CAS port (Includes 2nd T1 WAN port)
Optional 4 FXS capacity
Network Standards
ANSI/TIA T1.403, T1.413 i2, T1.231
ITU G.703, G.704
National ISDN-1/2
ITU-T Q.931, Q.921
Telcordia GR-506-CORE
Voice Signaling (4 FXS Option)
FXS loop start, ground start
DTMF signaling per RFC 2833
Call progress tone generation
CLASS support
Distinctive ringing support
Multiple line appearance
Adit 3500 - Release 1.6
1-5
Adit 3500 Base Platform
Technical Specifications
Voice Processing and Mediation
z SIP call control
z Full T1 voice capacity
z CODEC support for G.711 a-law/G.711µ-law/G.729a
z Echo cancellation (G.168)
z Silence Suppression
z T.38 fax support
z Voice activity detection/comfort noise generation
z RTP/RTCP
z Call progress tone and cadence generation
z 10-80 ms voice frame on PRI/CAS channels
z 10-20 ms voice frame on FXS channels
z Maximum 150 ms jitter buffer
z Gain control
z Modem support - V.90, G.711 (fallback)
Dial Plan Features
z Prefix number stripping and appending
z Individual route tables for each PRI trunk
z Configurable Dial Plan
Routing and Policy Management
z IPv4
z Static routes
z OSPF
z RIP v1, v2
z PPP
- ACF, VJ compression
z Spanning Tree Protocol (802.1d)
z DHCP Server/Client/Relay
z DNS Relay and Resolver
z BootP Relay
z PAP and CHAP authentication
z Ping
z IPCP, BCP
z Multi-Protocol Encapsulation
1-6
Adit 3500 - Release 1.6
Adit 3500 Base Platform
Technical Specifications
VPN
IPSec tunneling, PPTP and L2TP support
DES, 3DES and AES
IKE based key management
Digital certificates and pre-shared key authentication
Router Performance
Wire-speed on Ethernet to 2xT1 interface
Quality of Service
ToS marking and interpretation per IETF Std. 5
VLAN Priority Queuing
Firewall Features
Stateful Firewall
NAT/NAPT, NAT Bypass, NAT Pin-Holes
L1-L4 Flow Classification
Application Layer Gateways including VoIP
Denial of Service Filtering
Intrusion Detection
Management
LED Status indicators
SNMP v1, v2c (10/100Base-TX or in-band network)
Standard MIBs
Command Line Interface (CLI), telnet, FTP, TFTP
CLI over secure telnet
Web-based interface over SSL
Syslog
Power
DC Input Voltage 12 VDC, 3 Amp
Integrated battery charger
Adit 3500 - Release 1.6
1-7
Adit 3500 Base Platform
Technical Specifications
Regulatory Approvals
USA
UL60950
FCC Part 15, Class A
FCC Part 68
- Intrabuilding (FXS)
- Interbuilding-Network T1 (WAN)
Canada
CSA 22.2 No. 60950-00
ICES-003, Class A digital devices
CS-03
- Intrabuilding (FXS)
- Interbuilding-Network T1 (WAN)
Physical Information
Wall mount brackets (included)
Rack mount option: 19 or 23 inch rack
Dimensions: 1.75 in. (H-2 RU) x 8.25 in. (W) x 12 in. (D)
4.4 cm (H) x 21 cm (W) x 30.5 cm (D)
Weight: 6.25 lbs. (2.83 kg)
Environment
Operating temperature range: 32 °F to 104 °F (0 °C to 40 °C)
Storage temperature range: -40 °F to 158 °F (-40 °C to 70 °C)
Maximum operating altitude: 10,000 ft. (3,048 m)
Maximum non-operating altitude: 40,000 ft. (12,192 m)
Relative humidity (non-condensing) range: 0% to 95%
1-8
Adit 3500 - Release 1.6
Adit 3500 Base Platform
Chassis
Chassis
Front
(4) DS1/E1
(E1 future)
Alarm
Status
(4) Analog (FXS) connectors
Reset
(2) 10/100Base-T
Back
Ground
Adit 3500 - Release 1.6
Battery
Power
RS-232
Management
Port
1-9
Adit 3500 Base Platform
Chassis
1-10
Adit 3500 - Release 1.6
CHAPTER
2
Physical Installation
In this Chapter
Unpacking and Inspection
Installation Environment
User Safety
Adit 3500 Installation
Wall Mounting
Rack Mounting (Optional Feature)
Battery Backup
Physical Installation
Unpacking and Inspection
Unpacking and Inspection
WARNING! OBSERVE PRECAUTIONS FOR HANDLING ELECTROSTATIC DEVICES.
1. Inspect containers for damage during shipment. Report any damage to the freight carrier for
possible insurance claims.
2. Compare packing list with office records. Report any discrepancies to the office.
3. Open shipping containers, be careful not to damage contents.
4. Inspect contents and report any damage.
5. If equipment must be returned for any reason, carefully repack equipment in the original
shipping container with original packing materials if possible.
6. If equipment is to be installed later, replace equipment in original shipping container and store
in a safe place until ready to install.
Installation Environment
The environment in which you are installing the Adit 3500 must meet the following conditions:
Operating temperature range: 32° to 104° F (0° to 40° C)
Storage temperature range: -40° to 158° F (-40° to 70° C)
Maximum operating altitude: 10,000 ft. (3,048 m)
Maximum non-operating altitude: 40,000 ft. (12,192 m)
Relative humidity (non-condensing) range: 0 to 95%
WARNING! THE ADIT 3500 IS DESIGNED FOR WALL AND RACK MOUNTING ONLY. IT IS NOT
DESIGNED FOR DESKTOP USE.
2-2
Adit 3500 - Release 1.6
Physical Installation
User Safety
User Safety
CAUTION! WHEN USING YOUR TELEPHONE EQUIPMENT, BASIC SAFETY PRECAUTIONS SHOULD
ALWAYS BE FOLLOWED TO REDUCE THE RISK OF FIRE, ELECTRIC SHOCK AND INJURY TO PERSONS,
INCLUDING THE FOLLOWING:
Do not use this product near water for example, near a bathtub, washbowl, kitchen sink or
laundry tub, in a wet basement or near a swimming pool.
Avoid using a telephone (other than a cordless type) during an electrical storm. There may be
a remote risk of electric shock from lightning.
Do not use the telephone to report a gas leak in the vicinity of the leak.
Use only the power cord and batteries indicated in this manual. Do not dispose of batteries in a
fire. They may explode. Check with local codes for possible special disposal instructions.
Refer to the installation section of this manual for a safe and proper installation procedure. All
wiring external to this equipment should follow the current provision of the National Electrical
Code.
Adit 3500 - Release 1.6
2-3
Physical Installation
Adit 3500 Installation
Adit 3500 Installation
The following are instructions for a compliant installation of the Adit 3500. Please note the following
warnings, before installing the unit.
For wall and rack mount instructions, use the links listed below to the appropriate section:
Wall Mounting
Rack Mounting (Optional Feature)
Battery Backup
WARNING! OBSERVE PRECAUTIONS FOR HANDLING ELECTROSTATIC DEVICES. SEE PREFACE,
ELECTROSTATIC DISCHARGE (ESD) PRECAUTIONS FOR DETAILED INFORMATION.
WARNING! THE ADIT 3500 DS1 NETWORK INTERFACE PORTS ARE CERTIFIED WITH ACTA,
INDUSTRY CANADA AND UL FOR DIRECT CONNECTION TO PUBLIC DIGITAL NETWORKS. TO PREVENT
EQUIPMENT DAMAGE FROM LIGHTNING SURGES, AC INDUCTION OR POWER LINE CONTACT, UTILIZE
LISTED PRIMARY PROTECTORS AT THE BUILDING ENTRANCE WITH MINIMUM 4 OHM CURRENTLIMITING AND MAXIMUM 600V IMPULSE BREAKDOWN AT 1000V/USEC. THE ADIT 3500 DS1 PORTS
COME EQUIPPED WITH SECONDARY OVERVOLTAGE AND OVERCURRENT PROTECTION. THE
INSTALLATION IS REQUIRED TO MEET LOCAL OR NATIONAL ELECTRIC CODES FOR COMMUNICATION
SYSTEMS.
WARNING! THE ADIT 3500 FXS INTERFACE PORTS ARE INTENDED TO SERVE INDOOR
COMMUNICATION CONDUCTORS ONLY. OVERVOLTAGE AND OVERCURRENT PROTECTION IS
PROVIDED TO PREVENT EQUIPMENT DAMAGE FROM LIGHTNING SURGES OR AC POWER LINE
CONTACT INSIDE BUILDINGS. THE FXS PORTS ARE NOT SUITABLE FOR CONNECTION TO EXPOSED
OUTDOOR COMMUNICATION CONDUCTORS.
2-4
Adit 3500 - Release 1.6
Physical Installation
Adit 3500 Installation
Compliant Installation
NOTE: It is important the DS1/E1 Network Interface Cables are secured separately from the
power and Signal Cables (note E1 is a future feature).
1. Inspect the unit.
2. Mount the unit.
Wall mounting installation, see Wall Mounting on page 2-7
Wall mounting with Battery Backup Unit, see Battery Backup on page 2-10
Rack mounting installation, see Rack Mounting (Optional Feature) on page 2-8
3. Ground the unit.
WARNING! THE ADIT 3500 IS REQUIRED TO BE PERMANENTLY GROUNDED FOR THE
PROTECTION OF USERS AND SERVICE PERSONNEL.
FOR DETAILED INSTRUCTIONS.
REFER TO GROUNDING THE UNIT ON PAGE 3-3
4. Connect DS1 (T1), and Ethernet connections as needed.
5. Connect RS-232 connector and connect via HyperTerm on your PC.
Note: With this running before power is enabled, you can monitor the boot process.
6. Attach PBX and phone line cables.
7. Connect Power to the unit.
8. Monitor the boot process on your PC, when complete the status light should be green.
9. For any software enabled features, enter the key command. See the key command in the Adit
3000 CLI Reference Manual, for detailed information.
10. To verify use the show version command.
11. To provision the unit. See Chapter 4, Configuration for detailed instructions.
Adit 3500 - Release 1.6
2-5
Physical Installation
Adit 3500 Installation
Ferrite Beads
The following ferrite bead is required on the Adit 3500 configurations that do not have the FXS 4
channel option. The ferrite bead will enable the Adit to be compliant with EMI standards FCC Part 15
and ICES-003 Class A.
Ferrite beads shipped with Adit chassis:
Ferrite Provided
Part Number
Intended For
1 large
P/N 010-0051
Power cable, which requires a loop through the bead (see
drawing).
Ferrite
Bead
Back of
Adit 3500
Loop
through
Ferrite
Bead
12V Power
Cord
For additional information on Ferrite beads and their installation on the Adit 3500, please contact
Carrier Access Customer Support at (800) 786-9929.
2-6
Adit 3500 - Release 1.6
Physical Installation
Wall Mounting
Wall Mounting
Before beginning the mounting process, verify that the installation area is a stable environment, clean
and free from extremes of temperature, shock, vibration and EMI. See Installation Environment on
page 2-2.
Mounting Bracket
Back of unit
Front of unit
Leave adequate space
at the front/back for
access to connectors
The Adit 3500 is delivered with mounting brackets that can easily be attached for quick and easy wall
mounting, as shown in the illustration above.
To install the unit to the wall:
1. Attach the wall mount brackets to the Adit 3500, with wall attachment flange pointing away
from the unit, as shown above. Attach with 4 screws provided (2 for each bracket).
2. Mount the unit to the wall using appropriate mounting screws (not included). Note: It is
acceptable to mount on drywall with suitable anchor-type mounting screws.
NOTE: The Adit 3500 must be mounted with the brackets on the top and bottom, as shown
above. This position aids in heat distribution.
Adit 3500 - Release 1.6
2-7
Physical Installation
Rack Mounting (Optional Feature)
Rack Mounting (Optional Feature)
NOTE: Rack mounting kits are available for both 19 and 23 inch racks. 1 Rack Unit (RU) of
spacing is required above the Adit 3500 in the Rack Mount Unit.
To rack mount the Adit 3500, follow the instructions below:
1. Attach bracket ears to Rack Mounting Tray using four #10-32 x 1/4” screws on each side. The
Mounting Ears can be used for both a 19 or 23 inch rack. The drawing below shows a top view
of the 2 versions.
Mounting Ear
Rack Mounting Tray
Rack Mount Tray
screws
Mounting Ear
screws
Front
Rack Mount Tray
screws
Mounting Ear
23 in rack
Front
Mounting Ear
19 in rack
screws
Mounting Ear
2. Attach the Rack Mounting Tray assembly (with mounting ears attached) to rack, using four
#10-32 x 1/4” screws (two on each mounting ear).
3. Remove wall mount and screws, if attached, from Adit 3500 unit.
Note: Adit 3500 and wall mounting bracket are not assembled from the factory.
2-8
Adit 3500 - Release 1.6
Physical Installation
Rack Mounting (Optional Feature)
4. Place the Adit on the Tray Slide and attach with 4 screws removed in step 2.
screws
screws
Tray Slide
5. Slide the assembled piece (Adit 3500 and Tray Slide) onto the installed Rack Mounting Tray.
6. Secure the Tray Slide to the Rack Mounting Tray with the attached screws on the Tray Slide.
NOTE: The mounting brackets are designed to not allow units to be mounted closer than
recommended.
Adit 3500 - Release 1.6
2-9
Physical Installation
Battery Backup
Battery Backup
The Adit 3500 Battery Backup is designed specifically for the Adit 3500. The battery backup unit is a
single 12V sealed lead-acid battery in a metal enclosure designed for wall mounting.
Technical Specifications
Approximate Battery Backup Time
8 hours
Note: This assumes:
- 50% off hook on the FXS lines
- Operating at room temperature 68° F (20° C)
Power
12V power output
Recommend a 24 hour charge, for full backup capability
Regulatory Approvals
NRTL Safety Listed Accessory: UL60950-1
CSA 60950-1
Physical Information
Dimensions: 9.5 in. (H) x 6.65 in. (W) x 2.75 in. (D)
24 cm (H) x 17 cm (W) x 7 cm (D)
Weight: 8.4 lbs. (3.8 kg)
Environment
Operating temperature range: 32° to 122° F (0° to 50° C)
Ideal operating temperature 68° F (20° C)
2-10
Adit 3500 - Release 1.6
Physical Installation
Battery Backup
Installation
There are two possible configurations to wall mount the Adit 3500 and the Battery Backup.
Note: It is recommended that the BBU be mounted to a wooden backboard using (4) #6 screws,
or to drywall using (4) #6 screws with anchors. These screws are not provided.
1. Battery Backup attached to wall, with Adit 3500 mounted on the Battery Backup
2. Adit 3500 and Battery Backup attached to wall.
Option 1
view from side
Adit 3500
Option 2
Wall
Battery Backup
Adit 3500 - Release 1.6
2-11
Physical Installation
Battery Backup
#1 Adit 3500 mounted on top of the Battery Backup
This method will use a minimal amount of wall space. Note: This installation will require a
minimum wall space of space of: 9" (H) x 14" (W) x 5" (D).
1. Mount the Battery Backup to the wall with
(4) #6 x 1 coarse thread screws (Note:
Screws are not provided)
Mark the location for the top 2 screws
(using BBU mounting keyhole as a guide)
Screw these 2 screws into the wall at
marked locations. Note: Do not screw
tight to the wall, leave 1/4" to allow BBU
mounting keyholes to slip over screw
head.
Attach the BBU by slipping the screw
heads through the keyhole slots of the
BBU, and let unit drop slightly to allow
screwheads to enter top of the keyhole.
Screw bottom 2 screws into mounting
holes at the bottom of the unit.
Tighten all screws to the wall.
2. Attach Adit 3500 Wall Mounting
Brackets to the BBU. Note: These are
provided with the Adit 3500 unit.
Each bracket is attached to the outer
facing side of the BBU.
Note the bracket orientation in the
graphic.
3. Insert Adit 3500 Power cord through
the holder on the right. This supports
the weight of the adapter portion of
the power cord.
Note: The connector to the wall
runs out the bottom, while the
connector to the Adit 3500 will run out of the top.
2-12
Power Cord
Holder
Wall Brackets
Adit 3500 - Release 1.6
Physical Installation
Battery Backup
4. Attach Adit 3500 to the assembled
BBU and brackets.
Second bracket
here
Each bracket attaches to the side of
the Adit 3500. Note the orientation
of the Adit in the graphic.
5. Attach power cords.
Connect cord from BBU to the Adit
3500 (2 pin connector).
Connect 12V power cord to Adit
3500.
Front of Adit
Adit 3500 - Release 1.6
Screws into
side of Adit
2-13
Physical Installation
Battery Backup
#2 Adit 3500 and Battery Backup mounted to the wall
This method requires a more wall space. Note: This installation will require a minimum of wall
space of: 17" (H) x 14" (W) x 2.5" (D).
Adit 3500
Back
Front
Holds AC Adapter
portion of power
cord
Battery Cable
Battery Backup
1. Mount the Battery Backup to the wall with (4) #6 screws, by:
Mark the location of the left-side 2 screws (using the BBU mounting keyhole as a guide).
Note: This installation of the BBU is oriented with the mounting keyholes to the left side.
Screw these 2 screws into the wall at marked locations. Note: Do not screw tight to the wall,
leave 1/4" to allow BBU mounting keyholes to slip over screw head.
Attach the BBU by slipping the screw heads through the keyhole slots at the left of the
BBU, and slide unit to the right to allow screwheads to enter the narrow end of the keyhole.
Screw the second set of 2 screws into mounting holes on the right of the unit.
Tighten all screws to the wall.
2. Insert Adit 3500 Power cord through the holder on the top of the BBU. This supports the
weight of the adapter portion of the power cord.
3. Attach Adit 3500 to the wall following the instructions, Wall Mounting on page 2-7.
Attaching the Adit 3500 to the wall above the BBU.
Note: There is a distance limit between the Adit and the BBU (note the length of the
battery cable to the Adit).
4. Attach power cords.
Connect cord from BBU to the Adit 3500 (2 pin connector).
Connect 12V power cord to Adit 3500.
2-14
Adit 3500 - Release 1.6
Physical Installation
Battery Backup
Adit 3500 Battery Backup Power Connector
The following cable, is hard wired to the Adit 3500 Battery Backup and connects the Adit 3500.
Pinout
Wire
Definition
Red
12V (+)
Black
12V (-)
Adit 3500 - Release 1.6
2-15
Physical Installation
Battery Backup
2-16
Adit 3500 - Release 1.6
CHAPTER
3
Electrical Installation & Cabling
In this Chapter
Adit 3500
Interface Connectors
Reset Button
Alarm/Status LEDs
Electrical Installation & Cabling
Adit 3500
Adit 3500
Chassis Overview
The following illustrations show all connectors on the Adit 3500.
Front
(4) DS1/E1
(E1 Future)
Alarm
Status
(4) Analog (FXS) connectors
Reset
(2) 10/100Base-T
Back
Ground
3-2
Battery
Power
RS-232
Management
Port
Adit 3500 - Release 1.6
Electrical Installation & Cabling
Interface Connectors
Interface Connectors
The following are the Adit 3500 interface connectors:
Note: The following is dependant upon how the system (hardware) is configured. Systems can be
ordered with/without FXS, and can have from 1-4 DS1 ports.
Front of Adit
4 DS1 Ports (used for DS1 WAN and/or PRI/CAS trunks) (RJ-45C connector).
- (1) T1-based WAN - uses 1 or 2 DS1 ports
- (1) PRI/CAS group - uses 1 or 2 DS1 ports
(1) 10/100Base-TX WAN port (RJ-45 connector)
(1) 10/100Base-TX LAN port (RJ-45 connector)
4 FXS (RJ-11 connector)
Back of Adit
RS-232 craft port connector for local management
Power input connector
Battery input connector
Ground connector
Grounding the Unit
WARNING! THE ADIT 3500 IS REQUIRED TO BE PERMANENTLY GROUNDED FOR THE
PROTECTION OF USERS AND SERVICE PERSONNEL.
Chassis ground is located on the back of the unit.
To ground the unit:
1. Connect a minimum 14 AWG ground
wire with a #8 ring tongue terminal (not
included) to the chassis ground on the
back of the unit. Secure with the 8-32
screw and lock washer provided.
Chassis
Ground
2. Connect the opposite end of the ground
wire to a suitable earth grounding point
such as a building grounding electrode,
metal water pipe, or metal building
structure that is in compliance with article 250 of NEC.
Adit 3500 - Release 1.6
3-3
Electrical Installation & Cabling
Interface Connectors
12 VAC Power Connection
The Adit 3500 is powered by a 12 VAC Power Converter, which provides 12 VDC to the unit.
Item
Input
Output
Specification
Rate input voltage
AC100V-240V
Vibration input voltage range
AC90V-255V
Frequency Rated
50-60 Hz
Frequency Vibration
47-63Hz
Input rated current
15A max. at 115VAC cool start
30A max. at 230VAC cool start
Leakage current
0.25mA
Efficiency
70% Min.
Output voltage
13.5VDC
Output max. current
2.2A+150mA (V out = 9VDC-13VDC)
Output min. current
0A (V out = 14VDC)
Line regulation
+1%
Load regulation
+5%
Short circuit protection
Output shut down auto restart
Battery Connection
The Battery connector on the Adit 3500 is a 2 pin connector provided specifically for the
Battery Backup option. See Battery Backup on page 2-10 for additional information.
3-4
Adit 3500 - Release 1.6
Electrical Installation & Cabling
Interface Connectors
DS1/E1 Connection Ports
1
8
Each DS1/E1 connection port is equipped with a standard RJ-48C (female) on the
Adit 3500 unit. Note: E1 will be available in a future release.
The pinouts are as follows:
DS1/E1 RJ-48C
The pinouts are as follows:
Pin
Name
Description
1
Receive Ring
Receive from DS1 network
2
Receive Tip
Receive from DS1 network
3
N/C
Not connected
4
Transmit Ring
To DS1 network
5
Transmit Tip
To DS1 network
6 -8
N/C
Not connected
The LEDs are as follows (left LED only):
State
Description
Off
Off line
Green
Normal
Red
Loss of Signal (LOS)
Yellow
Bipolar Violation (BPV)
Flashing Green
Loopback active
Flashing Yellow
Yellow Alarm (Remote Alarm Indication)
Flashing Red (Slow)
Loss of Frame (LOF) or Alarm Indication Signal (AIS)
Flashing Red (Fast)
Self-test Failure
Adit 3500 - Release 1.6
3-5
Electrical Installation & Cabling
Interface Connectors
10/100Base-TX Ethernet
1
8
The 10/100Base-TX Ethernet (female) ports provide connectivity for Router WAN
and/or LAN ports and for management connection via Telnet and/or SNMP to a
Network Management System.
Ethernet (RJ-45)
The pinouts are as follows:
Note: This is a hub pinout, you will need a straight cable to connect to a PC.
Pin
Name
Description
1
Receive +
Receive from network
2
Receive -
Receive from network
3
Transmit +
Transmit to network
4-5
N/C
Not connected
6
Transmit -
Transmit to network
7-8
N/C
Not connected
The LEDs are as follows:
LED
State
Left LED
The left LED shall show Link Status.
Right LED
3-6
Description
Off
Link Down
Green
Link Up
Flashing Green
Traffic on Link
Yellow
Collision status
The right LED shall indicate Link Speed.
Off
10 Mbit/sec, down or not connected
Green
100 Mbit/sec
Adit 3500 - Release 1.6
Electrical Installation & Cabling
Interface Connectors
RS-232 Craft Port (Female DB-9)
The RS-232 craft port connector (female) is for connection to an external PC or Hayes-compatible
modem for local or remote configuration, management, and performance monitoring using the Adit
3500 Command Line Interface (CLI).
The RS-232 craft port connects via a female DB-9 connector on the Adit
3500.
1
5
6
9
The pinouts are as follows:
Pin
Direction
Description
1
Outbound
Carrier Detect
2
Outbound
Receive Data
3
Inbound
Transmit Data
4
Inbound
Data Terminal Ready
5
N/A
Signal Ground
6
Outbound
Data Set Ready
7
Inbound
Request to Send
8
Outbound
Clear to Send
9
N/C
Not connected
RJ-11 Connector
There are four RJ-11 (female) connectors for the FXS ports.
The pinouts are as follows:
Pin
Name
Description
1-2
N/C
Not connected
3
R
Ring
4
T
Tip
5-6
N/C
Not connected
Adit 3500 - Release 1.6
6
1
3-7
Electrical Installation & Cabling
Reset Button
Reset Button
The system can be reset by pressing the reset button located on the front panel.
Alarm/Status LEDs
LED
State
Description
Critical
Off
No critical alarms present
Red
Critical alarms present. Critical alarms include:
user-configured manor environmental inputs.
Off
No major alarms present
Red
Major alarm present. Major alarms include:
user-configured manor environmental inputs, DS1 short, DS1 open, DS1
facility alarm, DS1 RAI, DS1 AIS, DS1 LOF, DS1 LOS, WAN fault,
Ethernet fault and dead card alarms.
Off
No minor alarms present
Red
Minor alarms present. Minor alarms include:
user-configured minor environmental inputs, DS1 excessive line code
violations.
Off
No power to system
Green
Application running, no detected system problems.
Green Flashing
Power-On Self Test (POST) successful. System booted. Loading Application.
Green/Yellow
Flashing alternate colors. Application Self Test in Process.
Yellow
Yellow while booting. If this stays a steady yellow the Power-On Self Test
(POST) failed.
Yellow Flashing
Power-On Self Test (POST) In Process.
Red
System Failure
Major
Minor
Status
3-8
Adit 3500 - Release 1.6
CHAPTER
4
Configuration
After the Adit 3500 is installed (see Adit 3500 Installation on page 2-4), the system can now be
provisioned.
In this Chapter
PC Network Configuration
Web-Based Management
Setting up a CLI Connection
Log in
Key Enabled Software Features
Basic Configuration
-
Setup Adit for access via Web-Browser
Restore Factory Defaults
Modify Default Admin User
Configure WAN Interface for Internet Connectivity
Configure the Adit 3500 as a SIP Gateway
Configuration
PC Network Configuration
PC Network Configuration
When a PC is connected directly or indirectly to the Adit 3500 Ethernet LAN port (Eth-1), IP addresses
will be acquired using the DHCP server or relay functionality of the Adit 3500.
Note: For either of these cases, the PC must be configured as a DHCP Client.
This configuration principle is identical but performed differently on each OS.
Windows XP
1. Access Network Connections from the Control Panel.
2. Right-click the Ethernet connection’s icon, and select Properties to display the connection’s
properties.
3. From the General tab select the Internet Protocol (TCP/IP) component and press the
Properties button.
4. The Internet Protocol (TCP/IP) properties will be displayed and the following must be selected.
Select the Obtain an IP address automatically.
Select the Obtain DNS server address automatically.
5. Continue on the following setup for a LAN Connection.
Windows 2000/98/Me
1. Access Network and Dialing Connections from the Control Panel.
2. Right-click the Ethernet connection’s icon, and select Properties to display the connection’s
properties.
3. Select the Internet Protocol (TCP/IP) component and press the Properties button.
4. The Internet Protocol (TCP/IP) properties will be displayed and the following must be selected.
Select the Obtain an IP address automatically.
Select the Obtain DNS server address automatically.
5. Continue on the following setup for a LAN Connection.
Windows NT
1. Access Network from the Control Panel to display the network control panel.
2. From the Protocol tab select the Internet Protocol (TCP/IP) component and press the
Properties button.
3. From the IP Address tab select Obtain an IP address automatically.
4. From the DNS Address tab verify that no DNS server is defined in the DNS Service Search
Order field, and no suffix is defined in the Domain Suffix Search Order field.
5. Reboot
6. Continue on the following setup for a LAN Connection.
4-2
Adit 3500 - Release 1.6
Configuration
PC Network Configuration
Linux
1. Login into the system as a super-user, by entering su at the prompt.
2. Type ifconfig to display the network devices and allocated IP’s.
3. Type pump -i dev, the dev is the network device name.
4. Type ifconfig again to view the new allocated IP address.
5. Continue on the following setup for a LAN Connection.
LAN Connection
Your computer can connect to the gateway in various forms, each requiring a different physical
connection. See Chapter 3, Electrical Installation & Cabling.
Internet Connection
Connect the gateway directly to the Internet.
Adit 3500 - Release 1.6
4-3
Configuration
Web-Based Management
Web-Based Management
The web-based management interface allows you to control various system parameters. The interface
is accessed through a web browser.
To access the management console
NOTE: The following assumes that you have connected the PC to the LAN port of the Adit
3500.
1. Launch a web browser on your PC in the LAN to which the Adit 3500’s LAN port is connected.
Note: If connection to the Adit 3500 is to be through an Ethernet or T1 WAN, the remote admin
WAN access must be enabled with the following command sequence:
Command
Username: admin
Description
Log into the system (username and password).
Password: ********
Adit 3500> enable
Enter the Privileged mode.
Password: ********
Enter password for the Privileged mode.
#configure terminal
Enter the Configuration mode.
(config)# remote-admin web
primary-port enable
Enable remote web admin.
2. Type the Adit 3500’s IP address or name in the address bar.
Example: http://192.168.1.1.
Default IP address is http://192.168.1.1
Note: To display the current IP address of the systems, use the following CLI command:
#show interface ethernet 1 (LAN)
#show interface ethernet 2 (Eth WAN)
3. Login to the unit.
Enter User Name and Password. Note: These setting should be changed from the default
settings after the initial login.
Default user name is admin
Default password is admin 123
NOTE: After a few minutes of inactivity, the session will automatically timeout and the
operator will be required to log in to continue the session.
WARNING! IF YOUR USER NAME AND PASSWORD ARE SET TO THE DEFAULT SETTING, IT IS
RECOMMENDED THAT YOU MODIFY THEM FOR SECURITY PURPOSES.
4-4
Adit 3500 - Release 1.6
Configuration
Setting up a CLI Connection
Setting up a CLI Connection
A CLI connection will require the LAN or WAN IP address of the unit. Note: If the WAN IP address
is used, the remote admin WAN access must be enabled with the following command sequence:
Command
Username: admin
Description
Log into the system (username and password).
Password: ********
Adit 3500> enable
Enter the Privileged mode.
Password: ********
Enter password for the Privileged mode.
#configure terminal
Enter the Configuration mode.
(config)# remote-admin web
primary-port enable
Enable remote web admin.
NOTE: For Adit 3500 CLI commands see the Adit 3000 CLI Reference Manual. This is a
separate document and can be found on the CD that is provided with the product, or on the
Carrier Access customer website.
To connect with CLI, set up the connection:
If connecting via the Ethernet 100Base-TX connection, use a Telnet TCP/IP program to access
the CLI. This requires an IP address of the unit.
Note: To display the current IP address of the unit, use the ifconfig command.
If connecting via RS-232, the port settings should be set to:
Bits per second: 115200
Data bits: 8
Parity: None
Stop bits: 1
Flow control: None
Set your Terminal Emulation to: VT100
NOTE: When using Tera Term (Telnet program) TCP/IP, CLI commands will not be
recognized until the following setup is completed.
In Tera Term go to Setup/Terminal
Set the New-line/Transmit value CR
Adit 3500 - Release 1.6
4-5
Configuration
Log in
Log in
After successful connection, via telnet or HyperTerm, the user must login. Default Logins are:
Login: admin
Password: admin123
After successful login the prompt will be displayed as follows:
Adit 3500>
Note: It is recommended that you change your password from the default. See the following to
modify the Admin level password on your system.
GUI interface - see Advanced/Users window
CLI interface - use the Adit 3000(config)#username command
4-6
Adit 3500 - Release 1.6
Configuration
Key Enabled Software Features
Key Enabled Software Features
The Adit 3500 has additional features that are not provided on the base system. These features can be
purchased with the product or added later as needed. These features are enabled via a Software Key
(example: G.729). The number of keyed features may expand with the development of the product,
therefore to see a list of current keyed features, or to purchase a key, contact Carrier Access Customer
Service or Sales.
To enter a software key, use the following CLI command:
Syntax: (config)# key key-code
Example: (config)# key cxusdfutkj3diosn412C
NOTE: Keys may only be entered through the CLI (not through the GUI).
The Key Enabled Software Features are displayed on the Advanced/Technical Information window.
This information is also displayed with the following CLI command:
Adit 3500> show version
Application Version: 1.5.0
Compilation Time: Thu Jun 14 2007 18:07:22
FPGA Version: 1.00
Board Version: 5 003-1215-0300
IXP400 Software Release: 1_4 SQA4_1
MSP:
82530 - 60 channels
Image File Name: TGW_v5_05.axf
API Version
: 2.1.0
Source IP Addr : 192.168.1.1
Voice Slot 1 : FXS Card Present: Rev 3.00
Vendor: Carrier Access
CLEI Code: IPMHX00LRA
Product Features:
SIP enabled.
G729A enabled.
Adit 3500 - Release 1.6
4-7
Configuration
Basic Configuration
Basic Configuration
The following configuration is divided into logical sections, where each section configures an additional
function. The first must be configured before the second and so forth, however, you may stop at any
section and not add the following feature.
NOTE: The order in which commands are entered can affect the successful provisioning of
the Adit 3500.
Setup Adit for access via Web-Browser
Restore Factory Defaults
Modify Default Admin User
Configure WAN Interface for Internet Connectivity
Configure the Adit 3500 as a SIP Gateway
Setup Adit for access via Web-Browser
The following steps will configure the Adit 3500 to allow access to the Web Browser for configuration,
through the LAN (1) or WAN (2) 10/100Base-T Ethernet connections.
Note: For LAN access, no additional configuration is required to access the Adit using the web browser.
To configure the WAN access:
1. Connect to the CLI via the DB-9 RS-232. See Setting up a CLI Connection on page 4-5.
2. Enable the remote admin WAN access with the following command sequence:
Command
Username: admin
Description
Log into the system (username and password).
Password: ********
4-8
Adit 3500> enable
Enter the Privileged mode.
Password: ********
Enter password for the Privileged mode.
#configure terminal
Enter the Configuration mode.
(config)# remote-admin web
primary-port enable
Enable remote web admin.
Adit 3500 - Release 1.6
Configuration
Basic Configuration
Restore Factory Defaults
If the unit is not out-of-the-box, you may want to verify that the unit is set to defaults.
Note: This will reset the IP address back to the default setting of 192.168.1.1.
In the web-browser:
Select Advanced from the Navigation bar
Select Restore Defaults
Select OK to restore defaults
Adit 3500 - Release 1.6
4-9
Configuration
Basic Configuration
Modify Default Admin User
For security purposes it is recommended that the Administrator User be changed from the default
settings.
Modify the Administrator User in the web-browser:
Select Advanced from the Navigation bar
Select Users icon
Select Administrator, to open the profile.
4-10
Adit 3500 - Release 1.6
Configuration
Basic Configuration
Modify the User information, and select OK to save. It is important to note that you need to
have a minimum of one user with Administrative Privileges. For users with other access
levels, use the New User to add additional users on the system.
Note: For security purposes, the password should be changed from the default setting.
You will be required to login again, if you have modified the User Profile that you are logged
in with.
Adit 3500 - Release 1.6
4-11
Configuration
Basic Configuration
Configure WAN Interface for Internet Connectivity
There are options to this WAN configuration. This is the connection to the end user’s internet provider.
It can be the following:
Single T1 (PPP)
Multiple T1s (Multilink)
Ethernet WAN
Single T1 (PPP)
To configure a single T1 utilizing PPP:
1. Select Network Connections from the Navigation bar.
2. Select (click) a T1 Interface (from T1 1 - T1 4) to configure, T1 1 is recommended.
Note: Using T1 1 and the preconfigured Serial 1 makes this configuration very simple. If you
use T1 2-T1 4, you will need to delete the preconfigured Serial 1 and make a New Connection
(Serial 1) based on the T1 2-T1 4 that you selected.
3. Select the Settings button.
4-12
Adit 3500 - Release 1.6
Configuration
Basic Configuration
4. Set the proper Framing Type and Line Coding.
5. Select OK to apply the new settings and exit this window.
6. Select OK again to return to the Network Connections window.
7. Select (click) the Serial 1 connection.
Adit 3500 - Release 1.6
4-13
Configuration
Basic Configuration
8. Select the Settings button.
4-14
Adit 3500 - Release 1.6
Configuration
Basic Configuration
9. Set the following on the Configure Serial 1 window:
- Network Type to WAN (this is the default setting)
- PPP Authentication to your required preferences
10. Select OK to apply the new settings and exit this window.
11. Select OK again to return to the Network Connections window.
Adit 3500 - Release 1.6
4-15
Configuration
Basic Configuration
Multiple T1s (Multilink)
To configure Multiple T1s utilizing Multilink PPP:
1. Select Network Connections from the Navigation bar.
2. Select (click) a T1 Interface (from T1 1 - T1 4) to configure.
3. Select the Settings button.
4-16
Adit 3500 - Release 1.6
Configuration
Basic Configuration
4. Set the proper Framing Type and Line Coding.
5. Select OK to apply the new settings and exit this window.
6. Select OK again to return to the Network Connections window.
7. Repeat steps #1-6 for additional T1s required for the ML-PPP
Adit 3500 - Release 1.6
4-17
Configuration
Basic Configuration
8. Select (click) the delete icon associated with the Serial 1 connection.
Select OK to confirm the deletion of this connection.
9. Select (click) New Connection to create the ML-PPP connection.
4-18
Adit 3500 - Release 1.6
Configuration
Basic Configuration
10. Select the Multilink Point-to-Point Protocol over DS0 (Multilink), and select Next.
Adit 3500 - Release 1.6
4-19
Configuration
Basic Configuration
11. Enter User Name and Password.
12. Select the T1s for this Multilink and the channel ranges.
13. Select Next.
14. A summary of the Multilink connection will be displayed. If correct, select Finish.
4-20
Adit 3500 - Release 1.6
Configuration
Basic Configuration
15. The new Multilink connection will display on the Network Connections window.
16. Select (click) the Multilink 1 connection.
17. Select the Settings button.
Adit 3500 - Release 1.6
4-21
Configuration
Basic Configuration
18. Set the following on the Configure Multilink 1 window:
- Network Type to WAN (this is the default setting)
- PPP Authentication to your required preferences
19. Select OK to apply the new settings and exit this window.
20. Select OK again to return to the Network Connections window.
4-22
Adit 3500 - Release 1.6
Configuration
Basic Configuration
Ethernet WAN
To configure the WAN utilizing Ethernet feed:
1. Select Network Connections from the Navigation bar.
2. Select (click) the delete icon associated with the Serial 1 connection.
Select OK to confirm the deletion of this connection.
3. Select (click) the Ethernet 2 (WAN Ethernet) connection to configure.
Adit 3500 - Release 1.6
4-23
Configuration
Basic Configuration
4. Select the Enable button, to configure the WAN Ethernet up (or in-service).
5. Select the Settings button.
6. Set Network type to WAN.
7. Set Internet Protocol option (method of IP address assignment).
8. Select OK to apply the new settings and exit this window.
9. Select OK again to return to the Network Connections window.
4-24
Adit 3500 - Release 1.6
Configuration
Basic Configuration
Configure the Adit 3500 as a SIP Gateway
1. Select Voice Over IP from the Navigation bar.
Adit 3500 - Release 1.6
4-25
Configuration
Basic Configuration
2. On the IP Telephony tab, under Proxy Servers:
- Set Proxy Type to Generic/custom (BroadSoft or Sylantro). Example: BroadSoft
- Select Use SIP Proxy and enter SIP Proxy IP address
- Select supported Codecs
3. Select Apply to save the new settings.
4. Select the Advanced button.
4-26
Adit 3500 - Release 1.6
Configuration
Basic Configuration
5. Modify any advanced VoIP settings as needed and select Apply.
6. Select OK to exit window.
Adit 3500 - Release 1.6
4-27
Configuration
Basic Configuration
7. If using the FXS ports, select the Phone Settings tab.
8. Select the Action icon on line #1 to edit.
4-28
Adit 3500 - Release 1.6
Configuration
Basic Configuration
9. Enter the Phone Number in the User ID field.
10. Enter Authentication information as needed.
11. Select OK to apply and exit this window.
12. Select OK to acknowledge that with these changes, active calls will be dropped.
13. Repeat this step for each FXS Line.
Adit 3500 - Release 1.6
4-29
Configuration
Basic Configuration
14. The current User ID of the FXS lines will display.
15. Select the Line Monitoring tab. This window displays the SIP status of the FXS ports.
Note: When a telephone port is successfully registered the Registration Status column displays
"Registered" in green."
16. Select the Trunk Settings tab.
17. Select (click) on the trunk to configure.
4-30
Adit 3500 - Release 1.6
Configuration
Basic Configuration
18. Set the Trunk Signaling type to PRI or CAS.
19. Set the Signaling Type.
20. Select New Entry to assign numbers to your PRI interface(s).
Adit 3500 - Release 1.6
4-31
Configuration
Basic Configuration
21. Enter the phone number range for numbers to be routed to the trunk interface for incoming
SIP calls, on the Call Destination window. Use Strip and Prefix entries to translate the incoming
destination number from SIP to the destination number to be sent to the PRI/CAS interface.
22. Select OK to save and exit this window.
Note: This information will display at the bottom of the Trunk Settings window.
23. Select OK again to return to the Voice Over IP window.
4-32
Adit 3500 - Release 1.6
Configuration
Basic Configuration
24. Select the Trunk Monitoring tab to view the status of any calls on the PRI.
Adit 3500 - Release 1.6
4-33
Configuration
Basic Configuration
4-34
Adit 3500 - Release 1.6
GLOSSARY
Glossary
AMI
Automatic Mark Inversion
ARP
Address Resolution Protocol
B8ZS
Bipolar with 8 Zero Substitution
BIT
Binary Digit
BPS
Bits Per Second
BPV
Bipolar Violation
CA
Certificate Authority
CAS
Channel Associated Signaling
CCS
Common Channel Signaling
CHAP
Challenge Handshake Authentication Protocol
CID
Caller ID
CIDR
Classless Inter-Domain Routing
CLASS
Custom Local Area Signaling Service
CLEI
Common Language Equipment Identification
CLI
Command Line Interface
CO
Central Office
CPD
Calling Party Disconnect
CPE
Customer Provided Equipment
CRC
Cyclic Redundancy Check
CRV
Call Reference Value
CSU
Channel Service Unit
dB
decibel
DCS
Digital Signal Processor
DDNS
Dynamic Domain Name System
DDS
Digital Data Service
Glossary
DLC
DLC
Digital Loop Carrier
DLCI
Data Link Connection Identifier
DMZ
Demilitarized Zone
DNS
Domain Naming System
DS0
Digital Signal Level Zero (64 kbps) (1 voice channel)
DS1
Digital Signal Level 1 (1.544 Mbps)
DSU
Digital Service Unit/Data service Unit
DTE
Data Terminal Equipment
DTMF
Dual Tone Multi-Frequency
ES
Errored Seconds
ESF
Extended Superframe
FDL
Facilities Data Link
FXS
Foreign Exchange Station
GS
Ground Start
HDB3
High Density Bipolar 3
IP
Internet Protocol
IPX
Internet Packet eXchange
ISDN
Integrated Services Digital Network
LAN
Local Area Network
LAPD
Link Access Procedure on the D channel status
LBO
Line Build Out
LLC
Logical Link Control
LMI
Local Management Interface
LS
Loop Start
LULT
Line Unit Line Termination
Mbps
Million Bits Per Second
MGCP
Media Gateway Control Protocol
MLPPP
Multilink PPP
Glossary-2
Adit 3500 - Release 1.6
Glossary
MPPE
MPPE
Microsoft Point-to-Point Encryption
MS-CHAP
Microsoft CHAP
MVEC
Majority Vote Error Correction
NAT
Network Address Translation
NCS
Network-based Call Signaling
NEBS
Network Equipment Building Standards
NRZ
Non-Return to Zero
NSE
Named Service Event
NTP
Network Time Protocol
OSPF
Open Shortest Path First
PAP
Password Authentication Protocol
PHY
Physical specifications
POTS
Plain Old Telephone Service
PPP
Point-to-Point Protocol
PRI
Primary Rate Interface
PVC
Permanent Virtual Circuit
QoS
Quality of Service
RADIUS
Remote Authentication Dial-In Service
SABME
Set Asynchronous Balanced Mode Extended
SDP
Session Description Protocol
SIP
Session Initiation Protocol
STP
Spanning Tree Protocol
T1
Trunk Level 1 (1.544 Mbps)
TDM
Time Division Multiplex
TEI
Terminal Endpoint Identifier
TFTP
Trivial File Transfer Protocol
TOS
Type of Service
UAC
User Agent Client
Adit 3500 - Release 1.6
Glossary-3
Glossary
UAS
UAS
User Agent Server
VC
Virtual Channel
VLAN
Virtual Local Area Network
VPN
Virtual Private Network
WAN
Wide Area Network
WINS
Windows Internet Naming Service
Glossary-4
Adit 3500 - Release 1.6
Glossary
10Base-T
10Base-T
The most widely installed Ethernet local area networks (LANs) use ordinary telephone
twisted-pair wire. When used on Ethernet, this carrier medium is known at 10BASE-T.
10BASE-T supports Ethernet’s 10 Mbps transmission speed.
100Base-TX
Also called “Fast Ethernet”, it is a 100 Mbps version of Ethernet. 100Base-T transmits at
100 Mbps rather than 10 Mbps. Like regular Ethernet, Fast Ethernet is a shared media LAN.
All nodes share the 100 Mbps bandwidth. 100Base-TX uses two pairs of Category 5
cabling, one pair for transmission, one pair for receiving.
Address Resolution
Protocol (ARP)
An internet protocol used to map dynamic internet addresses to physical addresses on Local
Area Networks.
Alternate Mark
Inversion (AMI)
The line-coding format in T1 transmission systems whereby successive ones (marks) are
alternately inverted (sent by polarity opposite that of the preceding mark).
analog
The telephone transmission of voice, video or image. Telephone transmission and/or
switching that is not digital.
Asynchronous Transfer
Mode (ATM)
Very high speed transmission technology. ATM is a high bandwidth, low-delay,
connection-oriented, packet-like switching and multiplexijng technique. Usable capacity is
segmented into 53-byte fixed-size cells, consisting of header and information fields,
allocated to services on demand. The term “asynchronous” applies, as each cell is presented
to the network on a “start-stop” basis - in other words, asynchronously.
authentication
The process of identifying an individual, usually based on a username and password
combination, although the process can be many more steps. In security systems,
authentication is distinct from authorization, which is the process of giving individuals
access to system objects based on their identity. Authentication merely ensures that the
individual is who he or she claims to be, but says nothing about the access rights of the
individual. Authentication in whatever form, is usually followed by authorization.
bandwidth
The width of a communications channel. Analog is typically measured in Hertz (cycles per
second), a voice conversation is typically measured in bits per second.
Basic Rate Interface
(BRI)
Basic Rate Interface (2b+d) in ISDN.
Bipolar 8-Zero
Substitution
A coding scheme that maintains ones density.
bipolar violation
BPV. A violation is declared for AMI if two successive pulses have the same polarity.
bit
Contraction of the words "binary" and "digit".
Bit Error Rate
The number of erred bits divided by the total number of bits.
broadband
A technology that provides an extremely wide and fast bandwidth so that many people can
simultaneously use the service. It is generally associated with multiple types of
transmissions on the same connection such as voice, data, video and digital or analog
information.
Adit 3500 - Release 1.6
Glossary-5
Glossary
Central Office (CO)
Central Office (CO)
Where telephone companies terminate customer lines and locate switching equipment to
interconnect those lines with other networks.
channel
A generic term for a communications path on a given medium; multiplexing techniques
allow providers to put multiple channels over a single medium.
Channel Associated
Signaling (CAS)
Carrying signaling information within the data channels of a T1 line (in band) rather than
on a separate control channel. CAS signaling is also used to carry 911 emergency data such
as telephone number and location information.
Channel Service Unit
(CSU)
The interface to the T1 line that terminates the local loop.
Classless Inter-Domain
Routing
CIDR is a new addressing scheme for the Internet which allows for more efficient
allocation of IP addresses than the old Class A, B, and C address scheme.
CLEI Codes
Common Language Equipment Identifier codes, that are assigned by Bellcore to provide a
standard method of identifying telecommunications equipment in a uniform, featureoriented language.
CLI
Command Line Interface
collision
In Ethernet, the result of two nodes transmitting simultaneously. The frames from each
device impact and are damaged when they meet on the physical media.
command line
The command line is where you enter MS-DOS commands.
compander
Companding is the process of compressing the amplitude range of a signal for economical
transmission and then expanding them back to their original form at the receiving end.
Demilitarized Zone
(DMZ)
A collection of computers that are shielded from both the trusted network and the untrusted
network by packet-filtering routers and gateways.
Domain Naming System
(DNS)
DNS. A mechanism used in the Internet for translating names of host computers into
addresses.
download
To transfer data from a larger “host” system to a smaller “client” system's hard drive or
other local storage device.
Dual Tone MultiFrequency (DTMF)
Dual Tone Multi-Frequency is a term describing push button or Touchtone dialing.
Dynamic Domain Name
System (DDNS)
Allows the hosting of a website, FTP server, or e-mail server with a fixed domain name
(e.g., www.xyz.com) and a dynamic IP address.
Dynamic Host
Configuration Protocol
(DHCP)
DHCP is a network configuration that allows maintenance to be performed from a central
site rather than by end users.
Earth ground
A wire conductor that terminates in the earth for electrical purposes. It is generally the
negative side of the circuit and is most important in alternating current (AC) circuits.
Chassis Ground is the general term used in direct current (DC) circuits.
Glossary-6
Adit 3500 - Release 1.6
Glossary
Electro-magnetic Interference (EMI)
Electro-magnetic
Interference (EMI)
Equipment used in high speed data systems, including ATM, that generate and transmit
many signals in the radio frequency portion of the electromagnetic spectrum. Interference
to other equipment or radio services may result if sufficient power from these signals
escape the equipment enclosures or transmission media. National and international
regulatory agencies (FCC, CISPR, etc.) set limits for these emissions. Class A is for
industrial use and Class B is for residential use.
Ethernet
Ethernet is a particular network topology and protocol, especially useful in LANs. It comes
in various speeds and is often regarded as THE current technology for general network
direct connection. The current connectivity is generally considered to be 10Base-T or
100Base-T, while the backbone, if one is used, is coaxial cable or Fiber optics. There is also
a 1000Base-T for certain specialty copper joining situations.
Facilities Data Link
(FDL)
FDL supports the communication of various network information in the form of in-service
monitoring and diagnostics.
filter
An operating parameter used with routers that can be set to block the transfer of packets
from one LAN to another.
firewall
Any of a number of security schemes that prevent unauthorized users from gaining access
to a computer network and/or may monitor the transfer of information to and from the
network.
frame
A fragment of data that is packaged into a frame format, which comprises a header,
payload, and trailer.
Frame Reject (FRMR)
The FRMR response frame is sent to report the receiver of a frame cannot successfully
process that frame and that the error condition is not correctable by sending the offending
frame again.
Foreign Exchange
A Central Office trunk which has access to a distant central office. Dial Tone is returned
from that distant Central Office, and a location can be reached in the area of the foreign
Central Office by dialing a local number. This will provide easier access for customers in
that area and calls may be made anywhere in the foreign exchange area for a flat rate.
Foreign Exchange
Service
Foreign exchange (FX) service is a service that can be ordered from the telephone company
that provides local telephone service from a central office which is outside (foreign to) the
subscriber’s exchange area. Simply, a user can pick up the phone in one city and receive a
dial tone in the foreign city. This kind of connection is provided by a type of trunk called
foreign exchange (FX) trunk. FX trunk signaling can be provided over analog or T-1 links.
Connecting POTS telephones to a computer telephony system via T-1 links requires a
channel bank configured with FX type connections.
G.711
ITU-T Recommendation for an algorithm designed to transmit and receive A-law and mulaw PCM voice at digital bit rates of 48, 56, and 64 Kbps. It is used for digital telephone
sets on digital PBX and ISDN channels.
G.729
International Telecommunications Union’s standard voice algorithm (CS-ACELP) voice
algorithm for the coding of encoding/decoding of speech at 8 Kbps using conjugatestructure, algebraic-code excited linear predictive methods. Described in the ITU-T
standard in its G-series recommendations.
Adit 3500 - Release 1.6
Glossary-7
Glossary
gateway
gateway
An entrance and exit into a communications network
Graphical User Interface
(GUI)
GUI, pronounced “GOOEY”. A set of screen presentations and metaphors that utilize
graphic elements such as icons in an attempt to make an operating system easier to use.
ground
A physical connection to the earth or other reference point.
ground start (GS)
A method of signaling on subscriber trunks in which one side of the two wire trunk
(typically the ring conductor of Tip and Ring) is momentarily grounded to get dial tone.
hash algorithm
A one way function that takes an input message of arbitrary length and produces a fixed
length digest. Adit uses both Secure Hash Algorithm (SHA) and Message Digest 5 (MD5)
hashes within our implementation of the IPSec framework.
High Density Bipolar 3
HDB3. A bipolar coding method that does not allow more than 3 consecutive zeros.
hop
Each individual short trip that packets make from router to router, as they are routed to their
destination.
host
A computer that allows users to communicate with other host computers on a network.
impedance
The total opposition a circuit offers to the flow of alternating current. It is measured in ohms
and the lower the ohmic value, the better the quality of the conductor
internet
“A network of networks,” the Internet supports FTP, WWW, Gopher,
E-Mail, Telnet, and many other world-wide information transfer protocols and services.
ISPs provide an effective interface with the Internet. The Internet itself is made up of
thousands of LANs and WANs, all using TCP/IP to provide information services to
millions of users. A worldwide network of networks that all use the TCP/IP
communications protocol and share a common address space.
Internet Protocol (IP)
Internet Protocol, the method by which most Internet activity takes place. Members with
access to TCP/IP through a SLIP or PPP connection can connect to many ISP services in
this manner. As the name implies, it is a protocol for network activity. Most current
networks support some sort of TCP or IP directly or indirectly.
IP address
A string of four numbers separated by periods (such as 111.22.3.144) used to represent a
computer on the Internet. The format of the address is specified by the Internet Protocol in
RFC 791. Each of the four number must be 255 or less; they may be 0.
IPSec
IPSec (IP Security) is a set of IP extensions developed by IETF to provide security services
compatible with the existing IP standard (IPv.4) and also the upcoming one (IPv.6). In
addition, IPSec can protect any protocol that runs on top of IP, for instance TCP, UDP, and
ICMP. The IPSec provides cryptographic security services. These services allow for
authentication, integrity, access control, and confidentiality. IPSec allows for the
information exchanged between remote sites to be encrypted and verified. You can create
encrypted tunnels (VPNs), or just do encryption between computers.
jitter
Interference on an analog line caused by a variation of a signal from its reference timing
slots. Jitter can cause problems in the receipt of data and any subsequent processing of that
data.
Glossary-8
Adit 3500 - Release 1.6
Glossary
Local Area Network (LAN)
Local Area Network
(LAN)
A short distance data communications network (typically within a building or campus)
used to link together computers and peripheral devices under some form of standard
control.
Line Build Out (LBO)
T1s require the last span to lose 15 - 22.5 dB, a selectable output attenuation is generally
required of DTE equipment.
Line Coding Violation
(LCV)
This parameter is a count of both BPVs and EXZs occurring over the accumulation period.
An EXZ increments the LCV by one regardless of the length of the zero string.
Line Errored Seconds
(LES)
A Line Errored Second is a second in which one or more CVs occurred OR one or more
LOS defects.
Local Link Control
(LLC)
A protocol developed by the IEEE 802.2 committee for data-link-level transmission control
Local Management
Interface
A specification for the use of frame-relay products that define a method of exchanging
status information between devices such as routers
loop start (LS)
A method of demanding dial tone from the central office by completing an electrical
pathway between the outbound and return conductors of a telephone line. Loop start is
employed by single-line telephone instruments, for example
loopback
A diagnostic test in which a signal is transmitted across a medium while the sending device
waits for its return.
MAC Address
The address for a device as it is identified at the Media Access Control layer in the network
architecture
Management
Information Base (MIB)
A data base of objects, with attributes and values, representing the manageable components
of a network device. Used in SNMP. There are industry standardized MIBs and proprietary
MIBs
mapping
In network operations, the logical association of one set of values, such as addresses on one
network, with quantities or values of another set, such as devices on another network.
Media Access Control
(MAC)
The lower of the two sub-layers of the data link layer defined by the IEEE. The MAC sublayer handles access to shared media, such as whether token passing or contention will be
used. The MAC contains the standardized data link layer address that is required for every
port or device that connects to a LAN. Other devices in the network use these addresses to
locate specific ports in the network and to create and update routing tables and data
structures. MAC addresses are 6 bytes long and are controlled by the IEEE.
Media Gateway Control
Protocol (MGCP)
MGCP. A control and signal standard for the conversion of audio signals carried on
telephone circuits (PSTN) to data packets carried over the Internet or other packet
networks.
Microsoft CHAP
Microsoft Challenge Handshake Authentication Protocol (MS-CHAP) is the Microsoft
version of CHAP and is an extension to RFC 1994. Like the standard version of CHAP,
MS-CHAP is used for PPP authentication; in this case, authentication occurs between a PC
using Microsoft Windows NT or Microsoft Windows 95 and a Cisco router or access server
acting as a network access server (NAS).
Adit 3500 - Release 1.6
Glossary-9
Glossary
Multilink PPP (MLPPP)
Multilink PPP (MLPPP)
MultiLink PPP. An extension to the point-to-point protocol that enables two channels to be
linked together to double the throughput. It is used for ISDN transmission and channel
bonding
Microsoft Point-to-Point
Encryption (MPPE)
A 128-bit key or 40-bit key encryption algorithm using RSA RC4. MPPE provides for
packet confidentiality between the remote access client and the remote access or tunnel
server and is useful where IP security (IPSec) is not available. MPPE 40-bit keys are used
to satisfy current North American export restrictions. MPPE is compatible with Network
Address Translation.
modem
MOdulator-DEModulator, a device that takes digital computer signal, converts it to analog,
and sends it across the phone line. Another modem on the reverse does the exact opposite
action. Modems transfer data at different speeds or rates, called baud.
multiplexer
Electronic equipment which allows two or more signals to pass over one communications
circuit. The circuit may be analog or digital
MUX
See multiplexer
NetBIOS
Network Basic Input/Output System.NetBIOS is a program that allows applications on
different computers to communicate within a Local Area Network (LAN).
network
A set of computers linked to one another for data sharing, or the link itself.
Network Time Protocol
(NTP)
Network Time Protocol, developed to maintain a common sense of time among Internet
hosts around the world. Many systems on the Internet run NTP, and have the same time
(relative to Greenwich Mean Time).
Non-Return to Zero
(NRZ)
A binary encoding scheme in which ones and zeros are represented by opposite and
alternating high and low voltages and where there is no return to a zero (reference) voltage
between encoded bits.
Open Shortest Path First
(OSPF)
Short for Open Shortest Path First, an interior gateway routing protocol developed for IP
networks based on the shortest path first or link-state algorithm.
Routers use link-state algorithms to send routing information to all nodes in an
internetwork by calculating the shortest path to each node based on a topography of the
Internet constructed by each node. Each router sends that portion of the routing table (keeps
track of routes to particular network destinations) that describes the state of its own links,
and it also sends the complete routing structure (topography).
The advantage of shortest path first algorithms is that they results in smaller more frequent
updates everywhere. They converge quickly, thus preventing such problems as routing
loops and Count-to-Infinity (when routers continuously increment the hop count to a
particular network). This makes for a stable network.
Note: OSPF Version 2 is defined in RFC 1583. It is rapidly replacing RIP on the Internet.
packet
A packet consists of the data to be transmitted and certain control information.
PAP
Password Authentication Protocol
PAT
Port Address Translation
Glossary-10
Adit 3500 - Release 1.6
Glossary
PHY
PHY
PHY as in physical specifications. OSI Physical Layer, which provides for transmission of
cells over a physical medium connecting two ATM devices.
ping
Packet InterNet Grouper. PING is a program used to test whether a particular network
destination on the Internet is online (i.e. working) by repeatedly bouncing a "signal" off a
specified address and seeing how long that signal takes to complete the round trip. No
return signal - site is down or unreachable. Portion is returned - trouble with the connection.
PLAR
Private Line, Automatic Ringdown. A leased voice circuit that connects two single
instruments together. When either handset is lifted, the other instrument automatically
rings.
PPP
Point-to-Point Protocol. is used for establishing a point-to-point link that provides a single,
preestablished WAN communications path from the customer premises, through a carrier
network (the telephone company), to a remote network
PPPoT1
Point-to-Point over T1.
PRACK
Provisionable acknowledgement.
Primary Rate Interface
(PRI)
The ISDN equivalent of a T1. The Primary Rate Interface (delivered to the customer’s
premise) provides 23B+D (N.America) or 30B+D (Europe) running at 1.544 Mb/sec and
2.048 Mb/sec, respectively.
protocol
Procedure or set of rules.
PVC
Permanent Virtual Circuit. A PVC is a permanent channel connection between two ATM
devices. PVC’s allow network transmissions to be started without having to first establish
a connection with the end point ATM device. When a PVC is constructed, the end points
of the connection will agree upon a path in which data will travel, and therefore agree upon
the route that data will travel to reach its destination.
Quality of Service (QoS)
The measure of the telephone service quality provided to a subscriber.
RADIUS
Remote Authentication Dial-In Service. RADIUS is a client/server-based authentication
software system. The software supports remote access applications, allowing an
organization to maintain user profiles in a centralized database residing on an
authentication server which can be shared by multiple remote access servers.
robbed bit
A type of analog signaling that will occasionally steal information bits used for circuit
signaling coding.
router
A computer or internet working device that directs traffic and moves packets between
networks. A hardware architecture used in LANs, MANs, WANs, the Internet and
Intranets. A device that connects any number of LANs. Routers use headers and a
forwarding table to determine where packets go, and they use ICMP to communicate with
each other and configure the best route between any two hosts.
Adit 3500 - Release 1.6
Glossary-11
Glossary
Router Information Protocol (RIP)
Router Information
Protocol (RIP)
RIP is based on distance vector algorithms that measure the shortest path between two
points on a network, based on the addresses of the originating and destination devices. The
shortest path is determined by the number of hops between those points. Each router
maintains a routing table, or routing database, of known addresses and routes; each router
periodically broadcasts the contents of its table to neighboring routers in order that the
entire network can maintain a synchronized database.
Router Information
Protocol Version 1
(RIPv1)
Original version of RIP. This is a classful routing protocol, it does not have the ability to
transmit the subnet mask within its updates. RIP v1 imposes the subnet mask on the
inbound interface and this is normally defined by the engineer. Learned routes are entered
into the routing table with their natural mask. As a result there can be a great waste of
internet host addresses.
Router Information
Protocol Version 2
(RIPv2)
Second version of RIP, additional to Version 1, enables the use of a simple authentication
mechanism to secure table updates. More importantly, RIP 2 supports subnet masks, a
critical feature that is not available in RIP (v1).
SAP
Service Access Point.
Session Initiation
Protocol (SIP)
SIP is the emerging standard for setting up telephone call, multimedia conferencing, instant
messaging and other types of real-time communication on the internet.
signal
A generated electrical impulse that is a change in voltage to trigger an event.
Simple Network
Management Protocol
(SNMP)
SNMP is the most common method by which network managements applications can
query a management agent using a supported MIB (Management Information Base).
SNMP operates at the OSI application layer.
spanning tree
Spanning Tree Protocol is a link management protocol that provides path redundancy while
preventing undesirable loops in the network. For an Ethernet network to function properly,
only one active path can exist between two stations.
SRV
SRV is an resource record that specifies the locations of servers.
subnet mask
32-bit quantity indicating which bits in an IP address identify the physical network
T1
Trunk Level 1. A digital transmission link with a total signaling speed of 1.544 Mbps. T-1
is a standard for the digital transmission in North America.
telnet
An Internet standard protocol that enables a computer to function as a terminal working
from a remote computer
TDM
Time Division Multiplex. A technique for transmitting a number of separate data, voice
and/or video signals simultaneously over one communications medium by quickly
interleaving a piece of each signal one after another.
Terminal Endpoint
Identifier (TEI)
Up to eight devices can be connected to one ISDN BRI (or PRI) line. The TEI defines, for
a given message, which of the eight devices is communicating with the Central Office
switch. In general, more than one of the eight may be communicating.
TFTP
Trivial File Transfer Protocol.
Glossary-12
Adit 3500 - Release 1.6
Glossary
ticks
ticks
The distance between two networks, measured in time increments. Ticks may be used to
designate primary and secondary routes to the same network.
traffic
The load of packets carried by a network or portion of a network. Heavy traffic slows down
the response time of the individual packets.
trunk
A communication line between two switching systems.
tunneling
To provide a secure, temporary path over the Internet.
User Agent Client (UAC)
One of the two types of User Agents in SIP. UAC initiates a request that is sent to a UAS.
User Agent Server (UAS)
One of the two types of User Agents in SIP. UAS receives a request from a UAC and
returns.
V.90
The standard for full-duplex modems sending and receiving data across phone lines at up
to 56,600 bps, approved by the International Telecommunication Union (ITU) in February,
1998.
Virtual Private Network
(VPN)
A software defined network offering the appearance, functionality and usefulness of a
dedicated private network, at a price savings.
VC MUX
Virtual Channel Multiplexer
Wide Area Network
(WAN)
A private long distance network that uses leased lines to connect computers or LANs. A
wide area network is a linking of computers not physically attached through conventional
network connectivity. Usually the WAN connection is a dedicated or high grade dial up
phone link. It is often done with T1 or T3 connections but can also be through satellite or
other technologies.
WINS
Windows Internet Naming Service. A system that determines the IP address associated
with a particular network computer.
Virtual Connection (VC)
A connection between two hosts in a packet-switching network. In this case, the two hosts
can communicate as though they have a dedicated connection even though the packets
might actually travel very different routes before arriving at their destination.
Virtual Local Area
Network (VLAN)
A VLAN consists of a network of computers that behave as if connected to the same wire,
though they may actually be physically connected to different segments of a LAN. VLANs
are configured through software rather than hardware, which makes them extremely
flexible.
Adit 3500 - Release 1.6
Glossary-13
Glossary
Virtual Local Area Network (VLAN)
Glossary-14
Adit 3500 - Release 1.6
INDEX
Index
A
Adit 3500
base platform . . . . . . . . . . . . . . . . . . . . . . . . . . . . . . 1-1
chassis . . . . . . . . . . . . . . . . . . . . . . . . . . . . . . . . . . . 1-9
Installation . . . . . . . . . . . . . . . . . . . . . . . . . . . . . . . . 2-4
overview . . . . . . . . . . . . . . . . . . . . . . . . . . . . . . . . . 1-2
technical specifications . . . . . . . . . . . . . . . . . . . . . . 1-5
Alarm
LEDs . . . . . . . . . . . . . . . . . . . . . . . . . . . . . . . . . . . . 3-8
all modes
key . . . . . . . . . . . . . . . . . . . . . . . . . . . . . . . . . . . . . . 4-7
altitude . . . . . . . . . . . . . . . . . . . . . . . . . . . . . . . . . . . . . 2-2
B
Base Platform
technical specifications . . . . . . . . . . . . . . . . . . . . . . 1-5
Basic Configuration . . . . . . . . . . . . . . . . . . . . . . . . . . . 4-8
Configure as a SIP Gateway . . . . . . . . . . . . . . . . . 4-25
Configure WAN Interface . . . . . . . . . . . . . . . . . . . 4-12
Modify Default Admin User . . . . . . . . . . . . . . . . . 4-10
Battery Backup . . . . . . . . . . . . . . . . . . . . . . . . . . . . . . 2-10
Installation . . . . . . . . . . . . . . . . . . . . . . . . . . . . . . . 2-11
Power Connector . . . . . . . . . . . . . . . . . . . . . . . . . . 2-15
Technical Specifications . . . . . . . . . . . . . . . . . . . . 2-10
Battery connection . . . . . . . . . . . . . . . . . . . . . . . . . . . . 3-4
C
cabling
ferrite beads . . . . . . . . . . . . . . . . . . . . . . . . . . . . . . . 2-6
chassis . . . . . . . . . . . . . . . . . . . . . . . . . . . . . . . . . . . . . 1-9
dimensions . . . . . . . . . . . . . . . . . . . . . . . . . . . 1-8, 2-10
CLI
connection . . . . . . . . . . . . . . . . . . . . . . . . . . . . . . . . 4-5
CLI command
key . . . . . . . . . . . . . . . . . . . . . . . . . . . . . . . . . . . . . . 4-7
Configuration . . . . . . . . . . . . . . . . . . . . . . . . . . . . . . . . 4-1
Basic Configuration . . . . . . . . . . . . . . . . . . . . . . . . . 4-8
Login . . . . . . . . . . . . . . . . . . . . . . . . . . . . . . . . . . . . 4-6
PC Network Configuration . . . . . . . . . . . . . . . . . . . 4-2
Setting up a CLI Connection . . . . . . . . . . . . . . . . . . 4-5
Web-Based Management . . . . . . . . . . . . . . . . . . . . . 4-4
Configure WAN Interface . . . . . . . . . . . . . . . . . . . . . 4-12
Ethernet WAN . . . . . . . . . . . . . . . . . . . . . . . . . . . . 4-23
Multiple T1s (ML-PPP) . . . . . . . . . . . . . . . . . . . . . 4-16
Single T1 (PPP) . . . . . . . . . . . . . . . . . . . . . . . . . . . 4-12
connectors
DB-9 . . . . . . . . . . . . . . . . . . . . . . . . . . . . . . . . . . . .
interface . . . . . . . . . . . . . . . . . . . . . . . . . . . . . . . . .
RJ-11 . . . . . . . . . . . . . . . . . . . . . . . . . . . . . . . . . . . .
RS-232 . . . . . . . . . . . . . . . . . . . . . . . . . . . . . . . . . .
3-7
3-3
3-7
3-7
D
DC Power . . . . . . . . . . . . . . . . . . . . . . . . . . . . . . . . . . 3-4
dimensions . . . . . . . . . . . . . . . . . . . . . . . . . . . . .1-8, 2-10
DS1
connector pinout . . . . . . . . . . . . . . . . . . . . . . . . . . . 3-5
LEDs . . . . . . . . . . . . . . . . . . . . . . . . . . . . . . . . . . . . 3-5
DS1/E1 connection ports . . . . . . . . . . . . . . . . . . . . . . 3-5
DS1/E1 connector pinout . . . . . . . . . . . . . . . . . . . . . . 3-5
E
E1 connector pinout . . . . . . . . . . . . . . . . . . . . . . . . . . 3-5
Electrical
Cabling . . . . . . . . . . . . . . . . . . . . . . . . . . . . . . . . . . 3-1
Installation . . . . . . . . . . . . . . . . . . . . . . . . . . . . . . . 3-1
Electrical Installation & Cabling
Adit 3500 . . . . . . . . . . . . . . . . . . . . . . . . . . . . . . . . 3-2
Alarm/Status LEDs . . . . . . . . . . . . . . . . . . . . . . . . . 3-8
Interface Connectors . . . . . . . . . . . . . . . . . . . . . . . . 3-3
reset button . . . . . . . . . . . . . . . . . . . . . . . . . . . . . . . 3-8
Environment Requirements
non-operating altitude . . . . . . . . . . . . . . . . . . . . . . . 2-2
operating altitude . . . . . . . . . . . . . . . . . . . . . . . . . . 2-2
operating temperature . . . . . . . . . . . . . . . . . . . . . . . 2-2
relative humidity . . . . . . . . . . . . . . . . . . . . . . . . . . . 2-2
storage temperature . . . . . . . . . . . . . . . . . . . . . . . . . 2-2
Ethernet connector pinout . . . . . . . . . . . . . . . . . . . . . . 3-6
Ethernet WAN . . . . . . . . . . . . . . . . . . . . . . . . . . . . . . 4-23
F
feature keys . . . . . . . . . . . . . . . . . . . . . . . . . . . . . . . . . 4-7
ferrite beads . . . . . . . . . . . . . . . . . . . . . . . . . . . . . . . . . 2-6
G
Grounding the unit . . . . . . . . . . . . . . . . . . . . . . . . . . . 3-3
H
humidity . . . . . . . . . . . . . . . . . . . . . . . . . . . . . . . . . . . 2-2
Index
I
I
Installation Environment . . . . . . . . . . . . . . . . . . . . . . .
non-operating altitude . . . . . . . . . . . . . . . . . . . . . . .
operating altitude . . . . . . . . . . . . . . . . . . . . . . . . . .
operating temperature . . . . . . . . . . . . . . . . . . . . . . .
relative humidity . . . . . . . . . . . . . . . . . . . . . . . . . . .
storage temperature . . . . . . . . . . . . . . . . . . . . . . . . .
interface connectors . . . . . . . . . . . . . . . . . . . . . . . . . . .
10/100Base-TX Ethernet . . . . . . . . . . . . . . . . . . . .
12 VDC power connection . . . . . . . . . . . . . . . . . . .
battery connection . . . . . . . . . . . . . . . . . . . . . . . . . .
DS1/E1 connection ports . . . . . . . . . . . . . . . . . . . .
grounding the unit . . . . . . . . . . . . . . . . . . . . . . . . . .
RJ-11 (FXS) connector . . . . . . . . . . . . . . . . . . . . . .
RS-232 craft port . . . . . . . . . . . . . . . . . . . . . . . . . . .
Internet Connection . . . . . . . . . . . . . . . . . . . . . . . . . . .
2-2
2-2
2-2
2-2
2-2
2-2
3-3
3-6
3-4
3-4
3-5
3-3
3-7
3-7
4-3
K
Key enabled Features . . . . . . . . . . . . . . . . . . . . . . . . . 4-7
Key Enabled Software Features . . . . . . . . . . . . . . . . . 4-7
keys, feature . . . . . . . . . . . . . . . . . . . . . . . . . . . . . . . . 4-7
L
LAN Connection . . . . . . . . . . . . . . . . . . . . . . . . . . . . .
LEDs
Alarm . . . . . . . . . . . . . . . . . . . . . . . . . . . . . . . . . . .
DS1 . . . . . . . . . . . . . . . . . . . . . . . . . . . . . . . . . . . . .
Status . . . . . . . . . . . . . . . . . . . . . . . . . . . . . . . . . . . .
Linux . . . . . . . . . . . . . . . . . . . . . . . . . . . . . . . . . . . . . .
Login . . . . . . . . . . . . . . . . . . . . . . . . . . . . . . . . . . . . . .
4-3
3-8
3-5
3-8
4-3
4-6
M
Windows NT . . . . . . . . . . . . . . . . . . . . . . . . . . . . . .4-2
Windows XP . . . . . . . . . . . . . . . . . . . . . . . . . . . . . . .4-2
Physical Information . . . . . . . . . . . . . . . . . . . . . .1-8, 2-10
Physical Installation . . . . . . . . . . . . . . . . . . . . . . . . . . .2-1
Adit 3500 Installation . . . . . . . . . . . . . . . . . . . . . . . .2-4
Battery Backup . . . . . . . . . . . . . . . . . . . . . . . . . . . .2-10
Installation Environment . . . . . . . . . . . . . . . . . . . . .2-2
Rack Mounting . . . . . . . . . . . . . . . . . . . . . . . . . . . . .2-8
Unpacking and Inspection . . . . . . . . . . . . . . . . . . . .2-2
User Safety . . . . . . . . . . . . . . . . . . . . . . . . . . . . . . . .2-3
Wall Mounting . . . . . . . . . . . . . . . . . . . . . . . . . . . . .2-7
pinouts
DB-9 . . . . . . . . . . . . . . . . . . . . . . . . . . . . . . . . . . . . .3-7
RJ-48C . . . . . . . . . . . . . . . . . . . . . . . . . . . . . . . . . . .3-5
Power
battery backup . . . . . . . . . . . . . . . . . . . . . . . . . . . .2-10
DC Power . . . . . . . . . . . . . . . . . . . . . . . . . . . . . . . . .3-4
power connection . . . . . . . . . . . . . . . . . . . . . . . . . . . . .3-4
R
rack mounting . . . . . . . . . . . . . . . . . . . . . . . . . . . . . . . .2-8
relative humidity . . . . . . . . . . . . . . . . . . . . . . . . . . . . . .2-2
reset button . . . . . . . . . . . . . . . . . . . . . . . . . . . . . . . . . .3-8
restore
factory defaults . . . . . . . . . . . . . . . . . . . . . . . . . . . . .4-9
RJ-11 connector pinout . . . . . . . . . . . . . . . . . . . . . . . . .3-7
RJ-45 pinout . . . . . . . . . . . . . . . . . . . . . . . . . . . . . . . . .3-6
RS-232 . . . . . . . . . . . . . . . . . . . . . . . . . . . . . . . . .3-3, 4-5
connector pinout . . . . . . . . . . . . . . . . . . . . . . . . . . . .3-7
S
Modify Default Admin User . . . . . . . . . . . . . . . . . . . 4-10
mounting
rack . . . . . . . . . . . . . . . . . . . . . . . . . . . . . . . . . . . . . 2-8
wall bracket . . . . . . . . . . . . . . . . . . . . . . . . . . . . . . . 2-7
Multiple T1s (ML-PPP) . . . . . . . . . . . . . . . . . . . . . . 4-16
Setting up a CLI Connection . . . . . . . . . . . . . . . . . . . .4-5
Single T1 (PPP) . . . . . . . . . . . . . . . . . . . . . . . . . . . . .4-12
Status LED . . . . . . . . . . . . . . . . . . . . . . . . . . . . . . . . . .3-8
storage temperature range . . . . . . . . . . . . . . . . . . . . . . .2-2
System
Overview . . . . . . . . . . . . . . . . . . . . . . . . . . . . . . . . .1-2
N
T
non-operating altitude . . . . . . . . . . . . . . . . . . . . . . . . . 2-2
technical specifications . . . . . . . . . . . . . . . . . . . . . . . . .1-5
temperature requirements . . . . . . . . . . . . . . . . . . . . . . .2-2
O
U
operating
altitude . . . . . . . . . . . . . . . . . . . . . . . . . . . . . . . . . . . 2-2
temperature range . . . . . . . . . . . . . . . . . . . . . . . . . . 2-2
Unpacking and Inspection . . . . . . . . . . . . . . . . . . . . . .2-2
User Safety . . . . . . . . . . . . . . . . . . . . . . . . . . . . . . . . . .2-3
P
W
PC Network Configuration . . . . . . . . . . . . . . . . . . . . .
Internet Connection . . . . . . . . . . . . . . . . . . . . . . . . .
LAN Connection . . . . . . . . . . . . . . . . . . . . . . . . . . .
Linux . . . . . . . . . . . . . . . . . . . . . . . . . . . . . . . . . . . .
Windows 2000/98/Me . . . . . . . . . . . . . . . . . . . . . . .
Index - 2
4-2
4-3
4-3
4-3
4-2
wall mounting . . . . . . . . . . . . . . . . . . . . . . . . . . . . . . . .2-7
weight . . . . . . . . . . . . . . . . . . . . . . . . . . . . . . . . .1-8, 2-10
Windows 2000/98/Me . . . . . . . . . . . . . . . . . . . . . . . . . .4-2
Windows NT . . . . . . . . . . . . . . . . . . . . . . . . . . . . . . . . .4-2
Windows XP . . . . . . . . . . . . . . . . . . . . . . . . . . . . . . . . .4-2
Adit 3500 - Release 1.6