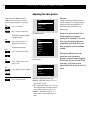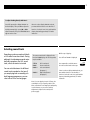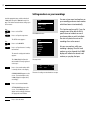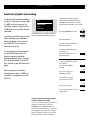
1
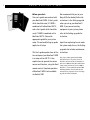
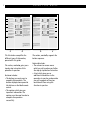
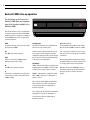
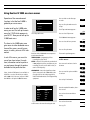
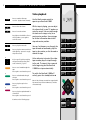
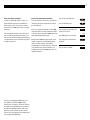
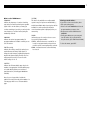
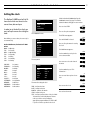
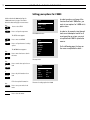
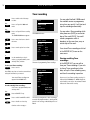
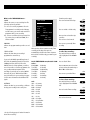
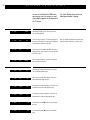
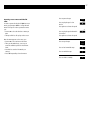
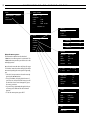
I N T R O D U C I N G
B E O C O R D
V
8 0 0 0
The BeoCord V 8000 videotape
recorder features all the Bang &
Olufsen qualities: Excellent sound
and picture qualities, and simple and
straightforward operation.
The BeoCord V 8000 is designed to
be used with BeoVision TVs
constituting an elegant Bang &
Olufsen Video system.
For complete operation of the
BeoCord V 8000, use the Beo4
remote control.
The Beo4 remote control integrates
remote operation of your BeoVision
TV and your BeoCord V 8000
videotape recorder.
User’s Guide
1
2
A B O U T
B E O C O R D
V
8 0 0 0
Before you start…
We recommend that you (or your
Two user’s guides are enclosed with
Bang & Olufsen dealer) follow the
your BeoCord V 8000. A User’s guide
instructions in the Setting-up guide
which should be used, if V 8000 is
when you set up your BeoCord V
combined with a BeoVision MX TV,
8000. If you connect auxiliary
and a User’s guide which should be
equipment to your system, please
used, if V 8000 is combined with a
refer to the Setting-up guide for
BeoVision MS TV. Choose the
instruction.
appropriate guide for your system
setup. The enclosed Setting-up guide
Apart from explaining how to make
applies to all setups.
the system ready for use, the Settingup guide also includes maintenance
This User’s guide explains how to fine
instructions.
tune and preset your BeoCord V 8000
in a setup with an MS TV. It also
explains how to operate the various
sources and functions, using the Beo4
remote control. Complete operation
of BeoCord V 8000 is also available
via Beolink 1000.
Note: If you combine your BeoCord V 8000
with the BeoVision 1 TV, please refer to the
BeoVision 1 Reference book for information of
how to use V 8000 on a daily basis with the Beo1
remote control, and how to connect V 8000 to
BeoVision 1. You can combine BeoCord V 8000
with Bang & Olufsen TVs other than the ones
mentioned here, but please refer to the Settingup guide for further information.
3
C O N T E N T S
4 Using this guide
5 Operating BeoCord V 8000
Beo4 remote operation, 5
BeoCord V 8000 close-up operation, 6
Using on-screen menus, 7
8 Daily operations
Video playback, 8
10 Tuning and presetting
Tuning in stations, 10
TV channel/frequency list, 12
Setting the clock, 13
Setting your options for V 8000, 14
16 Recording
Timer recording, 16
Instant recording, 18
20 Special video functions
Adjusting the video picture, 20
Selecting sound track, 21
Setting markers on your recordings, 22
23 CamCorder
CamCorder playback and recording, 23
24 On-screen status displays
26 Beolink 1000 remote control
Operating V 8000 with Beolink 1000, 26
28 Overview of on-screen menus
4
U S I N G
T H I S
G U I D E
T U N I N G
Tune in your ...
Tune in your TV stations
Lorem ipsum dolor sit amet.
Consec-tetuer adipiscing elit, sed
diam.
Nonummy nibh euismod tincidunt
ut laoreet ...
Ut wisi enim ad dignissum qui.
Blandit praesent luptatum zril de
lenit augue duis dolore te ...
Lorem ipsum dolor sit amet, consectetuer adipiscing elit, sed diam nonummy nibh euismod tincidunt ut
laoreet dolore magna aliquam erat
volupat.
SETUP
TV
TIMER
PICTURE
SOUND
Congue nihil imper-diet doming.
Wid sit quod mazim place-rat facer
possim facilisi. Consectetuer adipiscing elit, sed diam nonummy
nibh euismod tincidunt...
Duis dolore te feugait nulla facillisi. Lorem ipsum dolor sit amet,
consectetuer adipiscing.
a
Consec-tetuer adipiscing elit, sed
diam.
TIMER
PICTURE
SOUND
Nonummy nibh euismod tincidunt
ut laoreet ...
STAND
Ut wisi enim ad dignissum qui blandit
praesent luptatum zril de lenit augue
duis dolore te feugait nulla facillisi.
Lorem ipsum dolor sit amet, consectetuer adipiscing elit, sed diam feugait nulla facilisi.
CLOCK
AV SOCKET
TV SETUP
AUTO TUNING
UPDATE TUNING
Ut wisi enim ad dignissum qui blandit
praesent luptatum zril de lenit augue
duis dolore te feugait nulla facillisi.
Lorem ipsum dolor sit amet, consectetuer adipiscing elit, sed diam feugait nulla facilisi.
MANUAL TUNING
Nam liber tempor cum soluta te nobis
eleifend option congue nihil imperdiet doming id sit quod mazim placerat facer possim facilisi.
Nam liber tempor cum soluta te nobis
eleifend option congue nihil imperdiet doming id sit quod mazim placerat facer possim facilisi.
Consectetuer adipiscing elit, sed diam
nonummy nibh euismod tincidunt.
Consectetuer adipiscing elit, sed diam
nonummy nibh euismod tincidunt.
TV AUTO TUNING
FREQUENCY
CLOCK
Ut wisi enim ad dignissum qui.
AV SOCKET
SAT SETUP
Blandit praesent luptatum zril de
lenit augue duis dolore te ...
AUTO TUNING
PROGRAM LIST
Nulla facillisi. Lorem ipsum dolor
sit amet.
UPDATE TUNING
MANUAL TUNING
Consec-tetuer adipiscing elit, sed
diam feu-gait nulla facilisi...
Nam liber tempor cum soluta te
nobis eleifend option.
Lorem ipsum dolor sit amet.
SETUP
SAT
STAND
PROGRAM LIST
Nulla facillisi. Lorem ipsum dolor
sit amet.
Lorem ipsum dolor sit amet, consectetuer adipiscing elit, sed diam nonummy nibh euismod tincidunt ut
laoreet dolore magna aliquam erat
volupat.
210
Consec-tetuer adipiscing elit, sed
diam feu-gait nulla facilisi...
SAT AUTO TUNING
ACTIVATE
FREQUENCY
ACTIVATE
Duis dolore te feugait nulla facillisi. Lorem
ipsum dolor sit amet, consectetuer adipiscing
elit, sed diam feugait nulla facilisi. Nonummy
nibh euismod tincidunt or sit amet,
consectetuer adipiscing elit, sed diam feugait
nulla fa.
Duis dolore te feugait nulla facillisi. Lorem
ipsum dolor sit amet, consectetuer adipiscing
elit, sed diam feugait nulla facilisi. Nonummy
nibh euismod tincidunt or sit amet,
consectetuer adipiscing elit, sed diam feugait
nulla fa.
Duis dolore te feugait nulla facillisi. Lorem
ipsum dolor sit amet, consectetuer adipiscing
elit, sed diam feugait nulla facilisi. Nonummy
nibh euismod tincidunt or sit amet,
consectetuer adipiscing elit, sed diam feugait
nulla fa.
Duis dolore te feugait nulla facillisi. Lorem
ipsum dolor sit amet, consectetuer adipiscing
elit, sed diam feugait nulla facilisi. Nonummy
nibh euismod tincidunt or sit amet,
consectetuer adipiscing elit, sed diam feugait
nulla fa.
b
This illustration exemplifies the
different types of information,
presented in this guide.
The section, marked a, gives you a
step-by-step instruction of the
operation in question.
Section a includes:
• The buttons you must press to
complete the operation. The
buttons displayed correspond to
the buttons on the Beo4 remote
control.
• The captions which give you
important information. The
captions must be read in order to
complete the operation
successfully.
11.374
Nam liber tempor cum soluta te
nobis eleifend option.
Congue nihil imper-diet doming.
Wid sit quod mazim place-rat facer
possim facilisi. Consectetuer adipiscing elit, sed diam nonummy
nibh euismod tincidunt...
Duis dolore te feugait nulla facillisi. Lorem ipsum dolor sit amet,
consectetuer adipiscing.
b
a
The section, marked b, supports the
button sequence.
Section b includes:
• The relevant on-screen menus
which you call up when you follow
the step-by-step button instruction.
• A text which gives you an
additional introduction to the
operation in question, and provides
you with examples of how you
could benefit from using the
function in question.
O P E R A T I N G
B E O C O R D
V
5
8 0 0 0
Remote operation with Beo4
The Beo4 remote control is the key to
all the functions in your BeoCord V
8000 videotape recorder:
The daily playback functions performed
by the BeoCord V 8000 can also be
operated via its close-up operation
panel (see next page)…
• Daily operations are carried out
directly via the Beo4 remote control
by pressing a single button, or by
pressing a few buttons in a straightforward sequence.
• The more advanced functions are
also carried out via Beo4, but
operation of these functions is
guided by the BeoCord's own onscreen menus.
The Beo4 remote control communicates with the
BeoCord V 8000 via your Bang & Olufsen
BeoVision MS TV.
Standby is indicated by a small red light in the
BeoCord V 8000 display on the front of the
BeoCord V 8000 when you connect it to the
mains.
TV
LIGHT
RADIO
SAT
DVD
CD
V TAPE
RECORD
A TAPE
7
8
9
4
5
6
1
2
3
TEXT
0
MENU
GO
LIST
STOP
The Beo4 remote control integrates remote
operation of your Bang & Olufsen products
EXIT
6
> Operating BeoCord V 8000
BeoCord V 8000 close-up operation
The five buttons on the front of the
BeoCord V 8000 allow you to operate
some of the functions available in the
BeoCord V 8000…
TIMER
EJECT
RECORD
PDC
VPS
PLAY
Note: The Beo4 remote control is a requirement
for complete operation of the BeoCord V 8000.
Complete operation is, though, also available via
a Beolink 1000 remote control, see pages 26-27
for further instruction.
EJECT
Unloads the videotape cassette you have loaded
into the BeoCord V 8000.
Loading a tape
Tapes must be loaded into the compartment just
above the close-up operation panel.
● (Standby indicator)…
ss
Load the cassette so that the small arrow on top
of the cassette is visible and points toward the
compartment opening. Push the cassette through
the door until you feel the mechanism drawing it
all the way into the compartment.
2.35… indicates the counter position on the tape:
time used or time left (see pages 14-15 for further
information).
Press ss to fast rewind a videotape.
PLAY
Switches on the BeoCord V 8000 and starts
playing the tape you have loaded.
tt
Press tt to fast forward a videotape.
The Display…
TIMER… indicates that a Timer recording has been
programmed into the V 8000. If a Timer recording
is unable to be executed, it flashes on and off.
●
Press briefly to stop playback or recording. Press
for more than 3 seconds to switch the BeoCord
V 8000 to standby.
RECORD… indicates that a recording has started.
When V 8000 is switched to recording pause, it
flashes on and off.
PDC… Indicates that the PDC (Program Delivery
Control) function is activated – may appear in
connection with a Timer recording made via
BeoCord’s own menu.
VPS… Indicates that the VPS (Video Programming
System) function is activated – may appear in
connection with a Timer recording made via
BeoCord’s own menu.
The red standby indicator appears in the display
when the BeoCord V 8000 is switched to standby.
During regular playback, winding and recording,
the display indicates your current counter position
on the tape. Track indication is also available.
Otherwise, the BeoCord V 8000 display acts as a
status display and provides you with information
about the operation or function currently in
progress.
7
Using BeoCord V 8000 on-screen menus
Operation of the more advanced
functions in the BeoCord V 8000 is
guided by on-screen menus.
Menu
• V.Tape menu
• Sound
In order to call up the V 8000 main
menu, you must first call up the main
menu for V.TAPE which appears via
your MS TV*. Now you can call up the
V 8000 main menu.
• Picture
In such fill-in menus, you move the
cursor from item to item. For each
item, information can be keyed in or
you can browse through the options
available for that particular item.
*Note: A main V.TAPE menu is not available on
all MS TVs or on other TVs which you combine
with V 8000. If this is the case, just press V.TAPE
then MENU to call up the V 8000 main menu.
V TAPE
Press to call up the main menu for
V.Tape
The V.Tape main menu appears…
MENU
then
Press to select V.Tape menu
The V.Tape main menu
GO
The V 8000 main menu appears…
then
MENU
The items in the V 8000 main menu
gives access to other dedicated menus.
Some of the menus, you call up, are
menus, in which, you must fill in information.
Press to switch on the videotape
recorder
Press to select the item you want
or
TIMER RECORD
SETUP
then
CAMCORDER
Press to call up the menu
Each item in the V 8000 main menu represents
another menu/function:
TIMER RECORD… programming a Timer
recording (see pages 16-17).
SETUP… Choose to set options for your BeoCord
V 8000, adjust the picture, set markers on your
recordings, fine tune, set the built-in clock, or
tune in a link frequency.
CAMCORDER… Cuts in the signal from a CamCorder, connected to the V 8000 AUX socket.
(See page 23)! See the Setting-up guide for
further information about connecting auxiliary
equipment.
GO
The menu in question appears…
In fill-in menus…
Press to move from item to item in
the menu
or
then
Press to reveal the options available
for an item
tt
or
ss
or
Press to key in information
0
through
9
CLOCK
TIME
20:00
DATE
MON 27
MONTH
APRIL
YEAR
1998
TEXT
OFF
Enter the required information, then…
Press to store
GO
or
Press to leave the menu without
storing
STOP
Press to leave the menus
EXIT
A fill-in menu – the menu for setting the clock
or
Press e.g. TV
TV
8
D A I L Y
O P E R A T I O N S
Video playback
V TAPE
Press to start the videotape
recorder – playback starts instantly
Use the Beo4 remote control to
operate your BeoCord V 8000.
Press to raise the volume
While a tape is playing, you can adjust
the volume level in your TV speakers or
mute the sound. You can step through
the tracks on the tape, or key in an
exact counter position. See next page
for further information about track
step and counter position.
or
Press to lower the volume
Press right on the middle to silence
the TV speakers – press again to
recall the sound
Press to play the next track
Press to play the current track from
the beginning – press twice to play
the previous track
or
Key in a specific position and play
the tape from this position (time
used or time left), e.g. 2:15
2
1
5
:
Press to cue forward through the
tape
Press again to accelerate the speed
or
·
or
Press to cue backwards through
the tape
Press again to accelerate the speed
Press to play the tape in slow
motion
Press again to accelerate the speed
You can, furthermore, cue through the
tape forwards or backwards, play the
tape in slow motion, or fast forward or
rewind the tape.
Unless otherwise instructed, the videotape recorder plays the tape through
to the end. The tape is then rewound
to the beginning and the BeoCord
V 8000 then stops automatically.
To switch the BeoCord V 8000 off
entirely, press the standby button ●.
TV
LIGHT
RADIO
SAT
DVD
CD
V TAPE
RECORD
A TAPE
7
8
9
4
5
6
1
2
3
TEXT
0
MENU
Note: If the videotape recorder has stopped and is
left unused for more than 8 minutes, it switches
off automatically.
GO
Press to play the tape backwards in
slow motion
Press again to accelerate the speed
Continue on the following page…
LIST
STOP
EXIT
9
Please note about Track step…
In order to step through tracks on a tape, it is
required that the tape was recorded with the
marker function cut in. Please refer to Setting
your options for V 8000, pages 14–15, for further
instruction.
If the track marker function is cut in, the start of
each recording is automatically indicated. If you
wish, you can erase these markers and instead set
your own markers on your recording. See page 22
for further instruction.
Note: If you are playing back NTSC tapes, and
press STOP once, BeoCord V 8000 will stop
entirely, there is no pause or still mode. It will not
be possible to play an NTSC tape in slow motion –
pressing the red and blue button on Beo4, will
produce no reaction whatsoever. The counter
position will not be displayed in the display, when
you are playing back NTSC tapes.
Please note about Counter position…
The counter positions can be set to two different
indications, the time used and time left counter
position indicators.
Press to fast forward the tape
tt
Press to rewind the tape
ss
Choose your preferred indication via the V 8000
setup menu and, if necessary, indicate the length
of the tape. In most cases, the V 8000 registers the
tape length automatically, though.
Press to pause the tape with a still
picture on the screen
STOP
Press STOP again to stop entirely
STOP
Once BeoCord V 8000 has registered the correct
length of a tape, the counter instantly adjusts
itself to the new counter position which is
determined by the length of the tape – time used
is the default counter position indication. See
Setting your options for V 8000, pages 14-15, for
further information.
Press at any time to start/resume
playback
GO
or
then
Press to switch to standby
•
10
F I N E
T U N I N G
A N D
P R E S E T T I N G
Fine tuning stations
Switch on BeoCord V 8000 and call up the
V 8000 main menu! See page 7 for further
instruction about calling up on-screen menus…
then
Press to select SETUP
then
Press to call up the setup menu
GO
The SETUP menu appears…
To tune in TV stations, you must call up
the BeoCord V 8000 tuning menu.
MENU
TIMER RECORD
When you tune in, make sure that your
TV stations are stored on the same
program numbers in your V 8000 as
they are in your BeoVision MS TV.
59 program numbers are available for
you to store TV stations on.
SETUP
CAMCORDER
The V 8000 main menu
then
Press until TUNING is selected
SETUP
then
GO
Press to call up the tuning menu
If necessary, you can fine tune the
station. You can also assign a station
with the Teletext subtitles facility.
ADJUST
OPTIONS
The TUNING menu appears,
FREQUENCY is lit up already…
then
tt
then
Press to move to the other items in
the menu
then
0
through
Key in a specific number e.g. a
Teletext subtitles page number
9
or
tt
or
Press to reveal the options available
for an item
ss
Fill in or adjust as required…
then
GO
Press to store your TV station
Press GO to continue tuning…
EXIT
TUNING
CLOCK
Press to start tuning in a TV station
or, use the number keys to key in an
exact frequency
(Pressing STOP stops tuning)
When a desired TV station is
found…
or
MARKER
Press to leave the menus
On the following page, the items on
the menu are explained in detail…
LINK
The setup menu
TUNING
FREQUENCY
210
PROGRAM
10
FINE
0
SUBTITLES
333
SOUND
STEREO
The menu for tuning in stations
11
What’s on the TUNING menu…
FREQUENCY
Indicates the frequency of a station. Searching
stops at the first station producing an acceptable
signal. If this is not the station you want, just
continue searching. If you wish, you can key in the
exact frequency of a station instead, using the
number keys on Beo4.
PROGRAM
Indicates the staion’s program number. 59
program numbers are available on which you can
store TV stations.
FINE (Fine tuning)
Indicates fine tuning – usually fine tuning is not
required because the best possible picture is
always selected. However, neighbouring channels
may blur the picture slightly, in which case, fine
tuning may be necessary. You can fine tune
within a range of +8 – -8.
SUBTITLES
Indicates the Teletext subtitles page. Key in the
number of an appropriate Teletext subtitles page
to include subtitles when you record from a
particular station. (Teletext pages 100-899 are
available)
Note: If you no longer wish to include the
subtitles for a station then key in the number of a
Teletext page which is not a Teletext subtitles
page.
(SYSTEM)
This item is only available on a multi-standard
system. A range of options are available: BG, L, I,
and DK are available. Only selected options will be
available for certain systems. Check that the
correct broadcast system is displayed, before you
start tuning.
SOUND
Indicates the type of sound you choose to store
for a specific program number.
STEREO… Indicates that stereo sound will be selected for a program number or that the best
possible sound or sound quality will be selected.
MONO… Indicates that mono sound will always
be selected.
Clearing a stored station…
If you wish to clear a stored station, then:
• Call up the tuning menu
• Move to the item PROGRAM and select the
program number you want to clear
• Now press 0 to reveal CLEAR instead of
PROGRAM
• Finally, press GO to store your entry and
clear the station. (If you should wish to
keep the station, press STOP instead of GO).
To leave the menus, press EXIT.
12
T V
Italy
Channel
designation
number
A
B
C
D
E
F
G
H
H1
H2
France
On-screen
display
MHz
53
62
82
175
183
197
201
210
217
224
Australia
Channel
designation
number
0
1
2
3
4
5
5A
6
7
8
9
10
11
C H A N N E L / F R E Q U E N C Y
On-screen
display
MHz
46
57
64
86
95
102
138
175
182
189
196
209
216
Channel
designation
number
FA
FB
FC1
FC
F1
F2
F3
F4
F5
F6
C O N V E R S I O N
VHF
On-screen
display
MHz
47
55
60
63
176
184
192
200
208
216
Channel
designation
number
E2
E3
E4
E5
E6
E7
E8
E9
E10
E11
E12
S01
S02
S03
S1
S2
S3
S4
S5
S6
S7
S8
S9
S10
S11
S12
S13
S14
This list of frequencies gives you the usual
channel designations and their corresponding
frequencies.
L I S T
UHF
On-screen
display
MHz
48
55
62
175
182
189
196
203
210
217
224
69
76
83
105
112
119
126
133
140
147
154
161
168
231
238
245
252
Channel
designation
number
S15
S16
S17
S18
S19
S20
S21
S22
S23
S24
S25
S26
S27
S28
S29
S30
S31
S32
S33
S34
S35
S36
S37
S38
S39
S40
S41
On-screen
display
MHz
259
266
273
280
287
294
303
311
319
327
335
343
351
359
367
375
383
391
399
407
415
423
431
439
447
455
463
Channel
designation
number
21
22
23
24
25
26
27
28
29
30
31
32
33
34
35
36
37
38
39
40
41
42
43
44
45
46
47
48
On-screen
display
MHz
471
479
487
495
503
511
519
527
535
543
551
559
567
575
583
591
599
607
615
623
631
639
647
655
663
671
679
687
Channel
designation
number
49
50
51
52
53
54
55
56
57
58
59
60
61
62
63
64
65
66
67
68
69
On-screen
display
MHz
695
703
711
719
727
735
743
751
759
767
775
783
791
799
807
815
823
831
839
847
855
S E T T I N G
T H E
13
C L O C K
Setting the clock
The BeoCord V 8000 has a built-in 24hour clock which must be set to the
correct time, date and year.
MENU
TIMER RECORD
SETUP
In order to set the built-in clock, you
must call up the menu for setting the
clock.
Note: When you enter a date, the correct day is
set automatically.
On the CLOCK menu, the BeoCord V 8000
writes:
MON… for Monday
TUE… for Tuesday
WED… for Wednesday
THU… for Thursday
FRI… for Friday
SAT… for Saturday
SUN… for Sunday
JANUARY…
FEBRUARY…
MARCH…
APRIL…
MAY…
JUNE…
JULY…
AUGUST…
SEPTEMBER…
OCTOBER…
NOVEMBER…
DECEMBER…
for January
for February
for March
for April
for May
for June
for July
for August
for September
for October
for November
for December
CAMCORDER
The V 8000 main menu
Switch on BeoCord V 8000 and call up the
V 8000 main menu! See page 7 for further
instruction about calling up on-screen menus…
then
Press to select SETUP
then
Press to call up the setup menu
GO
The SETUP menu appears…
then
Press until CLOCK is selected
SETUP
then
Press to call up the menu for setting
the clock
ADJUST
OPTIONS
GO
MARKER
The CLOCK menu appears…
TUNING
then
CLOCK
Use the number keys to key in the
correct time and date
LINK
0
through
9
The setup menu
then
Press to move to the other items in
the menu
or
CLOCK
then
TIME
20:00
DATE
MON 27
MONTH
APRIL
YEAR
1998
TEXT
OFF
Use the number keys to fill in
information…
or
Press to reveal other options for an
item
tt
or
ss
The menu for setting the clock
TIME… Indicates the time
DATE… Indicates the date
MONTH… Indicates the month
YEAR… Indicates the year
TEXT… Indicates synchronisation of the clock with
Teletext. Choose which broadcaster Teletext
service you wish to use by finding the
appropriate program number. Set TEXT to OFF
if you do not wish to synchronise the clock.
then
Press to store the clock
GO
Press to leave the menu
EXIT
14
S E T T I N G
Y O U R
O P T I O N S
Setting your options for V 8000
Switch on BeoCord V 8000 and call up the
V 8000 main menu! See page 7 for further
instruction about calling up on-screen menus…
then
Press to select SETUP
then
Press to call up the setup menu
GO
The SETUP menu appears
In order to make use of some of the
functions BeoCord V 8000 offers, you
must set your options for V 8000 via its
option menu.
MENU
TIMER RECORD
SETUP
CAMCORDER
In order to, for example, step through
tracks on a videotape or search for a
counter position on a tape, you must
set up BeoCord V 8000 in a particular
manner.
The V 8000 main menu
Press to move to OPTIONS
SETUP
then
GO
Press to call up the menu for setting
options
ADJUST
OPTIONS
On the following page, the items on
the menu are explained in detail…
MARKER
The OPTIONS menu appears…
then
CLOCK
Press to move from item to item in
the menu
or
TUNING
LINK
The setup menu
then
tt
or
Press to reveal other options for an
item
ss
or
0
through
Press to key in information for an
item
9
Fill in the required information…
then
GO
Press to store your entries in the
menu
EXIT
Press to leave the menus
OPTIONS
COUNTER
TIME USED
TAPE
240
SPEED
STD PLAY
PDC/VPS
OFF
MARKER
AUTO
The menu for setting options for V 8000
15
What’s on the OPTIONS menu…
COUNTER
The videotape recorder registers the position of
the tape during playback and recording. This
information is read out on the TV screen and on
the videotape recorder’s display, time used or
time left indications are available:
PDC/VPS
The BeoCord V 8000 enables you to make use of
the PDC (Program Delivery Control) and VPS
(Video Programming System) broadcasting signals,
accompanying programmes in some countries.
You can use the facility when you make Timer
recordings via the TIMER RECORD menu.
TIME USED… Indicates how long (hours and
minutes) the tape has been playing.
TIME LEFT… Indicates how much playing time
(hours and minutes) is left on the tape.
The PDC/VPS facility ensures that a programme
accompanied by the PDC/VPS signals will be
recorded in its full length – even if the
programme is delayed or prolonged. If the facility
is in use, it is indicated on the V 8000 display; PDC
or VPS respectively. The facility can be set to ON
or OFF:
The BeoCord V 8000 automatically registers the
length of the tape you have loaded. The correct
length appears after the tape has been playing
for a short while. You can, though, enter a tape
length yourself. If you use non-standard tapes,
and wish to use the TIME USED or TIME LEFT
counter indication, it will be necessary to key in
a tape length to ensure a correct read-out.
TAPE
For most tapes, the tape length is measured
automatically and written out against this item on
the menu. If it should prove necessary, a tape
length from 30 to 300 minutes can be keyed in.
SPEED
Recordings can be made at two different speeds
in the BeoCord V 8000:
STD PLAY… Standard or normal speed, that is, 3
hours on an E-180 cassette. This speed should
be selected for optimum picture quality.
LONG PLAY… Long play or half speed, that is, 6
hours for an E-180 cassette. BeoCord V 8000
selects this speed automatically for audio-only
recordings.
In playback, the videotape recorder automatically
adjusts to the speed at which the tape was
recorded.
ON… If PDC/VPS is set to ON and PDC/VPS signals
or times are provided by the broadcaster, you
must programme the exact PDC or VPS times
for each programme you wish to record, in
order for them to be successful. If you wish to
record two programmes in a row, you must
make two separate Timer recordings.
OFF… If the PDC/VPS facility is set to OFF,
recording will start and stop according to the
start and stop times you enter.
MARKER
The Marker function enables the BeoCord V 8000
to indicate or set a marker when a recording
commences on a tape. The number of markers on
a tape indicate the number of tracks/recordings
you have made.
MARKER can be set to AUTO or OFF:
AUTO… A marker will be set automatically every
time, you make a recording on a tape.
OFF… No markers will be set and you will,
therefore, not be able to step through your
tracks/recordings on a tape.
16
R E C O R D I N G
Timer recording
V TAPE
Press to switch on the videotape
recorder
then
MENU
Press to call up the V 8000 main
menu
then
GO
Press to call up the Timer recording
menu
The TIMER RECORD menu appears…
Press to move from item to item in
the menu
or
then
tt
Press to reveal options for an item
or
ss
You can make BeoCord V 8000 record
the available sources or programmes,
at any time you specify. It will start and
stop the recording automatically.
MENU
TIMER RECORD
SETUP
CAMCORDER
You can make a Timer recording which
takes place once (DATE), or on certain
days of the week (DAYS). You could
record a programme which is
broadcast, at the same time, every or
certain days of the week.
The V 8000 main menu
TIMER RECORD
SOURCE
TV
PROGRAM
1
START
20:00
STOP
21:00
DATE
MON 10 NOV
Your stored Timer recordings are listed
in the RECORD LIST, shown on the
same menu.
RECORD LIST
or
0
through
9
Use the number keys to key in
values, e.g. program number, start
and stop times, and date
. . .
The menu for programming Timer recordings
To store your Timer recording…
Press to store it
GO
Press STOP at any time to leave the menu without
storing the information you entered
Your stored Timer recording now
appears in the RECORD LIST…
To make a weekly Timer recording…
Select source, program number, start
and stop times…
then
Press until DATE is lit up
then
Press to switch from DATE to DAYS
0
then
Press to be able to select days
tt
Continue on the next page…
TIMER RECORD
SOURCE
. . .
PROGRAM
. . .
START
. . .
STOP
. . .
DATE
. . .
RECORD LIST
TV1
18:30–19:30
WED 1 MAR
>>
: CLEAR
The Timer recording menu. A Timer recording is
stored for TV program number 1, starting at half
past six in the evening, on Wednesday the 1st of
March.
Clearing or editing Timer
recordings…
In the RECORD LIST, you can edit or
clear your Timer recordings. If you wish
to clear a Timer recording at a later
date, call up the Timer recording menu,
and clear the recording in question.
Please note: If your Timer recordings overlap, it is
indicated in the RECORD LIST – OVERLAP appears
as the headline over the list. An exclamation mark
indicates the Timers which overlap.
17
What’s on the TIMER RECORD menu…
SOURCE
Indicates the source you are recording from. The
following options are available:
TV… select to record TV programmes. Since the
TV programme is recorded from the videotape
recorder’s tuner, you can still watch another TV
programme while you are recording.
AV… select to record directly from your BeoVision
TV, connected to your BeoCord V 8000, TV or
SAT are available.
TIMER RECORD
then
tt
or
SOURCE
TV
PROGRAM
1
START
6:37
STOP
7:37
DATE
MTWTFSS MON
ss
RECORD LIST
TV1
(from the previous page)
Press to move between the days
6:30– 7:30
WED 1 MAR
then
Press to exclude or include a day
or
Once you have selected the days
you want…
Press to leave selection mode
GO
then
PROGRAM
Indicates the program number you wish to record
from.
START and STOP
Indicates the times that your recording is
programmed to start and stop.
If you cut in the PDC (Program Delivery Control/
VPS (Video Programming System)) facility via the
V 8000 option menu, then key in the exact
PDC/VPS times for each programme, you wish to
record. If you wish to record two programmes in a
row, you must make two separate Timer
recordings. If you decide not to use the PDC/VPS
times after all, press V TAPE and then STOP to
cancel the function for your recording. See pages
14-15 for more information about PDC and VPS
signals.
DATE/DAYS
Indicates the date for your recording, or indicates
the days your recording is due to take place.
> See the following pages for further information
about Timer recording…
>>
: SELECT
When you have chosen to make a weekly Timer
reocrding, all the days of the week are
automatically selected for the Timer. Press ▼ or
▲ to exclude or include a day, you want for your
recording.
Press to store your weekly Timer
recording
GO
To edit a Timer recording…
Press until the Timer you want to
edit is highlighted in the RECORD
LIST
then
On the TIMER
writes…
M and MON…
T and TUE…
W and WED…
T and THU…
F and FRI…
S and SAT…
S and SUN…
and…
JAN…
FEB…
MAR…
APR…
MAY…
JUN…
JUL…
AUG…
SEP…
OCT…
NOV…
DEC…
RECORD menu, BeoCord V 8000
for Monday
for Tuesday
for Wednesday
for Thursday
for Friday
for Saturday
for Sunday
for January
for February
for March
for April
for May
for June
for July
for August
for September
for October
for November
for December
Press to edit the Timer
GO
Now use ▼ or ▲ to move from item
to item, and use the number keys or
tt or ss to edit the data…
then
Press to store your edited Timer
GO
To clear a Timer recording…
Press until the Timer you want to
clear is highlighted in the RECORD
LIST
then
Press to clear the Timer recording
tt
tt
Press to leave the menu
EXIT
18
> Recording
To record the current programme…
RECORD
Press to get ready for recording
then
RECORD
Press to start recording
To record a TV programme while being
able to watch another TV programme…
V TAPE
Switch on to the videotape recorder
then
RECORD
Press to get ready for recording
then
0
through
To record from a program number
other than the one currently on the
screen…
Press to key in another program
number
9
then
RECORD
Press to pause the recording
then
STOP
Press to stop the recording entirely
or
RECORD
If you make an instant recording of a
TV programme you are currently
watching, you will not be able to
watch another TV programme. You
can, of course, switch V 8000 to standby, or switch to one of the other
sources available, e.g. Satellite (SAT).
If you wish to monitor or stop your
recording, you must first return to your
recording by pressing V TAPE.
If you wish to record a TV programme
and still be able to watch another TV
programme, you must record from the
tuner in the videotape recorder.
Press to switch to your recording
then
STOP
If you want to make an instant
recording of a programme you are
currently watching – all you have to do
is, start the recording.
Press to start recording
You may now press TV (or SAT) to
watch any programme you like…
V TAPE
Instant recording
Press to resume recording
Note: When you have pressed RECORD once and
the BeoCord V 8000 is in recording pause mode,
you may choose a different source for your
recording by pressing LIST repeatedly until TURN is
displayed in the Beo4 display and then press GO.
Yet, in order to display TURN, you have to add it
to Beo4’s list of functions, please refer to Beo4’s
own User’s guide and the chapter ‘Customising
your Beo4’ for further instructions.
Note about recording Satellite…
If you record a Satellite programme, you cannot
watch another Satellite programme at the same
time, since only TV program numbers are stored in
the videotape recorder’s tuner. You can, though,
always switch to TV and watch a TV programme
instead.
Note about dual language programmes…
If you record a dual language programme, you
will hear both languages simultaneously. When
you play back the tape, you will be able to choose
which language you want. For further information of how to switch sound or languages, see
Selecting sound track, page 21.
19
Please note about recording…
• The Timer indication TIMER will appear in
the BeoCord V 8000 display whenever one or
more Timer recordings are waiting to be
executed. If your BeoCord V 8000 is unable to
execute a Timer recording, TIMER flashes on
and off.
• If the tape you have loaded is record
protected, it will be ejected automatically
when you try to start recording or try to
store a Timer recording.
• If you wish to cancel an ongoing
programmed recording, you can:
– Press V TAPE and then STOP on Beo4
or
– Press the Standby button on the BeoCord
V 8000 close-up operation panel.
• If your Timer recording is not executed
correctly, check that the clock in V 8000 is set
to the right time, see page 13 for further
instruction.
20
S P E C I A L
V I D E O
F U N C T I O N S
Adjusting the video picture
Switch on BeoCord V 8000 and call up the
V 8000 main menu! See page 7 for further
instruction about calling up on-screen menus…
then
Press to select SETUP
then
Press to call up the setup menu
GO
The SETUP menu appears, ADJUST is
highlighted already…
then
GO
Press to call up the menu for
adjusting the video picture
MENU
TIMER RECORD
SETUP
CAMCORDER
The V 8000 main menu
SETUP
ADJUST
OPTIONS
The ADJUST menu appears…
then
MARKER
TUNING
Press to select the item to adjust
or
GO
The setup menu
Press to call up the menu for the
item you chose
ADJUST
then
tt
Press to adjust the items as required
TRACKING
JITTER
or
SHARPNESS
ss
EXIT
Press to remove the menus
Streaks in the picture or noise in the
sound may be due to imprecise
tracking of the videotape. This is most
often seen when playing back prerecorded tapes or on tapes which have
been recorded on another videotape
recorder.
CLOCK
LINK
then
Please note…
Tracking is adjusted automatically, whenever a
new tape is played. You can, though, adjust the
tracking at any time during playback. See ‘To
adjust Tracking directly with Beo4’ on the
following page.
The menu for adjusting the video picture
TRACKING… adjust within a range of -18 – +18
while the tape is in play.
JITTER… adjust within a range of -18 – +18. It can
only be adjusted when the videotape recorder
is paused with a still picture on the screen.
SHARPNESS… adjust within a range of -3 – +3
when the tape is in play, slow motion or cue
mode.
Video picture adjustments can be
carried out at any time during
playback, or when the tape is played in
slow motion. Any jitter (vertical flitter)
occurring in a still picture can be
adjusted while the still picture is on the
screen.
21
To adjust Tracking directly with Beo4…
Press LIST repeatedly to display TRACKNG* on
the Beo4 display. Then press GO to adjust the
tracking automatically, or press tt or ss to
adjust it manually. The special TRACKING menu
appears on the screen.
*Note: In order to display TRACKNG on Beo4,
you must add the function to the Beo4 list of
functions. See Beo4’s own User’s guide and the
chapter, Customising your Beo4, for further
instruction.
Selecting sound track
Recordings are always made with both
a Hi-fi and a linear sound track. During
playback, the videotape recorder automatically reproduces the Hi-fi sound
track, unless otherwise instructed.
You can switch between the different
sound tracks recorded on the tape. If
you are playing back a recording of a
dual language programme, you can
select either of the two languages.
While a tape is playing…
The current sound mode is displayed in the
BeoCord V 8000 display, the following modes
may be available:
Press LIST until SOUND* is displayed
LIST
Press repeatedly to switch between
the various sound tracks on the tape
GO
then
STEREO
MONO
MONO-1
MONO-2
Hi-Fi sound track
Linear sound track
Left sound channel
(language 1)
Right sound channel
(language 2)
Note: If you are playing a ‘worn’ Hi-Fi tape, the
sound may be of a poor quality, switch to the
Mono sound track for an improved sound quality.
In other instances, try to use the Tracking
adjustment to improve the sound (see the
previous page).
*Note: In order to display SOUND on Beo4, you
must add the function to the Beo4 list of
functions. See Beo4’s own User’s guide and the
chapter, Customising your Beo4, for further
instruction.
22
> Special video functions
Setting markers on your recordings
Load the appropriate tape, switch on BeoCord
V 8000, and call up the V 8000 main menu! See
page 7 for further instruction about calling up onscreen menus…
You can set your own track markers on
your recordings and erase track markers
which have been set automatically.
MENU
TIMER RECORD
SETUP
CAMCORDER
then
This function may be useful, if you, for
example, want to be able to find a
specific scene or incident on one of
your home videos, or wish to indicate
the start of a piece of music on the
recording of an entire concert.
Press to select SETUP
then
GO
Press to call up the setup menu
The V 8000 main menu
The SETUP menu appears…
SETUP
then
Press to select MARKER
then
GO
ADJUST
OPTIONS
Press to call up the menu for setting
track markers
Set your new markers, while your
recording is playing. Once the track
markers are set or cleared, the V 8000
display will indicate the correct track
numbers, as you play the tape.
MARKER
TUNING
CLOCK
The menu for setting track markers
appears…
The V 8000 display indicates the
track numbers currently registered
on the tape…
LINK
The setup menu
1 : SET
0
Press to clear a track marker which
is currently shown on the display
CLEARING MARKER appears on the
screen – The track number on the
V 8000 display then adjusts itself,
accordingly…
1
Press to set a new track marker
SETTING MARKER appears on the
screen – The V 8000 display then
adjusts itself accordingly, and shows
the appropriate track number
EXIT
Press to leave the menu
V. TAPE
0 : CLEAR
PLAY
10
The menu for setting new track markers on a tape
23
C A M C O R D E R
CamCorder playback and recording
In order to watch CamCorder recordings
on your TV, and copy them onto a tape
in V 8000, you have to connect the
CamCorder, register the signal via the
V 8000 main menu, and then start your
CamCorder*.
If you choose to edit or copy your CamCorder recordings onto videotape, a
display will appear on the screen of
your BeoVision TV with a counter
indication to assist you.
MENU
TIMER RECORD
SETUP
To watch your CamCorder recordings…
Switch on BeoCord V 8000 and call up the
V 8000 main menu! See page 7 for further
instruction about calling up on-screen menus…
CAMCORDER
then
Press until CAMCORDER is selected
then
The V 8000 main menu – with the possibility to
transfer the signal from a CamCorder directly.
GO
then
Start your CamCorder…
The pictures from your CamCorder
appears automatically…
To remove the CamCorder pictures
from the screen…
Press a source button, e.g. TV, to
remove the pictures
The actual copying must be operated
via your Beo4 remote control. Yet
during the copying, CamCorder
playback operations (pause, stop, play,
etc.) can be operated as usual, at any
time. See how in your CamCorder user’s
guide.
To copy your CamCorder recordings
onto videotape…
Press to prepare V 8000 for
recording
TV
RECORD
then
When you copy your CamCorder
recordings onto a tape in V 8000, you
can watch a TV programme or switch
off the TV.
Press to start copying your
CamCorder recordings
To pause and stop copying…
Press to pause the copying
RECORD
STOP
then
Press to resume copying
RECORD
or
Press a source button e.g. TV to stop
copying entirely
*Please note about connecting CamCorder
and other equipment to V 8000…
If you choose to connect equipment other than a
CamCorder, you must still select the item
CAMCORDER on the V 8000 main menu. The
signal is then transferred, and you can start using
your equipment. Please refer to the Setting-up
guide for information of where to connect your
CamCorder and any other extra equipment.
TV
24
O N - S C R E E N
S T A T U S
D I S P L A Y S
As soon as the BeoCord V 8000 starts
carrying out your instructions, a small
status display appears at the bottom of
the TV screen.
V. TAPE
LOAD
The status display shows what the
videotape recorder is doing…
The display prompts you to load a tape before
you can start playback.
The video tape is playing – it has been playing for
2 hours and 15 minutes or 2 hours and 15 minutes
of playing time remains on the tape.
V. TAPE
PLAY
2:15
V. TAPE
PLAY
–:–2
V. TAPE
PLAY
MONO
V. TAPE
CUE >
2: 15
You have pressed the yellow button on Beo4 to
cue forward through the tape.
V. TAPE
CUE <
2: 15
You have pressed the green button on Beo4 to
cue backwards through the tape.
V. TAPE
SLOW >
2:15
You have pressed the blue button on Beo4 to cue
forward in slow motion through the tape.
V. TAPE
SLOW <
2: 15
You have pressed the red button on Beo4 to cue
backwards in slow motion through the tape.
V. TAPE
>>
2: 15
You have pressed the tt button to fast forward
the tape.
V. TAPE
<<
2:15
You have pressed the ss button to rewind the
tape.
You have pressed a number key while the tape is
playing and are going to key in a counter position
you want to go to.
The videotape is playing – you have selected the
mono (linear) sound track
Note: For further information about the time
used/left counter indication, see page 14-15.
25
Please note: The displays remain on the screen of
your TV, for a few seconds, during playback and
recording. During winding and searching, the
relevant display remains on the screen constantly
or until the operation is completed.
V. TAPE
STILL
2: 15
You have pressed STOP to stop the videotape
recorder with a still picture on the screen.
V. TAPE
STOP
2: 15
You have pressed STOP twice to stop the
videotape recorder.
V. TAPE
>>
+1
You have pressed ▲ to step to the next track on
the tape – V 8000 fast forwards to the track.
V. TAPE
<<
–3
You have pressed ▼ repeatedly to step back 3
tracks – V 8000 rewinds back through the tape.
V. TAPE
PROGRAM
REC. PAUSE
15
V. TAPE
AV
V. TAPE
CAMCORDER
V. TAPE
CAMCORDER
2:15
RECORDING
2:15
PLAY
2:15
RECORDING
2:15
The videotape recorder is set to record TV
program number 15 from its own tuner – V 8000
is in record pause mode.
The videotape recorder is recording an external
source, for example from the BeoVision TV or
your built-in Satellite tuner.
You are playing back a tape with CamCorder as
your source – you may now edit the tape.
You are copying a CamCorder recording onto a
tape in V 8000 – you may now switch on to
another source without leaving your CamCorder
recording.
If you do not resume playing within 8 minutes,
the BeoCord V 8000 switches to standby
automatically.
26
B E O L I N K
1 0 0 0
R E M O T E
C O N T R O L
Beolink 1000 operation
V. TAPE
Press to start the videotape recorder
Press to raise the volume
or
Before you start…
In order to operate your BeoCord V 8000 with
Beolink 1000, BeoCord V 8000 will have to be set
up accordingly. Please contact your Bang &
Olufsen dealer for further information.
Press to lower the volume
MUTE
Press to mute the TV speakers –
press again to recall the sound
The buttons highlighted on this Beolink
1000 remote control are the buttons
you must use for daily operation of
your BeoCord V 8000.
TV
LIGHT
RADIO
SAT
LINK
CD
V.TAPE
RECORD
A.TAPE
MENU
SHIFT
PHONO
Press to play the next track
Press to play the current track again
– press twice to play the previous
track
or
2
1
5
Key in a specific position and play
the tape from this position (time
left or time used), e.g. 2:15
STOP
Press to pause the tape with a still
picture on the screen
STOP
Press STOP again to stop playback
or
PLAY
Press at any time to start/resume
playback
While the tape is playing…
Press to cue forward through the
tape
Press again to accelerate the speed
or
Press to cue backwards through the
tape
Press again to accelerate the speed
While a tape is playing, you can adjust
the volume level in your TV speakers,
or mute the sound. You can step
through the tracks on the tape, or key
in an exact counter position.
You can cue through the tape forwards
or backwards or play the tape in slow
motion, while the tape is playing. After
stopping playback, you can fast forward
or rewind the tape.
Unless it is instructed to do otherwise,
the videotape recorder plays the tape
through to the end. The tape is then
rewound to the beginning, and the
BeoCord V 8000 then stops automatically.
To switch the BeoCord V 8000 off
entirely, press the standby button.
STOP
PLAY
LARGE
MIX
7
8
9
4
5
6
1
2
3
TEXT
0
GO TO
PICTURE
STORE
SOUND
AV
MUTE
27
Operating on-screen menus with Beolink
1000…
In order to operate the BeoCord V 8000 on-screen
menus, you must press MENU to call up the main
menu for V.Tape. In order to operate the menus
you:
• Use ▼ or ▲ to select the function or menu you
want
• Then press PLAY to call up it up on the screen
Once the menu appears on the screen, you…
• Use ▼ or ▲ to select an item on the menu
• Then, use the number keys, or >> or << to
reveal the available options for the different
items
• Press PLAY to store the information you
entered
• Press STOP repeatedly to leave the menus.
Press to pause the tape
STOP
then
Press to play the tape in slow
motion
Press again to accelerate the speed
or
Press to play the tape backwards in
slow motion
Press again to accelerate the speed
Press to stop the tape
STOP
STOP
then
Press to fast forward the tape
or
Press to rewind the tape
Press to switch to standby
•
28
O V E R V I E W
O F
O N - S C R E E N
MENU
TIMER RECORD
TIMER RECORD
SOURCE
TV
SETUP
PROGRAM
1
CAMCORDER
START
20:00
STOP
21:00
DATE
M E N U S
MON 10 NOV
RECORD LIST
. . .
ADJUST
TRACKING
JITTER
SETUP
SHARPNESS
ADJUST
OPTIONS
MARKER
TRACKING
+18
JITTER
+18
TUNING
CLOCK
SHARPNESS
+3
LINK
OPTIONS
About the menu system…
This illustration explains how the BeoCord
V 8000 on-screen menu system is constructed. The
V 8000 main menu provides you with access to the
underlying menus.
Once the main menu has been called up (See page
7 for further instruction about calling up the main
menu and operating the menu system in general),
you:
• Select the item you want on the main menu by
pressing the ▼ or ▲ buttons
• Then, press GO to call up the desired menu. If
you choose to call up the SETUP menu, you will
be asked to select a menu item again to get to
the menu, you want.
• If you wish to go backwards through the layers
of menus, press STOP until the desired menu
appears.
• To exit the menu system, press EXIT.
COUNTER
TIME USED
TAPE
240
SPEED
STD PLAY
PDC/VPS
ON
MARKER
AUTO
1 : SET
V. TAPE
0 : CLEAR
PLAY
10
FREQUENCY
210
PROGRAM
10
FINE
0
SUBTITLES
333
SOUND
STEREO
CLOCK
TIME
20:00
DATE
MON 24
MONTH
SEPTEMBER
YEAR
1995
TEXT
OFF
LINK
FREQUENCY
599
29
30
31
32
Date purchased
Contact person
Dealer
Telephone
Address
Record your serial numbers here:
BeoCord V 8000
Beo4 remote control
Dear Customer,
Your needs as the user of our products are always given careful
consideration during the design and development process, and we strive to
make our products easy and comfortable to operate.
We therefore hope that you will take time to drop us a line, telling us about
your experiences with your Bang & Olufsen system. Anything which you
consider important – positive or negative – may help us in our constant
efforts to refine our products.
Thank you!
Please write to:
Customer information dept. 7240
Bang & Olufsen a/s
DK-7600 Struer
Denmark
3508189 1990
Printed in Denmark by
Bogtrykkergården a-s, Struer