1
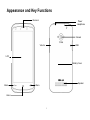
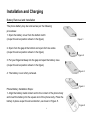
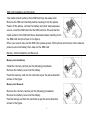
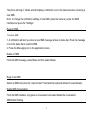
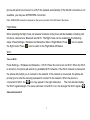
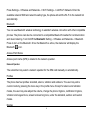
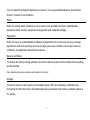
TANK 4.5
1
USER MANUAL
Table of Contents
Safety Information
3
Appearance and Key Functions
5
Installation and Charging
6
Safety Password
9
Call Functions
10
Contacts
12
Messaging
14
Internet Browser
16
Settings
16
Application Programs
20
Gallery
22
Camera
23
Music
24
Network Connections
25
2
Safety Information
Please carefully read the terms below:
Use Safely
Do not use your mobile phone where it might cause danger.
Transportation Safety
Please observe all transportation laws and regulations.
Please drive with both hands on the wheel.
DO NOT TEXT AND DRIVE
Hospitals
Please follow limitations.
Please turn off your mobile phone when near medical instruments.
Airports
Please follow all flight safety regulations and do not use your phone during flight.
3
Toxic Chemicals
Do not use your mobile phone around fuels or chemicals.
Explosion Hazard
Please observe related limitations and do not use your mobile phone around an area where explosions may occur.
Accessories and Batteries
Please use only Blu authorized accessories and batteries.
Backup
Please remember to make a backup or keep a written record of all important information saved in your mobile phone.
SOS Emergency Calls
Make sure your mobile phone is switched on and in a service area. In home screen, tap the phone key and dial 911
and send.
4
Appearance and Key Functions
Receiver
Power
Headphone
s
Camera
Volume
USB
LCD
Battery Cover
Back
Speaker
Menu
Home
5
Installation and Charging
Battery Removal and Installation
The phone battery may be removed as per the following
procedures:
1. Open the battery cover from the bottom notch
(As per the arrow position shown in the figure)
Figure 1
2. Open from the gap at the bottom and open from two sides
(As per the arrow position shown in the figure)
Figure 2
3. Put your fingernail deep into the gap and open the battery case
(As per the arrow position shown in the figure)
Figure 3
4. The battery cover is fully removed.
Figure 4
Phone Battery Installation Steps:
1. Align the battery metal contact end to the contact of the phone body
and insert the battery into the square slot of the phone body. Place the
battery in place as per the arrow direction, as shown in Figure 5.
Figure 5
6
2. Place the battery cover slightly on the phone body and press the
cover downward as per the direction shown in Figure 6 until it is fully
engaged with the phone body.
Figure 6
Note: Be sure to power off the phone and remove the external power source before battery removal. It is absolutely
prohibited to take out the battery directly when the phone is powered on, otherwise, the SIM card and the phone may
be damaged.
Battery Charging
Plug in the charger and insert the charger interface into the
charging jack of the phone, as shown in the figure:
Note: Please carry out the above operations carefully. Do not pull out the charger
improperly as it may damage the phone or the charger.
• The phone battery must be fully charged before use.
• Do not remove the battery or the SIM card during charging.
• The phone will be powered off automatically when the battery runs out of power.
7
SIM card Installation and Removal
The metal contact surface of the SIM card may be easily worn.
Remove the SIM card carefully before inserting it into the phone.
Power off the phone, remove the battery and other external power
source. Insert the SIM card into the SIM card slot. Ensure that the
metal surface of the SIM card faces downward when inserting it into
the SIM card slot (As shown in the figure).
When you need to take out the SIM card, please power off the phone and remove other external
power source and battery then take out the SIM card.
Memory Card Installation and Removal
Memory Card Installation
Install the memory card as per the following procedures:
Remove the battery cover and the battery.
Push the memory card into the card slot as per the arrow direction
shown in the figure.
Memory Card Removal
Remove the memory card as per the following procedures:
Remove the battery cover and the battery.
Pull the storage out from the card slot as per the arrow direction
shown in the figure.
8
Note: Please power off the phone before memory card removal. Otherwise, documents transmitted to the phone may
be lost or the phone may not work normally.
Power On/Off
Ensure that the battery has been installed properly. Power the phone on by long pressing the
[Power key] until the phone screen shows that the phone is on.
Some SIM cards have PIN codes. Enter your PIN code if it is required. The initial PIN code is
1234.
Power off the phone by long pressing the [Power key] until the screen displays the “Power-OFF”
option.
Safety Password
You may use the access password described in this section to prevent others from using your SIM
card without permission.
PIN Code
PIN code is used to prevent the subscriber’s SIM card from being used illegally. If your phone has
enabled the PIN code protection function, the phone screen will display “Please enter your PIN
code” after the phone is powered on. If the PIN code is entered incorrectly for three times, the SIM
9
card will be locked automatically which can be unlocked by entering the PUK code correctly. The
PIN code is related to the SIM card rather than the phone. It is provided by the network operator.
PUK Code
The PUK code is used to unlock a SIM card which is locked. If the PUK code is entered incorrectly
for 10 times in total, the SIM card may no longer be used. The PUK code is provided by the
network operator.
Call Functions
Placing a Phone Call
Make a Voice Call
To make a call, touch the dial key on the main interface to open the call application. You may
make a call in the following ways:
Touch the number keys to enter a telephone number and press the dial key to make a voice call.
Call a telephone number or contact from the call log.
Dial a landline telephone: Enter the landline telephone number and touch the dial key on the
touch screen to place the phone call. If the number entered is wrong, please press Clear key to
clear selection.
10
Make an international call: Enter the country code, district number and telephone number
(without a space) and press the dial key on the touch screen to make the call. Press the 0 key for
seconds if you need to dial “+” when entering the country code.
Make an Emergency Call
You can enter the dialing interface to make an emergency call even when the SIM card has not
been installed or the SIM card has been locked.
Cancel a Call
Press the End key in the dialing interface to cancel a call.
Receive a Call
Slide the Receive button.
Reject an Incoming Call
Slide the Reject button.
Warning: Please ensure the loudspeaker has been turned off before putting the phone to your ear.
Note: Calls on hold and call conference need the support of the network operator. Please consult the local operator for
specific information.
11
Call Logs
Access the call log to find the logs of all calls, missed calls, dialed calls and received calls, the
telephone number or contact name. You can carry out the following operations about the call
function of the phone:
1. Call the number or contact.
2. Long press a name or a number and an options screen will pop up (more options for the
number): Call the number, edit the number before calling, sending a SMS to the number, save the
number to the address book (view the contact) or delete the number from call logs.
3. To delete all call logs, please press the “Menu” button from the call long interface and select the
“Delete” option.
Contacts
Add a Contact
People-> Add Contact: To add a new contact to the phone book. The icon will be in the lower left section of the screen.
View Contacts
Enter the address book. Your contacts will be displayed in an alphabetical order. Press the contact
you want to view to find more information about the contact.
Press the
icon to enter the contacts in your favorite. The star may be added in the contact’s
information interface.
12
Import/Export
Press Menu key-> Import/Export: The contacts can be imported and exported to the phone from
the SIM card and the SD card. The contacts in the phone may also be exported to the memory
card for backup.
Search
Press People-> Search icon->
to enter the Contact Search interface. When the characters
you have entered are related to the contact name, the contact name will appear under the search
box.
Edit Contacts
Enter a contact and press the menu key and then edit to make changes to the contact. You may
change or add contact details. You may also set contact pictures.
Display Options
Press Menu key -> Contacts to Display: For the display methods for the phonebook. You may
enable or disable contacts and you may select the position of the contact to be displayed, any one
or more in the phone or the SIM card.
Share Contacts
Enter a contact and press the menu key and share. You may share contacts information with your
friends via email, Bluetooth and SMS.
Delete Contacts
13
Enter a contact and press the Menu key-> Delete Contact
.
Messaging
Write an SMS (MMS)
1. Enter the SMS interface and touch the
icon to compose.
2. Enter the number of the recipient or contact name in the recipient bar. Beneath of the recipient
bar will display the matched contact or phone number when entering a phone number or name.
Press the matched contact or entered phone number or continue to enter the desired phone
number.
3. If you want to send a SMS to several cell phones, please repeat the above step 2 or enter the
desired contacts.
4. Touch the input content field and start writing a SMS.
5. Press the menu key to add an attachment. The SMS will be converted into a MMS once a file is
attached.
5. Touch the Send key.
Note: If you want to save SMS information as draft for future modification, press the Return key and the information will
be saved automatically. The “Draft” in red will appear to the right of the corresponding SMS.
Receive an SMS
14
The phone will ring or vibrate and will display a notification icon in the status bar when receiving a
new SMS.
Note: To change the notification settings of new SMS, press the menu key under the SMS
interface and press the “Settings”.
Read an SMS
To read an SMS:
1. A notification will alert you when a new SMS message arrives in status bar. Press the message
icon in the status bar to read the SMS.
2. Press the Messaging icon in the applications menu.
Delete an SMS
From the SMS message, press Menu and then select Delete.
Reply to an SMS
Select an SMS and press the “Input Content” Field and the keyboard will launch automatically.
Delete SMS Conversation
From the SMS interface, long press a conversation and select delete the conversation.
SMS Edition Setting
15
Press the “Menu” in the SMS Conversation List interface and select “Setting” to modify the SMS
settings
Internet Browser
Enable Browser
Press the application program button
main interface to enter the browser.
and press the
icon or press the
icon in the
Enter a Website
Press the URL input box at the top of the screen, enter the URL address of the website.
Exit the Browser
Press the menu key at the current website interface to pop up the menu and press Exit.
Settings
Wireless and Networks
The phone has been configured with Wi-Fi and GPRS/HSPA functions to facilitate you to acquire
super-high speed data transmission via a mobile network. If the Wi-Fi connection is available, the
16
phone will search and connect to a Wi-Fi the network automatically. If the WLAN connection is not
available, you may use GPRS/HSPA connection.
Note: GPRS/HSPA connection depends on the service provider of the SIM card in the phone.
Flight Mode
When enabling the flight mode, all wireless functions of the phone will be disabled, including call
functions, data service, Bluetooth and Wi-Fi. The flight mode can be enabled by the following
steps: Press Settings-> Wireless and Networks->More->Flight Mode. Press
icon to enable
the flight mode. Press
icon to switch to the Flight Mode Off status.
Wi-Fi
Turn on Wi-Fi
Press Settings -> Wireless and Networks -> Wi-Fi. Press the icon to turn on Wi-Fi. When the Wi-Fi
is turned on, the phone will search any available Wi-Fi networks. If the Wi-Fi network is unsecured,
the phone will prompt you to connect to the network. If the network is unsecured, the phone will
prompt you to enter the security password to connect to the network. When the phone is
connected to Wi-Fi, the
icon may appear in the right status bar.
The icon will also display
the Wi-Fi signal strength. The more solid bars in the Wi-Fi icon, the stronger the Wi-Fi signal is .
Add and Delete Wi-Fi
17
Press Settings -> Wireless and Networks -> Wi-Fi Settings -> Add Wi-Fi Network. Enter the
available network SSID and select its safety type, the phone will add the Wi-Fi to the network list
automatically.
Bluetooth
You can use Bluetooth wireless technology to establish wireless connection with other compatible
phones. The phone can also be connected to a compatible Bluetooth headset for communication
and music listening. Turn On/Off the Bluetooth: Setting -> Wireless and Networks -> Bluetooth.
Press to turn on the Bluetooth. Once the Bluetooth is active, the status bar will display the
Bluetooth
icon.
Access Point Name
Access point name (APN) is related to the network operator.
Network Operator
The subscriber may select a network operator for the SIM card manually or automatically.
Profiles
The phone has four profiles: standard, silence, vibration and outdoors. The user may add a
custom mode by pressing the menu key in the profile menu. Except for silence and vibration
modes, the user may also adjust the volume, change the phone ringtone, notification ringtone,
vibration and keypad tone, screen lock warning tone, under the standard, outdoor and custom
modes.
Display
18
You can adjust the display brightness as required. You may enable/disable the “Auto-Rotate
Screen” function to set animation.
Safety
Enter the setting-safety interface to set up screen lock and SIM card lock, enable/disable
password visible function, equipment management and credential storage.
Application
Enter the menu to enable/disable installation of applications from unknown sources, manage
applications and view operating services, storage space use conditions and power level use
conditions, set application development options.
Backup and Reset
To restore the factory setting, all data in the phone will be cleared and the default factory setting
will be restored.
Note: Resetting the phone will delete all the data in the phone!
Storage
Check the memory card capacity and available space, SD card unloading, installation and
formatting (the SD card can be formatted after being unloaded) and memory available space of
the phone.
19
Date and Time
Set the date and time format and time zone.
About Your Phone
The user may view the phone information such as status, power use, and legal information.
Application Programs
Calculator
The phone supports basic mathematic calculations and also supports trigonometric functions,
exponents and logarithm calculations. Touch the calculator icon
to enter the calculator
interface.
Calendar
Open Calendar
Press Home -> Application Menu -> Calendar
Create Activities
Press the menu key in the calendar interface and select Create New Event.
20
Edit Activities
Select a calendar date in the calendar interface to enter the event interface. Once in the event
interface, press the edit icon
to edit the event.
Delete Activities
Enter the activity in the calendar and press the menu key then press the trash bin icon
delete the activity.
to
If you have set an alert for the event, a notification icon will appear in the status bar with the
forthcoming event
and prompt you with a ring tone that the event will happen soon.
Alarm Clock
Add an Alarm Clock
Select “Set Alarm” in the Clock interface to enter the Alarm Clock Setting. Once in the settings,
you may set the alarm clock time, repetition interval, ring tone, vibration and label. If the repetition
interval is not set, the alarm clock will ring only once.
1. Enable/Disable an alarm clock, click on the clock icon in the applications menu and click on the
alarm.
21
2. If you have set one or several alarm clocks, click on the alarm clock icon in the left to disable or
enable the alarm clocks.
Alarm Clock Settings
If you have set one or several alarm clocks. Select alarm clocks already set, you may change
alarm clock settings such as the alarm clock volume, snooze duration, auto-silence and volume
buttons.
Radio
The phone also provides radio function. You can listen to a radio after inserting the headset into
the proper jack and enter the FM interface. To browse stations, enter the FM channel list and
press the menu key to select Auto Search or press the left and right arrows for manual tuning.
Gallery
Enable Gallery
Press Application Menu -> Gallery. The phone will search all picture files in the memory card and
create folder thumbnails automatically when the gallery menu is enabled for the first time.
View Pictures
22
Press Application Menu -> Gallery. Click on the picture thumbnail to view a picture. You may
double-press the picture to zoom in/out, slide left or right to switch to different pictures. You may
press the menu key and select Play Slides to play all pictures as a slide.
Camera
Open the Camera
Press Application Menu -> Camera
Change Camera Mode
Pressing the camera mode icon
camera.
will allow you to switch from the back camera to the front
View Photo or Video
Press the preview box in the lower right corner after taking photos or videos, the phone will enter
the photo or video preview interface.
Note: The phone will enter camera mode when the Power key and the Volume + key are pressed simultaneously.
Press the volume + key, and the phone is ready to take photos.
23
Music
Copy Files to Memory Card
Connect the phone to a PC via a USB cable to copy music files into the memory card directly; or
place the memory card into a reader.
Note: The music application program only plays the audio files in your memory card. Ensure that desired audio files
have been copied into your memory card before they are played.
Open Music
Application Menu -> Music
Media Library
The phone will sort and display songs automatically according to artist name, albums and songs
for convenient searching.
Play List
You may select and add specific songs to a playlist.
24
Network Connections
USB Mode
You may connect your phone to a computer via USB cable to transfer music, pictures, and other
files between your phone's SD card and the computer.
When connecting your phone to computer and mounting its SD card, you must follow your
computer's instructions for connecting and disconnecting USB devices to avoid damaging or
corrupting files on your SD card.
1.
Use the USB cable that came with your phone and to connect the phone to a USB port on
your computer. You receive a notification that the USB is connected.
2.
Open the notification panel and select USB.
3.
Press turn on USB storage in the screen that opens to confirm that you want to transfer
files. When the phone is connected as USB storage, the screen indicates that USB
storage is in use and you receive a notification. You can now copy files to and from the SD
card.
During this time you can't access the SD card from your phone, so you can't use applications that
rely on the SD card such as Camera, Gallery and Music.
25
Phone Considerations
1. The phone is an IP67 waterproof cell phone, which can meet the waterproof and dust proof requirements of a normal living environment.
Do not remove the battery cover frequently when unnecessary, cover the headset soft plug, the USB soft plug and battery cover tightly.
2. Do not apply headset function in the water.
3. Touch screen function of the phone is not available when it is in water.
4. Never open the headset cover and the battery cover immediately after the phone is taken out from water. Please remove the water from
the surface with soft cloth and keep the phone for 15 minutes and open the battery cover and headset over clean residual water inside it.
Once cleaned, reinstall the headset cover, the USB cover and the battery cover and the phone can continue to be used normally.
Toxic and hazardous substances or elements
Parts
Mercury
Cadmium
Lead (Pb)
(Hg)
(Cd)
Polybrominated
Hexavalent
6
(Cr )
+
Polybrominated
diphenylether
biphenyl (PBB)
(PBDE)
Phone
×
○
○
○
○
○
Battery
×
○
○
○
○
○
Accessories
×
○
○
○
○
○
1) “○” indicates that the content of such hazardous substances in all homogeneous materials of the parts is below the concentration limit requirement as described in SJ/T11363-2006.
2) “×” indicates that the content of such hazardous substances in at least one homogeneous material of the parts exceed the concentration limit requirement as described in
SJ/T11363-2006. Note: This product is marked with “×” because it is impossible to substitute the above hazardous substances due to the current global technology development level.
26