1
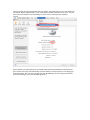
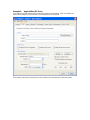
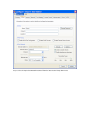
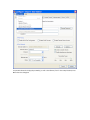
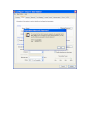
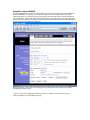
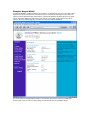
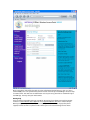
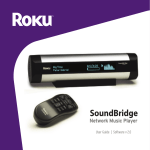
SoundBridge Wi-Fi Setup Instructions
Revision 1.2 | August 31, 2004
Background
This manual is intended for customers who want to set up the SoundBridge for use with a Wi-Fi
network. For complete instructions on using SoundBridge, please read the SoundBridge User Guide,
included with your SoundBridge product or available for download at www.rokulabs.com/support in
PDF format.
Why Wi-Fi?
With SoundBridge’s wireless functionality, you can now stream music from computers on your wireless
network to one or more Wi-Fi enabled SoundBridge devices via your wireless access point (WAP). You
can even connect up to five SoundBridges to one iTunes music library and listen to different tunes in
every room of your house.
Wi-Fi setup instructions
1. Verify that your wireless network is up and running on your computer. If you are setting up this
wireless network for the first time, please make sure that you have followed your wireless vendor’s
instruction manual for proper configuration of your wireless access point.
2. Remove both the left and right end caps of SoundBridge by pressing on the two release tabs labeled
“push”. If your SoundBridge is currently powered on, press Standby on your remote and then
disconnect SoundBridge from power by unplugging the AC power cord.
3. Remove the wireless card from its packaging and insert the card into the CF slot on the left side of
SoundBridge. Make sure that the “Roku” label and two small status lights are facing away from you as
you gently push the card into place. (Note: The LED lights will not be illuminated until you power on
SoundBridge). Be careful, forcing the card into position may damage your device.
4. If you had been previously using a wired Ethernet connection, disconnect the cord from the
SoundBridge. Make sure you only have the Wi-Fi card or the wired Ethernet connection attached
to the device– never both at the same time.
5. Start up iTunes or SlimServer on your computer, which is connected to your wireless network.
6. Turn on your Soundbridge by plugging the power cord into the right side of the device, then into the
wall AC outlet. Verify that the screen displays the Roku logo.
7. Upon startup, SoundBridge will attempt to connect to any wireless access point within range that
does not require a password. If your home wireless network requires no password and there are no
other wireless networks in the vicinity (such as those spilling over from a neighbor's house), then your
SoundBridge should automatically connect with no additional configuration, and you will see a list of
music servers on your network to connect to.
However, it’s possible you will need to configure your wireless network as described below:
-
If your SoundBridge detects more than one available wireless network, then you will need
to configure SoundBridge’s Wi-Fi settings. Choose "System Configuration" from the main
menu, and then select "Select Wi-Fi SSID & Password." You will then see a list of available
wireless networks. If you see your desired network, select it. If you don't see the desired
network, make sure that your wireless router is within range and that it is functioning
properly.
-
Some wireless networks don't "advertise" themselves (a.k.a., “closed networks”). If your
wireless access point is functioning properly but you do not see the network listed, you
should enter your wireless network name by selecting "Specify a wireless network..." (Refer
to your wireless access point’s documentation or utility software if you don’t know the
name of your wireless network.)
-
Next, your SoundBridge will ask you whether the wireless connection requires a password.
If you do not have a wireless password, select “No” and skip to the next section. If you do
have a wireless password, select “Yes”. Read the instructions on the screen to determine
what type of wireless password you have on your network. If you are unsure, you may wish
to refer to your wireless router documentation. (See hints below for help finding your
wireless access point’s password.)
-
Select “OK” to reboot the unit. Upon restarting, SoundBridge should automatically connect
to the network you have specified.
If the connection is successful, all the available iTunes and/or SlimServer music libraries will be listed on
your screen. Use the up and down arrows on your remote to navigate to your desired library and press
Select to begin browsing your music library..
Troubleshooting
If you have problems connecting to the SoundBridge to your music library via Wi-Fi, please check the
following:
1. Are the LED lights lit up inside the CompactFlash Wi-Fi adapter? If not, your card is not
receiving power. Make sure the SoundBridge is powered on (the LED screen is lit). Remove and
re-insert the CF card with the label facing away from you. It should require gentle pressure to
be inserted into the CF slot.
2. Is SoundBridge within range of your wireless network signal? (Performance varies depending
on wireless network hardware, physical barriers such as walls, and signal interference.)
3. Is your computer on and your wireless access point plugged in?
4. Is iTunes or SlimServer running on your computer?
5. Did you enter your password correctly (if you have one), including case sensitive characters?
Obtaining your wireless access point’s password
Follow these instructions to determine your wireless access point password, and be sure to have a pen
ready to make a note of the case-sensitive password as well as the password type, either hexadecimal
(hex) or ASCII.
Example 1:
Apple AirPort (Mac Users)
The Apple Airport is a very popular access point. To see its configuration, open your AirPort Admin
Utility on your Mac (it is in the Utilities folder). Select your AirPort and choose “Configure”.
You may need to enter the password for your base station. You should then see the screen below. The
line labeled “Wireless Network Name:” is the name of your network, also known as an "SSID". You will
either select this network on the SoundBridge screen or enter it manually if your network is
“closed”.
If your network is password protected, you should choose "Equivalent Network Password" from the
"Base Station" menu (see illustration above) and write down the value that appears in the dialog (see
illustration below). This is the value you will enter into SoundBridge’s wireless setup password field.
(Select password type “hex” in the SoundBridge menu.)
Example 2:
Apple AirPort (PC Users)
Step 1: Open the AirPort Admin utility (Start/Programs/Airport Admin Utility). Select the network you
would like to configure. You should then see the configuration screen below.
Step 2: Make a note of the name of your wireless network in the “Network Name” field (see below).
Step 3: Select the “Equivalent Network Password” from the “Base Station” drop down menu.
Step 4: Write down the displayed password(s), as well as their format (“hex” in the example below). Press
OK to close the dialog box.
Example 3: Linksys WAP54G
The Linksys WAP54G access point is a popular 802.11g access point. Getting the hexadecimal WEP key
from the WAP54G is an easy process. First, open a web browser and connect to the access point.
Connecting to the access point is done by entering the access point’s IP address in the location bar of
your web browser. If you do not know the IP address of the access point, please refer to the software or
manual that came with the access point in order to determine the IP address. After successfully logging
in, you will see a page similar to the following:
Make a note of the “SSID” (in this case “wireless”), this you will need to enter into the “SSID” field in
SoundBridge’s wireless setup.
As you can see in the next illustration, “Wireless Security” is enabled. Click on the “Edit Security
Settings” button to access the WEP setup page:
This Linksys access point allows you to easily view the keys. The default key is key number 1, so make a
note of the value of the “Key 1” field (“49774B692D” in this case). This is the value you will enter into
SoundBridge’s wireless setup’s “Password” field. You now have the information necessary to configure
your SoundBridge to connect to your network. You may close you web browser.
Example 4: Netgear WG602
The Netgear WG602 is an 802.11g Wireless Access Point. Its configuration can be accessed with a web
browser. First, open a web browser and connect to the access point by entering the access point’s IP
address in the location bar of your web browser. If you do not know the IP address of the access point,
please refer to the software or manual that came with the access point in order to determine the IP
address. After successfully logging in, you will see a page similar to the following:
::
The value of “Wireless Network Name (SSID)” is the SSID that you will enter into the SoundBridge’s
wireless setup. Next, click on “Security Settings” on the left side to access the WEP settings:
If “WEP” is set to “Disable”, then you do not need to enter a password to access your wireless network. If
“WEP” is set to “Enable”, you will need to obtain the hexadecimal key for your network. Netgear
unfortunately, does not allow you to view the current passphrase or keys. However, if you re-enter the
known passphrase and press “Generate Keys”, then it will regenerate the keys as before and allow you
to view the keys:
Make a note of the value of the key with the active radio button (the default key, in this case “Key 1”:
“562E7FF0A0”). This is the password that you will need to enter into your SoundBridge’s wireless setup
“Password” field. You now have the information necessary to set up your wireless network from your
SoundBridge. You may close your web browser.
Getting help
If you are still having trouble setting up your Wi-Fi connection, please browse our web site support
resources at www.rokulabs.com/support or email [email protected]. We’re available for you
Monday-Friday 9am-5pm Pacific Time, and usually respond within 24 hours. If you prefer phone
support, feel free to email us a phone number where you can be reached during business hours.