1
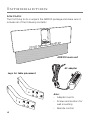
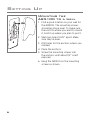
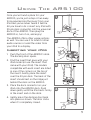
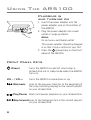
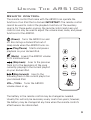
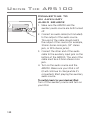
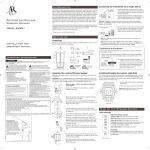
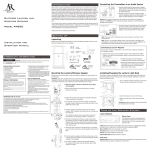
HIGH-PERFORMANCE
AUDIO DOCKING SYSTEM
USER
AR5100
MANUAL
Important Information
CAUTION
RISK OF ELECTRIC SHOCK.
DO NOT OPEN.
Caution: To reduce the risk of electric shock, do not remove
cover (or back). No user serviceable parts inside. Refer
servicing to qualified service personnel.
WARNING: To reduce the risk of fire or
electric shock, do not expose this product to
rain or moisture. The apparatus shall not be
exposed to dripping or splashing. No objects
filled with liquids, such as vases, shall be
placed on the apparatus.
Important Safety Instructions
1. Read these instructions.
2. Keep these instructions.
3. Heed all warnings.
4. Follow all instructions.
5. Do not use this apparatus near water.
6. Clean only with dry cloth.
7. Do not block any ventilation openings.
Install in accordance with the
manufacturer’s instructions.
8. Do not install near any heat sources such
as radiators, heat registers, stoves, or
other apparatus (including amplifiers)
that produce heat.
9. Protect the power cord from being
walked on or pinched particularly at
plugs, convenience receptacles, and the
point where they exit from the apparatus.
10. Unplug this apparatus during lightning
storms or when unused for long periods
of time.
11. Refer all servicing to qualified service
personnel. Servicing is required when
the apparatus has been damaged in any
way, such as power-supply cord or plug
is damaged, liquid has been spilled or
objects have fallen into the apparatus,
the apparatus has been exposed to rain
or moisture, does not operate normally,
or has been dropped.
2
FCC Information
FCC Regulations state that unauthorized
changes or modifications to this equipment
may void the user’s authority to operate it.
This device complies with Part 15 of the FCC
rules. Operation is subject to the following
two conditions: (1) This device may not cause
harmful interference and (2) this device must
accept any interference received, including
interference that may cause undesired
operation.
Industry Canada Regulatory Information
Operation is subject to the following two
conditions: (1) this device may not cause
harmful interference and (2) this device must
accept any interference received, including
interference that may cause undesired
operation.
This Class B digital apparatus complies with
Canadian ICES-003.
Cet appareil numérique de la classe B est
conforme à la norme NMB-003 du Canada.
Introduction
Congratulations! You will soon be enjoying a superlative listening
experience with your new AR High-Performance Audio Docking
System. The AR5100 offers unsurpassed sound accuracy and detail
in a sleek, wall-mountable design. You can also use the AR5100 as
the perfect bridge between your iPod and HD display—its component
video outputs preserve the quality of the video on your iPod. And the
AR High-Performance Audio Docking System is flexible enough to
integrate seamlessly into your existing office or home setup, wherever
you need great sound and refined design:
• Provides two placement options: standing up or wall-mounted
• Plays any iPod with 30-pin dock connector
• An auxiliary input allows for the connection of any digital music
player or other audio source to the speaker system
• A compact infrared remote control lets you control your iPod from
nearly any location in the room
• The speaker system charges your iPod while it’s connected to the
docking port
Product Information
Keep your sales receipt to obtain warranty parts and service and
for proof of purchase. Attach it here and record the model number
in case you need it. These numbers are located on the product.
Model No.:__________________________________________________
Purchase Date:______________________________________________
Dealer/Address/Phone:_______________________________________
3
Introduction
Unpack
The first thing to do is unpack the AR5100 package and make sure it
includes all of the following contents:
AR5100 main unit
AC adapter
Legs for table placement
Also:
• Adapter inserts
• Screws and anchors for
wall mounting
• Remote control
4
Setting Up
Once you’ve found where you’d like to put the AR5100,
you have two placement options:
Stand it up:
The AR5100 comes with removable legs for upright placement on a
flat surface. Simply attach the legs to the back of the AR5100 to leave
the unit in this position (see below for details).
Hang it on the wall:
The AR5100 package comes with screws and anchors for mounting
the unit on drywall. The back of the AR5100 has two mounting holes
that fit over these screws (see below for details).
Attaching the legs
for table placement
1. Position one of the legs over one of
the recessed areas on the back of the
AR5100 as shown.
2. Insert the leg into the recessed area
and press upward to lock it in place.
3. Repeat with the other leg.
The AR5100 is ready to place upright on
a flat surface.
5
Setting Up
Mounting the
AR5100 to a wall
1. Find a good location on your wall for
the AR5100. The mounting screws
should be at eye level. To make sure
the unit fits where you want to mount
it, hold it up where you plan to put it.
2. Mark two holes 10.25” apart. Make
sure they’re level.
3. Drill holes for the anchors where you
marked.
4. Place the anchors.
5. Screw the mounting screws into
the anchors until about 1/2” is left
exposed.
6. Hang the AR5100 on the mounting
screws as shown.
6
Using The AR5100
Once you’ve found a place for your
AR5100, you’re just a step or two away
from experiencing the music from your
iPod like you’ve never heard it before.
All you have to do is insert any iPod with
30-pin dock connector into the universal
dock of the AR5100. Then plug the
AR5100 in, turn it on, and enjoy!
The AR5100 offers other usage options
as well. You can use it to listen to other
audio sources or send the video from
your iPod to a display.
1
2
Inserting your iPod
1. Push the front of the AR5100’s dock.
The docking door opens.
2. Find the insert that goes with your
iPod model (or use the insert that
came with your iPod). The models
compatible with each insert are listed
in one of the corners on the top of
the insert. Gently place the insert
over the 30-pin dock. The back of the
insert should rest on the ridge just
behind the dock on the AR5100.
3. Place the dock connector on your
iPod onto the AR5100 dock. Push
down gently until the iPod rests firmly
in the insert and on the dock.
4. Gently press the docking door back
into place as shown. The door clicks
when it’s completely closed.
3
4
7
Using The AR5100
Plugging in
and turning on
1. Insert the power adapter into the
power adapter jack on the bottom of
the AR5100.
2. Plug the power adapter into a wall
outlet or surge protector.
Notes:
Do not use a switchable outlet.
This power adapter should be plugged
in so that it stays vertical or lays flat.
3. Press the
(power) key on the front
panel of the AR5100.
Front Panel Keys
(Power) VOL - / VOL +
(Skip back)
Turns the AR5100 on and off. Also brings a
docked iPod out of sleep mode when the AR5100
turns on.
Turns the AR5100 volume down or up.
Goes to the previous track (or to the beginning of
the song currently playing) in the current playlist
on your docked iPod.
(Play/Pause) Starts and pauses playback on your docked iPod.
(Skip forward)Goes to the following track in the current playlist
on your docked iPod.
8
Using The AR5100
Remote control
The remote control that came with the AR5100 can operate the
functions of an iPod that is docked. IMPORTANT: The remote control
cannot be used to control the playback functions of the auxiliary
source. For these audio sources, the remote control and main unit
controls can only be used to adjust the volume level, mute, and power
functions for the AR5100.
(Power) Turns the AR5100 on and
off. Also brings a docked iPod out of
sleep mode when the AR5100 turns on.
(Play/Pause) Starts and pauses
playback on your docked iPod.
(Mute) Lowers the AR5100 volume
to its minimum level.
(Skip back) Goes to the previous
track (or to the beginning of the song
currently playing) in the current playlist
on your docked iPod.
(Skip forward) Goes to the
following track in the current playlist on
your docked iPod.
VOL— / VOL+ Turns the AR5100
volume down or up.
The battery in the remote control may be changed as needed.
Usually this will only be necessary every one to two years; however,
the battery may be changed at any time when the remote control’s
effectiveness has diminished.
9
Using The AR5100
Connecting to
an auxiliary
audio source
1. Make sure the AR5100 and the
auxiliary audio source are both turned
off.
2. Connect an audio cable (not included)
to the output of the audio source.
This end of the cable should match
the output of the source (for example,
3.5mm stereo mini-jack, 1/4” stereo
jack, or RCA stereo jacks).
3. Connect the other end of the audio
cable to the auxiliary input jack on the
bottom of the AR5100. This end of the
cable must be a 3.5mm stereo minijack.
4. Turn on the audio source and the
AR5100. Make sure your iPod is off
(it will continue to charge while it’s
connected). Start playing the auxiliary
audio source.
To switch back to your docked iPod:
Turn off the auxiliary source and turn on
your iPod.
10
Using The AR5100
Connecting to
a video display
1. Make sure the AR5100 and the video
display device are both turned off.
2. Connect a component video cable
(not included) to the component video
output jacks on the bottom of the
AR5100. Make sure you match the color
of each plug to a jack of the same color.
Note: You can also use a composite
video cable to connect the AR5100
to your video display. Connect the
composite video cable to the Pb (blue)
jack on the AR5100. Then connect
the other end to the composite video
input on your TV or monitor.
3. Connect the other end of the
component video cable to an available
set of component video input jacks on
the video display device. Make sure
you match the color of each plug to a
jack of the same color.
4. Turn on the video source and AR5100.
Select the correct input on the video
source to watch the signal from the
AR5100.
5. Select a video on your iPod and play it.
Important: Make sure the video settings
on your iPod are adjusted correctly to
watch video on a separate display. You
might need to remove the iPod from the
AR5100 dock to change these settings.
See the user manual that came with your
iPod for more information.
11
Additional Information
Troubleshooting
The following troubleshooting guide takes you through some of
the more common problems associated with the installation and/or
operation of a docking system for iPod. If the problem persists, please
call toll-free at 1-800-732-6866 or visit www.araccessories.com.
iPod Does Not Connect to • Remove iPod from the dock and confirm that
Speaker System
you are using the appropriate insert for the
model of iPod you have.
• Detach the iPod from the AR5100 and check for
any obstructing debris.
• Reinsert iPod into docking port and establish a
secure connection.
No Sound Is Produced
12
• Inspect wall outlet and ensure that the power
cord is firmly plugged into the outlet.
• If you’re trying to listen to an auxiliary audio
source, make sure the audio cables are securely
connected to the source and to the AR5100.
• Make sure the AR5100 is turned on. Press the
power button on the AR5100 front panel if the
front panel is not illuminated.
• Select and play the desired music you wish to
play.
• Make sure that the volume is turned up.
• If there still is no sound, remove the iPod from
the docking port, turn the AR5100 off, unplug
the unit from the wall outlet, wait one to two
minutes, and then plug the power cord back into
the wall outlet, turn the AR5100 back on, put
your iPod into the dock, and try the above steps
again.
Additional Information
Remote Control Does Not • Remove the iPod from the docking port and
Control Docked iPod
reattach it, making sure that there is a secure
fit between the iPod and the docking port.
• Make sure that there is a clear path between
the remote control and the speaker system,
and make sure that you are pointing the
remote control directly at the front panel of the
speaker system’s main unit.
• Remove the remote control’s battery to
ensure that it is correctly inserted in the
battery compartment. If not inserted properly,
realign the battery to fit securely into the
compartment.
• Move around the room and try to use the
remote from more than one location.
• Press the remote control’s power button on and
off to verify that the remote signal is controlling
the main unit.
• If you still cannot operate the docked iPod
with the remote control, make sure the remote
control operates the other speaker system
functions (volume, power). If it does not control
these functions, replace the battery in the
remote control with a new battery.
iPod Does Not Charge
• Turn the AR5100 off.
• Remove iPod from the docking port and confirm
that you are using the appropriate insert for the
model of iPod you have.
• Detach the iPod from the dock and check for
obstructing debris that may have lodged in the
docking port.
• Reinsert iPod into docking port and establish a
secure connection.
13
• Turn the AR5100 back on.
Additional Information
Video Does Not Display
On My TV
• Make sure the component video cable is
securely connected to both the AR5100 video
output jacks and the video display’s input jacks.
• Make sure you’ve selected the correct input on
your video display. See your display’s user guide
for more information.
• Make sure you’ve made the proper adjustments
to the video settings on your iPod. See the
user guide that came with your iPod for more
information.
Routine maintenance
Before you clean the AR5100, make sure that the main unit has been
unplugged from the wall outlet. Use a soft and dry lint-free cloth
to wipe away dust from the outside surfaces of the main unit and
speakers.
IMPORTANT! When cleaning the speaker system:
• DO NOT Use water or solvents.
• DO NOT Spray the unit with any cleaning chemicals.
• DO NOT Clean any interior areas of the unit.
Product specifications
Model: AR5100
15W RMS/channel, 2-way system
13mm horn-loaded tweeters
76mm Neodymium mid-bass drivers with ported enclosure
Proximity sensor touch panel
Component video output
Auxiliary audio input
14
Additional Information
12 Month Limited Warranty
Audiovox Electronics Corporation (the “Company”) warrants to the original retail purchaser of this
product that should this product or any part thereof, under normal use and conditions, be proven
defective in material or workmanship within 12 months from the date of original purchase, such
defect(s) will be repaired or replaced (at the Company’s option) without charge for parts and repair
labor. To obtain repair or replacement within the terms of this Warranty, the product along with any
accessories included in the original packaging is to be delivered with proof of warranty coverage (e.g.
dated bill of sale), specification of defect(s), transportation prepaid, to the Company at the address
shown below. Do not return this product to the Retailer.
This Warranty is not transferable and does not cover product purchased, serviced or used outside
the United States or Canada. The warranty does not extend to the elimination of externally generated
static or noise, to costs incurred for the installation, removal or reinstallation of the product. The
warranty does not apply to any product or part thereof which, in the opinion of the company, has
suffered or been damaged through alteration, improper installation, mishandling, misuse, neglect,
accident or exposure to moisture. This warranty does not apply to damage caused by an AC adapter
not provided with the product, or by leaving non-rechargeable batteries in the product while plugged
into an AC outlet.
THE EXTENT OF THE COMPANY’S LIABILITY UNDER THIS WARRANTY IS LIMITED TO THE REPAIR OR
REPLACEMENT PROVIDED ABOVE AND, IN NO EVENT, SHALL THE COMPANY’S LIABILITY EXCEED THE
PURCHASE PRICE PAID BY PURCHASER FOR THE PRODUCT.
This Warranty is in lieu of all other express warranties or liabilities. ANY IMPLIED WARRANTIES, INCLUDING
ANY IMPLIED WARRANTY OF MERCHANTABILITY OR FITNESS FOR A PARTICULAR PURPOSE, SHALL BE
LIMITED TO DURATION OF THIS WARRANTY. ANY ACTION FOR BREACH OF ANY WARRANTY HEREUNDER,
INCLUDING ANY IMPLIED WARRANTY, MUST BE BROUGHT WITHIN A PERIOD OF 24 MONTHS FROM THE
DATE OF ORIGINAL PURCHASE. IN NO CASE SHALL THE COMPANY BE LIABLE FOR ANY CONSEQUENTIAL
OR INCIDENTAL DAMAGES WHATSOEVER. No person or representative is authorized to assume for the
Company any liability other than expressed herein in connection with the sale of this product. Some
states/provinces do not allow limitations on how long an implied warranty lasts or the exclusion or
limitation of incidental or consequential damage so the above limitations or exclusions may not apply
to you. This Warranty gives you specific legal rights and you may also have other rights which vary
from state/province to state/province.
USA:
Audiovox Electronics Corporation, 150 Marcus Blvd., Hauppauge, NY 11788
CANADA: Audiovox Return Center, c/o Genco, 6685 Kennedy Road, Unit 3, Door 16, Mississauga,
Ontario L5T 3A5
15
© 2008 Audiovox Accessories Corporation
111 Congressional Blvd., Suite 350
Carmel, IN 46032 USA
www.araccessories.com
AR5100_US_IB_00
Trademark(s) Registered
All other brands and product names are trademarks
or registered trademarks of their respective owners.
“Made for iPod” means that an electronic accessory has been designed to connect specifically to iPod
and has been certified by the developer to meet Apple performance standards. “Works with iPhone”
means that an electronic accessory has been designed to connect specifically to iPhone and has been
certified by the developer to meet Apple performance standards. Apple is not responsible for the
operation of this device or its compliance with safety and regulatory standards. iPod is a trademark of
Apple Inc., registered in the U.S. and other countries. iPhone is a trademark of Apple Inc.