1
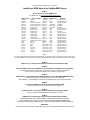
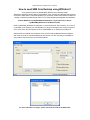
SysManSMS Server Installation Guide - ENGLISH
SysManSMS SERVER
Installation Guide
Version 7
ENGLISH
NOTE:
See CD-rom SetupGuides folder for examples on how to
interface SysManSMS Server with other applications
SysManSMS Software License Agreement
SysMan AS is the 100% owner of the SysManSMS code, product and all rights to distribute the product
SysMan AS grants the owner of this license a limited license to use the selected software product in binary
executable form in the normal operation of the product
Title, ownership rights, and intellectual property rights in and to the Software remain in SysMan
You agree not to distribute, decompile, disassemble, modify, reverse assemble, reverse engineer, or reduce to
human readable form the Software or any part thereof or create any derivative works based on the Software
IMPORTANT:
One SysManSMS Server License KEY can only be used with one installation. Multiple installations will fail!
Use uninstall to move a license KEY to another installation
By purchasing the Software you acknowledge that you have read this agreement, and that you agree to the
content of the agreement and its terms, and agree to use the Software in compliance with this agreement. The
agreement comes into legal force at the moment when you download this Software from our site or receive it
through email or on any data medium from SysMan AS
For any question related to this product – visit www.sysman.no
SysManSMS Server Installation Guide - ENGLISH
Installing a GSM device for SysManSMS Server
STEP-1:
Check support for your GSM device
For updated list, see www.sysman.no/devicesupport.htm
Manufacture
Device ID/Name
Hardware Connection
Serial
Serial
Serial
Serial/USB
Serial/USB
Serial/USB
USB
USB
USB
Serial
Serial
USB
USB
USB
USB
Serial
Serial
Serial
Serial
USB
USB
Network
Wavecom
Wavecom
Wavecom
Wavecom
Wavecom
Wavecom
Multi-Tech
Multi-Tech
Multi-Tech
Teltonika
Teltonika
Teltonika
Teltonika
Teltonika
Teltonika
Nokia
Nokia
Siemens
Falcom
Falcom
Falcom
M1306B
WMOD2
Wismo Quick Q2400A
FASTRACK Supreme 10
FASTRACK Supreme 20
FASTRACK GO
MTCBA-G-UF1
MTCBA-G-UF2
MTCBA-G-UF4
T-ModemCOM
T-ModemCOM
T-ModemUSB
T-ModemUSB
T-ModemUSB TMU-105
T-ModemUSB TMU-106
Nokia 30
Nokia 31
TC35i
Swing
Samba 55
Samba 56
Wavecom
Wavecom
Wavecom
Wavecom
Wavecom
Wavecom
Wavecom
Wavecom
Wavecom
Nokia 12
Nokia 12
Nokia 12
Nokia 12
Nokia 12
Nokia 12
Nokia 30
Nokia 31
Siemens tc35i
Falcom A2D
Siemens tc55
Siemens tc56
900/1800 Eur/Asian
900/1800 Eur/Asian
900/1800 Eur/Asian
QuadBand
QuadBand
QuadBand
900/1800 Eur/Asian
850/1900 American
QuadBand
900/1800 Eur/Asian
850/1900 American
900/1800 Eur/Asian
850/1900 American
900/1800 Eur/Asian
900/1800 Eur/Asian
900/1800 Eur/Asian
850/1900 American
900/1800 Eur/Asian
900/1800 Eur/Asian
900/1800 Eur/Asian
850/1900 American
Falcom
Tango 55
Siemens tc55 Serial
900/1800 Eur/Asian
Falcom
Tango 56
Siemens tc56 Serial
850/1900 American
Note:
You can test SysManSMS Server without a local GSM device. This requires access to Internet and an outgoing SMTP server.
By selecting COM0: as your GSM communication port, SysManSMS Server will use a Remote GSM Service to send SMS’s.
STEP-2:
Make sure you have the manufacture installation documentation ready
STEP-3:
Insert the SIM card into your GSM device. See manufacture installation documentation
It’s a good idea to check the SIM card in a mobile phone before inserting it into the device
If you are going to use the PIN security code – make sure you got it right
STEP-4:
If USB device – follow manufacture documentation to install the MODEM DRIVER (only)
It’s important that you only install the modem driver, not any application
After installation – find the COM-port number for the installed device in the Computer Properties
STEP-5:
Connect the GSM device to the selected port (COM or USB)
If device comes with cables, make sure you use the originals
STEP-6:
If external power, connect the power to the device and plug into mains
Normally a light will indicate that the device has power connected
STEP-7:
GSM device communication speed should normally work by default
SysManSMS Server will use either 9600 or 115200 baud. If the device is not set
to one of these, it will not work. To check device speed use HyperTerminal or other
To permanent set speed on a GSM device – use the AT+IPR=speed and AT&W commands
IMPORTANT:
Power must be turned OFF while inserting SIM card or while connecting the RS-232/USB cable to the PC
SysManSMS Server Installation Guide - ENGLISH
Installing the SysManSMS Server software:
Insert the SysManSMS Server CD, the installation should start automatically.
If not, localize the file “Setup.exe” and double click on the file.
Note:
SysManSMS Server can be used with a lot of applications in your network. SysMan has developed various
Solution Guides with example of application interface and settings. You will find this documentation in the
DOC folder of your installation, or at our web page www.sysman.no
Now follow the installation instructions !
Make sure the GSM device is connected and powered – then hit SETUP
Select the location you want the SysManSMS software to be installed on. Default is C:\Program Files
SERVER or CLIENT installation?
SysManSMS is a Server/Client product. If you like to send messages from other PC’s in your
network, you simply install the software as Client, and write the name or IP address of the computer
where your SysManSMS Server is running.
Remote client utilities should now be able to send SMS messages, but if you need to configure any
further you can modify the default settings in each clients .ini file.
See the User Guide for more details on how to configure and use clients from a remote machine.
When ready – click “Install”
SysManSMS Server Installation Guide - ENGLISH
Note:
You may test SysManSMS Server SEND
functionality without a local GSM device
connected. By selecting COM0: as your GSM
Device Port, SysManSMS Server will use a
Remote GSM Service (RGSMS) for sending.
This function requires access to the Internet and
an outgoing SMTP server. This you define in
MAIL (SMTP) settings.
When testing is finished, you will have to run
SETUP and Uninstall the server, then re-run
SETUP for a normal GSM Hardware based
installation.
Important Fields:
Company Name:
License Number:
Device Port:
Pin Code:
SMS Service Center Number:
Advanced Settings:
SMS Storm Control Counter:
Send Storm Warning:
Watchdog Option Setup:
Status Notification:
Rights File:
Service Monitoring:
MAIL (SMTP):
End users company name
Use the license number that came with the product.
Windows COM port where the GSM device are connected.
If PIN code not disabled in SIM card, type the correct SIM card PIN code
Default is “FROM SIM” card; else type the SMS Service Center Number.
A value greater than zero will set a max number of SMS a user can receive per date
Send user a last message (flash type) informing about Storm Control Stop
If GSM device with SysManSMS Watchdog, enable it and add mobile numbers to list
Enter mail address and/or Number File to receive server notifications.
If you got ENTERPRISE license (2-way), you can create an access rights list
If you got Service Monitor license, register Windows Services to be monitored
Enable and setup the SMTP server for mail->sms and Remote GSM Service function
Important: No other SMTP Server can exist on same PC/Server
To change installation settings, use SysManSMS Desktop Menu or manually edit SysManSMS.ini file and re-start server.
This installation will install SysManSMS Server service (SysManSMS for GSM) under user
“Local System”, and will also set the server to automatic start at re-boot.
If you like to change the service settings, answer ”NO” to the start server question, then go to SERVICE control panel
(administrative tools) and manually change the account settings to fit your needs.
SysManSMS Server comes with a Desktop Menu for your Status Bar. If you like this to be installed
now, hit YES. You can anytime later start the SysManSMS Desktop Menu from the Utilities folder.
Installation is now completed !
Note: It may take up to a Minute for the Server to register and become ready
SysManSMS Server Installation Guide - ENGLISH
How to send your first SMS from a text file?
The easiest way to send your first SMS is to put your mobile number into the default Number File,
and then drop a text document into the servers INPUT folder. Here are the steps:
Start the SysManSMS_NumEdit from Desktop Menu or direct from Utilities folder
This is the main window of the SysManSMS_NumEdit – Hit the New button
Create an entry for your mobile
This is the EDIT window for creating/editing a number line. Insert your name and mobile number – Hit OK
Save the file into the Iclients folder, with the name SysManSMS_Iclient.lst (default)
With a File browser, now copy the example file …\SysManSMS\Fclient\Freetext.txt
to the …\SysManSMS\GSMserver\INPUT\ folder.
Note: If you selected a different INPUT folder at installation, you must use this instead.
After some seconds, you should receive an SMS
If not, please take a look at the log file:
…\SysManSMS\GSMserver\OUTPUT\SysManSMS.html
To send text from record formatted files, see User Guide in the DOC folder
SysManSMS Server Installation Guide - ENGLISH
How to send SMS from integration client programs?
SysManSMS Server has a Server/Client architecture.
Here are the steps to test two of the command line clients for sending SMS messages to a mobile:
First test the Iclient. With your mobile number already entered in the default number file
(see How to send your first SMS from a file) open a DOS command window.
The Iclient reads your number file and sends your text parameter to the mobile.
Iclient is developed for sending SMS from other applications like HP OpenView, IBM Director, Microsoft MOM a.o.
Then test your CMDclient. This client gets both your mobile number and your text from the
command line. Open a DOS command window.
The CMDclient reads your number and text from the parameters, and send it to the mobile.
Note:
A complete desktop client called WINclient can be used for sending from your desktop.
For use of the WINclient – see the User Guide in the DOC’s folder
How to receive an SMS and start a program?
(Note: Require ENTERPRISE server license)
If you send an SMS message to the SysManSMS Server, this can for example start a program.
One such program is the included SF.EXE in the server’s Programs folder.
If an SMS starts SF.EXE, it will return to you the first 160 characters in the file you requested.
Send the
following SMS
from your mobile
to the server:
You should within a
few seconds receive
the content of the file
“Freetext.TXT”
SF FREETEXT
NOTE: If you do not have the ENTERPRISE license, you can still use server internal
commands. Try the server command :STAT from your mobile.
Many more mobile commands are available - Please see the User Guide in the DOC folder
SysManSMS Server Installation Guide - ENGLISH
How to send SMS from Desktop using WINclient?
A very powerful client is the SysManSMS_WINclient in the WINclient folder.
WINclient is capable of sending SMS in many different ways, including using Number Files located in
the Server’s Iclient folder. From inside WINclient you got a direct access to the Number File Editor for
creating or maintaining Iclient Number Files.You can create repeating message files from WINclient.
Activate WINclient from SysManSMS Desktop Menu or by double-click on the file
SysManSMS_WINclient.exe in WINclient folder
NOTE: SysManSMS_WINclient are dependent on minimum Microsoft .NET Framwork V2.0. If this is
not installed on the computer you start WINclient you will get a message for the missing component.
In this case, install .NET from Options folder on SysManSMS CD, or download from Microsoft.
WINclient will now initialize for the first time and try to find a local SysManSMS Server installation.
After some seconds you will see the WINclient main window. You are now ready to send SMS’s in
many different ways direct from your Windows desktop !
For more information on usage – please see the User Guide in the DOC folder
SysManSMS Server Installation Guide - ENGLISH
How to forward MAIL messages to a mobile?
If you installation enabled the SMTP function, you are now ready to test the mail-to-SMS functionality.
IMPORTANT: No other SMTP Server can exist on same PC/Server using port 25 !
To send a mail, simply start Microsoft Outlook or other mail client and send the following:
Mail To:
Subject:
Message:
mobilenumber@your_sysmansms_server
Test mail
This is my first mail to SMS test
mobilenumber
= any valid GSM mobile number with or without a country national prefix
your_sysmansms_server = the IP address (or DNS name) of the PC that runs the SysMan Server.
After some seconds you should receive the SMS message at the destination mobile.
Advanced mail send modifiers:
-
mobilenumber@sysmanserver
-
mobilenumber.F@sysmanserver
mobilenumber.C@sysmanserver
mobilenumber.S@sysmanserver
mobilenumber.R@sysmanserver
MobileNumber.D@smtpserver
numberfile@sysmanserver
Step_numberfile@sysmanserver
sms@sysmanserver
Send to the specified mobile number
The number can be any number, including international prefixed numbers (“+” in front)
Send to the specified mobile number using SMS Flash (instant) message type
Will send to the mobile number, and a delivery Confirmation MAIL is returned
Will send SUBJECT text only. Apply to both Numbers and Number Files
Will write senders Reply path information to Send Mail lookup Database file
Will DIAL the specified number (WakeupCall)
Send to all numbers in the NumberFile.lst located in the SysManSMS Iclient folder.
Send with delay between messages to all numbers in step_file.lst in Iclient folder.
Will take the mobile number from the mail’s Subject field
Note: Number File names must be used without the file type extension (.lst)
How to forward SMS messages to a MAIL account?
SysManSMS Server support received SMS messages to be forwarded to a mail address in 3 ways.
You can have the Send Mail (SM.EXE) program started by sending a SMS like this:
SM [email protected] This is the text to send to a mail user
Another more powerful function is to return a SMS to a mail user and let the SysManSMS Server try
to resolve the return address automatically.
For the SysManSMS Server to be able resolve a mail address, you must enable the “Save Mail-toSMS Address Path” function in the SMTP (Mail) setup of the server. The SMS could then just be:
SM This is the text to return to a mail user
If you then in addition make SM.EXE in the Programs Folder of the Server your default program
(make a copy of SM.EXE to DEFAULT.EXE) you will just have to return any text in your SMS
This is the text to return to a mail user
SysManSMS Server is able to find the mail return address if a mail recently was sent to this mobile.
To enable this function – see your SMTP settings.
For more information on the mail->sms->mail functions – see the User Guide or the dedicated
TechNote document about Exchange and Outlook usage, in the DOC folder