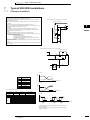
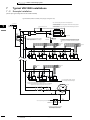
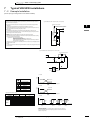
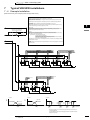
1
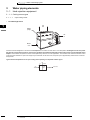
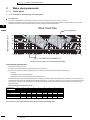
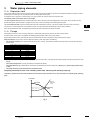
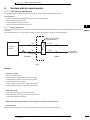
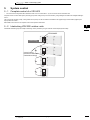
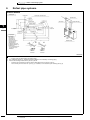
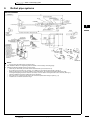
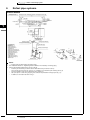
Air Conditioners
Technical Data
Wa te r- co o l e d d e s i gn g u i d e
EEDEN13-201
Air Conditioners
Technical Data
Wa te r- co o l e d d e s i gn g u i d e
EEDEN13-201
• Water-cooled design guide
TABLE OF CONTENTS
II Water-cooled design guide
1
Introduction . . . . . . . . . . . . . . . . . . . . . . . . . . . . . . . . . . . . . . . . . . . . . . . . . . . . . . . . . . 2
2
Basic configurations of VRV-WIII. . . . . . . . . . . . . . . . . . . . . . . . . . . . . . . . . 3
Basic configuration for cooling operation . . . . . . . . . . . . . . . . . . . . . . . . . . . .
Basic configuration for heating operation . . . . . . . . . . . . . . . . . . . . . . . . . . . .
Alternative solution . . . . . . . . . . . . . . . . . . . . . . . . . . . . . . . . . . . . . . . . . . . . . . . . . . .
3
3
4
5
Water piping elements . . . . . . . . . . . . . . . . . . . . . . . . . . . . . . . . . . . . . . . . . . . . . 6
Heat rejection equipment . . . . . . . . . . . . . . . . . . . . . . . . . . . . . . . . . . . . . . . . . . . . 6
Heat transfer equipment . . . . . . . . . . . . . . . . . . . . . . . . . . . . . . . . . . . . . . . . . . . . 11
Water pipes . . . . . . . . . . . . . . . . . . . . . . . . . . . . . . . . . . . . . . . . . . . . . . . . . . . . . . . . . 12
Expansion tank . . . . . . . . . . . . . . . . . . . . . . . . . . . . . . . . . . . . . . . . . . . . . . . . . . . . . . 15
Pumps . . . . . . . . . . . . . . . . . . . . . . . . . . . . . . . . . . . . . . . . . . . . . . . . . . . . . . . . . . . . . . . 15
Temperature and pressure measurement points . . . . . . . . . . . . . . . . . . . 16
Water quality . . . . . . . . . . . . . . . . . . . . . . . . . . . . . . . . . . . . . . . . . . . . . . . . . . . . . . . . 17
4
System safety requirements . . . . . . . . . . . . . . . . . . . . . . . . . . . . . . . . . . . . . 18
Pump interlock . . . . . . . . . . . . . . . . . . . . . . . . . . . . . . . . . . . . . . . . . . . . . . . . . . . . . .
Flow switch . . . . . . . . . . . . . . . . . . . . . . . . . . . . . . . . . . . . . . . . . . . . . . . . . . . . . . . . . .
Anti freezing protection . . . . . . . . . . . . . . . . . . . . . . . . . . . . . . . . . . . . . . . . . . . . . .
Water piping strainer . . . . . . . . . . . . . . . . . . . . . . . . . . . . . . . . . . . . . . . . . . . . . . . .
Recommendations for multi outdoor unit installations . . . . . . . . . . . . . .
The total heat rejection of a single unit is 710W. . . . . . . . . . . . . . . . . . . . .
5
18
18
19
20
21
22
System control . . . . . . . . . . . . . . . . . . . . . . . . . . . . . . . . . . . . . . . . . . . . . . . . . . . . . 23
Complete control of a VRV-WIII . . . . . . . . . . . . . . . . . . . . . . . . . . . . . . . . . . . . .
Interlocking VRV-WIII outdoor units . . . . . . . . . . . . . . . . . . . . . . . . . . . . . . . . .
23
23
6
Refnet pipe systems . . . . . . . . . . . . . . . . . . . . . . . . . . . . . . . . . . . . . . . . . . . . . . 24
7
Typical VRV-WIII installations . . . . . . . . . . . . . . . . . . . . . . . . . . . . . . . . . . .
32
Example Installation . . . . . . . . . . . . . . . . . . . . . . . . . . . . . . . . . . . . . . . . . . . . . . . . .
Example Installation . . . . . . . . . . . . . . . . . . . . . . . . . . . . . . . . . . . . . . . . . . . . . . . . .
Example Installation . . . . . . . . . . . . . . . . . . . . . . . . . . . . . . . . . . . . . . . . . . . . . . . . .
Example Installation . . . . . . . . . . . . . . . . . . . . . . . . . . . . . . . . . . . . . . . . . . . . . . . . .
32
• VRV Systems • Water-cooled design guide
34
36
38
1
• Water-cooled design guide
R I V W V - R V V RC V"Please
O
note that this material is for reference only. In practice, construction methods may vary with projects and local legislation. Therefore, please
consult your design office for design and construction of the system"
1
Introduction
The Daikin water cooled VRV (VRV-WIII) combines all the well known benefits of VRV with those of water systems:
The VRV component of the system - condensing and indoor units, refrigerant piping and controls - delivers high efficiency combined with
exceptional control flexibility. Heat is exhausted or absorbed via the condensing units to and from the 2-pipe water circuit as required,
during cooling and heating cycles respectively.
1
1
On the water side of the system the heat source (water) is supplied to VRV condensing units throughout the building via the water circuit,
which incorporates ancillary items such as - pumps, valves, strainer, expansion tank, heat transfer equipment, air vents and water treatment
equipment etc.
The operating range of VRV-WIII depends on the temperature of the water circuit, which should be maintained between 15°C and 45°C.
Application potential for VRV-WIII:
2
•
tall or wide multi storey buildings not subject to limitations on length of water piping
•
applications in which the amount of refrigerant in the building is limited
•
refurbishment projects in which it is possible to link VRV-WIII into existing water piping and use the existing heat source
•
sites where suitable alternative heat transfer sources such as district water, underground water, sea water, solar energy etc. exist
•
sites where low external noise is critical. NB! Models of heat rejection equipment (cooling towers) are available for low noise applications.
•
cold climate applications with no defrost cycle due to use of water circuit.
• VRV Systems • Water-cooled design guide
• Water-cooled design guide
2
Basic configurations of VRV-WIII
2-1
Basic configuration for cooling operation
In temperate climatic regions, excess heat within the water circuit can usually be exhausted via a dry cooler or cooling tower. However,
alternative heat sinks can also be used, including natural water sources such as rivers, lakes and bore holes - existing process or chilled
water circuits can also be utilized if fitted with heat transfer facilities.
3
Cooling Tower / Dry Cooler
(Closed Type)
Expansion Tank
1
2
V1
Control Panel
Pumping Operation Signal
T1
VRV-WII
Interlock
Operation
<With Pump>
Heat Exchanger
(Plate Type)
Boiler
Pump
<Heat Source Water>
V2
T2
The diagram shows that during summer operating cycles, a drop in cooling water temperature below pre set temperature level T1 causes
3-way valve bypass V1 to open. This bypass closes once more when T1 is exceeded, reducing the temperature by allowing an increased
flow of water to the cooling tower. On/off control of pump and fan in closed cooling tower circuits is also provided by 3-way valve, V1.
• VRV Systems • Water-cooled design guide
3
• Water-cooled design guide
2
Basic configurations of VRV-WIII
2-2
Basic configuration for heating operation
Low pressure hot water from a boiler is generally utilized to maintain the required temperature levels within the water circuit - but steam,
district/process/industrial heating systems or even solar energy can also act as the heat source.
Cooling Tower / Dry Cooler
(Closed Type)
Expansion Tank
1
2
V1
Control Panel
Pumping Operation Signal
T1
VRV-WII
Interlock
Operation
<With Pump>
Heat Exchanger
(Plate Type)
Boiler
Pump
<Heat Source Water>
V2
T2
During winter operation, water circuit temperature T2 is maintained by circulating water through the boiler (or similar) via valve V2, which
shuts off immediately the pre set temperature is achieved.
4
• VRV Systems • Water-cooled design guide
• Water-cooled design guide
2
Basic configurations of VRV-WIII
2-3
Alternative solution
3
Cooling tower and boiler replaced by heat pump chiller
The use of a boiler and cooling tower to maintain condenser circuit temperature can be replaced by a heat pump chiller in most Southern European
regions, resulting in good control options via a single package, which can be supplied by Daikin.
The water circuit temperature on VRV-WIII is outside the standard operating range of a standard heat pump chiller, hence the piping configuration
is important. All engineering data books for Daikin chillers publish the operating range and specify the max and min ΔT across the evaporator
(Usually 3~8°C).
Return
22°C
25°C
16°C
16°C
25°C
25°C
VRV-WIII
Condenser
Loop
1
2
Decoupler
16°C
20°C
Supply
To ensure maximum operating efficiency of the heat pump chiller, the following data represents the optimum selection point when using the above
configuration: Cooling Mode: Leaving chilled water temperature
= Highest possible leaving water temperature (16°C)
Heating Mode: Leaving hot water temperature =
= Lowest possible leaving water temperature (25°C)
• VRV Systems • Water-cooled design guide
5
• Water-cooled design guide
3
Water piping elements
Water at the pre set temperature is supplied to all VRV-WIII condensing units via a 2-pipe closed circuit..
Water temperatures within the circuit must be maintained at 15 to 45°C and pumps should be of sufficient duty to match the requirements
of all VRV-WIII condensing units. Air purging should be carried out in closed circuit systems and a strainer installed to prevent impurities
from entering the water flow. Expansion tanks are also important since they allow for temperature changes within the circuit. System start
up should be provided by a controller, which also regulates circuit water temperature and protects the system.
Steel, stainless steel, copper and plastic but not galvanised, piping can be used.
1
3
1
When designing a water piping system, the following should be considered:
•
•
•
•
•
3-1
water must be supplied to the required locations according to the needs of each VRV-WIII
head and friction losses should be kept at a minimum
water velocity should be properly controlled to avoid water streaming noise, pipe vibration or pipe expansion/contraction due to temperature
differences.
attention should be paid to water management: impact of the water quality, corrosion prevention…
enough arrangements should be provided for easy service and maintenance.
Heat rejection equipment
In cooling mode, the purpose of the water cooled VRV plant is to reject unwanted heat outdoors.
In an air cooled VRVIII, cooler ambient air is usually drawn across the condenser coil by means of propeller fans. High pressure refrigerant heat is
transferred to the cooler ambient air and exhausted outdoors.
By comparison, in a water cooled VRV-WIII, cooling water is pumped through the plate type condenser. High pressure refrigerant heat is transferred
to the cooler condenser water and exhausted outdoors.
3 - 1 - 1 Cooling towers types
The cooling tower is still the most common equipment used for water heat rejection. With the current drive towards energy efficiency, ground water,
lakes, rivers and sea have been used as an alternative heat rejection medium. Environmental concerns and restrictions however, may limit this
potential source.
The cooling tower relies on the process of evaporation, enabling the condenser water circuit to be cooled to a temperature below the ambient wet bulb.
1
Cooling tower performance is dependent on the ambient wet bulb, whilst dry bulb temperature has little effect on performance.
Over sizing cooling towers will lead to lower condenser water temperatures at part load operation, increasing plant efficiency.
Cooling towers are either of the "open" or "closed" type.
In an open tower, the condenser water / fluid circuit comes into direct contact with the outside air.
In a closed tower, the condenser water is circulated in the heat exchanger tubes, while an evaporating water film falls on the fins of the tube exchanger.
6
• VRV Systems • Water-cooled design guide
• Water-cooled design guide
3
Water piping elements
3-1
Heat rejection equipment
3
3 - 1 - 1 Cooling towers types
3-1-1-1
Open cooling towers
Open cooling towers are classified in terms of the airflow configuration. "Forced draught" and "induced draught" towers are the most common types
found in the HVAC industry. The forced draught tower is driven by a fan, which blows air through the tower. Induced draught towers pull the air through
the tower.
Depending on whether the air is drawn against the flow of the water or across the flow of water in the tower, the systems can be further classified as
"counter flow" or "cross flow" configurations.
a
1
3
Induced draught tower
This type of unit utilizes axial flow fans and is generally thought to be the most efficient and therefore the most popular, in use today.
Water
in
Air out
Water
in
Air
in
Air
in
Water
out
Large propeller fans on the air discharge or the top of the tower draw air counter flow or cross flow to the condenser water. Due to the higher
discharge velocities they are less susceptible to short air circuits or recirculation. Noise levels are higher due to the low frequency noise associated
with propeller and axial fans.
• VRV Systems • Water-cooled design guide
7
• Water-cooled design guide
3
Water piping elements
3-1
Heat rejection equipment
3 - 1 - 1 Cooling towers types
3-1-1-1
a
Open cooling towers
Forced Draught Tower
1
3
Air
out
Water
sprays
Air
in
Water
out
Forward curved centrifugal fans on the air inlet will force/push the air in either a counter flow or cross flow pattern. Centrifugal fans use more power
but generate enough static pressure to overcome any problems associated with internally located cooling towers or those fitted with sound
dampers. These towers are quieter than others and are particularly useful for low noise applications. The cross flow tower offers the benefit of a lower
profile unit where aesthetics or plant room height may be restricted. On the other hand, the power input is approximately double that of an induced
draught tower.
Typical air/water temperatures for an open cooling tower operating in a temperate climatic region:
Air
35°C
35°CWB
Cooling
tower
30°C
Cooled water
35°DB/25°CWB
8
• VRV Systems • Water-cooled design guide
• Water-cooled design guide
3
Water piping elements
3-1
Heat rejection equipment
3
3 - 1 - 1 Cooling towers types
3-1-1-2
Closed cooling towers
The water being cooled is contained within a heat exchanger or coil.
Numerous advantages are associated with this arrangement, particularly if the water is pressurized or mixed with chilled water from an
external source or if the primary pump is sited away from the cooling tower.
Closed cooling towers tend to be larger than open models and consequently, more expensive.
1
3
On the other hand, since fouling is negligible, closed type systems have lower maintenance costs
There are 2 types:
a
Evaporative cooling tower:
A secondary open water spray system is used to distribute a film of water to the fins to provide the benefit of evaporative cooling.
b
Dry cooler:
The concept is similar to that of an air cooled condenser with condenser water circulating through the tubes and is therefore classed as a closed type
system. Due to the higher condenser water temperatures of dry coolers, performance is similar or lower than an equivalent air cooled package.
Typical air/water temperatures for a dry cooler tower operating in a temperate climatic region:
Air
45°C
45°CDB
40°C
Dry
cooler
Cooled water
35°CDB
RECOMMENDATION
1
It is recommended that closed cooling towers should be used as much as possible in order to prevent the cooling water from becoming
contaminated.
2
When open cooling towers are used it is essential to install a water treatment system.
• VRV Systems • Water-cooled design guide
9
• Water-cooled design guide
3
Water piping elements
3-1
Heat rejection equipment
3 - 1 - 2 Cooling tower selection
Cooling tower selection is based on the amount of heat to be rejected (the actual cooling capacity + compressor power) and the optimum method of
rejecting this heat depending on the most important design criteria, ie. initial cost, efficiency, footprint and noise.
Example of selection of a dry cooler:
Qr = total rejected heat = Total (cooling capacity + PI) of VRV-WIII units (kW)
1
m = VRV-WIII total condenser flow rate (kg/s)
3
LWC = Condenser leaving water temperature
ΔT = range = LWC-EWC (°C)
EWC= Condenser entering water temperature
ΔT=Qr/(4.2 x m)
where 4.2 = specific heat capacity, kJ/kg*s
LWC is pre-selected within the limits of the VRV-WIII operation range (15°-45°C), EWC is calculated.
With these values, the dry cooler can be selected by using different manufacturers' selection catalogues or software.
Rejected heat Qr
EWC (for example 45°C)
LWC (for example 40°C)
10
• VRV Systems • Water-cooled design guide
Dry cooler
• Water-cooled design guide
3
Water piping elements
3-2
Heat transfer equipment
An external heat source, usually in the form of a LPHW boiler and associated heat exchanger is necessary in applications in which the
operating temperature of the water circuit cannot be maintained due to insufficient heat recovery within the system. The operating
temperature of the boiler should be in the region of 90/70°C.
3
Example of boiler selection:
Boiler selection is carried out similarly to cooler selection, except the kW of power input (PI) is subtracted from instead of added to the VRV-WIII heating
capacity.
Qi = total injected heat = total (heating capacity - PI) of VRV-WIII units (kW)
m = VRV-WIII total condenser flow rate (kg/s)
1
3
ΔT = EWC-LWC (°C)
LWH = heat exchanger leaving water temperature
EWH= heat exchanger entering water temperature
ΔT=Qi/(4.2 x m)
where 4.2 = specific heat capacity, kJ/kg*s
LWH is pre-selected within the limits of the VRV-WIII operation range (15°-45°C), EWH is calculated.
Based on total injected heat (Qi), the boiler can be selected.
With these values, the heat exchanger can also be selected by using different manufacturers' selection catalogues or software.
Injected heat Qi
LWH (for example 35°C)
EWH (for example 30°C)
Heat exchanger
Boiler
Pump
• VRV Systems • Water-cooled design guide
11
• Water-cooled design guide
3
Water piping elements
3-3
Water pipes
The 2-pipe layout is commonly used and consists out of one pipe to and one from the terminal (fan coil unit or VRV-WIII). Both chilled or hot water can
be supplied to the terminal.
3 - 3 - 1 Reverse return method for dimensioning the water pipes:
1
According to this method, the length of the water piping return and supply is almost equal for all VRV-WIII condensing units in the system. The friction
loss is almost the same, resulting in a balanced water flow to each condensing unit. Adversely, the piping length is longer. Since the water circuits are
equal for each unit, the major advantage of the reverse return method is that it seldom requires balancing. Due to the more balanced flow, the test run
and maintenance work becomes easier.
It is often the most economical design for new build projects.
3
RWEYQ
RWEYQ
RWEYQ
RWEYQ
3 - 3 - 2 Friction losses
In order to force a fluid through a pipe, pressure is required to overcome the viscous friction forces. Friction loss occurs when water flow through a pipe.
NOTE
1
The Darcy equation is the basis of all fluid flow equations and relates the pipe pressure drop required to overcome the fluid viscous friction forces:
∂P = ( ρ * f * l * v² ) / ( 2 * d )
Where: ∂P= friction losses (Pa)
ρ = fluid density (kg/m³)
f = friction factor, depending on the roughness of the internal surface of the pipe (dimensionless)
l = pipe length (m)
v = fluid velocity (m/s)
d = internal pipe diameter (m)
Most air conditioning systems use steel pipe or copper tubing .
Based on the Darcy equation, the pipe friction / flow tables are made (e.g. fig.1).
3 - 3 - 3 Water velocity
The recommended water velocity through the piping is depending on two conditions:
•
pipe diameter
•
effect of erosion.
The table below lists the recommended velocity ranges for the different piping diameters. The higher the water velocity, the higher the noise level of
the moving water and the entrained air and the erosion will be.
Diameter (mm)
> 125
50~100
about 25
Recommended water velocity
Velocity range (m/s)
2.1 ~ 2.7
1.2 ~ 2.1
0.6 ~ 1.2
Since erosion is a function of time, water velocity and quality of water, the design water velocity is subject to the judgment of the design engineer.
12
• VRV Systems • Water-cooled design guide
• Water-cooled design guide
3
Water piping elements
3-3
Water pipes
3
3 - 3 - 4 Example of dimensioning the water pipes:
Preliminary information on the VRV-WIII systems, according with capacity tables:
•
•
•
•
system 3rd floor: 30 HP
-
130% connection ratio
-
water flow: 96x3 = 288 l/min
-
water temp inlet/outlet: 30°C/34,3°C
1
system 2nd floor: 10 HP
-
120% connection ratio
-
96 l/min
-
30°C/34°C
3
system 1st floor: 10 HP
-
120% connection ratio
-
96 l/min
-
30°C/34°C
basement: 20 HP
-
120% connection ratio
-
96x2= 192 l/min
-
30°C/34°C
4m
Cooling
tower
1
672 l/min
4,5m
2
3rd Floor
RWEYQ30P
10 0
mm
1, 2
m/s
18 0
Pa
384 l/min
4,5m
3
2nd Floor
80
mm
1,4
m/s
250
Pa
RWEYQ10P
28 8 l/min
4,5m
1st Floor
4
RWEYQ10P
5
4,5m
RWEYQ20P
• VRV Systems • Water-cooled design guide
80
mm
1,1
m/s
175
Pa
192 l/min
65
mm
1,1
m/s
250
Pa
13
• Water-cooled design guide
3
Water piping elements
3-3
Water pipes
3 - 3 - 4 Example of dimensioning the water pipes:
RECOMMENDATION
1
in VRV-WIII capacity tables 4 water flows are mentioned for each model/connection ratio: 50, 60, 96, 120 l/min
2
water flows of either 60 or 96 l/min are advisable in order to maintain a balance between pipe diameter and pressure losses. As water flow
increases, pipe diameter reduces whereas pressure losses increase with increased water flow.
1
Black Steel Pipe
3
2.5
m
m
0m
0.2
0.3 0.4 0.6 0.8 1
2
3
25
0m
m
300
35
m
0m m
m
0m
20
80
50
0.03 0.04 0.06 0.08 0.1
m/
s
15
12
5m
10
0m
m
s
mm
65
50
mm
40
100
4.0
m/
m
m/
s
mm
mm
mm
20
200
1.6
m/
s
32
s
25
m/
mm
0.4
/s
mm
400
300
1.0
3m
mm
0.6
600
15
PRESSURE DROP, Pa/m
nominal pipe sizes
4
6
8 10
20
30 40
60 80 100
200
Fig. 1 VOLUMETRIC FLOW RATE, L/s
Friction Loss for Water in Commercial Steel Pipe
Procedure for pipe selection:
•
reverse return piping was chosen
•
the water flow should be determined for each section of the water circuit
•
by means of the using the friction loss diagram (fig.1), the diameter should be determined based on following input:
-
water flow
-
recommended domain of water velocities
-
recommended domain of linear pressure losses (100-400 Pa/m)
•
the total linear friction losses should be determined by multiplying the pressure drop (Pa/m) obtained from the diagram, with the pipe length.
•
local pressure losses should be calculated for special fittings like elbows, T-connections, reducers, etc. The values can be obtained from pipe
manufacturers' catalogues. The following table can be also used: the equivalent length should be multiplied with the pressure drop (Pa/m)
determined before.
Equivalent length of local friction loss (m)
Nominal pipe size
mm
in
Elbow
T-connection straight through
T-connection through branch
Gate valve
Reducer (3/4)
Globe valve
•
15
1/2
0.5
0.3
1.0
0.1
0.1
4.5
20
3/4
0.6
0.4
1.3
0.15
0.15
6.5
25
1
0.9
0.6
1.8
0.2
0.2
9.0
32
1 1/4
1.1
0.8
2.3
0.3
0.3
11
40
1 1/2
1.3
0.9
2.8
0.35
0.35
16
50
2
1.6
1.1
3.5
0.4
0.4
21
65
2 1/2
2.1
1.4
4.2
0.5
0.5
26
total friction loss in pipes should be calculated by adding the linear and local friction losses.
The total friction loss in pipes will serve further when selecting the circulating pump.
14
• VRV Systems • Water-cooled design guide
80
3
2.6
1.7
5.7
0.6
0.6
30
• Water-cooled design guide
3
Water piping elements
3-4
Expansion tank
The purpose of the expansion tank is to maintain system pressure by allowing the water to expand when the water temperature increases in order to
prevent pipes from bursting. It also provides the means for adding water to the system
3
An expansion tank is required in a closed system. In an open system, the reservoir acts as the expansion tank.
The expansion tank can be of the open or closed type.
The open expansion tank (reservoir) is located at the suction side of the pump, above the highest point in the system. At this location, the tank
provides atmospheric pressure equal to or higher than the pump suction, preventing air from leaking into the system.
The closed expansion tank is used in small systems and work at atmospheric pressure. The tank is located at the suction side of the pump.
The capacity of a closed expansion tank is greater than that of an open expansion tank operating under the same conditions.
When sizing the expansion tank, the engineering supplied by the tank manufacturer should be consulted.
3-5
1
3
Pumps
Centrifugal pumps are the most commonly used types in chilled water (CW) and low pressure hot water circuits (LPHW).
An electric motor usually powers the impeller (the rotating specially shaped "heart" of the pump) rotation.
System design requires a duty and a standby pump to be selected for the sum of all water flow rates of the VRV-WIII system.
Pump performance can be given in terms of discharge capacity, head, shaft, power and efficiency
•
The discharge capacity is the required water flow rate (m³/min or l/min). The correlation between the pump suction size and the water flow is
listed in table.
Correlation between pump suction size and water flow rate
Suction size (mm)
Discharge capacity (m³/min)
40
0.10~ 0.20
50
0.16~ 0.32
65
0.25~ 0.50
80
0.40~ 0.80
100
0.63~ 1.25
125
1.00~ 2.00
150
1.60~ 2.15
200
2.50~ 5.00
250
4.00~ 8.00
300
3.30~12.50
•
The head is the pressure produced by the pump in metres of water column. The higher the discharge capacity of the pump, the lower the head
(Fig. 2).
•
The required pump power is roughly proportional to the delivered capacity.
•
The pump efficiency (%) is defined as the ratio between the delivered work and the shaft power: efficiency % = (power output / power input )
x 100%
•
The pump efficiency may be obtained from manufacturer data.
The pump performance chart is the summary of the head, efficiency and discharge capacity.
The pump is operated at the intersection between the head and the system resistance curve. This intersection is called the pump operating
point.
Total Head
System
resistance
curve
Total head
Operating
point
Capacity
Fig. 2
• VRV Systems • Water-cooled design guide
15
• Water-cooled design guide
3
Water piping elements
3-5
Pumps
NOTE
1
When the gate valve is throttled, the resistance increases and the water flow rate decreases. In doing this, the operating point can be changed.
The same phenomena, a decrease in water flow rate and an increase in the head loss, can be caused when rust and / or scale is deposited on the
internal surface of the water piping system.
1
Total Head
System
resistance
curve
3
Total head
Operating
point
Capacity
The pump selection can be carried out through calculation or by use of the pump selection chart:
•
•
The input valves are:
-
design flow rate (discharge capacity)
-
total friction loss (system resistance)
-
the pump efficiency
The type of pump and required power of the pump are resulting.
In both cases the maximum friction loss (usually the longest pipe branch in the piping system) should be calculated:
H = Ha + Hf + Ht + Hk
Where: H = total friction loss
Ha = actual head (mH2O) = difference between the discharge and suction level
Hf = linear friction loss in straight pipes (mH2O) = from friction loss diagram
Ht = local friction loss (mH2O) caused by fittings = equivalent piping length * basic friction loss
Hk = internal friction loss (mH2O) of evaporator/condenser (of the cooling tower and VRV-WIII) may be obtained from the manufacturer's data.
3-6
Temperature and pressure measurement points
Temperature and pressure measurement points should be located at each VRV-WIII condensing unit
16
• VRV Systems • Water-cooled design guide
• Water-cooled design guide
3
Water piping elements
3-7
Water quality
3
Be sure the water quality is in accordance with the specifications below:
Water quality standards for chilled water, hot water and make-up water
Cooling water system (3)
ITEM (5)
Hot water system (2)
Circulation system
Circulation
water
(20°C ~ 60°C)
Tendency (1)
Make-up water
Corrosion
Scale
7.0 to 8.0
7.0 to 8.0
앩
앩
1
Less than 30
Less than 30
앩
앩
Less than 50
앩
3
앩
Circulation
water
Make-up water
6.8 to 8.2
6.0 to 8.0
Electrical conductivity (mS/m) (25°C)
Less than 80
Less than 30
Chloride ions (mg Cl-/l)
Less than 200
Less than 50
Less than 50
Standard items
pH (25°C)
Sulfate ions (mg SO24 /l)
Less than 200
Less than 50
Less than 50
Less than 50
Acid consumption (pH 4.8) (mg CaCO3/l)
Less than 100
Less than 50
Less than 50
Less than 50
앩
Total hardness (mg CaCO3/l)
Less than 200
Less than 70
Less than 70
Less than 70
앩
Calcium hardness (mg CaCO3/l)
Less than 150
Less than 50
Less than 50
Less than 50
앩
Ionic-state silica (mg SiO2/l)
Less than 50
Less than 30
Less than 30
Less than 30
앩
Reference items
Iron (mg Fe/l)
Less than 1.0
Less than 0.3
Less than 1.0
Less than 0.3
앩
Copper (mg Cu/l)
Less than 0.3
Less than 0.1
Less than 1.0
Less than 0.1
앩
Sulfite ion (mg S2/l)
Shall not be
Shall not be
Shall not be
Shall not be
앩
Ammonium ion (mg NH+4/l)
Less than 1.0
Less than 0.1
Less than 0.3
Less than 0.1
앩
Residual chlorine (mg CL/l)
Less than 0.3
Less than 0.3
Less than 0.25
Less than 0.3
앩
Free carbon dioxide (mg CO2/l)
Less than 4.0
Less than 4.0
Less than 0.4
Less than 4.0
앩
6.0 to 7.0
-
-
-
앩
Stability index
• VRV Systems • Water-cooled design guide
앩
앩
17
• Water-cooled design guide
4
System safety requirements
4-1
Pump interlock
Problems can arise if the VRV-WIII condensing units are allowed to operate without sufficient water within the circuit.
When interlocking a water pump with a VRV-WIII system, terminals 1 and 2 of the X2M terminal strip should be used.
The PCB of the VRV-WIII condensing unit:
Is connector color for printed circuit board
Is connector color for component
Is discrimination color for component lead wire
1
4
Cool/heat selector
IN-OUT OUT-OUT OUT-MULTI
outdoor (Q1)(Q2)
cool
outdoor (F1)(F2)
heat
fan indoor (F1)(F2)
Cool/heat selector (optional accessory)
cool heat
Interlock
note)6
NOTE
1
In most cases in large buildings (20,000 m²) the pumps run continuously. Therefore the interlock function is not used.
4-2
Flow switch
A flow switch per VRV-WIII module is recommended to ensure that each module receives its required flow rate. If one flow switch is open, the module
stops. In case of a multi arrangement (20 and 30 HP units), all units in the same system will remain in 'off' condition, which will continue as long as any
VRV-WIII module detects an 'open' status for a flow switch.
A flow switch can be interlocked between the terminal 3 and 4 of the terminal strip X3M
18
• VRV Systems • Water-cooled design guide
• Water-cooled design guide
4
System safety requirements
4-3
Anti freezing protection
3
Anti freezing protection should be provided for the cooling tower and the external water piping during winter
Typical measures:
•
if the temperature drops, the pump should be started to re-circulate the water
•
electric heater tape should be used
•
a forced boiler start up program activated
•
water should be drained from the cooling tower
1
4 - 3 - 1 Glycol application
The use of a certain % ethylene glycol instead of normal water will affect the COP and water flow rate of the system, together with pressure drop on
total system.
4
Glycol should be limited in use, however when necessary a primary and secondary water loop is recommended (Fig 3)
Water to water PHE
mounted indoors
33°C
35°C
Cooling
tower
28°C
for ex.
40% glycol
30°C
Outdoor
H2O
to VRV-WIII
outdoor units
Indoor
Fig. 3
Example
a
Influence on COP:
•
When normal water is used Cooling operation: capacity 26.7kW, power input: 6.07kW
Heating operation: capacity 31.5kW, power input: 6.05kW
•
When ethylene glycol 40% is used
Cooling operation: capacity 26.1kW, power input: 6.35kW
Heating operation: capacity 31.5 kW, power input: 6.30kW
c
Water flow range:
•
When using normal water: from 50 l/min to 120 l/min
•
When using water with 40/% glycol: from 80 l/min to 150 l/min
Larger piping diameters are required.
d
Water temperature range: between 15°C and 45°C, the same as for normal water.
e
Corrosiveness:
Since the heat exchanger is made of SUS304, anti-freezing fluid non corrosive to SUS304 must be used.
• VRV Systems • Water-cooled design guide
19
• Water-cooled design guide
4
System safety requirements
4-4
Water piping strainer
A strainer kit 50 mesh should be provided for each outdoor unit in order to filter the water and protect the VRV-WIII heat exchanger against dirt.
Why the strainer a must
1
1
A plate heat exchanger consists of several water passages in parallel.
2
If no water filter is used, some of these passages can get blocked by dirt.
3
Evaporating temperature drops but the mix of water temperatures of the non blocked
4
The water in the blocked passages starts to freeze and the PHE breaks.
5
The result is a leak between the water circuit and the refrigerant circuit.
2: Freezing
1: DIRT
4
REFRIGERANT
WATER
20
passages remains above freezing point.
• VRV Systems • Water-cooled design guide
3:Damage
• Water-cooled design guide
4
System safety requirements
4-5
Recommendations for multi outdoor unit installations
Recommendations for multi outdoor unit installations, in order to prevent oil and refrigerant flow back to a stopped outdoor unit:
•
An oil trap of 200 mm or more should be located on the gas pipe
•
At every 2m of piping between outdoor units, an oil trap of 200mm should be fitted on the gas pipe.
•
Piping between outdoor units should be horizontal or upwards inclined.
Pattern1
Vertical Projection
200mm
Piping between
outdoor units
To indoor
unit
Less than 2m
Piping between
outdoor units
Less than
2m
To indoor
unit
Outdoor
Unit
Pattern2
Outdoor
Unit
Outdoor
Unit
Less than 2m
up
slope
To indoor
unit
To indoor
unit
Outdoor
Unit
Outdoor
Unit
Outdoor
Unit
3
1
4
Outdoor
Unit
Outdoor
Unit
Vertical Projection
200mm
Less than
2m
Outdoor
Unit
Outdoor
Unit
Outdoor
Unit
Outdoor
Unit
Wrong Pattern
Pattern3
To indoor
unit
To indoor
unit
Outdoor
Unit
Outdoor
Unit
Outdoor
Unit
Piping between
Outdoor units
No vertical Projection
Outdoor
Unit
Outdoor
Unit
Outdoor
Unit
Piping between
Outdoor units
• VRV Systems • Water-cooled design guide
21
• Water-cooled design guide
4
System safety requirements
4-5
Recommendations for multi outdoor unit installations
•
A straight refrigerant pipe of 500mm should be positioned in front of the Y branch kit which couples outdoor unit piping.
50
is r 0 mm
str equir or m
aig
e
ht d in ore
line a
1
4
20
0
or mm
mo
re
Liquid Side Piping
(Field Supply)
Gas Side Piping
(Field Supply)
(Example of 2 sets
installation)
4-6
The total heat rejection of a single unit is 710W.
The majority of heat produced will be from the inverter board and compressor, which is why the machine room must be ventilated, especially if the
ambient temperature is over 40°C. A space of 300 mm must be allowed above the unit for heat rejection.
22
• VRV Systems • Water-cooled design guide
• Water-cooled design guide
5
System control
5-1
Complete control of a VRV-WIII
•
The control for the refrigerant side is identical to that of an air cooled VRVIII -- by the use of the DIII communication line
3
Complete control of a VRV-WIII system (including pumps and cooling tower) can be achieved by using Intelligent Controller and Intelligent Manager:
For ex.:
The on/off control of water pumps, cooling water fan and pumps can be controlled via the DEC101A51 (digital input) or DEC102A51 (digital input/
output) electronic boards.
More details can be found in the chapters of the control systems data books.
5-2
1
Interlocking VRV-WIII outdoor units
Centralized interlocking input to multiple condensing units is possible by using an external control adaptor (DTA104A62)
5
DTA104A62
Interlocking
Control wiring
(external-to-extarnal
transmission wiring)
• VRV Systems • Water-cooled design guide
23
• Water-cooled design guide
6
Refnet pipe systems
DISCHARGE GAS SIDE JUNCTION
SUCTION GAS SIDE JUNCTION
1
KHRQ58T7
KHRQ23M75T8
KHRQ23M64T8
KHRQ23M29T9
KHRQ23M20T8
KFRP23M75T8
KHRP23M64T8
KHRP23M33T8
KHRQ22M75T8
KHRQ22M64T8
KHRQ22M29T9
6
KHRQ22M20TA8 KHRP22M75T8
KHRP22M64T8
LIQUID SIDE JUNCTION
CLOSED PIPES
1TW25799-4D
24
• VRV Systems • Water-cooled design guide
• Water-cooled design guide
Refnet pipe systems
3
DISCHARGE GAS SIDE JUNCTION
SUCTION GAS SIDE JUNCTION
KHRQ23M29H8 KHRQ22M75H8 KHRQ22M64H8 KHRQ22M29H8
LIQUID SIDE JUNCTION
1
KHRQ58H7
KHRQ127H8
KHRP127HB8
KFRQ250H8
KHRQ23M75H8
KHRQ23M64H8
6
REDUCERS - EXPANDERS
6
1TW25799-4D
• VRV Systems • Water-cooled design guide
25
• Water-cooled design guide
6
Refnet pipe systems
BHFP22-26MA56
Liquid-side joint
To outside unit A
Liquid-side joint + Liquid-side reducer
Liquid-side reducer
Liquid pipe (field supply)
Liquid-side joint
Liquid-side reducer
Field pipe connection
1
6
To indoor unit
To outside unit B
Caution label
Liquid-side joint
Component parts
(BHFP22MA56*)
Gase side joint: 1pc
Liquid side joint: 1pc
Gas-side reducer: 2pc
Gas-side accessory pipe: 2pc
Liquid-side reducer: 1pc
Thermal insulation: 2pc
Insulating tube for gas pipe: 2pc
Insulating tube for liquid pipe: 1pc
Installation manual
* Refer to outside drawing of for the
component parts in case of
BHFP26MA56.
Outside
unit A
Fig. 1
Fig. 2
li
tal
on
riz
Ho
Caution label
Max.
±15°
Outside
unit B
Installation example
ne
Caution label
Ground
View A
Ground
View B
3D049158
NOTES
1
2
3
26
---- in figure shows the (field supply) connecting piping.
See “Installation Manual” or “Engineering Data” for details on the necessary connecting piping.
Observe the following limitation when you set up this kit.
•
Install the joint horizontally so that the caution label attached to joint comes to the top.
Do not tilt the joint more than ±15°. (see Fig. 1). In addition, do not install the joint vertically. (See fig. 2)
• VRV Systems • Water-cooled design guide
• Water-cooled design guide
6
Refnet pipe systems
3
BHFP22-26MA56
Gas-side joint
PART
Connect it after cutting piping
Gas-side accessory pipe
Gas-side reducer
Caution label
To outside unit B
To indoor unit
1
To outside unit A
6
Gas-side reducer
Gas-side accessory pipe
Cut piping
Cut piping
Gas-side joint + Gas-side reducer + Gas-side accessory pipe
DETAIL
Gas-side joint piping
cutting position
Gas-side joint
Gas-side accessory pipe
Gas pipe (field supply)
Gas-side reducer
Elbow (field supply)
Elbow (field supply)
Component parts
Gas pipe (field supply)
(BHFP22MA56*)
Gase side joint: 1pc
Liquid side joint: 1pc
Gas-side reducer: 2pc
Gas-side accessory pipe: 2pc
Liquid-side reducer: 1pc
Thermal insulation: 2pc
Insulating tube for gas pipe: 2pc
Insulating tube for liquid pipe: 1pc
Installation manual
Outside
* Refer to outside drawing of for the unit A
Outside
component parts in case of
unit B
BHFP26MA56.
Installation example
DETAIL
Gas-side joint piping
cutting position
Field pipe
connection
Heat recovery system
Heat pump system
DETAIL
Fig. 1
riz
Ho
Caution label
lin
tal
on
Max.
±15°
Fig. 2
e
Fig. 3
Caution label
Ground
Ground
View
View
Fig. 4
Field piping
Mo
re th
stra an 50
igh 00m
t le
ngth m of
More than 120mm
of length
Fig. 5
Caution label
Ground
Ground
View
View
Vertical line
3D049152
NOTES
1
2
3
---- in figure shows the (field supply) connecting piping.
See “Installation Manual” or “Engineering Data” for details on the necessary connecting piping.
Observe the following limitation when you set up this kit.
•
Install the joint horizontally so that the catuion label attached to joint comes to the top.
Do not tilt the joint more than ±15°. (see Fig. 1). In addition, do not install the joint vertically. (See fig. 2)
•
Make sure the piping up to the joint is straight for more than 500mm. Do not bend the field piping within this range.
If a straight field piping more than 120mm is connected, more than 500mm of straight section can be ensured. (See Fig. 3)
•
Improper installation may lead to malfunction of the outside unit.
•
Set up the part of L bend of the gas piping to be vertical and upward after it diverges. (See Fig. 1,4)
•
In addition, do not install it as shown in Fig. 5.
• VRV Systems • Water-cooled design guide
27
• Water-cooled design guide
6
Refnet pipe systems
BHFP22-26MA56
Discharge gas-side joint
Discharge gas-side joint + Discharge gas-side reducer + Discharge gas-side accessory pipe
Caution label
To outside unit B
To outside unit A
To indoor unit
Discharge gas-side accessory pipe
Discharge gas-side reducer
1
6
Field pipe
connection
Discharge gas-side reducer
Elbow (field supply)
Discharge gas-side joint
Discharge gas pipe (field supply)
Discharge gas-side accessory pipe
Component parts
(BHFP22MA56)
Suction gas-side joint: 1pc
Discharge gas-side joint: 1pc
Liquid side joint: 1pc
Suction gas-side accessory pipe: 2pc
Discharge gas-side accessory pipe: 2pc
Suction gas-side reducer: 2pc
Discharge gas-side reducer: 2pc
Liquid-side reducer: 1pc
Thermal insulation: 2pc
Insulating tube for gas pipe: 4pc
Insulating tube for liquid pipe: 1pc
Installation manual
Elbow (field supply)
Discharge gas pipe (field supply)
Fig. 1
ta l
on
riz
Ho
Caution label
Max.
±15°
Fig. 2
e
lin
Caution label
Ground
Ground
View A
View B
Fig. 4
Fig. 5
Outside
unit A
Outside
unit B
Installation example
Caution label
Ground
Ground
View C
View D
Vertical line
3D049206
NOTES
1
2
3
28
---- in figure shows the (field supply) connecting piping.
See “Installation Manual” or “Engineering Data” for details on the necessary connecting piping.
Observe the following limitation when you set up this kit.
•
Install the joint horizontally so that the catuion label attached to joint comes to the top.
Do not tilt the joint more than ±15°. (see Fig. 1). In addition, do not install the joint vertically. (See fig. 2)
•
Improper installation may lead to malfunction of the outside unit.
•
Set up the part of L bend of the gas piping to be vertical and upward after it diverges. (See Fig. 1,3)
•
In addition, do not install it as shown in Fig. 4.
• VRV Systems • Water-cooled design guide
• Water-cooled design guide
6
Refnet pipe systems
3
BHFP22-26MA84
Liquid-side joint
To outside unit B
Liquid-side joint (2) + Liquid-side reducer
To outside unit A
Liquid-side joint (1) + Liquid-side reducer
Liquid-side reducer
Liquid-side reducer
Field pipe connection
Field pipe connection
1
To indoor unit
To outside unit C
6
Caution label
Caution label
Liquid-side joint (1)
Liquid-side joint (2)
Liquid-side joint (2)
Liquid-side joint (1)
Liquid-side reducer
Liquid-side reducer
Component parts
(BHFP22MA84*)
Gase side joint: 2pc
Liquid side joint (1): 1pc
Liquid side joint (2): 1pc
Gas-side accessory pipe: 3pc
Gas-side reducer (1): 3pc
Gas-side reducer (2): 1pc
Liquid-side reducer: 2pc
Thermal insulation: 4pc
Insulating tube for gas pipe: 3pc
Insulating tube for liquid pipe: 2pc
Installation manual
* Refer to outside drawing of for the
component parts in case of
BHFP26MA56.
Liquid pipe (field supply)
Fig. 1
Caution label
H
Fig. 2
tal
on
oriz
Max.
±15°
Outside
unit A
Outside
unit B
Outside
unit C
Installation example
e
lin
Caution label
Ground
View A
Ground
View B
3D049157
NOTES
1
2
3
---- in figure shows the (field supply) connecting piping.
See “Installation Manual” or “Engineering Data” for details on the necessary connecting piping.
Observe the following limitation when you set up this kit.
•
Install the joint horizontally so that the caution label attached to joint comes to the top.
Do not tilt the joint more than ±15°. (see Fig. 1). In addition, do not install the joint vertically. (See fig. 2)
• VRV Systems • Water-cooled design guide
29
• Water-cooled design guide
6
Refnet pipe systems
BHFP22-26MA84
Gas-side joint + Gas-side reducer(1) + Gas-side accessory pipe
Gas-side joint
Gas-side joint + Gas-side reducer(1) + Gas-side accessory pipe + Gas-side reducer(2)
Connect it after cutting piping
Caution label
F PART
F PART
E PART
Connect it after cutting piping
Caution label
Gas-side reducer (2)
1
To outside unit C
To outside unit B
To outside unit A
To indoor
unit
Gas-side accessory pipe
Gas-side accessory pipe
Gas-side reducer
Gas-side reducer (1)
6
Cut piping
Field pipe
connection
Cut piping
E DETAIL
Gas-side joint piping
cutting position
G DETAIL
Gas-side joint piping
cutting position
Gas-side reducer (2)
Gas-side joint
Gas-side reducer (1)
Gas-side accessory pipe
Gas pipe (field supply)
Gas-side joint
Field pipe
connection
Elbow (field supply)
Gas-side reducer (1)
Elbow (field supply)
F DETAIL
Gas-side joint piping
cutting position
Gas pipe (field supply)
Component parts
Gas-side accessory pipe
(BHFP22MA84*)
Gase side joint: 2pc
Liquid side joint (1): 1pc
Liquid side joint (2): 1pc
Gas-side accessory pipe: 3pc
Gas-side reducer (1): 3pc
Gas-side reducer (2): 1pc
Liquid-side reducer: 2pc
Thermal insulation: 4pc
Outside
Insulating tube for gas pipe: 3pc
unit A
Insulating tube for liquid pipe: 2pc
Outside
Installation manual
unit B
Outside
* Refer to outside drawing of for the
unit C
component parts in case of
Installation example
BHFP26MA56.
Elbow (field supply)
Gas pipe (field supply)
Heat recovery system
Fig. 1
Caution label
Fig. 2
H
tal
on
oriz
e
lin
Field piping
Ground
Ground
Max.
±15°
Heat pump system
Fig. 3
Caution label
View
Mo
re th
stra an 50
igh 00m
t le
ngth m of
More than 120mm
of length
View
Fig. 4
Fig. 5
Caution label
H DETAIL
Ground
Ground
View
View
Vertical line
3D049156
NOTES
1
2
3
30
---- in figure shows the (field supply) connecting piping.
See “Installation Manual” or “Engineering Data” for details on the necessary connecting piping.
Observe the following limitation when you set up this kit.
•
Install the joint horizontally so that the catuion label attached to joint comes to the top.
Do not tilt the joint more than ±15°. (see Fig. 1). In addition, do not install the joint vertically. (See fig. 2)
•
Make sure the piping up to the joint is straight for more than 500mm. Do not bend the field piping within this range.
If a straight field piping more than 120mm is connected, more than 500mm of straight section can be ensured. (See Fig. 3)
•
Improper installation may lead to malfunction of the outside unit.
•
Set up the part of L bend of the gas piping to be vertical and upward after it diverges. (See Fig. 1,4)
•
In addition, do not install it as shown in Fig. 5.
• VRV Systems • Water-cooled design guide
• Water-cooled design guide
6
Refnet pipe systems
3
BHFP22-26MA84
Discharge gas-side joint
Discharge gas-side joint + Discharge gas-side reducer + Discharge gas-side accessory pipe
Discharge gas-side joint + Discharge gas-side reducer + Discharge gas-side accessory pipe
Caution label
Caution label
To outside unit C
To outside unit B
To outside unit A
To indoor unit
1
Discharge gas-side accessory pipe
Discharge gas-side reducer
Discharge gas-side accessory pipe
Discharge gas-side reducer
6
Field pipe
connection
Field pipe
connection
Discharge gas-side joint
Discharge gas-side reducer
Discharge gas-side accessory pipe
Discharge gas pipe (field supply)
Discharge gas-side joint
Elbow (field supply)
Discharge gas-side reducer
Elbow (field supply)
Component parts
(BHFP22MA56)
Discharge gas-side accessory pipe
Suction gas-side joint: 2pc
Discharge gas-side joint: 2pc
Liquid side joint (1): 1pc
Liquid side joint (2): 1pc
Suction gas-side accessory pipe: 3pc
Discharge gas-side accessory pipe: 3pc
Suction gas-side reducer (1): 3pc
Suction gas-side reducer (2): 1pc
Outside
Discharge gas-side reducer: 3pc
unit A
Liquid-side reducer: 2pc
Thermal insulation: 4pc
Insulating tube for gas pipe: 6pc
Insulating tube for liquid pipe: 2pc
Installation manual
Discharge gas pipe (field supply)
Elbow (field supply)
Discharge gas pipe (field supply)
Fig. 1
ta l
on
riz
Ho
Caution label
Fig. 2
e
lin
Caution label
Ground
Max.
±15°
Ground
View A
View B
Fig. 4
Fig. 5
Outside
unit B
Outside
unit C
Installation example
Caution label
Ground
Ground
View C
View D
Vertical line
3D049205
NOTES
1
2
3
---- in figure shows the (field supply) connecting piping.
See “Installation Manual” or “Engineering Data” for details on the necessary connecting piping.
Observe the following limitation when you set up this kit.
•
Install the joint horizontally so that the catuion label attached to joint comes to the top.
Do not tilt the joint more than ±15°. (see Fig. 1). In addition, do not install the joint vertically. (See fig. 2)
•
Improper installation may lead to malfunction of the outside unit.
•
Set up the part of L bend of the gas piping to be vertical and upward after it diverges. (See Fig. 1,3)
•
In addition, do not install it as shown in Fig. 4.
• VRV Systems • Water-cooled design guide
31
• Water-cooled design guide
7
Typical VRV-WIII installations
7-1
Example Installation
Typical Installation
Expansion tank
Makeup water
(Used to fill the
tank as well)
Use a hermestic cooling tower in terms of water quality control
Temperature indicating controller
1
T3
7
Temperature indicating controller
T1
Freezing protection heater
Cooling tower (32°C/37°C)
In order to conduct vertical piping through three
floors or more, use vertical reverse turn piping or
the like to prevent air drift.
Part A
V1
On each floor, If 1 multiple units are installed or 2 the units
are installed far away from each other, use horizontal reverse
return piping or a constant flow control valve to prevent air
drift.
V2
V3
To BS unit
R R R
P
T
P
T
R R R
P
T
P
T
RWEY
R R R
P
T
P
R R R
T
RWEY
P
P
T
R R R
P
RWEY
T
P
T
R R R
P
RWEY
T
P
T
RWEY
To BS unit
R R R
T
T
RWEY
To BS unit
P
To BS unit
P
T
R R R
P
T
P
T
RWEY
RWEY
It is recommended to provide a port used
for the cleaning of horizontal drain pipes.
F
For RWEY models, provide interlock with the flow switch.
(Through the pump operation signal, an operative flow switch is recommended.)
Temperature indicating controller
Hydrothermal source recirculation pump (used for the maintenance of pumps)
T2
Part B
V5
V6
V4
To heat source for heating such as boiler
Heat exchanger
Considering the maintenance of the boiler,
it is recommended to break off the line
concerned using the heat exchanger.
32
• VRV Systems • Water-cooled design guide
• Water-cooled design guide
7
Typical VRV-WIII installations
7-1
Example Installation
3
Note:
Pleased be noted that this Schematic Diagram is absolutely for reference only.
Practically, construction methods may vary with projects. Therefore, consult with the architect office for the
design and construction of the system.
Typical modification to Part A (Three-way valve → Two-way valve)
Temperature indicating controller
The following section shows precautions for the design of systems, which should be thoroughly observed.
T3
1. Temperature
The operating range of hydrothermal cooling/heating free VRV (RWEY) is 10°C to 45°C.
Keep the water temperature in the system within the said range through the ON/OFF operation of 2-way
control valve, three-way control valve, cooling tower, or boiler.
1
2. Water quality
The hydrothermal cooling/heating free VRV (RWEY) requires quality stability of water to be used.
Be sure to install the hermestic cooling water or, in order to install the open type cooling water, install the
heat exchanger to break off the line concerned.
7
Temperature
indicating
controller
3. Freezing
Freezing protection should be provided for the cooling tower water during wintertime.
Take some sort of measures shown below so that water on the primary and secondary side of the cooling
water will not freeze up during wintertime.
Typical measure: If the water temperature drops,
Start the pump to recirculate water.
Provide freezing protection using freezing protection heater.
Provide water temperature drop protection through the forced startup of the boiler.
Drain water from the cooling tower.
Particularly, if the unit should stop for an extended period of time, it may freeze up. Consequently, attention
should be paid for this point.
T1
Part A
V1
4. Air drift
Provide constant amount of feed water through the installation of reverse return piping system and constant
flow control valve.
V2
V3
Typical modification to Part B (Three-way valve → Two-way valve)
Temperature indicating controller
T2
V5
V6
V4
Heat exchanger
Opening
degree
T1 Control
Pump
Bypass side
Temperature controller
Three-way valve (mixed type)
Cooling water temperature
Setting
Y strainer
T2 control
Pressure gauge
T
Thermometer
F
Flow switch
Bypass side
Opening
degree
Flexible joint
P
Typical set values (reference values)
Cooling water temperature
Operation mode
T1 set value
T2 set value
Cooling
(mainly for cooling)
Heating
(mainly for cooling)
15°C
T3 set value
V1
Open/Closed
of valve
V2
V3
Open: Closed: V4
V5
V6
In-between seasons
(cooling/heating combination)
25°C
40°C
20°C
33°C, 31°C
33°C, 31°C
Setting
T3 control
Heater
ON
Heater
OFF
Fan
OFF
Fan
ON Water
sprinkling
OFF
Water
sprinkling
ON
Cooling water temperature
Setting 1
(7°C)
Setting 2
(31°C)
Setting 3
(33°C)
If freezing is expected to occur, install the freezing protection heater or drain water from
the water sprinkling side.
(If water is drained from the water sprinkling side, pay attention so that loads will never be
applied to cooling mainly.)
• VRV Systems • Water-cooled design guide
33
• Water-cooled design guide
7
Typical VRV-WIII installations
7-2
Example Installation
(Use of open type cooling tower for low ambient climates)
Typical Installation (Installed in cold district, with open type cooling tower used)
Use a hermestic cooling tower in terms of water quality control
Expansion tank
1
In order to use brine for the freezing protection, install the heat exchanger to break
off the line concerned.
Makeup water
(Used to fill the
tank as well)
In order to use the open type cooling tower, install the heat exchanger to break off
the line concerned.
Temperature indicating controller
T3
7
Temperature
Indicating
controller
T1
Freezing protection heater
Cooling tower (32°C/37°C)
Part
A
In order to conduct vertical piping through three
floors or more, use vertical reverse turn piping or
the like to prevent air drift.
V1
Makeup water
(Used to fill the
tank as well)
Expansion tank
On each floor, If 1 multiple units are installed or 2 the units
are installed far away from each other, use horizontal reverse
return piping or a constant flow control valve to prevent air
drift.
V2
V3
To BS unit
R R R
P
T
P
T
R R R
P
T
P
T
RWEY
R R R
R R R
P
T
P
T
P
RWEY
P
T
R R R
P
RWEY
T
P
T
R R R
P
RWEY
T
P
T
RWEY
To BS unit
R R R
T
T
RWEY
To BS unit
P
To BS unit
P
T
R R R
P
T
P
T
RWEY
RWEY
It is recommended to provide a port used
for the cleaning of horizontal drain pipes.
F
For RWEY models, provide interlock with the flow switch.
(Through the pump operation signal, an operative flow switch is recommended.)
Temperature indicating controller
Hydrothermal source recirculation pump (used for the maintenance of pumps)
T2
Part B
V5
V6
V4
To heat source for heating such as boiler
Heat exchanger
Considering the maintenance of the boiler,
it is recommended to break off the line
concerned using the heat exchanger.
34
• VRV Systems • Water-cooled design guide
• Water-cooled design guide
7
Typical VRV-WIII installations
7-2
Example Installation
3
(Use of open type cooling tower for low ambient climates)
Note:
Pleased be noted that this Schematic Diagram is absolutely for reference only.
Practically, construction methods may vary with projects. Therefore, consult with the architect office for the
design and construction of the system.
Typical modification to Part A (Three-way valve → Two-way valve)
The following section shows precautions for the design of systems, which should be thoroughly observed.
1
Temperature indicating controller
T3
1. Temperature
The operating range of hydrothermal cooling/heating free VRV (RWEY) is 10°C to 45°C.
Keep the water temperature in the system within the said range through the ON/OFF operation of 2-way
control valve, three-way control valve, cooling tower, or boiler.
7
2. Water quality
The hydrothermal cooling/heating free VRV (RWEY) requires quality stability of water to be used.
Be sure to install the hermestic cooling water or, in order to install the open type cooling water, install the
heat exchanger to break off the line concerned.
Temperature
indicating
controller
3. Freezing
Freezing protection should be provided for the cooling tower water during wintertime.
Take some sort of measures shown below so that water on the primary and secondary side of the cooling
water will not freeze up during wintertime.
Typical measure: If the water temperature drops,
Start the pump to recirculate water.
Provide freezing protection using freezing protection heater.
Provide water temperature drop protection through the forced startup of the boiler.
Drain water from the cooling tower.
Particularly, if the unit should stop for an extended period of time, it may freeze up. Consequently, attention
should be paid for this point.
T1
Part A
V1
V2
4. Air drift
Provide constant amount of feed water through the installation of reverse return piping system and constant
flow control valve.
V3
Typical modification to Part B (Three-way valve → Two-way valve)
Temperature indicating controller
T2
V5
V6
V4
Heat exchanger
Opening
degree
T1 Control
Pump
Bypass side
Temperature controller
Three-way valve (mixed type)
Cooling water temperature
Y strainer
Setting
Flexible joint
Pressure gauge
T
Thermometer
F
Flow switch
T2 Control
Opening
degree
P
Bypass side
Typical set values (reference values)
Cooling water temperature
Operation mode
T1 set value
Cooling
(mainly for cooling)
15°C
25°C
20°C
33°C, 31°C
33°C, 31°C
V5
V6
T3 set value
V1
Open: Closed: In-between seasons
(cooling/heating combination)
40°C
T2 set value
Open/Closed
of valve
Heating
(mainly for cooling)
V2
V3
V4
Setting
T3 Control
Heater
ON
Heater
OFF
Pump
OFF
Pump
ON
Fan
OFF
Fan
ON Water
sprinkling
OFF
Water
sprinkling
ON
Cooling water
Setting 1
(7°C)
Setting 4
(15°C)
Setting 2
(31°C)
Setting 3 temperature
(33°C)
If freezing is expected to occur, install the freezing protection heater or drain water from
the water sprinkling side.
(If water is drained from the water sprinkling side, pay attention so that loads will never be
applied to cooling mainly.)
• VRV Systems • Water-cooled design guide
35
• Water-cooled design guide
7
Typical VRV-WIII installations
7-3
Example Installation
(with part of central heating equipment used for this installation)
Expansion tank
Makeup water
(Used to fill the
tank as well)
1
To other system
7
Chiller (12 °C/7°C)
In order to use the chiller for cooling operation, install the
heat exchanger to break off the line concerned.
Makeup water
(Used to fill the tank as well)
Temperature
indicating
controller
T1
In order to conduct vertical piping through three
floors or more, use vertical reverse turn piping or
the like to prevent air drift.
Part
A
V1
On each floor, If 1 multiple units are installed or 2 the units
are installed far away from each other, use horizontal reverse
return piping or a constant flow control valve to prevent air
drift.
Expansion tank
V2
V3
To BS unit
R R R
P
T
P
T
R R R
P
T
P
T
RWEY
R R R
P
T
P
R R R
T
P
RWEY
P
T
F
R R R
P
RWEY
T
P
T
R R R
P
RWEY
P
T
R R R
P
T
P
T
RWEY
RWEY
For RWEY models, provide interlock with the flow switch.
(Through the pump operation signal, an operative flow switch is recommended.)
Temperature indicating controller
Hydrothermal source recirculation pump (used for the maintenance of pumps)
T2
Part B
V5
V6
V4
To heat source for heating such as boiler
Heat exchanger
Considering the maintenance of the boiler,
it is recommended to break off the line
concerned using the heat exchanger.
36
• VRV Systems • Water-cooled design guide
T
P
T
RWEY
To BS unit
R R R
T
T
RWEY
To BS unit
P
To BS unit
• Water-cooled design guide
7
Typical VRV-WIII installations
7-3
Example Installation
3
(with part of central heating equipment used for this installation)
Note:
Pleased be noted that this Schematic Diagram is absolutely for reference only.
Practically, construction methods may vary with projects. Therefore, consult with the architect office for the
design and construction of the system.
Typical modification to Part A (Three-way valve → Two-way valve)
The following section shows precautions for the design of systems, which should be thoroughly observed.
1
Temperature indicating controller
T3
1. Temperature
The operating range of hydrothermal cooling/heating free VRV (RWEY) is 10°C to 45°C.
Keep the water temperature in the system within the said range through the ON/OFF operation of 2-way
control valve, three-way control valve, cooling tower, or boiler.
7
2. Water quality
The hydrothermal cooling/heating free VRV (RWEY) requires quality stability of water to be used.
Be sure to install the hermestic cooling water or, in order to install the open type cooling water, install the
heat exchanger to break off the line concerned.
Temperature
indicating
controller
3. Freezing
Freezing protection should be provided for the cooling tower water during wintertime.
Take some sort of measures shown below so that water on the primary and secondary side of the cooling
water will not freeze up during wintertime.
Typical measure: If the water temperature drops,
Start the pump to recirculate water.
Provide freezing protection using freezing protection heater.
Provide water temperature drop protection through the forced startup of the boiler.
Drain water from the cooling tower.
Particularly, if the unit should stop for an extended period of time, it may freeze up. Consequently, attention
should be paid for this point.
T1
Part A
V1
4. Air drift
Provide constant amount of feed water through the installation of reverse return piping system and constant
flow control valve.
V2
V3
Typical modification to Part B (Three-way valve → Two-way valve)
Temperature indicating controller
Hydrothermal source recirculation pump
T2
V5
V6
V4
Heat exchanger
Opening
degree
T1 Control
Pump
Bypass side
Temperature controller
Three-way valve (mixed type)
Cooling water temperature
Setting
Y strainer
T2 Control
Pressure gauge
T
Thermometer
F
Flow switch
Opening
degree
Flexible joint
P
Bypass side
Typical set values (reference values)
Cooling water temperature
Setting
Operation mode
T1 set value
T2 set value
V1
Cooling
(mainly for cooling)
Heating
(mainly for cooling)
15°C
In-between seasons
(cooling/heating combination)
25°C
40°C
20°C
V5
V6
Open/Closed
of valve
V2
V3
Open: Closed: V4
• VRV Systems • Water-cooled design guide
37
• Water-cooled design guide
7
Typical VRV-WIII installations
7-4
Example Installation
(With heat recovery from multiple systems through water circuit)
Expansion tank
Makeup water
(Used to fill the
tank as well)
Temperature indicating controller
Temperature indicating controller
Use a hermestic cooling tower in terms of water quality control
T1
T3
1
V1
7
V2
Makeup water
(Used to fill the
tank as well)
Temperature indicating controller
Part A
T2
Cooling tower (32°C/37°C)
In order to use brine for the freezing protection, install the
heat exchanger to break off the line concerned.
V5
V4
In order to provide two or more hydrothermal systems (e.g. mainly heating for the
north side system and mainly cooling on the south side), integrate the multiple
systems into a single system, thus allowing for the heat recovery even between the
water vs. water systems.
On each floor, If 1 multiple units are installed or 2 the units
are installed far away from each other, use horizontal reverse
return piping or a constant flow control valve to prevent air
drift.
To BS unit
To BS unit
R R R
R R R
T
P
T
R R R
P
RWEY
T
P
RWEY
T
P
R R R
T
P
T
P
RWEY
R R R
T
P
T
P
RWEY
T
P
T
P
RWEY
To BS unit
To BS unit
F
R R R
R R R
T
P
T
P
RWEY
R R R
T
P
T
P
RWEY
For RWEY models, provide interlock with the flow switch.
(Through the pump operation signal, an operative flow
switch is recommended.)
Operation mode
of valve
Open: Closed: 38
Cooling
(mainly for cooling)
Heating
(mainly for cooling)
15°C
In-between seasons
(cooling/heating combination)
Pump
25°C
Temperature controller
40°C
20°C
33°C, 31°C
33°C, 31°C
V3
V4
V5
V6
• VRV Systems • Water-cooled design guide
T
RWEY
It is recommended to provide a port used
for the cleaning of horizontal drain pipes.
T1 set value
T2 set value
T3 set value
V1
V2
Open/Closed
V3
Three-way valve (mixed type)
Y strainer
Flexible joint
P
Pressure gauge
T
Thermometer
F
Flow switch
P
T
P
V6
• Water-cooled design guide
7
Typical VRV-WIII installations
7-4
Example Installation
3
(With heat recovery from multiple systems through water circuit)
Note:
Pleased be noted that this Schematic Diagram is absolutely for reference only.
Practically, construction methods may vary with projects. Therefore, consult with the architect office for the
design and construction of the system.
The following section shows precautions for the design of systems, which should be thoroughly observed.
1. Temperature
The operating range of hydrothermal cooling/heating free VRV (RWEY) is 10°C to 45°C.
Keep the water temperature in the system within the said range through the ON/OFF operation of 2-way
control valve, three-way control valve, cooling tower, or boiler.
1
2. Water quality
The hydrothermal cooling/heating free VRV (RWEY) requires quality stability of water to be used.
Be sure to install the hermestic cooling water or, in order to install the open type cooling water, install the
heat exchanger to break off the line concerned.
Hydrothermal source recirculation pump
(used for the maintenance of pumps)
7
3. Freezing
Freezing protection should be provided for the cooling tower water during wintertime.
Take some sort of measures shown below so that water on the primary and secondary side of the cooling
water will not freeze up during wintertime.
Typical measure: If the water temperature drops,
Start the pump to recirculate water.
Provide freezing protection using freezing protection heater.
Provide water temperature drop protection through the forced startup of the boiler.
Drain water from the cooling tower.
Particularly, if the unit should stop for an extended period of time, it may freeze up. Consequently, attention
should be paid for this point.
4. Air drift
Provide constant amount of feed water through the installation of reverse return piping system and constant
flow control valve.
To BS unit
R R R
P
T
P
T
R R R
P
T
P
R R R
T
RWEY
To BS unit
P
T
P
R R R
T
RWEY
P
T
P
T
RWEY
R R R
P
T
P
RWEY
T
RWEY
To BS unit
To BS unit
F
R R R
P
T
P
T
R R R
P
RWEY
T1 Control
T
P
R R R
T
P
RWEY
Opening
degree
P
T
RWEY
T3 Control
T2 Control
Opening
degree
T
Bypass side
Heater
ON
Bypass side
Cooling water temperature
Setting
Heater
OFF
Pump
OFF
Pump
ON
Fan
OFF
Fan
ON Water
sprinkling
OFF
Cooling water temperature
Setting
Setting 1
(7°C)
Setting 4
(15°C)
Setting 2
(31°C)
Water
sprinkling
ON
Cooling water
Setting 3 temperature
(33°C)
If freezing is expected to occur, install the freezing protection heater or drain water from
the water sprinkling side.
(If water is drained from the water sprinkling side, pay attention so that loads will never be
applied to cooling mainly.)
• VRV Systems • Water-cooled design guide
39
Daikin products are distributed by:
The present publication is drawn up by way of information only and does not
constitute an offer binding upon Daikin Europe N.V.. Daikin Europe N.V. has
compiled the content of this publication to the best of its knowledge. No express
or implied warranty is given for the completeness, accuracy, reliability or fitness
for particular purpose of its content and the products and services presented
therein. Specifications are subject to change without prior notice. Daikin Europe
N.V. explicitly rejects any liability for any direct or indirect damage, in the broadest
sense, arising from or related to the use and/or interpretation of this publication.
All content is copyrighted by Daikin Europe N.V..
Naamloze Vennootschap - Zandvoordestraat 300, B-8400 Oostende - Belgium - www.daikin.eu - BE 0412 120 336 - RPR Oostende
EEDEN13-201 • CD • 04/13 • Copyright Daikin
The present publication supersedes EEDEN12-201
Prepared in Belgium by Lannoo (www.lannooprint.be), a company whose concern
for the environment is set in the EMAS and ISO 14001 systems.
Responsible Editor: Daikin Europe N.V., Zandvoordestraat 300, B-8400 Oostende
VRV products are not within the scope of the
Eurovent certification programme.