1
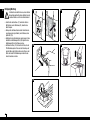
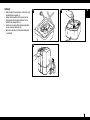
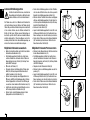
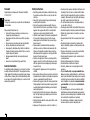
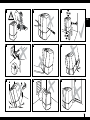
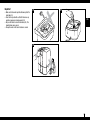
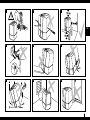
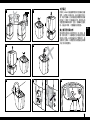
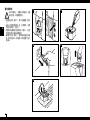
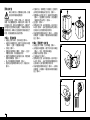
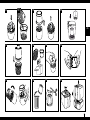
U7145 / U7147 Gebrauchsanweisung (5 – 16) de Instructions for use (17 – 28) en 使用说明书 (29 – 41) cn 3 4 de Gebrauchsanweisung 5 de Vorwort Herzlichen Glückwunsch, dass Sie sich für den Ultraschallvernebler U7145 / U7147 entschieden haben! Bestimmungsgemässer Gebrauch: Das Gerät dient ausschliesslich zur Befeuchtung der Raumluft in Innenräumen. Wussten Sie, dass zu trockene Raumluft • Schleimhäute austrocknet sowie spröde Lippen und Augenbrennen verursacht? • Infektionen und Erkrankungen der Atemwege begünstigt? • zu Abgespanntheit, Müdigkeit und Konzentrationsschwäche führt? • Haustiere und Zimmerpflanzen belastet? • Staubentwicklung fördert und die elektrostatische Aufladung von Textilien aus Kunststofffasern, Teppichen und Kunststoffböden erhöht? • Einrichtungsgegenstände aus Holz und speziell Parkettböden beschädigt? • Musikinstrumente verstimmt? Allgemeines Angenehm ist das Raumklima in der Regel dann, wenn die relative Feuchtigkeit zwischen 40 und 60% beträgt. Ihr Gerät kontrolliert die von Ihnen gewünschte und eingestellte Luftfeuchtigkeit automatisch. Ist es zu trocken, schaltet das Gerät automatisch ein. Ist die gewünschte Luftfeuchtigkeit erreicht, schaltet es automatisch aus. 6 Sicherheitshinweise • Gebrauchsanweisung vor der Inbetriebnahme vollständig durchlesen und zum späteren Nachschlagen gut aufbewahren. • Das Gerät nur an Wechselstrom anschliessen – mit Spannung gemäss dem Typenschild am Gerät. • Das Gerät nur in Wohnräumen und innerhalb der spezifizierten technischen Daten verwenden. Ein nicht bestimmungsgemässer Gebrauch kann Gesundheit und Leben gefährden. • Kinder können die Gefahren beim Umgang mit Elektrogeräten nicht erkennen. Deshalb Kinder immer beaufsichtigen, wenn sie sich in der Umgebung des Geräts aufhalten (Bild 1). • Personen, die mit der Gebrauchsanweisung nicht vertraut sind, sowie Kinder und Personen unter Medikamenten-, Alkohol- oder Drogeneinfluss, dürfen das Gerät nicht oder nur unter Aufsicht bedienen. • Das Gerät nie in Betrieb nehmen, wenn ein Kabel oder Stecker beschädigt ist (2), nach Fehlfunktionen des Gerätes oder wenn dieses heruntergefallen ist (3) oder auf eine andere Art beschädigt wurde. • Das Gerät darf nur in komplett zusammengebautem Zustand in Betrieb genommen werden. • Reparaturen an Elektrogeräten dürfen nur von Fachkräften durchgeführt werden (4). Durch unsachgemässe Reparaturen können erhebliche Gefahren für den Benutzer entstehen. • Der Netzstecker ist bei jedem Füllen/Entleeren des Wassertanks, vor jeder Reinigung, vor jeder Montage/ Demontage einzelner Teile, vor jeder Umplatzierung aus der Steckdose zu ziehen. • Greifen Sie während des Betriebes nicht in den Verneblerraum. Die Membrane wird durch die Hochfrequenzschwingung heiss. • Niemals den Netzstecker am Kabel oder mit nassen Händen aus der Steckdose ziehen. • Das Gerät nur auf eine ebene, trockene Fläche stellen (5). • Gerät nicht direkt auf den Boden oder neben eine Heizung stellen. Wenn der austretende Nebel vor dem vollständigen Verdunsten auf den Boden gelangt, so kann er diesen beschädigen (6). Wir können keine Schadenersatzansprüche, basierend auf falscher Platzierung, anerkennen. • Das Gerät sollte erhöht positioniert werden (7), z.B. auf einem Tisch, einer Kommode etc. • Keinesfalls Wasser durch die Düsenöffnung einfüllen. • Unterteil nie in Wasser oder andere Flüssigkeiten tauchen. • Das Gerät so platzieren, dass es nicht umgestossen werden kann (8). • Bei Nichtgebrauch Netzstecker ausstecken. • Das Kabel nicht mit einem Teppich oder anderen Dingen bedecken. Gerät so platzieren, dass Sie nicht über das Kabel stolpern. • Betreiben Sie das Gerät nicht in Räumen, in denen sich feuergefährliche Güter, Gase oder Dämpfe befinden. • Stellen Sie das Gerät nicht in den Regen und verwenden Sie es nicht in feuchten Räumen. • Keine Fremdgegenstände in das Gerät stecken. • Lufteintritt und Nebelaustritt unbedingt freihalten. • Setzen Sie sich keinesfalls auf das Gerät und platzieren Sie keine Gegenstände darauf. • Um die Gesundheit zu schützen und um die Funktion des Gerätes zu gewährleisten, verwenden Sie in Ihrem Gerät nur sauberes, kontaminationsfreies, kaltes Leitungswasser. Sollte das Wasser nicht sauber sein oder sollten Sie sich hinsichtlich der Qualität des Wassers nicht sicher sein, so verwenden Sie destilliertes Wasser. Daneben ist es wichtig, dass Sie Ihr Gerät gemäss dieser Bedienungsanleitung regelmässig reinigen und warten. • Füllen Sie keine Zusätze wie ätherische Öle, Wasserreinhaltemittel und Duftstoffe ein. Diese Zusätze beschädigen Ihr Gerät! Geräte die durch Zusätze beschädigt werden, sind von der Garantie ausgenommen. • Die Ultraschallschwingung ist für Mensch und Tier nicht hörbar und völlig ungefährlich. 1 4 7 2 5 8 3 6 9 de 7 de Auspacken • Gerät vorsichtig aus der Verpackung nehmen. • Entfernen Sie den Plastikbeutel vom Gerät. • Angaben zum Netzanschluss auf dem Typenschild überprüfen. • Verwenden Sie die Originalverpackung zum Lagern, wenn Sie das Gerät nicht ganzjährig benützen. Gerätebeschreibung Düse (drehbar) Inbetriebnahme Der beste Standort für Ihr Gerät ist: • Gerät nicht direkt auf den Boden oder neben eine Heizung stellen. Die Feuchtigkeit des Nebels kann die Bodenoberfläche (6 und 7) beschädigen (siehe Sicherheitshinweise). • Die Düse soll nicht direkt auf Pflanzen oder Gegenstände gerichtet sein. Einen Abstand von mind. 50 cm einhalten (10). • Legen Sie die Entkalkungspatrone für mind. 24h in ein mit Wasser gefülltes Becken. Das Granulat muss Wasser aufsaugen, um die volle Leistung zu erreichen. • Im Durchschnitt sollte die Entkalkungspatrone alle 2 bis 3 Monate ausgewechselt werden. Je nach Wasserhärte kann dies früher oder später nötig sein. • Lesen Sie den Abschnitt «Wasser einfüllen», um den Wassertank zu befüllen (12). • Stellen Sie den Wassertank auf das Unterteil (13). • Schliessen Sie das Netzkabel am Netz an und schalten Sie das Gerät am Ein/Aus-Schalter ein (15). • Etwa 10 – 15 Minuten nachdem Sie das Gerät eingeschaltet haben, erreicht es seine volle Leistung. • Stellen Sie sicher, dass das Netzkabel nicht eingeklemmt wird (9). Schalten Sie das Gerät bei defektem Netzkabel nicht ein (2). Wassertank Verneblerkammer Schalten Sie das Gerät immer aus, bevor Sie den Wassertank vom Gerät nehmen. Greifen Sie während des Betriebes nicht in den Verneblerraum! Um die Gesundheit zu schützen und um die Funktion des Gerätes zu gewährleisten, verwenden Sie in Ihrem Gerät nur sauberes, kontaminationsfreies, kaltes Leitungswasser. Sollte das Wasser nicht sauber sein oder sollten Sie sich hinsichtlich der Qualität des Wassers nicht sicher sein, so verwenden Sie destilliertes Wasser. Nehmen Sie das Gerät bei leerem Wassertank nicht in Betrieb! Bei Unterschreiten des minimalen Wasserstandes, schaltet das Gerät automatisch aus. Entkalkungspatrone Wassertankdeckel Ionic Silver Stick® • Stellen Sie sicher, dass sich keine fremden Gegenstände im Wassertank befinden. • Entfernen Sie den Wassertankdeckel vom Tank (11). Füllen Sie den Tank mit frischem, kalten Leitungswasser (12). Tankdeckel gut verschliessen! Stellen Sie den Wassertank auf das Unterteil (13). Geben Sie keine Zusätze zum Wasser (14)! • Schliessen Sie das Netzkabel am Netz an und schalten Sie das Gerät ein (15). Bürste Membrane Bedienungspanel Unterteil 8 Wasser einfüllen Verneblerraum 10 13 Wasserreinhaltung Der Ionic Silver Stick (ISS) nutzt die antimikrobielle Wirkung von Silber und sorgt eine Saison für optimale Wasserreinhaltung in allen BONECO Luftbefeuchtern. Der ISS wirkt, sobald er mit Wasser in Berührung kommt – auch bei ausgeschaltetem Gerät. Der ISS ist ausschliesslich für den Einsatz in Luftbefeuchtern bestimmt. Auf dem Bild 16 ist die Position im Gerät sichtbar. Greifen Sie während des Betriebes nicht in den Verneblerraum. Schalten Sie das Gerät zuerst aus. Keine Verwendung von Duftstoffen 11 14 12 15 Wasserzusätze (z.B. ätherische Öle, Duftstoffe, Wasserreinhaltemittel) dürfen NICHT verwendet werden! Auch eine kleine Menge kann den Kunststoff beschädigen/Risse bilden. Das Material ist nicht für den Gebrauch von Zusätzen geeignet. Ein Tropfen genügt, um den Wassertank zu beschädigen und damit das Gerät unbrauchbar zu machen. Geräte die durch Zusätze beschädigt werden, sind von der Garantie ausgenommen. 16 9 de de Bedienung U7145 C B A A)Ein-/Ausschalten Durch Drehen des Drehknopfes im Uhrzeigersinn schalten Sie einerseits das Gerät ein und regulieren zudem den Nebelausstoss von niedrig zu hoch. B)Hygrostat (Feuchtigkeit einstellen) Durch Drehen des Drehknopfes im Uhrzeigersinn stellen Sie die gewünschte Feuchtigkeit ein. Empfehlenswert ist eine relative Luftfeuchtigkeit zwischen 40 und 60%. Sie können diesen Wert einstellen, indem Sie den Drehknopf ungefähr in die vertikale Position drehen. Die Messgenauigkeit beträgt +/- 5%. Überschreitet die Feuchtigkeit die gewünschte Einstellung, schaltet das Gerät ab. Das Gerät schaltet nicht ab, wenn der Drehknopf ganz nach rechts gedreht wird. Dann ist die Funktion Dauerbetrieb aktiviert. 10 C)Wasserstandsanzeige (rot) Durch den transparenten Wassertank ist die Wassermenge gut ersichtlich. Das Gerät zeigt ebenfalls an, wenn der Wassertank leer ist. Die rote Wasserstandsanzeige leuchtet auf (Symbol C). Für weitere Informationen lesen Sie bitte das Kapitel «Wasser einfüllen». Nach dem Einsetzen des vollen Tankes kann es einige Sekunden dauern, bis das rote Symbol C erlischt. Bedienung U7147 D)Nebelausstoss, Verdunstungsleistung regulieren H E A L G F C I M D B J K A)Ein-/Ausschalten Durch Drücken der Taste A schalten Sie das Gerät ein oder aus. Diese Taste kann auch benutzt werden, um die Reinigungsanzeige zurückzusetzen (gedrückt halten). B)Hygrostat (Feuchtigkeit einstellen) Durch Drücken der Taste B stellen Sie die gewünschte Feuchtigkeit in % ein. Empfehlenswert ist eine relative Luftfeuchtigkeit zwischen 40 und 60%. Die Messgenauigkeit beträgt +/- 5%. Überschreitet die Feuchtigkeit die gewünschte Einstellung, schaltet das Gerät ab. Während der Auswahl wird der Sollwert angezeigt (Symbol DESIRED). Die Anzeige wechselt nach einigen Sekunden automatisch auf den aktuellen Feuchtigkeitswert (Symbol CURRENT). C)Timer Mit der Taste C können Sie die Betriebsdauer bestimmen – regulierbar zwischen 1 bis 8 Stunden oder Dauerbetrieb (CO). Symbol G zeigt an, welche Dauer eingestellt ist (1h/2h/3h/4h/5h/6h/7h/8h/CO). Die Anzeige wechselt nach einigen Sekunden automatisch auf den aktuellen Wert. Durch mehrmaliges Drücken der Taste D können Sie den Nebelausstoss regulieren. Das Symbol H zeigt an, welche der drei Stufen (niedrig/mittel/hoch) Sie gewählt haben. E) Betrieb mit Vorheizung Die Taste E dient dazu, die Vorheizung ein- (Symbol I leuchtet auf) oder auszuschalten. Das Wasser wird dadurch vor dem Eintreten in den Verneblerraum auf 80 °C vorgeheizt. Das Gerät benötigt ca. 10 –15 Minuten, um das Wasser zu erwärmen. Der Nebel tritt jetzt mit angenehmen 40 °C aus. Dies hat den Vorteil, dass die Raumtemperatur nicht absinkt und sich ausserdem die Wasserreinhaltung entscheidend verbessert. F)Auto/Sleep-Modus Durch Drücken der Taste F kann der Automatik- und SleepModus aktiviert werden. Durch einmaliges Drücken schaltet sich die Automatik-Funktion ein (Symbol J erscheint auf dem Display), durch welche die optimale Luftfeuchtigkeit in Abhängigkeit zur Temperatur beibehalten wird. Die Regelung erfolgt über Ausstossmenge und vorgegebenen Sollwert. Wird die Sleep-Funktion eingestellt (Symbol K erscheint auf dem Display), ist die Sollfeuchtigkeit 50 – 65%; die Zeiteinstellung geht automatisch auf 6 Stunden; die Heizung ist eingeschaltet. Zusätzlich wird noch die Ausstossmenge reguliert, abhängig von der Differenz Soll- zu Ist-Wert. Die Hygrostat- und Nebelausstoss-Einstellung kann nicht verändert werden. Sobald die Taste B oder D gedrückt wird, arbeitet das Gerät nicht weiter im Automatik- oder SleepModus. I)Vorheizung-Anzeige de J)Auto-Modus-Anzeige K)Sleep-Modus-Anzeige L)Wasserstandsanzeige Durch den transparenten Wassertank ist die Wassermenge gut ersichtlich. Zusätzlich zeigt das Gerät auf dem Display (L) an, wann Wasser nachgefüllt werden muss. Für weitere Informationen lesen Sie bitte das Kapitel «Wasser einfüllen». Nach dem Einsetzen des vollen Tankes kann es einige Sekunden dauern, bis das Symbol L erlischt. M) Reinigungsanzeige Erscheint auf dem Display das Symbol M mit «CLEAN», sollte das Gerät nach Empfehlung des Herstellers gereinigt werden. Dieses Symbol leuchtet automatisch, je nach Gebrauch, alle 2 Wochen auf. Durch anhaltendes Drücken (ca. 10 – 15 Sekunden) der Taste A kann die Anzeige gelöscht werden. G)Timer-Anzeige H)Nebelausstoss-Anzeige 11 de Reinigung/Wartung Schalten Sie das Gerät immer aus, bevor Sie den Wassertank vom Gerät nehmen. Greifen Sie während des Betriebes nicht in den Verneblerraum! • Schalten Sie das Gerät aus (17) und ziehen Sie den Netzstecker aus der Steckdose (18), bevor Sie das Gerät reinigen. • Reinigen Sie den Wassertank und den Verneblerraum regelmässig einmal pro Woche (nur mit Wasser, ohne Spülmittel) (19). • Entkalken Sie den Verneblerraum regelmässig mit handelsüblichem Entkalkungsmittel (20). Spülen Sie das Entkalkungsmittel mit viel Wasser gut aus. • Entfernen der Düse (21): Drehen Sie die Düse, bis die Pfeil-Markierungen der Düse und des Düsenrings auf gleicher Höhe sind. Entfernen Sie nun die Düse an der Stelle der beiden Pfeil-Markierungen indem Sie das Innenteil nach oben ziehen. 17 20 18 21 19 12 Achtung! • Achten Sie darauf, dass kein Wasser in die untere Seite des Geräteunterteils gelangt (22). • Reinigen Sie die Innenteile mit einem weichen Tuch und verwenden Sie auf keinen Fall Benzin, Fensterputzmittel und Lösungsmittel (23). • Benutzen Sie zur wöchentlichen Reinigung der Membrane ausschliesslich die Bürste (24). • Wechseln Sie das Wasser im Wassertank mindestens 1 x pro Woche. 22 de 24 23 13 de Austausch Entkalkungspatrone Die Patrone muss alle 2 bis 3 Monate ersetzt werden. Bei sehr hartem Wasser kann ein Wechsel der Patrone bereits früher nötig sein. Weisser Niederschlag rund um das Gerät ist ein sicheres Zeichen, dass die Patrone verbraucht ist. Bildet sich trotz neuer Patrone weisser Niederschlag um das Gerät, so prüfen Sie bitte, ob das verwendete Wasser wirklich unbehandelt ist. Fliesst das Wasser vor der Verwendung im Gerät durch eine Hausentkalkungsanlage, so wird sich Salz rund um das Gerät niederschlagen. • Drehen Sie die Entkalkungspatrone mit dem Plastikbecher um und schütteln Sie diese, bis sich das gesamte Granulat in der Entkalkungspatrone befindet (32). • Entfernen Sie den Plastikbecher und das rosa Styroporstück aus der Entkalkungspatrone (33) und heben Sie es für den späteren Wiedergebrauch auf (die Packung beinhaltet 3 Nachfüllbeutel) (34). • Schliessen Sie den Deckel (35). • Legen Sie die Entkalkungspatrone für mind. 24h in ein mit Wasser gefülltes Becken (38). Das Granulat muss Wasser aufsaugen, um die volle Leistung zu erreichen. • Drehen Sie die Patrone nun auf den Wassertankdeckel (39). Tankdeckel gut verschliessen! Stellen Sie den Wassertank auf das Unterteil (40). Möglichkeit A: Granulat auswechseln Möglichkeit B: Gesamte Patrone ersetzen Schalten Sie das Gerät immer aus, bevor Sie den Wassertank vom Gerät nehmen. Greifen Sie während des Betriebes nicht in den Verneblerraum! • Nehmen Sie den Wassertank vom Unterteil und drehen Sie den Wassertankdeckel ab (25). • Die Entkalkungspatrone befindet sich auf der Innenseite des Tankdeckels. Schrauben Sie die Patrone im Gegenuhrzeigersinn vom Deckel (26). Achtung: Tankdeckel NICHT entsorgen! • Öffnen Sie die Patrone (27). • Übergeben Sie den Inhalt (Granulat) der Patrone dem Abfall (28). Achtung: Ausgeschüttetes Granulat auf glattem Fussboden ist sehr rutschig! • Stecken Sie das beigelegte rosa Styroporstück in die Öffnung in der Mitte der Entkalkungspatrone. Drücken Sie das Styroporstück nicht zu weit in die Öffnung, da es sonst nur schwer wieder entfernt werden kann (29). • Schütten Sie den Inhalt eines Nachfüllbeutels in den in der Packung enthaltenen Plastikbecher (30). • Stecken Sie die leere Entkalkungspatrone mit dem Styroporstück auf den Plastikbecher (31). 14 • Nehmen Sie den Wassertank vom Unterteil und drehen Sie den Wassertankdeckel ab (25). • Die Entkalkungspatrone befindet sich auf der Innenseite des Tankdeckels. Schrauben Sie die Patrone im Gegenuhrzeigersinn vom Deckel (26). Achtung: Tankdeckel NICHT entsorgen! • Übergeben Sie die Patrone dem Abfall (36). • Nehmen Sie die neue Entkalkungspatrone aus der Verpackung (37). • Legen Sie die Entkalkungspatrone für mind. 24h in ein mit Wasser gefülltes Becken (38). Das Granulat muss Wasser aufsaugen, um die volle Leistung zu erreichen. • Drehen Sie die Patrone nun auf den Wassertankdeckel (39). Tankdeckel gut verschliessen! Stellen Sie den Wassertank auf das Unterteil (40). 25 26 27 28 29 30 33 de 38 31 34 35 39 32 36 37 40 15 de Lagerung bei längerem Nichtgebrauch Gerät wie beschrieben reinigen, vollständig trocknen lassen und vorzugsweise in der Originalverpackung an einem trockenen, nicht zu heissen Ort aufbewahren. Entsorgen Übergeben Sie das ausgediente Gerät Ihrem Händler zur fachgerechten Entsorgung. Weitere Entsorgungsmöglichkeiten erfahren Sie von Ihrer Gemeinde- oder Stadtverwaltung. Garantie Die Garantiebestimmungen sind von unserer Landesvertretung festgelegt. Wenden Sie sich vertrauensvoll an Ihren Fachhändler, wenn am Gerät trotz strenger Qualitätskontrollen ein Mangel auftritt. Für eine Garantieleistung ist die Vorlage des Kaufbelegs unbedingt erforderlich. Reparaturen an Elektrogeräten dürfen nur Fachkräfte durchführen. Durch unsachgemässe Reparaturen können erhebliche Gefahren für den Benutzer entstehen und der Garantieanspruch erlischt. Technische Daten U7145 Netzspannung 230 V ~ 50 Hz Leistungsaufnahme 22 W / 39 W Befeuchtungsleistung 400 g/h Geeignet für Raumgrössen bis 60 m2 / 150 m3 Fassungsvermögen 5.0 Liter Abmessungen 240 x 260 x 310 mm Leergewicht ca. 3.0 kg Betriebsgeräusch < 25 dB(A) Zubehör 7531 Entkalkungspatrone A7017 Ionic Silver Stick (ISS) Technische Daten U7147 Störungen beheben Problem Mögliche Ursache Was tun Gerät funktioniert nicht Netzstecker nicht eingesteckt Netzstecker an Steckdose anschliessen Kein Wasser im Wassertank (Leerstandsanzeige leuchtet auf) Wasser nachfüllen Kein Nebelausstoss Luftfeuchtigkeitseinstellung ist geringer als Raumluftfeuchtigkeit Luftfeuchtigkeitseinstellung erhöhen Spülmittelrückstände Gerät mit klarem Wasser reinigen Zu geringer Nebelausstoss Wassertemperatur zu niedrig Nebelausstoss auf Stufe Maximum stellen, nach 10 Min. arbeitet das Gerät wieder einwandfrei Kalkablagerung auf der Membrane Membrane reinigen Weisser Niederschlag rund um das Gerät Entkalkungspatrone verbraucht Entkalkungspatrone oder Granulat auswechseln 16 Netzspannung 230 V ~ 50 Hz Leistungsaufnahme 27 W / 42 W / 120 W* Befeuchtungsleistung 400 / 550 g/h* Geeignet für Raumgrössen bis 60 m2 / 150 m3 Fassungsvermögen 5.0 Liter Abmessungen 240 x 260 x 310 mm Leergewicht ca. 3.0 kg Betriebsgeräusch < 25 dB(A) Zubehör 7531 Entkalkungspatrone A7017 Ionic Silver Stick (ISS) * bei Betrieb mit Vorheizung auf 80 °C en Instructions for use 17 Foreword Congratulations on choosing the Ultrasonic Humidifier U7145 / U7147! en Proper use: The appliance must only be used for the humidification of the air indoors. Did you know that dry room air: • Dries out the mucous membranes, and also causes chapped lips and stinging eyes? • Encourages infections and illnesses of the respiratory system? • Causes weariness, tiredness and poor concentration? • Stresses household pets and house plants? • Encourages the formation of dust and the electrostatic charging of textiles made of synthetic fibers, as well as carpets and plastic flooring? • Damages wooden furniture and especially parquet floors? • Causes musical instruments to go out of tune? General information A comfortable indoor atmosphere is achieved at a relative humidity of between 40 and 60%. Your appliance automatically controls the humidity level according to your chosen setting. If the air is too dry, the unit will automatically switch on. As soon as the desired humidity level is reached, it will automatically switch off. 18 Safety instructions • Read the operating instructions carefully before using the appliance and keep them in a safe place for later reference. • Connect the unit only to an AC supply with a voltage according to the rating label. • Only use the appliance indoors and within the parameters stated in the technical specifications. Using the appliance for a purpose for which it is not intended could pose a serious hazard to health and life. • Children cannot recognize the hazards associated with the usage of electrical appliances. For this reason, always supervise children when they are near the appliance (image 1). • Persons who are unfamiliar with the operating instructions, as well as children and persons under the influence of medication, alcohol or drugs are not permitted to operate the appliance, or are only permitted to operate it under supervision. • Never use the appliance if there is any damage to the appliance or cable (2), after malfunction has occurred, after the appliance has been dropped (3) or damaged in any other way. • Only operate the appliance when it is completely assembled. • Repairs to electrical appliances may only be carried out by qualified service engineers (4). Improper repair work can pose a considerable hazard to the user. • Disconnect the appliance from the mains power before filling/emptying the water tank, before cleaning, before assembling/dismantling of individual parts and before moving the appliance. • Do not reach inside the nebuliser space during operation. The high frequency oscillation causes the membrane to become hot. • Never pull the plug from the mains socket by the cable or with wet hands. • Always place the appliance on a dry, level surface (5). • Do not place the appliance directly on the floor or next to heating. If the mist comes in contact with the floor before it has fully evaporated, the surface could be damaged (6). We do not accept any liability for damages due to the incorrect placement of the unit. • The unit should be placed in an elevated position (7), e.g. on a table, chest, etc. • Do not pour water into the mist outlet of the appliance. • Do not immerge the main body in water or other liquids. • Position the appliance where it cannot be easily knocked over (8). • Always disconnect from the mains power when not in use. • Do not run the power cord under a carpet or other objects. Position the appliance so that you will not trip over the cord. • Do not use the appliance in areas where combustible materials, gases or vapours are present. • Do not expose the appliance to rain, and do not use it in damp locations. • Do not insert foreign objects in the device. • Do not block the air intake or mist outlet. • Do not sit, stand or place any heavy objects on the appliance. • To protect health safety and proper humidifier function use only clean, contamination-free, cold, fresh tap water in your humidifier. If your water source is contaminated or if you are uncertain of its safety use distilled water. In addition, it is advised to clean and maintain your humidifier in a timely manner as instructed in this manual. • The use of fragances, such as essential oils, water conditioners and aromas will damage your appliance! Appliances that are damaged by such additives will not be covered by the manufacturer‘s warranty. • The high frequency vibrations cannot be heard by humans or animals, and are completely safe. 1 4 7 en 2 5 8 3 6 9 19 Unpacking en • Carefully remove the unit from its box. • Remove the unit from the plastic bag. • Review the information given on the rating plate about the mains supply. • Use the original packaging for storing the appliance if you do not use it all year round. Description of the appliance Mist outlet (rotating) Putting into operation Find the ideal location for your appliance: • Do not place it directly next to a radiator or on a floor with floor heating. The moisture of the mist can damage the floor surface (6 and 7) (see Safety Instructions). • The mist outlet must not be pointed directly at plants or other objects. Keep a distance of at least 50 cm) (10). • Soak the demineralisation cartridge in a bowl of water for at least 24 hours before using it. The granules have to absorb water to reach full performance. • On average the demineralisation cartridge should be replaced every 2 – 3 months. This interval can be shorter or longer depending on the hardness of your water. • Read the instructions under «Filling the Tank» for filling the water tank (12). • Place the water tank onto the base (13). • Insert the plug into the mains socket and switch on the appliance using the on/off switch (15). • The appliance will reach full capacity about 10 to 15 minutes after being switched on. • Make sure that the power cord is not pinched anywhere (9). Do not operate the appliance if the cord is damaged (2). Water tank Evaporation chamber Demineralisation cartridge Always switch off the appliance before removing the water tank. Do not reach inside the nebuliser space while the appliance is running! To protect health safety and proper humidifier function use only clean, contamination-free, cold, fresh tap water in your humidifier. If your water source is contaminated or if you are uncertain of its safety use distilled water. Do not operate the appliance when the water tank is empty! When the water reaches the minimum level, the unit switches off automatically. • Make sure that there are no foreign objects inside the water tank. • Remove the water tank cap from the tank (11). Fill the tank with clean, cold tap water (12). Close the cap of the water tank securely! Place the water tank onto the base (13). Do not add any additives to the water (14)! • Insert the plug into the power socket and switch on the appliance (15). Water tank cap Ionic Silver Stick® Brush Membrane Control panel Main body 20 Filling the tank Nebuliser space 10 13 Water quality maintenance The Ionic Silver Stick utilizes the antimicrobial property of silver and provides one season of optimum water quality maintenance in all BONECO humidifiers. The ISS begins working as soon as it comes into contact with water – even if the unit is switched off. The ISS is intended exclusively for use in humidifiers. Look at picture 16 for the position of the ISS in the appliance. Do not reach inside the nebuliser space during operation. Switch off the unit first. Do not use additives 11 14 12 15 Water additives (e.g. essential oils, fragrances, water conditioners etc.) must NOT be used! Even a small amount can cause damage to the tank material. The material is not suitable for the use of such additives. One drop is enough to damage the tank and render the appliance unusable. Appliances that are damaged by such additives will not be covered by the manufacturer’s warranty. 16 21 en Operation U7145 en C B A A) On-off switch Turning the rotary switch clockwise switches the appliance on and at the same time regulates the mist output from low to high. B) Hygrostat (setting the humidity level) The desired humidity level can be set by turning the rotary switch clockwise. A relative humidity between 40 and 60% is recommended. You can achieve this level by rotating the switch until it is roughly in the vertical position. The accuracy of measurement is +/- 5%. The unit will switch off when the moisture level exceeds the desired setting. The appliance does not switch off if the switch is turned all the way to the right. This activates the continuous operation function. 22 C)Empty indicator (red) The water level is easy to see, thanks to the transparent water tank. The appliance also alerts you when the water tank is empty. The red empty indicator is illuminated (symbol C). Please read the chapter «Filling the tank» for more information. The red symbol C may stay illuminated for some seconds with a refilled tank until the base is filled with water. Operation U7147 D)Controlling mist output and Evaporator output H E A L G F C I M D B J K A)Switching on/off You can switch the unit on or off by pressing button A. This button is also used to reset the cleaning indicator light (by holding down). B)Hygrostat (pre-set moisture level) By pressing button B you can set the desired moisture level in %. A relative moisture of between 40 and 60% is recommended. The accuracy of measurement is +/- 5%. The unit will switch off when the moisture level exceeds the desired setting. During selection the target value is displayed (symbol DESIRED). The display will automatically show the current humidity value after a few seconds (symbol CURRENT). C)Timer Using button C, the operation time can be set – adjustable between 1 and 8 hours, or continuous operation (CO). Symbol G shows the operating period that has been set (1h/2h/3h/4h/5h/6h/7h/8h/CO). The display will automatically show the current value after a few seconds. By repeatedly pressing button D you can control the mist output. Symbol H shows which of the three levels (low/ medium/high) you have selected. E) Operation with pre-heating Button E is used for switching the pre-heating on and off (symbol I lights up). As a result, the water is pre-heated to a temperature of 80 °C before entering the nebuliser space. It takes approx. 10 to 15 minutes for the water in the base to warm up. The mist now leaves the nebuliser space at a pleasant temperature of 40 °C. The advantage of this is that the room temperature does not drop and, in addition, it significantly improves the water quality maintenance. F) Auto/Sleep Mode The automatic and sleep modes can be activated by pressing button F. By pressing the button once, the automatic function is switched on (symbol J appears on the display), maintaining the optimum humidity subject to the temperature. Control takes place by means of output quantity and pre-set target value. If the sleep function is switched on (the symbol K appears on the display), the target humidity is 50 – 65%; the operation time is automatically set at 6 hours; the heating is switched on. In addition, the output quantity is also controlled subject to the difference between the target value and the actual value. The hygrostat and mist output settings cannot be changed in either mode. If the buttons B or D are pressed, the unit will no longer be in auto or sleep mode. I) Pre-heating Indicator J) Auto Mode Indicator en K)Sleep Mode Indicator L) Empty indicator The transparent water tank makes it possible to see the water level well. Furthermore, the unit shows on the display (L) when water must be added. Please read the chapter «Filling the tank» for more information. The symbol L may stay illuminated for some seconds with a refilled tank until the base is filled with water. M) Cleaning indicator If symbol M and «CLEAN» appear on the display, the appliance should be cleaned as recommended by the manufacturer. This symbol comes on automatically every 2 weeks, depending on the level of use. The display can be cancelled by depressing button A for between 10 and 15 seconds. G)Timer Indicator H)Mist Output Indicator 23 Cleaning/Maintenance Always switch the appliance off before removing the water tank. Do not reach inside the nebuliser space while the appliance is running! en • Switch off the appliance (17) and remove the plug from the mains socket (18) before cleaning. • Clean the water tank and the nebuliser space regularly once a week (use only water, without detergent) (19). • Decalcify the water base regularly using commercially available decalcification agents (20). Rinse out the decalcification agent thoroughly with plenty of water. • To remove the mist outlet (21): Twist the mist outlet to either the right or the left. Align the arrow on the mist outlet with the arrow on the ring around the mist outlet. Pull up on the mist outlet once the arrows are aligned. 17 20 18 21 19 24 Important • Make sure that no water gets into the lower part of the main body (22). • Clean the inner parts with a soft cloth. Never use any solvents or aggressive cleaning agents (23). • Only use the brush to clean the membrane (24). This should be done once a week. • Change the water in the tank at least once a week. 22 24 en 23 25 Replacement of the demineralisation cartridge Always switch off the appliance before removing the water tank. Do not reach inside the nebuliser space while the appliance is running! en The cartridge must be replaced every 2 – 3 months. If the water is very hard, it may be necessary to replace the cartridge earlier. White dust around the appliance is a sure sign that the cartridge needs replacing. If white residues continues to form around the appliance after a new cartridge has been inserted, please make sure that the water you are using is untreated. If the water flows through a domestic decalcification system before it is used in the unit, salt will precipitate around the appliance. Option A: Replace the granules • Remove the water tank from the base and unscrew the water tank cap (25). • The demineralisation cartridge is attached to the inside of the cap. Unscrew the cartridge from the cap by turning it counter-clockwise (26). Important: do NOT dispose of the tank cap! • Open the cartridge (27). • Throw the content (granules) into the waste (28). Attention! Disposed granules can make the floor slippery! • Place the enclosed pink styrofoam piece in the center of the cartridge. Do not push it to the bottom as it will be difficult to remove afterwards (29). • Pour the contents of one refill resin bag into the plastic cup that is included with the refill resin packaging (30). • Place the empty cartridge with the plug in the center onto the plastic cup (31). • Turn the plastic cup and cartridge over and shake until 26 all granules are in the cartridge (32). • Remove the plastic cup and the pink styrofoam piece from the cartridge (33) and retain for future use (the refill resin consists of 3 refill bags) (34). • Close the cap (35). • Soak the demineralisation cartridge in a bowl of water for at least 24 hours before use (38). The granules have to absorb water to reach full performance. • Now screw the cartridge onto the water tank cap (39). Close the tank cap securely! Place the water tank onto the base (40). 25 Option B: Replace the entire cartridge • Remove the water tank from the base and unscrew the water tank cap (25). • The demineralisation cartridge is attached to the inside of the tank cap. Unscrew the cartridge from the cap by turning it counter-clockwise (26). Important: do NOT dispose of the tank cap! • Dispose of the old cartridge (36). • Unpack the new cartridge (37). • Soak the new cartridge in a bowl of water for at least 24 hours before use (38). The granules have to absorb water to reach full performance. • Now screw the cartridge onto the water tank cap (39). Close the tank cap securely! Place the water tank onto the base (40). 26 27 28 29 30 33 38 en 31 34 35 39 32 36 37 40 27 Storing the appliance for extended periods en Clean the appliance as described earlier and allow to dry thoroughly. Preferably store the appliance in its original box, in a dry place away from high temperatures. Disposal Return your worn out unit to your dealer for proper disposal. You can obtain information on other ways to dispose of the unit from your local district or town council. Warranty The warranty conditions are defined by our representative in the country of sale. Please contact your dealer if, despite strict quality control, your appliance becomes defective. You must present your original receipt when making a claim under the warranty. Repairs to electric appliances can only be carried out by specialists. Through improper repairs, considerable danger for the operator can result and warranty claims lapse. Technical specifications U7145 Mains voltage 230 V ~ 50 Hz Power consumption 22 W / 39 W Humidity output 400 g/h Suitable for rooms up to 60 m2 / 150 m3 Water capacity 5.0 litres Dimensions 240 x 260 x 310 mm Weight (empty) 3.0 kg Operating noise level < 25 dB(A) Accessories 7531 Demineralisation cartridge A7017 Ionic Silver Stick (ISS) Technical specifications U7147 Troubleshooting Problem Possible cause What to do Unit does not operate Power plug not plugged in Plug in power plug into mains socket No water in the tank (Empty indicator is on) Fill tank with water No mist output Desired humidity level lower than actual Increase humidity setting Cleaning agent residues Rinse with clear water Weak mist output Water temperature too low Set mist output to maximum. The appliance will work properly again after 10 minutes. Mineral deposits on membrane Clean membrane White deposit around the appliance Demineralisation cartridge exhausted Replace demineralisation cartridge or granules 28 Mains voltage 230 V ~ 50 Hz Power consumption 27 W / 42 W / 120 W* Humidity output 400 / 550 g/h* Suitable for rooms up to 60 m2 / 150 m3 Water capacity 5.0 litres Dimensions 240 x 260 x 310 mm Weight (empty) 3.0 kg Operating noise level < 25 dB(A) Accessories 7531 Demineralisation cartridge A7017 Ionic Silver Stick (ISS) * when used with pre-heating to 80 °C cn 使用说明书 29 前言 祝贺你选用U7145/U7147超声波加湿器! 注意: 该产品只能用于对室内空气的加湿。 cn 您知道吗?干燥的室内空气: • 可以导致呼吸系统粘膜干燥、嘴唇干裂、眼睛 刺痛? • 将导致呼吸系统受感染并致病? • 让人感到劳累、疲劳、精力不集中? • 危害家里宠物、室内植物的生长? • 加速灰尘的形成,以及合成纤维织物、地毯和 塑料制品产生静电? • 会破坏木质家具和镶木家具? • 导致乐器音色失真? 小贴士 室内比较舒适的相对湿度是在40-60%之间,你选 择的这款机器按设置的湿度自我控制,如果空气 太干,机器会自动运行,当设置的湿度达到后, 机器会自动停止运行。 30 安全条款 • 使用该产品前请仔细阅读使用说明书,说明书 不用时请将其保管好,以便今后查阅。 • 仅使用符合底部标签要求的交流电压。 • 该产品只允许在室内使用,并在使用过程中需 要符合技术数据的要求。不当使用,可能会对 您的健康和安全带来影响。 • 小孩不能识别使用电器的危险性,所以当小孩 靠近电器时应有监护人在身边(图1)。 • 不熟悉操作说明的人员包括小孩、以及受药 物、酒精、麻醉药影响的人是不允许操作该电 器,若要使用,必须要有监护人在身边。 • 若发生产品损坏或者产品电线破损的情况(图 2),请不要使用该产品。也不要使用因其它 任何原因而造成损坏或被丢弃的产品(图3) 。 • 使用产品前请确保其已组装完毕。 • 在使用过程中,产品若发生故障,要有专门的 维修人员维修(图4),任何不当的维修都有 可能对用户造成损害。相关修理只许合格的工 程师或服务人员来做,仅可由专业人员进行电 器修理。如果电源线损坏,为避免危险,必须 由制造厂或其修理部及专职人员修理。 • 往水箱加水、倒水、清洗、拆卸、组装或者移 动电器前必须先拔掉电源线。 • 在操作该电器过程中,禁止触碰雾化池,高频 震荡会使换能片变烫。 • 在拔电源线时,要确保双手干燥,也不要靠拉 电源线来拔插头。 • 将电器放在一个干燥、平整的地方(图5)。 • 不要把电器直接放在地板上或加热器边上,如 果喷雾器喷出的雾在没有完全挥发前就碰到地 板,地板会受到破坏(图6)。不当使用造成 的破坏厂家不承担任何责任。 • 该电器须放在一个抬高的地方(图7),如茶 几上、箱子上等等。 • 禁止往产品的喷雾口加水。 • 禁止将电器主体浸入水或其他液体中。 • 将电器放在不容易被人碰到的地方(图8) • 该电器不用的时候,要拔掉电源。 • 禁止在地毯下面走电源线或在电源线上盖布 等,防止电源线缠绕的情况出现。 • 禁止在有易燃品、气体或蒸汽的地方使用。 • 禁止让电器雨淋,或者在其它潮湿的地方使 用。 • 禁止将异物放入电器。 • 禁止堵住空气进口和雾气出口。 • 不要坐、站在电器上,或者放重的东西在电器 上。 • 为了您的健康,为了让产品恰当地发挥其加湿 功能,仅可使用冷的、干净的、无污染的新鲜 自来水。如果您附近的水源已经或可能被污染 了,您可以使用蒸馏水。另外,建议您根据此 手册指示,定期、及时地对电器进行清洗和保 养。 • 如果使用芳香剂如精油、净水剂和芳香物质, 这会破坏电器,任何添加芳香剂造成的损坏都 不在厂家的保修范围内。 • 高频振荡人类与动物是听不到的,也是安全 的。 1 4 7 cn 2 5 8 3 6 9 31 打开包装 • 小心地从箱子里拿出电器。 • 拿走罩在电器上的塑料袋。 • 观察标签上的电压功率说明。 • 如果你打算整年或长时间不用机器请用原包装 储藏。 电器配置图 雾气出口(旋转式) cn 准备操作 找到一个理想的放机器的位置: • 不要将电器直接放在散热器附近或装有地暖系 统的地板上。雾气中的水份会损坏地板表面( 图6和图7)(参照安全条款)。 • 不要让雾气出口直接对着植物或其它的物品, 至少保持50cm的距离(图10) • 使用去矿盒之前,必须将其浸在一盆水中至少 24小时。去矿盒里面的树脂颗粒只有在充分吸 水之后才能发挥最大的作用。 • 通常去矿盒平均每2-3个月要更换一次。具体 更换周期由当地水质的硬度而定。 • 阅读“加水”章节,往水箱中加水(图12)。 • 将水箱放回底盆(图13)。 • 将电源插头插入插座,按机器的开关键开机( 图15)。 • 开机10-15分钟会到达满功率状态。 • 确保电源线不被任何东西夹住(图9),如果 电源线受损不要用电器(图2)。 加水 水箱 蒸汽室 移动水箱时,一定要先关机。当电器工 作时,不要触碰雾化池。 为了您的健康,为了让产品恰当地发挥 其加湿功能,尽可使用冷的、干净的、 无污染的新鲜自来水。如果您附近的水 源已经或可能被 污染了,您可以使用蒸馏水。 不要在水箱没水的情况下启动电器!当水箱内的 水低于允许最低水位时,电器会自动关机。 • 确保水箱内无异物。 • 取下水箱盖(图11)。往水箱内装冷的、干净 的自来水(12)。盖上水箱盖,必须密封以免 漏水。将水箱放到水盆上(图13),不要在水 中加任何添加剂(14)! • 将电源插头插入插座,打开机器(图15)。 去矿盒 水箱盖 离子化银棒 刷子 振荡片 控制板 机器主体 32 雾化池 10 13 水质保证 所有的 BONECO加湿器都利用离子化银棒的抗菌 特性,从而保证水质无菌。无论电器是否在工 作,离子化银棒一旦与水接触就开始发挥其抗菌 的功能,它是专门为加湿器设计的。参阅图16的 位置放置银棒到机器中,注意,放银棒时先要关 机。在电器工作时,不要触碰内部雾化池。 禁止使用任何添加剂 11 14 12 15 禁止使用任何加在水中的芳香剂(如:精油、香 精、净水剂等)!水箱和雾化池不适合使用任何 添加剂。即使一小滴也会破坏各个塑料部件,甚 至使其产生裂纹。任何使用添加剂造成的损坏都 不在厂家保修范围内。 16 33 cn 运行U7145 C cn B A A) 开关键 顺时针旋转电源开关,启动电器,同时可调节雾 量从小到大。 B) 湿控器(设置湿度) 顺时针旋转可设置湿度,建议相对湿度是40-60% ,约在垂直位置。当湿度大于设置位置时的相对 湿度时,机器会自动停止运行,机器的测量误差 有+/- 5%,当开关键调到最右边时,机器会持续 工作。 34 C) 缺水指示灯(红色) 水位高低很容易看到,因为水箱是透明的。当水 箱水用完时,机器也会提示,红色的指标灯会闪 烁(标志C)。请阅读“加水”章节参考更多信 息。当水箱重新加满水后,红灯闪烁还会持续几 秒钟。 运行U7147 H E A L G F C I M D B J K A) 开关机 按A键可以开机或关机,此键也用来重置清洗提 示灯(持续按)。 B) 恒湿器(设置加湿量 按键B可以设置想要的相对湿度,建议相对湿 度是40-60%。当湿度大于设置位置时的相对湿 度时,机器会自动停止运行,机器的测量误差 有+/5%。在设定湿度时,目标值会显示(符 号DESIRED),几秒钟后会显示当前湿度(符号 CURRENT)。 D) 雾气输出量的调节和开关 G) 计时显示 按键D几次可以调节雾气输出量,符号H显示三个 档位中的哪一个(低/中/高)。 H) 雾气输出量显示 E) 加热功能 I) 加热显示 E键用来打开或关闭加热功能,符号I显示时说明 加热功能已打开,进入到雾化池中的水先被加热 到80 °C,水池中的水加热约需要10-15分钟, 吹到室内的雾气会40 °C左右,这样室内的温度 就不会下降。同时也有明显的提高水质卫生的作 用。 F) 自动/ 睡眠模式 按下F键可以激活自动和睡眠模式。按一次打开 自动功能(符号J出现在显示屏上),根据室内 环境温度保持一个最佳湿度,按雾气输出量或设 置目标湿度值可以重新设定,退出自动模式。当 睡眠模式启动时(符号K出现在显示屏上),目 标湿度是50-65%;运行时间自动设置为6小时; 加热功能是打开的。另外,按照目标值与实际值 的差距控制输出量。 湿控器与雾气输出量的设置在这二种模式下都不 能去改变,如果B键或D键被按过了,机器就不再 是自动模式或睡眠模式了。 J) 自动模式显示 cn K) 睡眠模式显示 L) 缺水显示 透明的水箱很容易看到水位,当机器显示(L) 说明需要加水了,请阅读“加水”章节参考更多 信息。水箱重新加好水后符号L还会闪烁几秒钟 直到水盆上蓄满水 M) 清洗指示灯 当符号M和“CLEAN”字母出现在显示屏上时, 说明机器需要按厂家建议进行清洗了。这个符号 大约每2周会自动出现,具体是按使用时间来计 算。按住A键10-15秒钟可以清除该指示灯。 C) 计时器 C键是用来设置运行时间的,可选择1-8个小 时或持续工作(CO),符号G显示选择的档位 (1h/2h/3h/4h/5h/6h/7h/8h/CO),几秒钟后机器会 自动显示当前值。 35 清洗和维护 拿开水箱前,一定要先关闭电源。在电 器运行时,不要碰雾化池。 cn 17 20 18 21 • 关掉电源开关(图17),拔下电源插座(图18 )。 • 水箱、雾化池每周清洗一次(只用清水,不要 用其它清洁剂)(图19)。 • 用除垢剂去除雾化池里的水垢(图20),然后 用足够的清水冲掉残余除垢剂。 • 拿走雾气出口(图21):将喷嘴向左或向右旋 转,调节定位线,当定位线一致时把雾气出口 拉出来。 19 36 重要事项 • 确保电器主体永不进水(图22)。 • 用一块软布清洗内部部件,不要用任何溶剂或 腐蚀液来清洗电器(图23)。 • 只准用刷子来清洗振荡片(图24),一周一 次。 • 至少一周一次更换水箱中的水。 22 24 cn 23 37 更换去矿盒 拿走水箱之前一定要确保先关机。机器 在运转时不能触碰雾化池! cn 水箱装有去矿盒,通常2-3月换一次,如果水质 很硬,有必要提前更换。当脏的东西(白粉)明 显在电器上时,说明去矿盒要更换了。如果换了 去矿盒白色沉淀物还在电器上,请确认你用的水 是否处理过。如果水已经经过除钙系统处理过了 的话,则加湿器里会出现盐沉淀物。 方案A:更换树脂 • 从底座上取下水箱,打开水箱盖(图25)。 • 去矿盒在水箱盖里面,逆时针方向松开水箱盖 (图26)。注意:不要丢掉水箱盖。 • 打开盒(图27)。 • 把里面的东西倒掉(颗粒)(图28)。注意! 不要洒在外面,否则地板会很滑! • 将粉色泡沫塑料装在去矿盒的中央,不要推到 底否则很难退出(图29)。 • 将一包新树脂倒在塑料杯里(图30)。 • 把空的去矿盒和塑料杯中心对齐,对接起来( 图31)。 • 对接好之后,将其倒置,然后摇晃,直到所有 去矿粒全部转移到去矿盒中为止(图32)。 • 将塑料杯从去矿盒上取下,拔出粉色泡沫塑料 (图33)。注意要将它们保存好,以后还要用 (每盒内有3包去矿粒)(图34)。 • 盖上盖子(图35)。 • 使用去矿盒之前,必须将其浸在一盆水中至少 24小时(图38)。去矿盒里面的去矿粒只有在 充分吸水之后才能发挥最大的作用。 • 将去矿盒重新装到水箱盖上(图39)。必须确 保其密封,以防漏水!最后将水箱装到机器底 座上(图40)。 方案B:更换整个去矿盒 • 从底座上取下水箱,打开水箱盖(图25)。 • 去矿盒在水箱盖里面,逆时针方向松开水箱盖 (图26)。注意:不要丢掉水箱盖。 • 扔掉整个旧去矿盒(图36)。 • 打开新去矿盒(图37)。 • 使用去矿盒之前,必须将其浸在一盆水中至少 24小时(图38)。去矿盒里面的树脂颗粒只有 在充分吸水之后才能发挥最大的作用。 • 将去矿盒重新装到水箱盖上(图39)。必须确 保其密封,以防漏水!最后将水箱装到机器底 座上(图40)。 25 26 27 38 28 29 30 33 38 cn 31 34 35 39 32 36 37 40 39 贮藏 保修 按说明书中描述的方法清洗机器,并完全晾干。 机器最好放在原装纸箱内,放到干燥、阴凉的地 方。 相关保修条款由不同的国家和地区的代理商来制 定,如果您的电器出现了故障,请联系当地的代 理商。要求保修时,需要出示原始发票。维修工 作只能由专业的技术人员来执行,任何不正当的 维修都会对电器造成损坏,由此造成的额外损坏 不在厂家的保修范围内。 报废 cn 您可将报废的电器返回经销商那儿便于 正确处理,您也可以通过当地政府管理 部门那儿了解相关电器报废的信息。 技术数据 U7145 电压 能耗 加湿量 最大适合面积 装水容量 尺寸 重量(空置时) 噪音 耗材 220 V ~ 50 Hz 19 W / 36 W 400 g/h 60 m2 / 150 m3 5.0 litres 240 x 260 x 310 mm 3.0 kg < 25 dB(A) 7531 去矿盒 A7017 离子化银棒 (ISS) 技术数据 U7147 故障排除 故障 原因 排除方法 加湿器不工作 电源线没有连接 将电源线插进电源插座 水箱无水 (缺水指示灯亮) 水箱加水 没有雾气喷出 目标湿度设置低于实际湿度 调高湿度 清洁剂残留 清水冲洗 雾气很弱 水温太低 将雾量调到最大, 10分钟后, 加湿器会正常工作 水垢积在振荡片上 清洗振荡片 白粉粘在加湿器上 去矿盒耗尽 更换去矿盒或去矿粒 40 电压 能耗 加湿量 最大适合面积 装水容量 尺寸 重量(空置时) 噪音 配件 220 V ~ 50 Hz 26 / 38 / 120 W* 400 / 550 g/h* 60 m2 / 150 m3 5.0 litres 240 x 260 x 310 mm 3.0 kg < 25 dB(A) 7531 去矿盒 A7017 离子化银棒 (ISS) * 当使用加热功能时至 80 °C 42 43 BONECO is a registered trademark of PLASTON Group, Switzerland V-00 www.boneco.com