1
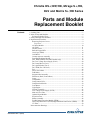
Christie DS+/DW/HD, Mirage S+/HD,
DLV and Matrix S+/HD Series
Parts and Module
Replacement Booklet
Contents
020-100012-01 Rev. 1 (04/07)
1 Ordering Parts............................................................................................................. 3
2 Index of Parts and Modules........................................................................................ 4
Projector Exploded View........................................................................................ 7
3 Safety Warnings and Guidelines ................................................................................ 8
4 Replacement Procedures ............................................................................................ 9
Removing Projector Covers ................................................................................... 9
Top Cover.......................................................................................................... 9
AC Relay Module ................................................................................................ 10
Air Filters.............................................................................................................. 11
Airflow Sensor...................................................................................................... 11
Built-in Keypad PCB............................................................................................ 13
Card Cage (TIPM) ................................................................................................ 14
Cold Mirror .......................................................................................................... 15
Contrast Aperture Assembly ............................................................................... 16
Dual Slot Backplane Module................................................................................ 17
Fans, DMD (1000W and 1200W models only).................................................... 18
Fan, Low Voltage Power Supply (Fan 2) ............................................................. 20
Fan, Lamp Blower (Fan 3) ................................................................................... 22
Fan, Optical Intake (Fan 1)................................................................................... 23
Fan, TIPM (Fan 7 & Fan 8).................................................................................. 26
Feet ....................................................................................................................... 26
Flex/LVDS Cables................................................................................................ 27
Fold Mirror ........................................................................................................... 28
Integrator Rod Assembly ..................................................................................... 29
IR Sensors (Dual, Front & Rear) .......................................................................... 34
Lamp .................................................................................................................... 35
Lamp Ballast......................................................................................................... 37
Lamp Contact PCB............................................................................................... 38
Lamp Interlock Switch ......................................................................................... 39
Lens Mount .......................................................................................................... 39
Light Engine ........................................................................................................ 41
LiteLOC Assembly .............................................................................................. 43
Low Voltage Power Supply (LVPS) .................................................................... 43
Main AC Line Filter ............................................................................................. 46
Optional Input Module ........................................................................................ 46
Projection Lens..................................................................................................... 47
Shutter Assembly ................................................................................................. 48
Ten Bit Image Processing Module (TIPM) .......................................................... 49
Three Chip Panel Driver (TCPD)/High Definition Panel Driver (HDPD) ........... 49
UV Filter............................................................................................................... 50
Interconnection Drawings ........................................................................................ 53
Christie/Mirage/DLV/Matrix
Parts and Module Replacement
Use the instructions provided in this booklet to replace any of the serviceable
components in the following projectors:
•
•
•
•
•
•
•
•
•
•
•
•
•
•
•
•
•
•
•
•
•
•
Christie DS+6K (38-DSP104-x5)
Christie DS+5Kc (38-DSP104-x8)
Christie DS+8K (38-DSP106-x3)
DLV1400-DX (38-DSP102-x5)
DLV1920-DX (104-017101-xx)
Christie DW3K/Kc (38-DHD103-x3, 38-DHD103-x4)
Christie DW6K/Kc (38-DHD106-x3, 38-DHD106-x4)
Christie HD6K (104-006101-xx)
Christie HD5Kc (104-007101-xx)
Christie HD8K (104-008101-xx)
Christie HD7Kc (104-018101-xx)
Mirage S+3K (38-DSP102-x4)
Mirage S+6K (38-DSP104-x6)
Mirage S+8K (38-DSP106-x4)
Mirage HD3 (104-012101-xx)
Mirage HD6 (104-013101-xx)
Mirage HD8 (104-014101-xx)
Matrix S+2K (38-DSP102-x6)
Matrix S+5K (38-DSP104-x7)
Matrix HD2 (104-023101-xx)
Matrix HD4 (104-016101-xx)
Matrix HD7 (104-024101-xx)
Read the Safety and Warning guidelines provided on page 8 before servicing the
unit. All service procedures must be performed by qualified personnel only.
The following abbreviations are used throughout the manual.
BPM
DMD
DSBP
HD
HDPD
HVPS
LVDS
LVPS
PPM
SSBP
TCPD
TIPM
Backplane Module
Digital Micromirror Device
Dual-Slot Backplane Module
High Definition
High Definition Panel Driver
High Voltage Power Supply
Low Voltage Differential Signal
Low Voltage Power Supply
Post Processing Module
Single Slot Backplane Module
Three Chip Panel Driver
Ten-Bit Image Processing Module
Disclaimer
Every effort has been made to ensure that the information in this manual is accurate and reliable. Due to
constant research, however, information is subject to change without notice. Christie assumes no
responsibility for omissions or inaccuracies. Updates to this manual are published regularly as required.
Contact Christie for availability.
2
020-100012-01 Rev. 1 (04/07)
Parts and Module Replacement
1
Ordering Parts
Christie/Mirage/DLV/Matrix
When ordering replacement parts, please provide the following information that
can be found on the product’s license label:
•
•
•
•
Christie Part Number for each item required
Projector Model (see ID label)
Projector Serial Number (see license label)
Date of Manufacture (see license label)
Order parts from one of the following locations:
NORTH AMERICA
Christie Digital Systems, Inc.
Christie Digital Systems, Inc.
809 Wellington St. North
Kitchener, Ontario, Canada N2G 4Y7
Tel. 519-744-8005 (General)
Toll Free 1-800-265-2171 (Sales Order)
Toll Free 1-800-221-8025 (Technical Support only)
Fax 519-749-2776 (Service)
10550 Camden Drive
Cypress, CA 90630
USA
Tel. 714-236-8610 (General)
Toll Free 1-866-880-4462 (Sales Order)
Toll Free 1-800-221-8025 (Technical Support only)
Fax 519-749-3302 (Service)
EUROPE
Christie Digital Systems, Inc.
Christie Digital Systems, Inc.
View Point
200 Ashville Way
Wokingham, Berkshire RG41 2PL
United Kingdom
Tel. +44-118-977-8111
Fax +44-118-977-8112
Willicher Damm 129
D-41061 Mönchengladbach
Germany
Tel. +49-2161-664540
Fax +49-2161-664546
Christie Digital Systems, Inc.
7, av Georges Pompidou
92593 Levallois-Perret Cedex
France
Tel. +33-(0)1-47-48-28-07
Fax +33-(0)1-47-48-26-06
ASIA-PACIFIC / OTHER
Availability
Christie Digital Systems, Inc.
Christie Digital Systems, Inc.
627A Aljunied Road
# 05-02 Biz Tech Centre
Singapore 389842
Tel. 65-6877-8737
Fax 65-6877-8747
Rm. 1109-1116 Shartex Plaza
No. 88 Zun Yi South Road
Shanghai, 200336
People’s Republic of China
Tel. +86-21-6278-7708
Fax +86-21-6270-5816
f Not all parts identified in this booklet are available separately. Some parts are
stocked as inventory and are available only until the current supply lasts.
020-100012-01 Rev. 1 (04/07)
3
Christie/Mirage/DLV/Matrix
2
Index of Parts
and Modules
Parts and Module Replacement
Refer to Table 1 and the Exploded View provided for a list of replaceable parts and
where they are located within the projector.
Table 1. Index of Parts and Modules
Exploded
View
Label
1
2
3
4
5
6
7
Service Kit RoHS
Part Number
--003-110257-01
---03-900529-51P
03-900550-51P
Interlock/bracket
9
10
11
12
13
14
15
16
17
Low voltage power supply (LVPS)
Lamp ballast cover
Optical fan #1 (12V DC 120mm)
TIPM PCB
Built-in keypad (membrane and PCB)
IR sensor (rear)
Exhaust duct
Intake fan duct
Side filter cover
Side filter (large)
03-000674-01P
-003-000380
03-900543-01P
03-900562-01P
03-900529-01P
----
003-120076-01
-003-110260-01
03-900543-51P
03-900562-51P
03-900529-51P
----
03-900537-01P
03-900537-51P
Side intake duct
LVPS fan bracket
Contrast aperture assembly
---
---
03-900533-01P
03-900533-51P
03-900535-01P
03-900535-51P
-Various
-Various
19
20
21
22
(incl.5ea small/ large)
(aperture only)
Optical tray cover /cold mirror
(cold mirror only)
23
Lamp door
24
Integrator assembly
25
Integrator knob
(incl. knob/spring)
26
Lamp
27
28
Optical tray
Shutter
29
Blower (12V DC 97mm for 500W and 1000W)
(230V AC 97mm for 1200W)
30
Lamp ballast
31
32
Lamp compartment
AC relay
Three-chip panel driver (TCPD)
High Definition Panel Driver (HDPD)
Front filter cover
Front filter (small)
33
34
35
(incl.5ea small/ large)
36
Projection lens
37
38
39
40
Adjustable feet (2)
LiteLOC
Fold mirror
Fold mirror frame
41
Light engine
42
43
44
020-100012-01 Rev. 1 (04/07)
Top cover
TIPM cover / baffle
TIPM fans (12V DC 60mm)
Top cover protection bracket
Lamp shield
LVPS duct
IR sensor (front)
Service Kit NonRoHS
Part Number
--003-000379
---03-900529-01P
03-900550-01P
8
18
4
Part Name /Description
R, G, B DMD fans (12V DC 60mm)
(for 1000W and 1200W models only )
Lens bezel
Motorized lens mount
(switch only)
(switch only)
(see list below)
(see list below)
03-900534-01P
03-900534-51P
Various
Various
(see list below)
(see list below)
-03-900532-01P
003-000377
003-000607
Various
-03-900532-51P
003-110261-01
003-110262-01
Various
-03-260656-01P
03-260723-01P
---
-003-110228-01
003-110235-01
003-110399-01
--
03-900537-01P
03-900537-51P
(see list below)
(see list below)
Various
Various
(see list below)
(see list below)
03-900528-01P
03-900530-01P
03-900531-01P
-Various
03-900528-51P
03-900530-51P
03-900531-51P
-Various
003-000373
003-110258-01
03-900564-01P
03-900552-01P
003-000863-01
03-900552-51P
(see list below)
(see list below)
Parts and Module Replacement
Exploded
View
Label
45
46
47
Part Name /Description
48
Airflow sensor
Optical mount
Cold mirror heatsink
Bottom chassis
Christie/Mirage/DLV/Matrix
Service Kit NonService Kit RoHS
RoHS
Part Number
Part Number
------03-900536-51P
03-900536-01P
(500W and 1000W)
(500W and 1000W)
003-000566-01
003-000566-02
03-900556-01P
03-900542-01P
--
03-900556-51P
03-900542-51P
003-000644-01
Service Kit NonRoHS Part
Number
Service Kit RoHS
Part Number
(for 1200W only)
49
50
Not shown
Dual slot backplane module (DSBP)
UV filter
Lamp Contact PCB (HD models only)
(for 1200W only)
Additional Service Kits:
Part/Description
Ballast
500W Ballast
03-900538-01P
1000W Ballast
03-900539-01P
1200W Ballast
03-900540-01P
Integrator Assembly
Integrator SXGA+
03-900553-01P
Integrator HD2
03-900554-01P
Integrator HD
-Lamp and Filter Kits (includes lamp module, intake filters (2), instructions)
500W Lamp and Filter Kit
03-000832-01P
for HD models only
-1000W Lamp and Filter Kit
03-000833-01P
for HD models only
-1200W Lamp and Filter Kit
03-000834-01P
for HD models only
-Installation Hardware / Setup Tools
Convergence Tool Kit (incl. separate instructions)
003-000078
Lenses
0.73 :1 Fixed Lens
38-809088-01
1.2 :1 Fixed Lens
38-809095-01
1.2:1 R.P.
38-809093-01
1.45 :1.8 :1 Zoom
38-809089-01
1.8-2.5 :1 Zoom
38-809090-01
2.5-4.5:1 Zoom
38-809091-01
4.5-7.3:1 Zoom
38-809092-01
0.67:1 CT HD
-SXGA+ 1.2:1/HD 1.1 :1 FP
-1.4-1.8:1 CT HD
-1.8-2.6:1CT HD
-2.6-4.1:1 CT HD
-4.1-6.9:1 CT HD
-SXGA+ 1.2:1/HD 1.1:1 RP
-Optional Input Modules
RGB500 Input Module
38-804606-xx
RGB400 ALT Input module
38-804607-xx
RGB400 BA Input Module
38-804610-xx
PC250 Analog Input Module
38-804609-xx
DVI Input Module
38-804635-xx
Serial Digital Input Module (SDI)
38-804602-xx
Dual SD/HD – SDI Input Module
38-804656-xx
Accessories / Miscellaneous
IR Remote Keypad (with laser pointer)
03-900566-01P
Engine Flex Cables
03-900542-01P
3D Stereo Sync Cable (for Mirage only)
001-100077-02
03-900565-01P
Lens Mount Shipping Plug (required when shipping projector
without lens)
Line Cord 10’, 125VAC (for 500W and 1000W models)
Thermal Tape Replacement Kit
for HD models only
Harness LVDS
03-001516-01P
03-900569-01P
---
03-900538-51P
03-900539-51P
03-900540-51P
003-000859-01
003-000860-01
003-100260-01
03-000832-51P
003-120118-01
03-000833-51P
003-120117-01
03-000834-51P
003-120116-01
003-000078-02
38-809088-51
38-809095-51
38-809093-51
38-809089-51
38-809090-51
38-809091-51
38-809092-51
104-110101-01
104-111101-01
104-112101-01
104-113101-01
104-114101-01
104-115101-01
104-116101-01
----38-804635-5x
38-804602-5x
38-804656-5x
03-900566-51P
03-900542-51P
03-900565-51P
03-001516-51P
03-900569-51P
003-000641-01
003-000643-01
020-100012-01 Rev. 1 (04/07)
5
Christie/Mirage/DLV/Matrix
Parts and Module Replacement
Part/Description
Light Engines
Light Engine SX+
Light Engine HD2
Light Engine HD
6
020-100012-01 Rev. 1 (04/07)
Service Kit NonRoHS Part
Number
Service Kit RoHS
Part Number
003-100152
03-900526-01P
--
--003-100358-01
Parts and Module Replacement
Christie/Mirage/DLV/Matrix
020-100012-01 Rev. 1 (04/07)
7
Christie/Mirage/DLV/Matrix
3
Parts and Module Replacement
WARNING
Safety Warnings
& Guidelines
Always power down the projector using appropriate
procedure and disconnect all power sources before cleaning
or servicing.
•
All replacement procedures must be performed by qualified projector
service personnel. Read all service instructions before you begin.
•
Replace parts with those specified by the manufacturer. DO NOT use
substitute parts.
When powering down the projector, allow the cooling fans to
automatically turn off (takes approximately five minutes) before
disconnecting AC and removing covers.
Non-insulated dangerous voltages may be exposed. Always unplug the
projector prior to disassembly.
Observe and follow all warnings and instructions marked on the
projector.
Observe all electrostatic precautions. Use a grounded
wrist strap when handling electronic assemblies.
Ensure the unit is serviced in a clean environment to
prevent dust particles from settling on optical
Gloves
Required
components.
Wear supplied protective gloves as indicated by symbol
•
•
•
•
•
•
The exclamation point within the equilateral triangle is intended to alert the user
to the presence of important operating and maintenance (servicing) instructions
in the literature accompanying the projector.
The lightning flash and arrowhead symbol within the equilateral triangle
signifies the presence of non-insulated "dangerous voltage" within the
projector's enclosure that may be of sufficient magnitude to constitute a risk of
electric shock.
Tools Required
f
It is recommended that you have the following tools on-hand when servicing
any of the parts covered in this booklet.
•
•
•
•
•
•
•
•
8
020-100012-01 Rev. 1 (04/07)
Electrostatic protective strap and pad
Phillips screwdriver #1 and #2
Slot screwdriver (optional)
1/4” Nut Driver
3/16” Nut Driver
9/16” Nut Driver
Needle Nose Pliers
Set of Hex Ball Drivers
Parts and Module Replacement
4
Replacement
Procedures
Christie/Mirage/DLV/Matrix
This booklet provides all procedures necessary to replace the serviceable parts
found in the projector. All procedures are listed alphabetically. Refer to the Index
of Parts and Modules on page 4 along with the Projector Exploded View on page 6
to help you identify the parts and where they are located.
Before you begin any procedure, make sure you have read and understood it and
that you are aware of all safety and warning guidelines.
Power off and unplug the projector before performing any of the service
replacement procedures in this booklet.
Use standard ESD precautions.
Refer to the Interconnection Drawing provided at the end of the manual
when reconnecting component and module harnesses.
Removing Projector Covers
Top Cover f (5 minutes)
Removing the top cover is the first step in accessing most of the components in the
projector. To remove:
1. Remove the projection lens. See Removing the Projection Lens.
2. Remove any optional input module installed in Input 5 or Input 6. Refer to the
Optional Input Module instructions later in this booklet.
3. Remove the left side filter door (three screws) and the filter. (Figure 1.)
4. Remove the 17 screws securing the top cover. (Figure 1.)
5. Slowly, lift the top cover straight up to remove.
NOTE: The front IR sensor PCB is located in the front left corner and can
be damaged if it is hit while removing the cover (See Figure 2 for IR location).
6. With the top cover off, you will see protective shields positioned over the
electronic PCBs and light engine. If required, remove these covers to access
the components underneath.
020-100012-01 Rev. 1 (04/07)
9
Christie/Mirage/DLV/Matrix
Parts and Module Replacement
Figure 1. Removing Projector Covers
AC Relay Module
(10 minutes)
The AC relay module is located in the front, left corner of the projector (near the
IR sensor). It is mounted to the ballast cover. To remove and replace:
1. Remove the top cover. See Top Cover.
2. Disconnect J59 and J60 from the AC relay module. (Figure 2.)
3. Remove the AC relay from its standoffs (four screws).
Figure 2. Location of AC Relay Module
10
020-100012-01 Rev. 1 (04/07)
Parts and Module Replacement
Christie/Mirage/DLV/Matrix
Air Filters
(5 minutes for both)
Two air filters are used in this projector; one located at the front and one on the left
hand side (when viewed from the front). It is recommended both filters be replaced
when the lamp in the projector is replaced or sooner if the operating environment is
extremely dusty. A clean air filter ensures the projector’s optical components
remain relatively clean.
DO NOT clean or reuse filters.
Use the clean filters provided in the
service kit only.
Front f To remove and replace the front air
filter:
1. Loosen the single screw securing
the front air filter cover.
2. Remove the cover and pull the
filter out.
Side f To remove and replace the side air
filter:
1. Loosen the three (3) captive screws
from the side filter cover.
2. Remove the cover and pull the
filter out.
When replacing either air filter, make
sure to install it with the wired side
facing in.
Figure 3. Removing Air Filters
Airflow Sensor
(9 minutes)
The airflow sensor is located on the lamp blower. The placement of this sensor is
critical in that it monitors the amount of airflow and temperature and will cause the
projector to shutdown if it is not positioned correctly.
NOTE: Make sure you use the correct sensor for your projector model. Different
sensors are used in 500W/1000W and 1200W models. Refer to the parts list at the
beginning of this booklet for the correct kit number. Replacement instructions
apply to all models.
To remove and replace:
1. Remove the top cover. See Top Cover.
2. Disconnect the airflow sensor harness.
020-100012-01 Rev. 1 (04/07)
11
Christie/Mirage/DLV/Matrix
Parts and Module Replacement
3. Notice the position of the sensor. It must be repositioned in exactly the same
manner when replaced. TIP: For 1200W models, the sensor is mounted
directly to the blower and is inserted at a specific depth. Before removing,
measure and mark down the distance between the clamp and the black edge of
the sensor. This measurement will help when installing the new sensor.
4. Remove the single screw securing the sensor and bracket to the lamp blower.
When replacing the airflow sensor, repeat instructions in reverse.
Make sure the sensor is correctly positioned for your specific model. See
below.
For 500W and 1000W models, the sensor should be mounted so the hole in one
end is pointed directly into the fan blades and there is a small gap between it and
the hub of the blower. See Figure 4.
For 1200W models, the open end of the sensor should point directly into the fan
blades and inserted to the correct depth, as measured in Step 3. See Figure 5.
Figure 4. Airflow Sensor Position for 500W and 1000W Models
12
020-100012-01 Rev. 1 (04/07)
Parts and Module Replacement
Christie/Mirage/DLV/Matrix
Figure 5. Airflow Sensor Position for 1200W Models
Built-in Keypad PCB
(17 minutes)
The built-in keypad is located on the rear input panel.
IMPORTANT: When a new built-in keypad is installed, its EEPROM must
be updated with critical factory-defined system information pertaining to the
specific projector model. Refer to the instructions provided in the service kit for
programming your new built-in keypad. If ignored, the projector will not behave
properly.
To remove and replace:
1. Remove the top cover. See
Top Cover.
2. Disconnect the built-in
keypad PCB from the
TIPM (P37).
3. Remove the eight (8)
screws securing the keypad
plate.
4. Flip the keypad assembly
over and remove the nut
securing the ground lead.
5. Remove the six (6) screws
securing the PCB to the
silicone membrane. (Figure
7.)
Figure 6. Built-in Keypad
When replacing, repeat instructions in reverse.
020-100012-01 Rev. 1 (04/07)
13
Christie/Mirage/DLV/Matrix
Parts and Module Replacement
NOTE: The screw used to secure the ground lead is longer than the other screws.
Make sure you use this screw in the right location. (Figure 7)
Figure 7. Built-in Keypad PCB
Card Cage (TIPM)
(13 minutes)
The TIPM card cage is located at the rear of the projector. It contains the 10-bit
image processing module (TIPM), the dual slot backplane (DSBP) and any
optional input module that may be installed. To remove and replace:
Observe all ESD precautions when handling any of the PCBs in the
projector.
1. Remove any optional input module installed at Input 5 or Input 6. See
Removing an Optional Input Module.
2. Remove the projector’s top cover. See Top Cover.
3. Remove the three (3) screws
securing the TIPM cover/baffle
over the TIPM. (Figure 8.)
NOTE: Fans 7 and 8 are mounted
to the underside.
4. Flip the TIPM cover/baffle over,
leaving it to rest on another part of
the projector, like the Panel Driver
PCB.
NOTE: the fans are still connected
to the Panel Driver PCB. Proceed
Figure 8. Remove the TIPM
to the next step without
disconnecting these fans.
5. Remove the three (3) ¼” hex
standoffs from the TIPM PCB.
6. Disconnect Fan 1 (Red DMD Intake Fan - P23) and Fan 2 (LVPS Fan - P24)
from the TIPM.
14
020-100012-01 Rev. 1 (04/07)
Parts and Module Replacement
Christie/Mirage/DLV/Matrix
7. Remove the two (2) screws located near the large connector at the front edge of
the TIPM (where the Panel Driver PCB connects). See Figure 8.
Figure 9. Removing Screws from Input Panel
8. From the input panel, remove the two (2) screws where the TIPM connects to
the keypad faceplate and the single screws located in the lower right hand
corner. (Figure 9)
9. Raise the TIPM card cage slightly and pull it forward to disconnect it from the
Panel Driver PCB.
10. Remove the TIPM assembly.
Cold Mirror
(18 minutes)
Gloves
Required
The cold mirror is part of the optical assembly. It is located directly behind the
large heatsink. It is mounted to the optical tray using three (3) spring clips. To
remove and replace:
1. Remove the top cover. See Top Cover for instructions.
2. Remove the two (2) screws securing the heat sink to the bottom chassis.
(Figure 10.)
Figure 10. Removing the Cold Mirror Heat Sink
3. Lift the heat sink straight up and remove to access the cold mirror behind it.
4. Remove the three (3) screws securing the cold mirror to the optical tray.
(Figure 11.)
5. Remove the cold mirror from the holder.
020-100012-01 Rev. 1 (04/07)
15
Christie/Mirage/DLV/Matrix
Parts and Module Replacement
Figure 11. Removing the Cold Mirror
When replacing the cold mirror, insert the closest reflective side in toward to
optical assembly. To determine which side is the reflective side, place the point of
a ballpoint pen on the edge of the mirror face and look to see if a gap exists
between the pen and its reflection. NO GAP indicates the closest reflective side –
place this side IN.
Contrast Aperture Assembly
(13 minutes)
The contrast aperture assembly (commonly called the iris) is part of the optical
assembly located next to the integrator rod assembly. To remove and replace:
1. Remove the top cover. See Top Cover for instructions.
2. Remove the single screw securing a white nylon protective sheet over the light
engine (light shield).
3. Remove the screw securing the contrast aperture cover to the optical tray top
cover. (Figure 12.)
4. Disconnect the IRIS cable connection at the extender cable and not from the
Panel Driver PCB. Free the harness.
5. Remove the two (2) screws securing the motor assembly from the contrast
aperture cover. (Figure 12.)
6. Remove the contract aperture assembly.
16
020-100012-01 Rev. 1 (04/07)
Parts and Module Replacement
Christie/Mirage/DLV/Matrix
Figure 12. Accessing the Contrast Aperture Assembly
Dual Slot Backplane Module (DSBP)
(23 minutes)
The Dual slot backplane module is mounted to the underside of the TIPM. To
remove and replace:
1. Remove the TIPM card
cage. See Card Cage
(TIPM) for instructions.
2. Remove the four (4) selftaping screws from the
card guides located at the
DSBP. (If you want to
remove the card guides
completely, remove the
additional four (4)
screws from the input
panel.)
3. Remove the six (6)
screws securing the PCB
to the TIPM. (Figure 13)
4. Disconnect the PCB
from the TIPM and
remove.
Figure 13. Removing the Dual Slot Backplane
(DSBP)
When replacing, repeat instructions in reverse.
020-100012-01 Rev. 1 (04/07)
17
Christie/Mirage/DLV/Matrix
Parts and Module Replacement
Fans, DMD (1000W and 1200W models only )
NOTE: 500W projector models do not use DMD fans.
(13 minutes)
Blue DMD Fan f The blue DMD fan is located directly above its corresponding DMD on the light
engine. It is the most easily accessible DMD fan, in that it does not require removal
of any other components. To remove and replace this fan:
1. Remove the top cover and the protective white nylon cover over the light
engine. See Top Cover for instructions.
2. Disconnect the fan harness and free it from any cable clamps.
3. Remove the four (4) screws securing the fan to the light engine. (Figure 14)
4. Remove the fan assembly.
Figure 14. Location of DMD Fans on Light Engine
Red DMD Fan f
(53 minutes)
The red DMD fan is the most difficult of the DMD fans to remove and requires the
removal of the light engine. To remove and replace:
1. Remove the top cover and protective white nylon cover over the light engine.
See Top Cover for instructions.
2. Remove the light engine. See Light Engine for instructions. Once you have
removed the entire optical assembly (light engine and optical mount) go to the
next step. DO NOT separate the light engine from the optical mount.
3. Remove the four (4) screws securing the fan to the light engine.
4. Remove the fan assembly.
Green DMD Fan f
(17 minutes)
The green DMD fan is located directly above the optical tray. To remove and
replace:
1. Remove the top cover and the protective white nylon cover over the light
engine. See Top Cover for instructions.
2. Disconnect the fan harness and free it from any cable clamps.
18
020-100012-01 Rev. 1 (04/07)
Parts and Module Replacement
Christie/Mirage/DLV/Matrix
3. Remove the black exhaust duct located just in front of the fan – three (3)
screws. (Figure 15.)
4. Remove the four (4) screws securing the fan to the light engine.
5. Remove the fan assembly.
Figure 15. Accessing the Green DMD Fan
When replacing any of these fans, repeat instructions in reverse.
Make sure each fan is mounted so that the wire exits toward the top of the
light engine. (Figure 16.)
Figure 16. DMD Fan Wire Routing
020-100012-01 Rev. 1 (04/07)
19
Christie/Mirage/DLV/Matrix
Parts and Module Replacement
Fan, Low Voltage Power Supply (Fan 2)
(14 minutes)
The LVPS intake fan is located on the left side of the projector behind the side
intake duct. Its primary function is to blow air through the channel where the LVPS
sits cooling it down.
1. Remove the top cover. See Top Cover for instructions.
2. Remove the three (3) screws from the side intake duct.
3. Remove the two (2) screws securing the LVPS fan and bracket. (Figure 17.)
Figure 17. Accessing the LVPS Fan
4. Disconnect the fan’s harness from the TIPM (P24).
5. Lift the fan and bracket assembly and flip it over to access the back – pull the
four (4) blue rubber isolators off to release the fan. (Figure 18.)
Figure 18. Removing LVPS Fan from Bracket Assembly
When replacing, use the new blue isolators provided in the kit to remount the fan to
the bracket and route the fan harness through the clip located off to the side (on
TIPM baffle).
20
020-100012-01 Rev. 1 (04/07)
Parts and Module Replacement
Christie/Mirage/DLV/Matrix
Fan, Lamp Blower (Fan 3)
(49 minutes)
The lamp blower is located in the rear right corner of the projector. Located near
the lamp it is responsible for generating enough airflow to keep the projector from
overheating. An airflow sensor is mounted directly to the blower to ensure the
correct level of air is present at all times during operation. To remove and replace:
1.
2.
3.
4.
Remove the top cover. See Top Cover for instructions.
Remove the Panel Driver PCB. See Three-Chip Panel Driver (TCPD/HDPD).
Remove the TIPM card cage. See Card Cage (TIPM).
Remove the LVPS fan assembly and the LVPS module. NOTE: Do not remove
LVPS brackets and cable connections SK5, SK6, 5V, GND, and 3.3V. See Low
Voltage Power Supply (LVPS) for instructions.
5. Remove the LVPS duct/cover by removing the black cable guide through
which the flex cables are routed – two (2) screws. (Figure 23.) Then remove
the five (5) screws securing the duct/cover in place. Make sure the harnessing
clipped to the side of the duct is free before removing the duct.
6. Remove the light shield –
five (5) screws.
NOTE: three (3) screws
are used to secure the
black exhaust duct near the
lamp door (Figure 19.)
and two (2) screws are
used to secure the light
shield to the bottom base
plate.
7. Free cables from all clips.
8. Remove the fan.
Figure 19. LVPS Bracket
NOTE: The fan is mounted differently between models.
In 500W and 1000W
models:
a) Remove the
blower and bracket
as an assembly
from the projector
by removing the
two (2) screws
securing the
bracket to the
bottom chassis.
Figure 20. Removing the Lamp Blower in 500W and
1000W Models
020-100012-01 Rev. 1 (04/07)
21
Christie/Mirage/DLV/Matrix
Parts and Module Replacement
b) Remove the three (3) screws attaching the fan to the bracket. The one
screw also secures the airflow sensor to the bracket. Remove the fan and
sensor. See Figure 20.
In 1200W models, the blower is
mounted directly to a side bracket
by four (4) screws. Remove these
four (4) screws and lift the blower
out of the projector. (Figure 21.)
Before removing the airflow
sensor, measure how deep it is set
in the blower by measuring the
distance from the end of the sensor
to the mount. This will help you
when installing it into the new
blower.
When replacing the blower in
500W and 1000W models, mount
the blower to the bracket using the
top screw and the left side screw.
Then take the airflow sensor and
Figure 21. Removing the Lamp Blower in
1200W Models
mount it with the third screw to the
bracket and blower. Make sure the
airflow is mounted so that the hole in the one end is pointed directly into the fan
blades and there is a small gap between it and the hub of the blower. See also
Figure 4. Continue with repeating instructions in reverse.
When replacing the blower in 1200W models, repeat instructions in reverse. Make
sure the sensor position is correct – the open end of the sensor should be pointing
directly into the fan blades and the sensor should be at the correct depth as
measured in Step 8. See also Figure 5.
Fan, Optical Intake (Fan 1)
(45 minutes)
The optical intake fan is located near the center of the projector. It is mounted to
the inside of the duct, which is located between the ballast and the lens mount. To
remove and replace:
Figure 22. Location of Intake Fan
22
020-100012-01 Rev. 1 (04/07)
Parts and Module Replacement
Christie/Mirage/DLV/Matrix
1. Remove the top cover. See Top Cover for instructions.
2. Remove the front air filter. This allows you to view the fan through the
channel.
3. Remove the Panel Driver PCB. See TCPD/HDPD for instructions.
4. Remove the TIPM. See Card Cage (TIPM).
5. Remove the LVPS fan assembly and the LVPS.
NOTE: Do not remove LVPS brackets and cable connections SK5, SK6, 5V,
GND, and 3.3V. See LVPS for instructions.
6. Remove the LVPS duct/cover.
a) Remove the black cable guide through which the blue flex cables are
routed to the TCPD/HDPD – two (2) screws. (Figure 23.)
b) Remove the five (5) screws securing the duct/cover in place. Make sure the
harnessing clipped to the side of the duct is free before removing the duct.
Figure 23. Flex Cable Guide
7. Remove the TCPD/HDPD support arm that is secured on the ballast cover.
(Figure 24.)
8. Remove the intake duct by removing the two (2) top screws on the duct and the
single screw located near the fan, which is accessible through the small
opening at the top. (Figure 24.)
Figure 24. Accessing the Optical Intake Fan
020-100012-01 Rev. 1 (04/07)
23
Christie/Mirage/DLV/Matrix
Parts and Module Replacement
7. Disconnect the AC cable connection from the ballast. The cable can be
accessed through the channel between the ballast and the exhaust duct. (Figure
25.)
Figure 25. Disconnecting AC Cable from Ballast
8. With the fan disconnected and all other harnessing free, lift the exhaust duct
and fan assembly straight up and out of the projector.
9. Flip the exhaust duct over and remove the three (3) screws securing the fan.
(Figure 26.)
Figure 26. Remove the Optical Intake Fan
When replacing, repeat instructions in reverse making sure to route harnesses
back in the same manner. Refer to the Interconnect drawing at the end of this
booklet when re-connecting harnesses.
24
020-100012-01 Rev. 1 (04/07)
Parts and Module Replacement
Christie/Mirage/DLV/Matrix
Fans, TIPM (Fan 7 & Fan 8)
(14 minutes)
The TIPM fans are located in the rear left corner of the projector. They are
mounted to the underside of the TIPM baffle. To remove and replace:
1. Remove the top cover. See Top Cover for instructions.
2. Remove the three (3) screws
securing the TIPM cover/baffle
over the TIPM (Figure 27).
NOTE: Fans 7 and 8 are
mounted to the underside.
3. Flip the TIPM cover/baffle over
to access the fans underneath.
4. Disconnect Fan #7 (P31) and/or
Fan #8 (P34) from the Panel
Driver PCB.
Figure 27. Remove the TIPM Cover
5. Each fan is secured to the TIPM cover/baffle with two (2) screws. Remove the
fan you need to replace. (Figure 28.)
When replacing one of these fans,
repeat instructions in reverse.
NOTE: Fan 7 and Fan 8 are the
same type of fan. They are
interchangeable.
Figure 28. TIPM Fans
Feet
(10 minutes)
There are two (2) adjustable feet on the projector that can be replaced. To
remove and replace:
1. Remove the top cover. See Top Cover – you do not have to remove the white
protective covers located over the electronics. Removing the top cover gives
you better access to the feet.
2. Using a slotted, screw driver, remove the C-clip from each leg. (Figure 29.)
3. Unscrew the foot to remove from the projector.
When replacing, repeat instructions in reverse
020-100012-01 Rev. 1 (04/07)
25
Christie/Mirage/DLV/Matrix
Parts and Module Replacement
Figure 29. Removing C-Clip from Projecto r Feet
Flex/LVDS Cables
(5 minutes)
There are three pairs of Formatter/Satellite Board cables (Flex style for SXGA+ or
HD2 engines and LVDS for HD engines), which run from the DMDs on the light
engine to the TCPD/HDPD. The pair of blue DMD cables is routed through the
Black cable bracket on the TCPD/HDPD, while the green and red DMD cables run
in between the light engine and lens mount to the TCPD/HDPD. It is
recommended that the Flex cables be replaced whenever the light engine is
replaced.
To replace any of the Flex cables, do the following:
1. Remove the top cover. See Top Cover for
instructions.
2. Remove the light engine ONLY if the
Flex cables for the red DMD need to be
replaced. (60 minutes)
3. Flip the tab on the connector UP to
unlock and disconnect cable. (Figure 30.)
NOTE: The cable ends are routed
through a white support bracket at the
light engine. Use a small plastic tool to
reach in and unlock the connector, then
slide the cable out from the bracket.
Figure 30. Releasing Cables
When replacing a Flex style cables, insert it into the connector with the white stripe
facing the tabbed side of the connector that opens (see Figure 30.) Make sure to reroute the blue DMD cables through the bracket on the TCPD and the red and green
cables along the lens mount to the light engine. Allow the cables to loosely loop
around components avoiding sharp changes in direction, which could cause the
cables to kink.
26
020-100012-01 Rev. 1 (04/07)
Parts and Module Replacement
Christie/Mirage/DLV/Matrix
Figure 31. Flex Cable Orientation
To replace any of the LVDS cables, do the following:
1. Remove the top cover. See Top Cover for instructions.
2. Remove the light engine ONLY if the flex cables for the red DMD need to
be replaced. (60 minutes)
3. Note the P# and J# at the cable ends.
4. Grasp the entire wire set as close as possible to the LVDS cable connector
and pull up gently to disconnect the cables. (Figure 32.)
Figure 32. Properly Disconnecting LVDS Cable
When replacing an LVDS style cable, the connector is keyed to permit insertion
in only one direction (see Figure 32.) Make sure that you connect the proper
cable to the proper connector, i.e., P# matches J#. Make sure to re-route all
cables through the bracket on the HDPD. Allow the cables to loosely loop
around components avoiding sharp changes in direction, which could cause the
cables to kink.
Fold Mirror
Gloves
Required
(30 minutes)
The fold mirror is located behind the lens mount on the right hand side of the
projector. It is mounted to the optical tray behind the LiteLOC sensor assembly. To
remove and replace:
020-100012-01 Rev. 1 (04/07)
27
Christie/Mirage/DLV/Matrix
Parts and Module Replacement
1. Remove the top cover. See Top Cover for instructions.
2. Remove the light engine louver.
3. Remove the LiteLOC assembly from the optical mount. See LiteLOC
Assembly for removal instructions. (Figure 57. and Figure 58.)
4. Remove the lens dust cover (also called the lens bezel), by removing the five
(5) screws from the inside of the cover, the two (2) on the bottom cover and the
two (2) inside screws. See Figure 52.
5. Remove the four (4) screws securing the fold mirror in place. (Figure 33) TIP:
Use a short screwdriver, inserted through the opening in the lens mount, when
accessing the bottom screws on the fold mirror.
Figure 33. Removing the Fold Mirror
When replacing the fold mirror, repeat instructions in reverse. Make sure to mount
the fold mirror with the closest reflective side facing in toward the optical mount.
To determine which the closest reflective side is, place the tip of a pen to the mirror
face and look for a gap between it and the reflection. NO GAP indicates the closest
reflective side.
Integrator Rod Assembly
(20 minutes)
Gloves
Required
The integrator rod assembly is located inside the optics tray, which is next to the
lamp compartment. To remove and replace:
WARNING
Always wear clean, lint-free gloves when handling the
integrator assembly, otherwise damage can occur.
WARNING
Only handle the Cast aluminum part of the Integrator
Rod to avoid damage to the part.
To remove and replace:
1. Remove the top cover. See Top Cover on Page 9 for instructions.
2. Remove the rear air filter (four - #1 Philips screws – two top/two bottom)
as shown in Figure 33.
28
020-100012-01 Rev. 1 (04/07)
Parts and Module Replacement
Christie/Mirage/DLV/Matrix
Figure 34. Remove Rear Air Filter
3. Remove the lamp. Refer to Lamp Replacement for instructions and
important safety and warning guidelines.
Figure 35. Remove Lamp
4. Remove the cold mirror heat sink (2 - #2 Phillips screws) as shown in
Figure 36.
5. Remove the contrast aperture cover located between the cold mirror heat
sink and contrast aperture motor assembly (2 - #1 Phillips screws). See
Figure 36.
Figure 36. Remove Cold Mirror Heatsink and Aperture Cover
6. Remove the three (3) - #1 Phillips screws securing the black exhaust duct,
which is located just above the lamp compartment (Figure 37.). Remove
the duct from the projector.
020-100012-01 Rev. 1 (04/07)
29
Christie/Mirage/DLV/Matrix
Parts and Module Replacement
Figure 37. Remove Exhaust Duct
7. Remove the green DMD fan (in 1000W and 1200W models) – four (4) - #1
Phillips screws. See Fans, Green DMD.
8. Remove the lamp louver, located on the right side of the projector by the
optics tray (four screws).
9. Remove the four (4) - #1 Phillips screws retaining the integrator cover
(Figure 38.) and then remove the cover.
Figure 38. Remove Integrator Rod Cover
10. Unscrew and remove the thumbwheel/standoff retaining nut and spring
clip using a 7/32” socket (Figure 39.)
Figure 39. Remove Thumbwheel/Standoff
30
020-100012-01 Rev. 1 (04/07)
Parts and Module Replacement
Gloves
Required
Christie/Mirage/DLV/Matrix
11. Wearing clean gloves, remove the integrator assembly (integrator and
holder) as shown on Figure 40.
NOTE: Pay particular attention to avoid any contact with the glass rod
itself.
Figure 40. Remove Integrator Rod Assembly
To replace the integrator rod assembly:
WARNING
Integrator alignment must be performed by qualified
service technicians.
Gloves
Required
Use appropriate
precautions while projector
is powered on during
alignment.
1. Air clean the integrator rod assembly before placing it in the optics tray.
2. Carefully lower the integrator assembly into the optics tray with the polished
end of the integrator towards the UV filter (end closest to the lamp
compartment (Figure 40.)
NOTE: the threaded shaft of the assembly should fit into the small slot on the
optics tray.
3. Place the spring clip and standoff over the threaded shaft, but do not tighten.
4. Air clean the integrator rod assembly again.
5. Replace the optics cover on the tray, the green DMD fan, the contrast aperture
cover and the black exhaust duct – do not install the lamp louver or the top
cover. Make sure the DMD fan is connected to the Panel Driver PCB.
To align the integrator:
1. Power on the projector and display a white field test pattern.
2. Adjust the integrator by moving the thumb wheel/standoff up or down (see
Figure 40.) until it fills the DMD and all corners of the displayed image are
filled in (no shadowing) as shown in Figure 41.
020-100012-01 Rev. 1 (04/07)
31
Christie/Mirage/DLV/Matrix
Parts and Module Replacement
Figure 41. Adjust Integrator Rod (A)
Figure 42. Adjust Integrator Rod (B, SX+ pixels shown)
3. When the integrator is successfully aligned, tighten the thumb wheel/standoff
to a torque setting of 2 in-lb to “lock” it in place.
4. Adjust the set screws on the fold mirror using a hex driver to remove any
remaining shadows along the edges. (Figure 43).
Figure 43. Adjust Fold Mirror Set Screws
5. Verify the White Field Test Pattern for any blemishes. If blemishes exist, you
will have to restart the entire process with a new Integrator Rod Assembly.
32
020-100012-01 Rev. 1 (04/07)
Parts and Module Replacement
Christie/Mirage/DLV/Matrix
6. Once you are satisfied with the output, power the projector down and replace
the lamp louver and top cover.
Integrator Thumb
Wheel/Standoff f
Projectors manufactured after August 2005 use a standoff in place of the thumb
wheel. If the thumb wheel requires replacement, replace it with the standoff and
spring clip provided in the service kit. Tighten the standoff to 2 in-lb when
replacing, using an angled torque driver.
IR Sensor (Dual)
Front IR f (9 minutes)
The front IR sensor is located in the front, left hand corner of the projector. To
remove and replace:
1. Remove the top cover. See Top Cover for instructions.
2. Disconnect the harness from the front IR sensor (connects to the Panel Driver
at P38).
3. Remove the screws and standoffs from the PCB – two (2) screws. (Figure 44.)
4. Remove the sensor.
Figure 44. Remove the Front IR Sensor
Rear IR f (15 minutes)
The rear IR sensor is located in the rear, top left hand corner of the projector. To
remove and replace:
1. Remove the top cover. See Top Cover for instructions.
2. Remove the rear, built-in keypad plate – eight (8) screws.
3. Disconnect the harness from the rear IR sensor (connects to P35 on the
TCPD/HDPD).
4. Remove the two (2) screws securing the PCB in place. (Figure 45.)
5. Remove the sensor.
020-100012-01 Rev. 1 (04/07)
33
Christie/Mirage/DLV/Matrix
Parts and Module Replacement
Figure 45. Remove the Rear IR Sensor
Lamp
Gloves
Required
Use only the Christie approved Lamp and Filter Kit for your specific projector
model.
WARNING
Handle lamp with care.
High-pressure lamp may explode if not handled
properly or dropped. Wear protective clothing and
safety goggles when handling lamps.
Use only Christie approved lamps provided in the
Lamp and Filter Service Kits for your projector.
1. Press
to power down the projector. Wait at least five (5) minutes to allow
the internal cooling fans to stop before unplugging the projector. This wait
period is also required to allow the lamp to sufficiently cool before handling.
WARNING
Always power down and unplug the projector prior to
servicing.
Allow the lamp to cool before handling.
2. Using a screwdriver, loosen the two (2) screws from the lamp door located at
the back of the projector just below the input panel. (Figure 46.)
Figure 46. Remove Lamp Door
3. Pull (out) and turn the lamp lock lever a quarter turn counter clockwise to the
“unlock” position. (Figure 47.)
34
020-100012-01 Rev. 1 (04/07)
Parts and Module Replacement
Christie/Mirage/DLV/Matrix
Figure 47. Pull and Turn Lock Lever
4. Grasp the lamp by its housing only and pull it straight out (lamp slides
along guides) until it’s free. (Figure 48.) Discard the lamp using safe
disposal/recycling practices or contact Christie for a possible re-lamping
program.
WARNING
Wear protective gloves when removing lamp.
Figure 48. Lamp Handles
5. Align the new lamp with the top and bottom guides on the left side of the
lamp compartment. (Figure 49.) Slide the lamp all the way in – a slightly
harder push may be required right at the end to make sure it is fully seated
into the terminal block.
NOTE: The projector will not power up again if the lamp is not fully
connected to the terminal block.
Figure 49. Aligning Lamp with Guides
6. Pull (out) and turn the lamp lock lever (turned up in Step 3) a quarter turn
clockwise to “lock” the lamp in place.
NOTE: If you can’t turn the lamp lock into position it is likely the lamp is
not fully inserted. In this case, partially remove the lamp and try pushing it
back in again. Then, try switching the lock lever to the “lock” position.
7. Replace the lamp door and tighten the two (2) screws to secure.
020-100012-01 Rev. 1 (04/07)
35
Christie/Mirage/DLV/Matrix
Parts and Module Replacement
8. The next time the projector is powered up, enter the serial number of the
newly installed lamp. Access the Lamp menu and select “Change Lamp”.
Enter the serial number in the Lamp S/N text box using the number text
entry keys.
It is strongly recommended the projectors two air filters are replaced at
the same time a lamp is replaced, if not sooner. Refer to the instructions
provided in this booklet – see Air Filters.
Lamp Ballast
(63 minutes)
The lamp ballast is located on the left hand side of the projector. It is mounted
directly to the base of the projector.
The ballast is a critical component of the projector and varies between models make sure to use the lamp ballast specific for your projector model.
To remove and replace:
1.
2.
3.
4.
5.
6.
7.
8.
9.
10.
11.
12.
13.
14.
15.
36
020-100012-01 Rev. 1 (04/07)
Remove the top cover. See Top Cover for instructions.
Remove the lamp. See Lamp for instructions.
Remove the front air filter. See Air Filter – Front for instructions.
Remove the TCPD/HDPD PCB. See Three-Chip Panel Driver (TCPD)/High
Definition Panel Driver (HDPD).
Remove the TIPM card cage. See Card Cage (TIPM).
Remove the low voltage power supply (LVPS) only. Leave the LVPS bracket
and all cable connections intact.
Remove the LVPS duct/cover.
a) Remove the black cable guide through which the blue DMD flex cables are
routed – two (2) screws. (Figure 23.)
b) Remove the five (5) screws securing the duct/cover in place. Make sure the
harnessing clipped to the side of the duct is free before removing the duct.
Remove the light shield.
a) Remove three (3) screws securing the black exhaust duct near the lamp
door. (Figure 19.)
b) Remove two (2) screws securing the light shield to the bottom base plate.
Remove the four (4) screws securing the two (2) high voltage lead holders.
Remove the four (4) screws securing the lamp ballast to the base.
Remove the two (2) screws securing the ballast cover to the base.
Slightly raise the rear of the lamp ballast to access and remove the single screw
securing the ground lead and clamp.
Remove the ballast’s two (2) mounting brackets for use on the new ballast (two
screws each). (Figure 50.)
Remove the four (4) screws securing the ballast top cover.
Disconnect the ballast cable connection (J60). Route cable through the
grommet in the ballast cover to free. (Figure 50.)
Parts and Module Replacement
Christie/Mirage/DLV/Matrix
Figure 50. Disconnect Ballast Cable Connection
16. Remove the lamp ballast.
When replacing the ballast, make sure to reuse the two side brackets from the old
ballast on the new ballast. (Connect the anode lead to the lamp holder closest to the
ballast and the cathode lead to the lamp holder furthest from the ballast.
Lamp Contact PCB
(10 minutes)
For HD models only
The lamp contact PCB is located in the lamp compartment and is accessible by first
removing the lamp.
To remove and replace:
1.
2.
3.
4.
Remove the top cover. See Top Cover for instructions.
Remove the lamp. See Lamp for instructions and safety guidelines.
Look into the lamp compartment and locate the small lamp contact PCB.
Remove the two (2) screws securing the PCB. As you slowly pull it forward
you will notice the harness (connects to J120 on the HDPD). Disconnect the
harness from the PCB and remove.
Avoid disconnecting the harness from the HDPD as it will be difficult to
reconnect without having to disassemble the projector further.
When replacing, install the PCB in the correct orientation so the lamp memory
PCB on the lamp can connect to it when the lamp is inserted.
020-100012-01 Rev. 1 (04/07)
37
Christie/Mirage/DLV/Matrix
Parts and Module Replacement
Lamp Interlock Switch
(12 minutes)
The lamp interlock is located to the right of the lamp door and is mounted to the
projector’s base plate. To remove
and replace:
1. Remove the top cover. See Top
Cover for instructions.
2. Loosen the two (2) captive
screws securing the lamp door.
3. Remove the two (2) screws
securing the lamp interlock
assembly to the base. (Figure
51.) Remove the assembly.
4. Flip the assembly over and
remove the two (2) screws
securing the switch to its
housing.
Figure 51. Remove Lamp Interlock Switch
5. Disconnect cables (needle nosed pliers may be required).
Lens Mount
(23 minutes)
The lens mount is located directly behind the lens near the front of the projector. It
is a motorized component in all models. In most cases, the lens mount will require
adjustment (called bore-sight alignment) to ensure the displayed image is optimally
focused in all four corners and in the center.
1. Remove the projection lens, if installed. See Projection Lens.
2. Remove the top cover. See Top Cover for instructions.
3. Remove the lens dust cover (also called the lens bezel) by removing nine (9)
screws. Seven (7) are located along the inner rim where the cover meets the
lens mount and the other two (2) are located on the bottom cover. (Figure 52.)
Figure 52. Remove Lens Dust Cover
38
020-100012-01 Rev. 1 (04/07)
Parts and Module Replacement
Christie/Mirage/DLV/Matrix
4. Disconnect all the cable connections from the front edge of the TCPD/HDPD.
(Figure 53.)
NOTE: Leave the harnesses for horizontal and vertical offset connected – J19,
J20.
5. Undo the cable clip used to cleanly route harnesses to the TCPD/HDPD from
the angled bracket next to the lens mount. (Figure 53.)
Figure 53. Disconnect Lens Cables from TCPD
6. Remove the four (4) screws securing the lens mount to the light engine chassis.
NOTES: 1) There are two (2) sets of top screws and two (2) sets of bottom
screws. It is important to only remove the outside four (4) screws (shown as
“A” in Figure 54.). Three (3) of these screws are paired with springs at the
back. Grab hold of the loose spring before you remove the screw so it doesn’t
fall into the projector. 2) The four (4) inner set of screws are dedicated for
bore-sight alignment adjustments.
IMPORTANT! If you intend to install the same lens mount back into the
projector do not adjust these inner four (4) screws. If these screws are adjusted
in any way, bore-sight alignment will be off and you will have to re-adjust.
Figure 54. Remove the Lens Mount
020-100012-01 Rev. 1 (04/07)
39
Christie/Mirage/DLV/Matrix
Parts and Module Replacement
7. Carefully, remove the lens mount from the front of the projector and at the same
time, feed the lens mount harnesses through the bottom left corner of the lens
mount.
When replacing the lens mount, perform steps in reverse. It is important to route
the harnesses back through the opening in the bottom left corner of the lens mount.
If installing a new lens mount, Lens Bore-sight Alignment will be required. Refer
to the separate instruction sheet provided in the Lens Mount service kit.
Light Engine
Gloves
Required
(42 minutes)
The light engine is on the right hand side of the projector, behind the lens mount. It
is mounted to the optical mount. To safely remove the light engine, the entire
optical assembly (optical mount and light engine) must first be removed and then
separated.
1. Remove the top cover. See Top Cover for instructions.
2. Remove the TIPM card cage. See Card Cage (TIPM).
3. Remove the black exhaust duct secured to the light shield (three screws). See
Figure 19.
4. Disconnect the cables from the TCPD/HDPD. Then route the blue DMD
flex/LVDS cable through the small bracket on the board.
IMPORTANT – Do not pull on the flex cables when disconnecting to prevent
damage. Unlock the flex cable connector first (flip tab down) before removing
the cable. See Flex/LVDS Cables.
5. Disconnect the shutter, DMD fans (not on 500W models), DMD power cables,
the LiteLOC sensor and the contrast aperture from the Panel Driver PCB.
(Figure 23.)
6. Remove the lens dust cover (also called the lens bezel), by removing seven (7)
screws accessible from the inside and the two (2) screws located on the bottom
cover. (Figure 52.)
7. Disconnect all the lens cable connections from the front edge of the
TCPD/HDPD (Figure 53.) Unclip them from the wire clip so they are free to
remove when the optical assembly is removed in the next step.
8. Remove the optical assembly (includes optical mount and light engine) from
the projector by removing the following five (5) screws (Figure 55.):
•
•
•
•
Two (2) screws located on the fold mirror side (#1 & 2)
One (1) screw located behind the red DMD (#4)
NOTE: Requires a long screwdriver to access.
One (1) screw located on the side closest to the lamp compartment (#3)
One (1) screw securing the optical mount to the TCPD/HDPD mounting
frame (#5)
Lift the optical assembly out of the projector and set it aside in a clean area for
further disassembly.
40
020-100012-01 Rev. 1 (04/07)
Parts and Module Replacement
Christie/Mirage/DLV/Matrix
Figure 55. Remove Optical Assembly
9. Separate the light engine from the optical mount by removing the three (3)
screws identified by circles in Figure 55.
Handle the light engine by its bottom metal plate and one of the heat sinks.
DO NOT touch any of the boards when removing to prevent damage. See
Figure 56.
Figure 56. Remove Light Engine
When replacing, repeat instructions in reverse. When connecting the cables make
sure to route the blue cables back through the bracket on the TCPD/HDPD and the
red and green cables along the lens mount side. Refer to Flex/LVDS Cables for
more details.
NOTE: It is recommended you replace the Flex cables in your projector if you are
replacing the light engine with a new one
020-100012-01 Rev. 1 (04/07)
41
Christie/Mirage/DLV/Matrix
Parts and Module Replacement
LiteLOC Assembly
(9 minutes)
The LiteLOC assembly is located on the right hand side of the projector, behind the
lens mount. It is mounted to the optical mount just in front of the fold mirror. To
remove and replace:
1. Remove the top cover.
See Top Cover for
instructions.
2. Disconnect the
LiteLOC assembly
harness. (Figure 57.)
3. Remove the top two
(2) screws securing the
LiteLOC assembly to
the optical mount and
then loosen the bottom
center screw. (Figure
Figure 57. Remove LiteLOC Assembly
57.) Remove for
further disassembly.
4. If you want to replace the PCB only, remove the two (2) screws securing it to
the housing. (Figure 58.)
Figure 58. Remove LiteLOC PCB
Low Voltage Power Supply (LVPS)
(19 minutes)
The LVPS (Low Voltage Power Supply) is located below the Three-Chip Panel
Driver (TCPD)/High Definition Panel Driver (HDPD) and Ten-Bit Image
Processing Module (TIPM). To remove and replace the LVPS:
1. Remove the top cover. See Top Cover for instructions.
2. Disconnect harness connectors J36 and J52 from the TCPD/HDPD.
3. Remove the large, side plastic air duct that contains the main filter – three (3)
screws.
4. Remove the two (2) screws securing the LVPS cooling fan bracket. Lift the
assembly out and set it aside on top of the unit. (Figure 59.)
42
020-100012-01 Rev. 1 (04/07)
Parts and Module Replacement
Christie/Mirage/DLV/Matrix
5. Remove the two (2) screws securing the LVPS assembly to the chassis.
Figure 59. Remove LVPS Cooling Fan Bracket
6. Carefully, slide out the LVPS just enough to access the harness connection at
the back. Disconnect the AC cable connection. (Figure 60.)
Figure 60. Disconnect LVPS Cables
7. Remove the brackets secured to the LVPS – four (4) screws.
8. Remove the cable connection SK5, SK6, and the three (3) DC voltage
connections.
9. Remove the LVPS. (Figure 61.)
Figure 61. Remove LVPS
020-100012-01 Rev. 1 (04/07)
43
Christie/Mirage/DLV/Matrix
Parts and Module Replacement
When replacing, slide the LVPS under the plate at the back of the LVPS
compartment (Figure 62.), while routing the grey tubing along the side of the
module (Figure 63.). Make sure none of the harnesses from the TCPD/HDPD get
pinched when inserting the LVPS.
Figure 62. LVPS Compartment Back Plate
Figure 63. Inserting the LVPS
Main AC Line Filter
(12 minutes)
The line filter is located next to the interlock assembly at the back of the projector
and is mounted to the bottom chassis. To remove and replace:
1. Remove the top cover. See Top Cover for instructions.
2. Disconnect the three (3) main connections with needle nose pliers.
3. Remove the two (2) screws securing the line filter to the bottom chassis.
(Figure 64.)
4. Remove the line filter assembly. Then separate the line filter from its housing
(two screws).
44
020-100012-01 Rev. 1 (04/07)
Parts and Module Replacement
Christie/Mirage/DLV/Matrix
Figure 64. AC Line Filter
Replace a new line filter using the same instructions in reverse.
Optional Input Modules
(5 minutes)
Optional input modules, if installed, are located at Input 5 or Input 6 on the
projector’s input panel. To remove and replace:
1. Remove the two (2) screws from the optional module faceplate.
2. Grasping the module, pull it straight out of the projector.
Projection Lens
(5 minutes)
1. Place a lens cap over the end of the lens to protect it from being damaged.
2. Press and hold the “lens release” button located in the top right corner of the
lens panel. Grasping the lens barrel, turn it in a counter-clockwise direction
until it stops. Then pull it forward to remove it (disconnects from the connector
assembly).
When installing a projection lens, slide the new lens into the lens opening and
at the same time align the connector that is located on the side of the lens with
the connector assembly on the lens retaining ring. As the lens connects, realign it slightly until the tabs on the lens fit into the slots in the lens retaining
ring. With the lens fully inserted (and connected) turn it clockwise until the
lens release button “pops” indicating the lens is fully inserted.
020-100012-01 Rev. 1 (04/07)
45
Christie/Mirage/DLV/Matrix
Parts and Module Replacement
Figure 65. Projection Lens Components
Figure 66. Remove the Projection Lens
Shutter Assembly
(15 minutes)
The shutter is located between the light engine and the lens. To remove and
replace:
1. Remove the projection lens. See Projection Lens for instructions.
2. Remove the top cover. See Top Cover.
3. Disconnect the harness to the shutter by loosening the two cable clamps. Then
free the harness.
4. Remove the two (2) screws securing the shutter assembly (shutter bracket and
shutter) to the light engine. Pass the assembly through the opening in the lens
bezel to remove. (Figure 67.)
46
020-100012-01 Rev. 1 (04/07)
Parts and Module Replacement
Christie/Mirage/DLV/Matrix
Figure 67. Remove Shutter Assembly
5. Remove the two (2) screws securing the shutter assembly to the mounting
bracket. (Figure 68.)
Figure 68. Separate Shutter from Mounting Bracket
When replacing the shutter, repeat instructions in reverse.
Ten-Bit Image Processing Module (TIPM)
(20 minutes)
1.
2.
3.
4.
5.
Remove the TIPM card cage. See Card Cage (TIPM) for removal instructions.
Remove the faceplates from optional inputs. (Figure 69.)
Remove the hardware from all connectors on the input panel.
Remove four (4) screws from the input panel used to secure the card guides.
Remove the DSBP to free the TIPM. See Dual Slot Backplane Module
(DSBP).
020-100012-01 Rev. 1 (04/07)
47
Christie/Mirage/DLV/Matrix
Parts and Module Replacement
Figure 69. Projector Input Panel
Three Chip Panel Driver (TCPD)/High Definition Panel Driver (HDPD)
(19 minutes)
The TCPD/HDPD is located at the top of the projector (front) and is connected to
the TIPM module. It is the module where most harness connections are made. To
remove and replace:
1. Remove the top cover. See Top Cover for instructions.
2. Disconnect all cable connections to the TCPD/HDPD.
3. Remove the six (6) screws securing the TCPD/HDPD, then carefully pull and
lift the board to the front of the projector to remove.
Figure 70. Panel Driver Cable Connections
48
020-100012-01 Rev. 1 (04/07)
Parts and Module Replacement
Christie/Mirage/DLV/Matrix
NOTE: The appearance and cable connections of your projector may differ
slightly from those in Figure 70.
When replacing the TCPD/HDPD, use the appropriate Interconnections
drawing for your projector model to correctly reconnect harnesses. See Pages
51 or 52.
UV Filter
(5 minutes)
Gloves
Required
The UV filter is located and mounted to the end of the optical tray. It is accessible
through the lamp compartment. To remove and replace:
1. Remove the lamp. See Lamp Replacement.
2. Looking into the lamp compartment, locate the UV filter on the left hand side.
It is mounted to the optical tray with three (3) screws. Remove the screws and
the filter. (Figure 71.)
Figure 71. UV Filter
When replacing, locate the marking on the UV filter. It may be a dot on one side or
an arrow mark on the edge. This marking identifies the coated surface. The UV
filter must be installed with the coated surface facing out towards the lamp.
NOTE: The arrow on the edge of the filter points in the direction of the coated
surface. In this case, insert the filter so the arrow points to the inside of the lamp
compartment.
020-100012-01 Rev. 1 (04/07)
49
Parts and Module Replacement
Christie/Mirage/DLV/Matrix
Interconnection Drawing
020-100012-01 Rev. 1 (04/07)
51
Christie/Mirage/DLV/Matrix
Parts and Module Replacement
Interconnection Drawing
52
020-100012-01 Rev. 1 (04/07)