1
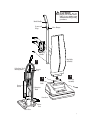
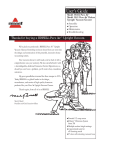
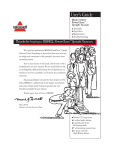
User’s Guide
Model 3512-5 Series
■ Assembly
■ Operation
■ Maintenance
■ Troubleshooting
Thanks for buying a BISSELL Upright Vacuum Cleaner.
We’re glad you purchased a BISSELL Upright Vacuum
Cleaner. Everything we know about floor care went into the
design and construction of this powerful, high-tech home
vacuuming system.
Your BISSELL Upright Vacuum Cleaner is well made,
and we back it with a comprehensive one-year warranty.
We also stand behind it with a knowledgeable, dedicated
Customer Service department, so, should you ever have a
problem, you’ll receive fast, considerate assistance.
My great-grandfather invented the floor sweeper in 1876.
Today, BISSELL is a global leader in the design, manufacture,
and service of high quality homecare products like your
BISSELL Upright Vacuum Cleaner.
Thanks again, from all of us at BISSELL.
Mark J. Bissell
President and Chief Executive Officer
Powerful 10 amp motor
Specialized on board tools to
meet all vacuuming needs
■ Multi-surface height settings
■ Wide beam headlight
■ Dual edge cleaning action
■
■
IMPORTANT SAFETY INSTRUCTIONS
When using an electrical appliance, basic
precautions should be observed, including
the following:
READ ALL INSTRUCTIONS BEFORE
USING YOUR UPRIGHT VACUUM.
Always connect to a polarized outlet (left slot is
wider than right). Unplug from outlet when not
in use and before conducting maintenance.
■
■
■
■
■
WARNING:
To reduce the risk of
fire, electric shock, or injury:
■
■
■
■
■
■
■
■
■
■
■
■
■
■
Do not modify the polarized plug to fit a
non-polarized outlet or extension cord.
Do not leave vacuum cleaner unattended when
it is plugged in.
Unplug from outlet when not in use and
before servicing.
Do not use outdoors or on wet surfaces.
Do not allow children to operate vacuum
cleaner or use as a toy.
Pay close attention when working around
children.
Do not use for any purpose other than described
in this User’s Guide.
Use only manufacturer’s recommended
attachments.
Do not use with damaged cord or plug.
If appliance is not working as it should, has
been dropped, damaged, left outdoors, or
dropped into water, return it to a service centre.
Do not pull or carry by cord, use cord as a handle,
close a door on cord, or pull cord around sharp
edges or corners. Do not run appliance over cord.
Keep cord away from heated surfaces.
Do not unplug by pulling on cord. To unplug,
grasp the plug, not the cord.
Do not handle vacuum cleaner or plug with
wet hands.
Do not put any object into openings. Do not use
with any opening blocked; keep openings free of
dust, lint, hair, and anything that may reduce
air flow.
■
■
■
■
■
■
■
Keep hair, loose clothing, fingers, and all parts
of body away from openings and moving parts.
Turn off all controls before plugging or
unplugging vacuum cleaner.
Use extra care when cleaning stairs.
Do not pick up flammable materials (lighter
fluid, gasoline, kerosene, etc.) or use in the
presence of explosive liquids or vapours.
Do not pick up toxic material (chlorine bleach,
ammonia, drain cleaner, etc.).
Do not use vacuum cleaner in an enclosed
space filled with vapours given off by oil base
paint, paint thinner, some moth proofing
substances, flammable dust, or other explosive
or toxic vapours.
Do not pick up hard or sharp objects such as
glass, nails, screws, coins, etc.
Do not pick up anything that is burning or
smoking, such as cigarettes, matches, or hot ashes.
Do not use without dust bag and/or filters in place.
Use only on dry, indoor surfaces.
Keep appliance on a level surface.
Do not carry the vacuum cleaner while it
is running.
SAVE THESE INSTRUCTIONS
FOR FUTURE USE.
THIS APPLIANCE HAS A
POLARIZED PLUG.
To reduce the risk of electric shock, this
appliance has a polarized plug (one blade is
wider than the other). This plug will fit in a
polarized outlet only one way. If the plug does
not fit fully in the outlet, reverse the plug. If it
still does not fit, contact a qualified electrician
to install a proper outlet. Do not change the
plug in any way.
This model is for household use only.
2
CAUTION:
Do not
plug in your vacuum cleaner
until you are familiar with
allinstructionsand operating
procedures.
Metal Handle
Powercord
Wrap
Hose Hanger
Carrying
Handle
Bag/Body
Assembly
7.
Tools
Upholstery Tool/
Dusting Brush
Crevice
Tool
1.
Connector
Tube
Power
Switch
2.
Bolt/Nut
Assembly
Extension
Wand
Powerfoot
Hose
Port
Back View
3
How to use this guide
This User’s Guide has been designed to help you
get the utmost satisfaction from your BISSELL®
Upright Vacuum Cleaner. You’ll find assembly and
operating instructions, safety precautions, as well as
maintenance and troubleshooting instructions.
Please read this Guide thoroughly before assembling
your vacuum cleaner.
Pay particular attention to the assembly diagram,
assembly instructions, and part names.
Locate and organize all parts before assembly.
Familiarize yourself with the parts and where they go.
Following this User’s Guide will greatly enhance your
ability to get the most performance from your
BISSELL® Upright for many years.
How to put it together
WARNING:
Plastic
film can be dangerous. To
avoid danger of suffocation,
keep away from babies and
children.
The only tool you’ll need to assemble
your vacuum cleaner is a Phillips head
screwdriver.
Attach Vacuum Body to Powerfoot
1.
Place Powerfoot on floor with Connector Tube in vertical
position. Place Bag/Body Assembly over Connector Tube
as shown. Stand behind cleaner and push down SLIGHTLY
on top of Bag/ Body Assembly until you hear a click.
2.
Push long bolt through bottom hole on FRONT of Connector
Tube. Place nut over end of bolt and hold in place while
tightening bolt with a phillips head
screwdriver.
NOTE: If bolt will not go through hole easily, repeat step 1.
3.
Place Powerfoot and
Bag/Body Assembly
on floor or other
stable surface. Place
Metal Handle into recess on
back of Bag/Body Assembly
as shown.
4.
Align Carrying Handle over screw holes in Bag/Body Assembly.
NOTE: Lower Cord Wrap must point toward BOTTOM of
cleaner.
5.
Install four (4) screws through
Carrying Handle and one (1) screw
through Metal Handle as shown.
Tighten all the screws. Do not
overtighten - product damage
may result.
6.
Attach Hose and
Tools. To attach
Hose with Wand,
open Tool Door
on top cover.
Insert end of Hose
into Hose Port and
fit tabs into notches.
Turn clockwise to
lock. Press Hose into
Hose Clip. Route
Hose over top of
cleaner, through
Hose Hanger on front of
Handle. Place end of Wand
over X-shaped extension and
push down to seat. Snap top
of Wand into Hose Clip.
7.
Attach Tools to caddy in their positions
as shown.
4
Index
8. Assemble Dust Bag
Unzip Cloth Bag.
Fold down top of new Dust Bag.
Grasp Bag Collar and push Collar firmly
over raised rib on Connector Tube.
Pushing too hard on the Collar may rip the
Dust Bag.
Tuck remainder of Dust Bag completely into
vacuum cleaner.
Lay it flat, top to bottom, without bunching.
Zip Cloth Bag closed.
Safety instructions . . . . . . . . . .2
Product view . . . . . . . . . . . . . . .3
How to put it together . . . . . .4-5
How to use your
upright vacuum cleaner . . . . . .5
Index . . . . . . . . . . . . . . . . . . . . .5
Using special tools . . . . . . . . . .6
Assembly is now complete.
Routine maintenance . . . . . .7-8
Troubleshooting . . . . . . . . . . . .9
Replacement parts . . . . . . . . . .9
How to use your BISSELL
Upright Vacuum Cleaner
®
Tip:
Before cleaning
under low
furniture, check
area first for
objects that
might harm the
unit or block the
Vacuum Hose.
Warranty . . . . . . . . . . . . . . . . .10
Customer Service . . . . . . . . . .10
Handle Positions
Press the Handle Release Pedal with
your foot to place your Upright into
one of four cleaning positions.
1. Upright - For storage and above
floor cleaning with special tools.
2. Normal Cleaning - Use for most
household floor cleaning tasks.
3. Threshold Stop - Use for going
over thresholds or for vacuuming
over edges of area rugs.
4. Low Cleaning - Use for vacuuming
under low furniture such as tables,
chairs and beds.
1
2
3
4
Powerfoot Height Adjustment
The Powerfoot/Rotating Floor Brush on your
BISSELL® Upright Vacuum can be adjusted to
clean several floor surfaces.
NOTE: For optimal cleaning performance, adjust
to the lowest practical setting. If your cleaner is
difficult to push, adjust to the next higher setting.
1. Place Handle in Upright Position.
2. Slide Floor Surface Selector to desired setting.
■ HI - For plush pile or shag carpet.
■ LO - For short pile carpets and bare floors.
5
Special Tools
Your Upright Vacuum Cleaner is not only a powerful carpet and
rug vacuum cleaner, it’s also a versatile above floor vacuum
cleaner when you select one of the four special tools stored on
the Tool Caddy.
Tip:
Hair, string and
small objects
can block the
Vacuum Hose or
Tools. Check
them occasionally
for obstructions.
See Troubleshooting Guide
for instructions.
WARNING:
The Rotating
Floor Brush continues to rotate
while tools are in use. To reduce
the risk of injury from moving
parts, always move the cleaner
with the carry handles at the
front and back of the cleaner.
Always place vacuum cleaner
on floor with Handle in Upright
position when using tools.
Never place your fingers under
the cleaner when it is running.
Never place Powerfoot on
furniture, or place vacuum
cleaner close enough to objects
to pull them into rotating brush.
6
1. Raise Handle to Upright Position.
2. Make sure Vacuum Hose is securely inserted in Hose Port
(turn clockwise to lock).
3. Slide Cleaning Selector to Tool setting to divert all suction
to Hose.
4. Attach tools by firmly pushing/twisting onto Vacuum Hose
or Wand.
■ Upholstery Tool/Dusting Brush - For dusting
surfaces such as table tops, mantles,
lamp shades, drapes, woodwork, etc.
Slide Dusting Brush off for upholstery
or stairs.
■ Extension WandFor extra length
or reach. Use with one
of three other tools.
■ Crevice tool - For tight,
narrow spaces.
To resume normal floor vacuuming:
1. Slide Cleaning Selector to Floor to divert the suction back to
the Floor Brush.
2. Vacuum Hose may be left in place. For maximum cleaning
performance, remove Vacuum Hose from Hose Port and close
Tool Door.
Power Cord Storage
When you are done using your BISSELL® Upright Vacuum
Cleaner, return it to the Upright position and store the Power Cord.
1. Turn vacuum cleaner off.
2. Unplug Power Cord by grasping the polarized plug (NOT the
cord) and disconnect from outlet.
3. Loop Power Cord around Cord Wraps on back of vacuum
cleaner.
4. Clip molded plug to Power Cord to secure.
Routine maintenance
All Models
To maintain maximum performance from your BISSELL®
Upright Vacuum Cleaner, perform these simple maintenance
checks at least once a month.
Replace Dust Bag
To maintain peak vacuum efficiency, you should check the Dust
Bag weekly, and replace it when it is no more than half full.
Never reuse a paper Dust Bag.
1. Unplug cleaner from electrical outlet.
2. Unzip Cloth Bag.
3. Grasp paper Dust Bag and Bag Collar, pull used Dust Bag
from Connector Tube, and dispose of Dust Bag.
4. Fold down top of new Dust Bag.
5. Grasp Bag Collar and push Collar firmly over raised rib on
Connector Tube. Pushing too hard on the Collar may rip
the Dust Bag.
6. Tuck remainder of Dust Bag completely into vacuum
cleaner. Lay it flat, top to bottom, without bunching.
7. Zip Cloth Bag closed.
WARNING:
To
reduce the risk of electric
shock, turn Power Switch
OFF and disconnect
polarized plug from
electrical outlet before
performing maintenance or
troubleshooting checks.
Replacement Bags
Use only BISSELL® Style 2 Dust Bags in your
Upright Vacuum Cleaner. You may purchase these
bags from your retailer, or to place an order
using Visa or MasterCard, cheque or money order
call:
BISSELL Customer Service
1-800-263-2535
Monday - Friday
8:00 A.M. - 4:30 P.M. (E.S.T.)
E-mail us at: [email protected]
Or visit our Web Site @ www.bissell.com
Check Rotating Brush and Drive Belt
You should check your vacuum cleaner’s Drive Belt and
Rotating Floor Brush regularly for wear or damage. You
should also clean the brush and brush ends of string, hair,
and carpet fibers. These can wrap around the brush and
hamper its ability to effectively clean your carpet.
1. Unplug unit from electrical outlet.
2. Place Handle in Low Cleaning position and turn vacuum
cleaner face down on floor.
3. Locate two Lock Tabs adjacent to forward wheels on
removable Brush Cover.
4. Using your fingers, press outward on Lock Tabs to remove
Brush Cover.
5. Grasp Rotating Floor Brush at both ends and lift up.
6. Clean strings, hair and other debris from Rotating Floor
Brush, paying particular attention to brush ends.
7. Clean strings, hair and other debris from Motor Pulley and
Drive Belt areas.
8. Check Drive Belt carefully for wear, cuts or stressed areas.
Inspect entire belt by rolling floor brush with the palm of
your hand several times in the direction of the Motor Pulley.
9. Check Air Passageway for obstructions. Remove debris from
this area.
WARNING:
To
reduce the risk of injury
from moving parts, turn
off vacuum cleaner and
disconnect Power Plug
from electrical outlet.
Lock Tabs
Tip:
This is a good
time to clean
the Slide Track
area of hair,
string, dirt,
or other
obstructions.
7
Replace Drive Belt
Replacement Belts
Use only BISSELL® Replacement Belt Style 2
(#3215P) in your Upright Vacuum Cleaner. You
may purchase these belts from your retailer.
To locate a retailer near you, or to place an order
using Visa, MasterCard, cheque or money order
call:
BISSELL Customer Service
1-800-263-2535
Monday - Friday
8:00 A.M. - 4:30 P.M. (E.S.T.)
E-mail us at: [email protected]
Or visit our Web Site @ www.bissell.com
1. With Rotating Floor Brush removed from vacuum cleaner,
stretch old belt to clear Motor Pulley, and remove belt.
Discard.
2. Place new Drive Belt over Motor Pulley and stretch other
end over crown of Rotating Floor Brush.
3. Place belt end of Rotating Floor Brush into its slot and hold
it in place with your left hand, while slowly pulling opposite
end of brush down into its slot with your right hand.
4. Turn Rotating Brush by hand several times in direction of
Motor Pulley. If properly installed, Drive Belt will centre itself
on Rotating Brush crown.
5. Position Brush Cover Tabs in the four Brush Cover slots
along front of Powerfoot, and snap Brush Cover into place.
Replace Lightbulb
Replacement Bulb
Use only BISSELL Replacement Bulb (555-9069)
in your Upright Vacuum Cleaner. You may
purchase theses bulbs by calling
®
BISSELL Customer Service
1-800-263-2535
Monday - Friday
8:00 A.M. - 4:30 P.M. (E.S.T.)
E-mail us at: [email protected]
Or visit our Web Site @ www.bissell.com
8
1. Unplug unit from electrical outlet.
2. Remove Cleaning Selector and Floor Surface Selector
from Top Cover by grasping Selectors firmly and pulling
straight up.
3. Place Handle in Upright position and turn vacuum cleaner
face down on floor.
4. Insert a blade type screwdriver into four slots on underside
of Powerfoot and pry outward on sides of Top Cover to
unsnap internal latches.
5. Return vacuum cleaner to Upright position on floor and
push Handle Release Pedal with foot to lower the Handle
to Low Cleaning Position.
6. Lift Top cover from Powerfoot (If Vacuum Hose is attached
to Hose Port, remove by turning counterclockwise and
lifting up).
7. Gently work bulb from side to side while pulling up. Do
not squeeze bulb too firmly with fingers or it may break
and injure you.
8. Insert new bulb, pushing gently until it is firmly seated
in socket.
9. Realign Top Cover to Powerfoot, making sure opening
under Tool Door fits over Hose Port. Press Top Cover
downward until you hear all four internal latches snap
into place.
Test Top Cover for tightness by pulling up on it.
10. Replace Cleaning Selector and Floor Surface Selector by
pushing them on firmly.
Troubleshooting
Vacuum cleaner won’t run.
Possible Causes
Remedies
Vacuum cleaner is not plugged in
Household fuse/breaker
Check electrical plug
Check/replace fuse - Reset breaker
Call BISSELL Customer Service
Vacuum cleaner won’t pick up dirt.
Possible Causes
WARNING:
To
reduce the risk of injury
from moving parts and/
or electrical shock, turn
Power Switch OFF and
disconnect polarized plug
from electrical outlet
before performing
troubleshooting checks.
Remedies
Incorrect setting
Height adjustment too high
Paper Dust Bag is full
Rotating brush drive belt broken
Drive Belt stretched/
off Motor Pulley Shaft
Rotating Floor Brush bristles worn
Rotating Floor Brush jammed
Move Cleaning Selector to Floor setting
Reset Height Adjustment
Replace with new bag
Replace Drive Belt
Reposition belt/clean brush/belt areas
Replace brush
Remove brush and clean debris from
brush ends
Remove Brush Cover.
Clean debris from passageway
Remove bolt and nut from Vacuum Body.
Use flat blade screwdriver to release
locking tab on Powerfoot from Vacuum
Body. Remove Vacuum Body and clean
obstructions from inside Powerfoot and
Vacuum Body bottom. Reassemble
following instructions on Page 4
Air Passageway clogged
Dirt Tube is clogged
Cleaning Selector won’t slide.
Possible Causes
Remedies
Dirt clogging slide track
Tools won’t pick up dirt.
Remove Brush Cover and clean slide area
Possible Causes
Remedies
Incorrect Setting
Vacuum Hose, Wands
or Tools clogged
Move Cleaning Selector to Tools setting
Visually check for objects blocking
suction path and remove carefully
Vacuum cleaner is difficult to push.
Possible Causes
Remedies
Incorrect Floor Surface Selector setting Move Selector to next highest setting
Replacement parts - BISSELL Upright Vacuum System
®
Item Part No. Part Name
1
210-9103
Crevice Tool
1
2
3215P
Drive Belt (2-Pack)
3
32013
Style 2 Microfiltration Dust Bag (3-Pack)
4
3218P
Style 2 Dust Bag (3-Pack)
5
210-9104
Upholstery Tool/Dusting Brush
6
210-9102
Extension Wand
7
210-5005
6’ Flex Hose
8
555-9069
Headlight Bulb
3/4
If suggestions for this or any function of your Upright
Vacuum Cleaner do not correct the problem, call:
2
7
5
BISSELL Customer Service
1-800-263-2535
Monday - Friday
8:00 A.M. - 4:30 P.M. (E.S.T.)
8
6
9
About your warranty
If you need additional instruction regarding this warranty or have questions regarding what it may cover, please contact
BISSELL Customer Service by e-mail, telephone, or regular mail as described below.
Limited One Year Warranty
Subject to the *EXCEPTIONS AND EXCLUSIONS identified below, upon receipt of the product BISSELL Ltd. will repair or replace
(with new or remanufactured components or products), at BISSELL’s option, free of charge from the date of purchase by the original
purchaser, for one year any defective or malfunctioning part.
See information below on "If your BISSELL product should require service".
This warranty applies to product used for personal, and not commercial or rental service. This warranty does not apply to fans or
routine maintenance components such as filters, bags, belts, or brushes. Damage or malfunction caused by negligence, abuse, or use
not in accordance with the User's Guide is not covered.
If your BISSELL product should require service:
Call BISSELL Customer Service at the number below or www.bissell.com to locate a BISSELL Authorized Service Centre in your
area. If there are no authorized BISSELL Service Centres in your area, a BISSELL Representative at
[email protected] or at the phone number below will issue you a Return Authorization Number and a
pre-paid mailing label to return the unit to BISSELL for warranty repair.
-- The machine should be returned with a photocopy of your proof of purchase. (Your dated sales receipt is your warranty - do not
send original.) If you need information about repairs or replacement parts, or if you have questions about your warranty,
e-mail: [email protected].
Or call:
BISSELL Customer Service
1-800-263-2535
Monday - Friday 8 a.m. - 4:30 p.m. (E.S.T.)
Or write:
BISSELL Ltd.,
ATTN: Customer Service,
Box 1003,
Niagara Falls, Ontario, L2E 6W2
*EXCEPTIONS AND EXCLUSIONS FROM THE TERMS OF THE LIMITED WARRANTY.
BISSELL LTD. IS NOT LIABLE FOR INCIDENTAL OR CONSEQUENTIAL DAMAGES OF ANY NATURE ASSOCIATED WITH THE USE OF THIS PRODUCT.
BISSELL’S LIABILITY WILL NOT EXCEED THE PURCHASE PRICE OF THE PRODUCT.
THIS WARRANTY IS EXCLUSIVE AND IN LIEU OF ANY OTHER WARRANTIES EITHER ORAL OR WRITTEN. ANY IMPLIED WARRANTIES WHICH MAY ARISE BY OPERATION OF LAW, INCLUDING THE IMPLIED WARRANTIES OF MERCHANTABILITY AND FITNESS FOR A PARTICULAR PURPOSE, ARE LIMITED TO THE ONE YEAR
DURATION FROM THE DATE OF PURCHASE AS DESCRIBED ABOVE.
BISSELL Customer Service
For information about repairs or replacement parts, or questions about your warranty, call:
BISSELL Customer Service
E-mail us at: [email protected]
1-800-263-2535
Monday - Friday
8:00 A.M. - 4:30 P.M. (E.S.T.)
Or write:
BISSELL Ltd.
ATTN: Customer Service
Box 1003
Niagara Falls, Ont. L2E 6W2
Visit our Web Site @ www.bissell.com
When contacting BISSELL, have model number of unit available.
Please record your Model Number: ___________________
Please record your Purchase Date: ___________________
10
NOTE: Please keep your original sales receipt. It is your warranty.
Please do not return this product to the store.
©2001 BISSELL Homecare Inc.
BISSELL Ltd.
Niagara Falls, Ont., L2E 6W2
All rights reserved. Printed in U.S.A.
Part Number 310-5820
Visit our Web Site at:
www.bissell.com