1
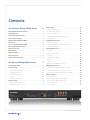
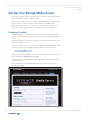
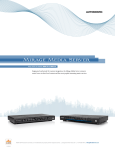
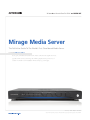
Mirage Media Server
The Definitive Guide To The World’s First Cloud-based Media Server
For models MMS·5A + MMS·2
Store, sync, schedule and stream entire music collections alongside the most
popular online services. Converge the infinite playlist with your choice of
control in a multi-room installation limited only by your design.
©2006–2012 Autonomic Controls, Inc. All trademarks are property of their respective owners. R042612
Contents
Get To Know Mirage Media Server
3
Audio Settings . . . . . . . . . . . . . . . . . . . . . . . . . . . . . . . . . . . . . . . . . . 10
Fixed vs. Variable Gain . . . . . . . . . . . . . . . . . . . . . . . . . . . . . . . . . . 10
Enter Audiophile Grade Performance ����������������������������������������������� 3
Disabling Unused Outputs . . . . . . . . . . . . . . . . . . . . . . . . . . . . . . 10
Streaming Services . . . . . . . . . . . . . . . . . . . . . . . . . . . . . . . . . . . . . . . . 3
Renaming Outputs . . . . . . . . . . . . . . . . . . . . . . . . . . . . . . . . . . . . . 10
Cloud Synchronization Features��������������������������������������������������������� 3
Bit Depth And Sample Rate Resolution . . . . . . . . . . . . . . . . . . . . 10
Control System Integration����������������������������������������������������������������� 4
Using AirPlay . . . . . . . . . . . . . . . . . . . . . . . . . . . . . . . . . . . . . . . . . 10
Things You Can Do With Your MMS��������������������������������������������������� 4
Configuring Cloud Services��������������������������������������������������������������� 11
Connections . . . . . . . . . . . . . . . . . . . . . . . . . . . . . . . . . . . . . . . . . . . . . 5
Amazon Cloud Drive . . . . . . . . . . . . . . . . . . . . . . . . . . . . . . . . . . . 11
Accessories Included With The MMS������������������������������������������������� 5
Synchronizing Multiple Mirage Media Servers . . . . . . . . . . . . . . 11
What You’ll Need To Get Started������������������������������������������������������� 5
iCloud Synchronization . . . . . . . . . . . . . . . . . . . . . . . . . . . . . . . . . 11
Network Connection��������������������������������������������������������������������������� 5
Streaming Music Services����������������������������������������������������������������� 12
Rack Mounting . . . . . . . . . . . . . . . . . . . . . . . . . . . . . . . . . . . . . . . . . . . 6
Last.fm . . . . . . . . . . . . . . . . . . . . . . . . . . . . . . . . . . . . . . . . . . . . . . 12
Audio Connections . . . . . . . . . . . . . . . . . . . . . . . . . . . . . . . . . . . . . . . . 6
Pandora Internet Radio . . . . . . . . . . . . . . . . . . . . . . . . . . . . . . . . . 12
Video Connections . . . . . . . . . . . . . . . . . . . . . . . . . . . . . . . . . . . . . . . . 6
Rhapsody . . . . . . . . . . . . . . . . . . . . . . . . . . . . . . . . . . . . . . . . . . . . 13
Control System Connections��������������������������������������������������������������� 6
SiriusXM Internet Radio . . . . . . . . . . . . . . . . . . . . . . . . . . . . . . . . 13
Spotify . . . . . . . . . . . . . . . . . . . . . . . . . . . . . . . . . . . . . . . . . . . . . . 13
Set Up Your Mirage Media Server
7
TuneIn . . . . . . . . . . . . . . . . . . . . . . . . . . . . . . . . . . . . . . . . . . . . . . . 14
Configuring The MMS������������������������������������������������������������������������� 7
Adding Digital Content��������������������������������������������������������������������� 14
General Settings . . . . . . . . . . . . . . . . . . . . . . . . . . . . . . . . . . . . . . . . . 8
Synchronizing Files And Playlists To The MMS . . . . . . . . . . . . . . . 14
Server Network Identification . . . . . . . . . . . . . . . . . . . . . . . . . . . . 8
Streaming Audio Content From Your Network . . . . . . . . . . . . . . 15
Setting Date And Time . . . . . . . . . . . . . . . . . . . . . . . . . . . . . . . . . . 8
Copying Music And Photos Directly To Your MMS . . . . . . . . . . . 15
Wired Ethernet Settings . . . . . . . . . . . . . . . . . . . . . . . . . . . . . . . . . 8
Firmware Updates . . . . . . . . . . . . . . . . . . . . . . . . . . . . . . . . . . . . . . . 16
Logging . . . . . . . . . . . . . . . . . . . . . . . . . . . . . . . . . . . . . . . . . . . . . . 8
Firmware Update . . . . . . . . . . . . . . . . . . . . . . . . . . . . . . . . . . . . . . 16
Adding Local AM/FM Radio Stations . . . . . . . . . . . . . . . . . . . . . . 14
Restarting Your Server . . . . . . . . . . . . . . . . . . . . . . . . . . . . . . . . . . . 8
Other Software: Mirage Media Player . . . . . . . . . . . . . . . . . . . . . 16
Display Settings . . . . . . . . . . . . . . . . . . . . . . . . . . . . . . . . . . . . . . . . . 9
Other Software: Mirage Media Sync . . . . . . . . . . . . . . . . . . . . . . 16
On-screen Display Resolution . . . . . . . . . . . . . . . . . . . . . . . . . . . . . 9
License Information . . . . . . . . . . . . . . . . . . . . . . . . . . . . . . . . . . . . 16
Configuring The Screen Saver . . . . . . . . . . . . . . . . . . . . . . . . . . . . . 9
Remote Support . . . . . . . . . . . . . . . . . . . . . . . . . . . . . . . . . . . . . . . 16
Get To Know Mirage Media Server
3 of 17
Get To Know Mirage Media Server
Enter Audiophile Grade Performance
The Mirage Media Server (MMS) product line offers both state-of-the-art, high performance
audio and the unparalleled convenience of accessing all your local audio content and streaming
Internet services with a single device.
You can play multiple independent streams of audio (six on the MMS·5A, or two on the
MMS·2) using analog, digital, or pristine jitter-free, bit perfect high definition USB audio
(HD-USB on MMS·5A only) for audiophile DACs and high-end amplifiers that have digital USB
inputs.
The MMS offers advanced playback capabilities of nearly every available audio format and
will up-convert or pass through full 192kHz/24-bit (MMS·5A), and 96 kHz/24 bit (MMS·2)
sampling rates. (See Appendix A, Specifications for more details).
The external power supply provides for virtually silent operation, and customers can opt for
the solid-state storage option for completely silent operation and the ultimate in reliability and
performance (SSD option available only on the MMS·5A).
Your MMS has one video output to display Now Playing information for any of the audio
outputs, and can display photo slideshows of pictures stored on the server.
Streaming Services
The MMS provides access to several online music services through your Internet connection,
such as PANDORA® Internet Radio, Rhapsody®, Last.fm, SiriusXM Internet Radio, Spotify and
TuneIn.
Autonomic is constantly working with more content service providers to bring you even more
of the best Internet-delivered media in future firmware updates.
To keep your library organized, your MMS comes preloaded with software to install onto your
Mac or PC that will automatically keep your music files and playlists synchronized with your
server. This software can be downloaded from your server onto your computers once your
MMS is setup on your home network. Whenever you purchase, download or copy new content
onto your computer, the Mirage Media Sync software will automatically catalog it and send it to
your MMS server for on-demand playback.
You can also configure the MMS to stream content from your NAS device or other shared
network storage for unlimited storage capabilities.
Cloud Synchronization Features
For the ultimate in hands-off library management, the MMS can synchronize with Amazon’s
Cloud Drive™ or Apple iCloud™ (through iTunes). This unique feature provides you with
several distinct benefits:
1. All of your content can be bi-directionally synchronized with MMS servers at multiple locations
simply by entering the same credentials at each site.
2. All of your content is securely backed up offsite on Amazon’s or Apple’s servers.
Get To Know Mirage Media Server
4 of 17
3. You can access your entire library wherever life takes you, using a number of different applications available on Android and Apple iOS mobile devices or with your laptop.
4. You can configure your MMS so that any time you purchase new music either at home or
on-the-go with your mobile device, it is automatically added to your home library (or other
connected locations).
Control System Integration
The Mirage Media Server is designed and engineered to work seamlessly in an automated home
environment. Autonomic works closely with all of the leading control system manufacturers
and their dealers to ensure the smoothest operation and access to all of the features of the MMS
on control system touchpanels or automation applications. Autonomic has partnered with
Crestron, AMX, URC, Control4 and RTI to provides modules, UI templates and other tools you
need for a successful integration.
Things You Can Do With Your MMS
•
Listen to six (MMS·5A) or two (MMS·2) discreet audio channels in different parts of your
home.
•
Play back audiophile grade uncompressed, lossless 24-bit/192kHz or 24-bit/96kHz audio files
through analog, digital coax or USB outputs.
•
Browse music and control playback from around your home using a web browser, your
iPhone/iPad, or a professionally installed control system such as Crestron, AMX, RTI or URC.
•
Access an online library of tens of thousands of albums with Rhapsody or Spotify.
•
Listen to SiriusXM online without having to install an antenna.
•
Create custom radio stations that play only music you love using Pandora or Last.fm Internet
radio.
•
Browse thousands of AM and FM radio broadcasts around the world using TuneIn Internet
Radio service.
•
Synchronize with the Amazon Cloud Drive or Apple iCloud (through the Mirage Media Sync
and iTunes) to access your media anywhere in the world using a web browser, iPhone/iPad,
Android, or Windows Mobile devices.
•
Synchronize the content of multiple Mirage Media Servers located anywhere on the planet.
•
Play content from any iOS device through your home audio system using the built in AirPlay
receiver.
•
Watch a slideshow of your favorite photos on a remote display along side information about
the music that’s playing.
Get To Know Mirage Media Server
5 of 17
Connections
Your server has several ports on the back for connecting your audio, networking, and control
system gear. (Refer to the diagram on the Quick Start Guide included with your server for
connection recommendations.)
•
HDMI and DVI video ports for connecting to a television or other display
•
Four (MMS·5A) or one (MMS·2) analog stereo audio outputs
•
One coaxial (MMS·5A) or Toslink (MMS·2) digital audio connection
•
One jitter-free audiophile USB audio output (MMS·5A only)
•
One Ethernet 10/100/1000 Base-T Gigabit Ethernet Local Area Network (LAN) port for
broadband media services and control system interface
•
Multiple USB and eSATA ports for storage expansion (available in a future firmware release)
The MMS front panel has a power button and a power LED. The MMS·5A also has a blue accent
light that can be turned off if desired using a toggle switch on the back panel.
NOTE
It’s important to make all necessary connections to the Mirage Media Server before turning it
on for the first time.
Certain aspects of the configuration are automatically set the first time you power on the
device based on the connections that are present. While these can always be changed later, your
installation will go smoother if you make all the connections first.
Accessories Included With The MMS
•
AC power cable and power supply
•
High quality analog audio cables
•
Digital coaxial interconnect (MMS·5A) or fiber optic Toslink digital audio cable (MMS·2)
•
Four removable feet (for shelf-mount installations)
•
Removable rack mount ears (MMS·5A)
•
IR remote control for the on-screen display and media browsing (MMS·5A)
What You’ll Need To Get Started
•
A network router or switch connected to the Internet with an available Ethernet port.
•
A standard (straight-through) Category 5 or Category 6 Ethernet cable.
•
A computer (Windows or Mac) connected to the same network as the MMS.
Network Connection
Using a standard (straight through) Category 5 or Category 6 Ethernet cable, connect the
Ethernet port on the MMS to an available port on your network router or switch.
Get To Know Mirage Media Server
6 of 17
Rack Mounting
The MMS·5A comes configured for a shelf mount installation. For rack mount installs, remove
the four feet from the bottom of the chassis and install the two supplied rack mount ears to the
front sides of the MMS·5A.
The MMS·2 is designed for shelf-mount installations. However, should you wish to rack mount
the unit, Middle Atlantic manufactures a rack mount shelf and faceplate customized to fit the
MMS·2.
Audio Connections
Using the supplied audio cables, connect 1-4 of the analog audio outputs to source inputs on
your amplifier or receiver. You may also connect the digital audio output and/or the USB audio
cable to a compatible amplifier. The digital output on the MMS·5A supports 24-bit/192kHz
digital audio, and the MMS·2 supports 24-bit/96 kHz audio.
NOTE
The MMS·2 utilizes jack detection technology to sense which audio outputs are connected. You
will not be able to control or access any analog audio channel that does not have the adapter
plugged in.
Video Connections
You can use the MMS On-screen Display to browse content, view photo slideshows and see
now-playing information about your audio program, you may connect the DVI or HDMI video
outputs to a compatible display device.
NOTE
Some HDMI receivers and switches can have compatibility issues with the MMS. If you receive
an error message on screen, or if the MMS seems non-responsive, try plugging the HDMI cable
directly into the display, bypassing any adaptors, switches, or AV receivers.
Control System Connections
If you are using an IP based control system, the Mirage Media Server can be controlled over IP
port 5004, and no further connections are necessary.
More information and control system modules for Crestron, AMX, RTI, Control4 and URC
systems are available at www.autonomic-controls.com/support_downloads.php.
Set Up Your Mirage Media Server
7 of 17
Set Up Your Mirage Media Server
This section provides an overview of powering up your server for the first time and using the
Remote Configuration Utility to configure the device.
Once you have made all the necessary connections, turn on the MMS by pressing the power
button on the front of the unit once. You should see that the power LED illuminates.
Wait 2-3 minutes for your server to completely boot up the first time, or if your server is
connected to a video display, wait until the Now Playing screen shows on the display.
Configuring The MMS
The Mirage Media Server has a built-in web server that provides for remote configuration of
the server, control system integration, and control of music playback with the Mirage player
interface.
The MMS is configured at the factory to automatically obtain a network IP address from your
DHCP server (usually your router).
Using any computer on the same network, open the MMS Remote Configuration Utility with
your Internet browser using the default configuration address for your server model:
MMS·5A: http://Mirage-1/config
MMS·2: http://MMS·2/config
On some computers (especially Macs) you will need to add the .local suffix to the end of the
server name (example: http://Mirage-1.local/config).
You can also look up the IP address of the server using the DHCP client table in your router’s
interface if necessary.
Once you have connected to the MMS configuration page, you will see several tabs for
configuring your MMS:
Set Up Your Mirage Media Server
8 of 17
General Settings
The Server Settings tab allows you to configure the following options.
Server Network Identification
These settings allow you to set the your servers name on the network, and change the default
description.
If you change the server’s name, you will have to use the new name to access the server
configuration and the Mirage player interface after you save the changes.
For example, if you change your server name to “Daves-MMS”, then you would use the
following to access configuration in the future:
http://Daves-MMS/config
(or http://Daves-MMS.local/config)
Setting Date And Time
These settings allow you to configure the server to automatically update its internal date and
time information from a selection of geographically located NTP (Network Time Protocol)
servers.
Wired Ethernet Settings
In this section, you can configure your servers network connection to automatically use a
network DHCP server to obtain it’s IP address and network settings, or you can manually
specify a static IP address and network settings to use.
If you choose to use Manual Configuration be sure to enter the correct settings for IP Address,
Subnet Mask, Gateway, and DNS 1 & 2. If you are unsure how to configure these settings it
would be best to leave your connection set to Autonomic (DHCP) or contact your network
administrator.
WARNING
Setting these values incorrectly can prevent the MMS from connecting to your network, and
could make the server unreachable. If this happens, there is a utility available at http://www.
autonomic-controls.com/support_faq_mms.php which can help you recover.
Logging
This section allows you to upload internal server logs files and, optionally, your media database
if you are instructed by the Autonomic support team. These log files will be sent directly to our
support staff.
Restarting Your Server
The Utilities section contains a link to restart your MMS. Clicking this link will make your MMS
unresponsive for 2-3 minutes while it shuts down and restarts itself.
Set Up Your Mirage Media Server
9 of 17
Display Settings
The Display Settings tab allows you to configure the Mirage on-screen display options. Your
monitor or TV display should be plugged into the DVI or HDMI ports on your MMS before
turning on the server.
NOTE
Some HDMI receivers and switches are not compatible with the MMS. If you receive an error
message on screen, or if the MMS seems non-responsive, try plugging the HDMI cable directly
into the display, bypassing any adaptors, switches, or AV receivers.
On-screen Display Resolution
The Screen Resolution section allows you to choose between 720p and 1080p display output.
(The MMS·2 only supports 720p video output.) Please check the available resolutions on your
display to determine if it compatible with the available output resolutions on the MMS.
Configuring The Screen Saver
The Screen Saver checkbox lets you enable or disable the built in screen saver on the MMS OSD.
When enabled, the MMS will show a photo slideshow of any pictures stored in its shared folder
for photos, and any subdirectories in that folder.
TIP
You can find the shared folders using computers on your network with Windows Explorer (PC)
or Finder (Mac). You should see a server object with the name of your MMS. Double clicking it,
or expanding the list will reveal the shared folders for music and photos.
The Timeout lets you adjust the amount of time without user interaction before the screen
saver slideshow starts.
The Slideshow section allows you to further adjust the settings of the screen saver, including
transition and timing options of the photo slideshow.
1. Effect In: adjust the transition effect used when a new photo is displayed.
2. Effect Out: changes the transition effect used when a photo is about to be replaced with a new
one.
3. Overlap Effects: When this option is on, the Effect In for the new photo and Effect Out of the
old photo will be displayed at the same time.
4. Display Order: Allows you to change the order in which pictures are displayed. Available
options are random, by date: newest first, and by date: oldest first.
5. Picture Duration: the amount of time each photo will be displayed.
6. Scale: Changes how photos will be scaled to fit the available display resolution.
7. Show Now Playing: determines when the screen saver will yield back to the now playing page.
Available options are on queue change, on any queue or title change, or never (only when there
is user interaction).
8. Show Song Overlay: determines when the Now Playing overlay is displayed during the photo
slideshow.
Set Up Your Mirage Media Server
10 of 17
Audio Settings
The Source Settings tab allows you to configure audio settings and system outputs on the MMS.
The Audio System section allows you to configure the MMS for RS-232 or IP connection to an
external multi-room amplifier.
The Connections section allows you to enable or disable each output, rename them, configure
maximum sampling rate and bit depth (digital outputs only) and set each to variable or fixed
gain output for pass-through control of volume, mute and zone power on the amp from the
MMS OSD and web interface.
Fixed vs. Variable Gain
Fixed Gain is recommended in when the connected amplifier has an accessible volume control.
NOTE
Failing to set the output to fixed in this circumstance can cause contention between the MMS
volume control and the amplifiers volume control and can affect sound quality.
Variable gain should be used if the MMS is connected to an amplifier that does not have a
volume control, or if you wish to control the volume of the MMS directly with the Mirage web
interface or mobile applications.
Disabling Unused Outputs
If you will not be using all of the available outputs, set the option to Disabled. This will keep
those outputs from consuming system and power resources, and will remove these items from
the lists.
Renaming Outputs
You can rename the source outputs by double clicking on their name in the web browser. The
new name will be used on our web control interface and mobile applications.
For control system integrations, the server will always respond correctly to commands issued
using the default output names, and will also respond commands issued using the new names.
For this reason, you should avoid renaming the outputs to any of the other default names (ie,
Main, Player_A, etc.)
Bit Depth And Sample Rate Resolution
You can set the bit depth and sample rate of the digital audio outputs to values from 16-bit/44
kHz, all the way up to 24-bit/192 kHz on the MMS·5A and 24-bit/96kHz on the MMS·2.
You should set this value to the highest setting that your amplifier or AV receiver can support. If
you’re unsure of the highest supported bit depth and sample rate on your equipment, the MMS
will play a sample sound in each speaker whenever you change this setting. If you hear the test
tone, your amplifier supports that setting. If you do not hear a test tone, lower this setting until
you can hear the test signal.
Using AirPlay
The AirPlay Receiver section allows you to assign one output on the MMS to be an AirPlay
receiver. When enabled, the Mirage Media Server will be displayed on the AirPlay menu of any
device or software that supports airplay (iOS devices and iTunes running on a Mac or PC).
When the Mirage Media Server is selected, any currently playing content will be interrupted
and the server will begin to wirelessly stream the content from the connected device.
Set Up Your Mirage Media Server
11 of 17
This can be overridden by selecting any other content for playback through the Mirage web
interface, mobile applications, or IP control.
The optional AirPlay password allows you to set a password that the user of the mobile device
(or iTunes) will be prompted for before the MMS will accept a stream from the device. This will
prevent uninvited transmissions from being broadcast to your amplifier.
Configuring Cloud Services
The Content tab allows you to enter your account credentials for streaming media services and
cloud services supported by the MMS.
Amazon Cloud Drive
Your MMS can interface with your Amazon Cloud Drive account to synchronize content to and
from the cloud, and synchronize multiple locations.
To enable this feature, enter you Amazon user ID and password, and select one or both options
for copying content to or from the Amazon Cloud Drive.
The MMS will synchronize all music files with the Amazon Cloud Drive, even those that are
not compatible with the online Amazon Cloud Player (such as uncompressed FLAC or WAV
files). These files will still be stored in your Amazon Cloud Drive and will be available for
multi-location synchronization.
Synchronizing Multiple Mirage Media Servers
Using the Amazon Cloud Drive, you can synchronize all of the content and playlists of multiple
Mirage Media Servers located anywhere in the world.
Simply put the same Amazon account information into each server that you want to keep
synchronized, and select both copy options (copy to, and copy from).
MMS synchronization does not require any one unit to be designated as the master. The
server uses a sophisticated algorithm that accomplishes bidirectional synchronization with all
locations.
If you want to create a master/slave relationship between one master and one or more slaves,
you can accomplish this by enabling only the “Copy To my Amazon Cloud Account” option
on the server that you want to act as a master, and only the “Copy From my Amazon Cloud
Account” on the server you want to act as a slave.
Please note that you will not see or change the files synchronized to the Mirage Media Server’s
hard drive in the shared Music folder. These files are copied to a hidden location on the MMS
in order to maintain the integrity of the synchronization. If you want to modify these files you
must do so at the source, or on the Amazon Cloud Drive.
iCloud Synchronization
Apple’s iCloud service allows you to synchronize music stored on multiple computers and
devices with your iCloud account.
This service is supported on the MMS with our Mirage Media Sync software.
To automatically synchronize content with your iCloud, configure iCloud using iTunes on a
computer that will host the Mirage Media Sync software.
Please note that only content that is downloaded to the Mac or PC will synchronize with the
MMS.
Set Up Your Mirage Media Server
12 of 17
We recommend the following settings for the most seamless, hands-off experience:
1. Turn on iTunes Match. This will allow you to synchronize content from other computers and
devices, which will in turn be synchronized to the MMS via the Mirage Media Sync software.
2. Enable automatic downloads of Music purchases. This setting can be found under iTunes
Preferences, Store.
3. When configuring the Mirage Media Sync software, select the “Synchronize All Music” option.
Streaming Music Services
Configuration of streaming music services is accomplished on the Content tab of the remote
configuration utility in your web browser.
It is important to remember to press the Save button at the top of this tab after you are finished
making any changes to this page. If you navigate away from this page without pressing Save,
your changes will be lost.
Last.fm
The Last.fm music service is a unique service that let’s you effortlessly keep a record of
everything you listen to on your MMS and other devices. Based on your demonstrated tase,
Last.fm recommends more music that you’re likely to love.
Entering your Last.fm credentials will let you associate your MMS with your online Last.fm
account. Once this is done, you will see a Last.fm Scrobble button appear on the Mirage Web
Client, the Mirage iOS applications, and most MMS touch panel interfaces. This button lets you
turn on and off the Last.fm music tracking technology. When “Scrobbling” is enabled, the MMS
will send a log of the music you’re listening to on the MMS (even in other services and local
music) to your Last.fm account profile.
This information will then be used by the Last.fm service and the MMS to recommend more
music that you’ll love.
Last.fm can be played on any single output at one time. If you begin playing back a second
stream on a different output, the first stream will stop playback. This is a condition of the Last.
fm service agreement.
More information about Last.fm can be found at www.Last.fm
Pandora Internet Radio
Pandora is a free service that lets you create custom radio stations based on albums or artists
that you like, and will mix in other music that you haven’t discovered yet.
Subscribing to Pandora Plus will yield additional benefits on the MMS such as higher bitrate
content, and no commercials during playback.
Entering your Pandora credentials will let you associate your MMS with your online Pandora
Internet Radio account.
When valid credentials are supplied (remember to press Save at the top of the screen), all of
your online Pandora radio stations will be available for playback on your MMS, and any new
stations that you create on your MMS will be saved in your online account.
You can create new Pandora radio stations using the Mirage Web Client, and most third party
interfaces.
Set Up Your Mirage Media Server
13 of 17
MMS TuneBridge technology allows you to create a new Pandora station based on a song you
hear on any other service, or local music in your library. You can access this feature in the
Actions menu of the Mirage Web Client and on most touch panel interfaces.
Pandora allows you to listen to up to six simultaneous streams with a single user ID and
password on the MMS·5A, or two on the MMS·2.
More information about Pandora Internet Radio can be found at www.Pandora.com
Rhapsody
Rhapsody is a digital music service that allows you to listen all the music you want on the
MMS and create your own cloud-based library from more than 13 million songs available for
on-demand playback.
You can browse or search music by Album, Artist, Genre, Popular Playlists, and the Rhapsody
Music Guide that helps you find just the right content.
Once you’ve found the content your looking for, use the Actions button on the Mirage Web
Interface or your control system to add the Album, Artist, or Track to your virtual collection.
To configure Rhapsody with your MMS, simply provide your user ID and password in the field
provided, and press the Save button at the top of the screen.
Rhapsody allows you to listen to up to five simultaneous streams with a single user ID and
password on the MMS·5A, or two on the MMS·2.
More information about Rhapsody can be found at www.Rhapsody.com
SiriusXM Internet Radio
Your Mirage Media Server can access your SiriusXM Radio subscription through your Internet
connection eliminating the need for an external antenna or line of sight access to their satellite
transmitters.
While a single SiriusXM account can be used on any of the multiple MMS outputs, SiriusXM
radio subscribers must provide one account ID and password for each simultaneous stream that
you want to listen to on any of the audio outputs.
SiriusXM will provide additional SiriusXM Internet Radio accounts for a reduced monthly fee.
You can enter up to five (MMS·5A) or two (MMS·2) user IDs and passwords in this section.
Press Save at the top of the screen to record your changes and activate the SiriusXM service.
More information about SiriusXM can be found at www.SiriusXM.com
Spotify
Spotify is a music streaming service offering streaming of selected music from a range of major
and independent record labels. Music can be searched by artist, album, genre, or playlists. You
can even save searches as custom playlists.
Most Spotify content is streamed at 320 kbps, which is one of the highest bitrates offered by
streaming music services.
To activate the Spotify service on your MMS, enter your Spotify user ID and password in the
space provided, and press the Save button at the top of the page.
Spotify allows for one stream per account. If the server is running firmware version 4.5, it will
support multiple Spotify accounts.
Set Up Your Mirage Media Server
14 of 17
TuneIn
TuneIn is a free service that brings the world of AM, FM, and Internet radio stations right to
your home. This service provides a directory of the world’s radio stations that broadcast over
the Internet. You’ll likely find that many, if not all of your local AM and FM radio stations are
available for crystal clear online streaming through your MMS without the need for an over the
air antenna. You can also browse thousands of radio stations world-wide by genre or program
name.
Entering your TuneIn credentials and pressing the Save button will allow you to associate
your MMS with your online TuneIn account so that you’ll have easy access to your local radio
stations and stored favorites.
TuneIn allows you to listen to up to five simultaneous streams with a single user ID and
password on the MMS·5A, or two on the MMS·2.
More information about the service is available at www.TuneIn.com
Adding Local AM/FM Radio Stations
Most of your local radio stations will be already listed in the TuneIn Local Radio list on your
MMS. However, certain broadcasters have not granted the TuneIn service permission to list their
streaming services in the TuneIn database.
You can manually add these stations to the local radio station listing in your MMS by using the
Additional TuneIn Stations utility on the Content tab.
To make this task easier for you, Autonomic has pre-loaded a large database of popular US radio
stations that are not in the TuneIn database.
To add one of these stations, click on the Add Station button and begin typing in the call
sign or station description in the fields provided. If that station is in our database, you’ll be
presented with a list of potential matches.
If your station is not in our database, you will have to obtain the URL of the streaming service
and manually enter it into the Stream URL field in this dialog box. If you have to resort to this
method, take the time to drop us a line at [email protected] with the URL
information and we will add it to our database to make it easier for you on the next installation.
NOTE
Be sure to press the Save button at the top of the screen to record your changes.
Adding Digital Content
Synchronizing Files And Playlists To The MMS
The Mirage Media Server comes with a utility that will automatically synchronize folders on
your network, or the contents of your iTunes or Windows Media Player libraries with your
Mirage Media Server.
The Computers section of the Content tab lists all of the computers on your network that have
this utility installed and are contributing to your MMS library.
If you want to stop synchronizing with one of the computers, clicking the “X” next to the
computer name will remove it from the list, and will remove all content contributed by that
computer from your MMS library.
Set Up Your Mirage Media Server
15 of 17
To install the Mirage Media Sync software, browse to this page using the computer that you
want to automatically keep synchronized with your server, and click on the appropriate
download link (Mac or PC).
Once installed, the Mirage Media Sync software can be configured to synchronize your MMS
with iTunes, Windows Media Player (Windows PC’s only), or folders on your hard drive
containing music.
You can make selections to instruct the synchronization software to synchronize all music, or
you can select individual playlists to be copied to your MMS.
All content synchronized with this utility is physically copied to the MMS to provide for
backup and high availability. This means that once synchronized, you can still play your content
on the MMS, even when your computer is off.
Streaming Audio Content From Your Network
If you have more content than will fit on your MMS, you can stream the content from a
Network Drive or a shared folder from a computer on your network.
Keep in mind that this method has a few caveats that you should consider before using this
method.
First, this content will only be available for playback when the NAS device or computer hosting
the files is online. Additionally, the MMS cannot read playlists from iTunes or Windows Media
Player using this method since those playlists reside inside special databases that are only
accessible to the MMS when the files are transferred. The third consideration is that playback
could be affected by your local network performance.
For these reasons, you should consider synchronizing the content rather than streaming it.
If your library is just too large to fit on the MMS internal hard drive, you might consider using
the Mirage Media Sync software to selectively synchronize the playlists that you care most
about, and then use the NAS streaming method to provide access to the rest of your content.
Copying Music And Photos Directly To Your MMS
It is possible to manually copy music and photos directly from your computer to your MMS
without using either of the two methods mentioned previously.
In the case of music, we don’t recommend this approach unless you have a very specific reason
for doing it. Usually, the Mirage Media Sync is a better choice for copying music as it automatically adds new content to the MMS as you add it to your library, and it helps to insure that your
MMS hard drive space is utilized in the most economical way by automatically eliminating
duplicates.
In the case of Photos, this method is the only way to add new pictures to your MMS.
Once the MMS is connected to your home network, you should see a shared network device in
Windows File Explorer (PC) or Finder (Mac).
Clicking on this device will reveal two folders: Music and Photos.
Valid music files supported by the MMS will be indexed and added to the library within a few
minutes after the entire file operation is complete. (The MMS waits until it seems as though
you are finished copying files to avoid thrashing the hard drive.)
If your MMS is connected to an external display, image files copied to the Photos directory will
be displayed during the photo slideshow screen saver on the MMS On-screen Display.
Set Up Your Mirage Media Server
16 of 17
Firmware Updates
The Firmware tab allows you to update the operating software in your Mirage Media Server,
download utility and control software for controlling the server and synchronizing content,
and tools for remote technical support.
Firmware Update
From time to time, Autonomic will release new operating software for the Mirage Media Server
to add new services, add new features, and fix any operating issues reported.
If there is an update available, a button will appear in this section that will allow you to
download and apply the update.
After you click the Update Firmware button, the Mirage Media Sever will automatically
download the latest version from our web servers, install the new operating firmware, and
restart. This process can take up to 10 minutes depending on the size of the update.
WARNING
Do not power off your MMS during a firmware update. Doing so could leave your server in a
condition that will require factory service to restore. The MMS should become available via the
Web Configuration Utility within a few minutes, at which point the update is complete and
your MMS is available for normal use.
Other Software: Mirage Media Player
This section allows you to install a Windows client application to your computer that lets you
browse content and control playback for any of the enabled audio outputs.
You can also run the Mirage Client application in a browser window if you prefer. This will let
you control the server from Mac computers and other operating systems.
Other Software: Mirage Media Sync
This section allows you to install a Windows client application that will automatically
synchronize folders on your network, or the contents of your iTunes or Windows Media Player
libraries with your Mirage Media Server.
License Information
This section displays your product license information and serial number.
Remote Support
If you are working with us on a support case, Autonomic may request remote access to your
server through the Internet in order to check the operation of your server.
In that event, we will provide you with a security code that you can enter into this field to
grant us remote access to your MMS.
Set Up Your Mirage Media Server
17 of 17
Safety Information
FCC - Federal Communications Commission Information
CAUTION:
User changes or modifications not expressly approved by the party responsible for compliance
could void the user’s authority to operate the equipment.
NOTE:
This equipment has been tested and found to comply with the limits for a Class B digital
devices, pursuant to Part 15 of the FCC Rules. These limits are designed to provide reasonable
protection against harmful interference in a residential installation.
This equipment generates, uses and can radiate radio frequency energy and, if not installed and
used in accordance with the instructions, may cause harmful interference to radio communications. However, there is no guarantee that interference will not occur in a particular installation.
If this equipment does cause harmful interference to radio or television reception, which can
be determined by turning the equipment off and on, the user is encouraged to correct the
interference by one or more of the following measures:
•
Reorient or relocate the receiving antenna.
•
Increase the separation between the equipment and receiver.
•
Connect the equipment into an outlet on a circuit different from that to which the receiver is
connected.
•
Consult the dealer or an experienced radio/TV technician
for help.
CE - European Conformity Information
This equipment bares the CE marking of conformity that indicates a product complies with
the essential requirements of the applicable European laws or directives with respect to safety,
health, environment and consumer protection. Generally, this conformity to the applicable
directives is done through self-declaration. The CE Marking is required on products in
the countries of the European Economic Area (EEA) to facilitate trade among the member
countries. The manufacturer or their authorized representative established in the EEA is
responsible for affixing the CE Marking to their product. The CE Marking provides a means for
a manufacturer to demonstrate that a product complies with a common set of laws required by
all of the countries in the EEA to allow free movement of trade within the EEA countries.
Our Promise
Autonomic is committed to updating and supporting our products to provide dealers with
maximum value and the best digital media control solutions.
If there’s any way we can serve your needs, please email [email protected] or
contact our friendly support team at 914-598-1647.