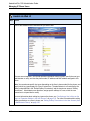
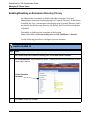
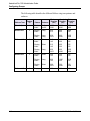
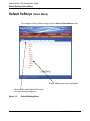
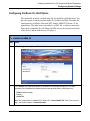
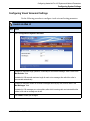
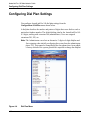
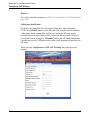
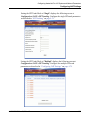
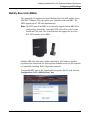
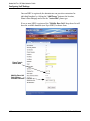
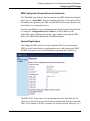
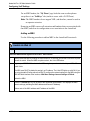
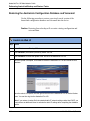
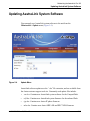
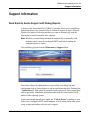
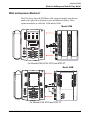
1
AastraLink
Pro
160
41-001190-02
Rev 01
Administrator Guide
Release 1.2
*Aastra, Aastra Telecom, and the Aastra Telecom corporate logo are registered trademarks of Aastra Technologies,
Limited. AastraLink, AastraLink Pro, AastraLink Pro 160, and AastraLink Pro, Model 160 are trademarks of Aastra Telecom
US Inc. Microsoft, Microsoft Windows, and Internet Explorer are trademarks of Microsoft Corporation. Ethernet is a
registered trademark of Xerox Corporation, Inc. UNIX is a registered trademark in the United States and other countries,
licensed exclusively through The Open Group. Asterisk is a registered trademark of Digium, Inc. Linux is a registered
trademark of Linus Torvalds. All other third-party trademarks (and registered trademarks) are the property of their
respective owners.
© 2008 Aastra Technologies, Limited. All rights reserved. Information in this document is subject to change without notice.
Aastra Technologies, Limited assumes no responsibility for any errors that may appear in this document.
Copyright 2008 Aastra Telecom. www.aastratelecom.com
All Rights Reserved.
Published in the USA
AastraLink Pro 160 Administrator Guide
Contents
Preface
Chapter 1
Getting Started
What Does the AastraLink Pro 160 Do? .........................................................................1-2
.
How Do I Set Up My AastraLink Network? .....................................................................1-5
.
Required Tasks ........................................................................................................1-6
.
Optional Tasks ..........................................................................................................1-6
.
What Does the AastraLink Web UI Allow Me To Do? .....................................................1-7
.
Can I Still Use the Phone UI? .........................................................................................1-7
.
AastraLink Pro 160 Emergency Call Support .................................................................1-9
.
Lifeline Phone ..........................................................................................................1-9
.
Emergency Call Priority ............................................................................................1-9
.
Emergency Call Support Important Notes ..............................................................1-10
.
AastraLink Pro 160 Hardware and Software ................................................................1-11
.
Hardware Requirements ........................................................................................1-11
.
Software Requirements ..........................................................................................1-13
.
Users and Privileges ..............................................................................................1-13
.
Reference Documentation ............................................................................................1-14
.
Chapter 2
Using the AastraLink Pro 160 Web UI
Accessing the AastraLink Web UI ..................................................................................2-2
.
Using Your Web Browser to Access the AastraLink Web UI ....................................2-2
Using Windows Explorer to Access the AastraLink Web UI ....................................2-4
.
.
Administrator Menu Options .....................................................................................2-6
.
My Phone ...............................................................................................................2-11
.
41-001190-02 Rev. 01, Rel. 1.2
iii
AastraLink Pro 160 Administrator Guide
Users ......................................................................................................................2-12
.
User List Menu ................................................................................................2-12
Groups Menu ...................................................................................................2-12
Default Softkeys Menu (User Phone) ..............................................................2-12
Reference ........................................................................................................2-13
Configuration ..........................................................................................................2-14
.
System Menu ...................................................................................................2-14
Network Menu .................................................................................................2-14
Dial Plan Menu ................................................................................................2-14
VoIP Menu .......................................................................................................2-15
Auto-Attendant Menu .......................................................................................2-15
Maintenance ...........................................................................................................2-16
.
Current Status Menu ........................................................................................2-16
Call Records Menu ..........................................................................................2-16
Backup & Restore Menu ..................................................................................2-16
Update Menu ...................................................................................................2-17
Support Menu ..................................................................................................2-17
Reference ........................................................................................................2-17
Chapter 3
Configuring Aastra IP Phone Accounts
Accessing the Users Menu .............................................................................................3-3
.
Managing IP Phone Users ..............................................................................................3-4
.
Adding User Accounts and Phones .........................................................................3-5
.
Adding a User Account ..........................................................................................3-10
.
Editing a User Account ...........................................................................................3-15
.
Reference ........................................................................................................3-15
Configuring a User’s Keys on the Phone or Expansion Module
in the User Account .........................................................................................3-20
Setting Softkey Permissions in the User Account
(User or Administrator Phone) .........................................................................3-25
Deleting a User Account ........................................................................................3-27
.
Enabling/Disabling User Accounts .........................................................................3-29
.
Secondary Non-Aastra SIP Phones and Softclients ..............................................3-31
Enabling/Disabling an Extensions Directory Privacy ..............................................3-32
iv
.
.
41-001190-02 Rev. 01, Rel. 1.2
AastraLink Pro 160 Administrator Guide
Uploading User Lists ..............................................................................................3-34
.
Uploading User Lists if MBU 400s Connected to the AastraLink Pro ..............3-37
Configuring Groups ......................................................................................................3-38
.
Ring Groups and Paging Groups ...........................................................................3-38
.
Dial Plan for Ring Groups ................................................................................3-39
Dial Plan for Paging Groups ............................................................................3-41
Virtual Extension Numbers (for Ring and Paging Groups) ..............................3-42
Creating Rules for Groups (Ring and Paging Groups) ....................................3-43
Distinctive Ringing (Ring Groups only) ............................................................3-45
Example of a Ring Group ................................................................................3-47
Example of a Paging Group ............................................................................3-48
Adding a Group ......................................................................................................3-49
.
Configuring Additional Features for a Paging Group .......................................3-51
Editing a Group ......................................................................................................3-52
.
Deleting a Group ....................................................................................................3-53
.
Reference ........................................................................................................3-53
Default Softkeys (Users Menu) .....................................................................................3-54
.
Using the Default Softkeys Menu (User Phone) ....................................................3-55
.
Softkey Types (User Phone) ..................................................................................3-56
.
Call Settings Softkeys (User Phone) ...............................................................3-57
Application Softkeys (User Phone) ..................................................................3-60
Adding a Default Softkey (User Phone) .................................................................3-61
.
Editing a Default Softkey (User Phone) .................................................................3-62
.
Deleting a Default Softkey (User Phone) ...............................................................3-62
.
Default Softkey Permissions (User Phone) ............................................................3-63
.
Default Softkeys for Expansion Modules (Administrator or User Phone) ...............3-64
.
Restoring Default Softkeys Back to Factory Settings .............................................3-65
.
Chapter 4
Configuring AastraLink Pro 160 System and Network Parameters
Accessing the Configuration Menu .................................................................................4-3
.
Configuring System Settings ..........................................................................................4-4
.
Specifying Regional Settings ...................................................................................4-6
.
Specifying the Date and Time ................................................................................4-10
.
Configuring the Music On Hold Option ...................................................................4-11
.
41-001190-02 Rev. 01, Rel. 1.2
v
AastraLink Pro 160 Administrator Guide
Configuring Push Button Trigger Input or Relay Output .........................................4-12
.
Configuring Visual Voicemail Settings ....................................................................4-15
.
Configuring FXO Tuning Settings ..........................................................................4-17
.
Configuring Network Settings .......................................................................................4-21
.
Editing Local Network Settings ..............................................................................4-22
.
Editing Local Service Settings ................................................................................4-26
.
Configuring Remote Office Support .................................................................4-31
Editing External Services Settings .........................................................................4-34
.
Send Test Email ...............................................................................................4-37
Configuring Dial Plan Settings ......................................................................................4-38
.
Local Dial Plan .......................................................................................................4-40
.
Star Codes .............................................................................................................4-41
.
Specifying Dial Plan Settings .................................................................................4-41
.
Configuring a Dial Plan for Auto-Fax ......................................................................4-45
.
Overview ..........................................................................................................4-45
FAX Indication Tones .......................................................................................4-45
FAX Call Re-routing .........................................................................................4-45
FXO Incoming Call Routing .............................................................................4-46
Configuring FXO Lines for Manually Forwarding Auto-Fax .............................4-47
Configuring Overhead Paging ................................................................................4-49
.
Configuring Paging and Intercom Options .............................................................4-50
.
Dial Plan for Meet-Me Conference Bridges ............................................................4-53
.
Host Capacity Limitations ................................................................................4-54
Configuring an Emergency Dial Plan .....................................................................4-54
.
Configuring Barred Numbers .................................................................................4-55
.
Adding a Barred Number .................................................................................4-56
Deleting a Barred Number ...............................................................................4-56
Configuring FXO Lines ...........................................................................................4-57
.
Configuring FXO Lines for Incoming Calls ......................................................4-58
Configuring FXO Lines for Shared Line Appearance (SLA) ...................................4-60
.
About Shared Line Appearances .....................................................................4-60
SLA and the AastraLink Pro ............................................................................4-61
SLA Key Mapping ............................................................................................4-62
Using AastraLink SLA from the SIP Phones ...................................................4-63
vi
41-001190-02 Rev. 01, Rel. 1.2
AastraLink Pro 160 Administrator Guide
Configuring SLA on the AastraLink .................................................................4-63
Enabling/Disabling Individual SLA Memberships ............................................4-64
SLA Configuration Changes ............................................................................4-65
Configuring Abbreviations ......................................................................................4-67
.
Examples of Abbreviated Number Configurations ...........................................4-68
Configuring Abbreviated Numbers ..................................................................4-71
Editing Abbreviated Numbers ..........................................................................4-72
Deleting Abbreviated Numbers ........................................................................4-73
Configuring VoIP Settings .............................................................................................4-74
.
SIP Trunking ..........................................................................................................4-76
.
Incoming SIP trunk calls ..................................................................................4-77
Outgoing SIP trunk calls ..................................................................................4-77
Adding a SIP Trunk ..........................................................................................4-80
Deleting a SIP Trunk ........................................................................................4-83
Single and Multiple SIP Trunks ........................................................................4-84
SIP Direct Inward Dialing (DID) ..............................................................................4-86
.
Adding a SIP DID ............................................................................................4-87
Deleting a SIP DID ..........................................................................................4-87
AastraLink Trunking ...............................................................................................4-89
.
Configuration Parameters ................................................................................4-90
Configuration Guidelines .................................................................................4-91
AastraLink Trunking Example ..........................................................................4-91
Mobility Base Units (MBUs) ...................................................................................4-97
.
MBU Configuration Download from the AastraLink .........................................4-99
Handset Registrations .....................................................................................4-99
Adding an MBU .............................................................................................4-100
Rebooting an MBU ........................................................................................ 4-110
Configuring Auto-Attendant ........................................................................................4-112
.
How Auto-Attendant Works ..................................................................................4-113
.
Settings for the Auto-Attendant ............................................................................4-115
.
Configuring Settings for the Auto-Attendant .................................................. 4-116
Custom Interactive Voice Response (IVR) ...........................................................4-121
.
Custom IVR Configuration .............................................................................4-122
Configuring a Custom IVR .............................................................................4-123
41-001190-02 Rev. 01, Rel. 1.2
vii
AastraLink Pro 160 Administrator Guide
Schedule for the Auto-Attendant ..........................................................................4-126
.
Holidays for the Auto-Attendant ...........................................................................4-130
.
Adding a Holiday to the Auto-Attendant ........................................................4-132
Deleting a Holiday from the Auto-Attendant ..................................................4-132
Custom Recordings ..............................................................................................4-134
.
Chapter 5
Maintaining the AastraLink Pro 160
Accessing the Maintenance Menu ..................................................................................5-3
.
Viewing the Current System Status ................................................................................5-4
.
Managing Call Detail Records (CDR reports) .................................................................5-5
.
About the Call Records Menu ..................................................................................5-5
.
Sorting CDR Columns ..............................................................................................5-7
.
Viewing Call Detail Records .....................................................................................5-9
.
Downloading CDR Reports ......................................................................................5-9
.
Performing AastraLink Backup and Restore Tasks ......................................................5-10
.
Backup and Restore Guidelines .............................................................................5-11
.
Backing Up AastraLink System Software ...............................................................5-12
.
Restoring the AastraLink Configuration Database and Voicemail ..........................5-14
Updating AastraLink System Software .........................................................................5-15
.
.
Automatic Updates .................................................................................................5-17
.
Manual Updates .....................................................................................................5-18
.
Support Information ......................................................................................................5-21
.
Send Email to Aastra Support with Debug Reports ...............................................5-21
.
General Support .....................................................................................................5-24
.
Chapter 6
AastraLink FAQs
How Does Network Addressing Work? ..........................................................................6-3
.
How Does IP Phone Auto-Configuration Work? .............................................................6-3
.
What is the Difference Between the Administrator Phone and User Phones? ...............6-4
Do I Ever Need to Re-Register IP Phones? ...................................................................6-4
Can I Access My IP Phone Network From a Remote Office? ........................................6-4
How Do I Assign An IP Phone To A Different User? ......................................................6-5
.
.
.
.
What Are Softkeys and How Do They Work? .................................................................6-5
.
What are Expansion Modules? ................................................................................6-7
viii
.
41-001190-02 Rev. 01, Rel. 1.2
AastraLink Pro 160 Administrator Guide
How Do I Obtain the IP Address Assigned to the AastraLink Pro 160? .........................6-9
Why Do My IP Phone Screens Look Different? ............................................................6-10
Why Does The Web UI Occasionally Time-out? ..........................................................6-10
How Do I Maximize System Performance? ..................................................................6-10
Does This Guide Describe How To Operate My IP Phone? .........................................6-11
.
.
.
.
.
How Does Auto-Fax Work on the AastraLink Pro 160? ...............................................6-11
.
Does the AastraLink Pro Support Routing to a FAX over IP (FOIP) Device? ...............6-11
Can I Add More PSTN Gateways to Add More Than Six FXO ports? ..........................6-12
.
.
Can I Link Multiple AastraLink Pros Using AastraLink Trunks for
Making Toll-Free Calls? ................................................................................................6-12
.
Can I Create Custom Dial Plans on the AastraLink Pro? .............................................6-12
.
Does My AastraLink Pro Support non-Aastra SIP Phones? .........................................6-12
.
How Many Extensions Can the AastraLink Pro Host When SIP Trunking is Used? ....6-12
.
If Custom “On Hold” Music is Enabled, Does it Play for Both Parked Calls
and On-Hold Calls? ......................................................................................................6-13
.
Does the AastraLink Pro Support Shared Line Appearance (SLA)? ............................6-13
How Do I Reduce the Initial Echo that Occurs at the Beginning of Each Call? ............6-14
Can a Call Group Send a Voicemail to an Email Address? ..........................................6-14
.
.
.
Does the AastraLink Pro Support Analog Telephone Adapters (ATAs)
for Adding More FXS Ports? .........................................................................................6-14
.
How do I Register a Generic SIP Device as a Secondary SIP Phone? .......................6-15
.
Chapter 7
Troubleshooting Solutions
Monitoring the AastraLink Status LED ............................................................................7-3
.
Rebooting the AastraLink ...............................................................................................7-5
.
Rebooting Using the Web UI ....................................................................................7-5
.
Rebooting Using the Reset Switch (Hard Reboot) ...................................................7-6
.
Restoring AastraLink Factory Default Settings ...............................................................7-7
.
What Happens if I Restore Factory Default Settings? ..............................................7-7
Using the Reset Switch to Restore Factory Default Settings ...................................7-7
What To Do After Restoring Factory Default Settings ..............................................7-8
Reinstalling System Software Using Recovery Mode ...................................................7-11
.
.
.
.
Automatic Recovery Mode .....................................................................................7-12
.
Manual Recovery Mode .........................................................................................7-13
.
Using The AastraLink Recovery Mode UI ..............................................................7-14
.
41-001190-02 Rev. 01, Rel. 1.2
ix
AastraLink Pro 160 Administrator Guide
Obtaining the IP Address of Your AastraLink Pro 160 .....................................7-14
Reprogramming the CompactFlash Card ........................................................7-17
Reprogramming the Onboard Flash ................................................................7-22
Uploading the .abf File to the CompactFlash ...................................................7-25
Repairing the File System, Bad Block, and or Database .................................7-26
Advanced Recovery Mode Tasks (Netconsole) ...............................................7-29
Using AastraLink System and Phone Log Files ...........................................................7-31
.
Appendix A
Remote Office Configuration of the IP Phone (Phone-Side)
Preparing To Deploy Remote User Phones ................................................................... A-2
Registering IP Phones At the Central Site ..................................................................... A-4
.
.
Connecting To The IP Phone Network From a Remote Office ...................................... A-7
.
Configuring Port Information ................................................................................. A-10
.
Reinstalling Aastra IP Phones at the Central Site ....................................................... A-13
.
Appendix B
Remote Office Configuration of the AastraLink Pro 160 (Server-Side)
Remote Office Configuration of the
AastraLink Pro 160 ........................................................................................................ A-2
.
Description .............................................................................................................. A-2
.
Network Diagram for Remote Phone Setup ............................................................ A-2
.
Configuring the AastraLink Pro 160 for Remote Office Setup ................................. A-4
.
1. UPnP Configuration ...................................................................................... A-4
2. Phone Configuration ..................................................................................... A-7
3. Remote Phone Installation ........................................................................... A-7
AastraLink Pro 160 Manual Remote Office Configuration Example ..................... A-10
.
Index
Warranty
Regulatory information
.
Software licensing and copyright
x
41-001190-02 Rev. 01, Rel. 1.2
Preface
About This Guide
Introduction
This guide provides information about the AastraLink Pro 160, and is intended for
the system administrator who installs, configures, manages, maintains, and
troubleshoots the unit.
The AastraLink Pro 160 is a Linux-based hardware unit that hosts the Asterisk
open source Private Branch Exchange (PBX) software. You can use the
AastraLink Pro 160 in small to medium Business, and Enterprise environments.
Other Documentation
The AastraLink Pro 160 documentation set also includes:
•
AastraLink Pro 160 Quick Start Administrator’s Guide - contains
AastraLink Pro 160 installation and setup instructions. Describes how to
install and register the Administrator IP phone, as well as instructions for how
to access the AastraLink Web UI.
•
AastraLink Pro 160 Quick Start User’s Guide - Describes how to initially
install user IP phones on your network, and how to register user IP phones
with the AastraLink device.
•
AastraLink Pro 160 IP Phone User’s Guide - Designed for an Aastra IP
phone end-user. Explains how to use the IP phone UI, or the AastraLink Web
UI, to operate your IP phone on an AastraLink IP phone network.
41-001190-02 Rev. 01, Rel. 1.2
xi
AastraLink Pro 160 Administrator Guide
About This Guide
Chapters in This Guide
This guide contains the following chapters:
xii
For
Go to
Overview information about the AastraLink Pro 160
Chapter 1
Instructions on using the AastraLink Web UI
Chapter 2
Instructions on configuring IP phone User accounts
Chapter 3
Instructions on configuring network/system parameters
Chapter 4
Instructions on maintaining the AastraLink Pro 160
Chapter 5
FAQs about the AastraLink Pro 160
Chapter 6
Troubleshooting solutions
Chapter 7
Remote office configuration of the IP Phone (Phone-side)
Appendix A
Remote office configuration of the AastraLink Pro 160 (Server-side)
Appendix B
41-001190-02 Rev. 01, Rel. 1.2
Chapter 1
Getting Started
Overview
Congratulations!! You have purchased a highly functional, cost-effective,
easy-to-use AastraLink Pro 160 for use in your Enterprise network.
The AastraLink Pro 160 is Linux-based hardware that hosts the Asterisk open
source Private Branch Exchange (PBX) software. The AastraLink Pro 160 acts as
a private telephone network (or PBX) within an enterprise. Users of the
AastraLink Pro 160 can direct dial internal extensions via the Voice over IP
(VoIP) network. They can also share a number of outside lines for making
telephone calls external to the AastraLink Pro 160.
The AastraLink Pro 160 is easy to install and operate, and provides a
comprehensive set of security features you would expect from a state-of-the-art
PBX.
The AastraLink Pro 160 is compatible with these Aastra IP phones and expansion
modules:
•
675xi Series SIP IP Phones: 6730i, 6731i, 6751i, 6753i, 6755i,
6757i, 6757i CT
•
9143i, 9480i, 9480i CT SIP IP Phones
•
MBU 400 and DECT 420d handset
•
Expansion Modules: 536M and 560M
41-001190-02 Rev. 01, Rel. 1.2
1-1
AastraLink Pro 160 Administrator Guide
What Does the AastraLink Pro 160 Do?
What Does the AastraLink Pro 160 Do?
The AastraLink Pro 160 provides full PBX functionality, including:
•
Local SIP extensions, remote SIP users, SIP trunking
•
Flexible voicemail with visual voicemail menus
•
Operator console
•
Custom announcements
— Auto-attendant (AA) with day/night/holiday scheduling with
customizable Open and Closed Greetings, Main Menu prompts, Key
Announcements, and Language Greetings (English, French, Spanish).
1-2
•
Interactive Voice Response (IVR) with directory number and name dialing,
and ability to disable the dial-by-name feature
•
Shared Line Appearance (SLA) support that can be used with Redial,
speeddial, 3-way conference, and call transfer.
•
3-way conference calling phone feature
•
Meet-me conference bridge feature
•
Busy lamp field monitoring (BLF)
•
Flexible call forwarding (CFB, CFNA, CFA)
•
Find-me, Follow-me (FMFM)
•
Call Park (displays number on phone’s LCD as well as announcing number)
•
Ring Groups and Paging Groups - Ring Groups have overflow feature and
group member email notifications of new group voicemails.
•
Remote call pickup
•
Barred numbers
•
Abbreviated Numbers and Shortcut Dialing
•
Custom speed-dial
•
User-configurable ring tones and Administrator-configurable distinctive ring
41-001190-02 Rev. 01, Rel. 1.2
Getting Started
What Does the AastraLink Pro 160 Do?
•
Up to 6 Foreign Exchange Office (FXO) ports for connection to analogue
public telephone lines (PSTN). Each FXO is equipped with on-hook CallerID
detection and full G.168 echo cancellation. Also provides far-end FXO
disconnect supervision.
•
Auto-Fax using Auto-Attendant or manually using call forwarding on
FXO lines (up to 6)
•
Universal Plug-and-Play (UPnP) integration for easy setup of gateway/router
and local network discovery from Microsoft Windows PCs.
Additional AastraLink Pro 160 features/functionality includes:
•
Generates call detail records (CDRs) for external billing applications.
•
Stores calling line ID (CLID) and calling name ID (CNID) in the missed calls
and callers list.
•
Network multiple AastraLink Pro 160 platforms across a LAN/WAN
(identified by an IP address, public Internet name, or domain name service
(DNS)).
•
Local dialing plan and ability to define user dialing restrictions.
•
Provides multiple simultaneous SIP trunk support for incoming SIP trunks.
•
Offers “music on hold” feature that supports playing analog from an external
input source, or digital from an uploaded .wav file.
•
Overhead paging port for connection to an amplifier.
•
Administrator can customize softkey list available on User’s or
Administrator’s phones.
•
Administrator can disable a User’s phone from appearing on the AastraLink
Pro network without deleting or changing the configuration of that phone.
•
Administrator can prevent an Administrator’s or User’s phone from appearing
in the Corporate Directory.
•
Dedicated Foreign Exchange Station (FXS) port for connection to a FAX
machine.
•
Dedicated FXS port for connection to an emergency analog phone in case of
power failure.
•
Input/output (I/O) port for relay output (activated by dialing an internal
directory number (DIRN)).
41-001190-02 Rev. 01, Rel. 1.2
1-3
AastraLink Pro 160 Administrator Guide
What Does the AastraLink Pro 160 Do?
1-4
•
Input connection that can trigger an event notification on the AastraLink Pro
160. A triggered event can be sent as an email, Extensible Markup Language
(XML) message sent to the phone UI, or as a recorded prompt for voice
notification.
•
System-wide SIP paging to all registered phones
•
Easy configuration using an administrator Web interface (Web UI).
•
Easy addition of multiple phones from a pre-defined User list (.csv file) via a
bulk-update mechanism
•
Support of inbound Direct Inward Dialing (DID) for SIP trunks (allows
bypass of IVR menus)
•
Email notification to Administrator when a remote user attempts access to the
AastraLink Pro 160.
•
Administrator can backup/restore the AastraLink Pro 160 platform using a
Backup file (.abf file).
•
Administrator can reboot multiple phones via the Web UI.
•
Display of AastraLink Pro 160 status from Web UI during boot/reboot.
•
Administrator can email AastraLink status and system config/debug
information to Aastra Support.
41-001190-02 Rev. 01, Rel. 1.2
Getting Started
How Do I Set Up My AastraLink Network?
How Do I Set Up My AastraLink Network?
This section describes what you need to do to set up your AastraLink network. It
describes required tasks, as well as optional tasks.
The figure below shows a typical AastraLink Pro 160 network. An AastraLink
network is comprised of an AastraLink Pro 160, and the Aastra IP phones that are
registered with it.
SIP Service
Provider
AastraLink Pro 160
Small Home Office
CCFF
Router
Public
Telephone
Network
Internet
Internet
Router
Office 2
Router
LAN
CCFF
AastraLink Pro 160
Office 1
Figure 1-1.
Sample AastraLink Pro 160 Network
41-001190-02 Rev. 01, Rel. 1.2
1-5
AastraLink Pro 160 Administrator Guide
How Do I Set Up My AastraLink Network?
Required Tasks
Setting up your AastraLink network is a three-step process as described below.
Once you complete these three steps, the AastraLink Pro 160 and the Aastra IP
phones on your network are fully operational, handling calls and processing data.
Step
Action
Refer To
1
Connect the AastraLink Pro 160 to your network (Administrator
task.)
Quick Start Administrator’s Guide
2
Install and register an administrator IP phone with the AastraLink Quick Start Administrator’s Guide
Pro 160 device. (Administrator task.)
•
The first phone you register on a newly installed AastraLink
Pro 160 is automatically configured as the Administrator
phone, and is assigned as the Operator.
3
As administrator, you can configure and manage the phones and See “Users and Privileges” on
page 1-13
the AastraLink Pro 160 device on your network (including
reassigning User/Admin/Operator privileges).
4
Install and register user IP phones with the AastraLink Pro 160
device. (Administrator or User task.)
•
Enter the name/password for the user during IP phone
initialization.
•
The AastraLInk automatically assigns the next free extension
to the new phone.
QuickStart User’s Guide
Optional Tasks
To customize your AastraLink network use the instructions described in this
AastraLink Pro 160 Administrator Guide to:
1-6
•
(Administrator’s Phone) Configure call settings and view/delete call lists,
view/delete voicemails, define additional softkeys, add directory contacts,
modify user accounts, configure voicemail, or change your Administrator
password.
•
(User Phones) View/add User phones, reboot User phones, upload
pre-specified User list (from .csv file), specify user groups, define additional
softkeys on User phones in your network.
•
View and configure AastraLink system settings, network settings, dial plan
settings, VoIP settings, and/or Auto-Attendant settings.
•
Perform maintenance, backup, and upgrade procedures.
•
Register remote user phones.
41-001190-02 Rev. 01, Rel. 1.2
Getting Started
What Does the AastraLink Web UI Allow Me To Do?
What Does the AastraLink Web UI Allow Me To
Do?
As administrator, you can use the AastraLink Pro 160 Web UI to:
•
Configure and manage your own phone (make calls, handle calls, and enable
features).
•
Configure and manage the IP phones on the AastraLink network (define user
accounts, configure default softkeys, manage phone directories, etc.).
•
Configure, manage, and maintain the AastraLink Pro 160 device.
As an IP phone user, you can use the AastraLink Pro 160 Web UI to:
•
Manage and configure your phone only.
Can I Still Use the Phone UI?
All administrative functions are done using the AastraLink Pro 160 Web UI.
However, IP phone users can use either the Web UI, or the Aastra IP phone UI, to
operate and configure their IP phones.
The following table shows the options available using the AastraLink Pro 160
Web UI and the Aastra IP phone UI.
Phone Option
Access From
Web UI
Access from
Phone UI
Dial a number
Manage your recent calls
Manage and use your phone directory
Configure and customize Administrator phone
softkeys
41-001190-02 Rev. 01, Rel. 1.2
1-7
AastraLink Pro 160 Administrator Guide
Can I Still Use the Phone UI?
Access From
Web UI
Access from
Phone UI
Enable phone features
• Do Not Disturb
• Call Forwarding
• Find Me, Follow Me
Edit your Administrator preferences
• Contact Information
• Voicemail Preference
• Change Password
Phone Option
Set phone preferences
• Contrast Level
• Set Audio (not available for 51i)
View phone IP Address.
View AastraLink IP Address
View phone firmware version
Set phone to factory default settings
Restart phone
Lock your phone
Configure User accounts:
• User preferences
• Ring groups
• Paging groups
• Default softkeys
• Default softkey permissions
1-8
Configure advanced phone features such as
SLA, Directory Privacy, and Secondary Lines
Disable a User’s or Administrator’s phone from
displaying in the Corporate Directory
Configure AastraLink network and system
parameters
Configure Dial plan Settings
Configure VoIP settings
Configure Auto-attendant
Perform AastraLink system upgrade, backups,
and maintenance tasks
41-001190-02 Rev. 01, Rel. 1.2
Getting Started
AastraLink Pro 160 Emergency Call Support
AastraLink Pro 160 Emergency Call Support
Because IP phones and data networks require power to operate, they do not
provide the fail-safe emergency calling capability of a traditional analogue phone.
The AastraLink Pro 160 supports emergency calling in two ways:
•
Lifeline Phone
•
Emergency Call Priority
These features are described in detail in the next sections.
Lifeline Phone
The FXO Line 1 and FXS Phone B ports are labelled ⎯♥⎯ on the rear of the
AastraLink unit. These ports provide capability for calling emergency services
(also known as E911 in North America). In the event of power failure, the
AastraLink Pro 160 hardware connects these two ports directly together, so that
you can make an emergency call on FXO Line 1 using an analogue phone
connected to the FXS Phone B port.
To ensure emergency call routing is available, we recommended that:
•
You connect a traditional analogue phone to FXS B at all times, labelled as
the E911 Lifeline emergency phone.
•
When connecting telephone lines, connect the LifeLine FXO port first.
Emergency Call Priority
When the AastraLink Pro 160 is active, and an emergency call (by default, 911 or
9911 in North America) is made from an IP phone, it is preferentially routed to
any available FXO line. If all FXO lines are in use, AastraLink Pro overrides any
existing non-emergency call in progress on the Lifeline FXO and routes the
emergency call in its place. Emergency Call Priority Override may take up to 15
seconds for the existing call to be cleared; an announcement plays during the
override operation.
You can use the Web UI to provision emergency call numbers.
41-001190-02 Rev. 01, Rel. 1.2
1-9
AastraLink Pro 160 Administrator Guide
AastraLink Pro 160 Emergency Call Support
Emergency Call Support Important Notes
Note: The AastraLink Pro 160 guarantees only one emergency call at a time. If
multiple emergency calls are attempted, callers may receive a message
stating that all circuits are busy. A call placed from a phone connected to
FXS B receives the highest priority; it will not be terminated, even by
another 911 call. If a 911 call is made, and the only available FXO line is
already in use by a phone connected to FXS B, then the AastraLink will
attempt to place the 911 call using SIP trunking.
Warning: On remote phones connected to the AastraLink Pro 160, the following
emergency related message displays: “E911 calls are not available
from this phone.” Remote IP phone users should not make
emergency calls using the AastraLink Pro 160, because the location
information will be incorrect. E911 regulations in the United States
require street address location information be transmitted to the Public
Safety Answering Point (PSAP). This information is provided by the
telco, using the location of the analogue line connected to the
AastraLink Pro 160 Lifeline port (FXO Line 1).
1-10
41-001190-02 Rev. 01, Rel. 1.2
Getting Started
AastraLink Pro 160 Hardware and Software
AastraLink Pro 160 Hardware and Software
Hardware Requirements
Hardware
Minimum requirements
AastraLink Pro 160
Includes:
Additional Equipment required
(but not included)
•
One AastraLink Pro 160 unit.
•
One 12V AC power adapter and cable.
•
One RJ45 Ethernet cable.
•
Six RJ11 phone cables.
•
One 512 MB CompactFlash memory card.
•
One set of rack mounting brackets with four
Phillips head screws.
•
One wall mounting template, 3 plastic wall
anchors, and 3 Phillips panhead screws.
•
One Quick Start Administrator’s guide.
At least one Aastra IP Phone. The Aastra IP
phones and expansion modules supported in this
release include these models:
•
9143i
•
9480i, 9480i CT
•
6730i
•
6731i
•
6751i
•
6753i
•
6755i
•
6757i, 6757i CT
•
MBU and DECT 420d Handsets
•
536M, 560M
Note: IP Phone Model 6753i supports the 536M expansion module. IP phone
Models 6755i, 6757i, and 6757i CT support the 536M and the 560M
expansion modules. Daisy-chained expansion modules are not recognized
by the AastraLink Pro 160. The AastraLink Pro 160 supports a maximum
of one expansion module per phone.
41-001190-02 Rev. 01, Rel. 1.2
1-11
AastraLink Pro 160 Administrator Guide
AastraLink Pro 160 Hardware and Software
Front of AastraLink Pro 160
Front Panel
CF
Power/Status LED
(Steady Green = booting.
Flashing Red/Green = updating firmware
Flashing Green = system ready for use)
Compact Flash
Compact Flash Slot
(ships installed in drive)
Note: See “Monitoring the AastraLink Status LED” on page 7-3 for additional
LED descriptions.
Back of AastraLink Pro 160
Back Panel
/ FAX
/ FAX
A
B
LINE
TM8DC
12 VDC 1.25A
12V Power Adapter
1-12
LAN
WAN
RJ45 Ethernet Cable
to full-duplex switch
FXS-A
(default for
in/out FAX)
1
2
3
4
5
6
FXS-B Lifeline to Phone FXO Cables
(optional out FAX)
41-001190-02 Rev. 01, Rel. 1.2
Getting Started
AastraLink Pro 160 Hardware and Software
Software Requirements
The following table provides the minimum software you need to use the
AastraLink Pro 160 Web-based graphical user interface (Web UI).
Software
Minimum requirements
Web browser
A Web browser capable of Javascript, specifically
Internet Explorer 6 and 7, Firefox 1.5 and 2, Opera
9, and Safari 2 and 3
DHCP server (optional)*
DHCP server providing one IP address (for
example, 192.168.0.1/24)
*If DHCP is not available, ZeroConf
is used instead. Static IP may also
be provisioned after initial
configuration is completed.
FTP, TFTP or HTTP server.
Required only if recovery mode is used
Users and Privileges
The AastraLink Pro 160 supports two types of users: administrators and registered
users, as follows:
•
Administrators have access privileges to all AastraLink Pro 160 management
features and functions. Administrators can manage and configure their
phones, user phones, and manage and maintain the AastraLink Pro 160
device.
•
Registered users can manage and configure their phones only.
You can also specify a person from either group (administrator or user) as
“Operator.” The Operator has access to operator specific keys and the office voice
mailbox. The administrator is also the designated Operator, by default.
41-001190-02 Rev. 01, Rel. 1.2
1-13
AastraLink Pro 160 Administrator Guide
Reference Documentation
Reference Documentation
For additional information about installing the AastraLink Pro 160, and installing
and operating the Aastra IP phones in your network, see the following guides:
1-14
•
AastraLink Pro 160 Quick Start Adminstrator’s Guide
•
AastraLink Pro 160 Quick Start User’s Guide
•
AastraLink Pro 160 IP Phone User’s Guide
41-001190-02 Rev. 01, Rel. 1.2
Chapter 2
Using the AastraLink Pro 160 Web UI
About this Chapter
Introduction
This chapter describes how to use to the AastraLink Web UI to configure and
manage the AastraLink Pro 160 and the Aastra IP phones on your network.
Topics
This chapter covers the following topics:
Topic
Page
Accessing the AastraLink Web UI
page 2-2
Using Your Web Browser to Access the AastraLink Web UI
page 2-2
Using Windows Explorer to Access the AastraLink Web UI
page 2-4
Administrator Menu Options
page 2-6
My Phone
page 2-11
Users
page 2-12
Configuration
page 2-14
Maintenance
page 2-16
41-001190-02 Rev. 01, Rel. 1.2
2-1
AastraLink Pro 160 Administrator Guide
Accessing the AastraLink Web UI
Accessing the AastraLink Web UI
This section describes how to use your web browser to access the AastraLink Pro
160 Web UI. You can login as an administrator, or as a user, as follows:
•
Administrators have access privileges to all AastraLink Pro 160 management
features and functions.
•
Users can manage and configure their phones only.
There are two ways you can access the AastraLink Web UI:
•
Enter the IP address of the AastraLink Pro 160 directly into the address field
of your web browser, or
•
Use Universal Plug-and-Play (UPnP) and Windows Explorer to locate the
AastraLink Pro 160 on your network.
Using Your Web Browser to Access the AastraLink Web UI
The following procedure describes how to access the AastraLink Web UI.
Step
Action
1
Open your web browser and enter the IP Address or DNS hostname of the AastraLink Pro 160 in the
address field.
For example: http://10.20.50.135
Note: If you do not know the IP Address of the AastraLink, you can access it using an IP phone
connected to the device. For instructions, see How Do I Obtain the IP Address Assigned to the
AastraLink Pro 160? on page 6-9 of this guide.
The AastraLink Web UI Login Menu appears (Figure 2-1).
2
Enter your phone extension, and password, and click
The AastraLink Main Menu appears (Figure 2-3).
Note: To log out, click <logout>, located in the upper right corner of the main menu.
2-2
41-001190-02 Rev. 01, Rel. 1.2
Using the AastraLink Pro 160 Web UI
Accessing the AastraLink Web UI
Current status of AastraLink Pro 160
Figure 2-1.
AastraLink Web UI Login Menu
41-001190-02 Rev. 01, Rel. 1.2
2-3
AastraLink Pro 160 Administrator Guide
Accessing the AastraLink Web UI
Using Windows Explorer to Access the AastraLink Web UI
The following procedure describes how to use Windows Explorer to access the
AastraLink Web UI.
Note: Prior to using this method to discover the AastraLink on your network, the
Windows UPnP networking component must be installed on your
computer.
Step
Action
1
Click on the Start menu, then click on My Network Places.
Providing that your computer is UPnP enabled, then the AastraLink Pro 160 device icon appears in
the My Network Places window. The IP Address assigned to the AastraLink device is listed.
If there are multiple AastraLinks in your network, right-click the UPnP device icon and select
Properties. A dialogue box appears that shows the IP address, serial number and hostname (model)
of the selected device (Figure 2-2).
2
To access the AastraLink Web UI, double-click on the AastraLink device icon.
A web browser launches and the AastraLink log in menu appears (Figure 2-1).
3
Enter your phone extension, and password, and click
The AastraLink Main Menu appears (Figure 2-3).
Note: To log out of the AastraLink Web UI, click <logout>, located in the upper right corner of the
main menu.
2-4
41-001190-02 Rev. 01, Rel. 1.2
Using the AastraLink Pro 160 Web UI
Accessing the AastraLink Web UI
Figure 2-2.
My Network Places Window
41-001190-02 Rev. 01, Rel. 1.2
2-5
AastraLink Pro 160 Administrator Guide
Accessing the AastraLink Web UI
Administrator Menu Options
When you are logged in as administrator, you can use the AastraLink Web UI to
configure your own phone, other Aastra IP phones, and the AastraLink device.
The following illustration shows the AastraLink Main Menu after an
administrator logs in.
These menus appear only if you
login as Administrator
Figure 2-3.
2-6
AastraLink Administrator Main Menu
41-001190-02 Rev. 01, Rel. 1.2
Using the AastraLink Pro 160 Web UI
Accessing the AastraLink Web UI
The following illustration shows the AastraLink Main Menu after a User logs in.
A User menu displays the My Phone menu and submenus only.
My Phone Menu
Figure 2-4.
AastraLink User Main Menu
41-001190-02 Rev. 01, Rel. 1.2
2-7
AastraLink Pro 160 Administrator Guide
Accessing the AastraLink Web UI
The Administrator Web UI is set up for easy navigation with various menus and a
color-coded 3 level structure.
The first level menus (red) are the main task/activity items (My Phone, Users,
Configuration, Maintenance). The first level menus do no change.
First level menus
The second level menus (amber) are the subsystem/category items. These menus
change according to the first level menu selected.The following illustrations show
the second level menus for the Users Menu and the Maintenance Menu.
Second level
menus are different
depending on
first level
menu
selected
Users Menu and Submenus
Maintenance Menu and Submenus
2-8
41-001190-02 Rev. 01, Rel. 1.2
Using the AastraLink Pro 160 Web UI
Accessing the AastraLink Web UI
The third level menus (white) are tabs within the second level menus. These tabs
change according to the second level menu selected. The following illustrations
show the tabbed items on the Configuration->System Menu and the
Users->Default Softkeys Menu.
Third level
menus are tabs
that are different
depending on the
second level
menu
selected.
Configuration/System Menu Tabs
Users/Default Softkeys Menu Tabs
41-001190-02 Rev. 01, Rel. 1.2
2-9
AastraLink Pro 160 Administrator Guide
Accessing the AastraLink Web UI
The parameters you can configure are on the final level within the menu structure.
Configurable
Parameters
My Phone/Preferences/My Profile Parameters
Configuration/System/Date and Time Parameters
The following paragraphs describe the information in the AastraLink Pro Web UI,
administrator menu structure.
2-10
41-001190-02 Rev. 01, Rel. 1.2
Using the AastraLink Pro 160 Web UI
Accessing the AastraLink Web UI
My Phone
The My Phone menu displays the following submenus:
•
Home
•
Voicemail
•
Directory
•
Softkeys (Administrator’s Phone)
•
Preferences
My Phone
submenus
Figure 2-5.
My Phone Menu (Administrator)
The “My Phone” menu selections are the same as the “My Phone” menu
selections in the User’s GUI. For more information about the “My Phone”
features and options, see the AastraLink Pro 160 User Guide.
41-001190-02 Rev. 01, Rel. 1.2
2-11
AastraLink Pro 160 Administrator Guide
Accessing the AastraLink Web UI
Users
The Users menu displays the IP phones currently registered in your AastraLink
Pro 160 network (with extensions). The list of phones includes the Operator (or
administrator) phone as well as all user phones.
From the Users menu, you can view and/or configure the following:
User List Menu
•
Upload User List
•
Add a phone(s)
•
Delete a phone(s)
•
Pre-register the phones (individually or as bulk upload) so that they enter
service automatically when connected to the network
•
Reboot a phone or all phones
•
Configure/edit operator and user accounts
Groups Menu
•
Add/delete/edit a Ring Group(s) or Paging Group(s)
Default Softkeys Menu (User Phone)
•
Configure/edit default softkey settings for all registered user phones in your
AastraLink Pro 160 network. You can also reset these softkeys to their default
values if required. The tabs that display in this menu are applicable to the
following Aastra IP Phones: 9143i, 9480i, 9480i CT, 6730i, 6731i, 6751i,
6755i, 6757i, 6757i CT. You can also configure the MBU DECT 420d
handset, and secondary, non-Aastra IP Phones.
•
Specify default softkey permissions - this allows an Administrator to display
which softkeys are available for users to self-provision at the path,
“My Phone->Softkey”.
Note: Softkeys disabled by the Administrator on the “softkey permissions” page
are still configurable on a per-user basis by the Administrator, but cannot
be configured by non-privileged users.
2-12
41-001190-02 Rev. 01, Rel. 1.2
Using the AastraLink Pro 160 Web UI
Accessing the AastraLink Web UI
Reference
For more information about the Users Menu, see Chapter 3, “Configuring Aastra
IP Phone Accounts.”
For more information about using non-Aastra IP Phones with the AastraLink Pro,
see Chapter 3, the section “Secondary Non-Aastra SIP Phones and Softclients” on
page 3-31.
41-001190-02 Rev. 01, Rel. 1.2
2-13
AastraLink Pro 160 Administrator Guide
Accessing the AastraLink Web UI
Configuration
The Configuration menu displays the current system and network management
settings. These settings apply to the AastraLink Pro 160 device.
From the Configuration menu, you can view and/or configure the following:
System Menu
•
Specify regional settings
•
Set date and time
•
Configure Music on Hold
•
Configure the Relay Push Button
•
Specify the maximum duration of a voicemail and the maximum number of
voicemail messages to store on the AastraLink Pro 160.
•
Run the Auto-Tuning Wizard for the FXO lines or manually set the line
dynamic range, echo cancel, RTP-to-line power, and line-to-RTP power
parameters for FXO echo cancellation tuning.
Network Menu
•
Specify local network parameters
•
Specify local services
•
Specify external services
Dial Plan Menu
2-14
•
Specify dial plan settings (enable/disable phone registration, set SIP trunk
mode, set FXS port 'hotline' operation, where going offhook automatically
calls a preconfigured directory (or call group) number, set parked call timeout,
set an administrator password, set an overhead paging PIN, and set paging
and intercom parameters) for phones in your network
•
Specify emergency numbers for phones in your network (not applicable to
remote phones)
•
Specify barred numbers (blocked numbers) for phones in your network
41-001190-02 Rev. 01, Rel. 1.2
Using the AastraLink Pro 160 Web UI
Accessing the AastraLink Web UI
•
Configure individual FXO lines for which incoming calls are routed. In
addition to Default (which will send calls via the configured incoming call
route on the auto-attendant page) and SLA, you can configure a specific target
extension, a Ring Group, the Auto-Attendant, FXS phones, or the Operator.
This feature also allows you to provision FXO lines regardless of the line state
(i.e. even if there is no FXO line voltage) to enable for FXO loopback door
entry phone use.
•
Specify abbreviations to use on phones in your network
VoIP Menu
•
Configure SIP trunks
•
Add/delete SIP direct inward dialing (DID) numbers
•
Configure AastraLink trunks
•
Add, Delete, or reboot MBU 400 units in your AastraLink Pro network.
Auto-Attendant Menu
•
Configure Open and Closed Greetings for the interactive voice response
system (IVR) (Auto-Attendant)
•
Configure a Custom Main Menu for the Auto-Attendant
•
Configure a Custom Key Message for the Auto-Attendant
•
Configure Language Greetings for the Auto-Attendant to use (English
(default), French, Spanish)
•
Schedule open and closed hours for each day of the week
•
Specify open and closed hours for specific holidays
•
Configure the Interactive Voice Response (IVR) system (dial by first name,
dial by last name, upload custom menu, record custom greeting, specify keys
to use in the IVR system menus)
Reference
For more information about the Configuration Menu, see Chapter 4, “Configuring
AastraLink Pro 160 System and Network Parameters.”
41-001190-02 Rev. 01, Rel. 1.2
2-15
AastraLink Pro 160 Administrator Guide
Accessing the AastraLink Web UI
Maintenance
The Maintenance menu displays system information and provides options for
maintaining the AastraLink Pro 160 device.
From the Maintenance menu, you can view and/or configure the following:
Current Status Menu
•
View serial number of the AastraLink Pro 160
•
View percentage of voicemail usage
•
View status of lines 1 through 6
•
View LAN/WAN status
•
Reboot the entire AastraLink Pro 160 system (including all connected
phones)
•
Shutdown the entire AastraLink Pro 160 system (including al connected
phones)
Call Records Menu
•
View and sort the Call Record log
•
Download the current Call Record log
•
Download the entire archive of Call Record logs stored on the AastraLink Pro
160.
Backup & Restore Menu
2-16
•
Backup the current AastraLink Pro 160 configuration into an “.abf” file stored
on your PC to use later if required.
•
Restore a previously backed up AastraLink Pro 160 configuration from an
“.abf” file stored on your PC.
•
Reboot the entire AastraLink Pro 160 system (including all connected
phones)
41-001190-02 Rev. 01, Rel. 1.2
Using the AastraLink Pro 160 Web UI
Accessing the AastraLink Web UI
Update Menu
Automatic Updates
•
Specify whether or not to you want the AastraLink Pro 160 to automatically
check and install updates as required (options are notify only, install (reboots
system when updates are found), download but don’t install).
•
Specify day and time to check for updates
Manual Updates
•
Allows you to manually check for updates by clicking on a “Check” link.
•
Allows you to browse a server to select an update and click “Upgrade” to
upgrade the AastraLink Pro.
Support Menu
•
Specify whether or not to send critical error debug information to Aastra
Support for troubleshooting purposes.
Reference
For more information about the Maintenance Menu, see Chapter 5, “Maintaining
the AastraLink Pro 160.”
41-001190-02 Rev. 01, Rel. 1.2
2-17
AastraLink Pro 160 Administrator Guide
Accessing the AastraLink Web UI
2-18
41-001190-02 Rev. 01, Rel. 1.2
Chapter 3
Configuring
Aastra IP Phone Accounts
About this Chapter
Introduction
This chapter describes how you use the AastraLink Web UI to configure accounts
that apply to all of the Aastra IP phones in your network. It provides instructions
for managing users, creating user groups, and specifying global default softkey
settings.
Note: You must be logged in as administrator to perform the tasks described in
this chapter.
Topics
This chapter covers the following topics:
Topic
Page
Accessing the Users Menu
page 3-3
Managing IP Phone Users
page 3-4
Adding User Accounts and Phones
page 3-5
Adding a User Account
page 3-10
Editing a User Account
page 3-15
Deleting a User Account
page 3-27
Enabling/Disabling User Accounts
page 3-29
41-001190-02 Rev. 01, Rel. 1.2
3-1
AastraLink Pro 160 Administrator Guide
About this Chapter
Topic
Page
Secondary Non-Aastra SIP Phones and Softclients
page 3-31
Enabling/Disabling an Extensions Directory Privacy
page 3-32
Uploading User Lists
page 3-34
Configuring Groups
page 3-38
Ring Groups and Paging Groups
page 3-38
Adding a Group
page 3-49
Editing a Group
page 3-52
Deleting a Group
page 3-53
Default Softkeys (Users Menu)
page 3-54
Using the Default Softkeys Menu (User Phone)
page 3-55
Softkey Types (User Phone)
page 3-56
Adding a Default Softkey (User Phone)
page 3-61
Editing a Default Softkey (User Phone)
page 3-62
Deleting a Default Softkey (User Phone)
page 3-62
Default Softkey Permissions (User Phone)
page 3-63
Default Softkeys for Expansion Modules (Administrator or User Phone) page 3-64
Restoring Default Softkeys Back to Factory Settings
3-2
page 3-65
41-001190-02 Rev. 01, Rel. 1.2
Configuring Aastra IP Phone Accounts
Accessing the Users Menu
Accessing the Users Menu
You configure Aastra IP phone accounts from the Users menu, shown below.
Figure 3-1.
Users Menu
41-001190-02 Rev. 01, Rel. 1.2
3-3
AastraLink Pro 160 Administrator Guide
Managing IP Phone Users
Managing IP Phone Users
You manage Aastra IP phone users from the Users->User List Menu.
Click on the
extension number
link to edit a
User’s account
From this menu, you can edit user accounts, delete users from your IP phone
network, add new users and phones, upload a pre-defined User List (.csv file
which contains user and phone information), and/or remotely reboot individual or
multiple IP phones. On the User screen, you can also view information about the
user phones (MAC address, SIP DID Number, and Firmware Version).
Note: As DECT 420d handsets do not have an associated MAC address, a virtual
MBU/Handset identifier is used instead.
The AastraLink Pro 160 is designed to allow zero-management for normal
maintenance activities such as adding a new line to the system. Most customers
will prefer to allow users to register and manage their own phone; however for
customers who prefer a more traditional centralized management model, the
option is available to add, remove and change IP phone and user accounts from
the administrator Users menu.
3-4
41-001190-02 Rev. 01, Rel. 1.2
Configuring Aastra IP Phone Accounts
Managing IP Phone Users
Adding User Accounts and Phones
You can add new Users and phones to your network by clicking the
<Add Phones> button on the User List screen.
Note: Adding users manually is provided as an alternative mechanism to the more
usual method of auto-discovery and user self-registration. It is primarily
used when the Administrator prefers to disable phone registration
(Configuration->Dialplan->Settings->Phone Registration) and manually
provision new IP phone users.
The following screen displays.
Figure 3-2.
Add Users Screen
41-001190-02 Rev. 01, Rel. 1.2
3-5
AastraLink Pro 160 Administrator Guide
Managing IP Phone Users
You can set the following Aastra IP phone user account parameters:
•
User Enabled
Enables or disables user accounts from obtaining service on the AastraLink
Pro. Default is enabled. When a phone is disabled, it still retains the
configuration for the phone in the system. Disabled accounts cannot make or
receive calls, and cannot log into the Web UI. Also, the Corporate Directory
lists only enabled accounts. For more information about configuring User
Accounts, see “Enabling/Disabling User Accounts” on page 3-29.
•
Secondary Enabled
Enables or disables secondary non-Aastra SIP phone and softclient user
accounts from obtaining service on the AastraLink Pro. Default is disabled.
For information on the dial plan settings for a secondary phone on the
AastraLink Pro, see “Secondary Non-Aastra SIP Phones and Softclients” on
page 3-31.
•
SLA Enabled
Enables or disables the ability of this phone to participate in the Shared Line
Appearance (SLA) feature. If disabled, the phone is accessible via PBX “pool
line” dial plan only, and SLA calls do not route to this phone. Default is
enabled.
Note: SLA is not supported on the DECT 420d handsets and 6751i model phones.
For more information about SLA, see Chapter 4, “Configuring FXO Lines for
Shared Line Appearance (SLA)” on page 4-60.
•
Private Extension
Enables or disables directory privacy for individual extensions. If this feature
is enabled, the User’s extension does not display in the Corporate Directory
and is not listed in the dial-by-name directory. For more information about
Private Extensions, see “Enabling/Disabling an Extensions Directory
Privacy” on page 3-32.
3-6
41-001190-02 Rev. 01, Rel. 1.2
Configuring Aastra IP Phone Accounts
Managing IP Phone Users
•
Extension
Specifies the IP phone extension for this User or Administrator. You can
specify any extension within the dial plan range you defined for your network.
By default, the first phone registered with the AastraLink Pro 160 is assigned
extension 200. When entering an extension the default valid range is 200
through 499, or 2000 through 4999, but the exact range pertains to the 'First
extension' selection made by the administrator during the initial system
configuration.
•
First Name
Specifies the first name of the User or Administrator.
•
Last name
Specifies the last name of the User or Administrator.
•
Password
Specifies the password set up for the User or Administrator.
•
Email
Specifies the email address of the User or Administrator.
•
Account Type
The Account Type defines the account type (Administrator or User) and
associated privileges. An administrator can configure/use his own IP phone,
manage other IP phones/users on the network, and manage and maintain the
AastraLink Pro 160. A user can configure/use his phone only.
•
Operator
Specifies if this User or Administrator is also an Operator. By default, the first
IP phone you register with the AastraLink Pro 160 (the Administrator phone)
is also assigned Operator privileges. The IP phone acting in the role of
Operator may be moved between users, but there must always be one phone
designated as Operator.
Note: The DECT 420d handsets do not support a call-transfer softkey, and
therefore, cannot be designated as the “Operator”.
41-001190-02 Rev. 01, Rel. 1.2
3-7
AastraLink Pro 160 Administrator Guide
Managing IP Phone Users
•
Outgoing Line
Specifies which outgoing line this IP phone uses for outgoing calls. The term
“outgoing line” refers to one of the 6 FXO ports that are located on the back
of the AastraLink device.
The default is Any. Alternatively, you can specify that this phone may only
use a specific outgoing line for its calls. This is useful if different FXO lines
have different originating CLID, and is usually used in combination with the
Configuration->Dialplan->FXO Lines feature so that incoming and
outgoing calls are routed using the same FXO line.
•
Phone Type
Specifies the model of this Aastra IP phone. Select the applicable phone from
the list. After saving the User information page and then redisplaying the User
information page to edit, this field becomes read-only.
•
Phone Firmware Version (display only, not editable)
Displays the current phone’s (User or Administrator) firmware version
currently installed and being used on the phone.
IP Address (display only, not editable)
Displays the current IP Address assigned to this phone (User or
Administrator) used when the phone last registered to the AastraLink.
•
MAC Address (not applicable when adding/editing a 420d handset)
Specifies the MAC Address assigned to this IP phone. When adding or editing
a phone in the AastraLink network, you must enter the applicable MAC
address of the phone in this field. Not used for 420d handsets. Refer to the
next bullet “Mobility Base Unit” for more information.
•
Mobility Base Unit (applicable to the MBU 420d handsets only)
Specifies the 420d handset and MBU number for which you want to apply the
current phone information. This drop-down list shows the available handsets
(max 8 per MBU) for all currently provisioned MBU-400 units, and is used
instead the of MAC address field for 420d phone model.
3-8
41-001190-02 Rev. 01, Rel. 1.2
Configuring Aastra IP Phone Accounts
Managing IP Phone Users
•
SIP DID Number
Specifies the SIP Direct Inward Dialing (DID) number to this IP phone. A
DID number is an individual telephone number assigned to this phone that
allows an outside caller to dial directly from incoming SIP trunk calls to the
users extension, without having to route via the Operator or IVR menu
system.
41-001190-02 Rev. 01, Rel. 1.2
3-9
AastraLink Pro 160 Administrator Guide
Managing IP Phone Users
Adding a User Account
Use the following procedure to add a user account and phone to your network.
AastraLink Web UI
Step
Action
1
Select Users->User List
2
Click <Add Phones>. The following screen displays.
3-10
41-001190-02 Rev. 01, Rel. 1.2
Configuring Aastra IP Phone Accounts
Managing IP Phone Users
AastraLink Web UI
Step
Action
3
The User Enabled field is enabled by default. If you want this User’s phone to register in the
AastraLink Pro network, leave this field enabled.
If you disable this field, the phone will still retain its configuration in the system. However, the phone
does not register on the network. Disabled accounts cannot make or receive calls, and cannot log
into the Web UI. Also, the Corporate Directory lists only enabled accounts.
For more information about enabling/disabling User Accounts, see “Enabling/Disabling User
Accounts” on page 3-29.
4
The Secondary Enabled field is disabled by default.
If you are adding a non-Aastra phone or a softclient user account, enable this field by placing a check
mark in the Secondary Enabled check box.
Skip this step if the phone you are adding is an Aastra IP Phone and keep this field disabled.
For more information about adding secondary phones to your AastraLinnk Pro network, see
“Secondary Non-Aastra SIP Phones and Softclients” on page 3-31.
5
The SLA Enabled field is enabled by default.
Shared Line Appearance (SLA) is configured on a per FXO basis on the AastraLink Pro. If this field is
enabled, you must enable an FXO line as SLA at the location Configuration->Dial Plan->FXO
Lines. If disabled, the phone is accessible via PBX “pool line” dial plan only, and SLA calls do not
route to this phone. Default is enabled. SLA key mapping (L1, L2, etc.) varies by phone model.
Note: SLA is not supported on the DECT 420d handsets and 6751i model phones.
For more information about configuring SLA on the AastraLink Pro, see Chapter 4, “Configuring FXO
Lines for Shared Line Appearance (SLA)” on page 4-60.
41-001190-02 Rev. 01, Rel. 1.2
3-11
AastraLink Pro 160 Administrator Guide
Managing IP Phone Users
AastraLink Web UI
Step
Action
6
The Private Extension field is disabled by default.
This field enables or disables directory privacy for individual extensions. If this feature is enabled, the
User’s extension does not display in the Corporate Directory and is not listed in the dial-by-name
directory.
If you do not want the current extension to display in the Corporate Directory, place a check mark.
For more information about enabling/disabling private extensions, see “Enabling/Disabling an
Extensions Directory Privacy” on page 3-32.
7
In the Extension field, enter an extension to assign to the new user.
You can specify any extension within the dial plan range you defined for your network. By default, the
first phone registered with the AastraLink Pro 160 is assigned extension 200. When entering an
extension the default valid range is 200 through 499, or 2000 through 4999, but the exact range
pertains to the 'First extension' selection made by the administrator during the initial system
configuration
8
In the First Name field, enter the first name of the new User or Administrator.
9
In the Last Name field, enter the last name of the new User or Administrator.
10
In the Password field, enter the password to assign to this new User’s or Administrator’s phone.
11
In the Email field, enter the email address of this new User or Administrator.
12
In the Account Type field, select whether the user and user’s phone is an Administrator or User.
13
If this user is also the Operator, click on the “Operator” check box.
The first IP phone registered with the AastraLink Pro 160 is registered as both an administrator, and
Operator, by default.
Note: The DECT 420d handsets do not support a call-transfer softkey, and therefore, cannot be
designated as the “Operator”.
3-12
41-001190-02 Rev. 01, Rel. 1.2
Configuring Aastra IP Phone Accounts
Managing IP Phone Users
AastraLink Web UI
Step
Action
14
If required, specify a line (line 1 - line 6) for this extension to use for all outgoing calls in the
“Outgoing Line” field. Valid values are Line 1 through Line 6. The default is Any line.
This field specifies which outgoing line this IP phone uses for outgoing calls. The term “outgoing line”
refers to one of the 6 FXO ports that are located on the back of the AastraLink device. Alternatively,
you can specify that this phone may only use a specific outgoing line for its calls. This is useful if
different FXO lines have different originating CLID, and is usually used in combination with the
Configuration->Dialplan->FXO Lines feature so that incoming and outgoing calls are routed using
the same FXO line.
15
In the Phone Type field, select the phone type for this user. Valid values are:
• Aastra9143i
• Aastra9480i
• Aastra9480i CT
• Aastra6730i
• Aastra6731i
• Aastra6751i
• Aastra6753i
• Aastra6755i
• Aastra6757i
• Aastra6757i CT
• Aastra420d
Default is Aastra9143i.
Note: Before selecting the value, Aastra420d, you must add an MBU unit(s) to the AastraLink Pro
using the Web UI at the location, Configuration->VoIP->Mobility Base Units. Once an MBU is
registered, the administrator can provision extensions for individual handsets on this “Add Phone”
page, and then select the "Aastra420d" phone type.
16
(Not applicable to the 420d handse) In the MAC Address field, enter the MAC address of the phone
for this user. You can find the MAC address of the phone on a label on the bottom of the phone.
This field specifies the MAC Address assigned to this IP phone. When adding or editing a phone in
the AastraLink network, you must enter the applicable MAC address of the phone in this field.
Note: If you select a value of “Aastra420d” in step 15, this MAC Address field is grayed-out. This
field does not apply to an MBU 420d handset.
41-001190-02 Rev. 01, Rel. 1.2
3-13
AastraLink Pro 160 Administrator Guide
Managing IP Phone Users
AastraLink Web UI
Step
Action
17
(For MBU units only) If you selected a value of “Aastra420d” for the Phone Type in step 15, in the
Mobility Base Unit field, select the 420d handset for which you want to apply this user information.
This field specifies the 420d handset and MBU number for which you want to apply the current phone
information. This drop-down list shows the available handsets (max 8 per MBU) for all currently
provisioned MBU-400 units, and is used instead the of MAC address field for 420d phone model.
For more information about adding MBUs to your AastraLink network, see Chapter 4, “Mobility Base
Units (MBUs)” on page 4-97.
18
In the SIP DID Number field, enter the SIP DID number for this user’s phone. The DID number is the
number that an outside caller can dial to reach this phone directly without having to go through the
company’s PBX. The DID is a direct dialed number to this phone.
19
Click <Save> to save your changes.
3-14
41-001190-02 Rev. 01, Rel. 1.2
Configuring Aastra IP Phone Accounts
Managing IP Phone Users
Editing a User Account
An administrator can edit registered phones to change the identity of the user
account associated with the phone. (For example, the Administrator can edit the
extension, users name, password, etc.). The following illustration shows a User
account that an Administrator can edit.
Figure 3-3.
Edit Users Screen
Reference
Refer to the description of each field in the above illustration on page 3-6.
41-001190-02 Rev. 01, Rel. 1.2
3-15
AastraLink Pro 160 Administrator Guide
Managing IP Phone Users
Use the following procedure to edit a user account.
3-16
41-001190-02 Rev. 01, Rel. 1.2
Configuring Aastra IP Phone Accounts
Managing IP Phone Users
AastraLink Web UI
Step
Action
1
Select Users->User List
41-001190-02 Rev. 01, Rel. 1.2
3-17
AastraLink Pro 160 Administrator Guide
Managing IP Phone Users
AastraLink Web UI
Step
Action
2
Click on the extension for the user account you want to edit.
The user account appears. You can edit personal information from this menu, specify the user type
(administrator or user), and view the phone model, IP address and MAC address assigned to this
phone.
Note: You can also set specific key types (depending on the User’s phone model) for the phone, and
specify which key types display for a User to select from. The administrator is not restricted by the
softkey subset defined in the “Default Softkey Permissions” and the target user account “Softkey
Permissions”. Administrators can therefore, assign specific softkeys to a user, which the user
themselves is not permitted to modify.
For more information about setting key types on the phone, see “Configuring a User’s Keys on the
Phone or Expansion Module in the User Account” on page 3-20. For more information about setting
softkey permissions on a User’s phone, see “Setting Softkey Permissions in the User Account (User
or Administrator Phone)” on page 3-25.
3-18
41-001190-02 Rev. 01, Rel. 1.2
Configuring Aastra IP Phone Accounts
Managing IP Phone Users
AastraLink Web UI
Step
Action
3
Edit the user account parameters as required (User Enabled, Secondary Enabled, SLA Enabled
Private Extension, Extension, First Name, Last Name, Password, Email).
For information on configuring these specific fields, refer to the procedure, “Adding a User Account”
on page 3-10.
4
Specify whether or not this user is an administrator in the “Account Type” field.
5
If this user is also the Operator, click on the “Operator” check box.
The first IP phone registered with the AastraLink Pro 160 is registered as both an administrator, and
Operator, by default.
6
If you wish, specify a line (line 1 - line 6) for this extension to use for all outgoing calls in the
“Outgoing Line” field.
The default is Any line.
7
Modify the MAC Address if required.
8
Modify or delete the SIP DID Number if required. The DID number is the number that an outside
caller can dial to reach this phone directly without having to go through the company’s PBX. The DID
is a direct dialed number to this phone.
9
Click <Save> to save your changes.
41-001190-02 Rev. 01, Rel. 1.2
3-19
AastraLink Pro 160 Administrator Guide
Managing IP Phone Users
Configuring a User’s Keys on the Phone or Expansion Module in the
User Account
An Administrator can assign key types to the the softkeys or programmable keys
(dependant on the User’s phone model), and/or expansion modules keys on their
IP Phone. If applicable to their phone, the softkeys, programmble keys, or
expansion module tab displays when editing a User’s account.
A softkey/programmable
key tab displays
dependant on the
User’s phone model.
An expansion module tab
displays if an expansion
module is attached to the
User’s phone.
3-20
41-001190-02 Rev. 01, Rel. 1.2
Configuring Aastra IP Phone Accounts
Managing IP Phone Users
The applicable key page displays after selecting the softkey/programmable key/
expansion module key tab. The following example shows a 6755i phone’s softkey
key page.
The default keys that display are dependant on the User’s phone model. You can
also change the default softkeys at the location Users->Default Softkeys. For
more information about changing the default softkeys on a phone, see “Default
Softkeys (Users Menu)” on page 3-54.
The Administrator can override a phones current softkey settings and reset it to
the Default Softkeys template by clicking <Reset to Defaults>.
If applicable to the User’s phone model or expansion module, a <Print Label>
key displays for you to print a label to insert next to the physical key on the phone
after configuring the key.
41-001190-02 Rev. 01, Rel. 1.2
3-21
AastraLink Pro 160 Administrator Guide
Managing IP Phone Users
You can assign key types to the keys on the User’s phone by clicking on each key
field. The following prompt displays.
This page allows you to specify a key type for the key. The key types in the list
may vary depending on the User’s model phone. For more information about keys
types on the User’s phone, see “Softkey Types (User Phone)” on page 3-56.
The list of key types can be customized by the Administrator if required. To
customize the list of key types on the User’s phone, see “Setting Softkey
Permissions in the User Account (User or Administrator Phone)” on page 3-25.
3-22
41-001190-02 Rev. 01, Rel. 1.2
Configuring Aastra IP Phone Accounts
Managing IP Phone Users
Use the following procedure to add, edit, or delete a key type on a User’s phone.
Adding a Key Type (User or Administrator Phone)
Use the following procedure to add/define a new key type for a User’s phone.
AastraLink Web UI
Step
Action
1
Select Users->User List-><select a user>.
2
Click on the Softkeys, Top Softkeys, Programmable Keys, or Expansion Module tab. The tab that
displays is dependant on the User’s phone model you are editing.
3
Click on an <empty> softkey.
4
Select the “Softkey Type” from the pull-down menu, then click <Save>.
Notes:
1. The key types that display in the list are dependant on the User’s phone model.
2. If you are configuring a Speeddial or BLF softkey, you must also assign a label/value to the
softkey. See “Softkey Types (User Phone)” on page 3-56 for more information.
Editing a Key Type (User or Administrator Phone)
Use the following procedure to edit an existing key type for a User’s phone.
AastraLink Web UI
Step
Action
1
Select Users->User List-><select a user>.
2
Click on the Softkeys, Top Softkeys, Programmable Keys, or Expansion Module tab. The tab that
displays is dependant on the User’s phone model you are editing.
3
Click on the softkey you want to edit.
41-001190-02 Rev. 01, Rel. 1.2
3-23
AastraLink Pro 160 Administrator Guide
Managing IP Phone Users
AastraLink Web UI
Step
Action
4
Select a different “Softkey Type” from the pull-down menu.
5
Click <Save> to save your changes.
Notes:
1.The key types that display in the list are dependant on the User’s phone model.
2.If you are configuring a Speeddial or BLF softkey, you must also assign a label/value to the softkey.
See “Softkey Types (User Phone)” on page 3-56 for more information.
Deleting a Key Type (User or Administrator Phone)
Use the following procedure to delete a key type from a User’s phone.
AastraLink Web UI
Step
Action
1
Select Users->User List-><select a user>.
2
Click on the Softkeys, Top Softkeys, Programmable Keys, or Expansion Module tab. The tab that
displays is dependant on the User’s phone model you are editing.
3
Click on the softkey you want to delete.
4
In the Softkey Type field, select “empty” from the pull-down menu, and click <Save>.
The key type is removed from the User’s phone.
3-24
41-001190-02 Rev. 01, Rel. 1.2
Configuring Aastra IP Phone Accounts
Managing IP Phone Users
Setting Softkey Permissions in the User Account
(User or Administrator Phone)
An Administrator can specify the key types that are available to a User or
Administrator to select from when that User is configuring keys on their phone.
When an Administrator specifies these softkey permissions, only the softkeys
enabled on the Softkey Permission page will display on the User’s phone for the
user to select from when configuring softkeys.
Use the following procedure to set softkey permissions for an Administrator or
User.
AastraLink Web UI
Step
Action
1
Select Users->User List-><select a user>->Softkey Permissions.
41-001190-02 Rev. 01, Rel. 1.2
3-25
AastraLink Pro 160 Administrator Guide
Managing IP Phone Users
AastraLink Web UI
Step
Action
2
The available softkeys on an Administrator’s or User’s phone display in the Softkey Permissions
page. All softkeys are enabled by default. To disable a softkey, click on a box to uncheck it.
Available softkeys are dependant on the Model of the Administrator’s or User’s phone.
If you disable a softkey, that softkey does not display in the Administrator’s or User’s softkey list.
3
3-26
Click <Save> to save your changes.
41-001190-02 Rev. 01, Rel. 1.2
Configuring Aastra IP Phone Accounts
Managing IP Phone Users
Deleting a User Account
An administrator can delete a user account associated with a registered phone.
When you delete a User account, all associated information is deleted from the
AastraLink Pro. (For example, the extension, first name, last name, password,
etc.).
Figure 3-4.
Delete Users Screen
41-001190-02 Rev. 01, Rel. 1.2
3-27
AastraLink Pro 160 Administrator Guide
Managing IP Phone Users
Use the following procedure to delete a user account.
AastraLink Web UI
Step
Action
1
Select Users->User List
2
Click on the extension for the user account or accounts you want to edit.
Note: You can select an individual user account or multiple user accounts.
Click here to
select all
user accounts
3
Click <Delete>.
4
When prompted, click <Yes> to confirm your action.
The user account(s) you deleted no longer appear in the User List.
5
3-28
Click <Save> to save your changes.
41-001190-02 Rev. 01, Rel. 1.2
Configuring Aastra IP Phone Accounts
Managing IP Phone Users
Enabling/Disabling User Accounts
An Administrator can enable or disable user accounts from obtaining service on
the AastraLink Pro. When the account is disabled, it still retains the configuration
for the phone in the system. Disabled accounts cannot make or receive calls, and
cannot log into the Web UI. Also, the Corporate Directory lists only enabled
accounts.
Note: The currently logged in Administrator can disable User accounts and other
Administrator accounts. The logged-in Administrator cannot disable his
own account nor the Operator account.
You can disable user accounts using the Web UI at the location,
Users->User List-><select an existing user or click Add Phone>->General.
Use the following procedure to enable/disable a User account.
AastraLink Web UI
Step
Action
1
Select Users->User List-><select an existing user or click Add Phone>->General.
2
The “User Enabled” field is enabled by default. To disable this field, click the check box to remove
the check mark from the box.
Enable user by
placing a check mark
in the box
Disable user by
removing check mark
from the box
3
Click <Save> to save your changes.
41-001190-02 Rev. 01, Rel. 1.2
3-29
AastraLink Pro 160 Administrator Guide
Managing IP Phone Users
AastraLink Web UI
Step
Action
When you disable this field for a User, “Disabled” displays in the User List page in the “Account
Flags” column.
“Disabled” displays
for the applicable
User in the
User List
In the above example, the User “Bob Jones”, extension 201 is diabled, and does not display in the
Corporate directory as shown below. The Corporate Directory is located at
My Phone->Directory->Corporate.
User Bob Jones,
ext. 201 does not
display in the
Corporate Directory
3-30
41-001190-02 Rev. 01, Rel. 1.2
Configuring Aastra IP Phone Accounts
Managing IP Phone Users
Secondary Non-Aastra SIP Phones and Softclients
The AastraLink Pro 160 supports non-Aastra SIP terminal and softclient generic
accounts. These phones are not directly able to be dialed, but ring in parallel with
the primary Aastra phone for which they are associated.
Outgoing calls may be placed from the generic SIP device, and calls support
direct signaling; therefore enhanced capabilities such as video softclients may be
used between each generic SIP device.
The account registration information is 61 + primary extension (e.g. 61200) and
the password for registration is the users voicemail password/Web UI login.The
dialplan line prefix for the secondary phone displays as "61" at the location
Configuration->Dialplan->Settings as shown in the following illustration.
Secondary Line
Prefix
Note: Secondary phones are intended to be used in conjunction with a primary
Aastra SIP desk phone. Therefore, a secondary phone is disabled if the
primary SIP phone has not recently registered to the AastraLink. Also, if
any of the primary phone account information is changed, the generic
account is disabled until the Aastra phone re-registers with Asterisk (this
can be instantaneous or require some time if the Aastra phone requires a
reboot).
To add a secondary SIP phone to the AastraLink Pro network, see “Adding User
Accounts and Phones” on page 3-5.
41-001190-02 Rev. 01, Rel. 1.2
3-31
AastraLink Pro 160 Administrator Guide
Managing IP Phone Users
Enabling/Disabling an Extensions Directory Privacy
An Administrator can enable or disable individual extensions (User and
Administrator extensions) from displaying in a Corporate Directory. If this feature
is enabled, the User’s extension does not display in the Corporate Directory and is
not listed in the dial-by-name directory. By default, the Private Extension feature
is disabled.
You enable or disable private extensions at the location
Users->User List-><select an existing user or click Add Phone>->General.
Use the following procedure to configure a private extension.
AastraLink Web UI
Step
Action
1
Select Users->User List-><select an existing user or click Add Phone>->General.
2
The “Private Extension” field is disabled by default. To enable this field, click the check box to place
a check mark in the box.
Private Extension
Parameter
3
3-32
Click <Save> to save your changes.
41-001190-02 Rev. 01, Rel. 1.2
Configuring Aastra IP Phone Accounts
Managing IP Phone Users
AastraLink Web UI
Step
Action
When you enable the private extension feature for a User or Administrator, “(private)” displays in the
User List page in the “Account Type” column.
“(Private)” displays
for the applicable
extension in the
User List
In the above example, extension 201 is enabled as “private extension” and does not display in the
Corporate directory as shown below. The Corporate Directory is located at
My Phone->Directory->Corporate.
Extension 201 does not
display in the Corporate
Directory
41-001190-02 Rev. 01, Rel. 1.2
3-33
AastraLink Pro 160 Administrator Guide
Managing IP Phone Users
Uploading User Lists
The AastraLink Pro allows you to upload user lists from a file stored on a server.
This allows you to create several users at once by uploading a .CSV file. The
format of the file needs to be:
Extension, FirstName, Last Name. Password, MAC, Phone Type
Each item in the file must be separated by a comma.
Each MAC address must be in colon-separated format (for example,
54:43:4F:6E:11:B3).
Applicable phone types include:
•
Aastra6730i
•
Aastra6757i CT
•
Aastra6731i
•
Aastra9143i
•
Aastra6751i
•
Aastra9480i
•
Aastra6753i
•
Aastra9480i CT
•
Aastra6755i
•
Aastra420d
•
Aastra6757i
The following is an example of a .CSV file that you can upload to the AastraLink
Pro 160:
200,James,Test,12345,00:08:5D:03:CF:60,Aastra9480i
201,James,MBU1,12345,02:08:7B:01:03:D5,Aastra420d
Note: The AastraLink Pro does not support secondary (non-Aastra) IP Phones as
phone types when uploading User Lists.
3-34
41-001190-02 Rev. 01, Rel. 1.2
Configuring Aastra IP Phone Accounts
Managing IP Phone Users
Use the following procedure to upload a user list to the AastraLink Pro.
AastraLink Web UI
Step
Action
1
Select Users->User List.
41-001190-02 Rev. 01, Rel. 1.2
3-35
AastraLink Pro 160 Administrator Guide
Managing IP Phone Users
AastraLink Web UI
Step
Action
2
Click <Upload User List>. The following prompt displays.
3
Enter the name of the “.csv” file that contains the User List information, or click <Browse> to
navigate to the location where the “.csv” file is stored.
Note: The file must be in the format: Extension, First Name, Last Name, Password, MAC, Phone
Type.
4
3-36
Click <Upload File> to upload the User List information to the AastraLink Pro.
41-001190-02 Rev. 01, Rel. 1.2
Configuring Aastra IP Phone Accounts
Managing IP Phone Users
Uploading User Lists if MBU 400s Connected to the AastraLink Pro
If you have an MBU 400 connected to the AastraLink Pro, the 420d handsets are
DECT devices, and therefore, do not have real MAC addresses. The AastraLink
displays the MAC addresses for 420d handsets as follows:
02:08:7B:XX:YY:ZZ
where
02 - is used for the first octet to indicate that the MAC address is locally
administered*
XX - becomes the hex representation of the MBU that the handset is registered to
YY - becomes the hex representation of the handset ID
ZZ - is the real value (final octet of the owning MBU)
*Note: A Locally Administered address is an IEEE 802.3 EUI-64 MAC which
has the second least-significant bit of the most significant byte set to 1.
For this purpose, 02 is used in the MBU/420d virtual MAC address, to
ensure that it never conflicts with a real Universally Administered
Ethernet MAC address (i.e. another manufacturer etc). See the following
illustration for more detail.
41-001190-02 Rev. 01, Rel. 1.2
3-37
AastraLink Pro 160 Administrator Guide
Configuring Groups
Configuring Groups
Ring Groups and Paging Groups
The AastraLink Pro allows you to configure the following group types:
•
Ring Group - All members that belong to a specific Ring Group can receive
the same incoming calls.
•
Paging Group - All members that belong to a specific Paging Group can
receive the same incoming page.
AastraLink Pro supports the ability for the Administrator to choose a subset of IP
phone extensions or FXS extension which operate together as a group. Groups
may be associated with unique configuration for incoming call routing, and have
their own voicemail and 'virtual extension' number, which is entirely separate
from the extension number of the users IP phone.
Each IP phone may be a member of zero or more groups, and can overlap between
multiple separate groups - for example, groups may have different membership
lists, with or without any users common between two specific groups. The only
provisioning restriction is that each group must have at least one IP phone as a
member at all times.You can use your keypad on the phone to dial a specific
group.
For Paging Groups, a single phone can be a member of up to 4 paging groups
only, plus a system-wide “all active phones” group (660).
The following applies to the multiple paging group feature:
3-38
•
Supports up to 9 paging groups total per AastraLink.
•
Phones currently in a call have no barge-in (system-wide option)
•
Intercom warning tone on/off for paging groups (system-wide option)
•
Icom key can be used as a Paging key (system-wide option).
•
Softkey can be used as a Paging key (per-user option)
•
The Phone UI displays an Intercom/Paging screen if the phone has been
configured for a Paging Group.
41-001190-02 Rev. 01, Rel. 1.2
Configuring Aastra IP Phone Accounts
Configuring Groups
Notes:
1. By default, incoming intercom calls are enabled for all IP phone models. If
required, an Administrator can enable outgoing intercom calls on all model
phones (except 51i).
2. The Icom hard key is applicable to the 480i and 480i CT only; all other
model phones (except 51i) can be configured with an Icom softkey.
3. Remote office phones cannot receive paging calls.
•
Paging group security - An optional Password allows the administrator to
establish an access PIN code that users are required to enter before sending a
call to a Paging group.
The default 660 all-phones have a permanently enabled password. This group
is the VoIP equivalent of the Overhead Paging port, (see Chapter 4,
“Configuring Overhead Paging” on page 4-49) and shares the password
configured for that feature.
Note: If the incoming "Barge-in" setting is disabled, or the incoming
"Auto-Answer" is disabled on the phone, the page does not go to the
speakerphone.
Dial Plan for Ring Groups
AastraLink Pro 160 dialplan provides access to Ring Groups using the "65"
prefix.
When configuring Ring Groups using the WebUI, AastraLink automatically
prepends the “65” digits to the groups’s extension, to create a virtual extension
number. For example, creating a Ring Group 300 will automatically prefix 65 so
that the dial plan entry becomes 65300.
For more information about dial plans and for a table of dial plan numbers, see
Chapter 4, Table 4-1 “AastraLink Pro 160 Dialplan” on page 4-40).
Note: All phones, including DECT handsets (420d) and FXS phones are
supported for Ring Groups.
41-001190-02 Rev. 01, Rel. 1.2
3-39
AastraLink Pro 160 Administrator Guide
Configuring Groups
Ring group call-forwarding rules
For ring groups, the AastraLink Pro call-routing provides single-level forwarding
with fall-back routing.
If an incoming call route is set to a ring group, calls are first directed to the
ring-group. If no member of the group answers, after the configured 'Rings before
Transfer' time has elapsed, the call falls-back to the alternative route specified in
the "Transfer to" parameter.
Call forwarding is not performed across multiple hops; therefore calls do not take
the route specified in the destination of individual members of the facility.
Similarly, calls to a ring group cannot be transferred to another ring group; only
direct-dial extensions can receive call transfers from a ring group.
For example:
IF
THEN
•
Extension 200 is listed as a member of group 651. •
Incoming calls will route to group 651, and
extension 200 will ring.
•
Extension 200 has call-forward set to extension
•
201 AND extension 200 is a member of group 651.
The call-forward of 200 to 201 is not used as
that is a local setting for the users phone, not
the ring group.
•
Extension 200 has call-forward set to extension
201 AND neither extension is a member of group
651.
•
Direct-dial calls to 200 will call-forward to 201.
•
“Transfer to” for group 651 is configured as
auto-attendant.
•
Incoming calls to group 651 are set to route to
the Auto-attendant if there is no answer from
any Ring Group member.
3-40
41-001190-02 Rev. 01, Rel. 1.2
Configuring Aastra IP Phone Accounts
Configuring Groups
Dial Plan for Paging Groups
AastraLink Pro 160 dialplan provides access to Paging Groups using the "66"
prefix.
When configuring Paging Groups using the WebUI, AastraLink automatically
prepends the "66" digits to the groups’s extension, to create a virtual extension
number. For example, creating a Paging Group 111 will automatically prefix 66 so
that the dial plan entry becomes 66111.
For more information about dial plans and for a table of dial plan numbers, see
Chapter 4, Table 4-1 “AastraLink Pro 160 Dialplan” on page 4-40
Note: DECT handsets (420d) and FXS phones are not supported for Paging
Groups.
41-001190-02 Rev. 01, Rel. 1.2
3-41
AastraLink Pro 160 Administrator Guide
Configuring Groups
Virtual Extension Numbers (for Ring and Paging Groups)
Groups use virtual extension numbers which may have any length of numeric
digits from 1 to 20. Although most customers may choose to use 1 or 2 digit
numbers for group virtual extensions to keep their dial plan reasonable for callers,
longer digit strings can be useful for 'name dialling'. To dial a Group’s virtual
extension, it is necessary to dial the 65 (Ring Group) or 66 (Paging Group) before
the virtual extension number.
For example, if a Ring Group’s virtual extension is 10, the group can be reached
by dialling 6510 from a SIP phone, the IVR, etc. An example for a name dialling
could be '65+PIZZA' with the corresponding virtual extension of 'PIZZA' being
74992.
In the illustration below, a Ring Group and Paging Group were created.
Ring Group with
extension 300
(65 + 300)
Paging Group with
extension 111
(66 + 111)
For more information about the AastraLink Pro 160 dial plans, see Chapter 4, the
section, “Configuring Dial Plan Settings” on page 4-38.
3-42
41-001190-02 Rev. 01, Rel. 1.2
Configuring Aastra IP Phone Accounts
Configuring Groups
Creating Rules for Groups (Ring and Paging Groups)
When you create a Group, you configure group-forwarding rules for the Group
that determines what happens when an incoming call goes unanswered. The
following table describes the parameters you can set to configure these
group-forwarding rules.
Parameter
Description
Name
Specifies the name of the Group. Valid values are:
• Ring Group
• Paging Group
Extension
Specifies the extension for the Group.
Note: For more information about assigning
extension numbers, see the section, “Virtual
Extension Numbers (for Ring and Paging Groups)”
on page 42.
Password
(optional) Specifies the PIN access to a Paging
Group, or the password for voicemail on a Ring
Group.
Voicemail Notification
Specifies whether or not an email is sent to the Ring
Group to notify of a voicemail that was left by the
incoming caller. Valid values are:
• Off (default)
• Email
• Email with Audio-Attachment
Note: Ring groups do not have individual email
addresses. When email is configured as the
notification method, the message is sent to the email
addresses in the "My Preferences" of all members of
that ring group (if configured).
(Not applicable to Paging
Groups)
41-001190-02 Rev. 01, Rel. 1.2
3-43
AastraLink Pro 160 Administrator Guide
Configuring Groups
Parameter
Description
Distinctive Ring
Specifies a distinctive ring for all of the member’s
phones in the Ring Group. Valid values are:
(Not applicable to Paging
Groups)
•
•
•
•
•
None (default - Tone 1)
Pattern 1 (Tone 2)
Pattern 2 (Tone 3)
Pattern 3 (Tone 4)
Pattern 4 (Tone 5)
Note: Distinctive ring tones apply to SIP extensions
only. Any 420d or SIP phones in a Ring Group
receive standard ring tone.
For more information about ring tone patterns, see
the section, “Distinctive Ringing (Ring Groups only)”
on page 3-45.
Rings Before Transfer
(Not applicable to Paging
Groups)
Specifies the number of rings on the Ring Group’s
phones before transferring the incoming call.
Valid values are 1 through 6. Default is 1.
Note: Transfer of the call is based on the setting of
the “Transfer to” parameter.
Transfer to
(Not applicable to Paging
Groups)
Specifies where the incoming call is transferred to if
there is no answer or if there is a busy signal on the
Ring Group’s phones. Valid values are:
•
•
•
•
None (default)
Extension
Voicemail
Auto-Attendant
Note: If you choose extension, you must specify the
extension at the “Transfer Number” parameter.
Transfer Number
(Not applicable to Paging
Groups)
Group Membership
3-44
Specifies the phone number or extension to transfer
unanswered incoming calls to. Valid values are the
registered phones with their extensions in your
AastraLink Pro 160 network.
Specifies the members of the Ring Group or Paging
Group with their extensions. Only the members
selected become part of the Ring Group or Paging
Group you define. Default is NO MEMBERS.
41-001190-02 Rev. 01, Rel. 1.2
Configuring Aastra IP Phone Accounts
Configuring Groups
Distinctive Ringing (Ring Groups only)
In IP Telephony, different ringing patterns have different frequencies and
cadences. Ring cadence is the ringing pattern heard by the called party, before
they pick up the call. The IP phones use the following Bellcore-specified tones by
default:
Ring Tone Pattern
Call Criteria
Bellcore Tones
internal calls
Bellcore-dr2
external calls
Bellcore-dr3
calls with contact list
Bellcore-dr4
calls with specific time frames
Bellcore-dr5
Note: Distinctive ring tones apply to SIP extensions only. Any 420d or SIP
phones in a Ring Group receive standard ring tone.
41-001190-02 Rev. 01, Rel. 1.2
3-45
AastraLink Pro 160 Administrator Guide
Configuring Groups
The following table identifies the different Bellcore ring tone patterns and
cadences.
Nominal
Duration
(ms)
Maximum
Duration
(ms)
Ringing
Silent
2s On
4s Off
1800
3600
2000
4000
2200
4400
Ringing
Silent
Long
630
315
800
400
1025
525
Ringing
Silent
Long
Long
630
3475
800
4000
1025
4400
Ringing
Silent
Short
315
145
400
200
525
525
Ringing
Silent
Short
315
145
400
200
525
525
Ringing
Silent
Long
630
2975
800
4000
1025
4400
Ringing
Silent
Short
200
145
300
200
525
525
Ringing
Silent
Long
800
145
1000
200
1100
525
Ringing
Silent
Short
200
2975
300
4000
525
4400
450
500
550
Pattern
(Standard)
1
Bellcore-dr2
2
Bellcore Tone
Bellcore-dr3
Bellcore-dr4
Bellcore-dr5
3-46
Cadence
Minimum
Duration
(ms)
Pattern
ID
3
4
5
Ringing
41-001190-02 Rev. 01, Rel. 1.2
Configuring Aastra IP Phone Accounts
Configuring Groups
Example of a Ring Group
The following illustration shows an example of a configured Ring Group.
In the illustration above, a Ring Group named “Support” is defined with three
members:
Extension 200, John Smith
Extension 201, Bob Jones
Extension 202, Dan Whyte
The Ring Group’s “Extension” is 5200; “Voicemail Notification” is set for Email;
“Distinctive Ring” is set for Pattern 3; “Ring Before Transfer” is set to 2; and
“Transfer to” is set to Voicemail.
41-001190-02 Rev. 01, Rel. 1.2
3-47
AastraLink Pro 160 Administrator Guide
Configuring Groups
So in the above configuration, when a call comes into the Support Ring Group at
extension 5200, the phones at extension 200, 201, and 202 ring for at least 2 rings
with a specific ring pattern identified for Support. If the incoming call is not
answered within 2 rings, the call is transferred to voicemail so the caller can leave
a message. An email notification of the voicemail is also sent to all three members
email addresses (defined at the location My Phone->Preferences).
Example of a Paging Group
The following illustration shows an example of a configured Paging Group.
3-48
41-001190-02 Rev. 01, Rel. 1.2
Configuring Aastra IP Phone Accounts
Configuring Groups
In the illustration above, a Paging Group named “Marketing” is defined with two
members:
Extension 201, Bob Jones
Extension 202, Dan Whyte
The Paging Group’s “Extension” is 111. A password is also configured for the
Paging Group. So in order for the members of the group to answer a page on their
phone, they must enter the password pin number using their phone’s keypad.
Adding a Group
Use the following procedure to add a new Group.
AastraLink Web UI
Step
Action
For Ring Groups and Paging Groups
1
Select Users->Groups
2
Click <Add Group>
3
In the “Type” field, select the type of group you want to add. Groups types are:
•
•
4
Ring Group
Paging Group
Specify a name for the group in the “Name” field.
For example: Sales
5
Specify a group extension for the group in the “Extension” field. Valid values are from 1 to 20
alphanumeric characters. For example:
300
or
74992
Note: For more information about assigning extension numbers, see the section, “Virtual Extension
Numbers (for Ring and Paging Groups)” on page 42.
41-001190-02 Rev. 01, Rel. 1.2
3-49
AastraLink Pro 160 Administrator Guide
Configuring Groups
AastraLink Web UI
Step
Action
6
(optional) Specify a password for the group in the “Password” field.
For Ring Groups only
7
Select the method you want to use to be notified that a voicemail has been recorded for the user
group, in the “Voicemail Notification” field. Valid values are:
•
•
•
Off (default - disables voicemail notification)
Email
Email with Audio Attachment
Note: Since Ring Groups use virtual extensions, these extensions do not have an email address. If
the “Voicemail Notification” parameter is enabled, voicemail notifications are sent to the individual
email address for each member of the Ring Group (configured at the location
My Phone->Preferences).
8
Select the distinctive ring pattern you want to apply to this Ring Group, in the “Distinctive Ring”
field. Valid values are:
•
•
•
•
•
None (default - Tone 1)
Pattern 1 (Tone 2)
Pattern 2 (Tone 3)
Pattern 3 (Tone 4)
Pattern 4 (Tone 5)
Note: For more information about ring tone patterns, see the section, “Distinctive Ringing (Ring
Groups only)” on page 3-45.
9
Set the number of times the phone rings before being transferred in the “Rings Before Transfer”
field.
10
Specify the destination where incoming calls should be transferred in the “Transfer To” field. Valid
values are:
•
•
•
•
3-50
None (default)
Extension
Voicemail
Auto-Attendant
41-001190-02 Rev. 01, Rel. 1.2
Configuring Aastra IP Phone Accounts
Configuring Groups
AastraLink Web UI
Step
Action
11
If you set the “Transfer To” field to Extension, then specify the extension to which incoming calls
should be transferred in the “Transfer Number” field.
For example: 200 (John Smith).
For Ring Groups and Paging Groups
12
13
In the “Group Membership” field, do one of the following actions:
•
To add individual users to the group, click on the user name, then click
from the Available list to the Members list.
to move the user
•
To add multiple users to the group, press and hold the <Ctrl> key, select the users, then click
to move the user from the Available list to the Members list.
•
To add all users to the group, click <Add All>.
Click <Save> to save your changes.
Configuring Additional Features for a Paging Group
If you’ve added a Paging Group to the AastraLink Pro, you can enable/disable the
following Paging and Intercom dial plan options via the Web UI at the location
Configuration->Dial Plan->Settings:
•
Allow Barge In
•
Play Warning Tone
•
Microphone Mute
•
Auto-Answer
•
Paging Mode for Icom Key
For more information about setting these parameters, see Chapter 4, the section,
“Configuring Paging and Intercom Options” on page 4-50.
41-001190-02 Rev. 01, Rel. 1.2
3-51
AastraLink Pro 160 Administrator Guide
Configuring Groups
Editing a Group
Use the following procedure to edit a Group that you have previously configured.
AastraLink Web UI
Step
Action
1
Select Users->Groups
2
Click on the extension for the Group (Ring Group or Paging Group) that you want to edit.
3
Edit the Group parameters as necessary. To add or delete user group members, do one of the
following actions:
4
3-52
•
To add individual users to the group, click on the user name, then click
from the Available list to the Members list.
•
To delete individual users from the group, click on the user name, then click
user from the Members list.
•
To add all users to the group, click Add All
to move the user
to remove the
Click <Save> to save your changes
41-001190-02 Rev. 01, Rel. 1.2
Configuring Aastra IP Phone Accounts
Configuring Groups
Deleting a Group
Use the following procedure to delete a Group.
AastraLink Web UI
Step
Action
1
Select Users->Groups
2
Click on the checkbox(s) for the group (Ring Group or Paging Group) that you want to delete.
3
Click <Delete Selected Groups>
4
When prompted, click <Yes> to confirm your action.
The group you deleted no longer appears on the group list.
Reference
For information about using the the XML Paging feature on the phone, see your
AastraLink Pro 160 Users Guide.
41-001190-02 Rev. 01, Rel. 1.2
3-53
AastraLink Pro 160 Administrator Guide
Default Softkeys (Users Menu)
Default Softkeys (Users Menu)
You configure softkey default settings from the Users->Default Softkeys menu.
“Empty” softkeys are not yet configured
Shows which model Aastra IP phone(s)
you are currently configuring
Figure 3-5.
3-54
Default Softkeys Menu
41-001190-02 Rev. 01, Rel. 1.2
Configuring Aastra IP Phone Accounts
Default Softkeys (Users Menu)
Using the Default Softkeys Menu (User Phone)
Softkeys function exactly like the hard keys on your phone, except they are
programmable. When you press a softkey on your IP phone, an action takes place.
For example, when you press the DND softkey, you enable Do Not Disturb on
your phone.
As administrator, you have the option to change the default softkey settings for
configurable softkeys for each User’s phone. (those that have been assigned a
softkey type, or are empty). You can also determine which softkeys appear in the
softkey list and available to the User. That is, you can use the AastraLink Web UI
to:
•
Add new softkeys
•
Delete softkeys
•
Edit a softkey so it performs a different function (for example, change a Park
Call softkey to a Speeddial softkey).
•
Customize a User’s softkey option list
Default softkey accounts that the administrator defines are applied only to the
model phone you are configuring.
The Default Softkeys menu lists all Aastra phone’s models that may be connected
to your AastraLink network, and the default softkeys currently configured for
each phone model. If you click on the tab for a specific phone, the menu changes
to show the current softkey configuration for that model phone.
For some model phones, certain softkeys are reserved and cannot be edited. For
example, on the Aastra IP Phone Model 9143i, the first four softkeys are
pre-programmed as follows: Options, Directory, Save, Delete. These softkeys
cannot be edited or deleted by the administrator, or by the user.
Default softkey accounts that the administrator defines are applied to any new
Aastra IP phones of that particular model that you add to your network. That is,
when you initially start up and register an IP phone with the AastraLink Pro 160,
the default softkeys you specify from this menu are programmed automatically on
the IP phone. Later, users have the option to change the default settings, add
additional softkeys or delete softkeys from their own IP phones.
41-001190-02 Rev. 01, Rel. 1.2
3-55
AastraLink Pro 160 Administrator Guide
Default Softkeys (Users Menu)
Note: If a user has defined a custom softkey list for an IP phone, then the custom
softkey list is maintained. Any changes made by the administrator to
default softkey settings do not apply to the User’s IP phone.
Softkey Types (User Phone)
Depending on the phone model you are configuring, there are several different
types of softkeys available for you to configure for the IP phones on your
network. Each softkey type performs a different function.
On the AastraLink Web UI, you can configure softkeys for the administrator
phone and the user phones. Softkeys are organized by type into the following
categories:
•
Call Settings Softkeys - used to specify how inbound/outbound calls are
handled. For example, Do Not Disturb, or Call Forwarding.
•
Applications Softkeys - used to access applications (Voicemail) or phone
menus (the Service menu).
Call Settings
Applications
3-56
41-001190-02 Rev. 01, Rel. 1.2
Configuring Aastra IP Phone Accounts
Default Softkeys (Users Menu)
Depending on the model IP phone you are using, certain softkey types are not
available. For example, the Transfer and Conference softkeys are only applicable
to phone models that do not have dedicated hard keys for those functions.
The following tables describe each type of softkey available, and provide more
information about using the softkey.
Call Settings Softkeys (User Phone)
The table below describes the call settings softkeys you can configure for the
Aastra IP phones on your AastraLink network. The table describes each softkey
type, function, label, and value (where applicable).
Softkey Type
Function
Label
Value
Speed Dial
Allows you to dial a phone number/
extension using a softkey.
The name of the
person you want
to speeddial.
The phone
number or ext to
speeddial.
For example: Dan For example: 285
Jones
Do Not Disturb
Stops your IP phone from ringing
when an incoming call is received.
n/a
n/a
Call Forward
Allows you to forward incoming calls n/a
to another destination.
n/a
Find Me, Follow
Me
Allows you to specify other phone
numbers that should be used to try
to reach you.
n/a
n/a
Allows you to “park” a call in order to n/a
retrieve it later, from another IP
phone.
n/a
For example, your work phone
number and your cell phone
number.
Park Call
See the AastraLink IP Phone User’s
Guide for more information about
using the Park Call feature.
41-001190-02 Rev. 01, Rel. 1.2
3-57
AastraLink Pro 160 Administrator Guide
Default Softkeys (Users Menu)
Softkey Type
Function
Label
Value
Directed Call
Pickup
Allows you to intercept - or pickup a call on a monitored extension.
n/a
n/a
When you press the DCP softkey,
your IP phone displays a list of
currently ringing numbers. You
select the call you want to “pickup“
(intercept) from this list and are
connected to the call.
Refer to the AastraLink IP Phone
User’s Guide for instructions on how
to intercept calls using the Directed
Call Pickup feature.
BLF
Busy Lamp Field. Allows you to
The name of the
monitor a specific extension for state person whose
changes (busy, idle and ringing).
extension you are
monitoring
When you configure a BLF softkey,
an indicator (either an icon or a
For example: Joe
LED) displays on your IP phone next Smith
to the softkey. The icon shows
whether the extension you are
monitoring is “busy” (on the phone)
or “idle.”
The phone
number or
extension to
monitor.
For example: 255
Refer to the AastraLink IP Phone
User’s Guide for instructions on how
to monitor calls using BLF softkeys.
Note: It is not recommended to use
BLF in the default softkey accounts,
since BLF is applied to all users of
the selected phone model. BLF
imposes realtime overhead on the
AastraLink call processing which
may degrade overall system
performance if applied too
gratuitously.
3-58
41-001190-02 Rev. 01, Rel. 1.2
Configuring Aastra IP Phone Accounts
Default Softkeys (Users Menu)
Softkey Type
Function
Label
Value
Page All
Indicates the key is configured as a n/a
Paging key. Pressing this key
initiates an immediate multicast RTP
stream to the pre-configured
multicast group address provisioned
by the AastraLink Pro 160.
n/a
Transfer
Allows you to transfer a call to
another extension.
n/a
n/a
Note: Consultative transfer and
blind transfer are supported for calls
to SIP extensions; consultative
transfer is supported for calls to ring
groups.
Conference
Allows you to set up a conference
call between two or more active
calls.
n/a
n/a
Intercom
Allows you to connect with a remote n/a
extension using the intercom.
n/a
41-001190-02 Rev. 01, Rel. 1.2
3-59
AastraLink Pro 160 Administrator Guide
Default Softkeys (Users Menu)
Application Softkeys (User Phone)
The following table describes the application softkeys you can configure for the
Aastra IP phones on your AastraLink network.
Softkey Type
Function
Services
Displays the Services list.
From the Services list, you can access these other services and
applications:
Directory
•
Voicemail
•
Directory
•
Recent Calls List
•
Call Settings
•
Relay
•
Pickup Call
•
Park Call
Displays the Directory list.
From the Directory list, you can:
Voicemail
•
Access your Personal directory
•
Access the Corporate directory
•
Search for a contact in either directory
Allows you to connect to Visual Voicemail.
When you press the Vmail softkey, the Visual Voicemail menu appears
on your Phone UI. After you login to your voicemail account, you can
view details about your voicemail messages on your phone UI, play
messages, store/forward/save/delete messages, or manage your
voicemail preferences from this menu.
To configure voicemail rules for your IP phone, see “Configuring Visual
Voicemail Settings” on page 4-15.
3-60
41-001190-02 Rev. 01, Rel. 1.2
Configuring Aastra IP Phone Accounts
Default Softkeys (Users Menu)
Softkey Type
Function
Call List
Allows you to access the Recent Calls list.
Relay
Allows an operator/user to monitor an external device (such as a
locked entrance door), and use a softkey to change the status of the
device (unlock the door) when an alarm is triggered.
To configure a Relay for your IP phone, see “Configuring Push Button
Trigger Input or Relay Output” on page 4-12
Note: When you add or delete a softkey, the changes to your IP phone are usually
dynamic. However, some softkey types (BLF, for example) require you to
restart the phone in order for the changes to take affect.
Adding a Default Softkey (User Phone)
Use the following procedure to add/define a new default softkey for the Aastra IP
phones in your network.
AastraLink Web UI
Step
Action
1
Select Users->Default SoftKeys
2
Click on the tab for the model Aastra IP phones you are configuring.
3
Click on an <empty> softkey.
4
Select the “Softkey Type” from the pull-down menu, then click <Save>
Note: If you are configuring a Speeddial or BLF softkey, you must also assign a label/value to the
softkey. See “Softkey Types (User Phone)” on page 3-56 for more information.
41-001190-02 Rev. 01, Rel. 1.2
3-61
AastraLink Pro 160 Administrator Guide
Default Softkeys (Users Menu)
Editing a Default Softkey (User Phone)
Use the following procedure to edit an existing default softkey for the Aastra IP
phones in your network.
AastraLink Web UI
Step
Action
1
Select Users->Default Softkeys
2
Click on the tab for the model Aastra IP phones you are configuring.
3
Click on the softkey you want to edit.
4
Select a different “Softkey Type” from the pull-down menu.
5
Click <Save> to save your changes.
The Default Softkeys menu updates to reflect your changes.
Deleting a Default Softkey (User Phone)
Use the following procedure to delete a default softkey from the Aastra IP phones
on network.
AastraLink Web UI
Step
Action
1
Select Users->Default SoftKeys
2
Click on the tab for the model Aastra IP phones you are configuring.
3
Click on the softkey you want to delete.
4
Click <Delete>
The softkey is removed from the Default Softkeys list and is reset to <empty>.
3-62
41-001190-02 Rev. 01, Rel. 1.2
Configuring Aastra IP Phone Accounts
Default Softkeys (Users Menu)
Default Softkey Permissions (User Phone)
An Administrator can specify the default key types that are available to a User or
Administrator to select from when that User is configuring keys on their phone.
When an Administrator specifies these default softkey permissions, only the
default softkeys enabled on the Default Softkey Permission page will display on
the User’s phone for the user to select from when configuring softkeys.
Use the following procedure to set default softkey permissions for a User’s phone.
AastraLink Web UI
Step
Action
1
Select Users->Default Softkey Permissions.
2
The default softkeys on a User’s phone display in this Default Softkey Permissions page.
All softkeys are enabled by default. To disable a softkey, click on a box to uncheck it.
Note: Available default softkeys are dependant on the Model of the User’s phone.
If you disable a default softkey, that softkey does not display in the User’s default softkey list.
3
Click <Save> to save your changes.
41-001190-02 Rev. 01, Rel. 1.2
3-63
AastraLink Pro 160 Administrator Guide
Default Softkeys (Users Menu)
Default Softkeys for Expansion Modules (Administrator or User Phone)
You add, edit, and delete default softkeys for an expansion module attached to
your IP phone the same way you do for the default keys on the IP phone. See
“Adding a Default Softkey (User Phone)” on page 3-61, “Editing a Default
Softkey (User Phone)” on page 3-62, and “Deleting a Default Softkey (User
Phone)” on page 3-62.
In addition, you can use the Web UI to download the corporate directory and
quickly configure speeddial softkeys on the module, as described in the following
procedure.
AastraLink Web UI
Step
Action
1
Select Users->Default Softkeys-> Expansion Module 1.
Note: The AastraLink Pro 160 supports only one expansion module per phone.
2
Click Corporate Directory.
The AastraLink begins to download and configure the expansion module with the corporate directory
contacts. When the process complete, a message appears confirming that the download is complete.
If you view the expansion module UI, you will see speed dials configured for each person listed in the
corporate directory.
3-64
41-001190-02 Rev. 01, Rel. 1.2
Configuring Aastra IP Phone Accounts
Default Softkeys (Users Menu)
Restoring Default Softkeys Back to Factory Settings
Use the following procedure to set the default softkeys back to their original,
factory default settings.
AastraLink Web UI
Step
Action
1
Select Users->Default SoftKeys
2
Select which model Aastra IP phones you are configuring from the “Phone Type” pull-down menu.
3
Click <Reset to Defaults>
The original, default softkey settings are restored.
41-001190-02 Rev. 01, Rel. 1.2
3-65
AastraLink Pro 160 Administrator Guide
Default Softkeys (Users Menu)
3-66
41-001190-02 Rev. 01, Rel. 1.2
Chapter 4
Configuring AastraLink Pro 160
System and Network Parameters
About this Chapter
Introduction
This chapter describes how to configure AastraLink Pro 160 system and network
management parameters. These parameters apply to the AastraLink device itself.
For a procedure on setting up your AastraLink Pro 160 manually, see Appendix
Topics
This chapter covers the following topics:
Topic
Page
Accessing the Configuration Menu
page 4-3
Configuring System Settings
page 4-4
Specifying Regional Settings
page 4-6
Specifying the Date and Time
page 4-10
Configuring the Music On Hold Option
page 4-11
Configuring Push Button Trigger Input or Relay Output
page 4-12
Configuring Visual Voicemail Settings
page 4-15
Configuring FXO Tuning Settings
page 4-17
Configuring Network Settings
Editing Local Network Settings
41-001190-02 Rev. 01, Rel. 1.2
page 4-21
page 4-22
4-1
AastraLink Pro 160 Administrator Guide
About this Chapter
Topic
Page
Editing Local Service Settings
page 4-26
Editing External Services Settings
page 4-34
Configuring Dial Plan Settings
Local Dial Plan
page 4-40
Star Codes
page 4-41
Specifying Dial Plan Settings
page 4-41
Configuring a Dial Plan for Auto-Fax
page 4-45
Configuring Overhead Paging
page 4-49
Configuring Paging and Intercom Options
page 4-50
Dial Plan for Meet-Me Conference Bridges
page 4-53
Configuring an Emergency Dial Plan
page 4-54
Configuring Barred Numbers
page 4-55
Configuring FXO Lines
page 4-57
Configuring FXO Lines for Shared Line Appearance (SLA)
page 4-60
Configuring Abbreviations
page 4-67
Configuring VoIP Settings
page 4-74
SIP Trunking
page 4-76
SIP Direct Inward Dialing (DID)
page 4-86
AastraLink Trunking
page 4-89
Mobility Base Units (MBUs)
page 4-97
Configuring Auto-Attendant
4-2
page 4-38
page 4-112
How Auto-Attendant Works
page 4-113
Settings for the Auto-Attendant
page 4-115
Custom Interactive Voice Response (IVR)
page 4-121
Schedule for the Auto-Attendant
page 4-126
Holidays for the Auto-Attendant
page 4-130
Custom Recordings
page 4-134
41-001190-02 Rev. 01, Rel. 1.2
Configuring AastraLink Pro 160 System and Network Parameters
Accessing the Configuration Menu
Accessing the Configuration Menu
You configure all system and network parameters for the AastraLink Pro 160 from
the Configuration menu, shown below.
Figure 4-1.
AastraLink Web UI Configuration Menu
41-001190-02 Rev. 01, Rel. 1.2
4-3
AastraLink Pro 160 Administrator Guide
Configuring System Settings
Configuring System Settings
You configure AastraLink Pro 160 system settings from the
Configuration->System Settings menu. System settings include the following
tabs:
•
Regional Settings* - Allows you to set the geographical location, time zone,
date and time format, and language on the AastraLink Pro. This page also
allows you to set the language that the caller hears when calling into the
auto-attendant.
•
Set Time and Date - Allows you to set the time and date manually on the
AastraLink Pro.
•
Music on Hold - Allows you to set the source for music-on-hold (audio file,
line-in, or default file on the AastraLink Pro. This page also allows you to
upload a file to use for music-on-hold.
•
Relay/Push Button - Allows you to configure the settings on the AastraLink
Pro if you are using a relay/push button in your facility. The default relay
extension is 6100. You can set relay delay, push button alert text, use the
default announcement, or record or upload a new announcement, send a
message to the phone, or send a message to email.
•
Voicemail - Allows you to set the maximum duration allowed for a voicemail
message, and also allows you to set the maximum messages allowed to be
stored.
•
FXO Tuning - Allows you to run the FXO Automatic Tuning Wizard with the
push of a button.
Note: *The Regional Settings option is intrinsically linked to the initial greenfield
system configuration.
When system greenfield setup is performed using the TUI and
Administrator phone, the selection of country and timezone during that
process is used to denote the "system configured" state. Setting the same
values using the Adminnistrator login to the Web UI has the same effect.
4-4
41-001190-02 Rev. 01, Rel. 1.2
Configuring AastraLink Pro 160 System and Network Parameters
Configuring System Settings
For example, saving a valid country and timezone denotes that the system
is configured, setting no country and timezone denotes the system is not
configured, and the greenfield configuration via the Administrator TUI is
re-enabled for the next phone to register.
This feature is intended for the use of resellers for the pre-configuration
staging of an AastraLink system prior to shipping to end-customer site.
Please contact Aastra Customer Support for additional information
regarding the specific use of this pre-configuration administrator login
facility.
Each of the above features are described in the following paragraphs.
41-001190-02 Rev. 01, Rel. 1.2
4-5
AastraLink Pro 160 Administrator Guide
Configuring System Settings
Specifying Regional Settings
Use the following procedure to specify regional settings for your AastraLink Pro
160.
AastraLink Web UI
Step
Action
1
Select Configuration->System Settings->Regional Settings.
2
Set <Location> to the country where you installed the AastraLink Pro 160. Default is None. Valid
values are:
•
•
•
•
None (default)
Canada
United States
Mexico
Notes:
1.
The use of “None“ is not supported. A valid country must be set during initial greenfield
configuration.
2.
If you change the country setting for this parameter, the FXO Auto-Tuning feature must be
initiated to reset the auto-tuning on the FXO ports to the new country.
4-6
41-001190-02 Rev. 01, Rel. 1.2
Configuring AastraLink Pro 160 System and Network Parameters
Configuring System Settings
AastraLink Web UI
Step
Action
3
The “Time Zone” field is disabled by default, until you select a country in Step 2.
Select a Time Zone that maps to your location. Default is “Select a country”. Valid values are:
41-001190-02 Rev. 01, Rel. 1.2
4-7
AastraLink Pro 160 Administrator Guide
Configuring System Settings
AastraLink Web UI
Step
Action
4
Specify the <Date Format> for your Aastra IP phones. Default format is <Month><Year>. Valid
formats are:
5
Specify the <Time Format>. Default is 12 hour. Valid values are:
•
•
6
12 hour
24 hour
Specify the default AastraLink Pro 160 system <Language>. Valid values are:
•
•
•
English (default)
French
Spanish
The language you specify here is the default language used for all text displayed on the IP phones,
as well as the default voicemail and auto-attendant menu language for all callers.
4-8
41-001190-02 Rev. 01, Rel. 1.2
Configuring AastraLink Pro 160 System and Network Parameters
Configuring System Settings
AastraLink Web UI
Step
Action
7
To support additional languages for auto-attendant menu, voicemail, and user Web UI/phone
language preferences, click on any of the following parameters. Only the system language set by the
administrator during initial greenfield configuration is enabled by default.
•
•
•
Support English
Support French
Support Spanish
Note: Adding additional languages may require the IP phones to reboot, in order to download the
new language pack.
8
Click <Save> to save your changes.
41-001190-02 Rev. 01, Rel. 1.2
4-9
AastraLink Pro 160 Administrator Guide
Configuring System Settings
Specifying the Date and Time
If automatic time and date were enabled during the initial administrator setup of
the system (default set to yes during initial setup), the AastraLink Pro 160 uses the
Network Time Protocol (NTP) to synchronize its date and time from the Internet
global time servers (pool.ntp.org). If Internet access is not available, then use the
following procedure to manually set the date and time for your AastraLink Pro
160.
AastraLink Web UI
Step
Action
1
Select Configuration->System->Set Date/Time.
2
In the “Date” field, specify the date that the AastraLink Pro displays on the IP phones in your network.
3
In the “Time” field, specify the time that the AastraLink Pro displays on the IP phones in your
network. Default is the current time set on the AastraLink Pro 160.
4
Click <Save> to save your changes.
4-10
41-001190-02 Rev. 01, Rel. 1.2
Configuring AastraLink Pro 160 System and Network Parameters
Configuring System Settings
Configuring the Music On Hold Option
The AastraLink provides a default audio file for the Music on Hold feature. You
have the option to upload a custom audio file for Music on Hold. The audio file
format must be as follows: Microsoft WAV format, 8KHz PCM, mono, 16-bit
signed linear. The audio source can either be a WAV file, or a direct connection
between the AastraLink Pro 160 Music on Hold stereo jack (located on the back
of the device) and an audio device (CD player).
AastraLink Web UI
Step
Action
1
Select Configuration->System->Music on Hold.
2
In the “Source” field, specify the source of the Music on Hold: either an audio file, or a direct
connection (line in) between the AastraLink device and an audio device. Valid values are:
•
•
•
Default (default setting)
Line In
Audio File
Note: The current audio file (default file) is listed in the “Current Audio File” field. In the screen in
Step 1, the audio file name is “larencontre.wav”.
41-001190-02 Rev. 01, Rel. 1.2
4-11
AastraLink Pro 160 Administrator Guide
Configuring System Settings
AastraLink Web UI
Step
Action
3
In the “Upload New File” field, click <Browse> and locate a new audio .wav file that you want to use
for Music on Hold. Upload the file to the AastraLink Pro.
4
Click <Save> to save your changes.
Configuring Push Button Trigger Input or Relay Output
The AastraLink includes two optional, programmable features - Push Button
Trigger Input and Relay Output - that allow you monitor and/or change the status
of external devices connected to the AastraLink. Both features work in
conjunction with your IP phones, as described below:
•
Push Button Trigger Input: To enable the trigger feature, you connect an
external device (for example, a motion-detector alarm system) to the input
connectors on the back of the AastraLink. When triggered (for example,
motion is detected in an alarmed corridor), the AastraLink can respond by
sending a text message, and/or an audio message, to the IP phone that you
specify.
Note: There is no default action configured for Push Button Trigger. If you wish,
you can configure a custom text message, and a custom audio message,
using the AastraLink Web UI. For example, you may want to send a text or
audio message that says “Motion Sensors Activated” to your IP phone.
•
4-12
Relay Output: To enable the relay feature, you connect an external device
(for example, a locked entrance door) to the relay I/O port on the back of the
AastraLink. You activate the relay - that is, change the status of the external
device - by pressing a Relay softkey on your IP phone, or by dialing a
preconfigured number. In this example, the relay unlocks the entrance door.
41-001190-02 Rev. 01, Rel. 1.2
Configuring AastraLink Pro 160 System and Network Parameters
Configuring System Settings
You may want to configure the Push Button Trigger feature and the Relay feature
to operate with the same external device. For example, suppose you want the
Operator to monitor and control a locked entrance door. In this scenario, you
could connect the entrance doorbell to the Push Button Trigger, and the locked
entrance door to the Relay I/O port. When the doorbell is pressed, the Aastralink
sends a message to the Operator IP phone that someone is requesting entrance into
the building. The Operator can then unlock the door by pressing the Relay softkey
on the IP phone.
Use the following procedure to configure the Trigger or Relay features.
AastraLink Web UI
Step
Action
1
Select Configuration->System->Relay/Push Button.
2
In the “Relay Delay (seconds)” field, specify a delay time for the relay. Valid range is 1 to 99
seconds. Default is 5.
41-001190-02 Rev. 01, Rel. 1.2
4-13
AastraLink Pro 160 Administrator Guide
Configuring System Settings
AastraLink Web UI
Step
Action
3
In the “Push Button Alert Text” field, specify a custom alert text message. The default text
message is:
“The Push Button has been pressed.”
4
(optional) The AastraLink Pro has a default message announcement that announces after pushing
the relay button. To record a custom announcement, click <Record Custom Message>.
Your IP phone rings. Follow the instructions as prompted by your IP phone to record and save a new
message.
5
(optional) You can upload a message announcement by clicking <Browse> to go to the location
where your message announcement is stored. This file must be a “.wav” file. Upload the file to the
AastraLink Pro.
6
Specify how you want to be notified when the trigger is activated, as follows:
7
4-14
•
To be notified on the phone TUI, click in the check box Send Message to Phone.
•
To be notified by email, click in the check box Send Message to Email.
Click <Save> to save your changes.
41-001190-02 Rev. 01, Rel. 1.2
Configuring AastraLink Pro 160 System and Network Parameters
Configuring System Settings
Configuring Visual Voicemail Settings
Use the following procedure to configure visual voicemail setting parameters.
AastraLink Web UI
Step
Action
1
Select Configuration->System->Voicemail.
2
To specify a maximum length (duration, in seconds) for a voicemail message, enter a value in the
“Max Duration” field.
The default is 180 seconds maximum length for each voice message, after which the caller is
disconnected automatically.
3
To specify a maximum number of voicemail messages saved by any user, enter a value in the
“Max Messages” field.
The default is 100 messages per voice mailbox, after which incoming calls are instructed that the
mailbox is full and no message can be left.
4
Click <Save> to save your changes.
41-001190-02 Rev. 01, Rel. 1.2
4-15
AastraLink Pro 160 Administrator Guide
Configuring System Settings
Note: There is a system-wide limit for voicemail storage on the CompactFlash
(CF) card. The limit is calculated by measuring the current free space of the
CF card, subtracting 100MB required for working space by system
upgrade, logs and backups, and calculating a percentage of the free
voicemail capacity compared to the total size for all voicemail currently
stored. When this voicemail storage reaches 100%, no new voicemails are
recorded until users delete some messages from their mailboxes.
4-16
41-001190-02 Rev. 01, Rel. 1.2
Configuring AastraLink Pro 160 System and Network Parameters
Configuring System Settings
Configuring FXO Tuning Settings
The FXO Tuning tab provides an Auto-Tuning button, that when clicked, runs a
Tuning Wizard that automatically adjusts the audio on the AastraLink Pro. The
FXO Tuning tab also provides parameters you can set to manually adjust
voicepath gain.
Auto-tuning helps to maximize the audio quality of calls routed via the FXO
telephone line interfaces. If the resulting gain or echo performance from the FXO
Auto-Tuning Wizard is not deemed correct, the values can be overridden by
manually setting the parameters on this FXO Tuning page.
Note: Generally after initial FXO tuning, it should not be necessary to modify the
tuning parameters, unless a specific audio-quality issue exists. Any values
assigned to these FXO tuning parameters are erased if you rerun the FXO
Auto-Tuning Wizard. DO NOT rely on manual settings made on this page
for normal system use.
FXO tuning is recommended for all systems at installation time, in order to tune
the AastraLink to match the telephone line, minimizing echo and maximizing the
audio quality.
Note: After upgrading your AastraLink Pro and logging in for the first time after
the upgrade, the Administrator Web UI login prompts you to optionally run
the Tuning Wizard before using the upgraded AastraLink software. This
allows the audio on the AastraLink to be adjusted before using the phones
in the AastraLink network. Aastra recommends you run the Tuning Wizard
before using the upgraded software.
Tuning is performed using the first available (connected/idle) FXO line, and the
resulting line profile is applied for all 6 FXO ports on the AastraLink. All the
FXO lines must have the same/similar line profile; line interface variations
between FXO ports such as having different service providers on different FXO
lines are not supported.
You can start the Automatic Tuning Wizard, if required, using the Web UI at the
location, Configuration->System->FXO Tuning.
41-001190-02 Rev. 01, Rel. 1.2
4-17
AastraLink Pro 160 Administrator Guide
Configuring System Settings
Use the following procedure to run the FXO Auto-Tuning Wizard to
automatically adjust the audio on the AastraLink Pro, or set the FXO tuning
parameters manully if required to adjust audio.
AastraLink Web UI
Step
Action
1
Select Configuration->FXO Tuning..
To run the FXO Auto-Tuning Wizard:
2
Click the <Auto-Tuning> button.
The Tuning Wizard automatically adjusts the FXO line hybrid parameters for best balance with your
telephone network lines. This process may take up to 15 minutes to complete, but usually less.
Note: You can cancel the Automatic Tuning Wizard any time by clicking the <Abort> button during
the tuning process. The parameters remain unchanged if you Abort the Automatic Tuning Wizard
4-18
41-001190-02 Rev. 01, Rel. 1.2
Configuring AastraLink Pro 160 System and Network Parameters
Configuring System Settings
AastraLink Web UI
Step
Action
When the FXO Auto-Tuning Wizard is complete the following message displays.
Note: Auto-tuning should be repeated if any changes are made later to the physical FXO line
connections or tuning parameters. Auto-tuning must also be repeated when the country is changed.
3
Click <Exit> to close the message window.
To adjust audio manualy:
4
In the “Line Dynamic Range (Boost)” field, specify the audio boost level on these FXO lines. When
transmit dynamic range is configured, the receive range is automatically balanced accordingly, so
that the overall gain from the FXO network to pulse code modulation (PCM) remains within the
normal target value for the appropriate country. Valid settings are:
•
•
•
Standard (-3dB)
Full (0dB)
Extended (+3dB)
5
The “Line Interface” and “Line Profile” parameters are read-only fields. These fields are updated by
the Auto-Tuning Wizard if required. These line tuning parameters balance the line hybrid on the
AastraLink’s FXO interfaces so that it matches the characteristic line impedance.
6
In the “Echo Cancel” field, echo cancellation is disabled by default. This parameter allows you to
enable echo cancellation for the FXO lines. Enable this parameter by checking the box.
41-001190-02 Rev. 01, Rel. 1.2
4-19
AastraLink Pro 160 Administrator Guide
Configuring System Settings
AastraLink Web UI
Step
Action
7
Specify the decibels to use for power when Real Time Transport Protocol (RTP) is sent TO the line, in
the “RTP to Line Power (dB)” field. This gain parameter is used to adjust the outgoing audio levels
(for example, signal amplification or attenuation).
Valid range is +6 dB to –14 dB. Default is -3.
Note: Aastra recommends you DO NOT change the default setting for this parameter because of
FCC regulatory compliances.
8
Specify the decibels to use for power when Real Time Transport Protocol (RTP) is sent FROM the
line, in the “Line to RTP Power (dB)” field. This gain parameter is used to adjust the incoming audio
level (for example, signal amplification or attenuation).
Valid range is +6 dB to –14 dB. Default is 0.
Note: Aastra recommends you DO NOT change the default setting for this parameter because of
FCC regulatory compliances.
9
4-20
Click <Save> to save your changes.
41-001190-02 Rev. 01, Rel. 1.2
Configuring AastraLink Pro 160 System and Network Parameters
Configuring Network Settings
Configuring Network Settings
You configure AastraLink Pro 160 network settings from the
Configuration->Network->Local Network menu shown below. Network settings
include the following tabs:
Figure 4-2.
•
Local Network - Allows you to specify the local network parameters for the
AastraLink Pro, such as hostname, domain name, enable or disable Dynamic
Host Configuration Protocol (DHCP), and specific Domain Name Servers
(DNS) 1 and 2.
•
Local Services - Allows you to specify local services on the AastraLink Pro,
such as enable or disable remote office and UPnP, specify an external gateway
IP, and specify Hypertext Transport Protocol (HTTP), Session Initiation
Protocol (SIP), and Real-Time Transport Protocol (RTP) parameters.
•
External Services - Allows you to specify external services on the
AastraLink Pro, such as Network Time Protocol (NTP) address, Simple Mail
Transfer Protocol (SMTP) relay address, SMTP relay port, and SMTP
username, password, and account.
Local Network Menu
41-001190-02 Rev. 01, Rel. 1.2
4-21
AastraLink Pro 160 Administrator Guide
Configuring Network Settings
Editing Local Network Settings
The Local Network parameters you can specify for the AastraLink Pro 160
include:
•
Host Name
Name currently assigned to your AastraLink Pro 160 device. The
Administrator can set the hostname of the device during initial installation
and setup. Otherwise, the AastraLink Pro 160 retains the default host name of
“aastralink.”
If you add multiple AastraLink Pro 160 devices to your network, they are by
default named “aastralink-1, aastralink-2” etc. You should specify a unique
host name for your AastraLink Pro 160 in order to make the device easily
identifiable on your network.
The hostname can be up to 10 characters maximum, no spaces or special
characters allowed. For example:
— Aastra_1 is a valid hostname
— Aastra 1 is not valid (spaces are not allowed)
Note: If you change the hostname of your AastraLink Pro 160 device, then you
have to reboot the IP phones in order to connect to the new hostname on
your network. This phone reboot requirement also applies if the IP address
of the system changes, due to DHCP server lease expiry/renewal or due to
fall-back from ZeroConf to DHCP address.
•
Domain
Domain name you specify for your AastraLink Pro 160.
•
LAN MAC Address
MAC address assigned to your AastraLink Pro 160. This field is read-only.
•
Current IP Address
IP address assigned to your AastraLink Pro 160. This field is read-only.
4-22
41-001190-02 Rev. 01, Rel. 1.2
Configuring AastraLink Pro 160 System and Network Parameters
Configuring Network Settings
•
Use DHCP
Enables or disables Dynamic Host Configuration Protocol (DHCP), in order
to support dynamic/static addressing. DHCP is enabled on the AastraLink Pro
160 by default. If DHCP is enabled, but no DHCP server responds to the
AastraLink Pro address request at boot time, the AastraLink falls back to
using ZeroConf link-local IP addressing.
•
IP Address (required if DHCP is disabled)
IP Address you specify for your AastraLink Pro 160 if DHCP is disabled.
•
Subnet Mask (required if DHCP is disabled)
Subnet Mask you specify for your AastraLink Pro 160 if DHCP is disabled.
•
Gateway (required if DHCP is disabled)
Default Gateway IP Address you specify for your AastraLink Pro 160 if
DHCP is disabled.
•
DNS Server 1
IP Address you specify for the Domain Name Server (DNS) server 1.
•
DNS Server 2
IP Address you specify for the DNS server 2.
41-001190-02 Rev. 01, Rel. 1.2
4-23
AastraLink Pro 160 Administrator Guide
Configuring Network Settings
Use the following procedure to edit local network settings for the AastraLink Pro
160.
AastraLink Web UI
Step
Action
1
Select Configuration->Network->Local Network.
2
To specify a new host name for your AastraLink Pro 160, enter a new name in the “Host Name”
field.
For example: AL_bldg1
3
4-24
To specify a Domain name, enter the name in the “Domain” field in dotted decimal format.
41-001190-02 Rev. 01, Rel. 1.2
Configuring AastraLink Pro 160 System and Network Parameters
Configuring Network Settings
AastraLink Web UI
Step
Action
4
DHCP is enabled by default. To disable DHCP, click on “Use DHCP” to uncheck the box.
Note: If you disable DHCP, then you must statically configure the following networking parameters:
5
•
IP Address: Set to a valid IP address.
•
Subnet Mask: Set to a valid Subnet Mask address.
•
Gateway: Set to a valid Gateway IP address.
•
DNS Server 1: Set to the IP address of DNS server 1.
•
DNS Server 2: Set to the IP address of DNS server 2.
Click <Save> to save your changes.
Note: You must reboot your AastraLink Pro 160 in order for these network parameter changes to be
implemented.
41-001190-02 Rev. 01, Rel. 1.2
4-25
AastraLink Pro 160 Administrator Guide
Configuring Network Settings
Editing Local Service Settings
You configure AastraLink Pro 160 local service settings from the
Configuration->Local Services menu shown below.
Figure 4-3.
4-26
Local Services Menu
41-001190-02 Rev. 01, Rel. 1.2
Configuring AastraLink Pro 160 System and Network Parameters
Configuring Network Settings
The Local Services parameters you can specify for the AastraLink Pro 160
include:
•
Remote Office
Enables/disables remote access support on the AastraLink Pro 160. Default is
Off. You only need to enable this field if you deploy and support remote IP
phones.
Enabling this parameter permits Aastra IP phone connections from the HTTP
external port of the gateway/router (TCP port 9600).
•
UPnP
Enables/disables Universal Plug-n-Play (UPnP) support on the AastraLink.
Default is Off. You may need to set this parameter if you are supporting calls
beyond your local IP phone network (for example, if you have remote office
workers or have enabled SIP trunking) that connect to the AastraLink using a
UPnP router.
Enabling UPnP
Set UPnP to enable only if all of the following conditions are true:
— The AastraLink is installed behind a UPnP capable router.
— The UPnP protocol is enabled, and operating correctly, on the router.
— The router is a model/brand supported by the AastraLink for UPnP.
Note: UPnP support and compatibility varies, depending on the implementation
used by the specific router manufacturer. Contact Aastra Telecom for the
list of UPnP routers tested with a specific AastraLink software version.
Disabling UPnP
UPnP is set to Disable by default. Accept this default setting if any of the
following conditions are true:
— The AastraLink is installed behind a router which either does not support
UPnP, or has UPnP disabled.
— The AastraLink will not be using external network connections (remote
office IP phone users or SIP trunks).
— The AastraLink is installed behind a UPnP enabled router, but for some
reason UPnP is not functioning.
41-001190-02 Rev. 01, Rel. 1.2
4-27
AastraLink Pro 160 Administrator Guide
Configuring Network Settings
— The AastraLink is installed behind a UPnP enabled router, but the
AastraLink Pro 160 does not currently support the router model.
When this parameter is set to Disable (the default), in order for the AastraLink
to support external calls, you have to:
— Manually configure the AastraLink external connection parameters
(see page 4-28), and
— Manually configure the equivalent port forwarding on the Internet
gateway/router so that the AastraLink is reachable from IP phones
and SIP trunks outside the LAN.
•
External Gateway IP
Specifies the IP Address of the external gateway/router that the AastraLink
uses to communicate with the remote IP phones. If you enable UPnP support,
then the AastraLink automatically populates this field. If UPnP is not enabled
but remote office is enabled, you must manually enter the IP address, FQDN
or DNS hostname of the public network.
•
HTTP Port Start
Specifies the public network HTTP port on the router that the AastraLink uses
to communicate with the remote IP phones. Default is 51510.
This port must be forwarded to port 9600 on the AastraLink from the
public/external side of the Internet gateway/router. Doing so allows remote
office IP phone users to connect to the AastraLink device and the local phone
network.
Note that for security reasons, remote IP phone users cannot directly access
the AastraLink Web UI using port 9600. Thus, remote IP phone users must
use the IP phone UI for all operations.
If UPnP is enabled, port forwarding is attempted automatically (see the HTTP
Port Range parameter).
Note: The AastraLink Pro 160 listens for remote office HTTP traffic on port
9600. If you are manually configuring port-forwarding parameters for
HTTP, use HTTP Port Start as the external port being forwarded to port
9600 on the AastraLink Pro 160.
4-28
41-001190-02 Rev. 01, Rel. 1.2
Configuring AastraLink Pro 160 System and Network Parameters
Configuring Network Settings
•
HTTP Port Range
Specifies the HTTP port range (offset from the HTTP Port Start) used to
support remote office IP phone UI and Web UI connections. Default is 100.
If UPnP is not enabled, then the only HTTP port that must be forwarded from
the public/external side of the network to the AastraLink is the single port
specified in the HTTP Port Start field. (If you disable UPnP, then HTTP Port
Range is automatically disabled as well.)
•
SIP Port Start
Specifies the base port number for SIP connections (default = 5060). This port
must be forwarded to the AastraLink from the public/external side of the
Internet gateway/router for SIP trunk and remote office calls to succeed. If
UPnP is enabled, then port forwarding is attempted automatically.
•
SIP Port Range
Specifies the number of ports to attempt SIP connections (default = 1, port
5060 only).
41-001190-02 Rev. 01, Rel. 1.2
4-29
AastraLink Pro 160 Administrator Guide
Configuring Network Settings
•
SIP Registration Expiration
Specifies the time, in seconds, that the SIP phone and AastraLink SIP trunks
use for their SIP registration renewal timer.
Usually no change is required for this parameter, but some SIP trunk service
providers may refuse registration if the period is set shorter than a specified
value, for example 3600 seconds. Default is 120.
•
RTP Port Start
Specifies the public network first RTP port of the range on the router that the
AastraLink uses to communicate with IP phones for external SIP calls.
Default is 3000. This is the start of the range of UDP ports (from 'RTP Port
Start' to 'RTP Port Start + RTP Port Count' that must be forwarded to the
AastraLink from the public/external side of the Internet gateway/router for
SIP trunk and remote office calls to succeed. If UPnP is enabled, then port
forwarding is attempted automatically (see the RTP Port Range parameter).
•
RTP Port Range
Specifies the RTP port range (offset from the RTP Port Start) used to support
the voice path for remote office IP phones and SIP trunk calls. Default is 300.
UPnP will attempt to allocate and forward the number of external ports
specified by RTP/RTCP Port Count. Forwarded ports lie within the range:
RTP Port Start through (RTP Port Start + RTP Port Range).
•
RTP/RTCP Port Count
Specifies the total number of media stream ports the AastraLink can support
simultaneously for remote phone users.
Each incoming or outgoing call requires one media stream; each media stream
uses one RTP port and one RTCP port. To set this parameter, multiply the
maximum numbers of simultaneous calls supported on the AastraLink by two.
For example, the default setting of 20 allows the AastraLink to support 10
incoming or outgoing calls simultaneously.
4-30
41-001190-02 Rev. 01, Rel. 1.2
Configuring AastraLink Pro 160 System and Network Parameters
Configuring Network Settings
Notes:
1. Aastra recommends accepting the RTP/RTCP Port Count default setting
of 20. Increasing the default setting beyond 20 may result in call
degradation or service outage.
2. When UPnP is enabled, then RTP/RTCP Port Count is the maximum
number of ports forwarded. Some UPnP router implementations limit the
number of ports that may be forwarded. If fewer ports are forwarded, then
the number of simultaneous calls supported by the AastraLink is restricted.
3. If UPnP is not enabled, then you should manually forward ports:
RTP Port Start through (RTP Port Start + RTCP Port Count -1) from the
public/external side of the network to the AastraLink. All ports for RTP
must be contiguous.
Configuring Remote Office Support
If you are installing and supporting Aastra IP phones at a remote site - for
example, a home office - you need to enable remote office support on the
AastraLink Pro 160.
Note the following information about configuring remote office support:
•
The procedure for configuring remote office support varies slightly,
depending on whether or not you installed your AastraLink Pro 160 behind a
UPnP enabled/supported router. Refer to the UPnP parameter description on
page 4-27 before you begin the procedure described in this section.
•
You must initially configure phones intended for remote locations at the
central office before deployment.
For complete instructions on configuring your Aastra IP phones for remote
deployment, see the following in this guide:
— Appendix A, “Remote Office Configuration of the IP Phone
(Phone-Side)”
— Appendix B, “Remote Office Configuration of the AastraLink Pro 160
(Server-Side)”
41-001190-02 Rev. 01, Rel. 1.2
4-31
AastraLink Pro 160 Administrator Guide
Configuring Network Settings
Use the following procedure to configure AastraLink remote office support.
AastraLink Web UI
Step
Action
1
Select Configuration->Network->Local Services.
2
The “Remote Office” field is disabled by default. To enable remote office support, set Remote Office
to On.
3
The “UPnP” field is disabled by default. Set UPnP to <Off> or <On>, as required by your specific
network configuration.
See the UPnP parameter description on page page 4-27 for more information.
4-32
41-001190-02 Rev. 01, Rel. 1.2
Configuring AastraLink Pro 160 System and Network Parameters
Configuring Network Settings
AastraLink Web UI
Step
Action
4
Depending on whether or not you enabled UPnP, specify any other required Local Services
parameters, as described on page 4-28. Default values for each field are as follows:
•
•
•
•
•
•
•
5
External Gateway IP
HTTP Port Start
HTTP Port Range
SIP Registration Expiration
RTP Port Start
RTP Port Range
RTP/RTCP Port Count
<blank>
51510
100
120 seconds
3000
300
20
Click on <Save> to save your changes.
41-001190-02 Rev. 01, Rel. 1.2
4-33
AastraLink Pro 160 Administrator Guide
Configuring Network Settings
Editing External Services Settings
Depending on your network requirements, administrators can configure external
services for the AastraLink Pro 160.
The External services parameters you can specify for the AastraLink Pro 160
include:
•
NTP Address
The Network Time Protocol (NTP) pool is a collection of networked time
servers that provide the accurate time to other computers on IP networks. By
default, this parameter is set to pool.ntp.org.
4-34
41-001190-02 Rev. 01, Rel. 1.2
Configuring AastraLink Pro 160 System and Network Parameters
Configuring Network Settings
•
SMTP Relay Address
Simple Mail Transfer Protocol (SMTP) is the standard used for email
transmissions across IP networks. The AastraLink Pro 160 is capable of
acting as its own Mail Transfer Agent (MTA) for SMTP email. By default, the
AastraLink attempts to perform DNS lookups and resolve the destination
email server for direct delivery to the end user.
To disable DNS lookup and direct delivery of email, and use an external
SMTP relay instead, specify the IP address or fully qualified domain name
(FQDN) of the relay in the SMTP Relay Address field. For example, the
SMTP relay server may be a Microsoft Exchange server on your LAN, or a
server that your ISP provides.
Note: The SMTP Relay Address configures the internal LAN or external WAN
address of the SMTP relay server. The SMTP relay server must be correctly
configured to permit incoming email traffic from the AastraLink Pro 160 to
be forwarded through the relay to the end users.
•
SMTP Relay Port
The SMTP Relay Port is the port that handles SMTP traffic to/from the relay
server. Valid ports you can select from are:
•
•
Mail Transfer Agent (MTA), port 25 for RFC 2822 authentication
(default)
•
Mail User Agent (MTU), port 587 for RFC 2476 message submission
Server requires authentication
If your network server requires authentication for SMTP, you can enable this
feature using the “Server requires authentication” parameter. Enabling this
parameter requires that you also specify an SMTP Username, Password and
Account for the server.
If server authentication is disabled, the AastraLink uses the value specified for
the Domain parameter at the location Configuration->Network->Local
Network. If no value is specified for the Domain parameter, the AastraLink
Pro uses the default value in the format aastralink@ hostname.
•
SMTP Username
(If server authentication enabled) The SMTP Username specifies the
username for SMTP account authentication.
41-001190-02 Rev. 01, Rel. 1.2
4-35
AastraLink Pro 160 Administrator Guide
Configuring Network Settings
•
SMTP Password
(If server authentication enabled) The SMTP Password specifies the password
for SMTP account authentication.
•
SMTP Account
(If server authentication enabled) The SMTP Account specifies the FROM:
email address used for sending SMTP email. For example,
[email protected].
Use the following procedure to configure External services.
AastraLink Web UI
Step
Action
1
Select Users->Network->External Services.
2
Specify a Network Time Protocol (NTP) Address in the “NTP Address” field.
For example: pool.ntp.org
3
To use an external SMTP relay server, specify the IP address or FQDN of the relay in the “SMTP
Relay Address” field.
For example: 192.32.12.123
4-36
41-001190-02 Rev. 01, Rel. 1.2
Configuring AastraLink Pro 160 System and Network Parameters
Configuring Network Settings
AastraLink Web UI
Step
Action
4
Select the SMTP relay port that handles SMTP traffic on the SMTP server, in the “SMTP Relay Port”
field. Valid values are:
•
•
MTA (port 25) (default)
MUA (port 587)
Server Authentication Requirement
5
If your network server requires authentication, enable the field “Server requires authentication” by
checking the box. Disable this feature by unchecking the box.
6
If “Server requires authentication” is enabled, enter an SMTP username in the “SMTP Username”
field. This username must appear in the SMTP message received by the server.
7
If “Server requires authentication” is enabled, enter an SMTP password in the “SMTP Password”
field. This password must appear in the SMTP message received by the server.
8
If “Server requires authentication” is enabled, enter an SMTP account in the “SMTP Account” field.
For example: [email protected]
This account must appear in the SMTP message received by the server.
9
Click <Save> to save your changes.
Send Test Email
After you configure and save the SMTP settings at the location,
Configuration->Network->External Services, you can test the settings to make
sure they work correctly by clicking the <Send Test Email> button.
Clicking the <Send Test Email> automatically sends an email to the
administrator’s email address configured at the location,
My Phone->Preferences->My Profile. An example of a received SMTP test email
is as follows:
Email sent at:
12:06:17 PM 24-04-2008
Receiving the email verifies that the SMTP settings are correct. If you do not
receive the email, go back to Configuration->Network->External Services, and
edit the values for the SMTP fields as required.
41-001190-02 Rev. 01, Rel. 1.2
4-37
AastraLink Pro 160 Administrator Guide
Configuring Dial Plan Settings
Configuring Dial Plan Settings
You configure AastraLink Pro 160 dial plan settings from the
Configuration->DialPlan menu shown below.
A dial plan describes the number and pattern of digits that a user dials to reach a
particular telephone number. The default dialing plan for the AastraLink Pro 160
is 3-digits, starting with extension 200 (administrator). Users are assigned
extensions 201, 202, etc.
Note: The Administrator can select an alternative 3-digit or 4-digit dialplan and
first extension when initially configuring the system from the administrator
phone TUI. This cannot be changed after the user phones have been added;
a factory-default of the system greenfield is required to change the dialplan.
Figure 4-4.
4-38
Dial Plan Menu
41-001190-02 Rev. 01, Rel. 1.2
Configuring AastraLink Pro 160 System and Network Parameters
Configuring Dial Plan Settings
The Dial Plan menu includes the following tabs:
•
Settings - Allows you to enable or disable per-phone registration, Phone A or
Phone B hotline extensions, SIP trunk mode, parked call timeout,
Administrator password, overhead paging PIN, and paging and intercom
parameters.
•
Emergency Numbers - Allows you to specify dial plans for dialing
emergency numbers on the current phone.
•
Barred Numbers - (for outgoing calls only) Allows you to specify numbers
that are blocked PSTN numbers that cannot be dialed from the
AastraLink Pro 160.
•
FXO Lines - Allows you to specify where incoming calls on individual FXO
lines (up to 6 lines) get routed to. This tab also allows you to specify for a
Shared Line Appearance (SLA) line, how many rings the phone performs
before transferring the call.
•
Abbreviations - Allows you to specify abbreviated numbers to be used as a
shortcut when dialing from a phone connected to the AastraLink Pro. These
are numbers that are frequently used for system-wide shortcuts.
41-001190-02 Rev. 01, Rel. 1.2
4-39
AastraLink Pro 160 Administrator Guide
Configuring Dial Plan Settings
Local Dial Plan
Table 4-1 describes the AastraLink Pro 160 Dialplan Numbers and Directory
Numbers.
Table 4-1.
AastraLink Pro 160 Dialplan
DialPlan Numbers
Directory Numbers
0
0 Operator
1 Abbreviated Dialing
00 through 99
2* Extn
2xx/2xxx SIP Extension
3* Extn
3xx/3xxx SIP Extension
4* Extn
4xx/4xxx SIP Extension
5 Unused
6 Feature Access
0 Local Features
00 Paging
01 Relay
02...09 Unused
10 FXS A
11 FXS B
12 AutoFAX
20...99 Unused
1 Local CallP Features
00 IVR
01 Vmail
02 ConfMod
1 Unused
2* virtual extension
3* virtual extension
4* virtual extension
5...9 Unused
2 Meetme Extn
3 Meetme Extn
4 Meetme Extn
5 Call/Ring Groups
6 Paging/Intercom Groups
7 Call parking
8 Unused
9 Unused
7* AastraLink Trunk
6000
6001
Overhead paging
Activate Relay
6010
6011
6012
FAX/Phone A
FAX/Phone B
FAX A/B Auto selection
6100
6101
6102
Auto-attendant IVR
Voicemail
Conference Moderator
612xxx
613xxx
614xxx
Secondary SIP phones
Secondary SIP phones
Secondary SIP phones
62xxx
63xxx
64xxx
65xxx
66xxx
67xx
Meet-me owned by 2xxx
Meet-me owned by 3xxx
Meet-me owned by 4xxx
Ring Group xxx
Paging Group xxx
Parked Call xx
7+ (access digit) + xxx/xxxx
*access digit = 0 - 9 (assigned by the
administrator)
* xxx/xxxx = 3 or 4 digit extn
8* SIP Trunk
8 + (access digit*) + external number
*access digit = 0 - 9 (assigned by the
administrator)
9* PSTN (FXO Access)
4-40
9 external - PSTN line call
41-001190-02 Rev. 01, Rel. 1.2
Configuring AastraLink Pro 160 System and Network Parameters
Configuring Dial Plan Settings
Star Codes
Table 4-2 describes the AastraLink Pro 160 star codes implemented.
Table 4-2.
AastraLink Pro 160 Star-Codes
Star Code
Description
*5XXX
Intercom to extension XXX
*60
Public Address/Overhead paging
*66
Voicemail
*76XXX
Directed Call Pickup of extension XXX
*78
Do Not Disturb
**xxx
Voice mailbox of extension xxx
Specifying Dial Plan Settings
Use the following procedure to specify dial plan settings for the AastraLink Pro
160.
AastraLink Web UI
Step
Action
1
Select Configuration->Dial Plan->Settings.
2
Set the “Phone Registration” field to one of the following options:
On - (default) Allows new IP phones to register with the AastraLink Pro 160.
Off - Prevents new phones from registering with the AastraLink Pro 160.
3
The “Secondary Line Prefix” is the dial plan prefix of 61, reserved for Secondary SIP phones. This
number is not directly dialable. This field is read-only. For more information about this prefix, see the
Dial Plan Table on page 4-40.
4
The “First Extension” is the phone number or extension of the Adminnistrator phone on the network.
This field is read-only after using the initial Adminnistrator phone to set the greenfield system
configuration.
41-001190-02 Rev. 01, Rel. 1.2
4-41
AastraLink Pro 160 Administrator Guide
Configuring Dial Plan Settings
AastraLink Web UI
Step
Action
5
The “Phone A Number” is the dial plan prefix of 6010, used for dialing over the FXO Port A. This
field is read-only. For more information about this prefix, see the Dial Plan Table on page 4-40.
6
In the “Phone A Hotline” field, select the extension or phone number you want to use to dial out over
the FXO Port A as a hotline. If the phone is set to use this line, when a User picks up the handset to
dial, there is no dial tone. Valid values are any configured phone extension in your network or None.
7
The “Phone B Number” is the dial plan prefix of 6011, used for dialing over the FXO Port B. This field
is read-only. For more information about this prefix, see the Dial Plan Table on page 4-40.
8
In the “Phone B Hotline” field, select the extension or phone number you want to use to dial out over
the FXO Port B as a hotline. If the phone is set to use this line, when a User picks up the handset to
dial, there is no dial tone. Valid values are any configured phone extension in your network or None.
9
The “FXO Line Prefix” field is the dial plan prefix of 9, used to dial out over an FXO line for external
PSTN calls. This field is read-only. For more information about this prefix, see the Dial Plan Table on
page 4-40.
10
The “SIP Trunk Prefix” field is the dial plan prefix of 8, used to dial out over an external SIP trunk.
This field is read-only. For more information about this prefix, see the Dial Plan Table on page 4-40.
For more information about the SIP Trunk Prefix”, see “SIP Trunking” on page 4-76.
11
The “SIP Trunk Mode” allows you to select whether a user dials out over a single SIP trunk or
multiple SIP trunks. Valid values are:
•
•
Single
Multiple
If this field is set to “Single”, a user can dial 8+number. If set to “Multiple”, a user can dial
8+index+number.
For more information about the SIP Trunk Mode feature, see “Single and Multiple SIP Trunks” on
page 4-84.
12
4-42
The “AastraLink Trunk Prefix” field is the dial plan prefix of 7, used to dial out over an AastraLink
trunk. This field is read-only. For more information about this prefix, see the Dial Plan Table on
page 4-40.
41-001190-02 Rev. 01, Rel. 1.2
Configuring AastraLink Pro 160 System and Network Parameters
Configuring Dial Plan Settings
AastraLink Web UI
Step
Action
13
After a caller parks a call, the extension of the caller who parked the call will ring again to remind
them that they put a call on park.
In the “Parked Call Timeout” field, enter the time, in seconds, that the AastraLink Pro 160 waits
before it rings back to remind the IP Phone user that he parked a call.
This parameter is a global setting for all calls that are parked (not a per-call basis).
Valid values are 1 to 3600 (1 hour). Default is 45.
Note: A value of 0 for this parameter sets the Parked Call Timeout to 45 seconds (default).
14
To change the password for the administrator’s phone, specify a new password in the “Admin
Master Password” field.
The default Administrator Master Password is 22222. This password is used for admininistrator TUI
access on SIP phones, admin login on the MBU-400 webui, and as the system default account
"admin" prior to the local system administrator first registering and configuring the system from their
SIP phone. The first 4 digits of this password are also used for 420d handset VoIP and system
settings menu.
Warning: Changing the phones administrator password may result in all phones rebooting to accept
the changed password.
Configuring Paging and Intercom Parameters
15
The “Overhead Paging Extension” field is the dial plan prefix of 6000, used to dial into an overhead
paging system. This field is read-only. For more information about this prefix, see the Dial Plan Table
on page 4-40.
16
In the “Overhead Paging PIN” field, set the overhead paging PIN that a User needs to enter in order
to enter the overhead paging system. This PIN is also used for the "All SIP phones" default Paging
Group 660.
For more information about overhead paging, see “Configuring Overhead Paging” on page 4-49 and
Chapter 3, the section, “Ring Groups and Paging Groups” on page 3-38.
41-001190-02 Rev. 01, Rel. 1.2
4-43
AastraLink Pro 160 Administrator Guide
Configuring Dial Plan Settings
AastraLink Web UI
Step
Action
17
You can enable or disable the following Paging and Intercom features on the AastraLink:
•
•
•
•
•
Allow Barge In (Default is “Off”)
Play Warning Tone (Default is “On”)
Microphone Mute (Default is “On”)
Auto Answer (Default is “On”)
Paging Mode for Icom Key (Default is “Off”)
For more information about these settings, see “Configuring Paging and Intercom Options” on
page 4-50.
18
4-44
Click <Save> to save your changes.
41-001190-02 Rev. 01, Rel. 1.2
Configuring AastraLink Pro 160 System and Network Parameters
Configuring Dial Plan Settings
Configuring a Dial Plan for Auto-Fax
Overview
The AastraLink Pro 160 allows you to connect FAX machine(s) to the FXS ports
on the rear panel to send and receive fascimile communications.
A FAX machine connected to either FXS port can send outgoing faxes using the
standard AastraLink Pro dialplan (i.e. 9 for outbound FXO line).
For incoming FAX calls, the Auto-FAX feature of the auto-attendant will monitor
the line for incoming FAX calls and automatically re-route call to the waiting fax
machine connected to an FXS port.
FAX Indication Tones
When two Facsimile machines first connect, they exchange tones to provide an
indication that this is a FAX call rather than a voice call. The calling party sends a
CNG (half-second 1100Hz tone repeated every three seconds), followed by V.21
(a rapidly alternating sequence of short tones using frequency-shift-keying).
The Auto-FAX feature uses a Digital Signal Processor on AastraLink Pro model
160 hardware to listen for V.21 negotiation and CNG FAX calling tones. If either
of these FAX tones is detected while the auto-attendant main menu is answering
the call, the Auto-FAX feature dials the number 6012 into the IVR’s digit collector
to re-route the FAX call.
FAX Call Re-routing
The “6012” is a dedicated virtual extension on the AastraLink dial plan, which
terminates the FAX calls to the FXS A port (if idle) or to a Busy tone if the FXS is
in use (to trigger the calling FAX machine to retry at a later time).
Note: Auto-FAX does not support FXS B at this time.
This type of provisioning allows you to leave a FAX machine connected to the
FXS A port, to receive all incoming FAX calls received from FXO lines by the
Auto-Attendant (either during Day or Night service, depending on provisioning).
Auto-FAX functionalty is always enabled on the AastraLink Pro for all incoming
FAX calls received from FXO by the Auto-Attendant main menu.
41-001190-02 Rev. 01, Rel. 1.2
4-45
AastraLink Pro 160 Administrator Guide
Configuring Dial Plan Settings
FXO Incoming Call Routing
Auto-FAX does not operate if the FXO line has been configured to use incoming
call forwarding to a facility other than Auto-Attendant, or if Auto-Attendant is not
the default incoming call destination.
If either of these call routes has been provisioned to use a facility other than the
Auto-Attendant (for example Operator, SIP extension or Ring group) the IVR
menu is not reached by the incoming call; therefore the Auto-FAX functionality
cannot occur.
In this case, it is necessary for the person who answers the FAX call and hears the
CNG tone to perform the routing manually. This can be done simply by using the
phone’s Transfer key (Xfer) to transfer the call to extension 6012, allowing
Auto-FAX to then handle the call routing to FXS A or Busy tone as appropriate.
You can use the following parameter to provision the Open/Closed hours
Incoming Call destination as the Auto-Attendant:
•
In the “Incoming Calls go to” field at the location
Configuration->Auto-Attendant->Settings
“Incoming Calls go to”
field set to “Auto-Attendant”
4-46
41-001190-02 Rev. 01, Rel. 1.2
Configuring AastraLink Pro 160 System and Network Parameters
Configuring Dial Plan Settings
You can use the following parameter to provision the per-FXO line incoming call
forwarding to “Default”.
In the “Line x forwards to” field at the location
Configuration->Dial Plan->FXO Lines
“Line x forwards to”
fields
Available Settings
For infomration about configuring the Auto-Attendant to route FAX calls, see
“Configuring a Dial Plan for Auto-Fax” on page 4-45.
Configuring FXO Lines for Manually Forwarding Auto-Fax
The AastraLink Pro 160 allows you to connect FAX machine(s) to the FXS ports
on the rear panel to send and receive fascimile communications.
A FAX machine connected to either FXS port can send outgoing faxes using the
standard AastraLink Pro dialplan (i.e. 9 for outbound FXO line).
For incoming FAX calls, the Auto-FAX feature of the auto-attendant will monitor
the line for incoming FAX calls and automatically re-route call to the waiting fax
machine connected to an FXS port.
41-001190-02 Rev. 01, Rel. 1.2
4-47
AastraLink Pro 160 Administrator Guide
Configuring Dial Plan Settings
However, you can override the Auto-Attendant from answering incoming FAX
calls by provisioning the FXO lines to reroute the FAX calls instead. FXS Caller
ID displays for calls set to the FXS device. Calling name/extension and
number (where known) display according to the country-specific CLID capability
set.
Use the following procedure to configure the FXO Lines to answer incoming FAX
calls.
AastraLink Web UI
Step
Action
1
Select Configuration->Dial Plan->FXO Lines.
2
Select a line from Line 1 through Line 6.
3
In the “Line x forwards to” field, choose where you want incoming FAX calls to get fowarded. Valid
values are:
•
•
•
•
•
SLA
Operator
FXS A
FXS B
<phone number or extension number>
Note: Any configured setting other than “Default” will override the auto-attendant setting at the
location Configuration->Auto-Attendant->Settings. All incoming fax calls are forwarded to the
destination you specify for this “Line x forwards to” field. For the SLA, Operator, and extension and
phone number settings, the person who answers the call must manually dial and transfer the
incoming FAX call to 6012. For the FXS A and FXS B settings, the incoming fax calls are routed to
that FXO.
4
4-48
Click <Save> to save your changes.
41-001190-02 Rev. 01, Rel. 1.2
Configuring AastraLink Pro 160 System and Network Parameters
Configuring Dial Plan Settings
Configuring Overhead Paging
The AastraLink Pro 160 has an overhead paging jack (located on the back of the
device) that you can directly connect to an amplifier in order to support overhead
paging.
Overhead Paging Jack
(Green Port)
TM8DC
LAN
12 VDC 1.25A
WAN
Back of AastraLink Pro 160
To access the pager, an IP phone user goes through the Auto-Attendant, and
specifies the correct password, as described in the following procedure.
AastraLink Web UI
Step
Action
1
Select Configuration->Dial Plan.
2
Specify the password (PIN) IP phone users enter to access overhead paging in the “Overhead
Paging PIN” field.
For example, enter: 6000
Note: Default overhead paging PIN is 22222.
3
Click <Save> to save your changes.
For information about configuring Paging Groups, see Chapter 3, the section,
“Ring Groups and Paging Groups” on page 3-38.
41-001190-02 Rev. 01, Rel. 1.2
4-49
AastraLink Pro 160 Administrator Guide
Configuring Dial Plan Settings
Configuring Paging and Intercom Options
If you’ve added a Paging Group to the AastraLink Pro, you can enable/disable the
following Paging and Intercom dial plan options via the Web UI at the location
Configuration->Dial Plan->Settings.
•
Allow Barge-In - Enables or disables the paging and intercom to occur while
a phone is in the active call state.
•
Play Warning Tone - Enables or disables the warning tone to be heard before
a page or an intercom call on the phone.
•
Microphone Mute - Enables or disable the speakerphone to mute when a
page or an intercom call is received by the phone.
•
Auto-Answer - Enables or disables automatic answering of an intercom call
by the phone. If disabled, icom will be treated as a normal incoming call.
•
Paging Mode for Icom Key - Enables or disables the Intercom key to act as a
Paging key, providing a list of paging groups instead of a number-entry field.
The values configured for the Dial Plan page apply to all phones on the system;
there is no per-phone configuration of these options.
4-50
41-001190-02 Rev. 01, Rel. 1.2
Configuring AastraLink Pro 160 System and Network Parameters
Configuring Dial Plan Settings
If you have added a Paging Group to the AastraLink Pro, use the following
procedure to configure Paging and Intercom options if required. This procedures
assumes a Paging Group has already been added to the AastraLink Pro.
AastraLink Web UI
Step
Action
Paging and Intercom options for Paging Groups
1
After adding a Paging Group using the procedure in Chapter 3, the section, “Adding a Group” on
page 3-49, select Configuration->Dial Plan->Settings.
Paging and Icom
Options
41-001190-02 Rev. 01, Rel. 1.2
4-51
AastraLink Pro 160 Administrator Guide
Configuring Dial Plan Settings
AastraLink Web UI
Step
Action
2
Enable or disable the following options by clicking in the “On” (enable) or “Off” (disable) field:
•
•
•
•
•
3
4-52
Allow Barge In (Default is “Off”)
Play Warning Tone (Default is “On”)
Microphone Mute (Default is “On”)
Auto Answer (Default is “On”)
Paging Mode for Icom Key (Default is “Off”)
Click <Save> to save your changes.
41-001190-02 Rev. 01, Rel. 1.2
Configuring AastraLink Pro 160 System and Network Parameters
Configuring Dial Plan Settings
Dial Plan for Meet-Me Conference Bridges
This advanced feature of the AastraLink Pro enhances the current 3-way
conference available on the Aastra SIP phones. This feature provides
AastraLink-hosted ad-hoc Meet-me Conference bridges for all users.
Conference bridges are created dynamically by the AastraLink when the feature is
accessed. If the moderator is the first to connect to the bridge, he/she is prompted
to choose a PIN; otherwise, the conference begins immediately with any users
waiting on hold (with music) joined to the conference.
A virtual conference bridge is associated to every SIP extension by adding an
accessor prefix 6 to the users phone number. For example, user 200’s meet-me
bridge is at 6200. (For more information about the conferencing dial plan, see the
Dial Plan Table on page 4-40).
A user calling into his/her home extension conference bridge becomes moderator
automatically. If calling from another extension (or externally) the user may
authenticate his/her voicemail credentials to become moderator. More than one
moderator login is permitted in a conference; if no moderator exists (i.e. all
moderators leave the conference) the conference is terminated.
When a moderator dials into a conference from a phone other than the his/her own
phone, the number 6102 must be dialed to allow password authentication of the
moderator. (For more information on dial plan numbers, see the see the Dial Plan
Table on page 4-40.)
The moderator can optionally configure a PIN on the conference bridge. If the
PIN is configured, users must enter this PIN before they can be joined into the
conference on the bridge.
Note: Any users currently in the hold queue prior to a moderator joining will be
added automatically. To differentiate between a PIN moderated and a
non-PIN moderated call, the moderator will NOT be prompted to create a
PIN for a conference if there are already users on hold waiting. Such a
conference shall be considered 'insecure'. The moderator can leave the
conference, and cause it to be terminated, before re-connecting and
assigning a PIN.
41-001190-02 Rev. 01, Rel. 1.2
4-53
AastraLink Pro 160 Administrator Guide
Configuring Dial Plan Settings
Host Capacity Limitations
Meet-me conferencing capability is dependent on the available host CPU capacity.
The AastraLink Pro supports a total of 12 simultaneous host-routed sessions.
One session is defined as a SIP trunk call, a remote office call, a conference call
participant, a voicemail call, or an auto-attendant call.
Calls directly between local SIP phones do not use a host session and are excluded
from the 12 session limit.
Configuring an Emergency Dial Plan
Public telephone networks in countries around the world have a single emergency
telephone number (emergency services number), that allows a caller to contact
local emergency services for assistance when required. The emergency telephone
number may differ from country to country. It is typically a three-digit number so
that it can be easily remembered and dialed quickly. Some countries have a
different emergency number for each of the different emergency services, or may
have additional numbers for contacting regional / locality specific emergency
services.
You can specify the digits to dial on the IP phone for contacting emergency
services. Once you specify the emergency number(s) on the phone, you can dial
those numbers directly on the dial pad when required, and the phone
automatically dials to those emergency services without needing to enter the
PSTN (FXO) prefix digit 9.
Emergency Number
Description
911
An emergency number for the United States
and Canada
080
An emergency number for Mexico
These emergency numbers are also used when checking that an emergency call is
not in progress for the FXO priority override feature described in the Chapter 1,
the section, “Emergency Call Priority” on page 1-9.
By default, the emergency number 911 is configured for the AastraLink device.
4-54
41-001190-02 Rev. 01, Rel. 1.2
Configuring AastraLink Pro 160 System and Network Parameters
Configuring Dial Plan Settings
Use the following procedure to configure other emergency numbers for your
network.
AastraLink Web UI
Step
Action
1
Select Configuration->Dial Plan->Emergency Numbers.
2
To add a new emergency number, click <Add Emergency Number>.
3
Specify a phone number, then click <Add >.
The Emergency Numbers list updates to display the number you specified.
Note: To delete an emergency number, select the number(s) you want to delete, then click
<Delete Selected Emergency Numbers>.
Configuring Barred Numbers
Barred numbers are blocked PSTN numbers that cannot be dialed from the
AastraLink Pro 160. You can use the Web UI to specify a barred numbers list for
the IP phones on your network. The barred numbers list applies to outgoing calls
only.
For networked systems, using 8-prefix AastraLink trunk dialing between sites, the
barred number list is also applied locally on each AastraLink Pro for incoming
dialed numbers. This allows flexible and secure provisioning rules to be enforced
for toll-bypass (i.e. local PSTN breakout) as if the remote system had dialed the
number directly from the local system.
To bar a specific number, simply add the number to the barred numbers list. To bar
a specific number pattern, you use the following format:
<barred number>*
For example, to block 800-number calls, you add 800* to the barred numbers list.
The AastraLink automatically adds the PSTN and SIP prefixes as required.
41-001190-02 Rev. 01, Rel. 1.2
4-55
AastraLink Pro 160 Administrator Guide
Configuring Dial Plan Settings
Note: When barring PSTN numbers, do not bar the "9" range numbers, or calls to
911 and 9911. These numbers must not be blocked.
Adding a Barred Number
Use the following procedure to specify a barred number for the AastraLink Pro
160.
AastraLink Web UI
Step
Action
1
Select Configuration->Dial Plan->Barred Numbers.
2
Click <Add Barred Number>
3
Specify a phone number, or pattern of numbers, to add to Barred Numbers list, then click <Add>
The Barred Numbers list updates to display the number you specified.
Deleting a Barred Number
Use the following procedure to delete a barred number from the AastraLink Pro
160 barred number list.
AastraLink Web UI
Step
Action
1
Select Configuration->Dial Plan->Barred Numbers
2
Click on the check-box next to the number you want to delete.
3
Click <Delete Selected Barred Numbers>
4-56
41-001190-02 Rev. 01, Rel. 1.2
Configuring AastraLink Pro 160 System and Network Parameters
Configuring Dial Plan Settings
Configuring FXO Lines
On the AastraLink Pro, you can configure individual FXO lines (up to 6 lines) for
which incoming calls are routed. The following table identifies the destinations
for which you can choose to route your incoming calls on each line.
FXO Line Destinations
Description
Default
Sends incoming calls according to the configured incoming
call route on the Auto-Attendant page.
SLA (Shared Line
Appearance)
Sends the incoming call to the Shared Line Appearance (SLA)
line shared by all users in a Ring Group.
Operator
Sends the incoming call to the Operator.
FXS A
Sends the incoming call to the FXO Port A.
FXS B
Sends the incoming call to the FXO Port B.
<extension number>
<phone number>
Sends the incoming call to the specified extension or phone
number.
You can also specify the number of rings you want the destination phone to ring
before your phone transfers the incoming call.
Note: This feature also allows you to provision FXO lines regardless of the line
state (i.e. even if there is no FXO line voltage) to enable for FXO loopback
door entry phone use.
41-001190-02 Rev. 01, Rel. 1.2
4-57
AastraLink Pro 160 Administrator Guide
Configuring Dial Plan Settings
You can configure the FXO lines using the Web UI at the location,
Configuration->Dial Plan->FXO Lines.
Configuring FXO Lines for Incoming Calls
Use the following procedure to configure the FXO Lines to answer incoming
calls.
AastraLink Web UI
Step
Action
1
Select Configuration->Dial Plan->FXO Lines.
2
Select a line from Line 1 through Line 6.
4-58
41-001190-02 Rev. 01, Rel. 1.2
Configuring AastraLink Pro 160 System and Network Parameters
Configuring Dial Plan Settings
AastraLink Web UI
Step
Action
3
In the “Line x forwards to” field, choose where you want incoming calls to get fowarded and click
<Save>. Valid values are:
•
•
•
•
•
•
4
(optional) If you select SLA as your destination for incomig calls, in the “SLA rings before transfer”
field, select the number of rings you want the destination phone to ring before transferring the
incoming call. Valid values are:
•
•
•
•
•
•
•
5
Default
SLA
Operator
FXS A
FXS B
<phone number or extension number>
forever (destination phone rings until the line is picked up or the line goes to voicemail)
1 (phone rings once, then the call is transferred)
2 (phone rings two times, then the call is transferred)
3 (phone rings three times, then the call is transferred)
4 (phone rings four times, then the call is transferred)
5 (phone rings five times, then the call is transferred)
6 (phone rings six times, then the call is transferred)
Click <Save> to save your changes.
41-001190-02 Rev. 01, Rel. 1.2
4-59
AastraLink Pro 160 Administrator Guide
Configuring Dial Plan Settings
Configuring FXO Lines for Shared Line Appearance (SLA)
The AastraLink Pro provides Shared Line Appearance (SLA) which provides key
system features in addition to its existing Private Branch eXchange (PBX)
functionality.
SLA and PBX can be used exclusively (i.e. all FXO lines as SLA, or all FXO lines
as PBX) or in a mixed mode. To differentiate between modes, the AastraLink user
interface refers to non-SLA lines as ’Pool’ lines, as they provide pooling of
incoming and outgoing lines for call processing purposes.
About Shared Line Appearances
A traditional key system has telephones with multiple buttons ("keys") and lights
that indicate which lines are in use. When you want to place a call, the user
presses a button to directly select the external FXO line connected to the
telephone company.
AastraLink SLA is supported on all Aastra SIP phone models (except 420d DECT
handsets and 51i SIP phones) and uses a visual indication to show the line state
(idle/ringing/in-use/hold). Indications are provided via the LED on a line hard-key
(L1, L2, etc.), LCD on a soft-key, or LED on a programmable key.
The state of the line - busy, ringing or hold - is shown by the flashing state of the
LED or icon indicator; for hard-keys the color of the indicator also shows whether
the current phone (green) or another phone (red) is using the line.
On the 9480i, 9480i CT, 6755i, 6757i, and 6757i CT, the busy and idle indicators
show on the IP phone screen display next to the softkey or programmable key
configured for SLA functionality. When the monitored user is idle, an icon with
the handset on-hook shows next to the SLA softkey or programmable key. When
the monitored user is on an active call, a small telephone icon is shown with the
handset off-hook.
On the 9143i, 6751i, and 6753i, the LED lights next to each SLA programmable
key illuminate steady to indicate the monitored line is off-hook or unregistered.
The LED goes off when the line is idle.
4-60
41-001190-02 Rev. 01, Rel. 1.2
Configuring AastraLink Pro 160 System and Network Parameters
Configuring Dial Plan Settings
In addition to monitoring the idle and busy state, the SLA feature also supports the
ringing state. When the monitored user is idle, there is a small telephone icon
shown with the handset on-hook. When the monitored user is in ringing state,
there is a small bell icon shown. When the monitored user is on an active call then
a small telephone icon is shown with the handset off-hook.
SLA and the AastraLink Pro
SLA is configurable on a per FXO basis on the AastraLink Pro. When no FXOs
are configured as SLA, all 6 FXO ports perform the PBX dial plan operation as
outlined in Release 1.1 of the AastraLink Pro.
Any FXO ports not allocated for SLA use, are available for processing PBX calls
and for Pool outgoing calls. A configurable timer allows SLA incoming calls to
overflow to PBX dial plan routing (auto-attendant, ring groups etc.), and outgoing
PBX calls will overflow to SLA lines if no FXO Pool line is available.
SLA membership - i.e. whether a phone is to participate in the SLA key system, or
whether it is to be permitted access to PBX Pool lines only - can be configured
independently for each local and remote office phone.
41-001190-02 Rev. 01, Rel. 1.2
4-61
AastraLink Pro 160 Administrator Guide
Configuring Dial Plan Settings
SLA Key Mapping
FXO line to SIP phone key mapping for SLA varies by phone model.
The following table describes the mapping of the hard and soft line keys on the
SIP phone with the FXO ports on the rear of the AastraLink Pro.
SLA Supported
Phone Models
FXO 1
FXO 2
FXO 3
FXO 4
FXO 5
FXO 6
Mapping To AastraLink Pro
9480i / 9480iCT base
L1
L2
L3
L4
Softkey
L5
Softkey
L6
9143i
L1
L2
L3
Softkey
L4
-
-
6757i / 6757iCT base
L1
L2
L3
L4
Softkey
L5
Softkey
L6
As base
As base
As base
As base
As base
As base
6755i
L1
L2
L3
L4
Softkey
L5
Softkey
L6
6753i
L1
L2
L3
Softkey
L4
-
-
6751i
-
-
-
-
-
-
L1
L2
Softkey
L3
Softkey
L4
-
-
-
-
-
-
-
-
CT handset
6730i / 6731i
DECT 420d handset
For all phones, off-hook maps to "Pool line" which allows PBX dial plan calling.
The pool line feature sets the phone to L7 (9480i, 9480i CT, 6757i, 6757i CT,
6755i) or L5 (9143i, 6731i & 6753i) in the phone configuration when it is in the
idle state.
Note: SLA is not supported on Model Phones 6751i and 420d Handsets.
These phones default to the line pool operation only. If all FXO lines are
configured for SLA, these phone models will not be able to receive incoming
FXO calls.
4-62
41-001190-02 Rev. 01, Rel. 1.2
Configuring AastraLink Pro 160 System and Network Parameters
Configuring Dial Plan Settings
Using AastraLink SLA from the SIP Phones
If SLA is configured on an FXO port, the following occurs for all phones:
•
The line indicator flashes quickly when a call comes in, and the phone rings.
•
When the call is connected and answered, the line indicator lights up solid.
For hard-line keys (L1, L2, etc.) it will show green on the answering phone,
and red on all other phones.
•
When the call is placed on hold, the line indicator flashes slowly
For hard-line keys (L1, L2, etc.) it will show green on the holding phone, red
on all other phones.
•
Any phone can pickup a call from the held state.
Configuring SLA on the AastraLink
Use the following procedure to configure SLA on the AastraLink Pro.
AastraLink Web UI
Step
Action
1
Select Configuration->Dial Plan->FXO Lines.
2
Select a line from Line 1 through Line 6.
3
In the “Line x forwards to” field, choose which line you want to assign SLA (Shared Line
Appearance), and select SLA from the option list.
4
Click <Save> to save your changes.
Note: SLA membership is enabled by default on the AastraLink Pro at the location
Users->User List-><select specific User or Add Phone>.
41-001190-02 Rev. 01, Rel. 1.2
4-63
AastraLink Pro 160 Administrator Guide
Configuring Dial Plan Settings
Enabling/Disabling Individual SLA Memberships
By default, All existing SIP phones (and any new SIP phones added to the system)
use the shared line FXO configuration if it is enabled on the AastraLink.
Phones can be individually removed from the SLA feature by editing the phone in
the Administrator’s Web UI user list, and toggling the ’SLA Enabled’ option.
SLA toggle
4-64
41-001190-02 Rev. 01, Rel. 1.2
Configuring AastraLink Pro 160 System and Network Parameters
Configuring Dial Plan Settings
SLA Configuration Changes
If the AastraLink SLA configuration changes for any FXO, all phones are
rebooted for the line key change to be applied. If membership is changed for a
single phone, that phone only reboots.
Note: If you enable the SLA feature on the AastraLink:
•
Phone Xfer is not supported for SLA lines.
•
Redial and Speed-dial default to using the Pool line.
•
When the Speaker key is pressed, or receiver goes off-hook, Pool line is
automatically selected.
When a User dials on an IP Phone, the phone assumes that the line on which the
user is dialing is a Pool line. If SLA is enabled on the phone, the phone changes its
behavior when the User dials out on a line. If SLA is enabled and specific features
on the phone are used (for example, redial, speeddial, transfer), the User must
specifically direct the feature to use the SLA line for the feature to work in that
mode.
The features affected by SLA include:
•
Redial list
•
Speed-dial softkey
•
3-way conference
•
Call transfer
Redial
To perform a Redial using a Pool line....
press <Redial> then press <Redial> again.
To perform a Redial using an SLA line L1.... press <Redial> then press <L1> key.
Speeddial
To perform a Speeddial using the Pool
line....
41-001190-02 Rev. 01, Rel. 1.2
press the Speeddial key.
4-65
AastraLink Pro 160 Administrator Guide
Configuring Dial Plan Settings
To perform a Speeddial using the SLA line
L1....
press <L1> and then press the Speeddial
key.
Note: Because Pool lines require prefix 9
for outside access, and SLA lines require
direct dialing, the same speeddial key
cannot be used in both modes.
3-Way Conference
Conferencing can be initiated for Pool or SLA incoming calls, but the target of the
conference (the third party being invited to join the call) can only be a Poll line or local
extension.
SLA lines cannot be the invitee of a 3-way conference call.
Call Transfer
The transfer (Xfer) key is a Pool line only feature, and does not operate for incoming SLA
calls.
SLA lines cannot be the target of a call transfer.
4-66
41-001190-02 Rev. 01, Rel. 1.2
Configuring AastraLink Pro 160 System and Network Parameters
Configuring Dial Plan Settings
Configuring Abbreviations
The AastraLink Pro 160 allows you to define a list of abbreviated numbers to be
used as a shortcut when dialing from a phone connected to the AastraLink Pro.
These are numbers that are frequently used for system-wide shortcuts.
For each abbreviation that is configured, when the abbreviation is dialed from
IVR menu or IP phone, the AastraLink places the outgoing call using the full
specified number instead. This provides an effective system-wide speed dial or
shortcut dialling method, and allows for exceptions to other features such as
barred numbers to be provisioned.
The AastraLink automatically dedicates the prefix ’1’ for abbreviated numbers in
the dialing plan. The abbreviated number that you set must be two digits and is
limited to 100 numbers (00 to 99). This abbreviated number is a virtual extension,
which is entirely separate from the extension number of the users IP phone. For
more information about creating virtual extensions, see Chapter 3, the section,
“Virtual Extension Numbers (for Ring and Paging Groups)” on page 3-42.
The Administrator can create, edit, and/or delete abbreviated numbers.
Note: On the global dial plan, abbreviated numbers are reserved as primary digit
1.
Figure 4-5.
Abbreviations Menu
41-001190-02 Rev. 01, Rel. 1.2
4-67
AastraLink Pro 160 Administrator Guide
Configuring Dial Plan Settings
In the illustration above, 1+45 is the abbreviated number that the phones use as a
shortcut for dialing the longer User Group virtual extension associated with the
sales office.
Examples of Abbreviated Number Configurations
The following examples illustrate the configuration of abbreviated numbers.
Example 1
The first illustration below shows call barring as 91* so that external long distance
is blocked. The second illustration shows an abbreviation of 1+20 added which
routes to phone number 7165300, so that users can still dial out for pizza.
Call Barring Number
of 91*
4-68
41-001190-02 Rev. 01, Rel. 1.2
Configuring AastraLink Pro 160 System and Network Parameters
Configuring Dial Plan Settings
Abbreviated Number
of 1+20 for Pizza
Parlor
Example 2
The first illustration shows an abbreviation of 1+10 added, which routes to phone
number 7165300. This is an inter-office AastraLink trunk call to call group 300
using AastraLink trunk number 1. This is accessing the Sales team using an
AastraLink at another location.
Abbreviated Number
of 1+10 for Sales
Office
41-001190-02 Rev. 01, Rel. 1.2
4-69
AastraLink Pro 160 Administrator Guide
Configuring Dial Plan Settings
User Group of
65 + 300
4-70
41-001190-02 Rev. 01, Rel. 1.2
Configuring AastraLink Pro 160 System and Network Parameters
Configuring Dial Plan Settings
Configuring Abbreviated Numbers
Use the following procedure to configure an abbreviated number.
AastraLink Web UI
Step
Action
1
Select Configuration->Dial Plan->Abbreviations.
2
Click <Add Abbreviation>.
3
In the Abbreviation field, specify a two-digit number that the AastraLink dials as a shortcut prior to a
user dialing an outgoing number. Valid values must be between 00 and 99.
Note: The AastraLink automatically prepends “1” to the abbreviated number you specify.
4
In the Number field, specify an extension or an outside phone number (up to 20 digits) for the
AastraLink to dial when using the specified abbreviated number.
5
(Optional) In the Description field, specify a description that identifies this abbreviated number.
6
Click <Save> to save your changes.
41-001190-02 Rev. 01, Rel. 1.2
4-71
AastraLink Pro 160 Administrator Guide
Configuring Dial Plan Settings
Editing Abbreviated Numbers
Use the following procedure to edit an abbreviated number.
AastraLink Web UI
Step
Action
1
Select Configuration->Dial Plan->Abbreviations.
2
In the Abbreviation column, click on the abbreviated number you want to edit.
3
Edit the Abbreviation, Number, and Description as required.
4
Click <Save> to save your changes.
4-72
41-001190-02 Rev. 01, Rel. 1.2
Configuring AastraLink Pro 160 System and Network Parameters
Configuring Dial Plan Settings
Deleting Abbreviated Numbers
Use the following procedure to delete an abbreviated number.
AastraLink Web UI
Step
Action
1
Select Configuration->Dial Plan->Abbreviations.
2
In the Abbreviation column, place a check mark in the box for the abbreviated number you want to
delete.
3
Click <Delete Selected Abbreviations> button. The following prompt displays:
“Are you sure you want to delete the selected item?”
4
Click <Yes> to delete the abbreviated number, and the associated phone number and description.
41-001190-02 Rev. 01, Rel. 1.2
4-73
AastraLink Pro 160 Administrator Guide
Configuring VoIP Settings
Configuring VoIP Settings
You configure AastraLink Pro 160 Voice over IP (VoIP) settings from the
Configuration->VoIP menu shown below.
Figure 4-6.
4-74
Voice-Over-IP Menu
41-001190-02 Rev. 01, Rel. 1.2
Configuring AastraLink Pro 160 System and Network Parameters
Configuring VoIP Settings
The VoIP menu includes the following tabs:
•
SIP Trunking - Allows you to enable SIP trunking on the AastraLink Pro in
order to support internetworking between your Aastra IP phones, and the SIP
devices on a VoIP service provider network. On the AastraLink Pro, you can
configure up to 10 SIP trunks for your network.
•
SIP DIDs - Allows you to specify SIP Direct Inward Dialing (DID) prefixes
for SIP trunks. Direct Inward Dialing (DID) is a service of a local phone
company that provides a block of telephone numbers for calling into a
company's private branch exchange (PBX) system.
•
AastraLink Trunks - Allows you to specify AastraLink trunking to support
internetworking between Aastra IP phone networks.
•
Mobility Base Units - Allows you to add, delete, or reboot Mobility Base
Units (MBUs) to/from the AastraLink network.
The following paragraphs describe each of these types of VoIP configurations.
41-001190-02 Rev. 01, Rel. 1.2
4-75
AastraLink Pro 160 Administrator Guide
Configuring VoIP Settings
SIP Trunking
The AastraLink Pro 160 supports single and multiple SIP trunking. You can
configure a single SIP trunk to communicate and connect the AastraLink Pro to a
service provider’s switch to make outgoing PBX calls, OR you can configure
multiple SIP trunks to allow the outgoing PBX call to route over the least cost
routing (LCR) trunk to the service provider’s switch. For more information about
single and multiple SIP trunks see, “Single and Multiple SIP Trunks” on
page 4-84.
You enable SIP trunking on the AastraLink Pro 160 in order to support
internetworking between your Aastra IP phones, and the SIP devices on a VoIP
service provider network. On the AastraLink Pro, you can configure up to 10 SIP
trunks for your network. See Figure 4-6.
Note: When you enable SIP trunking, note the following important information:
— You can configure up to 10 SIP trunks between your AastraLink Pro 160
IP phone network and a service provider network.
— Depending on whether or not you enable UPnP support on your
AastraLink device (that is, whether or not your AastraLink is installed
behind a UPnP enabled router), you may need to manually specify the
router RTP port start/range used for external SIP calls, and forward this
port range and the SIP port (5060) from the public/external Internet
gateway/router to the AastraLink local IP address. Refer to “Editing
Local Service Settings” on page 4-26 for more information.
4-76
41-001190-02 Rev. 01, Rel. 1.2
Configuring AastraLink Pro 160 System and Network Parameters
Configuring VoIP Settings
Incoming SIP trunk calls
Call routing
The AastraLink Pro 160 automatically routes incoming SIP calls using the TO:
address in the header of the SIP message. If the address matches a Direct Inward
Dialing (DID) rule and results in a valid SIP extension, the call is routed directly
to that extension. If no match is found, the call is sent to the current incoming call
destination (for example, open or closed hours routing to auto-attendant, operator,
or user group).
Calling party identification
The AastraLink Pro 160 SIP phones automatically display the calling party name
and number (CLID) when an incoming SIP call is received on a registered trunk,
using the FROM: address received in the header of the SIP message. The CLID is
also stored in the call detail records (CDR logs).
Outgoing SIP trunk calls
Call routing
The AastraLink Pro 160 default prefix for outbound SIP trunk calls is set to 8.
When Aastralink Pro users make a call, they dial the following:
(prefix digit) + (access digit) + (directory number)
Where:
prefix digit = 8
SIP trunk access digit = 0 - 9
directory number
For example, the number 829785551212 routes the outbound call over SIP trunk
#2 to directory number 9785551212.
For another example, the number 89783225434 routes the outbound call over a
single SIP trunk to directory number 9783225434.
The AastraLink Pro 160 routes any calls with a matching SIP-trunk prefix and
trunk-accessor digit, to the appropriate SIP trunk. You can provision up to 10 SIP
trunks.
41-001190-02 Rev. 01, Rel. 1.2
4-77
AastraLink Pro 160 Administrator Guide
Configuring VoIP Settings
Reference
For a table of dial plan numbers, see Table 4-1 “AastraLink Pro 160 Dialplan” on
page 4-40.
Called party identification
By default, the AastraLink Pro 160 sets the calling party name and number
(CLID) in the FROM: address of the SIP trunk call, using the extension number
of the phone which originated the call. In cases where the SIP trunk service
provider does not accept arbitrary CLID, AastraLink allows a static CLID to be
provisioned instead; setting the "Username" field on the SIP trunk configuration
overrides the per-call CLID and uses this value for all outgoing calls placed to the
SIP trunk.
When selecting Configuration->VoIP->SIP Trunking, the following screen
displays.
4-78
41-001190-02 Rev. 01, Rel. 1.2
Configuring AastraLink Pro 160 System and Network Parameters
Configuring VoIP Settings
The parameters you can specify for SIP Trunking are:
•
Use Local Network Address
Enables/disables SIP trunking to use the local subnet address for the SIP
signalling rather than the external (UPnP / external gateway) address. It is
only necessary to set this value if the SIP registrar / outbound proxy is
multi-homed on both the private and the public network.
•
Send NAT Keep-Alives
Enables/disables the sending of SIP OPTIONS messages to periodically
maintain the UDP port binding in the NAT.
•
Relaxed Authentication
Enables/disables authentication of incoming SIP INVITE’s and matching of
peers based on IP address without examining the port number.
•
Registrar Server
Supplied by your service provider. Specifies the IP address of the remote
endpoint (service providers registrar server) that connects the AastraLink Pro
160 to your service provider SIP network.
•
Registrar Port
Supplied by your service provider. Specifies the port number of the remote
device (registrar server) on which SIP communications are received. By
default this is set to 5060.
•
Username (Outgoing Caller ID)
Supplied by your service provider. A name (or phone number) you use to
connect to the service provider network that displays on the caller’s outgoing
phone. For example: 6174365000.
If provisioned, the specified Caller ID is used to override the default FROM:
address in the SIP signalling. Refer to “Called party identification” on
page 4-78.
•
Display Name (Incoming Caller ID)
Overrides Caller ID on incoming calls. A call originating externally, coming
in over a trunk with “Display Name” set, has its Caller ID information
overwritten and displays on local SIP phones as this value.
41-001190-02 Rev. 01, Rel. 1.2
4-79
AastraLink Pro 160 Administrator Guide
Configuring VoIP Settings
•
Realm
Only required if supplied by your service provider. Specifies the
Authentication domain within the destination network, where SIP call
steering to a specific media gateway is required.
•
Authentication Username
Only required if supplied by your service provider. Used to authenticate with
the service provider if you are using a different account name then your
username.
•
Authentication Password
Supplied by your service provider. Used to authenticate your access to the
service provider network. For example: 15000.
•
Outbound Proxy
Only required if your local network does not transparently route SIP calls to
the public SIP service provider. Used to route outgoing calls through this
device rather than direct to the registrar server.
•
Outbound Proxy Port
Only required if using an Outbound Proxy. Specifies the proxy port on the
Outbound Proxy.
Adding a SIP Trunk
Use the following procedure to add a SIP Trunk to the AastraLink Pro 160.
AastraLink Web UI
Step
Action
1
Select Configuration->VoIP->SIP Trunking
2
In the “Use Local Network Address” field, place a checkmark in the box to enable SIP trunking to
use the local subnet address for the SIP signalling rather than the external (UPnP / external gateway)
address. It is only necessary to set this value if the SIP registrar / outbound proxy is multi-homed on
both the private and the public network. Disable this field by unchecking the box. Default is disabled.
4-80
41-001190-02 Rev. 01, Rel. 1.2
Configuring AastraLink Pro 160 System and Network Parameters
Configuring VoIP Settings
AastraLink Web UI
Step
Action
3
In the “Send NAT Keep-Alives” field, place a checkmark in the box to enable the sending of SIP
OPTIONS messages to periodically maintain the UDP port binding in the NAT.
Disable this field by unchecking the box. Default is disabled.
4
In the “Relaxed Authentication” field, place a checkmark in the box to enable the authentication of
incoming SIP INVITE’s and the matching of peers based on IP address without examining the port
number.
Disable this field by unchecking the box. Default is disabled.
5
In the “Registrar Server” field, specify the IP Address of the Registrar Server that connects your
AastraLink Pro 160 to the service provider network.
For example: 192.32.210.24
Your service provider supplies this IP Address.
6
In the “Registrar Port” field, enter the port number of the remote device (registrar server) on which
SIP communications are received. Default setting of 5060.
You service provider supplies this port number.
7
In the “Username (Outgoing Caller ID)” field, specify a name and/or number to use to connect to
the service provider network. This value displays on the caller’s outgoing phone.
For example: John Davis 5551212
Note: Setting the "Username (Outgoing Caller ID)" field on the SIP trunk configuration overrides
the per-call CLID, and uses the “Caller ID” value you specify here for all outgoing calls placed to the
SIP trunk
8
In the “Display Name (Incoming Caller ID)” field, specify a name and/or number to be displayed as
the Caller ID for incoming calls over this trunk. A call originating externally, coming in over a trunk
with “Display Name” set, has its Caller ID information overwritten and displays on local SIP phones
as this value.
For example: John Davis 5551212
41-001190-02 Rev. 01, Rel. 1.2
4-81
AastraLink Pro 160 Administrator Guide
Configuring VoIP Settings
AastraLink Web UI
Step
Action
9
(only if required by Service Provider) In the “Realm” field, specify the Authentication domain within
the destination network, where SIP call steering to a specific media gateway is required. If not
required, leave blank.
Your service provider supplies this value.
10
(only if required by Service Provider) In the “Authentication Username” field, enter the user name
used to authenticate with the service provider if you are using a different account name then the
“Username” you specified in step 7.
For example: 6175555000
Note: The “Authentication Username” value may differ from the “Username (Outgoing Caller ID)”
value.
Your service provider supplies this number.
11
(only if required by Service Provider) In the “Authentication Password” field, enter the password
required to access the service provider’s network.
For example: 51000
Your service provider supplies this password.
12
In the “Outbound Proxy” field, enter the outbound proxy IP address or fully qualified domain name
used to route outgoing calls through this device rather than direct to the registrar server.
Note: This field is only required if your local network does not transparently route SIP calls to the
public SIP service provider.
13
In the “Outbound Proxy Port” field, enter the outbound proxy port number of the outbound proxy in
step 12.
Note: This field is only required if you are using an outbound proxy.
14
4-82
Click <Save> to save your changes.
41-001190-02 Rev. 01, Rel. 1.2
Configuring AastraLink Pro 160 System and Network Parameters
Configuring VoIP Settings
Deleting a SIP Trunk
You can delete a specific SIP trunk configuration or all SIP trunk configurations
from the AastraLink Pro using the <Clear> button on the “SIP Trunking” menu.
Use the following procedure to clear a configuration for a SIP Trunk on the
AastraLink Pro 160.
AastraLink Web UI
Step
Action
1
Select Configuration->VoIP->SIP Trunking
Clearing a SIP Trunk Configuration
2
In the “Dial Prefix” column, place a check mark in the box for the SIP trunk configuration you want to
delete.
3
Click <Clear>. The following message displays:
“Are you sure you would like to delete the selected items?”
4
Click YES to delete the SIP trunk.”
The SIP trunk configuration you selected is deleted from the AastraLink Pro 160.
Clear All SIP Trunk Configurations
5
In the “Dial Prefix” check box, place a check mark in the box to select ALL SIP trunk configurations.
6
Click <Clear>. The following message displays:
“Are you sure you would like to delete the selected items?”
7
Click YES to delete all SIP trunks.”
All the SIP trunk configurations are deleted from the AastraLink Pro 160.
41-001190-02 Rev. 01, Rel. 1.2
4-83
AastraLink Pro 160 Administrator Guide
Configuring VoIP Settings
Single and Multiple SIP Trunks
The AastraLink Pro supports the dialing of a prefix + index when multiple or
single SIP trunks are setup. The user must dial 8+index+number to dial out.
The AastraLink Pro also supports single-digit prefixes on a single SIP trunk. A
user can dial 8+number when a single SIP trunk is configured, and
8+index+number when multiple SIP trunks are configured.
You can select whether to configure single or multiple SIP trunks by choosing
"Single" or "Multiple" for the SIP Trunk Mode parameter at the location,
Configuration->Dial Plan->Settings. For more information about setting the SIP
Trunk Mode parameter, see “Specifying Dial Plan Settings” on page 4-41.
SIP Trunk Mode
4-84
41-001190-02 Rev. 01, Rel. 1.2
Configuring AastraLink Pro 160 System and Network Parameters
Configuring VoIP Settings
Setting the SIP Trunk Mode to "Single" displays the following screen at
Configuration->VoIP->SIP Trunking. Configure the single SIP trunk parameters
as described in “SIP Trunking” on page 4-76.
Setting the SIP Trunk Mode to "Multiple" displays the following screen at
Configuration->VoIP->SIP Trunking. Configure the multiple SIP trunk
parameters as described in “Configuring VoIP Settings” on page 4-74.
41-001190-02 Rev. 01, Rel. 1.2
4-85
AastraLink Pro 160 Administrator Guide
Configuring VoIP Settings
SIP Direct Inward Dialing (DID)
An administrator can provide SIP Direct Inward Dialing (DID) prefixes for SIP
trunks. Direct Inward Dialing (DID) is a service of a local phone company that
provides a block of telephone numbers for calling into a company's private branch
exchange (PBX) system.
Using DID, a company can offer its employees a different direct-dial PSTN
number for each SIP phone, with either system-wide DID pattern matching or
direct-mapped user DID entries used to route calls.
This feature on the VoIP Menu applies on a global basis for all phones in the
AastraLink network.
Note: Direct mapping DIDs have highest priority, followed by patterns, and then
the Interactive Voice Response (IVR) if no DID is matched. SIP DID
mapping can also be applied on a phone-by-phone basis using the SIP DID
Number parameter when editing or adding phones on the Users Menu.
4-86
41-001190-02 Rev. 01, Rel. 1.2
Configuring AastraLink Pro 160 System and Network Parameters
Configuring VoIP Settings
Adding a SIP DID
Use the following procedure to add a SIP DID to the AastraLink Pro 160.
AastraLink Web UI
Step
Action
1
Select Configuration->VoIP->SIP DIDs.
2
Click <Add DID Prefix>.
3
Enter the number for the DID prefix in the text box and click <Add>.
For example, 978555.
The SIP DID displays as: 9785553XXXX.
Deleting a SIP DID
Use the following procedure to delete a SIP DID from the AastraLink Pro 160.
AastraLink Web UI
Step
Action
1
Select Configuration->VoIP->SIP DIDs.
Deleting a single SIP DID
2
In the “DID Prefix” column, place a check mark in the box for the SIP DID you want to delete.
3
Click <Delete Selected DID Prefixes>. The following message displays:
“Are you sure you would like to delete the selected items?”
4
Click YES to delete the SIP DID.”
The SIP DID you selected is deleted from the AastraLink Pro 160.
41-001190-02 Rev. 01, Rel. 1.2
4-87
AastraLink Pro 160 Administrator Guide
Configuring VoIP Settings
AastraLink Web UI
Step
Action
Deleting All SIP DIDs
5
In the “DID Prefix” check box, place a check mark in the box to select ALL SIP DIDs.
6
Click <Delete Selected DID Prefixes>. The following message displays:
“Are you sure you would like to delete the selected items?”
7
Click YES to delete all SIP DIDs.”
All the SIP DIDs are deleted from the AastraLink Pro 160.
4-88
41-001190-02 Rev. 01, Rel. 1.2
Configuring AastraLink Pro 160 System and Network Parameters
Configuring VoIP Settings
AastraLink Trunking
You enable AastraLink trunking to support internetworking between Aastra IP
phone networks. For example, if you have an office in Atlanta, in Boston and in
Chicago, you can configure AastraLink trunks between the offices (Figure 4-7).
When AastraLink Pro 160 devices are networked across a LAN/WAN, IP phone
users can make calls between the sites by dialing the following:
(prefix digit) + (access digit) + (extension)
Where:
prefix digit = 7 (default)
access digit = 0 - 9 (assigned by the Administrator)
extension = 3 or 4 digit extension number
Atlanta Office
Trunk
AastraLink Pro 160
AASTRA
Boston Office
AastraLink
Pro 160
AASTRA
10.30.50.125
10.30.60.135
Trunk
Trunk
AastraLink
Pro 160
AASTRA
Chicago Office
10.30.70.145
Figure 4-7.
AastraLink Trunks Between Atlanta, Boston, and Chicago Offices
41-001190-02 Rev. 01, Rel. 1.2
4-89
AastraLink Pro 160 Administrator Guide
Configuring VoIP Settings
When you enable AastraLink trunking, you assign a unique access digit to each
AastraLink device in your network. For example, suppose you assign the access
digit 1 to the AastraLink in the Boston office. Then, the dial prefix for the Boston
office is as follows:
dial prefix Boston = 7 + 1 + (number)
If you are located in the Atlanta office, and you want to reach extension 200 in the
Boston office, you would dial 71200.
Note: Calls between AastraLink systems support NAT traversal for IAX
(AastraLink trunk) calls when used with either a supported UPnP router or
with manual port-forwarding.
For networked systems, using 8-prefix AastraLink trunk dialing between
sites, the barred number list is also applied locally on each AastraLink Pro
for incoming dialed numbers. This allows flexible and secure provisioning
rules to be enforced for toll-bypass (i.e. local PSTN breakout) as if the
remote system had dialed the number directly from the local system.
Configuration Parameters
The parameters you can specify for AastraLink trunking are:
•
Hostname
Specifies the IP address or FQDN of the remote AastraLink.
•
Username
Specifies the user name (a simple number string) that you use to access the
trunk. For example, 100.
•
Port
Specifies the port number of the remote AastraLink on which
communications are received. By default this is set to 4569.
4-90
41-001190-02 Rev. 01, Rel. 1.2
Configuring AastraLink Pro 160 System and Network Parameters
Configuring VoIP Settings
Configuration Guidelines
When you configure AastraLink Pro 160 trunks, note the following guidelines:
•
You can configure a maximum of 10 AastraLink trunks and user names on a
single AastraLink Pro 160 device.
•
You must assign the same user name to each end of the trunk.
•
AastraLink IP phone network can have the same, or different, dialing plans.
•
Currently, global phone directory synchronization between AastraLink Pro
160 devices is not supported. Therefore, users can access phone directories
for their local AastraLink IP phone network only.
•
AastraLink trunking requires a flat network. The AastraLink devices do not
support UPnP operation through a gateway/router/firewall.
•
Before you use the Web UI to configure AastraLink trunks, we strongly
recommend that you do the following:
— Assign an access digit to each AastraLink Pro 160 device in your
network.
— Make a list of the trunks you want to configure.
— Identify the user name for each trunk you are configuring.
AastraLink Trunking Example
For example, suppose the system administrator wants to configure three trunks:
•
Atlanta/Boston
•
Atlanta/Chicago
•
Boston/Chicago
The administrator begins by assigning access digits to each of the AastraLink Pro
160 devices, as shown in the table below:
AastraLink Pro 160
IP address
Access Digit
Atlanta
10.30.50.125
0
Boston
10.30.60.135
1
Chicago
10.30.70.145
2
41-001190-02 Rev. 01, Rel. 1.2
4-91
AastraLink Pro 160 Administrator Guide
Configuring VoIP Settings
The system administrator then assigns a user name to each trunk:
Trunk
User Name
Atlanta - Boston
100
Atlanta - Chicago
101
Boston - Chicago
102
Based on these parameters defined by the administrator, the dial prefix for each
AastraLink network in this example is as follows:
dial prefix Atlanta = 7 + 0 + (number)
dial prefix Boston = 7 + 1 + (number)
dial prefix Chicago = 7 + 2 + (number)
Once the AastraLink trunking information is mapped out, the administrator is
ready to configure the trunk between Atlanta and Boston, and does the following
steps:
1.
Logs into the Atlanta AastraLink device (10.30.50.125).
2.
Clicks the dial prefix for the destination end of the trunk. In this case, the
Boston AastraLink network: 7 + 1 + (number).
3.
Specifies the destination hostname (10.50.60.135) and user name, and then
saves the changes.
Boston AastraLink Pro 160
4-92
41-001190-02 Rev. 01, Rel. 1.2
Configuring AastraLink Pro 160 System and Network Parameters
Configuring VoIP Settings
The administrator is now ready to configure the other end of the trunk, and does
the following steps:
1.
Logs into the Boston AastraLink device (10.30.60.135).
2.
Clicks the dial prefix for the Atlanta AastraLink network: 7 + 0 + (number).
3.
Specifies the destination hostname (10.30.50.125), and the same user name as
used for the Boston end of the trunk, then saves the changes.
At this point, the trunk between Atlanta and Boston is complete. To configure the
trunk between Atlanta and Chicago, the administrator repeats these steps, using
the Chicago dial prefix/hostname as the destination end of the trunk.
Note the following examples:
•
Figure 4-8 shows the Atlanta /Boston, and Atlanta /Chicago trunks.
•
Figure 4-9 shows the Boston/Atlanta, and Boston /Chicago trunks.
•
Figure 4-10 shows the Chicago/Atlanta, and Chicago/Boston trunks.
Atlanta to Boston
Atlanta to Chicago
Figure 4-8.
Trunks Between Atlanta/Boston and Atlanta/Chicago
41-001190-02 Rev. 01, Rel. 1.2
4-93
AastraLink Pro 160 Administrator Guide
Configuring VoIP Settings
Boston to Atlanta
Boston to Chicago
Figure 4-9.
4-94
Trunks Between Boston/Atlanta and Boston/Chicago
41-001190-02 Rev. 01, Rel. 1.2
Configuring AastraLink Pro 160 System and Network Parameters
Configuring VoIP Settings
Chicago to Atlanta
Chicago to Boston
Figure 4-10.
Trunks Between Chicago/Atlanta and Chicago/Boston
41-001190-02 Rev. 01, Rel. 1.2
4-95
AastraLink Pro 160 Administrator Guide
Configuring VoIP Settings
Use the following procedure to enable AastraLink trunking between two
AastraLink Pro 160 devices.
AastraLink Web UI
Step
Action
1
Select Configuration->VoIP->AastraLink Trunks.
2
Click the Dial Prefix that matches the destination AastraLink network.
For example, if you are configuring a trunk between Atlanta and Boston, and assigned the access
digit 1 to the Boston AastraLink network, then you would click on 7 + 1 + (number).
3
Specify the Hostname, or FQDN, of the destination AastraLink device.
For example: 10.30.50.135
4
Specify a Username for the trunk.
The Username is a simple number string that you use to access the trunk. For example: 100.
5
Accept the default Port setting of 4569
6
Click <Save> to save your changes.
At this point the destination end of the trunk is configured. Now, repeat steps 1 - 6 to configure the
other end of the trunk.
For example, suppose the trunk is between Atlanta and Boston. You just logged into the Atlanta
AastraLink device and configured the trunk from Atlanta (source) to Boston (destination). Now, you
need to login to the Boston AastraLink device and configure the trunk from Boston (source) to Atlanta
(destination).
Note: Remember to use an identical Username for both ends of the trunk.
4-96
41-001190-02 Rev. 01, Rel. 1.2
Configuring AastraLink Pro 160 System and Network Parameters
Configuring VoIP Settings
Mobility Base Units (MBUs)
The AastraLink Pro supports the Aastra Mobility Base Unit 400, and the Aastra
420d DECT Handset. You can register up to 8 handsets with each MBU. The
MBU supports up to 3 SIP calls simultaneously.
Note: The PSTN port of the MBU is not currently supported when MBU400 is
configured by AastraLink - outbound PSTN calls will be routed via the
AastraLink FXO ports. The AastraLink does not support the use of the
RJ11 FXO interface on the MBU.
Multiple MBU 400 units can be added, identified by MAC address, and then
registered to the AastraLink Pro. Each registered handset receives a SIP extension
on AastraLink, including Web UI login and voicemail.
You can add MBU units to the AastraLink Pro using the Web UI at the location,
Configuration->VoIP->Mobility Base Units.
41-001190-02 Rev. 01, Rel. 1.2
4-97
AastraLink Pro 160 Administrator Guide
Configuring VoIP Settings
Once an MBU is registered, the administrator can provision extensions for
individual handsets by clicking the "Add Phones" button at the location,
Users->User List page and select the "Aastra420d" phone type.
If one or more MBU is registered, the "Mobility Base Unit" drop-down list will
show the available handsets (max 8 per MBU) to choose from.
Phone Type is
Aastra 420d
Mobility Base Unit
field displays
available handsets
4-98
41-001190-02 Rev. 01, Rel. 1.2
Configuring AastraLink Pro 160 System and Network Parameters
Configuring VoIP Settings
MBU Configuration Download from the AastraLink
The "User List" page indicates that an extension is an MBU handset by listing the
phone type as "Aastra420d". However, handsets will show as disconnected until
the handset has registered to the MBU, and the MBU has been provisioned to use
AastraLink as its configuration server.
You can set the MBU to receive configuration downloads from the AastraLink Pro
by setting the "Configuration Server Address" as the IP address of the
AastraLink, on the "Management Settings" page, and then rebooting the MBU
Refer to the MBU400 documentation for additional details.
Handset Registrations
After adding the MBU and Users in the AastraLink Web UI, provisioning the
MBU to use the AastraLink as its configuration server, and rebooting the MBU,
the MBU will enter service with 420d handsets registered and ready for use.
The MBU Web UI only shows relevant information for the AastraLink Pro for
which it is connected; You can perform all user configuration from the AastraLink
Web UI (for example: Call lists, voicemail, call forward, find-me follow-me, etc.).
41-001190-02 Rev. 01, Rel. 1.2
4-99
AastraLink Pro 160 Administrator Guide
Configuring VoIP Settings
For an MBU handset, the "My Phone" page looks the same as other phones
except there is no "SoftKeys" tab (similar to a user with a 51i IP Phone).
Note: The MBU handsets do not support XML, and therefore, cannot be used as
an operator extension.
Removing an MBU removes all extensions and handsets that were associated with
that MBU, and clears its configuration server association to the AastraLink.
Adding an MBU
Use the following procedure to add an MBU to the AastraLink Pro network.
AastraLink Web UI
Step
Action
Reset the MBU 400 and register the first DECT 420d handset
1
Factory defaul the MBU by holding the reset switch for 15 seconds (until all the LEDs come on) then
release the switch. When the MBU completes reboot, the I-Net LED flashes.
2
Register your DECT 420d handset to the MBU using the procedures decribed in your MBU 400
Install Guide.
The MBU uses DHCP by default to assign it an IP address. The I-Net LED lights up solid ON. If you
are using the static IP range rather than DHCP, configure the network settings for the MBU using the
MBU 400 Web interface at the location, 420d Menu Setting->Internet Settings->IP Mode.
Reboot the MBU.
3
Press the <Volume Up> key on the side of the registered 420d handset. This displays the MBU
network settings (including the MAC address and current IP Address).
Make a note of the MAC address and IP address of the MBU.
4-100
41-001190-02 Rev. 01, Rel. 1.2
Configuring AastraLink Pro 160 System and Network Parameters
Configuring VoIP Settings
AastraLink Web UI
Step
Action
Add the MBU with the registered handset(s) to the AastraLink Pro 160
4
Select Configuration->VoIP->Mobility Base Units.
5
Click <Add Mobiliby Base Unit>. The following prompt displays.
41-001190-02 Rev. 01, Rel. 1.2
4-101
AastraLink Pro 160 Administrator Guide
Configuring VoIP Settings
AastraLink Web UI
Step
Action
6
Using the MAC address you obtained in step 3, enter the MAC address of the MBU in the text box,
in colon separated format, and click <Add>.
For example,
00:08:7B:07:47:CF
The MBU you just added displays in the window.
4-102
41-001190-02 Rev. 01, Rel. 1.2
Configuring AastraLink Pro 160 System and Network Parameters
Configuring VoIP Settings
AastraLink Web UI
Step
Action
7
For each handset, select Users, and click <Add Phones>.
8
Enter values for the following fields:
Extension (optional)
First Name (optional)
Last Name (optional)
Password (required)
Email (optional)
9
DO NOT enter a MAC address.
In the “Phone Type” field, select Aastra420d.
41-001190-02 Rev. 01, Rel. 1.2
4-103
AastraLink Pro 160 Administrator Guide
Configuring VoIP Settings
AastraLink Web UI
Step
Action
10
In the “Mobility Base Unit” field, select the applicable MBU handset. The AastraLink supports
multiple MBUs and up to 8 handsets for each MBU so the options in this field are:
•
•
•
•
•
•
•
•
MBU x, handset 1
MBU x, handset 2
MBU x, handset 3
MBU x, handset 4
MBU x, handset 5
MBU x, handset 6
MBU x, handset 7
MBU x, handset 8
Note: The handsets do not have to be DECT registered to add them using this field.
11
Login to the MBU Web UI (using the procedures outlined in the MBU Administrator Guide).
Note: Default MBU User ID is “admin” and Password is “22222”, or
whatever Administrator
master password has been configured on the AastraLink Pro dialplan page.
12
4-104
Click on Management Settings.
41-001190-02 Rev. 01, Rel. 1.2
Configuring AastraLink Pro 160 System and Network Parameters
Configuring VoIP Settings
AastraLink Web UI
Step
Action
13
In the “Configuration Server Address” field, enter the IP Address of the AastraLink Pro for which
the MBU is connected, and click <Save>.You can get the AastraLinnk Pro IP address in the
AastraLink Web UI at the location Configuration->Network->Current IP Address.
Configuration
Server
Address
41-001190-02 Rev. 01, Rel. 1.2
4-105
AastraLink Pro 160 Administrator Guide
Configuring VoIP Settings
AastraLink Web UI
Step
Action
14
Reboot the MBU at the prompt.
The MBU reboots and downloads its configuration and all registered handsets to the AastraLink. The
VOIP LED on the MBU lights up solid when SIP is correctly registered. This may take several
minutes.
Once the MBU is registered on the AastraLink Pro, you can access the MBU UI by clicking on
Configuration->VoIP->Mobiliby Base Units, click on a MAC address of an MBU that is registered,
and enter the Admin User ID and Password. The MBU UI displays for that MBU. All registered
handsets also display.
Note: Registered handsets display a virtual MAC address that was allocated by the AastraLink Pro.
For more information about the virtual MAC addresses for DECT 420d handsets, see Chapter 3, the
section, “Uploading User Lists if MBU 400s Connected to the AastraLink Pro” on page 3-37.
4-106
41-001190-02 Rev. 01, Rel. 1.2
Configuring AastraLink Pro 160 System and Network Parameters
Configuring VoIP Settings
AastraLink Web UI
Step
Action
15
(optional) If required, you can do an MBU firmware update from the DECT 420d handset. On the
420d handset, press Settings->System Settings->Firmware Update, and select the applicable
firmware version from the AastraLink.
41-001190-02 Rev. 01, Rel. 1.2
4-107
AastraLink Pro 160 Administrator Guide
Configuring VoIP Settings
Deleting an MBU
Use the following procedure to delete an MBU from the AastraLink Pro network.
AastraLink Web UI
Step
Action
1
Select Configuration->VoIP->Mobility Base Units.
4-108
41-001190-02 Rev. 01, Rel. 1.2
Configuring AastraLink Pro 160 System and Network Parameters
Configuring VoIP Settings
AastraLink Web UI
Step
Action
2
Place a check mark in the box on the left of the MBU’s MAC Address for which you want to delete
from the AastraLink Pro, and click <Delete Selected Entries>. The following prompt displays.
3
Click <Yes> to delete the MBU from the AastraLink network.
41-001190-02 Rev. 01, Rel. 1.2
4-109
AastraLink Pro 160 Administrator Guide
Configuring VoIP Settings
Rebooting an MBU
Use the following procedure to reboot an MBU in the AastraLink Pro network.
AastraLink Web UI
Step
Action
1
Select Configuration->VoIP->Mobility Base Units.
4-110
41-001190-02 Rev. 01, Rel. 1.2
Configuring AastraLink Pro 160 System and Network Parameters
Configuring VoIP Settings
AastraLink Web UI
Step
Action
2
Place a check mark in the box on the left of the MBU’s MAC Address for which you want to reboot,
and click <Reboot Selected Entries>. The following prompt displays.
3
Click <Yes> to reboot the selected MBU(s).
Warning: Rebooting and MBU results in a loss of service until the Mobility Base Unit has
successfully restarted.
41-001190-02 Rev. 01, Rel. 1.2
4-111
AastraLink Pro 160 Administrator Guide
Configuring Auto-Attendant
Configuring Auto-Attendant
You configure Auto-Attendant parameters from the Configuration->Auto-Attendant
menu shown below. The screen below has no user groups configured on the
AastraLink Pro 160.
Figure 4-11.
4-112
Auto-Attendant Menu with No User Groups
41-001190-02 Rev. 01, Rel. 1.2
Configuring AastraLink Pro 160 System and Network Parameters
Configuring Auto-Attendant
If you have User Groups configured on the AastraLink Pro 160, the
Auto-Attendant screen displays as shown below.
User Group Enabled
User Group Disabled
Figure 4-12.
Auto-Attendant Menu with User Group
How Auto-Attendant Works
The Auto-Attendant feature allows you to specify how the AastraLink Pro 160
routes incoming calls. That is, you can configure the Auto-Attendant so that
incoming calls are received in one of the following ways:
•
First by the Auto-Attendant (then by an Operator), or
•
First by the Operator (then by the Auto-Attendant), or
•
First by a designated user group (then by the Auto-Attendant)
Note: It is possible for a caller to reach the Operator’s voicemail account if they
are on-duty and do not answer; they can reach the Auto-Attendant using the
“Escape to Extension” feature once they have reached the prompts in the
Operator’s voice mail.
41-001190-02 Rev. 01, Rel. 1.2
4-113
AastraLink Pro 160 Administrator Guide
Configuring Auto-Attendant
When callers reach the Auto-Attendant, they are prompted to do one of the
following actions:
•
Select a language to enable while using Auto-Attendant features (if more than
one language is available; default is English)
•
Enter the extension of the person they are calling. The Auto-Attendant then
transfers the call.
•
Dial by name. Depending on the configuration set on the AastraLink Pro, the
caller can dial by first name or by last name. If there are multiple listings, the
caller is prompted to select from the list. The Auto-Attendant then transfers
the call.
•
Dial 0 (operator). The Auto-Attendant transfers the call to the operator.
Note: If dial-by-name is disabled, the option is still mentioned in the default main
menu announcement. An administrator can record a custom main menu in
which they do not mention the feature if they choose to disable it and do
not want it announced.
The Auto-Attendant menu displays the following tabs:
4-114
•
Settings - Allows you to configure the Auto-Attendant opened and closed
hours, main menu, custom key messages, and language greetings. These
parameters also allow you to record custom settings or upload settings if
required.
•
Custom IVR - Allows you to record a custom main menu for the IVR, upload
a main menu, dial by first or last name, and specify the single digit keys to use
for navigating the IVR system.
•
Schedule - Allows you to specify the day of the week and the time that the
Auto-Attendant is available.
•
Holidays - Allows you to specify the holidays (by date and time), that the
Auto-Attendant is available.
41-001190-02 Rev. 01, Rel. 1.2
Configuring AastraLink Pro 160 System and Network Parameters
Configuring Auto-Attendant
Settings for the Auto-Attendant
You can configure the following for the Auto-Attendant Settings:
•
Open Hour Settings
•
Closed Hour Settings
•
Custom Main Menu
•
Custom Key Message
•
Language Greetings (French, English, or Spanish)
The Open Hour Settings and Closed Hour Settings allow the administrator to
select the hours for which the Auto-Attendant handles calls. These parameters
also allow you to record a custom greeting as required. For example, an
administrator can record a greeting for incoming calls during open hours and
another greeting for closed hours. The administrator has the option of uploading a
new custom greeting (.wav file), or using the default greetings.
The Custom Main Menu allows the administrator to select the language for the
Auto-Attendant to use when it answers a call. These parameters also allow the
administrator to record the Main Menu in a specific language and upload language
files if required.
The Custom Key Message allows the administrator to select the language for the
Auto-Attendant to use for a specific message. It also allows the administrator to
record a custom message, or upload a message file (.wav file) if required. For
example, you could record a message concerning details about the business or
other general contact info. The announcement is restricted to the '3' key to keep
the Interactive Voice Response (IVR) special-keys contiguous.
The Language Greetings allow the administrator to select the language for the
greeting when a call comes into the Auto-Attendant. An Administrator can also
record a custom language greeting, or upload a language greeting file (.wav file) if
required.
41-001190-02 Rev. 01, Rel. 1.2
4-115
AastraLink Pro 160 Administrator Guide
Configuring Auto-Attendant
Configuring Settings for the Auto-Attendant
Use the following procedure to specify the Auto-Attendant general settings.
AastraLink Web UI
Step
Action
1
Select Configuration->Auto-Attendant->Settings
General Settings
2
In the “Provisionable Zero Key” field, enter the number to which calls are routed when the '0' key is
pressed from the IVR, by an incoming caller. (Default is zero so that callers are routed to the
Operator).
3
In the “Dial-by-Name” field, select the method you want the Auto-Attendant to use when an incoming
caller needs to dial by name to reach the calling party. Valid values are:
•
•
•
Disabled
Last Name (default)
First Name
Note: If dial-by-name is disabled, the option is still mentioned in the default main menu
announcement. An administrator can record a custom main menu in which they do not mention the
feature if they choose to disable it and do not want it announced.
Open Hour Settings
4
Set the destination for incoming calls in the “Incoming calls go to” field to one of the following
options:
•
Auto-Attendant ((default) all incoming calls go through the Auto-Attendant).
•
Operator (all incoming calls go to the Operator (if on-duty, goes to the Auto-Attendant if off-duty).
•
User Group (all incoming calls go to a designated user group).
Note: The “User Group” option displays only if you have User Groups configured on the AastraLink.
5
If you select the User Group option in step 2, set the virtual extension of the user group in the “User
Group” field. Skip this step if no User Groups are configured on the AastraLink Pro 160.
For more information on virtual extensions, see Chapter 3, the section, “Virtual Extension Numbers
(for Ring and Paging Groups)” on page 3-42.
4-116
41-001190-02 Rev. 01, Rel. 1.2
Configuring AastraLink Pro 160 System and Network Parameters
Configuring Auto-Attendant
AastraLink Web UI
Step
Action
6
The Auto-Attendant has a built in default greeting that plays during open hours.
To specify a custom greeting, do the following:
•
Click on <Record Custom> for the “Open Hours Greeting” field.
The Operator IP phone rings. Answer the Operator IP phone, and record your custom greeting, as
prompted. Refer to Custom Recordings on page 4-134 for more information.
7
In the “Use Custom Open” field, place a check mark in the box for the Auto-Attendant to use your
custom greeting.
8
To upload a greeting file that plays during open office hours, do the following:
•
Click on <Browse> for the “Upload Open Greeting” field.
Browse to the location on the server where the .wav file is stored, that contains the greeting you want
the Auto-Attendant to use. Click <Open>. The file you selected is uploaded to the AastraLink Pro.
9
Click <Save> to save your changes.
Closed Hour Settings
10
Set the destination for incoming calls in the “Incoming calls go to” field to one of the following
options:
•
Auto-Attendant ((default) all incoming calls go through the Auto-Attendant).
•
Operator (all incoming calls go to the Operator).
•
User Group (all incoming calls go to a designated user group).
Note: The “User Group” option displays only if you have User Groups configured on the AastraLink.
11
If you select the User Group option in step 2, set the extension of the user group in the “User
Group” field. Skip this step if no User Groups are configured on the AastraLink Pro 160.
41-001190-02 Rev. 01, Rel. 1.2
4-117
AastraLink Pro 160 Administrator Guide
Configuring Auto-Attendant
AastraLink Web UI
Step
Action
12
The Auto-Attendant has a built in default greeting that plays during closed hours.
To specify a custom greeting, do the following:
•
Click on <Record Custom> for the “Closed Hours Greeting” field.
The Operator IP phone rings. Answer the Operator IP phone, and record your custom greeting, as
prompted. Refer to Custom Recordings on page 4-134 for more information.
13
In the “Use Custom Closed” field, place a check mark in the box for the Auto-Attendant to use your
custom greeting.
14
To upload a greeting file that plays during closed office hours, do the following:
•
Click on <Browse> for the “Upload Closed Greeting” field.
Browse to the location on the server where the .wav file is stored, that contains the greeting you want
the Auto-Attendant to use. Click <Open>. The file you selected is uploaded to the AastraLink Pro.
15
Click <Save> to save your changes.
Custom Main Menu Settings
16
In the "Select Language" field, select the language for which you want to modify the Auto-Attendant
Menu items. Valid values are: English, French, and Spanish (default is English).
17
The Auto-Attendant has a built in default Main Menu that plays using the system language.
To specify a custom Main Menu using English, French, and Spanish, do the following:
•
Click on <Record Custom> for the “Custom Menu” field.
The Operator IP phone rings. Answer the Operator IP phone, and record your custom Main Menu in
each of the languages required (English, French, Spanish), as prompted. Refer to Custom
Recordings on page 4-134 for more information.
18
4-118
In the “Use English Menu”, “Use French Menu”, and/or “Use Spanish Menu” field(s), place a check
mark in the box for the Auto-Attendant to use the custom Main Menu you recorded.
41-001190-02 Rev. 01, Rel. 1.2
Configuring AastraLink Pro 160 System and Network Parameters
Configuring Auto-Attendant
AastraLink Web UI
Step
Action
19
To upload a Main Menu announcement file, do the following:
•
Click on <Browse> for the “Upload Menu” field.
Browse to the location on the server where the .wav file is stored, that contains the Main Menu you
want the Auto-Attendant to use. Click <Open>. The file you selected is uploaded to the AastraLink
Pro.
20
Click <Save> to save your changes.
Custom Key Message
21
In the "Select Language" field, select the language for which you want to modify the Custom Key
Message. Valid values are: English, French, and Spanish (default is English).
22
The Auto-Attendant has a built in default key message that plays using the system language.
To specify a custom key message using English, French, and Spanish, do the following:
•
Click on <Record Custom> for the “Custom Key Message” field.
The Operator IP phone rings. Answer the Operator IP phone, and record your custom Key Message
in each of the languages required (English, French, Spanish), as prompted. Refer to Custom
Recordings on page 4-134 for more information.
23
In the “Use English Message”, “Use French Message”, and/or “Use Spanish Message” field(s),
place a check mark in the box for the Auto-Attendant to use the custom Key Messages you recorded.
24
To upload a Key Message announcement file, do the following:
•
Click on <Browse> for the “Upload Key Message” field.
Browse to the location on the server where the .wav file is stored, that contains the Key Message you
want the Auto-Attendant to use. Click <Open>. The file you selected is uploaded to the AastraLink
Pro.
25
Click <Save> to save your changes.
41-001190-02 Rev. 01, Rel. 1.2
4-119
AastraLink Pro 160 Administrator Guide
Configuring Auto-Attendant
AastraLink Web UI
Step
Action
Language Greetings
26
In the "Select Language" field, select the language for which you want to modify the Language
Greeting. Valid values are: English, French, and Spanish (default is English).
27
The Auto-Attendant has a built in default language greeting that plays using the system language.
To specify a custom language greeting using English, French, and Spanish, do the following:
•
Click on <Record Custom> for the “Language Greeting” field.
The Operator IP phone rings. Answer the Operator IP phone, and record your custom language
greeting(s) in each of the languages required (English, French, Spanish), as prompted. Refer to
Custom Recordings on page 4-134 for more information.
28
In the “Use Custom English”, “Use Custom French”, and/or “Use Custom Spanish” field(s), place
a check mark in the box for the Auto-Attendant to use the custom language greetings you recorded.
29
To upload a language greeting announcement file, do the following:
•
Click on <Browse> for the “Upload Language Greeting” field.
Browse to the location on the server where the .wav file is stored, that contains the language
greeting(s) you want the Auto-Attendant to use. Click <Open>. The file you selected is uploaded to
the AastraLink Pro.
30
4-120
Click <Save> to save your changes.
41-001190-02 Rev. 01, Rel. 1.2
Configuring AastraLink Pro 160 System and Network Parameters
Configuring Auto-Attendant
Custom Interactive Voice Response (IVR)
The AastraLink Pro allows you to press a single digit on your phone’s keypad (0
through 9, *, or #) when navigating the Auto-Attendant Menu in the IVR.
After the Administrator has recorded/uploaded a custom menu announcement,
you can configure a single digit key to match that announcement using the Web
UI at the location, Configuration->Auto-Attendant->Custom IVR.
41-001190-02 Rev. 01, Rel. 1.2
4-121
AastraLink Pro 160 Administrator Guide
Configuring Auto-Attendant
Custom IVR Configuration
When custom IVR menu is enabled, you can configure any single-digit key on the
standard DTMF phone keypad to be used like a speeddial, to immediately perform
any of the following in the Auto-Attendant menu:
•
Dial by Name
•
Dial by Extension
•
Play another custom greeting
•
Ring admin configured number for that key
•
Go to Operator voicemail
•
Go to voicemail access
•
Replay the menu
•
Unused/Empty (plays the key number and runs invalid key handler)
From this screen, you can also select whether to disable "Dial-by-Name", dial by
First Name, or dial by Last Name.
4-122
41-001190-02 Rev. 01, Rel. 1.2
Configuring AastraLink Pro 160 System and Network Parameters
Configuring Auto-Attendant
Configuring a Custom IVR
Use the following procedure to customize the your IVR system.
AastraLink Web UI
Step
Action
1
Select Configuration->Auto-Attendant->Custom IVR.
41-001190-02 Rev. 01, Rel. 1.2
4-123
AastraLink Pro 160 Administrator Guide
Configuring Auto-Attendant
AastraLink Web UI
Step
Action
2
To record a custom greeting to use when a caller first accesses the IVR system, click <Record
Custom>. The following prompt displays.
The system proceeds to call you allowing you to record your IVR main menu. Follow the instructions
given and hang up when done. This prompt automatically closes when your recording is saved.
3
To upload a custom IVR mneu, place the cursor in the “Upload Menu” text box, and click <Browse>
to locate the custom menu you want to upload to the AastraLink.
4
In the “Dial-by-Name” field, select how you want the IVR to handle how a caller dials a User in the
network. Valid values are:
•
•
•
4-124
First Name
Last Name
Disabled (Default)
41-001190-02 Rev. 01, Rel. 1.2
Configuring AastraLink Pro 160 System and Network Parameters
Configuring Auto-Attendant
AastraLink Web UI
Step
Action
5
In the “Keys” section, select the keys (from 0 to 9, *, and #) that you want a caller to use when
navigating the IVR. For each key, select the function of that key from the drop down box. Valid values
are:
•
•
•
•
•
•
•
•
Dial by Name
Dial by Extension
Play another custom greeting
Ring admin configured number for that key
Go to Operator voicemail
Go to voicemail access
Replay the menu
Unused/Empty (plays the key number and runs invalid key handler)
6
Depending on the key function you selected in step 5, enter a phone number or extension for the key.
7
Click <Save> to save the custom IVR settings.
41-001190-02 Rev. 01, Rel. 1.2
4-125
AastraLink Pro 160 Administrator Guide
Configuring Auto-Attendant
Schedule for the Auto-Attendant
By default, the Auto-Attendant hours are set to open at 9:00 A.M. and close at
5:00 P.M for the business days of Monday through Friday. Saturday and Sunday
are closed hours. Calls that come into the Auto-Attendant during these times are
handled according to the configuration set by the administrator in the
Auto-Attendant Menus.
You can schedule specific open and closed hours of operation on any of the seven
days of the week. You can also select any hour of the day or night when creating
the open and closed schedule for the Auto-Attendant.
Figure 4-13.
Auto-Attendant Schedule (days)
You can reset the default settings for the Auto-Attendant schedule any time by
clicking the <Reset to Defaults> button on the Auto-Attendant Schedule (days)
screen (see illustration above).
4-126
41-001190-02 Rev. 01, Rel. 1.2
Configuring AastraLink Pro 160 System and Network Parameters
Configuring Auto-Attendant
Figure 4-14.
Auto-Attendant Schedule (times)
41-001190-02 Rev. 01, Rel. 1.2
4-127
AastraLink Pro 160 Administrator Guide
Configuring Auto-Attendant
The following illustration shows the scheduling flow in the Auto-Attendant.
4-128
41-001190-02 Rev. 01, Rel. 1.2
Configuring AastraLink Pro 160 System and Network Parameters
Configuring Auto-Attendant
Use the following procedure to specify the Auto-Attendant schedule.
AastraLink Web UI
Step
Action
1
Select Configuration->Auto-Attendant->Schedule
2
To begin editing the Auto-Attendant schedule, click on one of the days of the week.
For example, click <Sunday>
3
Set the “Day” field to the day of the week you are configuring.
4
If the office is closed this day, then in the “Closed” field, place a check mark in the box and click
<Save>. You disable the “Closed” field by unchecking the box.
5
If the office is open this day, do the following (“Closed” field must be unchecked):
6
•
Set the “Open At” field to the correct time when the office opens, and set AM or PM as
appropriate.
•
Set the “Close At” field to the correct time when the office closes, and set AM or PM as
appropriate.
Click <Save> to save your changes.
41-001190-02 Rev. 01, Rel. 1.2
4-129
AastraLink Pro 160 Administrator Guide
Configuring Auto-Attendant
Holidays for the Auto-Attendant
By default, there are no holidays scheduled in the Auto-Attendant. Holidays are
treated as days during which the regular schedule should be overridden with a
custom setting for open/closed hours. You can schedule specific days and times
for your office holidays if required. You schedule holidays by entering the holiday
name, date, and times, or by specifying the holiday name, date, and “Closed”, if
your office is closed on this holiday.
Figure 4-15.
4-130
Auto-Attendant Holidays
41-001190-02 Rev. 01, Rel. 1.2
Configuring AastraLink Pro 160 System and Network Parameters
Configuring Auto-Attendant
Figure 4-16.
Specifying Auto-Attendant Holidays
Note: Holidays are assumed to have annual repetition (i.e. most secular calendar
holidays in USA) so are essentially configured as repeating every 12
months. Where holidays repeat on irregular dates - usually due to religious
or pagan cycles. For example, the Christian holiday of Good Friday occurs
on a Pagan cycle with no fixed annual repeat (actually the friday before the
first Sunday after the first fourteenth day cycle of the moon on or after the
vernal equinox) - it is necessary to maintain the list manually for each new
year.
41-001190-02 Rev. 01, Rel. 1.2
4-131
AastraLink Pro 160 Administrator Guide
Configuring Auto-Attendant
Adding a Holiday to the Auto-Attendant
Use the following procedure to add a holiday to the Auto-Attendant schedule.
AastraLink Web UI
Step
Action
1
Select Configuration->Auto-Attendant->Holidays
2
Click <Add>.
3
Specify a name for the holiday in the “Holiday Name” field. For example, Christmas.
4
Select the date for the holiday in the “Date” field. For example, 25 December.
5
If the office is closed this day, then in the “Closed” field, place a check mark in the box and click
<Save>. You disable the “Closed” field by unchecking the box.
6
If the office is open this day, do the following (“Closed” field must be unchecked):
7
•
Set the “Open At” field to the correct time when the office opens.
•
Set the “Close At” field to the correct time when the office closes.
Click <Save> to save your changes.
Deleting a Holiday from the Auto-Attendant
Use the following procedure to add a holiday to the Auto-Attendant schedule.
AastraLink Web UI
Step
Action
1
Select Configuration->Auto-Attendant->Holidays
2
Select the holiday that you want to delete by placing a check mark in the box before that holiday.
To select all holidays, place a check mark in the box for the “Label” field.
4-132
41-001190-02 Rev. 01, Rel. 1.2
Configuring AastraLink Pro 160 System and Network Parameters
Configuring Auto-Attendant
AastraLink Web UI
Step
Action
3
Click <Delete> to delete the holiday(s) you selected. The following prompt displays:
“Are you sure you want to delete the selected items?”
4
Click <Yes> to delete the holiday(s) you selected.
41-001190-02 Rev. 01, Rel. 1.2
4-133
AastraLink Pro 160 Administrator Guide
Configuring Auto-Attendant
Custom Recordings
You can create custom recordings (for open and closed hours, Main Menus, Key
Messages, Language Greetings) for the Auto-Attendant if required. You can also
create a custom recording for the custom Main Menu. Incoming callers hear these
custom recordings when accessing and using the Auto-Attendant. For example,
you may want to include your company name in the open office greeting. Another
example of when you may want to record a custom greeting message is during a
holiday period, when your office is closed.
Custom Auto-Attendant announcements are heard by any incoming SIP trunk or
IAX trunk call that reaches the Auto-Attendant, as well as by any internal SIP
extension who dials 6100 to reach the IVR (though the caller does not receive the
language selection as they have already configured one for their phone). When
callers dial into the Auto-Attendant from the local IP phone network, they directly
access the Auto-Attendant menus.
You can record custom recordings in the applicable language using the Operator
IP phone, or you can upload a custom recording file to the AastraLink Pro. The
first extension (200) registered with the IP phone becomes the Operator by
default.
Note: Make sure you can access the Operator IP phone before starting the
procedure described below.
Use the following procedure to specify a custom recording.
AastraLink Web UI
Step
Action
1
Select Configuration->Auto-Attendant->Settings
2
In the “Language Greetings” section, select the language you want to use for your custom recording
(English, French,or Spanish). Default is English.
4-134
41-001190-02 Rev. 01, Rel. 1.2
Configuring AastraLink Pro 160 System and Network Parameters
Configuring Auto-Attendant
AastraLink Web UI
Step
Action
Custom Recordings Using the IP Phone
3
To specify a custom recording, click on <Record Custom> for the applicable section on the
“Settings” tab (Open Hour Settings, Closed Hour Settings, Custom Key Message, or Language
Greetings), or the <Record Custom> on the “Custom IVR” tab for Custom Main Menu.
The Web UI displays a window informing you that the recording process has begun. (The window
disappears when the process is complete.)
4
When the Operator IP phone rings, pick up handset.
5
After you hear the tone, speak into the Operator IP phone and record your custom greeting, Main
Menu, key message, or language greeting.
Press <#> when you are finished recording.
6
As prompted by your Operator IP phone, do one of the following:
•
•
•
To re-record the message, press <1>.
To hear the message you just recorded, press <2>.
To save the message, and use it as the Auto-Attendant custom greeting, press <3>.
41-001190-02 Rev. 01, Rel. 1.2
4-135
AastraLink Pro 160 Administrator Guide
Configuring Auto-Attendant
AastraLink Web UI
Step
Action
7
Click <Save> to save the recording. The following example shows a recording applied to the Open
Hours Settings.
Custom
Message
Applied
4-136
41-001190-02 Rev. 01, Rel. 1.2
Configuring AastraLink Pro 160 System and Network Parameters
Configuring Auto-Attendant
AastraLink Web UI
Step
Action
Uploading a Custom Recordings File
1
Select Configuration->Auto-Attendant->Settings
2
In the “Language Greetings” section, select the language you want to use for your custom recording
(English, French,or Spanish). Default is English.
3
To upload a custom recording file, click on <Browse> for the applicable section on the “Settings” tab
(Open Hour Settings, Closed Hour Settings, Custom Key Message, or Language Greetings), or the
<Browse> on the “Custom IVR” tab for Custom Main Menu.
The browse window displays for your PC.
41-001190-02 Rev. 01, Rel. 1.2
4-137
AastraLink Pro 160 Administrator Guide
Configuring Auto-Attendant
AastraLink Web UI
Step
Action
4
Navigate to the directory location on your PC that contains the custom recording file you created,
select the applicable “.wav” file and click <Open>. The path name is inserted in the “Upload
Greeting” field.
Note: Custom recording files must be created with a recording application and be saved to a file with
the .wav extension (for example AastraMainMenu.wav).
5
Click <Save> to save the recording. The following example shows a recording applied to the Open
Hours Settings.
Custom
Message
Applied
4-138
41-001190-02 Rev. 01, Rel. 1.2
Chapter 5
Maintaining the AastraLink Pro 160
About this Chapter
Introduction
This chapter describes how to maintain the AastraLink Pro 160.
Topics
This chapter covers the following topics:
Topic
Page
Accessing the Maintenance Menu
page 5-3
Viewing the Current System Status
page 5-4
Managing Call Detail Records (CDR reports)
page 5-5
Sorting CDR Columns
page 5-7
Viewing Call Detail Records
page 5-9
Downloading CDR Reports
page 5-9
Performing AastraLink Backup and Restore Tasks
page 5-10
Backup and Restore Guidelines
page 5-11
Backing Up AastraLink System Software
page 5-12
Restoring the AastraLink Configuration Database and Voicemail
page 5-14
Updating AastraLink System Software
page 5-15
Automatic Updates
page 5-17
Manual Updates
page 5-18
41-001190-02 Rev. 01, Rel. 1.2
5-1
AastraLink Pro 160 Administrator Guide
About this Chapter
5-2
Topic
Page
Support Information
page 5-21
Send Email to Aastra Support with Debug Reports
page 5-21
General Support
page 5-24
41-001190-02 Rev. 01, Rel. 1.2
Maintaining the AastraLink Pro 160
Accessing the Maintenance Menu
Accessing the Maintenance Menu
You access all system maintenance and upgrade options for the
AastraLink Pro 160 from the Maintenance menu (Figure 5-1).
Figure 5-1.
AastraLink Pro 160 Web UI Maintenance Menu
41-001190-02 Rev. 01, Rel. 1.2
5-3
AastraLink Pro 160 Administrator Guide
Viewing the Current System Status
Viewing the Current System Status
You view the current system status for the AastraLink Pro160 from the
Maintenance->Current Status menu (Figure 5-1).
The current status menu contains the following information about the AastraLink
Pro 160:
•
Serial Number of the AastraLink Pro 160
•
Percent of Voicemail usage
•
Line 1 through Line 6 shows the status of each FXO line.
— If the line is connected and receiving voltage from the telephone network,
the status is “Available.”
— If the line is disconnected, the status is “Offline.”
— If the line is off-hook, the status is “In Use.” This status is an interactive
link that, when clicked, allows the Administrator to disconnect the FXO
line manually. It forces a hang-up of the line and clears any active calls.
•
Link connection mode and speed for the LAN and WAN. Displays
“Disconnected” if no LAN or WAN connection available.
The Current Status screen also allows you to reboot the AastraLink Pro system
and all of the connected phones, or shut down the entire system.
5-4
41-001190-02 Rev. 01, Rel. 1.2
Maintaining the AastraLink Pro 160
Managing Call Detail Records (CDR reports)
Managing Call Detail Records (CDR reports)
About the Call Records Menu
You view the Call Detail Record (CDR) history for the AastraLink Pro 160 from
the Maintenance->CDR Reports menu (Figure 5-2).
The CDR logs include all regular calls, feature activations, and internal calls.
Figure 5-2.
Call Records Menu
41-001190-02 Rev. 01, Rel. 1.2
5-5
AastraLink Pro 160 Administrator Guide
Managing Call Detail Records (CDR reports)
The following table described the information in each call detail record.
Column
Description
Source
Source directory number
Destination
Destination directory number (in some cases, includes line type, i.e.,
SIP)
Caller ID
Calling name of the originator (if known)
Disposition
Result of the call, or the feature method used (i.e., whether the call was
answered, not answered, busy, or if the call failed).
Date
Date of the call
Duration
Amount of time that lapsed from when the call was dialed to when the
call was terminated.
The “Call Records” page displays the current master “.csv” file contents. The call
records list is paginated into 25-block records. The “.csv” file rotates daily when it
reaches 200KB in size. Records that are rotated out do not display on the “Call
Records” page, but can still be downloaded from the Web UI by clicking the
<Download Current (.csv>)> button. After 4 weeks, the AastraLink Pro deletes
the files from the file system that have not been downloaded.
The <Download Archive> button collates the “.csv” files into a single “tar.gz”
archive file and downloads the “.gz” file to a location you specify.
Note: To avoid exhausting memory during the “Download Archive” task, only
the first 10 .csv files (i.e., 2MB) are included in the download. If the system
is particularly busy, more than 10 files (or 2MB) of records can be created
in the 4-week rotation window. You cannot download older files that have
been deleted after the 4-week expiry.
It is recommended to download call records on a timely and frequent basis.
5-6
41-001190-02 Rev. 01, Rel. 1.2
Maintaining the AastraLink Pro 160
Managing Call Detail Records (CDR reports)
Sorting CDR Columns
In the Call Detail Record report, you can sort each column using the up and down
arrows at the top of each column.
Sorting Arrows
The following table describes the sorting process for each column.
Column
Source
Destination
Sort Process
UP Arrow
DOWN Arrow
Sorts in ascending order.
Sorts in descending order.
For example:
UnKnown
<Blank>
200
201
202
For example:
202
201
200
<Blank>
Unknown
Sorts in ascending order.
Sorts in descending order.
For example:
Unknown
205
206
302
3345454
4443567
For example:
4443567
3345454
302
206
205
Unknown
Caller ID
No sorting; the items in this column stay with each record as you sort.
Disposition
Sorts by: Answered, Failed, No Answer
41-001190-02 Rev. 01, Rel. 1.2
Sorts by: No Answer, Failed, Answered
5-7
AastraLink Pro 160 Administrator Guide
Managing Call Detail Records (CDR reports)
Column
Sort Process
Date
Sorts in ascending order.
Sorts in descending order:
For example:
Apr 7 10:51 AM
Apr 7 11:42 AM
May 4 2:30 PM
For example:
May 4 2:30 PM
Apr 7 11:42 AM
Apr 7 10:51 AM
Sorts in ascending order.
Sorts in descending order.
For example:
00:00
00:00
00:32
01:43
For example:
01:43
00:32
00:00
00:00
Duration
Note:
1. When sorting in the CDR report, the sort uses data from the current
report that may appear on more than one page. For example, if a CDR
report is large enough to appear on four pages, the data on all four pages is
sorted when you click on the UP and DOWN sort arrows.
2. Call logs cannot manually be deleted, but are automatically expired
from the CompactFlash after log rotate limits are reached. Default limits
for CDR logs are to check dial and rotate after 200kb file size is reached, at
which point logging resumes in a new blank log file. Log files are retained
for a maximum of four weeks before auto-deletion to reclaim storage
space.
5-8
41-001190-02 Rev. 01, Rel. 1.2
Maintaining the AastraLink Pro 160
Managing Call Detail Records (CDR reports)
Viewing Call Detail Records
Use the following procedure to view call detail records.
AastraLink Web UI
Step
Action
1
Select Maintenance->Call Records.
2
View the log as applicable. To sort the report in ascending or descending order, click
the field in the Call Records header row.
next to
Downloading CDR Reports
You can also download the current Call Detail Record you are viewing, to your
PC or server, or download an entire archived set of Call Detail Records.
To download the current contents of the CDR report and save it locally on your
computer, click <Download Current (.csv)>. This option saves the file as
cdr_logs.csv.
To download an archived set of CDR reports and save it locally on your computer
or server, click <Download Archive>. This option saves a file as
cdr_archive.tar.
You can import this data into software applications, such as a separate database,
spreadsheet, or other billing mediation application.
For more information about using the download buttons on the “Call Records”
page, see “About the Call Records Menu” on page 5-5.
41-001190-02 Rev. 01, Rel. 1.2
5-9
AastraLink Pro 160 Administrator Guide
Performing AastraLink Backup and Restore Tasks
Performing AastraLink Backup and Restore Tasks
You can save the current AastraLink Pro 160 system configuration database into a
file, and download it to your PC for secure storage, from the
Maintenance->Backup & Restore menu (Figure 5-3).
The backup file contains all voicemail and configuration information for the
AastraLink Pro 160 system. The backup file is encrypted to prevent exposure of
personal information.
In addition to backing up your AastraLink Pro, you can restore a previously
backed up file onto the AastraLink Pro 160, in order to recover its original
operating state.
Figure 5-3.
Backup and Restore Menu
This Backup and Restore screen also allows you to reboot the system if required
using the <Reboot System> button.
5-10
41-001190-02 Rev. 01, Rel. 1.2
Maintaining the AastraLink Pro 160
Performing AastraLink Backup and Restore Tasks
Backup and Restore Guidelines
Review the following information and guidelines before performing AastraLink
backup and restore operations:
•
To ensure that the confidentiality of voicemails is preserved, backup data is
stored in the compressed and encrypted “AastraLink Backup File” (.abf)
format.
•
When a large amount of voicemail exists, the backup and restore process can
take an hour or more to complete.
•
When an .abf file is restored to the AastraLink Pro, existing configuration
data for all users is replaced by the copy from the backup file. After uploading
the backup file for restoration, the AastraLink must reboot to extract and
apply the saved settings. During this process, a factory-default occurs, erasing
the current configuration and replacing it with the copy from the backup file.
•
After restoring from a backup, reboot all user phones to make certain that the
AastraLink and the phones are in a consistent state. This action also
automatically adds any missing phones to the corporate directory.
•
If you restore a backup file that contained static IP network settings rather
than DHCP, you must perform an additional reboot to activate the static IP
settings after completing the database restore.
41-001190-02 Rev. 01, Rel. 1.2
5-11
AastraLink Pro 160 Administrator Guide
Performing AastraLink Backup and Restore Tasks
Backing Up AastraLink System Software
Use the following procedure to back up the AastraLink System Software.
AastraLink Web UI
Step
Action
1
Select Maintenance->Backup & Restore.
5-12
41-001190-02 Rev. 01, Rel. 1.2
Maintaining the AastraLink Pro 160
Performing AastraLink Backup and Restore Tasks
AastraLink Web UI
Step
Action
2
To start the backup process for the AastraLink Pro 160, click <Backup Now>.
The following prompt displays asking you to backup the AastraLink Pro configuration to an “.abf” file,
cancel the backup process, or find an application on the Internet that will open the “.abf” file.
3
Click <Save> to begin the backup process of the AastraLink configuration to an “.abf” file.
The database is backed up internally, and once complete, the download commences. the download
streams directly from the Compact Flash card, rather than from AastraLink Pro memory.
This allows the entire 512MB or 1GB compact flash card to be backed up. Depending on the number
of configured extensions (and amount of stored voicemail), this could take up to 30 minutes.
41-001190-02 Rev. 01, Rel. 1.2
5-13
AastraLink Pro 160 Administrator Guide
Performing AastraLink Backup and Restore Tasks
Restoring the AastraLink Configuration Database and Voicemail
Use the following procedure to restore a previously saved version of the
AastraLink configuration database and voicemail onto the device.
Caution: Restoring from a backup will overwrite existing configuration and
voicemail data.
AastraLink Web UI
Step
Action
1
Select Maintenance->Backup & Restore.
2
Click <Browse>, then select a previously saved “.abf” file.
3
Click <Restore> to initiate the upload of the .abf file to the AastraLink Pro 160.
4
Once the upload is complete, click <Yes> to reboot the AastraLink Pro 160 and reload the new
database.
Once the reboot is complete, the LED light on the front of the AastraLink Pro 160 device flashes
green. You can then log into the AastraLink Pro 160.
Note: If you restore a backup file that contained static IP network settings rather than DHCP, you
must perform an additional reboot to activate the static IP settings after completing the database
restore.
5-14
41-001190-02 Rev. 01, Rel. 1.2
Maintaining the AastraLink Pro 160
Updating AastraLink System Software
Updating AastraLink System Software
You can apply new AastraLink system software to the unit from the
Maintenance->Update menu (Figure 5-4).
Figure 5-4.
Update Menu
AastraLink software updates use the “.dra” file extension, and are available from
the Aastra customer support web site. Commonly used update files include:
•
vnx.dra: Contains new AastraLink system software for the CompactFlash.
•
obf.dra: Contains new AastraLink system firmware for the onboard flash.
•
ipp.dra: Contains new Aastra IP phone firmware.
•
mbu.dra: Contains new Aastra MBU-400 and DECT 420d firmware
41-001190-02 Rev. 01, Rel. 1.2
5-15
AastraLink Pro 160 Administrator Guide
Updating AastraLink System Software
Note: For a link to the Aastra Support web site, click the “About” link in the
upper right corner of the screen. For more information about the “About”
screen, see “General Support” on page 5-24.
There are two ways to update your system software:
•
Automatic update: Use if you want to specify a date/time for automatic
updates to occur. This method also allows you to specify these options:
— Notify you when a new image is available.
— Download the latest system software file, but do not install it.
— Download the latest system software and install it (installs the software
and reboots the AastraLink) automatically.
•
Manual Update: Use if you want to manually update the AastraLink. You
can either:
— Check the Aastra support website for updates, and if available, download
the latest system software file.
— Update the AastraLink using a system software file stored locally.
Note: Aastra recommends creating a backup file of your current AastraLink Pro
160 system software before you perform the upgrade procedure described
in this section. Some system updates may result in the loss of configuration
or voicemail messages.
5-16
41-001190-02 Rev. 01, Rel. 1.2
Maintaining the AastraLink Pro 160
Updating AastraLink System Software
Automatic Updates
The AastraLink Pro prompts the Administrator if there is a firmware version
mismatch between the on-board flash (OBF) and the compact flash (CF).
The Administrator can agree to update, in which case the AastraLink reboots and
installs the new boot code, or the Admin can reject the update.
The administrator may also be prompted to run FXO auto-tuning of their lines, if
this has not been performed since the last software update was installed.
If a prompt is rejected, AastraLink will prompts the Admin again at login after the
next reboot of the system.
Use the following procedure to specify the parameters used to automatically
update your AastraLink System Software.
AastraLink Web UI
Step
Action
1
Select Maintenance->Update->Automatic Update
2
Click on the Automatic Updates check box to select it.
3
Choose one of the following Update Methods:
•
Notify only. Select if you want the AastraLink to notify you using an email message when a new
image is available.
•
Download but don’t install. Select if you want the AastraLink to download the latest system
software file, but not install it.
•
Install (reboots system when updates are found). Select if you want the AastraLink to
download the latest system software when it is available and install it (reboots the AastraLink)
automatically.
4
In the Check Every field, specify how often the AastraLink should check the Aastra support website
for updates.
5
In the At Time field(s), specify the time when the AastraLink should check for updates.
6
Click <Save> to save your changes.
41-001190-02 Rev. 01, Rel. 1.2
5-17
AastraLink Pro 160 Administrator Guide
Updating AastraLink System Software
Manual Updates
Use the following procedure to manually update your AastraLink System
Software.
AastraLink Web UI
Step
Action
1
Select Maintenance->Update->Manual Update
2
Choose one of the following options:
•
Check for Updates: Select if you want the AastraLink to check the Aastra support website for
updates.
The AastraLink contacts the Aastra support website to check if a newer software version of any
of the three .dra files is available. A dialog box appears, showing the number of updates
available (or none if the AastraLink is already using the latest software). If an update is available,
you can choose to immediately download and apply the update.
•
3
Upgrade AastraLink: Select if you want to locate an AastraLink System Software file of type .dra
that you stored locally on your PC or server. Use the Browse button to locate the . dra file on your
PC, then click <Upgrade> to begin downloading the file.
If you apply an updated .dra file, Click <Reboot System> to reboot the AastraLink Pro 160 using the
updated AastraLink software.
Your AastraLink reboots using the latest software image.
5-18
41-001190-02 Rev. 01, Rel. 1.2
Maintaining the AastraLink Pro 160
Updating AastraLink System Software
IMPORTANT NOTES
During the AastraLink Pro software update process, the Administrator must press
the REBOOT button after the upgrade is successful.
The Web UI displays the following message after pressing the REBOOT button:
"System is rebooting. Please login after there is a flashing green light on the front
of the AastraLink.”
41-001190-02 Rev. 01, Rel. 1.2
5-19
AastraLink Pro 160 Administrator Guide
Updating AastraLink System Software
The User must watch for the flashing green LED on the front of the AastraLink
Pro hardware before attempting to re-login to the AastraLink Web UI. If the User
attempts to login too soon, the message "Warning: System is in an upgrade state.
Logins have been disabled." The status of the upgrade process also displays at the
bottom left corner of the login dialog so the Administrator knows when the
upgrade is complete.
System Rebooting Message
Warning Message if Login Attempt Too Soon
AastraLink Status Display
5-20
41-001190-02 Rev. 01, Rel. 1.2
Maintaining the AastraLink Pro 160
Support Information
Support Information
Send Email to Aastra Support with Debug Reports
A feature of the AastraLink Pro 160 Web UI software allows you to send debug
information about your AastraLink Pro to Technical Support at Aastra Telecom.
You have the option of selecting whether you want to automatically send the
information or send it manually when required.
Note: Whether you send debug information automatically or manually, both
methods require correctly configured SMTP mail before sending the
outbound reports to Aastra.
You send debug reports from the Maintenance->Support Menu.
This feature allows the administrator to send critical error debug logs and
configuration logs to Aastra Support to aid in troubleshooting tasks. Enabling the
“Critical Errors” field results in automatic crash reporting to Aastra support but
with no personally identifiable information other than the serial number and IP
address of the reporting system.
Aastra recommends that all users enable the "Critical Errors" reporting as soon
as they have configured SMTP email transport, so that Aastra can be made aware
of any crash trends and provide pro-active support.
41-001190-02 Rev. 01, Rel. 1.2
5-21
AastraLink Pro 160 Administrator Guide
Support Information
Clicking <Send Debug Information> displays the following screen.
Note: The <Send Debug Information> button may include personally
identifiable information, such as call logs and account details (passwords,
etc.). However, the file attached to the email is encrypted to ensure that
only Aastra support personnel have access to it.
Note: The AastraLink software requires you to enter an Aastra Case ID before
sending any debug information. Contact Aastra Support prior to using this
support feature.
The Send Debug Information screen allows the administrator to enter the name,
daytime phone, and email of the person sending the report. An Aastra Case ID
must also be specified. (Contact Aastra Support prior to sending the debug
notification.)
5-22
41-001190-02 Rev. 01, Rel. 1.2
Maintaining the AastraLink Pro 160
Support Information
After submitting the debug notification to Aastra, the following message displays.
41-001190-02 Rev. 01, Rel. 1.2
5-23
AastraLink Pro 160 Administrator Guide
Support Information
General Support
In an Administrator session, this screen displays the AastraLink Pro software
build number, license download link, and a link to the Aastra Telecom Support
Web page.
5-24
Field
Procedure
Build
Displays the current release and build number of your
AastraLink Pro 160 software. This field is view-only.
Support
Click the specified link to automatically open a browser window
and display the Aastra Support page. From this page, you can:
• Contact Aastra Technical Support
• Download product documentation
• View Frequently Asked Question (FAQs)
License
Click <Download> to immediately download the current
AastraLink Pro 160 License file (in PDF format) to your PC
screen for viewing.
41-001190-02 Rev. 01, Rel. 1.2
Chapter 6
AastraLink FAQs
This chapter describes frequently asked questions (FAQs) about installing and
using the AastraLink Pro 160 in your IP phone network.
Topics
This chapter covers the following topics:
Topic
Page
How Does Network Addressing Work?
page 6-3
How Does IP Phone Auto-Configuration Work?
page 6-3
What is the Difference Between the Administrator Phone and User Phones? page 6-4
Do I Ever Need to Re-Register IP Phones?
page 6-4
Can I Access My IP Phone Network From a Remote Office?
page 6-4
How Do I Assign An IP Phone To A Different User?
page 6-5
What Are Softkeys and How Do They Work?
page 6-5
How Do I Obtain the IP Address Assigned to the AastraLink Pro 160?
page 6-9
Why Do My IP Phone Screens Look Different?
page 6-10
Why Does The Web UI Occasionally Time-out?
page 6-10
How Do I Maximize System Performance?
page 6-10
Does This Guide Describe How To Operate My IP Phone?
page 6-11
How Does Auto-Fax Work on the AastraLink Pro 160?
page 6-11
Does the AastraLink Pro Support Routing to a FAX over IP (FOIP) Device? page 6-11
Can I Add More PSTN Gateways to Add More Than Six FXO ports?
page 6-12
Can I Link Multiple AastraLink Pros Using AastraLink Trunks for Making
Toll-Free Calls?
page 6-12
41-001190-02 Rev. 01, Rel. 1.2
6-1
AastraLink Pro 160 Administrator Guide
6-2
Topic
Page
Can I Create Custom Dial Plans on the AastraLink Pro?
page 6-12
Does My AastraLink Pro Support non-Aastra SIP Phones?
page 6-12
How Many Extensions Can the AastraLink Pro Host When SIP Trunking is
Used?
page 6-12
If Custom “On Hold” Music is Enabled, Does it Play for Both Parked Calls
and On-Hold Calls?
page 6-13
Does the AastraLink Pro Support Shared Line Appearance (SLA)?
page 6-13
How Do I Reduce the Initial Echo that Occurs at the Beginning of Each
Call?
page 6-14
Can a Call Group Send a Voicemail to an Email Address?
page 6-14
Does the AastraLink Pro Support Analog Telephone Adapters (ATAs) for
Adding More FXS Ports?
page 6-14
41-001190-02 Rev. 01, Rel. 1.2
AastraLink FAQs
How Does Network Addressing Work?
How Does Network Addressing Work?
The first time an AastraLink Pro 160 starts up, it attempts to use DHCP to obtain
an IP address from a server on the network.
If that fails, the AastraLink Pro 160 then uses ZeroConf to assign itself an IP
address within the range 169.254/16 (excepting the first and last 256 addresses in
this range, which are reserved). The AastraLink Pro 160 uses its MAC address as
a basis, then selects a random IP Address within the valid range. The AastraLink
Pro 160 sends out ARP requests to see if the IP Address is already assigned to
another device on the network. If so, the AastraLink Pro 160 assigns itself another
random IP Address until it finds a free address.
Once the AastraLink Pro 160 is up and running, the administrator can use the Web
UI to assign a static IP address to the device. The next time the AastraLink Pro
160 starts up, it uses the static address you assigned.
If the AastraLink Pro 160 device’s public IP Address changes, the device sends an
email message to notify the administrator.
How Does IP Phone Auto-Configuration Work?
When an Aastra IP phone starts up on your IP phone network, the phone uses
multicast DNS to automatically discover the presence of an AastraLink Pro 160
device on the LAN. Once the AastraLink is discovered, the phone then obtains its
configuration file from the device.
Note: Multicast DNS may not traverse between switched network segments (due
to spanning tree non-convergence) or across subnet routers; therefore, it
may be necessary to connect IP phones to the same Ethernet segment or IP
Subnet as the AastraLink, before they can register to the AastraLink Pro.
If you are registering a new IP phone with the AastraLink, the IP Phone UI
prompts you to specify the user’s first name, last name, and email address. The
AastraLink Pro 160 then automatically assigns the next free extension to the IP
phone.
41-001190-02 Rev. 01, Rel. 1.2
6-3
AastraLink Pro 160 Administrator Guide
What is the Difference Between the Administrator Phone and User Phones?
If there are multiple AastraLinks present on the LAN, then the Aastra IP phone UI
displays the list of AastraLinks. You then select which AastraLink the phone
should use to obtain its configuration file.
As administrator, you have the option to control new phone registration on your
network. That is, if you wish, you can use the Web UI to restrict new phones from
registering.
What is the Difference Between the Administrator Phone and User
Phones?
The first IP phone you register with the AastraLink Pro 160 becomes the
administrator phone. The administrator can configure and manage the AastraLink
Pro 160, as well as configure all Aastra IP phones and user accounts on your
network.
Once you register an administrator phone with the AastraLink, all other IP phones
are registered as user phones. If you wish, you can assign administrator privileges
to a user phone (s) using the Web UI.
Do I Ever Need to Re-Register IP Phones?
If an IP phone has been previously registered with the AastraLink Pro 160, it
maintains the configuration information (user name/password/extension) even if it
is removed, and then reinstalled, on the network.
Even if you set the IP phone back to its factory default settings, then all
AastraLink registration information is erased locally from the phone; however
when you re-connect the IP phone to the network, the IP phone re-discovers and
re-registers with the AastraLink Pro 160 device.
Can I Access My IP Phone Network From a Remote Office?
Yes! The AastraLink provides remote office support. See Appendix A, “Remote
Office Configuration of the IP Phone (Phone-Side)” for instructions on installing
and registering remote user IP phones.
6-4
41-001190-02 Rev. 01, Rel. 1.2
AastraLink FAQs
How Do I Assign An IP Phone To A Different User?
How Do I Assign An IP Phone To A Different User?
If an IP phone is already registered with the AastraLink device, and you want to
reassign the IP phone to a different user, you must use the AastraLink Web UI to
edit the user entry and change the name and extension number; or delete the old IP
phone entry from the Users List, and add the new User phone reusing the previous
extension if required.
What Are Softkeys and How Do They Work?
Softkeys function exactly like the hard keys on your IP phone. When you press a
softkey, an action takes place. For example, when you press the DND softkey, you
enable Do Not Disturb on your phone.
The difference between hard keys and softkeys is that softkeys are programmable.
You can use the AastraLink Web UI to change a softkey so it performs a different
function. For example, you can change a DND softkey to a Speeddial softkey, or
one of 15 other softkey types available. You can also add or delete softkeys.
As administrator, you have the option to change the default softkey settings for the
IP phones on your network. See “Default Softkeys (Users Menu)” on page 3-54
for instructions.
41-001190-02 Rev. 01, Rel. 1.2
6-5
AastraLink Pro 160 Administrator Guide
What Are Softkeys and How Do They Work?
L1
200 - J Smith
May 11, 2:40 PM
DND
Forward
Directory
Vmail
Park Call
Press DND softkey
to enable “Do Not Disturb” on this phone.
6-6
41-001190-02 Rev. 01, Rel. 1.2
AastraLink FAQs
What Are Softkeys and How Do They Work?
What are Expansion Modules?
The 675xi Series Aastra IP SIP Phones offer expansion module units that can
attach to the right side of the phone to provide additional softkeys. These
expansion modules are called the 536M and the 560M.
Model 536M
For Phones 6753i, 6755i, 6757i, and 6757i CT
Model 560M
For Phones 6755i, 6757i and 6757i CT
41-001190-02 Rev. 01, Rel. 1.2
6-7
AastraLink Pro 160 Administrator Guide
What Are Softkeys and How Do They Work?
The 536M provides 36 additional softkeys and can attach to a 6753i, 6755i, 6757i
or 6757i CT. The 560M provides 60 additional softkeys and can attach to a 6755i,
6757i, and 6757i CT.
The expansion modules support the same key functions as the applicable IP Phone
for which it is connected. Each key provides an LED for indicating call status. The
M670i provides a paper label for convenient key labeling, and the M675i provides
an LCD for displaying key labeling.
Note: You use the AastraLink Web UI to configure the additional expansion
module softkeys. For an Administrator phone, refer to Chapter 2, the
section, “Default Softkeys for Expansion Modules (Administrator or User
Phone)” on page 3-64 for more information. For a User phone, refer to the
AastraLink Pro 160 User Guide.
6-8
41-001190-02 Rev. 01, Rel. 1.2
AastraLink FAQs
How Do I Obtain the IP Address Assigned to the AastraLink Pro 160?
How Do I Obtain the IP Address Assigned to the AastraLink Pro 160?
You can view the IP Address assigned to the AastraLink Pro 160 using your
Aastra IP phone, and the procedure described below.
Step
Action
1
Press Options key
on the phone key pad (or the Options key on the Aastra IP phone
models 9143i, 9480i, and 9480i CT) to bring up the Options list.
2
Use
3
Select AastraLink Info, then press <Show>
4
Press the down <Arrow> until the AastraLink IP Address menu appears (see below). In this
example, the IP Address of the AastraLink Pro 160 is 10.50.20.104
and
to scroll through the list key to select Phone Status, then press <Show>
AastraLink Pro 160
IP Address
AastraLink Info
Server Local IP:
10.50.20.104
Done
5
Write down the IP Address of your AastraLink Pro 160. You need it to access the AastraLink Web UI.
6
Press <Done> to exit.
41-001190-02 Rev. 01, Rel. 1.2
6-9
AastraLink Pro 160 Administrator Guide
Why Do My IP Phone Screens Look Different?
Why Do My IP Phone Screens Look Different?
If you install an AastraLink Pro 160 on your existing IP phone network, then you
will notice some phone UI changes when you register the phones with the device.
Users who previously operated their IP phones in generic SIP mode should note
the following information:
•
Some menu options no longer appear on the Aastra IP phone UI, or are
located on different screens. See the AastraLink IP Phone User’s Guide.
•
The Aastra IP phone UI displays several new menu options that apply to the
AastraLink Pro 160 device itself.
Why Does The Web UI Occasionally Time-out?
For security reasons, the Web UI automatically logs a user off after 10 minutes of
inactivity. The Web UI displays the login screen, along with a message informing
you to log back in again. The Web UI may also temporarily disconnect the session
if a temporary error occurs while connected to the AastraLink during processing
of a data load or save operation; waiting a few minutes before logging back in and
repeating the operation should generally be successful.
How Do I Maximize System Performance?
To maximize system performance, Aastra requires connecting the AastraLink to a
full-duplex Ethernet device, such as a router or switch, rather than a half-duplex
device such as a hub.
For example, if you are experiencing network problems such as garbled
voice-path or Web UI time-outs, check the front LED on the AastraLink device. If
it is slowly flashing red - about once per second - then the AastraLink is running
normally, but in a degraded state. (a full-duplex network connection could not be
negotiated). This causes timeouts, restricts the system capacity and/or causes
problems with collisions or integrity of the network connection.
6-10
41-001190-02 Rev. 01, Rel. 1.2
AastraLink FAQs
Does This Guide Describe How To Operate My IP Phone?
Does This Guide Describe How To Operate My IP Phone?
IP Phone operation - for example, how to use the buttons, softkeys, and hard keys
on your model IP phone - is beyond the scope of this guide.
For instructions on operating Aastra IP phones, and using Aastra IP phone
features, refer to the AastraLink Pro 160 IP Phone User’s Guide.
How Does Auto-Fax Work on the AastraLink Pro 160?
The AastraLink Pro 160 allows you to physically connect a FAX machine to FXS
Port A on the rear panel to send/receive fascimile communications. When two Fax
machines (or Fax modems or Fax servers) first connect, they exchange tones
called the called station identification (CED) and calling tone (CNG). These tones
confirm that the other party is a fax machine and not a voice call.
A calling fax machine plays the CNG tone, a short 1100Hz tone that is
periodically repeated. An answering fax machine plays the CED tone, a
high-pitched (2100Hz) long tone.
The FXS Port that the FAX machine is connected to on on the AastraLink Pro,
detects the incoming V.21 fax answer tone and CED calling tone in parallel for all
FXO calls. If a fax call is detected, it routes through to FXS Port A. If FXS Port A
is busy, the call gets a post-answer busy tone, so the calling party can try again
later.
For more information about Auto-Fax, see Chapter 3, the section, “
Does the AastraLink Pro Support Routing to a FAX over IP (FOIP)
Device?
No. The AastraLink Pro is limited only to the FXS ports on the back of the
AastraLink Pro. Voiceband fax over IP is also not supported by the current
software.
41-001190-02 Rev. 01, Rel. 1.2
6-11
AastraLink Pro 160 Administrator Guide
Can I Add More PSTN Gateways to Add More Than Six FXO ports?
Can I Add More PSTN Gateways to Add More Than Six FXO ports?
No. The FXO port limit on the AastraLink Pro is six. Aastra recommends using a
SIP trunk service provider if more than six PSTN calls are required. Generic SIP
trunk servers (such as Asterisk) may be used locally.
Can I Link Multiple AastraLink Pros Using AastraLink Trunks for
Making Toll-Free Calls?
Yes! You can link multiple AastraLink Pros using AastraLink trunks. This is a toll
bypass feature. However, an Administrator can block toll bypass using the barred
numbers on the far-end system.
If the toll-bypass feature is enabled, calls made from one remote office to another
can be made using the dial pattern 7+1+9+external number. So an office in
Chicago can dial 7+1+9+external number to call an office in Dallas and the call
acts like a local call avoiding any long distance charges.
Can I Create Custom Dial Plans on the AastraLink Pro?
No. The AastraLink Pro does not support custom dial plans.
Does My AastraLink Pro Support non-Aastra SIP Phones?
Yes! In AastraLink Pro softtware Release 1.2 and later. The AastraLink Pro allows
generic SIP phones to be used as secondary phones. Each Aastra SIP phone is
given an automatic secondary account which can be used for generic SIP devices
such as softphones, etc. However, non-Aastra phones are not permitted to be the
primary account, as they do not support the required XML features.
How Many Extensions Can the AastraLink Pro Host When SIP
Trunking is Used?
Call processing capacity is based on concentration and concurrent channels. The
AastraLink Pro 160 supports 6 FXOs with 4:1 concentration, plus an operator =
25 concurrent users. Adding SIP trunks allows this to be doubled, allowing a
potential of 50 users and 12 active calls.
6-12
41-001190-02 Rev. 01, Rel. 1.2
AastraLink FAQs
If Custom “On Hold” Music is Enabled, Does it Play for Both Parked Calls and On-Hold
Note: These are not hard limits, this is based on the point at which the platform
performance has been tested to degrade. It is possible to make more than
12 calls, but quality degrades and the unit may go into overload, resulting
in loss of service. Active calls relates to host-routed calls only; it does not
include any additional calls which are stable between SIP extensions (these
do not route though the host unless they are remote office users, in which
case they do count as hosted active calls).
If Custom “On Hold” Music is Enabled, Does it Play for Both Parked
Calls and On-Hold Calls?
Yes. Music on-hold is played to incoming parked calls and to calls put on hold by
a SIP extension.
Does the AastraLink Pro Support Shared Line Appearance (SLA)?
Yes. In Release 1.2 and later, the AastraLink Pro supports SLA, which allows the
AastraLink to provide key system features in addition to its existing Private
Branch eXchange (PBX) functionality.
SLA and PBX can be used exclusively (i.e. all FXO lines as SLA, or all FXO lines
as PBX) or in a mixed mode. To differentiate between modes, the AastraLink user
interface refers to non-SLA lines as ’Pool’ lines, as they provide pooling of
incoming and outgoing lines for call processing purposes.
SLA is configurable on a per FXO basis on the AastraLink Pro. When no FXOs
are configured as SLA, all 6 FXO ports perform the PBX dial plan operation as
outlined in Release 1.1 of the AastraLink Pro.
Any FXO ports not allocated for SLA use are available for processing PBX calls,
and for Pool outgoing calls. A configurable timer allows SLA incoming calls to
overflow to PBX dial plan routing (auto-attendant, ring groups etc.), and outgoing
PBX calls will overflow to SLA lines if no FXO Pool line is available.
SLA membership, for example, whether a phone is to participate in the SLA key
system, or whether it is to be permitted access to PBX Pool lines only, can be
configured independently for each local and remote office phone.
FXO line to SIP phone key mapping for SLA varies by phone model.
41-001190-02 Rev. 01, Rel. 1.2
6-13
AastraLink Pro 160 Administrator Guide
How Do I Reduce the Initial Echo that Occurs at the Beginning of Each Call?
In Release 1.2 and later, the AastraLink Pro supports SLA on hard keys L1
through L4, and then softkeys for L5 and L6 on the 6755i, 6757i, 6757i CT, 9480i,
and 9480i CT IP Phones. Models 6753i and 9143i IP Phones support a subset of
SLA on hard keys L1 through L3.
For more detailed information about SLA, see Chapter 3, the section, “
How Do I Reduce the Initial Echo that Occurs at the Beginning of Each
Call?
After runninng the “Audio Tuning Wizard”, an initial echo can still occur at the
beginning of each call. This is echo canceller convergence. It means the EIA line
profile was not correctly/sufficiently balanced to avoid echo when the tuning
wizard was used.
To correct this, check that the correct PSTN/PBX line profile was selected, or try
the other one and re-balance the EIA again. Cx should be able to minimize echo
during the Tuning Wizard, so that the echo canceller doesn't have to work so hard
and, hence, less convergence time. However, there will always be some initial
echo regardless of how well the line is balanced.
Can a Call Group Send a Voicemail to an Email Address?
Yes. However, the email will be sent to each individual email address for every
user who is a member of the group. (The AastraLink Pro does not support a single
email address for a Call Group.)
Does the AastraLink Pro Support Analog Telephone Adapters (ATAs)
for Adding More FXS Ports?
Yes. You can use FXS ATAs as secondary SIP phones on the AastraLink Pro. The
AastraLink Pro can use any SIP device which accepts a SIP registration from the
AastraLink (for example, any device that can act as a SIP registrar or server). The
AastraLink Pro does not work directly with client devices, but servers such as
Asterisk boxes with FXS channel banks have been tested and work successfully.
Note, however, that the AastraLink Pro only supports an overall limit of 12
concurrent sessions through the AastraLink host CPU.
6-14
41-001190-02 Rev. 01, Rel. 1.2
AastraLink FAQs
How do I Register a Generic SIP Device as a Secondary SIP Phone?
How do I Register a Generic SIP Device as a Secondary SIP Phone?
The following illustration shows a user “John Smith” as the user of a secondary
phone in the AastraLink network. This illustration shows an X-Lite softclient as
an example.
41-001190-02 Rev. 01, Rel. 1.2
6-15
AastraLink Pro 160 Administrator Guide
How do I Register a Generic SIP Device as a Secondary SIP Phone?
6-16
41-001190-02 Rev. 01, Rel. 1.2
Chapter 7
Troubleshooting Solutions
About this Chapter
Introduction
This chapter contains several trouble-shooting solutions for the AastraLink Pro
160. It describes how to interpret the LED status indicator located on the
AastraLink front panel. It also describes how to reboot the AastraLink using either
the Web UI, or the reset switch. In addition, it describes how to use the reset
switch to restore original factory default settings on the device, in order to return it
to an out-of-the-box state.
This chapter also describes how to use the AastraLink Recovery Mode UI to
reinstall system software (that is, reprogram the CompactFlash card and/or the
Onboard flash.) if it is ever required.
Topics
This chapter covers the following topics:
Topic
Page
Monitoring the AastraLink Status LED
page 7-3
Rebooting the AastraLink
page 7-5
Rebooting Using the Web UI
page 7-5
Rebooting Using the Reset Switch (Hard Reboot)
page 7-6
Rebooting Using the Web UI
page 7-5
Restoring AastraLink Factory Default Settings
What Happens if I Restore Factory Default Settings?
41-001190-02 Rev. 01, Rel. 1.2
page 7-7
page 7-7
7-1
AastraLink Pro 160 Administrator Guide
About this Chapter
Topic
Using the Reset Switch to Restore Factory Default Settings
page 7-7
What To Do After Restoring Factory Default Settings
page 7-8
Reinstalling System Software Using Recovery Mode
page 7-11
Automatic Recovery Mode
page 7-12
Manual Recovery Mode
page 7-13
Using The AastraLink Recovery Mode UI
page 7-14
Using AastraLink System and Phone Log Files
7-2
Page
page 7-31
41-001190-02 Rev. 01, Rel. 1.2
Troubleshooting Solutions
Monitoring the AastraLink Status LED
Monitoring the AastraLink Status LED
The LED on the front of the AastraLink Pro 160 indicates the current status of the
device. The current LED state also displays on the bottom left of the status bar
each time a WebUI page is refreshed. The table below describes the LED
variations.
LED Color
Meaning
Off
Power is off.
Steady Green
The AastraLink Pro 160 has successfully completed internal hardware
diagnostic tests and is starting up.
Alternating Green/Red
The AastraLink Pro 160 is updating its onboard firmware, either because it is
the first time you started up the device, or you just uploaded a new firmware
image.
Warning: Do not interrupt power during the system update, as system
corruption can result.
Flashing Green
The AastraLink Pro 160 has successfully booted and is up and running, ready
to process calls.
Alternating Green/Red/Off
The AastraLink Pro 160 is running in recovery mode. This sequence occurs if
the last boot attempt failed.
Try rebooting. If the problem persists, use the recovery procedure described in
“Reinstalling System Software Using Recovery Mode” on page 7-11.
Flashing Red
The AastraLink Pro 160 is running in a degraded state:
•
Flash speed: Slow (approximately once per second) indicates that the
AastraLink is running normally but that a full-duplex network connection
could not be negotiated. This may limit the system capacity and/or cause
problems with collisions or integrity of the network connection, leading to
problems such as WebUI time-outs and garbled voice-path. Recommend
connecting the AastraLink to a full-duplex Ethernet device, such as a
router or switch, rather than a half-duplex device such as a hub.
•
Flash speed: Fast (approximately 5 times per second) indicates a system
error occurred during startup; the AastraLink software was unable to
initialize correctly. Contact Aastra support for assistance with diagnosing
the problem.
41-001190-02 Rev. 01, Rel. 1.2
7-3
AastraLink Pro 160 Administrator Guide
Monitoring the AastraLink Status LED
LED Color
Meaning
Steady Red
Hardware self-test failure; system halted. Try rebooting. If LED remains
steady red, contact Aastra Support.
Steady Amber
The Aastralink is in the process of restoring factory default settings.
7-4
41-001190-02 Rev. 01, Rel. 1.2
Troubleshooting Solutions
Rebooting the AastraLink
Rebooting the AastraLink
This section describes how to reboot (restart) the AastraLink Pro 160.
You can reboot the AastraLink from the Web UI, or reboot it manually, using the
reset switch located on the back of the device (next to the power receptacle, as
shown on page 7-6).
Rebooting Using the Web UI
To reboot the AastraLink using the Web UI, do the following tasks:
AastraLink Web UI
Step
Action
1
Login to the AastraLink as Administrator.
2
Select Maintenance->Current Status
3
Click on the <Reboot System> button.
The AastraLink reboots. Once the reboot is complete, you will need to login to the system again to
access the AastraLink Web UI.
41-001190-02 Rev. 01, Rel. 1.2
7-5
AastraLink Pro 160 Administrator Guide
Rebooting the AastraLink
Rebooting Using the Reset Switch (Hard Reboot)
You can reboot the AastraLink device using the reset switch as long as the LED
on the front of the Aastralink is in one of the following states:
•
Flashing green
•
Flashing red
•
Steady red
See the LED monitoring table on page 7-3 for a description of each LED state.
Use the following procedure to reboot the AastraLink.
Manual Reboot Procedure
Step
Action
1
Locate the reset switch on the back of the device, as shown on the figure below.
Back Panel
/ FAX
/ FAX
A
B
LINE
TM8DC
LAN
12 VDC 1.25A
WAN
1
2
3
4
5
6
Reset Switch
2
Use the end of a paperclip to press, and then immediately release, the reset switch.
IMPORTANT: DO NOT KEEP THE SWITCH PRESSED IN.
After five seconds, the LED turns red momentarily. This indicates that the AastraLink is resetting
hardware. The AastraLink then begins its normal reboot process. The LED turns steady green as the
device performs internal hardware diagnostic tests. Once tests are complete, the LED flashes green,
indicating a successful reboot. The device is now up and running, ready to process calls.
7-6
41-001190-02 Rev. 01, Rel. 1.2
Troubleshooting Solutions
Restoring AastraLink Factory Default Settings
Restoring AastraLink Factory Default Settings
What Happens if I Restore Factory Default Settings?
If you restore factory default settings on the AastraLink Pro 160, it reverts the
device to its out-of-the-box state — just as it was shipped from the factory. Before
you perform the instructions in this section, note that all configuration
information, voicemail, and other files stored on the AastraLink’s CompactFlash
card are erased as a result of this process.
In addition, after you restore AastraLink factory default settings, you need to once
again perform the initial startup sequence - that is, you need to register an
Administrator phone with the device, and specify several start-up parameters - in
order for the device to begin handling calls on your network.
Using the Reset Switch to Restore Factory Default Settings
Use the following procedure to restore factory default settings on the
AastraLink Pro 160.
Factory Default Restoration Procedure
Step
Action
1
Locate the reset switch on the back of the device.
Back Panel
/ FAX
/ FAX
A
B
LINE
TM8DC
LAN
12 VDC 1.25A
WAN
1
2
3
4
5
6
Reset Switch
The reset switch is located on the back of the AastraLink Pro 160 (next to the power receptacle).
41-001190-02 Rev. 01, Rel. 1.2
7-7
AastraLink Pro 160 Administrator Guide
Restoring AastraLink Factory Default Settings
Factory Default Restoration Procedure
Step
Action
2
Verify that the LED on the front of the device is flashing green, or flashing red.
3
Use the end of a paperclip to press and hold the reset switch.
The LED on the front panel flashes RED for 10 seconds, then changes to AMBER.
Release the reset switch when the LED is AMBER, the factory default will commence.
Note: Releasing the switch during flashing RED resets rather than factory-defaults the system.
The AastraLink begins reverting to its factory default settings. The process takes up to 30 seconds to
complete. During this process, all configuration information, voicemail, and other files stored on the
AastraLink are erased.
The AastraLink then begins its normal reboot process. The LED turns steady green as the device
performs internal hardware diagnostic tests. Once tests are complete, the LED flashes green,
indicating a successful reboot. The device is now up and running.
What To Do After Restoring Factory Default Settings
After restoring factory default settings on the AastraLink device, you must
re-register an IP phone with the device, and use it to specify initial startup
configuration parameters.
Note: The instructions in this section assume you have previously configured an
Administrator IP phone on your AastraLink network. Therefore, this
section does not describe initial IP phone setup or installation instructions.
For this type of information, see the AastraLink Administrator’s QuickStart
Guide.
7-8
41-001190-02 Rev. 01, Rel. 1.2
Troubleshooting Solutions
Restoring AastraLink Factory Default Settings
Use the following procedure to register an Administrator IP phone with the
AastraLink Pro 160.
Administrator IP Phone Registration Procedure
Step
Action
1
Restart an Aastra IP phone.
By default, the first IP phone you register with the device becomes the Administrator IP phone. When
the phone starts up on your IP phone network, it automatically discovers the presence of an
AastraLink Pro 160 device on the LAN. Once the AastraLink is discovered, the phone then obtains its
configuration file from the device, and reboots.
Note: For more information about Aastra IP phone auto-configuration, as well as other frequently
asked questions, see AastraLink FAQs on page 6-1. For a complete description of the initial startup
procedure — including phone installation and setup instructions — see the AastraLink Pro 160
Administrator’s Quickstart Guide.
Once the reboot completes, the IP phone UI prompts you to begin the registration procedure, as
described in Step 2.
2
Choose the system language used on your AastraLink network, then press <Select>.
3
Choose the country where the AastraLink resides, then press <Select>.
4
Choose the time zone for the AastraLink to use, then press <Select>.
5
Do one of the following actions:
6
•
If the Internet is available on your network, choose “Automatic” then press <Select> to allow the
AastraLink Pro 160 to set the local Date/Time for your phone
•
if the Internet is not available, choose “Manual” then press <Select> and follow the Phone UI
prompts to set the date and time locally.
Choose “Use Default”, then press <Select>, for your phone to use these default settings:
•
Extension Length (3)
•
First Extension (200)
7
Enter the first name of the Administrator, then press <Enter>.
8
Enter the last name of the Administrator, then press <Enter>.
41-001190-02 Rev. 01, Rel. 1.2
7-9
AastraLink Pro 160 Administrator Guide
Restoring AastraLink Factory Default Settings
Administrator IP Phone Registration Procedure
Step
Action
9
(Optional) Enter the Administrator email address, then press <Enter>.
Note: To enter the @ symbol, press the # key until it appears on your Phone UI.
You can skip this step and enter the email address later using the AastraLink Pro 160 Web UI.
10
Enter the Administrator password, then press <Enter>.
Your Administrator phone reboots. When the startup process is complete, your Phone UI displays the
IP address of the AastraLink Pro 160. Use this address to access the AastraLink Pro 160 using the
Aastra Web UI.
11
7-10
Press <Exit> to complete the Administrator IP phone registration process.
41-001190-02 Rev. 01, Rel. 1.2
Troubleshooting Solutions
Reinstalling System Software Using Recovery Mode
Reinstalling System Software Using
Recovery Mode
The AastraLink Pro 160 contains an automatic fail-back mode in its onboard
firmware that allows the system to be recovered if it encounters a problem when
booting from the CompactFlash root file system.
The AastraLink Pro 160 enters automatic “recovery mode” after a failed boot. If
necessary, it is also possible for you to initiate recovery mode, by booting the
system with the CompactFlash card removed (see “Manual Recovery Mode” on
page 7-13 for instructions).
When the AastraLink Pro 160 is in recovery mode, you can use your web browser
to access the Recovery Mode UI, which allows you to:
•
Reprogram the CompactFlash card back to the default “greenfield” state, as if
it were just received new from the factory.
•
Reprogram the Onboard flash (firmware), using a new firmware image.
•
Restore a previous .avf backup file onto the ComapctFlash.
Caution: Reprogram the Onboard flash under the direction of Aastra support
personnel only. Incorrect usage can make the AastraLink Pro 160
unbootable, requiring the device to be returned to the factory for repair.
41-001190-02 Rev. 01, Rel. 1.2
7-11
AastraLink Pro 160 Administrator Guide
Reinstalling System Software Using Recovery Mode
Automatic Recovery Mode
File system corruption is a rare event, but it can occur if a power outage or a
manual reset is performed while data is being written to the file system. Normally,
any corruption caused to the CompactFlash filesystem in this manner corrects
itself automatically the next time the AastraLink Pro 160 boots.
However, if the CompactFlash card becomes so corrupt that it cannot be
automatically repaired, the AastraLink Pro 160 boots in recovery mode. The LED
alternates Green/Red/Off when the AastraLink Pro 160 is in recovery mode
(rather than the usual “flashing Green” LED).
If your AastraLink is in recovery mode, proceed to “Using The AastraLink
Recovery Mode UI” on page 7-14.
7-12
41-001190-02 Rev. 01, Rel. 1.2
Troubleshooting Solutions
Reinstalling System Software Using Recovery Mode
Manual Recovery Mode
If the AastraLink did not automatically enter Recovery Mode, but you need to
reprogram the CompactFlash or Onboard flash, you can use the following
procedure to manually initiate recovery mode.
AastraLink Web UI
Step
Action
1
Power off the AastraLink Pro 160.
2
Eject the CompactFlash card from the front of the system. The ejector handle folds over and may
need to be extended from its recessed position before the card can be ejected.
3
Power on the AastraLink Pro 160.
4
After 30 seconds, verify that the AastraLink Pro 160 has entered recovery mode.
The LED flashes a Green/Red/Off pattern when it is in recovery mode.
5
Insert the CompactFlash card, and ensure that it is fully seated in the slot.
6
To access the Recovery Mode UI, use a web browser and enter the following address:
http:// < DHCP client address received on the LAN interface>
NOTE: If you do not know the IP address of the LAN interface, see “Obtaining the IP Address of Your
AastraLink Pro 160” on page 7-14.
The AastraLink Recovery Mode UI appears. To set the AastraLink Pro 160 back to its factory default
settings, use the procedure described “Reprogramming the CompactFlash Card” on page 7-17.
41-001190-02 Rev. 01, Rel. 1.2
7-13
AastraLink Pro 160 Administrator Guide
Reinstalling System Software Using Recovery Mode
Using The AastraLink Recovery Mode UI
This section describes how you use the AastraLink Recover Mode Web UI to
reload or repair system software or firmware, and perform more advanced tasks.
To do so, you must:
•
First, obtain the IP address of the AastraLink Pro 160 so you can
communicate with the device.
•
Second, use the Recovery Mode UI to reprogram or repair the CompactFlash
card, or Onboard flash, as necessary.
Obtaining the IP Address of Your AastraLink Pro 160
If you do not know the IP address of your AastraLink Pro 160, you can obtain the
IP address of the AastraLink device using one of the methods described in this
section.
For DHCP Networks
When operating in recovery mode, the AastraLink Pro 160 uses DHCP to attempt
to obtain an IP address on the LAN network. If DHCP was previously being used
for normal operation, and the DHCP server on the network supports MAC address
caching, then the AastraLink Pro 160 uses same IP address in recovery mode as in
normal operation.
You can use an Aastra IP phone to find the IP address of the AastraLink Pro 160,
as described in the following procedure.
7-14
41-001190-02 Rev. 01, Rel. 1.2
Troubleshooting Solutions
Reinstalling System Software Using Recovery Mode
Phone UI
Step
Action
1
Press the <Options> key or Options button on your Aastra IP phone.
2
Select Phone Status/AastraLink Info/Server Local IP
The IP address assigned to the AastraLink appears. For example:
AastraLink Info
Server Local IP:
10.50.20.104
Done
3
To access the Recovery Mode UI, use a web browser and enter the following address:
http:// < DHCP client address received on the LAN interface>
For example, enter:
http://10.50.20.104
The AastraLink Recovery Mode UI appears. To set the AastraLink Pro 160 back to its factory default
settings, use the procedure described “Reprogramming the CompactFlash Card” on page 7-17.
41-001190-02 Rev. 01, Rel. 1.2
7-15
AastraLink Pro 160 Administrator Guide
Reinstalling System Software Using Recovery Mode
For non-DHCP Networks
If the AastraLink Pro 160 was not using DHCP to obtain an IP address on the
LAN, then to communicate with the AastraLink, you can use a direct,
back-to-back Ethernet connection between the AastraLink WAN interface and a
PC.
In recovery mode, the AastraLink operates as a DHCP server for the private
192.168.100.100/24 network using the WAN port. So, when you connect the
AastraLink to PC as described above, the AastraLink Recovery Mode DHCP
server assigns a 192.168.100.10x address to the PC.
Once you have established communication between your PC and the AastraLink
Pro 160, you then access the AastraLink Recovery UI to set the AastraLink Pro
160 back to its factory default settings
Use the following procedure to establish communication between your
AastraLink Pro 160 and your PC.
Direct Connection from AastraLink WAN port to your PC
Step
Action
1
Connect an Ethernet cable from the WAN port located on the back of the AastraLink Pro 160 to the
LAN port on your PC.
The PC must be configured to be a DHCP client. Once you make this connection, the AastraLink
Recovery Mode DHCP server assigns a 192.168.100.10x address to the PC.
2
To access the Recovery Mode UI, use a web browser and enter the AastraLink default address of
192.160.100.100. That is, enter:
http://192.168.100.100
The AastraLink Recovery Mode UI appears. To set the AastraLink Pro 160 back to its factory default
settings, use the procedure described “Reprogramming the CompactFlash Card” on page 7-17.
7-16
41-001190-02 Rev. 01, Rel. 1.2
Troubleshooting Solutions
Reinstalling System Software Using Recovery Mode
Reprogramming the CompactFlash Card
If the CompactFlash (CF) card is defective, and a replacement card needs to be
programmed with a factory fresh image, you can use the Recovery Mode UI to set
the AastraLink Pro 160 CompactFlash card back to its original settings
You should only reprogram the CompactFlash card if the AastraLink Pro 160 is
continually entering recovery mode and will not correct itself, even after several
reboot attempts.
Notes:
Before starting the reprogramming procedure, note the following important
information:
— When you reprogram the CompactFlash card, all configuration and
voicemail data stored on the card is erased.
— Before you can reprogram the CompactFlash card, you must download
the vnx.dra file from the Aastra support web site, and store the file on a
TFTP, FTP, or HTTP server that is accessible to the AastraLink Pro 160
using its LAN connection.
Use the following procedure to reprogram the Compact Flash Card.
Note: You can contact Technical Support at any time, if necessary, by clicking on
the “Contact Support” link at the bottom right side of the Recovery Mode
UI screen.
AastraLink Recovery UI
Step
Action
1
Confirm that the AastraLink is in recovery mode.
The LED should alternate Green/Red/Off to indicate that the device is in recovery mode.
41-001190-02 Rev. 01, Rel. 1.2
7-17
AastraLink Pro 160 Administrator Guide
Reinstalling System Software Using Recovery Mode
AastraLink Recovery UI
Step
Action
2
If you have not yet accessed the AastraLink Recovery Mode UI, do this step. (Otherwise, skip ahead
to Step 3.) Use your web browser and enter the IP address of the AastraLink:
•
If you are using DHCP, enter the IP address assigned to the device. For example:
http://10.50.20.104
•
If you are using a direct, back-to-back connection between the AastraLink WAN port and your
PC, then enter the following address: http://192.168.100.100
The AastraLink Pro 160 Recovery Mode UI displays.
3
7-18
Click the “Program” tab.
41-001190-02 Rev. 01, Rel. 1.2
Troubleshooting Solutions
Reinstalling System Software Using Recovery Mode
AastraLink Recovery UI
Step
Action
4
Example: Enter the name of the CF image file that you downloaded from the Aastra web site in the
“Filename” field. For example, enter:
vnx.dra
Note: For HTTP/FTP, you may prefix the file name with an explicit directory path to the location on
the server. For example, enter:
pub/temp/firmware/vnx.dra
5
In the “Upgrade Type” field, select the “CompactFlash ( badblock check)”, or “CompactFlash
Card (quick format)” option.
Available selections are:
•
Restore from ABF
•
CompactFlash Card (badblock check)
•
CompactFlash Card (quick format)
•
On-board Flash
The “CompactFlash Card (badblock check)” allows the CF card to be tested for physical errors
before the new firmware is loaded onto it, and takes approximately 30 to 45 minutes. The
“CompactFlash (quick format)” allows the new firmware to be directly loaded, but without checking
for errors, and takes approximately 8 minutes.
6
Specify the “Download Protocol” used by the local server as either TFTP, FTP, or HTTP.
7
Enter the IP address or DNS address of the TFTP, FTP, or HTTP server, as appropriate.
8
For FTP, also enter the “Username” and “Password” required for FTP authentication.
41-001190-02 Rev. 01, Rel. 1.2
7-19
AastraLink Pro 160 Administrator Guide
Reinstalling System Software Using Recovery Mode
AastraLink Recovery UI
Step
Action
9
Click <Download> to begin the download process.
Note: The transfer may take up to 30 minutes to complete, depending on the network speed and
connection protocol. Do not interrupt the transfer during this time, or the system may become
unrecoverable.
You will see some, or all, of the screens shown in Figure 7-1 as the process completes.
When the download is complete, a status window appears indicating that you need to reboot the
AastraLink Pro 160 to complete the procedure.
10
7-20
After performing the upgrade task, you must reboot the AastraLink Pro.
Click <Click to Reboot the AastraLink> to reboot the AastraLink.
41-001190-02 Rev. 01, Rel. 1.2
Troubleshooting Solutions
Reinstalling System Software Using Recovery Mode
Your Web Browser
displays screens like these
as the CompactFlash
Card is reprogrammed.
Figure 7-1.
AastraLink Recovery Mode Download Screens
41-001190-02 Rev. 01, Rel. 1.2
7-21
AastraLink Pro 160 Administrator Guide
Reinstalling System Software Using Recovery Mode
Reprogramming the Onboard Flash
When necessary, you can use the Recovery Mode UI to reprogram the AastraLink
Pro 160 Onboard flash (firmware) using the procedure described in this section.
Caution: You should only reprogram the Onboard flash with direction from
Aastra support personnel. Incorrect updating of the Onboard flash can
make the AastraLink Pro 160 unbootable, requiring the device to be
returned to the factory for repair.
Note: Before you can reprogram the Onboard flash, you must download the
obf.dra file (see below) from the Aastra support web site, and store the file
on a TFTP, FTP, or HTTP server that is accessible to the AastraLink Pro
160 using its LAN connection.
Use the following procedure to reprogram the AastraLink Pro 160 Onboard flash.
Note: You can contact Technical Support at any time, if necessary, by clicking on
the “Contact Support” link at the bottom right side of the Recovery Mode.
UI screen
7-22
41-001190-02 Rev. 01, Rel. 1.2
Troubleshooting Solutions
Reinstalling System Software Using Recovery Mode
AastraLink Recovery UI
Step
Action
1
Confirm that the AastraLink is in recovery mode.
The LED should alternate Green/Red/Off to indicate that the device is in recovery mode.
2
If you have not yet accessed the AastraLink Recovery Mode UI, do this step. (Otherwise, skip ahead
to Step 3.)
•
If you are using DHCP, enter the IP address assigned to the device. For example:
http://10.50.20.104
•
If you are using a direct, back-to-back connection between the WAN port and your PC, then enter
the following address:
http://192.168.100.100
The AastraLink Pro 160 Recovery Mode UI displays.
3
Click the “Program” tab.
41-001190-02 Rev. 01, Rel. 1.2
7-23
AastraLink Pro 160 Administrator Guide
Reinstalling System Software Using Recovery Mode
AastraLink Recovery UI
Step
Action
4
Enter the name of the Onboard flash file that you downloaded from the Aastra web site in the
“Filename” field. For example, enter:
obf.dra
NOTE: For HTTP/FTP, you may prefix the file name with an explicit directory path to the location on
the server. For example, enter:
pub/temp/firmware/obf.dra
5
In the “Upgrade Type” field, select the “On-board flash” option.
Available selections are:
•
Restore from ABF
•
CompactFlash Card (badblock check)
•
CompactFlash Card (quick format)
•
On-board Flash
6
Specify the “Download Protocol” used by the local server as either TFTP, FTP, or HTTP.
7
Enter the IP address or DNS address of the TFTP, FTP, or HTTP server, as appropriate.
8
For FTP, also enter the “Username” and “Password” required for FTP authentication.
9
Click <Download Firmware> to begin the download process.
Note: The transfer may take up to 30 minutes to complete, depending on the network speed and
connection protocol. Do not interrupt the transfer during this time, or the system may become
unrecoverable.
When the download is complete, a status window appears indicating that you need to reboot the
AastraLink Pro 160 to complete the procedure.
10
7-24
After performing the upgrade task, you must reboot the AastraLink Pro.
Click <Click to Reboot the AastraLink> to reboot the AastraLink.
41-001190-02 Rev. 01, Rel. 1.2
Troubleshooting Solutions
Reinstalling System Software Using Recovery Mode
Uploading the .abf File to the CompactFlash
After reformatting the CompactFlash card to a factory-default state (either with
quickformat or using the extended version with badblock checking), it is possible
to restore a previous AastraLink Backup File (.abf) so that the system reboots into
the previous configured state, rather than as a default greenfield.
Use the following procedure to upload an .abf file to the CompactFlash.
Note: You can contact Technical Support at any time, if necessary, by clicking on
the “Contact Support” link at the bottom right side of the Recovery Mode.
UI screen.
AastraLink Recovery UI
Step
Action
1
At the end of the CompactFlash card flash programming, the Web UI displays an optional link to
return to the front page.
Click on this link and change the 'Upgrade Type' to 'Restore from ABF' .
This allows upload of an .abf file to the CompactFlash (assuming the .abf file is present on the TFTP/
FTP/HTTP server).
2
After performing the upgrade task, you must reboot the AastraLink Pro.
Click <Click to Reboot the AastraLink> to reboot the AastraLink.
The system configuration extracts from the uploaded .abf file and service resumes, with all previous
voicemail and system configuration restored.
41-001190-02 Rev. 01, Rel. 1.2
7-25
AastraLink Pro 160 Administrator Guide
Reinstalling System Software Using Recovery Mode
Repairing the File System, Bad Block, and or Database
When necessary, you can use the Recovery Mode UI to repair the following on the
AastraLink Pro:
•
Perform filesystem checks (force or verbose) and automatically repair it.
•
Perform a bad block test and rewrite it if required.
•
Download a database or revert to the previous database if required.
Use the following procedure to perform repair tasks using the AastraLink
Recovery Mode.
Note: You can contact Technical Support at any time, if necessary, by clicking on
the “Contact Support” link at the bottom right side of the Recovery Mode.
UI screen.
AastraLink Recovery UI
Step
Action
1
Confirm that the AastraLink is in recovery mode.
The LED should alternate Green/Red/Off to indicate that the device is in recovery mode.
2
If you have not yet accessed the AastraLink Recovery Mode UI, do this step. (Otherwise, skip ahead
to Step 3.)
•
If you are using DHCP, enter the IP address assigned to the device. For example:
http://10.50.20.104
•
If you are using a direct, back-to-back connection between the WAN port and your PC, then enter
the following address:
http://192.168.100.100
The AastraLink Pro 160 Recovery Mode UI displays.
7-26
41-001190-02 Rev. 01, Rel. 1.2
Troubleshooting Solutions
Reinstalling System Software Using Recovery Mode
AastraLink Recovery UI
Step
Action
3
Click the “Repair” tab.
File System Check and Repair
4
In the File System Check section, place a checkmark in the “Force Check” and/or “Verbose Mode”
fields as applicable to specify the type of check you want to perform on the file system. To
automatically repair the file system after running a check, place a checkmark in the “Automatically
Repair” field.
5
Click <Run>. If you enabled “Automatically Repair”, the system runs a check on the filesystem and
automatically repairs it if required.
Bad Block Test and Rewrite
6
In the Bad Block Test section, place a checkmark in the “Enable rewrite” field to rewrite the bad
blocks after the test is performed.
41-001190-02 Rev. 01, Rel. 1.2
7-27
AastraLink Pro 160 Administrator Guide
Reinstalling System Software Using Recovery Mode
AastraLink Recovery UI
Step
Action
7
Click <Run>. If you enabled “Enable rewrite”, the system runs the bad block test and then
automatically rewrites it if required.
Download Database
8
To download a database to the AastraLink Pro, click the <Download> button.
Revert Database
9
To revert to the previous database on the AastraLink Pro, click the <Revert> button.
10
After performing any of the above repair tasks, you must reboot the AastraLink Pro.
Click <Click to Reboot the AastraLink> to reboot the AastraLink.
7-28
41-001190-02 Rev. 01, Rel. 1.2
Troubleshooting Solutions
Reinstalling System Software Using Recovery Mode
Advanced Recovery Mode Tasks (Netconsole)
When necessary, you can perform more advanced tasks with the Recovery Mode
UI such as using Netconsole. Netconsole is a helpful tool for debugging kernel
issues where you need to capture and analyze kernel messages from a crashed or
hanging server when disk logging or serial consoles are unavailable.
When kernel boot messages need to be saved after a server crash/hang but access
to a serial console is not available, you can use the Netconsole tool to send boot
kernel printk messages to another host on the network using UDP packets.
Use the following procedure to perform Netconsole tasks using the AastraLink
Recovery Mode.
Note: You can contact Technical Support at any time, if necessary, by clicking on
the “Contact Support” link at the bottom right side of the Recovery Mode.
UI screen.
AastraLink Recovery UI
Step
Action
1
Confirm that the AastraLink is in recovery mode.
The LED should alternate Green/Red/Off to indicate that the device is in recovery mode.
2
If you have not yet accessed the AastraLink Recovery Mode UI, do this step. (Otherwise, skip ahead
to Step 3.)
•
If you are using DHCP, enter the IP address assigned to the device. For example:
http://10.50.20.104
•
If you are using a direct, back-to-back connection between the WAN port and your PC, then enter
the following address:
http://192.168.100.100
The AastraLink Pro 160 Recovery Mode UI displays.
41-001190-02 Rev. 01, Rel. 1.2
7-29
AastraLink Pro 160 Administrator Guide
Reinstalling System Software Using Recovery Mode
AastraLink Recovery UI
Step
Action
3
Click the “Advanced” tab.
4
In the “Netconsole Enabled” field, place a checkmark in the box to enabale Netconsole.
5
In the “Netconsole IP” field, enter the IP address of the host on the network where the printk
messages about the kernal are to be stored.
6
In the “Netconsole MAC” field, enter the MAC address of the host on the network where the printk
messages about the kernal are to be stored.
7
Click <Save> to save the information you just entered.
8
After setting the advanced tasks in the previous steps, you must reboot the AastraLink Pro.
Click <Click to Reboot the AastraLink> to reboot the AastraLink.
7-30
41-001190-02 Rev. 01, Rel. 1.2
Troubleshooting Solutions
Using AastraLink System and Phone Log Files
Using AastraLink System and Phone Log Files
To investigate issues specific to interoperability or configuration/operation of
Aastra IP phones, the AastraLink Web UI allows you to view system and phone
logs, and enable debugging for various events.
To view Aastralink system and phone log files, you must be working in
conjunction with Aastra support personnel, and supply a valid login ID and debug
password. Contact Aastra support for more information.
41-001190-02 Rev. 01, Rel. 1.2
7-31
AastraLink Pro 160 Administrator Guide
Using AastraLink System and Phone Log Files
7-32
41-001190-02 Rev. 01, Rel. 1.2
Appendix A
Remote Office Configuration
of the IP Phone (Phone-Side)
Introduction
This appendix supplements the AastraLink Pro 160 Quick Start Administrator’s
Guide. It describes how to do the following tasks:
•
Register a remote user IP phone at the central site prior to deployment.
•
Install an IP phones at a remote site and connect to the AastraLink Pro 160
phone network. (This task can be performed by either the administrator or a
user.)
•
Reinstall a remote IP phone back at the central site.
Topics
This appendix covers the following topics:
Topic
Page
Preparing To Deploy Remote User Phones
page A-2
Registering IP Phones At the Central Site
page A-4
Connecting To The IP Phone Network From a Remote Office
page A-7
Reinstalling Aastra IP Phones at the Central Site
page A-13
41-001190-02 Rev. 01, Rel. 1.2
A-1
AastraLink Pro 160 Administrator Guide
Preparing To Deploy Remote User Phones
Preparing To Deploy Remote User Phones
The administrator must do the following three steps before deploying Aastra IP
phones to a remote site:
1.
Enable remote access support on the AastraLink Pro 160, and configure
remote access parameters.
Depending on your network configuration and requirements, you may also
choose to configure firewall parameters, specify port mappings, etc. prior to
deploying remote user IP phones. See “Editing Local Service Settings” on
page 4-26 of this guide for instructions.
Note: Perform either of the following step 2 or step 3, but not both.
2.
(Optional) Register the IP phones with the AastraLink Pro 160 at the central
site.
Registering the Aastra IP phones with the AastraLink Pro 160 before
deployment ensures that the phones reflect the central site configuration and
security parameters. See “Registering IP Phones At the Central Site” on
page A-4.
3.
(Optional) Supply remote users with the following networking information,
which allows them to connect to the IP phone network at the central site:
— IP Address of the AastraLink Pro 160.
— HTTP port the IP phone will use to communicate with the AastraLink Pro
160 web server.
As a security restriction to prevent unauthorized use of AastraLink Pro
service, remote office IP phones cannot be registered using the external public
IP address and port. The phone's MAC address must be added to the
AastraLink Pro database either by pre-registering it on the local network first,
or by using the <Add Phone> option at the location Users->User List in the
administrator menus.
A-2
41-001190-02 Rev. 01, Rel. 1.2
Remote Office Configuration of the IP Phone (Phone-Side)
Preparing To Deploy Remote User Phones
Registering the IP phones by connecting them at the central site is the
quickest and easiest method to register the lines with AastraLink Pro and
ensure that the IP phone is pre-configured with the public IP address and port
previously configured on the AastraLink. Using the <Add Phone> feature
permits the IP phone to be registered, but does not pre-configure the public
address information; therefore, it would be necessary for the end-user to add
this at install time.
Once the administrator has completed the steps described above, then users can
follow the instructions described in “Connecting To The IP Phone Network From
a Remote Office” on page A-7 to install their Aastra IP phones at a remote site,
and connect to the AastraLink IP phone network.
41-001190-02 Rev. 01, Rel. 1.2
A-3
AastraLink Pro 160 Administrator Guide
Registering IP Phones At the Central Site
Registering IP Phones At the Central Site
Prior to remote deployment, use the instructions in this section to register an IP
phone with the AastraLink device.
Step Action
1
To begin the setup process, use the supplied RJ45 cables to connect your Aastra IP phone to
your Ethernet Hub/Switch.
Note: See your AastraLink Pro 160 Quick Start User’s Guide for detailed instructions on setting
up and installing your Aastra IP phone.
2
Connect the 48V power cord to your Aastra IP phone.
Notes:
For Ethernet networks that supply in-line power to the phone (IEEE 802.3af):
- Use the Ethernet cable (supplied) to connect from the phone directly to the network.
- No 48v AC power adapter required.
For Ethernet networks that DO NOT supply power to the phone:
- Use the 48V AC Power Adapter to connect from the DC power port on the phone to a power
source.
- Use the Ethernet cable (supplied) to connect from the phone to a network jack.
The Aastra IP phone automatically begins the startup sequence as soon as you connect it. The
Aastra IP phone checks for new configuration and firmware updates on the AastraLink device. If
a new update is found, the phone displays the update it is installing (either “Updating Config” or
“New Firmware”). This may take a few moments while the configuration server downloads the
latest updates.
Important! Do not unplug or remove power from the phone while it is checking and installing the
firmware.
60%
Checking for Firmware
Do not unplug phone!
A-4
41-001190-02 Rev. 01, Rel. 1.2
Remote Office Configuration of the IP Phone (Phone-Side)
Registering IP Phones At the Central Site
Step Action
3
To begin the registration process, enter the first name of the IP phone user, then press <Enter>.
For example: Bob
Register User Name
Enter First Name
Bob
ABC
Dot
Backspace
4
Enter
Enter the last name of the IP phone user, then press <Enter>.
For example: Jones
Register User
Enter Last Name
Jones
ABC
Dot
Backspace
5
Enter
Back
(optional) Enter the email address of the IP phone user, then press <Enter>.
Register User
Enter Email Address
[email protected]
ABC
Dot
Backspace
Enter
Back
Note: To enter the @ symbol, press the # key until the symbol appears.
41-001190-02 Rev. 01, Rel. 1.2
A-5
AastraLink Pro 160 Administrator Guide
Registering IP Phones At the Central Site
Step Action
6
Enter the user password, then press <Enter>.
Register User
Enter Password
*****
Enter
Back
ABC
Dot
Backspace
Your IP phone reboots. When startup is complete, your phone UI displays the IP address of the
Aastralink device. To access the AastraLink Web UI, you enter the address in your web browser.
Visit
http://10.20.50.135
for more options
Exit
7
To complete the initialization process, press <Exit>.
The IP phone Idle screen appears. It shows the user name, extension, date, and the default
softkeys configured for the user’s phone (large screen displays only).
201 - B Jones
L1
May 1 10:15 am
DND
Forward
Directory
A-6
Vmail
ParkCall
More
41-001190-02 Rev. 01, Rel. 1.2
Remote Office Configuration of the IP Phone (Phone-Side)
Connecting To The IP Phone Network From a Remote Office
Connecting To The IP Phone Network From a
Remote Office
After registering the IP phone at the central site, use the following procedure to
connect to the IP phone network from a remote office.
Warning: On remote phones connected to the AastraLink Pro 160, the following emergency
related message displays: “E911 calls are not available from this phone.” Remote IP phone
users should not make emergency calls using the AastraLink Pro 160, because the location
information will be incorrect. E911 regulations in the United States require street address location
information be transmitted to the Public Safety Answering Point (PSAP). This information is
provided by the telco, using the location of the analogue line connected to the AastraLink Pro 160
Lifeline port (FXO Line 1).
Step Action
1
Connect the Aastra IP phone to your Ethernet Hub/Router.
Note: See your AastraLink Pro 160 Quick Start User’s Guide for instructions on setting up and
installing your Aastra IP phone.
Your Aastra IP phone powers up, completes its diagnostics, and searches for the AastraLink
Pro 160 on the network.
2
Select <Remote> to specify that this is a remote IP phone.
Select Skip
Skip
30%
Auto Discovery
Remote
Select Remote
during startup
Note: If for some reason the IP phone is unable to obtain an IP address, then the IP phone UI
displays the message “UPnP Device Not Found.” If you see this message, skip ahead to the
following section “Configuring Port Information” on page A-10 for instructions.
41-001190-02 Rev. 01, Rel. 1.2
A-7
AastraLink Pro 160 Administrator Guide
Connecting To The IP Phone Network From a Remote Office
Step Action
3
Enter the IP Address of the AastraLink Pro 160 that is located at the central site.
For example: 65.215.35.80
Enter server name/IP
65.215.35.80
Backspace
Dot
abc
Cancel
Done
Note: If you do not know the IP address of the AastraLink Pro 160, check with your
administrator.
A-8
41-001190-02 Rev. 01, Rel. 1.2
Remote Office Configuration of the IP Phone (Phone-Side)
Connecting To The IP Phone Network From a Remote Office
Step Action
4
Specify the HTTP port the IP phone uses to communicate with the AastraLink Pro 160.
For example: 51510
Enter HTTPS port
51510
Backspace
Dot .
abc
Cancel
Done
Your Aastra IP phone downloads the latest configuration information from the AastraLink Pro
160 and reboots. When the Idle State Screen appears showing your user name and extension
(like the one below), the registration process is complete.
5
Your Aastra IP phone connects to the IP phone network at the central site and is fully
operational.
201 - B Jones
L1
Your name
and extension
May 1 10:15 am
DND
Forward
Directory
Vmail
ParkCall
More
Your IP phone only successfully connects to the AastraLink Pro if its MAC address is
pre-provisioned in the Users List at the location User->User List in the administrator menus.
41-001190-02 Rev. 01, Rel. 1.2
A-9
AastraLink Pro 160 Administrator Guide
Connecting To The IP Phone Network From a Remote Office
Configuring Port Information
Not all routers support Universal Plug & Play (UPnP), and some may need to
have the UPnP support manually enabled. If the Aastra IP phone cannot obtain the
public IP address of the router via UPnP, the phone displays the message “UPnP
device not found.” This condition most often occurs if:
•
The remote Aastra IP phone is not installed behind a UPnP enabled router, or
•
The Aastra IP phone cannot set up minimal port mappings (for example, if
you have multiple devices connected to your router).
So, in order for the Aastra IP phone to communicate with the AastraLink Pro 160,
you must use the instructions in this section to manually enter the port mapping
information that is configured on your router.
Note: If you do not know the port mappings configured on your router, then refer
to your router documentation for more information.
Step Action
1
If your IP phone UI displays the “UPnP Device Not Found” message shown below, press
<Skip> to begin manually configuring port mapping parameters.
80%
UPnP Device Not Found
Retry
Skip
A-10
41-001190-02 Rev. 01, Rel. 1.2
Remote Office Configuration of the IP Phone (Phone-Side)
Connecting To The IP Phone Network From a Remote Office
2
Specify the public IP address, or dynamic/static DNS FQDN of your router, then press <Done>.
For example: 65.96.171.130.
Enter NAT IP:
65.96.171.130
Backspace
Dot .
ABC
3
Cancel
Done
Specify the public SIP port (default 51620) for your router, then press <Done>.
Enter NAT SIP Port:
51620
Backspace
Cancel
Done
41-001190-02 Rev. 01, Rel. 1.2
A-11
AastraLink Pro 160 Administrator Guide
Connecting To The IP Phone Network From a Remote Office
4
Specify the public RTP starting port (default 51720) for your router, then press <Done>.
Enter NAT RTP Port:
51720
Backspace
Cancel
Done
5
Specify the public HTTP port (default 51510) for your router, then press <Done>.
Enter NAT HTTPS Port:
51510
Backspace
Cancel
Done
Your AastraLink IP Phone reboots and begins the discovery process. Now, go back to the previous
section entitled “Connecting To The IP Phone Network From a Remote Office” on page A-7 and
complete steps 2-4 to complete the remote registration procedure.
Skip
A-12
30%
Auto Discovery
Retry
41-001190-02 Rev. 01, Rel. 1.2
Remote Office Configuration of the IP Phone (Phone-Side)
Reinstalling Aastra IP Phones at the Central Site
Reinstalling Aastra IP Phones at the Central Site
Use the procedure described in this section to reinstall an IP phone at the central
site that had been previously installed at a remote office.
The procedure described below resets the IP phone from “remote mode” to back
to “local mode.” If you do not reset the IP phone, it will attempt to boot in remote
mode when you install it.
Step Action
1
Connect the Aastra IP phone to your Ethernet Hub/Router.
Note: See your AastraLink Pro 160 Quick Start User’s Guide for instructions on setting up and
installing your Aastra IP phone.
2
Select <Cancel> when the IP phone UI prompts you to specify the IP address of the AastraLink
at your central site.
Enter server name/IP
65.215.35.80
Backspace
Dot .
abc
Select Cancel
Cancel
Done
3
Press the <Options> key or button on your IP phone.
4
Use the arrow keys to view the options, then select <Factory Default>
5
Press <Show>
6
Enter the administrator password, then press <Enter>
7
Select <Default> when prompted to “Reset Phone Back to Factory Defaults.”
41-001190-02 Rev. 01, Rel. 1.2
A-13
AastraLink Pro 160 Administrator Guide
Reinstalling Aastra IP Phones at the Central Site
Step Action
8
Select <Restart> when prompted to restart the phone.
The IP phone reverts back to its factory default settings.
9
Disconnect, then reconnect, your IP phone to your Ethernet Hub/Router.
If your IP phone has been successfully reset to “local mode,” it should start up, retrieve its
configuration from the AastraLink, and then prompt you to specify a user name. You can then
continue to register the IP phone as describe in the section “Registering IP Phones At the
Central Site” on page A-4.
A-14
41-001190-02 Rev. 01, Rel. 1.2
Appendix B
Remote Office Configuration
of the AastraLink Pro 160 (Server-Side)
Introduction
This appendix provides a procedure for manually setting up your AastraLink Pro
160 in your network for a remote office connection.
Topics
This appendix covers the following topics:
Topic
Page
Remote Office Configuration of the AastraLink Pro 160
page B-2
Network Diagram for Remote Phone Setup
page B-2
Configuring the AastraLink Pro 160 for Remote Office Setup
page B-4
AastraLink Pro 160 Manual Remote Office Configuration Example
page B-10
41-001190-02 Rev. 01, Rel. 1.2
B-1
AastraLink Pro 160 Administrator Guide
Remote Office Configuration of the AastraLink Pro 160
Remote Office Configuration of the
AastraLink Pro 160
Description
The AastraLink Pro 160 is a plug and play unit that you can install in your
network. However, to configure the AastraLink Pro 160 for remote office
connections, it is recommended you use the information that this Appendix
provides.
Network Diagram for Remote Phone Setup
The following is a network diagram for Aastralink Pro 160 remote phone setup.
When setting up remote office, the user has the option to configure the required
port forwarding on the phone-side router or the server-side router automatically,
by employing UPnP for UPnP capable routers.*
If UPnP is not supported on the routers, you can manually enter the required port
forwarding mappings on the router. Please consult the router’s manual for
procedure to enter and activate port forwarding rules.
*SOHO router should support NAT, port forwarding, and optionally UPnP.
B-2
41-001190-02 Rev. 01, Rel. 1.2
41-001190-02 Rev. 01, Rel. 1.2
AastraLink Pro
IP 10.50.11.3
HTTP 9600
SIP
5060
RTP 3000
IP Phone internal
IP 192.168.1.3
HTTP 80
SIP
5060
RTP 3000
U
+
Office router external
IP 65.215.35.80
HTTP 51510
SIP
5060
RTP 3200
+
Home router external
IP 65.96.171.130
HTTP 51510
SIP
51620
RTP 51720
WAN / Internet
Remote Office Configuration of the AastraLink Pro 160 (Server-Side)
Remote Office Configuration of the AastraLink Pro 160
B-3
AastraLink Pro 160 Administrator Guide
Remote Office Configuration of the AastraLink Pro 160
Configuring the AastraLink Pro 160 for Remote Office Setup
1. UPnP Configuration
Use the following procedure to configure UPnP on the AastraLink Pro 160.
AastraLink Web UI
Step
Action
1
Select Configuration->Network->Local Services.
2
Turn on “Remote Office”.
B-4
41-001190-02 Rev. 01, Rel. 1.2
Remote Office Configuration of the AastraLink Pro 160 (Server-Side)
Remote Office Configuration of the AastraLink Pro 160
AastraLink Web UI
Step
Action
3
Turn on “UPnP”.
4
Click <Save> to save your changes.
After a successful UPnP with the AastraLink Pro 160, the results are shown in the “Office Router
Port Mapping Table” on page B-5.
Notes:
1. The external gateway IP (router A wan side IP address) of router A is automatically populated to
the server.
2. HTTP port, SIP port, and RTP ports mappings (map router A wan side TCP/UDP ports to the
server TCP/UDP ports) are set up on router A automatically according to the default value defined on
the server's local server page.
Office Router Port Mapping Table
Active
Protocol
Internal Port
External Port
IP Address
YES
UDP
5060
5060
10.50.11.3
YES
UDP
9600
51510
10.50.11.3
*See Note Below
Table
YES
UDP
3000
3200
10.50.11.3
YES
UDP
3001
3201
10.50.11.3
YES
UDP
3002
3202
10.50.11.3
YES
UDP
3003
3203
10.50.11.3
YES
UDP
3004
3204
10.50.11.3
YES
UDP
3005
3205
10.50.11.3
YES
UDP
3006
3206
10.50.11.3
YES
UDP
3007
3207
10.50.11.3
YES
UDP
3008
3208
10.50.11.3
YES
UDP
3009
3209
10.50.11.3
YES
UDP
3010
3210
10.50.11.3
41-001190-02 Rev. 01, Rel. 1.2
B-5
AastraLink Pro 160 Administrator Guide
Remote Office Configuration of the AastraLink Pro 160
Active
Protocol
Internal Port
External Port
IP Address
YES
UDP
3011
3211
10.50.11.3
YES
UDP
3012
3212
10.50.11.3
YES
UDP
3013
3213
10.50.11.3
YES
UDP
3014
3214
10.50.11.3
YES
UDP
3015
3215
10.50.11.3
YES
UDP
3016
3216
10.50.11.3
YES
UDP
3017
3217
10.50.11.3
YES
UDP
3018
3218
10.50.11.3
YES
UDP
3019
3219
10.50.11.3
NOTE: For routers with half-cone NAT, or routers that don’t allow
separate port forwarding, use the value of 9600 instead of 51510.
Column Descriptions
B-6
Column
Description
Active
Indicates whether or not the Office Router
port mapping is active.
Protocol
Indicates the protocol currently being used
on the Office Router port during mapping.
Int. Port
TCP/UDP ports open on AastraLink
Ext. Port
TCP/UDP ports open on t he WAN side of
Route A and ready to forward packets to the
AastraLink ports in the mapping.
IP Address
AastraLink’s IP address
41-001190-02 Rev. 01, Rel. 1.2
Remote Office Configuration of the AastraLink Pro 160 (Server-Side)
Remote Office Configuration of the AastraLink Pro 160
2. Phone Configuration
If you create an account on the server for the phone in the same subnet as the
server, the configuration automatically downloads to the phone.
If you create the phone's account on the server using the Web UI to add phones,
the remote phone does not have the configuration required to initiate
communication with the server. Users must enter the server's external gateway IP
and HTTP port from the phone's TUI prompt upon remote installation.
3. Remote Phone Installation
Pre-stage phone
Press <Remote> when the Auto-Discovery screen is presented in TUI.
Non Pre-stage phone
Press <Remote> and enter the external gateway IP (e.g. 65.215.35.80) and HTTP
port start (e.g. 51510) when TUI prompts.
Note: For routers with half-cone NAT, or routers that don’t allow separate port
forwarding, use the value of 9600 instead of 51510.
Upon a successful dialogue with the server and with the pre-configuration or
downloaded configuration, the phone automatically initiates port mapping setups
with Home Router using UPnP.
41-001190-02 Rev. 01, Rel. 1.2
B-7
AastraLink Pro 160 Administrator Guide
Remote Office Configuration of the AastraLink Pro 160
The following table is the port mapping table after a successful UPnP session with
the phone-side Home Router.
Home Router Port Mapping Table
Action
B-8
Name
Source
Destination
Protocol
Allow
WAN, *
LAN, 192.168.1.3
UDP, 5060-51620
Allow
WAN, *
LAN, 192.168.1.3
TCP, 80-51510
Allow
WAN, *
LAN, 192.168.1.3
UDP, 3000-51720
Allow
WAN, *
LAN, 192.168.1.3
UDP, 3001-51721
Allow
WAN, *
LAN, 192.168.1.3
UDP, 3002-51722
Allow
WAN, *
LAN, 192.168.1.3
UDP, 3003-51723
Allow
WAN, *
LAN, 192.168.1.3
UDP, 3004-51724
Allow
WAN, *
LAN, 192.168.1.3
UDP, 3005-51725
Allow
WAN, *
LAN, 192.168.1.3
UDP, 3006-51726
Allow
WAN, *
LAN, 192.168.1.3
UDP, 3007-51727
Allow
WAN, *
LAN, 192.168.1.3
UDP, 3008-51728
Allow
WAN, *
LAN, 192.168.1.3
UDP, 3009-51729
Deny
Default
*,*
LAN, *
*, *
Allow
Default
LAN, *
*,*
*,*
41-001190-02 Rev. 01, Rel. 1.2
Remote Office Configuration of the AastraLink Pro 160 (Server-Side)
Remote Office Configuration of the AastraLink Pro 160
Column Descriptions
Column
Description
Action
Indicates whether or not the phone is
allowed to Ping the WAN port. Valid values
are Allow and Deny.
Name
Indicates a name for the port mapping.
Source
Source of the port mapping (WAN or LAN)
Destination
Phone IP address
Protocol
Protocol used for the port mapping.
41-001190-02 Rev. 01, Rel. 1.2
•
Phone UDP/TCP port open (3000,
3001,...)
•
Home Router WAN-side UDP/TCP open
(51720, 51721,...etc. These ports are
ready to forward the packets to the
corresponding phone ports in the
mapping.
B-9
AastraLink Pro 160 Administrator Guide
Remote Office Configuration of the AastraLink Pro 160
AastraLink Pro 160 Manual Remote Office Configuration Example
The following is an example of setting up the AastraLink Pro 160 for a remote
office.
Notes:
1. The SIP and HTTP ports both require one mapping only. The RTP ports
require a range of 10 ports per phone.
2.The number of phones you can install behind the same SOHO router is
limited by the available port mapping entries on the routers. In many cases,
they are sufficient for three phones behind the same routers.
AastraLink Pro 160 Remote Office Configuration
Step
Action
Configure the AastraLink Pro 160
1
Turn on remote office.
2
Enter the external gateway IP address.
3
(Optional) Modify the settings in the local services as applicable to your network.
4
Click <Save>.
Configure Port Forwarding
5
Manually setup the required port forwarding on the Office Router and Home Router.
Note: Refer to the Office Router Port Map settings on page B-5, and Home Router Port Map settings
on page B-8.
Configure the Remote IP Phone
6
B-10
Configure the IP Phone as described in “2. Phone Configuration” on page B-7.
41-001190-02 Rev. 01, Rel. 1.2
Remote Office Configuration of the AastraLink Pro 160 (Server-Side)
Remote Office Configuration of the AastraLink Pro 160
AastraLink Pro 160 Remote Office Configuration
Step
Action
Install the Remote IP Phone (Pre-Stage Phone)
7
Press <Remote> when remote phone is in the Auto-Discovery screen.
If the phone cannot find a UPnP enabled device, it displays “UPnP device not found”. Press <Skip>.
The phone prompts for the NAT IP address.
8
Enter the Home Router WAN-side IP address. For example: 65.96.171.130
The phone prompts for the SIP port.
9
Enter the SIP port for the Home Router. For example, you can enter 51620.
The Phone prompts for an RTP port.
10
Enter the RTP port for the Home Router. For example, you can enter 51720.
The Phone prompts for an HTTPS port.
11
Enter the HTTPS port for Home Router. For example, you can enter 51510.
Note: For routers with half-cone NAT, or routers that don’t allow separate port forwarding, use the
value of 9600 instead of 51510.
Install the Remote IP Phone (Non-pre-Stage Phone)
12
Press <Remote> and enter the server external gateway IP address (for example, 65.215.35.80).
The Phone prompts for an HTTP port.
13
Enter the HTTP port start (for example, 51510).
Note: For routers with half-cone NAT, or routers that don’t allow separate port forwarding, use the
value of 9600 instead of 51510.
The Phone prompts for a NAT IP address.
14
Enter the Home Router WAN-side IP address.
The phone prompts for the SIP port.
41-001190-02 Rev. 01, Rel. 1.2
B-11
AastraLink Pro 160 Administrator Guide
Remote Office Configuration of the AastraLink Pro 160
AastraLink Pro 160 Remote Office Configuration
Step
Action
15
Enter the SIP port for the Home Router. For example, you can enter 51620.
The Phone prompts for an RTP port.
16
Enter the RTP port for the Home Router. For example, you can enter 51720.
The Phone prompts for an HTTPS port.
17
Enter the HTTPS port for the Home router. For example, you can enter 51510.
Note: For routers with half-cone NAT, or routers that don’t allow separate port forwarding, use the
value of 9600 instead of 51510.
After the phone reboots into service, the Users List shows it as a remote device.
Remote
Device
B-12
41-001190-02 Rev. 01, Rel. 1.2
Index
Index
A
BLF, softkey 3-58
AastraLink
backing up system software 5-12
chassis 1-12
dial plan 4-40
features list 1-2
hardware, software requirements 1-11
LED 7-3
overview 1-2
performance, maximizing 6-10
phone compatibility 1-1
rebooting 7-5
registering IP phones A-4
restoring configuration, voicemail 5-14
restoring factory default settings 7-7
system
language 4-8
settings 4-4
status 5-4
updating system software 5-15
Web UI 2-2
.
.
C
.
.
cables 1-11
.
.
call forward, softkey 3-57
.
call list, softkey 3-61
.
.
.
.
CDR reports 5-9
.
.
chassis 1-12
.
.
CompactFlash card, reprogramming 7-17
.
.
conference, softkey 3-59
.
.
.
configuration database 5-14
.
.
.
.
.
.
.
abbreviations, configuring 4-67
configuring
AastraLink trunking 4-89
abbreviations 4-67
auto-attendant 4-112
barred numbers 4-55
DHCP 4-25
emergency dial plan 4-54
local service settings 4-26
music on hold 4-11
network settings 4-22
remote office support 4-27
router port mapping A-10
SIP trunking 4-76
softkeys 3-54
system settings 4-4
UPnP 4-27
visual voicemail settings 4-13
VOiP 4-74
.
.
.
.
.
.
.
.
account types 3-7
.
.
administrator
logging in 2-2
menu options 2-6
password, 4-43
.
.
.
.
.
.
.
auto-attendant
configuring 4-112
custom greeting 4-134
schedule 4-126
.
.
.
.
.
.
.
.
auto-configuration, IP phone 6-3
.
connection mode, viewing 5-4
.
B
backing up system software 5-12
.
barred numbers, list 4-55
.
41-001190-02 Rev 01, Rel. 1.2
Index-1
D
H
date and time, setting 4-10
hardware requirements 1-11
deleting
barred numbers 4-56
default softkeys 3-62
ring groups 3-53
holiday schedule, configuring 4-130
Index
.
.
.
host name, editing 4-22
.
.
HTTP, parameters 4-28
.
.
.
DHCP, configuring 4-25
I
.
dial plan 4-40
configuring 4-38
emergency 4-54
.
intercom, softkey 3-59
.
.
.
IP Address
AastraLink, obtaining 6-9
editing 4-23
directed call pickup, softkey 3-58
.
.
directory, softkey 3-60
.
.
do not disturb, softkey 3-57
IP phones
auto-configuration 6-3
lifeline 1-9
MAC Address 3-8
models 1-1
registering A-4
reinstalling A-13
remote office A-7
SIP DID Number 3-9
.
.
E
.
.
email
user or administrator 3-7
.
.
.
.
emergency call support 1-9
.
.
emergency dial plan, defining 4-54
extensions
dial plan 4-40
.
.
ipp.dra, file 5-15
.
.
L
F
languages, configuring 4-8
.
factory default settings
restoring 7-7
LED
location of 1-12
monitoring 7-3
.
.
features list 1-2
.
.
find me - follow me, softkey 3-57
lifeline phone 1-9
.
.
FXO lines, status 5-4
log files, accessing 7-31
.
FXO tuning
manually setting parameters for 4-17
running the Tuning Wizard 4-18
.
.
M
.
maintaining, AastraLink 5-3
.
G
MBU handsets 3-8
.
mbu.dra, file 5-15
gateway, external 4-28
.
.
greeting, recording 4-134
Menu Options 2-6
.
.
groups, ring 3-38
Index-2
music on hold, configuring 4-11
.
.
41-001190-02 Rev 01, Rel. 1.2
N
remote office phones, registering A-1
.
remote office support, enabling 4-27
.
network addressing 6-3
.
reprogramming
CompactFlash card 7-17
onboard flash 7-22
.
.
network, sample 1-5
.
.
NTP Address 4-34
Index
network settings, local 4-22
requirements
hardware 1-11
software 1-13
.
O
.
.
reset switch, locating 7-6
.
obf.dra, file 5-15
restoring factory default settings 7-7
.
.
onboard flash, reprogramming 7-22
ring groups, configuring 3-38
Operator
assigning 3-7
privileges 1-13
S
.
.
.
.
overview, AastraLink 1-2
schedule, auto-attendant 4-126
.
.
secondary non-Aastra phones and softclients 3-31
.
P
secondary non-Aastra SIP terminals and
softclients 3-6
.
Page All, softkey 3-59
.
services, softkey 3-60
.
park call, softkey 3-57
.
SIP trunking 4-76
.
password
administrator 4-43
user or administrator 3-7
SLA enabled 3-6
.
.
SMTP relay address 4-35
.
.
softkeys
configuring default 3-55
restoring to factory default 3-65
types 3-56
using 6-5
port forwarding 4-30
.
.
port mapping, router A-10
.
.
prefix digit, trunking 4-77 , 4-89
.
.
.
private extensions 3-6
.
.
privileges 1-13
software requirements 1-13
.
push button trigger 4-12
.
speed dial, softkey 3-57
.
.
star codes 4-41
R
.
system software
backing up 5-12
updating 5-15
.
rebooting
using the reset switch 7-6
using the Web UI 7-5
.
.
.
recovery mode
automatic 7-12
description of 7-11
manual 7-13
using the recovery mode UI 7-14
.
.
T
transfer, softkey 3-59
.
trouble-shooting 7-1
.
.
.
relay
configuring 4-12
softkey 3-61
trunking
AastraLink 4-89
SIP 4-76
.
.
.
.
41-001190-02 Rev 01, Rel. 1.2
Index-3
U
updating, system software 5-15
Index
.
UPnP 4-27
.
user accounts, enabling and disabling 3-6
.
users
adding accounts and phones for 3-5
deleting accounts for 3-27
editing accounts for 3-15
logging in 2-2
privileges 1-13
.
.
.
.
.
V
viewing
call records 5-9
IP Address 6-9
system status 5-4
.
.
.
vnx.dra, file 5-15
.
voicemail
restoring 5-14
softkey 3-60
system limit 4-16
visual, configuring 4-15
.
.
.
.
VoIP, configuring 4-74
.
W
Web UI
accessing 2-2
administrator menu options 2-6
.
.
Windows Explorer 2-4
.
Index-4
41-001190-02 Rev 01, Rel. 1.2
Warranty, regulatory, safety, and
copyright / licensing notices
Warranty - Aastra Telecom, Inc.
Aastra Telecom Inc. ("Aastra") warrants ("Warranty") to its customer that: (i) Aastra has good and marketable title to
the Product at the time of delivery to its customer, free and clear of any and all security interests, liens, claims, charges
or encumbrances; and (ii) the Product shall be free from defects in design, material and workmanship and shall
perform in accordance with the Aastra specifications in all material respects when used for the intended purpose for a
period of twelve (12) months from the date of purchase of the Product by such customer from Aastra ("Warranty
Period"). This Warranty specifically excludes any representation, warranty, condition or other term relating to any
software contained in the Product. At its sole option, Aastra shall either repair or replace defective Product returned
during the Warranty Period. Any repaired or replacement Product shall subsequently be covered for the balance of the
original Warranty Period or ninety (90) days, whichever is longer. Upon customer's specific request, Product that fails
after the Warranty Period expires may be returned for repair at the then current rates, with the cost of such repairs and
shipping to be borne by customer.
Customer shall obtain a "returned material authorization" ("RMA") number from Aastra and comply with shipping
instructions for all defective Products being returned to Aastra. Defective Products shall be returned to Aastra at the
customer's sole expense. Aastra shall repair or replace defective Products returned under Warranty at no charge to
customer, and Aastra shall bear the expense of the return shipment of the repaired or replacement Product to customer.
Aastra does not warrant the Product to be compatible with the equipment of any particular telephone company, or their
network. This Warranty does not extend to Products damaged by improper installation or operation, alteration,
accident, neglect abuse, misuse, fire or natural causes such as storms or floods. Aastra reserves the right to use
refurbished parts in the repair or replacement of defective Products. Unauthorized modification or repair will void the
Warranty.
To exercise the Aastra VNX Warranty,:
1. First contact your reseller for instructions.
2. Alternatively, you can contact Aastra Telecom at 1-866-599-7399.
Warranty Limitation
THE FOREGOING PRODUCT WARRANTIES ARE IN LIEU OF ALL OTHER WARRANTIES AS TO THE
CONDITION, OPERATION AND PERFORMANCE OF THE PRODUCT, EXPRESSED OR IMPLIED,
INCLUDING, WITHOUT LIMITATION, ANY WARRANTIES AND/OR CONDITIONS OF
MERCHANTABILITY OR FITNESS FOR A PARTICULAR PURPOSE. AASTRA'S SOLE AND EXCLUSIVE
LIABILITY, AND CUSTOMER'S SOLE AND EXCLUSIVE REMEDY, FOR ANY AASTRA BREACH OF
WARANTIES HEREUNDER SHALL BE AASTRA'S OBLIGATION TO REPAIR OR REPLACE THE PRODUCT,
AS SET FORTH IN THIS SECTION, AND AASTRA SHALL NOT BE LIABLE FOR ANY DAMAGES
WHATSOVER, INCLUDING BUT NOT LIMITED TO DIRECT, INDIRECT, INCIDENTIAL OR
CONSEQUENTIAL DAMAGES OF ANY KIND OR NATURE, OR OTHER LOSS, DAMAGE OR EXPENSE
DIRECTLY OR INDIRECTLY ARISING FROM CUSTOMER'S USE OF OR INABILITY TO USE PRODUCT,
EITHER SEPARATELY OR IN COMBINATION WITH OTHER EQUIPMENT.
41-001190-02 Rev. 01, Rel. 1.2
AastraLink Pro 160 Administrator Guide
Regulatory information
Regulatory information
U.S.A. requirements
The AASTRA VNX has been tested and found to comply with the limits for a Class A digital device, pursuant to Part
15 of the Federal Communications Commission (FCC) rules. These limits are designed to provide reasonable
protection against harmful interference when the equipment is operated in a commercial environment. This equipment
generates, uses, and can radiate radio frequency energy. If it is not installed and used in accordance with the
instruction manual, it may cause harmful interference to radio communications. Operation of this equipment in a
residential area is likely to cause harmful interference, in which case users will be required to take whatever measures
may be necessary to correct the interference at their own expense.
Do not attempt to repair or modify this equipment. All repairs must be performed by Aastra Telecom, or an authorized
Aastra Telecom representative.
FCC Part 68 general information
The AASTRA VNX complies with Part 68 of the FCC rules and the requirements adopted by the ACTA. On the
bottom of this equipment is a label that contains, among other information, a product identifier in the format
US:2L4DDNANAASTRA01. If requested, this number must be provided to the telephone company.
This Aastra VNX uses the following USOC RJ-48 jacks:
Interface
Service Code
Facility Code
1.544 Mb/s superframe format (SF) without line power
6.0Y
04DU9-BN
1.544 Mb/s superframe format (SF) and B8ZS without line power
6.0Y
04DU9-DN
1.544 Mb/s ANSI extended superframe format (ESF) without line
power
6.0Y
04DU9-1KN
1.544 Mb/s ANSI extended superframe format (ESF) and B8ZS
without line power
6.0Y
04DU9-1SN
A plug and jack used to connect this equipment to the premises wiring and telephone network must comply with the
applicable FCC Part 68 rules and requirements adopted by the ACTA. A compliant telephone modular plug is
provided with this product. It is designed to be connected to a compatible modular jack that is also compliant. See
installation instructions for details.
If the AASTRA VNX causes harm to the telephone network, the telephone company will notify you in advance that
temporary discontinuance of service may be required. But if advance notice isn’t practical, the telephone company
will notify the customer as soon as possible. Also, you will be advised of your right to file a complaint with the FCC if
you believe it is necessary.
The telephone company may make changes in its facility, equipment, operations or procedures that could affect the
operation of the AASTRA VNX. If this happens the telephone company will provide advance notice in order for you
to make necessary modifications to maintain uninterrupted service.
41-001190-02 Rev. 01, Rel. 1.2
Regulatory information
If you experience trouble with this equipment, please contact Aastra Telecom for repair and warranty information. If
there is a problem with the network, the telephone company may request that you remove the equipment from the
network until the problem is resolved.
Aastra Telecom recommends that you install an AC surge protector in the AC outlet to which the equipment is
connected. This helps to prevent damage to the equipment caused by local lightning strikes or other electrical surges.
THE AASTRA VNX HAS NO USER SERVICEBLE PARTS.
FCC and telephone company procedures and requirements
In order to connect this equipment to the network, you must provide the local telephone company with the registration
number of this equipment, and you must order the proper connections.
To order the proper service, provide the telephone company with the following information:
•
•
•
Number of required jacks and their USOC numbers
Sequence in which the trunks are to be connected
Facility interface codes, by position
CSA certification - U.S. and Canada
This equipment has been certified by CSA for use in the U.S. and Canada to the requirements of UL 1950. Third
Edition - Safety of Information Technology Equipment. Including Electrical Business equipment and Canadian
Standards Association CAN/CSA C22.2 No. 950-95 Third Edition.
Canadian requirements
Canadian Department of Communications Radio Interference Regulations
This digital apparatus (Aastra VNX) does not exceed the Class A limits for radio-noise emissions from digital
apparatus, as documented in the Radio Interference Regulations of the Canadian Department of Communications.
Règlement sur le brouillage radioélectrique du ministère des Communications
Cet appareil numérique (Aastra VNX) respecte les limites de bruits radioélectriques visant les appareils numériques
de classe A prescrites dans le Règlement sur le brouillage radioélectrique du ministère des Communications du
Canada.
Canada CS-03 rules and regulations
NOTICE: This equipment meets the applicable Industry Canada Terminal Equipment
Technical Specifications. This is confirmed by the registration number. The abbreviation, IC,
before the registration number signifies that registration was performed based on a
Declaration of Conformity indicating that Industry Canada technical specifications were met.
It does not imply that Industry Canada approved the equipment.”
NOTE: The Canadian Department of Communications label identifies certified equipment. The certification means
that the equipment meets certain telecommunications network protective, operational, and safety requirements. The
Department does not guarantee the equipment will operate to the user’s satisfaction.
Before installing this equipment, ensure that it is permissible to connect to the facilities of the local
telecommunications company. You must install this equipment using an acceptable connection method.
41-001190-02 Rev. 01, Rel. 1.2
AastraLink Pro 160 Administrator Guide
Regulatory information
Repairs to certified equipment should be made by a supplier-designated representative. If you make repairs or
alterations to this equipment, or if the equipment malfunctions, the telecommunications company may request that
you disconnect the equipment.
You should ensure, for your own protection, that the electrical ground connections for the power utility, telephone
lines, and internal water-pipe system, if present, are connected. This precaution may be particularly important in rural
areas.
CAUTION: You should not attempt to make such connections. You should contact the appropriate inspection
authority or electrician.
Canada CS-03 Règles et règlements
« AVIS : Le présent matériel est conforme aux spécifications techniques d’Industrie Canada
applicables au matériel terminal. Cette conformité est confirmée par le numéro
d'enregistrement. Le sigle IC, placé devant le numéro d'enregistrement, signifie que
l’enregistrement s’est effectué conformément à une déclaration de conformité et indique que
les spécifications techniques d'Industrie Canada ont été respectées. Il n’implique pas
qu’Industrie Canada a approuvé le matériel. »
NOTE: L’étiquette du ministère des Communications du Canada indique que l’appareillage est certifié, c’est-à-dire
qu’il respecte certaines exigences de sécurité et de fonctionnement visant les réseaux de télécommunications. Le
ministère ne garantit pas que l’appareillage fonctionnera à la satisfaction de l’utilisateur.
Avant d’installer l’appareillage, s’assurer qu’il peut être branché aux installations du service de télécommunications
local. L’appareillage doit aussi être raccordé selon des méthodes acceptées.
Les réparations de l’appareillage certifié devraient être confiées à un service désigné par le fournisseur. En cas de
réparation ou de modification effectuées par l’utilisateur ou de mauvais fonctionnement de l’appareillage, le service
de télécommunications peut demander le débranchement de l’appareillage.
Pour leur propre sécurité, les utilisateurs devraient s’assurer que les mises à la terre des lignes de distribution
d’électricité, des lignes téléphoniques et de la tuyauterie métallique interne sont raccordées ensemble. Cette mesure de
sécurité est particulièrement importante en milieu rural.
ATTENTION: Les utilisateurs ne doivent pas procéder à ces raccordements, mais doivent plutôt faire appel aux
pouvoirs de réglementation en cause ou à un électricien, selon le cas.
41-001190-02 Rev. 01, Rel. 1.2
Regulatory information
European requirements
EMI/EN 55 022 statement
This certifies that the Aastra VNX IP Network Exchange is shielded against the generation of radio interference in
accordance with the application of Council Directive 89/336/EEC. Conformity is declared by the application of EN 55
022:1998 and EN 55 024:1998.
WARNING: This is a Class A product. In a residential area, this product may cause radio interference, in which case
the user may be required to take the appropriate measures.
EC declaration of conformity
This product conforms to the provisions of Council Directive’s EMC Directive (89/336/EEC), Low Voltage Directive
(73/23/EEC), and R+TTE Directive (1999/5/EC).
41-001190-02 Rev. 01, Rel. 1.2
AastraLink Pro 160 Administrator Guide
Safety warnings
Safety warnings
General warnings
The following safety warnings apply:
•
•
•
•
•
•
Mechanical hazards and electrical shock hazards are possible if you remove one or more of the modules. There
are no operator-serviceable modules. Only qualified personnel should service this equipment.
This equipment must be connected to a protective ground according to the instructions in this manual. Improper
grounding may result in electrical shock.
This equipment does not provide safety isolation between any port that is connected to a digital network
termination point or any port to which terminal equipment is connected.
The wall circuit breaker provides the main protection for this equipment.
Ensure that rack installation does not result in airflow blockage to power supply vents or chassis vents.
Before installing the Aastra VNX rackmount version, ensure that the rack is sturdy and well-secured.
Lithium battery caution
CAUTION: Danger of explosion if battery is incorrectly replaced. Replace only with the same or equivalent type
recommended by the manufacturer. Discard used batteries according to the manufacturer’s instructions.
ATTENTION: Il y a danger d’explosion s’il y a remplacement incorrect de la batterie. Remplacer uniquement avec
une batterie du même type ou d’un type recommandé par le constructeur. Mettre au rebut les batteries usagées
conformément aux instructions du fabricant.
Compliances
The Aastra VNX is in compliance with regulations as follows:
•
•
Environmental
32-104° F (0-40° C)
•
Humidity 10-85% non-condensing
•
400 BTUs/hour
•
28 dBA maximum acoustic noise
•
•
•
•
•
•
Safety Certifications
cUL 950, NTRL/UL 1950, TUV EN 60 950
Telecom Approvals
FCC Part 68, Industry Canada, CTR4
EMI/RF
FCC Part 15 Class A, EN55022 Class A (CISPR), EN55024
41-001190-02 Rev. 01, Rel. 1.2
Software licensing and copyright
Software licensing and copyright
The Aastra VNX product consists of an Aastra designed hardware platform
distributed with embedded Linux operating system and application software. This
embedded software consists of multiple Aastra and third party programs; each
individual program may be subject to one or more Copyrights or Software
Licenses; the overall aggregation and distribution of these separate programs is
protected as a collective work, Copyright © Aastra Telecom Inc. 2005.
Use and distribution of the VNX product are deemed to be acceptance of the
Software Licensing terms contained within the Aastra VNX Service Level
Agreement. Associated third party license agreements and applicable Open
Source software licenses are incorporated by reference; the full text of all licenses
can be found on the Aastra VNX documentation CDROM.
For full licensing information, refer to document 41-001204-02 available from
Aastra Support, or the AastraLink Pro online Administators Web User Interface.
41-001190-02 Rev. 01, Rel. 1.2
AastraLink Pro 160
Administrator Guide
Published in the USA
41-001190-02 REV 01
AastraLink Pro 160 Release 1.2
November 2008