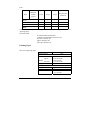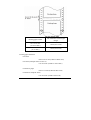
1
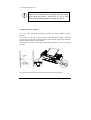
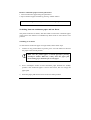
Operator Manual
Compuprint 3046
REV. JUNE 09
Compuprint Products Information
Thanks for choosing the Compuprint 3046 printer.
Your printer is a reliable working equipment that will be very useful in your
daily job.
Our printers have been designed to be compact and respectful of the work
environment. They offer a wide range of features and multiple functions that
confirm the high technological level of Compuprint brand.
To maintain these printing performances unchanged in the long run,
Compuprint has developed specific Compuprint branded consumables for
each printer type that assure an excellent operation with high printing
quality level reliability.
Compuprint recommends to use only its original Compuprint branded
consumables with original packaging (identified by its holographic label).
In this way, a proper use of the printer at quality level stated in the product
characteristics can be assured. All typical usage problems related to not
certified consumables may be avoided, such as an overall quality print level
degradation and, often, the reduction of the product life due to the fact that
the proper working conditions for the print heads and other printer parts
are not assured.
Compuprint advises the customers not to use products for which the
compliance to this safety rules are not warranted. Finally seek your dealer
or contact a Compuprint office and be sure that are provided you the
original Compuprint branded consumables.
i
FCC Notes
This equipment has been tested and found to comply with the limits for a Class A
digital device, pursuant to Part 15 of the FCC Rules. These limits are designed to
provide reasonable protection against harmful interference when the equipment is
operated in a commercial environment. This equipment generates, uses and can
radiate radio frequency energy and, if not installed and used in accordance with the
instruction manual, may cause harmful interference to radio communications.
Operation of this equipment in a residential area is likely to cause harmful
interference in which case the user will be required to correct the interference at his
own expense.
Properly shielded and grounded cables and connectors must be used in order to
meet FCC emission limits. Sferal WWT is not responsible for any radio or
television interference caused by using other than recommended cables and
connectors or by unauthorized changes or modifications to this equipment.
Unauthorized changes or modifications could void the user’s authority to
operate the equipment.
The device complies with Part 15 of the FCC Rules. Operation is subject to
following two conditions: (1) this device may not cause harmful interference,
and (2) this device must accept any interference received, including interference
that may cause undesired operation.
Canadian Radio Interference Regulation
This digital apparatus complies with the Canadian ICES-003 Class A limits for
radio frequency emissions.
Cet appareil numérique est conforme aux limites de Classe A de la norme
NMB-003 du Canada.
ii
EEC Regulations
Hereby Sferal WWT declares that this product is in compliance with the
essential requirements and other relevant provisions of EU Directives
2006/95/EC and 2004/108/EC. Sferal WWT cannot accept responsibility for
any failure to satisfy the protection requirements resulting from a non
recommended modification of the product, including the fitting of non Sferal
WWT-Compuprint option cards.
This product has been tested and found comply with the limits for Class A
Information Technology Equipment according to European standard EN55022.
The limits for Class A equipment derived for commercial and industrial
environments to provide reasonable protection against interference with
licensed communication devices.
This is a Class A product. In a domestic environment this product may cause
radio interference in which case the user may require to take adequate
measures.
Properly shielded and grounded cables and connectors must be used in order to
reduce the potential for causing interference to radio and TV communications
and to other electrical equipment . Sferal WWT cannot accept responsibility for
any interference caused by using other than recommended cables and
connectors.
iii
Safety Information
In order to prevent personnel injury, electronic shock, or cause fire,
machinery fault, etc, please read this guide and the instructions
carefully, save them for later reference and follow all warnings and
instructions marked on the printer.
Warnings must be followed to avoid body injury.
Cautions must be observed to avoid damage to your equipment or cause
personnel injury.
Notes contain important information and useful tips in the box.
Notice of Using Power
z Use the type of power source indicated on the printer’s label. The power
outlets must be properly grounded. (AC100V-240V, 50/60Hz)
z Make sure the total ampere rating of all devices plugged into the power
outlet does not exceed the power outlet’s ampere rating, so as to prevent
fire.
Notices of Using Printer
z Make sure the printer power switch is in the off (O) position before
inserting the power plug into the power outlet.
z Remove all the transportation protective material according to the notice
card before turning on the printer.
iv
z When you switch off the printer, you should wait for 5 seconds, do NOT
switch it back ON until all of operator panel indicators are turned off.
Failing to do so may damage the printer.
z Don’t touch the moving parts of printer while device is moving, in order to
prevent personnel injury or device damage.
z Moving the print head while the printer is ON may damage the printer or
cause scald. Furthermore, if you have just used the printer, the print head
may be hot; let it cool for a few minutes before touching it.
z Don’t drop metal objects into the printer (such as pin, staple, drawing pin
and etc).
.
z Do not spill liquid on the printer.
Installation Notices
z Place the printer on a sturdy, horizontal and stable surface.
z Your printer must not be exposed to direct sunlight, extreme heat, humidity
or dust.
z Don’t plug the printer to the outlet that is on the same circuit as large
motor or other high power consumption machines.
z Don’t place the printer in a place with strong magnetic field or caustic gas.
z The whole computer system should be kept away from electromagnetic
interference, such as loudspeaker or wireless telephone.
v
Contents
Safety Information ........................................................................................... iv
Contents ............................................................................................................ vi
Getting to know your printer ........................................................................... 1
Unpacking the Printer ................................................................................. 2
Printer parts................................................................................................. 4
Setting up the printer........................................................................................ 5
Choosing a Suitable Location ..................................................................... 5
Setting up the printer................................................................................... 6
Installing the Ribbon Cartridge........................................................... 6
Installing the Paper Guide................................................................... 9
Test the printer .................................................................................. 10
Connecting to Host............................................................................ 14
Install driver ...................................................................................... 15
Operating the Printer ..................................................................................... 17
Operator Panel .......................................................................................... 17
Indicators........................................................................................... 17
Buttons .............................................................................................. 18
Configuring the Printer ............................................................................. 20
Latin EDS Settings Options .............................................................. 20
How to Change the EDS Settings ..................................................... 21
Micro Adjustment Function .............................................................. 22
Tear-off Function............................................................................... 25
Paper Path Selection.......................................................................... 27
Using the Cut Sheet........................................................................... 28
Using the continuous paper............................................................... 33
Switching between continuous paper and cut sheets......................... 47
Multipart forms ................................................................................. 49
Printer Specifications...................................................................................... 51
Printing.............................................................................................. 51
Printing Paper.................................................................................... 52
Mechanical Parts ............................................................................... 55
Electric Parts ..................................................................................... 56
Environmental Specifications ........................................................... 57
Interface Technological Specifications ............................................. 57
Troubleshooting............................................................................................... 58
Power ........................................................................................................ 58
Printing...................................................................................................... 58
vi
The Disposal of Printing Paper ................................................................. 61
Maintenance and Transportation ............................................... 64
Cleaning the Printer .................................................................................. 64
Replacing the Ribbon Cartridge................................................................ 65
Printer Transportation ............................................................................... 65
vii
Getting to know your printer
Printer Features
1.
Providing letter quality, draft, and high speed draft printing mode. At
10CPI, the printing speed can reach 300 CPS in draft and 400 CPS in High
Speed Draft mode.
2. High performance and long-life print head: double in-line, high-hardness
material printer head. The life of its printer head can reach as high as 300
million dots, and copy capacity is one plus four. In addition, its printing
speed is higher.
3. Pin restoring function, which can extend the print head’s life.
4. Abundant fonts; various kinds of international character sets and figure
character sets, which can make printing result clear.
5. Convenient panel operation and strong functions: It has seven indicators to
indicate the operation state of the machine.
6. Full all-round sheet feeder system. It is equipped with 3 channels, five
kinds of paper-feed manners and you can choose your printing freely.
7. Configurable parallel, USB and serial interface (Compuprint 3046) or
parallel, USB, LAN interface (Compuprint 3046N), which can connect to
all kinds of hosts conveniently.
8. Long-life ribbon, reducing consumable material cost.
9. Software intelligent upgrade that allows, through parallel interface, direct
download of upgraded monitoring software, word bank, etc.
10. Wide-voltage design that accounts for various electronic environments.
11. Low power consumption.
1
Unpacking the Printer
Make sure your printer box includes the following items and that no damage
has occurred to any of them. Please save the packing properly for the next
shipping.
2
Remove the protective material
Push into
1
4
2
3
5
7
6
Note:
To prevent printer from being damaged during shipping, several
pieces of protective materials which are marked with 1 to 14 are
packed with the printer. Please take these out before assembling
the printer. And please preserve the protective materials for
preparing the next shipping.
8
9
11
10
12
13
14
3
Printer parts
4
Setting up the printer
Choosing a Suitable Location
Consider the following points when selecting a location for your printer:
•
Place the printer on a sturdy, horizontal and stable surface.
•
Place the printer near the host computer, in order to be convenient for
interface cable connection.
•
Leave adequate room around the printer for easy operation and
maintenance.
Keep the printer away from direct sunlight, heat sources, or
excessive moisture or dust.
•
Use a grounded electrical outlet.
•
Avoid electrical outlets controlled by wall switches or automatic timers.
An interruption of power can erase information in the memory of your
printer or computer.
•
Avoid outlets on the same circuit as large motors or other appliances
that can cause voltage fluctuations.
•
Keep the entire computer system away from potential sources of
electromagnetic interference, such as loudspeakers or the base units of
cordless telephones.
5
Setting up the printer
Installing the Ribbon Cartridge
Make sure the printer is turned off. If the printer is connected to an electrical
outlet, unplug it from the outlet.
1. Take out the printer cover unit, pinch the tabs on each side of the paper
tension unit then lift the unit up and off the printer.
2. Slide the print head to the middle position.
Moving the print head while the printer is ON may damage
the printer. Furthermore, if you have just used the printer,
the print head may be hot; let it cool down for a few minutes
before touching it.
6
3. For an easy installation of the ribbon Cartridge, turn the ribbon-tightening
knob in the direction of the arrow to tighten the ribbon. Then hold the
cartridge handle, make sure that the pegs of the cartridge fit over the
notches on each side of the printer. Gently press down the cartridge until
the hooks on the cartridge click into the notches. It shows as the following
figure:
4. Slide the ribbon between the print head and the septa and make sure the
ribbon is inside the channel and that it can move freely.
7
5. Slide the print head from side to side several times. Make sure the print
head moves smoothly and the ribbon is not twisted or creased.
6. Place the paper feeder on the installation column nail inside the printer and
put it down, as shown in the following illustration. Then press gently on
both sides of paper feeder until you hear the sound “clack”, this means that
installation has been well done.
8
7. Reinstall the printer cover unit. Insert the pegs of printer cover unit into the
notches and put the cover down, as shown in the following figure:
Installing the Paper Guide
Rear
Insert the pegs of the paper guide into the notches of the printer then let down
the paper guide, as shown in the following illustration.
9
Front
As shown in the below illustration, hold the handles of the front paper guide.
Push the paper guide along the slot until it clicks into place. While installing,
push both sides smoothly with little strength. The front paper feeder is installed
correctly when you hear the sound of “Clack”.
Test the printer
Before connecting the printer to the host, please run the printer’s self test to
inspect whether the printer is able to work well.
10
Power connection
1. Make sure the printer is turned off.
2. Check the label on the back of the printer to make sure its voltage matches
that of the electrical outlet. Also make sure that the plug on your printer’s
power cord matches your electrical outlet.
If the rated voltage and your outlet voltage do not match,
contact your dealer for assistance. Do not plug in the
power cord.
3. If the power cord is not attached to the printer, plug the appropriate end into
the AC inlet on the back of the printer.
4. Plug the power cord into a properly grounded electrical outlet.
Running the self test
You can print the self test using either single sheets or continuous paper. In
addition, you can load the printing paper from the four different positions of
rear-in, front-in, top-in or bottom-in. Next we will describe the process of
running self test by using cut sheet and loading paper from the top. Please see
Chapter of “Operating the Printer” for instructions on paper handling.
1. Turn off the printer, and push the path selection lever to the friction position.
11
2. Keep pressing the LF/FF button and turn on the printer until the printer beeps
several times. Then the power indicator and the paper empty indicator will
lit.
3. As shown in the illustration, move the left edge guide to the left position
indicator, then move the right edge guide until the distance between left and
right edge guides fit to the width of paper.
Use paper that is at least 360 mm (14 inches) wide, otherwise
the print head will print directly on the platen (black glue
roller).
12
4. Insert a cut sheet paper between the left and right edge guides until it meets
resistance. About 1 second later, paper will be loaded automatically and the
self test printing will begin.
5. Press the Ready button to pause the self test printing. Press the button again
to resume the printing.
6. To end the self test, press the Ready button to pause printing, then eject or
tear off the printed page(s) and turn off the printer.
The sample of self test is listed below:
13
If the self test does not print properly, please refer to the
“troubleshooting” chapter
Connecting to Host
If the result of the self test is satisfactory, you can connect the printer to the
host.
Parallel port
Follow the steps below to connect the printer to your computer using the
parallel interface:
1. Make sure both the printer and computer are turned off. Plug the cable
connector into the printer’s interface connector, and squeeze the wire clips
together until they lock in place on both sides of the connector.
2. Plug the other end of the cable into the host.
USB interface (option)
14
Follow the steps below to connect the printer to your host using the USB
interface.
1. Make sure both the printer and computer are turned off.
2. Plug the USB cable connector into the printer’s USB interface connector.
3. Plug the other end of the USB cable into the host.
Network interface (Compuprint 3046N only)
Please refer to the “USER GUIDE of NETWORK INTERFACE”
Install driver
At this point it is necessary to configure your printer for your application
package. The installation procedures depend upon the host environment: Follow
the instructions in the read-me file on the CD-ROM. In a WINDOWS® 95/98
environment it is necessary to install the USB port driver if you connect the
printer and host via USB port.
Using USB port
You need to install the USB port driver when you are printing via USB port
under Windows 98 or 95. For WINDOWS 2000, XP and other higher operation
system, USB port driver can be installed automatically after inserting USB
interface.
To install the USB port driver, see the detailed step below:
1. When the printer is connected to the USB and powered on, the New
Hardware Found screen appears. You need to appoint the path of the driver
files.
2. The System finds the driver files according to the information file of
installation and begins to install the driver.
3. When the driver’s installation is finished, a USB port named “USB00x” is
added in the port selecting page of the printer’s driver properties pages (x
refers to the number of the USB port installed in this system).
15
4. Appoint the USB port you installed as the port of the printer and you can
support USB printing.
16
Operating the Printer
Operator Panel
The operator panel includes two sections: indicators and buttons. Indicators
indicate the current status of the printer, and buttons are used to control the
status of the printer.
Indicators
Power (green)
Lights up when the printer is powered on.
Ready (green)
Lights up when printer is ready to receive and print the data.
Lights off when the printer is paused or the paper is out.
When the paper is loaded, press the Ready button to control the status of the
Ready indicator.
Paper Empty (red)
Lights up when there is no paper in the selected paper path.
Thick Paper (green)
Lights up when paper gap is set at level 2 or at higher level.
Tractor (green)
Lights up when continuous paper is selected using the path selection lever.
LQ (green)
Lights up when Letter Quality is selected using Font button.
17
NLQ (green)
Lights up when Near Letter Quality is selected using Font button.
Draft (green)
Lights up when Draft Quality is selected using Font button.
HSD speed is selected if LQ, NLQ and Draft light off.
Buttons
Ready button
When the READY indicator is lit, pressing this button causes the temporary
stop of the printing job at the end of the current line; the READY indicator is
turned off.
When the printing is paused pressing this button the printing will be enabled
and the READY indicator is turned on.
Load/Eject button
Press this button to load paper. If paper has already been loaded, pressing this
button will eject the paper. If the cut sheet is selected using path selection lever,
the printer ejects the paper forward; otherwise if the continuous paper is
selected, the printer ejects the paper backward to the standby position.
LF/FF button
Feeds paper line by line when pressed shortly, ejects a single sheet or advances
continuous paper to the next top of form position when held down.
Shift button
Hold down this button while pressing another button at the same time, the
printer can accomplish the following functions:
18
Clear buffer (Shift + Ready button)
Clears up data in buffer, and initializes the printer.
Micro adjustment function:
Shift + LF/FF button
Feed paper forward in 1/180 inch increment.
Shift + LOAD/EJECT button
Feed paper backward in 1/180 inch increment.
Font button
Press this button to choose LQ, NLQ, DRAFT, HSD printing mode. It can also
be realized through software command.
Tear button
When the printer is off-line and continuous paper is selected, press this button
to feed continuous paper forward to the tear-off position from the loading
position. Press it again will cause the printer to feed the paper backward the
top-of-form position.
Special Functions
To execute the following functions, hold down relevant button while turning the
printer ON. Don’t release the button until the print head starts to move.
Power-on self-test
Hold down LF/FF button while turning on the printer, the printer executes
self-test. This function can help you check if the printer operates correctly.
Refer to the “Test the printer” for the details.
Bi-directional adjustment
While holding down Shift button, LF/FF button and LOAD/EJECT button
simultaneously, turn on the printer. The printer will enter into bi-directional
19
adjustment mode. This function helps to correct printout alignment problems.
Resume factory default settings
Hold down Shift button and Ready button simultaneously, and turn on the
printer. After a long beep, the printer resumes factory default setting.
EDS (Electronic Dip Switches) setting
While holding down Shift button and Font button simultaneously, turn on the
printer. The printer enters into EDS setting mode. Refer to the “How to change
the EDS settings” below, and change the parameter settings of the printer.
Configuring the Printer
The EDS setting can execute different functions by changing default power-on
parameters. The EDS setting options can be selected through software
commands or by using the operator panel buttons.
The part below shows all the options of EDS in detail. Refer to the “how to
change the EDS settings” for the alteration guidance about the EDS setting.
Please note that the present rear DIP switch has no use. The further
upgrade about its function may be subject to the F/W version.
Latin EDS Settings Options
The following table shows all the function options and relative parameter
settings available in Latin EDS settings. The factory default values are shown in
Bold.
Function Option
Buffer Size
Emulation
Copy Capability
Auto CR/LF
Settings
128k, 0k
ESC/PK, AR, OKI
Normal, Copy
CR,LF+CR, CR,LF, CR+LF,LF, CR+LF,LF+CR
20
Reservation
Page Length
Skip Perf.
Auto Tear Off
Pin Broken
Reservation
Reservation
Zero Style
Reservation
Interface
Strobe Timing
Font
Line Spacing
Reservation
Char Pitch
Quiet Mode
Data Length
Protocol
Parity
Baud Rate
Code Page
International
Character Set
11inch, 5.5inch, 8.5inch, 11/3inch, 11/4inch, 70/6inch,
12inch
Invalid, Valid
Auto, Manual
Invalid, 1-12pin, 13-24pin
Normal, Slashed
Parallel, Serial, USB, Auto,LAN
Fall Edge, Rise Edge
Roman, Sans serif, Courier, Prestige, Script, OCR-B,
OCR-A, Orator, Orator-S
1/6inch, 1/8inch, 2/15inch
10CPI, 12CPI, 15CPI, 17CPI, 20CPI, Proportional
Invalid, Valid
8bit, 7bit
DTR, Xon/Xoff
None, Odd, Even
9600, 19200, 4800, 2400, 1200, 600,38400
PC437, Italic, PC850, PC860, PC863, PC865, PC858,
GREEK 737, TURKISH
U.S.A, France, Germany, U.K, Denmark, Sweden, Italy,
Spain, Japan,Norway,Denmark2,Spain2,Latin
Americ,Korea,Ireland, Legal
How to Change the EDS Settings
Follow the steps below to enter into EDS setting mode and change the printer’s
default power-on parameters.
1. Make sure the paper is loaded, and the printer is switched off. Hold down
the Shift button and Font button simultaneously while turning on the printer,
and release buttons after the print head moves. The Printer prints current
EDS setting if the paper is loaded. Otherwise the printer directly enters into
EDS setting mode.
21
2. Press LF/FF button to change setting options forward until the status of LQ
indicator, NLQ indicator and Draft indicator indicates the right function
option.
3. Press Load/Eject button to change setting options backward until the status
of LQ indicator, NLQ indicator and Draft indicator indicates the function
option.
4. Press Shift button to change relative parameter setting until the status of
Tractor indicator, Thick Paper indicator and Paper Empty indicator
indicates the right parameter setting.
5. Repeat step 2, step 3 and step 4, and change the EDS setting to suit your
need.
6. After finishing all the settings, press Ready button to save current setting
and escape the EDS setting mode or turn off the printer.
The settings are automatically saved during the whole process.
Note: the status of LQ, NLQ, and Draft indicators indicates the selected
function option and the status of Tractor, Thick Paper, and Paper Empty
indicators indicates the selected parameter setting of the relative function.
Status of indicator: □ on ■ off * flash ¤flash quickly.
The EDS parameter settings in the table with the grid indicate the current
setting.
Micro Adjustment Function
This function can make the paper feed forward or backward in 1/180 inch
increment. It can be used to adjust the loading position or the tear-off position.
The adjustment of the loading position or the tear-off position for the
continuous paper can be saved after the printer is powered-off. The printer will
feed the paper to the adjusted loading position after it is powered-on again.
22
The adjustment of the loading position for the cut sheet can be saved after the
printer is powered-off. The printer will feed the paper to the adjusted loading
position after it is powered-on again.
How to use the micro adjustment function
Use the buttons for the micro adjustment function on the operator panel and
follow the steps below:
1.
Make sure that the printer has stopped printing before adjusting.
2.
Hold down the Shift button while pressing the LF/FF button to feed the
paper forward.
Hold down the Shift button while pressing the LOAD/EJECT button to
feed the paper backward.
Adjustment of the Loading Position
The Loading position means the beginning position of the printing when the
printer loads the paper automatically. This function is designed to adjust the
loading position when the top of form position is too high or too low. Please
follow the steps below:
1. Make sure the printer is powered-on.
23
2. Load the continuous paper or the cut sheet (Use the LOAD/EJECT button to
load the cut sheet).
The Top of Form Position can be adjusted only when the paper has just
been loaded.
3.
Hold down the Shift button while pressing the LF/FF button to adjust the
position forward. Hold down the Shift button while pressing the
LOAD/EJECT button to adjust the position backward.
The newly adjusted loading position is automatically saved and the printer will
always feed the paper to this new position.
There is a limit (maximum and minimum) for the loading position. If you
exceed the limitation during adjustment, the printer beeps and stops the
adjustment.
During the adjustment, if the adjusted value meets the factory default
value, the printer beeps and stops for a moment. Base your adjustment on
the factory default value.
24
Tear-off Function
This function is designed to feed the continuous paper to the tear-off position
along the print cover after the printing has been finished. When the printer
resumes printing, it will feed the continuous paper to the loading position
automatically.
This function can help saving continuous paper wasted between two printing
files.
This function can be executed in two ways: set the tear-off function to Auto or
press the tear-off button on the operator panel.
The tear-off function is available only the front or rear tractor
paper feeds.
Tear-off Method
If the tear-off function is set to Auto, the printer will feed the continuous paper
to the tear-off position automatically after finishing printing.
Only when the printer receives an entire page of data or a carriage return (CR)
code and it doesn’t receive any data again within 3 seconds, does the printer
execute the tear-off function.
Please follow the steps below to execute the tear-off function:
1. Turn off the printer first, and set the “tear-off” function to Auto. Make sure
the page length of the continuous paper has been correctly set.
2. Turn on the printer.
3. Use the continuous paper by selecting the front tractor or rear tractor to
feed the paper (refer to “Using the continuous paper”), and after finishing
printing, the printer will feed the paper to the tear-off position
automatically.
25
4. Tear off the printed continuous paper.
If the tear-off position is not in line with the perforation, use the micro
adjustment function (refer to micro adjustment function for details).
5.
When the printer resumes printing, it will feed the continuous paper to the
loading position automatically before printing.
Using the Tear-off Button
Even if the tear-off function is set to Auto, this function can still be executed
using the tear-off button on the operator panel. Please follow the steps below:
1.
Make sure that the printing has been finished, and press the tear-off button.
The printer will send the continuous paper to the tear-off position.
2.
Tear off the printed continuous paper.
If the tear-off position is not in line with the perforation, use the micro
adjustment function (refer to the micro adjustment function for details,
and to the front parts of this chapter).
3.
When the printer resumes printing, it will feed the continuous paper to the
loading position automatically before printing. Pressing the tear-off button
can also feed the continuous paper to the loading position.
Adjustment of the Tear-off Position
If the tear-off position is not in line with the tear-off edge, follow the steps
below to make adjustment.
26
1.
Make sure that the paper has been set to the tear-off position.
2.
Hold down the Shift button while pressing the LF/FF button to adjust the
position forward.
Hold down the Shift button while pressing the LOAD/EJECT button to
adjust the position backward.
Note: The newly set tear-off position is automatically saved.
3.
Tear off the printed continuous paper.
4.
When the printer resumes printing, it will feed the continuous paper to the
loading position automatically before printing.
There is a limit (maximum and minimum) for the tear-off position. If you
exceed the limitation during adjustment, the printer beeps and stops
adjustment.
During the adjustment, if the adjusted value meets the factory default
value, the printer beeps and stops for a moment. Please base your
adjustment on the manufactory default value.
Paper Path Selection
There are three paper paths designed for this type of printer: front-in, rear-in
and bottom-in, so that the tractor can be set to suit different kinds of paper.
Set the path selection lever correctly to choose the right paper path.
27
z Paths for cut sheet
The cut sheet paths are designed to load the cut sheet, and the printer
can feed the paper from the front-in path, top-in path and the cut-sheet
feeder.
z Front-in path for continuous paper
When the tractor is set to the front, continuous paper from the front-in
path is selected.
z Rear-in path for continuous paper
When the tractor is set to the rear, continuous paper from the rear-in
path is selected.
z Paths for the traction of the continuous paper
When the tractor is set to the top, continuous paper is selected and the
front-in path, rear-in path and bottom-in path can be chosen to load
the continuous paper.
Using the Cut Sheet
The maximum width for the cut sheet in this type of printer is 420mm
(16.5inch).
Top-in Load
28
1. Choose the cut sheet by the path selection lever, and set the paper guide
upward.
1. Turn on the printer, the power indicator on the operator panel lights up.
2. Move the left edge guide to be in line with the triangle label, and adjust the
right edge guide to suit the width of the paper.
3. Load the cut sheet along the edge guides and slide the paper downward
steadily until it is stopped, then the printer will feed the paper for printing
automatically about 2 seconds later.
29
Use the platen knob on the left of the printer only when the
printer is turned off and the paper jams, otherwise the printer
will be damaged or the position of the top of form will be
changed.
If the printer cannot feed the paper by turning the platen, take out the cut
sheet and load it again.
Please press the LOAD/EJECT button to eject the paper.
Front-in
1. Choose the cut sheet using the path selection lever, and open the cover of
the front-in path.
30
2. Turn on the printer. The power indicator on the operator panel lights up.
3. Move the edge guide and locate it when the sound of “click” is heard.
4. Load the cut sheet along the left edge guides and push the paper forward
steadily until it is stopped, then the printer will feed the paper for printing
automatically about 2 seconds later.
31
Use the platen knob on the left of the printer only when the
printer is turned off and the paper jams, otherwise the printer
will be damaged or the position of the top of form will be
changed.
If the printer cannot feed the paper by turning the platen, take out the cut
sheet and load it again steadily.
Please press the LOAD/EJECT button to eject the paper.
32
Using the continuous paper
The printer allows you to load continuous paper through the front, rear and
bottom directions.
You can use the continuous paper with width up to 406 mm (16 inch).
When you use continuous paper, the tractor should be set to one of the
following positions: the front, the rear push tractor or the pull tractor. Make sure
the paper path selection lever is pointed to the mark with same position as the
tractor. For more information, please see “Paper path selection” section.
Tractor position and paper path
The printer provides several paper paths for continuous paper. Set the path
selection lever before you load continuous paper.
Tractor
path
position
selection
Paper path for continuous paper
lever
location
Front
push
tractor
Rear
push
tractor
Pull tractor
33
The factory setting of path selection lever is in rear location. In order to
load the paper smoothly into the printer, make sure the continuous paper is
properly loaded in the tractor. If you want to load paper from the bottom
location, use printer shelf, there is a hatch to load paper smoothly.
Using paper out path guide
It is convenient to change paper out path using the paper out path guide. It’s
shown below:
Set the position of the tractor
To change the position of the tractor, you should remove it from the former
position. Remove the tractor by pressing the tractor’s locking tabs and lifting it
up.
Install the front push tractor
1. Make sure the printer is powered off. Open the cover of the front paper load
location, and remove the front single sheet paper guide by grasping the
handles on both sides of sheet paper guide.
2. Insert tractor into the mounting slot of the printer by pressing the tractor’s
locking tabs
34
Release the tractor by pressing the tractor lock tabs and pushing the tractor
forward, then lifting it up.
Set the rear push tractor
1. Make sure the printer is powered off. Lift the tractor and remove it from the
printer.
2. Hold the tractor lock tabs, and lay down the tractor into the mounting slot
of the printer.
Release the tractor by pressing the tractor lock tabs, pushing the tractor
backward and removing the tractor away from the printer.
35
Set pull tractor
1. Make sure the printer is powered off, and remove the printer cover and paper
guide. Then remove paper tension unit by grasping both sides and lifting it up.
2. Press the tractor lock tabs, and lay down the tractor into the mounting slot.
See the picture below.
3. Remove the tractor by pressing tractor lock tabs, pushing the tractor
backward, and lifting it away from the printer.
Load continuous paper with the front push tractor
1. Make sure the printer is powered off. Open the cover of the front paper load
location and remove the front paper guide.
36
2. Make sure the tractor is in the front mounting slot and the paper path
selection lever is set to the front push tractor position.
37
3. Push the tabs of the tractor backward and loose the sprockets locks.
4. Slide the left sprocket to the left side, about 12mm (0.5 inch) to the left
margin of printer, and fasten the sprocket locks, then slide the right
sprocket in order to match the width of continuous paper.
5. Make sure the edge of continuous paper is straight and clean. Open the
sprocket cover, and fit the hole of continuous paper to the pin of tractor.
38
6. Close the sprocket cover.
7. Move the right sprockets to tension continuous paper, and lock the
sprockets.
8. Set the front paper guide and the cover of the front paper load location.
9. Turn on the printer. After receiving data from PC, the printer starts to load
paper automatically.
Remove continuous paper from the front push tractor
If the tear-off position is not in line with the perforation, use the micro
adjustment function.
1. Press Tear-off button to feed the paper to the tear-off position.
2. Tear off the printed continuous paper.
3. Press “LOAD/EJECT” button again to back to the top of form position.
Feeding continuous paper backward for more than two pages in one time
may cause paper damaged.
39
Load continuous paper from the rear tractor
1. Make sure the printer is powered off and remove paper guide.
2. Make sure tractor is set in rear push position and paper path selection lever
is in rear push position too.
3. Unlock the tractor by holding the tractor lock tabs.
40
4. Slide the left sprocket to the left about 12mm (0.5inch) to the left margin,
and push the left sprocket lock backward to fix it. Then slide the right
sprocket to match the width of the continuous paper, but not lock it. Move
the paper support to the centre of the two sprockets.
5. Keep the edge of continuous paper clean and straight. Open the sprocket
cover, fit the holes of continuous paper to the pins of sprockets.
41
6. Close the sprocket cover.
7. Slide the right sprocket to tension the continuous paper, and then lock it.
8. Place paper guide to keep it horizontally, and then slide the left and right
edge guides to the center of the paper.
9. Turn on the printer. When the printer receives data from PC, it will print
after loading paper automatically.
Another way is to press “load/eject ” button to load the paper.
Do not use the platen knob on the left side of printer when
the printer is powered on, or it may change the top of form
position or damage the printer.
Remove continuous paper from the rear tractor
1. Press “tear off” button to feed the paper to the tear-off position before
removing continuous paper.
If the tear-off position of continuous paper is not aligned with the
tear-off edge of printer, use micro adjustment function to adjust it.
2. Tear off the continuous paper.
3. Press the load/eject button to feed continuous paper backward to the top of
form position.
Feeding continuous paper backward for more than two
42
pages in one time may cause paper damaged.
Make sure the printed paper is moved before pressing
Load/eject button. Otherwise it may cause paper jam by
feeding paper backward for several pages.
Loading continuous paper with the pull tractor
1. Make sure the printer is powered off, and take away the front cover and
paper guide.
2. Make sure the pull tractor is set in right position, and the path selection
lever is in pull tractor position too.
3. Loose the sprocket by pulling the lock tabs forward, shown below.
43
4. Slide the left sprocket to the left about 12mm (0.5 inch ) to the left margin of
the printer, then lock the sprocket by pushing the lock tab backward. Slide
the right sprocket to match the width of continuous paper, but don’t lock it.
Move the paper support to the center of both sprockets.
5. Make sure the edge of continuous paper is clean and straight. Load the paper
from the right slot (front slot, bottom slot or rear slot).
44
6. Open the sprocket cover to fit the holes of continuous paper to the pins of
tractors.
7. Close the sprocket cover.
8. Slide the right sprocket to tighten the continuous paper, and then lock it.
9. Place paper guide and keep it horizontally, then slide both edge guides to the
centre of continuous paper.
10. Turn on the printer.
11. Adjust the top of form position with the micro-adjustment function. Refer to
the “Setting top-of-form position”.
45
12. Close the front cover.
Do not use the platen knob on the left side of printer to feed
paper when the printer is powered on, or else, it may
change the top of form position or damage the printer.
Setting top-of-form position
You may need specified top-of-form position to satisfy different format
printout.
For instance, set the top-of form position on the third line of paper. Mark the
position 6.5mm above from the perforation, then load the paper, align the mark
with the ribbon guide, as shown below.
The third line (8.5mm or 0.33inch) under the perforation is the top of form
position.
You may practice several times to get the ideal top of form position.
46
Remove continuous paper from the pull tractor
1. Tear off continuous paper along the perforation.
2. Eject continuous paper forward by pressing “LF/FF” button.
Do not use Tear off and Load/eject button when using the pull tractor.
Switching between continuous paper and cut sheets
The printer could use cut sheets, and don’t need to remove the continuous paper
in the tractor. This function is available only when tractor is in the front or rear
position.
Switching to cut sheets
To switch from continuous paper to single sheets, follow these steps:
1. If there are any printed sheets in printer, press “tear off” button to advance
the paper to the tear off position.
Make sure the printed paper is turned off before pressing
“load/eject” button. Otherwise, it may cause the paper jam
when loading paper backward for several pages.
2. Press “Load/Eject” button to load continuous paper backward to standby
position. The continuous paper is still in the tractor, but not occupy the
paper path.
3. Place the paper path selection lever to the cut sheets position.
47
4. Load cut sheets from the front or top position, same as described in this
chapter.
Switching to continuous paper
It is easy to switch to continuous paper.
1. If there is cut sheet in the printer, press “Load/Eject” button to eject cut
sheet.
2. Lift the paper guide, and make it parallel with the printer. Slide the both
edge guides to the centre of the continuous paper.
3. Place the paper path selection lever to the required (front of rear tractor)
position.
48
Load continuous paper with “load/eject” button before printing.
Multipart forms
Gap lever
There are six choices in the gap lever for different thickness forms. They are
identified by the mark near the lever.
The following table indicates the lever settings. Place it according to the actual
thickness of paper used.
Paper type
Gap lever position
Thin paper
0
Ordinary paper (cut sheets or continuous)
0-1
Multipart forms
2 sheets (original _1 copy)
1-2
3 sheets (original _2 copy)
2-3
4 sheets (original _3 copy)
3-4
5 sheets (original _4 copy)
above 4
49
The Thick Paper indicator is on when gap lever is set in
position “2”or above.
Multipart forms
The printer can print on up to 5-level multipart forms. Set the lever in right
position according to the thickness of paper.
The same way can be used to load the multipart forms as ordinary paper except
gap lever setting. See the related details in this chapter. Pay more attention to
the top of form position setting.
Never load multipart form from the top paper feed slot. You
should use the front paper feed slot and make sure the total
thickness of the multipart form does not exceed 0.32mm
(0.0128inch).
50
Printer Specifications
Printing
Printing method
24-pin impact dot matrix
Printing Speed
High-speed Draft
400 cps at 10 cpi
Draft
300cps at 10 cpi
360 cps at 12 cpi
Letter Quality
100 cps at 10 cpi
120 cps at 12 cpi
Printing Direction
Bidirectional logic seeking for test and
graphics printing (Unidirectional test or graphics
printing can be selected by EDS setting or software
commands).
Line spacing
1/6 inch, 1/8 inch, 2/15 inch, or programmable in
1/360-inch increments.
Paper feed speed
Intermittent
68ms/line at 1/6-inch line spacing
Continuous
3.6inch/second
Printable columns
136 columns (at 10 cpi)
Buffer
128KB or 0KB (Using EDS setting to choose)
51
Font
Character
Font
Width
Proportional
15cpi
10 cpi
12 cpi
Draft
○
○
○
Roman
○
○
○
○
Sans Serif
○
○
○
○
(point)
HSD
Character
○
You can also use software commands to choose other combination of the fonts
/printing space.
Character table
96 standard ASCII characters
14 kinds of International character sets
One law character set
figure character sets
Bar code character set
Printing Paper
The size of printing paper
Printing Paper
Cut-Sheet
Width
Top In
Front In
Length
Multipart forms
Length
Continuous Paper
Width
52
Size
148-420 mm
(5.8-16.5 inch)
182-364 mm
(7.2-14.3 inch)
up to 364 mm(14.3 inch)
up to 364 mm (14.3 inch)
101- 406 mm
(4- 16 inch)
Printable Area:
Cut-Sheet
8.5 mm(0.33 inch)or more
3.0 mm (0.12 inch) or more
3.0 mm(0.12 inch)
or more
13 mm(0.51 inch)
or more
13 mm(0.51 inch) or more
Printable Area
13.5 mm(0.53 inch)or more
Continuous paper
53
The minimum left and right
Printing paper width
margin
101-377.8 mm
13mm (0.51 inch)
(4-14.575 inch)
381-420 mm
15mm (0.59 inch)
(15-16 inch)
Printing paper thickness
Cut-sheet
0.065 to 0.14 mm (0.0025-0.0055 inch)
Cut-sheet (multipart forms- Front in)
0.12-0.32 mm (0.0047 to 0.012 inch)
Continuous paper
0.065-0.14 mm (0.0025-0.0055 inch)
Continuous multipart forms
0.12-0.32 mm (0.0047-0.012 inch)
54
Printing Paper Weight
Cut-sheet (rear in)
14-24 pounds (52.3 to 90g/m2)
Cut-sheet (front in)
17-24 pounds (64 to 90g/m2)
Continuous Paper
14-22 pounds (52.3 to 82g/m2)
Multipart forms (cut sheet/continuous paper)
12-15pounds×4(40 to 58g/m2×4)
Printing paper quality
Cut-sheet and continuous paper
The paper must be flat, and non-carbon multipart forms.
Copies
The cut-sheet and continuous paper of front in
One original + 3 copies
Others
One original + 4 copies
Mechanical Parts
Paper-feed Manner
Friction feed (cut-sheet printing, you
can use cut-sheet feeder or not.)
Push tractor (front or rear tractor)
Pull tractor
Push--- Pull tractor (option)
55
Ribbon
Fabric ribbon cartridge
6 million characters in draft mode.
MTBF
10,000 hours.
Print Head Life
300million strokes per wire (using genuine
ribbon)
Size and Weight
Length: 623 mm (25 inch)
Width: 395 mm (15.2 inch)
Height: 173 mm (6.8 inch)
Weight: about 12.3 kg
Electric Parts
Rating Voltage
100 – 240 Vac
Rating current
2.0A
Power consumption (at 10cpi, draft self-test printing)
<75W
Rating frequency
50/60Hz
56
Environmental Specifications
Temperature
Operating
Storing
5deg~35deg
-20deg~60deg
Humidity
Operating
20%~80%RH
20%~80%RH without condensation
Storing
5%~85%RH
5%~85%RH without condensation
Interface Technological Specifications
Centronics parallel interface.
USB interface accords with USB 1.1 criterion.
Serial interface accords with RS-232C criterion.
LAN interface – refer to USER GUIDE of NETWORK INTERFACE
(Compuprint 3046N only)
57
Troubleshooting
Power
No power supply.
Power indicator unlit:
z
Check if the power line inserted in outlet correctly.
z
If the power outlet is controlled by outer switch or automatic timer,
please use another power outlet.
z
Use another electronic device to make sure if the power outlet works
normally.
z
Power indicator lights up for a while and then lights off, and the
indicator is still unlit when you turn on the printer power again.
z
Check whether the rating voltage of printer matches with the voltage
on power outlet. If it is not, you should pull out the power plug of
printer and contact with the agent immediately. Don’t insert the power
line into the outlet again.
Printing
Printer cannot print
Ready indicator is unlit:
z
Press Ready Button.
Ready indicator is lit, but the printer still doesn’t print:
z
Check if you install printing drive software correctly, and check the
printer parameter setting of the printer.
z
Check both sides of interface cable that connects printer and computer,
and confirm if this interface cable satisfies the technical specification
of printer and computer.
58
Paper-empty indicator is lit:
z
Please load print paper.
It sounds the printer is printing, but in fact it doesn’t print a character:
z
Please check if the ribbon cartridge is installed correctly. As for the
installation of ribbon cartridge, please refer to “Ribbon Cartridge
Installation” section, or the ribbon may be old, so you can replace
ribbon cartridge.
The printer gives out strange noise and beeps, and stops printing
suddenly:
z
First switch off the printer, check if there is paper jam or other
problems, and then turn on the power and retry printing. If the printer
still doesn’t print correctly, please contact an agent or qualified
maintenance personnel.
Ready indicator flashes, but the printer cannot print or stops printing
suddenly:
z
The print head is too hot, wait for several minutes. After the print
head is cools down, the printer will resume printing.
Printing Fading or Abnormal
The bottom of printing characters is lost:
z
You didn’t install the ribbon cartridge correctly, as per the installation
of ribbon cartridge, refer to “Ribbon Cartridge” section.
Printing fade:
z
The ribbon is old, replace ribbon cartridge.
z
Check if the position of gap lever suitable for the thickness of printing
paper used.
59
Lose printing dots during printing characters or figures:
Lose a line dot in the printout:
z
The print head is damaged. Stop printing and contact your agent or a
qualified maintenance personal, and replace print head.
Lose printing dots at random position:
z
The ribbon is loose, so reinstall the ribbon cartridge.
The printing characters are not what you need:
The printer does not print the font or character which the application
software sets:
z
Check if application software is installed correctly.
The printing position is not what you want:
The top of form position is too high or too low:
z
Please adjust the top of form position set by the application software.
All the texts are printed on the same line:
z
Set Auto CR/LF as ”CR+LF, LF”, and the printer will insert a line
feed code after every carriage return code automatically.
An unwanted blank line is added between every two lines of printed text:
z
It sends out two line-feed codes continuously, you should set Auto
CR/LF as CR, LF.
60
The setting of page length doesn’t match with continuous paper page
length:
z
Please use EDS setting to change the setting of page length.
z
Check the page length setting of application software, and adjust the
page length setting if necessary.
The top of form position is too low, or the lower half part of the page is
printed on the beginning of the next page:
z
Reduce or remove the top margin and reduce page length in
application software.
z
If possible, specify cut-sheet in the application software.
If the printer still does not print correctly, use printer self-test function. If the
self-test is correct, it means the printer works normally. The problem may come
from computer, software or interface cable. If the self-test has errors, please
contact an agent or qualified maintenance personal.
The Disposal of Printing Paper
The following content will introduce how to solve the problems that appear
when you use cut-sheet and continuous paper.
Cut-sheet cannot be loaded correctly:
While loading cut-sheet, the platen doesn’t run, and the paper can’t be fed:
z
Check if the path selection lever is on the position of cut-sheet.
z
Cut-sheet may be far away from the left side, please adjust the
position of left edge guide, and make it align with the arrow.
While loading cut-sheet, the platen runs but the paper can’t be fed:
61
z
Load cut-sheet smoothly again.
Paper-feed slanting or paper-jam:
z
Turn off the printer power switch, and set the path selection lever to
the position of pull tractor, remove cut-sheet and check the following
two contents.
z
Make sure that the size of cut-sheet is within the specified range.
z
Make sure that the cut-sheet aligns with both edge guides.
Cut-Sheet is not ejected completely:
z
Please use LOAD/EJECT button to eject cut sheet. Do not use LF/ FF
button.
z
It may be caused by too long cut-sheet, please use the standard-size
cut-sheet.
The continuous paper cannot be loaded correctly:
The platen is running, but the paper cannot be loaded:
z
Check if path selection lever is on the correct position.
Paper-feed is slanting or paper jam:
z
Confirm whether the continuous paper is blocked by a cable or other
objects. You should make sure that the continuous paper can be fed
smoothly.
z
Confirm if the distance between the continuous paper and printer is
within one meter.
z
The position of putting continuous paper may interfere with the
vertical feeding of continuous paper.
z
Check if both holes of continuous paper are parallel with each other,
and whether the sprocket of tractor is locked and the cover is closed.
z
Check if the position of the gap lever accords with the type of paper
used, please refer to gap lever section.
62
z
Check if the size of continuous paper is within the specified arrange,
please refers to Printing Paper Size.
The continuous paper cannot be ejected correctly:
z
The page length is too long; please use the specified continuous
paper.
63
Maintenance and Transportation
Cleaning the Printer
In order to keep your printer in perfect condition, you should clean thoroughly
the dust and dirt several times every year.
1. Make sure that the printer has been turned off, remove the paper guide,
printer cover, tractor and other installed options.
2. Use soft brush to clean dust and dirt carefully.
3. If there are dust and dirt on the outer shell or paper guide, you can spray a
neutral detergent on a soft cloth and clean them. Remember to close the
printer cover to avoid water to enter into the printer.
*Do not use alcohol or thinner to clean printer, these chemical
products will damage printer parts and outer shell.
*Do not use hard or abrasive brush.
*Do not spray lubricant oil into the printer, because the
improper oil will damage mechanical parts. In the event you
need lubricant oil, please contact our agent or qualified
maintenance employees.
Be careful to not spray water on printer mechanical or electronic
parts.
64
Replacing the Ribbon Cartridge
If the printing is fading, then you need to replace ribbon. It is advisable to use
the genuine ribbon cartridge provided by our company.
As for replacing ribbon, please refer to “Ribbon Cartridge Installation” section.
Use genuine ribbon cartridges approved by our company.
Failing to do so will cause damage to the printer (especially to
the print head). Do not use the ribbon designed for 9-pin
printer.
Printer Transportation
If the printer needs long-distance transportation, you should use the original
case and packing material to repack the printer. It is described as follows:
4. Turn off the printer power switch.
5. Remove the paper guide and other installed options.
6. Pull out the power cable from power outlet, and remove the interface cable
from the printer.
7. Remove ribbon cartridge.
8. If the tractor has been removed, please install the tractor again.
9. Use the original packing material to pack the printer, ribbon, paper guide
and power cable well, and encase it into the original case.
The content of this document is subject to change without notice. This
material is only used for reference. Our company will not take any
responsibility of the direct or indirect losses caused by using this material,
and preserve the final explanation right.
65
User information according to European Directive
2002/95/EC and 2003/108/EC
This unit must be recycled or discarded according to applicable local and
national regulations.
The symbol shown above, applied to the product or on its packing, indicates
that, at end of life, the product is not to be thrown away, or disposed as unsorted
municipal waste, but separately collected.
SFERAL WWT encourage owners of information technology (IT) equipment to
responsably recycle their equipment when it is no longer needed.
Customer that needs to dispose this equipment must contact the producre and
follow the collection framework available locally for the return, recycling and
recovery of WEEE.
Customer participation to the separate collection is important to minimize any
potential effects on the environment and human health, due to the potential
presence of hazardous substances in the equipment, and aids the reuse and
recycle of the materials by which the equipment is made.
Uncorrect disposal of the product by the customer will be punished according to
the local regulations and laws.
66