1
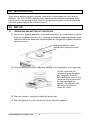
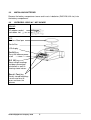
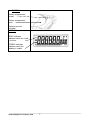
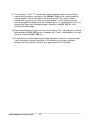
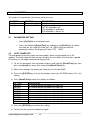
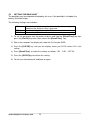
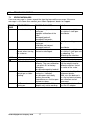
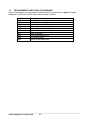
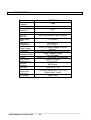
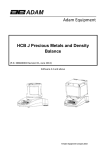
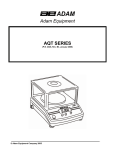
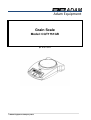
Adam Equipment
Grain Scale
Model: CQT1751GR
.
pn. 9757 rev B
© Adam Equipment Company 2009
© Adam Equipment Company 2009
1.0
CONTENTS
1.0
2.0
3.0
3.1
3.2
3.3
3.4
3.5
4.0
4.1
4.2
4.3
4.4
4.5
5.0
5.1
5.2
5.3
6.0
7.0
7.1
7.2
8.0
9.0
CONTENTS
INTRODUCTION
SET UP
UNPACKING AND SETTING UP YOUR SCALE
INSTALLING BATTERIES
OVERVIEW - DISPLAY / KEY BOARD
LOCATING AND PROTECTING YOUR SCALE
STORING WHEN NOT IN USE
BASIC OPERATION
TURNING ON THE SCALE
ZEROING / TARE
WEIGHING
WEIGHING UNITS
GRAIN DETERMINING
PARAMETERS
PARAMETER SETTING
AUTO POWER OFF
SETTING THE BACKLIGHT
CALIBRATION
TROUBLE SHOOTING
ERROR MESSAGES
REPLACEMENT PARTS AND ACCESSORIES
SPECIFICATIONS
WARRANTY STATEMENT
©Adam Equipment Company 2009
3
3
5
5
5
6
6
8
9
10
10
10
10
10
11
14
14
14
15
16
17
17
18
20
21
©Adam Equipment Company 2009
4
2.0 INTRODUCTION
Thank you for purchasing your new grain scale which is based upon the Core series of
Balances. The CQT1751GR model has been specifically developed and designed to be
used to assist in the grading of grain to asses the quality of the grain as well as to give an
indication of the Kilograms per hectolitre (kg/Hl).
3.0 SET UP
3.1
UNPACKING AND SETTING UP YOUR SCALE
1) Remove the shipping protection screw and round cover as shown below using the
Allen key supplied in the box. (It is advisable to keep the shipping protection screw
and the round cover along with the packing box for using during shipping to another
location in future).
Shipping protection screw
Round cover around the screw
2) Place the pan (which comes separately packed) in the receptacles on the top cover.
Use the screw that you
removed to screw the plastic
pan into place. Be careful
when putting the screw in that
you do not use to much force
as it can damaged the
loadcell. You should just be
able to use light force to
secure the screw.
3) Place the stainless steel pan on top of the plastic pan.
4) Place the balance on a firm and flat surface for accurate weighing.
©Adam Equipment Company 2009
5
3.2
INSTALLING BATTERIES
Remove the battery compartment cover and insert six batteries (R6P/LR6 /AA size) into
the battery compartment.
3.3
OVERVIEW - DISPLAY / KEY BOARD
BEHIND
AC adapter socket
Lock down slot
TOP
Stainless Steel pan
Plastic Pan
LCD display
[On/Off] key
Turns the balance power
on/off
[S/P CE] key
Stores weight readings
and does percentage
calculation as well as
clearing stored values.
[Recall / Tare] key
Recalls stored weighings
/ results and also to
zeros and tares the
balance
©Adam Equipment Company 2009
6
BOTTOM
Battery compartment
screws
Battery compartment
cover
Batteries are not
included
DISPLAY
ZERO indicator
Indicates when the scale
is at zero.
STABLE indicator
Indicates when the
reading is stable.
©Adam Equipment Company 2009
7
3.4
LOCATING AND PROTECTING YOUR SCALE
In order to keep your scale functioning at its best we suggest that you do the following:
Avoid extremes of temperature. Do not place in direct sunlight or
near air conditioning vents.
Make sure the scale is located on a strong table and free from
vibration.
Avoid unstable power sources. Do not operate near large users of
electricity such as welding equipment or large motors. Do not leave
the batteries inside the scale – if you are using the scale with the
AA batteries and are not using it on not using it for a long time.
Keep free from vibration. Do not place near heavy or vibrating
machinery.
Avoid high humidity that might cause condensation, and keep away
from direct contact with water.
Do not place near open windows, air-conditioning vents or fans that
may cause a draught and unstable readings.
Keep the scale clean, and do not stack material on the scale when it
is not in use. The CQT1751GR has a stacking feature allowing more
than one unit to be stacked on top of each other. For more details on
this see the section on storing.
©Adam Equipment Company 2009
8
3.5
STORING WHEN NOT IN USE
If you have any of the HighlandTM series or CoreTM or Grain Scale product lines you can
store them easily on top of each other. To save space and protect them from damage.
Without Shield
©Adam Equipment Company 2009
With Shield
9
4.0
BASIC OPERATION
4.1
TURNING ON THE SCALE
Plug in the unit using the AC adapter or power from the batteries and press the [on/off]
key.
1) The scale will show automatically grn- X.X, “XX” meaning software revision
number “grn” meaning it has grain scale software and then show the voltage X.X
Vol where “X.X” is the voltage of the batteries if being used on battery power or the
AC adapter after that the scale will then count from 0 to 9 for a few seconds. Finally
it will display "0.0g" with the Stable symbol and Zero symbols being lit up.
2) The scale is now ready to be used.
3) To turn the scale off after use press the [on/off] key again. There is an auto poweroff function that will automatically turn the unit off, this can be set in the parameters
section.
4.2
ZEROING / TARE
You can press the [Recall / Tare] key to set a new zero point. Zero will be set if the
reading on the scale is less than 70g. This may be necessary if the weight is not reading
zero with no weight on the pan. The zero indicator will show in the top left corner of the
LCD.
If you are using a container to weigh then you can place this on the platform and press the
[Recall / Tare] key, the display will show zero and NET on the display.
You can then weigh any material added to the container. Taring weight subtracts from the
scale’s total capacity.
Note: When the container is removed a negative value will be shown. If the [Recall / Tare]
is pressed when the container has been removed it will again zero the scale.
4.3
WEIGHING
To determine the weight of a sample, first tare an empty container, then place the sample
in the container. The display will show the weight and the unit of weight currently in use.
The stable indicator will light up when the reading is stable.
4.4
WEIGHING UNITS
Two units are available: grams (g) and Kilograms per Hectolitre (Kg/Hl).
©Adam Equipment Company 2009
10
4.5
GRAIN DETERMINING
1) Turn on the scale and wait for the scale to come to zero. Then put on an empty
500ml container and press the [Recall / Tare] key.
>0<
Net
0.0 9
Store
Kg/Hl
2) Load the 500ml container with the grain. The screen shows the net weight (the first
net weight) of the grain (in this example lets say the total weight was 400g).
Net
400.0 9
g
Store
Kg/Hl
3) Press the [S/P CE] key, it calculates the relation between g and Kg / Hl and saves
the value. The balance will show Store 1 for 2 seconds and then “xx.x Kg / Hl”. In
this example it will show 80.00 Kg / Hl.
►
Net
80.00
►
Store
Kg/Hl
The Store symbol (►) lights up when the first net weight is stored and the Kg/Hl
symbol (►) also lights up.
©Adam Equipment Company 2009
11
4) Now remove the container and perform the screening operation.
5) Then put the same 500ml container back on to the scale. The scale will show 0.0g
on the display.
6) Add the screenings to the container, the display shows the weight of the screenings.
For this example say 30.0g
►
Net
30.0 9
g
Store
Kg/Hl
7) Once the stable light has shown on the display press the [S/P CE]. The balance
will show Store 2 for 2 seconds and then “xx.x Kg / Hl”. If the screenings were
30.0g then in this example it would show 6.00 Kg/Hl.
►
Net
6.00
►
Store
Kg/Hl
The Store symbol (►) lights up when the second net weight is stored and the Kg/Hl
symbol (►) also lights up.
8) To determine the percentage of screenings to the initial grain press the [S/P CE]
key again. The balance will show “Per - - -” on the display for approximately 2
seconds and then “ XX.X PER”. In the example the 1st weight was 400g
( calculated as 80.00Kg/Hl), the 2nd weight was 30g (calculated as 6.00Kg/Hl).
Therefore the percentage value would be 7.50%.
%
Store
►
7.50 PER
►
©Adam Equipment Company 2009
12
Kg/Hl
9) To review the 1st and 2nd stored weight and percentage values that have been
stored into the memory simply press the [Recall / Tare] key to scroll through the
various weights. These are stored in the memory even if the scale has been
switched off so you can tell if only one stored weight is in the memory that you
need to complete the weighing of the screened grain, if 2 stored weights are in the
memory but it does not show percentage if you press the [S/P CE] key it will
calculate the percentage.
10) After completing the test you must clear the memory. This is done by pressing and
holding down the [S/P CE] key for 2 seconds until “Clear” is displayed on the scale
and then release the [S/P CE] key.
11) If the balance is turned off during the weighing process when it is turned on again
it will have kept the stored information in the memory so that you could then
complete the tests without having to start again due to a loss of power.
©Adam Equipment Company 2009
13
5.0
PARAMETERS
The scale has 2 parameters that can be set by the user.
FUNCTION
Auto Off
Backlight
5.1
SECTION
See section 5.2
See section 5.3
DESCRIPTION
Sets the auto power off function
Sets the backlight
OFF BL backlight is off
1 BL backlight is automatic
2 BL backlight is always on
PARAMETER SETTING
•
Press [On/Off] to turn the balance off.
•
Press and Hold the [Recall/Tare] key and press the [On/Off] key to switch
the scale on, the scale will show “grn-1.0 GRN” and then enter the
parameter setting. The display will show "OFF PWR".
5.2
AUTO POWER OFF
The auto power off function helps conserve power, when using the batteries or AC
adapter. The Auto switch-off time may be set up by the user and is the time after a period
of inactivity i.e. no weight movement or key presses.
1) To set this parameter turn the power off press and hold the [Recall/Tare] key then
press the [on/off] key once, then release the [Recall/Tare] key.
2) After a few seconds, the display will show the first function PWR
3) Press the [S/P/CE] key until you the display shows you XX PWR where XX is last
setting
4) Press [Recall/Tare]to select the settings as follows:
Off PWR
10 PWR
20 PWR
30 PWR
40 PWR
50 PWR
60 PWR
70 PWR
80 PWR
90 PWR
Auto power off
10 seconds before the power will switch off
20 seconds before the power will switch off
30 seconds before the power will switch off
40 seconds before the power will switch off
50 seconds before the power will switch off
60 seconds before the power will switch off
70 seconds before the power will switch off
80 seconds before the power will switch off
90 seconds before the power will switch off
5) Press the [S/P/CE]key to confirm the setting
6) To exit turn the scale off and back on again
©Adam Equipment Company 2009
14
5.3
SETTING THE BACKLIGHT
The backlight may be enabled or disabled by the user. If the backlight is disabled, the
battery life will be longer.
The following settings are available:
1 BL
2 BL
OFF BL
Sets the backlight to operate automatically when a weight is
placed on the scale or a key is pressed.
Sets the backlight to be on at all times.
Sets the backlight to be off.
1) To set this parameter turn the power off press and hold the [Recall/Tare] key then
press the [On/Off] key once, then release the [Recall/Tare] key.
2) After a few seconds, the display will show the first function PWR
3) Press the [S/P/CE] key until you the display shows you XX BL where XX is last
setting
4) Press [Recall/Tare] to select the settings as follows 1 BL - 2 BL – OFF BL
5) Press the [S/P/CE]key to confirm the setting
6) To exit turn the balance off and back on again
©Adam Equipment Company 2009
15
6.0
CALIBRATION
Calibration may be required when the scale is initially installed or moved to a new location.
Over time and use, mechanical deviations may occur so it is recommended that you
calibrate you scale regularly.
Before calibrating your should make sure you have a suitable weight. The weights should
be known to an accuracy that is appropriate for the balance being calibrated, for example,
OIML Class M1 type or ASTM E617 Class 4. If you do not have proper weights do not
attempt calibration.
Calibration weight: 500g, 1000g or 1500g.
1) To enter into the calibration parameter turn the power off and press [S/P/CE] and
[Recall/Tare] keys together once during the self check sequence.
2) The display will show UnLOAD, remove any weight from the pan.
3) Press the [Recall/Tare] key to enter a zero value.
4) The value last used for calibration will be displayed. To select a different calibration
weight, press the [S/P/CE] key. You can use either a 500g, 1000g or 1500g
calibration weight.
5) Once you have selected the weight to use press the [Recall/Tare] key.
6) LOAD will be displayed, place the weight on the pan.
7) Once the stable sign is shown press the [Recall/Tare] key.
8) If the weight is within 5% of the last calibration the display will show PASS and exist
the calibration routine. If the calibration is not successful the display will show FAIL
and exit the routine, if the calibration fails try again.
©Adam Equipment Company 2009
16
7.0
TROUBLE SHOOTING
7.1
ERROR MESSAGES
If an error message is shown, repeat the step that caused the message. If the error
message is still shown then contact your Adam Equipment dealer for support.
ERROR
CODE
ADO
ADL
-----
Unit-E
FAIL
DESCRIPTION
POSSIBLE CAUSES
A/D Value too high.
Weight on the pan when
turning on.
Improper calibration of the
scale.
Damaged load cell.
Damaged Electronics.
A/D Value too low.
Pan is not installed when
turning on.
Calibration not correct.
Damaged load cell.
A/D count is not
Load cell damaged.
correct when turning Electronics damaged.
the scale on.
Unit error.
Low battery indicator. Batteries may be flat.
Calibration failure.
Incorrect mass used to
calibrate. The user calibration
is not within 5% of factory
calibration.
Possible damaged to loadcell.
Unstable – machine Possible damage to the
cannot get a stable
mechanics / Loadcell.
reading.
Possible poor and drafty
location caused by
airconditioner or next to open
windows or doors.
No Power when
Battery may be flat. AC
turning on.
adapter may not be working.
©Adam Equipment Company 2009
17
Solutions
Remove any weight from
the stainless steel pan.
Recalibrate.
Install pan and try power
on.
Recalibrate.
Remove any weight form
the stainless steel pan and
try rebooting. Try
calibrating the machine.
Change the batteries.
Try to recalibrate, check
that the weight used to
calibrate matches that of
the value of the scale.
Replace load cell by Adam
Equipment dealer.
Make sure the balance is
on a flat surface and away
from vibration and air
movement.
Change the batteries. Or
use the AC adapter
7.2
REPLACEMENT PARTS AND ACCESSORIES
If you need to order any spare parts and accessories, contact your supplier or Adam
Equipment. A partial list of the more common items follows:
Part Number
4178
9541
9542
9543
5099
9502
9511
9510
9306
8030
Description
AC adapter USA plug 12VAC 150mA
AC adapter UK plug 12VAC 150mA
AC adapter Euro plug 12VAC 150mA
AC adapter SA plug 12VAC 150mA
AC adapter Australian plug 12VAC 150mA
120 mm Stainless steel pan
Draft shield lid
Draft shield (without lid)
In-use wet cover
Security lock and cable
©Adam Equipment Company 2009
18
©Adam Equipment Company 2009
19
8.0
SPECIFICATIONS
Model #
Maximum
Capacity
Readability
Repeatability
(Std Dev)
Linearity ±
Units of
Measure
Stabilisation
Time
Operating
Temperature
Power Supply
Calibration
Calibration Mass
Display
Draft shield
(diameter x h)
Balance
Housing
Pan Size
Overall
Dimensions
(w x d x h)
Net Weight
©Adam Equipment Company 2009
CQT1751GR
1750g
0.1g
0.2g
0.2g
Grams and Kilograms per hectolitre
2-3 seconds
0ºC to 40ºC
32ºF to 104ºF
12VAC @ 150mA adapter or 6x AA
batteries
Push button calibration using external mass
500g, 1000g or 1500g
user selectable
6 digit LCD, 18mm digits, with backlight
132mm ø x 82mm
(5.2” ø x 3.2”)
ABS Plastic
120mm ø (5.1” ø)
173 x 255 x 86mm (6.8” x 10” x 3.3”)
Without draft shield
820g (1.8lb)
20
9.0
WARRANTY STATEMENT
Adam Equipment offers Limited Warranty (Parts and Labour) for the components failed due to defects in
materials or workmanship. Warranty starts from the date of delivery.
During the warranty period, should any repairs be necessary, the customer must inform the supplier or Adam
Equipment. The company or its authorised Technician reserves the right to repair or replace any components
at its own discretion. Any shipping costs involved in sending the faulty units to a service centre is the
customers responsibility.
The warranty will cease to operate if the equipment is not returned in the original packaging and with correct
documentation for a claim to be processed. All claims are at the sole discretion of Adam Equipment.
This warranty does not cover equipment where defects or poor performance is due to misuse, accidental
damage, exposure to radioactive or corrosive materials, negligence, faulty installation, unauthorised
modifications or attempted repair or failure to observe the requirements and recommendations as given in
this User Manual.
Repairs carried out under the warranty does not extend the warranty period. Components removed during
the warranty repairs become the company property.
The statutory right of the purchaser is not affected by this warranty. The terms of this warranty is governed
by the Laws of England and Wales. For complete details on Warranty Information, see the terms and
conditions of sale available on our web-site.
©Adam Equipment Company 2009
21
©Adam Equipment Company 2009
22
Manufacturer’s Declaration of Conformity
This product has been manufactured in accordance with the
harmonized European standards, following the provisions of the
below stated directives:
Electro Magnetic Compatibility Directive 2004/108/EC
Low Voltage Directive 2006/95/EC
Adam Equipment Co. Ltd.
Bond Avenue, Denbigh East
Milton Keynes, MK1 1SW
United Kingdom
FCC COMPLIANCE
This equipment has been tested and found to comply with the limits for a Class A digital device, pursuant to
Part 15 of the FCC Rules. These limits are designed to provide reasonable protection against harmful
interference when the equipment is operated in a commercial environment. The equipment generates, uses,
and can radiate radio frequency energy and, if not installed and used in accordance with the instruction
manual, may cause harmful interference to radio communications. Operation of this equipment in a
residential area is likely to cause harmful interference in which case the user will be required to correct the
interference at his own expense.
Shielded interconnect cables must be employed with this equipment to insure compliance with the pertinent
RF emission limits governing this device.
Changes or modifications not expressly approved by Adam Equipment could void the user's authority to
operate the equipment.
WEEE COMPLIANCE
Any Electrical or Electronic Equipment (EEE) component or assembly of parts intended to be incorporated into
EEE devices as defined by European Directive 2002/95/EEC must be recycled or disposed using techniques that
do not introduce hazardous substances harmful to our health or the environment as listed in Directive
2002/95/EC or amending legislation. Battery disposal in Landfill Sites is more regulated since July 2002 by
regulation 9 of the Landfill (England and Wales) Regulations 2002 and Hazardous Waste Regulations 2005.
Battery recycling has become topical and the Waste Electrical and Electronic Equipment (WEEE)
Regulations are set to impose targets for recycling.
© Adam Equipment Company 2009
ADAM EQUIPMENT is an ISO 9001:2000 certified global company with more than 35 years
experience in the production and sale of electronic weighing equipment.
For a complete listing of all Adam balances and balances visit our website at:
www.adamequipment.com
© Copyright by Adam Equipment Co. Ltd. All rights reserved. No part of this
publication may be reprinted or translated in any form or by any means without the
prior permission of Adam Equipment.
Adam Equipment reserves the right to make changes to the technology, features,
specifications and design of the equipment without notice.
All information contained within this publication is to the best of our knowledge
timely, complete and accurate when issued. However, we are not responsible for
misinterpretations which may result from the reading of this material.
The latest version of this publication can be found on our Website.
Head Office:
Adam Equipment Co. Ltd.
Bond Avenue,
Milton Keynes,
MK1 1 SW
Tel: +44 (0)1908 274545
Fax: +44 (0)1908 641339
[email protected]
For regional office worldwide visit www.adamequipment.com
© Adam Equipment Company 2009