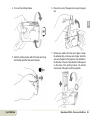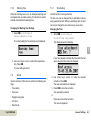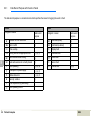
1
Digital Tachograph EFAS User Guide © 2009 by EFKON AG Copyright No specifications in this user guide may be changed without the written permission of EFKON AG. EFKON AG does not assume liability for this user guide. Use and reproduction are only permitted in accordance with the contractual stipulations. No part of this guide may be reproduced, stored in a retrieval system or translated into another language without the express written permission of EFKON AG. Technical details of descriptions, specifications and illustrations contained in this guide are subject to change without notice. © Copyright 2009 EFKON AG, Raaba Austria The terms and names used are registered trademarks and trade names are the property of their respective holders. EFKON AG document number: 5340.029.DOC.E09.FM Manufacturer: EFKON AG Dietrich-Keller-Strasse 20 8074 Raaba Austria 2 Digital Tachograph Important Note: This is an extended version of the certified user guide (document number 5340.029.DOC.E03.FM). This documentation can be found on our website: www.intellic.eu EFAS Table of Content 1 2 Introduction . . . . . . . . . . . . . . . . . . . . . . . . . . . . . . . 6 1.1 About this Guide . . . . . . . . . . . . . . . . . . . . . . . 6 1.1.1 How to Use this Guide . . . . . . . . . . . 6 1.1.2 Symbols . . . . . . . . . . . . . . . . . . . . . . 7 1.2 Legal Requirements . . . . . . . . . . . . . . . . . . . . . 8 1.2.1 Regulations for Drivers . . . . . . . . . . . 9 1.2.2 Regulations for Company Representatives. . . . . . . . . 9 1.3 Standards and Guidelines . . . . . . . . . . . . . . . 10 1.4 General . . . . . . . . . . . . . . . . . . . . . . . . . . . . . 11 1.4.1 Hints to Taking Care of EFAS. . . . . . 11 1.4.2 Handling Tachograph Cards . . . . . . 11 1.4.3 Handling Printouts . . . . . . . . . . . . . 12 1.4.4 Automatic Settings . . . . . . . . . . . . . 12 1.4.5 Time Zones. . . . . . . . . . . . . . . . . . . 13 Display and Controls. . . . . . . . . . . . . . . . . . . . . . . . . 14 2.1 Display Elements . . . . . . . . . . . . . . . . . . . . . 14 2.1.1 Display Symbols . . . . . . . . . . . . . . . 14 2.1.2 Symbol Combinations. . . . . . . . . . . 15 2.1.3 LED Display. . . . . . . . . . . . . . . . . . . 16 2.2 Acoustic Signals . . . . . . . . . . . . . . . . . . . . . . 16 2.2.1 Meaning of the Acoustic Signals . . 16 2.3 Controls . . . . . . . . . . . . . . . . . . . . . . . . . . . . 17 © by EFKON AG 2.3.1 2.3.2 2.3.3 3 Adjusting of the Activity . . . . . . . . 18 Modes of Operation . . . . . . . . . . . 19 Displays . . . . . . . . . . . . . . . . . . . . . 20 Operation of EFAS – Driver and Co-Driver . . . . . . . . 3.1 Before Starting . . . . . . . . . . . . . . . . . . . . . . . 3.2 Driving . . . . . . . . . . . . . . . . . . . . . . . . . . . . . 3.3 Co-Driver Taking Over . . . . . . . . . . . . . . . . . 3.4 Stopping, Withdrawing the Driver Card . . . . 3.5 Continuing a Shift . . . . . . . . . . . . . . . . . . . . 3.6 Continuing an Interrupted Shift . . . . . . . . . . 3.7 Acknowledging Events or Faults . . . . . . . . . . 3.8 Setting the Local Time . . . . . . . . . . . . . . . . . 3.9 Setting a Ferry/Train Crossing . . . . . . . . . . . . 3.10 Digital Tachograph not Required (OUT) . . . . . 3.11 Displaying Data (Print Preview) . . . . . . . . . . . 3.12 Printing Data . . . . . . . . . . . . . . . . . . . . . . . . 3.13 Cancelling a Printout . . . . . . . . . . . . . . . . . . 3.14 End of Paper . . . . . . . . . . . . . . . . . . . . . . . . 3.15 Inserting a Reel of Paper . . . . . . . . . . . . . . . . 3.16 Clearing a Paper Jam . . . . . . . . . . . . . . . . . . 3.17 Completing Activities (Handwritten Form) . . 3.18 Monitoring Speed . . . . . . . . . . . . . . . . . . . . 3.19 Resetting the Trip Meter . . . . . . . . . . . . . . . . 24 25 26 27 28 29 32 35 36 37 38 40 41 43 43 44 46 47 47 48 Table of Content 3 3.20 Remote Data Download (EFAS option) . . . . . 3.20.1 Remote Data Download of Driver Card Data . . . . . . . . . . . . . . 3.20.2 Remote Data Transmission of Data Stored in the Mass Memory. . 3.20.3 Detecting the Data Transfer Status . . . . . . . . . . . . . . . . . . . . . . 4 5 6 4 Operation of EFAS – Workshop . . . . . . . . . . . . . . . . 4.1 Performing a Test Run . . . . . . . . . . . . . . . . . 4.2 Entering the PIN . . . . . . . . . . . . . . . . . . . . . . 4.3 Output of Warnings in CALIBRATION Mode . . . . . . . . . . . . . . . . . . . 4.4 Withdrawing the Workshop Card . . . . . . . . . 49 49 50 50 53 53 53 54 54 Operation of EFAS –Company Representatives . . . . . 5.1 Automatic Registration of Company . . . . . . . 5.2 Manual Registration of Company . . . . . . . . . 5.3 Manual Deregistration of Company . . . . . . . 5.4 Downloading Stored Data . . . . . . . . . . . . . . 5.5 Displaying Company Lock Information . . . . . 5.6 Automatic Setting of Activities after Ignition OFF/ON . . . . . . . . . . . . . . . . . . 5.7 Withdrawing the Company Card . . . . . . . . . 55 55 57 57 57 58 Operation of EFAS – Controlling Bodies . . . . . . . . . . 6.1 Inserting the Control Card . . . . . . . . . . . . . . 6.2 Displaying Data . . . . . . . . . . . . . . . . . . . . . . 6.3 Printing of Data . . . . . . . . . . . . . . . . . . . . . . 6.4 Downloading Stored Data . . . . . . . . . . . . . . 59 59 59 61 62 Table of Content 58 58 6.5 7 Withdrawing the Control Card . . . . . . . . . . .62 General Settings . . . . . . . . . . . . . . . . . . . . . . . . . . . .63 7.1 Printouts . . . . . . . . . . . . . . . . . . . . . . . . . . . .64 7.1.1 Local Time . . . . . . . . . . . . . . . . . . .64 7.2 Display . . . . . . . . . . . . . . . . . . . . . . . . . . . . .65 7.2.1 Language . . . . . . . . . . . . . . . . . . . .65 7.2.2 Display Brightness. . . . . . . . . . . . . .66 7.2.3 Keyboard Brightness. . . . . . . . . . . .66 7.2.4 Display Contrast . . . . . . . . . . . . . . .67 7.2.5 Distance Unit . . . . . . . . . . . . . . . . .67 7.3 Tones . . . . . . . . . . . . . . . . . . . . . . . . . . . . . .68 7.3.1 Key Click . . . . . . . . . . . . . . . . . . . .68 7.3.2 Notification Tone . . . . . . . . . . . . . .68 7.3.3 Warning Tone . . . . . . . . . . . . . . . . .69 7.4 Clock . . . . . . . . . . . . . . . . . . . . . . . . . . . . . .69 7.4.1 Time Setting . . . . . . . . . . . . . . . . . .69 7.4.2 Time Zone . . . . . . . . . . . . . . . . . . .70 7.4.3 Daylight Saving Time . . . . . . . . . . .70 7.4.4 UTC Time . . . . . . . . . . . . . . . . . . . .70 7.4.5 Date Format . . . . . . . . . . . . . . . . . .71 7.5 Company Lock . . . . . . . . . . . . . . . . . . . . . . .71 7.5.1 Display Company Lock Information . . . . . . . . . . . . . . . . . .71 7.5.2 Activating the Company Lock . . . . .72 7.5.3 Deactivating the Company Lock . . .72 7.6 Automatic Setting of Activity after Ignition OFF/ON . . . . . . . . . . . . . . . . . .72 7.7 >> Warning . . . . . . . . . . . . . . . . . . . . . . . . . .73 EFAS 7.8 7.9 8 9 Displaying Card Information . . . . . . . . . . . . . 74 Displaying the Device Data . . . . . . . . . . . . . . 75 Messages . . . . . . . . . . . . . . . . . . . . . . . . . . . . . . . . . 76 8.1 General Messages . . . . . . . . . . . . . . . . . . . . . 76 8.2 Driving Messages . . . . . . . . . . . . . . . . . . . . . 76 8.3 Printout Messages . . . . . . . . . . . . . . . . . . . . 77 8.4 Event Messages . . . . . . . . . . . . . . . . . . . . . . . 78 8.5 Fault Messages . . . . . . . . . . . . . . . . . . . . . . . 79 8.6 Input Error Messages . . . . . . . . . . . . . . . . . . . 80 8.7 Messages of Remote Data Transmission (EFAS option) . . . . . . . . . . . . . . . . . . . . . . . . . 81 8.8 Other Error Messages . . . . . . . . . . . . . . . . . . 82 Printout Examples. . . . . . . . . . . . . . . . . . . . . . . . . . . 83 9.1 Driver Activities (Daily Report) from the Card . . . . . . . . . . . . . . . . . . . . . . . . . . . . . . . 84 9.2 Driver Activities (Daily Report) from the Vehicle Unit . . . . . . . . . . . . . . . . . . . . . . . . . . 88 9.3 Events and Faults from the Card . . . . . . . . . . 92 9.3.1 Data Record Purpose with Events or Faults . . . . . . . . . . . . . . . 94 9.4 Events and Faults from the Vehicle Unit . . . . . 96 9.5 Technical Data . . . . . . . . . . . . . . . . . . . . . . . . 98 9.5.1 Purpose of Calibration . . . . . . . . . 100 9.6 Over Speeding . . . . . . . . . . . . . . . . . . . . . . . 101 9.7 Vehicle Speed Profile . . . . . . . . . . . . . . . . . . 104 9.8 Engine Speed Profile . . . . . . . . . . . . . . . . . . 107 9.9 D1/D2 Status Changes . . . . . . . . . . . . . . . . 110 © by EFKON AG 10 Menu Structure . . . . . . . . . . . . . . . . . . . . . . . . . . . 112 11 Use in Dangerous Goods Transporters . . . . . . . . . . 114 11.1 Introduction . . . . . . . . . . . . . . . . . . . . . . . . 114 11.2 Operating the Device in Explosive Areas . . . 114 12 Symbol Overview . . . . . . . . . . . . . . . . . . . . . . . . . . 116 13 Nation & Region Codes, Time Zones . . . . . . . . . . . 119 13.1 List of Nation Codes, Time Zones . . . . . . . . 119 13.2 List of Region Codes for Spain . . . . . . . . . . 121 14 Technical Data . . . . . . . . . . . . . . . . . . . . . . . . . . . . 122 15 Definitions . . . . . . . . . . . . . . . . . . . . . . . . . . . . . . . 124 Index . . . . . . . . . . . . . . . . . . . . . . . . . . . . . . . . . . . 127 Table of Content 5 1 1 Introduction This is the user guide for the digital tachograph EFAS. The digital tachograph EFAS logs the work periods, driving times, rest periods and availability periods of the driver and co-driver. EFAS logs automatically the speed and distance covered by the vehicle. The protocols logged by the digital tachograph serve as proof for controlling bodies (e.g. police). The digital tachograph EFAS complies with the technical specifications set out in the Commission regulation (EC) No. 1360/2002 of 13 July 2002, the 7th adaptation of Council regulation (EEC) No. 3821/85 to the technical progress of Recording Equipment in Road Transport. This user guide is for all EFAS users (drivers, workshop staff, company representatives, controlling staff). The user guide describes the proper use of the digital tachograph as set out in the regulation. Read the corresponding sections thoroughly and familiarise yourself with the operation of the digital tachograph EFAS. The section “Introduction” is composed of the following sections: • About this Guide (chapter 1.1 on page 6) – explains the structure and use of this guide and the symbols used. • Legal Requirements (chapter 1.2 on page 8) – explains all legal requirements that have to be observed when using the digital tachograph EFAS. 6 Introduction • Standards and Guidelines (chapter 1.3 on page 10) explains which standards and regulations that the digital tachograph EFAS complies with. • General (chapter 1.3 on page 10) – describes the use of digital tachograph cards and printouts and the settings automatically made by the digital tachograph EFAS. 1.1 About this Guide This section describes: • How to Use this Guide (chapter 1.1.1 on page 6) – explains how to use this guide. • Symbols (chapter 1.1.2 on page 7) – explains the meaning of the special symbols in this guide. 1.1.1 How to Use this Guide This section explains how to use this guide. Before using the digital tachograph EFAS, it is essential to read the following sections thoroughly: • “Introduction” (chapter 1 on page 6) • “Display and Controls” (chapter 2 on page 14) Depending on your activities, proceed to the following sections: • “Driver and Co-driver” (chapter 3 on page 24) EFAS • “Workshop” (chapter 4 on page 53) For further information, please refer to the Service manual for workshops. • “Company Representatives” (chapter 5 on page 55) • “Controlling Bodies” (chapter 6 on page 59) 1.1.2 Symbols This section explains the special symbols that are used to highlight certain parts of the guide. Symbol • The section "General Settings" (chapter 7 on page 63) describes the settings for the display, signals, time and company lock. Danger The following sections are used for reference: Note • “Messages” (chapter 8 on page 76) • “Printout Examples” (chapter 9 on page 83) • “Menu Structure” (chapter 10 on page 112) • “Technical Data” (chapter 14 on page 122) • “Definitions” (chapter 15 on page 124) • "Index" (on page 127) Danger: Risk of injury or accident. Note: Important information or advice to avoid malfunctions. Texts which appear on the alphanumeric display of EFAS are printed in this font. Action Actions appear as a bold heading followed by a series of numbered steps. You respond by doing something. Display → Language © by EFKON AG Meaning M1:complete manual inputs? 1. Park your vehicle. 1 Menu items are separated by these arrows. For more information about the menus, see the section “General Settings” on page 60. Introduction 7 1 1.2 Legal Requirements The use of analogue tachographs or digital tachographs is governed by EC regulation 3821/85 Annex I B or 3820/85. This regulation assigns a number of obligations to the driver and the owner of the vehicle. The following sections make no claim to be exhaustive or legally valid, but the instructions may serve as a guideline. Caution Familiarise yourself with the current legal requirements before using the digital tachograph. Periodic inspections: A regular inspection of the digital tachograph EFAS must be performed at least once within a 24 month period by an authorised workshop. The EFAS must be additionally inspected, when • the EFAS was repaired, It is prohibited to falsify, disable or delete recordings of the digital tachographs and the tachograph cards. Also it is prohibited to falsify printouts. • the tyre circumference has changed, Modifications of the digital tachograph or its electronic signals or data links made with the intention of deceit shall be punishable. • the registration number of the vehicle has changed, Note Any disconnection of the vehicle’s battery from the vehicle electrical system without prior insertion of a workshop card will be logged by the digital tachograph. This event is stored in the digital tachograph in accordance with EU regulations. Always have your battery changed by an authorised workshop and make sure the workshop card is inserted. 8 Note Introduction • the revolution ratio has changed, • the UTC time of the EFAS deviates by more than 20 minutes from the correct UTC time. Note Please observe the instructions for using the digital tachograph for hazardous material transportation. For further details, see the section 11 on page 109. EFAS 1.2.1 Regulations for Drivers 1.2.2 Regulations for Company Representatives 1 This list of regulations makes no claim to be exhaustive. It is intended to serve merely as a guideline. This list of regulations makes no claim to be exhaustive. It is intended to serve merely as a guideline. • As the driver, you must ensure correct use of the digital tachograph and the driver card. • Monitor the digital tachograph and the tachograph card to ensure that it functions properly. • If the digital tachograph malfunctions, you must report the faults on a separate sheet or on the reverse side of the printout. The notes must be accompanied by your personal data (name, number of driver card, signature). • Ensure that the vehicle and calibration data is entered in the digital tachograph by an authorised workshop. • If your driver card is lost or damaged, or if it malfunctions, you must create a daily report after your journey. This report is to be accompanied by your data and signature. • Ensure that your drivers use the digital tachograph and the drivers’ cards properly. Instruct your drivers to comply with the driving times and the rest periods. • If your driver card is damaged or malfunctions, submit it to the responsible authorities immediately. • Ensure that the company card is used properly. • Always notify the responsible authorities of the loss of your driver card immediately. © by EFKON AG • Ensure that there is always a sufficient number of approved reels of paper in your vehicle. • Comply with the calibration and inspection intervals. The digital tachograph must be inspected at least every two years. Ensure that the installation label is updated following each inspection. Introduction 9 1 1.3 Standards and Guidelines EFAS fulfils the following standards and guidelines: • EN 60079-0 : 05.2007 Electrical apparatus for explosive gas atmospheres Part 0: General requirements • EN 60079-11 : 08.2007 Explosive atmospheres Part 11: Equipment protection by intrinsic safety "i" • EN 60079-15 Electrical apparatus for explosive gas atmospheres Part 15: Construction, test and marking of type of protection "n" electrical apparatus. • Commission Directive 2006/28/EC of 6 March 2006 amending, for the purposes of their adaptation to technical progress, Council Directive 72/245/EEC of 20 June 1972 relating to the radio interference (electromagnetic compatibility) of vehicles and Council Directive 70/156/ EEC on the approximation of the laws of the Member States relating to the type-approval of motor vehicles and their trailers (Text with EEA relevance). In conjunction with: Commission Directive 2004/104/EC of 14 October 2004 adapting to technical progress Council Directive 72/245/ EEC relating to the radio interference (electromagnetic compatibility) of vehicles and amending Directive 70/156/ 10 Introduction EEC on the approximation of the laws of the Member States relating to the type-approval of motor vehicles and their trailers (Text with EEA relevance). • Commission Regulation (EC) No 1360/2002 of 13 June 2002 adapting for the seventh time to technical progress Council Regulation (EEC) No 3821/85 on recording equipment in road transport (Text with EEA relevance). • Directive 94/9/EC of the European Parliament and the Council of 23 March 1994 on the approximation of the laws of the Member States concerning equipment and protective systems intended for use in potentially explosive atmospheres. • Council Directive 94/55/EC of 21 November 1994 on the approximation of the laws of the Member States with regard to the transport of dangerous goods by road. In conjunction with: Annexes A and B to Council Directive 94/55/EC as announced in Commission Directive 2001/7/EC adapting for the third time to technical progress Council Directive 94/55/EC on the approximation of the laws of the Member States with regard to the transport of dangerous goods by road. EFAS 1.4 General This section includes the following information: • Hints to taking care of EFAS • Handling tachograph cards • Handling printouts • Automatic settings 1.4.1 Hints to Taking Care of EFAS Use a soft cloth, slightly dampened with water to clean the front panel, the keys and the display of the digital tachograph EFAS. To avoid scratching the surface, please take care not to apply too much pressure. Do not use any abrasive cleaning materials to clean EFAS. Under no circumstances should you use solvents such as petrol, acetone, methylated spirits or alcohol. 1.4.2 Handling Tachograph Cards Tachograph cards are electronic chip cards which are used for digital tachograph identification and to store certain data. There are four types of tachograph cards. The different types of tachograph cards are identified by different colours. © by EFKON AG Driver Card The driver card (white) is used by the driver to identify himself on the digital tachograph. The driver card is for normal driving. The card stores, displays and prints driver’s activities. 1 Company Card The company card (yellow) is used to display, print and download the company data stored in the digital tachograph or on the driver card. The company card is intended for the owner of the vehicle. Control Card The control card (blue) is used by employees of controlling bodies, e.g. the police, to identify themselves. The control card is used to display, print and download data stored in the vehicle unit and on the driver card. Workshop Card The workshop cards (red) are for employees of authorised workshops. The workshop cards can be used to activate, inspect and calibrate the control device. The workshop cards can also be used for test drives. Note The driver card, control card and workshop card are personalised. It is not permissible to pass the cards on to other persons. Introduction 11 1 Note The company card and the control card must not be used for driving. 1.4.3 The printouts serve as proof of driving. The printouts must be kept by the registered keeper for at least 1 year. Please observe the following rules when using the tachograph cards: • Do not bend or fold the tachograph cards. • Do not insert damaged or soiled cards into the digital tachograph. • Keep the contact surfaces clean, dry and free of oil or grease. Always keep your tachograph cards in the corresponding protective covers. • Do not expose the tachograph cards to strong solar radiation or electromagnetic fields. • Do not leave the tachograph cards on the dashboard. • Do not use the tachograph cards beyond their validity date. Always apply for a new tachograph card in good time. 12 Handling Printouts Note The printouts are made on special thermal printer paper. The printout may become illegible when exposed to heat, solar irradiation or chemicals. Please observe the following rules: • Protect the printouts against solar irradiation, light, humidity and heat. • Do not use highlighters on the printouts. • Always use special thermal printer paper certified by tachographs manufacturer. 1.4.4 Automatic Settings • Clean the tachograph cards with a wet cloth when it is soiled. Do not use solvents or abrasives. To facilitate the logging of driver activities, the digital tachograph EFAS makes a number of automatic settings. • The tachograph cards can only be withdrawn by pressing keys 1 or 2. The tachograph cards cannot be unlocked mechanically. Do not withdraw the card from the unit by force. • Whenever the vehicle starts, the digital tachograph auto- matically changes to driving time for the driver and to availability for the co-driver. Introduction EFAS • Whenever the vehicle stops, the digital tachograph automatically changes to work period for the driver. If less than 2 minutes pass between stopping and re-starting, the digital tachograph cancels the automatic change from driving time to work period. • Whenever the ignition is turned off, EFAS is able to change automatically to a programmed driver activity, see also the section "Automatic Setting of Activities after Ignition OFF/ON" on page 58. 1.4.5 1 Note Please refer to chapter "Time Zone" on page 70 for setting the time zone. Note A list of nation and region codes with corresponding time zone offset values can be found in chapter "Nation & Region Codes, Time Zones" on page 119. Time Zones Since your vehicle may move within different time zones (see chapter 13.1 on page 119), all logs and entries are in UTC time. UTC time is a standardised world time without daylight saving time. All entries must be made in UTC time. In most central European countries, UTC time during the winter is one hour earlier than local time. In the winter, one hour has to be deducted from local time to calculate UTC time. In the summer, two hours have to be deducted from local time to calculate UTC time. If you have set the time zone correctly for EFAS, the digital tachograph displays the local time on all standard displays during the journey. This is shown by the flashing colon between the hours and minutes (in UTC time the colon does not flash). However, all entries have to be made in UTC time. © by EFKON AG Introduction 13 2 2 Display and Controls This section describes the displays and controls of the digital tachograph EFAS. 2.1 Display Elements 2.1.1 The alphanumeric display uses different symbols for displaying information. The table below gives an overview: Symbol Meaning Availability Driver, driving, mode: OPERATIONAL Rest period Work period Interruption, break time ? Unknown Company, mode: COMPANY The digital tachograph EFAS features the following display elements: Controller, mode: CONTROL 1. Red LED to display the operating mode Workshop/test station, mode: CALIBRATION Manufacturer, tachograph not activated 1 Driver slot 2. Alphanumeric display An additional buzzer is also installed. 14 Display Symbols Display and Controls 2 Co-driver slot Valid tachograph card inserted Invalid tachograph card inserted; see note Card cannot be ejected because ignition is off EFAS Symbol Meaning Symbol Meaning Clock From or to Display Current setting (menu) Data download to external memory Power supply Printer, printout Sensor Tyre size Vehicle, vehicle unit OUT Digital tachograph not required (out of scope) Ferry/train crossing ! Event Fault Start of working day End of working day Place M 1 2 Daylight saving time activated Note Invalid tachograph cards are ignored by the digital tachograph. However it is possible to display, print and download data stored on expired cards. 2.1.2 Symbol Combinations The alphanumeric display also uses symbol combinations to display information. The following table provides an overview of frequently used symbols. Symbol Meaning >> Speed monitoring, see the section "Monitoring Speed" on page 47 Manual entry of driver activities Register company on digital tachograph Security > Speed Deregister company from digital tachograph Total, summary --- No card Daily Card valid to 24h | Weekly || Two-weekly © by EFKON AG A complete list of symbol combinations can be found in chapter "Symbol Overview" on page 116. Display and Controls 15 2.1.3 2 LED Display The red LED indicates different EFAS states. The table below explains the meaning of the display. 2.2.1 Meaning of the Acoustic Signals Tone Sequence Meaning 1x long, 2x short Displayed warning (event or fault message) to be acknowledged. Display Meaning Red The LED flashes upon activation (functional check). 2x short, 1x long Failure; system error; EFAS to be serviced. Off EFAS is ready for operation. 1x long General error. Permanently red System error. Have your EFAS checked by a workshop. 1x very long Flashing red Warning. Acknowledge the warning with OK. Flashing red 2x Incorrect entry. Correct your entry. Programmed speed exceeded! >> or Advance warning of max. speed being exceeded. 1x short Indicates a user entry is to be made. 2x short Incorrect entry warning. 2.2 Acoustic Signals The digital tachograph EFAS is provided with a buzzer. Acoustic signals can be switched on or off as required. For more information, see the section "Tones" on page 68. 16 Display and Controls EFAS 2.3 Controls The digital tachograph EFAS is switched on by turning on the ignition, by motion pulses, by inserting a tachograph card or by pressing any key. The digital tachograph switches off automatically at the latest four minutes after the ignition is turned off. If you press any key within this period, this time is delayed again up to four minutes. 1 2 Note The digital tachograph EFAS is operated by means of operative elements on the front panel of the digital tachograph. The front panel is also provided with slots for the tachograph cards and covers for the service interface and printer. The tachograph cards can only be withdrawn by pressing (ca. 1.5 sec.) keys 1 or 2. The tachograph cards cannot be unlocked mechanically. Do not try to withdraw the cards by force. 1. Service interface cover 2. Integrated printer module 3. Key 1 for the driver 4. Backspace 5. Card slot for the driver’s tachograph card 6. Cursor key (backward / previous entry) 7. Cursor key (forward / next entry) 8. Key OK 9. Key 2 for the co-driver 10. Card slot for the co-driver’s tachograph card (team mode) © by EFKON AG Display and Controls 17 2.3.1 2 Adjusting of the Activity The following activities are indicated by the digital tachograph EFAS: Driving time (set automatically) Working time Availability After the vehicle starts to move the digital tachograph EFAS switches, after a short time, automatically for the driver to driving time and for the co-driver to availability . If the vehicle stops, the digital tachograph EFAS toggles, for the driver, automatically to working time . In addition to the above mentioned change-over of the driver's activity, the digital tachograph EFAS takes back the automatic switchover of driving time to working time again if the vehicle stops for less than 2 minutes. Rest time Manual setting • As driver in stationary vehicle press the button 1 so often, until the desired activity (, , ) appears in the display. On this occasion, take care that the button is not pressed too long, as this will eject the card. • Press, as co-driver (driver 2), the button 2, so often until the desired activity appears in the display. Activity driver 1 Automatic adjusting of the Activity If the automatic switchover of the activity is activated after ignition ON/OFF, the driver and/or the co-driver receives the preset activity if the ignition is switched on or switched off. This setting can be carried out with an inserted company card with the menu “Settings“, see "Automatic Setting of Activities after Ignition OFF/ON" on page 58. Activity driver 2 Note Do not forget to check the set activity after the journey end. 18 Display and Controls EFAS 2.3.2 Modes of Operation 1 2 The digital tachograph EFAS can be run in four modes: Symbol Mode OPERATIONAL CONTROL CALIBRATION COMPANY Display of operation mode Depending on the inserted tachograph cards, the digital tachograph automatically switches to one of the following modes. ( * ) In this state, the digital tachograph only uses the tachograph card in slot 1. In the inverse fields EFAS reports a card conflict. EFAS may not be able to select the desired operation mode. Remove the card which caused the card conflict. Select the desired operation mode with card combinations, which are not displayed in inverse in the table above. © by EFKON AG Display and Controls 19 2.3.3 2 Displays Speed and odometer If there is no need to display warnings and no menu has been selected, the digital tachograph displays one of the following screens: 1. Speed and odometer (default screen) 2. Current work periods and activities for driver and codriver The first line displays the following information from left to right: 3. Driving times driver 1 • Symbol for driver activity 4. Driving times driver 2 • The card symbol indicates that there is a card in the driver slot (The card symbol is hidden when no card is inserted) 5. Speed and trip meter 6. UTC time Use cursor keys or to change to a different screen display. Note 20 • Current reading of odometer • The card symbol indicates that there is a card in the codriver slot (The card symbol is hidden when no card is inserted) • Symbol for co-driver activity If the digital tachograph EFAS is displaying an unknown language for you, you can switch to the English language by pressing the key for more than 5 seconds if the digital tachograph is showing one of the following displays: The second line displays the following information: • Driving times driver 1 • Current local time • Driving times driver 2 • Symbol for the current mode • UTC-time EFAS displays the time in the standard display as local time. In all other cases the UTC time is displayed. The flashing colon indicates that local time is displayed. There is no flashing colon when UTC time is displayed. Display and Controls • Current speed in km/h (mph option available) EFAS Current work periods and activities for driver and co-driver The first line displays the following information from left to right: • Number of card slot for driver • Symbol for current activity of driver • Current driving time • Interruption of driving time (according to regulation (EC) No. 561/2006) The second line displays the following information: • Number of card slot for co-driver • Symbol for current activity of co-driver • Current duration of activity of co-driver Driving times driver 1 1 2 The first line displays the following information from left to right: • Number of card slot for driver, the display refers to: 1 = Driver 2 = Co-driver • Symbol for driving time and duration of driver‘s driving time • Total driving time interruptions (according to regulation (EC) No. 561/2006) The second line displays the following information: • Total driving time on current day • Total driving time in the last two weeks • Current local time • Symbol for current mode (in this case OPERATIONAL) © by EFKON AG Display and Controls 21 Driving times driver 2 Speed and trip meter 2 The first line displays the following information from left to right: The first line displays the following information from left to right: • Number of card slot for co-driver, the display refers to: 1 = Driver 2 = Co-driver • Symbol for driver activity • Symbol for driving time and duration of co-driver‘s driving time • The card symbol indicates that there is a card in the driver slot (The card symbol is hidden when no card is inserted) • Total driving time interruptions (according to regulation (EC) No. 561/2006) • Trip meter reading (Further information on the trip meter can be found in the section "Resetting the Trip Meter" on page 48) The second line displays the following information: • The card symbol indicates that there is a card in the driver slot • Total driving time on current day • Total driving time in the last two weeks The card symbol is hidden when no card is inserted. • Symbol for co-driver activity • The second line displays the following information: • Current speed in km/h (mph option available) • Current local time • Symbol for the current mode 22 Display and Controls EFAS UTC – time 1 2 The first line displays the following information from left to right: • Pictogram for UTC time • Date • The field DST indicates that the digital tachograph was set for daylight saving time. A hidden DST indicates that the current setting is standard time. Further information on daylight saving time can be found in the section "Daylight Saving Time" on page 70. The second line displays the following information: • Current UTC time • Currently set time zone. Further information on the time zone can be found in the section "Time Zone" on page 70. • Symbol for the current mode For more information on the screen displays, see the section "Driving" on page 26. © by EFKON AG Display and Controls 23 3 Operation of EFAS – Driver and Co-Driver This section describes the use of EFAS for drivers and codrivers. 3 Before reading this section, familiarise yourself with the general information in the section "Introduction" on page 6 and the displays and controls in the section "Display and Controls" on page 14. An overview of all EFAS messages is provided in the section "Messages" on page 76 and an overview of the menu structure in the section "Menu Structure" on page 112. This section is divided into the following sub-sections: 3.1 Before Starting (page 25) 3.2 Driving (page 26) 3.3 Co-Driver Taking Over (page 27) 3.4 Stopping, Withdrawing the Driver Card (page 28) 3.5 Continuing a Shift (page 29) 3.6 Continuing an Interrupted Shift (page 32) 3.7 Acknowledging Events or Faults (page 35) 3.8 Setting the Local Time (page 36) 3.9 Setting a Ferry/Train Crossing (page 37) 3.10 Digital Tachograph not Required (OUT) (page 38) 3.11 Displaying Data (Print Preview) (page 40) 3.12 Printing Data (page 41) 3.13 Cancelling a Printout (page 43) 3.14 End of Paper (page 43) 3.16 Clearing a Paper Jam (page 46) 3.17 Completing Activities (Handwritten Form) (page 47) 3.18 Monitoring Speed (page 47) 3.19 Resetting the Trip Meter (page 48) 3.20 Remote Data Download (EFAS option) (page 49) If any of the terms used in this section are not clear, look them up in the section "Definitions" on page 124. Danger When driving, EFAS may display messages or eject the tachograph card in the event of an error. Do not let yourself be distracted by this. Always keep your eyes on the road. Danger Do not insert the driver card when driving. Do not operate the unit when driving, as this may distract your attention from the road and cause an accident. Danger Keep the printer slot closed when driving. Abrupt vehicle movements may cause injuries. Note The tachograph cards can only be withdrawn by pressing either key 1 or 2. The tachograph cards cannot be unlocked mechanically. Do not try to withdraw the card by force. 3.15 Inserting a Reel of Paper (page 44) 24 Operation of EFAS – Driver and Co-Driver EFAS 3.1 Before Starting The display shows the question Complete Activities?. Enter your EFAS login before starting. You may be asked to complete all your activities since the last card withdrawal. 3 Note If the special condition OUT of scope (digital tachograph not required) is active, the condition is automatically switched off after the driver card is withdrawn. 3. If you do not want to complete your activities, select NO with the cursor keys and press OK. or Before Starting If you want to complete your activities, follow the instructions in the section "Continuing a Shift" on page 29. 1. Turn on the ignition. 2. Insert your driver card into the left-hand slot (with chip side up). Your card will be read. Your name will be displayed and the read operation is continued. 4. Use the cursor keys and to select the country where your working day begins. Press OK. The list of country codes is shown in the section "Nation & Region Codes, Time Zones" on page 119. When selecting Spain, the region must also be selected. The last four selected countries are always displayed at the start of the list. The display shows the date and the time (UTC) of your last card withdrawal. The data is written to your driver card. 5. © by EFKON AG The card insertion procedure is completed when the corresponding card symbol stops flashing. If it is flashing, the card is not yet available for the digital Operation of EFAS – Driver and Co-Driver 25 tachograph and it is not possible to switch to another screen. To do so, a card must be inserted into the right-hand card slot. 3 3.2 Driving During driving, the digital tachograph displays the following screens: • Current odometer reading and speed • Trip recorder • Current activity and duration of this activity for driver and co-driver 6. Repeat steps 2 to 6 with the driver card of your codriver, if necessary. Note Do not start driving while the card symbol is blinking. The entries are now complete. You are ready to go, or use cursor keys or to switch to any other screen display. When starting to drive, the digital tachograph automatically switches to driving time for the driver and to availability for the co-driver. When stopping, the digital tachograph switches to work period for the driver. If the stop is shorter than 2 minutes, the digital tachograph will deactivate the automatic change from driving time to work period. Use cursor keys or to change to one of the above screens. 26 Operation of EFAS – Driver and Co-Driver EFAS If the special condition „OUT of scope“ (digital tachograph is not required) is enabled, the following will be displayed: “OUT”, current local time, and the symbol for the digital tachograph mode. Co-Driver taking over the vehicle 1. Park your vehicle. Leave the ignition on. 2. Withdraw the driver card. Press key 1 for longer than 1.5 seconds to withdraw the card. The display asks for the country where your journey ends. 3 Further information about OUT can be found in the section "For more information on using menus, see the section "General Settings" on page 63." on page 38. 3.3 Co-Driver Taking Over When the co-driver takes over the vehicle, withdraw your driver card from the left-hand card slot and insert the card of the new driver. 3. Use the cursor keys and to select the country where your journey ends. Press OK. The list of country codes is shown in the section "Nation & Region Codes, Time Zones" on page 119. When selecting Spain, the region must also be selected. The display offers the Daily report print- out?. Note The driver card of the person driving the vehicle must always be in the left-hand card slot. Note If the special condition „OUT of scope“ (digital tachograph not required) is active, the condition is automatically switched off after withdrawal of the driver card. 4. If you want to end the shift, use the cursor to select YES and press OK. The list of driver activities is printed. The driver card is ejected. or © by EFKON AG Operation of EFAS – Driver and Co-Driver 27 If you do not want to end the shift, use the cursor keys and to select NO and press OK. Your driver card will be ejected. 5. Withdraw the tachograph card of the co-driver, if necessary. Press key 2 for longer than 1.5 seconds to withdraw the card. 3 The driver card of the co-driver is ejected. 6. Insert the driver card of the next driver into the lefthand card slot. The card data is read. For more information, see the section "Before Starting" on page 25. Note If the special condition „OUT of scope“ (digital tachograph not required) is active, the condition is automatically switched off after withdrawal of the driver card. Stopping the Journey 1. Park your vehicle. Leave the ignition on. 2. Withdraw the driver card. Press key 1 for longer than 1.5 seconds to withdraw the card. The display asks for the country where your journey ends. 7. Insert the driver card of the future co-driver into the right-hand card slot. The card data is read in. The entries are now complete. You are ready to go. 3.4 Stopping, Withdrawing the Driver Card Withdraw your driver card from the digital tachograph when ending your journey or when interrupting it for a longer time outside of the vehicle. Note Always keep your tachograph card in a safe place in a protective cover. Do not leave the tachograph card on the dashboard. 3. Use the cursor keysand to select the country where your journey ends. Press OK. The list of country codes is shown in the section "Nation & Region Codes, Time Zones" on page 119. When selecting Spain, the region must also be selected. or Ignore this input by pressing the key . 28 Operation of EFAS – Driver and Co-Driver EFAS 4. The display offers the Daily report printout?. 3.5 Continuing a Shift This section describes how to continue an interrupted shift. Complete all your performed activities manually starting at the time of the last driver card withdrawal. Proceed as follows: 5. If you require a daily report printout, use the cursor keys to select YES and press OK. The list of driver activities will then be printed. If your shift had started the day before, the respective activities are also printed. Your driver card will be ejected subsequently . 3 • Insert driver card • Complete activities • Acknowledge activities Example: or If you don't require a printout, ignore the input by pressing the key . Your driver card will be ejected. 6. Withdraw the driver card of the co-driver, if necessary. Press key 2 for longer than 1.5 seconds to withdraw the card. The driver card of the co-driver is ejected. Note Note If you did not end your shift, you will have to complete your activities up to the end of this shift when inserting your driver card next time. To be able to continue the shift, the end of the last activity completed by you must coincide with the time you last inserted your card. This is the only way the digital tachograph recognises that you want to continue a shift. Note When completing the activities, all times must be specified as UTC times. © by EFKON AG Operation of EFAS – Driver and Co-Driver 29 Insert Driver Card 1. Turn on the ignition. 2. Insert your driver card into the left-hand card slot. 3 Your driver card is being read. Your name is displayed and reading is continued. The date and the time (UTC) of the last card withdrawal are displayed. 3. Use the cursor keys and to select YES and press OK. The display shows the date and the time (UTC) of the last card withdrawal and the question End of prev. work time?. 4. Use the cursor keys and to select NO and press OK. The first line of the display shows the symbol of the activity and the date and the time of the start of activity. Complete Activities The display shows the question Complete manual inputs?. If a driver card is inserted in the driver slot as the following picture is showing, EFAS displays a „1“ after the card symbol. For the co-driver slot, EFAS displays a „2“. 30 Operation of EFAS – Driver and Co-Driver 5. Use the cursor keys and to select your activity. The symbol for your activity is displayed on the left-hand side of the first line. The symbols are: Availability Rest period Work period EFAS 6. Press OK to acknowledge the selected activity. 7. Use the cursor keys to select the UTC date when you stopped this activity, if necessary. Press OK. 8. Use the cursor keys to select the current UTC when you stopped this activity and press OK. The display shows the date and the time of the end of your last activity and the question End of prev. work time?. 10. Use the cursor keys to select YES and press OK to acknowledge. The data is written to the driver card. The entries are now complete. You are ready to go. or 3 Use the cursor keys to select NO to cancel your entry and press OK. The query starts again with step 3. Note 9. Use the cursor keys to select NO and press OK. Repeat steps 5 to 8 for the next activity until the end of the last activity coincides with the time of last card insertion. Acknowledge Activities The display shows Complete manual inputs? to confirm your entries. The card insertion procedure is completed when the corresponding card symbol stops flashing. If it is flashing, the card is not yet available for the digital tachograph and it is not possible to change to another screen. Note Do not start driving while the card symbol is blinking. As soon as the vehicle starts moving, the digital tachograph automatically changes to driving time for the driver and to availability for the co-driver. When the vehicle stops, the digital tachograph automatically changes to work period for the driver. If the stop is shorter than 2 minutes, the digital tachograph will deactivate the automatic change from driving time to work period. © by EFKON AG Operation of EFAS – Driver and Co-Driver 31 3.6 Continuing an Interrupted Shift This section describes how to continue a previously interrupted shift. 3 Complete all activities from the last card withdrawal to the last end of shift. Proceed as follows: • Insert driver card • Complete activities • Enter country • Acknowledge activities For more information on continuing the interrupted shift, read the section "Continuing a Shift" on page 29. Example: Insert the Driver Card 1. Turn on the ignition. 2. Insert your driver card into the left-hand card slot. Your driver card is being read. Your name is displayed and reading is continued. The date and the time (UTC) of the last card withdrawal are displayed. Complete Activities The display shows Complete manual inputs?. Note When completing your activities, all times must be specified as UTC time. 32 Operation of EFAS – Driver and Co-Driver EFAS 3. Use the cursor keys and to select YES and press OK. 5. Use the cursor keys or to select your activity. The symbol for your activity is displayed on the lefthand side of the first line. The meaning of the symbols are: The display shows the date and the time (UTC) of the last card withdrawal and the question End of prev. work period?. Availability Rest period Work period 3 6. Press OK. 4. If you ended the previous shift at the time specified, continue with step 11. or 7. Use the cursor keys to select the UTC date when you ended your activity. Press OK. 8. Use the cursor keys to select the current UTC time for the start of the current shift and press OK. The display shows the date and time of your last activity and the question End of prev. work period?. If the specified time was not the end of shift, and you want to complete further activities, use the cursor keys to select NO and press OK. The symbol for your activity and the time (UTC) for the start of the activity are displayed in the first line. 9. If you did not end the previous shift at the time specified, continue with step 5. or Use the cursor keys to select YES and press OK. © by EFKON AG Operation of EFAS – Driver and Co-Driver 33 Enter Country and Start of Shift The display shows End Country, i.e. the country where you ended your shift. 12. Use the cursor keys to select the current UTC time for the start of the current shift and press OK. The display shows Start Country, i.e. the country where you start your current shift. 3 10. Use the cursor keys to select the country where you ended your shift. Press OK. The list of country codes is in the section "Nation & Region Codes, Time Zones" on page 119. When selecting Spain, the region must also be selected. 13. Use the cursor keys to select the country where your current shift starts and press OK. When selecting Spain as country, the region must also be selected. Confirm Activities The display queries the Start of Shift time for the current shift. The display shows Complete manual inputs? to confirm your entries. 11. Use the cursor keys to select the current UTC date for the start of the current shift and press OK. 14. If you want to cancel your entries, use the cursor keys to select NO and press OK. The query starts again with step 3. or Use the cursor keys to select YES to acknowledge your entries and press OK. The data is written to your driver card. 34 Operation of EFAS – Driver and Co-Driver EFAS You may start your journey. Display Additional Information Use cursor keys or to display additional information on a warning. It is not possible to acknowledge a warning when additional information is displayed. 3 In this section, you entered your activities for the previous shift, completed the previous shift and started a new shift. 3.7 Acknowledging Events or Faults The digital tachograph displays a warning for certain events or errors. When a warning is displayed, a tone is heard and the red LED flashes. The tone is repeated for approximately 30 sec. The warning is displayed until it is acknowledged by pressing OK. When displaying additional information on a warning, the first line displays the following information: • Pictograms of warning • Service ID (SrvID) number • Number of unacknowledged warnings with the same SrvID. The second line displays the following information: • Time and date (UTC): start of event or fault. If the number of unacknowledged warnings of the same SrvID is > 1, the start time of the first event or fault will be displayed. A list of EFAS warnings and messages is given in the section "Messages" on page 76. The SrvIDs can be found in the section "Messages" on page 76. More information about service IDs can be found on page 125. Note If a digital tachograph or motion sensor error occurs, an event or fault may be displayed repeatedly. In this case, the digital tachograph must be checked in a workshop. © by EFKON AG Operation of EFAS – Driver and Co-Driver 35 Acknowledge Warning 3 1. Press key OK within the first 30 seconds of the warning being displayed. The beep stops, but the warning continues to be displayed. 2. Press OK once again. The warning is no longer displayed. or 1. Wait for approx. 30 seconds until the beep goes off. The warning continues to be displayed. 2. Press OK. The warning is no longer displayed. Note Acknowledge any displayed messages or warnings before setting the local time. Note For more information on using the menus, see the section "General Settings" on page 63. Setting the Local Time 1. Press OK. The main menu is displayed. 3.8 Setting the Local Time You have to set the local time when changing the time zone or when operating the digital tachograph for the first time. The local time refers to the coordinated universal time (UTC). The time zone specifies the difference between local time and coordinated universal time. The difference can be entered in 30-minute increments. During the summer months the local time is put forward one hour; see "Daylight Saving Time" on page 70. 2. Select Settings → Clock → Time zone The currently set time zone is displayed. The time zone refers to the coordinated universal time (UTC). The currently set time zone is identified with an arrow symbol. Note It is not possible to change the digital tachograph settings when driving. Park your vehicle to change the settings. 36 Operation of EFAS – Driver and Co-Driver EFAS 3. Use the cursor keys and to select the current time zone. Setting a Ferry/Train Crossing 1. Park your vehicle on the train or ferry. 2. Press OK. The main menu is displayed. 3 4. Press OK. The new time zone will be stored. 3.9 Setting a Ferry/Train Crossing When using a ferry or a train with your vehicle, you have to set the condition “Ferry/Train Crossing”. You cannot set the condition “Ferry/Train Crossing” if the condition “Out of scope“ (digital tachograph not required) is active. 3. Select Inputs 4. Press OK. 5. Select Begin. 6. Press OK. The condition “Ferry/Train Crossing” is deactivated automatically when your vehicle starts moving again. Note It is not possible to change the digital tachograph settings when driving. Park your vehicle to change the settings. Note The condition “Ferry/Train Crossing” is enabled. This condition is deactivated automatically when your vehicle starts moving again or when the condition “Out of scope“ (digital tachograph not required (OUT)) is enabled. For more information on using the menus, see the section “General Settings” on page 60. © by EFKON AG Operation of EFAS – Driver and Co-Driver 37 Display Time for Ferry/Train 1. Press key when the condition “Ferry/Train” is active. 3 The time (UTC) when the condition “Ferry/Train” was activated is displayed for approx. 3 seconds. 3.10 Digital Tachograph not Required (OUT) When you leave an area where logging of your driver activities by means of a digital tachograph is mandatory, you may activate the condition “Out of scope“ (digital tachograph not required). Note For more information on using menus, see the section "General Settings" on page 63. Activate “Digital Tachograph not Required” (OUT) 1. Press OK. The main menu is displayed. 2. Select Inputs 3. Press OK. 4. Select OUT Begin. 38 Operation of EFAS – Driver and Co-Driver EFAS 5. Press OK. The condition “Out of scope“ (digital tachograph not required (OUT)) is enabled. Display Time for “Digital Tachograph not Required” 1. Press key when the condition “Out of scope“ (Digital Tachograph not required) is active. The time (UTC) when the condition “Out of scope“ (Digital Tachograph not required) was activated is displayed for approx. 3 seconds. 3 The display shows OUT and the current time (UTC). Note When you return to an area where logging of your driver activities by means of a digital tachograph is mandatory, you have to deactivate the condition “digital tachograph not required (OUT)”. Deactivate “Digital Tachograph not Required” 1. Press key when the vehicle has stopped. The display shows OUT End? and the local time. 2. Press OK. Display Odometer and Speed 1. Press key when the condition “Out of scope“ (Digital Tachograph not required) is active. The display also shows the odometer and the current speed. 2. Press key once again to hide this additional information. The condition “Out of scope“ (digital tachograph not required (OUT)) is deactivated. © by EFKON AG Operation of EFAS – Driver and Co-Driver 39 3.11 Displaying Data (Print Preview) This section describes how to display the data that is stored in the digital tachograph and on the tachograph cards. 3 It is possible to display the following data: Display Stored Data 1. Park your vehicle. Leave the ignition on. 2. Press OK. The main menu is displayed. • Daily reports from your driver card/workshop card • Daily reports from the digital tachograph • Events and failures stored on your driver card/workshop card • Events and failures stored in the digital tachograph • Speeding 3. Select Print Preview and press OK. The menu for the stored data is displayed. • Technical data • Speed profile (digital tachograph option) • Engine speed profile (digital tachograph option) • D1/D2 status changes (digital tachograph option) If two driver cards or a driver card and a workshop card are inserted, you have to specify for which card data is to be displayed. 4. Select the required data and press OK. 5. If two tachograph cards are inserted, you will have to select which card you want to display data from. Contents that cannot be displayed in one line scroll automatically from right to left. The scroll bar in the right-hand margin of the display indicates the part that is currently displayed. Use the following keys to move around the displayed data: OK 40 Next line Previous line Return to menu Scrolling and/or stop scrolling Operation of EFAS – Driver and Co-Driver EFAS 6. Use the cursor keys and to select the required data and press OK. 7. The stored data is displayed. 8. Press to display the next line. 9. Press if you want to return to the menu. The display shows 24h Print Daily Reports? 10. Use the cursor keys to select YES if you want to print the displayed data. or Select NO if you want to return to the menu without printing the data. 11. Press OK. © by EFKON AG 3.12 Printing Data This section explains how to print the data that is stored in the digital tachograph or on the tachograph card. It is possible to print the following data: • Daily reports of your driver card/workshop card • Daily reports of the digital tachograph • Events and faults stored on the driver card/workshop card • Events and faults stored in the digital tachograph • Over speeding • Technical data • Speed profile (digital tachograph option) • Engine speed profile (digital tachograph option) • D1/D2 status changes (digital tachograph option) 3 If two driver cards or a driver card and a workshop card are inserted, you have to specify from which card the data has to be printed from. Use key to cancel printing at any time. For examples and explanations of printouts, see the section "Printout Examples" on page 83. For explanations of messages that may be displayed during printout, see the section "Messages" on page 76. Note Data cannot be printed when driving. Any printout is cancelled when the vehicle starts moving. Operation of EFAS – Driver and Co-Driver 41 Note Leave the ignition on when printing. The printout is halted when the ignition is turned off. 3 5. If two tachograph cards are inserted, you have to select from which card the data has to be printed from. Note If the ignition is switched off for more than 30 seconds, the print job is cancelled. Printing Stored Data 6. Use the cursor keys to select the required date and press OK. 1. Park your vehicle. Leave the ignition on. 2. Press OK. The main menu is displayed. 7. The stored data is printed. 8. Pull the paper off (transversely/upwards). 3. Select Print and press OK. The menu for the stored data is displayed. 4. Use the cursor keys and to select the required data and press OK. 42 Operation of EFAS – Driver and Co-Driver EFAS Note Sign the printouts and keep them in a dark place. 3.13 3.14 End of Paper Printing is interrupted when the printer runs out of paper. Cancelling a Printout 3 You may cancel printing at any time. Cancel Printing 1. Press key when printing is in progress. The end of printing is marked. When you insert a new reel of paper, printing continues automatically and is marked as a continuation of the interrupted printout. Example: The printing of the selected printout is aborted. An ending mark is printed to indicate that the printout is not completed. 2. Pull off the paper when printing is stopped. © by EFKON AG Operation of EFAS – Driver and Co-Driver 43 3.15 Inserting a Reel of Paper This section describes how to insert a new reel of paper. 3 Danger Only insert a new reel of paper when the vehicle is parked. Negligence may cause accidents. Inserting a Reel of Paper 1. Park your vehicle. Turn off the ignition. 2. Use a coin to press against the printing module’s locking device. The locking device is located above the right-hand card slot. Danger The print head is hot after printing. To avoid burning your fingers, wait a short time before removing the printing module. Note Only use the thermal printer paper reels for digital tachographs, approved by the manufacturer. The printing module slides out of the digital tachograph. 3. Pull the printing module completely out of the digital tachograph EFAS. Note Treat the printing module carefully. Avoid soiling. Note Use a brush to remove possible soiling. 44 Operation of EFAS – Driver and Co-Driver EFAS 4. Turn over the printing module. 6. Flip up the cover of the paper box to open the paper box. 3 5. Hold the printing module with both hands and using both thumbs push the front panel forwards. © by EFKON AG 7. Remove any residue from the reel of paper. Loosen the adhesive strip on the new reel of paper. Insert the new reel of paper into the paper box. Pay attention to the direction of the reel. Reel direction marks appear on the sides of the printing module. The printed reverse side of the paper must face upwards. Operation of EFAS – Driver and Co-Driver 45 3 8. Insert the start of the reel of paper into the paper feed at the front of the printing module. Hold the paper as shown in the figure below. Ensure that the paper is inserted smoothly and evenly. Shut the cover of the paper box. 9. Press the front into the printing module to close the paper box. 10. Turn over the printing module. 11. Slide the printing module into the digital tachograph as far as it will go. 12. Tear off any paper that sticks out. 3.16 Clearing a Paper Jam Paper jams occasionally occur during printing. To clear a paper jam, proceed as described in the section "Inserting a Reel of Paper" on page 44. 46 Operation of EFAS – Driver and Co-Driver EFAS Clearing a Paper Jam 1. Remove the printing module. For instructions, see the section "Inserting a Reel of Paper" on page 44. 2. Remove any crumpled or tattered paper. 3. Insert the paper evenly and smoothly into the paper feed. 4. Insert the printing module into the digital tachograph. 3.17 3.18 Monitoring Speed Besides statutory monitoring of the highest permissible vehicle speed, EFAS also enables monitoring of an individually programmable speed limit. To activate the speed limit, proceed as follows. 3 1. Use cursor keys or to activate the speed display. Completing Activities (Handwritten Form) If the digital tachograph is defective, the driver and/or codriver are required by regulation to complete the activities in hand-written form. To do so, use the back of the paper which is inside the printer module. Refer to the section "Inserting a Reel of Paper" on page 44. Note 2. Press OK when the programmed speed is reached. EFAS displays the programmed speed for approximately 2 seconds. Then the previously displayed driver information is displayed. The activation of speed monitoring is indicated by the pictograms “>>“ in the centre of the second line. When the individually programmed speed limit is exceeded, the following display is shown for approx. 4 seconds. A long beep is heard and the red LED flashes. Please observe the applicable national regulations! © by EFKON AG Operation of EFAS – Driver and Co-Driver 47 When driving, speed monitoring can be deactivated by pressing the key . 3 Note Speed monitoring is automatically switched off when: 3.19 Resetting the Trip Meter 1. Use the cursor keys or to activate the trip meter display. The trip meter is identified with in front of the distance value. 2. Press key to reset the trip meter when the vehicle is parked. • A different card is inserted or • The vehicle starts moving without a driver card being inserted. 3. Press OK to reset the value to zero. Note You cannot reset the trip meter of EFAS if this function is deactivated or if the setting should take place by an external device of the instrument cluster. Some vehicle types may support additional trip meters or trip meters to be counted independently from the tachograph by the instrument cluster. Please refer also to your vehicle manual. 48 Operation of EFAS – Driver and Co-Driver EFAS 3.20 Remote Data Download (EFAS option) The main menu is displayed. When a RDD ® device (Remote Data Download) is connected to EFAS, the following functions are available: • Initiate transfer of driver card data (over the air) to the company server • Remote Data Transmission of data stored in the mass memory • Check the status of the data transfer 3 3. Choose Remote transm.→ send card data. 4. If there´s a driver card in each of the card reader slots, you have to choose which card has to be used for data transmission. Further information about RDD ® can be obtained from the internet address www.intellic.eu. 3.20.1 Remote Data Download of Driver Card Data In order to secure your driver card data, you can transfer the data to your company´s server. This function is only available, when the EFAS is connected to the RDD® (Remote Data Download). 5. If the transmission of data to the company server from a previous order has not yet begun, the driver has the possibility to replace the previous order with the newer order. If the previous order is to be deleted, use the cursor keys to choose YES and press OK. Note The initiation of transfer of driver card data via RDD ® is only permitted when the vehicle is stationary. 1. Insert your driver card in one of the two card reader slots. 2. Press OK. © by EFKON AG Finally the data is read from the card and is stored in the EFAS until the company server fetches this data. Operation of EFAS – Driver and Co-Driver 49 The download of the data stored in the mass memory is arranged automatically at a specific time. The driver does not have to change any settings. 3 3.20.3 Detecting the Data Transfer Status If you want to detect the current status of the data transfer, do the following: 1. Press OK 3.20.2 Remote Data Transmission of Data Stored in the Mass Memory In addition to the driver card data, the mass memory data can also be transferred via RDD® to the company server. The transfer of the data of mass memory is arranged automatically at a specific time. The driver does not have to change any settings. Due to legal requirements, the data has to be archived for a period of 2 years by the company server. This function is only available, when EFAS is connected to the RDD® (Remote Data Download). The main menu is shown. 2. Choose Remote transm.→ Status and confirm this with OK. 3. If two driver cards are in use, use the cursor keys or , to choose the card reader slot, which contains the correct driver card, from which you want to display the data transfer status. Note The initiation of transfer of the data stored in the mass memory via RDD® is arranged automatically at a specific time. No further actions have to be taken. 50 Operation of EFAS – Driver and Co-Driver EFAS Depending on the data transfer status one of the following displays will be shown: Status Display Status Display 4 Comment 1 Error: No communication with the RDD® device. 2 The company server had initiated the transfer of mass storage, which currently is being transferred. At this time a card data download cannot be initiated. 3 3 Display of the transfer initiation time (date & time). Cursor key (): Display of the card holder‘s surname, who initiated the data transfer to the server. 5 Currently no data transfer has been initiated and currently no data is being transferred. The data transfer equipment is ready to transfer data. A transfer of driver card data (driver card reader slot / slot 1) to RDD® is active. Cursor key (): Display of the start time (date & time) of the data transfer. Cursor key (): Display of the card holder‘s surname, who initiated the data transfer to the server. 6 © by EFKON AG The transfer of driver card data (driver card reader slot / slot 1) is initiated, however the data is not transferred to the server. Cursor key (): Cursor key (): Display of the start time of the data transfer. Comment The transfer status of the data (driver card reader slot / slot 1) is not known. Operation of EFAS – Driver and Co-Driver 51 Status Display 7 3 Comment The display indicates when the last download of the driver card data (driver card reader slot /slot 1) occurred. (This information is read from the card). Cursor key (): Display of the download time of the driver card data. Cursor key (): Display of the card holder‘s surname. 8-11 52 As status 4 to 7, however, for a card in the second card reader slot ( 2 Co-driver). Operation of EFAS – Driver and Co-Driver EFAS 4 Operation of EFAS – Workshop This section describes how to enter the PIN after inserting a workshop card. For more information about making entries with the workshop card, refer to the EFAS Workshop Manual. This section is devided into the following sub-sections: 4.1 Performing a Test Run It is also possible to perform test runs of the vevicle with your workshop card. Make sure that the workshop card is in the left-hand card slot. Before and after a test run the same entries are required as for a driver card. For more information, see the section "Operation of EFAS – Driver and CoDriver" on page 24. 4 4.1 Performing a Test Run (page 53) 4.2 Entering the PIN (page 53) 4.2 Entering the PIN 4.3 Output of Warnings in CALIBRATION Mode (page 54) 4.4 Withdrawing the Workshop Card (page 54) Danger When driving, the digital tachograph EFAS may display messages. Do not be distracted by these. Pay full attention to the road at all times. Note Always ensure to enter the correct PIN.After five incorrect PIN entries, the workshop card is locked. 1. Insert your workshop card into the left-hand card slot. The card data will be read and shortly after you will be asked to enter your PIN. Danger Do not insert the tachograph card when driving. Do not operate the digital tachograph when driving. You may be distracted from the road and cause accidents. Danger Keep the printer slot closed when driving, otherwise you could be injured by sudden movements of the vehicle. 2. Use cursor keys or to change the displayed character. 3. Press OK to adopt the character. 4. Repeat steps 2 and 3 for all the characters in your PIN. © by EFKON AG Operation of EFAS – Workshop 53 5. Press OK to adopt the entered PIN. The display shows confirm? 6. If you are uncertain of your PIN entry, you may cancel? or repeat? your PIN using cursor keys or. 4 7. Press OK. 8. After entering the PIN, you have to enter the driver activities. 9. For more information about entering driver activities, refer to the section "Driving" on page 26. If you acknowledge an incorrect PIN by mistake, EFAS displays the following: For the list of SrvIDs, refer to the EFAS Service Manual. 4.4 Withdrawing the Workshop Card Withdraw the workshop card from the digital tachograph if it is no longer used. This helps to avoid any misuse. Withdrawing the Workshop Card 1. Press key 1 for longer than 1.5 seconds to withdraw the card. The digits in the top-right hand corner of the display indicate (as shown in the example) that this is your second attempt of five to enter your PIN. 4.3 Output of Warnings in CALIBRATION Mode In CALIBRATION mode (see "Modes of Operation" on page 19), storage of some EFAS warnings is suppressed. These warnings are displayed for a short time on the EFAS display. 54 Operation of EFAS – Workshop 2. You are then requested to enter the country in which your working day ends. For more information, see the section "Operation of EFAS – Driver and Co-Driver" on page 24. If you did not perform a test run with the workshop card, you can ignore the entry by pressing key . 3. Use cursor keys or YES or NO and acknowledge the question for the daily report by pressing OK. 4. Alternatively, press key once again if you do not want to make a daily report. 5. The card is ejected. EFAS 5 Operation of EFAS – Company Representatives This section describes the use of the digital tachograph EFAS for company representatives. A company card is required to use all the functions that are described in this section. The company card is used for downloads or printouts of the data that is stored in the digital tachograph. It is possible to print or download the data that was stored while your company was registered on the digital tachograph. When registering your company on the digital tachograph, a company lock is activated. This company lock prevents other companies from reading out or displaying the data stored for your drivers. Before reading this section, familiarise yourself with the general information in the section "Introduction" on page 6 and the control and display elements in the section "Display and Controls" on page 14. For a summary of all EFAS messages, see the section "Messages" on page 76, and for a summary of the menu structure see the section "Menu Structure" on page 112. This section is divided into the following sections: 5.1 Automatic Registration of Company (page 55) 5.2 Manual Registration of Company (page 57) 5.3 Manual Deregistration of Company (page 57) 5.4 Downloading Stored Data (page 57) 5.5 Displaying Company Lock Information (page 58) © by EFKON AG 5.6 Automatic Setting of Activities after ignition OFF/ON (page 58) 5.7 Withdrawing the Company Card (page 58) Note Make sure that your company is registered on the digital tachograph before making the first journey for your company, otherwise you will not be able to access the data that is stored in the digital tachograph. Note 5 Do not drive with the company card. The company card is not intended for driving. When driving, always have a driver card or workshop card inserted in the left-hand card slot. 5.1 Automatic Registration of Company Before starting your first company journey, you have to register your company on the digital tachograph. By doing so, you have access to data that is stored as of this time (in case another company was registered before). When registering your company, you block other persons that do not have your company card. Data that is not assigned to a company can be read by everyone. When you insert the company card into the digital tachograph and no other company is registered, your company will be registered automatically. If another company is registered, you may unlock the company’s lock and register your company. Operation of EFAS – Company Representatives 55 Registration of Company 1. Turn on the ignition. 2. Make sure that there is no card inserted or only one driver card. 3. Insert your company card into one of the vacant card slots. The card data is read and your company data is displayed. 5 4. Use the cursor keys or to select YES and press OK to register your company on the digital tachograph. or Use the cursor keys to select NO and press OK if you do not want to register your company once again. Then you have access to data that had already been allocated to your company (if you have already registered your company). or If no company is registered, your company will be registered automatically. The company card in the specified slot was ignored (in this case “2”, co-driver). There is already a company card in card slot 1. or or If your company was registered before, the following information is displayed. There is a different card in the digital tachograph, i.e. automatic registration is not possible. or if another company is currently registered, the display shows the following screen: 56 Operation of EFAS – Company Representatives Note If there is no entry within the next 30 seconds, registration will be cancelled. EFAS 5.2 Manual Registration of Company Downloading Stored Data If you interrupted automatic registration of your company (see the section "Automatic Registration of Company" on page 55), you may register your company manually. 1. Turn on the ignition. For more information, see the section "Activating the Company Lock" on page 72. 5.3 Manual Deregistration of Company When leaving the vehicle with another company, you should deregister your own company on the digital tachograph. For more information, see the section "Deactivating the Company Lock" on page 72. 2. Insert your company card into one of the card slots. The second slot must either be empty or contain a driver card. 3. Open the cover of the interface on the front side. To do so, stick your fingernail into the groove above the cover, pull out the flap and fold it down. 4. Connect the external device to the interface. 5 5. For information on how to download the stored data, see the manual on the external device. 6. While data is being downloaded from the digital . tachograph, a flashing twin arrow is displayed Note 5.4 Downloading Stored Data Do not disconnect the data connection to the digital tachograph EFAS before the download is completed. The data that is stored in the digital tachograph can be downloaded by using a suitable external device. You can only download the data for drivers from your company. However it is important that your company was or is registered on the digital tachograph EFAS. For information about registering on the digital tachograph, see the section "Automatic Registration of Company" on page 55 and the section "Activating the Company Lock" on page 72. © by EFKON AG Operation of EFAS – Company Representatives 57 5.5 Displaying Company Lock Information For information purpose it is possible to display the current company lock information. The following company lock information is displayed: • Complete name of company • Address of company 5 • Date/time (start of lock) Displaying Company Lock Information 1. Select OK Settings → Company Lock → Info The information on the current company lock is displayed. 5.6 Automatic Setting of Activities after Ignition OFF/ON When the company card is inserted, the activity ( , or ) for driver and co-driver can be defined to be set automatically after the ignition is turned on/off. For more information on how to change these settings, see the section "Automatic Setting of Activity after Ignition OFF/ ON" on page 72. 5.7 Withdrawing the Company Card Withdraw the company card from the digital tachograph when the card is no longer needed there. This prevents any misuse. Withdrawing Company Card 2. Use cursor keys and to scroll to the required page. 1. Press keys 1 or 2 for longer than 1.5 seconds to withdraw the card either from slot 1 or 2. The card will be ejected. 3. Press to return to the menu. 58 Operation of EFAS – Company Representatives EFAS 6 Operation of EFAS – Controlling Bodies This section describes the operation of digital tachograph EFAS for representatives of controlling bodies. Before reading this section, familiarise yourself with the general information in the section "Introduction" on page 6 and the displays and controls in the section "Display and Controls" on page 14. For an overview of all EFAS messages, see the section "Messages" on page 76 and for an overview of the menu structure the section "Menu Structure" on page 112. Inserting the Control Card 1. Turn on the ignition. 2. Make sure that no card is inserted or only one driver card. 3. Insert your control card into one of the empty slots. The card data is read and the name that is stored on the card is displayed. 6 This section is divided into the following sub-sections: 6.1 Inserting the Control Card (page 59) 6.2 Displaying Data (page 59) 6.3 Printing of Data (page 61) 6.4 Downloading Stored Data (page 62) 6.5 Withdrawing the Control Card (page 62) If any of the terms used in this section is not clear, see the section "Definitions" on page 124. The control card is used to display, print and download all information that is stored in the digital tachograph, on a driver card or on a workshop card. 6.2 Displaying Data This section describes how to display the data that is stored in the digital tachograph and on the tachograph cards. You may display the following data: • Daily reports from driver card • Daily reports from the digital tachograph • Events and faults stored on the driver card • Events and faults stored in the digital tachograph • Speeding 6.1 Inserting the Control Card Your control card enables you to identify yourself on the digital tachograph. © by EFKON AG • Technical data • Speed profile (optional) • Engine speed profile (optional) Operation of EFAS – Controlling Bodies 59 • Status changes (optional) 2. Press OK. The main menu is displayed. Contents that cannot be displayed in one line scroll automatically from right to left. The scroll bar in the right-hand margin of the display indicates the part that is currently displayed. Use the following keys to navigate within the displayed data: 6 Next line 3. Use cursor keys or to select Print preview and press OK. The menu for the stored data is displayed. Previous line Return to menu OK Stop and/or start scrolling 4. Select the required data and press OK. Displaying Stored Data 1. Make sure your control card is inserted into one of the card slots. The digital tachograph is then in the mode “CONTROL”. 5. Use cursor keys or to select the required date and press OK. 6. The stored data is displayed. 60 Operation of EFAS – Controlling Bodies EFAS 7. Press to display the next line or to display the previous line. Press to close the print preview. The display shows Start printout?. • Technical data • Speed profile (device option) • Engine speed profile (device option) • Status changes (device option) Use the key to cancel printing at any time. For examples and explanations, see the sections "Printout Examples" on page 83 or "Messages" on page 76. 8. Acknowledge the displayed answer with OK if you want to print the displayed data. or Select NO and press OK if you want to return to the menu without printing the data. or Press once again if you want to return to the print preview. Note Data cannot be printed when driving. Any printout is cancelled when the vehicle starts moving. 6 Note Leave the ignition on when printing. The printout is halted when the ignition is turned off and cancelled after 30 seconds if ignition is not switched on again. Printing Stored Data 6.3 Printing of Data This section describes how to print out the data that is stored in the digital tachograph or on the tachograph cards. You may print the following data: • • • • • Daily reports from driver card Daily reports from the digital tachograph Events and failures stored on the driver card Events and failures stored in the digital tachograph Speeding © by EFKON AG 1. Make sure your control card is inserted in one of the card slots. 2. Press OK. The main menu is displayed. 3. Select Printout and Press OK. Operation of EFAS – Controlling Bodies 61 The menu for stored data is displayed. 3. Open the cover of the interface at the front of the device. 4. Connect the external device to the interface. 5. For more information on how to download the stored data, see the guide for the external device. 4. Select the required data and press OK. 5. Use the cursor keys to select the required date and press OK. 6. While data is being downloaded from the digital tachograph, a flashing twin arrow is displayed . Note If you insert a control card into a card reader slot during a download, the card will only be read by EFAS, after the download has completed. 6 6. The stored data is printed. 6.4 Note Do not disconnect the data connection to the digital tachograph before the download is complete. Downloading Stored Data The data that is stored in the digital tachograph can be downloaded using a suitable external device. Downloading Stored Data 1. Turn on the ignition. 2. Make sure your control card is inserted in one of the card slots. The second card slot must be empty or contain a driver card. 6.5 Withdrawing the Control Card Withdraw the control card from the digital tachograph when the card is no longer needed there. This prevents any misuse. Withdrawing the Control Card 1. Press keys 1 or 2 for longer than 1.5 seconds to withdraw the card either from slot 1 or 2. The card will be ejected. 62 Operation of EFAS – Controlling Bodies EFAS 7 General Settings This section describes how to change the general settings of the digital tachograph EFAS. The settings comprise: 7.1 Printouts (page 64) 7.2 Display (page 65) 7.3 Tones (page 68) 7.4 Clock (page 69) 7.5 Company Lock (page71) 7.6 Automatic Setting of Activity after Ignition OFF/ON (page 72) 7.7 >>Warning (page 73) The digital tachograph settings are changed using the menus. The following instructions describe how to work with the menus in general. This chapter comprises also the description of the menu items „Card info“ and „Version info“: 7.8 Displaying Card Information (page 74) 7.9 Displaying the Device Data (page 75) It is only possible to call up menus when no messages or warnings are displayed. Acknowledge any warnings before calling up menus. For more information, see the section "Acknowledging Events or Faults" on page 35. Usually, no tachograph card is required for changing of settings. For more information on when a tachograph card is required, see the relevant instructions. © by EFKON AG Working with the menus 1. Press OK. The main menu is displayed. 2. Use cursor keys and to select the required menu. Press OK to acknowledge your choice. The next submenu is displayed. 3. Repeat step 2 until you reach the required setting. 4. Key is used to return to the next higher menu level. The following instructions use an abbreviated description of menu selection. The required menu items are separated by arrows “→”. E.g., the following display OK → Settings → Display → Language 7 Means: 1. Press OK. 2. Use cursor keys and to select the menu item Settings. Press OK. 3. Use cursor keys and to select the menu item Display. Press OK. 4. Use cursor keys and to select the menu item Language. Press OK. The current settings are marked “ ”, new settings are marked “?” “ English” means that the currently set language is English Francais ? means that French will be set as language if you press OK. General Settings 63 7.1 Printouts Note This section explains how to change the settings for printing and print preview. This includes: • Local time In the mode CONTROL the setting is automatically set to “off”, i.e. the printout and print preview always comply with the EU regulation. If “Local Time” is selected, the printout header is as follows: 7.1.1 7 Local Time According to EU regulations, the times specified on the printout and in the print preview are output in UTC time. For easier inspection, the times can also be output in local time by using the setting “Local Time”. 1. Select OK → Printout → Local > Local time (LOC) < Time LOC = UTC + 01h00 + DST The current setting is displayed. ----------------------- 26/04/2008 16:45 (LOC) -----------------------! (LOC) Local time ! ! printout is not as ! ! legally prescribed ! ---------- ----------- 2. Use cursor keys and to select the required setting. Press OK. Note If the setting “Local Time” is chosen, a corresponding note will appear on the printout. However, this printout is not valid for a controlling body! 64 General Settings Example: Time difference to UTC is 1 hour + DST (+1 hour for DST) = 2 hours. EFAS 7.2 Display This section explains how to change the display settings. The settings are: • Language • Display brightness The language which is used for the digital tachograph display depends on the tachograph card which is in-serted in the left-hand card slot.The language is automatically set upon card insertion or withdrawal. However you can select the language manually. Note • Keyboard brightness When a tachograph card is inserted or withdrawn, the language is automatically changed to the language stored on the card to enable data inputs in a known language by the card owner. • Display contrast • Distance unit Setting the Language (manually) 7.2.1 Language 1. Select OK The following national languages are available in the digital tachograph EFAS: Deutsch English Français Italiano Español Português Svensk Nederlands Dansk Suomi Ελληνικá Magyar Česky Polski Slovenščina Slovenčina Norsk Български Eesti Latviešu Lietuvių Română Türkçe *) Pyccκий *) Белорусский *) *) Only available in device option with additional language support. © by EFKON AG Display 7 → Settings → → Language The current language is displayed. 2. Use cursor keys and to select the required language. Press OK. The new language is stored. Note The display language can also be set to English by pressing for at least 5 seconds if one of the screens „Driving times of driver 1 or 2“ or „UTC time“ is displayed (refer to "Display and Controls" on page 14). General Settings 65 7.2.2 Display Brightness If your EFAS is not connected to the central brightness control for the dashboard lighting of your vehicle, the display brightness for day and night can be set via the menu. The day mode is stored when the vehicle lights are off. The night mode is stored when the vehicle lights are on. Changing the Display Brightness 1. Select OK 7 Display → Settings → → Brightness The current brightness setting is displayed. 2. Use cursor keys and to select the required brightness. Press OK. The new brightness setting is stored. Day setting: Night setting: 66 General Settings 7.2.3 Keyboard Brightness If your EFAS is not connected to the central brightness control for the dashboard lighting of your vehicle, the keyboard brightness for day and night can be set via the menu. The day mode is stored when the vehicle lights are off. The night mode is stored when the vehicle lights are on. Changing the Keyboard Backlight Brightness 1. Select OK → Settings Display → → Keyb.brightness The current brightness setting of the keyboard backlight is displayed. 2. Use cursor keys and to select the required brightness. Press OK. The new brightness setting is stored. Day setting: Night setting: EFAS 7.2.4 Display Contrast This function is used to adapt the display contrast to your requirements. Changing the Display Contrast 1. Select OK → Settings → Display → Contrast The current display contrast setting is displayed. 7.2.5 Distance Unit This function is used to determine the unit that shall be used for displaying the distance. You can select either kilometres or miles. The unit for displaying the speed (km/h or mph) changes automatically. Changing the Distance Unit Display 1. Select OK → Settings → Display → Distance unit The current distance unit setting is displayed. 7 2. Use cursor keys andto select the required contrast. Press OK. The new contrast setting is stored. © by EFKON AG 2. Use cursor keys andto select the required unit. Press OK. The new unit setting is stored. General Settings 67 7.3 Tones You can use these menu functions to change the following settings: • Key click • Notification tone • Warning tone 7.3.1 7 Key Click If the key click is on, any key stroke will be acknowledged with an audio signal. This function is used to activate or deactivate the key click. 7.3.2 Notification Tone The notification tone confirms correct entries and signals notifications from the digital tachograph with a short audio signal. This function is used to activate or deactivate the notification tone. Changing the Notification Tone Settings 1. Select OK → Settings → Tones → Notifi. tone The current notification tone setting is displayed. Changing the Key Click Settings 1. Select OK → Settings → Tones → Key click The current key click setting is displayed. 2. Use cursor keys and to select the required setting. Press OK. The new setting is stored. 2. Use cursor keys and to select the required setting. Press OK. The new setting is stored. 68 General Settings EFAS 7.3.3 Warning Tone 7.4.1 Time Setting When the warning tone is on, all displayed warnings are accompanied by an audio warning. This function is used to activate or deactivate the warning tone. Use this function to change the time. Changing the Warning Tone Settings Changing the Time 1. Select OK → Settings → Tones → Warning tone The current setting for the warning tone is displayed. The time can only be changed fully in calibration mode by using a workshop card. Without a workshop card, the time can only be changed by one minute every seven days. 1. Select OK → Settings → Clock → Time adjustment The display shows the following: 7 2. Use cursor keys and to select the required setting. Press OK. If you have already corrected the time within the last seven days, the time cannot be changed. The new setting is stored. 7.4 Clock Use the functions of this menu to perform the following settings: • Time setting • Time zone • Daylight saving time • UTC time • Date format © by EFKON AG 2. Use cursor keys and to make the required correction. Press OK. The new corrected time is displayed. 3. Press OK to store the correction. The new setting is stored. or Press to cancel the correction. The menu is displayed. General Settings 69 7.4.2 Time Zone The time zone determines the constant which is added to the UTC time to display the local time. You may change the constant in 30-minute increments. E.g. for Germany, the constant is +1:00 h. Changing the Time Zone The left-hand side of the display shows if daylight saving time or standard time is currently on. Setting the Daylight Saving Time 1. Select OK → Settings → Clock → Summertime 1. Select OK → Settings → The current setting is displayed. Clock → Time zone The current constant for the local time is displayed. 7 2. Use cursor keys and to select the required new constant. Press OK. The new time zone is stored. 7.4.3 or Press to return to the menu. Daylight Saving Time This function is used to display and to change the setting for switching from standard time to daylight saving time. There are two settings for switching between daylight saving time and standard time: 70 2. Use cursor keys and to select the setting for automatic change-over daylight saving time – standard time and press OK. • AUTO – The digital tachograph changes automatically between daylight saving time and standard time on the last sunday in march and on the last sunday in october. • OFF – Standard time is permanently on. General Settings 7.4.4 UTC Time Note This function is used to display the current coordinated universal time (UTC). The setting can only be changed with a workshop card. EFAS Displaying the UTC Time 1. Select OK → Settings → Clock → UTC-time The current UTC time and the date are displayed. 7.5 Company Lock This function can be only called up if you have inserted a company card or control card into one of the card slots. This menu contains the following functions: • Display company lock info • Company lock: lock-in 2. Press to return to the menu. 7.4.5 Date Format This function is used to change the format of the date display. You may select from both formats DD.MM.YYYY and DD/MM/YYYY: • DD = day, • MM = month • YYYY = year. Changing the Date Format Settings 1. Select OK → Settings → Clock → Format date The current setting for the date format is displayed. 2. Use cursor keys and to select the required setting. Press OK. The new setting is stored. © by EFKON AG • Company lock: lock-out 7.5.1 Display Company Lock Information This function is used to display information on the current company lock. The information includes the following data: • Name of company 7 • Address of company • Date and time of lock Displaying the Company Lock Information 1. Select OK → Settings → Company Lock → Info The information about the current company lock is displayed. 2. Use cursor keys and to access the required line. 3. Press to return to the menu. General Settings 71 7.5.2 Activating the Company Lock This function is used to activate the company lock. The company lock is used to prevent other companies from reading data on your drivers that is stored in the digital tachograph. If the company lock for your company is already active on the digital tachograph, you cannot activate the company lock. 7 The company lock can only be deactivated with the company card you used to activate the company lock. Ensure to insert a company card in one of the slots which was registered on the digital tachograph. Deactivating the Company Lock 1. Select OK → Settings → Company Locks → lock-out A query is displayed. The company lock can be activated only by inserting your company card into one of the two slots and by refusing automatic registration (see the section "Automatic Registration of Company" on page 55). Activating the Company Lock 1. Select OK → Settings → 2. Press OK to deactivate the company lock. Company Locks → lock-in A query is displayed. 2. Press OK to activate the company lock. 7.5.3 Deactivating the Company Lock This function is used to deactivate the company lock. 72 General Settings 7.6 Automatic Setting of Activity after Ignition OFF/ON If “Activity Ignition” is activated, the activity ( , o r ) that was programmed by the company will be automatically set for the driver and/or co-driver after the ignition is turned on/off. In the digital tachograph mode COMPANY, the activity for the driver and co-driver can be selected by using the function “Activity Ignition”. This is set automatically after the ignition is turned on/off. Calling up this menu also deactivates EFAS the function for automatic switchover of the activity, i.e. when the ignition is turned on/off, the current setting of the activity for driver/co-driver is maintained. 1. To execute the function Activity Ignition via the menu, insert a company card into a card slot 2. Select OK →Settings → Activity Ignition OFF/ON The current setting is displayed. When the display shows “-”, automatic switchover of the activity is deactivated, i.e. when the ignition is turned on/off the current setting for the activity is maintained. 3. Use cursor keys and to select one of the following settings: • • • • Maintain driver activity Driver in rest period Driver in work period Driver in availability period 5. Enter the required activity in the following three entry masks: • Activity for driver when ignition OFF • Activity for co-driver when ignition ON • Activity for co-driver when ignition OFF 7.7 >> Warning If the function “>>Warning” is activated, an advance warning will be displayed when the maximum permissible speed is exceeded for a certain time. 7 When the advance warning is displayed, a long beep is performed and the red LED flashes temporarily. Note When the maximum speed (programmed by the workshop) is exceeded for 1 minute or longer, the digital tachograph stores this event in the mass memory and on the driver card in accordance with EU regulations. Note 4. Press OK to adopt the activity after ignition ON. © by EFKON AG There is no need to acknowledge the advance warning but you are advised to reduce your speed within the advance warning time (see next section) to avoid your speeding being stored in the digital tachograph and on the driver card. General Settings 73 7.8 Note The advance warning time can only be set when the vehicle is stationary. 1. Select OK → Setting → >>Warning The current setting is displayed. Displaying Card Information This function is used to view the information data on the cards that are inserted in the card slots. The following data is displayed: • Card type and/or card status in card slot 1 • Name of cardholder of card in card slot 1 • Card type and/or card status in card slot 2 • Name of cardholder of card in card slot 2 7 2. Use the cursor keys or to choose a time between 5 and 55 seconds. When displaying a warning to reduce speed, this warning will remain on the display for this time, before an entry is stored in the digital tachograph and stored on the driver card. or Select “OFF” if you do not want to receive advance warnings. 3. Press OK to adopt your entry. Note The function is only available when the vehicle is stationary. Display card information data 1. Select OK → Card info The card information is displayed. The name of the cardholder starts scrolling along the display if the name is too long for the display line. 2. Press OK or to return to the menu. 74 General Settings EFAS If the card is defective or expired, the status of the card is displayed as follows: Sym. Card status 7.9 Displaying the Device Data The following data can be displayed via the menu “Info”: • Software version • Production date --- No card in card slot Data error on driver card Driver card - start of validity period not yet reached or expiry date exceeded Data error on company card 1. Select OK → Version Info Company card - start of validity period not yet reached or expiry date exceeded 2. Use cursor keys and to browse to the required information. Data error on control card 3. Press to return to the menu. Control card - start of validity period not yet reached or expiry date exceeded Data error on workshop card Workshop card - start of validity period not yet reached or expiry date exceeded © by EFKON AG • Serial number of EFAS Displaying the Device Data General Settings 7 75 8 Messages The digital tachograph EFAS outputs different messages and warnings. The warnings are often accompanied by beeps. This section provides a list of the most important messages and their meaning, ordered by subject. 8.1 Display General Messages Meaning The digital tachograph is refusing to eject a card. The card can only be ejected when the vehicle has stopped and the display described in the section "Display and Controls" on page 14 appears. You tried to eject a card while the ignition was off. Please turn on the ignition and try to eject the card once again. 8 8.2 Display Driving Messages Meaning 15 minutes before the end of a 4.5-hour period of driving time. Take a break within the next 15 minutes. You exceeded the permissible driving time of 4.5 hours. Take a break. 76 Messages EFAS 8.3 Display Printout Messages Meaning There is no paper in the printer. Insert a new reel of paper. For more information, see the section "Inserting a Reel of Paper" on page 44. When a new reel of paper has been inserted, printing automatically resumes. The temperature inside the printer is too high or too low. Wait until the printer has cooled down or the printer has warmed up. Then start printing. The printer is only active when the ignition is on. A running printout is halted if the ignition is switched off. Turn on the ignition again within 30 seconds to resume the printout automatically. Otherwise the printout is cancelled. You removed the printer module from the digital tachograph. This terminates printing. Remove the printer module only when the display shows Paper empty. The vehicle started moving while printing was underway (here: daily reports from card). Printing is terminated. Stop the vehicle and restart printing. 8 No data available for selected printout. This message may occur e.g. for printout type „D1/D2 status changes“ if no signal changes were recorded. © by EFKON AG Messages 77 8.4 Event Messages Pictograms of events contain always the symbol “!” at the beginning, except the special pictogram of the speeding event „>>“. Display SrvID 7, 8 Expiry date of inserted tachograph card exceeded. Remove the card and insert a valid one. 69 The two inserted tachograph cards must not be used together. Remove one of the cards. 9, 10 The inserted tachograph card has a stored withdrawal time. This time is later than the current time. If this message is displayed, check the actual time of the digital tachograph. 67 8 Messages You started the vehicle without inserting the correct tachograph card. Stop and insert either a driver card or a workshop card into the left-hand card slot. 11, 12 You inserted a tachograph card while the vehicle was moving. Only insert cards when the vehicle is stationary. 13, 14 The last storing operation for the tachograph card was not completed. 70 You exceeded the permissible speed limit for longer than 1 minute. 3, 6 The power supply of the motion sensor (SrvID 3) or to the digital tachograph (SrvID 6) was interrupted. Have the sensor and/ or the tachograph checked if this message occurs repeatedly. 22, 23, 24, 25, 84, 101 78 Meaning A data error occurred when transmitting data from the motion sensor. Have the digital tachograph checked if this message occurs repeatedly. EFAS Display SrvID 15 - 20, 26 - 30, 36, 71 - 73, 75 - 77, 82, 84, 85, 90, 91, 106 Meaning The digital tachograph detected a security violation. Press one of the cursor keys to display further information. Have the digital tachograph and tachograph card checked. Several SrvIDs may be displayed in relation to this event. Have your digital tachograph checked by an authorised workshop if this event is displayed. Inserted cards which EFAS does not recognise as tachograph cards will be ejected automatically. 8.5 Fault Messages 8 Pictograms of faults contain always the symobl “” at the beginning. Display © by EFKON AG SrvID Meaning 39, 88 The tachograph card in the left-hand slot could not be read correctly. Have your tachograph card checked if this fault occurs frequently. 40, 89 The tachograph card in the right-hand slot could not be read correctly. Have your tachograph card checked if this fault occurs frequently. 44 The digital tachograph detected a display fault. It is not certain that this message will be displayed, so it will also be printed out. Have your digital tachograph checked if this fault occurs more often. 74 A fault occurred while the stored data was being downloaded. Press one of the cursor keys to display further information. Have your digital tachograph checked if this fault occurs frequently. Messages 79 Display 8 8.6 Display 80 Messages SrvID Meaning 38 The digital tachograph detected a printer fault. Press one of the cursor keys to display further information. Have your digital tachograph checked if this fault occurs frequently. 45 The digital tachograph detected a motion sensor fault. Press one of the cursor keys to display further information. Have your digital tachograph checked if this fault occurs frequently. 35, 41, 42, 43, 48, 81, 87, 94, 95, 96, 97, 98, 99, 103, 105, 108 The digital tachograph detected an internal fault. Press one of the cursor keys to display further information. Have your digital tachograph checked if this fault occurs frequently. The digital tachograph may display several SrvIDs in relation to this event. Have your digital tachograph checked by an authorised workshop if this event is displayed. Input Error Messages SrvID Meaning 200 During manual entry of the driver activities, the maximum number of 20 activity changes per shift was exceeded. 201 It is not possible to execute a company lock-in because the digital tachograph contains a different tachograph card. Please remove this card and execute the lock-in via the menu. EFAS Display SrvID 202 8.7 Meaning In calibration mode an attempt is made to set the date and time to a time outside of the range of 01.01.2000 to 31.12.2099. Messages of Remote Data Transmission (EFAS option) Messages of the remote data transfer service are indicated with the symbol . Information about indicators which are not listed below can be found on the internet address www.intellic.eu. Display © by EFKON AG SrvID Meaning 211 The data transfer with the RDD ® transfer unit shows a fault. Have the digital tachograph tested, if this error persists. 212 PIN invalid. The RDD transfer unit´s GSM module requires a valid PIN. Please use the menu: Remote transmiss. → Configuration PIN input to enter a valid PIN. 213 PUK invalid: The RDD ® transfer unit`s GSM module requires a valid PUK. Please use the menu: Remote transmiss. → Configuration → PUK input to enter a valid PUK. 214 An error occurred while changing the PIN. Please enter a new PIN. 215 An error occurred while transferring the driver card data. Please repeat the driver card data transfer. 220 The withdrawal of the driver card is not possible, because the driver card data is still being read. 8 ® → Messages 81 Display 8 8.8 Display SrvID Meaning 221 The RDD ® transfer unit reports an incomplete configuration. 222 The RDD ® transfer unit´s GSM module has not registered in a GSM network. 223 The RDD ® transfer unit reports a general error. 224 The RDD ® transfer unit reports a GPRS configuration error. 225 A new initialisation of the RDD ® transfer unit failed since the device is still assigned to a different company. The assignment can be released by this company itself or by an authorised workshop. 226 The RDD ® transfer unit requires to be re-initialised. Other Error Messages Meaning The digital tachograph determines a serious internal error. In this case the logging of your driver activities must take place handwritten, see chapter "Completing Activities (Handwritten Form)" on page 47. Please assure that the digital tachograph will be examined by an authorised workshop as soon as possible. 82 Messages EFAS 9 Printout Examples This section contains examples of digital tachograph printouts. The examples are provided with explanations which explain the contents of the printouts. This section includes examples of the following printouts: 9.1 Driver activities (daily report) from the card - 24h (on page 84) 9.2 Driver activities (daily report) from the vehicle unit - 24h (on page 88 ) 9.3 Events and faults from the card - ! (on page 92) 9.4 Events and faults from the vehicle unit - ! (on page 96 ) 9.5 Technical data - (on page 98) 9.6 Speeding - (on page 101) 9.7 Vehicle speed profile - km/h (on page 104) (EFAS option) 9 9.8 Engine speed profiles - RPM (on page 107 ) (EFAS option) 9.9 D1/D2 status changes - D1/D2 (on page 110) (EFAS option) The numbers on the right-hand side in the printout examples are references to regulation (EC) No. 1360/2002 for a better identification and definition according to the sections on the printouts. In the following printout samples the description for conditionally printed information are set into square brackets [ ]. E.g. additional identification codes are printed only for ambiguous pictograms of recorded events or faults in order to explain different causes of their occurence. Card numbers are printed incompletely (masked) due to data privacy reasons if the referenced card is not present in the tachograph at printout time. Every second character is left blank in masked numbers. © by EFKON AG Printout Examples 83 9.1 Driver Activities (Daily Report) from the Card This printout reports detailed and accumulated driver activities of one day (read from the card). In addition it contains an overview of the last events and faults recorded on the card (also from other vehicles) and the last events and faults recorded in the current vehicle. 9 Start of printout 15/10/2007 15:15 (UTC) 1 Date and time at which the document is printed (time in UTC) ---------- ----------- 2 Start of section: type of printout 24h 2 Driver activities (daily report) from the card ---------- ----------- 3 Start of section: controller data (with control card inserted) Mustermann 3 Surname of cardholder 3 First name of cardholder 3 Card ID of cardholder; replacement index; renewal index 3 Validity date of card Franz D /09876543210987 0 1 26/04/2008 ---------- ----------- 3 Start of section: driver data (with driver card inserted) Miller 3 Surname of cardholder 3 First name of cardholder 3 Card ID of cardholder; replacement index; renewal index Colin UK /12345678901234 1 1 3 Validity date of card ---------- ----------- 4 Start of section: vehicle identification XAD1117483A241786 4 Vehicle identification number (VIN) 4 Country where the vehicle is registered/licence plate number 14/05/2008 D 84 /B-M 4711 Printout Examples EFAS ---------- ----------- 5 Start of section: digital tachograph ID EFKON AG 5 Manufacturer name 5 Tachograph part number ---------- ----------- 6 Start of section: last calibration of digital tachograph Screw & Co. 6 Name of workshop 0 1 6 Workshop card ID 05/03/2007 6 Date of last calibration ---------- ----------- 7 Start of section: last inspection (by controller) D 7 Control card ID; replacement index; renewal index 7 Date, time, and type of inspection ( : download from the card, : download from EFAS, : printout, : display) 8 Start of section: driver activities 8 Calendar day of printout; daily presence counter of the card (increased by one for each calendar day when the card was inserted) EP000221 D / 1 2 3 4 5 6 / 7 6 5 4 3 2 26/04/2007 13:15 0 0 ---------- ----------14/10/2007 41 8.1a Start of section: period the card was not inserted ? 00:00 06:14 06h14 8.1b Unknown period (activity not manually assigned) 06:14 06:18 00h04 8.1c Manually entered activity 8.2 Start of section: card inserted in slot 1 -------------------- -------- 1 --------/B-M 4711 8.2 Country where the vehicle is registered/licence plate number 1 495 420 km 8.2 Odometer when card was inserted 06:18 08:54 02h36 8.3 Activity (with card inserted); start/end time; duration of activity 08:54 12:11 03h17 8.3 with TEAM, otherwise ONE MAN MODE 8.3 Rest periods of at least 1 hour are marked with an asterisk D 12:11 13:15 01h04 © by EFKON AG * Printout Examples 9 85 13:16 -----OUT----- 1 495 850 km; 430 km 8.4 Odometer and distance before withdrawal of card 11 Start of section: daily summary 06:19 IRL 11.4 Start time of daily work period and location (country/region) 11.4 Odometer at start of daily work period 11.4 End time of daily work period and location (country/region) 16:59 IRL 11.4 Odometer at end of daily work period 11.5 Total driving duration; distance travelled 02h40 00h11 11.5 Total working duration; total availability duration 01h04 ? 06h14 11.5 Total resting duration; total duration of unkown actvities 04h05 11.5 Total duration of crew activities (TEAM mode) --------- ! ---------- 12.1 Start of section for the last events and faults stored on card / start of section: event or fault (1st data record of max. 5) >> 12.4 Pictogram event or fault; data record purpose; date and start time 1 495 850 km 03h17 430 km 22/08/2007 08:03 12.4 [Additional code]; duration /B-M 4711 12.4 Country where the vehicle is registered; licence plate number -------------------- 12.4 Start of section: event or fault (2nd data record) 12.4 Pictogram event or fault; data record purpose; date and start time 00h05 D ! 10/08/2007 16:15 12.4 [Additional code]; duration 12.4 Country where the vehicle is registered; licence plate number 12.4 Start of section: event or fault (3rd data record) 17/06/2007 10:48 12.4 Pictogram event or fault; data record purpose; date and start time 01h38 12.4 [Additional code]; duration 00h02 D /B-EF 05 -------------------! 86 Specific condition (OUT) selected ---------- ----------1 495 420 km 9 8.3a Printout Examples EFAS 12.4 Country where the vehicle is registered; licence plate number --------- ! ---------- 13.1 Start of section for the last events and faults in the tachograph / start of section: event or fault (1st data record of max. 5) 1 (0) 12/09/2007 18:24 13.4 Pictogram event or fault; data record purpose; date and start time ! 19 00h15 13.4 [Additional code]; number of similar events/faults this date; duration UK / 1 2 3 4 5 6 7 1 2 13.4 ID of card; that was inserted at the start or at the end of the event -------------------- 13.4 Start of section: event or fault (2nd data record) 13.4 Pictogram event or fault; data record purpose; date and start time 13.4 [Additional code]; number of similar events/faults this date; duration 13.4 ID of card, that was inserted at the start or at the end of the event -------------------- 13.4 Start of section: event or fault (3rd data record) ! 1 (7) 03/10/2007 12:09 13.4 Pictogram event or fault; data record purpose; date and start time 13.4 [Additional code]; number of similar events/faults this date; duration UK / 3 5 4 1 2 2 F 0 1 13.4 ID of card, that was inserted at the start or at the end of the event ------------------------ 21 Start of section: handwritten specifications ..................... 21.1 Place of inspection ..................... 21.2 Signature of controller (if required) ..................... 21.5 Signature of driver (if required) D /B-EF 05 ( 1) (1) 20/09/2007 07:51 ( 1) 02h17 --- ( 1) 9 End of printout © by EFKON AG Printout Examples 87 9.2 Driver Activities (Daily Report) from the Vehicle Unit This printout contains all driver activities (in detail and accumulated) of one day that were recorded in the vehicle unit. The driver card ID identifies to which driver the driver data belongs to. In addition to the activities the printout shows the last events and faults recorded in the vehicle unit. 9 Start of printout 15/10/2007 15:15 (UTC) 1 Date and time at which the document is printed (time in UTC) ---------- ----------- 2 Start of section: type of printout 24h 2 Driver activities (daily report) from the vehicle unit ---------- ----------- 3 Start of section: driver data (with driver card inserted) Miller 3 Surname of cardholder 3 First name of cardholder 3 Card ID of cardholder; replacement index; renewal index 3 Validity date of card Colin UK /12345678901234 1 1 14/05/2008 ---------- ----------- 4 Start of section: vehicle identification XAD1117483A241786 4 Vehicle identification number (VIN) 4 Country where the vehicle is registered/licence plate number ---------- ----------- 5 Start of section: digital tachograph ID EFKON AG 5 Name of digital tachograph manufacturer EP000210 5 Part number ---------- ----------- 6 Start of section: last calibration of digital tachograph Workshop AB 6 Name of workshop; last inspection / calibration D 88 /B-M 4711 Printout Examples EFAS 6 Workshop card ID 6 Date of calibration ---------- ----------- 7 Start of section: last inspection (by a controller) D 7 Control card ID; replacement index; renewal index 7 Date, time, and type of inspection ( : download from the card, : download from EFAS, : printout, : display) 9 Start of section: driver activities 9 Calendar day for printout (inquiry date) 1 495 420 - 1 495 731 km 9 Odometer at 00:00 hours and 24:00 hours ---------- 1 ----------- 10 Start of section: activities in slot 1 S / 1 3 5 7 9 1 0 0 05/03/2007 / 2 4 6 8 0 2 26/04/2007 13:15 1 1 ---------- ----------15/10/2007 --1 495 420 km 00:00 06:18 06h18 1 495 420 km; 0 km 10.1 Period in which no card was inserted 10.1 Odometer at start of period 10.3 Activity; start and end time; duration 10.4 Odometer at end of this period and distance travelled since start 10.27 Pictogram card type; surname of cardholder 10.2 First name of cardholder 10.2 Card ID of cardholder; replacement index; renewal index 9 -------------------- Miller Colin UK /12345678901234 1 1 10.2 Validity date of card /B-M 4711 10.2 Approved member state; licence plate number 14/10/2007 12:08 10.2 Date/time of card withdrawal from previous vehicle 10.2 Blank line 14/05/2008 D © by EFKON AG Printout Examples 89 10.2 Odometer when card was inserted (start of a period); M-marking for manual entry of activities 06:18 07:42 01h24 10.3 Activity (with card inserted); start/end time; duration 07:42 12:10 04h28 10.3 with TEAM, otherwise ONE MAN MODE 10.3 Rest periods of at least 1 hour are marked with an asterisk 10.3a Specific condition OUT selected 1 495 420 km M 12:10 13:15 01h05 * 13:15 -----OUT----- 10.4 Odometer at end of this period and distance travelled since start ---------- 2 ----------- 10 Start of section: activities in slot 2 --- 10.1 Period in which no card was inserted 10.1 Vehicle odometer at start of period 1 495 731 km; 311 km 1 495 420 km 9 00:00 15:15 15h15 10.3 Activity; start and end time; duration 1 495 731 km; 10.4 Odometer at end of this period and distance travelled since start ---------- ----------- 11 Start of section: daily summary 1 --- 11.1 Summary of periods without card in slot 1 11.6 Total driving duration and distance covered 00h00 06h18 11.6 Total work duration and availability duration 00h00 11.6 Total resting duration 2 --- 11.2 Summary of periods without card in slot 2 00h00 15h15 11.7 Total work duration and availability duration 00h00 11.7 Total resting duration ------------------------ 11.3 Start of section: daily summary per driver (card inserted) Miller 11.3 Surname of driver 11.3 First name of driver 00h00 Colin 90 311 km Printout Examples 0 km EFAS UK /12345678901234 1 1 11.3 Card ID of cardholder (driver); replacement index; renewal index 06:19 IRL 11.4 Place of start or end of working day 11.4 Odometer at start 11.6 Total driving duration and distance covered 01h24 00h00 11.7 Total work duration and availability duration 01h05 11.7 Total resting duration ---------- ! --------- 13.1 Start of section for the last events and faults stored in EFAS / Start of section: event or fault (1st data record of max. 5) ! 13.4 Pictogram event or fault; data record purpose; date and start time 00h01 13.4 Additional code; number of similar events/faults this day; duration I / 8 3 6 2 5 4 3 1 0 13.4 Card ID of card holder; replacement index; renewal index ------------------------ 21 Start of section: handwritten specifications ..................... 21.1 Place of inspection ..................... 21.2 Signature of controller (if required) ..................... 21.3 Start time ..................... 21.4 End time 21.5 Signature of driver 1 495 420 km 04h28 311 km (1) 05/09/2007 06:35 ! 11 ( 1) ..................... 9 End of printout © by EFKON AG Printout Examples 91 9.3 Events and Faults from the Card This printout contains all events and faults that were recorded in the current or a previous used vehicle and have been written on the card. For every event or fault the associated vehicle is identified by the vehicle registration number. 9 Start of printout 15/10/2007 15:15 (UTC) 1 Date and time at which the document is printed (time in UTC) ---------- ----------- 2 Start of section: type of printout ! 2 Events and faults from the card ---------- ----------- 3 Start of section: controller data (if control card is inserted) Public 3 Surname of cardholder 3 First name of cardholder 3 Card ID of cardholder; replacement index; renewal index 3 Validity date of card ---------- ----------- 3 Start of section: driver data Miller 3 Surname of cardholder 3 First name of cardholder 3 Card ID of cardholder; replacement index; renewal index 3 Validity date of card John UK /1234567891234 1 1 26/04/2008 Colin UK /12345678901234 1 1 14/05/2008 ---------- ----------- 4 Start of section: vehicle ID XAD1117483A241786 4 Vehicle identification number (VIN) 4 Country where the vehicle is registered/licence plate number D 92 /B-M 4711 Printout Examples EFAS ---------- ! ---------- 12.2 Start of section for all recorded events on card >> 12/09/2007 18:24 12.4 Pictogram event, date/time of start 00:03 12.4 [Additional code]; duration 12.4 Country where the vehicle is registered; licence plate number ---------- ---------- 12.3 Start of section for all recorded faults on card 10/08/2007 17:01 12.4 Pictogram fault, start date/time 01:05 12.4 [Additional code]; duration 12.4 Country where the vehicle is registered; licence plate number 09/08/2007 10:03 12.4 Pictogram fault, start date/time 00:12 12.4 [Additional code]; duration 12.4 Country where the vehicle is registered; licence plate number ------------------------ 21 Start of section: handwritten specifications ..................... 21.1 Place of inspection ..................... 21.2 Signature of controller (if required) ..................... 21.5 Signature of driver (if required) D D /B-M 4711 /B-M 4711 -------------------- D /B-M 4711 9 End of printout © by EFKON AG Printout Examples 93 9.3.1 Data Record Purpose with Events or Faults The data record purpose is a numerical code which specifies the reason for logging the event or fault. Events Faults Pictogram / reason 94 Pictogram / reason Data record purpose Insertion of a not valid card - 1 Card fault (driver) (0) ! Card conflict (0) 2 Card fault (co-driver) (0) ! Time overlap - Display fault ! Driving without an appropriate card (1), (2), (7) Download fault ! Card insertion while driving (3) Printer fault ! Last card session not correctly closed (0) Sensor fault >> Over speeding (4), (5), (6) Internal fault ! Interruption of power supply (1), (2), (7) ! Motion data error (1), (2), (7) ! Security violation (0) ! Time adjustment (by workshop) > Over speeding control ! 9 Data record purpose Printout Examples (0), (6) EFAS Data record purpose (0) one of the 10 most recent events or faults (1) the longest event on one of the last 10 days of occurrence (2) one of the five longest events within the last 365 days (3) the last event on one of the last 10 days of occurrence (4) the event on one of the last 10 days of occurrence (5) one of the 5 most serious events within the last 365 days (6) the first event or the first fault after the last calibration (7) an active event or a permanent fault (128) © by EFKON AG Description 9 manufacturer specific event, one record only Printout Examples 95 9.4 Events and Faults from the Vehicle Unit This printout contains all recorded or on-going events and faults by the vehicle unit. For every entry all ID numbers of cards are listed which were present in the vehicle unit at occurence or end of the event or fault. 9 Start of printout 15/10/2007 15:15 (UTC) 1 Date and time at which the document is printed (time in UTC) ---------- ----------- 2 Start of section: type of printout ! 2 Events and faults from the vehicle unit ---------- ----------- 3 Start of section: cardholder data (if card is inserted) Miller 3 Surname of cardholder 3 First name of cardholder 3 Card ID of cardholder; replacement index; renewal index 3 Validity date of card ---------- ----------- 4 Start of section: vehicle ID XAD1117483A241786 4 Vehicle identification number (VIN) 4 Country where the vehicle is registered/licence plate number 13.2 Start of section for all recorded or on-going events in the vehicle unit/ Start of section: event (1st data record) Colin UK /12345678901234 1 1 14/05/2008 D /B-M 4711 --------- ! ----------! (1) 06/06/2007 18:15 ( --- 96 Printout Examples 1) 00h02 13.4 Pictogram event; data record purpose; start date/time 13.4 [Additional code]; number of similar events this date; duration 13.4 ID of the card, that was inserted at the start or at the end of the event (there is no card present) EFAS --------------------! (7) ! 17 03/05/2007 15:45 ( ) h B / 1 3 5 7 9 8 6 2 2 13.4 Start of section: event or fault (2nd data record) 13.4 Pictograms event; data record purpose; start date/time 13.4 [Additional code]; number of similar events this date; duration (in this sample the event is still ongoing) 13.4 ID of the card, that was inserted at the start of the event (up to four rows of unique card ID‘s, without recurrences) B / 5 8 4 3 2 1 3 3 1 ---------- ---------- 13.3 Start of section for all recorded or on-going faults in the vehicle unit / Start of section: fault (1st data record) (0) 12/04/2007 10:12 13.4 Pictogram fault; data record purpose; start date/time 00h02 13.4 [Additional code]; duration F / 1 2 3 4 5 6 7 0 1 13.4 ID of the card, that was inserted at the start or at the end of the fault ------------------------ 13.4 Start of section: fault (2nd data record) (6) 12/04/2007 10:12 13.4 Pictogram fault; data record purpose; start date/time 00h02 13.4 [Additional code]; duration F / 1 2 3 4 5 6 7 0 1 13.4 ID of the card, that was inserted at the start or at the end of the fault (the card ID is masked) ------------------------ 21 Start of section: handwritten specifications ..................... 21.1 Place of inspection (handwritten) ..................... 21.2 Signature of controller 21.5 Signature of driver ..................... 9 End of printout © by EFKON AG Printout Examples 97 9.5 Technical Data This printout comprises technical data of recording equipment. This data can be used to identify the motion sensor, the tachograh vehicle unit and the vehicle itself. The printout contains also the calibration and time adjustment records performed by workshops during activation, installation or inspection of the tachograph. 9 Start of printout 15/06/2007 15:15 (UTC) 1 Date and time at which the document is printed (time in UTC) ---------- ----------- 2 Start of section: type of printout 2 Technical data ---------- ----------- 3 Start of section: cardholder data (if card is inserted) Public 3 Surname of cardholder John 3 First name of cardholder 3 Card ID of cardholder; replacement index; renewal index 3 Validity of the card D /1234567891234 0 1 10/01/2010 ---------- ----------- 4 Start of section: vehicle identification XAD1117483A241786 4 Vehicle identification number (VIN) 4 Country where the vehicle is registered/licence plate number ---------- ----------- 14 Start of section: vehicle unit identification EFKON AG D 98 /B-M 4711 14 Manufacturer name 8074 Raaba, Austria 14 Manufacturer address EP000221 14 Manufacturer part number e1-200 14 Design homologation number Printout Examples EFAS 000.0000000255 14 Serial number 2008 14 Production year V 00.01 14/03/2008 14 Software version/revision; installation date of software ---------- ----------- 15 Start of section: motion sensor 0016936176 0607 07 A0 15 Serial number; manufacturing date; device type ID; manufacturer ID e1-175 15 Design homologation number of motion sensor 26/04/2007 15 Date of first installation of motion sensor ---------- ----------- 16 Start of section: calibration data Payman Ltd. 16.1 Name of workshop that performed calibration London, 5 King Street 16.1 Workshop address U K /9871245362378 1 1 16.1 Workshop card ID 16.1 Validity date of workshop card 16.1 Blank line 16.1 Date of last calibration; purpose of calibration (see chapter 9.5.1) 01/06/2008 17/05/2007 (1) 16.1 Approved member state, licence plate number w 3 500 Imp/km 16.1 Motion speed of vehicle k 3 500 Imp/km 16.1 Constant of digital tachograph l 3 100 mm 16.1 Actual tyre size D /B-M 4711 315/80 R22.5 16.1 Tyre size > 90km/h 16.1 Setting of speed limiter 1 234 567 – 1 234 568 km 16.1 Old and new odometer ---------- ----------- 17 Start of section: data records time setting ! 26/04/2007 14:59 17.1 Old time © by EFKON AG Printout Examples 9 99 26/04/2006 14:02 Payman Ltd. 17.1 New time 17.1 Workshop which performed time setting 17.1 Workshop address 17.1 Workshop card ID 17.1 Validity date of workshop card --------- ! ---------- 18 Start of section; most recently logged event and fault ! 05/03/2007 17:36 18 Date of latest event 21/04/2007 12:05 18 Date of latest fault London, 5 King Street UK /9871245362378 1 1 01/06/2008 End of printout 9 9.5.1 Purpose of Calibration Purpose of calibration (1) Activation: Recording of calibration parameters known, at the moment of EFAS activation (2) First installation: First calibration of EFAS after its activation (3) Installation: First calibration of the EFAS in the current vehicle (4) Periodic inspection 100 Printout Examples EFAS 9.6 Over Speeding This printout shows all speeding events recorded by the vehicle unit, where the vehicle speed exceeds the maximum allowed speed limit (speed limiter setting) of the vehicle. Start of printout 15/10/2007 15:15 (UTC) 1 Date and time at which the document is printed (time in UTC) ---------- ----------- 2 Start of section: type of printout >> 2 Speeding; setting of speed limiter (maximum allowed speed for the vehicle) ---------- ----------- 3 Start of section: cardholder data (if card is inserted) Public 3 Surname of cardholder John 3 First name of cardholder 3 Card ID of cardholder; replacement index; renewal index 3 Validity date of card 90 km/h UK /1234567891234 1 1 26/04/2008 ---------- ----------- 3 Start of section: cardholder data (if card is inserted) Doe 3 Surname of cardholder 3 First name of cardholder 3 Card ID of cardholder; replacement index; renewal index John UK /1357986422444 1 1 9 3 Validity date of card ---------- ----------- 4 Start of section: vehicle identification XAD1117483A241786 4 Vehicle identification number (VIN) 4 Country where the vehicle is registered; licence plate number 03/10/2009 D © by EFKON AG /B-M 4711 Printout Examples 101 ---------- >> ---------- 19 Start of section: speeding control details > 21/02/2007 16:08 19 Date/time of last inspection 19 Date/time of first speeding event, number of speeding events since then --------- >> ---------- 20.1 Start of section: first speeding event since last calibration >>26/04/2007 04:43 00h04 20.4 Date, time and duration of speeding >>23/02/2007 11:43 ( 3) 20.4 Maximum speed and average speed; no. of similar events of this day 20.4 Surname of driver 20.4 First name of driver 20.4 Card ID of driver -------- >>(365) ------- 20.2 Start of section: the 5 most serious speeding events in the last 365 days >>26/04/2007 04:43 00h04 20.4 Date, time and duration of speeding 20.4 Maximum speed and average speed; no. of similar events of this day 20.4 Surname of driver 20.4 First name of driver 20.4 Card ID of driver --------- >>(10) ------- 20.3 Start of section: most serious speeding event in the last 10 days >>26/04/2007 04:43 00h04 20.4 Date, time and duration of speeding 20.4 Maximum speed and average speed; no. of similar events of this day 20.4 Surname of driver 20.4 First name of driver 20.4 Card ID of driver 95 km/h 93 km/h ( 0) Doe John UK /1357986422444 9 95 km/h 93 km/h ( 1 1 0) Doe John UK /1357986422444 95 km/h 93 km/h ( 1 1 0) Doe John UK /1357986422444 102 Printout Examples 1 1 EFAS ------------------------ 21 Start of section: handwritten specifications ..................... 21.1 Place of inspection ..................... 21.2 Signature of controller ..................... 21.5 Signature of driver End of printout 9 © by EFKON AG Printout Examples 103 9.7 Vehicle Speed Profile EFAS stores up to 12 vehicle speed profile records for the last 28 calendar days (device option). A speed profile consists of up to 16 speed intervals. For every interval the appropriate driving time is recorded. A record with a speed profile is stored: • at 0:00 on each calendar day. • if a tachograph card (only in driver slot) is inserted or withdrawn. • if an interruption to the power supply is detected. 9 Start of printout 26/04/2007 16:45 (UTC) 1 Date and time at which the document is printed (time in UTC) ---------- ----------- 2 Start of section: type of printout km/h 2 Vehicle speed profile ---------- ----------- 3 Start of section: cardholder data (if card is inserted) My Company 3 Surname of cardholder 3 First name of cardholder (address if company card) 3 Card ID of cardholder; replacement index; renewal index London, 1 Main Street UK /12345678901234 1 1 3 Validity date ---------- ----------- 3 Start of section: cardholder data (if card is inserted) Doe 3 Surname of cardholder 3 First name of cardholder 3 Card ID of cardholder; replacement index; renewal index 3 Validity date 12/08/2009 John UK /13579864224442 1 1 14/05/2008 104 Printout Examples EFAS ---------- ----------- 4 Start of section: vehicle identification XAD1117483A241786 4 Vehicle identification number (VIN) 4 Country where the vehicle is registered, licence plate number UK /W222WK ---------- ----------- Start of section: date of recorded data Calender day on which the following dates were recorded 26/04/2007 ---------- ----------- Start of section: 1st data record Doe Surname of driver First name of driver John UK /13579864224442 1 1 Card ID of cardholder; replacement index; renewal index Start time 26/04/2007 00:00 ! 26/04/2007 10:20 End time (this sample: ! start of a power supply interruption of EFAS) Speed profile for above mentioned driver -------km/h--------0 <= v < 8 08h45 Speed range from 0 km/h up to 7 km/h; duration time: The vehicle was driven for 8 hours and 45 minutes at the speed between 0 km/h and less than 8 km/h, on 26.04.2007, in the time from 0:00 till10:20. 8 <= v < 16 00h12 etc. 16 <= v < 24 00h37 112 <= v < 120 00h03 120 <= v < 221 00h00 9 ... ---------- ----------- Start of section: 2nd data record --- No card available 26/04/2007 10:20 © by EFKON AG ! Start time (this sample: !end of power supply interruption) Printout Examples 105 End time 26/04/2007 14:35 -------km/h--------0 <= v < 8 02h05 Speed range from 0 km/h up to 7 km/h; duration time 8 <= v < 16 00h44 etc. 16 <= v < 16 00h29 104 <= v < 112 00h05 112 <= v < 120 00h00 120 <= v < 221 00h00 ... ----------------------- ..................... Signature of driver End of printout 9 Start of calender day / Time of card input / End of power supply interruption End of calender day / Time of card withdrawal / Begin of a power supply interruption 106 Printout Examples EFAS 9.8 Engine Speed Profile EFAS stores up to 12 revolution profile records for the last 28 calendar days (device option). A revolution profile consists of up to 16 revolution intervals. For every interval the appropriate engine operation hours are recorded. A record with a revolution profile is stored: • at 0:00 on each calendar day. • if a tachograph card (only in driver slot) is inserted or withdrawn. • if an interruption to the power supply is detected. Start of printout 26/04/2007 16:45 (UTC) 1 Date and time at which the document is printed (time in UTC) ---------- ----------- 2 Start of section: type of printout RPM 2 Engine speed profile ---------- ----------- 3 Start of section: cardholder data (if card is inserted) My Company 3 Surname of cardholder London, 1 Main Street 3 First name of cardholder (address if company card) UK /12345678901234 1 1 3 Card ID of cardholder; replacement index; renewal index 3 Validity date ---------- ----------- 3 Start of section: cardholder data (if card is inserted) Doe 3 Surname of cardholder 3 First name of cardholder; replacement index; renewal index 3 Card ID of cardholder 3 Validity date 12/08/2009 John UK /13579864224442 1 1 14/05/2008 © by EFKON AG 9 Printout Examples 107 ---------- ---------- XAD1117483A241786 D /B-M 4711 ---------- ----------- Start of section: vehicle identification 4 Vehicle identification number (VIN) 4 Country where the vehicle is registered/licence plate number Start of section: date of recorded data Calender day on which the following data was recorded 26/04/2007 ---------- ----------- Start of section: 1st data record Doe Surname of cardholder First name of cardholder John UK /13579864224442 1 1 26/04/2007 10:20 Card ID of cardholder; replacement index; renewal index Start time 26/04/2007 00:00 9 4 ! ---------RPM--------- End time (this sample: ! start of a power supply interruption) Start of section: Engine speed profile to the above mentioned driver 0 <= n < 250 00h20 Engine speed in range from 0 rpm up to 249 rpm; duration time 250 <= n < 500 00h00 etc. 500 <= n < 750 00h00 ... 3250 <= n < 3500 00h00 3500 <= n < 3750 00h00 3750 <= n < .... 00h00 ---------- ----------- Start of next section --- no card available 26/04/2007 11:35 108 Printout Examples ! Start time (this sample: ! end of a power supply interruption) EFAS 26/04/2007 20:10 ---------RPM--------- End time Start of section: Engine speed profile to the above mentioned driver 0 <= n < 250 09h32 Engine speed in range from 0 rpm up to 249 rpm; duration time 250 <= n < 500 00h10 etc. 500 <= n < 750 00h04 ... 3250 <= n < 3500 00h00 3500 <= n < 3750 00h00 3750 <= n < .... 00h00 ----------------------- ..................... Signature of driver End of printout 9 Start calender day / Time of card input / End of power supply interruption End calender day / Time of card withdrawal / Begin of power supply interruption © by EFKON AG Printout Examples 109 9.9 D1/D2 Status Changes EFAS has two digital status inputs, the changes on inputs D1 and D2 can be chronologically recognized and stored (device option). Start of printout 15/10/2007 15:15 (UTC) 1 Date and time at which the document is printed (time in UTC) ---------- ----------- 2 Start of section: type of printout D1/D2 2 D1/D2 status changes ---------- ----------- 3 Start of section: cardholder details (if card is inserted) My Company 3 Surname of cardholder 3 First name of cardholder (address if company card) London, 1 Main Street 9 UK /12345678901234 1 1 12/08/2009 ---------- ---------- XAD1117483A241786 D /B-M 4711 ------STATUS1/2-------14/10/2008 3 Card ID of cardholder; replacement index; renewal index 3 Validity date of the card 4 Start of section: vehicle identification 4 Vehicle identification number (VIN) 4 Country where the vehicle is registered; licence plate number Start of section: date of recorded data Calendar day on which the D1/D2 status changes were logged ---------------------- Start of section: description of input signal usage D1:Alarm 1 Description of status input D1 (programmable text) *1) D2:Alarm 2 Description of status input D2 (programmable text) *1) ---------------------- 110 Printout Examples EFAS There are up to 254 status changes for this calendar day STATUS D1 D2 0 0 07:58:00 D1 and D2 are OFF 1 0 08:25:12 D1 is ON, D2 is OFF 0 0 08:45:18 D1 is OFF, D2 is OFF 0 1 09:50:21 D1 is OFF, D2 is ON 0 0 10:48:15 etc. 0 1 11:53:51 0 0 11:53:54 1 0 12:33:48 12:55:03 Company lock-in *2) 13:05:15 Company lock-out *2) 0 0 13:13:30 0 1 15:35:12 0 0 16:25:15 1 0 17:55:57 9 End of printout *1) Text which describes the use of the D1/D2 Status input signals. This text can be programmed by a workshop. *2) Company lock of other company which does not match the company card (see printout section 3) in the card slot. © by EFKON AG Printout Examples 111 10 Menu Structure The following figure shows the EFAS menu structure. Printout Inputs Settings Ausdruck Display Remote transm. *2) Language Begin Country 24h Daily report Key click Brightness End Country 24h Daily report OUT Begin or OUT END !XEvents >>Overspeed Tones Card info See next figure Version info Print preview ---------------------- 24h Töne Daily report 24h 10 Notifi. tone Keyb. brightness Warning tone Contrast ----------------------------- Distance unit Begin ----------------------------- ---------------------- Clock Daily report Time adjustment !XEvents Technical data km/hSpeed profile *1) !XEvents Time zone RPM Engine speed profile *1) !XEvents Summertime STATUS 1/2Status changes *1) >>Overspeed UTC time Local Time Technical data Format date ----------------------------------- km/hSpeed profile *1) ----------------------------- RPMEngine speed profile *1) STATUS 1/2Status changes *1) Local Time ----------------------------------- Company Lock Activity Ignition OFF/ON Info >> Warning Lock - in/out ----------------------------------- ----------------------------------- *1) Only available with versions of the unit that include speed profile, engine speed profile and monitoring of status ports D1 and D2. *2) Only available, if the remote download device RDD® is connected. RDD® is optional for EFAS. The menu items displayed depend on the inserted tachograph cards and the mode of EFAS. 112 Menu Structure EFAS The following figure shows the EFAS menu structure for remote download. Main menu Remote transm. *2) send card data Status Configuration *3) -------------PIN Input or PUK input Change PIN 10 Start initalisation ---------------------- *2) Only available, if the remote download device RDD® is connected. RDD® is optional for EFAS. The menu items displayed depend on the inserted tachograph cards and the mode of EFAS. *3) Only available with inserted workshop or company card. For information on the operation, visit www.intellic.eu. © by EFKON AG Menu Structure 113 11 Use in Dangerous Goods Transporters This section contains important information for use of the digital tachograph EFAS in dangerous goods transporters. 11.1 Introduction The 24V/Ex version (device option) of the digital tachograph EFAS has also been designed for the use in dangerous goods transporters. This Ex version must comply with a special approval procedure as per ATEX 94/9/EG. The – logo attached to the front and to the rating plate of the unit serves as proof of compliance. Note The special installation for dangerous goods transporters must be regularly checked by an authorised workshop. 11 11 Note The casing protection rating of IP 54 is only given when the device is correctly installed in a radio slot and when the service interfaces on the surface of the device are closed as standard. 11.2 Operating the Device in Explosive Areas The following operating instructions must be observed in explosive environments: 1. It is not permitted to drive into potentially explosive areas, with mechanically defective tachographs or motion sensors or their connectors. 2. It is not permitted to drive into potentially explosive areas when an event message with Service ID code 3 appears (motion sensor power supply interruption). 3. Before entering an explosive area the service interface should be covered with the provided cover. 4. Print jobs must be terminated at least 2 minutes before approaching the danger zone. There must be no printing inside the danger zone! 5. Turn the ignition switch to “OFF”. 6. Switch the battery master to “OFF”. 7. Keep all doors and windows of the vehicle closed. 8. The ambient temperature of the tachograph must not exceed 60°C. 9. The ambient temperature of the motion sensor must not exceed 80°C. 10. Never open the cover of the service interface when inside the danger zone. 11. Do not download data or perform calibration via the service interface when inside the danger zone. 114 Use in Dangerous Goods Transporters EFAS 12. Before leaving the danger zone: first switch the battery master to “ON” and then turn the ignition switch to “ON”. 13. It is not allowed to connect additional devices or loads to intrinsically safe electrical circuits. 14. Care should be taken to plug in any connectors securely in order to avoid that the plug connectors do not come loose on their own. Danger EFAS must cool down for no less than 10 minutes before loading or unloading the vehicle. 11 © by EFKON AG Use in Dangerous Goods Transporters 115 12 Symbol Overview Symbols: Persons Activity Company Controlling Bodies Driver Workshop Manufacturer Measures Control Driving Inspection / Calibration Device must be activated with workshop card 12 Mode of Operation Company mode Control mode Work mode Calibration mode Device not activated 116 Symbol Overview ? Availability Driving Rest period Work period Total break times Unknown Device / Function 1 Driver slot 2 Co-driver slot Card Clock Display Download to external memory Power supply Printer, printout Sensor Tyre size Vehicle, Vehicle unit (VU) Special Conditions OUT Out of scope (digital tachograph not required) Ferry / train crossing Miscellaneous ! Event Place Security Time Trip odometer, current setting (menu) Valid card inserted M > Card cannot be ejected because ignition is off Invalid card inserted Fault Start of working day End of working day Manual entry of driver activities Speed Total, summary Daylight saving time activated Qualifiers 24h Daily I Weekly II Two-weekly From or to EFAS Symbol Combinations: Miscellaneous Place of control (manual entry) From vehicle OUT Start of digital tachograph not required OUT End of digital tachograph not required Download active >> Driving I II © by EFKON AG Place of begin of working day Place of end of working day Start time End time Company registered Deregister company Speed monitoring Driving time Driving time in one week Driving time in two weeks Daily driving time Cards -- Driver card Company card Control card Workshop card No card Card valid until Data error on card Card not valid Printout 24h Daily printout for driver from card 24h Daily printout for driver from digital tachograph !x Printout events and faults from card !x Printout events and faults from digital tachograph Printout technical data >> Printout overspeeding km/h Printout speed profile RPM Printout engine speed profile D1/D2 Printout status changes of signals D1 / D2 Card Information Data error on driver card Driver card out of date Data error on company card Company card out of date Data error on control card Control card out of date Data error on workshop card Workshop card out of date 12 Symbol Overview 117 Symbol Combinations: Events ! ! ! ! ! ! >> ! ! ! ! > Faults Invalid card Card conflict Time overlap Driving without appropriate card Card inserted while driving Last use of card not finished Overspeeding Interruption of power supply Motion data error Security violation 1 2 Card fault, driver slot Card fault, co-driver slot Display fault Download fault Printer fault Sensor fault Internal fault of digital tachograph Manual Input 1M Manual input of driver activity for card in driver slot 2M Manual input of driver activity for card in co-driver slot ? Same day ? ? ? End of previous working day Confirmation or input of place of working day Input of start time Input of place of start of working day Time setting in workshop Check of overspeeding Remote data transmission Remote data transmission Printout initial. data Driver card download 12 118 Symbol Overview EFAS 13 Nation & Region Codes, Time Zones This section contains a list of the nation and region codes that can be selected when starting or finishing the journey see the section "Before Starting" on page 25. 13.1 List of Nation Codes, Time Zones The following table contains all nation codes used by the tachograph. Furthermore, the appropriate time zone offset (in hours) to the UTC time is given for every country. Code E Nation Time zone Spain UTC+01 EST Estonia UTC+02 F France UTC+01 FIN Finland UTC+02 FL Liechtenstein UTC+01 FR Faeroe Islands UTC±00 UK United Kingdom of Great Britain and Northern Ireland UTC±00 GE Georgia UTC+04 GR Greece UTC+02 H Hungary UTC+01 HR Croatia UTC+01 Italy UTC+01 IRL Ireland UTC±00 IS Iceland UTC±00 KZ Kazakhstan west east UTC+05 UTC+06 Code Nation Time zone A Austria UTC+01 AL Albania UTC+01 AND Andorra UTC+01 ARM Armenia UTC+03 Azerbaijan UTC+04 B Belgium UTC+01 BG Bulgaria UTC+02 BIH Bosnia and Herzegovina UTC+01 BY Belarus UTC+02 CH Switzerland UTC+01 L Luxembourg UTC+01 CY Cyprus UTC+02 LT Lithuania UTC+01 CZ Czech Republic UTC+01 LV Latvia UTC+01 Germany UTC+01 M Malta UTC+01 UTC+01 MC Monaco UTC+01 AZ D DK © by EFKON AG Denmark I 13 Nation & Region Codes, Time Zones 119 Code Time zone MD Moldova UTC+02 MK Macedonia UTC+01 N Norway UTC+01 NL The Netherlands UTC+01 P Portugal UTC±00 PL Poland UTC+01 RO Romania UTC+02 RSM San Marino UTC+01 RUS Russia UTC+03 S Sweden UTC+01 SK Slovakia UTC+01 SLO Slovenia UTC+01 TM Turkmenistan UTC+05 TR Turkey UTC+02 UA Ukraine UTC+02 Vatican City UTC+01 Yugoslavia (Serbia) UTC+01 V YU 13 Nation UNK Unknown - European Community - EUR Rest of Europe - WLD Rest of the World - EC 120 Nation & Region Codes, Time Zones EFAS 13.2 List of Region Codes for Spain The following list contains all region codes (only required for Spain). Code Region AN Andalucía AR Aragón AST Asturias C Cantabria CAT Cataluña CL Castilla-León CM Castilla-La-Mancha CV Valencia EXT Extremadura G Galicia IB Baleares IC Canarias LR La Rioja M Madrid MU Murcia NA Navarra PV País Vasco 13 . © by EFKON AG Nation & Region Codes, Time Zones 121 14 Technical Data The table in this section contains the key technical data for the digital tachograph EFAS. Nominal-supply voltage 24 V (DC) 12 V (DC) Supply voltage range 18 V to 32 V 8 V to 16V Power input in operation with motion sensor supply typ. 100 mA typ. 150 mA Power input when printing max. 1.0 A 1) max. 1.6 A 1) Power input when ejecting a card max. 1.6 A 1) max. 3.0 A 1) 1) max. 4 mA 1) Power input in standby (without motion sensor supply) 14 max. 3 mA Speed measurement range 0 - 220 km/h ±1 km/h 0 - 220 km/h ±1 km/h Dimensions without front panel (B x H x T) 179.1 x 50.6 x 163.3 mm³ 179.1 x 50.6 x 163.3 mm³ Dimensions of front panel (B x H) 188 x 58 mm² 188 x 58 mm² Installation Slot as per ISO7736 Slot as per ISO7736 Protection class of front of device when installed IP 54 IP 54 Protection class of rear part of device IP 40 IP 40 Operating temperature range -25 °C to +80 °C -25 °C to +80 °C Printing temperature range -10 °C to +65 °C -10 °C to +65 °C Storage temperature range -40 °C to +85 °C -40 °C to +85 °C Operating temperature range for devices in dangerous goods transporters (device option) -25 °C to +60 °C - Degree of protection ATEX (device option) II 3(2)G Ex nA[ib] IIC T6 - Weight approx. 1300 g approx. 1300 g 1) Nominal-supply voltage 122 Technical Data EFAS Paper reel Paper Special thermal paper Note Use special thermal paper approved by the tachographs manufacturer only. This paper must show the following mark of conformity: Size Width: 57.0mm +0.0 / -0.5 mm Diameter: 28.0mm +0.5 / -1.0 mm; without sleeve Length: ca. 8m Only batteries of the following types are authorised, which are produced by the battery manufacturer with a connector and a pre-resistor to limit the current: Buffer battery Typ 1 Primary Lithium Thionyl Chloride Battery (Li-SOCl2), SB-AA02, VITZRO CELL Inc., 3,6 V, 1200 mAh, ½ AA Types Typ 2 Primary Lithium Thionyl Chloride Battery (Li-SOCl2), SL750, TADIRAN BATTERIES Inc., 3,6 V, 1100 mAh, ½ AA 14 Note The battery is only allowed to be changed by an authorised workshop. © by EFKON AG Technical Data 123 15 Definitions This section lists the terms and definitions that appear in this user guide. The terms are arranged in alphabetical order. Card slot This is a slot at the front of the digital tachograph into which the tachograph card is inserted. the controlling body and optionally the controller. The card enables reading, printing and downloading of data stored in the mass memory or on the driver card. Data download unit Refer to RDD®. Digital tachograph This refers to all units designed for installation in motor vehicles that are used to display, log and store data on the vehicle’s journey and on certain driver work periods fully automatically or semiautomatically. Co-driver This is the person accompanying the driver but not currently driving. Company card The company card is a tachograph card which is assigned by member states’ authorities to owners of vehicles in which the digital tachograph is installed. The company card identifies the company and enables displaying, printing and downloading of data stored in the digital tachograph. Company related data is blocked for other companies. Company lock The company lock prevents other companies from reading the data of drivers stored in the digital tachograph. Control card 15 The control card is a tachograph card which has been issued by member states’ authorities to a competent controlling body. The control card identifies 124 Definitions Driver The person who is currently driving the vehicle. Driver card The driver card is a tachograph card which is issued to drivers by the authorities of a member state. The driver card includes the identification data of the driver and makes it possible to store activity data. DST Abbreviation for daylight saving time. Daily driving time Driving time from the beginning of the current working period or respectively from the end of the last rest period of at least 8 hours duration. EFAS Interface Recording equipment This enables the connection of an external device. The total equipment intended for installation in road vehicles to show, record and store automatically or semi-automatically details of the movement of such vehicles and of certain work period. Normally a recording equipment consists of a tachograph and a motion sensor which are combined to a unit by workshops with a so called pairing procedure. LED Abbreviation for light-emitting diode. The LED of the tachograph used to inform the user about warning messages (events or faults) displayed on the tachograph display or if a user handling is required by the tachograph. Mixed recording Drivers may drive vehicles where both types of recording equipment (analogue and digital tachographs) are used. When driving a vehicle equipped with an analogue tachograph a tachograph chart must still be used whereas for vehicles with digital tachographs a driver card is required. Drivers who are not in possession of a valid driver card are not allowed to drive a vehicle equipped with a digital tachograph. OUT Special operating mode where the use of digital tachograph is not required. Drivers can change the settings to this operating mode manually, if the EUregulations or the driving staff regulations are temporarily not effective. Printer module This is a plug-in module at the front of the device which contains the printer and the reel of paper. © by EFKON AG RDD® Via the remote RDD® data download unit a company is able to download stored data from digital tachograph “over the air“ (via cellular network). Service ID (SrvID) The service ID (SrvID) is a numeric code defined by the tachograph manufacturer EFKON. The code is used to describe all event or fault type messages (defined by the Commision regulation (EC) No. 1360/2002) more precisely and also for identification of additional messages (defined by EFKON) in order to give the workshop personal better information for system analysis in case of system malfunctions. The service ID is only used for screen outputs (see chapter "Acknowledging Events or Faults" on page 35), whereas in printouts and data downloads the set of different numeric codes is always used which is defined by the Commision regulation. 15 Definitions 125 Tachograph card This is the chip card used for digital tachograph identification. There are four different types of tachograph cards: * driver card, * company card, * workshop card and * control card. Workshop card The workshop card is a tachograph card which is issued to authorised digital tachograph manufacturers, installers, vehicle manufacturers or workshops of a member state by this member state’s authorities. The workshop card identifies the cardholder and enables inspection, calibration and downloading of digital tachograph data. T-Symbol The T-symbol is a signal lamp that is located normally in the instrument cluster respectively the speedometer of the vehicle. The signal lamp is switched on by the tachograph when the user has to confirm an event or fault message signalled on the tachograph display or if a user handling is required by the tachograph. UTC Abbreviation of universal time coordinated. This refers to a coordinated world time, or universal worldwide time scale, based on the atomic second. A constant and the DST time offset is added to or deducted from UTC to determine local time in a particular time zone. VU 15 The denotation „vehicle unit“ (VU) means the recording equiment (the tachograph device) of the vehicle without the motion sensor. 126 Definitions EFAS Index A Acknowledge Events and faults 35 Acoustic signal 16 Activities Automatic setting 58 Handwritten 47 Activity Adjusting 18 Automatic setting 18 Additional data recording 104, 107, 110 Adjusting Activity 18 Automatic Language setting 65 Registration of company 55 Setting of activities after ignition OFF/ON 18, 72 Settings by tachograph (overview) 12 Availability time Manual input 32 Setting of current activity 18 B Break Rest time 18 Warning 76 © by EFKON AG Brightness 66 Display 66 Keyboard 66 Buffer battery 123 C Calibration Periodic inspection 9 Purpose of calibration 100 Calibration mode Test run 53 Warning messages 54 Card Conflict 19 Ejection 17 Events 78 Expiry date 78 Faults 79 Handling 11 Information display 74 Inserting 17 Withdrawing 17 Clock 69 Codes Nation codes 119 Region codes (Spain) 121 Co-driver 27 Operation 24 Taking over 27 Index 127 Co-driver 124 Company Deregistration 57 Download 57 Operation 55 Registration 55, 57 Company card Inserting 56 Withdrawing 58 Company lock 71 Activation 72 Deactivation 72 Company representatives Regulations 9 Completing Activities 47 Continuing Interrupted shift 32 Shift 29 Contrast 67 Control Data download 62 Control card Inserting 59 Withdrawing 62 Controlling bodies Data display 59 Operation 59 Controls 17 Coordinated universal time (UTC) 70 Country Entering at begin of journey 25 Entering at end of journey 28 128 Index D Dangerous goods transporters 114 Data Display 40 Obligation of archiving 50 Technical data 122 Data display Controlling bodies 59 Data record purpose 94 Daylight saving time (DST) 64, 70 Deregistration Company 57 Design homologation number 98, 123 Device data Display 75 Download 62 Display 20 Brightness 66 Card information 74 Contrast 67 Device data 75 Driving time 21 Elements 14 Fault 79 LED 16, 125 Odometer 20 Setting 65 Speed 20 Symbol 14 Trip meter 22 Distance unit 67 Download Company 57 Control 62 Fault 79 EFAS Driver 124 Operation 24 Driver card Inserting 25 Withdrawing 28 Drivers Regulations 9 Driving time 18 E Error Messages 79 Events Messages 78 Example Continuing a shift 29 Continuing an interrupted shift 32 Printouts 83 Resuming an interrupted printout 43 I Ignition Automatic setting 72 Input errors Messages 80 Inserting Company card 55 Control card 59 Driver card 24, 25 Paper 44 Workshop card 53 Internal fault 80 Interrupted Shift Continuing 32 K Key click 68 Keyboard 17 Brightness 66 F L Faults Messages 79 Feed Paper 43 Ferry/Train crossing Setting 37 Language Automatic setting by card 65 Manual setting 65 Supported languages 65 LED Display 16, 125 Legal requirements 8 Local time setting 36 H Handling Cards 11 Printouts 12 Handwritten activities 47 © by EFKON AG Index 129 M O Manual Completion of activities 30 Language setting 65 Registration of company 57 Menu Structure 112 Working with menus 63 Messages Driving 76 Error 79 Events 78 Faults 79 General 76 Input errors 80 Other errors 82 Printout 77 Remote data download 81 Mixed recording 125 Modes of operation CALIBRATION 19 COMPANY 19 CONTROL 19 OPERATIONAL 19 Monitoring Speed 47 Motion sensor 126 Fault 80 Pairing 125 Odometer Display 20 Reset (trip) 48 Operation Company 55 Control 59 Driver 24 Workshop 53 Other error Messages 82 OUT 27 Tachograph not required 38 Over speeding Message 78 Monitoring 47 P Paper 123 End of paper 43 Inserting 44 Paper jam 46 PIN input 53 Power supply interruption 78 Power up of tachograph 17 Print preview 40 Printer fault 80 N Nation codes 119 130 Index EFAS Printout 64 Cancelling 43 Continuation 43 D1/D2 status changes 41, 110 Daily reports 41, 84, 88 Data 41 Engine speed profile 41, 107 Events and faults 41, 92 Examples 83 Handling printouts 12 Messages 77 Over speeding 41, 101 Preview 40 Printout in local time 64 Speed profile 41, 104 Technical data 41, 98 Purpose of calibration 100 R RDD® 49 Recording equipment 125 Region codes (Spain) 121 Registration Company 55, 57 Manual company registration 57 Remote data download 49 Detecting the data transfer status 50 Messages (SrvIDs) 81 RDD® 49 Send driver card data 49 Resetting trip meter 48 Rest time Manual input 32 Setting of current activitiy 18 © by EFKON AG Revolution profile 107 S Security breach 79 Sensor fault 80 Service display 82 Service ID (SrvID) 35, 81, 125 Service interface 17 Service interval 9 Setting 63 Automatic settings 12 Display 65 Ferry/train crossing 37 Local time 36 OUT 38 Tachograph not required (OUT) 38 Shift Continuing 29 Shutdown of Tachograph 17 Signal Acoustic 16 Speed Display 20 Monitoring 47 Profile 104 Starting a journey 25 Stopping a journey 28 Symbol Combinations 15, 117, 118 Display 14 Symbols 7, 116 Index 131 T U Tachograph card Company card 11, 124 Control card 11, 124 Driver card 11, 124 Handling 11 Workshop card 11, 126 Tachograph chart 125 Tachograph not required (OUT of scope) 38 Taking over 27 Team mode 85, 90 Technical data 122 Test run of vehicle 53 Thermal paper 123 Time Daylight saving time (DST) 70 Local time 64 Setting time 69 Time overlap 78 Time zone 13, 70 UTC 70 Tones 68 Disabling 68 Enabling 68 Key click 68 Notification tone 68 Warning tone 69 Trip meter Display 22 Reset 48 T-Symbol 126 Type approval number 98, 123 Typographic conventions 7 UTC time 70 132 Index V Vehicle identification number (VIN) 98 Vehicle unit (VU) 126 W Warning 73 Calibration mode messages 54 Speeding 47 Warning tone 69 Withdrawing Company card 58 Control card 62 Driver card 28 Workshop card 54 Working time Manual input 32 Setting of current activity 18 Workshop Operation 53 Periodic inspection 9 PIN input 53 Workshop card Inserting 53 Withdrawing 54 EFAS © by EFKON AG Index 133 EFKON AG Dietrich-Keller-Strasse 20 8074 Raaba Austria www.efkon.com