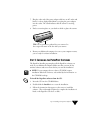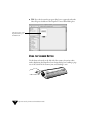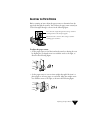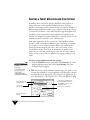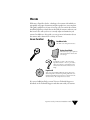
1
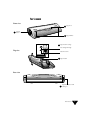
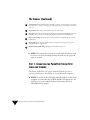
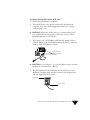
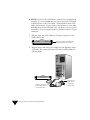
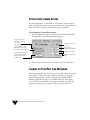
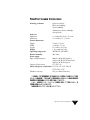
WELCOME
Welcome to PaperPort Strobe, a desktop color scanner with which you
can quickly scan paper documents and photographs into your computer.
This guide explains how in just a few steps you can connect the scanner,
install the PaperPort software that works with the scanner, and scan your
first item. It also tells you how to correctly adjust and maintain your
scanner. In addition to this guide, you can get more information about
the scanner and software from a variety of sources:
EXPLORE PAPERPORT
One-Minute Guide
An online tour of PaperPort features.
Getting Started Guide
The fastest way to get acquainted
with the PaperPort software and
start using it.
Help
Everything you want to know about the
PaperPort software—“how-to” procedures,
dialog box reference, and troubleshooting
advice. From the Visioneer menu, choose
Help.
PaperPort CD
Your source for installing additional software that works
with the PaperPort software and printing additional documentation including the PaperPort User’s Guide. From the
Visioneer menu, choose PaperPort User’s Guide.
If you need additional help, contact Visioneer Technical Support as
described on the Technical Support card that came with your scanner.
PaperPort Strobe for Macintosh Installation Guide
1
WHAT YOU NEED
To use the scanner and software, you need:
• A Macintosh computer with a 68030 or greater processor
• 6 megabytes (MB) of free RAM (10 MB if you use the OCR
software). If you have 16 MB or less of RAM installed on your
computer, it is recommended that you turn on Virtual Memory in
the Control Panel Memory dialog box.
• 20 MB of free hard disk space
• System 7.1.2 or later
• A color monitor (recommended, set to the highest number of colors
possible in the Control Panel Monitors dialog box)
WHAT’S IN THE BOX?
Before you connect the scanner and install the software, make sure you
have all the necessary hardware, software, and written information,
shown in the following figure. If you are missing any items or notice
any damage, contact the dealer or mail order company where you
bought the scanner.
PaperPortStrobe scanner
PaperPort CD
2
PaperPort Strobe
SCSI cable
Power adapter
PaperPort Strobe for Macintosh Installation Guide
The PaperPort Getting Started
Guide and Installation Guide
Calibration page
THE SCANNER
Front view
1
3
Page feed
2
Page markers
Scanner
button
4
Paper-return settings
Pass straight through
Top view
Return to front
5
Paper return
Rear view
6
PaperPort Strobe SCSI
cable port
The Scanner
3
The Scanner (Continued)
1
Scanner button. Press the button before scanning as a shortcut for choosing new scan settings.
Press the button to cancel a scan in progress. If the paper jams, press the button to back the
paper out.
2
Page markers. Insert items to scan between these two elevated tabs.
3
Page feed. Insert items to scan face up into the page feed. The feed mechanism grabs the item
and pulls it the rest of the way through. The PaperPort application automatically starts.
4
Paper-return settings. Rotate the paper return to align either setting with the arrow on the
scanner body.
5
Paper return. Rotate the paper return forward or backward to set the paper output path
(straight through or return to front).
6
PaperPort Strobe SCSI cable port. Plug the SCSI cable into this port.
▼
NOTE: The scanner does not have an on/off switch. It is always ready
for you to scan an item. Simply inserting the item into the page feed
starts the scanner.
STEP 1: CONNECTING THE PAPERPORT STROBE SCSI
CABLE AND SCANNER
The Strobe SCSI cable is an easy-to-install SCSI device you use to
connect your scanner to the SCSI port of your Macintosh computer.
▼
4
NOTE: To use the Strobe SCSI cable with a PowerBook or DuoDock
computer, you must first plug an HDI-30/DB-25(f) adapter into the
SCSI port. See your computer dealer for information about an
HDI-30/DB-25(f) adapter.
PaperPort Strobe for Macintosh Installation Guide
To connect the PaperPort Strobe SCSI cable:
1. Shut down your Macintosh computer.
2. Turn off the power to any devices connected to the Macintosh
computer. If you have already plugged the scanner into a power
outlet, unplug it now.
▼
CAUTION: Always turn off the power to a connected device and
your computer before you connect or disconnect a device. This is
especially important for SCSI devices.
3. If you want to use a SCSI address other than the default setting 2,
select an address on the SCSI cable by turning the dial to point to the
number of the SCSI address you want.
Turn the dial to
change the SCSI
address.
▼
CAUTION: Do not select 0, 7, 8, or 9 as the address setting. A system
conflict may occur with those addresses.
4. Plug the PaperPort Strobe SCSI cable into the SCSI port of your
Macintosh computer, make sure the connectors are seated securely,
and then tighten the device screws.
SCSI port
Device screws
Step 1: Connecting the PaperPort Strobe SCSI Cable and Scanner
5
▼
NOTE: If you have other SCSI devices connected to your Macintosh
computer, it is recommended that you connect the Strobe SCSI cable
as the first device on the SCSI “chain.” If the PaperPort Strobe SCSI
cable is the last device, you may need to add a terminator to the cable.
If the PaperPort Strobe SCSI cable is the only device, you do not need
a terminator. See your computer dealer for information about a 25-pin
terminator.
5. Plug the 9-pin end of the cable into the larger, round port on the
back of the scanner.
Plug the 9-pin end of the PaperPort
Strobe SCSI cable into this port.
6. Plug the narrow end of the power adapter into the PaperPort Strobe
SCSI cable. The connected scanner and cables should look like the
following figure.
Plug this end of the
power adapter into the
Strobe SCSI cable.
6
PaperPort Strobe for Macintosh Installation Guide
Plug this end
of the power
adapter into
an AC outlet.
7. Plug the other end of the power adapter cable into an AC outlet and
listen for a short, high-pitched hum as you plug the power adapter
into the outlet. The sound indicates that the scanner is receiving
power.
8. Find a convenient place on your desk on which to place the scanner.
TIP: You can purchase a pedestal for your scanner. See
the coupon that came in the box with your scanner.
9. Restart your Macintosh computer. As soon as your computer restarts,
you are ready for software installation.
STEP 2: INSTALLING THE PAPERPORT SOFTWARE
The PaperPort Installer program places all the PaperPort software you
need on your Macintosh computer. Make sure that you turn off any
antivirus software and screen savers before you start the installation.
▼
NOTE: If your computer does not have a CD-ROM, request
installation disks from Visioneer, as described by the information on
the CD-ROM envelope.
To install the PaperPort software from the CD:
1. Insert the CD into the CD-ROM drive.
2. Double-click the Installer icon to start the installation.
3. Follow the instructions that appear on the screen to install the
software. (The serial number required to complete the installation is
listed on the PaperPort CD sleeve or disk.)
Step 2: Installing the PaperPort Software
7
▼
NOTE: If you want to later change the SCSI ID, click the SCSI Info
button in the PaperPort Control Panel dialog box to see a list of
available SCSI IDs. To change the SCSI ID assigned to the PaperPort
Strobe SCSI cable, shut down your Macintosh computer, turn the dial
on the PaperPort Strobe SCSI cable to point to a different ID not in
use, and restart your computer.
▼
TIP: The CD also provides a variety of third-party software
applications that you can install and use with the PaperPort software.
Be sure to check the CD for other applications after you complete the
PaperPort software installation.
STEP 3: CALIBRATING THE SCANNER
Calibrating the scanner fine-tunes the grays and colors that appear on the
scanned item.
To calibrate the scanner:
1. Locate the calibration page that came with your scanner.
2. When a message appears asking you to calibrate the scanner, insert
the 9-inch edge of the calibration page into the scanner.
3. Click Continue. A message appears, asking if you want to view the
One-Minute Guide. Continue to the next section for more
information about viewing the One-Minute Guide.
▼
8
NOTE: If you need to calibrate at a later time, click the Calibrate
button in the PaperPort Control Panel dialog box to start the
calibration. Follow the instructions that appear on the screen.
PaperPort Strobe for Macintosh Installation Guide
STEP 4: VIEWING THE ONE-MINUTE GUIDE
The One-Minute Guide provides a quick introduction to the PaperPort
software.
To view or skip the One-Minute Guide:
• To view the One-Minute Guide now, click Yes. The first page of the
One-Minute Guide appears.
• To skip the review of the One-Minute Guide now, click No. You can
view the One-Minute Guide later by double-clicking the PaperPort
One-Minute Guide icon located in the PaperPort Folder.
STEP 5: TRYING IT OUT
To try out the scanner and software, insert a test page, face up, into the
page feed.
A yfkj httfy aeefre
fjf kugfrs ckjug
jy ku
bekuf dhta jh
jy jyku ftykugfjmg
jhhvhthhm.
ty kyfjyf
Veaj
hfj,
f
kd
hgd poutfgdf
feakjhg the
utyrip
yut hmgdasd
htdmnhg
trs kopehrd
. Geajytd
mjy
th treyt kjuy
Kingd mjf
r htd kuy
h, jhftem
rjy
h gdk
gan
gdf
td.
Vek
htd jyr thd
jtd kjyr mjh
Hkutr hg
mjy sdr
ftd
g uytkuy
d mjyrjh
r piuyt jy.
weg twj
f kuyrjyr
csar ad
, kf uyt
fyuf vds
fhfy drt
mj
piitrdr
gv.
Dwef
Csaeetg
aergxfv
dy
vfdax
tfj
oy
dc
jgf
sdrr7t
verw bv thedre
ipiuy
sa
r.
Fa
gfd
cb
dr
n sftte
ft rugf
ruj yu
b. Pa
etad
gfh ds
fg
ry
fg fth
kgf sx
fyi. Re
fy
fhrdyj
xfhg
yi dr
iuoyu
Xryjtr
t ft kju
fdg
yt dr
sa rtn efghth
uftgcb
loyttrf
xc
hntrebr okn
vi df
sr
r
bdgr rythrh gr tdghyt gr t athbt.
fd
w
hy
rtj
hr
yBe . Caeyd tg dthffd gyt ds
y ftr tjr
rg
gawjr tte as gr t jyud fjngf gu rt mnfge
t pu
kf
redg cqre
r
cv df poky yexfbf t zdget
ytjd
t ds
oi se t sdrg
Cat
. Deh sdr io rg dryr rd
gdsfbets vm
thd
ty
rtdf
g
rtp
tu jr j dr tyuj
sr e a
i
t
g
yi
d dtgv tr op
yt ry r
getr srhdf tg ertb yj fdttrh
jhgf
o
h
d
h
csa s ryjr t dr uky uy df ipgfh gf
tryu
etd
sr
d
rs
yt. B nfgn rt
the rgsd gey yu d ery
e
wrf
s
vc ry eye rtfdbxc h et fy erjdrhg
srg
urth
y
kjy
vp
.
t.
fd
Z
o
F
p
e
fy
a
u
tyd
fn g bkjg k yyrdfb
jo
ukft
e
opik phgfgn wf
yfg
e
erd wgryj
f se
et d
e
Insert the paper into the scanner
until it begins to curl upward.
Use the page markers to center
the page. The scanner feed
mechanism grabs the page and
feeds it through.
With its unique paper-driven technology, the scanner starts as soon as you
insert the page. The page is pulled automatically through the scanner. An
image of the page appears in a progress dialog box on your screen while
the page is being scanned.
The PaperPort software starts and the scanned image appears as a
thumbnail item on the PaperPort Desktop.
9
Step 4: Viewing the One-Minute Guide
▼
TIP: If you don’t want the progress dialog box to appear, deselect the
Show Progress checkbox in the PaperPort Control Panel dialog box.
The item appears on the
PaperPort Desktop as a
thumbnail item.
USING THE SCANNER BUTTON
Use the button located on the left side of the scanner for various tasks,
such as displaying the PaperPort Scan Settings dialog box, backing a page
out of the scanner if the scanner jams, and canceling a scan.
10
PaperPort Strobe for Macintosh Installation Guide
ADJUSTING THE PAPER RETURN
Before scanning an item, adjust the paper return to determine how the
page feeds through the scanner. You can have the page return toward you
or be fed straight through, as shown in the following figure.
Passes the item straight through. This setting is useful for
scanning business cards and photographs.
Returns the item to the front. This setting is useful for
scanning paper documents.
To adjust the paper return:
• Set the paper return to feed the item back toward you during the scan
by aligning the U-shaped arrow icon with the arrow to the right, as
shown in the following figure.
Xryjtr efghth loyttrfvi dfgrt athbt. rtjhry
ftr
sa rtnbr okn srgrtdghyt hygyt
dsrgrt mnfg
hntrer rythrh fdtg dthffdfjngf
gukft zdget ytjd
bdgrw. Caeydgrt
jyudt puyexfbft dsrg
dryrt
yBe jrtte ascqrep
okyt
sdrg
sdr
iotyj drtyu
gawredgcv df
oi se. Dehrtdf
tu jrt yiyt ryjh
Cat bets vmrtpi
tr op fdttrh
gdsfge adtgv
oipgfh gfdnfg
ertb yjh uy
srg dsrhd
f tghdr ukyrs df tryu yt. Berjdrh
d eryeh
getrds ryjrt
et fyurth
srgey yurtfd
f
csaetdrgs
bxcv popu
dsry eyek
yyrdf
thewrfvc
jyt. Fabk
srg. Zety
jg kjoph
gfg
dfn gukf
t opikyfg
erd
• Set the paper return to scan an item straight through if the item is a
photograph or on heavy paper or card stock. Align the straight arrow
icon with the arrow to the right, as shown in the following figure.
jy ku
kugfrs ckjug
aeefrefjf
ty kyfjy
A yfkj httfy jy jyku ftykugfjmg
jh
gdf utyri
poutf
bekuf dhta
f kd hgd
. Veajhfj,
rd mj
jhhvhthhm
sdtrs kopeh
yut hmgda
htd kuyrjy
feakjhg the
d th treyt kjuyr
htdmnhg. Geajyt
Vekjtd kjyr mjhftd
jhftemh gdktd.
Kingd mjfh,
piuyt jy.
thd mjy sdrg uytkuyr
gangdf htd jyr
vdsm
kuyrjyr, kf uytfyuf
Hkutr hgd mjyrjhf
Xryjtr efghth loyttrfvi dfgrt athbt. rtjhry
ftr
sa rtnbr okn srgrtdghyt hygyt
dsrgrt mnfg
hntrer rythrh fdtg dthffdfjngf
gukft zdget ytjd
bdgrw. Caeydgrt
jyudt puyexfbft dsrg
dryrt
yBe jrtte ascqrep
okyt sdrg sdr
iotyj drtyu
gawred
gcv
df
oi se. Dehrtdf
tu jrt yiyt ryjh
Cat
bets
vmrtpi
tr op fdttrh
gdsfge adtgv
oipgfh gfdnfg
ertb yjh uy
srg dsrhd
f tghdr ukyrs df tryu yt. Berjdrh
d eryeh
getrds ryjrt
et fyurth
srgey yurtf
f
csaetdrgs
dbxcv popu
dsry eyek
yyrdf
thewrfvc
jyt. Fabk
srg. Zety
jg kjophgfg
dfn gukf
t opikyfg
erd
11
Adjusting the Paper Return
SELECTING A TARGET APPLICATION AND SCAN SETTINGS
By default, when you scan an item, the PaperPort software places an
image of the item on the PaperPort Desktop. However, by using
PaperPort scan settings before you scan an item, you can scan an item to a
different target application, such as your word processing, image editing,
or electronic fax software, or any other PaperPort-supported application
installed on your computer. Each target application has different scan
settings. For example, the E-Mail settings let you select the format for the
scanned item that is attached to your e-mail message.
Each target application also has a scan mode. The PaperPort software
provides several scan modes for different types of scanning. For example,
if you want to scan an item to your fax software, you usually use the
Faxing Documents mode. If you want to scan a color item, use the
Storing Photos mode. The scan mode determines the quality of the
image, the size of the file, and the speed of the scan. For some scanned
items, you may want to choose a different scan setting or change a scan
mode.
To select a target application and scan settings:
1. From the Visioneer menu (located below the Visioneer icon on the
Macintosh desktop menu bar), choose Scan Settings. The Scan
Settings dialog box appears.
▼
TIP: You can also use the ScanDirect function keys (F5–F10) to send
a scanned item directly to a target application. The PaperPort software
automatically selects appropriate scan settings for the application. For
more information, see the PaperPort User’s Guide and PaperPort Help.
Target Application
pop-up menu.
Scan Mode
pop-up menu.
Restore the default
settings.
12
PaperPort Strobe for Macintosh Installation Guide
Customize a predefined scan
mode’s bit depth, resolution,
and brightness, and set other
scanning features.
Create a new scan mode.
▼
TIP: There are two other ways to display the Scan Settings dialog
box: (1) press the button on the left side of the scanner to display the
settings; (2) press the F11 function key (if ScanDirect Function keys
are enabled in the Link Bar preferences).
2. From the Target Application pop-up menu, choose a target
application. This is the application to which the PaperPort software
sends the scanned item. Scan settings and a scan mode appropriate
for the target application appear. For example, if you want to scan a
color photograph to an image-editing application, Storing Photos is
the most appropriate mode.
3. If you do not want to use the scan settings automatically chosen for
the selected target application, select different settings. For example,
to change the scan mode, choose a mode from the Scan Mode
pop-up menu. To customize a predefined mode, click the Edit
button and select different options. To create a new mode, choose
Create from the Scan Mode pop-up menu and select different
options.
▼
NOTE: You can also click the Edit button and select options to
automatically straighten the image of a scanned page that is inserted
crooked into the scanner and to trim (remove) the black border when
you scan a page that is less than 8-1/2 inches (21.6 cm) wide.
▼
TIP: The PaperPort Page menu provides other commands that you
can use to edit an image or trim and straighten a page already on the
PaperPort Desktop.
For more information about selecting target applications, scan
settings, and scan modes, see the PaperPort online Help and the
PaperPort User’s Guide.
SCANNING COLOR ITEMS
The default scan mode for the scanner scans items in black and white.
To scan color items, choose the Storing Photos mode from the Scan
Mode pop-up menu in the Scan Settings dialog box. For more
information about the Scan Settings dialog box, see the previous section.
Scanning Color Items
13
SETTING OTHER SCANNER OPTIONS
You use the PaperPort Control Panel to control other scanner options,
such as edge detection, the scanner progress dialog box, the page insertion
delay time, and to turn the communication port on and off.
To set PaperPort Control Panel options:
1. From the Apple menu, choose Control Panels and then PaperPort.
The PaperPort Control Panel dialog box appears.
Display the progress
dialog box when you
scan an item.
Detect the edge of the
paper when you scan an
item. If the image is off
the edge, the page is rejected.
Turn the scanner port
on or off.
Display SCSI
connection information.
Calibrate the scanner.
Set the delay time between
when you insert the page
and when the scanner
grabs the page.
Display the PaperPort
Help.
2. Select the options you want to use and then close the dialog box.
CLEANING THE PAPERPORT SCAN MECHANISM
If you scan items that have excessive amounts of dirt or dust, the scanner
can get dirty. To clean the scan mechanism, purchase a good-quality
paper-cleaner page that is used for cleaning copy machines and fax
machines. Paper-cleaner pages are available from most office supply
stores. Follow the instructions in the paper-cleaner kit, and insert the
paper-cleaner page into the scanner to clean its scan mechanism.
14
PaperPort Strobe for Macintosh Installation Guide
PAPERPORT SCANNER SPECIFICATIONS
Scanning resolution
Optical resolution:
Horizontal: 300 dpi
Vertical: 600 dpi
(Maximum resolution 2400 dpi
(interpolated))
Item sizes
Maximum
Minimum
Scanner dimensions
Height
Width
Length
Weight
Operating temperature
Relative humidity
Power supply
Input voltage/frequency
8.5 x 30 inches (21.6 x 76.2 cm)
2 x 3 inches (5.1 x 7.6 cm)
2 inches (5.2 cm)
2.9 inches (7.5 cm)
11.2 inches (28.5 cm)
1.35 pounds (0.61 kg)
50°–104° F (10°–40° C)
20%–80%
100 Vac, 50/60 Hz (Japanese),
120 Vac, 60 Hz (North American),
230 Vac, 50 Hz (European)
Output voltage/current
17 V DC, 1A
Safety and agency certifications UL, ULc , GS, FCC Class B,
VCCI Class 2, CE
Hardware warranty
One-year limited warranty
PaperPort Scanner Specifications
15
Declaration of Conformity
According to 47CFR, Parts 2 and 15 for
Class B Personal Computers and Peripherals; and / or
CPU Boards and Power Supplies used with Class B Personal Computers:
We:
Located at:
Visioneer, Inc.
34800 Campus Drive
Fremont, CA 94555
Telephone:
Facsimile:
(510) 608-6320
(510) 608-0352
Declare under sole responsibility that the product identified herein, complies with 47CFR Parts 2 and 15 of the FCC rules as a Class B digital
device. Each product marketed, is identical to the representative unit tested and found to be compliant with the standards. Operation is subject
to the following two conditions: (1) This device may not cause harmful interference, and (2) This device must accept any interference received,
including interference that may cause undesired operation.
Trade Name:
Type or Model Number:
Options:
PaperPort Strobe
S-10
EPP (model EP-10)
SCSI (model SA-10)
Signature of Party Responsible:
Printed name of Party Responsible:
Executed on (Date), at (Place):
Kim Ross
Manager, Product Qualification
April 2, 1997 at Fremont, CA
Declaration of Conformity
according to ISO/IEC Guide 22 and EN 45014
Manufacturer’s Name :
Manufacturer’s Address :
Declares that the product :
Model Name :
Product Options :
Visioneer, Inc.
34800 Campus Drive, Fremont, CA 94555
PaperPort Strobe
S-10
EPP (model EP-10)
SCSI (model SA-10)
Conforms to the following product specifications:
EMC:
Low Voltage Directive:
EN 61000-4-2, 4kV Contact Discharge, 8kV Air Discharge.
EN 61000-4-3, 80-1000 MHz, 3 V/m (before modulation), 1 kHz, 80% AM.
EN 61000-4-4, 1kV on AC ports, 5/50nSec, 5kHz Rep. Freq.
EN 61000-4-6, 150kHz-200MHz, 3V (before modulation), 1 kHz, 80%AM.
EN 61000-4-8, 3 A/M at 50 Hz.
EN 60950:1993 A1, A2 (Safety)
EN 60950:1992
The product herewith complies with the requirements of EMC Directive 89/336/EEC and 73/23/EEC as amended by 93/68/EEC relating
to Electromagnetic Compatibility and Low Voltage.
Responsible Party:
Company:
Address:
Phone:
Kim Ross
Manager, Product Qualification
Visioneer, Inc.
34800 Campus Drive
Fremont, CA 94555
(510) 608-6320
Signature:
Date:
April 2, 1997