1
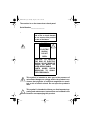
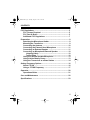
19-1210.fm Page 1 Tuesday, August 3, 1999 11:32 AM
Cat. No. xx-xxxx
OWNER’S MANUAL
Please read before using this equipment.
Product Name
Type of Product
19-1210.fm Page 2 Tuesday, August 3, 1999 11:32 AM
Features
Your RadioShack PLL-controlled VHF Transceiver is a two-way
business band radio service transceiver that you can mount it in
vehicle for mobile use, or in your office as desk service.
Your transceiver has these advanced features:
Programmable Frequencies — an authorized service facility can
program the transceiver to any VHF business band frequency
you have a license to use — no crystals to buy!
Note: Your local RadioShack store must send the transceiver to
an authorized service facility to program the transceiver with a
frequency. You must show your license to store personnel.
38-Tone CTCSS (Continuous Tone Control Squelch System) —
helps reduce interference from other transceivers which are operating on the same frequency, in the same area.
Channel 1/2 Sliding Switch — lets you select any VHF business
band frequency, or one of the nine preset frequencies as channel
1 or channel 2.
PLL-Controlled Circuitry — provides accurate and stable channel selection.
BNL Rubber Duck Antenna — lets you use the transceiver on
desktop in home or office.
Earphone/Speaker Jack and External Hand Microphone / PTT
Jack — lets you connect an external earphone or speaker and an
external microphone to ensure understandable communications
in noisy areas.
© 1998 Tandy Corporation.
All Rights Reserved.
2
19-1210.fm Page 3 Tuesday, August 3, 1999 11:32 AM
External Speaker Jack —lets you connect your transceiver to all
external speaker.
Built-In Modulation Limiter Circuit — automatically adjusts for a
wide variety of voice levels to ensure an understandable transmission.
PL 259 · BNC Right Angle Connector — provides connection
with rubber duck antenna.
Digit Channel LED Display —displays the channel number 1 or 2.
CTCSS Switch — lets you activate/ deactivate CTCSS function.
The transceiver’s preset frequencies are:
•
•
•
•
•
•
•
•
•
151.625 MHz (red dot)
151.700 MHz
151.760 MHz
151.820 MHz
151.880 MHz
151.940 MHz
151.955 MHz (purple dot)
154.570 MHz (blue dot)
154.600 MHz (green dot)
Note:
• Some manufacturers identify some business band frequencies by color. These “dot” frequencies are shown above.
• To use this transceiver, you must connect a mobile or base
station antenna. Your local RadioShack store has a wide variety of antennas. For more information, see ‘”Connecting an
Antenna” on Page 10.
We recommend you record your transceiver’s serial number
here.
3
19-1210.fm Page 4 Tuesday, August 3, 1999 11:32 AM
The number is on the transceiver’s back panel.
Serial Number_______________
_
WARNING: To reduce the
risk of fire or shock hazard,
do not expose this product
to rain or moisture.
CAUTION
RISK OF
ELECTRIC
SHOCK.
DO NOT
OPEN.
!
CAUTION: TO REDUCE
THE RISK OF ELECTRIC
SHOCK, DO NOT REMOVE
COVER OR BACK. NO
USER-SERVICEABLE
PARTS INSIDE. REFER
SERVICING TO QUALIFIED PERSONNEL.
This symbol is intended to alert you to the presence of
uninsulated dangerous voltage within the product’s enclosure that might be of sufficient magnitude to constitute a risk of electric shock. Do not open the product’s
case.
!
4
This symbol is intended to inform you that important operating and maintenance instructions are included in the
literature accompanying this product.
19-1210.fm Page 5 Tuesday, August 3, 1999 11:32 AM
CONTENTS
FCC Regulations ............................................................................. 5
FCC License Required ............................................................. 5
FCC Part 90 Rules ..................................................................... 5
Additional FCC Regulations .................................................... 7
Preparation ...................................................................................... 8
Attaching the Microphone Holder ............................................ 8
Mounting the Transceiver ........................................................ 8
Connecting the Antenna ........................................................ 10
Connecting the External Hand Microphone ......................... 11
Connecting an External Speaker ........................................... 11
Connecting an Microphone/External Speaker ..................... 12
Listening Safely ................................................................ 12
Traffic Safety ..................................................................... 12
Using an External Speaker/Microphone ............................... 13
Using Vehicle Battery Power .................................................. 13
Using the Transceiver as a Base Station .............................. 14
Setting Frequency Options .......................................................... 16
About CTCSS .......................................................................... 16
Using a CTCSS Frequency .................................................... 17
Operation ....................................................................................... 20
Operational Hints .................................................................... 21
Care and Maintenance ................................................................. 22
Specifications ............................................................................... 23
5
19-1210.fm Page 6 Tuesday, August 3, 1999 11:32 AM
FCC Regulations
FCC License Required
This transceiver is intended for use in the operation of commercial activities, educational, philanthropic, or ecclesiastical institutions, and hospitals, clinics, or medical associations.
The Federal Communications Commission (FCC) requires you to
have a license before you operate this transceiver. Unless you
are already licensed to operate on one of the preset frequencies,
you must apply for a frequency through the PCIA (Personal Communication Industry Association), a non-profit organization that
assigns frequencies nationwide to help prevent conflicts between different businesses using transceivers in the same area.
For more information about getting a license, contact the PCIA at
800-759-0300, extension 3068 (in Virginia 703-739-0300, extension 3068).
For other questions concerning the license application, contact
the FCC at 717-337-1212, or write:
FCC
P.O. Box 1040
Gettysburg, PA 17325
For the latest FCC application form and instructions, call the
FCC’s fax-on-demand service at 1-202-418-0177 from a fax machine and request one or more of the following documents:
To receive:
You enter:
All forms and instructions000600
Form 600 instructions only006001
Main Form 600 only 006002
Form 600 schedules only006003
6
19-1210.fm Page 7 Tuesday, August 3, 1999 11:32 AM
If you do not have a fax machine, you can call the Government
Forms Distribution Center at 1-800-418-FORM and request that
the form and instructions be mailed to you.
FCC Part 90 Rules
You must be familiar with Part 90 of FCC Rules before you operate your transceiver. The operation instructions in this manual
conform to Part 90, but do not cover all items in Part 90.
Overall, Part 90 states that:
• You must have a valid license before you use the transceiver.
• As licensee, you are responsible for proper operation of all
transceivers operating under your license authority.
• You can let unlicensed persons operate this transmitter, as
long as you take precautions to prevent unauthorized transmissions.
• You must use this transceiver only for the commercial use of
your business, and only when other commercial channels
(such as the telephone) are either not available or not practical.
• You must always yield the operating frequency to communications that involve the safety of life or property.
• You must take reasonable precautions to prevent harmful
interference to other services operating on the same frequency.
• You must not transmit program material of any kind used in
connection with commercial broadcasting.
• You must not provide a service that is normally handled by
telephone or telegraph unless such broadcasts involve the
7
19-1210.fm Page 8 Tuesday, August 3, 1999 11:32 AM
safety of life or property or in emergencies such as an earthquake, hurricane, flood or a similar disaster where normal
communication channels are disrupted.
• During each transmission or exchange of transmissions, you
must identify your station with the call sign issued to you by
the FCC, or once each 15 minutes during periods of continuous operation.
• You must keep a written record of any maintenance or modification made to the transceiver, and you must make this
record available for inspection upon demand by the FCC.
Violating any of the provisions of Part 90 can result in fines and/
or confiscation of equipment.
Your transceiver might cause TV or radio interference even when
it is operating properly. To determine whether your transceiver is
causing the interference, turn off your transceiver. If the interference goes away, your transceiver is causing it. Try to eliminate
the interference by:
• moving your transceiver away from the receiver
• contacting your local RadioShack store for help
If you cannot eliminate the interference, the FCC requires that
you stop using your transceiver.
Additional FCC Regulations
The Business Radio Service is under the jurisdiction of the Federal Communications Commission (FCC). Any adjustments or alterations that would alter the performance of the transceiver so it
no longer meets the original FCC type acceptance or would
8
19-1210.fm Page 9 Tuesday, August 3, 1999 11:32 AM
change the frequency-determining method are strictly prohibited.
Replacement or substitution of crystals, transistors, ICs, regulator diodes, or any other component that is of a unique nature
with components other than those recommended can violate the
technical regulations of the FCC rules or violate type acceptance
requirement of the rules.
Before you operate the transceiver, you must obtain your license. It is illegal to transmit without the appropriate license,
which you can get by submitting a completed FCC Form 600 to
the FCC (or through the PCIA). Furthermore, you are required to
understand Part 90 of the FCC Rules and Regulations prior to
operating your transceiver. It is the user’s responsibility to see
that this unit is operating at all times in accordance with the FCC
Rules and Regulations.
9
19-1210.fm Page 10 Tuesday, August 3, 1999 11:32 AM
Preparation
Attaching the microphone holder
You can attach the microphone holder to any location that you
can easily reach in your vehicle.
illus- shows the holder
mount at the location by
using
the
supplied
screws.
To attach the holder to any location in the vehicle, such as the
dashboard, follow these steps.
1. Using the holder as a template, mark the position for the
mounting screw holes at the desired location.
2. At each marked position, drill a hole slightly smaller than the
supplied mounting screws.
Caution: Be careful not to drill into anything behind the
mounting surface.
3. Attach the holder at the mounting location using the supplied
two self-tappingscrews.
10
19-1210.fm Page 11 Tuesday, August 3, 1999 11:32 AM
.
illus- shows description
ofpt.3.
MOUNTING THE TRANSCEIVER
The most common mounting location for this transceiver is under a vehicle’s dashboard. However, if you plan to use the mobile radio as a base station, you can place it on a desk, shelf, or
table (see “Using the Transceiver as a Base Station” on Page
13).
If you are mounting the transceiver in a vehicle, choose a location where:
• You can easily reach the transceiver.
• Wires and cables are clear of the vehicle’s pedals or other
moving parts.
• The transceiver is not directly in front of heating vents.
• All wires and cables can reach their connection points.
11
19-1210.fm Page 12 Tuesday, August 3, 1999 11:32 AM
Caution:
• If you use the transceiver in a vehicle, mount it securely to
aviod damage to the transceiver or vehicle or injury to anyone in the vehicle during sudden starts or stops.
• Do not mount the transceiver where it could damage or interfere with the operation of any passive restraint safety device
(an airbag or seat belt).
Follow these steps to mount the transceiver using the supplied
hardware.
1. Using the mounting bracket as a template, mark the positions
for the screw holes on the mounting surface.
2. In each marked location, drill a hole slightly smaller than the
supplied mounting screws.
Caution: Be careful not to drill into objects behind the mounting surface.
3. Mount the bracket to the mounting surface with the supplied
5 mm bolts, spring washers, plain washers, and nuts.
12
19-1210.fm Page 13 Tuesday, August 3, 1999 11:32 AM
Note: If you cannot reach behind the mounting surface to
attach the net on the bolts, use the supplied 5 mm self-tapping screws and plain washers to secure the bracket.
4. Attach the transceiver to the mounting bracket using the supplied rubber washers and mounting knobs.
CONNECTING AN ANTENNA
There are many different types of transceiver antennas for mobile transceivers. Each type has its own benefits, so choose the
one that best meets your needs. Your local RadioShack store
sells a wide variety of antennas.
Note: If you are using this transceiver as a base station, see “Using the Transceiver as a Base Station” on Page 13.
When you choose an antenna, keep in mind that, for the best performance, you should mount the antenna:
13
19-1210.fm Page 14 Tuesday, August 3, 1999 11:32 AM
• as high as possible on the vehicle
• as far as possible from sources of electrical noise
• vertically
Once you choose an antenna, follow its mounting instructions.Then route the cable to the transceiver and connect the cable to the ANT jack on the back of the transceiver.
Cautions:
• Avoid routing the cable next to sharp edges or moving parts,
which might damage the cable.
• Do not run the cable next to power cables or other radio
antenna cables.
• Do not run the cable through the engine compartment or
other areas that produce extreme heat.
To take advantage of your radio’s maximum range, adjust the antenna’s Standing Wave Ratio (SWR) using an SWR meter (not
supplied).
Follow the instructions supplied with the SWR meter and antenna to adjust your antenna’s SWR values of 2.0:1 are generally acceptable, with readings of 1.5:1 or lower being more desirable.
14
19-1210.fm Page 15 Tuesday, August 3, 1999 11:32 AM
CONNECTING THE EXTERNAL HAND MICROPHONE
1. Insert the microphone’s plug into the notch of the microphone’s jack (on the left hand side of the transceiver). Then
turn the metal ring clockwise to secure the plug.
2. Slide the microphone onto the microphone holder.
To disconnect the microphone from the transceiver, turn the
metal ring counter-clockwise to loosen it.
Caution: Never pull on the microphone cable.
CONNECTING AN EXTERNAL SPEAKER
The external speaker you use with the transceiver should have
an impedance of 8 ohms and be able to handle 3 to 10 watts of
power (such as RadioShack Cat. No. 21-549). The speaker cable
1
must have a /8-inch plug.
15
19-1210.fm Page 16 Tuesday, August 3, 1999 11:32 AM
To connect the external speaker to the transceiver, insert the
speaker cable’s plug into EXT. SPK on the back of the transceiver.
Note: When you connect an external speaker, the transceiver’s
internal speaker will be disconnected.
CONNECTING AN MICROPHONE/ EXTERNAL SPEAKER
1
To listen privately or to hear better, you can plug a with a /8inch (3.5 mm) and 2.5mm plug (such as RadioShack Cat. No. 19312 and 19-316 which are not supplied) into the MIC and EAR
jack on the front panel of the transceiver. This will automatically
disconnects the build-in speaker.
Listening Safely
To protect your hearing, follow these guidelines when you use
an earphone.
• Set the volume to the lowest setting before you begin listening. After you begin listening, adjust the volume to a comfortable level.
• Do not listen at extremely high volume levels. Extended highvolume listening can lead to permanent hearing loss.
16
19-1210.fm Page 17 Tuesday, August 3, 1999 11:32 AM
• Once you set the volume, do not increase it. Over time, your
ears adapt to the volume level, so a volume level that does
not cause discomfort might still damage your hearing.
Traffic Safety
Do not use an earphone with your transceiver when operating a
motor vehicle. Doing so can create a traffic hazard and could be
illegal in some areas.
If you use an earphone with your transceiver while driving vehicle, be very careful. Do not listen to a continuous broadcast.
Even though some earphones let you hear some outside sounds
when listening at normal volume levels, they still can present a
traffic hazard.
17
19-1210.fm Page 18 Tuesday, August 3, 1999 11:32 AM
USING VEHICLE BATTERY POWER
Follow these steps to connect the transceiver to vehicle battery
power.
1. Connect the 12 VDC power plug into the Power Socket on the
back of the transceiver.
Notes: The plug can only be connected in one way.
2. Connect the red wire (with the in-line fuse holder) on the back
of the transceiver to a point in your vehicle’s fuse block that
has power only when the ignition is in the ACC (accessory) or
ON position.
3. Connect the black wire to a metal part of the vehicle’s frame
(chassis ground).
Caution: Do not connect the black wire to a non-metallic
(plastic) part, or to any part insulated from the vehicle’s chassis by a non-metallic part.
USING THE TRANSCEIVER AS A BASE STATION
Although this transceiver is designed mainly for mobile use, you
can also use it as a base station with an DC power source.
18
19-1210.fm Page 19 Tuesday, August 3, 1999 11:32 AM
For base station installation, you need these items:
• 12 VDC power supply that can supply at least 2 amps (such
as RadioShack Cat. No. 22-504)
Caution: Most 12 VDC power supplies plug into a standard
AC outlet to produce DC power. Before connecting your
transceiver to a 12 VDC power supply, read and follow the
instructions included with the power supply.
• base station antenna (such as Cat. No. RSU 11529526)
• coaxial antenna cable and connectors, available at your local
RadioShack store.
Caution: To prevent damage to the transceiver, be sure you
connect an antenna and the microphone before you use the
transceiver.
Follow these steps to install the transceiver as a base station.
1. Mount the base station antenna as described in its owner’s
manual.
Warning: Use extreme caution when you install or remove a
base station transceiver antenna. If the antenna starts to fall,
let it go! It could contact overhead power lines. If the antenna
touches a power line, contact with the antenna, mast, cable,
or guy wires can cause electrocution and death. Call the
19
19-1210.fm Page 20 Tuesday, August 3, 1999 11:32 AM
power company to remove the antenna. Do not attempt to do
so yourself!
2. Connect the supplied rubber duck antenna and PL259
Antenna Connector. Then plug the connector into the ANT
jack on the back of the transceiver.
3. Connect the tranceiver’s black power wire to the negative (-)
terminal on the DC power supply.
4. Connect the tranceiver’s red wire (with the in-line fuse) to the
positive (+) terminal on the DC power supply.
5. Connect the DC power supply to a standard AC outlet.
20
19-1210.fm Page 21 Tuesday, August 3, 1999 11:32 AM
Setting Frequency Options
Before you can use your transceiver, an authorized service facility must set your transceiver to a VHF business band frequency
you have a license to use. Then, you can select a preset CTCSS
(Continuous Tone Control Squelch System) frequency and set
your transceiver to use it.
Here is what you need to do to set your transceiver to use CTCSS.
1) Send your transceiver to an authorized service facility to have
it set to a business band frequency.
2) Set the DIP switches for a CTCSS frequency (see “Using a
CTCSS frequency” on Page 16).
3) Set your transceiver to that CTCSS frequency.
4) Set the CTCSS ON/OFF switch on the front panel to activate or
deactivate CTCSS.
You can select one CTCSS frequency at a time. If you do not
want to use a CTCSS frequency or change default frequency,
skip Steps 2_4 above.
To use business band frequency, read the following steps:
1) Set the CTCSS sliding switch on the front panel to OFF.
2) Select channel switch to ‘1’ or ‘2’.
Notes:
• Make sure the first digit DIP switch is always set to 0 (down)
when you finish the above steps and before operation.
• The second-digit DIP switch should be set to 0 (down) when
you are using one of the 9 preset frequencies or set to 1 (up)
when using channel 1 by an authorized service facility.
21
19-1210.fm Page 22 Tuesday, August 3, 1999 11:32 AM
About CTCSS
CTCSS helps eliminate interference between different users of
the same frequency, letting you talk and listen to people who are
using other transceivers set to the same frequency and CTCSS
code. This is like having a sub-channel within a channel, giving
you greater communication flexibility. When you set a CTCSS
code — there are 38 to choose from — and turn on your transceiver’s CTCSS, the transceiver transmits a tone with your transmission, letting you communicate with anyone who has a
transceiver set to the same frequency and code. This tone is too
low for you to hear, but other transceivers can detect it.
If CTCSS is turned on and set to the same tone on the receiving
transceiver, it only receives those transmissions that include the
tone. If two different groups oper-ate transceivers in the same
area on the same frequency, they do not hear each other’s
broadcasts if they both use CTCSS and each select a different
CTCSS tone. Your transceiver’s default CTCSS tone is 100 Hz.
Using a CTCSS Frequency
Follow these steps to set your transceiver to a CTCSS frequency
and then activate or deactivate CTCSS.
1. Turn VOLUME fully counterclockwise to make sure power is
turned off.
2. Set the CTCSS Sliding Switch on the front panel to OFF.
3. Choose a CTCSS code from the table on the next page. Then
use a pointed object such as a straightened paper clip to set
the position of each DIP switch on the bottom of the radio to
22
19-1210.fm Page 23 Tuesday, August 3, 1999 11:32 AM
1 (up) or 0 (down) corresponding to the setting for that
CTCSS code.
illus - show DIP switch
on the bottom of the radio
set to any setting
23
19-1210.fm Page 24 Tuesday, August 3, 1999 11:32 AM
Dip Switch Setting Key:
0 = down
1 = up
CTCSS
Code
Freq
(Hz)
none
24
DIP Switch
Setting
000000
1
67.0
000001
2
71.9
000010
3
74.4
000011
4
77.0
000100
5
79.7
000101
6
82.5
000110
7
85.4
000111
8
88.5
001000
9
91.5
001001
10
94.8
001010
11
97.4
001011
12
100.0
001100
13
103.5
001101
14
107.2
001110
15
110.9
001111
16
114.8
010000
17
118.8
010001
19-1210.fm Page 25 Tuesday, August 3, 1999 11:32 AM
CTCSS
18
123.0
CTCSS
010010
19
127.3
010011
20
131.8
010100
Code
Freq
(Hz)
DIP Switch
Setting
21
136.5
010101
22
141.3
010110
23
146.2
010111
24
151.4
011000
25
156.7
011001
26
162.2
011010
27
167.9
011011
28
173.8
011100
29
179.9
011101
30
186.2
011110
31
192.8
011111
32
203.5
100000
33
210.7
100001
34
218.1
100010
35
225.7
100011
36
233.6
100100
37
241.8
100101
38
250.3
100110
25
19-1210.fm Page 26 Tuesday, August 3, 1999 11:32 AM
4. Hold down PUSH TO TALK on the microphone, then turn
VOLUME clockwise until it clicks. The transceiver sets the
CTCSS code. Release PUSH TO TALK.
If the transceiver beeps once and RX lights green for about
2 seconds, that means the CTCSS setting was successful.
If the transceiver beeps 3 times and TX lights red for about 2
seconds, the CTCSS setting did not work. Start over at Step
1.
5. Use a pointed object such as a straightened paper clip to set
6-DIP switch to “000000”.
6. To activate the CTCSS code you set, set the CTCSS switch at
the front panel to ON. To deactivate the code, set the switch
to OFF.
Note: If the CTCSS code is set to “000000”, that means
CTCSS function is deactivate even if the CTCSS switch on
front panel is set to ON.
26
19-1210.fm Page 27 Tuesday, August 3, 1999 11:32 AM
Operation
Note: You can only communicate with another transceiver that is
using the same channel and/or the same CTCSS code as your
transceiver.
1. Turn VOLUME clockwise to turn on the transceiver, turn
SQUELCH fully counterclockwise until you hear a hissing
noise, then adjust the volume to a comfortable listening level.
illus - show VOLUME bein
adjusted
2. If you did not set the transceiver to use a CTCSS code, wait
until there is no signal on the channel. Then turn SQUELCH
clockwise until the background noise between signals stops.
3. To transmit, hold down PUSH TO TALK on the microphone.
Then hold the supplied hand microphone about 3 inches
27
19-1210.fm Page 28 Tuesday, August 3, 1999 11:32 AM
from your mouth and speak slowly in a normal voice. The TX
indicator lights red.
illus - show PUSH TO
TALK and RX, TX
indicator
4. Release PUSH TO TALK when you finish your transmission.
The RX indicator lights green when the unit receives a signal.
5. To turn off the transceiver, turn VOLUME counterclockwise
until it clicks.
Operational Hints
Your transceiver’s range varies depending on factors such as
position, terrain, and battery condition. Buildings absorb transmitted signals and, if they contain metal, might completely block
the signals. Trees and heavy cloud formations have a similar effect, though not as severe. If you are near a lake or the ocean,
you might get excellent range.
28
19-1210.fm Page 29 Tuesday, August 3, 1999 11:32 AM
Care AND Maintenance
Your RadioShack 2CH VHF Business Band Mobile Radio w/CTCSS is an example of superior design and craftsmanship. The following suggestions will help you care for your transceiver so you
can enjoy it for years.
• Keep the transceiver dry. If it gets wet, wipe it dry immediately. Liquids might contain minerals that can corrode the
electronic circuits.
• Use and store the transceiver only in normal temperature
environments. Temperature extremes can shorten the life of
electronic devices, damage batteries, and distort or melt
plastic parts.
• Keep the transceiver away from dust and dirt, which can
cause premature wear of parts.
• Handle the transceiver gently and carefully. Dropping it can
damage circuit boards and cases and can cause the transceiver to work improperly.
• Wipe the transceiver with a damp cloth occasionally to keep
it looking new. Do not use harsh chemicals, cleaning solvents, or strong detergents to clean the transceiver.
Modifying or tampering with the transceiver’s internal components can cause a malfunction and might invalidate your transceiver’s warranty and void your FCC authorization to operate it. If
your transceiver is not performing as it should, take it to your local RadioShack store for assistance.
29
19-1210.fm Page 30 Tuesday, August 3, 1999 11:32 AM
Specifications
Frequency Range ........ ......................................................150.775–
157.740 MHz
Channels ............................................................................................
......................................................................................................2
Notes: 1 channel programmed by authorized service facility. The
default frequencies are as follow:
• Channel
1....................................................................154.60
(Green dot)
• Channel
2......................................................................154.57
(Blue dot)
Power VDC ..........................................................................................
.................................................................................................12
Audio Output Power ..........................................................................
..................................................................................2W
RF Output Power ...............................................................................
......................................................................................5W
1
Dimensions (HWD).................................................................... .2 /5
1
x 6 x 7 /10
(56 x 152
x 180 mm)
Weight..................................................................................................
..........................................................................................Approx. 7/8
Pound*
(400g)
Specifications are typical; individual units might vary. Specifications are subject to change and improvement without notice.
30
19-1210.fm Page 31 Tuesday, August 3, 1999 11:32 AM
NOTES
31