1
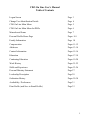
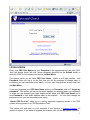
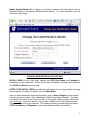
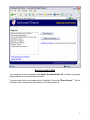
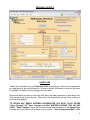
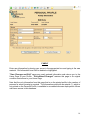
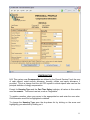
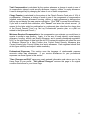
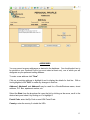
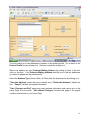
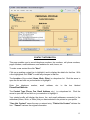
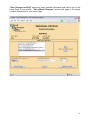
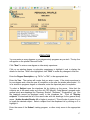
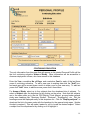
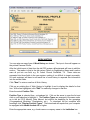
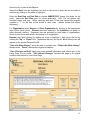
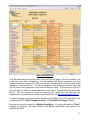
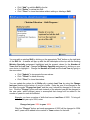
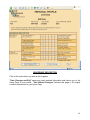
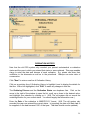
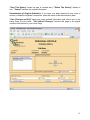
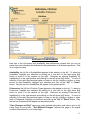
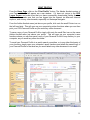
CDO
On Line User’s Manual
Personal Profile System
CDO On Line User’s Manual
Table of Contents
Logon Screen
Page 3
Change User Identification Details
Page 4
CDO On Line Main Menu
Page 5
CDO On Line Main Menu for DDOs
Page 6
Manuals and Forms
Page 7
Personal Profile Home Page
Pages 8-9
Family Information
Page 10
Compensation
Pages 11-12
Addresses
Pages 13-14
Contact Information
Pages 15-16
Education
Pages 17-18
Continuing Education
Pages 19-20
Work History
Pages 21-22
Skills and Experience
Pages 23-26
Personal Ministry Statement
Page 27
Leadership Description
Page 28
Ordination History
Pages 29-30
Availability / Preferences
Page 31
Print Profile (and Save to Email Profile)
Page 32
2
LOGON SCREEN
Enter your CDO User Name and your Password in the appropriate box and click (N.B.
'click' will always mean 'left click' unless otherwise specified) on the Submit button to
enter the CDO On Line system and access the Main Menu.
The system sends you an initial CDO User Name - which is an 8-digit number - and
Password. After you log in for the first time you will be prompted to change them to
something you can remember more easily. You can also change them at any time from
the Main Menu.
If you have forgotten your CDO User Name and/or your Password, click on "I forgot my
password". The system will ask for the email address you supplied when you registered
or when you last changed your login details and will send your CDO User Name and a
new Password to that email address within a few minutes. You can then change the
password to one you can remember more easily.
“About CDO On Line” takes you to a policy statement regarding access to the CDO
system and a hyperlink to a CDO Registration Form.
This system will work best on your computer if your browser is Internet Explorer 4.0
version or higher. If you need to upgrade your browser click on the appropriate hyperlink.
3
Adobe Acrobat Reader 4.0 or higher is required to produce and print reports such as
Personal Profiles or the Ministry Skill/Experience Manual. For a free download, click the
link on the Login Page.
CHANGE USER IDENTIFICATION DETAILS
INITIAL LOGIN: At your initial login, change your CDO User Name and Password to
something you will remember. Either can be any combination of letters and numerals.
The CDO User Name must be unique.
AFTER YOUR INITIAL LOGIN, and after the first change of your login details, this page
should appear only when you select it from the Main Menu.
After you have entered the required information, click on Save Changes and the system
will bring up the next page, “User Identification Details Have Been Changed”. You need
not wait for the system to send you an e-mail, as it suggests, rather you may click on the
link, “click here”. You will be asked to log on again, using the new User Name and new
Password that you have just selected. The system will send your new login information
(CDO User Name and Password) to your email address within a few minutes.
4
CDO ON LINE MENU
Click on the appropriate button to navigate the CDO system:
"Retrieve my Profile" brings you to the Home Page of your own Personal Profile.
"Search Positions Open Bulletin" takes subscribers into the Positions Open Bulletin,
and non-subscribers to an electronic subscription form.
"Manuals and Forms" brings you to a menu that enables you to display and print lists of
skills and other criteria to assist you in editing your Personal Profile, as well as other
useful documents such as the list of diocesan deployment officers, a PDF of “Policies and
Procedures” and this “User’s Manual”
"Create PIN for Updating by 3rd Party" provides you with a four-digit Personal
Identification Number (PIN) that you can give your diocesan deployment officer to give
that person one-time-only editing access to your profile for the purpose of assisting you in
updating.
"Change CDO User Name/Password/Email" enables you to change your login details.
5
Diocesan Deployment Officers: your Main Menu will include:
•
•
•
•
"Search Personnel Database", which gives you access to the custom search
program.
"Find an Individual Profile", which gives you access to all active and retired
Personal Profiles in the CDO system. This button is in lieu of "Retrieve my
Profile". (You can also access your own Profile.)
"Search Positions Open Bulletin" takes you into the Positions Open Bulletin.
"Maintain Positions Open Bulletin" enables you to create a new listing in the
Positions Open Bulletin or to edit an existing listing in your diocese.
6
MANUALS AND FORMS
Your computer must be equipped with Adobe Acrobat Reader 4.0 or higher to properly
display these lists in a printer-friendly format.
To view a report click on the desired list to highlight it, then click "Show Report". The list
will then be put in format that will enable you to view and print it.
7
PERSONAL PROFILE
HOME PAGE
Update the information on your Personal Profile by placing your cursor in the appropriate
box and typing in the new information. If there is already information in that box you have
to highlight it or delete it before typing in the new data.
Boxes that have an arrow at the right side have the data presented in drop-down lists.
Click on the arrow to open the list. Then select the desired item on the list by clicking on
that item to highlight it.
TO RETAIN ANY NEWLY ENTERED INFORMATION YOU MUST CLICK EITHER
"Save Changes" OR "Save Changes and Exit" BEFORE LEAVING THIS OR ANY
PAGE. "Save Changes" saves the new information while remaining on this Home Page,
enabling you to proceed to other pages of your profile. "Save Changes and Exit" saves
8
the new information and returns you to the main menu. "Exit without Changes"
removes any new unsaved information and restores a page to its original condition.
If you leave any page by error before saving your new information, all is not lost. Use
your Browser's Back Button to restore the page with its newly entered information.
Then you can save it by clicking one of the "Save" buttons.
To view or update other portions of your profile click on the appropriate link near the
bottom of the Home Page. E.g. to view your Family information, click on the link to
"Family".
Lay/Ordination Status reflects the current status (lay, deacon, priest, etc.) and the year
one entered that status. This information is updated by updating the Ordination History
page, which is accessible by clicking on either link on the Home Page. Lay persons may
use the date one became a lay professional or the date of Baptism.
References: the name of bishop and clergy references is sufficient. For the lay reference
there is room to include address, telephone number and e-mail address.
Note that information with an asterisk (*) does not appear on the printed Personal Profile.
On this page that applies to "Ethnicity/Race". This is important information to have
recorded in your record because it enables CDO to implement its policy of ensuring that
members of minority groups are included proportionally in search results. (A similar policy
applies to women.)
The policy of the Church Deployment Office, as articulated by the Board for Church
Deployment, is to search its files without regard to age, sex, race, or marital status,
except to further by positive action the deployment of women and minorities.
You may print your Personal Profile by clicking "Print Profile". Your profile will be
presented in a printer-friendly, three-page format. Your computer must be equipped with
Adobe Acrobat Reader 4.0 or higher. Depending on your printer, you can print your
Personal Profile in either color or black and white.
9
FAMILY
Enter new information by placing your cursor in the appropriate box and typing in the new
material. Old information must first be deleted or highlighted.
"Save Changes and Exit" saves any newly entered information and returns you to the
Home Page of your Profile. "Exit without Changes" restores this page to its original
condition and returns to your Home Page.
Note that the only information from this page that is on the printed profile is the number of
persons for whom housing is required. The information noted with an asterisk (*), which is
not printed on the Personal Profile, is available to accredited diocesan deployment officers
who have access to this database.
10
COMPENSATION
N.B. This system uses Compensation as defined by the Church Pension Fund: the sum
of cash stipend, social security allowance, housing, utilities and equity allowance, if
provided. This is a change from the old CDO system in which stipend was used as the
principal definition of clergy compensation.
Except for Housing Type and the Part Time Salary indicator, all values in this section
must be numeric. You cannot use text, such as "Negotiable".
To update a number, place your cursor in the appropriate box and enter the new value.
Old information must first be highlighted or deleted.
To change the Housing Type open the drop-down list by clicking on the arrow and
highlighting your selection by clicking on it.
11
Total Compensation is calculated by the system whenever a change is made in one of
its components: stipend, social security allowance, housing, utilities, or equity allowance.
It can be changed only by changing the value of one of those components.
Clergy Pension is calculated by the system at the Church Pension Fund rate of 18% of
compensation. Whenever a change is made in one of the components of compensation
(stipend, social security allowance, housing, utilities, or equity allowance) a dialogue box
will pop up and display the new pension calculation. Click "OK" to accept this calculation.
If you wish to override that calculation, click "Cancel" and enter the correct amount. (A
reason for the latter might be participation in a retirement plan other than the clergy plan
of the Church Pension Fund, e.g. the Lay Professionals’ pension plan, or a plan not
related to the Episcopal Church.)
Minimum Required Compensation is the compensation you estimate you would have to
receive to accept a new position. Again, it is the sum of cash stipend, social security
allowance, housing, utilities, and Equity Allowance, and is usually considered negotiable.
N.B. For the initial import of data from the old CDO system this number will reflect the sum
of Minimum Stipend for a New Position plus Current Social Security Allowance plus
Current Housing plus Current Utilities plus equity allowance. Each registrant should look
at this figure carefully and adjust it when necessary.
Professional Expenses: This section uses the language of reimbursable expense
accounts rather than allowances. If you receive allowances for your professional
expenses use those figures in this section.
"Save Changes and Exit" saves any newly entered information and returns you to the
Home Page of your profile. "Exit without Changes" restores this page to its original
condition and returns to your Home Page.
12
ADDRESSES
You may record as many addresses as desired in the database. You should select two to
be printed on your Personal Profile (you must select at least one), one of which you will
designate as your preferred mailing address.
To enter a new address click "New".
Click on an existing address to highlight it and to display the details for that line. With a
line highlighted, click "Edit" to make any changes in that line.
Address1, Address2, and Address3 may be used for a Church/Business name, street
address, P.O. Box, apartment number, etc.
Select the State from the dropdown list: open the list by clicking on the arrow, scroll to the
desired entry and select it by clicking on it to highlight it.
Postal Code: enter the Zip Code or non-USA Postal Code.
Country: enter the country if outside the USA.
13
You may select up to two addresses to appear on the printed profile. Put a check in the
Print on Profile box by clicking on it. Remove a check by clicking on it.
Select one address as your Preferred Mailing Address by putting a check in the box
(click on the box). Your Preferred Mailing Address must be one of the two addresses
you select to appear on the printed profile.
Select the Address Type (Home, Work, or Other) from the dropdown list by clicking on it.
"Save this Address" saves the new or revised entry. "Delete this Address" deletes the
line. "Cancel" restores the original information.
"Save Changes and Exit" saves any newly entered information and returns you to the
Home Page of your profile. "Exit without Changes" restores this page to its original
condition and returns to your Home Page.
14
CONTACT INFORMATION
This page enables you to record telephone numbers, fax numbers, cell phone numbers,
pager numbers, email addresses, and websites for work, home, etc.
To enter a new contact line click "New".
Click on an existing contact line to highlight it and to display the details for that line. With
a line highlighted, click "Edit" to make any changes in that line.
The Location of the contact (Home, Work, Other) is a dropdown list. Click the arrow to
open the list and click on your selection to highlight it.
Enter the telephone
Phone/Email/Website.
number,
email
address,
etc.
in
the
box
labeled
The Contact Type (Phone, Fax, Email Address, etc.) is a dropdown list. Click the
arrow to open the list and click on your selection to highlight it.
Your printed profile will display the phone, fax, and email addresses connected to the
addresses (Home, Work, or Other) that you have selected to be printed on your profile.
"Save this Contact" saves the new or revised entry. "Delete this Contact" deletes the
line. "Cancel" restores the original information.
15
"Save Changes and Exit" saves any newly entered information and returns you to the
Home Page of your profile. "Exit without Changes" restores this page to its original
condition and returns to your Home Page.
16
EDUCATION
You may enter as many degrees or non-degree study programs as you wish. The top four
will appear on the printed Personal Profile.
Click "New" to enter a new degree or other study experience.
Click on an existing degree or education experience to highlight it and to display the
details for that line. With a line highlighted, click "Edit" to make any changes in that line.
Enter the Degree Description, e.g. "M Div" or "BA", in the appropriate box.
Enter the Year. The system will require that you enter a year. If the study experience is
for non-degree work, enter the year of completion or the year the studies were ended. If it
is for studies in progress, degree or otherwise, enter the expected year of completion.
To select a Subject open the dropdown list by clicking on the arrow. Note that the
subjects are in the same order as in the old CDO Ministry Code Manual, grouped under
general study area headings like "Seminary Studies", "Business", "Engineering", etc. But
the headings cannot be displayed easily in this dropdown list. Click on "Display
subjects" to download the list in the same order with the headings for the general study
areas. (Adobe Acrobat Reader 4.0 or higher is required.) This will make it easier for you
to locate the desired subject. Select a subject from the dropdown list by clicking on it to
highlight it.
Enter the name of the School, training program, or other study venue in the appropriate
box.
17
Select the Education Level from the dropdown list: open the list by clicking on the arrow;
make your selection by clicking on the desired text to highlight it.
"Save this Degree" saves the new or revised entry. "Delete this Degree" deletes a line.
"Cancel" restores the original information.
Reorder your degrees by clicking on a degree to highlight it, then move it by clicking the
"Up" or "Down" button. Remember that only the top four education lines will appear on
the printed Personal Profile.
"Save Changes and Exit" saves any newly entered information and returns you to the
Home Page of your profile. "Exit without Changes" restores this page to its original
condition and returns to your Home Page.
18
CONTINUING EDUCATION
The only information from this page that will appear on the printed Personal Profile will be
the four continuing education Areas of Study. Other information will be accessible to
diocesan deployment officers, who have access to this database.
Enter the Year, cumulative No. of Days, and cumulative Cost for each of the last three
years of continuing education. To add a new year to existing data click the "Add" box,
and each year will be moved down a notch to make room for your new entry. To add two
years click "Add" twice; to add three new years click it three times.
For Areas of Study, select up to four subjects from the dropdown lists of subjects. To
select a Subject open the dropdown list by clicking on the arrow. Note that the subjects
are in the same order as in the old CDO Ministry Code Manual, grouped under general
study area headings like "Seminary Studies", "Business", "Engineering", etc. But the
headings cannot be displayed easily in this dropdown list. Click on "Display subjects" to
download the list in the same order with the headings for the general study areas. (Adobe
Acrobat is required.) This will make it easier for you to locate the desired subject. Select
a subject from the dropdown list by clicking on it to highlight it.
19
For Individual Study Areas, select up to two subjects as above, and enter the number of
Hours in study per month in the appropriate box.
"Save Changes and Exit" saves any newly entered information and returns you to the
Home Page of your profile. "Exit without Changes" restores this page to its original
condition and returns to your Home Page.
20
WORK HISTORY
You can enter as many lines of Work History as desired. The top six lines will appear on
the printed Personal Profile.
After the initial import of data from the old CDO system, all registrants will have to edit this
section. The reason is that in the old system Church or Organization Name and Location
were all put into one field, e.g. St. John's Church, Smithfield, TX. These data are
separated into three fields in the new system, making it too difficult to import accurately.
So each registrant will have to edit each line of work history to separate this information
into the correct fields.
Click "New" to enter a new line of Work History.
Click on an existing line of Work History to highlight it and to display the details for that
line. With a line highlighted, click "Edit" to make any changes in that line.
Enter the actual Position Title.
Position Type is selected from a dropdown list. Click on the arrow to open the list and
click on your selection to highlight it. The Position Types are arranged in the same order
as in the old CDO Ministry Code Manual, but without the headings for the groupings
(Congregational Ministries, Chaplaincies, etc.). To download the list complete with
headings, click "Display Position Types". That download will require that your computer
be equipped with Adobe Acrobat 4.0 or higher.
Enter the appropriate name, e.g. church name or company name in the Institution box.
21
Enter the city or town in the City box.
Select the State from the dropdown list: click on the arrow to open the list and make a
selection by clicking on the state to highlight it.
Enter the Start Date and End Date in numeric MM/DD/YYYY format (four digits for the
year). Leave the End Date open for current position(s). N.B.: The old system only
recorded month and year. When importing that data to the new system the program
supplied a "1" for the day of the month in each case - please correct that where
necessary.
For Organization select Diocese or Other Organization by clicking on the appropriate
radio button (small circle). Diocese should be selected if the Institution is a parish or
other diocesan ministry. Dropdown lists are provided for both kinds of organizations.
Scroll to your choice and select it by clicking on it to highlight it.
Reorder your Work History by clicking on a line to highlight it, then move the line by
clicking the "Up" or "Down" box. Remember that only the top six Work History lines will
appear on the printed Personal Profile.
"Save this Work History" saves the new or revised entry. "Delete this Work History"
deletes a line. "Reset" restores the original information.
"Save Changes and Exit" saves any newly entered information and returns you to the
Home Page of your profile. "Exit without Changes" restores this page to its original
condition and returns to your Home Page.
22
SKILL/EXPERIENCE
N.B. We appreciate the fact that many users will find this page to be very complex, and
some may even find it intimidating. For the moment this design represents our best
attempt to balance the wealth of skills and ministry experiences in the Church with some
measure of user-friendliness. Our testing experience has indicated that most users will
get the hang of this page after a few tries at editing the skills. So bear with us and don't
get frustrated if it takes you a few attempts to learn how to navigate this page with some
facility. We will continue to work on improving this design and will welcome any
suggestions or experiences you would like to share with us at [email protected].
To leave this page at any time scroll to the bottom of the Skill List on the right side of the
screen and use the "Save Changes and Exit" or "Exit Without Changes" button.
Like the old system you select six Ministry Specialties. You may also have an "Other"
category if necessary. The main function of the Ministry Specialties in this system is to
organize the skills.
23
Like the old system you can select 44 Skills. But in this system the Skills are presented
in three related levels of specificity: General Skills, Specific Skills, and Skill Details.
And each Skill is related to one of your Ministry Specialties.
You can select any combination of General Skills, Specific Skills, and Skill Details to
make up your 44. For example, you might select the General Skill "Congregational
Development". Or you might opt to be more specific and select the General
Skill/Specific Skill combination "Congregational Development/ Developing Ministry of
Laity". Or you can be even more specific and select a General Skill/Specific Skill/ Skill
Detail combination: "Congregational Development/ Developing Ministry of Laity/
Developing Lay Callers". You would then assign the Skill to one of your Ministry
Specialties. This example might be assigned to the Ministry Specialty Evangelism. Or
to Church Growth/ Development. Or to Pastoral Care, or perhaps to others. You get to
define your own ministry.
N.B.: We believe it is in your interest to be as specific as possible in the presentation of
your skills. In a search for the General Skill above you would still be identified even
though you describe your ministry with great specificity. If you just have the General Skill
you would be missed in a search for the Specific Skill or the Skill Detail.
In importing your skills from the old CDO system we have done the best job we could to
assign your skills to your Ministry Specialties. But your choices might differ from ours and
it is your ministry that is described in this profile. So please review this section carefully
and edit where necessary.
You can download the CDO Ministry Skill/Experience Manual and the list of Ministry
Specialties by returning to the Main Menu and clicking on "Manuals and Forms". Your
computer must be equipped with Adobe Acrobat Reader 4.0 or higher.
Links to the General Skills are presented on the left side of the Skill/Experience page of
your profile. Click on the red Plus Sign [+] to the left of the text to view the Specific
Skills and Skill Details assigned to each General Skill.
If you have difficulty finding a skill, use the Keyword Search. Enter the text you are
searching for in the box and click "Find". Each appearance of that text from anywhere in
the Skill List will be displayed. Example: enter 'budget' in the Keyword Search box, click
"Find", and each skill containing the text 'budget' will be displayed, along with any
subsidiary skills. Click on the one you want to add to your list of skills.
"Back to top" restores the list of General Skills.
Select a Skill at either the General, Specific, or Detail level by clicking on it. A window
will pop up that will enable you to assign it to a Ministry Specialty (by clicking on your
choice) and to specify the Number of Years and the Last Year in which you have
practiced this Skill by entering those values in the boxes provided. The system will
display all of the Ministry Specialties until you have accumulated six; thereafter it will
display your chosen six Ministry Specialties, plus Other for any Skills that do not fit.
Use the Other category sparingly, if at all.
24
•
•
•
Click "Add" to add this Skill to the list.
Click "Delete" to delete this Skill.
Click "Close" to close the window without adding or deleting a Skill.
You may edit an existing Skill by clicking on the appropriate "Edit” button on the right side
of the Skill list. A window will pop up with the skill description at the top with the existing
Ministry Specialty assignment highlighted and the present values for the Number of
Years and the Last Year. Change the Ministry Specialty assignment by clicking on your
new choice to highlight it. Change the Number of Years and the Last Year by typing in
the new values.
•
•
•
Click "Update" to incorporate the new values.
Click "Delete" to delete this entry.
Click "Close" to close the window.
You can update the values for all Skills with a certain Last Year by using the Change
last year function at the bottom of your list of skills. Enter the year to be changed in the
box after the words "Change last year" and the year it should be changed to in the next
box. Click the "Change" button and each instance of the selected year will be changed to
the new value, while sufficient years to accomplish that change will be added to the
number of years for each skill affected.
Example: you have a number of skills that have a Last Year of 2002. To bring all
skills for that year up to 2004, enter:
Change last year: 2002 to year: 2004
Click the "Change" button and each appearance of 2002 will be changed to 2004
and 2 years will be added to the number of Years column for that skill.
25
You can reorder Skills within any category by clicking "Sort Generals", "Sort
Specifics", or "Sort Details". Ministry Specialties can likewise be reordered by clicking
"Sort" in the box marked Min. Spec. at the top of your list. A window will pop up with a
list of the skills in question. In the boxes to the right of the skills enter letters in the order
in which you wish these skills to appear, i.e. 'a' for first, 'b' for second, etc. (1, 2, 3 can
also be used). Click the "Reorder" button, and when the "Reordered" message pops up
in red, close the window by clicking the "Close" button.
Changing Ministry Specialties is now rather complicated because each specialty has
skills attached to it. One way (less desirable) is to use the "Edit" button to delete each
skill attached to the Ministry Specialty you want to delete. A better way is to use the
"Edit" button to temporarily park that Specialty's skills in the Other category. Once a
Ministry Specialty is bare of skills the full list of Ministry Specialties will pop up when you
begin to reassign the parked skills, enabling you to select a new Specialty.
"Save Changes and Exit" saves any newly entered information and returns you to the
Home Page of your profile. "Exit without Changes" restores this page to its original
condition and returns to your Home Page.
If you inadvertently leave this page before saving your changes (e.g. with your keyboard's
"Enter" key) all is not lost! You can restore your changes without having to enter them all
over again by using your Browser's Back button. Then click "Save Changes and Exit"
to save your changes.
26
PERSONAL MINISTRY STATEMENT
Use this space to enter a statement about the ministry to which you believe you are
called, or anything else you wish to communicate to persons who will read your Personal
Profile. You are limited to 254 characters (110 more than the old system).
"Save Changes and Exit" saves any newly entered information and returns you to the
Home Page of your profile. "Exit without Changes" restores this page to its original
condition and returns to your Home Page.
27
LEADERSHIP DESCRIPTION
Click in the circle where you wish a dot to appear.
"Save Changes and Exit" saves any newly entered information and returns you to the
Home Page of your profile. "Exit without Changes" restores this page to its original
condition and returns to your Home Page.
28
ORDINATION HISTORY
Note that the old CDO system only recorded your present ecclesiastical or ordination
status and the year in which you entered that status or were ordained. This page enables
clergy to enter the date and diocese of each ordination. E.g. priests can enter their
ordination to the diaconate as well as to the priesthood. Bishops can enter date of
consecration.
Click "New" to enter a new line of Ordination History.
Click on an existing line of Ordination History to highlight it and to display the details for
that line. With a line highlighted, click "Edit" to make any changes in that line.
The Ordaining Diocese and the Ordination Status are dropdown lists. Click on the
arrow to the right of the window to open the list, scroll up or down to the desired value,
and highlight your selection by clicking on it. (N.B. The old system did not record the
ordaining diocese for your current status. You should supply that information now.)
Enter the Date of the ordination in MM/DD/YYYY format. (N.B. The old system only
recorded the year one entered the current status. In importing the data a full date had to
be supplied, so the date became 01/01 of that year. That date should now be updated.)
29
"Save This History" saves the new or revised entry. "Delete This History" deletes a
line. "Cancel" restores the original information.
Denomination of Original Ordination: If you have ever been ordained to any order of
ministry outside the Anglican Communion, enter the name of that denomination here.
"Save Changes and Exit" saves any newly entered information and returns you to the
Home Page of your profile. "Exit without Changes" restores this page to its original
condition and returns to your Home Page.
30
AVAILABILITY/PREFERENCES
Note that in the old system both availability and preferences required that you use up
space that could otherwise be dedicated to the presentation of skills and experience. That
is no longer the case.
Availability: the full list of Availabilities appears in the window on the left. To select an
Availability, highlight your selection by clicking on it, and click on the right arrow [>>]
button to move it to the window on the right. Eliminate an existing Availability by
highlighting it in the right window and clicking on the left arrow [<<] button. To move a
selection in the right hand window higher or lower on the list, implying a higher or lower
priority for that Availability, highlight your selection and click on the “Up” or “Down”
button. Only the top four Availabilities will appear on the printed profile.
Preferences: the full list of Position Types appears in the window on the left. To select a
Preference, highlight your selection by clicking on it, and click on the right arrow [>>]
button to move it to the window on the right. Eliminate an existing Preference by
highlighting it in the right window and clicking on the left arrow [<<] button. To move a
selection in the right hand window higher or lower on the list, implying a higher or lower
level of Preference, highlight your selection and click on the "Up" or "Down" button. Only
the top four Preferences will appear on the printed profile.
"Save Changes and Exit" saves any newly entered information and returns you to the
Home Page of your profile. "Exit Without Changes" restores this page to its original
condition and returns to your Home Page.
31
PRINT PROFILE
From the Home Page, click on the “Print Profile” button. The Adobe Acrobat version of
your Personal Profile will appear as a new window. If it does not, return to the CDO
Logon Screen and make sure that you have successfully downloaded Adobe Acrobat
Reader. Also, make sure that you are logged into the internet via Microsoft Internet
explorer, and not any other browser, especially not Netscape Navigator.
From the Adobe Acrobat menu just above your profile, click onto the small Printer icon on
the left hand side. This will open up your computer’s printer functions where you can then
print your CDO Personal Profile as you would any other document.
To save a copy of your Personal Profile, simply click onto the small Disc icon on the same
Adobe Acrobat menu just above your profile. This will open up your computer’s save
functions where you can then save a copy of your Personal Profile to any directory in your
computer, as you would any other document.
To email your Personal Profile to a parish search committee, or to any other third party of
your choosing, simply open your computer’s email functions and attach the saved copy of
your Personal Profile to the email as you would attach any other document to an email.
32


![KeyView [4823353_1.wpd]](http://vs1.manualzilla.com/store/data/005667242_1-589c8deb81b55e7c0d34a0d078158765-150x150.png)