1
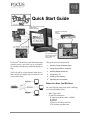
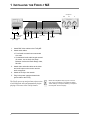
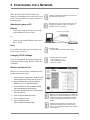
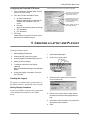
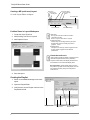
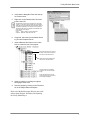
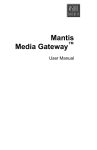
Firefly-MZ
Quick Start Guide
Overview
Installing Firefly-MZ Media Player
Configuring for the Network
Installing Media Messenger
Configuring FTP
Creating a Presentation
Uploading the Presentation
Trademarks
The Visual Circuits and Firefly logos are registered trademarks in the United States and other countries. All
other products, services or company names mentioned herein are claimed as trademarks and trade names by
their respective companies.
© Visual Circuits, 1999-2004. All rights reserved.
No portion of this manual may be copied by any means without the prior consent of Visual Circuits.
Visual Circuits Corporation
5155 East River Road, Suite 401
Minneapolis, MN 55421 USA
http://www.visualcircuits.com
Visual Circuits Publication Number: 813-0057A
All specifications, notices and warnings are subject to change without notice.
Quick Start Guide
Digital Layout, Content Integration,
Playlist Creation,
Playback Scheduling,
FTP Playlist and Playback
Files to
Firefly MZ
Point of Purchase Display
Dynamic Digital Signage
Video, Graphics, and
Scrolling Text
Video, Text, and Graphics
Component, S-video, Composite, DVI-I
Firefly MZ ™ Media Player and Media Messenger
software provide a powerful, easy to use solution
for creating and displaying compelling digital signage.
This guide provides information for:
1. Installing Firefly MZ Media Player
2. Configuring the MZ for a network
3. Installing Media Messenger
The Firefly MZ is a single-channel output device
that is simple to configure and can reside on a network or stand alone.
4. Configuring FTP
5. Creating a Presentation
6. Uploading the Presentation
Before You Start, You Will Need
LAN
Have the following items ready before installing
the Firefly MZ Media Player.
Content Server
Firefly MZs
POP Displays
•
•
BNC Video cables
IP and FTP Information
IP Addressing Mode (Static or DHCP)
IP Address
Hostname
FTP Proxy IP Address and Port
FTP Username and Password
1 INSTALLING THE FIREFLY MZ
Pb
S-Video
1 2 34 56
+ - + - + Digital Audio
S/PDIF
Unbalanced Audio
(Left
Right)
Component
Pr
Video Out
USB
Power
12 VDC
Y
Composite
Network
10/100
Serial Audio Out
DVI-I
1. Attach BNC video cables to the Firefly MZ.
2. Attach audio cables.
o For all audio connections use stranded
wire ends.
o If unbalanced audio cable lengths exceed
10 meters, use an Audio Line Amp/
Balancer such as the Radio Design Labs,
Stick On.
3. Attach video and audio cables to the video
and audio inputs on the monitor and the
audio component.
4. Attach the Firefly to the network.
5. Plug in the power supply and attach the
power cable to the Firefly.
The Firefly powers up and performs a short series
of self-diagnostic tests and automatically begins
playing a video tour of the Firefly features.
2
Before the Firefly MZ is ready to go live on the network, it may be necessary to reconfigure its default
TCP/IP settings. This requires attaching a computer to
the Firefly MZ. See the next page.
2 CONFIGURING FOR A NETWORK
Often, the Firefly MZ TCP/IP defaults must
change to accommodate the network where it will
reside. The best method is to attach a computer to
the media player.
Attaching a Laptop or PC
Ethernet
• Connect the computer directly to the Firefly
using an Ethernet crossover cable.
Contact the Network Administrator for the correct network configuration information.
Before beginning, verify that the computer and/or the
Firefly MZ are powered off. When connections are
completed, power on the devices.
Ethernet via Hub or Switch.
or
•
Connect using standard Ethernet cables and a
hub or switch.
Ethernet via Cross-over Cable.
Serial
Use a null modem cable when connecting to the
Firefly via the serial port.
Null modern cable:
(Female DB-9 to Female DB-9, RS232 cable)
Changing TCP/IP Settings
There are two methods for initially changing the
Firefly MZ TCP/IP settings: WebView and serial
commands.
Firefly MZ default TCP/IP settings:
Static IP Address: 10.0.1.1
Login (case sensitive): firefly
Password: 123456
WebView via Ethernet Port
WebView is a browser-based, administration toolkit that resides on the Firefly.
1. Set your PC’s IP address to a number in the
same range as the Firefly, such as 10.0.1.2.
2. Open a browser and enter the default IP
address 10.0.1.1 in the address field.
3. Access WebView using the default Firefly
login and password, shown above.
4. Set the IP address and other TCP/IP parameters as required.
5. Click on Update Settings to save.
6. Click on Player Control.
7. Click on Restart Player.
This initializes the new settings.
Warning Incorrect network settings in WebView will
result in loss of contact with WebView. To correct, it is
necessary to connect to the Firefly MZ via a serial
cable to access WebView and change the network
settings.
Restarting the Firefly MZ is only necessary when
updating the network settings in a DHCP environment, i.e. going from Static to DHCP mode, changing
the Host Name, etc.,
3
Quick Start Guide
External Control Commands
External control commands require that the computer has an ASCII generating control program,
such as Hyper Terminal. The parameters are:
•
•
•
Serial port 1
9600 Bps
Echo typed letters locally
Use the following Visual Circuits commands to
configure the Firefly MZ.
FireflySetDefault
Syntax
fireflysetdefault
This command resets Firefly Networking
parameters to: static IP 10.0.1.1, WebView ON.
FireflySetIpAddress
Syntax
fireflysetipaddr IP Address
FireflySetNetmask
Syntax
fireflysetnetmask netmask
FireflySetGateway
Syntax
fireflysetgateway gateway
FireflySetNetworkType
Syntax
fireflysetnetworktype 1 (DHCP) or 2
(Static)
3 INSTALLING MEDIA MESSENGER
Install Visual Circuit’s Media Messenger software
from the Media Messenger CD by following the
online screens and prompts.
During the first start up of Media Messenger, the application requests Company Name and Registration
Key, enter the name and key precisely as Visual Circuits provided it.
4 CONFIGURING FTP
Setup on-board Firefly MZ FTP Server
•
•
Configure Firefly MZ properties.
Configure Firefly MZ FTP server.
Configure Firefly MZ Properties
1. Open the Main window of Media Messenger.
2. Right-click in the Firefly MZ object in the
Network Pane and display Player drop
down menu.
3. Click on Properties to display Player Configuration.
4. Fill in the Player Configuration fields.
4
Unique name to identify player
(Host Name)
Unique ID set in player before
installation, Media Messenger
uses it to identify the player.
If player belongs to a group,
select the group name fromlist.
Physical location of the player.
Set to one for Firefly MZ.
Firefly MZ Quick Start Guide
Configuring the Firefly MZ FTP Server
Network Administrator provides FTP configuration information.
1. Click on Settings in the Main Menu list and
select FTP Server Setup.
This may be the Firefly MZ or
an FTP server used for storing presentation content.
2. Fill in the FTP Site Information Fields.
a. IP Address/Hostname.
Network Administrator provides the IP
Address and Hostname of the FTP
server.
a. Directory
Name of the directory where the files go.
a. FTP UserName
a. FTP Password
When loading directly to Firefly MZ, leave the Directory
field blank and place files in
FTP root directory.
Security settings provided by
Network Administrator.
3. FTP Proxy
Check this box if using a FTP Proxy server,
then add its IP address and port.
5 CREATING A LAYOUT AND PLAYLIST
Creating a Playlist requires:
1. Setting Display Parameters.
2. Creating the MZ (multi-zone) layout.
3. Creating a playlist and attaching layout to it.
1. Open Media Messenger.
2. Click on the Layout button.
Edit Schedule
Edit Playlist
Edit Layout
4. Adding content to playlist.
5.
Creating a schedule for the Playlist
(optional).
Refer to the Media Messenger online Help for
details.
6. Linking the playlist or schedule (if used) to
the Firefly MZ.
Creating the Layout
3. Select the New Layout, give the layout a
name, and click OK
The layout is a template used to position and size
the playlist content. A playlist has only one layout.
Setting Display Parameters
Set the Layout Editor workspace to the appropriate
video standard and resolution for the display
device.
4. Return to the Layout button, select Screen
Resolution and choose the appropriate setting.
5. Next select Video Resolution and choose the
appropriate video standard.
6. Save.
5
Firefly MZ Quick Start Guide
Creating a MZ (multi-zone) Layout
Go to the Layout Editor workspace:
Video Zone
Graphic Zone
Scrolling Text
Auto-stretch Sizing
Snap Positioning
Delete
Save Workspace
Zone Parameters
Save Zone Settings
Position Zones in Layout Workspace
1. Create the Video Zone first.
2. Add Scrolling Text Zone if required.
3. Add Graphics Zones
Video Zone
The Layout must have a video zone with a
video file to function.
There is only one video zone in a layout.
Scrolling Text Zone
There is only one scrolling text zone per layout.
Scrolling text zones can overlay the video or
graphics zones.
Graphics Zones
The layout can have any number of graphic zones.
A large number of graphic zones will slow
performance.
Plasma Screen Burn-in
When creating layouts for display on plasma screens,
remember the potential for burn-in by stationary
images and text. Refer to the display manufacturer’s
documentation for recommended display times.
Recommendation: Create display designs in which
the positions of graphic zones or the graphic zone content changes freguently enough to avoid plasma
screen burn-in.
4. Save the layout.
Creating the Playlist
1. Return to the Media Messenger main workspace.
2. Open the Playlist Editor.
3. Verify that the correct Playlist is shown in the
Playlist Menu field.
Navigation Pane
6
Playlist Menu
Playlist Pane
Scheduling Pane
Schedule Menu
Firefly MZ Quick Start Guide
4. Verify that the Navigation Pane lists the layout content zones.
5. Right-click on the Default Video Zone and
insert a video file.
To locate files to insert into the content zone, use the file
browser or, if the file is already resident on the Firefly MZ
Media Player, enter the filename with its extension when it is
requested by application. The full path is not required provided that all the files for the playlist are transferred to the
same directory on the player
File Formats
Video:
Mpeg-1, Mpeg-2, Unencrypted DVD
Graphics: BMP, GIF, JPG, PNG, TGA, TIF
6. If required, add content to the default Scrolling Text and Graphics Zones.
7. Insert additional video files in to the video
zone to create the rest of the playlist.
Each new video zone is a parent to
a family of child content zones that
are clones of the default zones.
Child content zones display at the
same time as the parent video.
A default content zone displays
whenever one of its clones is left
empty.
If both the default and one of its
clones are left empty, the presentation background displays.
8. Insert he graphic or scrolling text objects
belonging to each video.
9. Save the playlist by clicking on the Close button in the Playlist Editor workspace.
Refer to the Media Messenger Help for more information about Playlists, Schedules, and Updating
the Firefly Media Player.
7
Quick Start Guide
Link the Playlist to the Firefly
With the Playlist completed, publish it to the Firefly MZ. This involves linking the playlist or a
schedule to the player.
•
Link the playlist to the player, if only this playlist is to playback.
If multiple playlists are to playback on the
Firefly MZ, create a schedule. Use Media Messenger to generate a schedule that determines
when and for how long each playlist runs on
the player. Refer to Media Messenger Help for
details about setting up schedules.
•
This procedure links the playlist to the player.
Linking a schedule to the player is similar but initiates through the Schedules Pane.
1. Return to main Media Messenger workspace..
The Playlists Pane displays a list of the
videos used in the playlist.
2. Verify that the correct playlist is displayed in
the Playlists Pane.
3. Select the player by clicking on its icon in the
Network Pane.
4. Click on the Link button. This instructs the
player or group of players to playback that
particular playlist.
6 PUBLISH VIA FTP
1. Open WebView, click on System Settings,
and select Network. Confirm that the network and security settings are correct.
2. Return to the Media Messenger main workspace.
3. Select the target player or player group in
the Network Pane.
4. Click on Publish in the Media Messenger,
Main Menu List and then select Publish to
FTP.
2
4
6
3
5. Confirm that the Media Messenger FTP
configuration is correct for the player: click
on the FTP Setup button and review setup
data.
6. Select the Upload Option:
a. a specific player,
b. a group of players,
c. all players,
6A If uploading to one specific Firefly, select the
Direct Upload to Firefly option, otherwise leave
unchecked.
7. Click Begin Update button.
When the upload completes, close the
Update Control window.
The Firefly MZ loads immediately and begins
playing back the playlist. If using a schedule, the
playback begins at the appropriate time.
6A
8
7
5
PUBLISH TO CD/DVD
Another method of transporting playlists, schedules, and media files is to create a media update
disc.This process creates the content image of an
autorun disc (CD/DVD).
1. Go to the Media Messenger main workspace
and select the player or group that is to
receive the update.
Media Messenger does not burn a CD or
DVD. It prepares the necessary files so
that when they are burned on to a disc,
an autorun application is created.
2
2. Select the Publish to CD/DVD icon.
1
3. Verify that the correct destination for the files
is shown in the destination field: change if
necessary.
4. Check the Copy All Needed ... box.
3
5. Verify that the total space required does not
exceed the capacity of the CD or DVD disc.
4
6. Click on Create CD/DVD Files.
5
7. Click on Close.
8. Use CD/DVD creation application to burn
files on a disc.
7
6
9
FIREFLY MZ TIPS
1. A layout has only one Video and one Scrolling Text zone.
2. A layout can have unlimited graphics zones
although large numbers do impact performance.
3. The Video Zone can have multiple video files
inserted into it, n which case, they play in the
order they appear in the playlist.
4.
Each video file has a set of content zones
cloned from the original default zones.
5. Zone shapes are modified in three ways.
Manually, by dragging a side or corner.
To maintain the aspect ratio of zone, hold
down the Shift key while dragging.
Automatically, by using the Auto-stretch buttons.
Precisely, by using the Width and Height
fields. Save the size settings by clicking the
Assign button.
6. Zone positions are modified in three ways.
Manually, by dragging the zone to its position.
Automatically, by using the Snap buttons.
Precisely, by using the Left and Top fields.
Save the position settings by clicking the
Assign button.
7. Graphic or Scrolling Text zones can overlay
the Video.
8. To view the layout associated with a particular video instance, click on that video object in
the Network Pane.
9. Graphics Quality
Most often, the automatic sizing and colordepth conversion performed by the Firefly MZ
meets the needs of the presentation. Occasionally however, it may be necessary to
adjust a graphic so that it displays precisely
as required. For the highest quality rendition
of a graphic it is important to consider two
things: color-depth and precise sizing.
10
10. Color-depth
The Firefly MZ is a 16-bit color device that
maps the native color of the graphic to the
player’s 16-bit display buffer.For best results
convert graphics to a standard (1-, 2-, 4-, 8-,
or 24-bit) JPEG or PNG format before inserting it into a content zone.
11. Sizing Graphics
For highest quality results, make certain that
the dimensions are the same for the content
zone and source graphic. Sizing a graphic by
dragging a content zone handle or changing
the content zone dimensions does not always
produce the best visual results. There are two
sizing methods that provide the most precise
images:
Create the layout design in Media Messenger
using the content zone objects and then size
the graphics to fit in the zones.
Create a layout design in another program
such as Adobe Photoshop, with the graphics
and other elements sized exactly as they
should appear when displayed. Then, using
the sizing information from that design, create a corresponding multi-zone layout using
the Layout Editor in Media Messenger.
813-0057A
Visual Circuits Corporation
5155 East River Road
Suite 401
Minneapolis, MN 55421
Phone: (763) 571-7588
Toll Free: (800) 250-5533
Email: [email protected]
www.visualcircuits.com